Users have been complaining that the search engine, Bing, loads as the default instead of Google. Annoying, but don’t fret! We’ve put together a simple guide on how to get rid of Bing and restore your preferred search engine.
On Google Chrome
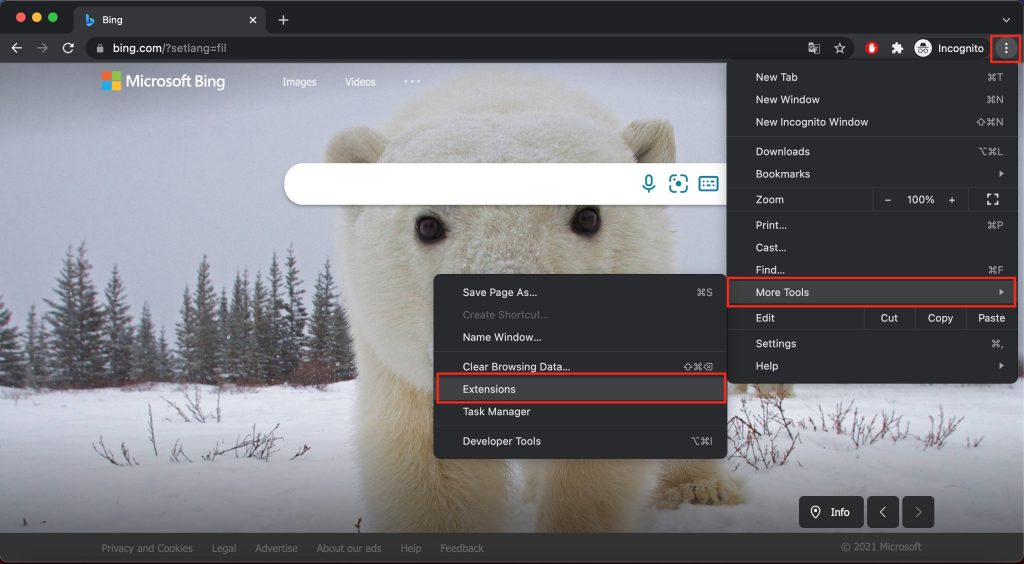
1. Open Google Chrome and click the 3-dots menu. 2. Select More Tools, then choose Extensions.
3. Remove any Bing Extensions you see. 4. Go back to the Menu, then select Settings.
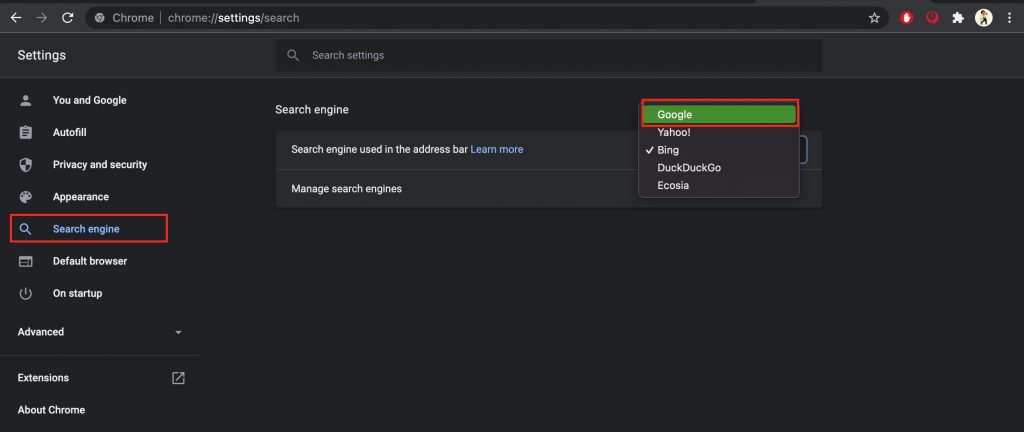
5. Look for Search Engine and click it.
6. On the right side, choose your preferred Search Engine (Google, Yahoo, DuckDuckGo or Ecosia). 7. Restart Google Chrome. If it still uses Bing as your search engine, we suggest resetting or reinstalling Chrome.
On Mozilla Firefox
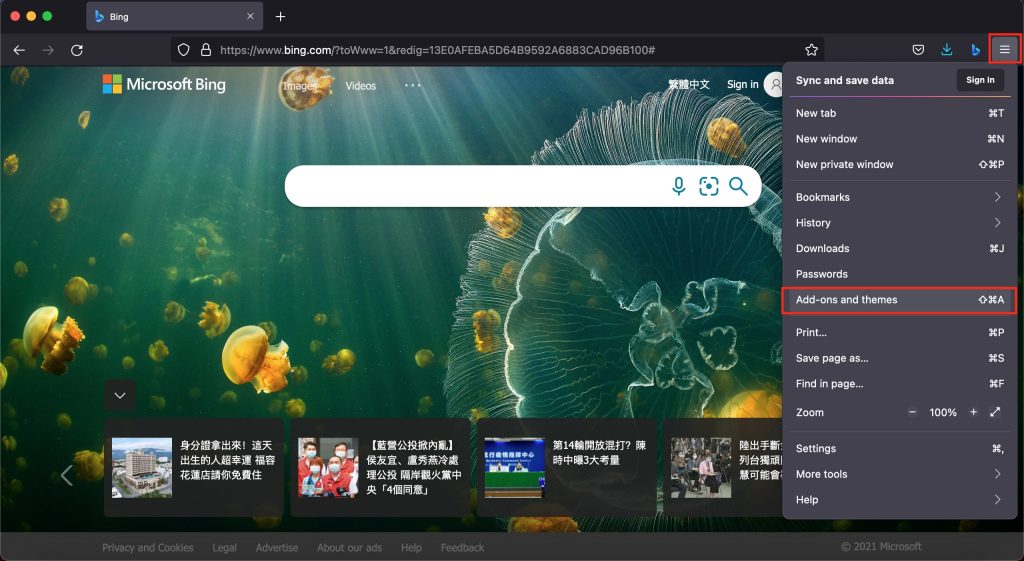
1. Open Mozilla Firefox and click the hamburger menu (3 horizontal lines). 2. Select Add-ons and themes.
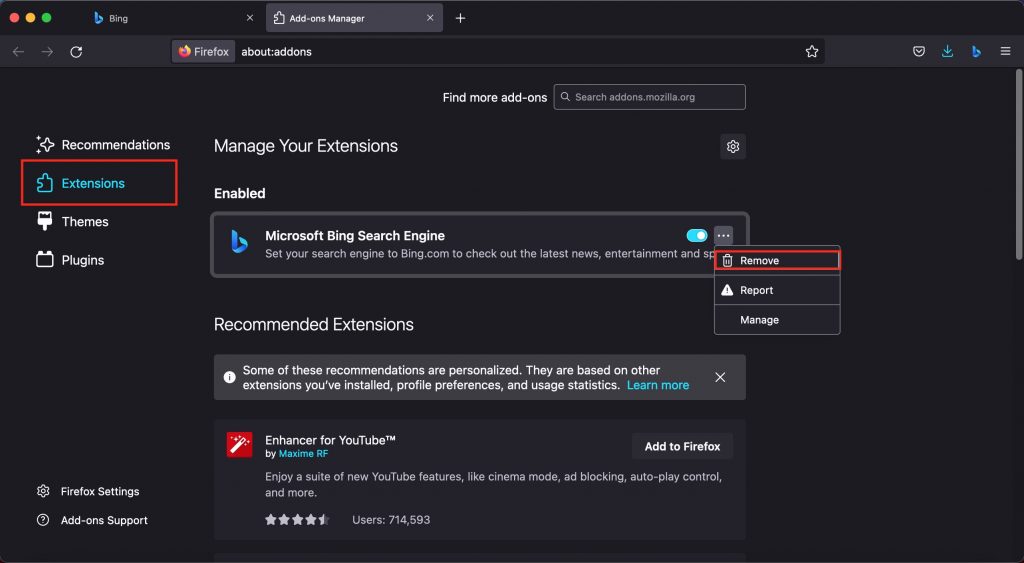
3. Choose Extensions on the left side, then remove any Bing extensions you see.
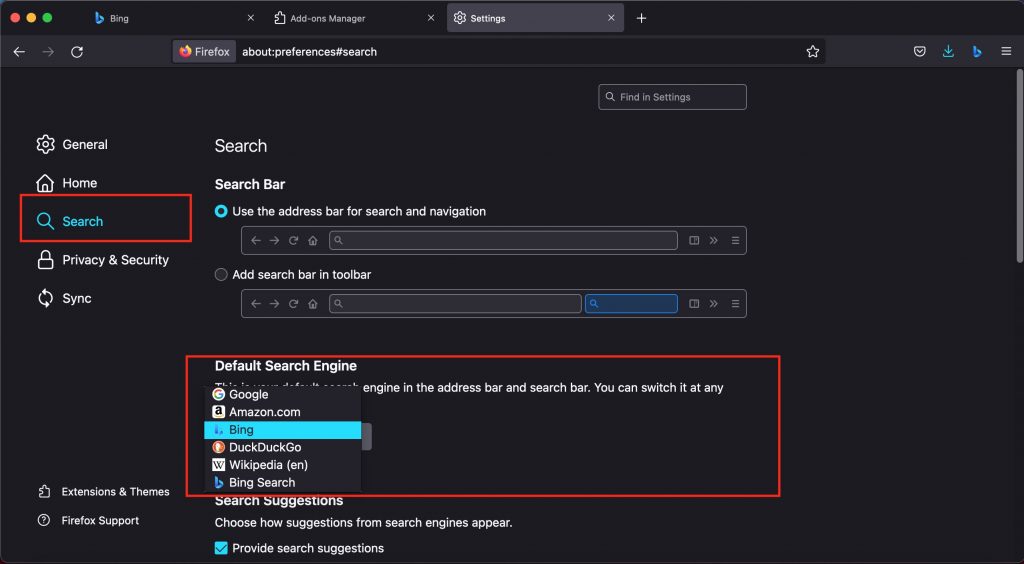
4. Go back to the Menu, then select Settings. 5. On the left side, click Search and look for the Default Search Engine section on the right side.
6. Choose your preferred Search Engine (Google, Amazon.com, DuckDuckGo or Wikipedia). 7. RestartFirefox. If it still uses Bing as your search engine, we suggest resetting or reinstalling Firefox.
On Microsoft Edge
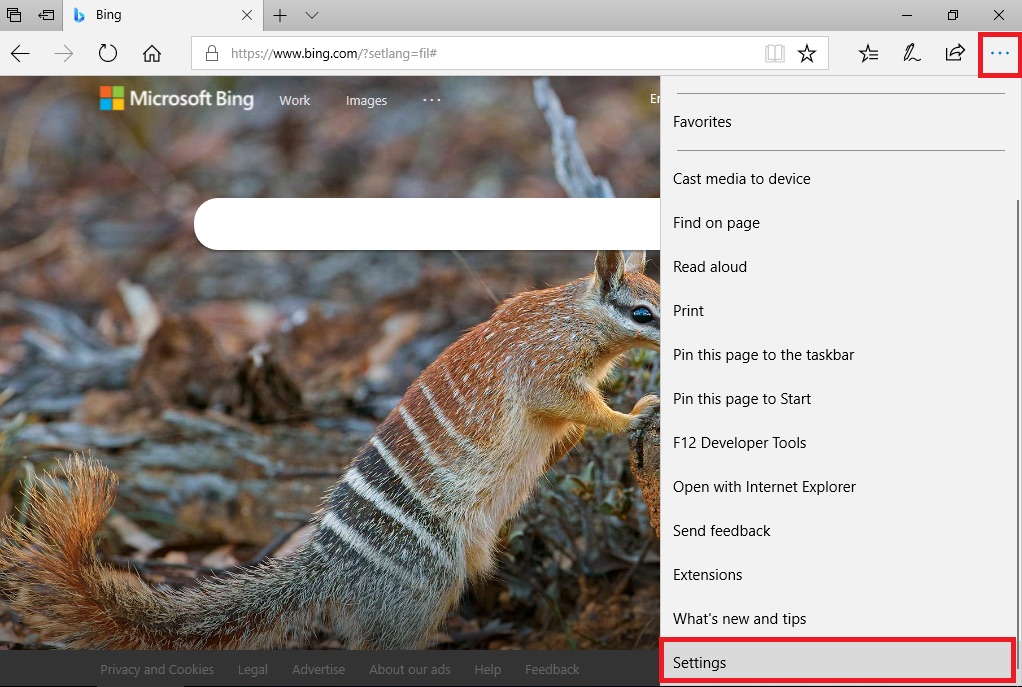
1. Open Microsoft Edge. 2. Click the 3-dots menu on the upper right corner, then select Settings.
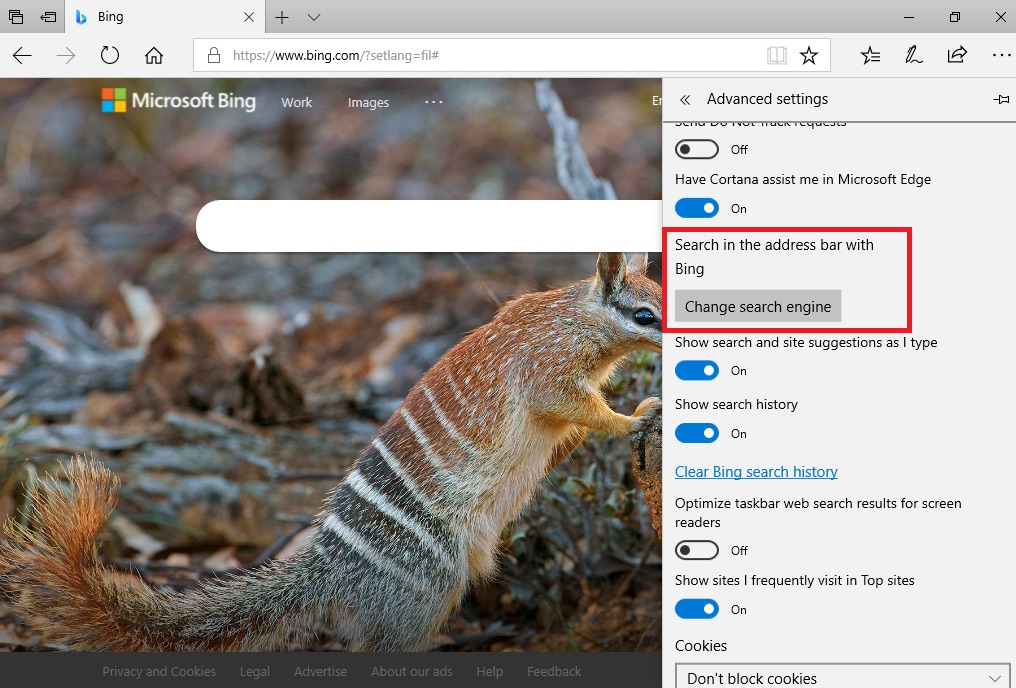
3. Select View Advance Settings and click the Changesearchengine button.
4. Choose your preferred Search Engine then click the Set as default button.
We hope this short guide has helped you get things back to normal! If you’ve found it a useful article, please do SHARE with friends and family.
In the modern world, searching for information is simple. There’s no need to go from one library to another, flipping through numerous pages, or checking the table of contents before you get to what you’re looking for. Simply typing words on the internet will give you limitless results — all you need to do is narrow them down.
What is a Search Engine?
If you need to find something, like a website or page that contains your needed information, you’ll need to go and visit a search engine page to query keywords.
A search engine is a program or application that checks, hunts, and searches the web for sites based on keywords. It uses these keywords and returns pages that are connected to what you have typed.
Search engines use web crawlers or web spiders to catalog the World Wide Web. These crawling bots are used for indexing contents. They will scan, check, assess and inspect site pages and their information across the web.
Notable Search Engines and Their Brief Histories
Archie — During the 1990s, the very first search engine arrived, named Archie. Its purpose was to search FTP sites to create indexes of files that are downloadable.
Veronica and Jughead — Created around 1992/93, they both searched file names and titles in Gopher index systems.
Infoseek — In 1994, Webmasters would submit and provide a page in real-time with this program.
Yahoo Search — Also created in 1994, it created a collection of favorable web pages with description of each website.
Looksmart, Excite and AltaVista — These search engines were created in 1995 and tried to compete with Yahoo.
Backrub — Created around 1996, Google’s initial project, Backrub, was a search engine that utilized backlinks for searches. It ranked pages depending on citations from other sites.
Ask Jeeves — Started in 1996, this search engine used human editors that tried to match search queries.
Google — Officially launched in 1998.
MSN Search — Relied on three different search engines: Looksmart, Overture and Inktomi.
Snap — A somewhat complex search engine, released in 2005, that shows search volumes, revenues and advertisers.
Bing — Rebranded name for MSN/Live Search.
Schema.Org — In 2011, Microsoft, Google and Yahoo collaborated to create Schema.org to create structured internet data.
Top 10 Most Used Search Engines
The following list contains the top ten from across the world:
1. Google:“Just google it” is a ubiquitous expression nowadays. Google is the most popular across all search engines — even more than all others combined. According to statistics, around 78% of desktops and laptops uses Google.
2. Yahoo: In the past, Yahoo had competed with Google. But as the years went on, Yahoo users had declined significantly. Now it is mostly used as a backup search engine in case the dominant one is down.
3. Bing: Microsoft Bing (or just Bing) is owned by Microsoft. Its origin came from MSN Search and Windows Live Search. This search engine is proud of its ‘decision’ engine which provides suggestions on the sides.
4. AOL Search: Known before as American Online Search. This search engine is used mostly by older people accustomed to AOL.
5. Duck Duck Go: Some say that Duck Duck Go is for and by Hipsters. But the main reason users choose this search engine is that it does not track search history and avoids spammy websites.
6. Baidu: This search engine is the 3rd largest out there. Baidu dominates the Chinese market and is the first choice in China. This engine has a sophisticated online censorship system since there’s many restrictions in its operating region.
7. Yandex: If Baidu has China as its market, then Yandex has the Russian market.
8. Ask: Its origin is the older “Ask Jeeves”. Since it could not compete with Google, it’s now powered by Google — if you can’t beat ‘em, join ‘em!
9. Naver: South Korea is another huge tech and communications market with its own search engine, Naver.
10.Seznam: The search engine popular in the Czech Republic and C. Europe.
And some honorable mentions:
Ecosia — Donates surplus income to organizations that plant trees.
Dogpile — Shows results from the top 3 search engines (Google, Bing and Baidu).
Gigablast — An open-source search engine.
Qwant — A popular, EU-based search engine.
Tips For Using Search Engines
Search engines are brilliant tools to immediately get the information we want. However, since search engines generally do not have much security capability, you should invest in a security product to provide and efficient browsing.
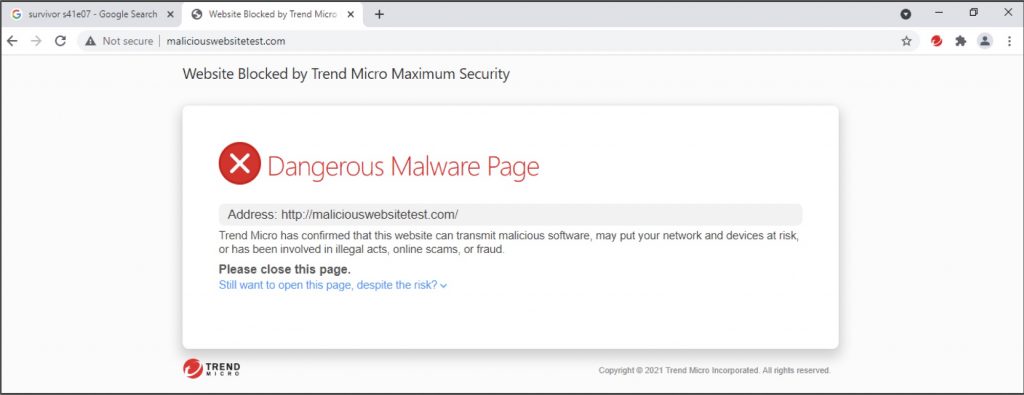
1. Install the Maximum Security tool bar to prevent you from visiting malicious websites.
You can install the Trend Micro Maximum Security toolbar service, which warns you of security risks relevant to the websites you visit.
When you search online, it monitors and rates websites in search engines such as Google, Bing, Baidu, and Yahoo. The Trend Micro Toolbar provides Page Ratings that show if the page is safe, suspicious, dangerous, trusted or untested.
A Mac User? No problem. Trend Micro Antivirus for Mac has the same toolbar feature to protect your online activity.
2. Install AdBlock One to stop annoying ads.
In addition, be sure to also use AdBlock One for Safari. This app stops annoying online ads from bothering you and helps load web pages faster — a significant boost in securing and improving your digital life.
Because it can contain so many different kinds of files, the Other category is a difficult source of clutter to deal with, and frequently causes frustration to Mac users. In this article, we’ll show you the steps to take to clean it up — and get more from your Mac!
What Is Other on Your Mac’s Storage?
The Other category in Mac storage contains files that don’t easily fit into the typical categories of Document, Photo, App, Video, Audio, etc. Other storage on Mac can hold a wide range of files, including system files, temp. files, and cached files. But not all the files in the Other category on Mac are as easy to justify as cached files or archives. “Bloatware” (such as junk files) refers to programs that aren’t useful but take up a lot of space, decreasing performance.
The file types considered Other in Mac storage mayinclude:
MacOS system files and folders.
Temporary files.
Common document and file types (for instance, PDF, DOC, PSD).
Archives and disk images (such as ZIP, ISO, DMG).
App plugins, add-ons, and extensions.
Files from your library (such as Application support, iCloud files, and screensavers).
Cached files (user cache, browser cache, and system cache).
Files not recognized by a Spotlight search, such as a virtual machine hard drive.
How to Check Other Storage on Your Mac
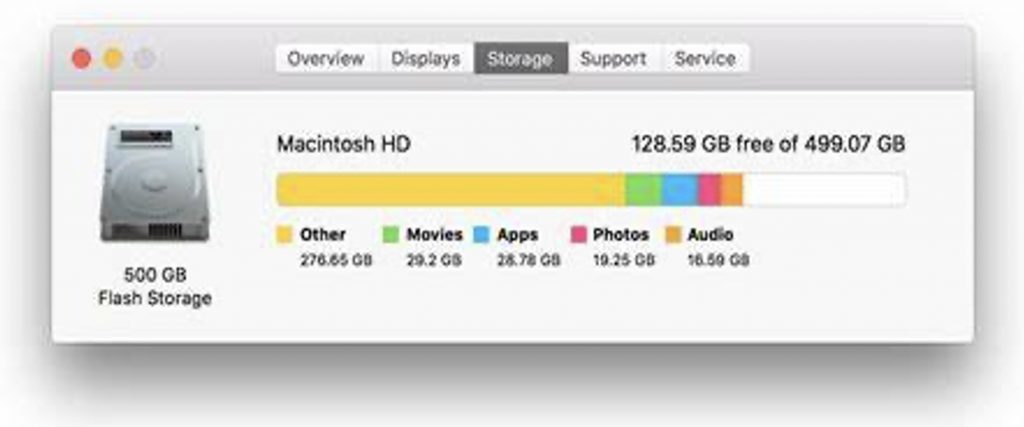
1. Click the Appleicon in the top-left corner and select About This Mac.
2. Choose the Storage tab. You’ll see a chart showing the types of files that are taking up storage on your Mac. If you’re reaching your limit, it’s time to clear out that Other storage!
How to Find Other Storage Files on Your Mac
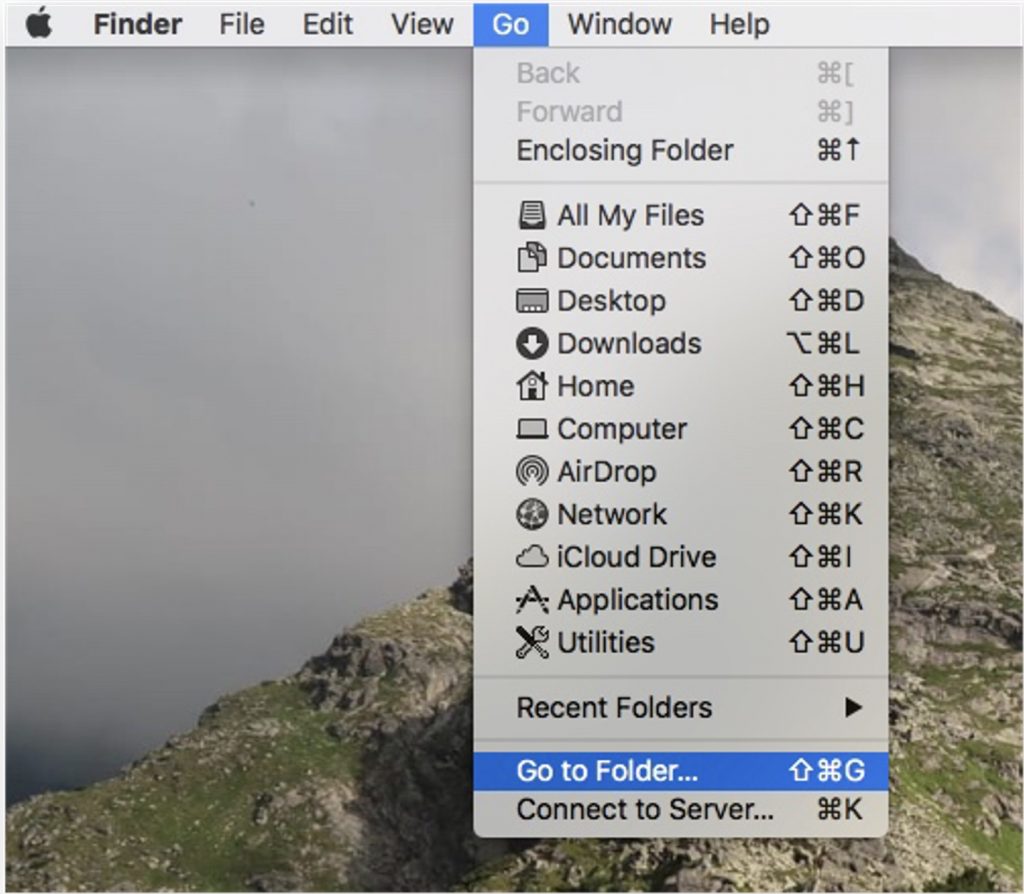
1. Open Finder and click Go in the menu bar.
2. Select GotoFolder.
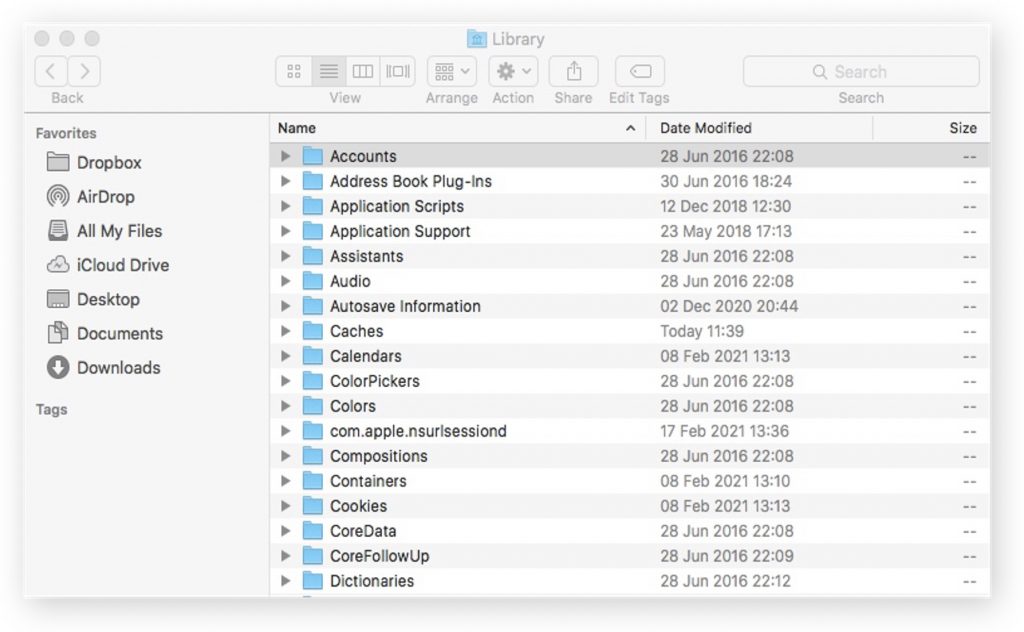
3. Enter ~/Library and press enter (or click Go).
4. The library will appear, which contains all files and folders categorized as Other. What follows is quite a risky and time-consuming process. Besure to do your research and know your file names — as the wrong deletion can be catastrophic.
The One-Stop Solution: Trend Micro’s Cleaner One Pro
Cleaner One Pro is an easy-to-use, all-in-one disk cleaning and utility optimization app that will help you boost your Mac’s performance. It will take care of the Other problem automatically.
Cleaner One Pro includes several housecleaning tools, including:
Memory Optimizer
Junk Cleaner
File Scanner
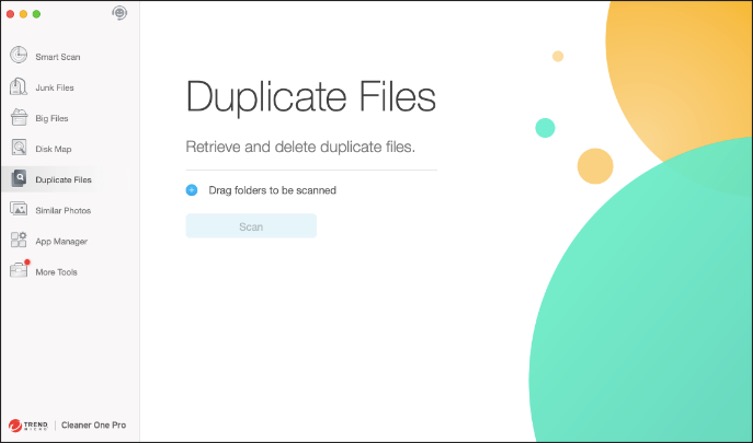
Duplicate Files Finder
App Manager
File Shredder
Memory Disk map
These functions are all rolled into one easy-to-use interface for maximum efficiency and simplicity. Click the link above or the button at the bottom of this page to get more from your Mac.
How to Delete Other Storage on Your Mac
After successfully opening the window above, you now want to go through these three primary folders:
When you’re done going through these folders and deleting as necessary, empty the Trash and restart your Mac. But be careful what you delete — you do not want to jeopardize your device by deleting the wrong file!
Furthermore, while deleting files, remember that the Other label DOES NOT signify junk files. Some files in this category exist for a reason: for example, some cache files are needed in order to make your system work faster, while ZIP archive files can contain important system documents and data. Good luck!
As always, if this article has been of use and/or interest to you, please do SHARE it with family and friends to help keep the online community secure and protected.
Eventually, if you’re shutter-happy enough, you’ll need to transfer your iPhone’s photos to your Mac to save the precious space on your mobile device. Simply sending a few photos as an email attachment is fine for a small number of photos, but in this article, we share several easier and more convenient ways of exporting your iPhone’s photos to your Mac.
Transfer Photos from iPhone to Mac with a USB Cable
Connecting your device using a Lightning-to-USB cable is the most common way of transferring pictures from an iPhone to a Mac. Below are several ways you can do this using a few different apps.
How to Use Finder to Transfer Photos from iPhone to Mac
Starting with macOS Catalina, there is no iTunes. However, you can easily sync your iPhone with your Mac using Finder. Here’s how to do it:
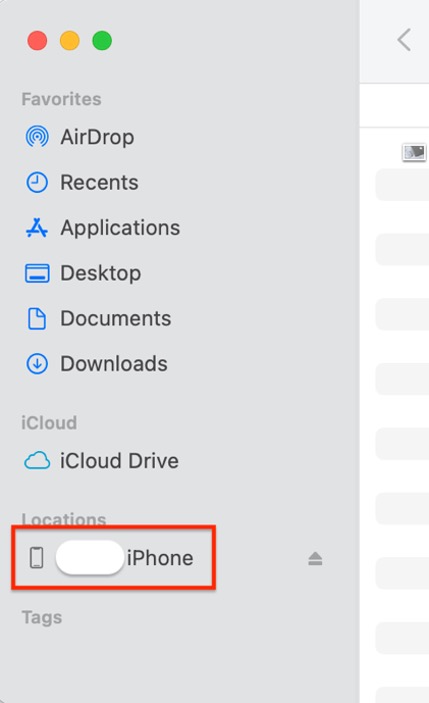
1. Connect your iPhone to your Mac with a Lightning-to-USB cable. 2. Open Finder. Your iPhone should appear in Finder’s sidebar under Locations.
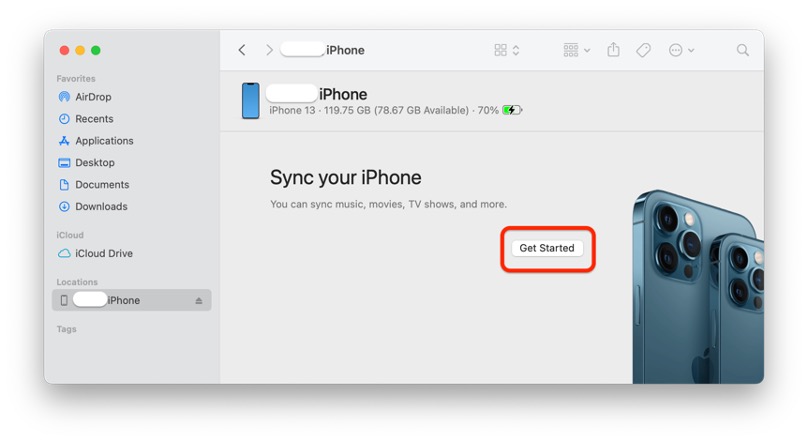
3. In the sidebar, select your iPhone. If prompted, confirm that you trust your iPhone. 4. Click Get Started.
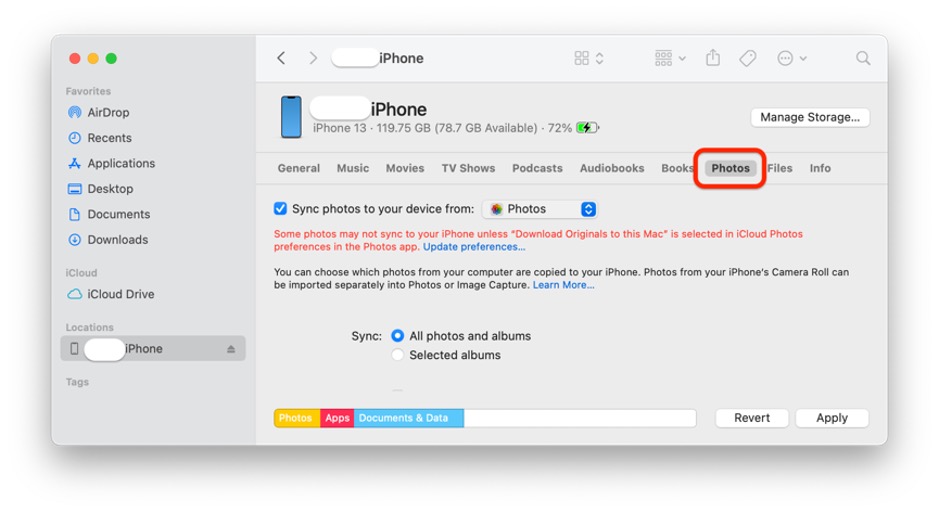
5. At the top of the window, click Photos and then check the Sync photos to your device from: box.
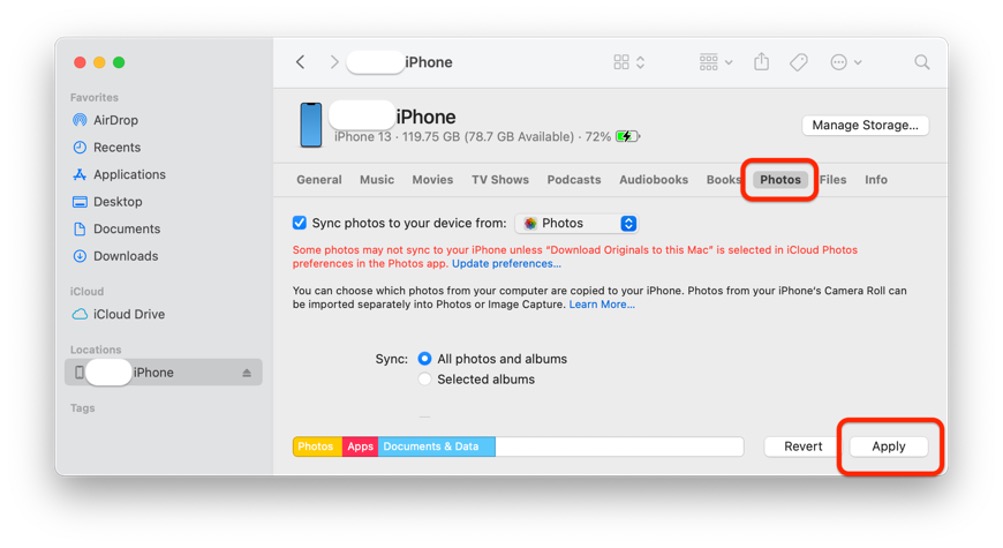
6. Use the drop-down menu to choose the folder or app on your iPhone that you want to sync photos from. 7. Use the checkboxes at the bottom of the window to choose whether you want to sync all your photos and albums or only selected albums. 8. Click Apply.
How to Use the Photos App to Transfer Photos from iPhone to Mac
Below are instructions on how to transfer photos from iPhone to Mac using the Photos app:
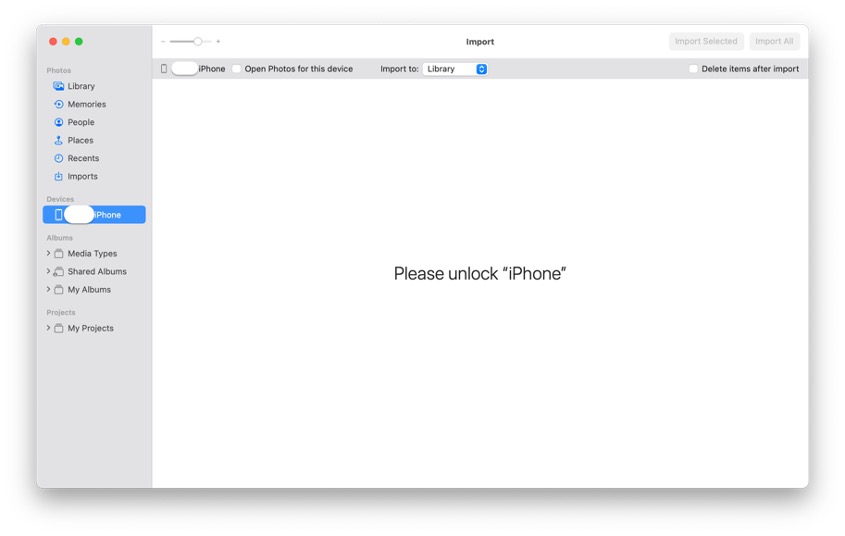
1. Connect your iPhone to Mac using a Lightning-to-USB cable. 2. Once prompted, confirm that you are using a trusted device. You will only need to do this if you haven’t synced your photos using this method before. 3. Open the Photos app on your Mac if it doesn’t automatically open. 4. In the sidebar, select your iPhone.
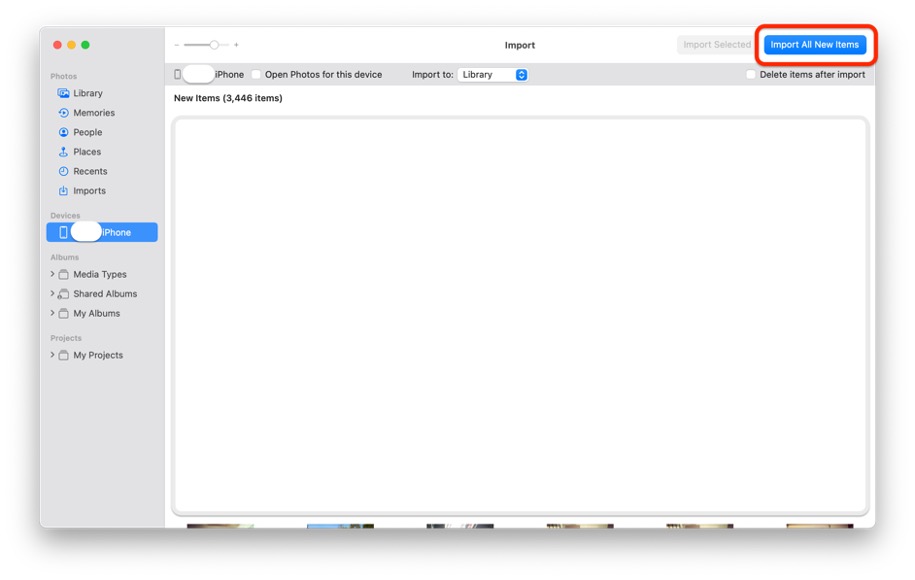
5. In the upper menu of the Photos app, choose Import. 6. Click Import All New Photos, or select the photos you need and click Import Selected.
Use Image Capture to Transfer Photos from iPhone to Mac
Another method for transferring photos from your iPhone to your Mac involves using the native Image Capture app. This method lets you quickly and easily download your photos to a folder of your choice.
It is primarily intended for use with digital cameras and scanners, but it can also be used with iPhones with no issue.
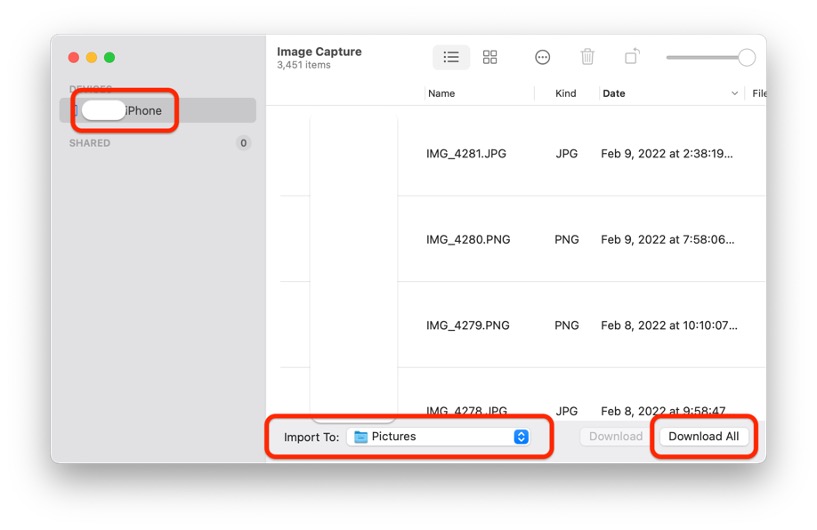
1. Connect your iPhone to your Mac using a Lightning-to-USB cable and allow access to the device when prompted. 2. Open Image Capture on your Mac. 3. In the sidebar, select your iPhone under the Devices category. 4. At the bottom of the window, use the Import To drop-down menu to choose the location to save your pictures.
5. Select the pictures you want to import and click the Download button, or if you want to transfer all your photos, click Download All.
Transfer Photos from iPhone to Mac wirelessly
There are several options for transferring photos even if you don’t have a Lightning-to-USB cable. Here they are:
Use AirDrop to Transfer Photos from iPhone to Mac
AirDrop works great for transferring photos between your iPhone and Mac, and vice versa. Please ensure both devices are connected to the same Wi-Fi network and no more than around 30 feet from each other.
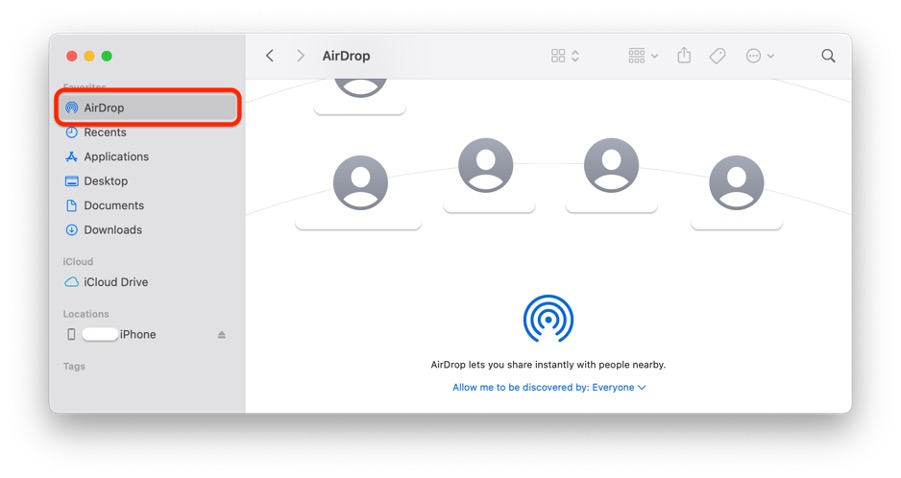
1. First, make sure your Mac is discoverable by everyone. Open Finder on your Mac, click Go in the menu bar, and select AirDrop. A Finder window will open with the AirDrop icon at the bottom.
2. Make sure that Everyone is selected under the Allow me to be discovered by: drop-down menu. 3. On your iPhone, open the Photos app and select the pictures you want to transfer. 4. Tap the Share button and select AirDrop.
5. Select the device you want to transfer your photos to and click Done. Depending on your Mac’s settings, you may be asked where you want to save the photos.
Use iCloud to Transfer Photos from iPhone to Mac
iCloud lets you synchronize your photos between your iPhone and Mac. Because the two devices will be regularly synchronized, this method is very efficient.
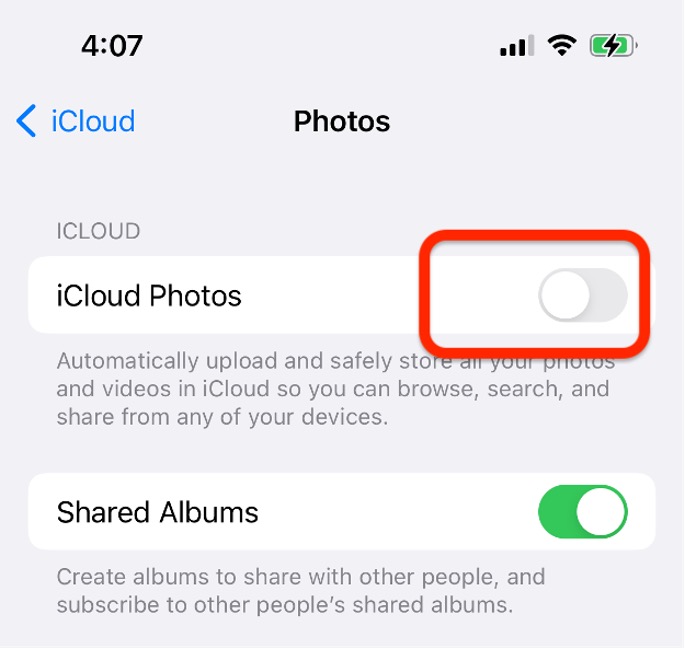
1. Make sure to sign in to your Apple ID on your iPhone and Mac and that they are both connected to Wi-Fi. 2. On your iPhone, go to Settings > Your Apple ID > iCloud > Photos. 3. Enable the slider next to iCloud Photos.
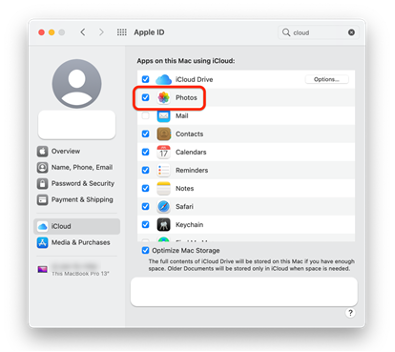
4. On your Mac, go to the Apple menu and select System Preferences. 5. For macOS Catalina or later (Big Sur and Monterey), go to iCloud or Apple, then choose iCloud. 6. Check the boxes next to iCloud Drive and Photos.
Note: remember to switch off sync after transferring if you want to delete photos on your iPhone and keep them on your Mac because as long as sync is enabled, any changes you make to photos on one device will automatically be synced to the other.
Got lots of duplicates?
Transferring photos to your Mac is a great way to reclaim some of the precious storage space on your iPhone, but if you’ve got lots of duplicate photos, you’re going to have a nightmare of a time sorting through them on your Mac. Fortunately, Cleaner One Pro is on hand to help out!
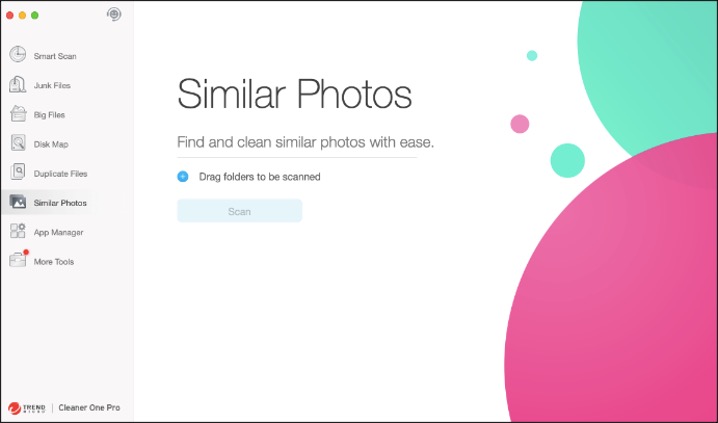
Cleaner One Pro makes the time-consuming process of finding and removing similar photos and duplicate files a thing of the past! Simply run a quick scan on your Mac to detect and remove everything hogging storage space.
If your Mac frequently performs slowly or freezing all the time, you see a “Your system has run out of application memory” message or occasionally seeing the dreadful spinning beach ball, chances of these can be signs that your memory, or RAM, is being used to the max.
What is RAM on Mac?
Random Access Memory (RAM) is a computer’s temporary data storage device. It stores the information the computer is actively using so that it can be accessed quickly. The more running programs your computer has, the more it uses memory to perform properly. It’s essential for your computer to work properly.
It is different from the internal storage on your Mac. You keep all your files in internal storage but you can’t choose what to save in your RAM as your computer needs flexibility in moving files in or out of that memory all the time.
It works similarly like when you are working in an office. The bigger the office the more people can do different tasks simultaneously. Like in a computer, the more RAM you have the more process your computer can handle at once.
When you launch a program, your computer gathers the program’s files from the hard drive. Once the files are retrieved, the computer needs a working area to process the data and allow you to interact with it. This is your RAM. Your computer places your program’s files in RAM temporarily while you are working with them so that your computer can access that information faster and efficiently.
Why it is necessary to Add more RAM
By default, most Macs were shipped with around 8GB of RAM. Old files and cluttered caches can reduce your Mac’s available RAM and cause your system to slow down. Some applications require a lot of RAM to work efficiently, such as video editing apps and 3D design software.
Adding more RAM is one of the easiest, most cost-effective ways to improve the performance of your MAC, primarily because most computers are shipped with a minimal amount of memory.
Free up Memory with System Activity Monitor
If installing more RAM isn’t an option, you can start looking at the Activity Monitor to show how much memory is being used – that will help you identify if an app is using up more than it should be.
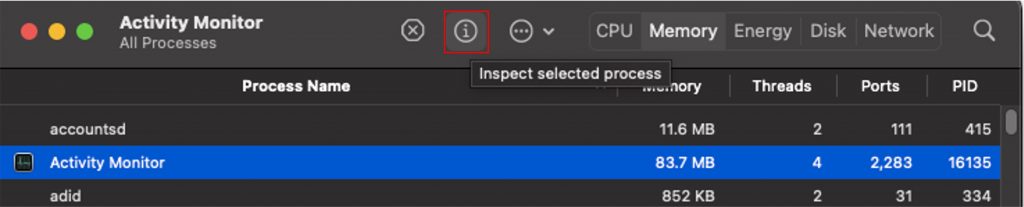
Activity Monitor comes with your Mac. You can find it in Utilities, or start typing Activity Monitor into Spotlight. If you select the Memory tab, this shows a list of all the active apps and processes on your Mac and how much memory each of them is using.
You should see a Memory Pressure chart and the breakdown of how your memory is being used.
The most important thing to look at is the Memory Pressure chart, which shows up in green, yellow, or red based on whether your Mac needs more RAM or not. If it is all green, it means your RAM is still efficient. Yellow means your Mac might be needing an upgrade, and red means your Mac definitely needs that added RAM.
When you find the suspect app to be using resources even though you weren’t using them, select it and click on Information (i).
This will show more information about the process including the memory it used. If you want to close this app, you can just click on Quit. Then it will ask if you are sure to quit this process. You can choose Quit or Force Quit. Force Quite is useful for frozen apps.
Note: If you are not familiar with the process, it’s better not to close as it may be required by your Mac.
Reduce Memory Usage on Mac
We now know the fix we can do when our Mac is running out of memory. It is still better if we can prevent it from happening especially if we only have limited options to upgrade our Mac’s memory.
There are a few things you can do to maximize what is available. This may also help speed up your Mac.
1. Make your Desktop Clean all the time.
Cluttered documents, images, and different types of files are worth cleaning or at least sorting them to a different folder/location. The macOS is designed to manage your Desktop icon as an active window. The more icons the more memory will be used.
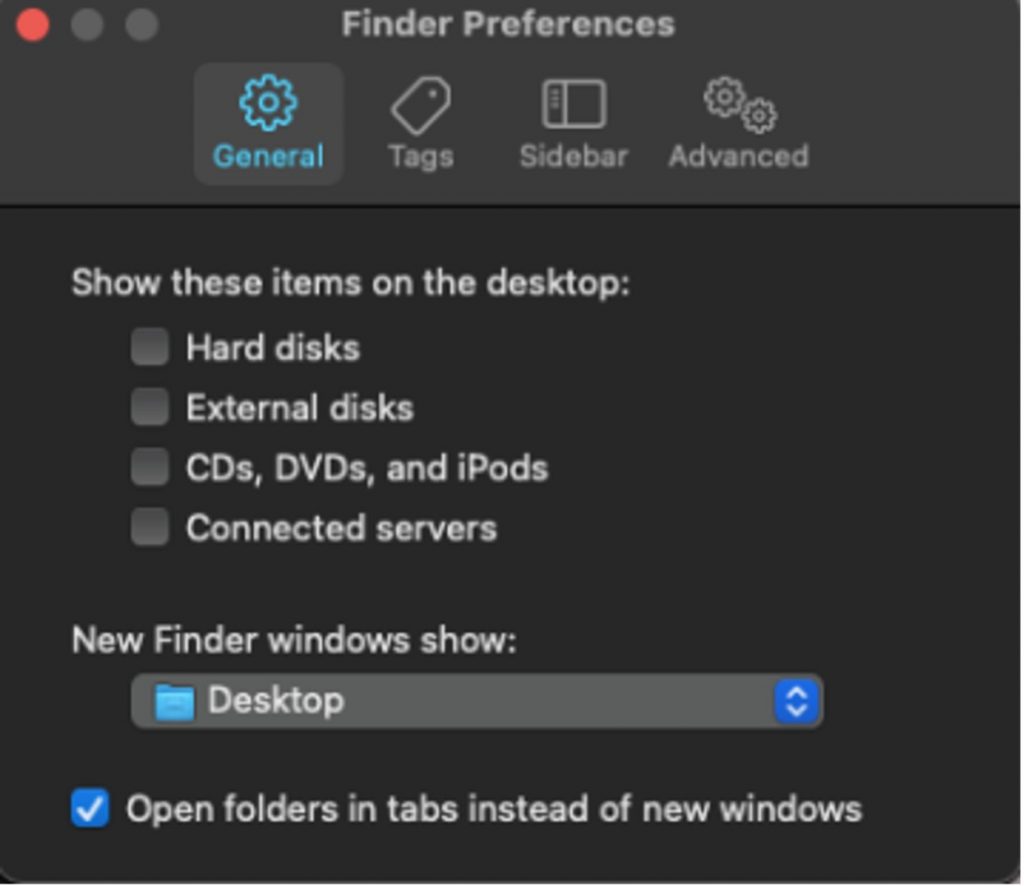
2. Manage Memory Usage in Finder
The Finder application is designed by default to show all files available on the system. Try changing the default display of Finder to not show All My Files.
Open Finder and click on Finder > Preferences
Under General choose a folder to be shown when you open a new Finder window.
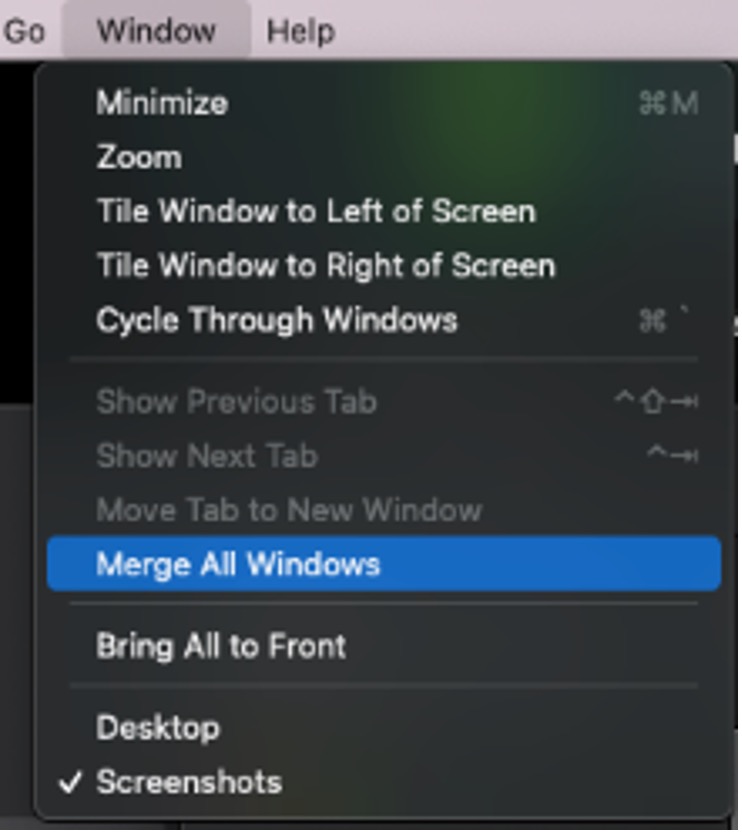
3. Close Unwanted Finder Windows or merge them.
Each Finder window can have an impact on RAM usage. You can close them all at once by using the keyboard shortcut, pressing Command + Option + W, or merging all the Finder windows together.
In the Finder, click on Window > Merge All Windows.
4. Disable Items that launches at Start up
Check if there are apps set to run during start-up or after you log in on your Mac as most of these might not be really essential for your everyday use of your computer.
How to stop apps from starting automatically:
Open System Preferences > Click on Users & Groups.
Click on your User name on the sidebar on the left if that’s not already selected.
Click on Login Items.
Select an app in the list that you don’t want to run during startup and click on the (-) button.
5. Close web browser tabs
It’s best practice to keep minimal open browser tabs at the same time as recent macOS will see the websites open in Safari listed as a separate process in Activity Monitor. It would also be best to close Safari or the browser you use from time to time.
6. Delete browser extensions
Browser extensions are tools for quick access to features while surfing the internet. But sometimes they just consume more memory. Check your browsers for unwanted browser extensions you don’t really need.
7. Free up more disk space on your Mac
You may also need to clear some space on your Mac from time to time. The recommendation is to keep 20% of your drive space free. You could delete large unused files, old downloads, and old apps. Large unused files can be installer packages you used a long time ago that you already forgot. You can also look for duplicate files or similar photos.
Best App to Free up RAM and Optimize memory usage on Mac
Cleaner One Pro is an all-in-one disk cleaning app with an easy-to-use interface so you can effortlessly visualize, manage and free up your storage space to keep your Mac optimized for the best performance.
Its key features include:
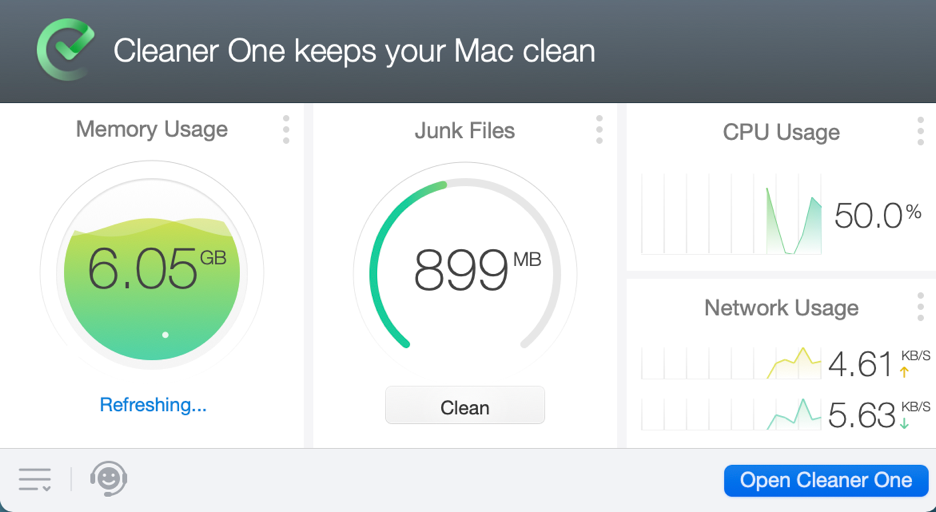
Quick Optimizer – Quick Optimizer monitors your CPU Usage, Network Usage and Memory Usage, while scanning and deleting Junk Files in just one click.
Junk Files – Remove temporary files and hidden hidden leftover files in one click.
Similar Photos – Offer an abundance of useful features to get rid of similar looking images.
Big Files – Filter and manage large files on your disk and free up more storage space.
Disk Map – Analyze your storage usage in a visual and interactive map.
Duplicate Files – Retrieve and delete duplicate files.
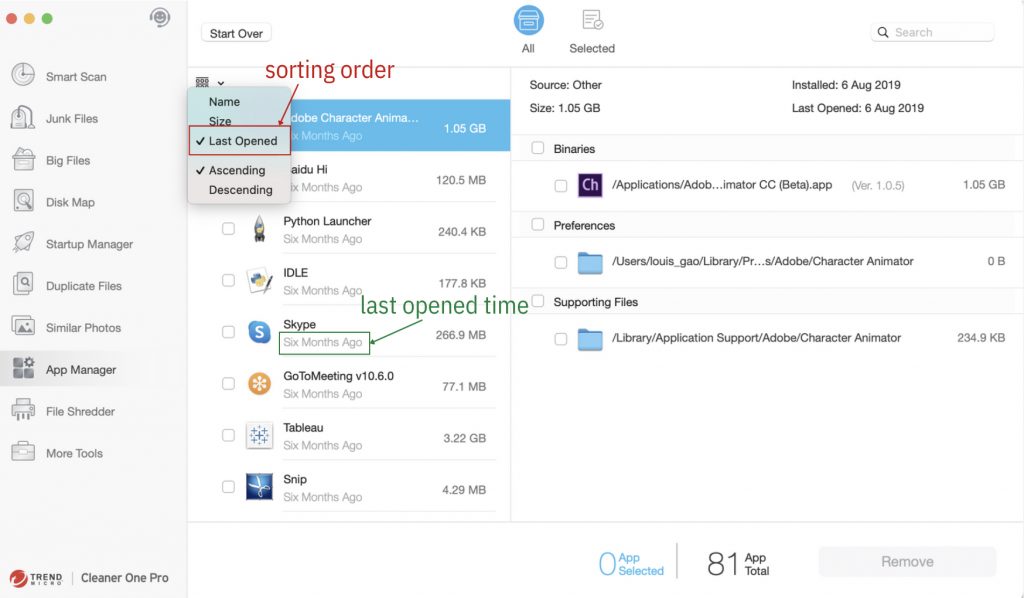
App Manager – View and manage apps by name, size or date. Remove unwanted apps and associated files. Batch remove multiple apps.
Startup Manager – Easily manage startup apps and services. Speed up boot time and enhance the performance.
Cleaner One Pro is available from Apple’s App Store and the Trend Micro website. Download and claim your free trial today!
You may check our article about Cleaner one Pro for more information:
It is commonly believed that Macs are immune to viruses. However, although they are less vulnerable than Windows computers, the reality is that MacBooks, iMacs, and Mac minis are still susceptible to malware and other security vulnerabilities — and there are some worrying ones out there, too.
Below are the top 5 macOS malware programs, security flaws, and vulnerabilities that you need to be aware of!
Silver Sparrow
Disclosed by Red Canary researchers, Silver Sparrow is a unique macOS malware program that was created to target Apple’s new M1 processors.
Silver Sparrow is a PUA (potentially unwanted application) that can serve as a delivery mechanism for malware. Once your device is infected it will contact a server every hour. It is still currently unknown how much of a threat Silver Sparrow truly poses, but in theory, it could act as a catalyst for significant attacks.
Apple quickly released an update to macOS that stopped Silver Sparrow from being able to be installed. Therefore, if you have a fully updated version of macOS, you are safe from Silver Sparrow.
XLoader
It was all but guaranteed that one of the most common pieces of Windows malware would make its way to macOS. Initially reported by Check Point security researchers in July 2021, it was confirmed that a Mac version of the XLoader malware had actually been around for some time.
XLoader is a new variant of the infamous Formbook, a program used to steal login credentials, record keystrokes, and download and execute files.
Once a device is infected with XLoader, it transfers a hidden application bundle containing a copy of itself to the user’s home folder, and what is particularly dangerous about it is the fact that it can run completely undetected by macOS.
XCSSET
Initially reported by Trend Micro in August 2020, XCSSET primarily targets macOS users in Asia. Many experts believe that XCSSET mainly targets Chinese gambling sites and their users.
XCSSET replaces users’ web browser icons with fake versions that launch malware whenever opened. XCSSET can bypass macOS’s privacy protections by hijacking the privileges of legitimate apps, allowing it to take screen captures.
XCSSET seeks to access information via the Safari browser, including login details for various Apple, Google, PayPal, and Yandex services. Other types of information it can collect include notes and messages sent via Skype, Telegram, QQ, and WeChat.
macOS Big Sur IOMobileFrameBuffer
This vulnerability can allow attackers to take over an affected system. It is a critical memory corruption issue found in internal component extensions in macOS. This security flaw allows the installation of malicious applications and enables them to execute commands with system administrator privileges — bypassing macOS’s built-in security measures.
The issue was addressed immediately by Apple, with a fix released in the macOS Big Sur 11.5.1 July 26, 2021 update.
Log4Shell
Log4Shell is a vulnerability in the widely used Java library Apache Log4j — software used by an innumerable number of large companies including Google, Apple, Netflix, Twitter, and many more. It enables attackers to perform remote code execution and gain control over affected servers.
Log4j is an open-source logging tool used by a huge number of websites and apps. Because it is so widely used, the number of services at risk of exploitation is incredibly concerning.
Although macOS is not directly affected by Log4Shell, according to security researchers, the vulnerability has been found to affect Apple’s iCloud platform. Luckily, Apple was quick to patch the vulnerability — releasing a fix shortly after it was discovered.
It was estimated that around 850,000 attacks were attempted within just 72 hours of the initial outbreak. It is not clear if Apple’s iCloud was among the services targeted.
Apache has already released an update fixing the vulnerability, although because of Log4j’s widespread worldwide use, the prospect of all the apps that use it receiving the fix is simply not realistic.
However, even if you use one of the compromised apps, your Mac will not be at risk. When exploited, the bug affects the server running Log4j, not the computer itself. Although in theory the exploit could be used to plant a malicious app on a server that then affects connected machines.
Stay protected at all times
Malware creators will always seek out undiscovered vulnerabilities that they can exploit, and Macs are certainly not immune. Fortunately, security researchers are often exceptionally quick at discovering these vulnerabilities, and fixes are almost always released timely.
However, it is best practice to always use a trusted antivirus app to ensure you are as protected as possible against all types of threats.
Trend Micro’s Antivirus One — the best option for complete peace of mind
Antivirus One can protect your Mac from viruses, malware, and adware, block potential web threats and safeguard against vulnerabilities.
Some key features include:
Fast Thorough Scans — Scan your Mac for hidden threats in less than a minute.
Web Threat Protection — Avoid online fraud, malicious software embedded in websites, and other threats lurking on the web.
Data Privacy Sweeps — Clear personal information out of Safari, Google Chrome, and Mozilla Firefox before it leaks online.
The privacy of our data has always been important. However, because we’re sharing more of it than ever before, being aware of data privacy and taking the necessary steps to protect it has never been more crucial. In this article, in celebration of Data Privacy Week, we cover why data privacy is so important, what can happen if your data were to fall into the wrong hands, and what you can do to protect your personal data.
Find out if your email address appeared in any data leaks
What is data privacy and why is it important?
Data privacy often refers to the practice of handling sensitive data in line with regulatory requirements. In most developed countries, there are specific data privacy laws in place that regulate how companies can collect, store, and share customer data.
While the EU has a comprehensive data privacy law, the General Data Protection Regulation (GDPR), which covers all different types of data, only three US states currently have similar, all-encompassing data privacy laws (California, Virginia, and Colorado). Instead, the US has many different laws designed to target specific types of data. For example, the Fair Credit Reporting Act (FCRA) protects information in your credit report, and the Family Educational Rights and Privacy Act (FERPA) protects students’ education reports from being freely accessible.
However, because of how much time we spend online nowadays, we’re putting more of our personal data out there for others to see than ever before. As a result, it is not only important to understand how protected your data is when you share it with a company, but also how private it is when you share it online.
How to protect your data privacy
Here are some of our top tips for data privacy protection:
Only give your data to trustworthy companies and websites — Perhaps you’ve come across a new online clothing store or seen an app on the app store that takes your fancy, but you’re unsure if you can trust the company. If you’ve never heard of the company before, it’s best to do some quick research to learn whether or not you can trust it with your data.
Think twice before sharing — With social media being such a big part of our everyday lives, it’s easy to forget that what we post online, stays online forever. Always think twice before sharing something online. Don’t publicly share personal information such as your address, phone number, or social security number.
Take advantage of privacy settings — On every website, app, and game that you use, make sure you’re taking advantage of the built-in privacy settings. By doing so, you’ll ensure that only people you know can view your information.
Use strong passwords and enable 2FA — When you create an online account, you almost always need to share lots of personal data — your full name, email address, and date of birth, for example. Although this data isn’t publicly accessible, if a hacker were to gain access to one of your accounts, they would be able to see all this information. To avoid this happening, make sure to use only strong, tough-to-hack passwords and that all your accounts have two-factor authentication (2FA) enabled.
Use a VPN on public Wi-Fi — Unprotected Wi-Fi networks are notoriously unsecure. Because no password is required to access them, nearby hackers can steal any data transferred over them. To protect yourself, always use a VPN on public Wi-Fi networks.
Data leaks in 2021 — T-Mobile, LinkedIn, Moncler & CoinMarketCap
The truth is, no matter how well a company abides by data privacy laws and how thoroughly it protects its customers’ data, it can never be 100% data leak-proof. In 2021 alone, a shocking number of companies suffered high-profile data leaks, including T-Mobile, LinkedIn, Moncler, and CoinMarketCap. Those leaks resulted in hundreds of millions of people having their sensitive personal data leaked, which is used by criminals to commit all sorts of crimes — with the most concerning of them all being identity theft.
According to the Federal Trade Commission, there were over 1 million reports of identity theft in 2021. Below are some of the things the FTC says criminals can do with your data:
Get new credit cards in your name.
Open a phone, electricity, or gas account in your name.
Steal your tax refund.
Get medical care under your name (and leave you with a huge bill!).
Pretend to be you if they get arrested.
Cybercriminals often put stolen data up for sale on underground forums on the regular internet, as well as the dark web. And as you can imagine, personal information that is particularly valuable to them can fetch a high price. On average, on the dark web, a driver’s license will go for $205, an ID card for $213, and a passport sells for a whopping $684!
How to stay protected from data leaks
You might be thinking that staying protected from data leaks is an impossible task, but the answer is easy: Trend Micro™ ID Security . Available for Android and iOS, Trend Micro™ ID Security can scan the internet and the dark web 24/7 for your personal information. If your data is leaked, the app notifies you immediately so you can take action to avoid people stealing your identity. If your information is out there, you’ll be the first to know!
Here are some of the features offered by Trend Micro™ ID Security :
Personal Data Protection Score — See exactly how safe your online personal data is with your customized Protection Score.
24/7 Comprehensive Personal Data Monitoring — ID Security can scan the internet and the dark web for all your personal information including up to 5 email addresses and bank account numbers, 10 credit card numbers, your Social Security number, and lots more.
Social Media Account Protection — Strengthen the security of your social media accounts. Be instantly alerted if your Facebook or Twitter account’s data is leaked by cybercriminals.
Have you noticed your iPhone behaving a little strangely recently? Maybe you’ve been bombarded by unusual ads or your battery has been hitting 0% much more quickly than normal. If you’ve got your suspicions that your iPhone has a malware infection, keep on reading to learn how to know for sure!
Step #1 — Check for high data usage
One particularly big sign of a malware infection is if your iPhone is using much more data than normal. Follow the instructions below to check:
Go to either Settings > Cellular or Settings > Mobile Data (depending on which version of iOS you have, it will be different).
You will then be able to check exactly how much data you’ve used in the current period. If it is significantly higher than you’re used to, search through the list of apps and look for any that you don’t recognize or remember installing. If any of them are using up a lot of data, you should strongly consider deleting them because they could be malicious.
Step #2 — Check for battery-hogging apps
Some forms of malware can run in the background without you even being aware of it, consuming huge amounts of your iPhone’s resources and having a significant impact on how long its battery lasts. As a result, similar to an increase in data usage, a sudden increase in battery usage is another red flag that indicates that your iPhone may have a problem. Here’s how you can check:
Navigate to Settings and select Battery.
Choose either Last 24 hours or Last 10 Days.
You can now see every app’s battery usage during the selected time period. Just like checking for high data usage, if you see any unusual apps that are using up a lot of battery, you should delete them.
Step #3 — Check for strange apps
Malware comes in many different varieties. While it is true that many consume a lot of battery and data, it is not the case for all malicious apps. Because of this, you also need to simply scan through every app installed on your iPhone and look for ones you don’t recognize.
This step may take a while, especially if you’ve installed lots of them, but scan through all your apps and search for ones that you don’t recognize. Every time you see an unfamiliar one, you should remove it.
Step #4 — Constantly being bothered by pop-ups?
If you’re always being bombarded by ads every time you surf the web on your iPhone, it’s a very strong sign that it has been infected by adware, which is a particular form of malware. Although it is generally considered one of the less dangerous types of malware, it can still be very annoying. If you’re suffering from this issue, but you were unable to find any malicious apps while following the previous steps, you should move on to the next step.
Step #5 — Run a malware scan
If you were unsuccessful in detecting any malware-infected apps while following the instructions in the previous steps and your iPhone is still behaving unusually, you need to run a malware scan — Trend Micro Mobile Security works perfectly for this!
Trend Micro Mobile Security can protect you against malicious apps, ransomware, dangerous websites, unsafe Wi-Fi networks, and more. Ridding your iPhone of malware simply couldn’t be any easier! Click the button below to download.Get Mobile Security
Some of Trend Micro Mobile Security ’s awesome features include:
Surf anywhere —Prevent mobile apps from loading dangerous and risky websites when you browse.
Stop threats —Rely on the cloud-based Smart Protection Network™ and Mobile App Reputation technology to stop threats before they can reach you.
Avoid online scams and fraud —Flag malicious phishing emails and scam websites.
Improve performance — Take advantage of optimization features to make your mobile devices work better.
Apple on Wednesday released iOS 15.3 and macOS Monterey 12.2 with a fix for the privacy-defeating bug in Safari, as well as to contain a zero-day flaw, which it said has been exploited in the wild to break into its devices.
Tracked as CVE-2022-22587, the vulnerability relates to a memory corruption issue in the IOMobileFrameBuffer component that could be abused by a malicious application to execute arbitrary code with kernel privileges.
The iPhone maker said it’s “aware of a report that this issue may have been actively exploited,” adding it addressed the issue with improved input validation. It did not reveal the nature of the attacks, how widespread they are, or the identities of the threat actors exploiting them.
An anonymous researcher along with Meysam Firouzi and Siddharth Aeri have been credited with discovering and reporting the flaw.
CVE-2022-22587 is the third zero-day vulnerability discovered in IOMobileFrameBuffer in a span of six months after CVE-2021-30807 and CVE-2021-30883. In December 2021, Apple resolved four additional weaknesses in the kernel extension that’s used to manage the screen framebuffer.
Also fixed by the tech giant is a recently disclosed vulnerability in Safari that stemmed from a faulty implementation of the IndexedDB API (CVE-2022-22594), which could be abused by a malicious website to track users’ online activity in the web browser and even reveal their identity.
Other flaws of note include —
CVE-2022-22584 – A memory corruption issue in ColorSync that may lead to arbitrary code execution when processing a malicious crafted file
CVE-2022-22578 – A logic issue in Crash Reporter that could allow a malicious application to gain root privileges
CVE-2022-22585 – A path validation issue in iCloud that could be exploited by a rogue application to access a user’s files
CVE-2022-22591 – A memory corruption issue in Intel Graphics Driver that could be abused by a malicious application to execute arbitrary code with kernel privileges
CVE-2022-22593 – A buffer overflow issue in Kernel that could be abused by a malicious application to execute arbitrary code with kernel privileges
CVE-2022-22590 – A use-after-free issue in WebKit that may lead to arbitrary code execution when processing maliciously crafted web content
The updates are available for iPhone 6s and later, iPad Pro (all models), iPad Air 2 and later, iPad 5th generation and later, iPad mini 4 and later, iPod touch (7th generation), and macOS devices running Big Sur, Catalina, and Monterey.
One of the first malware samples tailored to run natively on Apple’s M1 chips has been discovered, suggesting a new development that indicates that bad actors have begun adapting malicious software to target the company’s latest generation of Macs powered by its own processors.
While the transition to Apple silicon has necessitated developers to build new versions of their apps to ensure better performance and compatibility, malware authors are now undertaking similar steps to build malware that are capable of executing natively on Apple’s new M1 systems, according to macOS Security researcher Patrick Wardle.
Wardle detailed a Safari adware extension called GoSearch22 that was originally written to run on Intel x86 chips but has since been ported to run on ARM-based M1 chips. The rogue extension, which is a variant of the Pirrit advertising malware, was first seen in the wild on November 23, 2020, according to a sample uploaded to VirusTotal on December 27.
“Today we confirmed that malicious adversaries are indeed crafting multi-architecture applications, so that their code will natively run on M1 systems,” said Wardle in a write-up published yesterday. “The malicious GoSearch22 application may be the first example of such natively M1 compatible code.”
While M1 Macs can run x86 software with the help of a dynamic binary translator called Rosetta, the benefits of native support mean not only efficiency improvements but also the increased likelihood of staying under the radar without attracting any unwanted attention.
First documented in 2016, Pirrit is a persistent Mac adware family notorious for pushing intrusive and deceptive advertisements to users that, when clicked, downloads and installs unwanted apps that come with information gathering features.
For its part, the heavily obfuscated GoSearch22 adware disguises itself as a legitimate Safari browser extension when in fact, it collects browsing data and serves a large number of ads such as banners and popups, including some that link to dubious websites to distribute additional malware.
Wardle said the extension was signed with an Apple Developer ID “hongsheng_yan” in November to further conceal its malicious content, but it has since been revoked, meaning the application will no longer run on macOS unless attackers re-sign it with another certificate.
Although the development highlights how malware continues to evolve in direct response to both hardware changes, Wardle warned that “(static) analysis tools or antivirus engines may struggle with arm64 binaries,” with detections from industry-leading security software dropping by 15% when compared to the Intel x86_64 version.
GoSearch22’s malware capabilities may not be entirely new or dangerous, but that’s beside the point. If anything, the emergence of new M1-compatible malware signals this is just a start, and more variants are likely to crop up in the future.