If you start a program and receive an error stating that the program you are trying to run needs the Microsoft Visual C++ 2015 Runtime, you can use this tutorial to install the package so that your program works again.
When developers create a Windows program using Microsoft Visual Studio 2015, there are specific dynamic link libraries (DLLs) that their programs are linked to work correctly.
These DLLs are distributed through the Microsoft Visual C++ 2015 Runtime, and if the package is not installed, users will encounter errors stating that DLLs are missing or you need to install the runtime.
As an example, the video game Valorant released an update today that did not include the Microsoft Visual C++ 2015 Runtime, causing the game not to work after the update was installed.
When users launch Valorant, they are instead greeted with the following error.
Missing Microsoft Visual C++ 2015 Runtime error
“The following component(s) are required to run this program: Microsoft Visual C++ 2015 Runtime”
The good news is that it is really easy to fix this problem by downloading and install the runtime from Microsoft’s website.
To install the Microsoft Visual C++ 2015 Runtime, please follow these steps:
You will be brought to a page where it asks you to select whether you want to download the 32-bit or 64-bit version of Windows. Select the version you need and click the Next button. If you are unsure what version you need, you can use this tutorial to determine what you need.
BleepingComputer suggests that you download and install both the x86 AND x64 versions of the runtime to not run into issues in the future.
The files will now be download to your computer. Once downloaded, double-click on the downloaded vc_redist.x64.exe file.
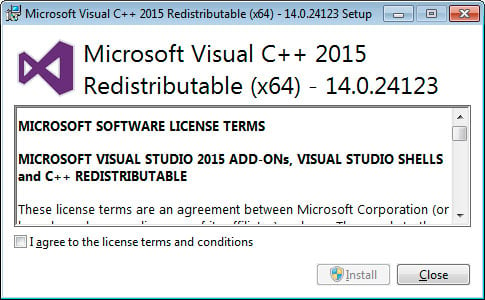
The Microsoft Visual C++-2015 Redistributable screen will be displayed and ask you to agree to the license terms and conditions. Put a checkmark in the “I agree” box and then click on the Install button.Microsoft Visual C++-2015 Redistributable
If Windows prompts you to allow the program to make changes or continue, click on the Yes or Allow button.
When done, the program will display a message stating that it was successfully installed.Redistributable Installed
Now perform the same steps to install the vc_redist.x86.exe runtime.
You can now close the installer.
If you already had the Visual C++ 2015 Runtime installed, you can run the above redistributables and perform a repair.
Perform a Repair
You can now try to run the program that previously gave the missing runtime error, and it should work again.
By default, the Windows 10 Start menu will open up in a size that accommodates all of the pinned items. For those who wish to use a larger Start screen, making the Start menu open in a full-screen mode is possible.
When the full-screen mode is enabled, the Start screen will overlay the entire desktop and provide a more generous amount of space to pin applications, and your live tiles will be larger.
If you wish to enable the Start full-screen mode, please follow these steps:
Click on the Start menu and then click on the Settings cog ( ) to open the Windows 10 Settings.
When the Settings open, click on Personalization and then Start.
In the Start settings, look for a setting named ‘Use Start full screen‘ and click on the toggle to enable the feature, as shown below.Enable Start full screen
You can now close the Start settings screen.
Now that you have enabled Start full screen mode, when you click on the Start button, the Start menu will be shown in full screen and overlay the entire desktop.
Start full screen
When using Start in full screen mode, you can close the Start menu at any time by pressing the Escape key on your keyboard or by clicking on another program or screen.
To disable Start full screen mode, just follow these steps again, but this time disable the ‘Use Start full screen’ setting.
One of the Windows 10 Start Menu features is a built-in Bing search when a local search fails to find anything. Whether it be due to privacy reasons, bugs, or just personal dislike, this article will explain how to disable Bing search in the Start Menu.
When you perform a search in the Windows 10 Start Menu, Windows will first look for local search results such as settings, files, or programs and display any that are found.
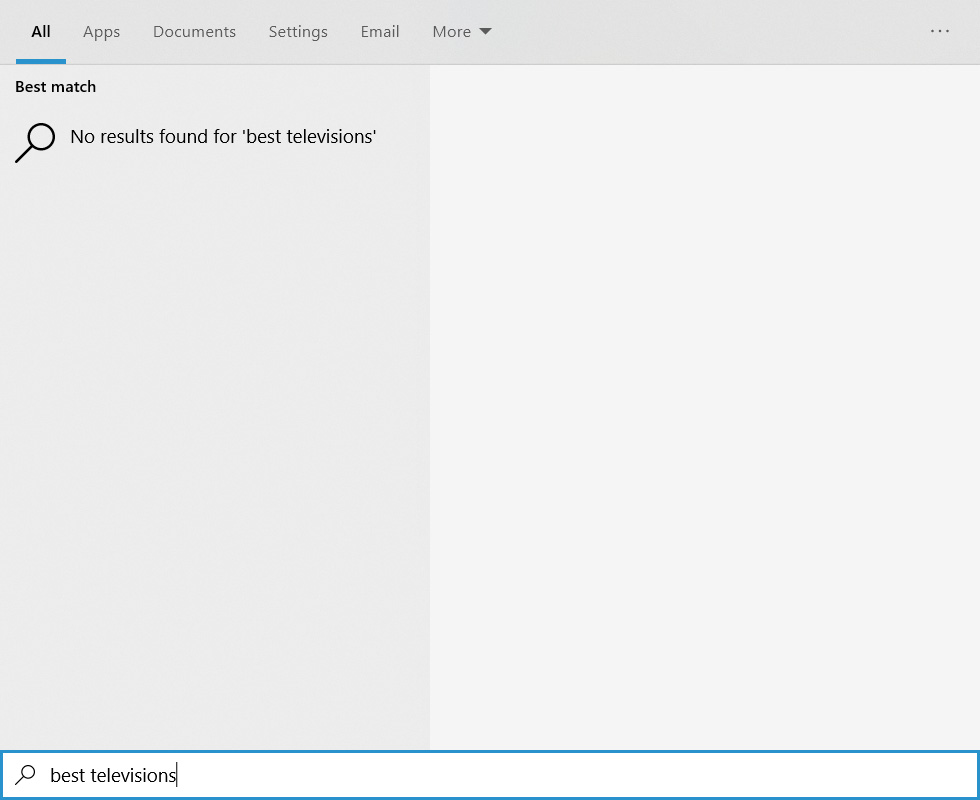
If there are no local results, Windows will then perform a Bing search for the search keyword and list the results in the Start Menu as shown below.
Blank search results in Start Menu
When logged into a Microsoft Account, these searches will be uploaded to Microsoft, who will then list them in your account’s Privacy Dashboard. This is a privacy concern for fear that Microsoft is using this data to track your browsing habits.
There have also been bugs in the Bing search component in the past that have caused the Windows 10 Start menu to appear completely blank. If you do not utilize the Bing search feature, disabling it could prevent those bugs in the future.
Below we have outlined two methods that can be used to disable Bing search in the Windows 10 Start Menu.
How to disable Bing search in the Windows 10 Start Menu
Unfortunately, for those who want to disable Bing search in the Start Menu, Microsoft does not provide an easy method.
Instead, Windows users need to modify the Registry so that it is using the following Registry values.
For those who feel comfortable modifying the Registry, we have instructions on setting the proper values using the Registry Editor.
For those who are not comfortable with Registry modifications, please see method two that contains an easy to use premade Registry file that makes the settings for you.
METHOD 1: DISABLE BING SEARCH RESULTS VIA THE GROUP POLICY EDITOR
Windows 10 Pro comes with the Group Policy editor, which you can use to disable Bing search in the Start Menu.
To disable Bing Search, follow these steps:
Search in the Start Menu for ‘gpedit.msc‘ and select it when the result appears.
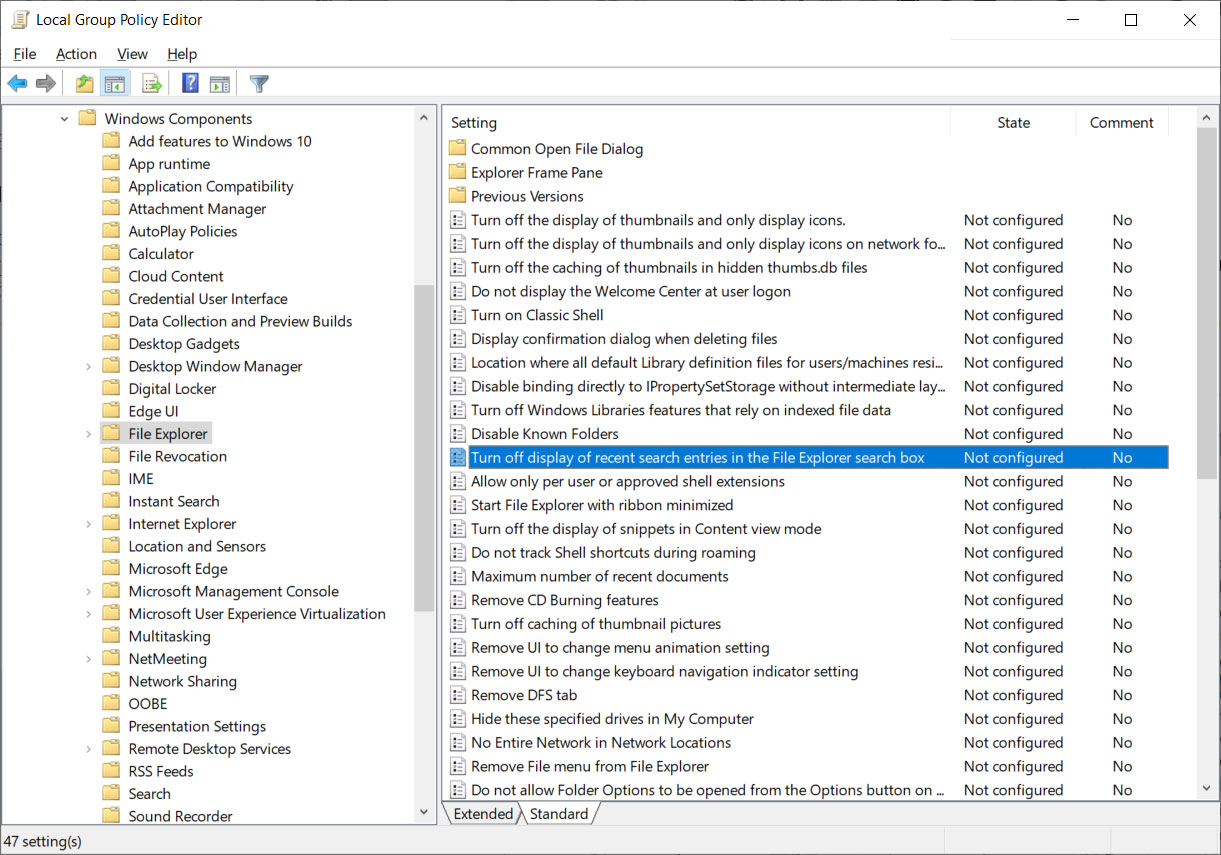
When the Group Policy Editor opens, navigate to the following path: User Configuration\Administrative Templates\Windows Components\File Explorer
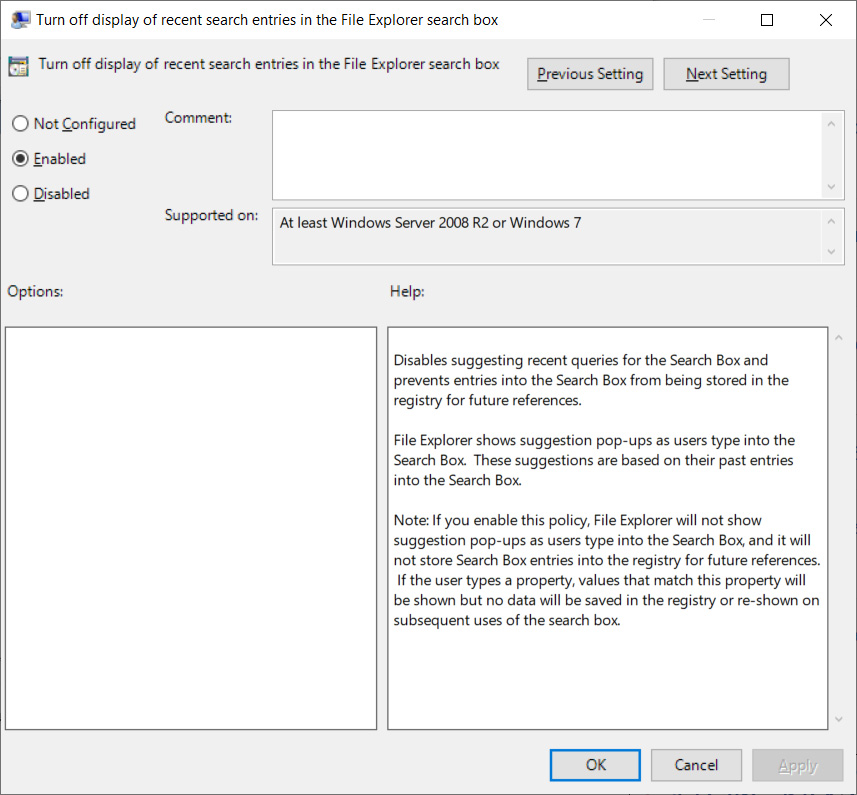
Under the File Explorer section, you will see a policy called ‘Turn off display of recent search entries in the File Explorer search box’ as shown below. Double-click on the policy to open it.
To disable Bing search, set this policy to ‘Enabled.’
When done, click on the Apply and then OK button to save the policy.
You can now close the Group Policy Editor and restart Windows Explorer or restart your computer.
Once restarted, Bing searches will no longer appear in the Start Menu.
METHOD 2: USE THE REGISTRY EDITOR TO DISABLE BING INTEGRATION
If you are using Windows 10 Home and are comfortable using the Windows Registry, you can disable Bing’s integration in Windows Search using the Registry editor.
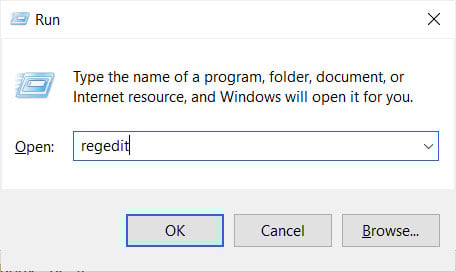
First, open the Windows Registry Editor by pressing the Windows key + the R key at the same time. This will open the Run: dialog and then type regedit and press the OK button.Starting Registry Editor
Windows will display a UAC prompt asking if you wish to allow the Registry Editor to make changes to the system. Press the Yes button to continue.
Navigate to the HKEY_CURRENT_USER\SOFTWARE\Policies\Microsoft\Windows\Explorer key. If the key does not exist, create the necessary folders until you are in the Explorer key.
Right-click on Explorer and select New and then DWORD (32-bit) Value, as shown below.New DWORD value
You will be prompted to enter the name of the new value. Type DisableSearchBoxSuggestions and press Enter on the keyboard. A new value will be created that should automatically be set to 0. Now double-click on BingSearchEnabled and set the value to 1 and then press the OK button.
When done, you should have the BingSearchEnabled value created and set to 1.
Once restarted, Bing search will no longer work in the Windows 10 Start Menu.
Bing Search disabled
Enable Bing integration again
To enable Bing integration again, simply disable the group policy or edit the Registry and delete the DisableSearchBoxSuggestions value under the HKEY_CURRENT_USER\SOFTWARE\Policies\Microsoft\Windows\Explorer Registry key.
Once again, restart the Explorer process or the computer, and Bing integration will work again.
Update 10/5/20: Added updated instructions on how to disable Bing search.
Windows Safe Mode is a way of booting up your Windows operating system in order to run administrative and diagnostic tasks on your installation. When you boot into Safe Mode the operating system only loads the bare minimum of software that is required for the operating system to work. This mode of operating is designed to let you troubleshoot and run diagnostics on your computer. Windows Safe Mode loads a basic video drivers so your programs may look different than normal.
For Win98/ME, XP, Vista and Windows 7 there are two methods of booting into Safe Mode, while 95 and 2000 only have one. We will describe these methods below:
F8 – By pressing the F8 key right when Windows starts, usually right after you hear your computer beep when you reboot it, you will be brought to a menu where you can choose to boot into safe mode. If it does not work on the first try, reboot and try again as you have to be quick when you press it. I have found that during boot up right after the computer shows you all the equipment , memory, etc installed on your computer, if you start lightly tapping the F8 key you will usually be able to get to the desired menu.
System Configuration Utility – You can use the System Configuration Utility, or MSCONFIG, found in Windows 98, ME, XP, Windows Vista, and Windows 7 to make Windows boot into Safe Mode on the next reboot. We will go into specific details in the sections below. Please note, that you should not force your computer to boot into Safe Mode using the System Configuration Utility if you suspect you are infected with malware as the malware may corrupt keys required to boot into Safe Mode. You can read more about this here.
Windows 95
Windows 95 can only boot into Safe Mode using the F8 method as it does not have a System Configuration Utility.
Using the F8 Method:
Restart your computer.
When the machine first starts it will generally list some equipment that is installed in your machine, amount of memory, hard drives installed etc. When it is finished with that it will say “Starting Windows 95”. Immediately after seeing “Starting Windows 95” press the F8 key.
You will now be presented with a menu. Select the option for Safe Mode using the arrow keys.
Then press enter on your keyboard to boot into Safe Mode.
Do whatever tasks you require and when you are done reboot to boot back into normal mode.
Windows 98/ME
NOTE: Windows ME may look slightly different than what is shown in the images below. You should still have no problem following along.
Using the F8 Method:
Restart your computer.
When the machine first starts again it will generally list some equipment that is installed in your machine, amount of memory, hard drives installed etc. At this point you should gently tap the F8 key repeatedly until you are presented with a menu.
When you have the menu on the screen. Select the option for Safe Mode using the arrow keys.
Then press enter on your keyboard to boot into Safe Mode.
Do whatever tasks you require and when you are done reboot to boot back into normal mode.
Using the System Configuration Tool Method:
Step 1: Close all programs so that you have nothing open and are at the desktop.
Step 2: Click on the Start button then click on Run.
Step 3: In the Run field type msconfig as shown in the image below.
Figure 1. Starting Msconfig
Step 4: Press the OK button and the System Configuration Utility will start up. You will then see a screen similar to Figure 2 below.
Figure 2. SCU Startup Screen
Step 5: You should now press the Advanced button designated by the red box in the figure above and you will see a screen similar to figure 3 below.
Figure 3. Advanced Options
Step 6: Place a check mark in the checkbox labeled “Enable Startup Menu” designated by the red box in Figure 3 above. Then press the OK button and then the OK button again. Windows 98/ME will now prompt if you would like to reboot as shown in Figure 4 below.
Figure 4. Confirm Reboot
Step 7: Press the Yes button and your computer will restart into Safe Mode.
Step 8: When the computer boots up perform what diagnostic or troubleshooting tasks you require.
Step 9. When you are finished with these tasks, complete steps 1-7 again, but in Step 6 this time uncheck the checkbox labeled “Enable Startup Menu”.
Step 10: Reboot the computer back into normal mode.
Windows 2000
Windows 2000 can only boot into Safe Mode using the F8 method as it does not have a System Configuration Utility.
Using the F8 Method:
Restart your computer.
When the machine first starts again it will generally list some equipment that is installed in your machine, amount of memory, hard drives installed etc. When that is completed it will start loading Windows.
When you see the screen that has a black and white bar at the bottom stating “Starting Windows”, tap the F8 key repeatedly until you get to the Windows 2000 Advanced Options Menu
At this menu use the arrow keys to select the Safe Mode option, which is usually the first in the list.
Press the enter key.
Your computer will continue booting, but now will boot into Safe Mode.
Do whatever tasks you require and when you are done reboot to boot back into normal mode.
Windows XP
Using the F8 Method:
Restart your computer.
When the machine first starts again it will generally list some equipment that is installed in your machine, amount of memory, hard drives installed etc. At this point you should gently tap the F8 key repeatedly until you are presented with a Windows XP Advanced Options menu.
Select the option for Safe Mode using the arrow keys.
Then press enter on your keyboard to boot into Safe Mode.
Do whatever tasks you require and when you are done reboot to boot back into normal mode.
Using the System Configuration Tool Method:
Note: If you are having trouble entering Safe Mode via the F8 method, you should not use this method to force it to startup into safe mode. For reasons why, you should read this.
Step 1: Close all programs so that you have nothing open and are at the desktop.
Step 2: Click on the Start button then click on Run.
Step 3: In the Run field type msconfig as shown in the image below.
Figure 4. Starting Msconfig
Step 4: Press the OK button and the System Configuration Utility will start up. You will then see a screen similar to Figure 5 below.
Figure 5. Starting the System Configuration Utility
Step 5: Click on the tab labeled “BOOT.INI” which is designated by the red box in Figure 5 above. You will then be presented with a screen similar to Figure 6 below.
Figure 6. BOOT.INI Tab
Step 6: Put a check mark in the checkbox labeled “/SAFEBOOT” designated by the red box in Figure 6 above. Then press the OK button. After pressing the button you will be presented with a confirmation box as shown in Figure 7 below.
Figure 7. Confirm Reboot
Step 7: Press the Restart button and let the computer reboot. It will now boot up into Safe Mode.
Step 8: When the computer boots up do what diagnostic or troubleshooting tasks that you need to do.
Step 9. When are finished with your tasks, complete steps 1-7 again, but in Step 6 this time uncheck the checkbox labeled “/SAFEBOOT”. Then click on the General tab and set it for Normal startup.
Step 10: Reboot the computer back into normal mode.
Windows Vista
Using the F8 Method:
Restart your computer.
When the computer starts you will see your computer’s hardware being listed. When you see this information start to gently tap the F8 key repeatedly until you are presented with the Windows Vista Advanced Boot Options.
Select the Safe Mode option using the arrow keys.
Then press the enter key on your keyboard to boot into Vista Safe Mode.
When Windows starts you will be at a typical logon screen. Logon to your computer and Vista will enter Safe mode.
Do whatever tasks you require, and when you are done, reboot to go back into normal mode.
Using the System Configuration Tool Method:
Note: If you are having trouble entering Safe Mode via the F8 method, you should not use this method to force it to startup into safe mode. For reasons why, you should read this.
Close any running programs and open Windows so you are back at the desktop.
Click on the Start () button.
In the Start Menu Search Box () type msconfig and press enter on your keyboard.
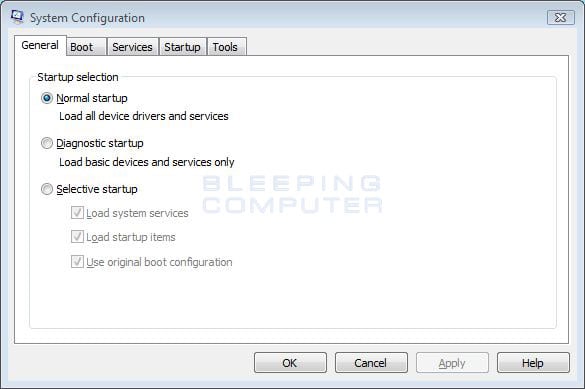
The System Configuration utility will open and you will see a screen similar to the one below.
Figure 8. Vista System Configuration Utility
Click on the Boot tab.
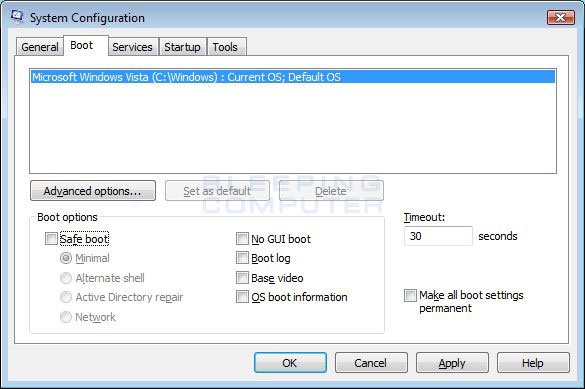
You will now be at the Boot options screen as shown below.
Figure 9. Vista Boot tab in the System Configuration utility
Put a check mark in the checkbox labeled Safe boot
Press the Apply button and then press the OK button.
You will now be presented with a prompt stating that you need to reboot the computer to apply the change.
Figure 10. Restart Prompt
Click on the Restart button to reboot your computer.
Your computer will now restart directly into Safe Mode. When you get to the Vista logon screen, log on to the computer and perform any necessary tasks.
When done with your tasks, from within Safe Mode, start msconfig.
When the program is open, and you are on the General tab, select the option labeled Normal Startup.
Then press the Apply button and then the OK button.
When the programs prompts you to reboot, allow it to do so, and you will boot back into Windows Vista in normal mode.
Windows 7
Using the F8 Method:
Restart your computer.
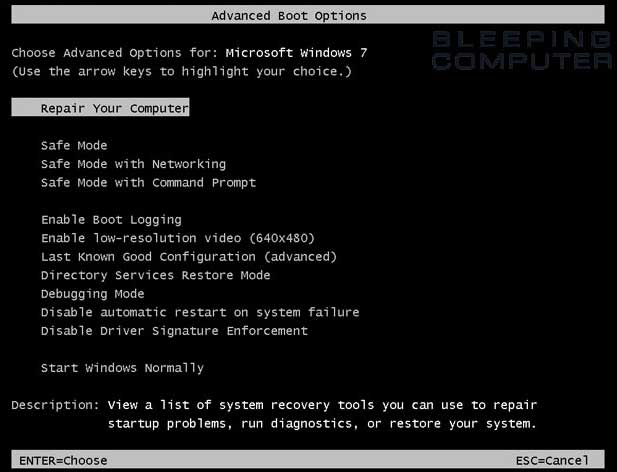
When the computer starts you will see your computer’s hardware being listed. When you see this information start to gently tap the F8 key on your keyboard repeatedly until you are presented with the Windows 7 Advanced Boot Options screen as shown in the image below.
Figure 11. Windows 7 Advanced Boot Options screen
Using the arrow keys, select the Safe Mode option you want.
Then press the enter key on your keyboard to boot into Windows 7 Safe Mode.
When Windows starts you will be at a typical logon screen. Logon to your computer and Windows 7 will enter Safe mode.
Do whatever tasks you require, and when you are done, reboot to go back into normal mode.
Using the System Configuration Tool Method:
Note: If you are having trouble entering Safe Mode via the F8 method, you should not use this method to force it to startup into safe mode. For reasons why, you should read this.
Close any running programs and open Windows so you are back at the desktop.
Click on the Start () button.
In the Start Menu Search Box type msconfig as shown in Figure 12 below.
Figure 12. Windows 7 Search box
Then press enter on your keyboard.
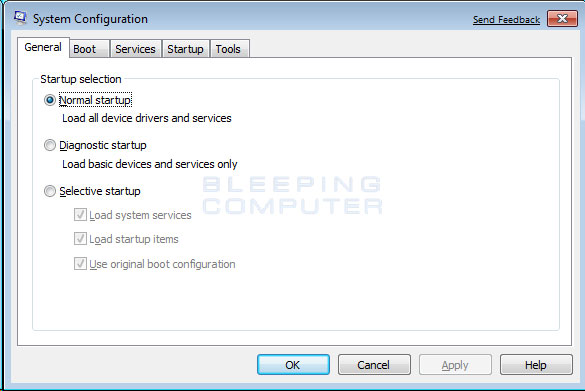
The System Configuration utility will open and you will see a screen similar to the one below.
Figure 13. Windows 7 System Configuration Utility
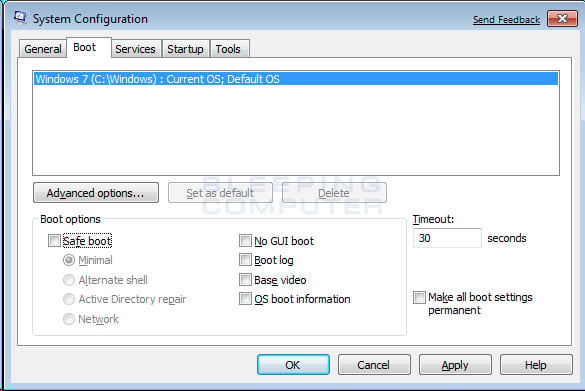
Click on the Boot tab.
You will now be at the Boot screen as shown below.
Figure 14. Windows 7 Boot tab in the System Configuration utility
Put a check mark in the checkbox labeled Safe boot
Press the Apply button and then press the OK button.
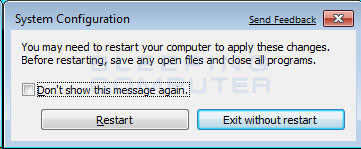
You will now be presented with a prompt stating that you need to reboot the computer to apply the change.
Figure 15. Restart Prompt
Click on the Restart button to reboot your computer.
Your computer will now restart directly into Safe Mode. When you get to the Windows 7 logon screen, log on to the computer and perform any necessary tasks.
When done with your tasks, from within Safe Mode, start msconfig.
When the program is open, and you are on the General tab, select the option labeled Normal Startup.
Then press the Apply button and then the OK button.
When the programs prompts you to reboot, allow it to do so, and you will boot back into Windows 7 in normal mode.
From the Windows Start screen, type Advanced startup and when the search results appear, click on the Settings category and then click on the Advanced startup options search option.
When the Settings screen opens, scroll down and click on the Restart now button under the Advanced Startup category and your computer will restart.
When the Advance startup menu appears, click on the Troubleshoot option.
Then click on the Advanced Options button.
Finally click on the Startup Settings option and then click on the Restart button. Your computer will now restart again.
When you get to the Startup Settings screen, press the number for the Safe Mode option you wish to use.
Do whatever tasks you require, and when you are done, reboot to go back into normal mode.
Using the System Configuration Tool Method:
Note: If you are having trouble entering Safe Mode via the Advanced Startup menu, you should not use this method to force it to startup into safe mode. For reasons why, you should read this.
Go to the Windows Start screen and type msconfig. When the msconfig search results appears, click on it.
The System Configuration utility will open and you will see a screen similar to the one below.
Click on the Boot tab.
You will now be at the Boot screen as shown below.
Put a check mark in the checkbox labeled Safe boot
Press the Apply button and then press the OK button.
You will now be presented with a prompt stating that you need to reboot the computer to apply the change.
Click on the Restart button to reboot your computer.
Your computer will now restart directly into Safe Mode. When you get to the Windows 8 logon screen, log on to the computer and perform any necessary tasks.
When done with your tasks, from within Safe Mode, go back to the Start screen by pressing the Tab key on your keyboard. Then start msconfig again by typing msconfig and then clicking on its search result.
When the program is open, and you are on the General tab, select the option labeled Normal Startup.
Then press the Apply button and then the OK button.
When the programs prompts you to reboot, allow it to do so, and you will boot back into Windows 8 in normal mode.
Press the Ctrl+Alt+Delete keys a the same time to enter the Windows security screen.
While holding down the Shift key, click on the Power button () and then click on Restart.
When Windows 10 restarts, you will be at the Choose an Option screen as shown below. At this screen, click on the Troubleshoot button to access the Troubleshoot options.
At the Troubleshoot screen, click on the Advanced Options button to open the advanced options screen.
At the Advanced Options screen, click on the Startup Settings option. This will open the Startup Settings screen.
At the Startup Settings screen, click on the Restart button. Windows will now restart.
After restarting you will be shown a Startup Settings screen. At this screen you should press the number 5 key on your keyboard to enter Safe Mode with Networking.
Your computer will now reboot. Once rebooted, you will be at a login prompt. Login to access Safe mode with Networking.
Problems that can occur by forcing Safe Mode using the System Configuration Utility
It is possible to make your computer continuously boot up into safe mode using the System Configuration utility as described above. The program does this by changing your boot.ini file, the settings file that configures your computer’s boot sequence, and adding the /safeboot argument to your operating systems startup line. An example of this can be seen below.
Original
[operating systems] multi(0)disk(0)rdisk(0)partition(2)\WINDOWS=”Microsoft Windows XP Professional” /FASTDETECT /NOEXECUTE=OPTIN
After using MsConfig.exe
[operating systems] multi(0)disk(0)rdisk(0)partition(2)\WINDOWS=”Microsoft Windows XP Professional” /FASTDETECT /NOEXECUTE=OPTIN /safeboot:minimal
When you are done using safe mode, you would then run the System Configuration utility again and uncheck the /Safeboot option, thus removing the /safeboot argument from the boot.ini file, and allowing your computer to boot up normally.
On a computer that is operating properly this is normally not a problem. Unfortunately, though, a new trick that some of the more recent malware are using is to delete certain Windows Registry keys so that your computer can not properly boot into safe mode. It is in these situations that using the System Configuration utility to boot into safe mode can cause the computer to become inoperable for many users.
This is because once you set the computer to boot into Safe Mode using /Safeboot, it will continuously attempt to start Safe Mode until the /safeboot argument is removed from the boot.ini. Since the malware is not allowing us to actually boot into safe mode, you have no way of getting to a point where you can run the System Configuration utility again to uncheck the /Safeboot option. Thus, you are stuck with a computer constantly attempting to get into safe mode and not being able to do so.
If a situation like this has happened to you it is possible to fix this problem by renaming your boot.ini file. The first step would be to use a boot disk to start your computer. If your computer does not have a floppy disk, then you can typically boot off the Windows CD that came with your computer in order to access the Windows Recovery Console. More information about the Windows Recovery Console can be found here. Once booted to a command prompt, you would simply rename your C:\Boot.ini file to another name like C:\Boot.ini.bak. The command to rename the file at the command prompt is:
ren C:\Boot.ini Boot.ini.bak
Once the file is renamed, you can then remove the boot disk and reboot your computer to get back to normal mode. When booting up after the rename, do not be surprised if you see an error stating that you do not have a valid Boot.ini file. When you get back to normal Windows mode, you can then rename C:\Boot.ini.bak to C:\Boot.ini and run Msconfig again to remove the /safeboot flag.
Conclusion
It is not uncommon when people are helping you troubleshoot your computer that they tell you to enter Safe Mode. With this tutorial you should now know how to enter Safe Mode when it is required.
If you have any questions please feel free to post them in our tech support forums.
Microsoft said it won’t be fixing or is pushing patches to a later date for three of the four security flaws uncovered in its Teams business communication platform earlier this March.
The disclosure comes from Berlin-based cybersecurity firm Positive Security, which found that the implementation of the link preview feature was susceptible to a number of issues that could “allow accessing internal Microsoft services, spoofing the link preview, and, for Android users, leaking their IP address, and DoS’ing their Teams app/channels.”
Of the four vulnerabilities, Microsoft is said to have addressed only one that results in IP address leakage from Android devices, with the tech giant noting that a fix for the denial-of-service (DoS) flaw will be considered in a future version of the product. The issues were responsibly disclosed to the company on March 10, 2021.
Chief among the flaws is a server-side request forgery (SSRF) vulnerability in the endpoint “/urlp/v1/url/info” that could be exploited to glean information from Microsoft’s local network. Also discovered is a spoofing bug wherein the preview link target can be altered to point to any malicious URL while keeping the main link, preview image and description intact, allowing attackers to hide malicious links and stage improved phishing attacks.
The DoS vulnerability, which affects the Android version of Teams, could cause the app to crash simply by sending a message with a specially crafted link preview containing an invalid target instead of a legitimate URL. The last of the issues concerns an IP address leak, which also affects the Android app. By intercepting messages that include a link preview to point the thumbnail URL to a non-Microsoft domain, Positive Security said it’s possible to gain access to a user’s IP address and user agent data.
“While the discovered vulnerabilities have a limited impact, it’s surprising both that such simple attack vectors have seemingly not been tested for before, and that Microsoft does not have the willingness or resources to protect their users from them,” Positive Security’s co-founder Fabian Bräunlein said.
Apple on Wednesday released iOS 15.3 and macOS Monterey 12.2 with a fix for the privacy-defeating bug in Safari, as well as to contain a zero-day flaw, which it said has been exploited in the wild to break into its devices.
Tracked as CVE-2022-22587, the vulnerability relates to a memory corruption issue in the IOMobileFrameBuffer component that could be abused by a malicious application to execute arbitrary code with kernel privileges.
The iPhone maker said it’s “aware of a report that this issue may have been actively exploited,” adding it addressed the issue with improved input validation. It did not reveal the nature of the attacks, how widespread they are, or the identities of the threat actors exploiting them.
An anonymous researcher along with Meysam Firouzi and Siddharth Aeri have been credited with discovering and reporting the flaw.
CVE-2022-22587 is the third zero-day vulnerability discovered in IOMobileFrameBuffer in a span of six months after CVE-2021-30807 and CVE-2021-30883. In December 2021, Apple resolved four additional weaknesses in the kernel extension that’s used to manage the screen framebuffer.
Also fixed by the tech giant is a recently disclosed vulnerability in Safari that stemmed from a faulty implementation of the IndexedDB API (CVE-2022-22594), which could be abused by a malicious website to track users’ online activity in the web browser and even reveal their identity.
Other flaws of note include —
CVE-2022-22584 – A memory corruption issue in ColorSync that may lead to arbitrary code execution when processing a malicious crafted file
CVE-2022-22578 – A logic issue in Crash Reporter that could allow a malicious application to gain root privileges
CVE-2022-22585 – A path validation issue in iCloud that could be exploited by a rogue application to access a user’s files
CVE-2022-22591 – A memory corruption issue in Intel Graphics Driver that could be abused by a malicious application to execute arbitrary code with kernel privileges
CVE-2022-22593 – A buffer overflow issue in Kernel that could be abused by a malicious application to execute arbitrary code with kernel privileges
CVE-2022-22590 – A use-after-free issue in WebKit that may lead to arbitrary code execution when processing maliciously crafted web content
The updates are available for iPhone 6s and later, iPad Pro (all models), iPad Air 2 and later, iPad 5th generation and later, iPad mini 4 and later, iPod touch (7th generation), and macOS devices running Big Sur, Catalina, and Monterey.
This article describes how to recover a bricked USW-Flex-Mini via recovery mode. The first step in the recovery process is to prepare a web server. See the subsections below on how to do that on each of the different operating systems: Windows, macOS and Ubuntu/Debian and then continue to the recovery instructions once that is done.
The first step in the recovery process is to prepare a web server. See the subsections below on how to do that on each of the different operating systems: Windows, macOS and Ubuntu/Debian.
How to Prepare a Web Server on Windows
1. Download Python for Windows (Executable Installer) here.
2. Open the downloaded file and make sure you select Add Python x.x to PATH during installation.
3. After the Python installation open Command Prompt as Administrator and confirm that Python is installed correctly with the command below:
python -V
4. Create a directory for the web server by running the commands below:
mkdir c:\webserver
cd c:\webserver
5. Start the Python web server on port 80. Note that the version of Python can be found with the command from step 3:
3. Create a directory for the web server by running the commands below:
cd ~
mkdir webserver
cd webserver
4. Start the Python web server on port 80. Note that the version of Python can be found with the command from step 2:
Python 3.x:
sudo "${python_version}" -m http.server 80
Python 2.x:
sudo "${python_version}" -m SimpleHTTPServer 80
How to Recover a USW Flex Mini
1. Prepare a web server as explained above, and set the server / computer’s IP to a static 192.168.1.99. The way to set a static IP on a computer will vary from platform to platform. Find instructions on how to do that in your product’s documentation (Windows, macOS or Ubuntu/Linux).
2. Download the latest firmware (found in Downloads), rename the binary to fwupdate.bin and place it in the directory that was created earlier (webserver).
3. Power down the switch by unplugging from the power source.
4. Press the switch’s reset button and hold it down as you provide power to the switch. Hold the reset button down for over 10 seconds during boot up. The LED pattern should be: blue-white-off blinking.
5. The USW-Flex-Mini should be updated after a while.
The method described in this article should help recover a “bricked” UniFi AP. This method will not void the device warranty, whereas opening the chassis for serial TTL will void your warranty. Most soft brick issues will be resolved via this procedure. If your issue continues unresolved, it might indicate a hardware issue that cannot be resolved via software. Feel free to contact support if you believe this to be the case.IMPORTANT:When Recovering UAP Gen1 Devices, The device itself will need approximately 5 minutes to finish recovering after the put command is entered.
TFTP for Windows
1. Prior to beginning the TFTP recovery, download the firmware for the device needed by visiting the UniFi Downloads section. Navigate to the UAP in question using the menu on the left, and find the latest firmware file. Confirm it is a .bin firmware file and not the UniFi Network application software file before downloading.
2. Once the correct firmware has been identified, download it and save it on your computer.
3. Unplug the ethernet cable from the UniFi AP.
4. Using a paperclip press and hold the UniFi AP’s reset button. Make sure you can feel it being depressed by the paperclip. Do not release the button until step 6.
5. While keeping the reset button pressed in, plug the ethernet cable back into the AP. Keep the reset button depressed until you see the device’s LED flashing in upgrade mode (read about LED patterns in this article). This may take up to 25 seconds. User Tip: The UAP will not respond to ping requests while in TFTP recovery mode, but will respond to ARP requests.
6. You may release the reset button. Now the device is in TFTP transfer mode.
7. Set a static IP on your Computer’s NIC. A static IP of 192.168.1.25, a subnet of 255.255.255.0 and gateway of 192.168.1.20 will work.
8. Plug the UniFi PoE injector’s LAN cable directly to your computer.
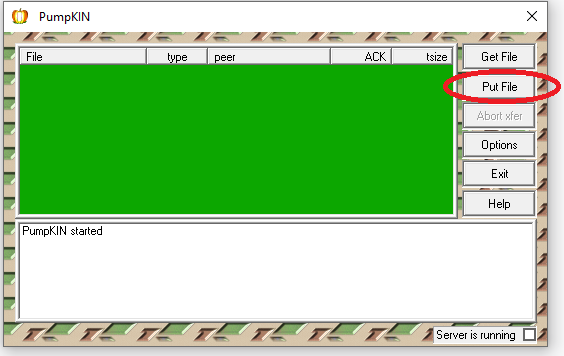
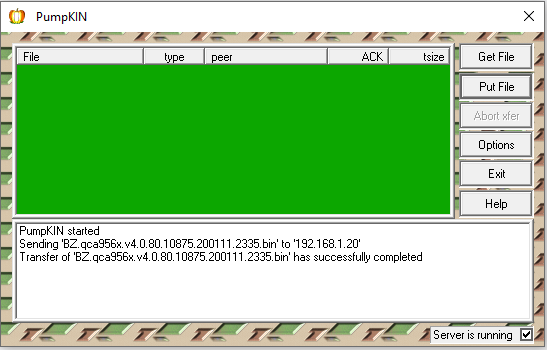
9. This example uses the Pumpkin TFTP software, which you can download here (clicking link will download the .exe file immediately) and disable the firewall or allow the Pumpkin connection. Click on “Put File”.
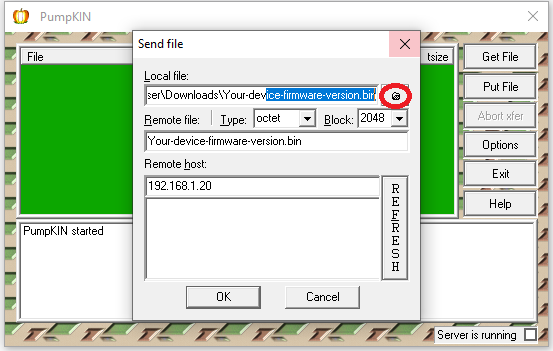
10. In “Local Files” browse for the firmware you downloaded and saved previously (in step 1).
11. In the “Remote host” field enter the gateway you had predetermined (192.168.1.20), then click OK.
12. At this point, the file should begin transferring. The firmware will upgrade now and the device will automatically reboot once it has finished. Do not reboot it yourself.
TFTP for Linux & macOS
1. Prior to beginning the TFTP recovery, download the firmware for the device needed by visiting the UniFi Downloads section. Navigate to the UAP in question using the menu on the left, and find the latest firmware file. Confirm it is a .bin firmware file and not the UniFi Network application software file before downloading.
2. Once the correct firmware has been identified, download it and save it on your computer. You will need to know the exact path to your file, so for this example, we are moving the downloaded firmware file to /Users/username/.
3. Go to System Preferences > Network and set your computer’s network IP address to 192.168.1.25, subnet 255.255.255.0 and gateway 192.168.1.20. User Tip: Take note of what your IP address is before changing it. You will have to revert back to the original IP address on step 12.
4. On macOS Open Applications > Utilities > Terminal and type:
tftp
On Linux, open the command line application of choice and type the following (substituting the bolded path and firmware name for the name of the file you downloaded in step 2 and the path to where it is saved):
5. A tftp> command prompt will appear. You are ready to reset the AP and connect it to your computer, while it’s in “upgrade mode”.
6. Unplug the ethernet cable from the UniFi AP.
7. Using a paperclip press and hold the UniFi AP’s reset button. Make sure you can feel it being depressed by the paperclip. Do not release the button until step 9.
8. While keeping the reset button pressed in, plug the ethernet cable back into the AP. Keep the reset button depressed until you see the device’s LED flashing in upgrade mode (read about LED patterns in this article). This may take up to 25 seconds. User Tip: The UAP will not respond to ping requests while in TFTP recovery mode, but will respond to ARP requests.
9. You may release the reset button. Now the device is in TFTP transfer mode.
10. On the TFTP command line in Terminal, paste these four lines and hit enter:
connect 192.168.1.20
binary
rexmt 1
timeout 60
Click to copy
11. Type the command put followed by the path to the firmware downloaded in step 2 and hit enter. Following the example mentioned in step 2, something similar to this would be typed into the Terminal window:
put /Users/Alex/BZ.qca956x.v3.9.27.8537.180317.1235.bin
IMPORTANT:Remember you must substitute the bolded path and firmware file name with your own path and file name.
Once it is successful, you will see something like this in the Terminal window (bolded words will be different for each user):
tftp> connect 192.168.1.20
tftp> binary
tftp> rexmt 1
tftp> timeout 60
tftp> put /path/firmware.bin
Sent x bytes in y seconds
The file should begin transferring at this point. The firmware will upgrade and the device will automatically reboot once it has finished. Do not reboot it yourself.
12. Re-connect the PoE injector’s LAN cable into your router. Restore the network IP back to what it was before.User Tip: If your device is having trouble getting adopted by the UniFi Network application after this process, try forgetting the device by going to the UniFiDevices section, clicking on the UAP in question and then within the properties panel that pops up, go to Config (gear icon) > Manage Device > Forget this device. Click on the “Forget” button and try the process again.
This article explains best practices for configuring larger UniFi networks with AirPlay/Chromecast devices. For efficient and reliable channel utilization, networks with more than 100 WiFi clients will need the multicast block option to be enabled on each of their SSIDs. This guide is especially useful for schools, stadiums, public venues, or similar networks.
Note: This guide applies to a network with a UniFi Security Gateway, UDM, or UDM-Pro. If your network does not have one of these, the steps may need to be adapted.
Creating a ChromeCast/AirPlay Network
Once your UniFi Network scales beyond a certain number of WiFi clients, it is important to ensure that every AP’s WiFi channel continues to be used efficiently. The broadcast traffic from more than 100 clients is typically high enough that WiFi performance may start to degrade. We always recommend enabling the multicast block option setting for larger networks.
However, this option causes a problem with users that would like to use their ChromeCast/AirPlay devices on the same WiFi network, because those devices will no longer hear the MDNS broadcasts from other devices on the network. They will no longer be discoverable.
In order to gain the performance benefits of multicast block while still maintaining discoverability to these WiFi clients, please follow these steps:
Go to Settings > WiFi and select on the SSID to check that multicast block is enabled if it has more than 100 clients on it.
Create a separate SSID/VLAN for the ChromeCast/AirPlay clients.
Go to Settings > Networks, and add a New Network.
Go to Settings > WiFi, and add a new WiFi Network, ensuring that the Network from Step “a” is selected, instead of LAN.
Go to Settings > Advanced Features > Advanced Gateway Settings > Multicast DNS and enable Multicast DNS, then click Apply Changes.
Forget the old network on your ChromeCast/AirPlay clients and connect them to the new WiFi Network.
Test Discoverability from the appropriate mobile apps.
Microsoft .NET Framework 4.7.2 is a highly compatible, in-place update to .NET Framework 4, 4.5, 4.5.1, 4.5.2, 4.6, 4.6.1, 4.6.2, 4.7, and 4.7.1.
The offline package can be used in situations in which the web installer cannot be used because of a lack of Internet connectivity. This package is larger than the web installer and does not include the language packs. We recommend that you use the web installer instead of the offline installer for optimal efficiency and bandwidth requirements.
When you install this package, the following packages or updates are installed per your operating system:
In Windows 7 Service Pack 1 (SP1) and Windows Server 2008 R2 SP1, .NET Framework 4.7.2 is listed as an installed product under the Programs and Features item in Control Panel.
In Windows Server 2012, Update for Microsoft Windows (KB4054542) is listed under the Installed Updates item in Control Panel.
In Windows 8.1 or Windows Server 2012 R2, Update for Microsoft Windows (KB4054566) is displayed under the Installed Updates item in Control Panel.
In Windows 10 Anniversary Update (version 1607), Windows 10 Creators Update (version 1703) and Windows Server 2016, Update for Microsoft Windows (KB4054590) is listed under the Installed Updates item in Control Panel.
In Windows 10 Fall Creators Update (version 1709), Update for Microsoft Windows (KB4073120) is listed under the Installed Updates item in Control Panel.
Microsoft .NET Framework 4.7.2 is available on Windows Update and on Windows Server Update Service (WSUS). It will be offered as a recommended update on Windows Update.
Note The package installer (NDP472-KB4054530-x86-x64-AllOS-ENU.exe) was updated on July 10, 2018. If you downloaded the installer before July 10, 2018, we recommend that you download the latest version (4.7.3081.0) of the installer to get the additional fixes included in the update.
Download information
The following files are available for download from the Microsoft Download Center:
For all Windows operating systems except Windows RT 8.1:
The following issues are fixed for .NET Framework 4.7.2.
SQL Server (SQL)
Fixes an issue in which the .NET Framework API SqlConnection.ConnectionString property is used to set a null or empty connection string. In this situation, a Null Reference Exception (NRE) occurs when you use the API together with .NET Framework 4.7.2. [611802, System.Data.dll, Bug]
Fixes an issue in which you connect to Azure SQL DB and MultipleActiveResultSets=true is used in the connection string together with System.Data.SqlClient.SqlConnection. In this situation, the async query operations cause a bad TDS protocol request stream to be sent from the client. This causes the Async Query APIs to fail. [620109, System.Data.dll , Bug]
Windows Presentation Framework (WPF)
Adds an AppContext switch that opts out of some work that was done during AppDomain or process shutdown. This issue can reduce (but not eliminate) the possibility of a crash in applications that make unwarranted assumptions about the timing of the finalizer thread. [593963, WindowsBase.dll, Bug]
Fixes a crash in WPF that occurs when you multiple characters are replaced by a single character (in a different language than the original text) by using IMEPad. [605996, PresentationFramework.dll, Bug]
Combo box grouped items now report children correctly through UIAutomation. [605922, PresentationFramework.dll, Bug]
More information
This version of .NET Framework runs side-by-side with .NET Framework 3.5 SP1 and earlier versions. However, it performs an in-place update for .NET Framework 4, 4.5, 4.5.1, 4.5.2, 4.6, 4.6.1, 4.6.2, 4.7, and 4.7.1.
Known issues
Applications that rely on .NET Framework to initialize a COM component and that run with restricted permissions may fail to start or run correctly, and return “access denied,” “class not registered,” or “internal failure occurred for unknown reasons” errors.
For more information about the various command-line options that are supported by this update, see the “Command-Line options” section in .NET Framework Deployment Guide for Developers.
Restart requirement
You may have to restart the computer after you install this update. We recommend that you exit all applications that are using .NET Framework before you install this update.
Supported operating systems
Microsoft .NET Framework 4.7.2 (Offline Installer) supports the following operating systems:
Windows Server 2016 (version 1709)
Windows 10 Anniversary Update (version 1607) (x86 and x64)
Windows 10 Creators Update (version 1703) (x86 and x64)
Windows 10 Fall Creators Update (version 1709) (x86 and x64)

 Microsoft Visual C++-2015 Redistributable
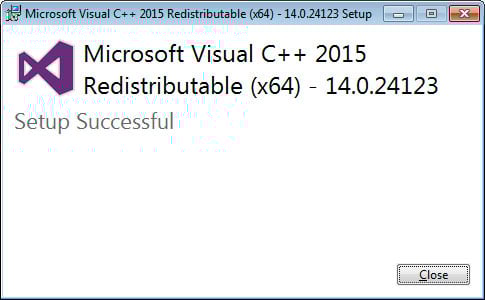 Redistributable Installed
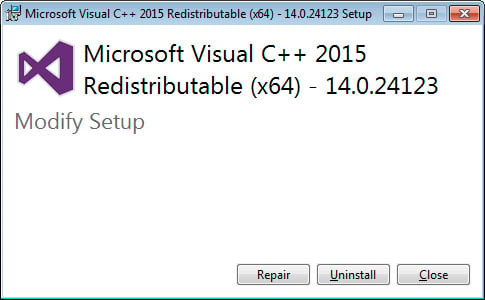
 Enable Start full screen
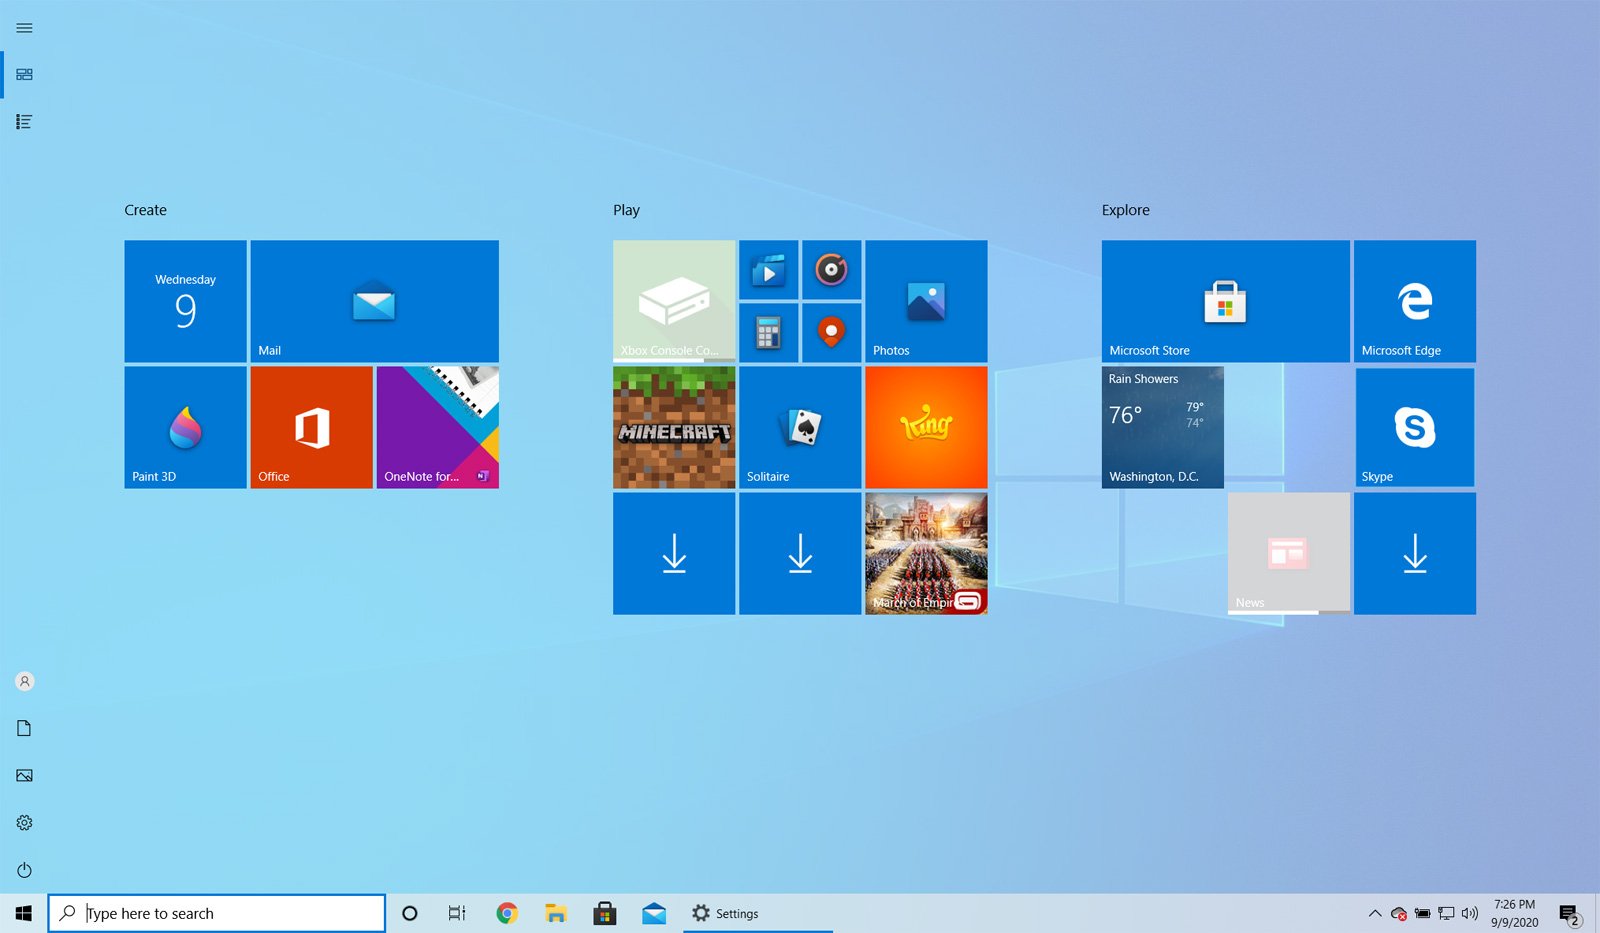

 Starting Registry Editor
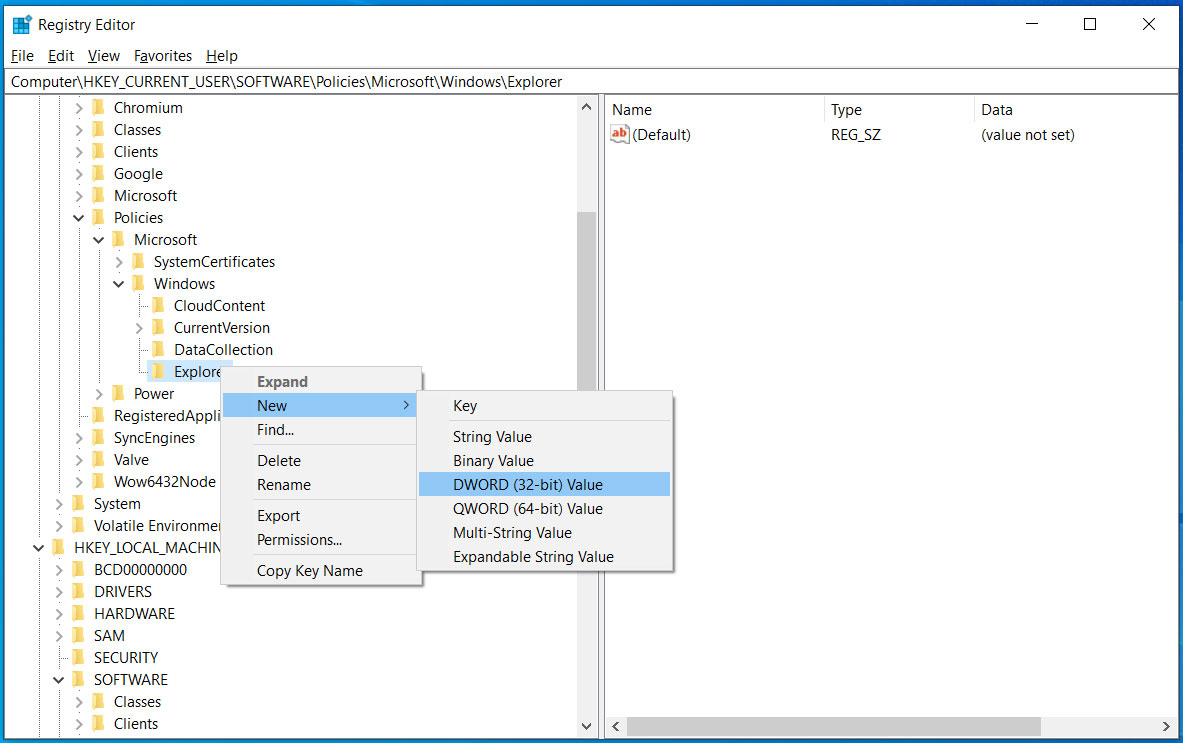 New DWORD value
 ) button.