Accessibility Options		utilman
				or
				control access.cpl

Add Hardware Wizard		hdwwiz
Programs and Features		appwiz.cpl
(Add New Programs)		control appwiz.cpl,,1
(Add Remove Windows Components)	control appwiz.cpl,,2
(Set Program Access & Defaults) control appwiz.cpl,,3


Administrative Tools	        control admintools
Advanced User Accounts
Control Panel	                netplwiz
Authorization Manager	        azman.msc
Automatic Update control        wuaucpl.cpl
Backup and Restore Utility	sdclt
Bluetooth Transfer Wizard	fsquirt
Calculator	                calc
Certificate Manager	        certmgr.msc
Character Map	                charmap

Check Disk Utility	        chkdsk
Clear Type (tune or turn off)	cttune
Color Management	        colorcpl.exe
Command Prompt	                cmd
Component Services	        dcomcnfg
	                        or
	                        comexp.msc
Computer Management	        CompMgmtLauncher.exe
	                        or
	                        compmgmt.msc
Control Panel	                control

Credential (passwords) Backup
and Restore Wizard	        credwiz
Data Execution Prevention	SystemPropertiesDataExecutionPrevention
Date and Time Properties	timedate.cpl
Device Manager	                hdwwiz
	                        or
	                       devmgmt.msc
Device Pairing Wizard	       DevicePairingWizard
Digitizer Calibration Tool
(Tablets/Touch screens)	       tabcal
Direct X Control Panel
(if installed)	              directx.cpl
Direct X Troubleshooter	      dxdiag
Disk Cleanup Utility	      cleanmgr
Disk Defragmenter	      dfrgui
	                      defrag
Disk Management	              diskmgmt.msc
Disk Partition Manager	      diskpart
Display Color Calibration     dccw
Display DPI / Text size	      dpiscaling
Display Properties (Themes,
Desktop, Screensaver)	      control desktop
Display Properties
(Resolution, Orientation)     desk.cpl
Display Properties
(Color & Appearance)	      control color
Documents (open
'My Documents' folder)	      documents
Downloads (open
'Downloads' folder)	     downloads
Driver Verifier Utility	     verifier
DVD Player	             dvdplay

Edit Environment Variables   rundll32.exe sysdm.cpl,EditEnvironmentVariables
Encrypting File
System Wizard (EFS)	     rekeywiz
Event Viewer	             eventvwr.msc
File Signature Verification
Tool (Device drivers)	     sigverif
Files and Settings
Transfer Tool	            %systemroot%\system32\migwiz\migwiz.exe
Firewall Control Panel	    firewall.cpl
Folders Properties	    control folders
Fonts list	            control fonts
Font preview	            fontview arial.ttf
Game Controllers	    joy.cpl
Local Group Policy Editor   gpedit.msc
Internet Properties	    inetcpl.cpl
IP Configuration	    ipconfig
iSCSI Initiator
configuration	            iscsicpl
Keyboard Properties	    control keyboard
Language Pack Installer	    lpksetup
Local Security Policy	    secpol.msc
Local Users and Groups	    lusrmgr.msc
Log out	                    logoff
Microsoft Malicious
Software Removal Tool	    mrt
Microsoft Management
Console	                   mmc
Access (Microsoft Office)  msaccess
Excel (Microsoft Office)   Excel
Powerpoint
(Microsoft Office)         powerpnt
Word (Microsoft Office)	   winword
Microsoft Paint            mspaint

Microsoft Support
Diagnostic Tool	          msdt
Mouse Properties	  control mouse
	                  or
	                  main.cpl
Network Connections	  control netconnections
	                  or
	                  ncpa.cpl
Projector:	          netproj
Connect to Network
Projector Switch
projector display	  displayswitch
Notepad	                  notepad
ODBC Data Source Admin
Default ODBC driver:	  C:\windows\system32\odbcad32.exe
32-bit ODBC driver
under 64-bit platform:	  C:\windows\sysWOW64\odbcad32.exe
ODBC configuration
Install/configure MDAC
drivers	                 odbcconf
On Screen Keyboard	 osk
OOB Getting Started	 gettingstarted
Password - Create a
Windows Password Reset
Disk (USB)	        "C:\Windows\system32\rundll32.exe" keymgr.dll,PRShowSaveWizardExW


Pen and Touch
(Tablet/Pen input
configuration)	        tabletpc.cpl
Performance Monitor	perfmon.msc
Phone and Modem Options	telephon.cpl
Phone Dialer	        dialer
Power Configuration	powercfg.cpl and powercfg.exe
Presentation Settings	PresentationSettings
Problem Steps Recorder	psr
Program Access and
Computer Defaults
browser / email / media	computerdefaults
Printers and Faxes	control printers
Print Management (.msc)	PrintManagement
Printer Migration
(backup/restore)	printbrmui and printbrm.exe
Printer user interface
(List all printui.dll
options)	        printui
Private Character
Editor	                eudcedit
Regional Settings
Language, Date/Time
format, keyboard	intl.cpl
Registry Editor	        regedit
Remote Assistance	msra

Remote Desktop	        mstsc
Resource Monitor	resmon
Resultant Set of Policy	rsop.msc
Settings (Windows 10)	ms-settings:
Scheduled Tasks	control schedtasks
Screenshot
Snipping Tool	        snippingtool
Security Center	        wscui.cpl
Services	        services.msc
Shared Folder Wizard	shrpubw
Shared Folders	        fsmgmt.msc
Shut Down Windows	shutdown
Software Licensing
Activation	        slui
Sounds and Audio	mmsys.cpl
Sound Recorder	        soundrecorder
Sound Volume	        sndvol
Syncronization Tool
(Offline files)	        mobsync
System Configuration
Utility	                msconfig
System File Checker
Utility (Scan/Purge)	sfc
System Information	msinfo32
System Properties	sysdm.cpl SystemProperties
	                or
	                sysdm.cpl DisplaySYSDMCPL

System Properties
Performance	        SystemPropertiesPerformance
System Properties
Hardware	        SystemPropertiesHardware
System Properties
Advanced	        SystemPropertiesAdvanced
System Repair
Create a System
Repair Disc	       recdisc
System Restore	       rstrui
Task Manager	       taskmgr
Task Scheduler	       taskschd.msc
Telnet Client	       telnet
Trusted Platform
Module Initialization
Wizard	               tpmInit
User Accounts
(Autologon)	       control userpasswords2
User Account
Control (UAC) Settings UserAccountControlSettings
User Profiles
Edit/Change type       C:\Windows\System32\rundll32.exe sysdm.cpl,EditUserProfiles
Windows Disc Image
Burning Tool	       isoburn C:\movies\madmax.iso
Windows Explorer       explorer
Windows Features       optionalfeatures
Windows Firewall       firewall.cpl
Windows Firewall with
Advanced Security      wf.msc
Windows Image
Acquisition (scanner)  wiaacmgr
Windows Magnifier      magnify
Windows Management
Infrastructure         wmimgmt.msc
Windows Memory
Diagnostic Scheduler   mdsched
Windows Mobility
Center (for notebook)  mblctr
Windows PowerShell     powershell
Windows PowerShell ISE powershell_ise
Windows Security
Action Center	       wscui.cpl
Windows Script Host
(VBScript)	       wscript NAME_OF_SCRIPT.VBS
Windows System
Security Tool
Encrypt the SAM database. syskey (boot password.)
Windows Update         wuapp
Windows Update
Standalone Installer   wusa
Windows Version
(About Windows)	      winver
WordPad	              write


Unless indicated otherwise, all the commands above work in all versions of Windows from Vista upwards.
Most of these utilities can be found in %systemroot%\System32\

soruce
Blog
Microsoft Office Customization Tool
The Office Customization Tool creates the configuration files that are used to deploy Office in large organizations. These configuration files give you more control over an Office installation: you can define which applications and languages are installed, how those applications should be updated, and application preferences. After creating the configuration files, you can use them with the Office Deployment Tool to deploy a customized version of Office.
Note
The Office Customization Tool is part of the deployment process for installing Office on hundreds or thousands of computers. To follow this process end-to-end, we recommend completing the assessment and planning phases for your Office deployment. If you're not an enterprise administrator and are looking to install Office 365 in your home or business, see Install Office with Office 365.
Get started
To work with the service, go to Office Customization Tool and choose the products, languages, and application settings you want to configure. For example, you can create a configuration file that downloads the 64-bit English version of Office 365 ProPlus, or you can create a file that installs the 64-bit English and German version of Office without Access and Publisher and with the EULA automatically accepted. When you're done, you export the configuration file, which you can then use with the Office Deployment Tool or another software distribution solution to deploy Office in your organization.
Note
If you use System Center Configuration Manager (Current Branch) to deploy Office, we recommend using the Office 365 Installer wizard in the Configuration Manager console. That wizard includes a customized version of the Office Customization Tool. For more details, see Deploy Office 365 ProPlus with System Center Configuration Manager (Current Branch).
Create a configuration file
Follow these steps to create a configuration file that can be used by the Office Deployment Tool or another software distribution solution to install Office. Note that a product and language must be selected before you can export the configuration file.
- Go to Office Customization Tool.
- In the General section, type your organization name and a description for this particular configuration. For example, you might want to use this file to install the 64-bit version of Office for your finance department.
- In the Product and releases section, choose the architecture you want to deploy. Each configuration file can only deploy one architecture. For details on which architecture to choose, see Choose the 32-bit or 64-bit version of Office.
- Choose the products and applications you want to deploy, and then click Add. Note that you can create a package that includes Office, Visio, and Project by selecting each and adding them separately.
- Choose the update channel you want to deploy. The update channel determines how frequently your client devices are updated with new features. For best practice recommendations, see Step 3 - Choose your update channels.
- Choose which version you want to deploy. Unless you require a particular version, we recommend choosing the latest. For details on previous versions, see Update history for Office 365 ProPlus.
- In the Language section, choose which languages to include. You can include multiple languages and you can select Match operating system to automatically install the same languages that are in use on the client device. For more details, see Overview of deploying languages in Office 365 ProPlus.
- In the Installation section, choose whether to install the Office files directly from the cloud or from a local source on your network. For more details, see Choose how to deploy.
- Choose whether to display the installation from your end users and whether to pin the Office icons to the taskbar. For more details on these options, see Display element and PinIconsToTaskBar property.
- In the Update and upgrade section, choose whether to install updates directly from the cloud, from a local source on your network, or with Configuration Manager. If you want to update your client devices automatically, choose CDN and Automatically check for updates. For best practice recommendations, see Choose your update channels.
- Choose whether to automatically upgrade from 2013 versions of Click-to-Run versions of Office, whether to automatically remove all MSI-versions of Office, and whether to automatically install the same language as the removed MSI-version of Office. For more details, see Install the same languages from a previous MSI installation.
- If you are deploying a volume-licensed version of Office, Visio, or Project, specify the appropriate license key in Licensing and activation settings. Note that Office 365 ProPlus is not volume licensed and does not require a KMS or MAK activation. For more details, see Overview of volume activation of Office.
- Choose whether to automatically accept the EULA.
- In the Application preferences section, choose what settings to apply when deploying Office. You can search for a setting, filter the settings by Office app, and learn more about each setting by clicking it and reviewing the detailed description.
- Click Finish, review the configured settings in the righthand pane, and then click Export.
- Accept the terms in the license agreement, name the confguration file, and then click Export.
- You can now use the configuration file in your deployment workflow with the Office Deployment Tool or another software distribution solution.
Edit an existing configuration file
Follow these steps to import and edit an existing configuration file.
- Go to Office Customization Tool.
- Click Import, and then select the configuration file you want to edit.
- Change the settings you want, and then export the updated file.
Define application preferences
As part of the Office Customization Tool, you can define application prefences for Office 365 ProPlus, including VBA macro notifications, default file locations, and default file formats. When you define these preferences, you can apply them as part of deploying Office or you can apply them to an existing installation of Office without changing any other deployment settings. For more details, see Apply application prefences and Apply application preferences to an existing installation of Office.
Notes
When creating a configuration file, the Office Customization Tool includes two attributes for the Configuration element: The ID attribute, which identifies the deployment method, and the Host attribute, which identifies the deployment options that have been selected. These attributes don't contain any personally identifiable information (PII), but Click-to-Run sends the attribute values to Microsoft so that we can better understand what configurations customers use and make customization even easier. Because of these insights, we recommend keeping the attributes. They are optional, however, and can be removed without affecting your deployment.
source
https://docs.microsoft.com/en-us/DeployOffice/overview-of-the-office-customization-tool-for-click-to-run
Microsoft Office default installation folders for Windows
Installation Paths
All the applications provided by the Office suite (Word, Excel, Outlook, Access, Powerpoint), if installed, can be found within the given folder(s). The executable files have kept the same names since Office XP, which are the following:
- Word:
WINWORD.EXE - Excel:
EXCEL.EXE - PowerPoint:
POWERPNT.EXE - Access:
MSACCESS.EXE - Outlook:
OUTLOOK.EXE - Visio:
VISIO.EXE - Project:
WINPROJ.EXE
Office XP
- Windows 64-bit:
C:\Program Files\Microsoft Office\Office10\ - Windows 32-bit:
C:\Program Files (x86)\Microsoft Office\Office10\
Office 2003
- Windows 64-bit:
C:\Program Files\Microsoft Office\Office11\ - Windows 32-bit:
C:\Program Files (x86)\Microsoft Office\Office11\
Office 2007
- Windows 64-bit:
C:\Program Files\Microsoft Office\Office12\ - Windows 32-bit:
C:\Program Files (x86)\Microsoft Office\Office12\
Office 2010
- Windows 64-bit:
C:\Program Files\Microsoft Office\Office14\ - Windows 32-bit:
C:\Program Files (x86)\Microsoft Office\Office14\
Click-To-Run
- Windows 64-bit:
C:\Program Files\Microsoft Office 14\ClientX64\Root\Office14\ - Windows 32-bit:
C:\Program Files (x86)\Microsoft Office 14\ClientX86\Root\Office14\
Office 2013
- Windows 64-bit:
C:\Program Files\Microsoft Office\Office15\ - Windows 32-bit:
C:\Program Files (x86)\Microsoft Office\Office15\
Click-To-Run
- Windows 64-bit:
C:\Program Files\Microsoft Office 15\ClientX64\Root\Office15\ - Windows 32-bit:
C:\Program Files (x86)\Microsoft Office 15\ClientX86\Root\Office15\
Office 2016
- Windows 64-bit:
C:\Program Files\Microsoft Office\Office16\ - Windows 32-bit:
C:\Program Files (x86)\Microsoft Office\Office16\
Click-To-Run
- Windows 64-bit:
C:\Program Files\Microsoft Office 16\ClientX64\Root\Office16\ - Windows 32-bit:
C:\Program Files (x86)\Microsoft Office 16\ClientX86\Root\Office16\
If you never heard of Click-To-Run installation mode, read here.
GUID
In case you also need the installation GUIDs, for example to retrieve some Office-related installation data from Windows Installer and/or Registry Editor, I’m also enumerating those (source: https://support.microsoft.com/en-us/kb/234788):
Office XP
- Word: {8E46FEFA-D973-6294-B305-E968CEDFFCB9}
- Excel: {5572D282-F5E5-11D3-A8E8-0060083FD8D3}
- PowerPoint: {FC780C4C-F066-40E0-B720-DA0F779B81A9}
- Access: {CC29E967-7BC2-11D1-A921-00A0C91E2AA3}
- Office: {20280409-6000-11D3-8CFE-0050048383C9}
Office 2003
- Word: {1EBDE4BC-9A51-4630-B541-2561FA45CCC5}
- Excel: {A2B280D4-20FB-4720-99F7-40C09FBCE10A}
- PowerPoint: {C86C0B92-63C0-4E35-8605-281275C21F97}
- Access: {F2D782F8-6B14-4FA4-8FBA-565CDDB9B2A8}
- Office: {90110409-6000-11D3-8CFE-0150048383C9}
Office 2007
- Word: {0638C49D-BB8B-4CD1-B191-051E8F325736}
- Excel: {0638C49D-BB8B-4CD1-B191-052E8F325736}
- PowerPoint: {0638C49D-BB8B-4CD1-B191-053E8F325736}
- Access: {0638C49D-BB8B-4CD1-B191-054E8F325736}
- Office: {0638C49D-BB8B-4CD1-B191-050E8F325736}
Office 2010
32-bit
- Word: {019C826E-445A-4649-A5B0-0BF08FCC4EEE}
- Excel: {538F6C89-2AD5-4006-8154-C6670774E980}
- PowerPoint: {E72E0D20-0D63-438B-BC71-92AB9F9E8B54}
- Access: {AE393348-E564-4894-B8C5-EBBC5E72EFC6}
- Office: {398E906A-826B-48DD-9791-549C649CACE5}
64-bit
- Word: {C0AC079D-A84B-4CBD-8DBA-F1BB44146899}
- Excel: {8B1BF0B4-A1CA-4656-AA46-D11C50BC55A4}
- PowerPoint: {EE8D8E0A-D905-401D-9BC3-0D20156D5E30}
- Access: {02F5CBEC-E7B5-4FC1-BD72-6043152BD1D4}
- Office: {E6AC97ED-6651-4C00-A8FE-790DB0485859}
source https://www.ryadel.com/en/microsoft-office-default-installation-folders-versions/
How to increase maximum size Microsoft Outlook pst files and ost files
In Outlook 2003 and 2007 the maximum recommended size of a Unicode pst-file and ost-file has been limited to 20 gb
In Outlook 2010, 2013 and 2016, the maximum recommended limit has been set to 50 gb
you can increase the limit with Group Polices and Registry
Registry
Outlook 2003
HKEY_CURRENT_USER\Software\Microsoft\Office\11.0\Outlook\PST
Outlook 2007
HKEY_CURRENT_USER\Software\Microsoft\Office\12.0\Outlook\PST
Outlook 2010
HKEY_CURRENT_USER\Software\Microsoft\Office\14.0\Outlook\PST
Outlook 2013
HKEY_CURRENT_USER\Software\Microsoft\Office\15.0\Outlook\PST
Outlook 2016
HKEY_CURRENT_USER\Software\Microsoft\Office\16.0\Outlook\PST
create new DWORD with value MaxLargeFileSize
Don’t set this higher than 4294967295 (decimal) or ffffffff (hexadecimal)
Group Polices
User Configuration-> Administrative Templates-> Microsoft Outlook <version>-> Miscellaneous-> PST Settings
Disk Part for Windows 7 and 10
The diskpart utility it’s a command line utility (available in Windows 2000, XP, Vista, 7, 8, 8.1 and 10) can be used to create or delete partitions on your PC.
Open command prompt with administrative privilege. Click Start , type CMD , right click "open as an Administrator" . On command prompt, type diskpart . When utility is open , type list disk for list of all disk available. select disk "number" where "number" is hard disk you want use , for example select disk 2 and type Enter . after that, type command clean for delete any partitions on hard disk selected .
How to Remove Windows 10 Built-in Apps with PowerShell
With PowerShell . In a easy way we can uninstall applications installed on Windows 10
click to Start button or Cortana search bar and type PowerShell
Right click on PowerShell icon and Select "Run as Administrator"
Some buit-in apps, like Contacts, are integrated on Microsoft Windows 10 operating system and is not permitted remove it.
copy and paste on PowerShell Command below
3D Builder
Get-AppxPackage *3dbuilder* | Remove-AppxPackage
Alarms and Clock
Get-AppxPackage *windowsalarms* | Remove-AppxPackage
Calculator
Get-AppxPackage *windowscalculator* | Remove-AppxPackage
Calendar and Mail
Get-AppxPackage *windowscommunicationsapps* | Remove-AppxPackage
Camera
Get-AppxPackage *windowscamera* | Remove-AppxPackage
Get Office
Get-AppxPackage *officehub* | Remove-AppxPackage
Get Skype
Get-AppxPackage *skypeapp* | Remove-AppxPackage
Get Started
Get-AppxPackage *getstarted* | Remove-AppxPackage
Groove Music
Get-AppxPackage *zunemusic* | Remove-AppxPackage
Maps
Get-AppxPackage *windowsmaps* | Remove-AppxPackage
Microsoft Solitaire Collection
Get-AppxPackage *solitairecollection* | Remove-AppxPackage
Money
Get-AppxPackage *bingfinance* | Remove-AppxPackage
Movies & TV
Get-AppxPackage *zunevideo* | Remove-AppxPackage
News
Get-AppxPackage *bingnews* | Remove-AppxPackage
OneNote
Get-AppxPackage *onenote* | Remove-AppxPackage
People
Get-AppxPackage *people* | Remove-AppxPackage
Phone Companion
Get-AppxPackage *windowsphone* | Remove-AppxPackage
Photos
Get-AppxPackage *photos* | Remove-AppxPackage
Store
Get-AppxPackage *windowsstore* | Remove-AppxPackage
Sports
Get-AppxPackage *bingsports* | Remove-AppxPackage
Voice Recorder
Get-AppxPackage *soundrecorder* | Remove-AppxPackage
Weather
Get-AppxPackage *bingweather* | Remove-AppxPackage
Xbox
Get-AppxPackage *xboxapp* | Remove-AppxPackage
-------------------------------------------------------------------------
Remove all applications and mantain Calculator:
Get-AppxPackage -AllUsers | where-object {$_.name –notlike “*windowscalculator*”} | Remove-AppxPackage
Get-appxprovisionedpackage –online | where-object {$_.packagename –notlike “*windowscalculator*”} | Remove-AppxProvisionedPackage -online
Source
https://community.spiceworks.com/topic/1408834-removing-windows-10-apps-gpo
Matty_C
Upgrade to Windows 10 from Windows 7
Today you can again update your operating system and passing from Windows 7 Pro or Windows 8.1 Pro to Windows 10 Pro, free of charge.
You need only download Media Creator Tool directly from Microsoft website , run the tool and select "update Windows 10" instead of "Using the tool to create installation media (USB flash drive, DVD, or ISO file) to install Windows 10 on a different PC"
Instructions from Microsoft website:
1. Select Download tool, and select Run. You need to be an administrator to run this tool.
2. On the License terms page, if you accept the license terms, select Accept.
3. On the What do you want to do? page, select Upgrade this PC now, and then select Next.
4 .After downloading and installing, the tool will walk you through how to set up Windows 10 on your PC. All Windows 10 editions are available when you select Windows 10, except for Enterprise edition. For more information on Enterprise edition, go to the Volume Licensing Service Center.
Requirements:
regoular Microsoft Windows 7 Professional - Windows 8 Professional activated.
At the end of the process, you can find Windows 10 Professional license activated
How to create a virtual machine in Hyper-V
From Microsoft Website:
Create a virtual machine by using Hyper-V Manager
- Open Hyper-V Manager.
- From the Action pane, click New, and then click Virtual Machine.
- From the New Virtual Machine Wizard, click Next.
- Make the appropriate choices for your virtual machine on each of the pages. For more information, see New virtual machine options and defaults in Hyper-V Manager later in this topic.
- After verifying your choices in the Summary page, click Finish.
- In Hyper-V Manager, right-click the virtual machine and select connect.
- In the Virtual Machine Connection window, select Action > Start.
Create a virtual machine by using Windows PowerShell
- On the Windows desktop, click the Start button and type any part of the name Windows PowerShell.
- Right-click Windows PowerShell and select Run as administrator.
- Get the name of the virtual switch that you want the virtual machine to use by using Get-VMSwitch. For example,
Get-VMSwitch * | Format-Table Name - Use the New-VM cmdlet to create the virtual machine. See the following examples.
Note
If you may move this virtual machine to a Hyper-V host that runs Windows Server 2012 R2, use the -Version parameter with New-VM to set the virtual machine configuration version to 5. The default virtual machine configuration version for Windows Server 2016 isn't supported by Windows Server 2012 R2 or earlier versions. You can't change the virtual machine configuration version after the virtual machine is created. For more information, see Supported virtual machine configuration versions.
- Existing virtual hard disk - To create a virtual machine with an existing virtual hard disk, you can use the following command where,
- -Name is the name that you provide for the virtual machine that you're creating.
- -MemoryStartupBytes is the amount of memory that is available to the virtual machine at start up.
- -BootDevice is the device that the virtual machine boots to when it starts like the network adapter (NetworkAdapter) or virtual hard disk (VHD).
- -VHDPath is the path to the virtual machine disk that you want to use.
- -Path is the path to store the virtual machine configuration files.
- -Generation is the virtual machine generation. Use generation 1 for VHD and generation 2 for VHDX. See Should I create a generation 1 or 2 virtual machine in Hyper-V?.
- -Switch is the name of the virtual switch that you want the virtual machine to use to connect to other virtual machines or the network. See Create a virtual switch for Hyper-V virtual machines.
New-VM -Name <Name> -MemoryStartupBytes <Memory> -BootDevice <BootDevice> -VHDPath <VHDPath> -Path <Path> -Generation <Generation> -Switch <SwitchName>For example:
New-VM -Name Win10VM -MemoryStartupBytes 4GB -BootDevice VHD -VHDPath .\VMs\Win10.vhdx -Path .\VMData -Generation 2 -Switch ExternalSwitchThis creates a generation 2 virtual machine named Win10VM with 4GB of memory. It boots from the folder VMs\Win10.vhdx in the current directory and uses the virtual switch named ExternalSwitch. The virtual machine configuration files are stored in the folder VMData.
- New virtual hard disk - To create a virtual machine with a new virtual hard disk, replace the -VHDPath parameter from the example above with -NewVHDPath and add the -NewVHDSizeBytes parameter. For example,
New-VM -Name Win10VM -MemoryStartupBytes 4GB -BootDevice VHD -NewVHDPath .\VMs\Win10.vhdx -Path .\VMData -NewVHDSizeBytes 20GB -Generation 2 -Switch ExternalSwitch - New virtual hard disk that boots to operating system image - To create a virtual machine with a new virtual disk that boots to an operating system image, see the PowerShell example in Create virtual machine walkthrough for Hyper-V on Windows 10.
- Existing virtual hard disk - To create a virtual machine with an existing virtual hard disk, you can use the following command where,
- Start the virtual machine by using the Start-VM cmdlet. Run the following cmdlet where Name is the name of the virtual machine you created.
Start-VM -Name <Name>For example:
Start-VM -Name Win10VM - Connect to the virtual machine by using Virtual Machine Connection (VMConnect).
VMConnect.exe
Options in Hyper-V Manager New Virtual Machine Wizard
The following table lists the options you can pick when you create a virtual machine in Hyper-V Manager and the defaults for each.
| Page | Default for Windows Server 2016 and Windows 10 | Other options |
|---|---|---|
| Specify Name and Location | Name: New Virtual Machine.
Location:C:\ProgramData\Microsoft\Windows\Hyper-V\. |
You can also enter your own name and choose another location for the virtual machine.
This is where the virtual machine configuration files will be stored. |
| Specify Generation | Generation 1 | You can also choose to create a Generation 2 virtual machine. For more information, see Should I create a generation 1 or 2 virtual machine in Hyper-V?. |
| Assign Memory | Startup memory: 1024 MB
Dynamic memory: not selected |
You can set the startup memory from 32MB to 5902MB.
You can also choose to use Dynamic Memory. For more information, see Hyper-V Dynamic Memory Overview. |
| Configure Networking | Not connected | You can select a network connection for the virtual machine to use from a list of existing virtual switches. See Create a virtual switch for Hyper-V virtual machines. |
| Connect Virtual Hard Disk | Create a virtual hard disk
Name: <vmname>.vhdx Location: C:\Users\Public\Documents\Hyper-V\Virtual Hard Disks\ Size: 127GB |
You can also choose to use an existing virtual hard disk or wait and attach a virtual hard disk later. |
| Installation Options | Install an operating system later | These options change the boot order of the virtual machine so that you can install from an .iso file, bootable floppy disk or a network installation service, like Windows Deployment Services (WDS). |
| Summary | Displays the options that you have chosen, so that you can verify they are correct.
- Name |
Tip: You can copy the summary from the page and paste it into e-mail or somewhere else to help you keep track of your virtual machines. |
How to create a virtual switch for hyper-v virtual machines
From Microsoft Website:
Create a virtual switch by using Hyper-V Manager
- Open Hyper-V Manager, select the Hyper-V host computer name.
- Select Action > Virtual Switch Manager.
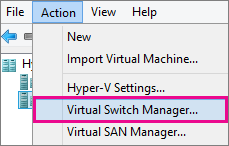
- Choose the type of virtual switch you want.
Connection type Description External Gives virtual machines access to a physical network to communicate with servers and clients on an external network. Allows virtual machines on the same Hyper-V server to communicate with each other. Internal Allows communication between virtual machines on the same Hyper-V server, and between the virtual machines and the management host operating system. Private Only allows communication between virtual machines on the same Hyper-V server. A private network is isolated from all external network traffic on the Hyper-V server. This type of network is useful when you must create an isolated networking environment, like an isolated test domain. - Select Create Virtual Switch.
- Add a name for the virtual switch.
- If you select External, choose the network adapter (NIC) that you want to use and any other options described in the following table.

| Setting name | Description |
|---|---|
| Allow management operating system to share this network adapter | Select this option if you want to allow the Hyper-V host to share the use of the virtual switch and NIC or NIC team with the virtual machine. With this enabled, the host can use any of the settings that you configure for the virtual switch like Quality of Service (QoS) settings, security settings, or other features of the Hyper-V virtual switch. |
| Enable single-root I/O virtualization (SR-IOV) | Select this option only if you want to allow virtual machine traffic to bypass the virtual machine switch and go directly to the physical NIC. For more information, see Single-Root I/O Virtualization in the Poster Companion Reference: Hyper-V Networking. |
If you want to isolates network traffic from the management Hyper-V host operating system or other virtual machines that share the same virtual switch, select Enable virtual LAN identification for management operating system. You can change the VLAN ID to any number or leave the default. This is the virtual LAN identification number that the management operating system will use for all network communication through this virtual switch.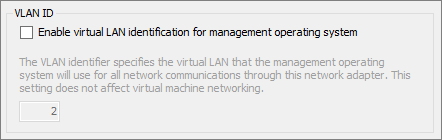
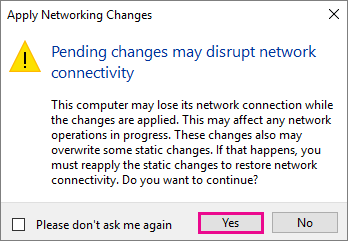
Click OK.
Click Yes.
Create a virtual switch by using Windows PowerShell
- On the Windows desktop, click the Start button and type any part of the name Windows PowerShell.
- Right-click Windows PowerShell and select Run as Administrator.
- Find existing network adapters by running the Get-NetAdapter cmdlet. Make a note of the network adapter name that you want to use for the virtual switch.
Get-NetAdapter - Create a virtual switch by using the New-VMSwitch cmdlet. For example, to create an external virtual switch named ExternalSwitch, using the ethernet network adapter, and with Allow management operating system to share this network adapter turned on, run the following command.
New-VMSwitch -name ExternalSwitch -NetAdapterName Ethernet -AllowManagementOS $trueTo create an internal switch, run the following command.
New-VMSwitch -name InternalSwitch -SwitchType InternalTo create an private switch, run the following command.
New-VMSwitch -name PrivateSwitch -SwitchType Private
For more advanced Windows PowerShell scripts that cover improved or new virtual switch features in Windows Server 2016, see Remote Direct Memory Access and Switch Embedded Teaming.
Add Hyper-v role on Microsoft Windows Server 2016
Instructions from Microsoft Website:
Install Hyper-V by using Server Manager
- In Server Manager, on the Manage menu, click Add Roles and Features.
- On the Before you begin page, verify that your destination server and network environment are prepared for the role and feature you want to install. Click Next.
- On the Select installation type page, select Role-based or feature-based installation and then click Next.
- On the Select destination server page, select a server from the server pool and then click Next.
- On the Select server roles page, select Hyper-V.
- To add the tools that you use to create and manage virtual machines, click Add Features. On the Features page, click Next.
- On the Create Virtual Switches page, Virtual Machine Migration page, and Default Stores page, select the appropriate options.
-
On the Confirm installation selections page, select Restart the destination server automatically if required, and then click Install.
-
When installation is finished, verify that Hyper-V installed correctly. Open the All Servers page in Server Manager and select a server on which you installed Hyper-V. Check the Roles and Features tile on the page for the selected server.
Install Hyper-V by using the Install-WindowsFeature cmdlet
- On the Windows desktop, click the Start button and type any part of the name Windows PowerShell.
- Right-click Windows PowerShell and select Run as Administrator.
-
To install Hyper-V on a server you're connected to remotely, run the following command and replace
<computer_name>with the name of server.PowerShellInstall-WindowsFeature -Name Hyper-V -ComputerName <computer_name> -IncludeManagementTools -RestartIf you're connected locally to the server, run the command without
-ComputerName <computer_name>. - After the server restarts, you can see that the Hyper-V role is installed and see what other roles and features are installed by running the following command:
PowerShell
Get-WindowsFeature -ComputerName <computer_name>If you're connected locally to the server, run the command without
-ComputerName <computer_name>.