Updated: May 23, 2023
By: NAKIVO Team
File shares are used in organizations to allow users to access and exchange files. If the number of file shares is large, it may be difficult to manage them because mapping many shared resources to each user’s computer takes time and effort. If the configuration of one file share changes, you need to update shared drive mappings for all users using this share. In this case, DFS can help you optimize the hierarchy of shared folders to streamline administration and the use of shared resources.
This blog post explains DFS configuration and how to set up DFS replication in Windows Server 2019.

NAKIVO for Windows Backup
Fast backup of Windows servers and workstations to onsite, offiste and cloud. Recovery of full machines and objects in minutes for low RTOs and maximum uptime.
What Is DFS and How It Works
A Distributed File System (DFS) is a logical organization that transparently groups existing file shares on multiple servers into a structured hierarchy. This hierarchy can be accessed using a single share on a DFS server.
A DFS file share can be replicated across multiple file servers in different locations to optimize server load and increase access speed to shared files. In this case, a user can access a file share on a server that is closest to them. DFS is intended to simplify access to shared files.

DFS uses the Server Message Block (SMB) protocol, which is also known as the Common Internet File System (CIFS). Microsoft’s implementation of DFS doesn’t work with other file sharing protocols like NFS or HDFS. However, you can connect multiple SMB shares configured on NAS devices and Linux machines using Samba to your DFS server running on Windows Server. DFS consists of server and client components.
You can configure one DFS share that includes multiple file shares and connect users to this single file share using a unified namespace. When users connect to this file share using a single path, they see a tree structure of shared folders (as they are subfolders of the main share) and can access all needed file shares transparently. Underlying physical file servers hosting file shares are abstracted from the namespace used to access shares. DFS namespaces and DFS replication are the two main components used for DFS functioning.
What is a DFS namespace?
A DFS namespace is a virtual folder that contains links to shared folders stored on different file servers. DFS namespaces can be organized in different ways depending on business needs. They can be organized by geographical location, organization units, a combination of multiple parameters, etc. You can configure multiple namespaces on a DFS server. A DFS namespace can be standalone or domain-based.

- A standalone DFS namespace stores configuration information and metadata locally on a root server in the system registry. A path to access the root namespace is started with the root server name. A standalone DFS namespace is located only on one server and is not fault-tolerant. If a root server is unavailable, the entire DFS namespace is unavailable. You can use this option if you don’t have an Active Directory domain configured (when using a Workgroup).
- A domain-based DFS namespace stores configuration in Active Directory. A path to access a root namespace starts with the domain name. You can store a domain-based DFS namespace on multiple servers to increase the namespace availability. This approach allows you to provide fault tolerance and load balancing across servers. Using domain-based DFS namespaces is recommended.
A namespace consists of the root, links (folders), and folder targets.
- A namespace root is a starting point of a DFS namespace tree. Depending on the type, a namespace can look like this:
\\ServerName\RootName (a standalone namespace)
\\DomainName\RootName (a domain-based namespace)
- A namespace server is a physical server (or a VM) that hosts a DFS namespace. A namespace server can be a regular server with the DFS role installed or a domain controller.
- A folder is a link in a DFS namespace that points to a target folder containing content for user access. There are also folders without targets used for organizing the structure.
- A folder target is a link to a shared file resource located on a particular file server and available via the UNC path (Universal Naming Convention). A folder target is associated with the folder in a DFS namespace, for example, \\FS2\TestShare on the FS2 server. A folder target is what users need to access files.
One folder target can be a link to a single folder or multiple folders (if these folders are located on two different servers and are synchronized/replicated with each other). For example, a user needs to access \\DFS-server01\TestShare\Doc but depending on the user’s location, the user is redirected to a shared folder \\FS01\Doc or \\FS02\Doc.
The DFS tree structure includes the following components:
- DFS root, which is a DFS server on which the DFS service is running
- DFS links, which are links pointing to network shares used in DFS
- DFS targets, which are real network shares to which DFS links point
What is DFS replication?
DFS replication is a feature used to duplicate existing data by replicating copies of that data to multiple locations. Physical file shares can be synchronized with each other at two or more locations.
An important feature of DFS replication is that the replication of a file starts only after that file has been closed. For this reason, DFS replication is not suitable for replicating databases, given that databases have files opened during the operation of a database management system. DFS replication supports multi-master replication technology, and any member of a replication group can change data that is then replicated.
A DFS replication group is a group of servers participating in the replication of one or multiple replication folders. A replicated folder is synchronized between all members of the replication group.

DFS replication uses a special Remote Differential Compression algorithm that allows DFS to detect changes and copy only changed blocks of files instead of copying all data. This approach allows you to save time and reduce replication traffic over the network.
DFS replication is performed asynchronously. There can be a delay between writing changes to the source location and replicating those changes to the target location.
DFS Replication topologies
There are two main DFS replication topologies:
- Hub and spoke. This topology requires at least three replication members: one which acts as a hub and two others act as spokes. This technique is useful if you have a central source originating data (hub) and you need to replicate this data to multiple locations (spokes).
- Full mesh. Each member of a replication group replicates data to each group member. Use this technique if you have 10 members or less in a replication group.
What are the requirements for DFS?
The main requirement is using Windows Server 2008 DataCenter or Enterprise editions, Windows Server 2012, or a newer Windows Server version. It is better to use Windows Server 2016 or Windows Server 2019 nowadays.
NTFS must be a file system to store shared files on Windows Server hosts.
If you use domain-based namespaces, all servers of a DFS replication group must belong to one Active Directory forest.
How to Set Up DFS in Your Windows Environment
You need to prepare at least two servers. In this example, we use two machines running Windows Server 2019, one of which is an Active Directory domain controller:
- Server01-dc.domain1.local is a domain controller.
- Server02.domain1.local is a domain member.
This is because configuring DFS in a domain environment has advantages compared to Workgroup, as explained above. The domain name is domain1.local in our case. If you use a domain, don’t forget to configure Active Directory backup.
Enable the DFS roles
First of all, you need to enable the DFS roles in Windows Server 2019.
- Open Server Manager.
- Click Add Roles and Features in Server Manager.
- Select Role-based or featured-based installation in the Installation type screen of the Add Roles and Features wizard.
- In the Server Selection screen, make sure your current server (which is a domain controller in our case) is selected. Click Next at each step of the wizard to continue.
- Select server roles. Select DFS Namespaces and DFS Replication, as explained in the screenshot below.

- In the Features screen, you can leave settings as is.
- Check your configuration in the confirmation screen and if everything is correct, click Install.
- Wait for a while until the installation process is finished and then close the window.
DFS Namespace Setup
Create at least one shared folder on any server that is a domain member. In this example, we create a shared folder on our domain controller. The folder name is shared01 (D:\DATA\shared01).
Creating a shared folder
- Right-click a folder and, in the context menu, hit Properties.
- On the Sharing tab of the folder properties window, click Share.
- Share the folder with Domain users and set permissions. We use Read/Write permissions in this example.
- Click Share to finish. Then you can close the network sharing options window.

Now the share is available at this address:
\\server01-dc\shared01
Creating a DFS namespace
Let’s create a DFS namespace to link shared folders in a namespace.
- Press Win+R and run dfsmgmt.msc to open the DFS Management window. You can also run this command in the Windows command line (CMD).
As an alternative, you can click Start > Windows Administrative Tools > DFS Management.
- In the DFS Management section, click New Namespace.

- The New Namespace Wizard opens in a new window.
- Namespace Server. Enter a server name. If you are not sure that the name is correct, click Browse, enter a server name and click Check Names. In this example, we enter the name of our domain controller (server01-dc). Click Next at each step of the wizard to continue.

- Namespace Name and Settings. Enter a name for a namespace, for example, DFS-01. Click Edit Settings.

Pay attention to the local path of a shared folder. Change this path if needed. We use the default path in our example (C:\DFSRoots\DFS-01).
- You need to configure access permissions for network users. Click Use custom permissions and hit Customize.

- We grant all permissions for domain users (Full Control). Click Add, select Domain Users, select the appropriate checkboxes, and hit OK to save settings.

- Namespace type. Select the type of namespace to create. We select Domain-based namespace and select the Enable Windows Server 2008 mode checkbox. Select this checkbox if the functional level of your domain is Windows Server 2008 when you use Windows Server 2016 or Windows Server 2019 for better compatibility.
It is recommended that you use a Domain-based namespace due to advantages such as high DFS namespace availability by using multiple namespace servers and transferring namespaces to other servers.

- Review Settings. Review settings and, if everything is correct, click Create.

- Confirmation. The window view in case of success is displayed in the screenshot below. The namespace creation has finished. Click Close.

Adding a new folder to a namespace
Now we need to add a new folder into the existing namespace. We are adding a folder on the same server, which is a domain controller, but this method is applicable for all servers within a domain.
- Open the DFS management window by running dfsmgmt.msc as we did before. Perform the following actions in the DFS management window.
- In the left pane, expand a namespace tree and select a namespace (\\domain1.local\DFS-01\ in our case).
- In the right pane (the Actions pane), click New Folder.
- In the New Folder window, enter a folder name, for example, Test-Folder to link the DFS folder and a shared folder created before. Click Add.

- Enter the path to the existing folder. We use \\server01-dc\shared01 in this example. You can click Browse and select a folder. Click OK to save the path to the folder target.

The folder target has been added.
- Click OK to save settings and close the New Folder window.

Now you can access the shared folder by entering the network address in the address bar of Windows Explorer:
\\server01-dc\dfs-01\Test-Folder
You should enter a path in the format:
\\DomainName\DFS-NameSpace\

How to Configure DFS Replication
We need to configure the second server to replicate data. The name of the second server is Server02 and this server is added to the domain1.local domain in this example. Add your second server to a domain if you have not done this operation before.
Install the DFS roles, as we did for the first server. As an alternative method, you can use PowerShell instead of the Add Roles wizard. Run these two commands in PowerShell to install DFS replication and DFS namespace roles.
Install-WindowsFeature -name “FS-DFS-Replication” -IncludeManagementTools
Install-WindowsFeature -name “FS-DFS-Namespace” -IncludeManagementTools
First of all, we need to install the DFS Replication role on the second server.

Create a folder for replicated data, for example, D:\Replication
We are going to use this folder to replicate data from the first folder created on the first server before.
Share this folder (D:\Replication) on the second server and configure access permissions the same way as for the previous shared folder. In this example, we share the folder with Domain Users and grant Read/Write permissions.

The network path is \\server02\replication in this example after sharing this folder. To check the network path to the folder, you can right-click the folder name and open the Sharing tab.
Let’s go back to the domain controller (server01-dc) and open the DFS Management window.
In the left pane of the DFS Management window, expand the tree and select the namespace created before (Test-Folder in this case).
Click Add Folder Target in the Actions pane located in the top right corner of the window.
The New Folder Target window appears. Enter the network path of the folder that was created on the second server before:
\\Server02\Replication
Click OK to save settings and close the window.

A notification message is displayed:
A replication group can be used to keep these folder targets synchronized. Do you want to create a replication group?
Click Yes.

Wait until the configuration process is finished.
As a result, you should see the Replicate Folder Wizard window. Perform the next steps in the wizard window.
Check the replication group name and replicated folder name. Click Next to continue.

Check folder paths in the Replication Eligibility screen.

Select the primary member from the drop-down list. In this example, the primary member is Server01-dc. Data from the primary member is replicated to other folders that are a part of the DFS namespace.

Select the topology of connections for replication.
Full mesh is the recommended option when using a DFS replication group with less than ten servers. We use Full mesh to replicate changes made on one server to other servers.
The No Topology option can be used if you want to create a custom topology after finishing the wizard.
The Hub and spoke option is inactive (grayed out) because we use less than three servers.

Configure replication group schedule and bandwidth. There are two options:
- Replicate continuously using the specified bandwidth. Replication is performed as soon as possible. You can allocate bandwidth. Continuous replication of data that changes extensively can consume a lot of network bandwidth. To avoid a negative impact on other processes using the network, you can limit bandwidth for DFS replication. Keep in mind that hard disk load can be high.
- Replicate during the specified days and times. You can configure the schedule to perform DFS replication at the custom date and time. You can use this option if you don’t need to always have the last version of replicated data in target folders.
We select the first option in our example.

Review settings for your DFS replication group. If everything is correct, click Create.
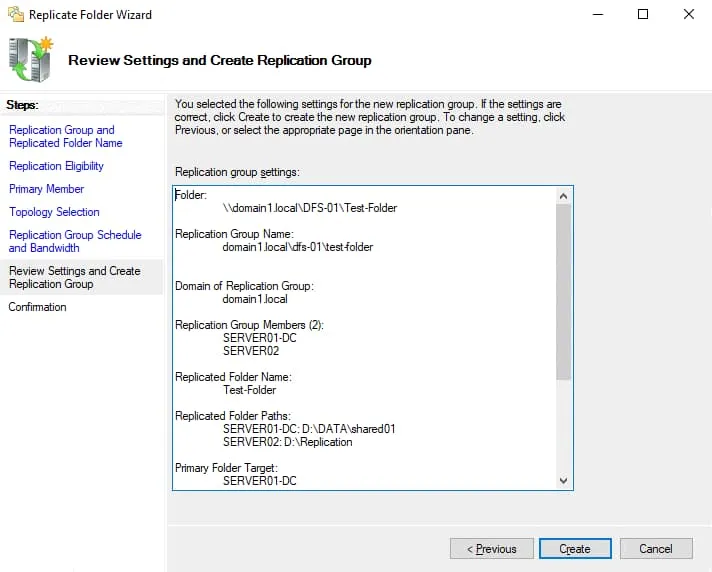
View the DFS replication configuration status on the Confirmation screen. You should see the Success status for all tasks as displayed on the screenshot below. Click Close to close the wizard window.

A notification message about the replication delay is displayed. Read the message and hit OK.

DFS replication has been configured. Open a shared folder from which data must be replicated initially. Write a file to that network folder and check whether the new data is replicated to the second folder on another server. Don’t forget that opened files are not replicated until they are closed after saving changes to a disk. In a few moments, you should see a file-replica in the target folder.
Using filters for DFS Replication
Use file filters to select the file types you don’t want to replicate. Some applications can create temporary files and replicating them wastes network bandwidth, loads hard disk drives, consumes additional storage space in the target folder, and increases overall time to replicate data. You can exclude the appropriate file types from DFS replication by using filters.
To configure filters, perform the following steps in the DFS Management window:
- Expand the Replication tree in the navigation pane and select the needed DFS replication group folder name (domain1.local\dfs-01\Test-folder in our case).
- Select the Replicated Folders tab.
- Select the needed folder, right-click the folder name and hit Properties. Alternatively, you can select the folder and click Properties in the Actions pane.
- Set the filtered file types by using masks in the folder properties window. In this example, files matching the rule are excluded from replication:
~*, *.bak, *.tmp
You can also filter subfolders, for example, exclude Temp subfolders from DFS replication.

Staging location
There can be a conflict when two or more users save changes to a file before these changes are replicated. The most recent changes have precedence for replication. Older versions of changed files are moved to the Conflict or Deleted folder. This issue can happen when replication speed is low and the file size is large (amount of changes is high) when the amount of time to transfer changed data is lower than the interval between writing changes to the file by users.
Staging folders act as a cache for new and changed files that are ready to be replicated from source folders to target folders. The staging location is intended for files that exceed a certain file size. Staging is used as a queue to store files that must be replicated and ensure that changes can be replicated without worrying about changes to them during the transfer process.
Another aspect of configuring staging folders is performance optimization. DFS replication can consume additional CPU and disk resources, slow down and even stop if the staging quota is too small for your tasks. The recommended size of the staging quota is equal to the size of the 32 largest files in the replication folder.
You can edit staging folder properties for DFS Replication in the DFS Management window:
- Select a replication group in the left pane of the DFS Management window.
- Select the Memberships tab.
- Select the needed replication folder, right-click the folder, and hit Properties.
- Select the Staging tab in the Properties window.
- Edit the staging path and quota according to your needs.

Saved changes are not applied immediately. New staging settings must be replicated across all DFS servers within a domain. Time depends on Active Directory Domain Services replication latency and the polling interval of servers (5 minutes or more). Server reboot is not required.
DFS Replication vs. Backup
Don’t confuse DFS Replication of data in shared folders and data backup. DFS replication makes copies of data on different servers, but if unwanted changes are written to a file on one server, these changes are replicated to other servers. As a result, you don’t have a recovery point because the file has been overwritten with unwanted changes on all servers and you can use it for recovery in case of failure. This threat is present in case of a ransomware attack.
Use NAKIVO Backup & Replication to protect data stored on your physical Windows Server machines including data stored in shared folders. The product also supports Hyper-V VM backup and VMware VM backup at the host level for effective protection.

1 Year of Free Data Protection: NAKIVO Backup & Replication
Deploy in 2 minutes and protect virtual, cloud, physical and SaaS data. Backup, replication, instant recovery options.
Conclusion
Distributed File System (DFS) can significantly simplify shared resources management for administrators and make accessing shared folders more convenient for end-users. DFS makes transparent links to shared folders located on different servers.
DFS namespaces and DFS replication are two main features that you can configure in the DFS Management window after installing the appropriate Windows server roles. Opt for configuring DFS in a domain environment rather than in a Workgroup environment because there are many advantages, such as high availability and flexibility in an Active Directory domain.
Source :
https://www.nakivo.com/blog/configure-dfs-replication-for-windows-server/