This article outlines key setup and configuration processes that can be completed in the UniFi Talk application.
- Create users
- Assign phones to users
- Assign numbers to users
- Add a third-party SIP provider
- Set up a Smart Attendant
- Manage voicemails and call recordings
- View call logs
- Set up groups
- Troubleshooting
Create users
To create new users in the UniFi Talk application:
- Open the Users tab and click the Add User button in the top-right corner of the screen.
- Type the user’s first name, last name, and extension in the respective text fields. If you do not assign an extension, the UniFi Talk application will do so automatically.
- Select the user’s phone number from the drop-down menu and click Save. If no phone number is selected, the user will only be able to make internal calls unless they are added to a group with a number assigned.
Assign phones to users
A user must be assigned to each phone managed by the UniFi Talk application. You can assign a phone to a user on the Devices page or in the user’s profile panel.
To assign a phone to a user on the Devices page:
- Click the Devices icon in the left navigation bar.
- Hover your cursor over the phone you’d like to assign to the user, then click the Assign link when it appears.
- Select the user from the pop-up window’s drop-down field, then click Assign.
To assign a phone to a user via their profile panel:
- Click the Users icon in the left navigation bar.
- Click the user that you’d like to assign a phone to.
- Click the Manage tab, then scroll down and click the Manage drop-down option.
- Select the phone that you’d like to assign to the user from the Reassign Device drop-down field.
- Click Save at the bottom of the panel.
Assign numbers to users
If you wish to purchase additional numbers in the UniFi Talk application before you start assigning, see UniFi Talk – Manage UniFi Talk subscriptions.
To assign a number to a user:
- Click the Users icon in the left navigation bar.
- Click the user that you’d like to assign a number to.
- Click the Manage tab, then scroll down and click the Manage drop-down option.
- Select the number that you’d like to assign to the user from the Change Number drop-down field.
- Click Save at the bottom of the panel.
Note: Users without a number assigned will not be able to make or receive external calls, but will still have an active extension that can make and receive unlimited internal calls.
Add a third-party SIP provider
Session Initiation Protocol (SIP) providers facilitate real-time video and voice communication (e.g., Twilio, Voxbone, 3CX, etc.). If you currently subscribe to a third-party SIP provider, you don’t have to purchase a UniFi Talk subscription to use your existing service in the UniFi Talk application.
To add a third-party SIP provider to your UniFi Talk application:
- Create and configure a new trunk in your SIP provider’s settings console:
- Create a credential list and assign username and password credentials to the trunk itself.
- Add an ACL IP and a new entry for your router’s public IP address (e.g., 1.2.3.4/32).
- Add an origination uri in the same format as your router’s public IP address (e.g., sip:1.2.3.4:6767).
- Ensure that the Direct Inward Dialing (DID) number(s) you want to use with UniFi Talk are assigned to the newly created trunk.
- Add your SIP provider’s information to the UniFi Talk application:
- Go to Settings > System Settings.
- Click the Add Third-Party SIP Provider button at the bottom of the screen.
- Enter your provider’s name.
- Enter your SIP provider’s required fields:
- Locate your SIP provider’s custom fields by referencing either the Providers ITSPs directory or your provider’s user documentation.
- Click the Add Field button in the UniFi Talk Settings menu.
- Type or paste the copied field into the Add Fields window and click the + icon. Repeat this process for multiple entries.
- Click Done once all fields have been added.
- Type the DID number(s) from your SIP provider in the Input Numbers field(s) in either E.164 format (e.g., +10123456789) or the format supported by your provider.
- Add your SIP provider’s media and signaling servers:
- Click the Add IP Address Range button.
- Type the address information in the corresponding fields and click Add.
- Enable the Static Signaling Port toggle located in the Network tab of the UniFi Talk Settings menu.
- Assign the new DID number(s) and phone(s) to users registered in your UniFi Talk application:
- Open the Users page of your UniFi Talk application.
- Click the desired user then click the Manage tab at the top of their profile panel.
- Select the phone that you’d like to assign the user from the Reassign Device drop-down menu.
- Select the DID number that you’d like to assign the user from the Change Number drop-down menu.
- Repeat this process as needed for additional users.
Note: If you’re using a third-party SIP provider, said provider will be responsible for maintaining E911 compliance. Please contact your provider for more guidance on how to ensure that all requirements are met.
- Add or adjust port forwarding rule(s) for the UniFi OS Console hosting the UniFi Talk application:
- Open the UniFi Network Settings menu and click the Firewall & Security tab.
- Locate the Port Forwarding section and click the Create New Forwarding Rule button.
- Add all required information to apply the port forwarding rule(s) to your UniFi OS Console.
If you have another router upstream from your UniFi OS Console, forward incoming traffic to Port 6767 of your UniFi OS Console.
Set up a Smart Attendant
The Smart Attendant helps you create and execute custom call routing to ensure that all your calls are directed to the right extension or preferred language speaker.
To set up a Smart Attendant:
- Open the Smart Attendant tab in the UniFi Talk application. If you already have one or more Smart Attendants, click the Add New button. Otherwise, proceed with setup.
- Name your Smart Attendant and click Next.
- Select the number(s) you want the Smart Attendant to answer from the drop-down field.
- If you select None, your Smart Attendant will not be active until you assign it a number.
- You can also select multiple numbers for your Smart Attendant to answer.
- From this screen, you can also configure the Ringback and Hold Music that your Smart Attendant will use.
- Ringback: The audio that callers hear when dialing a Talk user or group via your Smart Attendant.
- Hold Music: The audio that callers hear when a Talk user places them on hold after being dialed via your Smart Attendant.
- Select if your Smart Attendant will behave differently based on business hours. When enabled, you can define custom call handling for business hours and non-business hours.
- If you select Yes, configure your business hours schedule. You can add multiple business hour segments within a single day.
- Select if you wish to have extension dialing enabled. When enabled, callers can dial an extension to connect with a user or group without going through Smart Attendant menus.
- If you select Yes, select an extension dialing method:
- All Users and Groups: All users and groups in your Talk application can be dialed by their extension.
- Custom List: Only the Talk users and groups added to the custom list can be dialed by their extension.
- Smart Attendant Ring Menus: Only the Talk users and groups added to the Smart Attendant with a Ring Phone(s) menu can be dialed by their extension.
- If you select Yes, select an extension dialing method:
- Configure your Smart Attendant’s greeting message:
- Select the voice your Smart Attendant will use for generated audio.
- Select the greeting type. You can generate audio from text or use custom audio by recording or uploading a file.
- Following the instructions to configure your greeting based on the type selected.
- Create your call routing tree:
- Enter the prompt message and select the user(s) and/or group(s) that each key press will direct to.
- If you don’t need a call routing tree or wish to configure this later, click No then Finish.
To add a new menu or user:
- Hover your cursor over the menu that you’d like to add a new block to and click the + icon when it appears.
- Choose between the two different types of blocks:
- Keypress Prompt (e.g., Press 1 for Sales)
- Ring Phone(s) (Dial a specific user or group)
- Play Audio (Play an audio message)
- Voicemail (Leave voicemail for a specific user)
- Keypress to Return (Return to the previous menu)
- Schedule (Configure call handling based on a schedule)
To delete a menu or user, hover your cursor over it and click the X icon when it appears.
Manage voicemails and call recordings
The UniFi Talk application collects voicemail by default. To listen to voicemails, click the Voicemail button on your Talk phone.
To automate call recordings:
- Enable the Automatic Call Recording toggle from Settings > Call Settings.
- Review the disclaimer text in the pop-up advisory window carefully, and click I Understand if you consent.
To disable voicemail:
- Open the Settings menu and click the Call Settings tab.
- Open the Voicemail drop-down.
- Disable the voicemail toggle.
View call logs
To view your call logs:
- Open the Call Log tab to view a listing of every call made with a device managed by the UniFi Talk application.
- View the details of a specific call:
- Click the desired call’s entry or hover your cursor over its listing and click the View link when it appears.
- Review basic call information (e.g., caller, recipient, call experience score, length, date, and time) from the General section of the call log’s pop-up panel.
- Click the Recording tab at the top of the call log’s panel to listen to its recording.
- For voicemail messages, click the Voicemail tab at the top of the call log’s panel to listen to its recording.
- To delete a call log, hover your cursor over the log’s entry and click Delete, then click the Delete button in the confirmation pop-up window.
Set up groups
The UniFi Talk application allows you to create groups that allow multiple phones to share the same number and ring. Groups can utilize all UniFi Talk application features, including the Smart Attendant.
To create a new group:
- Click the Groups icon in the left navigation bar and click the Create New Group link in the top-right corner of the following page.
- Enter a group name, assign a number to the group (optional), and add an internal extension (optional).
- Select either Simultaneous or Sequential call handling.
- Simultaneous: When the group is called, all phones assigned to group members will ring. The first phone to answer will receive the call and the other phones will stop ringing.
- Sequential: When the group is called, phones assigned to group members will ring in the order you define.
- Manage the group’s members. You can add Talk users and global contacts to a group.
- Configure the Ringback for the group. This is the audio that callers hear when calling the group.
- Click Create.
Note: Groups without a number assigned will not be able to make or receive external calls, but will still have an active extension that can make and receive unlimited internal calls.
To assign a specific outgoing number to a user who is a member of several groups:
- Open the Users page, select the user, and click the Manage tab.
- Select the desired outgoing number from the drop-down field.
Troubleshooting
I can’t receive incoming calls
We recommend enabling the static signaling port feature if your UniFi Talk deployment can’t receive incoming calls. The instructions below describe how to implement this fix.
- In the Talk application, enable the toggle for static signaling port within Settings > System Settings > Create Static Signaling Port.
- Create a port forwarding rule that forwards port 6767 to your UniFi OS Console running the Talk application. If your routing tasks are being handled by UniFi, go to the Network application to create this rule within Settings > Advanced Features > Advanced Gateway Settings > Port Forwarding.
Need help creating this port forwarding rule? - Try making a call to one of your UniFi Talk phones from an external number to test if incoming calling is working.
- If the steps above did not work, try creating a firewall rule that allows Internet traffic destined for port 6767 of your UniFi OS Console running the Talk application. If your firewall rules are managed by UniFi, go to the Network application to create this rule within Settings > Traffic & Security > Global Threat Management > Firewall.Need help creating this rule?
I can’t make outgoing calls
For outgoing call failures, we recommend disabling the SIP ALG setting found in the router upstream from the UniFi OS Console running the Talk application (e.g., the router modem installed by your ISP). The SIP ALG setting is sometimes enabled by default on these devices and interferes with telephony.
I could previously make and/or receive calls, and now I can’t
In some cases, events like a network outage can result in degraded Talk application performance. This can be resolved by restarting the Talk application.
To restart the Talk application:
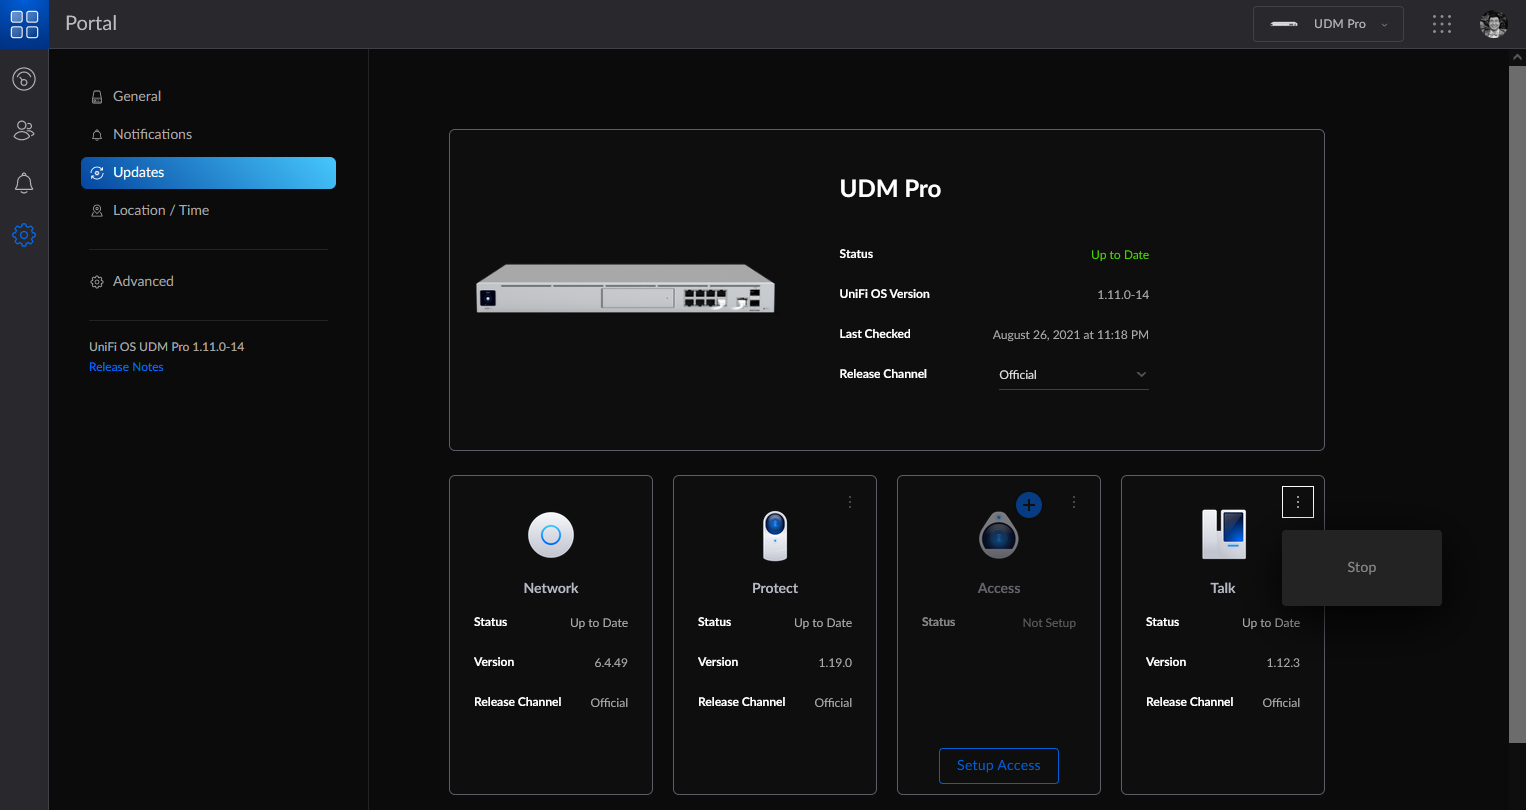
- From unifi.ui.com, select your UniFi OS Console, go to Settings > Updates, and locate the Talk application tile.
- Click on the three dots menu in the Talk application tile and select Stop.

- After the Talk application has stopped, click on the Start Talk button.
If you’re still having trouble making and/or receiving calls, please contact UniFi Technical Support.
Recovering Talk subscriptions and phone numbers
If you need to factory reset, replace, or migrate to a new UniFi OS Console, or reset the Talk application, you can recover your Talk subscriptions and phone numbers during the UniFi Talk setup process. This option is available when you’re logged in using the same Ubiquiti account that manages your Talk subscriptions.
To recover or migrate your Talk subscriptions:
- Log in to your Ubiquiti account at unifi.ui.com and select the UniFi OS Console you’d like to recover or migrate your Talk subscriptions to.
- Launch the UniFi Talk Setup Wizard.
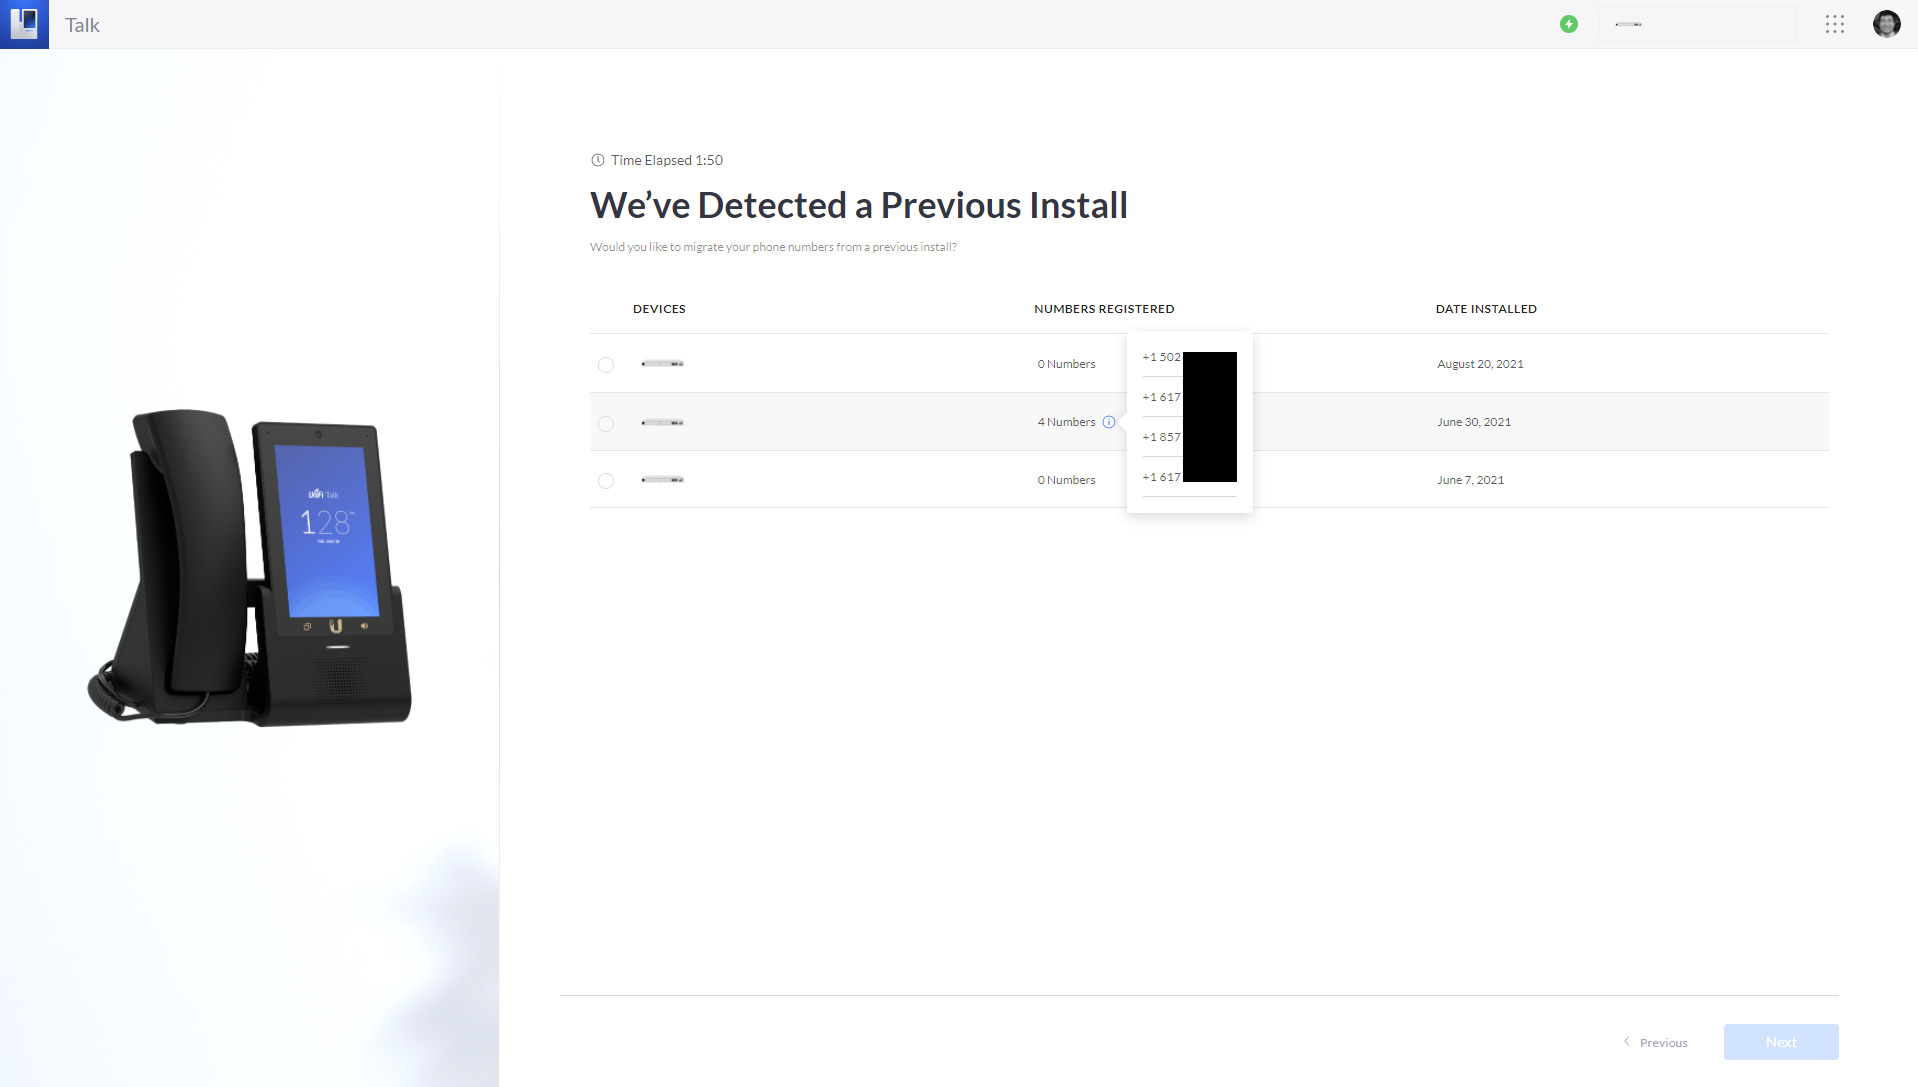
- If you have multiple UniFi Talk deployments associated with your Ubiquiti account, you’ll see a list of previous deployments to select from. Hover over the information tooltip to view the phone numbers associated with each deployment.
- Select the deployment with the phone numbers that you want to recover or migrate.

- Click the Next button to continue setup.
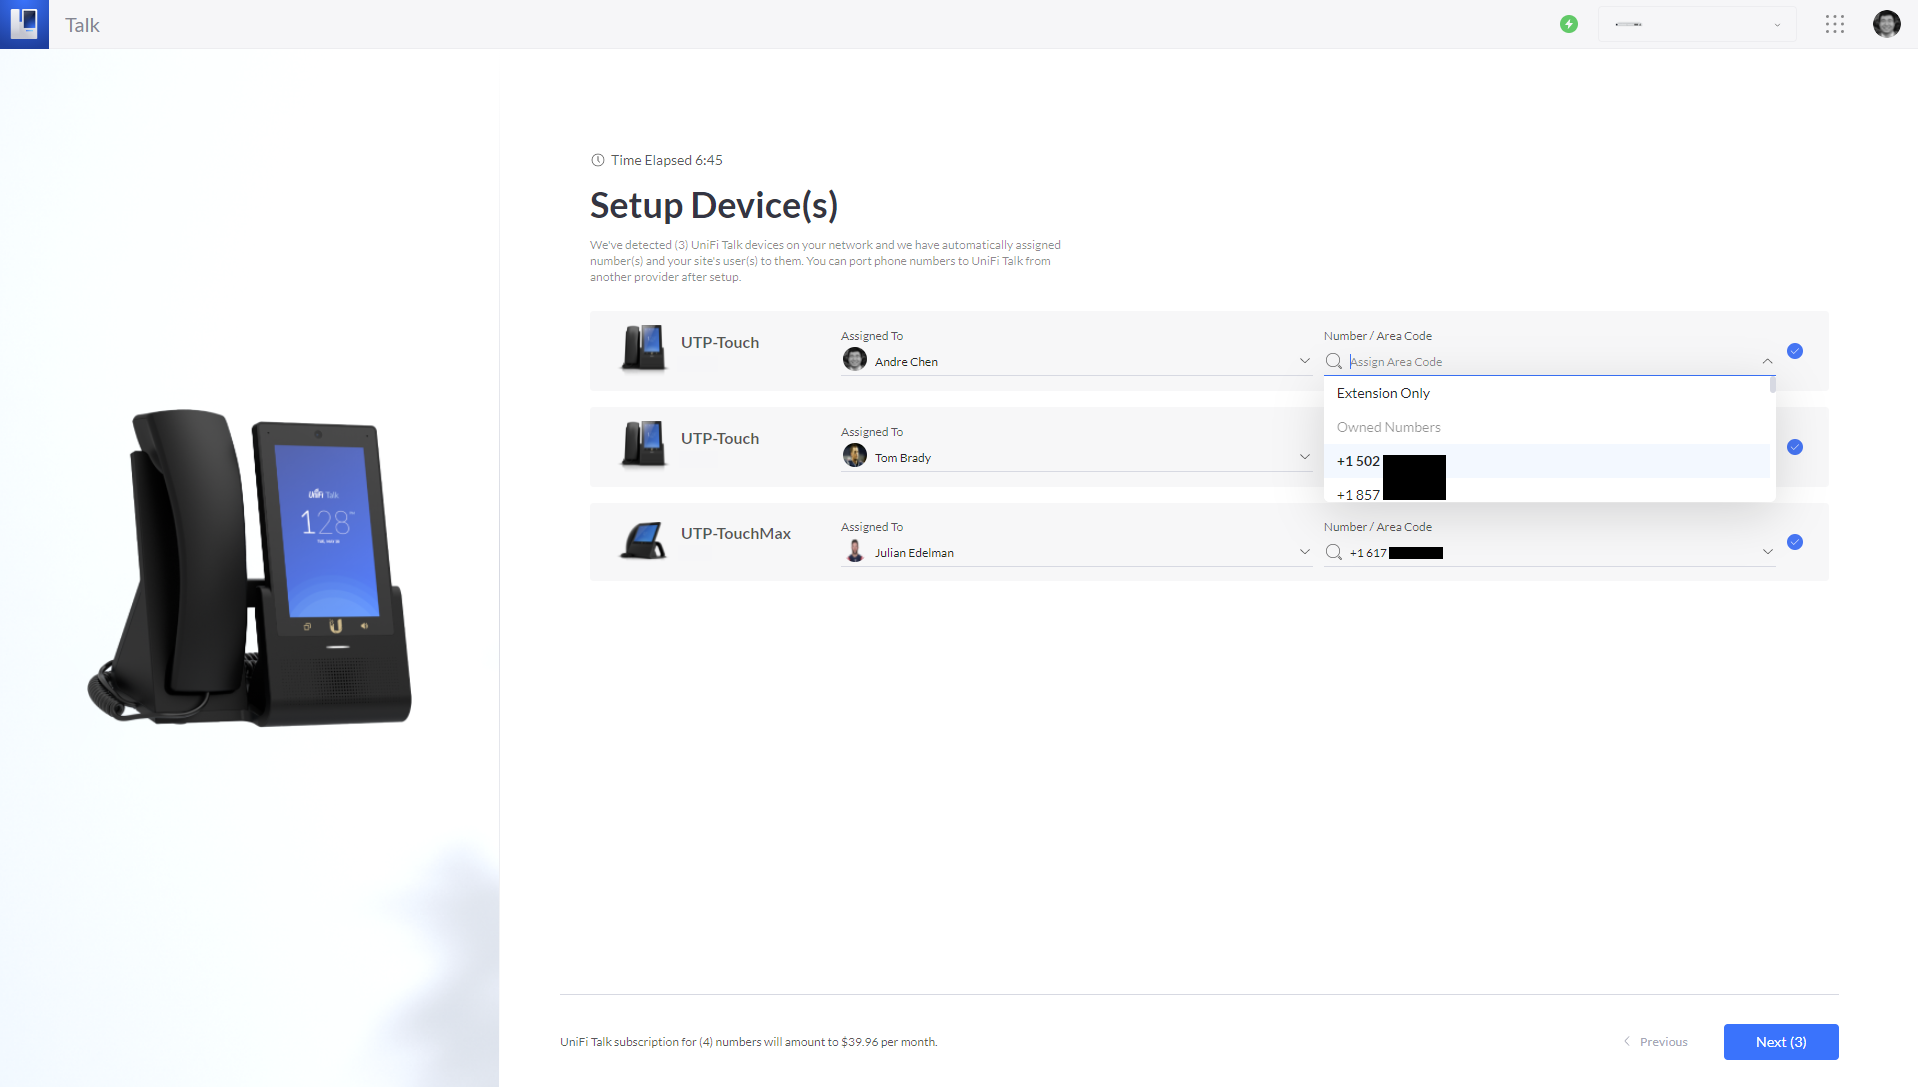
- On the Setup Device(s) page, you’ll now have the option to assign your recovered or migrated phone numbers to users and devices. These are available for selection from the Number / Area Code dropdown menu. Make your selections and click Next.

- Complete the UniFi Talk setup process to finish recovering or migrating your Talk subscriptions and phone numbers.
Notes: A Talk subscription can only be active on a single UniFi OS Console. If you use this option during the UniFi Talk setup process while a subscription is still active on another UniFi OS Console, your subscription(s) will be transferred and will no longer be accessible from that device.
If you’re still having trouble making and/or receiving calls, please contact UniFi Technical Support.
Source :
https://help.ui.com/hc/en-us/articles/1500000304422-UniFi-Talk-Use-the-UniFi-Talk-application


