With UniFi Network you can forward UDP and TCP ports to an internal LAN device using the Port Forwarding feature on the Dream Machine (UDM and UDM Pro) and USG models.
- Frequently Asked Questions (FAQ)
- Configuring a Port Forwarding Rule
- USG/USG-Pro: Forwarding Ports on WAN2 using Destination NAT
- Troubleshooting Port Forwarding Issues
Requirements
- Applicable to the latest firmware on all UDM and USG models.
- The Port Forwarding feature is designed to only work on WAN1 on the USG models, but it can use both WAN1 and WAN2 on the UDM-Pro.
- It is necessary to manually configure a Destination NAT (DNAT) + WAN firewall rule(s) to forward ports on the WAN2 interface on the USG models, see the section below.
Frequently Asked Questions (FAQ)
Do I need to manually create firewall rules for Port Forwarding?Can I forward ports on the WAN2 interface of the UDM/USG?How does the Port Forwarding feature interact with UPnP?Do I need to manually configure Hairpin NAT?Can I limit which remote devices are allowed to use the forwarded ports? My Port Forwarding rule does not work, what should I do?
Configuring a Port Forwarding Rule
1. Navigate to Settings > Advanced Features > Advanced Gateway Settings and create new port forwarding.
2. Fill in the settings:
- Name: webserver
- Enable Forward Rule: turn this on when ready to activate this rule
- Interface: WAN / WAN2 / Both (UDM Pro only)
- From: Anywhere or Limited
- Port: 443
- Forward IP: 192.168.1.10
- Forward Port: 443
- Protocol: TCP
- Logging: Optional
| From: | The clients on the Internet that are allowed to use the Port Forwarding rule. Set to Anywhere by default, meaning all hosts. It is possible to limit the allowed hosts by specifying an IP address (for example 198.51.100.1) or subnet range (for example 198.51.100.0/24). |
| Port: | The WAN port that the clients on the Internet connect to, for example 443. This does not need to match the port used on the internal LAN host. You can forward TCP port 10443 to TCP port 443, for example. |
| Forward IP: | The IP address used by the internal LAN host, for example 192.168.1.10. |
| Forward Port: | The port used by the internal LAN host, for example TCP port 443. |
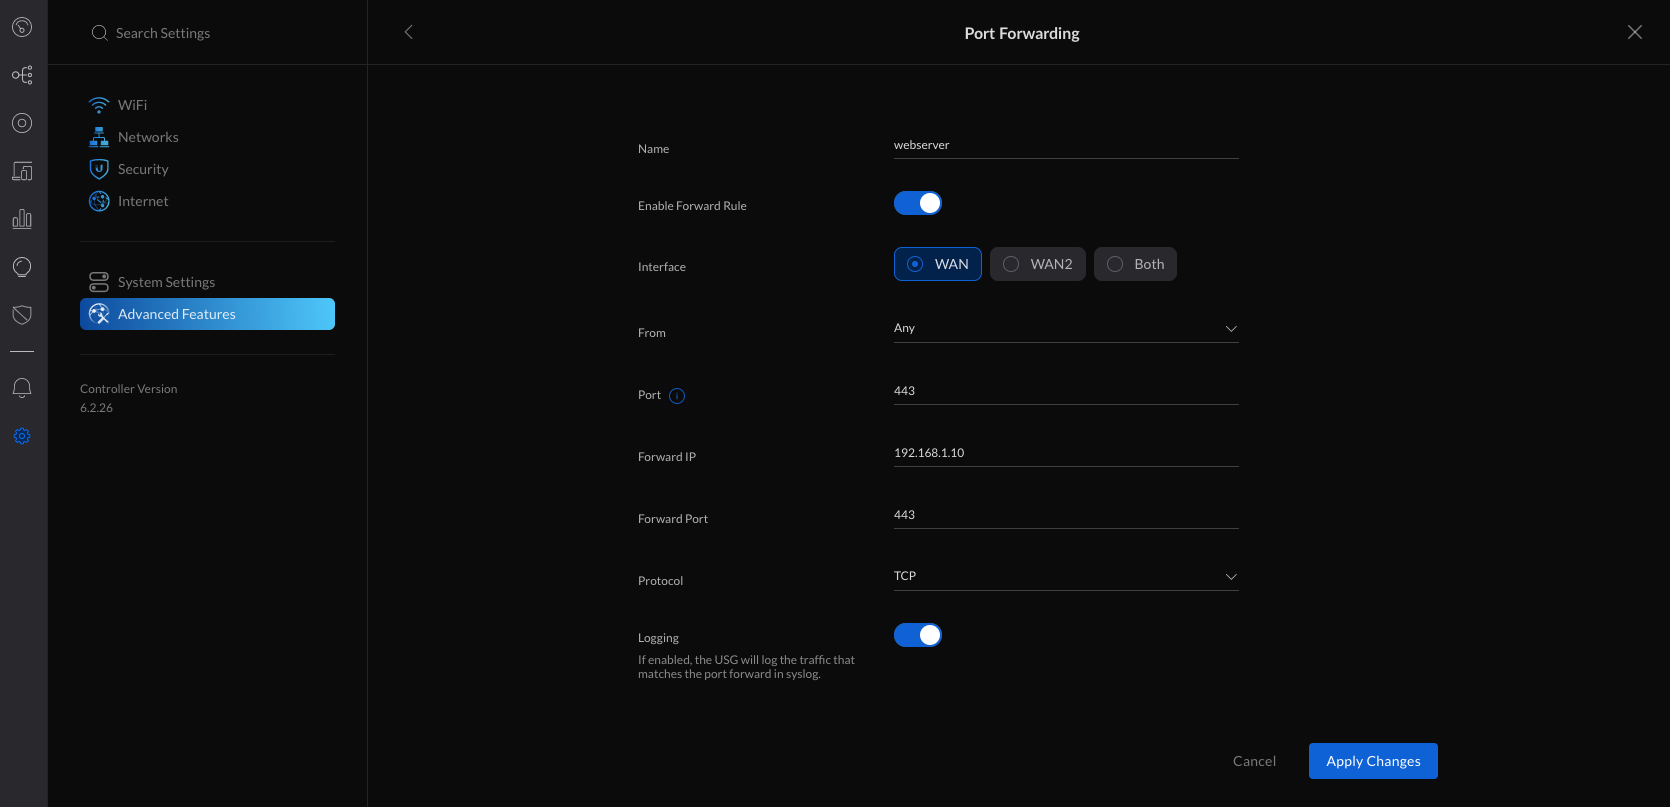
3. Apply the changes.
Note: On the USG models, it is necessary to manually configure a Destination NAT (DNAT) + WAN firewall rule to forward ports on the WAN2 interface, see the section below.
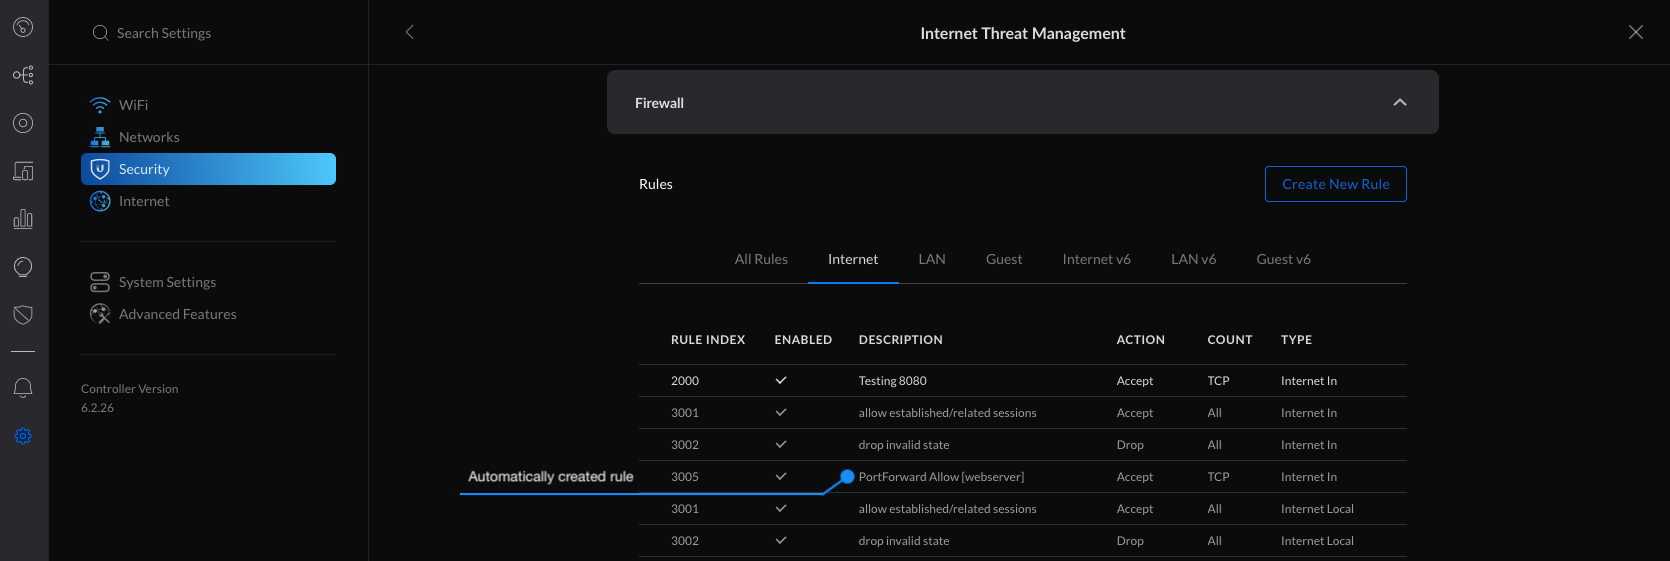
4. The firewall rule(s) needed for the new Port Forwarding rule you created are automatically added.
5. You can verify the automatically created rules in the Settings > Security > Internet Threat Management > Firewall > Internet section.
USG/USG-Pro: Forwarding Ports on WAN2 using Destination NAT
ATTENTION: This is an advanced configuration that requires creating and modifying the config.gateway.json file. See the UniFi – USG/USG-Pro: Advanced Configuration Using JSON article for more information on using the JSON file.
Follow the steps below to forward ports on the WAN2 interface of the USG models. It is necessary to manually create a Destination NAT (DNAT) rule using the Command Line Interface (CLI) and a custom Firewall Rule using the UniFi Network application. Afterwards, the config.gateway.json file needs to be created or updated to incorporate the custom configuration into UniFi Network.
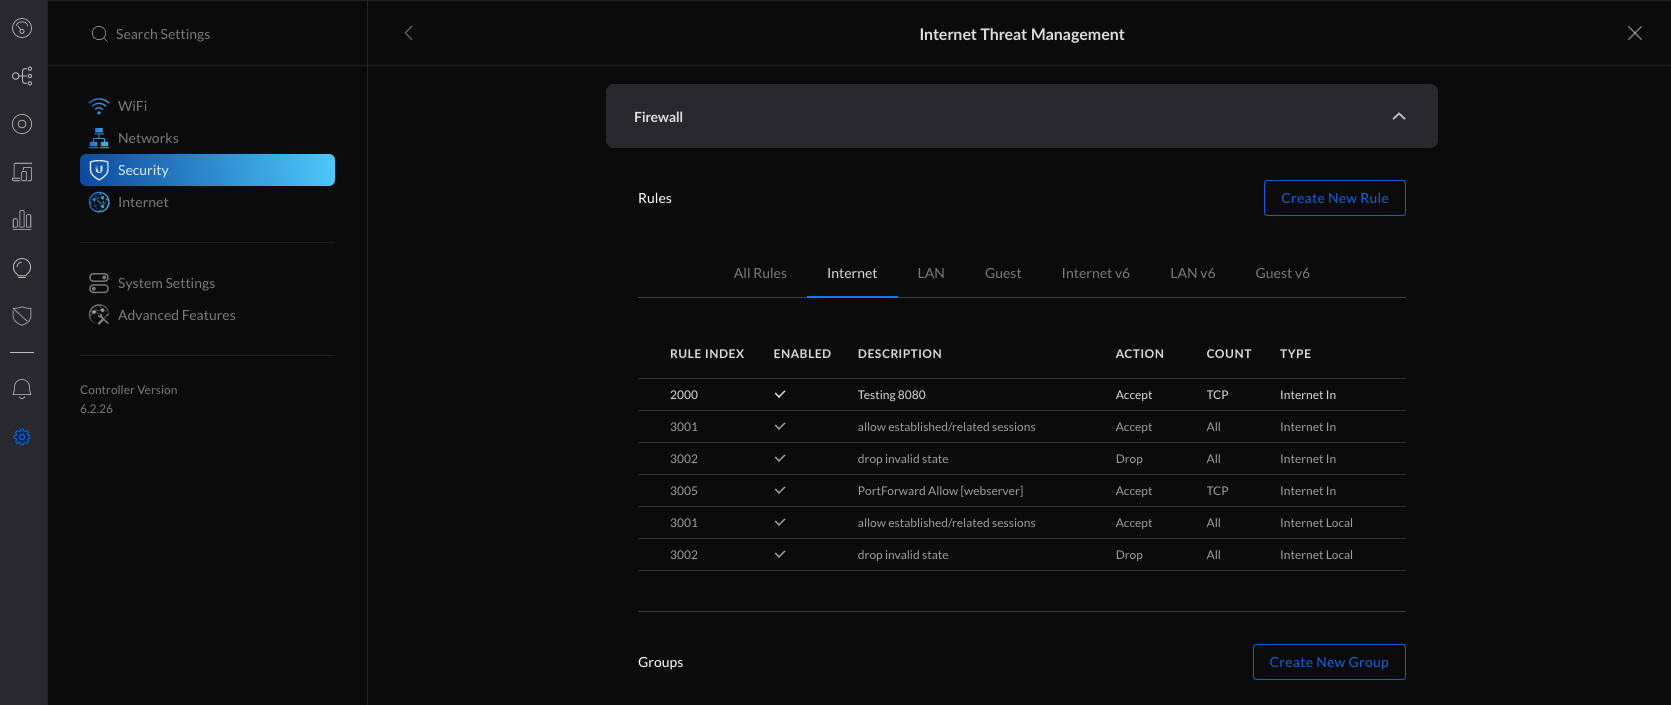
1. Begin by creating a new custom Firewall Rule within Settings > Security > Internet Threat Management > Firewall > Internet section.
2. Create a new Firewall Port Group by clicking Create New Group.
3. Fill in the information and specify the port that needs to be allowed through the firewall (443 in this example) and apply changes.
- Name: https
- Type: Port Group
- Port: 443

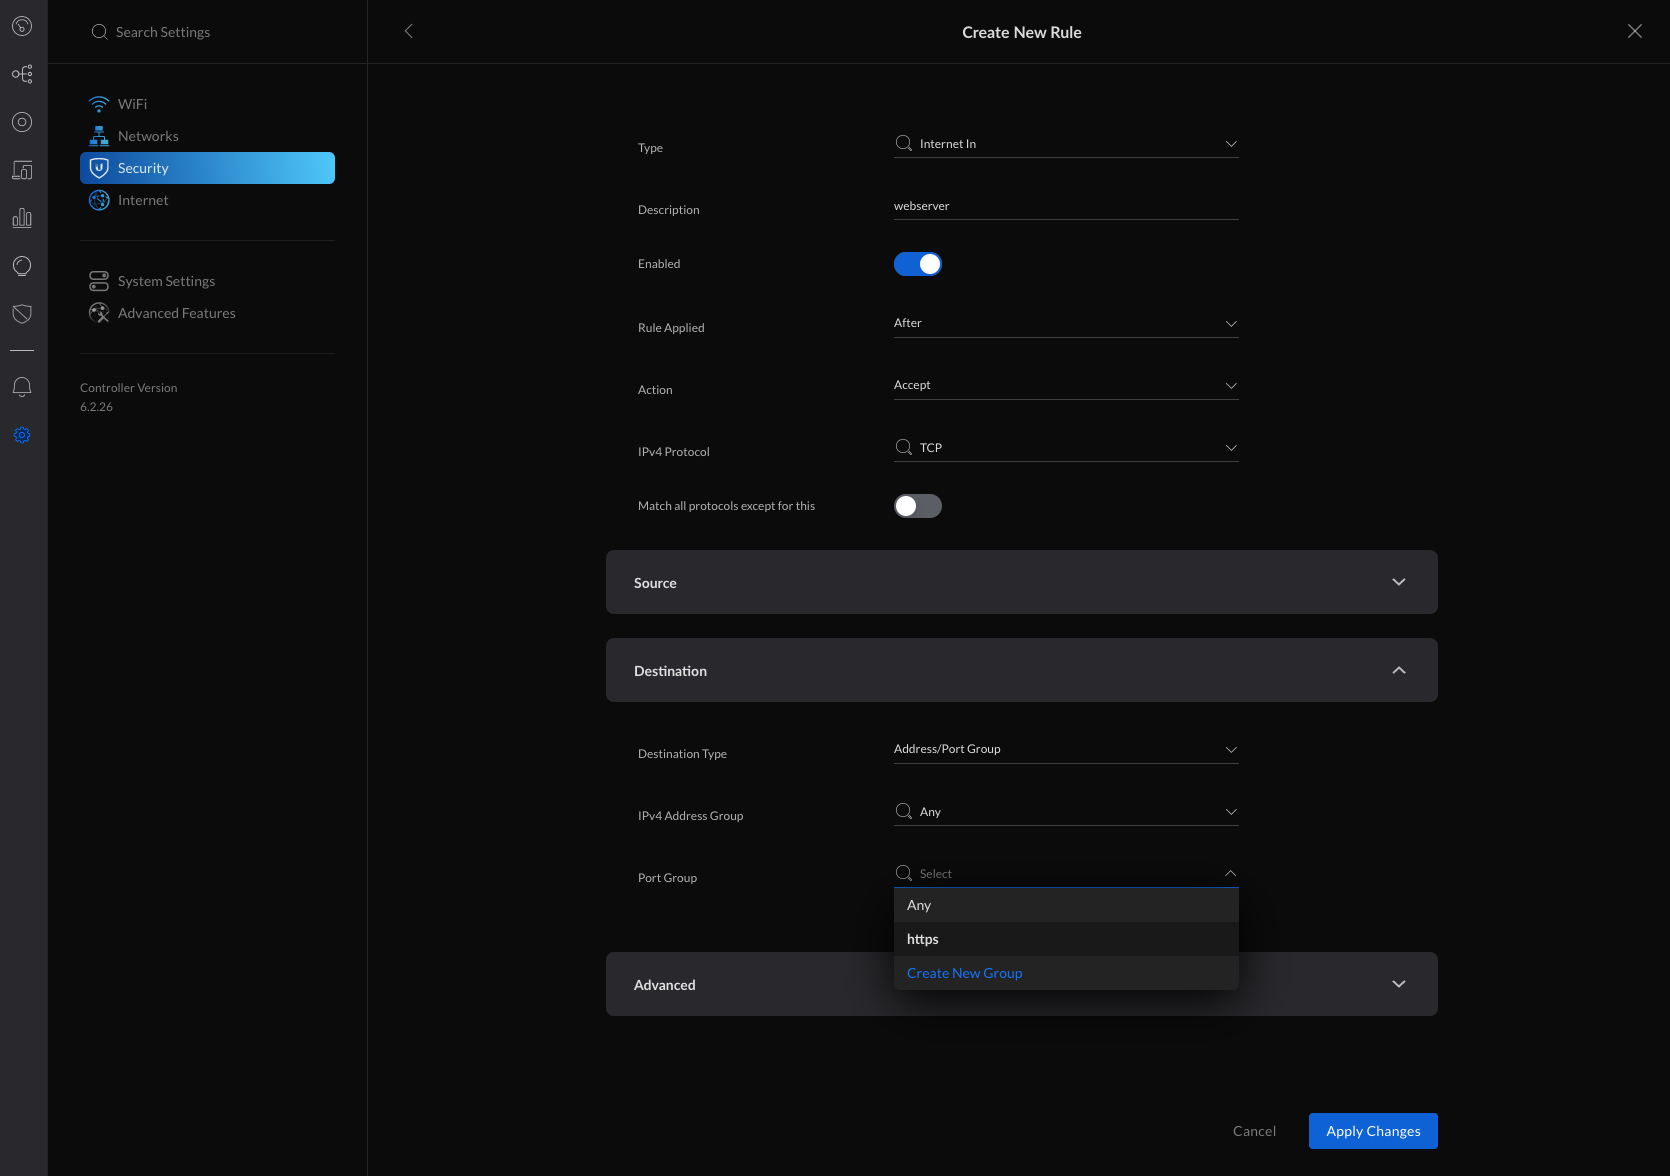
4. Navigate to Settings > Security > Internet Threat Management > Firewall > Internet and create new rule.
5. Fill in the information, selecting the previously created Port Group and apply changes.
- General
- Type: Internet In
- Description: webserver
- Enabled: turned on when ready to take this rule live
- Rule Applied: After (after predefined rules)
- Action: Accept
- IPv4 Protocol: TCP
- Match all protocols except for this: disabled
- Source: Optional
- Destination
- Destination Type: Address/Port Group
- IPv4 Address Group: Any
- Port Group: https (select from any previously created firewall port groups)
- Advanced: Optional
6. The next step is to access the USG using the Command Line Interface (CLI) and add a custom Destination NAT (DNAT) rule. SSH access to your devices must be enabled within Settings > System Settings > Controller Configuration > Device SSH Authentication.
7. Connect to the USG via SSH.SSH using WindowsSSH using macOS
8. Verify that the WAN2 interface is UP and that it is assigned an IP address by running the following command:
show interfaces ; sudo ipset list ADDRv4_eth2
Click to copy
unifiadmin@usg:~$ show interfaces
Codes: S - State, L - Link, u - Up, D - Down, A - Admin Down
Interface    IP Address                        S/L  Description
---------    ----------                        ---  -----------
eth0         203.0.113.1/24                    u/u  WAN
eth1         192.168.1.1/24                    u/u  LAN
eth2         192.0.2.1/24                      u/u  WAN2
lo           127.0.0.1/8                       u/u
             ::1/128
unifiadmin@usg:~$ sudo ipset list ADDRv4_eth2 Name: ADDRv4_eth2 Type: hash:net Revision: 3 Header: family inet hashsize 1024 maxelem 65536 Size in memory: 16792 References: 1 Members: 192.0.2.1
NOTE: The ADDRv4_eth2 is a special address group that automatically uses the IP address that is assigned to the eth2 interface. On the USG-Pro, the WAN2 interface uses eth3 instead and thus the address group will be ADDRv4_eth3.
9. Enter configuration mode by typing configure and hitting enter.
10. Add the Destination NAT rule for the WAN2 interface of the USG/USG-Pro (replace eth2 with eth3 for the USG-Pro):
set service nat rule 4001 description 'webserver'
set service nat rule 4001 destination group address-group ADDRv4_eth2
set service nat rule 4001 destination port 443
set service nat rule 4001 inbound-interface eth2
set service nat rule 4001 inside-address address 192.168.1.10
set service nat rule 4001 inside-address port 443
set service nat rule 4001 protocol tcp
set service nat rule 4001 type destination
Click to copy
11. Commit the changes and exit back to operational mode by typing commit ; exit and hitting enter.
This is an example of the process:
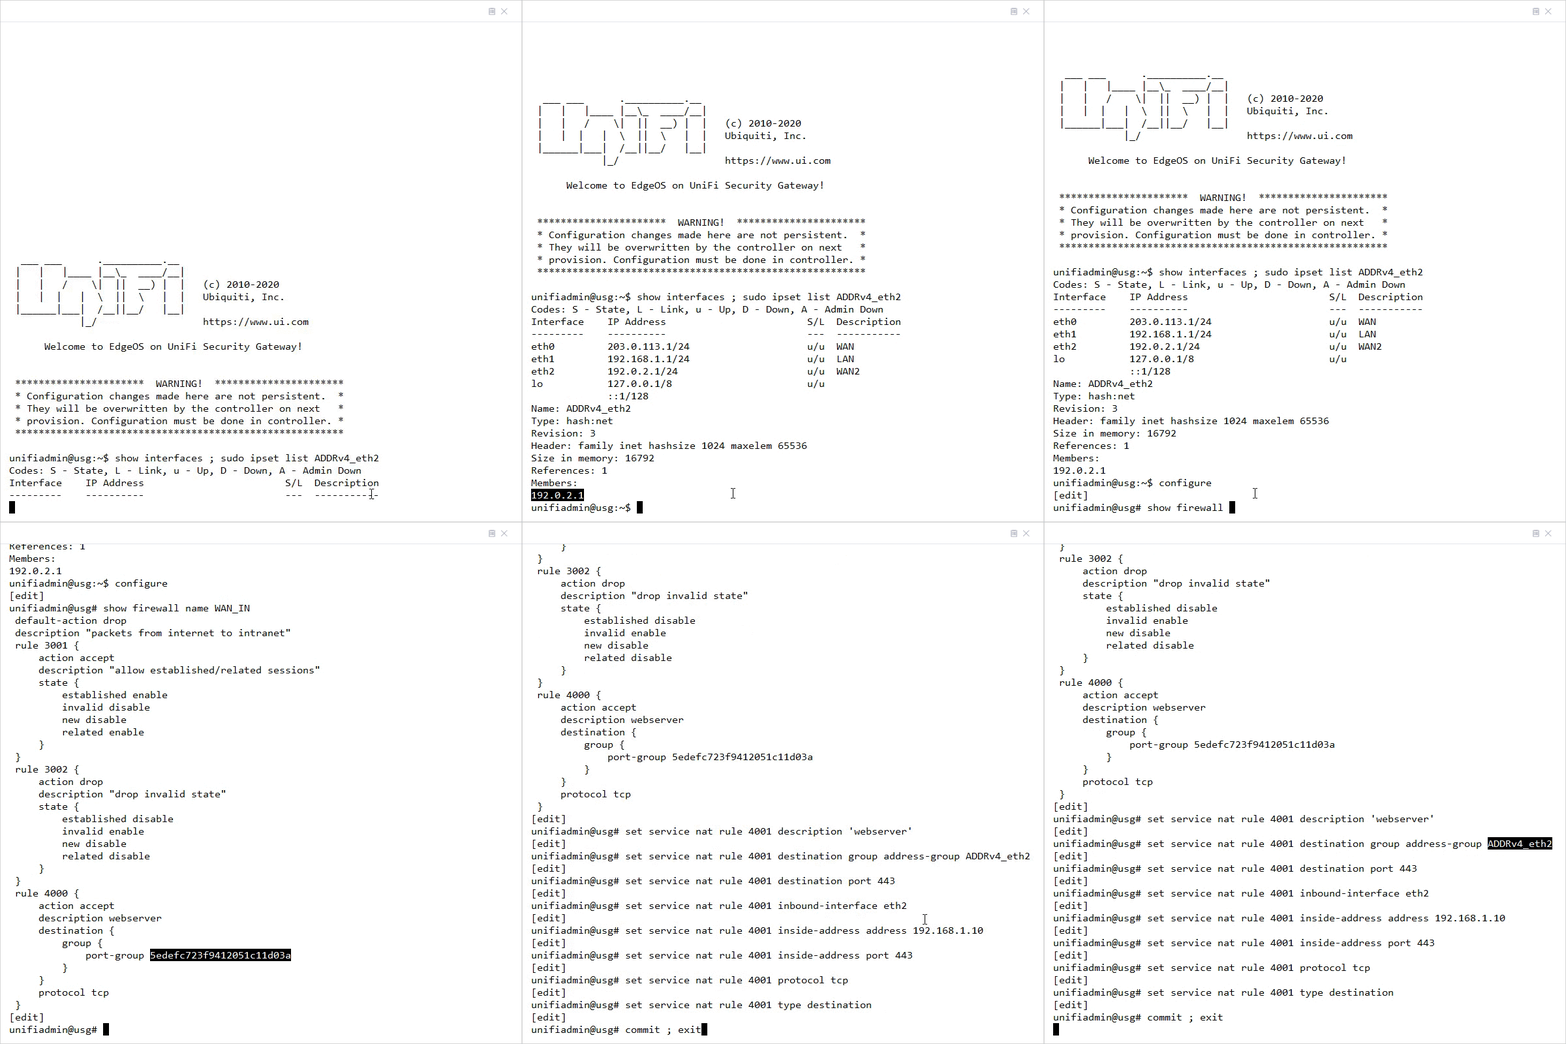
12. Use the mca-ctrl -t dump-cfg command to display the entire config in JSON format:
mca-ctrl -t dump-cfg
Click to copy
13. The Destination NAT section of the configuration in JSON format can then be used in the config.gateway.json file.
{
       "service": {
                "nat": {
                        "rule": {
                                "4001": {
                                        "description": "webserver",
                                        "destination": {
                                                "group": {
                                                        "address-group": "ADDRv4_eth2"
                                                },
                                                "port": "443"
                                        },
                                        "inbound-interface": "eth2",
                                        "inside-address": {
                                                "address": "192.168.1.10",
                                                "port": "443"
                                        },
                                        "protocol": "tcp",
                                        "type": "destination"
                                }
                        }
                }
       }
}
Click to copy
14. See the UniFi – USG/USG-Pro: Advanced Configuration Using JSON article for more information on how to create and modify the config.gateway.json file.
Troubleshooting Port Forwarding Issues
Refer to the troubleshooting steps below if the Port Forwarding or custom Destination NAT rule is not working. Either of the following options can be the cause: Possible Cause #1 – The USG/UDM is located behind NAT and does not have a public IP address. Possible Cause #2 – The UDM/USG is already forwarding the port to another device or has UPnP enabled. Possible Cause #3 – The traffic from the Internet clients is not reaching the WAN interface of the UDM/USG. Possible Cause #4 – The LAN host is not allowing the port through the local firewall or does not have the correct route configured.
Source :
https://help.ui.com/hc/en-us/articles/235723207-UniFi-USG-UDM-Port-Forwarding-Configuration-and-Troubleshooting