This article describes how to perform advanced configurations on the UniFi Security Gateway (USG and USG-PRO-4) using the config.gateway.json file. This article is not applicable to the UniFi Dream Machine models. The UDM line does not support configurations done outside of the UniFi Network application.NOTES & REQUIREMENTS:
- Ubiquiti Support cannot assist in the creation of the config.gateway.json file nor will assistance be provided for command line configuration. If assistance is required, feel free to visit our Community to create a topic and ask for help with your desired configuration.
- This article covers advanced configuration, and should only be used by advanced users.
Table of Contents
- Introduction
- Creating the config.gateway.json File
- Editing the config.gateway.json File
- Testing & Verification
- Related Articles
Introduction
The config.gateway.json is a file that sits in the UniFi Network application filesystem and allows custom changes to the USG that aren’t available in the web GUI. Some possible customizations will be: configuring site-to-site VPNs with hostnames, policy routing certain traffic out WAN2, or even adding multiple IP addresses on an interface. These features don’t exist in the UniFi Network application yet, so the config.gateway.json file will supplement those features until they’re available in the GUI.
When making customizations via the config.gateway.json file, it is best to enter only the customizations that can’t be performed via the Network application. If the formatting is incorrect, a provisioning loop will be triggered on the USG, and a reboot will take place once the USG comes out of the provisioning loop. At this point the config.gateway.json file could be corrected or removed to correct this.WARNING:Some users may find they can get away with using the full config, but this is not recommended as it will most likely cause issues down the road. A provisioning loop might take place when a setting is changed in the Network application that conflicts with a setting in the config.gateway.json file.
Creating the config.gateway.json File
By default, the config.gateway.json file doesn’t exist, it has to be created in order to use it.
1. Create a new file using a text editor such as TextEdit or Notepad++.
2. The structure of a json file is just as important as the words themselves. Incorrect placement of brackets, indentations, line breaks or any other structural element will make the json file invalid. It is recommended to run the text through a json validator in order to verify it has the correct syntax. The JSON Formatter website is one example of the many options of json validators you’ll find online.
3. Once the contents of the file has been validated, save it by naming it config.gateway.json and placing it under the <unifi_base>/data/sites/site_ID directory stored on the Network application. User Tip:Depending on your operating system, placing the file under this directory might be as simple as drag and drop, or using a FTP server might be necessary. The config.gateway.json file must have unifi:unifi as the owner and group permissions. You can check to verify with ls -l <unifi_base>/data/sites/site_ID. To change it, once you’re in the site directory, use the command: chown unifi:unifi config.gateway.json
The location <unifi_base> will vary from one operating system to another. See this article for more information. The site_ID can be seen in the URL of your browser when on the Network application. The original site is named “default”, and every site that is created will be assigned a random string. For example, this is what would be seen in the URL bar when inside the dashboard page of a site:
In the above case, the random string ceb1m27d is the folder name that shall be used under <unifi_base>/data/sites/. Therefore, the config.gateway.json should be placed inside <unifi_base>/data/sites/ceb1m27d/.User Tips:
- On Cloud Key install the path for the .json file is: /srv/unifi/data/sites/[site name/default]/
- On an Ubuntu install the path for the .json file is: /usr/lib/unifi/data/sites/[site name/default]/
Editing the config.gateway.json File
Before customizing firewall or NAT rules, take note of the rule numbers used in the UniFi Network application under Settings > Routing & Firewall > Firewall. Default firewall rules start at either 3001 or 6001, and NAT rules will also start at 6001 (which don’t overlap with firewall rules). The custom rules created in the config.gateway.json cannot have duplicate rule numbers with the existing rules in the USG, or there will be a provisioning loop. It is recommended to put custom rules before the existing ruleset, as the lower number will win between two matching rules.NOTE: When editing thiscustom json file, it is not necessary to include everything. You must only include the complete “path” to the items you have edited, anything outside of the path can be omitted. Think of each node in the json file as a folder that is nested within other folders (except for the level 1 folder which is our main section). The folder path that takes you from level 1 all the way down to the item you will be configuring must be present in the json file. See this example where we want to edit “close”, which has the following path: system > conntrack > timeout > tcp > close.
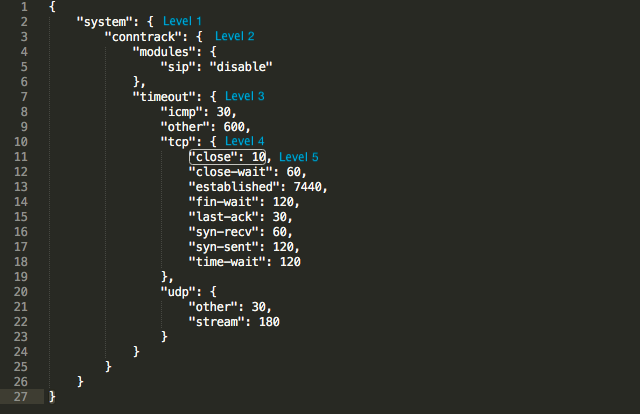
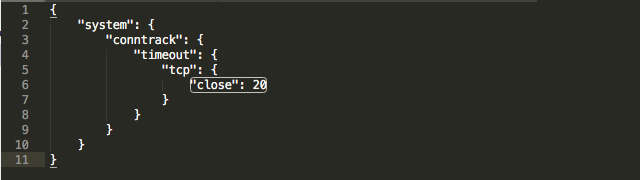
Notice that in level 3 “modules” is also present along with “timeout”, but we will not include it in the json file because it is not part of the path to “close”. Same with the other items in level 5 under “tcp”. They do not need to appear in the config.gateway.json file because they are not part of the path. A successful change then, in the configuration of “close” from 10 to 20 would look like this:
The following is an example of how a DNAT rule is created for DNS configured using EdgeOS formatting:
1. Connect to the USG via SSH, and issue the following commands:
configure
set service nat rule 1 type destination
set service nat rule 1 inbound-interface eth0
set service nat rule 1 protocol tcp_udp
set service nat rule 1 destination port 53
set service nat rule 1 inside-address address 10.0.0.1
set service nat rule 1 inside-address port 53
commit;save;exit
2. Next is displaying the config. The following command displays the entire config in a JSON format:
mca-ctrl -t dump-cfg
 The config can also be exported if preferred. The following example exports the output to the
 config.txt:
mca-ctrl -t dump-cfg > config.txt
3. Find the appropriate section with the custom changes in the config output, for our example above it would be the following:
                "nat": {
                        "rule": {
                                "1": {
                                        "destination": {
                                                "port": "53"
                                        },
                                        "inbound-interface": "eth0",
                                        "inside-address": {
                                                "address": "10.0.0.1",
                                                "port": "53"
                                        },
                                        "protocol": "tcp_udp",
                                        "type": "destination"
                                },
4. Above is the custom rule, but it’s missing all the closing brackets (}) at the end to make it correct. If you look at the config output from the start, there is a certain format that is required for the file to be read correctly. Each node in a section must be separated by a comma (,), and it section must begin with an opening bracket ({) and finish with a closing one (}). Follow the existing format carefully. If the above rule is the only change in the config.gateway.json, you would edit it to look like so:
{
       "service": {
                "nat": {
                        "rule": {
                               "1": {
                                       "destination": {
                                               "port": "53"
                                       },
                                       "inbound-interface": "eth0",
                                       "inside-address": {
                                               "address": "10.0.0.1",
                                               "port": "53"
                                       },
                                       "protocol": "tcp_udp",
                                       "type": "destination"
                               }
                       }
               }
       }
}
5. If there are multiple sections to add, say Firewall, Service, VPN, the closing bracket for that section would be followed by a comma (},), before starting the next section. You can see these formatting details in the example below.
The DNAT rule # ranges are from 1-4999, and the Source/Masquerade rule numbers are from 5000-9999. If you wanted to add a port forward (DNAT) in the config.gateway.json for WAN2 in a multiWAN (load-balance) setup, this is what the config.gateway.json would look like with only this particular NAT rule:
{
	"service": {
		"nat": {
			"rule": {
				"4500": {
					"description": "port_forward_WAN2",
					"destination": {
						"address": "100.64.100.100",
						"port": "22"
					},
					"inbound-interface": "eth3",
					"inside-address": {
						"address": "192.168.1.100"
					},
					"protocol": "tcp",
					"type": "destination"
				}
			}
		}
	}
}
And if we were to add a VPN with hostnames to the file, the config.gateway.json would look like the one below. Notice the opening and closing brackets, as well as the bracket with comma before starting with the "vpn" section:
{
	"service": {
		"nat": {
			"rule": {
				"4500": {
					"description": "port_forward_WAN2",
					"destination": {
						"address": "100.64.100.100",
						"port": "22"
					},
					"inbound-interface": "eth3",
					"inside-address": {
						"address": "192.168.1.100"
					},
					"protocol": "tcp",
					"type": "destination"
				}
			}
		}
	},
	"vpn": {
		"ipsec": {
			"site-to-site": {
				"peer": {
					"yyyy.ignorelist.com": {
						"authentication": {
							"id": "xxxx.ignorelist.com"
						},
						"local-address": "xxxx.ignorelist.com"
					}
				}
			}
		}
	}
}
Testing & Verification
It’s recommended to validate the code once finished creating the config.gateway.json. There are a number of free options out there, jsonlint.com is used by the Ubiquiti support team quite often.
After adding the config.gateway.json to the UniFi Network site of your choosing, you can test it by running a “force provision” to the USG in UniFi Devices > select the USG > Config > Manage Device > Force provision. This will take a while to provision (30 seconds to 3 minutes), and if it stays in provisioning longer than that, there may be a formatting error in the config.gateway.json, and you are experiencing the provisioning loop that was mentioned earlier. You can check server.log in the application and search for commit error. You can usually find what went wrong with the provisioning of the newly customized configuration in the log files. Find information about that here.User Tip:An easy way to test the validity of the json file is: python -m json.tool config.gateway.json
Deleting Changes or Reverting to Previous State
To remove a certain advanced configuration, just delete the section pertinent to that configuration in the config.gateway.json file. To completely remove all advanced configurations created in the config.gateway.json file, delete the file or rename it. This will void all manual changes. The USG will be provisioned with the current config contained within the UniFi Network application.
A best practice when editing an already working config.gateway.json file is to create a backup. If you need to add additional changes to the config.gateway.json file, rename the current file to config.gateway.json.old, essentially creating a backup, and copy all the existing and new changes into a new file named config.gateway.json. This way, if there happens to be any mistakes resulting in a “commit” error or provisioning loop, you can delete config.gateway.json, and try again starting from config.gateway.json.old.
Source :
https://help.ui.com/hc/en-us/articles/215458888-UniFi-USG-Advanced-Configuration-Using-config-gateway-json