August 31, 2023
In some cases, you may receive the error ‘Windows cannot access sharename. The network path was not found. Error code: 0x80070035‘ when you try to open a shared network folder on a Windows computer, Samba share, or NAS device. In this article, we’ll look at how to fix this shared folder error on Windows 10 and 11.
Contents:
- Disable Legacy SMB Versions of File Shares
- Check the Windows SMB Client Settings
- Allow SMBv2 Insecure Guest Logons on Windows
- Enable Legacy SMB v1 Client on Windows
- Disable SMB 1.0 and SMB 2.0 Protocols on Windows Clients
- Check the Network Discovery Settings on Windows
- Add Windows Credentials to access NAS or Samba Shares
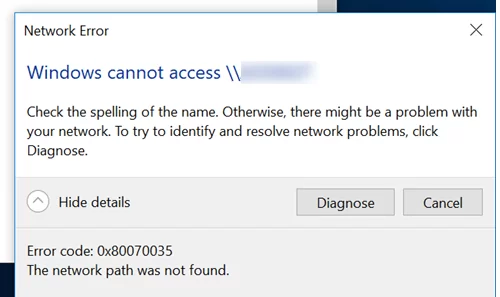
Network Error Windows cannot access \\sharedNAS Check the spelling of the name. Otherwise, there might be a problem with your network. To try identify and resolve network problems, click Diagnose. Error code: 0x80070035. The network path was not found.
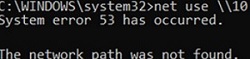
Another error occurs if you try to map such a shared folder as a network drive using Group Policy or the net use command:System error 54 has occurred. The network path was not found.
At the same time, you can easily open this shared folder from other computers (running older versions of Windows 10, 8.1 or 7), smartphones, and other devices.
Disable Legacy SMB Versions of File Shares
In most cases, the ‘0x80070035: The network path not found‘ error indicates that the target shared folder on the remote computer only supports SMBv1 connections or SMBv2 guest access. These are legacy and insecure versions of the Server Message Block (SMB, CIFS) file-sharing protocol. Enabling these protocols on your client will probably solve the problem, but it will reduce the security of your Windows device. So reconfiguring the remote file server device to support at least SMBv2 with authentication, or ideally SMBv3, is the first thing to try. This is the most correct and secure method.
Change your file server’s SMB configuration:
- NAS device – disable SMBv1, enable authenticated SMBv2 access (depending on NAS vendor);
- Samba server on Linux – disable guest access in smb.config file under [global] section:map to guest = never restrict anonymous = 2Specify the minimum SMB version supported:server min protocol = SMB2_10 client max protocol = SMB3 client min protocol = SMB2_10 encrypt passwords = trueDisable anonymous access in the configuration of each shared folder:guest ok = no
- On the Windows file server, disable the SMBv1 and SMBv2 protocols (described in a separate section of the article). Enable the Turn on password protected sharing option (navigate to Control Panel -> All Control Panel Items -> Network and Sharing Center -> Advanced sharing settings -> All networks, or run the command
control.exe /name Microsoft.NetworkAndSharingCenter /page Advanced).
Check the Windows SMB Client Settings
Perform the following simple checks on your Windows client. These steps can help you resolve the “Network Path Not Found” error without compromising the security of your computer:
- Check that you have entered the correct file server name. Try opening the network folder not by name (
\\FS01\Public), but by IP address (\\192.168.3.111\Public); - In the properties of the shared network folder (both at the NTFS file system permissions and the shared folder level), check that your user has permission to read the contents of the folder;
- Reset the DNS cache on both computers:
ipconfig /flushdns - If you simultaneously have two active network interfaces on your device (Wi-Fi and Ethernet), try temporarily disabling one of them and check access to your local network resources;
- Check that the following services are running on your computer (open the
services.mscconsole). Start these services and change the startup type to Automatic Delayed Start:Function Discovery Provider Host – fdPHost Function Discovery Resource Publication – FDResPub SSDP Discovery – SSDPSRV UPnP Device Host – upnphost DNS Client (dnscache) - Try temporarily disabling your anti-virus and/or firewall application and see if the problem persists when you access network resources;
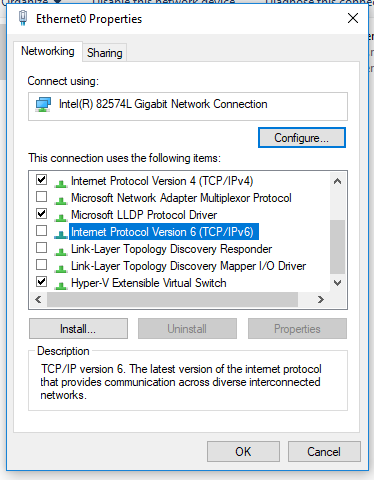
- Try to disable the IPv6 protocol in the properties of your network adapter in the Control Panel. Check that the following protocols are enabled for your network adapter: Client for Microsoft Network and File and Printer Sharing for Microsoft Networks;
- Try to reset the Windows network settings on the computer with the commands:
netsh winsock reset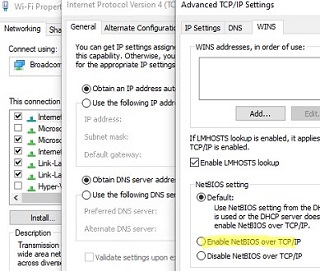
netsh int ip reset - If you are using a Windows workgroup network, make sure that NetBIOS protocol support is not disabled in the TCP/IPv4 properties of your network adapter. Next, open the Local Security Policy Settings (
secpol.msc), go to Local Policies -> Security Options -> Network security: LAN Manager authentication level and select Send LM & NTLM — use NTLMv2 session security if negotiated (this is an unsafe option!!).
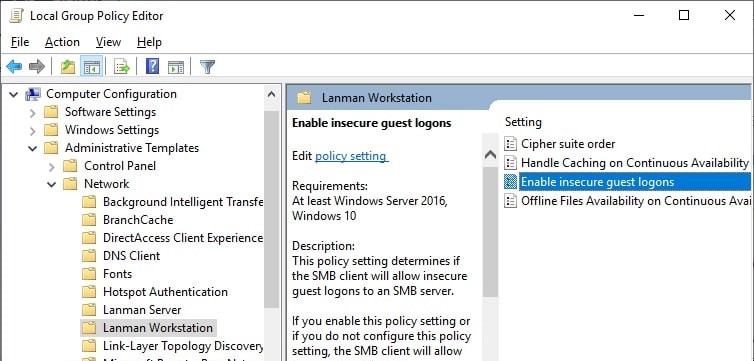
Allow SMBv2 Insecure Guest Logons on Windows
If you are using anonymous shared folder access to NAS storage or other computers (without entering a username and password), you will need to enable the insecure guest logon policy on the client computer. By default, modern versions of Windows don’t allow anonymous (guest) access to shared network folders using the SMB 2.0 protocol.
If you try to connect to the shared folder as an anonymous (guest) user, an event with Event ID 31017 will appear in the Event Viewer log.Source: Microsoft-Windows-SMBClient Date: Date/Time Event ID: 31017 Task Category: None Level: Error Keywords: (128) User: NETWORK SERVICE Computer: fs01.woshub.com Description: Rejected an insecure guest logon. User name: Ned Server name: ServerName
To allow SMBv2 guest logons (this is an unsafe option and should only be used when it is absolutely necessary!), open the Local Group Policy editor (gpedit.msc), and turn on the Enable insecure guest logons policy (Computer Configuration -> Administrative templates -> Network -> Lanman Workstation).
Or you can enable insecure SMB shared folder access under guest account via the registry using the command:
reg add HKLM\SYSTEM\CurrentControlSet\Services\LanmanWorkstation\Parameters /v AllowInsecureGuestAuth /t reg_dword /d 00000001 /f
Enable Legacy SMB v1 Client on Windows
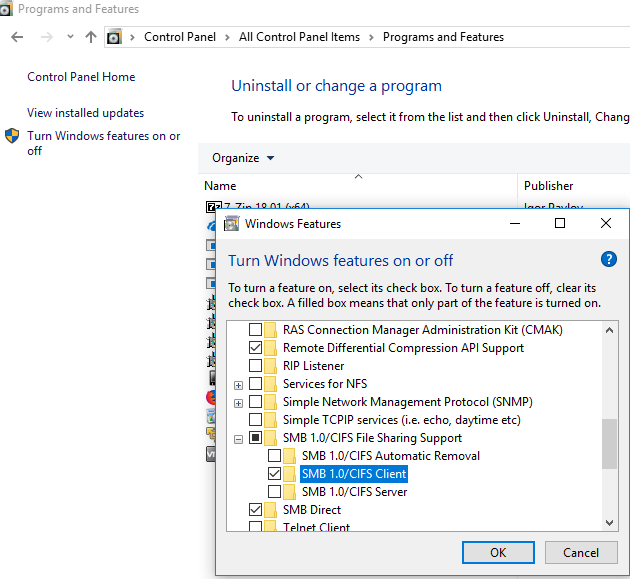
You must enable the SMB1Protocol-Client component on the client computer if your network device (file storage) only supports the SMB 1.0 file-sharing protocol (although this is not recommended for security reasons).
The SMB v1.0 protocol is disabled by default in modern versions of Windows 10/11 and Windows Server 2019/2022. This is because SMB 1.0 is a legacy and vulnerable protocol for file and folder sharing on Windows. When you try to connect from Windows 10/11 to an SMBv1-only file share (for example, an old version of NAS storage, a computer running Windows XP/Windows Server 2003) and list the remote device’s shared network folders (by the UMC path, such as \\FileStorageNetworkName), you will receive an error ‘Network path not found‘.
You can use the DISM command to check if the SMBv1 protocol is enabled in Windows:
Dism /online /Get-Features /format:table | find "SMB1Protocol"

As you can see, in this case the SMB1Protocol-Client feature is disabled.SMB1Protocol | Disabled SMB1Protocol-Client | Disabled SMB1Protocol-Server | Disabled SMB1Protocol-Deprecation | Disabled
You can enable the SMB v1 client protocol to access legacy shared folders from the Turn Windows features on or off panel ( optionalfeatures.exe -> SMB 1.0 / CIFS File Sharing Support -> SMB 1.0 / CIFS Client).
Or you can enable the SMB 1.0 client with the DISM command:
Dism /online /Enable-Feature /FeatureName:"SMB1Protocol-Client"
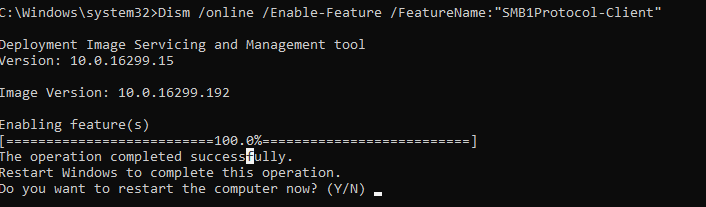
After installing the SMBv1 client, restart your computer and check that the shared network folder can now be opened.
On Windows Server 2019/2022, you can enable SMBv1 with the command
Install-WindowsFeature FS-SMB1
Important! If you have enabled the SMB1 client, remember that this protocol is vulnerable and has a large number of remote exploitation vulnerabilities. If you don’t need the SMB v1 protocol for legacy device access, be sure to disable it.
In Windows 10/11, the SMBv1 client is automatically disabled if it has not been used for more than 15 days.
Disable SMB 1.0 and SMB 2.0 Protocols on Windows Clients
If only modern devices that support SMB v3 are used on your network (Windows 8.1/Windows Server 2012 R2 and later, see the table of SMB versions in Windows), you can fix the 0x80070035 error by completely disabling SMB1 and SMB2 on all clients. The fact is that your computer may try to use the SMB 2.0 protocol to access shared folders that only accept SMB 3.0 connections
First, disable the SMB 1.0 protocol using the Turn Windows features on or off panel (optionalfeatures.exe) or with commands:
sc.exe config lanmanworkstation depend= bowser/mrxsmb10/nsi
sc.exe config mrxsmb10 start= disabled
Dism /online /Disable-Feature /FeatureName:"SMB1Protocol"
Then disable the SMB 2.0 protocol:
reg.exe add "HKLM\SYSTEM\CurrentControlSet\services\LanmanServer\Parameters" /v "SMB2" /t REG_DWORD /d "0" /f
sc.exe config lanmanworkstation depend= bowser/mrxsmb10/nsi
sc.exe config mrxsmb20 start= disabled
PowerShell -ExecutionPolicy Unrestricted
Set-SmbServerConfiguration –EnableSMB2Protocol $false
You can check that the SMB 1 and SMB 2 protocols are disabled by running the following PowerShell command:
Get-SmbServerConfiguration | select "*enablesmb*"|flEnableSMB1Protocol : False EnableSMB2Protocol : False

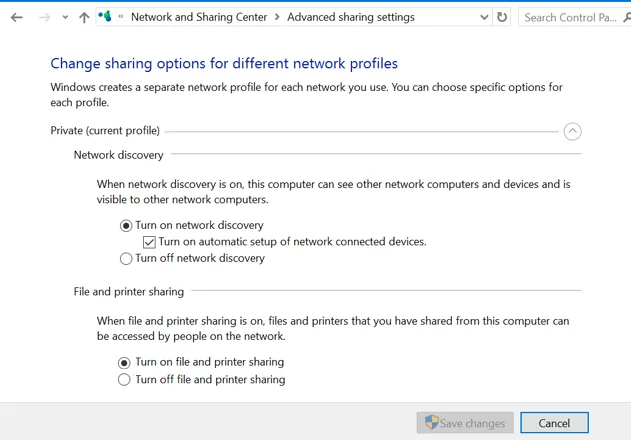
Check the Network Discovery Settings on Windows
If your computers are joined to a workgroup, I strongly recommend that you follow the recommendations from the article Network computers are not showing up in Windows.
In the Network and Sharing Center section of the Control Panel on both computers, check that the Private network profile is set as the current profile (Private: Current profile). Make sure that the following options are enabled:
- Turn on network discovery + Turn on automatic setup of network connected devices;
- Turn on file and printer sharing.
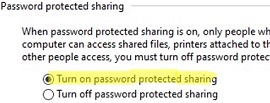
In the All Networks section, enable the following options:
- Turn off password Protect Sharing;
- Turn on sharing.
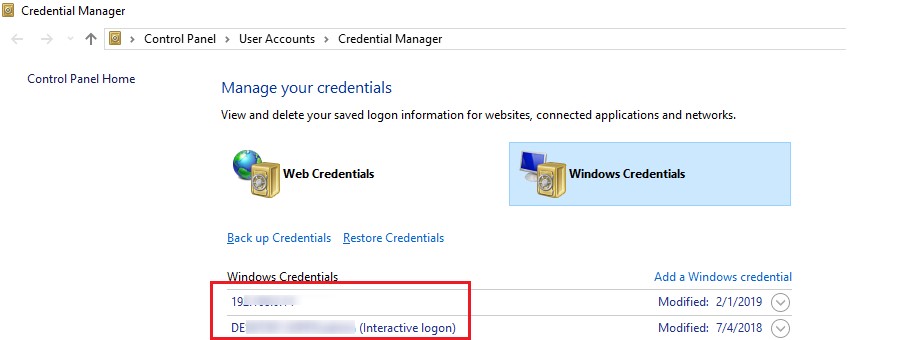
Add Windows Credentials to access NAS or Samba Shares
If the problem only occurs when accessing the NAS share or Samba server on Linux, you can try saving the connection credentials (username and password used to connect to the SMB share) to the Windows Credential Manager (Control Panel\All Control Panel Items\Credential Manager\Windows Credential or run the command control.exe keymgr.dll).
Click Add a Windows credential and specify the SMB file server hostname (or IP) and the connection credentials.
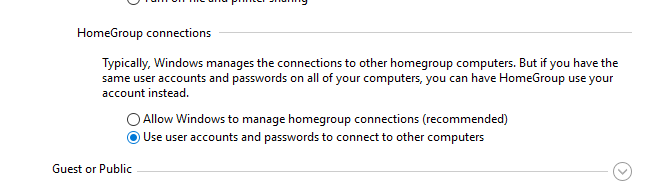
Then go to Network and Sharing Center and enable the option Use user accounts and passwords to connect to other computers in the Advanced sharing settings.
Windows automatically uses the saved credentials to access the specified file server resources.
I hope that my article will be useful to you and that you will be able to restore access to your shared folders on LAN.
Source :
https://woshub.com/error-code-0x80070035-network-path-not-found-windows-10/