Small businesses are often targeted by cybercriminals due to their lack of resources and security measures. Protecting your business from cyber threats is crucial to avoid data breaches and financial losses.
Why is cyber security so important for small businesses?
Small businesses are particularly in danger of cyberattacks, which can result in financial loss, data breaches, and damage to IT equipment. To protect your business, it’s important to implement strong cybersecurity measures.
Here are some tips to help you get started:
One important aspect of data protection and cybersecurity for small businesses is controlling access to customer lists. It’s important to limit access to this sensitive information to only those employees who need it to perform their job duties. Additionally, implementing strong password policies and regularly updating software and security measures can help prevent unauthorized access and protect against cyber attacks. Regular employee training on cybersecurity best practices can also help ensure that everyone in the organization is aware of potential threats and knows how to respond in the event of a breach.
When it comes to protecting customer credit card information in small businesses, there are a few key tips to keep in mind. First and foremost, it’s important to use secure payment processing systems that encrypt sensitive data. Additionally, it’s crucial to regularly update software and security measures to stay ahead of potential threats. Employee training and education on cybersecurity best practices can also go a long way in preventing data breaches. Finally, having a plan in place for responding to a breach can help minimize the damage and protect both your business and your customers.
Small businesses are often exposed to cyber attacks, making data protection and cybersecurity crucial. One area of particular concern is your company’s banking details. To protect this sensitive information, consider implementing strong passwords, two-factor authentication, and regular monitoring of your accounts. Additionally, educate your employees on safe online practices and limit access to financial information to only those who need it. Regularly backing up your data and investing in cybersecurity software can also help prevent data breaches.
Small businesses are often at high risk of cyber attacks due to their limited resources and lack of expertise in cybersecurity. To protect sensitive data, it is important to implement strong passwords, regularly update software and antivirus programs, and limit access to confidential information.
It is also important to have a plan in place in case of a security breach, including steps to contain the breach and notify affected parties. By taking these steps, small businesses can better protect themselves from cyber threats and ensure the safety of their data.
Tips for protecting your small business from cyber threats and data breaches are crucial in today’s digital age. One of the most important steps is to educate your employees on cybersecurity best practices, such as using strong passwords and avoiding suspicious emails or links.
It’s also important to regularly update your software and systems to ensure they are secure and protected against the latest threats. Additionally, implementing multi-factor authentication and encrypting sensitive data can add an extra layer of protection. Finally, having a plan in place for responding to a cyber-attack or data breach can help minimize the damage and get your business back on track as quickly as possible.
Small businesses are attackable to cyber-attacks and data breaches, which can have devastating consequences. To protect your business, it’s important to implement strong cybersecurity measures. This includes using strong passwords, regularly updating software and systems, and training employees on how to identify and avoid phishing scams.
It’s also important to have a data backup plan in place and to regularly test your security measures to ensure they are effective. By taking these steps, you can help protect your business from cyber threats and safeguard your valuable data.
To protect against cyber threats, it’s important to implement strong data protection and cybersecurity measures. This can include regularly updating software and passwords, using firewalls and antivirus software, and providing employee training on safe online practices. Additionally, it’s important to have a plan in place for responding to a cyber attack, including backing up data and having a designated point person for handling the situation.
In today’s digital age, small businesses must prioritize data protection and cybersecurity to safeguard their operations and reputation. With the rise of remote work and cloud-based technology, businesses are more vulnerable to cyber attacks than ever before. To mitigate these risks, it’s crucial to implement strong security measures for online meetings, advertising, transactions, and communication with customers and suppliers. By prioritizing cybersecurity, small businesses can protect their data and prevent unauthorized access or breaches.
Here are 8 essential tips for data protection and cybersecurity in small businesses.
1. Train Your Employees on Cybersecurity Best Practices
Your employees are the first line of defense against cyber threats. It’s important to train them on cybersecurity best practices to ensure they understand the risks and how to prevent them. This includes creating strong passwords, avoiding suspicious emails and links, and regularly updating software and security systems. Consider providing regular training sessions and resources to keep your employees informed and prepared.
2. Use Strong Passwords and Two-Factor Authentication
One of the most basic yet effective ways to protect your business from cyber threats is to use strong passwords and two-factor authentication. Encourage your employees to use complex passwords that include a mix of letters, numbers, and symbols, and to avoid using the same password for multiple accounts. Two-factor authentication adds an extra layer of security by requiring a second form of verification, such as a code sent to a mobile device, before granting access to an account. This can help prevent unauthorized access even if a password is compromised.
3. Keep Your Software and Systems Up to Date
One of the easiest ways for cybercriminals to gain access to your business’s data is through outdated software and systems. Hackers are constantly looking for vulnerabilities in software and operating systems, and if they find one, they can exploit it to gain access to your data. To prevent this, make sure all software and systems are kept up-to-date with the latest security patches and updates. This includes not only your computers and servers but also any mobile devices and other connected devices used in your business. Set up automatic updates whenever possible to ensure that you don’t miss any critical security updates.
4. Use Antivirus and Anti-Malware Software
Antivirus and anti-malware software are essential tools for protecting your small business from cyber threats. These programs can detect and remove malicious software, such as viruses, spyware, and ransomware before they can cause damage to your systems or steal your data. Make sure to install reputable antivirus and anti-malware software on all devices used in your business, including computers, servers, and mobile devices. Keep the software up-to-date and run regular scans to ensure that your systems are free from malware.
5. Backup Your Data Regularly
One of the most important steps you can take to protect your small business from data loss is to back up your data regularly. This means creating copies of your important files and storing them in a secure location, such as an external hard drive or cloud storage service. In the event of a cyber-attack or other disaster, having a backup of your data can help you quickly recover and minimize the impact on your business. Make sure to test your backups regularly to ensure that they are working properly and that you can restore your data if needed.
6. Carry out a risk assessment
Small businesses are especially in peril of cyber attacks, making it crucial to prioritize data protection and cybersecurity. One important step is to assess potential risks that could compromise your company’s networks, systems, and information. By identifying and analyzing possible threats, you can develop a plan to address security gaps and protect your business from harm.
For Small businesses making data protection and cybersecurity is a crucial part. To start, conduct a thorough risk assessment to identify where and how your data is stored, who has access to it, and potential threats. If you use cloud storage, consult with your provider to assess risks. Determine the potential impact of breaches and establish risk levels for different events. By taking these steps, you can better protect your business from cyber threats
7. Limit access to sensitive data
One effective strategy is to limit access to critical data to only those who need it. This reduces the risk of a data breach and makes it harder for malicious insiders to gain unauthorized access. To ensure accountability and clarity, create a plan that outlines who has access to what information and what their roles and responsibilities are. By taking these steps, you can help safeguard your business against cyber threats.
8. Use a firewall
For Small businesses, it’s important to protect the system from cyber attacks by making data protection and reducing cybersecurity risk. One effective measure is implementing a firewall, which not only protects hardware but also software. By blocking or deterring viruses from entering the network, a firewall provides an added layer of security. It’s important to note that a firewall differs from an antivirus, which targets software affected by a virus that has already infiltrated the system.
Small businesses can take steps to protect their data and ensure cybersecurity. One important step is to install a firewall and keep it updated with the latest software or firmware. Regularly checking for updates can help prevent potential security breaches.
Conclusion
Small businesses are particularly vulnerable to cyber attacks, so it’s important to take steps to protect your data. One key tip is to be cautious when granting access to your systems, especially to partners or suppliers. Before granting access, make sure they have similar cybersecurity practices in place. Don’t hesitate to ask for proof or to conduct a security audit to ensure your data is safe.
In Part 1: Rethinking Cache Purge, Fast and Scalable Global Cache Invalidation, we outlined the importance of cache invalidation and the difficulties of purging caches, how our existing purge system was designed and performed, and we gave a high level overview of what we wanted our new Cache Purge system to look like.
It’s been a while since we published the first blog post and it’s time for an update on what we’ve been working on. In this post we’ll be talking about some of the architecture improvements we’ve made so far and what we’re working on now.
Cache Purge end to end
We touched on the high level design of what we called the “coreless” purge system in part 1, but let’s dive deeper into what that design encompasses by following a purge request from end to end:
Step 1: Request received locally
An API request to Cloudflare is routed to the nearest Cloudflare data center and passed to an API Gateway worker. This worker looks at the request URL to see which service it should be sent to and forwards the request to the appropriate upstream backend. Most endpoints of the Cloudflare API are currently handled by centralized services, so the API Gateway worker is often just proxying requests to the nearest “core” data center which have their own gateway services to handle authentication, authorization, and further routing. But for endpoints which aren’t handled centrally the API Gateway worker must handle authentication and route authorization, and then proxy to an appropriate upstream. For cache purge requests that upstream is a Purge Ingest worker in the same data center.
Step 2: Purges tested locally
The Purge Ingest worker evaluates the purge request to make sure it is processible. It scans the URLs in the body of the request to see if they’re valid, then attempts to purge the URLs from the local data center’s cache. This concept of local purging was a new step introduced with the coreless purge system allowing us to capitalize on existing logic already used in every data center.
By leveraging the same ownership checks our data centers use to serve a zone’s normal traffic on the URLs being purged, we can determine if those URLs are even cacheable by the zone. Currently more than 50% of the URLs we’re asked to purge can’t be cached by the requesting zones, either because they don’t own the URLs (e.g. a customer asking us to purge https://cloudflare.com) or because the zone’s settings for the URL prevent caching (e.g. the zone has a “bypass” cache rule that matches the URL). All such purges are superfluous and shouldn’t be processed further, so we filter them out and avoid broadcasting them to other data centers freeing up resources to process more legitimate purges.
On top of that, generating the cache key for a file isn’t free; we need to load zone configuration options that might affect the cache key, apply various transformations, et cetera. The cache key for a given file is the same in every data center though, so when we purge the file locally we now return the generated cache key to the Purge Ingest worker and broadcast that key to other data centers instead of making each data center generate it themselves.
Step 3: Purges queued for broadcasting
Once the local purge is done the Purge Ingest worker forwards the purge request with the cache key obtained from the local cache to a Purge Queue worker. The queue worker is a Durable Object worker using its persistent state to hold a queue of purges it receives and pointers to how far along in the queue each data center in our network is in processing purges.
The queue is important because it allows us to automatically recover from a number of scenarios such as connectivity issues or data centers coming back online after maintenance. Having a record of all purges since an issue arose lets us replay those purges to a data center and “catch up”.
But Durable Objects are globally unique, so having one manage all global purges would have just moved our centrality problem from a core data center to wherever that Durable Object was provisioned. Instead we have dozens of Durable Objects in each region, and the Purge Ingest worker looks at the load balancing pool of Durable Objects for its region and picks one (often in the same data center) to forward the request to. The Durable Object will write the purge request to its queue and immediately loop through all the data center pointers and attempt to push any outstanding purges to each.
While benchmarking our performance we found our particular workload exhibited a “goldilocks zone” of throughput to a given Durable Object. On script startup we have to load all sorts of data like network topology and data center health–then refresh it continuously in the background–and as long as the Durable Object sees steady traffic it stays active and we amortize those startup costs. But if you ask a single Durable Object to do too much at once like send or receive too many requests, the single-threaded runtime won’t keep up. Regional purge traffic fluctuates a lot depending on local time of day, so there wasn’t a static quantity of Durable Objects per region that would let us stay within the goldilocks zone of enough requests to each to keep them active but not too many to keep them efficient. So we built load monitoring into our Durable Objects, and a Regional Autoscaler worker to aggregate that data and adjust load balancing pools when we start approaching the upper or lower edges of our efficiency goldilocks zone.
Step 4: Purges broadcast globally
Once a purge request is queued by a Purge Queue worker it needs to be broadcast to the rest of Cloudflare’s data centers to be carried out by their caches. The Durable Objects will broadcast purges directly to all data centers in their region, but when broadcasting to other regions they pick a Purge Fanout worker per region to take care of their region’s distribution. The fanout workers manage queues of their own as well as pointers for all of their region’s data centers, and in fact they share a lot of the same logic as the Purge Queue workers in order to do so. One key difference is fanout workers aren’t Durable Objects; they’re normal worker scripts, and their queues are purely in memory as opposed to being backed by Durable Object state. This means not all queue worker Durable Objects are talking to the same fanout worker in each region. Fanout workers can be dropped and spun up again quickly by any metal in the data center because they aren’t canonical sources of state. They maintain queues and pointers for their region but all of that info is also sent back downstream to the Durable Objects who persist that data themselves, reliably.
But what does the fanout worker get us? Cloudflare has hundreds of data centers all over the world, and as we mentioned above we benefit from keeping the number of incoming and outgoing requests for a Durable Object fairly low. Sending purges to a fanout worker per region means each Durable Object only has to make a fraction of the requests it would if it were broadcasting to every data center directly, which means it can process purges faster.
On top of that, occasionally a request will fail to get where it was going and require retransmission. When this happens between data centers in the same region it’s largely unnoticeable, but when a Durable Object in Canada has to retry a request to a data center in rural South Africa the cost of traversing that whole distance again is steep. The data centers elected to host fanout workers have the most reliable connections in their regions to the rest of our network. This minimizes the chance of inter-regional retries and limits the latency imposed by retries to regional timescales.
The introduction of the Purge Fanout worker was a massive improvement to our distribution system, reducing our end-to-end purge latency by 50% on its own and increasing our throughput threefold.
Current status of coreless purge
We are proud to say our new purge system has been in production serving purge by URL requests since July 2022, and the results in terms of latency improvements are dramatic. In addition, flexible purge requests (purge by tag/prefix/host and purge everything) share and benefit from the new coreless purge system’s entrypoint workers before heading to a core data center for fulfillment.
The reason flexible purge isn’t also fully coreless yet is because it’s a more complex task than “purge this object”; flexible purge requests can end up purging multiple objects–or even entire zones–from cache. They do this through an entirely different process that isn’t coreless compatible, so to make flexible purge fully coreless we would have needed to come up with an entirely new multi-purge mechanism on top of redesigning distribution. We chose instead to start with just purge by URL so we could focus purely on the most impactful improvements, revamping distribution, without reworking the logic a data center uses to actually remove an object from cache.
This is not to say that the flexible purges haven’t benefited from the coreless purge project. Our cache purge API lets users bundle single file and flexible purges in one request, so the API Gateway worker and Purge Ingest worker handle authorization, authentication and payload validation for flexible purges too. Those flexible purges get forwarded directly to our services in core data centers pre-authorized and validated which reduces load on those core data center auth services. As an added benefit, because authorization and validity checks all happen at the edge for all purge types users get much faster feedback when their requests are malformed.
Next steps
While coreless cache purge has come a long way since the part 1 blog post, we’re not done. We continue to work on reducing end-to-end latency even more for purge by URL because we can do better. Alongside improvements to our new distribution system, we’ve also been working on the redesign of flexible purge to make it fully coreless, and we’re really excited to share the results we’re seeing soon. Flexible cache purge is an incredibly popular API and we’re giving its refresh the care and attention it deserves.
Visit 1.1.1.1 from any device to get started with our free app that makes your Internet faster and safer.
To learn more about our mission to help build a better Internet, start here. If you’re looking for a new career direction, check out our open positions.
There is a famous quote attributed to a Netscape engineer: “There are only two difficult problems in computer science: cache invalidation and naming things.” While naming things does oddly take up an inordinate amount of time, cache invalidation shouldn’t.
In the past we’ve written about Cloudflare’s incredibly fast response times, whether content is cached on our global network or not. If content is cached, it can be served from a Cloudflare cache server, which are distributed across the globe and are generally a lot closer in physical proximity to the visitor. This saves the visitor’s request from needing to go all the way back to an origin server for a response. But what happens when a webmaster updates something on their origin and would like these caches to be updated as well? This is where cache “purging” (also known as “invalidation”) comes in.
Customers thinking about setting up a CDN and caching infrastructure consider questions like:
How do different caching invalidation/purge mechanisms compare?
How many times a day/hour/minute do I expect to purge content?
How quickly can the cache be purged when needed?
This blog will discuss why invalidating cached assets is hard, what Cloudflare has done to make it easy (because we care about your experience as a developer), and the engineering work we’re putting in this year to make the performance and scalability of our purge services the best in the industry.
What makes purging difficult also makes it useful
(i) Scale The first thing that complicates cache invalidation is doing it at scale. With data centers in over 270 cities around the globe, our most popular users’ assets can be replicated at every corner of our network. This also means that a purge request needs to be distributed to all data centers where that content is cached. When a data center receives a purge request, it needs to locate the cached content to ensure that subsequent visitor requests for that content are not served stale/outdated data. Requests for the purged content should be forwarded to the origin for a fresh copy, which is then re-cached on its way back to the user.
This process repeats for every data center in Cloudflare’s fleet. And due to Cloudflare’s massive network, maintaining this consistency when certain data centers may be unreachable or go offline, is what makes purging at scale difficult.
Making sure that every data center gets the purge command and remains up-to-date with its content logs is only part of the problem. Getting the purge request to data centers quickly so that content is updated uniformly is the next reason why cache invalidation is hard.
(ii) Speed When purging an asset, race conditions abound. Requests for an asset can happen at any time, and may not follow a pattern of predictability. Content can also change unpredictably. Therefore, when content changes and a purge request is sent, it must be distributed across the globe quickly. If purging an individual asset, say an image, takes too long, some visitors will be served the new version, while others are served outdated content. This data inconsistency degrades user experience, and can lead to confusion as to which version is the “right” version. Websites can sometimes even break in their entirety due to this purge latency (e.g. by upgrading versions of a non-backwards compatible JavaScript library).
Purging at speed is also difficult when combined with Cloudflare’s massive global footprint. For example, if a purge request is traveling at the speed of light between Tokyo and Cape Town (both cities where Cloudflare has data centers), just the transit alone (no authorization of the purge request or execution) would take over 180ms on average based on submarine cable placement. Purging a smaller network footprint may reduce these speed concerns while making purge times appear faster, but does so at the expense of worse performance for customers who want to make sure that their cached content is fast for everyone.
(iii) Scope The final thing that makes purge difficult is making sure that only the unneeded web assets are invalidated. Maintaining a cache is important for egress cost savings and response speed. Webmasters’ origins could be knocked over by a thundering herd of requests, if they choose to purge all content needlessly. It’s a delicate balance of purging just enough: too much can result in both monetary and downtime costs, and too little will result in visitors receiving outdated content.
At Cloudflare, what to invalidate in a data center is often dictated by the type of purge.Purge everything, as you could probably guess, purges all cached content associated with a website. Purge by prefix purges content based on a URL prefix. Purge by hostname can invalidate content based on a hostname. Purge by URL or single file purge focuses on purging specified URLs. Finally, Purge by tag purges assets that are marked with Cache-Tag headers. These markers offer webmasters flexibility in grouping assets together. When a purge request for a tag comes into a data center, all assets marked with that tag will be invalidated.
With that overview in mind, the remainder of this blog will focus on putting each element of invalidation together to benchmark the performance of Cloudflare’s purge pipeline and provide context for what performance means in the real-world. We’ll be reviewing how fast Cloudflare can invalidate cached content across the world. This will provide a baseline analysis for how quick our purge systems are presently, which we will use to show how much we will improve by the time we launch our new purge system later this year.
How does purge work currently?
In general, purge takes the following route through Cloudflare’s data centers.
A purge request is initiated via the API or UI. This request specifies how our data centers should identify the assets to be purged. This can be accomplished via cache-tag header(s), URL(s), entire hostnames, and much more.
The request is received by any Cloudflare data center and is identified to be a purge request. It is then routed to a Cloudflare core data center (a set of a few data centers responsible for network management activities).
When a core data center receives it, the request is processed by a number of internal services that (for example) make sure the request is being sent from an account with the appropriate authorization to purge the asset. Following this, the request gets fanned out globally to all Cloudflare data centers using our distribution service.
When received by a data center, the purge request is processed and all assets with the matching identification criteria are either located and removed, or marked as stale. These stale assets are not served in response to requests and are instead re-pulled from the origin.
After being pulled from the origin, the response is written to cache again, replacing the purged version.
Now let’s look at this process in practice. Below we describe Cloudflare’s purge benchmarking that uses real-world performance data from our purge pipeline.
Benchmarking purge performance design
In order to understand how performant Cloudflare’s purge system is, we measured the time it took from sending the purge request to the moment that the purge is complete and the asset is no longer served from cache.
In general, the process of measuring purge speeds involves: (i) ensuring that a particular piece of content is cached, (ii) sending the command to invalidate the cache, (iii) simultaneously checking our internal system logs for how the purge request is routed through our infrastructure, and (iv) measuring when the asset is removed from cache (first miss).
This process measures how quickly cache is invalidated from the perspective of an average user.
Clock starts As noted above, in this experiment we’re using sampled RUM data from our purge systems. The goal of this experiment is to benchmark current data for how long it can take to purge an asset on Cloudflare across different regions. Once the asset was cached in a region on Cloudflare, we identify when a purge request is received for that asset. At that same instant, the clock started for this experiment. We include in this time any retrys that we needed to make (due to data centers missing the initial purge request) to ensure that the purge was done consistently across our network. The clock continues as the request transits our purge pipeline (data center > core > fanout > purge from all data centers).
Clock stops What caused the clock to stop was the purged asset being removed from cache, meaning that the data center is no longer serving the asset from cache to visitor’s requests. Our internal logging measures the precise moment that the cache content has been removed or expired and from that data we were able to determine the following benchmarks for our purge types in various regions.
Results
We’ve divided our benchmarks in two ways: by purge type and by region.
We singled out Purge by URL because it identifies a single target asset to be purged. While that asset can be stored in multiple locations, the amount of data to be purged is strictly defined.
We’ve combined all other types of purge (everything, tag, prefix, hostname) together because the amount of data to be removed is highly variable. Purging a whole website or by assets identified with cache tags could mean we need to find and remove a multitude of content from many different data centers in our network.
Secondly, we have segmented our benchmark measurements by regions and specifically we confined the benchmarks to specific data center servers in the region because we were concerned about clock skews between different data centers. This is the reason why we limited the test to the same cache servers so that even if there was skew, they’d all be skewed in the same way.
We took the latency from the representative data centers in each of the following regions and the global latency. Data centers were not evenly distributed in each region, but in total represent about 90 different cities around the world:
Africa
Asia Pacific Region (APAC)
Eastern Europe (EEUR)
Eastern North America (ENAM)
Oceania
South America (SA)
Western Europe (WEUR)
Western North America (WNAM)
The global latency numbersrepresent the purge data from all Cloudflare data centers in over 270 cities globally. In the results below, global latency numbers may be larger than the regional numbers because it represents all of our data centers instead of only a regional portion so outliers and retries might have an outsized effect.
Below are the results for how quickly our current purge pipeline was able to invalidate content by purge type and region. All times are represented in seconds and divided into P50, P75, and P99 quantiles. Meaning for “P50” that 50% of the purges were at the indicated latency or faster.
Purge By URL
P50
P75
P99
AFRICA
0.95s
1.94s
6.42s
APAC
0.91s
1.87s
6.34s
EEUR
0.84s
1.66s
6.30s
ENAM
0.85s
1.71s
6.27s
OCEANIA
0.95s
1.96s
6.40s
SA
0.91s
1.86s
6.33s
WEUR
0.84s
1.68s
6.30s
WNAM
0.87s
1.74s
6.25s
GLOBAL
1.31s
1.80s
6.35s
Purge Everything, by Tag, by Prefix, by Hostname
P50
P75
P99
AFRICA
1.42s
1.93s
4.24s
APAC
1.30s
2.00s
5.11s
EEUR
1.24s
1.77s
4.07s
ENAM
1.08s
1.62s
3.92s
OCEANIA
1.16s
1.70s
4.01s
SA
1.25s
1.79s
4.106s
WEUR
1.19s
1.73s
4.04s
WNAM
0.9995s
1.53s
3.83s
GLOBAL
1.57s
2.32s
5.97s
A general note about these benchmarks — the data represented here was taken from over 48 hours (two days) of RUM purge latency data in May 2022. If you are interested in how quickly your content can be invalidated on Cloudflare, we suggest you test our platform with your website.
Those numbers are good and much faster than most of our competitors. Even in the worst case, we see the time from when you tell us to purge an item to when it is removed globally is less than seven seconds. In most cases, it’s less than a second. That’s great for most applications, but we want to be even faster. Our goal is to get cache purge to as close as theoretically possible to the speed of light limit for a network our size, which is 200ms.
Intriguingly, LEO satellite networks may be able to provide even lower global latency than fiber optics because of the straightness of the paths between satellites that use laser links. We’ve done calculations of latency between LEO satellites that suggest that there are situations in which going to space will be the fastest path between two points on Earth. We’ll let you know if we end up using laser-space-purge.
Just as we have with network performance, we are going to relentlessly measure our cache performance as well as the cache performance of our competitors. We won’t be satisfied until we verifiably are the fastest everywhere. To do that, we’ve built a new cache purge architecture which we’re confident will make us the fastest cache purge in the industry.
Our new architecture
Through the end of 2022, we will continue this blog series incrementally showing how we will become the fastest, most-scalable purge system in the industry. We will continue to update you with how our purge system is developing and benchmark our data along the way.
Getting there will involve rearchitecting and optimizing our purge service, which hasn’t received a systematic redesign in over a decade. We’re excited to do our development in the open, and bring you along on our journey.
So what do we plan on updating?
Introducing Coreless Purge
The first version of our cache purge system was designed on top of a set of central core services including authorization, authentication, request distribution, and filtering among other features that made it a high-reliability service. These core components had ultimately become a bottleneck in terms of scale and performance as our network continues to expand globally. While most of our purge dependencies have been containerized, the message queue used was still running on bare metals, which led to increased operational overhead when our system needed to scale.
Last summer, we built a proof of concept for a completely decentralized cache invalidation system using in-house tech – Cloudflare Workers and Durable Objects. Using Durable Objects as a queuing mechanism gives us the flexibility to scale horizontally by adding more Durable Objects as needed and can reduce time to purge with quick regional fanouts of purge requests.
In the new purge system we’re ripping out the reliance on core data centers and moving all that functionality to every data center, we’re calling it coreless purge.
Here’s a general overview of how coreless purge will work:
A purge request will be initiated via the API or UI. This request will specify how we should identify the assets to be purged.
The request will be routed to the nearest Cloudflare data center where it is identified to be a purge request and be passed to a Worker that will perform several of the key functions that currently occur in the core (like authorization, filtering, etc).
From there, the Worker will pass the purge request to a Durable Object in the data center. The Durable Object will queue all the requests and broadcast them to every data center when they are ready to be processed.
When the Durable Object broadcasts the purge request to every data center, another Worker will pass the request to the service in the data center that will invalidate the content in cache (executes the purge).
We believe this re-architecture of our system built by stringing together multiple services from the Workers platform will help improve both the speed and scalability of the purge requests we will be able to handle.
Conclusion
We’re going to spend a lot of time building and optimizing purge because, if there’s one thing we learned here today, it’s that cache invalidation is a difficult problem but those are exactly the types of problems that get us out of bed in the morning.
If you want to help us optimize our purge pipeline, we’re hiring.
Visit 1.1.1.1 from any device to get started with our free app that makes your Internet faster and safer.
To learn more about our mission to help build a better Internet, start here. If you’re looking for a new career direction, check out our open positions.
Throughout Speed Week, we have talked about the importance of optimizing performance. Compression plays a crucial role by reducing file sizes transmitted over the Internet. Smaller file sizes lead to faster downloads, quicker website loading, and an improved user experience.
Take household cleaning products as a real world example. It is estimated “a typical bottle of cleaner is 90% water and less than 10% actual valuable ingredients”. Removing 90% of a typical 500ml bottle of household cleaner reduces the weight from 600g to 60g. This reduction means only a 60g parcel, with instructions to rehydrate on receipt, needs to be sent. Extrapolated into the gallons, this weight reduction soon becomes a huge shipping saving for businesses. Not to mention the environmental impact.
This is how compression works. The sender compresses the file to its smallest possible size, and then sends the smaller file with instructions on how to handle it when received. By reducing the size of the files sent, compression ensures the amount of bandwidth needed to send files over the Internet is a lot less. Where files are stored in expensive cloud providers like AWS, reducing the size of files sent can directly equate to significant cost savings on bandwidth.
Smaller file sizes are also particularly beneficial for end users with limited Internet connections, such as mobile devices on cellular networks or users in areas with slow network speeds.
Cloudflare has always supported compression in the form of Gzip. Gzip is a widely used compression algorithm that has been around since 1992 and provides file compression for all Cloudflare users. However, in 2013 Google introduced Brotli which supports higher compression levels and better performance overall. Switching from gzip to Brotli results in smaller file sizes and faster load times for web pages. We have supported Brotli since 2017 for the connection between Cloudflare and client browsers. Today we are announcing end-to-end Brotli support for web content: support for Brotli compression, at the highest possible levels, from the origin server to the client.
If your origin server supports Brotli, turn it on, crank up the compression level, and enjoy the performance boost.
Brotli compression to 11
Brotli has 12 levels of compression ranging from 0 to 11, with 0 providing the fastest compression speed but the lowest compression ratio, and 11 offering the highest compression ratio but requiring more computational resources and time. During our initial implementation of Brotli five years ago, we identified that compression level 4 offered the balance between bytes saved and compression time without compromising performance.
Since 2017, Cloudflare has been using a maximum compression of Brotli level 4 for all compressible assets based on the end user’s “accept-encoding” header. However, one issue was that Cloudflare only requested Gzip compression from the origin, even if the origin supported Brotli. Furthermore, Cloudflare would always decompress the content received from the origin before compressing and sending it to the end user, resulting in additional processing time. As a result, customers were unable to fully leverage the benefits offered by Brotli compression.
Old world
With Cloudflare now fully supporting Brotli end to end, customers will start seeing our updated accept-encoding header arriving at their origins. Once available customers can transfer, cache and serve heavily compressed Brotli files directly to us, all the way up to the maximum level of 11. This will help reduce latency and bandwidth consumption. If the end user device does not support Brotli compression, we will automatically decompress the file and serve it either in its decompressed format or as a Gzip-compressed file, depending on the Accept-Encoding header.
Full end-to-end Brotli compression support
End user cannot support Brotli compression
Customers can implement Brotli compression at their origin by referring to the appropriate online materials. For example, customers that are using NGINX, can implement Brotli by following this tutorial and setting compression at level 11 within the nginx.conf configuration file as follows:
Cloudflare will then serve these assets to the client at the exact same compression level (11) for the matching file brotli_types. This means any SVG or BMP images will be sent to the client compressed at Brotli level 11.
Testing
We applied compression against a simple CSS file, measuring the impact of various compression algorithms and levels. Our goal was to identify potential improvements that users could experience by optimizing compression techniques. These results can be seen in the following table:
Test
Size (bytes)
% Reduction of original file (Higher % better)
Uncompressed response (no compression used)
2,747
–
Cloudflare default Gzip compression (level 8)
1,121
59.21%
Cloudflare default Brotli compression (level 4)
1,110
59.58%
Compressed with max Gzip level (level 9)
1,121
59.21%
Compressed with max Brotli level (level 11)
909
66.94%
By compressing Brotli at level 11 users are able to reduce their file sizes by 19% compared to the best Gzip compression level. Additionally, the strongest Brotli compression level is around 18% smaller than the default level used by Cloudflare. This highlights a significant size reduction achieved by utilizing Brotli compression, particularly at its highest levels, which can lead to improved website performance, faster page load times and an overall reduction in egress fees.
To take advantage of higher end to end compression rates the following Cloudflare proxy features need to be disabled.
Email Obfuscation
Rocket Loader
Server Side Excludes (SSE)
Mirage
HTML Minification – JavaScript and CSS can be left enabled.
Automatic HTTPS Rewrites
This is due to Cloudflare needing to decompress and access the body to apply the requested settings. Alternatively a customer can disable these features for specific paths using Configuration Rules.
If any of these rewrite features are enabled, your origin can still send Brotli compression at higher levels. However, we will decompress, apply the Cloudflare feature(s) enabled, and recompress on the fly using Cloudflare’s default Brotli level 4 or Gzip level 8 depending on the user’s accept-encoding header.
For browsers that do not accept Brotli compression, we will continue to decompress and send Gzipped responses or uncompressed.
Implementation
The initial step towards implementing Brotli from the origin involved constructing a decompression module that could be integrated into Cloudflare software stack. It allows us to efficiently convert the compressed bits received from the origin into the original, uncompressed file. This step was crucial as numerous features such as Email Obfuscation and Cloudflare Workers Customers, rely on accessing the body of a response to apply customizations.
We integrated the decompressor into the core reverse web proxy of Cloudflare. This integration ensured that all Cloudflare products and features could access Brotli decompression effortlessly. This also allowed our Cloudflare Workers team to incorporate Brotli Directly into Cloudflare Workers allowing our Workers customers to be able to interact with responses returned in Brotli or pass through to the end user unmodified.
Introducing Compression rules – Granular control of compression to end users
By default Cloudflare compresses certain content types based on the Content-Type header of the file. Today we are also announcing Compression Rules for our Enterprise Customers to allow you even more control on how and what Cloudflare will compress.
Today we are also announcing the introduction of Compression Rules for our Enterprise Customers. With Compression Rules, you gain enhanced control over Cloudflare’s compression capabilities, enabling you to customize how and which content Cloudflare compresses to optimize your website’s performance.
For example, by using Cloudflare’s Compression Rules for .ktx files, customers can optimize the delivery of textures in webGL applications, enhancing the overall user experience. Enabling compression minimizes the bandwidth usage and ensures that webGL applications load quickly and smoothly, even when dealing with large and detailed textures.
Alternatively customers can disable compression or specify a preference of how we compress. Another example could be an Infrastructure company only wanting to support Gzip for their IoT devices but allow Brotli compression for all other hostnames.
Compression rules use the filters that our other rules products are built on top of with the added fields of Media Type and Extension type. Allowing users to easily specify the content you wish to compress.
Deprecating the Brotli toggle
Brotli has been long supported by some web browsers since 2016 and Cloudflare offered Brotli Support in 2017. As with all new web technologies Brotli was unknown and we gave customers the ability to selectively enable or disable BrotlI via the API and our UI.
Now that Brotli has evolved and is supported by all browsers, we plan to enable Brotli on all zones by default in the coming months. Mirroring the Gzip behavior we currently support and removing the toggle from our dashboard. If browsers do not support Brotli, Cloudflare will continue to support their accepted encoding types such as Gzip or uncompressed and Enterprise customers will still be able to use Compression rules to granularly control how we compress data towards their users.
The future of web compression
We’ve seen great adoption and great performance for Brotli as the new compression technique for the web. Looking forward, we are closely following trends and new compression algorithms such as zstd as a possible next-generation compression algorithm.
At the same time, we’re looking to improve Brotli directly where we can. One development that we’re particularly focused on is shared dictionaries with Brotli. Whenever you compress an asset, you use a “dictionary” that helps the compression to be more efficient. A simple analogy of this is typing OMW into an iPhone message. The iPhone will automatically translate it into On My Way using its own internal dictionary.
O
M
W
O
n
M
y
W
a
y
This internal dictionary has taken three characters and morphed this into nine characters (including spaces) The internal dictionary has saved six characters which equals performance benefits for users.
By default, the Brotli RFC defines a static dictionary that both clients and the origin servers use. The static dictionary was designed to be general purpose and apply to everyone. Optimizing the size of the dictionary as to not be too large whilst able to generate best compression results. However, what if an origin could generate a bespoke dictionary tailored to a specific website? For example a Cloudflare-specific dictionary would allow us to compress the words and phrases that appear repeatedly on our site such as the word “Cloudflare”. The bespoke dictionary would be designed to compress this as heavily as possible and the browser using the same dictionary would be able to translate this back.
A new proposal by the Web Incubator CG aims to do just that, allowing you to specify your own dictionaries that browsers can use to allow websites to optimize compression further. We’re excited about contributing to this proposal and plan on publishing our research soon.
Try it now
Compression Rules are available now! With End to End Brotli being rolled out over the coming weeks. Allowing you to improve performance, reduce bandwidth and granularly control how Cloudflare handles compression to your end users.
Visit 1.1.1.1 from any device to get started with our free app that makes your Internet faster and safer.
To learn more about our mission to help build a better Internet, start here. If you’re looking for a new career direction, check out our open positions.
Every day, website visitors spend far too much time waiting for websites to load in their browsers. This waiting is partially due to browsers not knowing which resources are critically important so they can prioritize them ahead of less-critical resources. In this blog we will outline how millions of websites across the Internet can improve their performance by specifying which critical content loads first with Cloudflare Workers and what Cloudflare will do to make this easier by default in the future.
Popular Content Management Systems (CMS) like WordPress have made attempts to influence website resource priority, for example through techniques like lazy loading images. When done correctly, the results are magical. Performance is optimized between the CMS and browser without needing to implement any changes or coding new prioritization strategies. However, we’ve seen that these default priorities have opportunities to improve greatly.
In this co-authored blog with Google’s Patrick Meenan we will explain where the opportunities exist to improve website performance, how to check if a specific site can improve performance, and provide a small JavaScript snippet which can be used with Cloudflare Workers to do this optimization for you.
What happens when a browser receives the response?
Before we dive into where the opportunities are to improve website performance, let’s take a step back to understand how browsers load website assets by default.
After the browser sends a HTTP request to a server, it receives a HTTP response containing information like status codes, headers, and the requested content. The browser carefully analyzes the response’s status code and response headers to ensure proper handling of the content.
Next, the browser processes the content itself. For HTML responses, the browser extracts important information from the <head> section of the HTML, such as the page title, stylesheets, and scripts. Once this information is parsed, the browser moves on to the response <body> which has the actual page content. During this stage, the browser begins to present the webpage to the visitor.
If the response includes additional 3rd party resources like CSS, JavaScript, or other content, the browser may need to fetch and integrate them into the webpage. Typically, browsers like Google Chrome delay loading images until after the resources in the HTML <head> have loaded. This is also known as “blocking” the render of the webpage. However, developers can override this blocking behavior using fetch priority or other methods to boost other content’s priority in the browser. By adjusting an important image’s fetch priority, it can be loaded earlier, which can lead to significant improvements in crucial performance metrics like LCP (Largest Contentful Paint).
Images are so central to web pages that they have become an essential element in measuring website performance from Core Web Vitals. LCP measures the time it takes for the largest visible element, often an image, to be fully rendered on the screen. Optimizing the loading of critical images (like LCP images) can greatly enhance performance, improving the overall user experience and page performance.
But here’s the challenge – a browser may not know which images are the most important for the visitor experience (like the LCP image) until rendering begins. If the developer can identify the LCP image or critical elements before it reaches the browser, its priority can be increased at the server to boost website performance instead of waiting for the browser to naturally discover the critical images.
In our Smart Hints blog, we describe how Cloudflare will soon be able to automatically prioritize content on behalf of website developers, but what happens if there’s a need to optimize the priority of the images right now? How do you know if a website is in a suboptimal state and what can you do to improve?
Using Cloudflare, developers should be able to improve image performance with heuristics that identify likely-important images before the browser parses them so these images can have increased priority and be loaded sooner.
Identifying Image Priority opportunities
Just increasing the fetch priority of all images won’t help if they are lazy-loaded or not critical/LCP images. Lazy-loading is a method that developers use to generally improve the initial load of a webpage if it includes numerous out-of-view elements. For example, on Instagram, when you continually scroll down the application to see more images, it would only make sense to load those images when the user arrives at them otherwise the performance of the page load would be needlessly delayed by the browser eagerly loading these out-of-view images. Instead the highest priority should be given to the LCP image in the viewport to improve performance.
So developers are left in a situation where they need to know which images are on users’ screens/viewports to increase their priority and which are off their screens to lazy-load them.
Recently, we’ve seen attempts to influence image priority on behalf of developers. For example, by default, in WordPress 5.5 all images with an IMG tag and aspect ratios were directed to be lazy-loaded. While there are plugins and other methods WordPress developers can use to boost the priority of LCP images, lazy-loading all images in a default manner and not knowing which are LCP images can cause artificial performance delays in website performance (they’re working on this though, and have partially resolved this for block themes).
So how do we identify the LCP image and other critical assets before they get to the browser?
To evaluate the opportunity to improve image performance, we turned to the HTTP Archive. Out of the approximately 22 million desktop pages tested in February 2023, 46% had an LCP element with an IMG tag. Meaning that for page load metrics, LCP had an image included about half the time. Though, among these desktop pages, 8.5 million had the image in the static HTML delivered with the page, indicating a total potential improvement opportunity of approximately 39% of the desktop pages within the dataset.
In the case of mobile pages, out of the ~28.5 million tested, 40% had an LCP element as an IMG tag. Among these mobile pages, 10.3 million had the image in the static HTML delivered with the page, suggesting a potential improvement opportunity in around 36% of the mobile pages within the dataset.
However, as previously discussed, prioritizing an image won’t be effective if the image is lazy-loaded because the directives are contradictory. In the dataset, approximately 1.8 million LCP desktop images and 2.4 million LCP mobile images were lazy-loaded.
Therefore, across the Internet, the opportunity to improve image performance would be about ~30% of pages that have an LCP image in the original HTML markup that weren’t lazy-loaded, but with a more advanced Cloudflare Worker, the additional 9% of lazy-loaded LCP images can also be improved improved by removing the lazy-load attribute.
39% of desktop images seems like a lot of opportunity to improve image performance. So the next question is how can Cloudflare determine the LCP image across our network and automatically prioritize them?
Image Index
We thought that how soon the LCP image showed up in the HTML would serve as a useful indicator. So we analyzed the HTTP Archive dataset to see where the cumulative percentage of LCP images are discovered based on their position in the HTML, including lazy-loaded images.
We found that approximately 25% of the pages had the LCP image as the first image in the HTML (around 10% of all pages). Another 25% had the LCP image as the second image. WordPress seemed to arrive at a similar conclusion and recently released a development to remove the default lazy-load attribute from the first image on block themes, but there are opportunities to go further.
Our analysis revealed that implementing a straightforward rule like “do not lazy-load the first four images,” either through the browser, a content management system (CMS), or a Cloudflare Worker could address approximately 75% of the issue of lazy-loading LCP images (example Worker below).
Ignoring small images
In trying to find other ways to identify likely LCP images we next turned to the size of the image. To increase the likelihood of getting the LCP image early in the HTML, we looked into ignoring “small” images as they are unlikely to be big enough to be a LCP element. We explored several sizes and 10,000 pixels (less than 100×100) was a pretty reliable threshold that didn’t skip many LCP images and avoided a good chunk of the non-LCP images.
By ignoring small images (<10,000px), we found that the first image became the LCP image in approximately 30-34% of cases. Adding the second image increased this percentage to 56-60% of pages.
Therefore, to improve image priority, a potential approach could involve assigning a higher priority to the first four “not-small” images.
Chrome 114 Image Prioritization Experiment
An experiment running in Chrome 114 does exactly what we described above. Within the browser there are a few different prioritization knobs to play with that aren’t web-exposed so we have the opportunity to assign a “medium” priority to images that we want to boost automatically (directly controlling priority with “fetch priority” lets you set high or low). This will let us move the images ahead of other images, async scripts and parser-blocking scripts late in the body but still keep the boosted image priority below any high-priority requests, particularly dynamically-injected blocking scripts.
We are experimenting with boosting the priority of varying numbers of images (2, 5 and 10) and with allowing one of those medium-priority images to load at a time during Chromes “tight” mode (when it is loading the render-blocking resources in the head) to increase the likelihood that the LCP image will be available when the first paint is done.
The data is still coming in and no “ship” decisions have been made yet but the early results are very promising, improving the LCP time across the entire web for all arms of the experiment (not by massive amounts but moving the metrics of the whole web is notoriously difficult).
How to use Cloudflare Workers to boost performance
Now that we’ve seen that there is a large opportunity across the Internet for helping prioritize images for performance and how to identify images on individual pages that are likely LCP images, the question becomes, what would the results be of implementing a network-wide rule that could boost image priority from this study?
We built a test worker and deployed it on some WordPress test sites with our friends at Rocket.net, a WordPress hosting platform focused on performance. This worker boosts the priority of the first four images while removing the lazy-load attribute, if present. When deployed we saw good performance results and the expected image prioritization.
export default {
  async fetch(request) {
    const response = await fetch(request);

    // Check if the response is HTML
    const contentType = response.headers.get('Content-Type');
    if (!contentType || !contentType.includes('text/html')) {
      return response;
    }

    const transformedResponse = transformResponse(response);

    // Return the transformed response with streaming enabled
    return transformedResponse;
  },
};

async function transformResponse(response) {
  // Create an HTMLRewriter instance and define the image transformation logic
  const rewriter = new HTMLRewriter()
    .on('img', new ImageElementHandler());

  const transformedBody = await rewriter.transform(response).text()

  const transformresponse = new Response(transformedBody, response)

  // Return the transformed response with streaming enabled
  return transformresponse
}

class ImageElementHandler {
  constructor() {
    this.imageCount = 0;
    this.processedImages = new Set();
  }

  element(element) {
    const imgSrc = element.getAttribute('src');

    // Check if the image is small based on Chrome's criteria
    if (imgSrc && this.imageCount < 4 && !this.processedImages.has(imgSrc) && !isImageSmall(element)) {
      element.removeAttribute('loading');
      element.setAttribute('fetchpriority', 'high');
      this.processedImages.add(imgSrc);
      this.imageCount++;
    }
  }
}

function isImageSmall(element) {
  // Check if the element has width and height attributes
  const width = element.getAttribute('width');
  const height = element.getAttribute('height');

  // If width or height is 0, or width * height < 10000, consider the image as small
  if ((width && parseInt(width, 10) === 0) || (height && parseInt(height, 10) === 0)) {
    return true;
  }

  if (width && height) {
    const area = parseInt(width, 10) * parseInt(height, 10);
    if (area < 10000) {
      return true;
    }
  }

  return false;
}
When testing the Worker, we saw that default image priority was boosted into “high” for the first four images and the fifth image remained “low.” This resulted in an LCP range of “good” from a speed test. While this initial test is not a dispositive indicator that the Worker will boost performance in every situation, the results are promising and we look forward to continuing to experiment with this idea.
While we’ve experimented with WordPress sites to illustrate the issues and potential performance benefits, this issue is present across the Internet.
Website owners can help us experiment with the Worker above to improve the priority of images on their websites or edit it to be more specific by targeting likely LCP elements. Cloudflare will continue experimenting using a very similar process to understand how to safely implement a network-wide rule to ensure that images are correctly prioritized across the Internet and performance is boosted without the need to configure a specific Worker.
Automatic Platform Optimization
Cloudflare’s Automatic Platform Optimization (APO) is a plugin for WordPress which allows Cloudflare to deliver your entire WordPress site from our network ensuring consistent, fast performance for visitors. By serving cached sites, APO can improve performance metrics. APO does not currently have a way to prioritize images over other assets to improve browser render metrics or dynamically rewrite HTML, techniques we’ve discussed in this post. Although this presents a potential opportunity for future development, it requires thorough testing to ensure safe and reliable support.
In the future we’ll look to include the techniques discussed today as part of APO, however in the meantime we recommend using Snippets (and Experiments) to test with the code example above to see the performance impact on your website.
Get in touch!
If you are interested in using the JavaScript above, we recommended testing with Workers or using Cloudflare Snippets. We’d love to hear from you on what your results were. Get in touch via social media and share your experiences.
Visit 1.1.1.1 from any device to get started with our free app that makes your Internet faster and safer.
To learn more about our mission to help build a better Internet, start here. If you’re looking for a new career direction, check out our open positions.
Transferring your domains to a new registrar isn’t something you do every day, and getting any step of the process wrong could mean downtime and disruption. That’s why this Speed Week we’ve prepared a domain transfer checklist. We want to empower anyone to quickly transfer their domains to Cloudflare Registrar, without worrying about missing any steps along the way or being left with any unanswered questions.
Domain Transfer Checklist
Confirm eligibility
Confirm you want to use Cloudflare’s nameservers: We built our registrar specifically for customers who want to use other Cloudflare products. This means domains registered with Cloudflare can only use our nameservers. If your domain requires non-Cloudflare nameservers then we’re not the right registrar for you.
Confirm your domain is not a premium domain or internationalized domain name (IDNs): Cloudflare currently does not support premium domains or internationalized domain names (Unicode).
Confirm your domain hasn’t been registered or transferred in the past 60 days: ICANN rules prohibit a domain from being transferred if it has been registered or previously transferred within the last 60 days.
Confirm your WHOIS Registrant contact information hasn’t been updated in the past 60 days: ICANN rules also prohibit a domain from being transferred if the WHOIS Registrant contact information was modified in the past 60 days.
Before you transfer
Gather your credentials for your current registrar: Make sure you have your credentials for your current registrar. It’s possible you haven’t logged in for many years and you may have to reset your password.
Make note of your current DNS settings: Make note of your current DNS settings: When transferring your domain, Cloudflare will automatically scan your DNS records, but you’ll want to capture your current settings in case there are any issues. If your current provider supports it, you could use the standard BIND Zone File format to export your records.
Remove WHOIS privacy (if necessary): In most cases, domains may be transferred even if WHOIS privacy services have been enabled. However, some registrars may prohibit the transfer if the WHOIS privacy service has been enabled.
Renew your domain if up for renewal in the next 15 days: If your domain is up for renewal, you’ll need to renew it with your current registrar before initiating a transfer to Cloudflare.
Unlock the domain: Registrars include a lightweight safeguard to prevent unauthorized users from starting domain transfers – often called a registrar or domain lock. This lock prevents any other registrar from attempting to initiate a transfer. Only the registrant can enable or disable this lock, typically through the administration interface of the registrar.
Sign up for Cloudflare: If you don’t already have a Cloudflare account, you can sign up here.
Add your domain to Cloudflare: You can add a new domain to your Cloudflare account by following these instructions.
Add a valid credit card to your Cloudflare account: If you haven’t already added a payment method into your Cloudflare dashboard billing profile, you’ll be prompted to add one when you add your domain.
Wait for your DNS changes to propagate: Registrars can take up to 24 hours to process nameserver updates. You will receive an email when Cloudflare has confirmed that these changes are in place. You can’t proceed with transferring your domain until this process is complete.
Initiating and confirming transfer process
Request an authorization code: Cloudflare needs to confirm with your old registrar that the transfer flow is authorized. To do that, your old registrar will provide an authorization code to you. This code is often referred to as an authorization code, auth code, authinfo code, or transfer code. You will need to input that code to complete your transfer to Cloudflare. We will use it to confirm the transfer is authentic.
Initiate your transfer to Cloudflare: Visit the Transfer Domains section of your Cloudflare dashboard. Here you’ll be presented with any domains available for transfer. If your domain isn’t showing, ensure you completed all the proceeding steps. If you have, review the list on this page to see if any apply to your domain.
Review the transfer price: When you transfer a domain, you are required by ICANN to pay to extend its registration by one year from the expiration date. You will not be billed at this step. Cloudflare will only bill your card when you input the auth code and confirm the contact information at the conclusion of your transfer request.
Input your authorization code: In the next page, input the authorization code for each domain you are transferring.
Confirm or input your contact information: In the final stage of the transfer process, input the contact information for your registration. Cloudflare Registrar redacts this information by default but is required to collect the authentic contact information for this registration.
Approve the transfer with Cloudflare: Once you have requested your transfer, Cloudflare will begin processing it, and send a Form of Authorization (FOA) email to the registrant, if the information is available in the public WHOIS database. The FOA is what authorizes the domain transfer.
Approve the transfer with your previous registrar: After this step, your previous registrar will also email you to confirm your request to transfer. Most registrars will include a link to confirm the transfer request. If you follow that link, you can accelerate the transfer operation. If you do not act on the email, the registrar can wait up to five days to process the transfer to Cloudflare. You may also be able to approve the transfer from within your current registrar dashboard.
Follow your transfer status in your Cloudflare dashboard: Your domain transfer status will be viewable under Account Home > Overview > Domain Registration for your domain.
After you transfer
Test your site and email: After the transfer is complete, you’ll want to test your site to ensure everything is working properly. If you encounter any issues or have any questions you can always talk with us on our community forums or Discord server.
Visit 1.1.1.1 from any device to get started with our free app that makes your Internet faster and safer.
To learn more about our mission to help build a better Internet, start here. If you’re looking for a new career direction, check out our open positions.
Internet connections are most often marketed and sold on the basis of “speed”, with providers touting the number of megabits or gigabits per second that their various service tiers are supposed to provide. This marketing has largely been successful, as most subscribers believe that “more is better”. Furthermore, many national broadband plans in countries around the world include specific target connection speeds. However, even with a high speed connection, gamers may encounter sluggish performance, while video conference participants may experience frozen video or audio dropouts. Speeds alone don’t tell the whole story when it comes to Internet connection quality.
Additional factors like latency, jitter, and packet loss can significantly impact end user experience, potentially leading to situations where higher speed connections actually deliver a worse user experience than lower speed connections. Connection performance and quality can also vary based on usage – measured average speed will differ from peak available capacity, and latency varies under loaded and idle conditions.
The new Cloudflare Radar Internet Quality page
A little more than three years ago, as residential Internet connections were strained because of the shift towards working and learning from home due to the COVID-19 pandemic, Cloudflare announced the speed.cloudflare.com speed test tool, which enabled users to test the performance and quality of their Internet connection. Within the tool, users can download the results of their individual test as a CSV, or share the results on social media. However, there was no aggregated insight into Cloudflare speed test results at a network or country level to provide a perspective on connectivity characteristics across a larger population.
Today, we are launching these long-missing aggregated connection performance and quality insights on Cloudflare Radar. The new Internet Quality page provides both country and network (autonomous system) level insight into Internet connection performance (bandwidth) and quality (latency, jitter) over time. (Your Internet service provider is likely an autonomous system with its own autonomous system number (ASN), and many large companies, online platforms, and educational institutions also have their own autonomous systems and associated ASNs.) The insights we are providing are presented across two sections: the Internet Quality Index (IQI), which estimates average Internet quality based on aggregated measurements against a set of Cloudflare & third-party targets, and Connection Quality, which presents peak/best case connection characteristics based on speed.cloudflare.com test results aggregated over the previous 90 days. (Details on our approach to the analysis of this data are presented below.)
Users may note that individual speed test results, as well as the aggregate speed test results presented on the Internet Quality page will likely differ from those presented by other speed test tools. This can be due to a number of factors including differences in test endpoint locations (considering both geographic and network distance), test content selection, the impact of “rate boosting” by some ISPs, and testing over a single connection vs. multiple parallel connections. Infrequent testing (on any speed test tool) by users seeking to confirm perceived poor performance or validate purchased speeds will also contribute to the differences seen in the results published by the various speed test platforms.
And as we announced in April, Cloudflare has partnered with Measurement Lab (M-Lab) to create a publicly-available, queryable repository for speed test results. M-Lab is a non-profit third-party organization dedicated to providing a representative picture of Internet quality around the world. M-Lab produces and hosts the Network Diagnostic Tool, which is a very popular network quality test that records millions of samples a day. Given their mission to provide a publicly viewable, representative picture of Internet quality, we chose to partner with them to provide an accurate view of your Internet experience and the experience of others around the world using openly available data.
Connection speed & quality data is important
While most advertisements for fixed broadband and mobile connectivity tend to focus on download speeds (and peak speeds at that), there’s more to an Internet connection, and the user’s experience with that Internet connection, than that single metric. In addition to download speeds, users should also understand the upload speeds that their connection is capable of, as well as the quality of the connection, as expressed through metrics known as latency and jitter. Getting insight into all of these metrics provides a more well-rounded view of a given Internet connection, or in aggregate, the state of Internet connectivity across a geography or network.
The concept of download speeds are fairly well understood as a measure of performance. However, it is important to note that the average download speeds experienced by a user during common Web browsing activities, which often involves the parallel retrieval of multiple smaller files from multiple hosts, can differ significantly from peak download speeds, where the user is downloading a single large file (such as a video or software update), which allows the connection to reach maximum performance. The bandwidth (speed) available for upload is sometimes mentioned in ISP advertisements, but doesn’t receive much attention. (And depending on the type of Internet connection, there’s often a significant difference between the available upload and download speeds.) However, the importance of upload came to the forefront in 2020 as video conferencing tools saw a surge in usage as both work meetings and school classes shifted to the Internet during the COVID-19 pandemic. To share your audio and video with other participants, you need sufficient upload bandwidth, and this issue was often compounded by multiple people sharing a single residential Internet connection.
Latency is the time it takes data to move through the Internet, and is measured in the number of milliseconds that it takes a packet of data to go from a client (such as your computer or mobile device) to a server, and then back to the client. In contrast to speed metrics, lower latency is preferable. This is especially true for use cases like online gaming where latency can make a difference between a character’s life and death in the game, as well as video conferencing, where higher latency can cause choppy audio and video experiences, but it also impacts web page performance. The latency metric can be further broken down into loaded and idle latency. The former measures latency on a loaded connection, where bandwidth is actively being consumed, while the latter measures latency on an “idle” connection, when there is no other network traffic present. (These specific loaded and idle definitions are from the device’s perspective, and more specifically, from the speed test application’s perspective. Unless the speed test is being performed directly from a router, the device/application doesn’t have insight into traffic on the rest of the network.) Jitter is the average variation found in consecutive latency measurements, and can be measured on both idle and loaded connections. A lower number means that the latency measurements are more consistent. As with latency, Internet connections should have minimal jitter, which helps provide more consistent performance.
Our approach to data analysis
The Internet Quality Index (IQI) and Connection Quality sections get their data from two different sources, providing two different (albeit related) perspectives. Under the hood they share some common principles, though.
IQI builds upon the mechanism we already use to regularly benchmark ourselves against other industry players. It is based on end user measurements against a set of Cloudflare and third-party targets, meant to represent a pattern that has become very common in the modern Internet, where most content is served from distribution networks with points of presence spread throughout the world. For this reason, and by design, IQI will show worse results for regions and Internet providers that rely on international (rather than peering) links for most content.
IQI is also designed to reflect the traffic load most commonly associated with web browsing, rather than more intensive use. This, and the chosen set of measurement targets, effectively biases the numbers towards what end users experience in practice (where latency plays an important role in how fast things can go).
For each metric covered by IQI, and for each ASN, we calculate the 25th percentile, median, and 75th percentile at 15 minute intervals. At the country level and above, the three calculated numbers for each ASN visible from that region are independently aggregated. This aggregation takes the estimated user population of each ASN into account, biasing the numbers away from networks that source a lot of automated traffic but have few end users.
The Connection Quality section gets its data from the Cloudflare Speed Test tool, which exercises a user’s connection in order to see how well it is able to perform. It measures against the closest Cloudflare location, providing a good balance of realistic results and network proximity to the end user. We have a presence in 285 cities around the world, allowing us to be pretty close to most users.
Similar to the IQI, we calculate the 25th percentile, median, and 75th percentile for each ASN. But here these three numbers are immediately combined using an operation called the trimean — a single number meant to balance the best connection quality that most users have, with the best quality available from that ASN (users may not subscribe to the best available plan for a number of reasons).
Because users may choose to run a speed test for different motives at different times, and also because we take privacy very seriously and don’t record any personally identifiable information along with test results, we aggregate at 90-day intervals to capture as much variability as we can.
At the country level and above, the calculated trimean for each ASN in that region is aggregated. This, again, takes the estimated user population of each ASN into account, biasing the numbers away from networks that have few end users but which may still have technicians using the Cloudflare Speed Test to assess the performance of their network.
Navigating the Internet Quality page
The new Internet Quality page includes three views: Global, country-level, and autonomous system (AS). In line with the other pages on Cloudflare Radar, the country-level and AS pages show the same data sets, differing only in their level of aggregation. Below, we highlight the various components of the Internet Quality page.
Global
The top section of the global (worldwide) view includes time series graphs of the Internet Quality Index metrics aggregated at a continent level. The time frame shown in the graphs is governed by the selection made in the time frame drop down at the upper right of the page, and at launch, data for only the last three months is available. For users interested in examining a specific continent, clicking on the other continent names in the legend removes them from the graph. Although continent-level aggregation is still rather coarse, it still provides some insight into regional Internet quality around the world.
Further down the page, the Connection Quality section presents a choropleth map, with countries shaded according to the values of the speed, latency, or jitter metric selected from the drop-down menu. Hovering over a country displays a label with the country’s name and metric value, and clicking on the country takes you to the country’s Internet Quality page. Note that in contrast to the IQI section, the Connection Quality section always displays data aggregated over the previous 90 days.
Country-level
Within the country-level page (using Canada as an example in the figures below), the country’s IQI metrics over the selected time frame are displayed. These time series graphs show the median bandwidth, latency, and DNS response time within a shaded band bounded at the 25th and 75th percentile and represent the average expected user experience across the country, as discussed in the Our approach to data analysis section above.
Below that is the Connection Quality section, which provides a summary view of the country’s measured upload and download speeds, as well as latency and jitter, over the previous 90 days. The colored wedges in the Performance Summary graph are intended to illustrate aggregate connection quality at a glance, with an “ideal” connection having larger upload and download wedges and smaller latency and jitter wedges. Hovering over the wedges displays the metric’s value, which is also shown in the table to the right of the graph.
Below that, the Bandwidth and Latency/Jitter histograms illustrate the bucketed distribution of upload and download speeds, and latency and jitter measurements. In some cases, the speed histograms may show a noticeable bar at 1 Gbps, or 1000 ms (1 second) on the latency/jitter histograms. The presence of such a bar indicates that there is a set of measurements with values greater than the 1 Gbps/1000 ms maximum histogram values.
Autonomous system level
Within the upper-right section of the country-level page, a list of the top five autonomous systems within the country is shown. Clicking on an ASN takes you to the Performance page for that autonomous system. For others not displayed in the top five list, you can use the search bar at the top of the page to search by autonomous system name or number. The graphs shown within the AS level view are identical to those shown at a country level, but obviously at a different level of aggregation. You can find the ASN that you are connected to from the My Connection page on Cloudflare Radar.
Exploring connection performance & quality data
Digging into the IQI and Connection Quality visualizations can surface some interesting observations, including characterizing Internet connections, and the impact of Internet disruptions, including shutdowns and network issues. We explore some examples below.
Characterizing Internet connections
Verizon FiOS is a residential fiber-based Internet service available to customers in the United States. Fiber-based Internet services (as opposed to cable-based, DSL, dial-up, or satellite) will generally offer symmetric upload and download speeds, and the FiOS plans page shows this to be the case, offering 300 Mbps (upload & download), 500 Mbps (upload & download), and “1 Gig” (Verizon claims average wired speeds between 750-940 Mbps download / 750-880 Mbps upload) plans. Verizon carries FiOS traffic on AS701 (labeled UUNET due to a historical acquisition), and in looking at the bandwidth histogram for AS701, several things stand out. The first is a rough symmetry in upload and download speeds. (A cable-based Internet service provider, in contrast, would generally show a wide spread of download speeds, but have upload speeds clustered at the lower end of the range.) Another is the peaks around 300 Mbps and 750 Mbps, suggesting that the 300 Mbps and “1 Gig” plans may be more popular than the 500 Mbps plan. It is also clear that there are a significant number of test results with speeds below 300 Mbps. This is due to several factors: one is that Verizon also carries lower speed non-FiOS traffic on AS701, while another is that erratic nature of in-home WiFi often means that the speeds achieved on a test will be lower than the purchased service level.
Traffic shifts drive latency shifts
On May 9, 2023, the government of Pakistan ordered the shutdown of mobile network services in the wake of protests following the arrest of former Prime Minister Imran Khan. Our blog post covering this shutdown looked at the impact from a traffic perspective. Within the post, we noted that autonomous systems associated with fixed broadband networks saw significant increases in traffic when the mobile networks were shut down – that is, some users shifted to using fixed networks (home broadband) when mobile networks were unavailable.
Examining IQI data after the blog post was published, we found that the impact of this traffic shift was also visible in our latency data. As can be seen in the shaded area of the graph below, the shutdown of the mobile networks resulted in the median latency dropping about 25% as usage shifted from higher latency mobile networks to lower latency fixed broadband networks. An increase in latency is visible in the graph when mobile connectivity was restored on May 12.
Bandwidth shifts as a potential early warning sign
On April 4, UK mobile operator Virgin Media suffered several brief outages. In examining the IQI bandwidth graph for AS5089, the ASN used by Virgin Media (formerly branded as NTL), indications of a potential problem are visible several days before the outages occurred, as median bandwidth dropped by about a third, from around 35 Mbps to around 23 Mbps. The outages are visible in the circled area in the graph below. Published reports indicate that the problems lasted into April 5, in line with the lower median bandwidth measured through mid-day.
Submarine cable issues cause slower browsing
On June 5, Philippine Internet provider PLDTTweeted an advisory that noted “One of our submarine cable partners confirms a loss in some of its internet bandwidth capacity, and thus causing slower Internet browsing.” IQI latency and bandwidth graphs for AS9299, a primary ASN used by PLDT, shows clear shifts starting around 06:45 UTC (14:45 local time). Median bandwidth dropped by half, from 17 Mbps to 8 Mbps, while median latency increased by 75% from 37 ms to around 65 ms. 75th percentile latency also saw a significant increase, nearly tripling from 63 ms to 180 ms coincident with the reported submarine cable issue.
Conclusion
Making network performance and quality insights available on Cloudflare Radar supports Cloudflare’s mission to help build a better Internet. However, we’re not done yet – we have more enhancements planned. These include making data available at a more granular geographical level (such as state and possibly city), incorporating AIM scores to help assess Internet quality for specific types of use cases, and embedding the Cloudflare speed test directly on Radar using the open source JavaScript module.
In the meantime, we invite you to use speed.cloudflare.com to test the performance and quality of your Internet connection, share any country or AS-level insights you discover on social media (tag @CloudflareRadar on Twitter or @radar@cloudflare.social on Mastodon), and explore the underlying data through the M-Lab repository or the Radar API.
Visit 1.1.1.1 from any device to get started with our free app that makes your Internet faster and safer.
To learn more about our mission to help build a better Internet, start here. If you’re looking for a new career direction, check out our open positions.
We know that plugins can be used to extend the functionality of WordPress. But what if you can do some smaller things in WordPress without installing them? Say, you dislike the admin bar at the top and wish to eliminate it? Yes, that can be accomplished by means of code snippets for WordPress.
Basically, code snippets for WordPress are used to do certain actions that might otherwise require a dedicated smaller plugin. Such code snippets are placed in one of the WordPress core or theme files (generally the functions.php file of your theme).
As you might have guessed, code snippets for WordPress, while really useful, tend to alter the default functionality. There can be a small margin of error with each snippet. Generally, such issues tend to arise due to incompatible plugins and/or themes and tend to disappear once you eliminate the said theme/plugin or decide not to use the said snippet.
However, to be on the safer side, be very sure to take proper backups of your WordPress website before making any changes by means of snippets. Also, if you encounter any error or performance issues, rollback your site and check for any plugins or incompatible theme issues.
Now, on to the code snippets for WordPress users!
1. Allow Contributors to Upload Images
By default, WordPress does not permit contributor accounts to upload images. You can, of course, promote that particular account to Author or Editor and this will give them the rights to upload and modify images, However, it will also grant them additional rights, such as the ability to publish their own articles (as opposed to submission for review).
This particular code snippet allows contributor accounts to upload images to their articles, without granting them any additional privileges or rights. Paste it in the functions.php file of your theme:
if ( current_user_can('contributor') && !current_user_can('upload_files') )
     add_action('admin_init', 'allow_contributor_uploads');
     function allow_contributor_uploads() {
          $contributor = get_role('contributor');
          $contributor->add_cap('upload_files');
     }
2. Show Popular Posts Without Plugins
This one is a little trickier. However, if you are not too keen on installing an extra plugin to showcase popular posts (say, you have limited server memory or disk space), follow this snippet.
The search feature of WordPress has been around for a long time. However, if your website does not need it, or you do not want users to “search” through your website for some reason, you can use this code snippet.
Essentially, it is a custom function that simply nullifies the search feature. Not just the search bar in your sidebar or the menu, but the entire concept of native WP search is gone. Why can this be useful? Again, it can help if you are running your website on low spec server and do not have content that needs to be searched (probably you aren’t running a blog).
There are various ways to secure your website. You can install a security plugin, turn on a firewall or opt for a free feature such as Jetpack Protect that blocks brute force attacks on your website.
The following code snippet, once placed in your functions.php file, rejects all malicious URL requests:
global $user_ID; if($user_ID) {
    if(!current_user_can('administrator')) {
        if (strlen($_SERVER['REQUEST_URI']) > 255 ||
            stripos($_SERVER['REQUEST_URI'], "eval(") ||
            stripos($_SERVER['REQUEST_URI'], "CONCAT") ||
            stripos($_SERVER['REQUEST_URI'], "UNION+SELECT") ||
            stripos($_SERVER['REQUEST_URI'], "base64")) {
                @header("HTTP/1.1 414 Request-URI Too Long");
                @header("Status: 414 Request-URI Too Long");
                @header("Connection: Close");
                @exit;
        }
    }
}
5. Paginate Your Site Without Plugins
Good pagination is very useful for allowing users to browse through your website. Rather than “previous” or “next” links. This is where another one of our code snippets for WordPress comes into play – it adds good pagination to your content.
In functions.php:
global $wp_query;
$total = $wp_query->max_num_pages;
// only bother with the rest if we have more than 1 page!
if ( $total > 1 )  {
     // get the current page
     if ( !$current_page = get_query_var('paged') )
          $current_page = 1;
     // structure of "format" depends on whether we're using pretty permalinks
     $format = empty( get_option('permalink_structure') ) ? '&page=%#%' : 'page/%#%/';
     echo paginate_links(array(
          'base' => get_pagenum_link(1) . '%_%',
          'format' => $format,
          'current' => $current_page,
          'total' => $total,
          'mid_size' => 4,
          'type' => 'list'
     ));
}
6. Disable the Admin Bar
The WordPress Admin Bar provides handy links to several key functions such as the ability to add new posts and pages, etc. However, if you find no use for it and wish to remove it, simply paste the following code snippet to your functions.php file:
// Remove the admin bar from the front end
add_filter( 'show_admin_bar', '__return_false' );
7. Show Post Thumbnails in RSS Feed
If you wish to show post thumbnail images in your blog’s RSS feed, the following code snippet for WordPress can be useful.
Place it in your functions.php file:
// Put post thumbnails into rss feed
function wpfme_feed_post_thumbnail($content) {
global $post;
if(has_post_thumbnail($post->ID)) {
$content = '' . $content;
}
return $content;
}
add_filter('the_excerpt_rss', 'wpfme_feed_post_thumbnail');
add_filter('the_content_feed', 'wpfme_feed_post_thumbnail');
8. Change the Author Permalink Structure
By default, WordPress shows author profiles as yoursite.com/author/name. However, you can change it to anything that you like, such as yoursite.com/writer/name
The following code snippet needs to be pasted in the functions.php file. Then, it changes the author permalink structure to “/profile/name”:
add_action('init', 'cng_author_base');
function cng_author_base() {
    global $wp_rewrite;
    $author_slug = 'profile'; // change slug name
    $wp_rewrite->author_base = $author_slug;
}
9. Automatically Link to Twitter Usernames in Content
This is especially useful if you are running a website that focuses a lot on Twitter (probably a viral content site, etc.) The following code snippet for functions.php converts all @ mentions in your content to their respective Twitter profiles.
For example, an @happy mention in your content will be converted to a link to the Twitter account “twitter.com/happy” (“happy” being the username):
If you are using the PayPal Donate function to accept donations from your website’s visitors, you can use this code snippet to create a shortcode, and thus make donating easier. First, paste the following in your functions.php file:
function donate_shortcode( $atts, $content = null) {
global $post;extract(shortcode_atts(array(
'account' => 'your-paypal-email-address',
'for' => $post->post_title,
'onHover' => '',
), $atts));
if(empty($content)) $content='Make A Donation';
return '<a href="https://www.paypal.com/cgi-bin/webscr?cmd=_xclick&business='.$account.'&item_name=Donation for '.$for.'" title="'.$onHover.'">'.$content.'</a>';
}
add_shortcode('donate', 'donate_shortcode');
As mentioned with each code snippet, you just need to add the said snippet to the required file. Mostly, you would only need to add code snippets to the functions.php file (in some cases, it can differ).
However, what if you are just not comfortable editing your theme’s files? If that is the case, have no fear. The Code Snippets plugin can help you out!
It is a simple plugin that lets you add code snippets to your functions.php without any manual file editing. It treats code snippets as individual plugins of their own – you add the code and hit save … and the rest is handled by the Code Snippets plugin.
Once you activate the plugin, you will find a Snippets menu right under “Plugins.” Head to Snippets » Add New:
Add a name for your snippet, paste the snippet in the code area, and then provide a description for your own reference. Once done, activate the snippet and you’re good to go! Even if you change the theme, the code snippet remains functional.
Your site needs to have a defined structure because, without it, it’ll just be a random collection of pages and blog posts. Your users need this structure to navigate on your site, to click from one page to another. Google also uses the structure of your site to determine what content is important and what is less relevant. This guide tells you everything you need to know about site structure.
Site structure refers to organizing and arranging a website’s pages and content. It defines the information hierarchy within the site and serves as a roadmap for search engine crawlers. A well-structured site facilitates easy navigation, enhances user experience, and helps search engines like Google understand and effectively index the site’s content. This, in turn, can improve the site’s performance by making it easier for users to find and engage with the content. Ultimately, an optimized site structure helps achieve higher rankings, more traffic, and better conversion rates.
Importance for usability
The structure of your website significantly impacts the experience for your visitors (UX). If visitors can’t find the products and information they’re looking for, they’ll not likely become regular visitors or customers. In other words, you should help them navigate your site. A good site structure will help with this.
Navigating should be easy. You need to categorize and link your posts and products so they are easy to find. New visitors should be able to grasp what you’re writing about or selling instantly.
Importance of your site structure for SEO
A solid site structure vastly improves your chances of ranking in search engines. There are three main reasons for this:
a. It helps Google ‘understand’ your site
The way you structure your site will give Google vital clues about where to find the most valuable content on your site. It helps search engines understand what your site is mainly about or what you’re selling. A decent site structure also enables search engines to find and index content quickly. A good structure should, therefore, lead to a higher ranking in Google.
b. It prevents you from competing with yourself
On your site, you might have blog posts that are quite similar. If, for example, you write a lot about SEO, you could have multiple blog posts about site structure, each covering a different aspect. Consequently, Google won’t be able to tell which of these pages is the most important, so you’ll be competing with your content for high rankings. You should let Google know which page you think is most important. You need a good internal linking and taxonomy structure to do this, so all those pages can work for you instead of against you.
c. It deals with changes on your website
The products you sell in your shop will likely evolve. So does the content you’re writing. You probably add new product lines as old stock sells out. Or you write new articles that make old ones redundant. You don’t want Google to show outdated products or deleted blog posts, so you need to deal with these kinds of changes in the structure of your site.
Are you struggling with setting up your site’s structure? Don’t know the best strategy to link from one post to another? Check out our Site structure training, part of the Yoast SEO academy. Access to Yoast SEO academy is included in the price of Yoast SEO Premium. Before you know it, you’ll be able to improve your rankings by creating the best structure for your site!
How to set up the structure of your site
So, how do you construct a solid site structure? First, we’ll look at an ideal site structure and then explain how to achieve this for your site.
What’s an ideal site structure?
Let’s start by looking at an ideal situation: How should you organize your site if you’re starting from scratch? We think a well-organized website looks like a pyramid with several levels:
Homepage
Categories (or sections)
Subcategories (only for larger sites)
Individual pages and posts
The homepage should be at the top. Then, you have some sections or category pages beneath it. You should be able to file your content under one of these categories. You can divide these sections or categories into subcategories if your site is larger. Beneath your categories or subcategories are your pages and posts.
An ideal site structure looks like a pyramid. On top, you’ll find the homepage and, right below, the main sections or categories, possibly followed by subcategories. On the ground, you’ll find all the individual posts and pages.
Your homepage
On top of the pyramid is the homepage. Your homepage should act as a navigation hub for your visitors. This means, amongst others, that you should link to your most important pages from your homepage. By doing this:
Your visitors are more likely to end up on the pages you want them to end up on;
You show Google that these pages are important.
Further down this article, we’ll help you determine which pages are essential to your business.
Beware not to link too many pages from your homepage, which will cause clutter. And a cluttered homepage doesn’t guide your visitors anywhere. If you want to optimize your homepage further, you can do many other things. Read our article on homepage SEO to find out what.
Navigation
In addition to having a well-structured homepage, it’s also important to create a clear navigation path on your site. Your site-wide navigation consists of two main elements: the menu and the breadcrumbs.
The menu
First, let’s take a look at the menu. The website menu is the most common aid for navigation on your website, and you want to make the best possible use of it. Visitors use your menu to find things on your website. It helps them understand the structure of your website. That’s why the main categories on your site should all have a place in the menu on your homepage.
Furthermore, putting everything in just one menu is not always necessary. If you have a big site with lots of categories, this may clutter your website and makes your main menu a poor reflection of the rest of your site. Where it makes sense, creating a second menu is perfectly fine.
For instance, eBay has one menu at the top of the page – also called the top bar menu – and, in addition to that, a main menu. This top bar menu links to important pages that aren’t categories in the shop, like pages that relate to the visitor’s account on the site. The main menu reflects the most important product categories on eBay.
eBay has multiple ways to start navigating from the homepage
Finally, just like on your homepage, you shouldn’t add too many links to your menu. They will become less valuable for your users and search engines if you do.
Adding breadcrumbs to your pages can make your site’s structure even clearer. Breadcrumbs are clickable links, usually at the top of a page or post. Breadcrumbs reflect the structure of your site. They help visitors determine where they are on your site. They improve your site’s user experience and SEO, as you can read in our guide on breadcrumbs.
You can use one of the many breadcrumb plugins for your WordPress site. You can also use our Yoast SEO plugin, as we’ve implemented a breadcrumb functionality in our plugin as well.
Taxonomies
WordPress uses so-called taxonomies to group content; other CMSs have similar systems. The word ‘taxonomy’ is a fancy term for a group of things — website pages, in this case — that have something in common. This is convenient because people looking for more information on the same topic can find similar articles more easily. You can group content in different ways. The default taxonomies in WordPress are categories and tags.
Categories
You should divide your site’s blog posts or products into several categories. If these categories grow too big, you should divide these categories into subcategories to clear things up again. For example, if you have a clothing store and sell shoes, you can divide this category into subcategories: ‘boots’, ‘heels’, and ‘flats’. These subcategories contain products, in this case, shoes, of that specific type.
Adding this hierarchy and categorizing your pages helps your user and Google make sense of every page you write. Add your main categories to your site’s menu when implementing your category structure.
Your site’s structure will also benefit from adding tags. The difference between a category and a tag mostly concerns structure. Categories are hierarchical: you can have subcategories and even sub-subcategories. Tags, however, don’t have that hierarchy. Tags say: “Hey, this article or product has a certain property that might interest a visitor.” Think of it like this: categories are the table of contents of your website, and tags are the index. A tag for the online clothing store mentioned above could be a brand, for instance, Timberlands.
Try not to create too many tags. You’re not structuring anything if you add a new unique tag to every post or article. Ensure each tag is used at least twice, and your tags group articles that genuinely belong together.
Some WordPress themes display tags with each post, but some don’t. Ensure your tags are available to visitors somewhere, preferably at the bottom of your article or in the sidebar. Google isn’t the only one that likes tags: they are useful for visitors wanting to read more about the same topic.
Site structure is all about grouping and linking the content on your site. Until now, we mostly discussed so-called classifying links: links on your homepage, navigation, and taxonomies. On the other hand, contextual links are internal links within the copy on your pages that refer to other pages within your site. For a link to be contextual, the page you link to should be relevant for someone reading the current page. If you look at the previous paragraph, for instance, we link to a post about tagging, so people can learn more about it if they’re interested.
Your most important pages are often very relevant to mention on several pages across your site, so you’ll link to them most often. Just remember that not only the page you’re linking to is relevant, the context of the link is important as well.
Google uses the context of your links to gather information about the page you’re linking to. It always uses the anchor text (or link text) to understand what the page you’re linking to is about. But the anchor text isn’t the only thing Google looks at. Nowadays, it also considers the content around the link to gather extra information. Google is becoming better at recognizing related words and concepts. Adding links from a meaningful context allows Google to value and rank your pages properly. Yoast SEO Premium makes internal linking a breeze by automatically suggesting relevant content from your site to link to.
Contextual linking for blogs
For blogs, you should write extensively on the topics you want to rank for. You should write some main articles — your cornerstone articles — and write various posts about subtopics of that topic. Then link from these related posts to your cornerstone articles and from the cornerstone articles back to related posts. In this way, you’ll ensure that your most important pages have both the most and most relevant links.
The following metaphor might help you understand this principle:
Imagine you’re looking at a map of a state or country. You’ll probably see many small towns and some bigger cities. All towns and cities will be interconnected somehow. You’ll notice that small towns often have roads leading to the big cities. Those cities are your cornerstones, receiving the most links. The small towns are your posts on more specific topics. Some roads (links) lead to these smaller towns, but not as much as the big cities.
Contextual internal linking works differently on an online store with very few to no pages that are exclusively meant to inform. You don’t explore a specific topic on your product pages: you’re selling a product. Therefore, on product pages, you mostly want to keep people on a page and convince them to buy the product. Consequently, contextual linking is far less prominent in this context. You generally shouldn’t add contextual links to your product descriptions because it could lead to people clicking away from the page.
There are just a couple of meaningful ways of adding contextual links to the product pages for your ecommerce SEO:
link from a product bundle page to the individual products
a ‘related items’ or ‘compare with similar items’ section
a ‘customers also bought’ section
a ‘product bundles’ or ‘frequently bought together’ section.
Landing pages are the pages you want your audience to find when they search for specific keywords you’ve optimized for. For instance, we want people who search for ‘free SEO training’ to end up on the page about our free training called ‘SEO for beginners’. You need to approach the content of your most important landing pages differently than your regular pages.
Here, we’ll discuss two types of landing pages: cornerstone pages and product landing pages. They’re both pages you’d like people to land on from the search engines, but they require quite a different approach. But first, we’ll shortly go into search intent because you have to know what your audience is really looking for.
Search intent
When setting up your site structure, you must consider search intent. It’s about what you think people are looking for when they enter a query into a search engine. What do people want to find? And: what do they expect to find?
Consider different possibilities in search intent, as you might want to cater to different types on your site. Are people just looking for an answer to a question or a definition? Are they comparing products before purchase? Or are they intending to buy something right away? This is often reflected in the type of query they make. You can also use Google’s search results to create great content that fits someone’s needs.
When you have an idea of the search intent, ensuring your landing page fits your audience’s search intent is essential. Pages can answer multiple search intents, but you need a clear view of at least your most important pages.
Cornerstone articles are the most important informational articles on your website. Their focus is to provide the best and most complete information on a particular topic; their main goal is not to sell products.
Because of this focus, we usually think of blogs when discussing cornerstone content. Of course, that doesn’t mean it can only be a blog post. All different kinds of websites have cornerstone articles! Rule of thumb: if an article brings everything you know about a broad topic together, it’s a cornerstone content article.
Product landing pages significantly differ from cornerstone articles. The latter are lengthy, whereas product landing pages shouldn’t be that long. Rather than complete articles, they should be focused. These pages only need to show what your visitors need to know to be convinced. They don’t need to hold all the information.
You want to rank with these pages, meaning they need content. Enough content for Google to understand what the page is about and what keyword it should rank for. Where cornerstone articles could be made up of thousands of words, a couple of hundred could be enough for product landing pages. The main focus of the content should be on your products.
Structuring or restructuring your content doesn’t always have high priority in everything you have to do. Especially when you blog a lot or add other content regularly, it might feel like a chore. Although it isn’t always fun, you must do it, or your website might become messy. To prevent that from happening, you need to fix your site structure and keep an eye on it while adding new content. Site structure should be part of your long-term SEO strategy.
Evaluate your menu
When your business goal or website changes, your menu must also change. Planning things visually will pay off when you start thinking about restructuring your site. Make a flowchart.
Start with your new menu one or two levels deep and see if you can fit in more pages you have created over the years. You’ll find that some pages are still valid but don’t seem relevant to your menu anymore. No problem, just be sure to link to them on related pages and in your sitemaps so that Google and your visitors can still find these pages. The flowchart will also show you any gaps in the site structure.
Creating an overview of your categories, subcategories, and products or posts will also help you to rethink your site’s taxonomy. This could be a simple spreadsheet, but you can use more visual tools like LucidChart or MindNode.
Do your product categories and subcategories provide a logical overview of your product range or your posts and pages? Perhaps you’ve noticed somewhere down the line that one category has been far more successful than others, or you wrote many blog posts on one subject and very few on others.
If one category grows much larger than others, your site’s pyramid could be thrown off balance. Think about splitting this category into different categories. But, if some product lines end up much smaller than others, you might want to merge them. Don’t forget to redirect the ones you delete.
If you have built your HTML sitemap manually, update that sitemap after changing your site structure. In the far more likely event you have an XML sitemap, re-submit it to Google Search Console.
You might be able to update and republish some outdated articles to make them relevant again. If an article is outdated, but no one reads it anyway, you might delete it. This could clean up your site nicely.
What you should know, in that case, is that you should never delete a page or article without thinking. If Google cannot find the page, it serves your user a 404 error page. Both the search engine and your visitor will see this error message saying the page doesn’t exist, and that is a bad experience and, thus, bad for your SEO.
Be smart about this! You need to redirect the URL of the page you’re deleting properly so your user (and Google) lands on a different page that is relevant to them. That could even improve your SEO!
Got some old content to clean up on your site? Sort out hidden pages and dead ends in four easy steps with our orphaned content SEO workout, available in Yoast SEO Premium.
Avoid keyword cannibalization
Your website is about a specific topic, which could be quite broad or rather specific. While adding content, you should be aware of keyword cannibalization. If you optimize your articles for keywords that are all too similar, you’ll be devouring your chances of ranking in Google. If you optimize different articles for similar key terms, you’ll be competing with yourself, making both pages rank lower.
You’ll have some work to do if you suffer from keyword cannibalization. In short, you should research the performance of your content and probably merge and redirect some of it. When merging posts, we recommend creating a new draft by cloning one of the original posts with the free Yoast Duplicate Post plugin. This allows you to work on your merged post without making these changes to a live post. Read the guide by Joost to learn more about keyword cannibalization and how to fix it.
Internal linking with Yoast SEO
Feeling a bit overwhelmed by all this advice? Yoast SEO has some handy tools to make internal linking so much easier.
Yoast SEO’s text link counter visualizes your links so you can optimize them. It shows the internal links in a post and the internal links to a post. This tool can enhance your site structure by improving the links between your related posts. Make sure your cornerstones get the most (relevant) links! You can identify your cornerstones by finding them in the column with the pyramid icon.
Quickly see which posts have internal links pointing to them with the text link counter in Yoast SEO
Yoast SEO Premium helps you with your internal linking as well. Our internal linking suggestions tool will show you which articles are related to the one you’re writing, so you can easily link to them: just by dragging the link into your editor!
The internal linking suggestions even include other content types
Moreover, our tool allows you to indicate which articles you consider cornerstone content on your site. Those articles will be shown at the top of the internal linking suggestions. You’ll never forget to link to them again.
As we have seen, there are several reasons why site structure is important. A good site structure helps both your visitors and Google navigate your site. It makes it easier to implement changes and prevents competing with your content. So use the tips and pointers in this guide to check and improve your site structure. That way, you’ll stay on top and keep your website from growing out of control!
Want to improve your site structure but don’t know where to start? Get Yoast SEO Premium and get loads of helpful tools and guidance, including free access to Yoast SEO Academy, our Site structure training, and our SEO workouts!
Marieke was head of strategy and former CEO at Yoast. After the sale of Yoast to Newfold Digital in 2021 she is no longer active at Yoast in 2023. Marieke, together with her husband Joost, actively invests in and advises several startups through their company Emilia Capital.
In SEO, there are on-page factors and off-page factors. On-page SEO factors are aspects of your website that you can optimize for better search rankings. It’s about improving things like your technical set-up, your content, and how user-friendly your site is. In this post, we’ll explain all about on-page SEO and how it differs from off-page SEO, and we’ll talk about some on-page optimizations that can help you to rank better.
On-page and off-page SEO: what’s the difference?
Every SEO strategy is focused on ranking as high as possible in the search engines. To do this, we all try to design and develop a website that Google’s algorithm — and people! — will love. That’s basically what SEO is about. The factors in Google’s algorithm can be divided into two categories that will determine the ranking of your website: on-page factors and off-page factors.
On-page SEO factors all have to do with elements on your website. For instance, things you work on to improve your E-E-A-T also fall in this category. Some of the most important on-page SEO factors are:
Your site set-up and technical features, site speed in particular
The quality of your content and use of keywords
How do you use additional media, such as images and videos
Your site structure and internal linking
Structured data and search appearance
Your URL structure
User experience
Meanwhile, off-page SEO looks at what happens away from your website. Some off-page SEO factors include:
Relevant links from other websites leading to your site
Social media activity
Business and map listings
External marketing activities
Pro tip: Find out more about on-page SEO with our front-end SEO inspector! You can use the front-end inspector tool in Yoast SEO Premium to explore the SEO data, metadata and schema output for pages on your site. It’s a great way to get to grips with your on-page SEO.
Importance of on-page SEO
On-page SEO consists of all the elements of SEO that you have control over. If you own a website, you can control the technical issues and the quality of your content. We believe you should be able to tackle all of these factors as they’re in your own hands. Remember: if you create an excellent website, it will start ranking.
Focusing on on-page SEO will also increase the chance that your off-page SEO strategy will be successful. Link building with a crappy site is very tough. Nobody wants to link to poorly written articles or sites that don’t work correctly.
How to optimize on-page SEO factors
1. Make sure search engines can crawl and index your site
If you’re unfamiliar with crawlability and indexing, here’s a quick explanation of what it is and what it has to do with Google. To show your page in the search results, Google must first know about that page. It has to be indexed by Google, meaning that this page has been stored in their index. And for that to be possible, you must ensure you’re not blocking Google from indexing your post or your whole site. So check if you’re not unintentionally doing that (we still see this happening!), and ensure your site is indexed.
Although this isn’t technically a ranking factor, getting your site into the search results requires it, so we thought it should be included here.
2. Invest time in creating quality content based on solid keyword research
Why do you think people visit your site? Most likely because it contains the information they’re looking for. Therefore it’s essential to write excellent content that corresponds with their needs. Search engines like Google also read your text. Which site ranks highest for a specific search term is primarily based on a website’s content. That’s why your content should be informative, easy to read, and focused on the right keywords that your audience uses.
Aside from creating quality content, you must remove or remedy low-quality pages. So-called thin content can harm your SEO. Take time to find these pages and do something with them occasionally to keep your content in good shape.
A significant on-page ranking factor is site speed. Users don’t want to wait for pages to load, so Google tends to rank fast-loading sites higher. If you’re unsure how fast (or slow) your site is, check out your Core Web Vital scores using the report in Google Search Console. This helpful tool will point out areas where your site speed can be improved so you know what to work on.
If you’re tech-savvy, you can probably handle this on your own. If you’re unsure where to start, our Technical SEO training can help you.
4. Get your site structure and internal linking right
A good site structure helps Google (and users) understand your site and navigate your content. And when it comes to making that site structure, internal linking is the way to do it. Firstly, you must channel many internal links to your most important content. We call those pages cornerstone content. Secondly, you should tidy up pages that aren’t getting many (if any) internal links. Those pages are what we refer to as orphaned content. It would be best if you decided whether to improve those pages and add more internal links pointing to them or remove them altogether.
Yoast SEO Premium has two SEO workouts to help you improve your site structure and internal linking. Using the workouts can help you to make big improvements quickly, so give them a go!
5. Optimize your use of images and videos
You’ll want to include images on your site to make it attractive, and maybe some videos too. Doing that wrong can harm your SEO, but doing it correctly comes with some SEO benefits.
High-quality images are usually large files that can slow your site down, and that’s a problem. Using smaller image files and giving them descriptive names, captions, and alt tags will favor your SEO. Plus, there are additional benefits. For one, you’ll make your site more accessible, so it’s helpful for a wider audience. And for another thing, you’ll have a chance of your images ranking in the Google Image search results. Read more about these topics in our posts about image SEO and alt tags.
Adding videos to your site is a bit more complicated than images. And ranking your videos on Google (or YouTube) comes with its own set of challenges. We’ve got a great series of posts all about video SEO, if you’d like to learn more about optimizing in this area. There’s also a dedicated Yoast Video SEO plugin, if you’re serious about getting your videos ranking.
6. Create a persuasive search appearance
How your site looks in the search results is vital for SEO. While the search results aren’t part of your site, the things you do to optimize your search appearance are. Therefore, we consider SEO titles, meta descriptions, and structured data part of on-page SEO.
Optimize your SEO title and meta description, and then add structured data for results that stand out
Optimizing the text for your search snippets is fairly straightforward. Adding structured data can be trickier. Good to know: Yoast SEO can help with all these tasks. With checks and previews to help you, getting your SEO titles and meta descriptions right couldn’t be easier. And when it comes to structured data, Yoast does all the hard work for you — all you need to do is select the content type and fill in the blanks.
7. Make your URLs SEO-friendly
A well-crafted URL structure helps your on-page SEO — it’s like giving your web pages a good road map. Think of it as a friendly address that guides search engines and invites users to explore your content. Creating SEO-friendly URLs makes it easier for humans and search engines to understand what your page is all about. Opt for concise and descriptive URLs that include relevant keywords, as they provide a clear signpost. A clean and organized URL structure enhances navigation, making it easier for everyone to understand your website. Don’t forget to keep it short and readable.
8. Design an excellent user experience
The last thing we want to mention is user experience. Simply put, users need to understand your website easily. They should be able to find what they want in a heartbeat. They should know where to click and how to navigate through your site. And your site should be fast! A beautifully designed website is nice, but you should make it your top priority to create a user-friendly website first.
If you want to learn more about combining SEO and UX to get more people to your site, we’d advise you to look at our other articles on user experience. Or check out our all-around SEO training course.
To conclude
We’ve talked about the most important on-page SEO factors. First, ensure that your website works correctly and that your technical SEO is up to par. Secondly, create content that is user-centered and focused on the right keywords. Thirdly, work on the usability and speed of your site to help users and search engines around your website.
As these factors are all a part of your site, you can work on them to ensure your on-page SEO is top-notch! That being said, do remember to also work on your off-page SEO. Although you may not have total control over these factors, you can still put some effort into creating that exposure on other sites too!

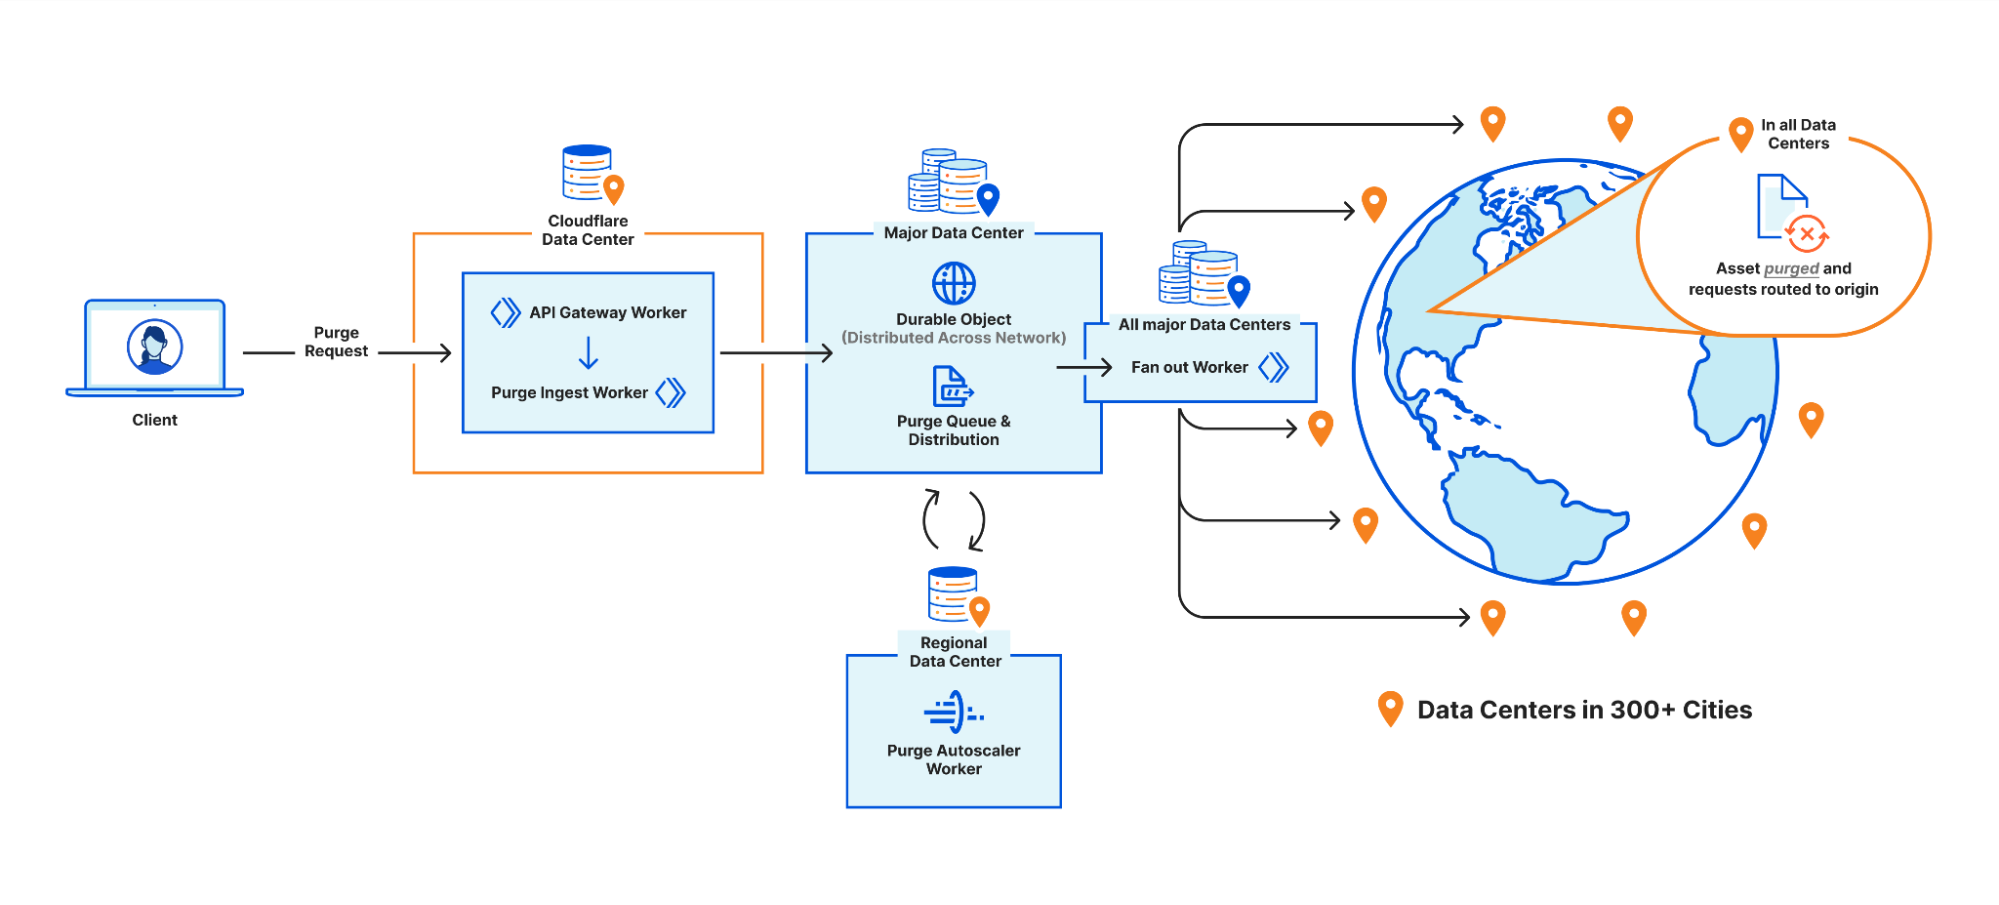
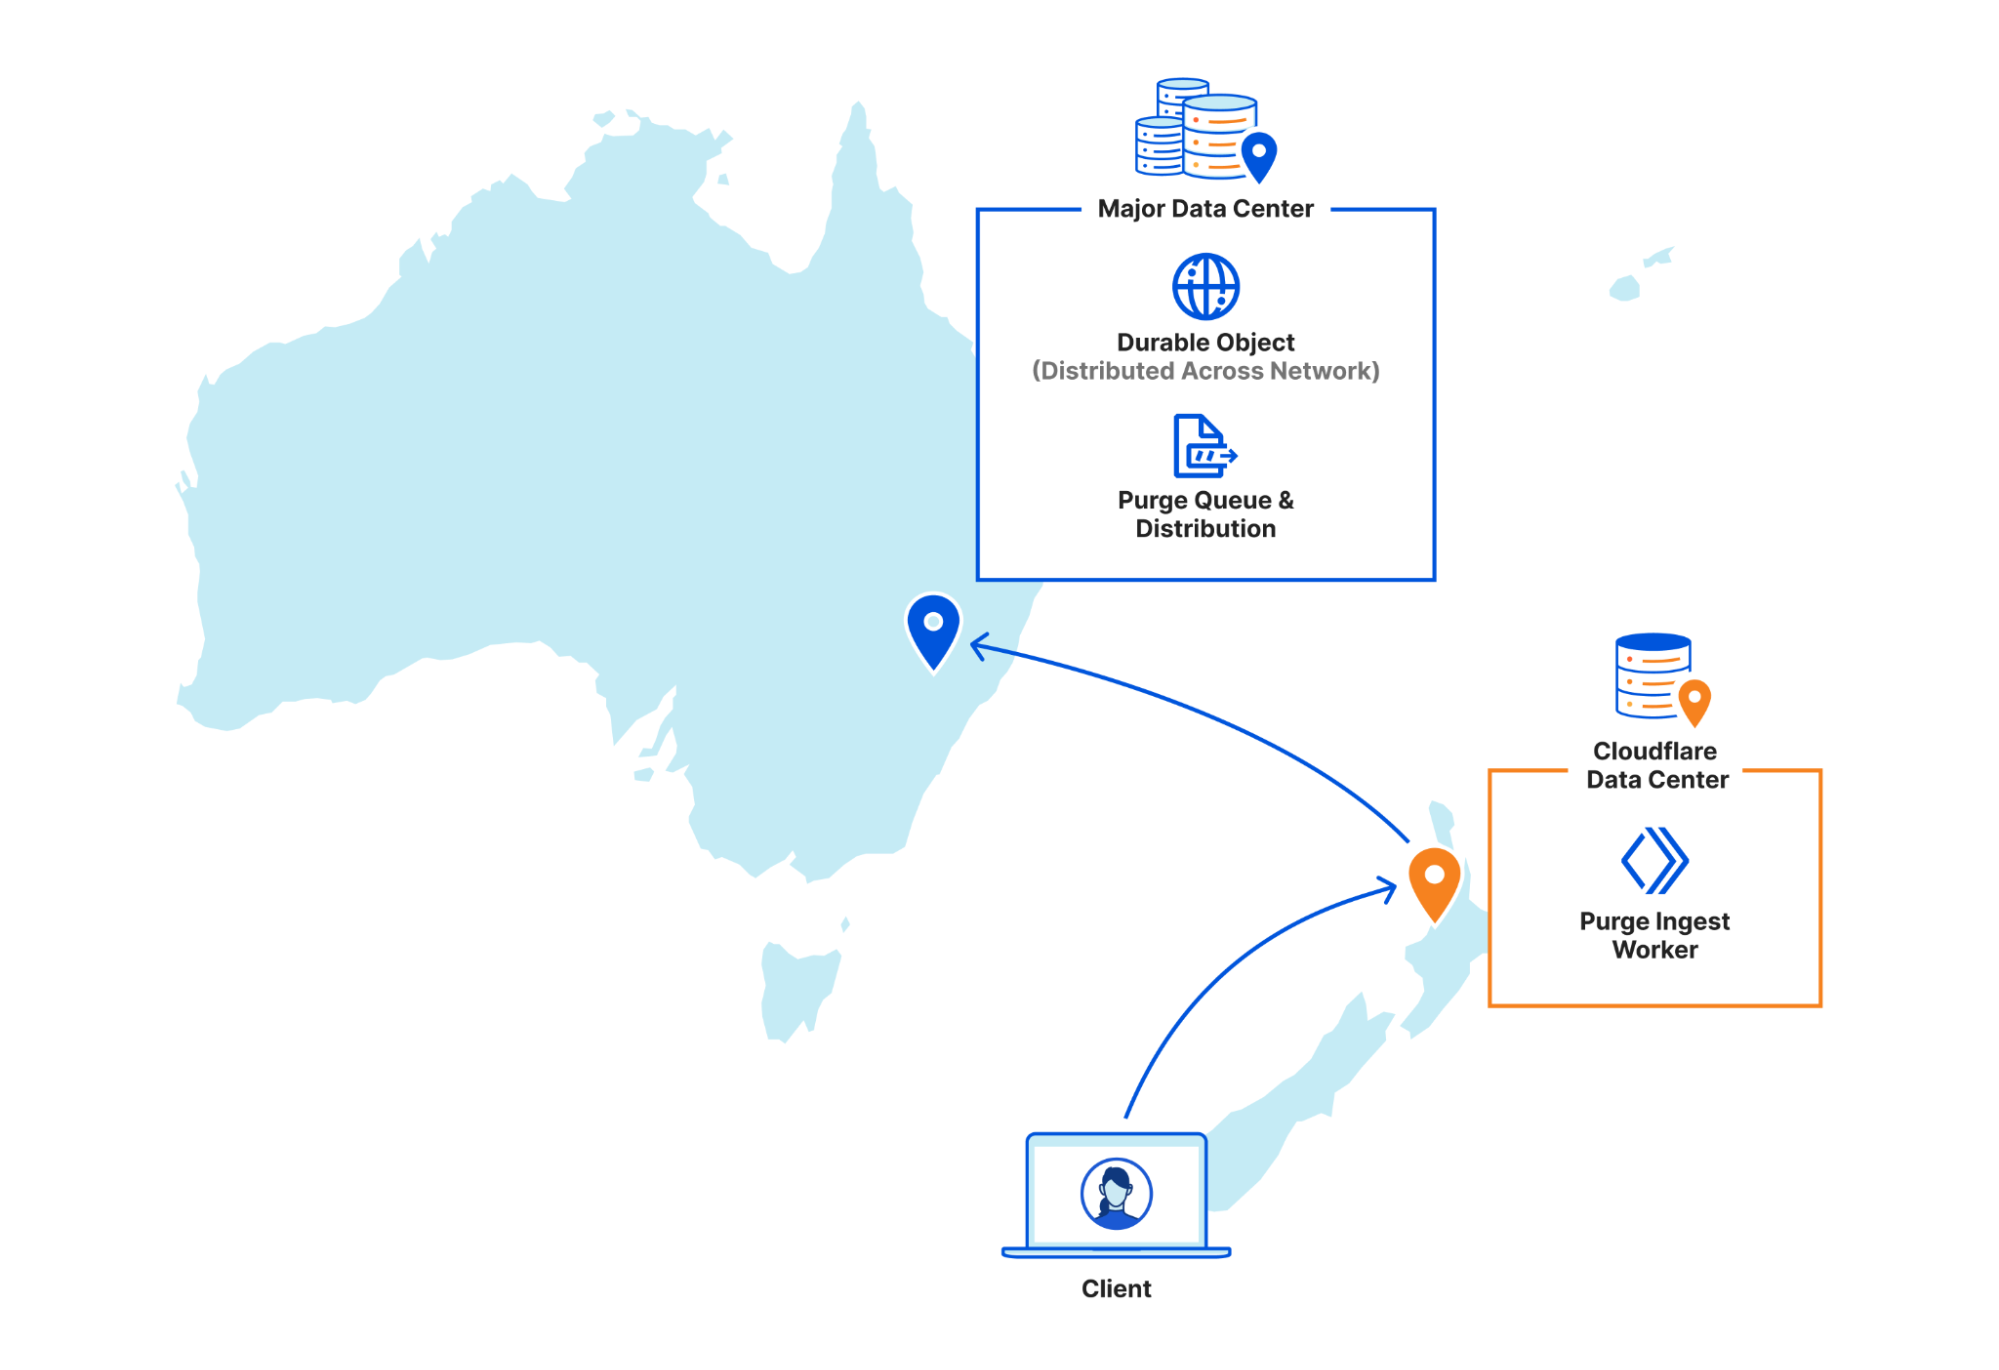
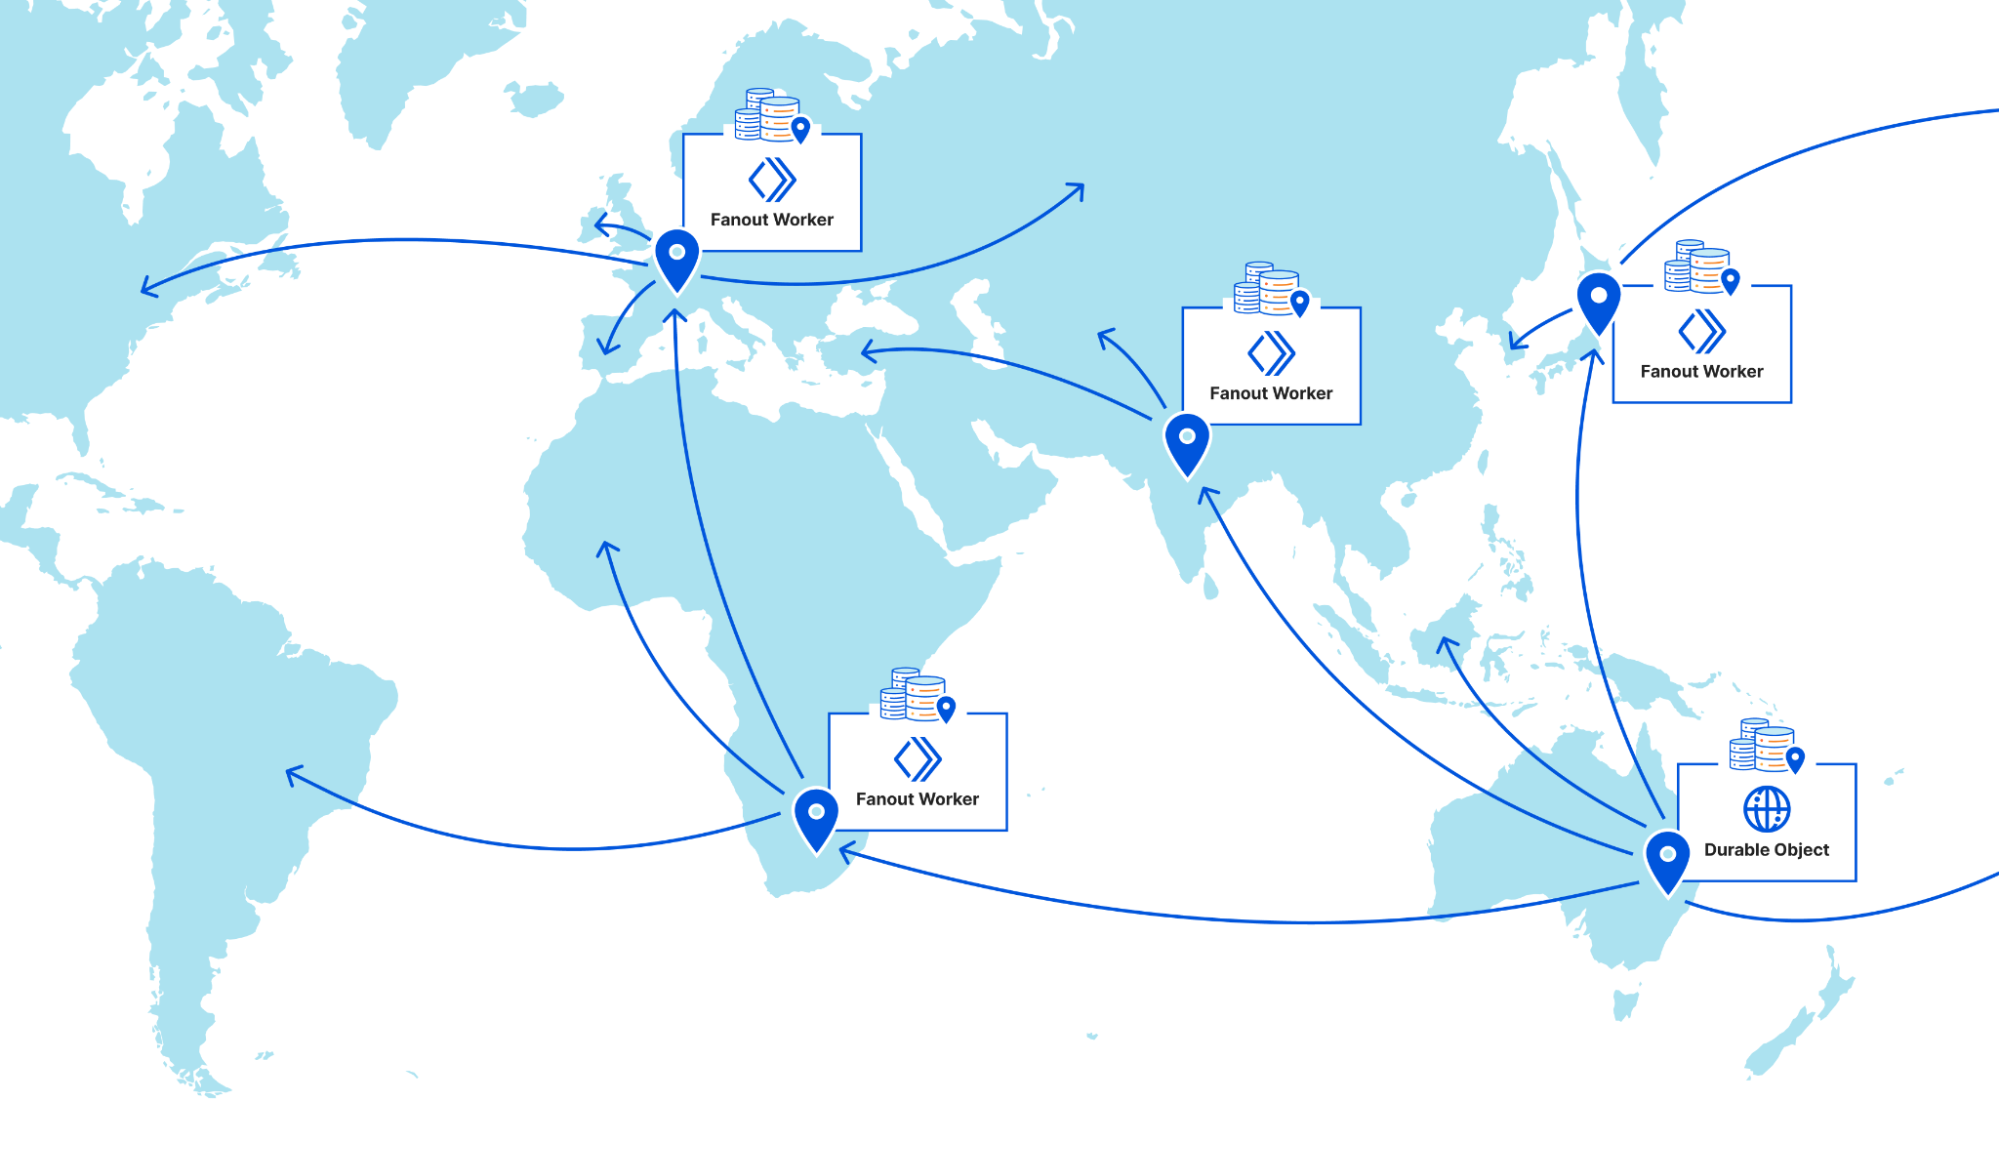
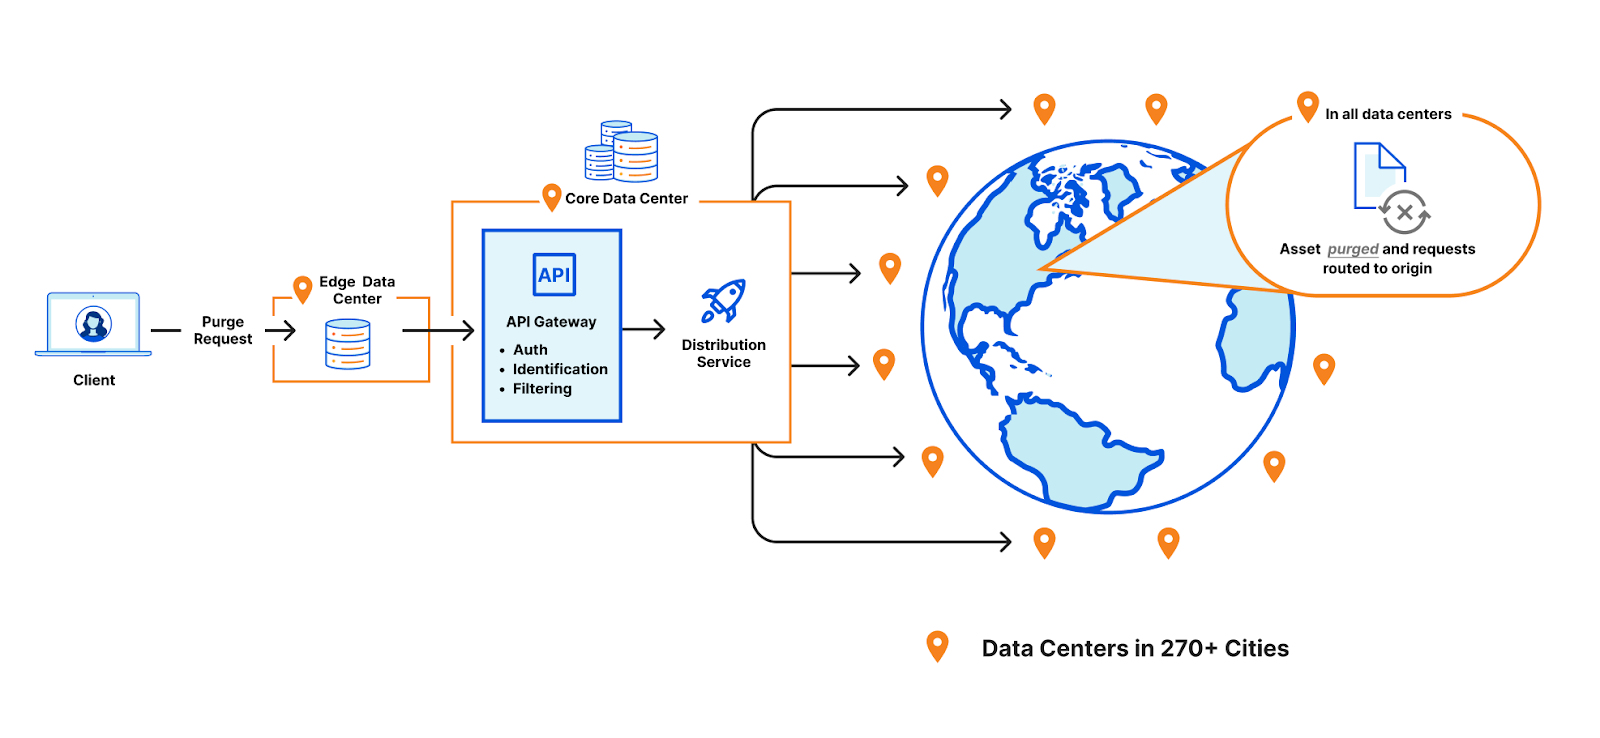
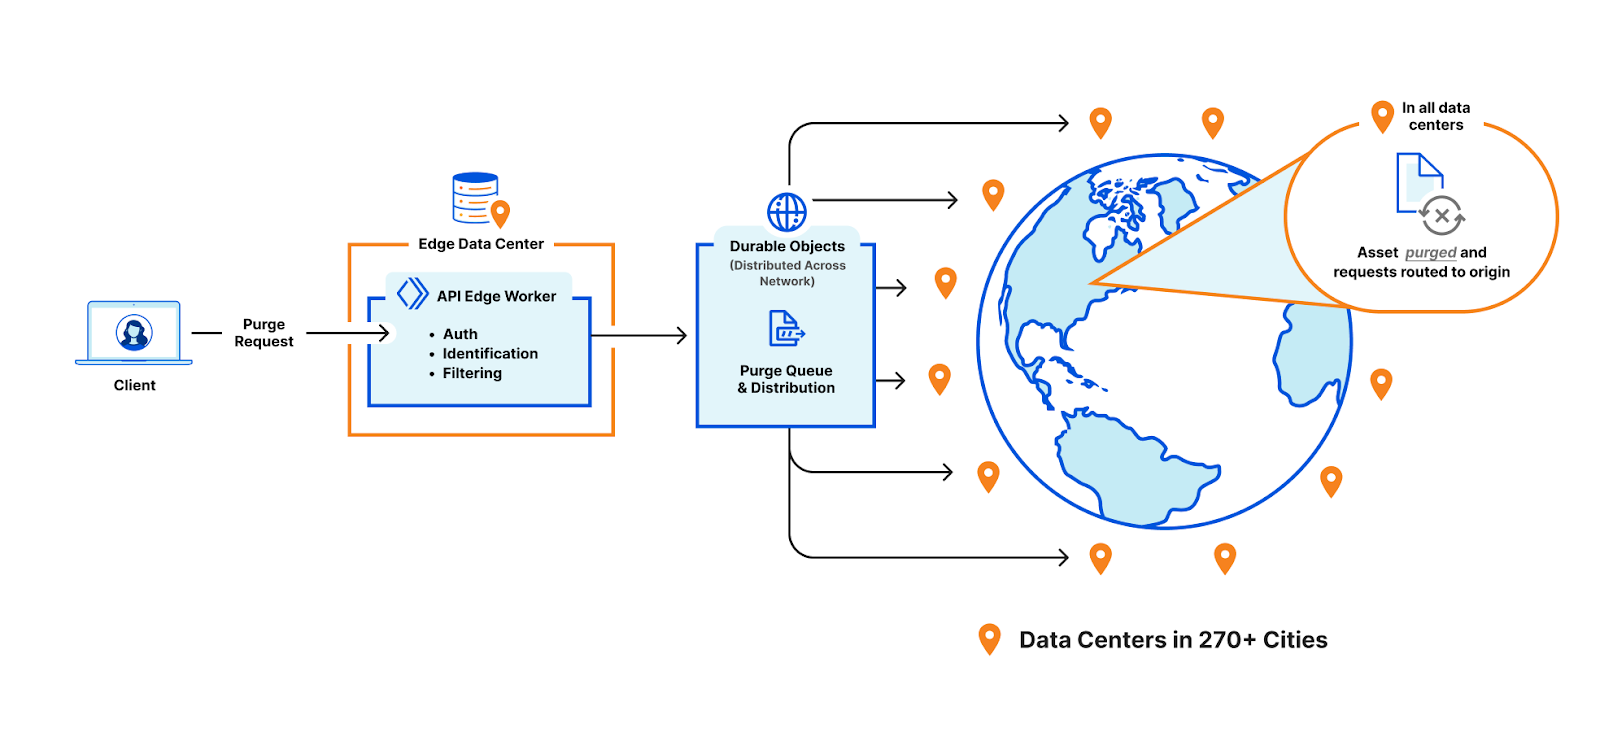
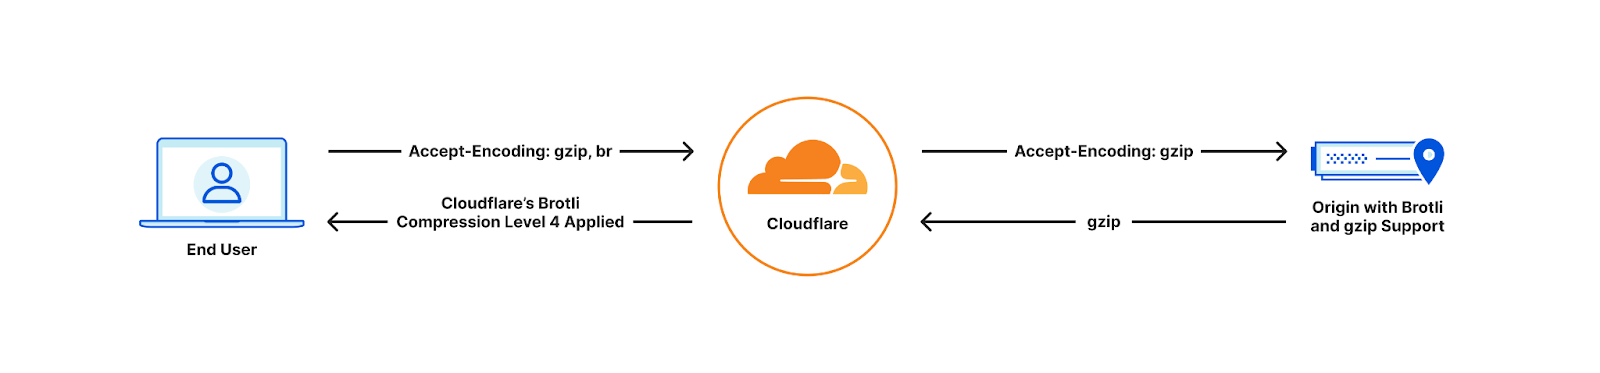
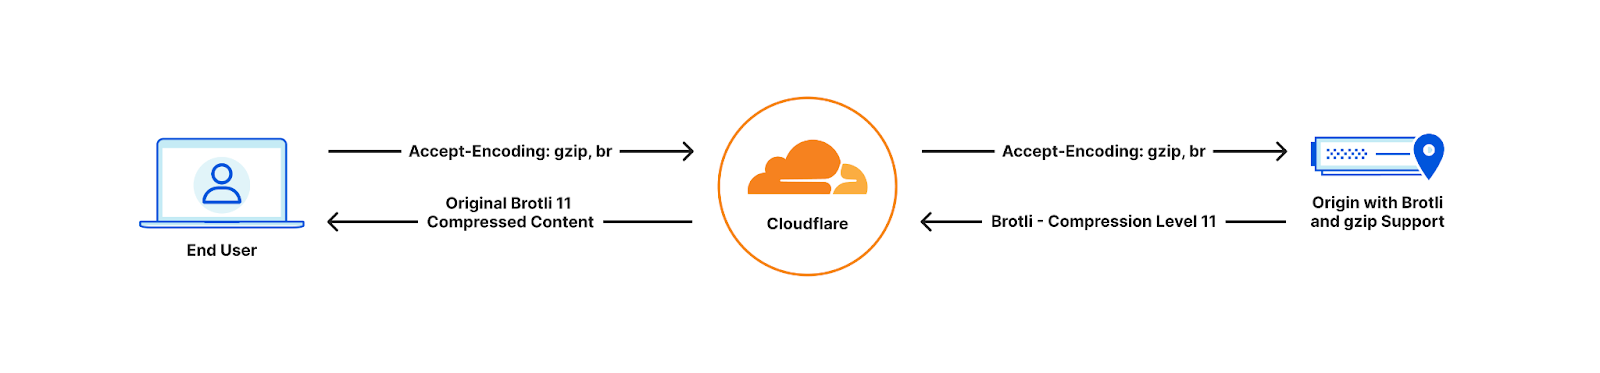
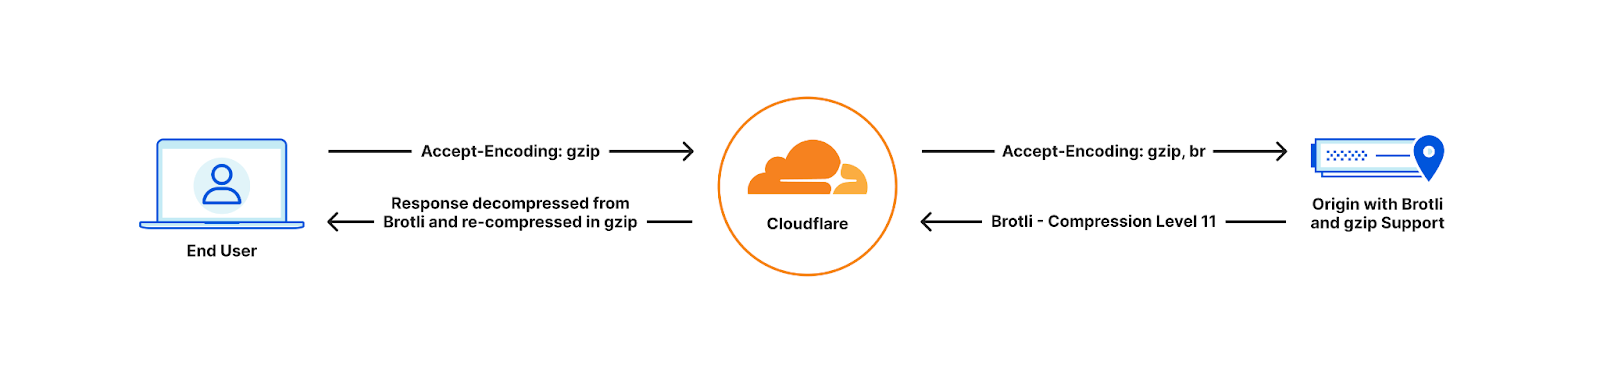
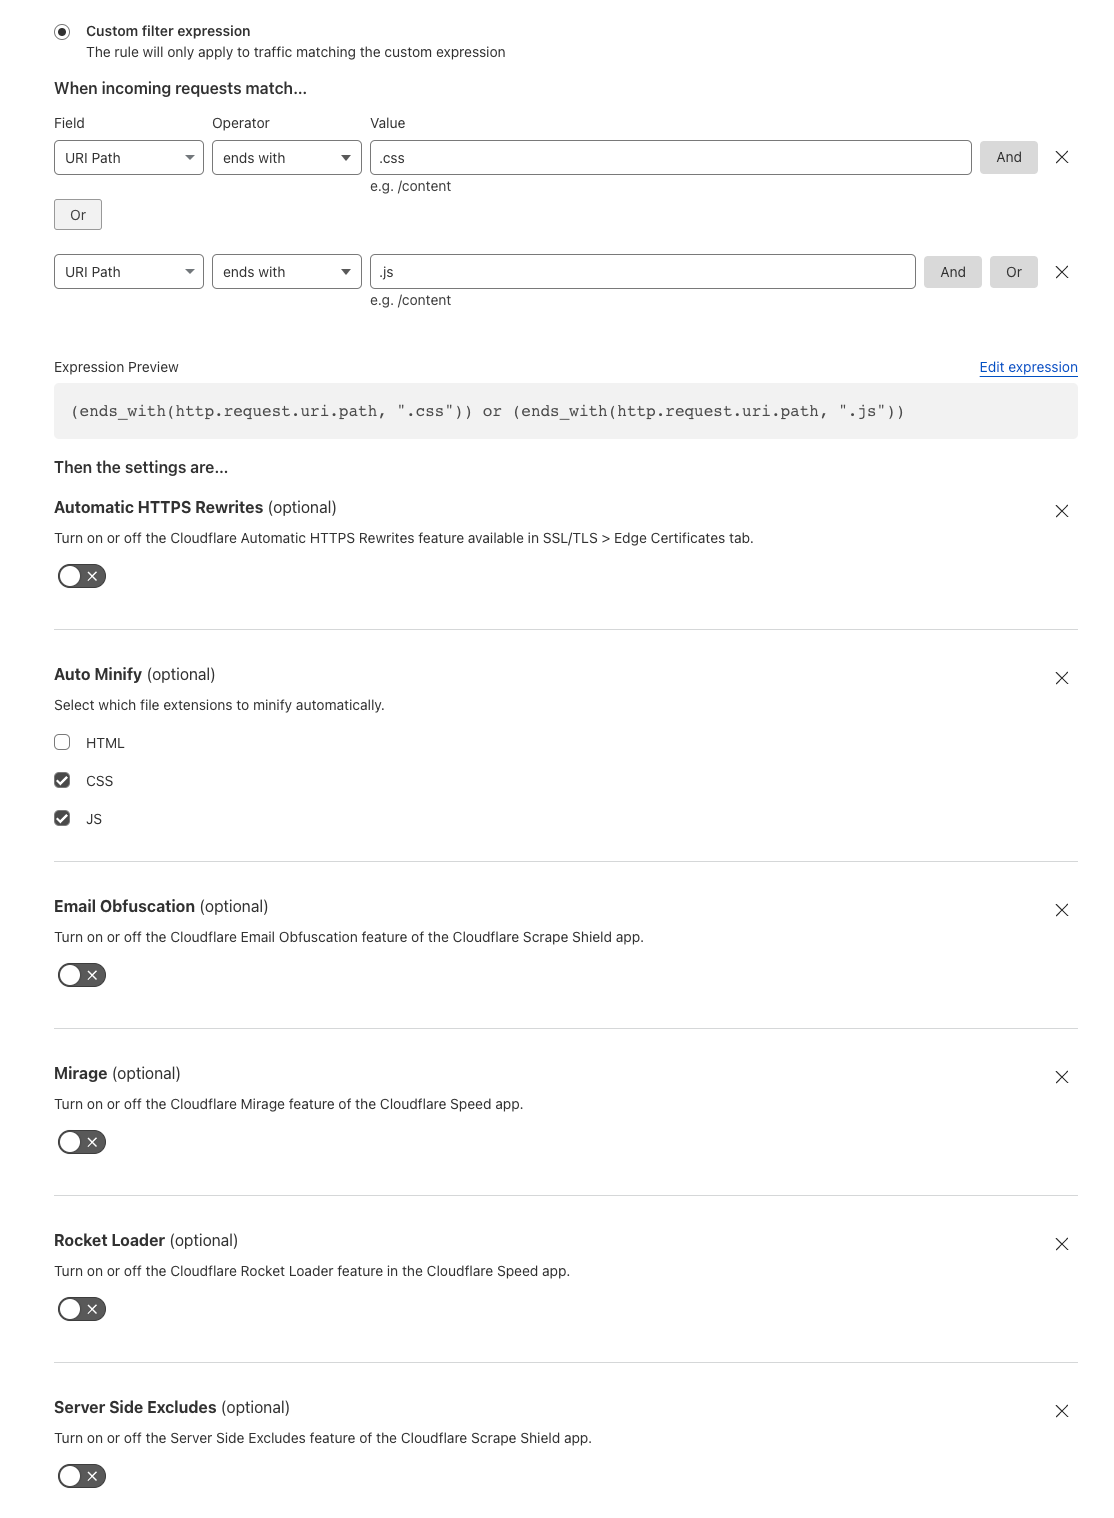
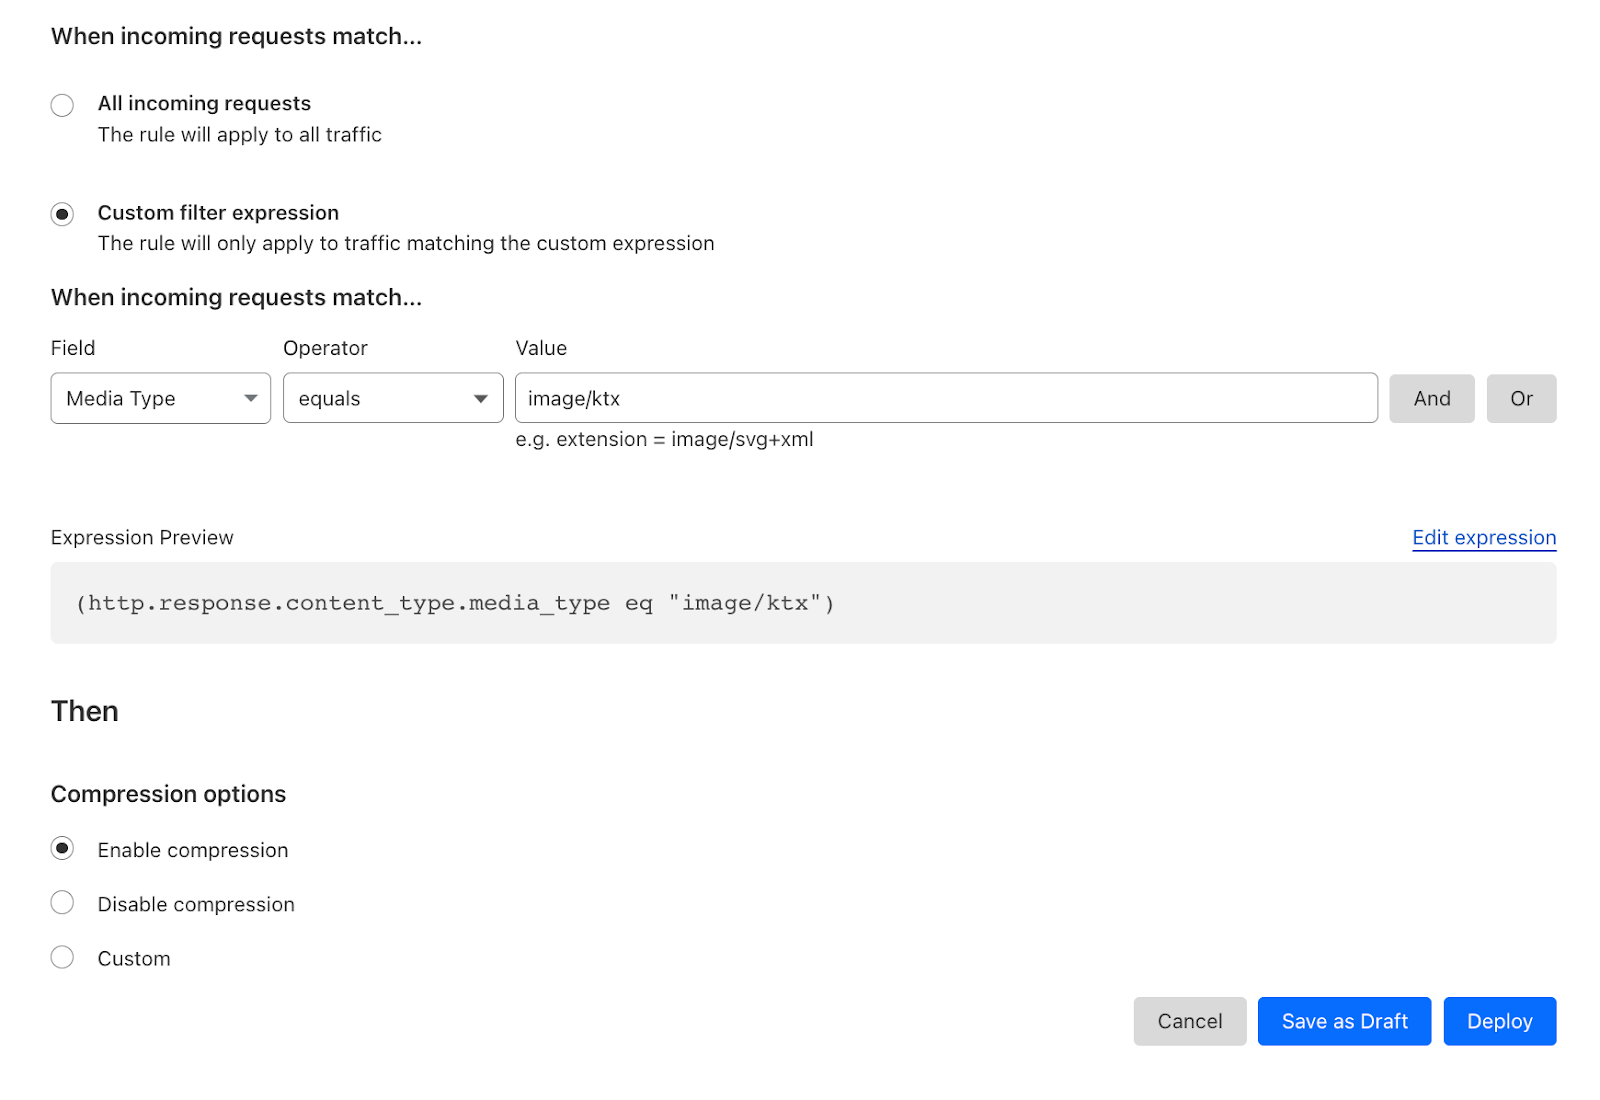
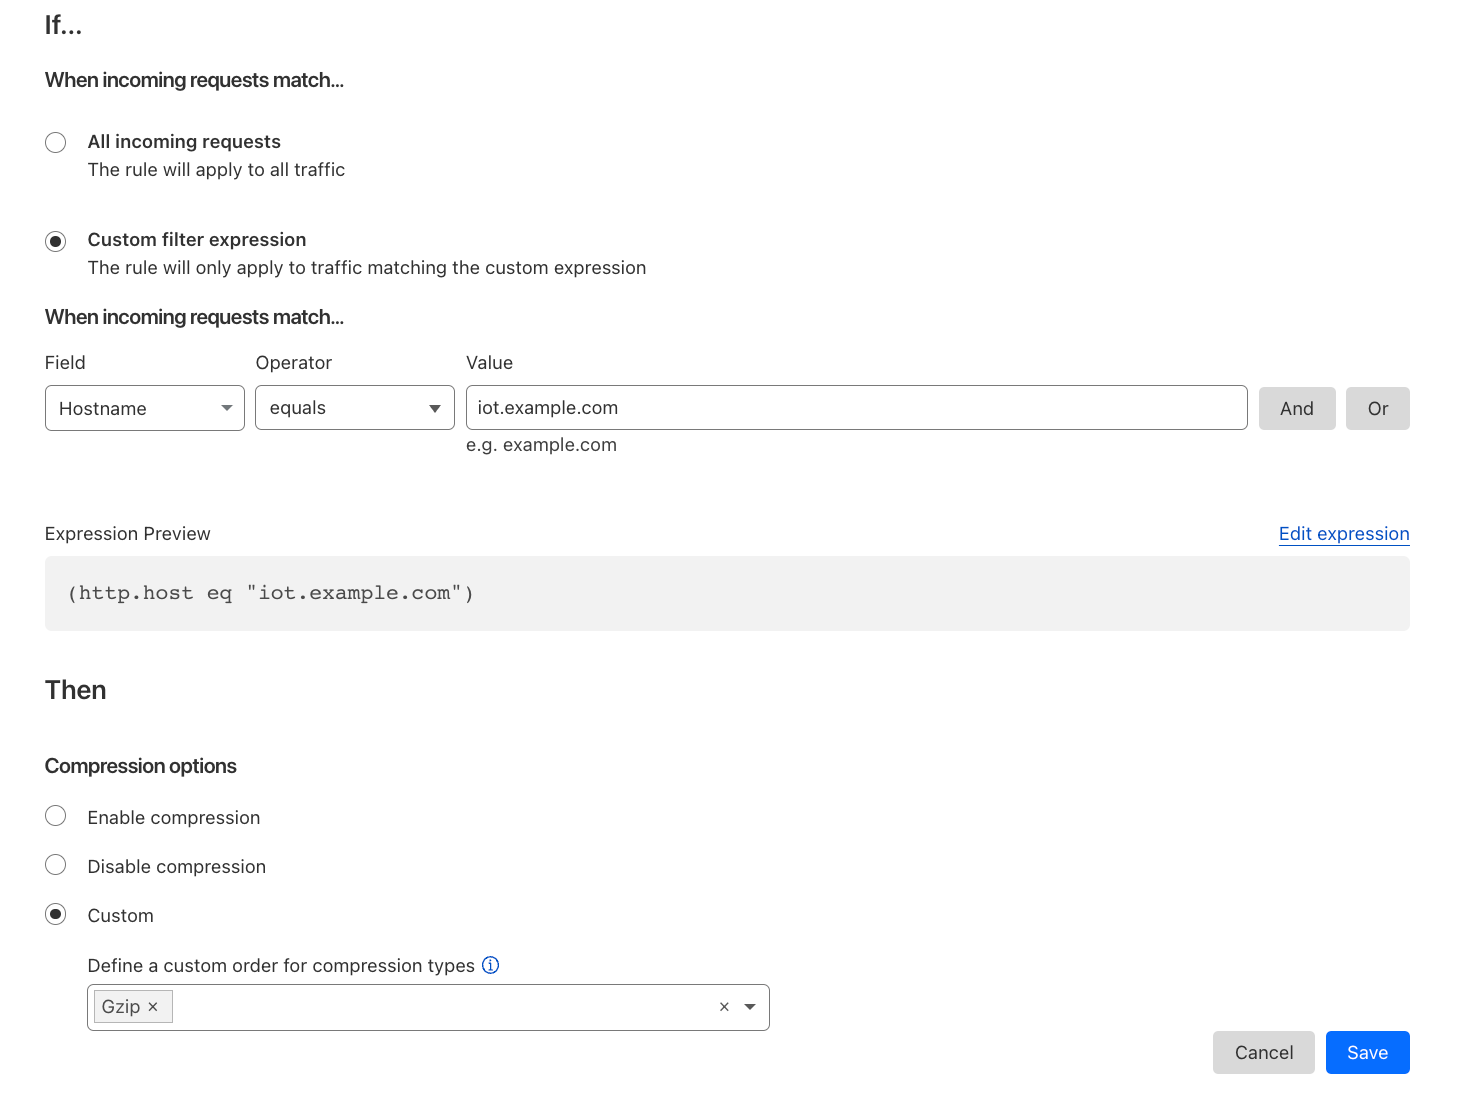
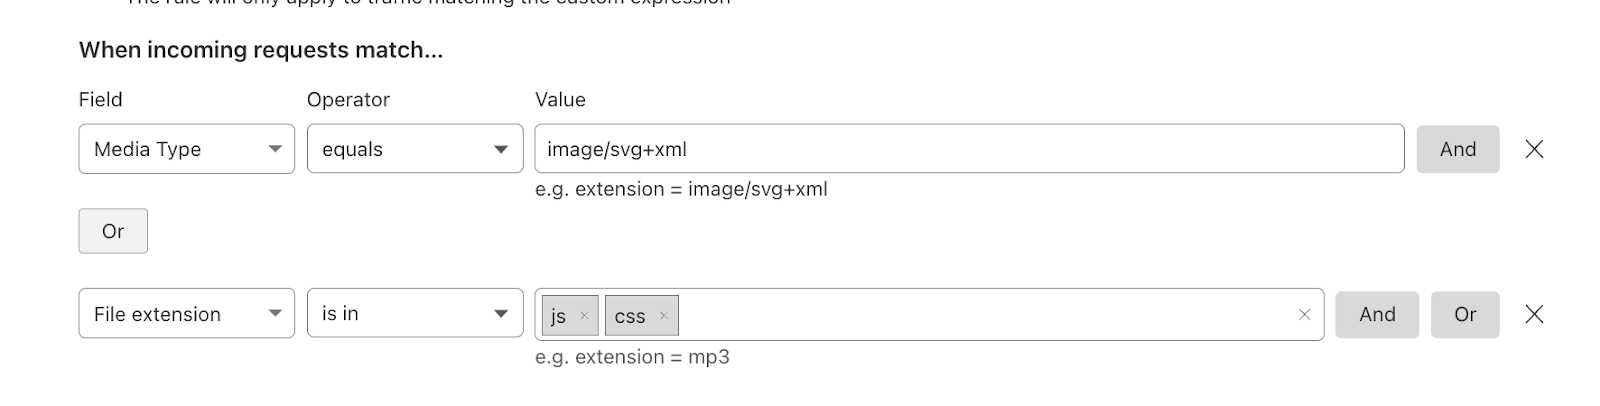
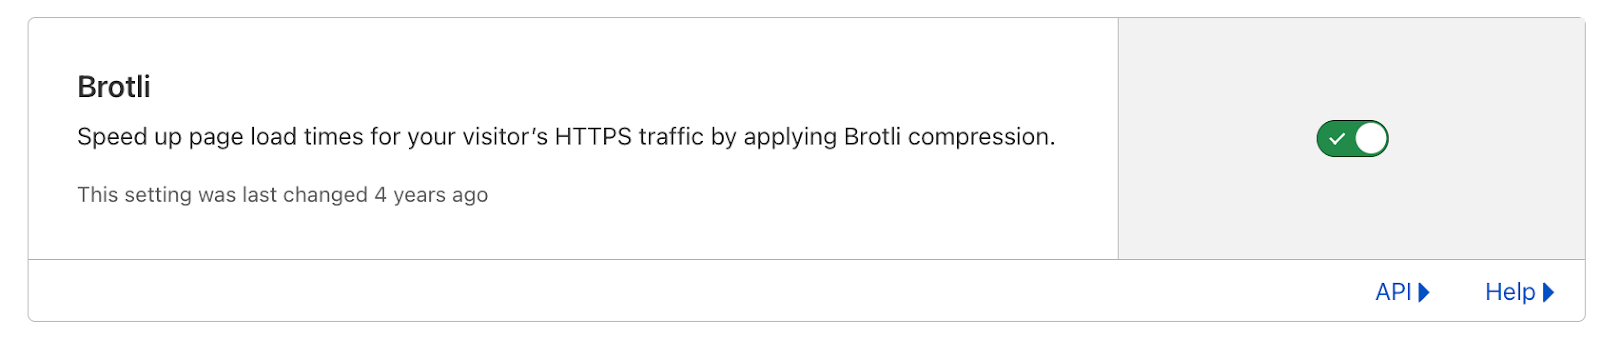
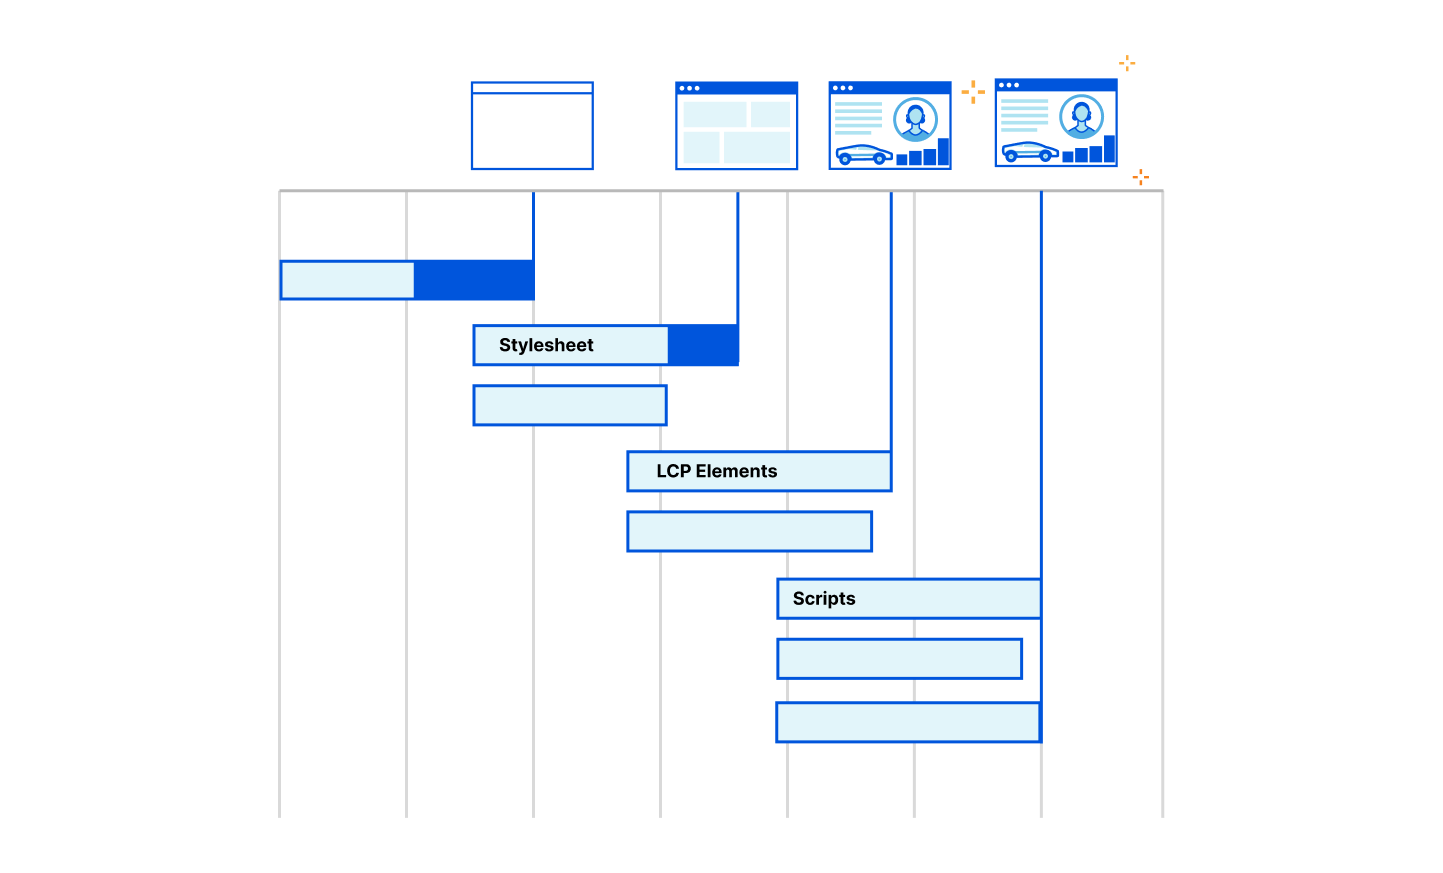
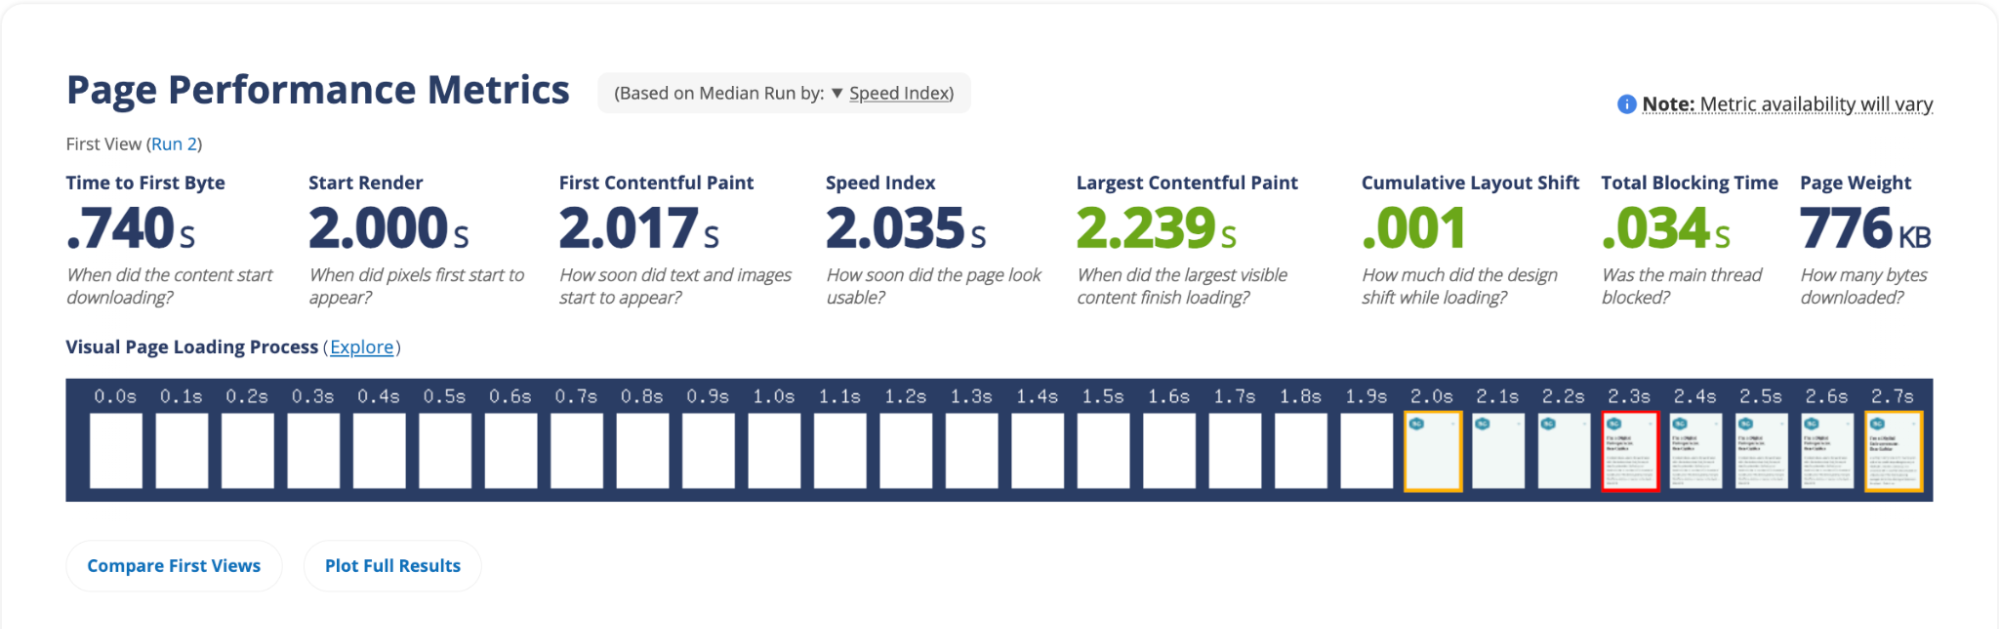

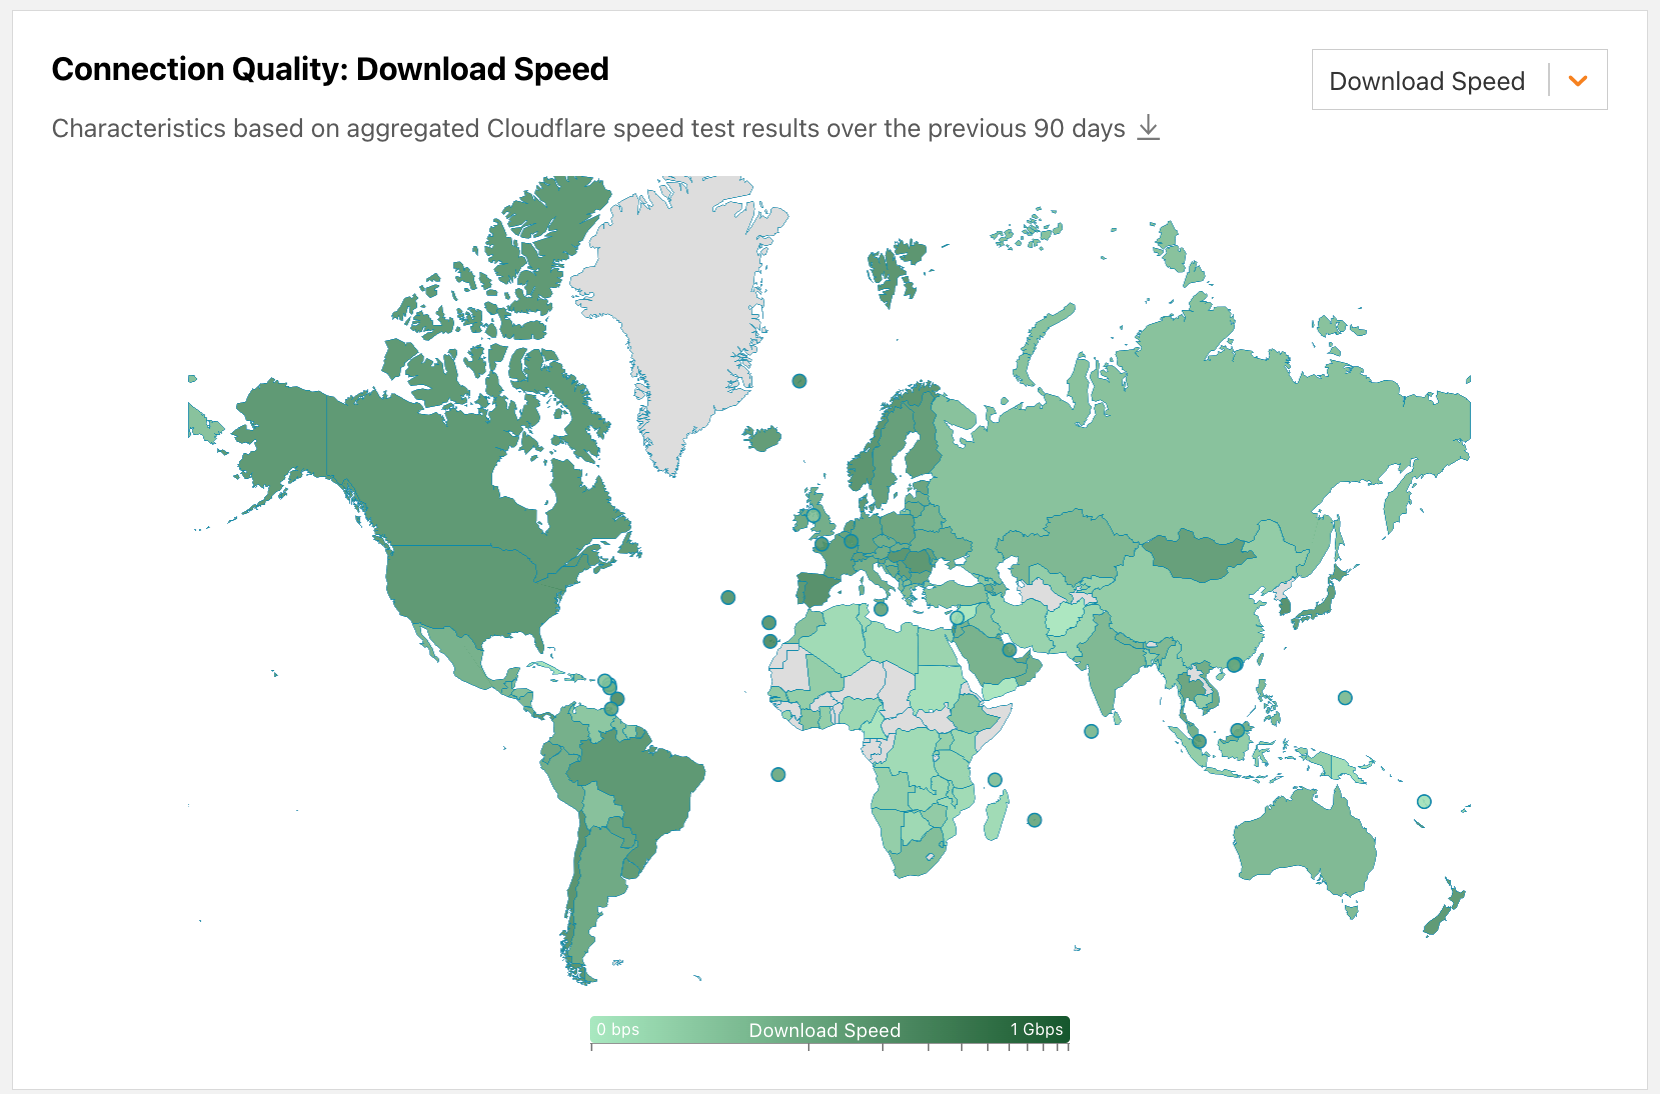
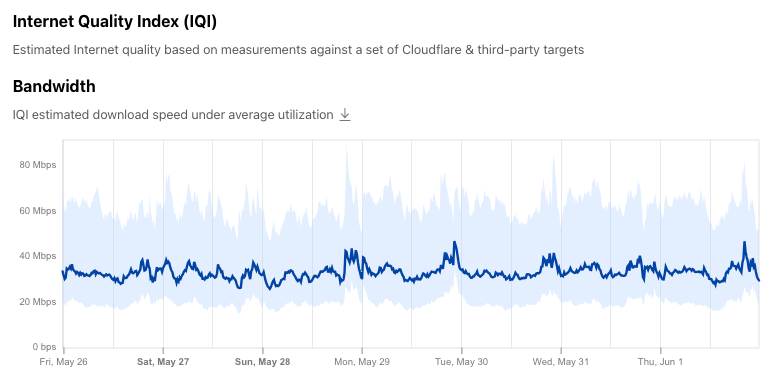
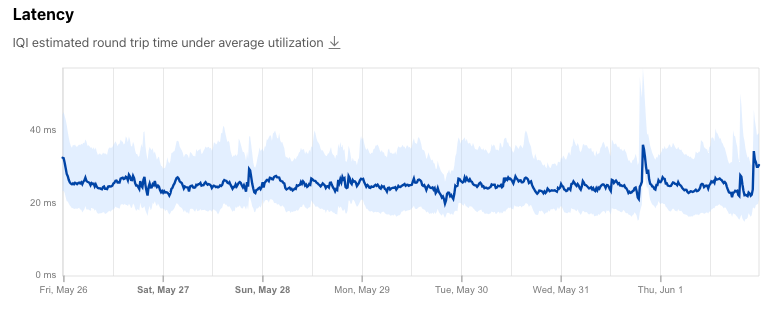

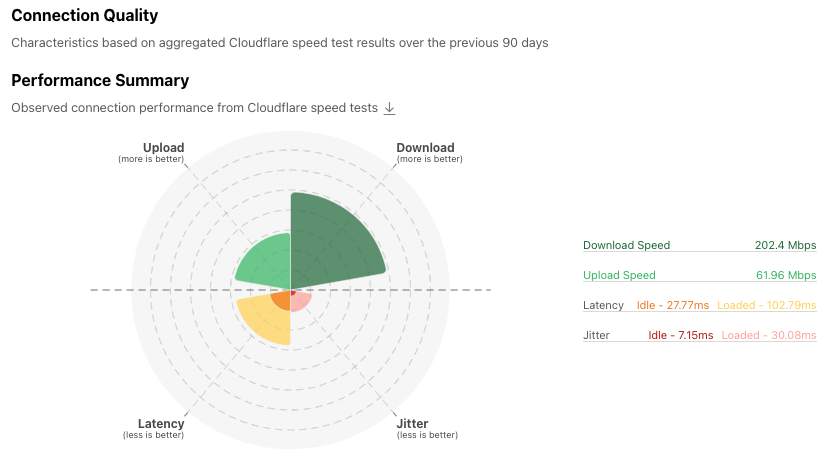

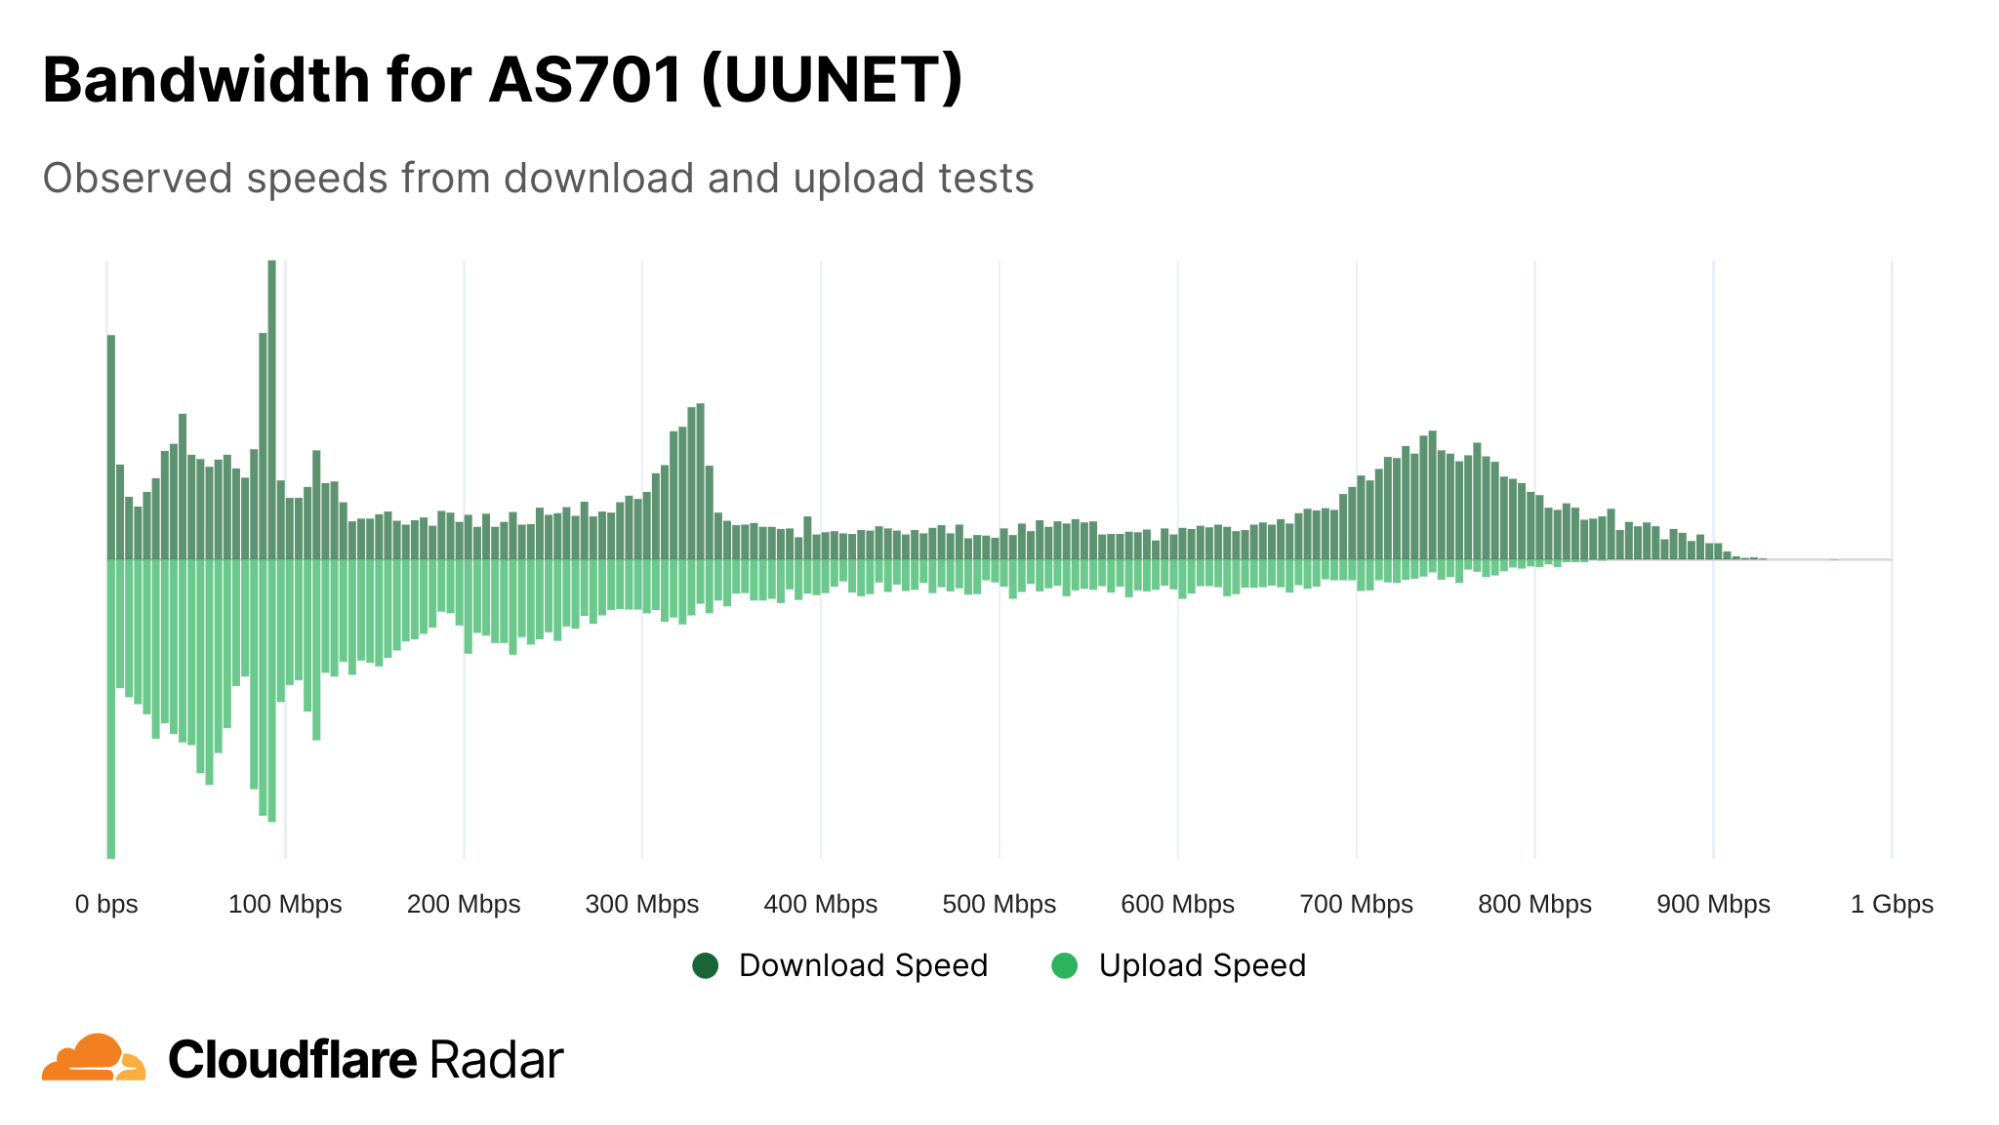

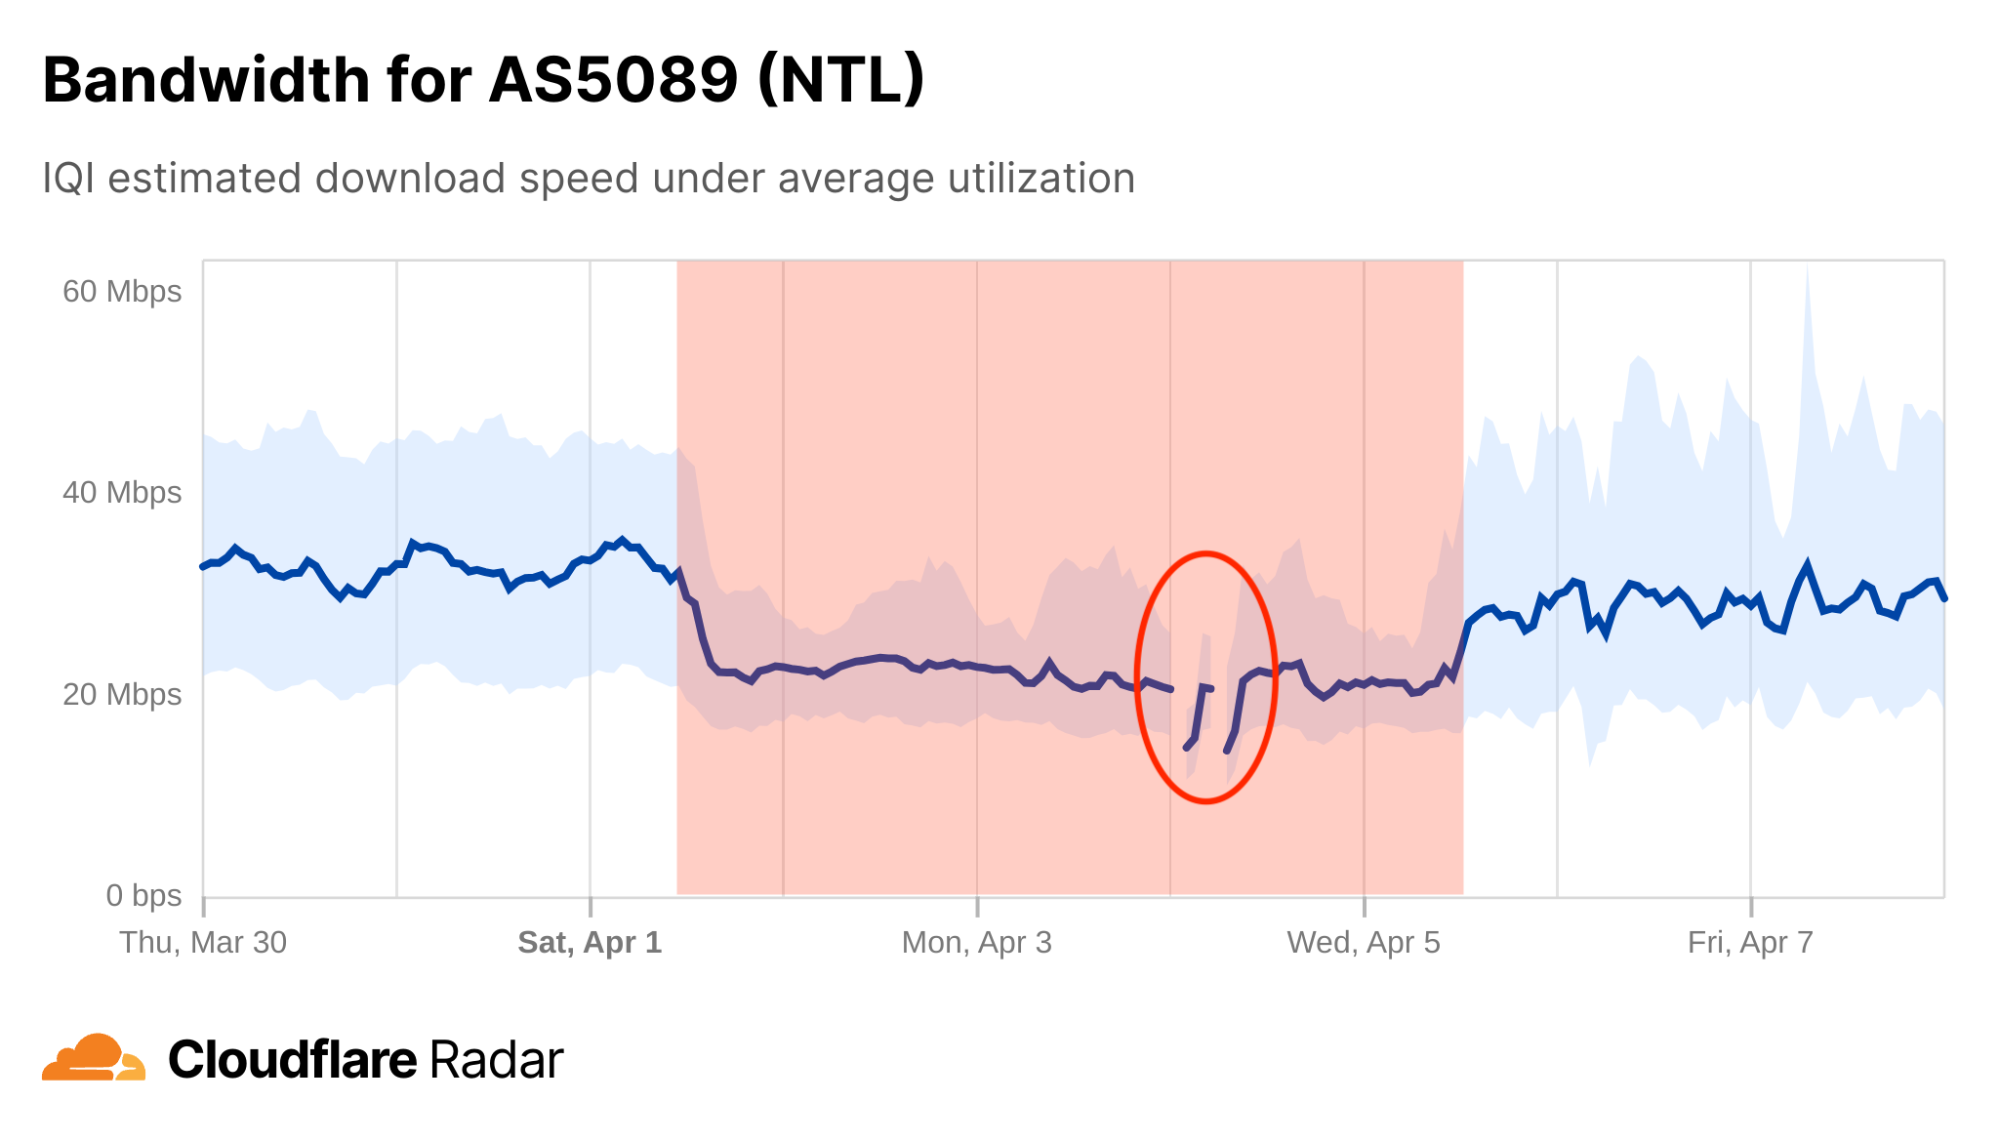

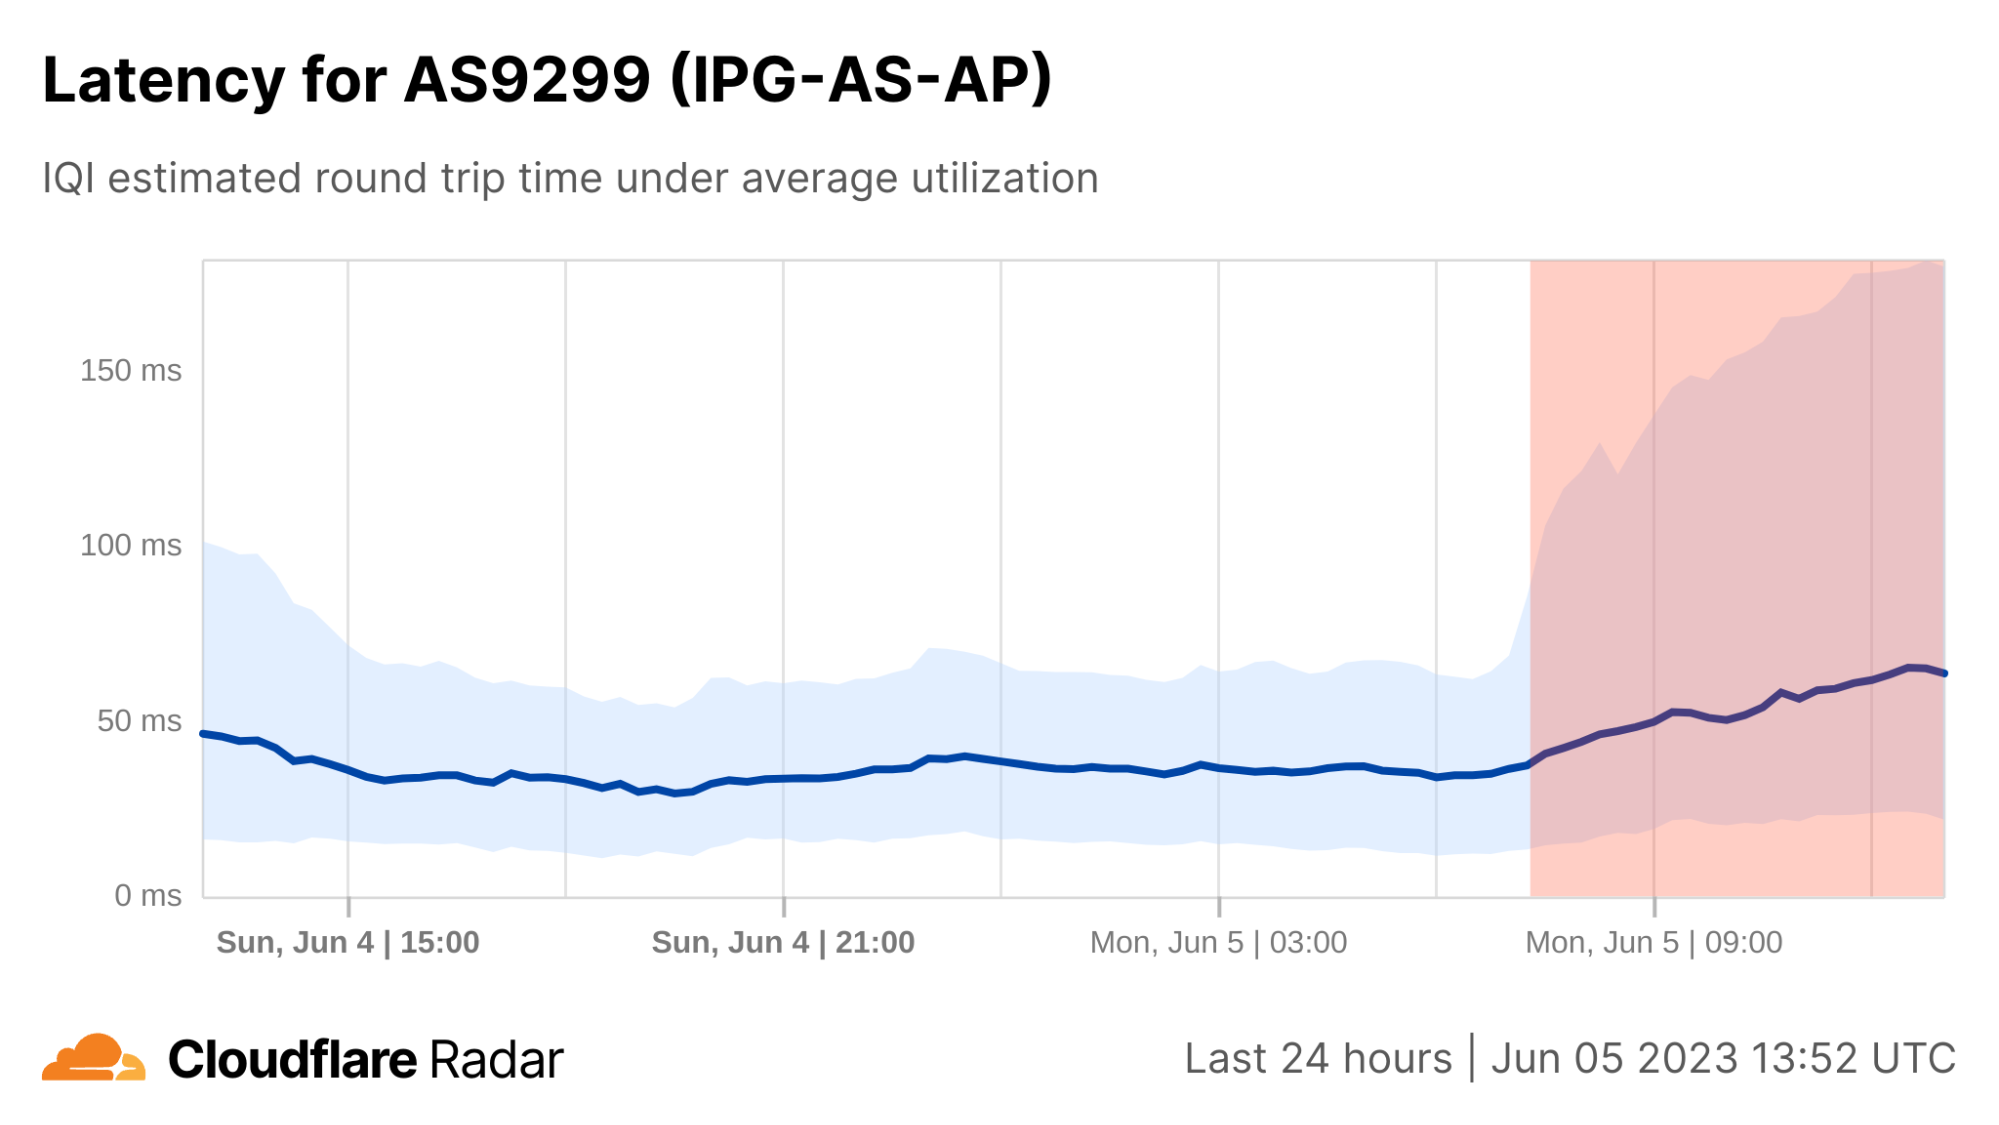
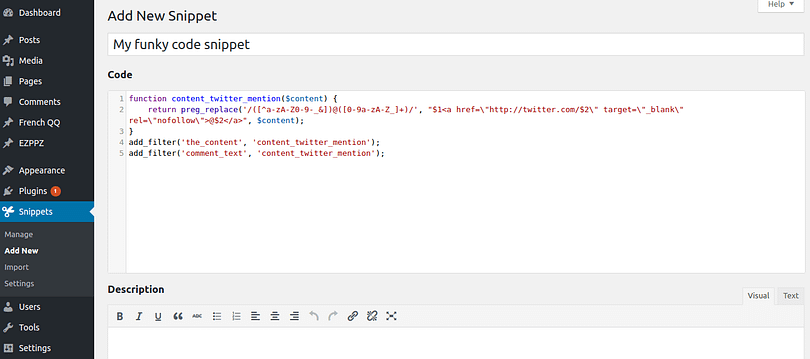
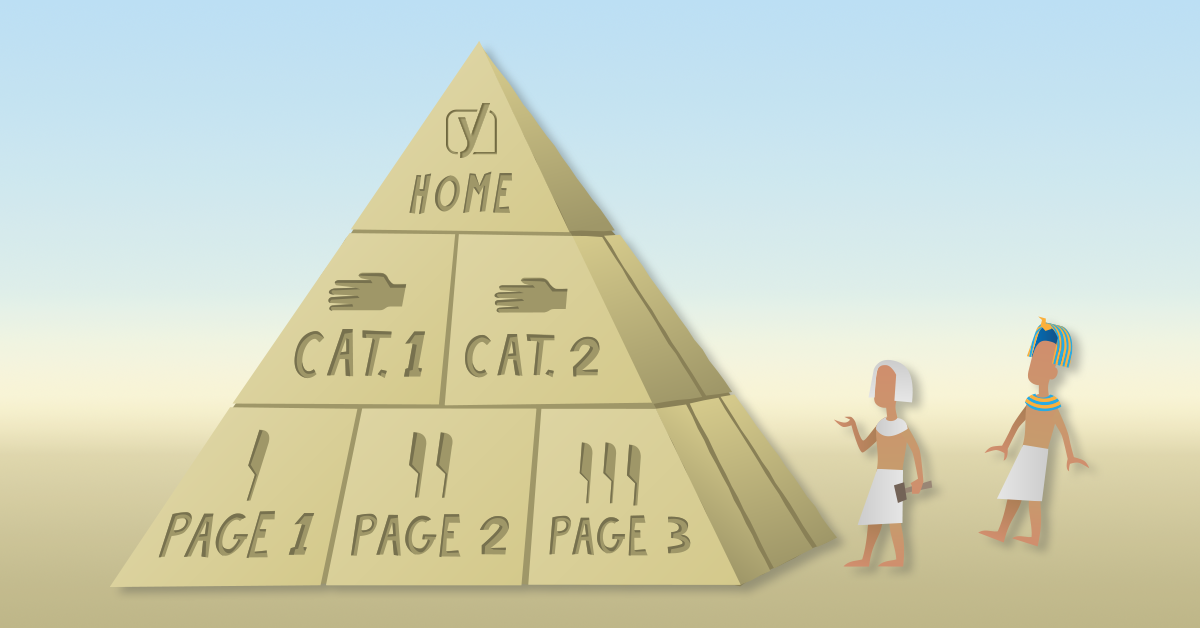


