On December 23, 2021 the Wordfence Threat Intelligence team initiated the responsible disclosure process for a vulnerability we discovered in “WordPress Email Template Designer – WP HTML Mail”, a WordPress plugin that is installed on over 20,000 sites. This flaw made it possible for an unauthenticated attacker to inject malicious JavaScript that would execute whenever a site administrator accessed the template editor. This vulnerability would also allow them to modify the email template to contain arbitrary data that could be used to perform a phishing attack against anyone who received emails from the compromised site.
Wordfence Premium users received a firewall rule to protect against any exploits targeting this vulnerability on December 23, 2021. Sites still using the free version of Wordfence will receive the same protection on January 22, 2022.
We sent the full disclosure details to the developer on January 10, 2022, after multiple attempts to contact the developer and eventually receiving a response. The developer quickly acknowledged the report and released a patch on January 13, 2022.
We strongly recommend ensuring that your site has been updated to the latest patched version of “WordPress Email Template Designer – WP HTML Mail”, which is version 3.1 at the time of this publication.Description: Unprotected REST-API Endpoint to Unauthenticated Stored Cross-Site Scripting and Data Modification Affected Plugin:WordPress Email Template Designer – WP HTML Mail Plugin Slug: wp-html-mail Plugin Developer: codemiq Affected Versions: <= 3.0.9 CVE ID:CVE-2022-0218 CVSS Score: 8.3 (High) CVSS Vector:CVSS:3.1/AV:N/AC:L/PR:L/UI:N/S:C/C:L/I:L/A:N Researcher/s: Chloe Chamberland Fully Patched Version: 3.1
WP HTML Mail is a WordPress plugin developed to make designing custom emails simpler for WordPress site owners. It is compatible with various WordPress plugins like WooCommerce, Ninja Forms, BuddyPress, and more. The plugin registers two REST-API routes which are used to retrieve email template settings and update email template settings. Unfortunately, these were insecurely implemented making it possible for unauthenticated users to access these endpoints.
More specifically, the plugin registers the /themesettings endpoint, which calls the saveThemeSettings function or the getThemeSettings function depending on the request method. The REST-API endpoint did use the permission_callback function, however, it was set to __return_true which meant that no authentication was required to execute the functions. Therefore, any user had access to execute the REST-API endpoint to save the email’s theme settings or retrieve the email’s theme settings.
As this functionality was designed to implement setting changes for the email template, an unauthenticated user could easily make changes to the email template that could aid in phishing attempts against users that receive emails from the targeted site. Worse yet, unauthenticated attackers could inject malicious JavaScript into the mail template that would execute anytime a site administrator accessed the HTML mail editor.
As always, cross-site scripting vulnerabilities can be used to inject code that can add new administrative users, redirect victims to malicious sites, inject backdoors into theme and plugin files, and so much more. Combined with the fact that the vulnerability can be exploited by attackers with no privileges on a vulnerable site, this means that there is a high chance that unauthenticated attackers could gain administrative user access on sites running the vulnerable version of the plugin when successfully exploited. As such, we strongly recommend that you verify that your site is running the most up to date version of the plugin immediately.
Timeline
December 23, 2021 – Conclusion of the plugin analysis that led to the discovery of a Stored Cross-Site Scripting Vulnerability in the “WordPress Email Template Designer – WP HTML Mail” plugin. We develop and release a firewall rule to protect Wordfence users. Wordfence Premium users receive this rule immediately. We attempt to initiate contact with the developer. January 4, 2022 – We send an additional outreach attempt to the developer. January 10, 2022 – The developer confirms the inbox for handling the discussion. We send over the full disclosure details. January 11, 2022 – The developer acknowledges the report and indicates that they will work on a fix. January 13, 2022 – A fully patched version of the plugin is released as version 3.1. January 22, 2022 – The firewall rule becomes available to free Wordfence users.
Conclusion
In today’s post, we detailed a flaw in the “WordPress Email Template Designer – WP HTML Mail” plugin that made it possible for unauthenticated attackers to inject malicious web scripts that would execute whenever a site owner accessed the mail editor area plugin, which could lead to complete site compromise. This flaw has been fully patched in version 3.1.
We recommend that WordPress site owners immediately verify that their site has been updated to the latest patched version available, which is version 3.1 at the time of this publication.
Wordfence Premium users received a firewall rule to protect against any exploits targeting this vulnerability on December 23, 2021. Sites still using the free version of Wordfence will receive the same protection on January 22, 2022.
If you know a friend or colleague who is using this plugin on their site, we highly recommend forwarding this advisory to them to help keep their sites protected as this is a serious vulnerability that can lead to complete site takeover.
If your site has been compromised by an attack on this or any other plugin, our Professional Site Cleaning services can help you get back in business.
So far in our three big security mistakes series, we have talked about not using a secure username and keeping unused themes and plugins. Now it’s time to address the last one, if you haven’t guessed already, failing to update and backup your WordPress website.
Why Is Updating Your WordPress Important?
Did you know 80% of websites that are hacked are hacked because they weren’t updated?
If your wordpress website isn’t updated, hackers know that they can get in without having to do much work on their end. They are able to find holes, or security threats because wordpress hasn’t fixed them yet for all users so why not take advantage? This doesn’t mean updating will completely stop someone from hacking into your site but this does cut down on their chances immensely!
Even though updating your WordPress site is critical to keeping it secure and bug-free, many people fail to do this regularly, which can leave their site vulnerable to attack.
Fortunately, we have an automatic solution for you, the Shield Security plugin! We wrote a full summary of this feature for you to read here.
Remember to not only update your WordPress core regularly, but your themes, plugins, and other add-ons as well.
How to Backup Your WordPress Website
As you probably know, failing to backup your website can result in lost data if your site is hacked or crashes. Some hosting providers take automatic backups of your site on a regular basis, others require you to do it manually or pay for that additional feature. If none of those options are appealing to you then a WordPress backup plugin is probably your best option.
There are several solutions out there that automatically back up all of the files in your WordPress site, including images and content – ensuring you never lose another post or page! You can also easily restore a previous version of your wordpress if needed.
We wrote out a list of our recommendation plugins and solutions for backups in this article, you definitely want to give that a good read and get yourself a scheduled backup system in place.
Unfortunately, there is no perfect solution that will work at all times, but with some savvy tools such as the Shield Security Free or Pro plugin and educational recourses such as this article you can keep your site up and information safe!
WordPress security is important to think about. When you install wordpress on your site, it comes with a built-in firewall that helps protect against malicious attacks, but usually, that’s not enough so you’d probably install a tool such as our Shield Security Free or Pro plugin. However, any unused themes or plugins will make your wordpress vulnerable. This blog post is going to go over 10 different ways to clean up and secure your wordpress site!
10 Tips and Tricks to Reduce Overload and Secure Your WordPress Website:
Delete any unused themes or plugins from your wordpress site in order to clean it up and reduce vulnerabilities from attacks on your site’s security.
Deactivate all unused themes and plugins instead of just deleting them so they’re still available if you ever need them again.
Remove spam comments that are clogging up your site and taking up valuable server space.
If you have any inactive users, delete their accounts to clean up your wordpress site.
Review the wordpress security settings on your website and make sure they’re as tight as possible.
Update wordpress, themes, and plugins regularly so that you’re using the latest versions which come with security enhancements.
Use a caching plugin to help speed up your website – this will not only improve user experience but also SEO performance.
Minimize the use of third-party scripts (such as social media sharing buttons) on your wordpress site as these can slow it down and make it more vulnerable to hacking.
Optimize your wordpress site for web performance by compressing images, minifying CSS and JavaScript files, enabling browser caching, etc. so that your website loads faster which is great for SEO purposes – install a wordpress backup plugin such as BackWPup (all plans) or VaultPress (paid plan).
It’s also important to review wordpress setup and make sure there isn’t any room for improvement
There’s a lot in this list, we know. That’s why we’ve included a checklist in our Free or Pro version with links to the settings you need to have for securing your site and applying most of the optimization listed above.
If you’re an admin of an account, then you should probably stop using admin as your username. It turns out that this is one of 3 big security mistakes that users make when it comes to WordPress security. In today’s post, we’ll go over why admin usernames are not a good idea and the best practices for choosing a new username in order to keep your site safe from hackers!
Why is choosing the admin username bad for my WordPress website’s security?
If you are the admin of an account, then you might think that using admin as your username is a great idea. However, this isn’t exactly true! When it comes to security on WordPress websites and choosing usernames for admin accounts, there are quite a few things that can go wrong if you use admin as your username.
The first reason why having the admin username is bad for security purposes has to do with brute force attacks. Brute force attacks are when hackers try different combinations in order to gain access to passwords or private information about users on any given website. Because so many people choose admin as their password due to its simple structure (admin), these kinds of hacker attacks tend to be very successful because they essentially have everything they need to gain access to a site right from the start.
In addition to being vulnerable to brute force attacks, admin usernames are also very susceptible to social engineering scams. Social engineering scams are when hackers try to get unsuspecting users to give away personal information like passwords or log-in credentials by posing as someone that the user trusts. For example, if you receive an email from your bank asking for updated login information, and you’re not sure whether the email is legitimate or not, it’s best to call customer service and ask them about the message before taking any further action.
Since admin is such an easily guessed username, it makes it much easier for scammers to try and scam people into giving away their personal log-in details. So, if you’re using admin as your username, it’s not only bad for security reasons but also makes you more susceptible to scams.
Tips For Choosing A Secure Username
If you want to be extra careful with how you choose usernames moving forward, there are two things that we would recommend doing. The first thing is to check if any other accounts have been made on your website or blog with similar names (e.g., administrator, support, helpdesk ). If you find any, change them to something more unique, like a special term, a department name, a person’s name. That way, even if someone tries to hack into your account, they’ll be met with a login error.
The second thing you can do is use a password manager to create and store strong passwords for all of your accounts (including admin ). This will help make sure that no one ever gains access to your site by guessing or cracking your password. If you’re not familiar with password managers, I’d recommend checking out LastPass or Dashlane. They both offer free and paid versions, so you can choose the one that’s best for you.
What are some safer alternatives to using admin as my WordPress website username?
If you’re looking for a more secure alternative to the admin username, then there are quite a few options that you can choose from. Here are some of our favorites:
– Username: YourFirstName + YourLastName – This is a great option because it’s unique and easy to remember.
– Username: CompanyName_UserName – This is another good option if you want to use your company name as your login credentials.
– Username: Password123! – This might not be the most secure option, but it’s definitely better than using admin as your username.
– Username: randomword123 – This is a good option if you want to create a unique username that isn’t easily guessed by hackers.
Whatever username you choose, be sure to make it something that you can remember and that isn’t easily guessed by hackers. And, most importantly, never use admin as your login credentials! Choosing a more secure alternative will help keep your WordPress website safe from unwanted intrusions.
The holidays are a time for sharing, giving, and family. However, cybersecurity experts warn that cybercriminals also take advantage of this special time to spread malicious software or steal credit card information. In order to reduce the risk of becoming a victim during the holiday season, we’ve compiled cybersecurity tips you can follow to stay safe online.
P.S. This is not just any blog post on cybersecurity; it’s our top 10 list!
Tip #1: Be Cautious of Phishing Emails
One of the most common ways cyber criminals attempt to steal your personal information is by sending phishing emails. These emails often look like they’re from a legitimate company or organization, but in reality, they’re from cybercriminals trying to trick you into giving up your personal information. To protect yourself, be cautious of any email that asks for sensitive information such as your credit card number or password, and never click on links or open attachments in suspicious emails.
Tip #2: Use Strong Passwords
Another way cybercriminals can gain access to your personal information is by stealing your passwords. In order to protect yourself, use strong passwords that are difficult to guess. You can create strong passwords by using a combination of letters, numbers, and symbols. Also, be sure to never use the same password for multiple accounts.
Tip #3: Keep Your Devices Protected
One of the best ways to protect your devices from cybercriminals is by keeping them protected with antivirus software. Antivirus software can help protect your devices from malware and other types of malicious software. In addition, it’s important to keep your operating system and applications up-to-date as this can also help protect you from cybersecurity threats.
Tip #4: Be Cautious When Using Public Wi-Fi Networks
Public Wi-Fi networks are a convenient way to stay connected when you’re out and about, but they can also be a hotspot for cybercriminals. These networks are often unsecured, which means your data is vulnerable to being stolen by hackers. To protect yourself when using public Wi-Fi networks, make sure you use a VPN and be careful not to enter any sensitive information such as your credit card number or passwords.
Tip #5: Avoid Shopping Online on Unsecured Websites
When shopping online, it’s important to only visit websites that are secure. Secure websites have a web address that starts with “HTTPS” instead of “HTTP” and they will usually have a lock symbol next to their web address. Cybercriminals often create fraudulent websites that look identical to secure websites in order to trick you into entering your personal information. When shopping online, always make sure the website is secure before entering any sensitive information.
Tip #6: Use a Password Manager App
Using strong passwords can be difficult when trying to remember them all. To help protect yourself, use password manager apps that are designed for this purpose. These apps create complex and unique passwords for every account on your devices so you don’t have to worry about it! Plus they automatically log you in with these saved passwords whenever needed, making it even easier too!
Tip #7: Turn On Two-Factor Authentication Whenever Possible
Two-factor authentication provides an extra layer of security by requiring two different forms of authentication before you can log in to your account. This could be something as simple as a code sent to your phone or a one-time password that is generated by an app. By turning on two-factor authentication, you can help protect yourself from cybercriminals who may try to steal your login credentials.
Tip #8: Check Your Credit Report Regularly
One way to help protect yourself from identity theft is by checking your credit report regularly. You can get a free copy of your credit report once a year from each of the three major credit reporting agencies. Checking your credit report can help you identify any suspicious activity and take action if necessary.
Tip #9: Be Wary of Social Media Scams
Social media scams are a common way for cybercriminals to steal your personal information. These scams often involve fake posts or messages from friends asking you to click on links or download files. Always be wary of any posts or messages that seem suspicious and never click on any links or download any files without verifying the source first.
Tip #10: Back Up Your Data
One of the best ways to protect your data from being lost or stolen is by backing it up regularly. By backing up your data, you can ensure that if your device is ever lost or stolen, you will still have a copy of all your important files. There are many different ways to back up your data, so find one that works best for you and stick with it!
These are just a few of the many cybersecurity tips that you can use to help protect yourself during the holiday season. Even though there are real risks out there, we wish you all the best during this festive time! Stay safe and enjoy your time with family and friends! 🙂
This morning, GoDaddy disclosed that an unknown attacker had gained unauthorized access to the system used to provision the company’s Managed WordPress sites, impacting up to 1.2 million of their WordPress customers. Note that this number does not include the number of customers of those websites that are affected by this breach, and some GoDaddy customers have multiple Managed WordPress sites in their accounts.
According to the report filed by GoDaddy with the SEC [1], the attacker initially gained access via a compromised password on September 6, 2021, and was discovered on November 17, 2021 at which point their access was revoked. While the company took immediate action to mitigate the damage, the attacker had more than two months to establish persistence, so anyone currently using GoDaddy’s Managed WordPress product should assume compromise until they can confirm that is not the case.
It appears that GoDaddy was storing sFTP credentials either as plaintext, or in a format that could be reversed into plaintext. They did this rather than using a salted hash, or a public key, both of which are considered industry best practices for sFTP. This allowed an attacker direct access to password credentials without the need to crack them.
According to their SEC filing: “For active customers, sFTP and database usernames and passwords were exposed.”
We attempted to contact GoDaddy for comment and to confirm our findings, but they did not immediately respond to our requests for comment.
What did the attacker have access to?
The SEC filing indicates that the attacker had access to user email addresses and customer numbers, the original WordPress Admin password that was set at the time of provisioning, and SSL private keys. All of these could be of use to an attacker, but one item, in particular, stands out:
During the period from September 6, 2021, to November 17, 2021, the sFTP and database usernames and passwords of active customers were accessible to the attacker.
GoDaddy stored sFTP passwords in such a way that the plaintext versions of the passwords could be retrieved, rather than storing salted hashes of these passwords, or providing public key authentication, which are both industry best practices.
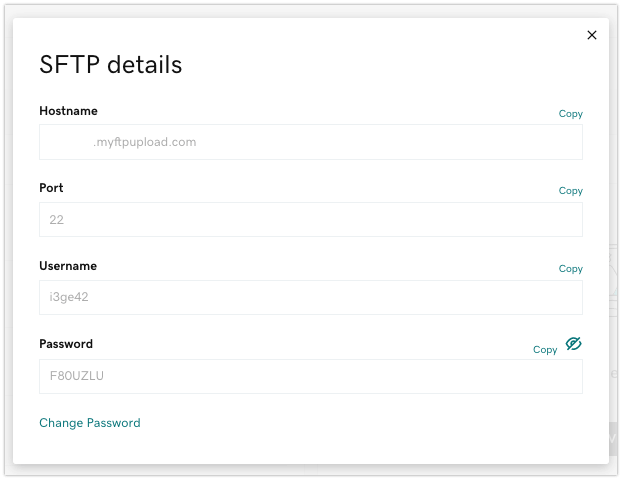
We confirmed this by accessing the user interface for GoDaddy Managed Hosting and were able to view our own password, shown in the screenshot below. When using public-key authentication or salted hashes, it is not possible to view your own password like this because the hosting provider simply does not have it.
You’ll also note that the system is using port 22, which is Secure File Transfer Protocol. There are several kinds of sFTP, and this confirms that they’re using sFTP via SSH, which is encrypted, and designed to be one of the most secure ways to transfer files. Storing plaintext passwords, or passwords in a reversible format for what is essentially an SSH connection is not a best practice.
GoDaddy appears to acknowledge that they stored database passwords as plaintext or in a reversible format. These are also retrievable via their user interface. Unfortunately storing database passwords as plaintext is quite normal in a WordPress setting, where the database password is stored in the wp-config.php file as text. What is more surprising, in this breach, is that the password that provides read/write access to the entire filesystem via sFTP is stored as plaintext.
What could an attacker do with this information?
While the SEC filing emphasizes the potential phishing risk posed by exposed email addresses and customer numbers, the risk posed by this is minimal compared to the potential impact of exposed sFTP and database passwords.
Although GoDaddy immediately reset the sFTP and Database passwords of all the impacted sites, the attacker had nearly a month and a half of access during which they could have taken over these sites by uploading malware or adding a malicious administrative user. Doing so would allow the attacker to maintain persistence and retain control of the sites even after the passwords were changed.
Additionally, with database access, the attacker would have had access to sensitive information, including website customer PII (personally identifiable information) stored on the databases of the impacted sites, and may have been able to extract the contents of all impacted databases in full. This includes information such as the password hashes stored in the WordPress user accounts databases of affected sites, and customer information from e-Commerce sites.
An attacker could similarly gain control on sites that had not changed their default admin password, but it would be simpler for them to simply use their sFTP and database access to do so.
On sites where the SSL private key was exposed, it could be possible for an attacker to decrypt traffic using the stolen SSL private key, provided they could successfully perform a man-in-the-middle (MITM) attack that intercepts encrypted traffic between a site visitor and an affected site.
What should I do if I have a GoDaddy Managed WordPress site?
GoDaddy will be reaching out to impacted customers over the next few days. In the meantime, given the severity of the issue and the data the attacker had access to, we recommend that all Managed WordPress users assume that they have been breached and perform the following actions:
If you’re running an e-commerce site, or store PII (personally identifiable information), and GoDaddy verifies that you have been breached, you may be required to notify your customers of the breach. Please research what the regulatory requirements are in your jurisdiction, and make sure you comply with those requirements.
Change all of your WordPress passwords, and if possible force a password reset for your WordPress users or customers. As the attacker had access to the password hashes in every impacted WordPress database, they could potentially crack and use those passwords on the impacted sites.
Change any reused passwords and advise your users or customers to do so as well. The attacker could potentially use credentials extracted from impacted sites to access any other services where the same password was used. For example, if one of your customers uses the same email and password on your site as they use for their Gmail account, that customer’s Gmail could be breached by the attacker once they crack that customer’s password.
Enable 2-factor authentication wherever possible. The Wordfence plugin provides this as a free feature for WordPress sites, and most other services provide an option for 2-factor authentication.
Check your site for unauthorized administrator accounts.
Scan your site for malware using a security scanner.
Check your site’s filesystem, including wp-content/plugins and wp-content/mu-plugins, for any unexpected plugins, or plugins that do not appear in the plugins menu, as it is possible to use legitimate plugins to maintain unauthorized access.
Be on the lookout for suspicious emails – phishing is still a risk, and an attacker could still use extracted emails and customer numbers to obtain further sensitive information from victims of this compromise.
Conclusion
The GoDaddy Managed WordPress data breach is likely to have far-reaching consequences. GoDaddy’s Managed WordPress offering makes up a significant portion of the WordPress ecosystem, and this affects not only site owners, but their customers. The SEC filing says that “Up to 1.2 million active and inactive Managed WordPress customers” were affected. Customers of those sites are most likely also affected, which makes the number of affected people much larger.
For the time being, anyone using GoDaddy’s Managed WordPress offering should assume their sites have been compromised until further information becomes available, and follow the steps we have provided in this article. We will update the article if more information becomes available.
Note: All product names, logos, and brands are property of their respective owners in the United States and/or other countries. All company, product, and service names used on this page are for identification purposes only. Use of these names, logos, and brands does not imply endorsement.
Today, we are excited to announce that Wordfence is authorized by the Common Vulnerabilities and Exposures (CVE®) Program as a CNA, or CVE Numbering Authority. As a CNA, Wordfence can now assign CVE IDs for new vulnerabilities in WordPress Core, WordPress Plugins and WordPress Themes.
WordPress powers over 40% of the World Wide Web in 2021. By becoming a CNA, Wordfence expands our ability to elevate and accelerate WordPress security research. This furthers our goal of helping to protect the community of WordPress site owners and developers, and the millions of website users that access WordPress every day.
What is a CNA?
The acronym CNA stands for CVE Numbering Authority. A CNA is an organization that has the authority to assign CVE IDs to vulnerabilities for a defined scope. As a CNA, Wordfence can assign CVE IDs to WordPress Plugins, Themes, and Core Vulnerabilities.
What is a CVE?
CVE is an international, community-based effort and relies on the community to discover vulnerabilities. The vulnerabilities are discovered then assigned and published to the CVE List. The mission of the Common Vulnerabilities and Exposures (CVE®) Program is to identify, define, and catalog publicly disclosed cybersecurity vulnerabilities. There is one CVE Record for each vulnerability in the catalog.
What does this mean for Wordfence customers?
As the Wordfence Threat Intelligence team continues to produce groundbreaking WordPress security research, Wordfence can more efficiently assign CVE IDs prior to publicly disclosing any vulnerabilities that our team discovers. This means that a CVE ID will be immediately assigned with every vulnerability we discover rather than waiting for an assignment from an external CNA.
To report a vulnerability, even if there is uncertainty about the responsible disclosure process, proof of concept production, or mitigation review procedures, the Wordfence Threat Intelligence team is available to assist. Our highly credentialed team has expertise and experience in proper security disclosure and can assist in ensuring that adequate remediation of vulnerabilities, no matter the severity, are applied and verified. As the original researcher, you receive the CVE ID and public credit for your discovery. You will also receive thanks from the users and community that you have protected through your responsible disclosure. Please reach out to us and we will be happy to assist.
How to report vulnerabilities to Wordfence for CVE assignment and publication?
To report a vulnerability to Wordfence for a WordPress plugin, WordPress theme, or WordPress core, please reach out to security@wordfence.com with the vulnerability information. Please include the following details:
A concise description of the vulnerability.
A proof of concept – that is, how the vulnerability could potentially be exploited.
What software component in our scope is affected – namely, which plugin or theme is affected, or which part of WordPress core.
The version number(s) affected.
The name(s) of individuals you would like credited for the discovery – or indicate if you would like to remain anonymous.
Any other additional information as appropriate.
The Wordfence Threat Intelligence team will review your findings and report back within 1-3 business days with a CVE ID assignment, or a request for additional information.
Community engagement and outreach at Wordfence has helped accelerate our efforts to secure the global WordPress community. Becoming a CNA has helped further this goal. Our team looks forward to expediting our own research and helping to encourage and enable new researchers to join the growing community of people who discover and responsibly disclose WordPress vulnerabilities. Together we can work towards a safer Web for all.
The word firewall gives the impression that once installed on your WordPress site nothing will be able to attack it and you don’t need any other security measures applied. This is not true.
A firewall can only act on the WordPress site code level, it can not ever affect lower levels on your server such as blocking IP addresses and ports to your server.
There is no WordPress plugin that can do that.
So Why Then Have a WordPress Firewall At All?
Let’s break it down for you.
The WordPress firewall detects and blocks responses from malicious data.
What does that mean?
When data is transferred on your site, such as a user logging in or a blog post or image being displayed, the firewall hides this data from prying, malicious, eyes.
It applies a set of rules for incoming and outgoing traffic in order to protect your website.
It’s similar to an SSL, but an SSL only encrypts the data and then the firewall hides it.
A Firewall Has Several Methods To Protect Your Site
FIltering
This allows the filtering of traffic so that only legitimate users can access your site based upon rules that you set
Proxy
A proxy is like a security guard. It is the middleman that stops bad traffic from getting to your site
Inspection
A firewall allows you to set variables for trusted information. It then inspects all data coming in and if the key elements are not found agreeable in comparison to your set variables it doesn’t allow it through.
These methods are an important part of keeping your site secure. It helps drastically reduce the amount of attacks and malicious code injections that your security service/plugin needs to handle.
What Are The Recommend Settings For Your Firewall
Most firewall and security plugins have a set standard for recommended settings, but there are a few items that are crucial to the success of its application:
Firewall Block Response
Specify how the security plugin will respond when the firewall detects malicious data.
Firewall White Listing and Ignore Options
Specify certain factors that completely bypass all Firewall checking.
These options should be used sparingly and with caution since you never want to white list anyone, even yourself, unless you really must.
Firewall Blocking Options
There are 9 firewall options that determine what data is checked on each page request. Depending on certain incompatibilities with other plugins, you may need to disable certain options to ensure maximum compatibility.
Keeping your site up and running is crucial for any business and having a reliable firewall plays a major part in that.
If you have any questions about the firewall or wish to request some features, please drop us a message in the comments section below, or contact us in our support center.
If you have a website running on WordPress then ensuring its security should be your foremost concern. But before you even begin to harden WordPress, you should first know…
Why WordPress Security is Important?
WordPress accounted for 90% of all hacked sites that were fixed by Sucuri in 2018 as per this report.
WordPress sets the default username to Admin which is child’s play to guess for anyone.
WordPress reveals the username in the author slug by default.
An intruder can access your site’s database tables which are, by default, set to wp_prefix and can be guessed easily, unless modified.
Your site is vulnerable to DoS (denial of service) attacks which can result in prolonged downtime.
A hacker can inject malicious code in your website’s database without your knowledge.
This WordPress Security guide provides only the most useful tips for securing and hardening your WordPress site that you can implement right away, leaving you with ample time to focus on other important aspects of your website.
When you install WordPress on your site for the first time, you have to fill in the password among other details. An easy to crack password is the simplest way a hacker can gain access to your website. So what’s the solution?
Make sure you set a strong password containing a combination of uppercase and lowercase alphabets, characters and numbers that cannot be guessed. Please don’t keep a hacker-friendly password like “your name” or “password”.
The second tip is that you should never disclose your site password to anyone. If you have to provide your login details for support purposes to some 3rd party, make sure to change your password once the support issue is resolved.
2. Keep a Username that Cannot be Guessed
By default, WordPress sets the username to ‘admin’ at the time of installation. Nothing could be easier to guess than this. So please make sure to set a hard-to-guess username when you install WordPress.
But this is just the first step.
The second step is to hide your username from the site visitors since WordPress reveals your username in the author profile.
So head over to Admin menu>Users>Your Profile and change your Nickname from your admin username to something different, most probably your real name, and then select your newly created Nickname from the ‘Display name publicly as‘ dropdown.
3. Change the Author Slug to Hide Your Username
But even after you change the author nickname, WordPress reveals your real username in the author ‘slug’ or URL whenever anyone hovers over the author name. So, you should hide your real username in the author ‘slug’.
But how do you hide your username in the author slug or URL? There are two easy ways to do this.
The first method is by using a free plugin like Edit Author Slug.
Or if you’re like me and would rather do it manually rather than installing a plugin, then the second method is the best solution and hardly takes 5 minutes to implement.
Head over to phpMyadmin in your cPanel (hopefully your web host allows access to the php database). Once inside phpMyAdmin panel, from the left menu of scroll to the wp_users table (replace ‘wp’ with your database tables prefix).
You will see your login details here. You should change the user_nicename from your actual username to something different and then save the changes. That’s it; your real username will no longer be displayed on your author slug.
4. Setup 2-Factor Authentication for Login
Want to ensure fool-proof login security? Then consider setting up 2-factor authentication (2FA) for your login page. This way no intruder can gain access to your site even he manages to crack your password.
Now, you should know that different types of 2FA are available like SMS based or app-based. For the purpose of this step, we will use an app-based 2FA for securing the WordPress login page.
First, install the Google Authenticator plugin on your site. Of course, you must have the Google Authenticator app installed on your phone. If you have not already installed it, do it before proceeding to the next step.
Now in the settings page of the plugin, click on the Configure button under the Google Authenticator tab. It will ask you to first create a mini orange account (the plugin creator) which will take about 10 seconds. Now onto the next step.
Then scan the bar code using the Google Authenticator app on your mobile. Notice that you can also use the LastPass authenticator here if you prefer this app.
Finally, just enter the one time code and you are all set. But don’t forget to tick the “Enable 2FA prompt on the WP Login Page” checkbox.
Now when you log in to your site the next time, you will see an additional 2FA prompt below the email and password boxes like this.
5. Secure your .htaccess File for First Line of Defence
The .htaccess file is an Apache Web Server file that enables basic redirects and is also useful for enhancing your website security.
It is a good first line of defence for securing your website.
Your .htaccess file can secure your website in the following ways by:
Restricting access to important files and folders
Disabling directory browsing
Allowing only specific IPs to access the Admin area
Disabling access to XML-RPC File
Blocking author scans
Now let’s start adding the code snippets for each of the above steps. Remember, you need to add the snippets listed in the following steps in your .htaccess file outside the #Begin WordPress and #End WordPress tags.
1. Restrict access to important files and folders
You should restrict access to important files such as wp-config.php, php.ini and .htaccess itself since no one but yourself should have a concern with these files. Just add the following snippet to restrict access.
# Block wp-config, php.ini and .htaccess
<FilesMatch "^.*(error_log|wp-config\.php|php.ini|\.[hH][tT][aApP].*)$">
Order deny,allow
Deny from all
</FilesMatch>
Next, you should disable access to the wp-includes folder since this folder contains files that are required to run the WordPress core minus the plugins and themes. So why should anyone snoop around in this folder?
What’s easier to break into for a thief, a home whose plan details are known or one whose are unknown? Similarly, if your site’s file and directory structure is visible, it will be easier for hackers to break into your site.
To prevent this, you should disable directory browsing by adding the following code.
Options -Indexes
3. Allow only specific IPs to access the Admin area
If you’re running a single author blog and access your site from known IPs, then you can only allow these known IPs to access the WordPress admin area by inserting the following snippet.
AuthUserFile /dev/null
AuthGroupFile /dev/null
AuthName "WordPress Admin Access Control"
AuthType Basic
<LIMIT GET>
order deny,allow
deny from all
# whitelist Syed's IP address
allow from xx.xx.xx.xxx
# whitelist David's IP address
allow from xx.xx.xx.xxx
</LIMIT>
Remember to replace the xx in the snippet above with your IP. If you access your site from multiple IPs, then insert all the IPs in the ‘all from’ line.
4. Disable access to XML-RPC File
The XML-RPC file enables 3rd party application access to your website. If you’re not giving access to any 3rd party app, it’s advisable to disable access to the XML-RPC file since it could be used by hackers gain backdoor entry to your site.
Just add the following code in the .htaccess file to do this.
# Block WordPress xmlrpc.php requests
<Files xmlrpc.php>
order deny,allow
deny from all
</Files>
5. Block author scans
Another way hackers can gain entry to your WordPress site is by scanning all the usernames used on your site and then trying to crack your admin password with those usernames. This is typical of a brute force attack.
To prevent anyone from fishing for usernames, you should block author scans by adding the following snippet in the .htaccess file.
# BEGIN block author scans
RewriteEngine On
RewriteBase /
RewriteCond %{QUERY_STRING} (author=\d+) [NC]
RewriteRule .* - [F]
# END block author scans
6. Use a Security Plugin for All-round Protection
A good security plugin is essential to enhance your WordPress site’s security. There are many plugins available to boost your site’s security but some of the better ones include All-In-One WP Security & Firewall (which I use and recommend), BulletProof Security and iThemes Security.
Why I Recommend the All-in-One WP Security and Firewall plugin?
If you’re running a popular WordPress website with high traffic, your site could be vulnerable to DDoS (Distributed Denial of Service) attacks that can result in unscheduled downtime and loss of revenue.
There are multiple ways to prevent such an attack from occurring. The first is at the server or hosting level. Your hosting company could offer a DoS attack protection. If you haven’t decided on your web host yet, you can consider WPX Hosting that offers comprehensive website security for free.
The second method is to use a free CDN like Cloudflare that offers free DoS mitigation plans at the entry-level which are good enough for sites with moderate traffic.
8. Make Regular Backups for Unforeseen Situations
In the event of any disruption on your site, you could lose all your hard work, including, your posts. To prevent such an extreme event from occurring it is always advisable to maintain regular backups of your WordPress site.
Again, there are two ways to do this.
The first method is to find a web host that offers free daily backups. If you’re using managed WordPress hosting, chances are your web host already offers free daily backups. Even if not, you can check out with your host regarding this must-have feature.
The second method is to use a free plugin like UpdraftPlus that allows you to schedule daily automatic backups directly to Dropbox, Google Drive, Amazon S3 etc.
9. Use SSL to Encrypt the Connection between Your Site and Users
Secure Socket Layer (SSL) encrypts the information between your web host server and the visitors’ browser preventing leaking of sensitive information like their payment credentials to curious eavesdroppers.
Apart from the security aspect, SSL is also a ranking factor in Google’s search results and you would do well to implement it on your site. That’s why I recommend implementing SSL on your website. You can also get free SSL from some web hosts. Read on to know more.
10. Use Secure Hosting to Fortify Your Site
You may have taken the utmost care to secure your WordPress site, but what if your web server is prone to malicious attacks? There isn’t much you can do in this case.
Well, the most important security feature your web host can provide is free malware scanning. After all, malware removal can cost an arm and length once your site is hit by a malware.
Fortunately, help is at hand.
We use WPX hosting for hosting all our websites since they provide the following three crucial features for securing my website, absolutely free of cost:
Free malware scanning and removal
Free SSL certificate for all my sites
Free daily backups
I also have to add that WPX Hosting provides free cloud-based CDN (content delivery network) and a managed WordPress hosting support experience that I absolutely love.
11. Change the Database Table Prefix to Deter Hackers
Your WordPress database is vulnerable to MySQL injection if a hacker can get his hands on it. You cannot completely secure your WordPress database but you sure can make it difficult for hackers to find your database tables by changing their default prefix from “wp_” to something difficult to guess.
The easiest way to change your database table prefix is by using the terrific (and free) security plugin All-in-One WP Security and Firewall.
12. Update Your Plugins and Themes to Prevent Backdoor Access
Plugins are arguably the primary reason to use WordPress over any other CMS. They extend WordPress capabilities in a limitless manner. But they are also a source of malicious code which could play havoc with your website.
To avoid this possibility, make sure you install only legitimate plugins on your site and avoid any hacked or nulled plugin like the plague since the person who nulled the plugin could also embed some unsuspecting malware into the plugin.
Also, make sure to install the latest version of the plugin since these usually contain many bug fixes. If the plugin hasn’t been updated in a long time, it may be wiser to switch to an alternative.
Speaking of the latest version, make sure to…
13. Enable Auto Updates for Plugins and Themes
If you use many plugins, there may be frequent updates and updating these plugins will in itself become a chore for you. One easy fix for this is to use the JetPack plugin by Automattic (the creators of WordPress).
Jetpack has this wonderful option to enable auto-updates for all plugins that you install from WordPress.org repository. Remember, you will still need to update any 3rd party plugin manually.
But I am assuming that the bulk of your plugins will be free plugins installed from WordPress.org and you can enable auto-updates for all of these.
The second method is even better since you can auto-update not just your plugins but also themes and even the major versions of WordPress. However, you should not use this if there is a possibility of the updates breaking your site.
Just insert the following code in the wp-config.php file, which is located in the public_html directory.
You should also consider disabling access to the theme and plugin editor within your WordPress admin dashboard as an added security measure to prevent users with admin access to tinker with your database.
Just add the following single line of code in the wp-config.php file.
define('DISALLOW_FILE_EDIT', true);
And there we have it. 14 in-depth tips to take your WordPress security to the next level and protect your site from most of the attacks that could be directed its way.
What do you feel about these tips to harden WordPress security and how many have you implemented on tour site? Let me know in the comments.
Please Note: This page contains affiliate links to products or services that are tried and tested by us. If you buy the product or service using our affiliate links, at no additional cost to you, it will help us to maintain this site and publish useful content regularly. Thank you.
You are creating content in the WordPress editor but the document fails to update. In fact, you see an error message that says “Updating failed. Error message: The response is not a valid JSON response.” Before you panic, let me assure you that this error can be resolved easily so you don’t lose your hard work.
Why does “the response is not a valid JSON response” error occur?
There could be multiple reasons why this error occurs. This post delves into each reason and offers multiple solutions to solve the problem.
Disable the Block editor and switch back to Classic editor
Old is still Gold in WordPress
The error “Updating failed. Error message: The response is not a valid JSON response.” is overwhelmingly seen in the new Block editor called Gutenberg.
The easiest way to resolve the updating error is by disabling Gutenberg and switching back to the Classic editor. As they say, old is Gold.
You can install the Classic Editor plugin for this. Once you have activated the plugin, try to save your posts. You should not see any error message now.
But what if you still want to use the block editor?
Nice question. It could be that reverting to the classic editor is not an option for you. In that case, you should follow what we are doing on PassionWP. With the classic editor plugin installed and activated, navigate to Settings>Writing.
Now select the Classic Editor as the “default editor for all users” option, save your changes, and clear your website cache. Right after this, select the Block Editor as the default editor and again save the changes.
Classic Editor plugin settings
Now try editing an existing post or create a new post with the block editor. You should not encounter the JSON response error. However, it could be that the editor fails to automatically save your changes.
In this event, press Ctrl + S (Cmd + S for Mac) to manually save your changes. This solution works for us and we are using the block editor without encountering the JSON response error.
Mixed content error due to the use of SSL certificate
Another common reason for this error is the use of a secure socket layer (SSL) certificate (Https) on your WordPress site. Using an SSL certificate can result in some content being delivered non-securely on Http protocol even while the rest of the content is delivered in a secure manner over Https protocol.
This results in a mixed content error in which both https and https content is transmitted at the same time to the web browser, usually Google Chrome.
How to solve the Mixed Content Error in WordPress?
We investigated the mixed content error and noticed that it is linked to the use of the Really Simple SSL plugin that is used by over 3 million WordPress users to configure https on their websites.
To resolve the “the response is not a valid JSON response” or mixed content error, navigate to Settings > SSL. This will open the plugin’s settings. Now click on the Settings tab.
You should do the following two things here:
Ensure that the “Mixed content fixer” option is turned on. This prevents mixed content problems on your website that we discussed above.
Next, you should turn on the “Use an alternative method to fix the mixed content” option. This will ensure that “the response is not a valid JSON response” error does not erupt abruptly while editing.
Really Simple SSL settings
After saving the changes, go back to the post you were working on and try saving your post or page. You should no longer experience the response is not a valid JSON response error.
Alternative solutions to the response is not a valid JSON response error
Deactivate all the plugins on your site and edit the content normally. If you’re using the Really Simple SSL plugin then deactivate this plugin first. Subsequently, try saving the document. If you are able to save it without facing any errors, re-activate the plugins one by one to check which plugin was causing the error.
There is another solution you can try to fix the response is not a valid JSON response error in WordPress.
Navigate to Settings > Permalinks. Change the permalink structure from post-name or the current structure to Plain i.e. https://yoursite.com/?p=123. Now try saving your post/page. The problem should have been resolved.
WordPress permalinks settings
But try this solution if all other methods fail as changing the permalinks will result in huge SEO issues on a live website and you will also need to add multiple redirects.
We discussed 4 possible solutions to the response is not a valid JSON response error in WordPress. I hope one of these methods worked for you. If it did, let me know in the comments below. If it didn’t, post your specific problem so others can suggest different solutions.