How to promote your blog without social media? The best way to boost your blog traffic is by using SEO (search engine optimization) techniques. This includes writing great content that people will want to read, creating high-quality images for your posts, and making sure your site loads quickly. However, you need to prompt your blog to attract more visitors and increase the traffic and clicks. Most webmasters ask themselves, how do I get people to read my blog? The answer is straightforward: you can follow the next few tips and get a boosted blog. In this post, seobase will explain how to promote your blog without social media, how to get your blog noticed, and how to get traffic to your website without social media.
Comment and Engage With Other Blogs.
There are compelling methods to get boosted blogs without using social media. Commenting and engaging with other blogs is key to getting your blog noticed. Some web admins create their website blogs and overlook that community is essential to achieve their goals from this post.
One of the most effective ways to promote your blog without social media you can do is to visit and read other bloggers’ content, and to boost your blog’s traffic is to comment and engage with other blogs. In this step all you need to do in this step is to visit other blogs and comment. As a result, your fellow bloggers might also return the favor to your blog website. You can do this through commenting on other blogs, sharing links to them on social media, or even asking questions on forums.
Write Authentic Blog Content.
To promote your blog posts without social media, you need to know some more creative ideas; one of them is unique content. Writing unique and authentic content will attract the readers. Catchy headlines and optimized blogging content will attract the most readers to your blog. Attracting more readers increases traffic, clicks, and converts to customers. Also, do not overlook including the right keywords. Learn how to set a successful SEO keyword strategy.
If you want to write authentic blog content, you need to think about what you would say to a friend who was writing a similar post. This will help you avoid sounding too much like everyone else. When you start writing, build the content structure so that readers can find answers to their queries and do not have to leave your site quickly or look for another blog that answers their queries and questions. To learn how to promote your blog without social media with unique content, check the new content ideas.
Sign up to our blog to stay tuned about the latest industry news.Subscribe
Share Your Blog Posts on Pinterest.
Suppose you don’t use the social media platforms or even if you don’t have social media yet to support your content promotion. Here’s a vital and valuable tip to follow regarding how to get traffic to your website without social media; you can share your posts on Pinterest to get boosted blog.
Just make sure you use the right hashtags and keywords so people can find your content easily. On Pinterest, users engage in niche topics; this will help you to get your blog noticed to increase your website position and rank #1 on Google SERPs. No worries, there are plenty of places to promote your blog without social media.
Write Guest Posts.
If you write guest posts to get boosted blog, you will not only gain exposure for your own website, but you will also help others by sharing their work. This is one of the easiest ways to generate new business leads and get people to read my blog. As a result, you will get traffic to your website without social media.
If you’re following the guest post way to get your blog noticed and promote your blog without social media, you may face only one problem; getting people from your guest post to your website is a bit challenging. According to Backlinko, one industry study found that the average guest post brings in only 50 visitors. To solve this problem, you need to use the Guest Post Bonuses. With a Guest Post Bonus, you give the readers and webmasters motivation to make them visit your website. Read Why Everyone Ignores Your Guest Post Outreach Email.
Start a Podcast.
A podcast is an audio show that usually records interviews with experts in various fields. You can record these yourself or use services such as Blubrry.com. Once your episodes are ready, you need to find a platform to host them. Several options are available, including iTunes, SoundCloud, Stitcher, Google Play Music, and more.
The podcast may be one of the best places to promote your blog. The podcast bonus strategy is similar to the Guest Post Bonus strategy discussed above. Instead of creating a reward for each guest post, you can create a set of bonuses for each podcast you go to as a guest.
Furthermore, you can inform about these rewards through email campaigns. But how does this strategy start? Follow these steps to implement a successful podcast strategy:
First, create content that your podcast listeners will care about.
Then, assign podcast rewards to what you’ll talk about in the podcast.
After that, play it by the podcast host.
Finally, host your rewards section landing page at a URL that’s easy to remember and write.
How to Promote Your Blog Without Social Media: Conclusion.
Blogging without social media is not very popular, and not many bloggers follow it. However, it is a very successful strategy by which you can get a boosted blog. There are a lot of places to promote your blog that no one has visited yet. The competition in blogging social media marketing is tough and fierce. Despite its outstanding results, it takes a lot of time and effort to get a high ranking on Google.
The SEO checkpoints best practices are crucial for your website’s ranking on SERPs. Implementing this blog post SEO checklist wouldn’t take so much time; however, it would lead you to achieve your SEO goals. 15 min SEO daily to make sure you are on the right track is your best option to get a higher rank. First, let’s refresh our memory with the SEO meaning, then we can discuss the best practices of the SEO checkpoints in detail.
SEO is an acronym for (Search engine optimization), a set of activities we do to create good content and design the website. It also includes defining the business strategy and how to produce content to gain a better position in Google search results and attract more visitors to the site.
The term SEO may broaden to include another definition: Search Engine Optimization (SEO) is optimizing your online content so that a search engine likes to display it as a higher result for searches around a particular keyword. In this post, seobase will explain SEO checklist best practices in simplified detail to the most critical SEO checkpoints, daily SEO tracking, monthly SEO tasks and show you some ideal ways to achieve advanced results in search engines.
How to Use This SEO Checklist?
We have divided the SEO checkpoints best practices into main points to facilitate their explanation. Therefore, we will separately focus on each SEO component in the following few lines. Here are the leading SEO components checkpoints:
Basic SEO Checklist
Technical SEO Checklist
Keyword Research Checklist
Content Checklist
On-page SEO Checklist
Link Building Checklist
To set a successful SEO strategy, you should focus on the above SEO checkpoints best practices and carefully apply them to your website. This SEO checklist best practices work for e-commerce stores, local businesses, and affiliate sites.
Basic SEO Checkpoints Best Practices
Set up Google Search Console.
Google offers free Google Search Console services to track your site’s organic search performance. The importance of this tool is that it shows you the effectiveness of the detailed SEO plan, and it is a reliable service since the Google search engine provides it.
You can find on GSC:
The keywords you rank for,
Your ranking positions,
Your website errors.
In addition, you can submit your sitemaps successfully to get the best and most accurate results.
Sign up to our blog to stay tuned about the latest industry news.Subscribe
Set up Bing Webmaster Tools.
This step is similar to what is applied to Google, but this time to Bing. Setting up the Bing Webmaster Tools is essential for implementing a successful SEO plan.
Set up seobase online SEO Tools.
You can use seobase best online SEO tool to get the best results on search engines and improve your rankings. seobase provides webmasters with the most powerful SEO tools to facilitate the implantation of their SEO strategy and make it easier to achieve their SEO goals in the long term. Here are a few key SEO tools from seobase:
Rank Tracker Tool: it keeps you up-to-date with your Google positions and ranking on other search engines.
SERP Checker Tool: a cloud-based tool that allows you to check your SERPs on Google and other search engines.
Set up Google Analytics.
Also, Google offers an additional free service, Google Analytics, which is essential because it shows how many people visit your site, how they found it, and how they interact with it.
You can link Google Search Console with Google Analytics to see Search Console data in Analytics.
Install an SEO plugin.
You can skip this step if you’re using a different website platform like Shopify. This step is for WordPress users. If you are using WordPress, you should install an additional SEO plugin. These plugins help you organize your sitemaps and place the proper meta tags. Despite the importance of these tools, you do not need more than one tool only.
Here are some tools you can choose from to install in WordPress:
We’ve already mentioned that the GSC tool enables you to set your sitemaps to get accurate data. In addition, it is essential to fine-tune your Sitemaps because they are the link between search engines and the main content on your site. Sitemaps tell search engines where to find content on your website so that their spiders can easily crawl and index your pages. You can use the seobase Site Profiler tool to get a certain answer confirming that your website can be crawled and indexed.
Usually, you can find your sitemap at one of these URLs:
Creating a robots.txt file is an essential step on your SEO checklist; if checks, you can improve your SEO performance. But what is a robots.txt file? Robots.txt is a text file; its job is to direct search engines to where they can crawl and where they are not allowed to.
A robots.txt file may be necessary if you do not want search engines to crawl a specific section of your website that does not have the required SEO factors, to not affect the SEO checklist of your website.
You can check your robots.txt file; all you have to do is write your domain name and robots.txt like this; yourdomain.com/robots.txt.
If you see a text file, you already have a robots.txt file. If not, search Google for “robots.txt generator” to create one, or you can ask for help from a professional SEO company.
Now, after performing all of the above steps, you just got the basic SEO checklist best practices done. Let’s move to the next level of your SEO strategy, the technical SEO checklist.
Technical SEO Checkpoints Best Practices
Implementing technical SEO checkpoints best practices helps you create reliable bases and ensure your site can be crawled and indexed. As a result, your website will rank higher than any other website in your industry on SERPs.
Here are the primary and most common technical SEO checkpoints best practices to follow.
Make sure your site is crawlable and indexable.
Google does not index any page or content its spiders have not crawled. So it is crucial to check that Google spiders have accessed your content constantly. You can do this through Google Search Console to search for any warnings or exceptions related to robots.txt files.
Many webmasters confuse indexing and crawling, although they are two completely different processes. The crawled pages do not have to be indexed by Google. If you found a ‘noindex’ meta tag for bots or an x-robots tag on the page, indexing will not be possible. You can conduct a live test on GSC to find your indexing issues. If during live testing, indexing issues were detected with the URL, then you can request indexing from Google. Also, Google will inform you about noindexed URLs in the Coverage report.
The good news is that you also can get this information using the seobase Site Profiler tool. The tool will give you a detailed report for your site audit, including this information.
Make sure you’re using HTTPs.
It is important to use HTTPS as it is an exemplary security standard and will protect the data of your visitors. This is even more important if you require passwords or payment information, then using HTTPS is a must.
If you don’t use HTTPS, it’s time to migrate now. First, ensure your site sits on HTTPS by checking your browser’s URL bar. If you see a “padlock” sign on the left side of the URL, then you’re using HTTPS. If you don’t see this sign, you are not.
Check for duplicate versions of your site in Google’s Index.
You may face a severe SEO issue if you allow Google to index more than one version of your website.
For example, you see that these links listed below are all the same and will not make a big difference or cause a glitch, but it is entirely different from the point of view of search engines:
https://www.domain.com
https://domain.com
http://www.domain.com
https://domain.com
Don’t let Google get distracted by all those links, and make sure only one format is indexed. It can lead to crawling, indexing, and security issues.
All other versions should redirect 301 to your main domain, and you can check for duplicate versions of your site in Google’s index by entering each variant into your browser bar. If you’ve set up redirects without issue, you’re good. But if you still find that you can access many versions, you must redirect immediately.
Check your site speed.
Since 2010, PageSpeed has been an important ranking factor on search engines for desktop. Since 2018, it has been included as a vital ranking factor on search engines for mobile.
If you think of it from the user’s point of view, it is tedious and frustrating if you go to a site to search for the information you need and it takes you a lot of time to load; Google also adopts this point of view. Therefore, if you slow site speed, Google does not consider this site worthy of ranking on the first page because it does not improve the user experience.
You can use tools like PageSpeed Insights. Also, you can use the seobase Site Profiler tool to give you deep insights about your PageSpeed and a whole site audit report to see how fast your web page loads.
Make sure your site is mobile-friendly.
There is no doubt that we are in a speedy era; many searches are done through mobile. So having a mobile-friendly website is more important than ever; it is no longer optional.
Check your site’s mobile-friendliness by using Google’s mobile-friendly testing tool. seobase Site Profiler tool gives you an excellent chance to check if your website is mobile-friendly.
Install an image compression plugin.
One of the most underrated factors on the SEO checklist is images. Compressing images and reducing the size of image files improves page speed. As a result, it will enhance your chances of ranking high on search engines.
For WordPress users, there are plenty of plugins available for that. For example, you can use one of the best free WordPress SEO tools, ShortPixel. It allows you to compress up to 100 images/month for free.
Furthermore, you can use Tinypng to compress images in general and use them on other platforms.
Fix broken pages (Broken Internal and Outbound Links.)
Broken links do not provide the best user experience and break the transfer of the domain authority DA to your site. The best way to find broken links on your website is to conduct a backlink audit or audit your site thoroughly. You can use Site Profiler and Backlink Checker tools from seobase to get the best results.
Fix duplicate content issues.
If you’re targeting e-commerce SEO, probably you’ll find duplicated content issues; it is very common in e-commerce SEO because of the faceted navigation. Make sure you don’t have any duplicate content on your website.
You can fix this SEO issue by canonicalizing the affected URLs where necessary.
Keyword Research SEO Checkpoints Best Practices
This part of the seobase SEO checklist guide is primarily directed at SEO content writers. Applying the following SEO checkpoints to your content will boost your search engine rankings. Choosing the right keyword is your key to reaching the audience, but all your efforts will be in vain if your content is not SEO-equipped. Follow the next few tips to get your website at the top of the first search engine results pages (SERPs).
Explore your primary keyword.
The right keywords allow you to reach your goal easily. However, using improper or consistent SEO keywords with your content may be reason enough to distract search engines. In addition, the main keyword will refer to different subjects; thus, the search engine will see that your site is not trustworthy enough to appear on the first page because it does not provide a good user experience.
How do you know the best keyword to focus on?
Do frequent keyword research to target the main keywords you can rank by on the SERPs, but you should also ensure that you target the best keyword each time you post new content. Also, you can find the right keywords using the seobase keyword explorer tool.
Assess search intent.
If your page doesn’t align with the search intent, your chances of ranking are tiny to none.
So how do you assess search intent?
After finding the primary keyword, look at the ranked pages on Google SERPs for your primary keyword.
Check the URLs and titles of the top-ranking results, for example, if a user searches for “SEO checkpoints best practices.” Given the researcher’s intention, it is clear that he wants to know the primary points that must be applied to obtain the best SEO results. If the user searches for “SEO,” it is likely that he wants to get an SEO service provider.
Assess your chances of ranking on Google to enhance your SEO checkpoints best practices.
Investigating the difficulty of the keywords you use helps you prioritize your chances of ranking on search engines. Use the seobse keyword explorer tool to find out the SEO difficulty of keywords. If you are a beginner, you can use low or medium-difficulty keywords to be able to compete.
Also, check the results for the things that may suggest a hard keyword to crack, like high-quality backlinks and high topical relevance of the top-ranking sites, etc.
Research what people want to know.
Suppose a user searches for an “SEO Checklist.” You can see from analyzing search intent that people are looking for specific practical steps to implement. However, you should ask yourself a couple of vital questions;
What other questions do they have?
What other information fits your content to include?
You can find the answer to your questions in Google’s “People Also Ask” box.
Also, you can use a content ideas generator to find new subjects to write about. Finally, using the keywords explorer tool gives you a good insight into your query.
Late evening, on September 6, 2022, the Wordfence Threat Intelligence team was alerted to the presence of a vulnerability being actively exploited in BackupBuddy, a WordPress plugin we estimate has around 140,000 active installations. This vulnerability makes it possible for unauthenticated users to download arbitrary files from the affected site which can include sensitive information.
After reviewing historical data, we determined that attackers started targeting this vulnerability on August 26, 2022, and that we have blocked 4,948,926 attacks targeting this vulnerability since that time.
The vulnerability affects versions 8.5.8.0 to 8.7.4.1, and has been fully patched as of September 2, 2022 in version 8.7.5. Due to the fact that this is an actively exploited vulnerability, we strongly encourage you to ensure your site has been updated to the latest patched version 8.7.5 which iThemes has made available to all site owners running a vulnerable version regardless of licensing status.
All Wordfence customers, including Wordfence Premium, Wordfence Care, Wordfence Response, and Wordfence Free users, have been, and will continue to be, protected against any attackers trying to exploit this vulnerability due to the Wordfence firewall’s built-in directory traversal and file inclusion firewall rules. Wordfence Premium, Care, & Response, customers receive enhanced protection as attackers heavily targeting the vulnerability are blocked by the IP Blocklist.
The BackupBuddy plugin for WordPress is designed to make back-up management easy for WordPress site owners. One of the features in the plugin is to store back-up files in multiple different locations, known as Destinations, which includes Google Drive, OneDrive, and AWS just to name a few. There is also the ability to store back-up downloads locally via the ‘Local Directory Copy’ option. Unfortunately, the method to download these locally stored files was insecurely implemented making it possible for unauthenticated users to download any file stored on the server.
More specifically the plugin registers an admin_init hook for the function intended to download local back-up files and the function itself did not have any capability checks nor any nonce validation. This means that the function could be triggered via any administrative page, including those that can be called without authentication (admin-post.php), making it possible for unauthenticated users to call the function. The back-up path is not validated and therefore an arbitrary file could be supplied and subsequently downloaded.
Due to this vulnerability being actively exploited, and its ease of exploitation, we are sharing minimal details about this vulnerability.
Indicators of Compromise
The Wordfence firewall has blocked over 4.9 million exploit attempts targeting this vulnerability since August 26, 2022, which is the first indication we have that this vulnerability was being exploited. We are seeing attackers attempting to retrieve sensitive files such as the /wp-config.php and /etc/passwd file which can be used to further compromise a victim.
The top 10 Attacking IP Addresses are as follows:
195.178.120.89 with 1,960,065 attacks blocked
51.142.90.255 with 482,604 attacks blocked
51.142.185.212 with 366770 attacks blocked
52.229.102.181 with 344604 attacks blocked
20.10.168.93 with 341,309 attacks blocked
20.91.192.253 with 320,187 attacks blocked
23.100.57.101 with 303,844 attacks blocked
20.38.8.68 with 302,136 attacks blocked
20.229.10.195 with 277,545 attacks blocked
20.108.248.76 with 211,924 attacks blocked
A majority of the attacks we have observed are attempting to read the following files:
/etc/passwd
/wp-config.php
.my.cnf
.accesshash
We recommend checking for the ‘local-download’ and/or the ‘local-destination-id’ parameter value when reviewing requests in your access logs. Presence of these parameters along with a full path to a file or the presence of ../../ to a file indicates the site may have been targeted for exploitation by this vulnerability. If the site is compromised, this can suggest that the BackupBuddy plugin was likely the source of compromise.
Conclusion
In today’s post, we detailed a zero-day vulnerability being actively exploited in the BackupBuddy plugin that makes it possible for unauthenticated attackers to steal sensitive files from an affected site and use the information obtained in those files to further infect a victim. This vulnerability was patched yesterday and we strongly recommend updating to the latest version of the plugin, currently version 8.7.5, right now since this is an actively exploited vulnerability.
All Wordfence customers, including Wordfence Premium, Wordfence Care, Wordfence Response, and Wordfence Free users, have been, and will continue to be, protected against any attackers trying to exploit this vulnerability due to the Wordfence firewall’s built-in directory traversal and file inclusion firewall rules.
If you believe your site has been compromised as a result of this vulnerability or any other vulnerability, we offer Incident Response services via Wordfence Care. If you need your site cleaned immediately, Wordfence Response offers the same service with 24/7/365 availability and a 1-hour response time. Both these products include hands-on support in case you need further assistance.
If you know a friend or colleague who is using this plugin on their site, we highly recommend forwarding this advisory to them to help keep their sites protected, as this is a serious vulnerability that is actively being exploited in the wild.
We will continue to monitor the situation and follow up as more information becomes available.
What is Cumulative Layout Shift (CLS) and Why it Matters?
The Cumulative Layout Shift is a Core Web Vital metric and measures how visually stable the page is. The visual stability is calculated by how many unexpected layout shifts occur without interacting with the page. Every time the content shifts — not because you clicked on a link and so on — counts as a layout shift.
The sum of all these shifts determines the Cumulative Layout Shift score.
How many times have you been reading an article, and the content moved down because of some new ads? Or, have you ever tried to click on a button and ended up clicking on another link because a new big image suddenly pushed the content down?
All these examples are layout shifts — they’re caused by some elements on the page being unstable and changing their position on the page. Elements change their position due to different reasons. For instance, a new image or an ad loading above-the-fold (at the top of the page) forces some content to go down and occupy another section of the page.
You can imagine how annoying this experience is for users.
That’s why Cumulative Layout Shift is one of the three Core Web Vitals metrics assessing a page’s user experience. Alongside Largest Contentful Paint and First Input Delay, CLS will roll out as part of the Page Experience ranking factor in June 2021.
The Cumulative Layout Shift accounts for 15% of the PageSpeed score and it’s a highly relevant metric for user experience and the new ranking factor. Therefore, it could also affect your SEO performance.
What’s a Good CLS Score
As we explained, the CLS is the sum of all the unexpected content shifts occurring on the page. According to the sum of all the shifts, your CLS grade could pass Google’s assessment or not.
A good CLS score should be equal to or less than 0.1.
A CLS score between 0.1 and 0.25 means that the performance “needs improvements”.
The grade is “poor” if CLS is more than 0.25.
How to Find and Measure the Cumulative Layout Shift (CLS)
There are several ways to measure the CLS score, both from Lab and Data tools. Here are the most popular tools you can use:
Let’s see how PageSpeed Insights and Search Console can help you find and measure Cumulative Layout Shift.
Measuring and Finding CLS with PageSpeed Insights
PageSpeed Insights is one the best tools to measure and find Cumulative Layout Shift.
The tool provides you with the CLS score from the Lab and Field data so that you can measure both controlled and user data.
PageSpeed Insights also shows you the potential elements causing a layout shift.
The example below shows a bad score for CLS, both for the Field and Lab Data:
Jumping to the Diagnostics area, you can find what is causing the issue under the “Avoid large layout shift” section.
In this case, there’s only one element affecting CLS. It’s a preformatted text included on the page to explain how to measure CLS in JavaScript:
As you can see, PSI gives you the score related to each element so that you can understand how much every element contributes to the overall CLS score.
If you have more than one element listed in this section, you should start fixing the ones that contribute the most to the bad grade. It’s likely that by fixing the most relevant issues, you’ll get a score good enough to pass Google’s assessment.
Note: Let’s say that you get a bad Field grade and a good Lab one — yes, it could happen! In that case, you should make sure you get a good score for CLS in the Field Data, too. Keep in mind that Field Data is related to the real user experience. As for CLS, Lab Data only considers layout shifts during page load. On the other hand, Field Data counts all the layout shifts during the whole visit, from entry until the page is closed. Therefore, it’s more representative of your site than the Lab Data. It’s no coincidence that Google uses field Data for search rankings.
Measuring and Finding LCP on Search Console
In addition to measuring the CLS score and finding the elements causing layout shifts, you should analyze the sitewide performance.
The Core Web Vitals report in Search Console is the best way to find all the URLs affected by the same issue. For instance, in the Mobile or Desktop report’s Details tab, you may read “CLS issue: more than 0.1 (mobile)”.
By clicking on the specific row, you’ll find a list of URLs that need to be fixed for the same reason.
Once you solve the issue, it will be easy to validate the fix for all the pages affected by the same problem.
Let’s now understand what causes a bad CLS score and how you can solve it.
What Factors Affect CLS and Cause a Slow Score
The most common factors of a poor Cumulative Layout Shift grade on WordPress are:
Images and videos without dimensions
Ads, embeds, and iframes without dimensions
Web Fonts causing Flash of Unstyled Text (FOUT) or Flash of invisible text (FOIT)
Actions waiting for a network response before updating DOM (especially for ads)
Dynamically injected content (e.g., animations).
Keep in mind that CLS has the most significant impact on mobile — the most critical and challenging device for optimizing performance. There are several reasons, from a smaller viewport to a challenging mobile network and a weaker Central Processing unit (CPU).
Images and Videos Without Dimensions
Images and videos without dimensions are a common cause for a layout shift.
If you don’t specify the width and height size attributes, the browser doesn’t know how much space has to allocate while loading these elements. Likely, the space reserved won’t be enough. As a result, once these elements are fully loaded, they will take more space than expected — the content already displayed will shift.
You can solve this issue by including image dimensions on images and video elements in different ways. We’ve got you covered in the dedicated section!
Ads, Embeds, and Iframes Without Dimensions
The same “dimension” issue goes for ads, embeds, and iframes. Once again, not reserving enough space makes these dynamic elements push down the content already displayed. Therefore, new layout shifts will occur on the page.
You’ll manage this problem by assigning fixed dimensions to the ads and managing the size reserved for such elements through specific tactics.
Web Fonts Causing Flash of Unstyled Text (FOUT) or Flash of Invisible Text (FOIT)
Web fonts can cause layout shifts, plus a pretty unpleasant user experience while rendering the page. It’s about how slow the fonts load. You might face two different issues: Flash of Unstyled Text (FOUT) or Flash of invisible text (FOIT).
On the one hand, you could see the text on the page with a “not-so-good” style (FOUT). It’s because the custom font takes a bit to load. In the meantime, you’ll see the fallback font. Once the custom font is ready, it will replace the fallback one. You’ll then see the font changing on the page — and the content will inevitably shift.
On the other hand, you could wait a bit before seeing any text displayed. It’s because the custom font is still being loaded (FOIT). You’ll see the content on the page only after the custom fonts have been rendered. Once fully loaded, that content might cause a layout shift.
The main way to solve this issue is to preload fonts, as you’ll read in a minute.
Actions Waiting for a Network Response Before Updating DOM & Content Injected on the Page
Animations and dynamic content injected on the page — such as banners, ads, or Instagram feeds — can also cause a layout shift. Once again, it’s because there’s not enough space reserved for such elements.
At this point, you know how essential it is to allocate space for the elements that engage users and shouldn’t ruin the user experience.
By going over each point, you’ll understand how to fix the Search Console status: CLS issue: more than 0.25s or CLS issue: more than 0.1s, both from mobile and/or desktop.
🚀 For each of our recommendations, you’ll find a piece of information about its performance impact — from low to high. The higher the impact is, the higher chance that the Cumulative Layout Shift grade will improve after following that specific recommendation.
Some best practices to avoid large layout shifts don’t include a specific solution — they’re more about managing well space for ads and other crucial elements.
1. Include Width and Height Size Attributes on Images and Video Elements
Performance impact: high 🚀🚀🚀
One of the simplest ways to fix CLS is to include the width and height attributes on your images and video elements in your WordPress CMS:
WordPress adds image dimensions by default. So, this action should be automatically solved.
In case you’re facing any issue, keep in mind that WP Rocket automatically includes any missing “width” and “height” values to images.
You only have to select the “Add missing image dimensions” option in the Media tab. Fast and straightforward as that!
Another way to solve this issue is to take advantage of the CSS aspect ratio boxes and let the browsers set the default ratio of images.
Simply put, you should include the width or the height attribute and set the aspect ratio using CSS. The browser will figure out the missing attribute and get the image dimensions before rendering the page. By doing so, it will allocate the space needed while the image is loading. As a result, the content won’t move around, and layout shifts will be avoided.
It’s helpful information to keep in mind because many plugins, such as YouTube video embed ones, use aspect-ratio on their output.
Don’t forget about responsive images! You can use the srcset attribute:
Thanks to srcset, the browser can choose between a set of images and related sizes. Keep in mind that images should use the same aspect ratio to set image size.
By including size images, you’ll serve images with correct dimensions and address the PageSpeed Insights opportunity.
2. Preload Fonts (And Optimize Them)
Performance impact: low (high only if the site had large text) 🚀
As we explained, if web fonts don’t load fast, they cause a terrible user experience and affect the CLS grade.
As a best practice for avoiding layout shifts, you should preload fonts.
By preloading fonts, you’ll tell the browser to load the fonts as one of the top-priority resources. When rendering the page, the browser will load the fonts as fast as possible. As a result, the browser will likely include the fonts in the first meaningful paint — that’s when the page’s primary content is fully loaded and displayed. In that case, no layout shift will occur.
Did you know that you can easily preload fonts with WP Rocket? In the dedicated tab, you only have to include the URLs of the font files to be preloaded:
Please note that it’s useful to enable this WP Rocket option only if you have not activated the Remove Unused CSS feature (File optimization tab). If RUCSS is activated, you don’t need to activate the Preload fonts option.
There’s more to this point. To prevent any FOIT and FOUT issues, you should combine the rel=preload (or the WP Rocket feature enabled) with the CSS line font-display: optional.
The CSS font-display descriptor determines how font files are downloaded and displayed by the browser. With font-display: optional, the browser will download and cache the font files to make them immediately available for rendering. So, even though font-display has several values, optional is the one you should use.
Another useful tip to reduce the FOUT issue is to add the display:swap;missing on font-display properties. WP Rocket can help you do it if you minify/combine CSS files.
There are other ways to load fonts faster:
Convert the icon fonts to SVG. Font icons take a while to load and don’t help accessibility. There’s no reason to use them. Using SVGs, the font will render faster, and you will load the exact fonts you need.
Make multiple font formats available. By doing so, the browsers will pick the compatible format and only load its font. Here is some information about font formats that you may find helpful:
Avoid TTF. It’s usually 10 – 20% more heavy than WOFF.
Use SVG for Safari. It’s usually a bit smaller than WOFF.
Use WOFF2 for modern browsers. It’s the smallest size – around 30% smaller than WOFF and SVG.
Implement WOFF as a fallback when SVG or WOFF2 can’t be used.
Host your fonts locally or use a CDN to cache them. You’ll avoid any delay and deliver fonts faster.
By applying these recommendations, you’ll optimize your fonts and avoid several layout shifts. You’ll address the PSI recommendation: “Ensure text remains visible during webfont load” on your WordPress site.
3. Manage Space and Size for Ad Slots
Performance impact: high 🚀🚀🚀
There are several best practices to avoid any layout shift for ads:
Assign fixed dimensions to the ads so that you’ll reserve enough space for the ads to be loaded.
Reserve the biggest possible space for ads. Historical data come in handy to assess what’s the best dimension for each ad slot.
Keep every space reserved for ads that have not been displayed. In other words, you shouldn’t collapse any area on the viewport. You could rather include a placeholder or a fallback element.
Place non-sticky ads in the middle of the page — anyway, far from the top of the viewport.
The Delay JavaScript Execution feature provided by WP Rocket can help you control dynamic content above the fold like Google Ads. The feature can be used to stop dynamic interaction, content injection (ads), and dynamic class changes until there is an interaction on the page.
Once again, you’ll address the “Serve images with correct dimensions” PSI recommendation. The same goes for the next section.
4. Manage Space for Embeds and Iframes
Performance impact: high 🚀🚀🚀
The recommendations for managing embeds and iframes are similar to the ones for ads.
In particular, you should precompute enough space for such elements. Once again, historical data can be useful to understand how much space you should reserve.
Placeholder or fallback is an excellent solution to manage the unknown embed size.
5. Manage Dynamic Content
Performance impact: high 🚀🚀🚀
Dynamic content such as banners can also affect Cumulative Layout Shift. That’s why you should avoid displaying new content unless it’s triggered by user interaction. As you know, CLS counts only the layout shifts that occurred when users are not interacting with the page.
As explained in the “Manage Space and Size for Ad Slots” section, you can take advantage of the Delay JavaScript Execution option provided by WP Rocket to control dynamic content above the fold.
By managing dynamic content, you’ll take care of the following PageSpeed recommendations:
Avoid large layout shifts
Avoids enormous network payloads.
6. Prefer the CSS Transform Property for Animations
Performance impact: low 🚀
The last best practice to ensure visual stability is to take care of animations. You can use the CSS property: transform, which doesn’t trigger any layout changes.
You’ll address the “Avoid non-composited animations” PageSpeed recommendation.
What is First Input Delay (FID) and Why it Matters?
First Input Delay is a Core Web Vitals metric and measures how long it takes for the browser to respond to the first user’s interaction with a page — that is, clicking on a link, tapping on a button, or interacting with another element.
Let’s say that you land on a site and click on a link. Of course, you would expect the page to answer as soon as possible, right? Unfortunately, this is not always the case. For instance, you may click on a link, and nothing happens for a while — it’s because the browser is not able to process the user’s request immediately.
In more technical words, it’s because the browser’s main thread is processing another request and can’t respond to the user’s one. Quite often, the requests that keep the browser busy are related to processing JavaScript files. We’ll go over the JS files in the next section and explain how to fix the main issues.
So, back to you: you click on a link and keep waiting for something to happen on the page… Pretty annoying, isn’t it?
That’s why FID is part of the Core Web Vitals metrics and helps measure a page’s user experience.
Unlike the other two Core Web Vitals metrics, FID can only be measured on the field — after all, it’s all about users’ interaction.
For this reason, some tools, such as Lighthouse, can’t measure the First Input Delay and use Total Blocking Time as a proxy. TBT is a lab metric that also measures interactivity and responsiveness (without user interaction). As long as the TBT score is good, the FID grade should also be fine.
TBT accounts for 25% of the overall PageSpeed Insights score. It’s the highest weight, and only LCP has the same one. By improving TBT performance, you’ll likely improve your page speed grade and the FID performance.
What’s a good FID score
As for the other Core Web Vitals, scores are divided into three buckets: Good, Needs improvement, and Poor.
A good FID score needs to have a First Input Delay of less or equal to 100 milliseconds.
The score “needs improvement” if it’s between 100 and 300 milliseconds.
On the other hand, a “poor” score is beyond 300 milliseconds.
What’s a Good Total Blocking Time Score
You may wonder if the same score buckets apply to the Total Blocking Time. TBT score is slightly different — as the metric itself is. The key difference is that TBT measures interactivity without user input. That’s why it can be calculated as lab Data.
Total Blocking time measures how long the page is “blocked” before responding to user input such as a keyboard press, screen tap, or mouse click — no user interaction, you see? The sum of all the “block times” determines the TBT score.
To be a bit more technical, TBT measures the sum of all periods between First Contentful Paint (when you can interact with the first content on the page) and Time to Interactive (how long it takes for the page to get fully interactive).
As usual, Total Blocking Time includes three buckets:
Good – less or equal to 300 milliseconds
Needs improvement – Between 300-600 milliseconds
Poor – over 600 milliseconds.
In short: both FID and TBT capture a page’s interactivity and responsiveness — even though FID takes into account the user interaction, whereas TBT relies on user input. For this reason, both metrics are similar in terms of improvements needed.
What’s The Maximum Potential First Input Delay
You may have come across the Maximum Potential First Input Delay and wondered what’s the relationship with FID.
The Maximum Potential First Input Delay measures the maximum delay between the user’s interaction and the browser’s response.
It’s the worst-case scenario based on the duration of the longest task after the First Contentful Paint — that’s when the first part of a content’s page is displayed on the screen, and you can start interacting with the page.
Once you can click on a link or tap a button (First Contentful Paint accomplished), you can measure how long it takes for the page to respond to your request while the longest task is running. The longest task’s length is the Maximum Potential First Input Delay.
By measuring the Maximum Potential First Input Delay, you’ll know how long users will wait when interacting with the page after seeing the first content.
How to Measure the First Input Delay
Being a field metric, First Input Delay can be only measured by a few tools:
PageSpeed Insights give you the easiest opportunity to measure the First Input Delay score on a page basis, as well as the Total Blocking Time:
Measuring FID with Search Console
If you want to assess your site’s sitewide FID performance, you should take a look at the Core Web Vitals report in Search Console. The report is based on the Chrome User Experience Report.
By choosing either the mobile or desktop report, you can identify the FID performance’s potential issues and dive deeper into the URLs affected by the same problem — for instance, FID Issue: longer than 100 ms.
What factors affect FID and cause a slow score on WordPress
At this point, you can guess that FID is mainly impacted by JavaScript execution. When the browser is busy dealing with heavy JavaScript files, it can’t process other requests, including the users’ ones.
As a result, interactivity is poor; JavaScript execution times are longer; the main thread is busy and blocked. In short, the page can’t respond to user inputs nor interactions.
We’ll see different ways to fix these issues.
Since JavaScript is the key to improving FID, you should be aware that having many plugins — especially the JavaScript-based ones — could also affect the First Input Delay grade. You should avoid any unnecessary JavaScript execution on the pages where the plugin is not needed. It’s also important to remove any plugin that is not essential.
Heavy WordPress themes can also affect the First Input Delay grade. They have more JS files, complex layouts, and an inefficient style that will affect the main thread — therefore, the FID performance.
That’s why the less complexity the themes have, the better. And that’s also why the tendency now is to simplify everything: layouts, animations, more native JS use vs. relying on complex libraries.
We’ll go over the actions to improve FID in the next section. If you prefer, you can first watch the video that shows how to optimize FID with WP Rocket!
How to Reduce the First Input Delay Longer Than 100 ms or 300 ms on Mobile and Desktop
Improving how the browser deals with JavaScript execution reduces the First Input Delay on WordPress and enhances the FID score.
The goal is to make the process faster and smoother so that interactivity and responsiveness can get better.
If your FID grade has any issues, in the Core Web Vitals report on Search Console you’ll read “FID issue: longer than 100ms” or “FID issue: longer than 300ms“. The issue can be from mobile and/or desktop.
There are several ways to optimize the First Input Delay grade on WordPress:
Let’s see in detail what actions you should take and what’s the performance impact.
1. Defer JavaScript
Performance Impact: high
As for optimizing the JavaScript execution, you should defer Javascript files.
By deferring JavaScript files, these render-blocking resources will be loaded after the browser has rendered the most relevant content — that is, the content needed to let users interact with the page.
As a result, the loading time will improve, as well as the FID grade.
Once you have identified the JS resources to defer, you should add the defer attribute to the JavaScript files. The browser will then know which files to defer until the page rendering is complete.
You’ll find this option in the File optimization tab. You’ll also be able to exclude specific JS files from being deferred — in case you need this option due to any conflict.
You’ll address the “Eliminate render-blocking resources” and “Reduce the impact of third party code” PageSpeed recommendations — even though the JS render-blocking resources issues don’t stop here.
Keep reading to learn what other actions you should implement.
Unused JS files are the JavaScript resources not essential for rendering the page or not useful at all. Yet, these files are in the code, so you should manage them. Examples of unused JS files are the third-party JavaScript files such as the analytics and ads tracking codes.
The PageSpeed Insights report shows you the list of the unused JS files you should take care of:
You have two options to tackle unused Javascript files:
1. Load the JavaScript files only when needed. You can use plugins such as Perfmatters and Assets Cleanup to load these files only when needed. The execution of JavaScript files should be disabled in any other case. As an additional tip, you may ask your theme and plugin developers to ensure that only the needed assets are loaded when their respective features are used.
2. Delay the JavaScript files. Delaying JavaScript resources means that the JavaScript files won’t be loaded until the first user interaction (e.g., scrolling, clicking a button). In other words, no JS files will be loaded unless there’s user interaction. It’s important to keep in mind that not all the scripts from the PageSpeed recommendation list, like the one included above, can be safely delayed. An additional advantage of delaying JavaScript is that Lighthouse won’t detect any JS files. As a result, the tool won’t include any of these JS resources in the “Remove unused Javascript files” recommendation.
To be clear: you shouldn’t delay JS files to solve this PSI recommendation. You’ll find more information about the main reason why you should delay JS in the next point. However, it’s useful for you to know as an added value for improving your PSI score.
So, how can you delay JavaScript files? You can use a free plugin such as Flying Scripts.
On the other hand, you can take advantage of WP Rocket and its Delay JavaScript execution feature. The File optimization tab allows you to delay the JavaScript execution in a few clicks.
Lastly, here’s a list of other plugins that can help you to minimize unused JS. We recommend using them carefully:
Removing unused Javascript files will address the specific PageSpeed recommendation listed in the report. You’ll also address the “Eliminating render-blocking resources” and “Reducing javascript execution time” recommendations.
Don’t Miss Out!
The Core Web Vitals Cheat Sheets are the easiest and fastest way to learn how to optimize LCP, FID, and CLS and prioritize your performance tasks.Yes, I Want This!
3. Delay JS Execution Time Until User Interaction
Performance impact: very high
You can optimize JavaScript resources and prioritize the scripts needed for interaction by delaying the JS files and their execution until user interaction.
In other words, no JavaScript files will be loaded until user interaction, such as clicking a button or scrolling the content.
As explained above, you should delay all the JavaScript files that affect loading time and interaction for no reason, such as the unused JS files included in the previous section.
As you already know, you have different options to delay JavaScript files. You can use a free plugin such as Flying Scripts or take advantage of the Delay JavaScript execution feature option provided by WP Rocket — more details above.
This is how you’ll address the “Reduce javascript execution time” PSI recommendation.
4. Minify JS
Performance impact: low
Another effective way to manage the JavaScript execution time goes through the minification of JavaScript files.
By minifying JS files, you’ll remove any comments, line breaks, and white spaces included in the code. The goal is to make the files’ size smaller and faster.
Minification can be time-consuming, and there’s always the risk of missing out on anything. For these reasons, it’s best to use a minification tool or use WP Rocket. WP Rocket is the easiest way to minify JS files in a few clicks. You only have to enable the Minify JavaScript file option in the file optimization tab.
You’ll address the following PageSpeed Insights recommendations:
Minify JS
Avoid enormous network payloads.
5. Remove (or Reduce) Unused CSS
Performance impact: medium
As explained in the LCP section, removing or reducing unused CSS helps improve loading time — therefore, it improves interactivity and the FID metric.
WP Rocket offers a powerful feature that allows you to tackle unused CSS in one click. You only need to enable the option below, and the plugin will remove the unused CSS included in the HTML of the page.
By enabling this feature, you’ll easily address the “Reduce unused CSS” recommendation.
6. Async or Defer CSS
Performance impact: medium
The main thread work can have a significant impact on interactivity and FID performance. That’s why one of the PSI recommendations is “Minimize main thread work.” To address the issue and improve FID time, you should defer or async the CSS files.
In the Defer JavaScript section, you read why defer is essential to allow the browser to focus only on the resources essential to page rendering. The same goes for the CSS files that are render-blocking resources.
An option is to include the Defer attribute to all the CSS files:
<script defer src="/example-css-script"></script>
And here’s another 2-step process to make the CSS render-blocking resources load asynchronously:
Extract and inline the Critical Path CSS (CPCSS) using an available generator tool like this one.
If you’re looking for more detailed information, we recommend you read the dedicated Google resource.
An extra tip to keep in mind is to avoid placing large non-critical CSS code in the <head> of the code.
If you’re looking for a faster and easier way to quickly take care of both critical and non-critical CSS, WP Rocket can help you. Under Optimize CSS delivery, our cache plugin offers the Load CSS asynchronously option that defers non-critical CSS and inline critical CSS.
You’ll remove all the render-blocking CSS resources by enabling the option in the File Optimization tab:
Please note that if you have already enabled the Remove Unused CSS option (RUCSS), you can’t choose this option — simply because you don’t need it. WP Rocket is already optimizing CSS files at its best. We recommend optimizing CSS Delivery only in case RUCSS is not working for you.
By implementing these actions, you’ll take care once again of the “Eliminate render-blocking resources” PageSpeed Insights recommendations. You’ll also address the “Avoid chaining critical requests” recommendation.
7. Compress text files
Performance impact: high
As you can guess at this point, compression is something you need to take care of. It goes without saying that “Enable text compression” is one of the PSI recommendations that apply to FID times.
By compression and reducing files’ size, the browser and the server will send over files faster. The browser will load these resources quicker.
The easiest way to enable Gzip compression on WordPress is using a plugin. You can choose between different options, from the Enable Gzip Compression plugin to WP Rocket, which includes GZIP compression by default. Keep in mind that some hosts enable GZIP compression automatically.
8. Break up Long Tasks
Performance impact: high
As we explained at the beginning of the article, when the main thread is busy and blocked, the FID grade is negatively affected, and the page can’t respond to user inputs nor interactions.
The main thread is blocked because of the long tasks that the browser can’t interrupt — that is, all the tasks running longer than 50 ms. That’s why when the main thread is blocked, a page can’t respond to user inputs, and responsiveness gets affected.
To solve this issue, you should split long-running scripts into smaller chunks that can be run in less than 50ms.
content-visibility is a new powerful CSS property that can help boost the rendering performance by enabling the user agent to skip an element’s rendering work until it is needed.
You can improve your load performance by applying content-visibility: auto; contain-intrinsic-size: 1px 5000px; to elements where you want to delay the paint. Don’t forget the second part: it’s important to fix some usability issues.
Currently, this CSS property works only on Chrome and the majority of browsers based on it.
What is Largest Contentful Paint (LCP) and Why it Matters?
The Largest Contentful Paint (LCP) is a Core Web Vital metric and measures how long it takes for the largest element to become visible in the viewport. Until the LCP doesn’t load, you won’t see almost anything on the page. It’s because the LCP element is always above the fold — that’s at the top of the page.
LCP is usually an image or a text block. However, it could also be a video or an animation. The LCP element can differ between mobile and desktop.
As you can guess, the largest element is the most relevant one for user experience and perceived load speed.
Think about it: if the page’s biggest element doesn’t load fast, your user experience won’t be good. You would look at an almost blank page, waiting for the page to load… You could even leave the site! When browsing, a few seconds can make a huge difference.
That’s why Google has included LCP as one of the Core Web Vitals metrics — the metrics measuring how great your user experience is.
In June, LCP will roll out as part of the new ranking factor, the Page Experience Signal. For this reason, Largest Contentful Paint matters not only for delivering a great user experience but also for improving your SEO performance.
Let’s go over some of the easiest and most effective tools: PageSpeed Insights and Search Console.
Measuring and Finding LCP with PageSpeed Insights
PageSpeed Insights is the easiest way to measure and find the LCP element.
After testing your URL’s page, you’ll get the LCP grade in the Lab Data and the Field Data (if available). You’ll also get the PageSpeed recommendations to improve your performance.
Go to the Diagnostics area and look for the “Largest Contentful Paint element” section. You’ll discover what’s the LCP element for the page you’re analyzing.
Let’s go over a couple of examples and make things easier to understand.
The LCP example From Mobile
Let’s analyze a WP Rocket blog page from mobile.
We test the performance of the page in the tool and go to the Diagnostics area. The LCP element is the H1, which is the blog post title:
As long as the main title loads fast, the page will deliver an excellent user experience.
The LCP example From Desktop
Let’s now take a look at the same URL from the desktop.
We go again to the Diagnostics Area and look for the LCP element. Not surprisingly, LCP is not the same as for mobile. For desktop, the LCP is an image:
More precisely, it’s the image of the post.
Since PageSpeed Insights is a page-based tool, we recommend that you run several tests for different pages.
For an overall analysis, you should also take advantage of the Search Console.
Measuring and Finding LCP on Search Console
You can assess your sitewide performance and detect any issues with the Core Web Vitals report in Search Console.
You’ll be able to access both performances from mobile and desktop:
Once you open the report, you’ll see how your site’s pages perform according to each threshold: good, needs improvement, and poor.
Search Console report groups each Core Web Vital performance by status, issue type, and URLs.
For example, you might have some URLs not performing well for LCP. If so, in the report, you may read “LCP issue: longer than 2.5 s (mobile).”
By clicking on the row related to that specific issue, you’ll land on a page that provides the list of URLs that need to be fixed. While these URLs are an example, they can give you a pretty accurate idea of what’s going on.
It will be pretty easy to find the URL pattern and move forward with the fixing and the validation.
What Factors Affect LCP and Cause a Slow Score
For WordPress sites, three factors affect LCP: slow server response times, render-blocking JavaScript and CSS, and slow resource load time.
Slow Server Response Times
The browser makes a request to the server, but the server takes too long to send the content requested. Since the browser doesn’t receive the content quickly enough, it takes a while to get something rendered on your screen. As a result, load time is not great. The LCP score gets affected.
You’ll fix the issue by improving your Time to First Byte, using a CDN, and establishing third-party connections early.
Render-blocking JavaScript and CSS
The browser makes a request and gets the content from the server. At this point, the browser will render the content and show it, right? Not so fast.
To render any content, the browser has to analyze (or parse) the HTML of the page and make it “readable” into the HTML structure of the page — that’s the DOM tree. After that, the content will be rendered and fully displayed — unless some scripts and stylesheets block the HTML parsing. These scripts and stylesheets are the render-blocking resources.
As a result of this block, the parsing is delayed. Once again, the content you requested takes a bit before being loaded. The LCP performance gets affected again.
You’ll tackle these issues by deferring and removing unused JS files. Don’t worry! You’ll find all the information you need in the next section.
Slow Resource Load Times
Other files can also cause poor performance and a bad user experience: images, videos, and block-level elements like HTML and CSS files.
As you already know, LCP is related to the elements at the top of the page. And this issue comes up precisely when these files are rendered above-the-fold and take too long to load. As a result, loading time and LCP are affected once again.
You’ll manage the resource load times by optimizing images, minifying and compressing CSS, JS, HTML files, and preloading critical assets.
The bottom line: how fast the browser receives and renders the content requested determines the LCP score.
Let’s understand how to fix all these issues in detail.
If you prefer, you can first watch the video that shows how to improve LCP with WP Rocket.
How to Reduce a Largest Contentful Paint Longer Than 2.5 s or 4 s on Mobile and Desktop
Here are ten ways to improve the Largest Contentful Paint performance and fix the Search Console status “LCP issue: longer than 2.5s or LCP issue: longer than 4s“, both from mobile and/or desktop.
🚀 For each suggestion, you’ll find a piece of information about its performance impact — from low to high. The highest the impact is, the highest chance that the Largest Contentful Paint score will improve after following that specific recommendation.
1. Improve the Time to First Byte and Reduce Server Response Time
Performance Impact: high 🚀🚀🚀
One of the main reasons for a bad LCP is a slow server response time.
Every time you want to consume any piece of content, the browser sends a request to the server. The TTFB measures how long it takes for the browser to receive the first byte of content from the server.
By improving your TTFB, you’ll improve your server response time and the LCP score.
Please note that a good TTFB should be under 200 ms — you can quickly check this metric by testing your URL’s site on WebPageTest.
There are two ways to fix a bad server time:
1. Enable Page Caching
By enabling page caching, your site’s pages will be stored as HTML files on the server after the page is loaded for the first time. As a result, the content will be displayed faster. It’s an easy and effective way to improve TTFB.
You can also choose one of the top WordPress hosting providers that include a server-level caching option.
A dedicated tab will allow you to enable mobile caching and set the options you prefer. WP Rocket enables 80% of web performance best practices automatically. So, if you’re in doubt, you’ll get covered anyway!
2. Choose a Fast Server Hosting Service
A fast hosting can make a huge difference in performance. And maybe it’s time to upgrade your hosting plan!
As the first thing, your hosting provider should have servers close to the majority of your users. The closer your users are to the server, the fastest the data will be sent.
You should also choose the right server host type. A dedicated hosting server will ensure the fastest performance. Take into consideration how much traffic your site gets, and make your decision.
By enabling caching and choosing a fast hosting, you’ll take care of the following PageSpeed Insights recommendations:
Reduce server response times (TTFB)
Serve static assets with an efficient cache policy.
2. Use a CDN
Performance Impact: medium 🚀🚀
A CDN helps you reduce the length of time between the user request and the server response. This amount of time is the latency. The back and forth between the browser request and the server response is the round trip time (RTT).
If your users are located far from the server’s location, it could take a while before all the assets (e.g., images, JS and CSS files, videos ) are sent. Latency and RTT will be high and will affect loading time and the LCP score.
You already saw how the location of your server could affect your site’s performance.
A CDN solves the issue thanks to a global network of servers. No matter where your users are located. Every time they request a page, they will receive the assets from the closest server. Simple as that.
RocketCDN is the best way to let your users access your site quickly and easily.
If you want to know more about the CDN benefits and the different types, you can read our article.
Choosing a CDN will help you address the following PageSpeed recommendations:
Serve static assets with an efficient cache policy
Enable text compression.
Please note that a CDN will address such recommendations only if properly configured. The default options might not be enough to improve performance as expected.
3. Defer JavaScript
Performance Impact: high 🚀🚀🚀
Render-blocking resources like JavaScript files are one of the main causes of a bad LCP score.
Deferring the JavaScript files will help you tackle the issue. In other words, you’ll change the priority of the JS files being loaded.
Remember? The browser parses the HTML, builds the DOM tree, and then renders the page — unless there is any blocking resource to slow the process down.
By deferring JavaScript, the browser will process and load the JS files only after parsing the HTML document and building the DOM tree. Since there won’t be anything to block the process, rendering will be much faster — and the LCP metric will improve.
You can add the defer attribute to the JavaScript files so that the browser can detect the resources to defer. The browser will analyze the HTML and build the DOM tree with no interruption.
You can choose this option in the File optimization tab. What’s more, you can easily exclude specific JS files from being deferred — in case the defer feature conflicts with any file.
You’ll address the “Eliminate render-blocking resources” PSI recommendation in a few clicks — even though the render-blocking resources issues don’t stop here.
Let’s move to the next point about tackling render-blocking resources.
4. Remove Unused JavaScript
Performance Impact: medium 🚀🚀
Another way to eliminate the render-blocking resources is to remove the JavaScript resources that are not used. They may not be used for two reasons:
They’re not used anymore on your site. They’re still in the code but are completely useless.
They aren’t included in the above-the-fold content. Therefore, they’re non-critical for building the DOM tree. Yet, these files have a reason to be there (e.g., Google Analytics tracking code).
You can find the list of the unused JS files in the PageSpeed report in the “Remove unused Javascript” section:
There are two ways to solve this issue in WordPress:
1. Load the JavaScript files only when needed. For instance, the files should be loaded only on the pages that need that specific file — in any other case, the execution of JS should be disabled. You can take care of this aspect with plugins such as Perfmatters and Assets Cleanup.
2. Delay the JavaScript files. The JavaScript files won’t be loaded until the first user interaction (e.g., scrolling, clicking a button). If there’s no user interaction, the JS files won’t be loaded at all. By delaying JavaScript, the JS files won’t be detected by Lighthouse nor listed in the “Remove unused Javascript files” recommendation — even though not all the scripts from the PageSpeed recommendation list can be safely delayed. For instance, the Google Analytics tracking code is usually included in this PageSpeed Insights recommendation. If you delay the JS files, the Google Analytics JS file won’t be reported anymore. Note: Delaying JS files doesn’t have the purpose of solving this PSI recommendation per se. However, it works well in addressing this PageSpeed audit and improving your LCP score. So, it’s good for you to know.
So, how can you delay JS resources? You have different options.
If you’re looking for a free plugin to delay JavaScript files, you can use Flying Scripts.
Another way to safely tackle any unused JavaScript is to take advantage of WP Rocket! The plugin allows you to delay the JavaScript execution in a few clicks from the File optimization tab. You can easily add the URLs you want to exclude from delaying execution:
As we mentioned, by removing unused Javascript files, you’ll address the specific PageSpeed recommendation. Overall, you’ll work towards “Eliminating render-blocking resources” and “Reducing javascript execution time”.
As for the JS files, you should also defer non-critical CSS — all the files not relevant for rendering the page. In other words, you should change the priority for these files, too.
They will load after the browser has rendered the most relevant content on the page.
While deferring the CSS files, you should also inline critical CSS — the resources above-the-fold that need to be loaded as fast as possible. It means that you should identify the critical CSS (or Critical Path CSS) and inline them inside the HTML structure.
If you want to implement both actions on WordPress, here’s how the process looks like:
First, you should extract and inline the Critical Path CSS (CPCSS) using one available generator tool. You can find one here.
Another tip is to avoid placing large non-critical CSS code in the <head> of the code.
If you want to take care of both critical and non-critical CSS quickly, you can take advantage of WP Rocket’s features!
An effective way to tackle CSS is to remove unused CSS. WP Rocket can also help you to do it easily, thanks to its dedicated feature. You only need to enable the Remove unused CSS option, and the plugin will remove the unused CSS from the HTML of each page.
By implementing these actions, you’ll address the “Eliminate render-blocking resources”, “Reduce unused CSS”, and “Avoid chaining critical requests” PageSpeed Insights recommendations.
6. Minify CSS and JS Files
Performance Impact: low 🚀
Another effective way to optimize Largest Contentful Paint is to minify CSS and JS files.
Minification comes down to optimizing your code by making it more compact. It means to remove any white spaces, line breaks, and comments included in the code. As a result, minification will reduce CSS and JS files’ size and make them load faster.
It sounds easy, but the reality is more complicated. It’s not always simple to minify both file types and be sure to have excluded all the right resources — especially if you’re not a developer. Either way, it’s time-consuming.
The easiest and most effective way to take care of minification is to use a plugin like WP Rocket.
In the file optimization tab, you’ll have the opportunity to minify both CSS and JavaScript files.
You’ll address the following PageSpeed Insights recommendations:
Minify CSS
Minify JS
Avoid enormous network payloads.
7. Optimize Your Images
Performance Impact: high 🚀🚀🚀
Optimizing images is another relevant way to fix a bad LCP score.
Images are often the LCP element from mobile or desktop. By improving their loading time, you’ll boost the Largest Contentful Paint performance.
Here’s what you can do to fix any performance issues about images.
Compress and resize your images. You should reduce the file size without losing quality. The smaller the image dimension is, the faster the loading time will be.
To be clear: if you use a tool to optimize your images on the desktop, you will only optimize the original size. The images that you upload on WordPress won’t be resized. As you may know, in WordPress, there are different image sizes. Unless you use a proper image optimization plugin, you won’t optimize anything for performance.
For optimizing a few images, you could use a tool like ImageOptim. On the other hand, if you want to optimize more images and their thumbnails in bulk, Imagify is the perfect solution. You’ll reduce your images’ weight without sacrificing their quality. You’ll save plenty of time!
Convert your images into new formats. Overall, Google recommends the WebP format. And that’s why all WordPress image optimizer plugins now include the option to convert images to WebP. Other formats you may take into account are JPEG 2000 and JPEG XR. These formats are smaller than the JPEG, PNG, and GIF ones and help improve performance.
Use responsive images. You shouldn’t use the same images’ size for desktop and mobile. For instance, if the desktop image size is large, the mobile image size should be medium.
Page builders like Elementor allow users to upload different image sizes according to the device. Mobile image optimization is pretty essential, and the mobile score matters the most. Don’t underestimate its impact on your LCP grade!
Exclude the LCP element from lazy-loading. While overall lazy-load helps improve loading time, it can make the LCP score worse, especially when the LCP element is an image and gets lazy-loaded. That’s why excluding the LCP element from lazy-load and displaying it directly in the HTML of the page is an excellent way to optimize the LCP score.
Use a static image instead of a slider. Sliders can be very heavy to load because of the code. On the other hand, a static image made by HTML code is lighter and faster.
By optimizing your images, you’ll address the following PageSpeed Insights audits:
Serve images in next-gen formats
Properly size images
Efficiently encode images
Avoid enormous network payloads.
8. Compress Text Files
Performance Impact: high 🚀🚀🚀
You should also compress text files such as HTML, CSS, or JavaScript resources.
Compression means to “zip” your files in a smaller and lighter format so that they load faster. Once you reduce their size, the transfer between browser and server will be quicker. The browser will be able to load these resources faster. Load time and LCP will improve.
You can use compression formats such as GZIP and Brotli. On the one hand, GZIP is supported by most of the hosts. On the other one, Brotli is more performant and currently mostly recommended. Learn more about GZIP vs. Brotli in our blog post.
You can easily enable GZIP compression on WordPress by using a plugin. You can choose between different options, from the straightforward Enable Gzip Compression plugin to WP Rocket, which automatically includes GZIP compression. Also, some hosts enable GZIP compression by default.
Either way, you’ll address the “Enable text compression” PageSpeed recommendation.
9. Use Preload for Critical Assets (As the Largest Contentful Paint Image)
Performance Impact: low 🚀
At this point, you know how much the assets above the fold are critical for a good performance score. These critical resources can be fonts, images, videos, CSS, or JavaScript files.
To improve your LCP score, you should always make the critical assets load as fast as possible.
So, you may be wondering how to preload the Largest Contentful Paint image.
The Preload option comes in handy. It tells the browser to prioritize the load of these resources. In other words, the Preload prevents the browser from discovering and loading these critical files (including the LCP image) until much later.
By using preload for critical assets, you’ll address the “Preload key requests” PageSpeed recommendation.
10. Establish Third-party Connections Early
Performance Impact: low 🚀
Making the third-party connections faster is an additional way to optimize your LCP performance.
You should use the Preconnect option.
Let’s say that there’s a CSS or JS file requested from a third-party, such as Facebook or Google Analytics. The browser will request the external resource.
If enabled, the Preconnect option tells the browser to establish a connection with the external domain as fast as possible. The browser will then handle the request in parallel with the ongoing rendering process.
You can include the rel=”preconnect” in your code:
As an alternative, you can use a plugin as Perfmatters.
Since your browser may not support the preconnect option, it’s always best to implement dns-prefetch as a fallback technique. You’ll then resolve the DNS lookups faster. In other words, the external files will load more quickly, especially on mobile networks.
You can add the rel=”dns-prefetch” to your code — as a separate tag from the preconnect attribute:
WP Rocket’s Preload tab allows you to prefetch the DNS requests. You only have to specify the external hosts to be prefetched:
By establishing third-party connections earlier, you’ll improve the Time to First Byte and the server response time. You’ll also address the “Preconnect to required origins” PageSpeed recommendation.
Start Optimizing Your LCP Score on WordPress Today
You should now understand why Largest Contentful Paint is essential for performance and user experience and how you can improve its score. By applying all these optimization techniques, you’ll enhance the LCP grade on your WordPress site.
Not a WP Rocket customer yet? Save yourself time and let WP Rocket do the job for you. WP Rocket is the easiest way to get an excellent LCP score. You don’t even have to touch any settings! WP Rocket will automatically apply 80% of web performance best practices. You’ll see an instant improvement to the naked eye in your Core Web Vitals scores right away.
What’s more, you’ll stop managing multiple web performance plugins. You will only need WP Rocket to boost your LCP grade — no technical knowledge required, we promise!
Do you want to take a look first? Then watch our video and learn how to improve Largest Contentful Paint with WP Rocket in a few clicks!
First Input Delay (FID)What’s the First Input Delay and what’s the impact on UX and SEO performance? On this page, you’ll learn what FID is, how you can test it, and what factors affect its grade. You’ll also understand how to fix a bad score from mobile and desktop (FID longer than 100 or 300 ms) and improve your WordPress performance. Everything in plain English!
Cumulative Layout Shift (CLS)Wondering what Cumulative Layout Shift means and what’s the impact on your UX and SEO performance? Keep reading! You’ll find out what CLS is, how you can test it, and what factors affect its score. You’ll discover how to avoid large layout shifts and fix a bad grade from mobile and desktop (Cumulative Layout Shift more than 0.25 or 0.1 s). Everything in plain English!
Heard about this new Google Core Web Vitals project but not sure how it connects to your WordPress site? Or maybe you have no idea what the Core Web Vitals project is and why it matters for WordPress?
Either way, this post is going to cover everything you need to know about Core Web Vitals and WordPress. We’ll tell you what they are, how to test them, and how to improve your site’s scores to create a better user experience and maybe even boost your search rankings in 2021 and beyond.
What Are Google Core Web Vitals?
Core Web Vitals are a new initiative from Google designed to measure and improve user experience on the web. Instead of focusing on generic metrics like how long it takes your entire website to load, Core Web Vitals focus on how your WordPress site’s performance connects to delivering a high-quality user experience.
Users care about how fast they can start interacting with a page. That’s precisely what the Core Web Vitals metrics aim to measure.
Currently, there are three Core Web Vitals: Largest Contentful Paint (loading performance), Cumulative Layout Shift (visual stability), and First Input Delay (interactivity).
According to Google, these metrics are the most important ones for providing a great user experience.
If you think that these names are confusing, and if you tend to mix one metric with another, don’t worry! We’ll explain each metric in the easiest way. We want you to understand what each Core Web Vital means and its impact on user experience.
It’s the first step for improving the scores and your overall SEO and WordPress performance.
Explaining Largest Contentful Paint (LCP)
Largest Contentful Paint (LCP) measures how long it takes for the most meaningful content on your site to load – that’s usually your site’s hero section or featured image.
According to Google, how long it takes for a page’s main content to load affects how quickly users perceive your site to load.
Practical example: you land on a page and don’t see the top image fully displayed right away. You would be annoyed, right? You would even think about leaving the page right away. Here’s why the Largest Contentful Paint metric is closely related to user experience — more than the overall site’s loading time.
The LCP “element” is different for each site, and it’s also different between the mobile and desktop versions of your site. Sometimes the LCP element could be an image, while other times, it could just be text. You’ll get a clear example in the section on how to test and measure Core Web Vitals.
If you’re wondering what a good LCP time is, here are Google’s thresholds:
Good – Less than or equal to 2.5 seconds
Needs Improvement – Less than or equal to 4.0 seconds
Poor – More than 4.0 seconds.
On a side note: LCP is very similar to First Contentful Paint (FCP), another metric included in PageSpeed Insights.
The key difference is that LCP measures when the “main” content loads. FCP is focused on just when the “first” content loads — which could be a splash screen or loading indicator, that’s a less relevant user-experience element.
Explaining Cumulative Layout Shift (CLS)
The Cumulative Layout Shift (CLS) measures how much your site’s content “shifts” or “moves around” as it loads.
Practical example: you’re about to click on a link or CTA, and you can’t do it because your content has just gone down after being loaded. You have a terrible user experience, and that’s a layout shift. The same goes when you accidentally click the wrong button because the late-loading content caused a button to shift.
Or, have you ever been on a news website where the content in the article keeps shifting around as the site loads ads, and you are unable to keep reading? That’s a layout shift, too.
You can see from yourself how the cumulative layout shift is super annoying for users and how they will have a poor experience.
Here’s how Google defines the CLS scores:
Good – Less than or equal to 0.1 seconds
Needs Improvement – Less than or equal to 0.25 seconds
Poor – More than 0.25 seconds.
Explaining First Input Delay (FID)
First Input Delay (FID) measures the time between when a user interacts with something on your page (e.g., clicking a button or a link) and when their browser can begin processing that event.
Practical example: if you click on a button to expand an accordion section, how long does it take for your site to respond to that and show the content?
First Input Delay is probably the most complicated metric to understand and optimize for, also because it’s heavily affected by JavaScript.
Let’s say that you land on a site from mobile and click on a link, but you don’t get an immediate response. It could be because your phone is busy processing a large JavaScript file from that site.
Here’s how Google defines FID scores:
Good – Less than or equal to 100 ms
Needs Improvement – Less than or equal to 300 ms
Poor – More than 300 ms.
Do Core Web Vitals Affect SEO as a Ranking Factor?
In June 2021, Google will start using Core Web Vitals as a ranking factor – therefore, these metrics could affect your SEO performance.
Core Web Vitals will be part of the new Page experience signals, together with HTTPS-security, safe-browsing, mobile-friendliness, and intrusive interstitial guidelines.
Core Web Vitals will affect both mobile and desktop organic results, as well as whether or not your site appears in Top Stories. Previously, your site needed to use AMP to appear in Top Stories. That will no longer be the case when Google rolls out the change, but your site will need to meet specific minimum Core Web Vitals scores to appear in Top Stories.
In short: if you care about your SEO performance, improving your Core Web Vital scores is now mandatory.
How to Test & Measure Core Web Vitals on WordPress
You can test and measure the Core Web Vitals with all of Google’s tools for web developers, from PageSpeed Insights to the Chrome DevTools, the CrUX Report, and much more.
As you can see in the image below, Google’s tools measure all the three metrics — except for Chrome DevTools and Lighthouse.
These two tools use the Total Blocking Time as a proxy for the First Input Delay. That’s because FID can only be measured with real user data (Field Data), whereas Lighthouse only provides Lab Data.
Google’s tools to measure Core Web Vitals
If you prefer using another performance tool, you should know that both GTmetrix and WebPageTest have started to use the Lighthouse performance score.
Keep in mind that both tools only provide you with the Largest Contentful Paint and the Cumulative Layout Shift scores.
The reason is always the same: the First Input Delay can only be measured with real user interaction, and these tools rely on the Lighthouse Lab Data.
Let’s now go over two of the most popular tools: PageSpeed Insights and Search Console. The first one helps you detect individual page issues; the other allows you to diagnose sitewide problems.
How to Test and Measure the Core Web Vitals with PageSpeed Insights
Google’s tool provides data on all three metrics and gives specific recommendations to improve their performance.
The Diagnostics section will become your best ally to get a better score!
Just plug in your site’s URL, and you’ll see Core Web Vitals metrics in both the Field Data (based on the CrUX report) and the Lab Data (based on Lighthouse 6.0).
The Core Web Vitals metrics are marked with a blue ribbon – as long as you get it, you meet the threshold required by Google.
PageSpeed score for the WP Rocket homepage
You should keep in mind some notes:
The Core Web Vitals scores can slightly differ between the Field and Lab Data. In the screenshot above, LCP is 1.8 s according to the Field Data and 2.2 s in the Lab Data. That’s normal, and it depends on how data is collected.
Not having any Field Data when running your test is not an issue. It’s because there’s not enough real user data available. It doesn’t impact your Core Web Vitals because PageSpeed Insights considers the Lab Data for the page speed score.If you’re wondering what happens with the First Input Delay, not included in the Lab Data, you’ll get your answer in a few lines!
Always check both the mobile and desktop results. Your Core Web Vitals metrics will differ between the two. Keep in mind that the mobile score is the most relevant and the most challenging.
Let’s now look at how you can use PageSpeed Insights to identify the Core Web Vitals elements that need improvement.
Discovering the Largest Contentful Paint Element with PageSpeed Insights
As we explained, the LCP score measures how long it takes for the most meaningful element to become visible to your visitors.
To discover your site’s Largest Contentful Paint element, scroll down to the Diagnostics section and expand the Largest Contentful Paint element tab.
There, Google will display the HTML for the element that it’s using to measure LCP.
For example, on the desktop version of the WordPress.org homepage, the LCP element is an image:
The LCP element from the desktop – PageSpeed Insights
However, on the mobile version of the site, the LCP element is the subheading text:
The LCP element from the mobile – PageSpeed Insights
Discovering the Cumulative Layout Shift Elements with PageSpeed Insights
Quick recap: the Cumulative Layout Shift deals with how your site loads and whether or not your content “moves around” as new content is loaded.
To find the individual elements on your site that are “shifting” and affecting your score, go to the Avoid large layout shifts section in the Diagnostics area:
The CLS elements – PageSpeed Insights
Discovering First Input Delay and Total Blocking Time with PageSpeed Insights
First Input Delay is about user interaction, remember? Meaning, how long it takes for the page to respond after interacting with an element such as a link or a button.
That’s why FID is based on actual user data, and you won’t find its score in the Lab Data. As we explained, you’ll only see FID times in the Field Data section — and only if the CrUX report has collected enough data.
Total Blocking Time replaces First Input Delay in the Lab Data.
As long as you improve your Total Blocking Time, you’ll likely improve the FID score.
If you have a bad TBT score, you should go to the Minimize third-party usage section in the Diagnostics section.
Here, you’ll see what you can minimize in terms of third-party usage. It’s one of the main performance issues you need to solve – unless it’s already solved and included under the “Passed audits” sections, as you can see below:
How to Read the Core Web Vitals Report on Search Console
If you want to diagnose issues with your site as a whole, you should use the Core Web Vitals report in Google Search Console.
The report is based on an aggregate of real users’ data from CrUX. For this reason, the data included in the report could take a while before reporting issues. That’s why the Lab Data from Lighthouse is always valuable.
That said, the Core Web Vitals report is great to identify the groups of pages that require attention – both for desktop and mobile.
The Core Web Vitals report in Search Console – Overview
Once you open the report, you’ll find a Details tab that groups the URL performance by several criteria:
Status (Poor or Need improvement)
Metric type (e.g., CLS issue: more than 0.25 (desktop))
URL group (the list of URLs with similar performance).
Once you have fixed the URLs that needed an improvement, you’ll also be able to click on the Validation column and move forward with the “Validate Fix” option. Keep in mind that the validation process takes up to two weeks — be patient!
The Core Web Vitals report in Search Console – Details tab
How to Measure Core Web Vitals with Chrome Extensions
If you’re looking for a useful Chrome Extension, you could choose Web Vitals.
It gives you the Core Web Vital scores for any page you’re browsing:
Web Vitals Chrome extension
You may also want to try CORE Serp Vitals, which shows you the Core Web Vitals results directly on the SERP. Remember that you need to enter a Chrome UX Report API key to let the extension work.
CORE Serp Vitals Chrome extension
How to Improve Core Web Vitals on WordPress
Now for the critical question — if you aren’t currently meeting Google’s recommendations for the three Core Web Vitals metrics, how can you optimize your WordPress site to improve your Core Web Vitals scores?
The strategies are different for each metric. Most optimizations involve implementing WordPress performance best practices, though with a few points of emphasis — and that’s why choosing the best WordPress caching plugin will help you with no effort from your side.
Watch the video to understand how to optimize your Core Web Vitals, and keep reading to learn more about it.
How to Improve Largest Contentful Paint on WordPress
Optimizing for Largest Contentful Paint is the most straightforward metric as it’s pretty much entirely WordPress performance best practices:
Optimize browser caching. You should set the right option for the static files that your browser keeps in its cache. By doing so, you’ll address the “Serve static assets with an efficient cache policy” PageSpeed Insights recommendation. Guess what? WP Rocket enables the optimal expiration length automatically.
Optimize your images. A lot of times, your LCP element will be an image. Optimizing your images will speed up your site and address PageSpeed recommendations such as “Properly size images”, “Defer offscreen images”, “Serve images in next-gen formats”, and “Efficiently encode images”. You can use Imagify to optimize WordPress images automatically.
Optimize your code. Loading unnecessary CSS or JavaScript files before your main content will slow down the loading time. You can fix this by eliminating render-blocking resources on your WordPress site. You should also minify CSS and Javascript files and remove unused CSS. Optimizing your code will help you address the “Avoid chaining critical requests” PageSpeed recommendation. Once again, you’ll get most of the job done by setting these optimizations up in the File Optimization tab in WP Rocket.
Use server-level compression. Using Gzip or Brotli compression will reduce your site’s file size, which speeds up LCP and addresses the “Enable text compression” recommendation. WP Rocket automatically enables Gzip compression.
Use preconnect for important resources. Preconnect lets you establish important third-party connections early and addresses the “Preload key requests” and “Preconnect to required origins” recommendations. You can learn more in our tutorial.
Use a content delivery network (CDN) for global audiences. If you have a global audience, a CDN can speed up your LCP time for visitors around the world. It’s another effective way to reduce the Time to First Byte (TTFB). You can use our RocketCDN service.
You can secure your WordPress sites with CrowdSec using our latest application bouncer, available on the WordPress marketplace. This new plugin is compatible with versions 1.0.x and beyond. Given that the vast majority of websites in the world are hosted on WordPress, this plugin improves our defense arsenal in our mission to defend the greatest number.
Step one: Install CrowdSec agent
This bouncer has been designed to protect WordPress-hosted websites from all kinds of attacks. To be able to use this blocker, the first step is to install the CrowdSec agent.
Then, both installation and configuration of the plugin can be done in a few clicks from the WordPress marketplace.
CrowdSec plugin available on WordPress
Please note that first and foremost CrowdSec must be installed on a server that is accessible via the WordPress site. Remember: CrowdSec detects, bouncers deter.
Both pieces of software don’t have to be installed on the same server, although that would be easiest. To protect your server in the best possible way, the CrowdSec agent needs to be able to read relevant logs – either via file, syslog or whatever works best in your environment.
Step two: Install WordPress plugin
Installing the CrowdSec WordPress plugin is as easy as installing any other WordPress plugin:
Click ‘Plugins’ in the left navigation on your site’s dashboard.
Type ‘CrowdSec’ in the text field to the right. Hit enter.
In the CrowdSec plugin click ‘Install Now’
Once installed click ‘activate’ as illustrated below.
Now configure the plugin by clicking CrowdSec in the left navigation as shown below.
Set LAPI URL to the location of your CrowdSec agent. Is it installed on the same server, fill it out as shown above.
‘Bouncer API’ is created in cscli. Just follow the instructions.
For details on how to configure the CrowdSec WordPress bouncer, go to the official documentation or read on. Pay special attention to the option ‘Public website only’. This must be disabled if you wish to protect wp-admin (which you most likely would want to).
The “Flex mode” – a bulwark agains false positives
Thanks to the “Flex mode”, it is impossible to accidentally block access to your site to people who don’t deserve it. This mode makes it possible to never ban an IP but only to offer a Captcha, in the worst-case scenario.
CrowdSec blends into your design
When a user is suspected to be malevolent, CrowdSec will either send them her a Captcha to resolve or simply a page notifying that access is denied. Please note that it is possible to customize all the colors of these pages in a few clicks so that they integrate best with your design. On the other hand, all texts are also fully customizable. This will allow you, for example, to present translated pages in your users’ language.
The right balance between performance and security
By default, the “live mode” is enabled. The first time a stranger connects to your website, this mode means that the IP will be checked directly by the CrowdSec API. The rest of your user’s browsing will be even more transparent thanks to the fully customizable cache system.
But you can also activate the “Stream mode.” This mode allows you to constantly feed the bouncer with the malicious IP list via a background task (CRON), making it even faster when checking the IP of your visitors. Besides, if your site has a lot of unique visitors at the same time, this will not influence the traffic to the API of your CrowdSec instance.
Stream mode activation
If you’ve ever been confronted with high traffic, you are probably familiar with Redis or Memcached technologies. You have the capability to activate these caching technologies in the CrowdSec bouncer settings to guarantee invisible IP control on your site. For further explanation on stream vs live mode, check the official documentation.
CDN-friendly without forgetting other load balancers
If you use a CDN, a reverse proxy, or a load balancer, it is now possible to indicate in the bouncer settings the IP ranges of these devices to check the IP of your users. For other IPs, the bouncer will not trust the X-Forwarded-For header.
Coming up next
Soon, the plugin will have a dashboard allowing you to visualize the activity of your bouncer in live. It will also be possible to connect directly to CrowdSec’s global reputation database, without having to install an agent on your machine if you don’t wish to.
Widely tested, 100% open source
This plugin has been tested on the vast majority of WordPress versions installed in the world (90%+), according to WordPress real-time statistics. It has also been tested on a very wide range of PHP versions (7.2, 7.3, 7.4 and 8), the language in which WordPress is coded.
This plugin is released under MIT license, the most permissive and free license in the world. Its source code is fully available on GitHub. You can discover the entire collection of CrowdSec bouncers at our Hub. Beyond this one, you will find there more freshly released additions.
We would love to hear your feedback about this WordPress plugin. If you are interested in testing the bouncer to protect your sites or would like to get in touch with the team, give us a shout!
Today we’re thrilled to announce our new partnership with CrowdSec.
This is easily one of the most exciting developments in WordPress security for a long time, and it aligns with our goals to make Shield Security the best WordPress security solution, for everyone.
Our #1 mission with Shield is to deliver the most powerful security for WordPress sites. We’re not out to make millions in sales and scare you into upgrading to ShieldPRO because we have KPI targets.
We’re here simply to protect people and their businesses.
Our partnership with CrowdSec helps us fulfill that aspiration as we’re convinced it’ll deliver major security enhancements for every WordPress site running on Shield Security.
We hope you’ll be as excited as we are, after you learn about this collaboration!
In this article you’ll discover:
What CrowdSec is.
Why we decided to partner with CrowdSec.
How your WordPress security is enhanced with this integration.
How the CrowdSec integration differs between ShieldPRO and ShieldFREE
By gathering threat data about bots from millions of different sources, Crowdsec can build and share reliable intelligence about malicious bots (their IP addresses).
As a subscriber to CrowdSec, they’ll notify you about bad IP addresses, so that when those IPs send requests to your site/app, you can take action to block them immediately.
The reason this is so powerful is that when you block an IP address that you know is “bad”, you block all security threats from that IP completely. So the more quickly you can know about those bad IPs, the safer your sites will be.
Summary: Crowdsec offers you faster identification of bad IP addresses based on information gathered from other sites/servers across the globe.
It’s a complex system and we were working our way through it when we stumbled upon CrowdSec. It immediately piqued our interest since their focus is somewhat similar to our own.
We figured that if we could get their knowledge fed into Shield, then our customers could indentify bad bots more quickly and thereby instantly increase their protection.
We reached out to them to discuss whether there was scope for collaboration and they could immediately see, in-principle, that there was potential for mutual benefit.
Afterall, if Shield can give them access to data points about bad IPs from across 60,000+ WordPress websites, it’d be a huge addition to their network.
And conversely, if WordPress sites running Shield can access shared intelligence from all those sites and other websites/apps/platforms, our customers will also benefit.
What’s not to like about this idea?
They agreed that a collaboration between was definitely beneficial, and so here we are today!
How Does the CrowdSec Partnership Enhance Your WordPress Security?
We briefly touched upon this topic already, but we’ll go into a bit more below.
On any given WordPress site, Shield’s Automatic IP blocking system gathers intelligence about IP addresses that send requests to the site. It keeps track of bad IPs using a counter of “offenses” and when that IP has exceeded the allowed limit, it’s blocked from further access.
Basically a bad bot has 10 chances before it’s completely blocked. (10 is configurable)
This means there’s a small “window” open to any IP address to probe, attack or exploit your site, before Shield can be sure that they’re malicious.
With the CrowdSec integration, your WordPress sites will have access to intelligence about malicious IP addresses before they’ve ever accessed your website. (This intelligence will have already been gathered for you by other websites.)
This reduces that “window” available to malicious bots to zero.
Reducing the time window to zero means a malicious bot can’t:
Of course, this IP intelligence is formed through the activity of IP addresses on other websites, and sometimes your own.
With CrowdSec’s integration switched on, Shield will share its internal offenses-tracking with CrowdSec, which ultimately then shares the data with other WordPress sites.
This all happens seamlessly with zero effort or configuration needed by the security admin.
So in a nutshell, CrowdSec gives us a head-start against malicious bots and lets us block IPs before your Shield plugin needs to perform any assessments, relying on tracking already done by other Shield plugins, elsewhere on the Internet.
How Does The CrowdSec Integration Differ Between ShieldPRO and ShieldFREE?
ShieldPRO is designed to protect businesses and mission critical WordPress sites. If your WordPress site plays a critical role in your business, or even your personal endeavours, then ShieldPRO is definitely something you should consider.
If, however, your website isn’t so important, or you’re comfortable with restoring a website quickly from a backup after a hack, or you have other security systems in-place and feel you don’t need the extra protection that ShieldPRO offers, then ShieldFREE will go a long way to protecting your sites and users and offering useful extra features like Two-Factor Authentication.
The CrowdSec integration with Shield reflects this. When you’re running ShieldPRO you’ll get access to much more IP intelligence data, and also IP data from sources that reflect business or mission-critical websites, such as e-commerce stores etc.
As well receiving more relevant IP data, and at higher volumes, ShieldPRO installations will receive IP data more frequently. The current implementation is “every 2 hours” for ShieldPRO and “every week” for ShieldFREE.
This simply means that if you’re running ShieldFREE, your IP intelligence data will become increasingly stale, but you’ll be refreshed with the latest data each week.
We may adjust these settings over time.
If you need or desire greater protection based on the nature and purpose of the WordPress sites you’re operating, then we strongly urge you to move to the extra protection afforded to you by ShieldPRO.
CrowdSec and GDPR Compliance
Like ourselves, CrowdSec is commited to full compliance with privacy regulations, such as GDPR.
Please note, also, that CrowdSec integration is completely voluntary – you can switch it off on your Shield website at any time with no impact on your performance or security. Shield will continue to protect your site as it’s always done.
Future Plans For Our Partnership
You can already create a free account with CrowdSec over on their homepage. And once our Shield integration has been released, you’ll able to link your WordPress sites into your CrowdSec App account and view the data being sent to the network from all your sites.
We have a few further things under consideration to deepen our integration with CrowdSec, but we’ll annouce these as the integration progresses.
When Can You Get ShieldPRO + CrowdSec?
We’re getting set to release v16 of Shield Security in the coming weeks. Stay tuned to the newsletter or the changelog to get further details as they are published.
Thoughts, Suggestions and Feedback?
As always, we encourge our clients to share their thoughts with us when at any time, and in particular when we release a new feature such as this. Please feel free to leave your comments in the section below.
Scanning your WordPress sites for Malware is the most important thing you can do to protect your site.
This approach is common and is actually the USP (Unique Selling Point) of several popular WordPress security plugins and services.
Conventional wisdom and marketing emphasises to us all that scanning for malware is pinnacle of WordPress security greatness.
In this article I’ll argue that incessent Malware scanning isn’t going to keep your WordPress site secured.
I want to challenge your approach to WordPress site security and hope that by the end of the article your focus will have shifted a little.
Instead of endless “scanning for malware” treadmill, along with the anxiety that this produces in us, I want to show you there’s an alternative. And it’s a hugely effective way to keep your WordPress sites secure, and your data (and your customers’ data) safe.
Malware Scanning Is Super Important If You’re Already Hacked!
So yes, malware scanning is hugely important when you’re already compromised. You gotta find and eliminate the infection!
But let’s be absolutely clear here, statistically speaking, your site probably isn’t hacked. Yet.
Give me any random WordPress site and I’ll bet that “no”, it hasn’t been hacked. Afterall there are more non-hacked websites than hacked sites, so we’ve got better than a 50:50 chance.
So why on earth do we need powerful security plugins like ShieldPRO? What’s all that malware scanning for then?
Firstly, it’s important to realise that “under attack” and “hacked” are 2 different things. While you may not be compromised, if you’re not already under attack, I’d be very, very suprised.
So while I’d bet that you’re probably not hacked yet, the odds are good that if your site isn’t hacked today, it’ll be hacked eventually without robust security practices and defenses in-place.
The strategies and tools we need to handle both these scenarios (hacked and under attack) are different. ShieldPRO comes with all the powerful tools that work for both, but we’ll get to that a little later.
So What Is The Most Important Aspect Of WordPress Security Protection?
The clue is in the question – “PROTECTION“.
You’ll have heard the phrase that “prevention is better than cure”. This is a real thing.
It’s not a marketing ploy or persuasion tactic. It’s one of the rare times you can say ‘true fact‘ without sounding a little silly.
It is why, for example, Smallpox has been eradicated from planet earth, and why vaccines are the fastest way out of a global pandemic. <insert conspiracy theory counterargument here>
So it is, too, for WordPress site security.
It’s much easier and far cheaper to prevent a WordPress site from getting hacked and keep it clean, than it is to clean up after a site has been compromised.
If you’ve ever had to clean up a hacked site, you’ll know this to be true.
But it is depends on what you’re using you malware scanner for.
Malware scanning has 2 primary purposes:
To quickly detect hidden malware scripts, allowing you to eliminate infection more easily.
To let you know your website is vulnerable.
You see, many of us get it backwards. We think our website is vulnerable because we have malware.
But it’s the other way around: we have a malware infection because our website is vulnerable!
So if your favourite WordPress security plugin touts their primary feature is that they’re the #1 malware detector for WordPress, then you should also double-check with them that they actually prevent infection in the first place.
Sure you can detect and remove malware, but if you haven’t eliminated the root cause, you’re playing whack-a-mole with malware scripts.
Life’s too short for that.
I would never say, and certainly don’t imply, that malware scanning isn’t necessary as part of a holistic WordPress security strategy. We’ve made huge investments into our malware detection and repair engine within ShieldPRO because we know it’s important.
Being able to detect malware reliably, and eliminate it quickly, is critical in our efforts to secure WordPress sites after they’ve been compromised, and Shield fulfills this role for us.
But once malware has been discovered and cleaned, your work is only beginning. You’ll need to plug the hole that allowed the malware to get in there in the first place.
So, rather than set your primary goal to be detecting and eliminating malware, you’ll want to shift your focus a little and ask yourself…
What’s the Best Way To Stop Hacking in WordPress?
We said this earlier – good prevention is the path to robust WordPress security.
To prevent WordPress malware infections, we must understand how it happens in the first place.
There are a couple of angles to answering this. The most common answer you’ll hear is that vulnerable plugins and themes are single biggest vector for WordPress compromise.
This is true. But it’s not the whole story.
Let’s Play: Hacker Role Play
So let’s pretend you’re a WordPress website hacker and your stated goal is:
hack as many WordPress sites as you can all day, every day, and infect them with your malware scripts.
Here are some of your likely thoughts:
Firstly, you’d have a think about your target market – i.e. there are millions and millions of WordPress websites. Win!
Next, in order to hack 30,000+ websites every day you will need either:
a whole lot people to do a lot of manual work, or
automated bots and scripts to do all the hard work for you quickly
Since you don’t have the resources to hire people, you decide to build automated bots and scripts.
At this point you’ve decided to create automated bots to do your hacking for you. But there are a few things you must take into consideration when you design these bots:
You must “discover” the WordPress sites. Not all sites are WordPress, so you have to first find potential targets. So you’ll have your bots probe the websites to determine if they’re actually WordPress sites.
You have a library of publicly known (and maybe even non-public) WordPress plugin and theme vulnerabilities you’re going to exploit to gain access. So you narrow down your list of WordPress sites based on which sites have these vulnerable plugins/themes installed. This involves a lot more probing on the site.
You’ve now got a good list of sites to attack.
Attack!
Of course this layout is for illustrative purposes. But the principle of what’s happens in the real world is no different.
Some bots may not probe for discovery first, and instead go straight for the vulnerability itself, only to find it’s not present. But this can be considered a probing/exploit attempt, too.
In the end you’ll have lots of bots probing lots of websites.
Back To Preventing Malware and Hacking…
The first stage in hacking at scale is probing, with the use of bots/scripts, by either checking what the site has, or by directly targeting known vulnerabilities and hoping to get a hit.
If you track 404 errors on your own WordPress sites, you’ll see for example, there are often many requests to URLs that simply don’t exist. You’re being probed.
If we can detect these probing bots, determine that they’re sending requests for nefarious purposes, then we can completely block them from accessing our sites altogether.
This is true prevention and it works far better, and much more efficiently than repeatedly cleaning-up our sites after they’ve been compromised.
And this holds true not only for malware infections, but any possible compromise to your WordPress sites.
So your #1 goal shouldn’t be “find the best malware cleaner” – it should be: “find the best prevention against WordPress site hacking and compromise”.
How Does ShieldPRO Prevent WordPress Site Hacking?
The main area of focus of Shield Security for WordPress is in prevention.
We believe strongly that if we can prevent problems in the first place, we free ourselves and our WordPress sites to focus on the work that’s most important.
ShieldPRO achieves this by doing its utmost to detect bad bots and block them.
We use our exclusive, custom built AntiBot Detection Engine to detect bad bots. Detecting bad bots isn’t simple, because they do everything they can to hide their malicious intent. Shield builds up a profile for each IP address based on their activities and depending on their reputation, blocks certain requests.
Use our exclusive “NotBot” javascript snippet to quickly and reliably identify bots vs humans.
Gathers 25+ distinct “bot signals” to monitor, track and score visitors to build a unique “bot” profile.
Once we’ve accessed a visitor and determined it to be a bot, and more specifically, a bad bot, we prevent that visitor from performing certain requests against the site. And, depending on the Shield configuration, we can block that bot from sending any requests to the site entirely.
ShieldPRO prevents 10,000s of WordPress sites from being hacking every single day by standing in the way of malicious bots.
Of course, Shield will also scan for malware and filesystem modifications, vulnerable plugins and all the other usual suspects, but this “after-the-fact” scanning is no match for preventing such things in the first place.
Is Your WordPress Protection Focused On Prevention, or Cure?
If you ask yourself nothing else after reading this article, it should be whether your existing WordPress Security strategy is focused on prevention, or focused on cure.
We’ve argued that the biggest positive impact on your security lies in preventing the problems in the first place, and that ShieldPRO is built with this strategy in-mind.
While you might have the best or most expensive malware scanning engine on the market, if it’s consistently picking up threats, then you may not have the best WordPress protection available.


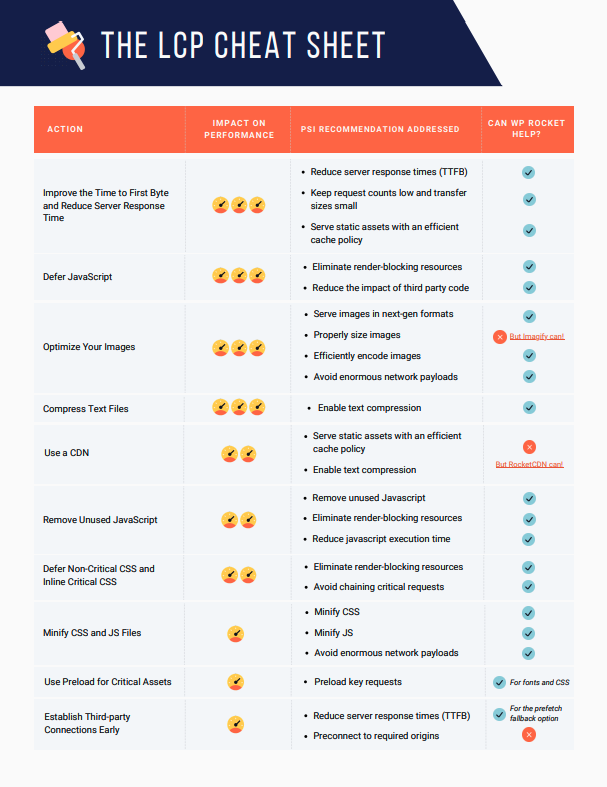


 First Input Delay (FID)What’s the First Input Delay and what’s the impact on UX and SEO performance? On this page, you’ll learn what FID is, how you can test it, and what factors affect its grade. You’ll also understand how to fix a bad score from mobile and desktop (FID longer than 100 or 300 ms) and improve your WordPress performance. Everything in plain English!
 Cumulative Layout Shift (CLS)Wondering what Cumulative Layout Shift means and what’s the impact on your UX and SEO performance? Keep reading! You’ll find out what CLS is, how you can test it, and what factors affect its score. You’ll discover how to avoid large layout shifts and fix a bad grade from mobile and desktop (Cumulative Layout Shift more than 0.25 or 0.1 s). Everything in plain English!


