SSL and TLS Deployment Best Practices

Version 1.6-draft (15 January 2020)

SSL/TLS is a deceptively simple technology. It is easy to deploy, and it just works–except when it does not. The main problem is that encryption is not often easy to deploy correctly. To ensure that TLS provides the necessary security, system administrators and developers must put extra effort into properly configuring their servers and developing their applications.

In 2009, we began our work on SSL Labs because we wanted to understand how TLS was used and to remedy the lack of easy-to-use TLS tools and documentation. We have achieved some of our goals through our global surveys of TLS usage, as well as the online assessment tool, but the lack of documentation is still evident. This document is a step toward addressing that problem.

Our aim here is to provide clear and concise instructions to help overworked administrators and programmers spend the minimum time possible to deploy a secure site or web application. In pursuit of clarity, we sacrifice completeness, foregoing certain advanced topics. The focus is on advice that is practical and easy to follow. For those who want more information, Section 6 gives useful pointers.

1 Private Key and Certificate

In TLS, all security starts with the server’s cryptographic identity; a strong private key is needed to prevent attackers from carrying out impersonation attacks. Equally important is to have a valid and strong certificate, which grants the private key the right to represent a particular hostname. Without these two fundamental building blocks, nothing else can be secure.

1.1 Use 2048-Bit Private Keys

For most web sites, security provided by 2,048-bit RSA keys is sufficient. The RSA public key algorithm is widely supported, which makes keys of this type a safe default choice. At 2,048 bits, such keys provide about 112 bits of security. If you want more security than this, note that RSA keys don’t scale very well. To get 128 bits of security, you need 3,072-bit RSA keys, which are noticeably slower. ECDSA keys provide an alternative that offers better security and better performance. At 256 bits, ECDSA keys provide 128 bits of security. A small number of older clients don’t support ECDSA, but modern clients do. It’s possible to get the best of both worlds and deploy with RSA and ECDSA keys simultaneously if you don’t mind the overhead of managing such a setup.

1.2 Protect Private Keys

Treat your private keys as an important asset, restricting access to the smallest possible group of employees while still keeping your arrangements practical. Recommended policies include the following:

  • Generate private keys on a trusted computer with sufficient entropy. Some CAs offer to generate private keys for you; run away from them.
  • Password-protect keys from the start to prevent compromise when they are stored in backup systems. Private key passwords don’t help much in production because a knowledgeable attacker can always retrieve the keys from process memory. There are hardware devices (called Hardware Security Modules, or HSMs) that can protect private keys even in the case of server compromise, but they are expensive and thus justifiable only for organizations with strict security requirements.
  • After compromise, revoke old certificates and generate new keys.
  • Renew certificates yearly, and more often if you can automate the process. Most sites should assume that a compromised certificate will be impossible to revoke reliably; certificates with shorter lifespans are therefore more secure in practice.
  • Unless keeping the same keys is important for public key pinning, you should also generate new private keys whenever you’re getting a new certificate.

1.3 Ensure Sufficient Hostname Coverage

Ensure that your certificates cover all the names you wish to use with a site. Your goal is to avoid invalid certificate warnings, which confuse users and weaken their confidence.

Even when you expect to use only one domain name, remember that you cannot control how your users arrive at the site or how others link to it. In most cases, you should ensure that the certificate works with and without the www prefix (e.g., that it works for both example.com and www.example.com). The rule of thumb is that a secure web server should have a certificate that is valid for every DNS name configured to point to it.

Wildcard certificates have their uses, but avoid using them if it means exposing the underlying keys to a much larger group of people, and especially if doing so crosses team or department boundaries. In other words, the fewer people there are with access to the private keys, the better. Also be aware that certificate sharing creates a bond that can be abused to transfer vulnerabilities from one web site or server to all other sites and servers that use the same certificate (even when the underlying private keys are different).

Make sure you add all the necessary domain names to Subject Alternative Name (SAN) since all the latest browsers do not check for Common Name for validation

1.4 Obtain Certificates from a Reliable CA

Select a Certification Authority (CA) that is reliable and serious about its certificate business and security. Consider the following criteria when selecting your CA:

Security posture All CAs undergo regular audits, but some are more serious about security than others. Figuring out which ones are better in this respect is not easy, but one option is to examine their security history, and, more important, how they have reacted to compromises and if they have learned from their mistakes.

Business focus CAs whose activities constitute a substantial part of their business have everything to lose if something goes terribly wrong, and they probably won’t neglect their certificate division by chasing potentially more lucrative opportunities elsewhere.

Services offered At a minimum, your selected CA should provide support for both Certificate Revocation List (CRL) and Online Certificate Status Protocol (OCSP) revocation methods, with rock-solid network availability and performance. Many sites are happy with domain-validated certificates, but you also should consider if you’ll ever require Extended Validation (EV) certificates. In either case, you should have a choice of public key algorithm. Most web sites use RSA today, but ECDSA may become important in the future because of its performance advantages.

Certificate management options If you need a large number of certificates and operate in a complex environment, choose a CA that will give you good tools to manage them.

Support Choose a CA that will give you good support if and when you need it.

Note

For best results, acquire your certificates well in advance and at least one week before deploying them to production. This practice (1) helps avoid certificate warnings for some users who don’t have the correct time on their computers and (2) helps avoid failed revocation checks with CAs who need extra time to propagate new certificates as valid to their OCSP responders. Over time, try to extend this “warm-up” period to 1-3 months. Similarly, don’t wait until your certificates are about to expire to replace them. Leaving an extra several months there would similarly help with people whose clocks are incorrect in the other direction.

1.5 Use Strong Certificate Signature Algorithms

Certificate security depends (1) on the strength of the private key that was used to sign the certificate and (2) the strength of the hashing function used in the signature. Until recently, most certificates relied on the SHA1 hashing function, which is now considered insecure. As a result, we’re currently in transition to SHA256. As of January 2016, you shouldn’t be able to get a SHA1 certificate from a public CA. Leaf and intermediate certificates having SHA1 hashing signature are now considered insecure by browser.

1.6 Use DNS CAA

DNS CAA[8] is a standard that allows domain name owners to restrict which CAs can issue certificates for their domains. In September 2017, CA/Browser Forum mandated CAA support as part of its certificate issuance standard baseline requirements. With CAA in place, the attack surface for fraudulent certificates is reduced, effectively making sites more secure. If the CAs have automated process in place for issuance of certificates, then it should check for DNS CAA record as this would reduce the improper issuance of certificates.

It is recommended to whitelist a CA by adding a CAA record for your certificate. Add CA’s which you trust for issuing you a certificate.

2 Configuration

With correct TLS server configuration, you ensure that your credentials are properly presented to the site’s visitors, that only secure cryptographic primitives are used, and that all known weaknesses are mitigated.

2.1 Use Complete Certificate Chains

In most deployments, the server certificate alone is insufficient; two or more certificates are needed to build a complete chain of trust. A common configuration problem occurs when deploying a server with a valid certificate, but without all the necessary intermediate certificates. To avoid this situation, simply use all the certificates provided to you by your CA in the same sequence.

An invalid certificate chain effectively renders the server certificate invalid and results in browser warnings. In practice, this problem is sometimes difficult to diagnose because some browsers can reconstruct incomplete chains and some can’t. All browsers tend to cache and reuse intermediate certificates.

2.2 Use Secure Protocols

There are six protocols in the SSL/TLS family: SSL v2, SSL v3, TLS v1.0, TLS v1.1, TLS v1.2, and TLS v1.3:

  • SSL v2 is insecure and must not be used. This protocol version is so bad that it can be used to attack RSA keys and sites with the same name even if they are on an entirely different servers (the DROWN attack).
  • SSL v3 is insecure when used with HTTP (the SSLv3 POODLE attack) and weak when used with other protocols. It’s also obsolete and shouldn’t be used.
  • TLS v1.0 and TLS v1.1 are legacy protocol that shouldn’t be used, but it’s typically still necessary in practice. Its major weakness (BEAST) has been mitigated in modern browsers, but other problems remain. TLS v1.0 has been deprecated by PCI DSS. Similarly, TLS v1.0 and TLS v1.1 has been deprecated in January 2020 by modern browsers. Check the SSL Labs blog link
  • TLS v1.2 and v1.3 are both without known security issues.

TLS v1.2 or TLS v1.3 should be your main protocol because these version offers modern authenticated encryption (also known as AEAD). If you don’t support TLS v1.2 or TLS v1.3 today, your security is lacking.

In order to support older clients, you may need to continue to support TLS v1.0 and TLS v1.1 for now. However, you should plan to retire TLS v1.0 and TLS v1.1 in the near future. For example, the PCI DSS standard will require all sites that accept credit card payments to remove support for TLS v1.0 by June 2018. Similarly, modern browsers will remove the support for TLS v1.0 and TLS v1.1 by January 2020.

Benefits of using TLS v1.3:

  • Improved performance i.e improved latency
  • Improved security
  • Removed obsolete/insecure features like cipher suites, compression etc.

2.3 Use Secure Cipher Suites

To communicate securely, you must first ascertain that you are communicating directly with the desired party (and not through someone else who will eavesdrop) and exchanging data securely. In SSL and TLS, cipher suites define how secure communication takes place. They are composed from varying building blocks with the idea of achieving security through diversity. If one of the building blocks is found to be weak or insecure, you should be able to switch to another.

You should rely chiefly on the AEAD suites that provide strong authentication and key exchange, forward secrecy, and encryption of at least 128 bits. Some other, weaker suites may still be supported, provided they are negotiated only with older clients that don’t support anything better.

There are several obsolete cryptographic primitives that must be avoided:

  • Anonymous Diffie-Hellman (ADH) suites do not provide authentication.
  • NULL cipher suites provide no encryption.
  • Export cipher suites are insecure when negotiated in a connection, but they can also be used against a server that prefers stronger suites (the FREAK attack).
  • Suites with weak ciphers (112 bits or less) use encryption that can easily be broken are insecure.
  • RC4 is insecure.
  • 64-bit block cipher (3DES / DES / RC2 / IDEA) are weak.
  • Cipher suites with RSA key exchange are weak i.e. TLS_RSA

There are several cipher suites that must be preferred:

  • AEAD (Authenticated Encryption with Associated Data) cipher suites – CHACHA20_POLY1305, GCM and CCM
  • PFS (Perfect Forward Secrecy) ciphers – ECDHE_RSA, ECDHE_ECDSA, DHE_RSA, DHE_DSS, CECPQ1 and all TLS 1.3 ciphers

Use the following suite configuration, designed for both RSA and ECDSA keys, as your starting point:

TLS_ECDHE_ECDSA_WITH_AES_128_GCM_SHA256
TLS_ECDHE_ECDSA_WITH_AES_256_GCM_SHA384
TLS_ECDHE_ECDSA_WITH_AES_128_CBC_SHA
TLS_ECDHE_ECDSA_WITH_AES_256_CBC_SHA
TLS_ECDHE_ECDSA_WITH_AES_128_CBC_SHA256
TLS_ECDHE_ECDSA_WITH_AES_256_CBC_SHA384
TLS_ECDHE_RSA_WITH_AES_128_GCM_SHA256
TLS_ECDHE_RSA_WITH_AES_256_GCM_SHA384
TLS_ECDHE_RSA_WITH_AES_128_CBC_SHA
TLS_ECDHE_RSA_WITH_AES_256_CBC_SHA
TLS_ECDHE_RSA_WITH_AES_128_CBC_SHA256
TLS_ECDHE_RSA_WITH_AES_256_CBC_SHA384
TLS_DHE_RSA_WITH_AES_128_GCM_SHA256
TLS_DHE_RSA_WITH_AES_256_GCM_SHA384
TLS_DHE_RSA_WITH_AES_128_CBC_SHA
TLS_DHE_RSA_WITH_AES_256_CBC_SHA
TLS_DHE_RSA_WITH_AES_128_CBC_SHA256
TLS_DHE_RSA_WITH_AES_256_CBC_SHA256

Warning

We recommend that you always first test your TLS configuration in a staging environment, transferring the changes to the production environment only when certain that everything works as expected. Please note that the above is a generic list and that not all systems (especially the older ones) support all the suites. That’s why it’s important to test first.

The above example configuration uses standard TLS suite names. Some platforms use nonstandard names; please refer to the documentation for your platform for more details. For example, the following suite names would be used with OpenSSL:

ECDHE-ECDSA-AES128-GCM-SHA256
ECDHE-ECDSA-AES256-GCM-SHA384
ECDHE-ECDSA-AES128-SHA
ECDHE-ECDSA-AES256-SHA
ECDHE-ECDSA-AES128-SHA256
ECDHE-ECDSA-AES256-SHA384
ECDHE-RSA-AES128-GCM-SHA256
ECDHE-RSA-AES256-GCM-SHA384
ECDHE-RSA-AES128-SHA
ECDHE-RSA-AES256-SHA
ECDHE-RSA-AES128-SHA256
ECDHE-RSA-AES256-SHA384
DHE-RSA-AES128-GCM-SHA256
DHE-RSA-AES256-GCM-SHA384
DHE-RSA-AES128-SHA
DHE-RSA-AES256-SHA
DHE-RSA-AES128-SHA256
DHE-RSA-AES256-SHA256

2.4 Select Best Cipher Suites

In SSL v3 and later protocol versions, clients submit a list of cipher suites that they support, and servers choose one suite from the list to use for the connection. Not all servers do this well, however; some will select the first supported suite from the client’s list. Having servers actively select the best available cipher suite is critical for achieving the best security.

2.5 Use Forward Secrecy

Forward secrecy (sometimes also called perfect forward secrecy) is a protocol feature that enables secure conversations that are not dependent on the server’s private key. With cipher suites that do not provide forward secrecy, someone who can recover a server’s private key can decrypt all earlier recorded encrypted conversations. You need to support and prefer ECDHE suites in order to enable forward secrecy with modern web browsers. To support a wider range of clients, you should also use DHE suites as fallback after ECDHE. Avoid the RSA key exchange unless absolutely necessary. My proposed default configuration in Section 2.3 contains only suites that provide forward secrecy.

2.6 Use Strong Key Exchange

For the key exchange, public sites can typically choose between the classic ephemeral Diffie-Hellman key exchange (DHE) and its elliptic curve variant, ECDHE. There are other key exchange algorithms, but they’re generally insecure in one way or another. The RSA key exchange is still very popular, but it doesn’t provide forward secrecy.

In 2015, a group of researchers published new attacks against DHE; their work is known as the Logjam attack.[2] The researchers discovered that lower-strength DH key exchanges (e.g., 768 bits) can easily be broken and that some well-known 1,024-bit DH groups can be broken by state agencies. To be on the safe side, if deploying DHE, configure it with at least 2,048 bits of security. Some older clients (e.g., Java 6) might not support this level of strength. For performance reasons, most servers should prefer ECDHE, which is both stronger and faster. The secp256r1 named curve (also known as P-256) is a good choice in this case.

2.7 Mitigate Known Problems

There have been several serious attacks against SSL and TLS in recent years, but they should generally not concern you if you’re running up-to-date software and following the advice in this guide. (If you’re not, I’d advise testing your systems using SSL Labs and taking it from there.) However, nothing is perfectly secure, which is why it is a good practice to keep an eye on what happens in security. Promptly apply vendor patches if and when they become available; otherwise, rely on workarounds for mitigation.

3 Performance

Security is our main focus in this guide, but we must also pay attention to performance; a secure service that does not satisfy performance criteria will no doubt be dropped. With proper configuration, TLS can be quite fast. With modern protocols—for example, HTTP/2—it might even be faster than plaintext communication.

3.1 Avoid Too Much Security

The cryptographic handshake, which is used to establish secure connections, is an operation for which the cost is highly influenced by private key size. Using a key that is too short is insecure, but using a key that is too long will result in “too much” security and slow operation. For most web sites, using RSA keys stronger than 2,048 bits and ECDSA keys stronger than 256 bits is a waste of CPU power and might impair user experience. Similarly, there is little benefit to increasing the strength of the ephemeral key exchange beyond 2,048 bits for DHE and 256 bits for ECDHE. There are no clear benefits of using encryption above 128 bits.

3.2 Use Session Resumption

Session resumption is a performance-optimization technique that makes it possible to save the results of costly cryptographic operations and to reuse them for a period of time. A disabled or nonfunctional session resumption mechanism may introduce a significant performance penalty.

3.3 Use WAN Optimization and HTTP/2

These days, TLS overhead doesn’t come from CPU-hungry cryptographic operations, but from network latency. A TLS handshake, which can start only after the TCP handshake completes, requires a further exchange of packets and is more expensive the further away you are from the server. The best way to minimize latency is to avoid creating new connections—in other words, to keep existing connections open for a long time (keep-alives). Other techniques that provide good results include supporting modern protocols such as HTTP/2 and using WAN optimization (usually via content delivery networks).

3.4 Cache Public Content

When communicating over TLS, browsers might assume that all traffic is sensitive. They will typically use the memory to cache certain resources, but once you close the browser, all the content may be lost. To gain a performance boost and enable long-term caching of some resources, mark public resources (e.g., images) as public.

3.5 Use OCSP Stapling

OCSP stapling is an extension of the OCSP protocol that delivers revocation information as part of the TLS handshake, directly from the server. As a result, the client does not need to contact OCSP servers for out-of-band validation and the overall TLS connection time is significantly reduced. OCSP stapling is an important optimization technique, but you should be aware that not all web servers provide solid OCSP stapling implementations. Combined with a CA that has a slow or unreliable OCSP responder, such web servers might create performance issues. For best results, simulate failure conditions to see if they might impact your availability.

3.6 Use Fast Cryptographic Primitives

In addition to providing the best security, my recommended cipher suite configuration also provides the best performance. Whenever possible, use CPUs that support hardware-accelerated AES. After that, if you really want a further performance edge (probably not needed for most sites), consider using ECDSA keys.

4 HTTP and Application Security

The HTTP protocol and the surrounding platform for web application delivery continued to evolve rapidly after SSL was born. As a result of that evolution, the platform now contains features that can be used to defeat encryption. In this section, we list those features, along with ways to use them securely.

4.1 Encrypt Everything

The fact that encryption is optional is probably one of the biggest security problems today. We see the following problems:

  • No TLS on sites that need it
  • Sites that have TLS but that do not enforce it
  • Sites that mix TLS and non-TLS content, sometimes even within the same page
  • Sites with programming errors that subvert TLS

Although many of these problems can be mitigated if you know exactly what you’re doing, the only way to reliably protect web site communication is to enforce encryption throughout—without exception.

4.2 Eliminate Mixed Content

Mixed-content pages are those that are transmitted over TLS but include resources (e.g., JavaScript files, images, CSS files) that are not transmitted over TLS. Such pages are not secure. An active man-in-the-middle (MITM) attacker can piggyback on a single unprotected JavaScript resource, for example, and hijack the entire user session. Even if you follow the advice from the previous section and encrypt your entire web site, you might still end up retrieving some resources unencrypted from third-party web sites.

4.3 Understand and Acknowledge Third-Party Trust

Web sites often use third-party services activated via JavaScript code downloaded from another server. A good example of such a service is Google Analytics, which is used on large parts of the Web. Such inclusion of third-party code creates an implicit trust connection that effectively gives the other party full control over your web site. The third party may not be malicious, but large providers of such services are increasingly seen as targets. The reasoning is simple: if a large provider is compromised, the attacker is automatically given access to all the sites that depend on the service.

If you follow the advice from Section 4.2, at least your third-party links will be encrypted and thus safe from MITM attacks. However, you should go a step further than that: learn what services you use and remove them, replace them with safer alternatives, or accept the risk of their continued use. A new technology called subresource integrity (SRI) could be used to reduce the potential exposure via third-party resources.[3]

4.4 Secure Cookies

To be properly secure, a web site requires TLS, but also that all its cookies are explicitly marked as secure when they are created. Failure to secure the cookies makes it possible for an active MITM attacker to tease some information out through clever tricks, even on web sites that are 100% encrypted. For best results, consider adding cryptographic integrity validation or even encryption to your cookies.

4.5 Secure HTTP Compression

The 2012 CRIME attack showed that TLS compression can’t be implemented securely. The only solution was to disable TLS compression altogether. The following year, two further attack variations followed. TIME and BREACH focused on secrets in HTTP response bodies compressed using HTTP compression. Unlike TLS compression, HTTP compression is a necessity and can’t be turned off. Thus, to address these attacks, changes to application code need to be made.[4]

TIME and BREACH attacks are not easy to carry out, but if someone is motivated enough to use them, the impact is roughly equivalent to a successful Cross-Site Request Forgery (CSRF) attack.

4.6 Deploy HTTP Strict Transport Security

HTTP Strict Transport Security (HSTS) is a safety net for TLS. It was designed to ensure that security remains intact even in the case of configuration problems and implementation errors. To activate HSTS protection, you add a new response header to your web sites. After that, browsers that support HSTS (all modern browsers at this time) enforce it.

The goal of HSTS is simple: after activation, it does not allow any insecure communication with the web site that uses it. It achieves this goal by automatically converting all plaintext links to secure ones. As a bonus, it also disables click-through certificate warnings. (Certificate warnings are an indicator of an active MITM attack. Studies have shown that most users click through these warnings, so it is in your best interest to never allow them.)

Adding support for HSTS is the single most important improvement you can make for the TLS security of your web sites. New sites should always be designed with HSTS in mind and the old sites converted to support it wherever possible and as soon as possible. For best security, consider using HSTS preloading,[5] which embeds your HSTS configuration in modern browsers, making even the first connection to your site secure.

The following configuration example activates HSTS on the main hostname and all its subdomains for a period of one year, while also allowing preloading:

Strict-Transport-Security: max-age=31536000; includeSubDomains; preload

4.7 Deploy Content Security Policy

Content Security Policy (CSP) is a security mechanism that web sites can use to restrict browser operation. Although initially designed to address Cross-Site Scripting (XSS), CSP is constantly evolving and supports features that are useful for enhancing TLS security. In particular, it can be used to restrict mixed content when it comes to third-party web sites, for which HSTS doesn’t help.

To deploy CSP to prevent third-party mixed content, use the following configuration:

Content-Security-Policy: default-src https: 'unsafe-inline' 'unsafe-eval';
                         connect-src https: wss:

Note

This is not the best way to deploy CSP. In order to provide an example that doesn’t break anything except mixed content, I had to disable some of the default security features. Over time, as you learn more about CSP, you should change your policy to bring them back.

4.8 Do Not Cache Sensitive Content

All sensitive content must be communicated only to the intended parties and treated accordingly by all devices. Although proxies do not see encrypted traffic and cannot share content among users, the use of cloud-based application delivery platforms is increasing, which is why you need to be very careful when specifying what is public and what is not.

4.9 Consider Other Threats

TLS is designed to address only one aspect of security—confidentiality and integrity of the communication between you and your users—but there are many other threats that you need to deal with. In most cases, that means ensuring that your web site does not have other weaknesses.

5 Validation

With many configuration parameters available for tweaking, it is difficult to know in advance what impact certain changes will have. Further, changes are sometimes made accidentally; software upgrades can introduce changes silently. For that reason, we advise that you use a comprehensive SSL/TLS assessment tool initially to verify your configuration to ensure that you start out secure, and then periodically to ensure that you stay secure. For public web sites, we recommend the free SSL Labs server test.[6]

6 Advanced Topics

The following advanced topics are currently outside the scope of our guide. They require a deeper understanding of SSL/TLS and Public Key Infrastructure (PKI), and they are still being debated by experts.

6.1 Public Key Pinning

Public key pinning is designed to give web site operators the means to restrict which CAs can issue certificates for their web sites. This feature has been deployed by Google for some time now (hardcoded into their browser, Chrome) and has proven to be very useful in preventing attacks and making the public aware of them. In 2014, Firefox also added support for hardcoded pinning. A standard called Public Key Pinning Extension for HTTP[7] is now available. Public key pinning addresses the biggest weakness of PKI (the fact that any CA can issue a certificate for any web site), but it comes at a cost; deploying requires significant effort and expertise, and creates risk of losing control of your site (if you end up with invalid pinning configuration). You should consider pinning largely only if you’re managing a site that might be realistically attacked via a fraudulent certificate.

6.2 DNSSEC and DANE

Domain Name System Security Extensions (DNSSEC) is a set of technologies that add integrity to the domain name system. Today, an active network attacker can easily hijack any DNS request and forge arbitrary responses. With DNSSEC, all responses can be cryptographically tracked back to the DNS root. DNS-based Authentication of Named Entities (DANE) is a separate standard that builds on top of DNSSEC to provide bindings between DNS and TLS. DANE could be used to augment the security of the existing CA-based PKI ecosystem or bypass it altogether.

Even though not everyone agrees that DNSSEC is a good direction for the Internet, support for it continues to improve. Browsers don’t yet support either DNSSEC or DANE (preferring similar features provided by HSTS and HPKP instead), but there is some indication that they are starting to be used to improve the security of email delivery.

7 Changes

The first release of this guide was on 24 February 2012. This section tracks the document changes over time, starting with version 1.3.

Version 1.3 (17 September 2013)

The following changes were made in this version:

  • Recommend replacing 1024-bit certificates straight away.
  • Recommend against supporting SSL v3.
  • Remove the recommendation to use RC4 to mitigate the BEAST attack server-side.
  • Recommend that RC4 is disabled.
  • Recommend that 3DES is disabled in the near future.
  • Warn about the CRIME attack variations (TIME and BREACH).
  • Recommend supporting forward secrecy.
  • Add discussion of ECDSA certificates.

Version 1.4 (8 December 2014)

The following changes were made in this version:

  • Discuss SHA1 deprecation and recommend migrating to the SHA2 family.
  • Recommend that SSL v3 is disabled and mention the POODLE attack.
  • Expand Section 3.1 to cover the strength of the DHE and ECDHE key exchanges.
  • Recommend OCSP Stapling as a performance-improvement measure, promoting it to Section 3.5.

Version 1.5 (8 June 2016)

The following changes were made in this version:

  • Refreshed the entire document to keep up with the times.
  • Recommended use of authenticated cipher suites.
  • Spent more time discussing key exchange strength and the Logjam attack.
  • Removed the recommendation to disable client-initiated renegotiation. Modern software does this anyway, and it might be impossible or difficult to disable it with something older. At the same time, the DoS vector isn’t particularly strong. Overall, I feel it’s better to spend available resources fixing something else.
  • Added a warning about flaky OCSP stapling implementations.
  • Added mention of subresource integrity enforcement.
  • Added mention of cookie integrity validation and encryption.
  • Added mention of HSTS preloading.
  • Recommended using CSP for better handling of third-party mixed content.
  • Mentioned FREAK, Logjam, and DROWN attacks.
  • Removed the section that discussed mitigation of various TLS attacks, which are largely obsolete by now, especially if the advice presented here is followed. Moved discussion of CRIME variants into a new section.
  • Added a brief discussion of DNSSEC and DANE to the Advanced section.

Version 1.6 (15 January 2020)

The following changes were made in this version:

  • Refreshed the entire document to keep up with the times.
  • Added details to use SAN (Subject Alternative Names) since the Common Name is deprecated by latest browsers.
  • SHA1 signature deprecation for leaf and intermediate certificate
  • Added DNS CAA information, recommened the use of it.
  • Added information about the extra download of missing intermediate certificate and the sequence of it.
  • Recommended the use of TLS 1.3
  • Recommended not to use the legacy protocol TLS v1.0 and TLS v1.1
  • Improved the secure cipher suites section with more information and newly discovered weak/insecure cipher.
  • Updated HSTS preload footnotes link.

Acknowledgments

Special thanks to Marsh Ray, Nasko Oskov, Adrian F. Dimcev, and Ryan Hurst for their valuable feedback and help in crafting the initial version of this document. Also thanks to many others who generously share their knowledge of security and cryptography with the world. The guidelines presented here draw on the work of the entire security community.

About SSL Labs

SSL Labs (www.ssllabs.com) is Qualys’s research effort to understand SSL/TLS and PKI as well as to provide tools and documentation to assist with assessment and configuration. Since 2009, when SSL Labs was launched, hundreds of thousands of assessments have been performed using the free online assessment tool. Other projects run by SSL Labs include periodic Internet-wide surveys of TLS configuration and SSL Pulse, a monthly scan of about 150,000 most popular TLS-enabled web sites in the world.

About Qualys

Qualys, Inc. (NASDAQ: QLYS) is a pioneer and leading provider of cloud-based security and compliance solutions with over 9,300 customers in more than 100 countries, including a majority of each of the Forbes Global 100 and Fortune 100. The Qualys Cloud Platform and integrated suite of solutions help organizations simplify security operations and lower the cost of compliance by delivering critical security intelligence on demand and automating the full spectrum of auditing, compliance and protection for IT systems and web applications. Founded in 1999, Qualys has established strategic partnerships with leading managed service providers and consulting organizations including Accenture, BT, Cognizant Technology Solutions, Deutsche Telekom, Fujitsu, HCL, HP Enterprise, IBM, Infosys, NTT, Optiv, SecureWorks, Tata Communications, Verizon and Wipro. The company is also a founding member of the Cloud Security Alliance (CSA). For more information, please visit www.qualys.com.

[1] Transport Layer Security (TLS) Parameters (IANA, retrieved 18 March 2016)

[2] Weak Diffie-Hellman and the Logjam Attack (retrieved 16 March 2016)

[3] Subresource Integrity (Mozilla Developer Network, retrieved 16 March 2016)

[4] Defending against the BREACH Attack (Qualys Security Labs; 7 August 2013)

[5] HSTS Preload List (Google developers, retrieved 16 March 2016)

[6] SSL Labs (retrieved 16 March 2016)

[7] RFC 7469: Public Key Pinning Extension for HTTP (Evans et al, April 2015)

[8] RFC 6844: DNS CAA (Evans et al, January 2013)

Source :
https://github.com/ssllabs/research/wiki/SSL-and-TLS-Deployment-Best-Practices
Warning: Unnecessary HSTS header over HTTP

we would like to add the HSTS header to our page https://www.wipfelglueck.de
Our page is running on a shared server, so we don’t have access to the httpd.conf. We tried to enable this header via the .htaccess file like this:

<ifmodule mod_headers.c>
  DefaultLanguage de
  Header set X-XSS-Protection "1; mode=block"
  Header set X-Frame-Options "sameorigin"
  Header set X-Content-Type-Options "nosniff"
  
  Header set X-Permitted-Cross-Domain-Policies "none"
  
  Header always set Strict-Transport-Security "max-age=31536000; includeSubDomains; preload"
  
  Header set Referrer-Policy: no-referrer
  
  <FilesMatch "\.(js|css|xml|gz)$"> 
    Header append Vary Accept-Encoding 
  </FilesMatch> 
   
  <filesMatch ".(ico|jpg|jpeg|png|gif|webp)$">
   Header set Cache-Control "max-age=2592000, public"
  </filesMatch>
  <filesMatch ".(css|js|json|html)$">
   Header set Cache-Control "max-age=604800, public"
  </filesMatch>
</IfModule>

When we check the page we receive the warning in subject with this text:
“The HTTP page at http://wipfelglueck.de sends an HSTS header. This has no effect over HTTP, and should be removed.”

I tried some ways to solve this, but was not successful so far. In the web I can’t find a solution, so I would be happy if you could give me a hint on this!

Thank you very much!!


Thank you very much for your respond!
With the header:

Header always set Strict-Transport-Security "max-age=31536000; includeSubDomains; preload" env=HTTPS

or

Header set Strict-Transport-Security "max-age=31536000; includeSubDomains; preload" env=HTTPS

there is no error, the page runs, but when I check the page this error is mentioned:

Error: No HSTS header
Response error: No HSTS header is present on the response.

That’s strange. What did I wrong?

Answer

You can conditionally set headers using env=

Header always set Strict-Transport-Security "..." env=HTTPS

(you can use both always and env= simultaneously, the former only filters by response status)

That being said, do not optimize for benchmarks or compliance checkmarks. This header does not do anything, caring about it just takes away attention from things that do have effects. This header simply has no effect when not sent via secured transports – but as these days, (almost) all plaintext requests should just redirect to https://, this is true for (almost) any response header in http://.

Source :
https://bootpanic.com/warning-unnecessary-hsts-header-over-http/

How to Find the Source of Account Lockouts in Active Directory

In this post, you will learn how to find the source of account lockouts in Active Directory.

Here are the steps to find the source of account lockouts:

Users locking their accounts is a common problem, it’s one of the top calls to the helpdesk.

What is frustrating is when you unlock a user’s account and it keeps randomly locking. The user could be logged into multiple devices (phone, computer, application, and so on) and when they change their password it will cause ongoing lock-out issues.

This guide will help you to track down the source of those lockouts.

Check it out:

Step 1: Enabling Auditing Logs

The first step to tracking down the source of account lockouts is to enable auditing. If you do not turn on the proper auditing logs then the lockout events will not be logged.

Here are the steps to turn on the audit logs:

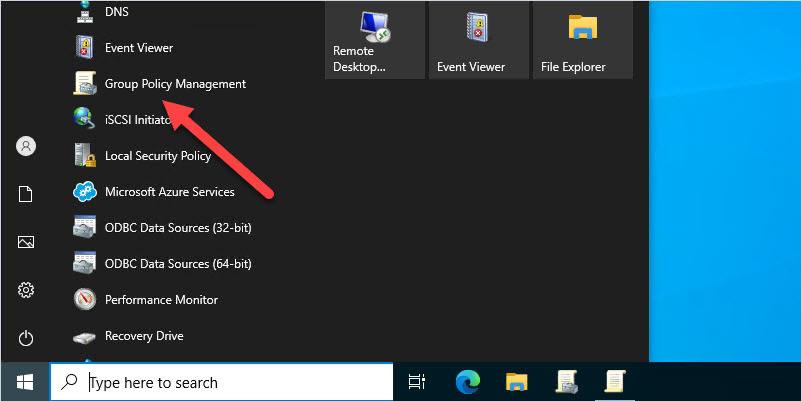
1. Open Group Policy Management Console

This can be from the domain controller or any computer that has the RSAT tools installed.

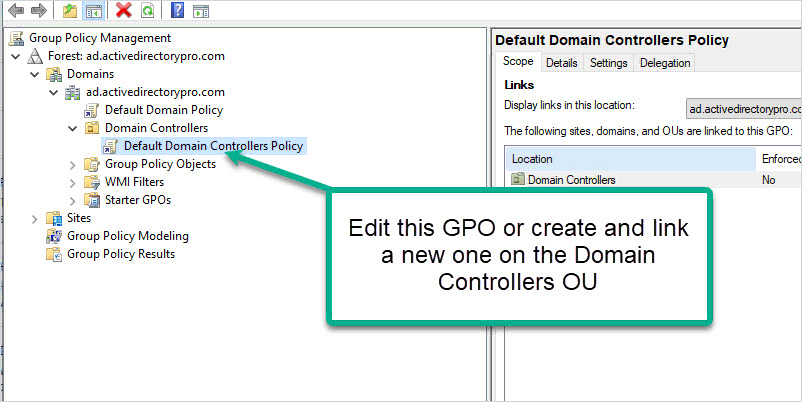
2. Modify Default Domain Controllers Policy

Browse to the Default Domain Controllers Policy, right-click, and select edit. You can also create a new GPO on the “Domain Controllers” OU if you prefer to not edit the default GPO.

3. Modify the Advanced Audit Policy Configuration

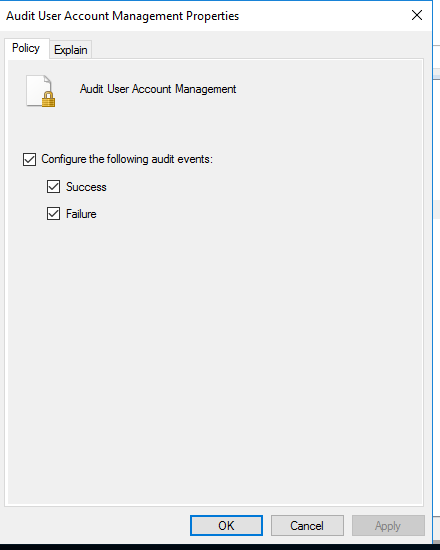
Browse to computer configuration -> Policies -> Security Settings -> Advanced Audit Policy Configuration -> Audit Policies -> Account Management

Enable success and failure for the “Audit User Account Management” policy.

Next, enable the following:

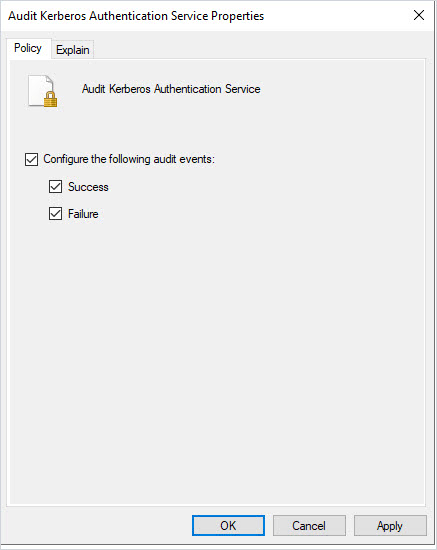
computer configuration -> Security Settings -> Advanced Audit Policy Configuration -> Audit Policies -> Account Logon

Enable Success and Failure for “Audit Kerberos Authentication Service.

Auditing is now turned on and event 4740 will be logged in the security events logs when an account is locked out. In addition, the Kerberos logs are enabling which will log authentication failures with the lockout. Sometimes event 4740 does not log the source computer and the Kerberos logs provide additional details.

Step 2: Using the User Unlock GUI Tool to Find the Source of Account Lockouts

This step uses the User Unlock Tool to find the event ID 4740 and other event IDs that will help troubleshoot lockouts.

I created this tool to make it super easy for any staff member to unlock accounts, reset passwords and find the source of account lockouts. It also has some additional features to help find the source of lockouts.

This is a much easier option than PowerShell.

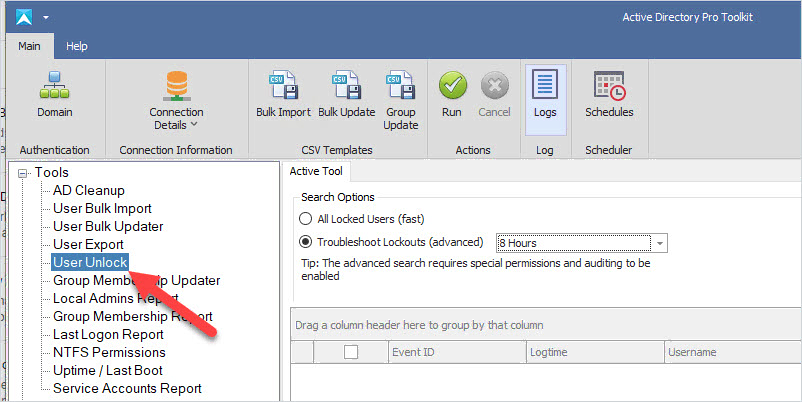
1. Open the AD Pro Toolkit

You can download a free trial here.

Click on the “User Unlock” tool in the left side menu.

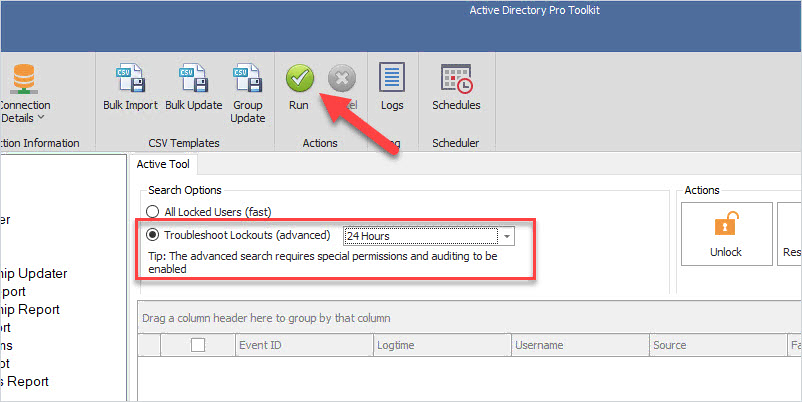
Step 2. Select Troubleshoot Lockouts

Select Troubleshoot lockouts and click run

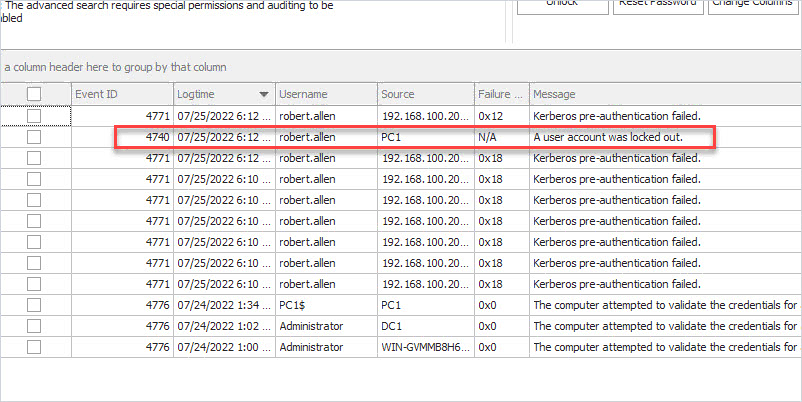
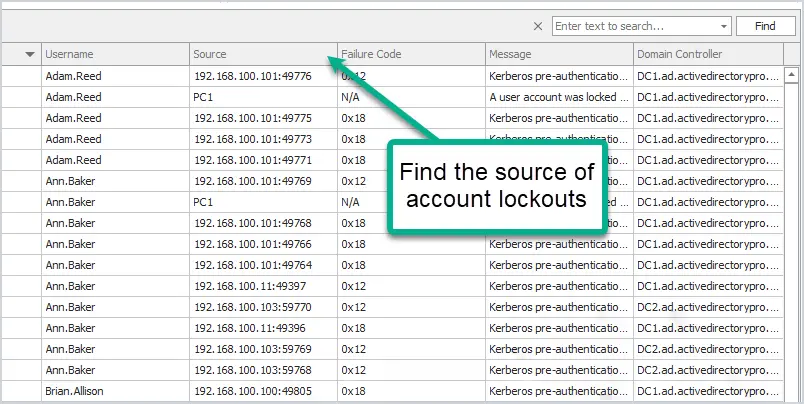
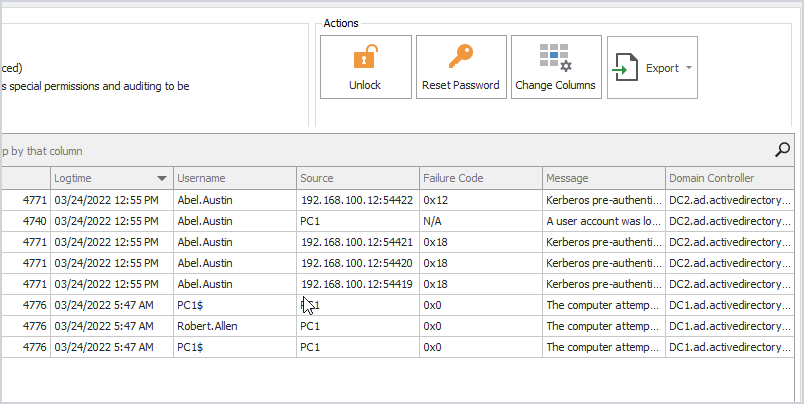
You will now have a list of events that will show the source of a lockout or the source of bad authentication attempts.

In the above screenshot, you can see the account “robert.allen” lockout came from computer PC1.

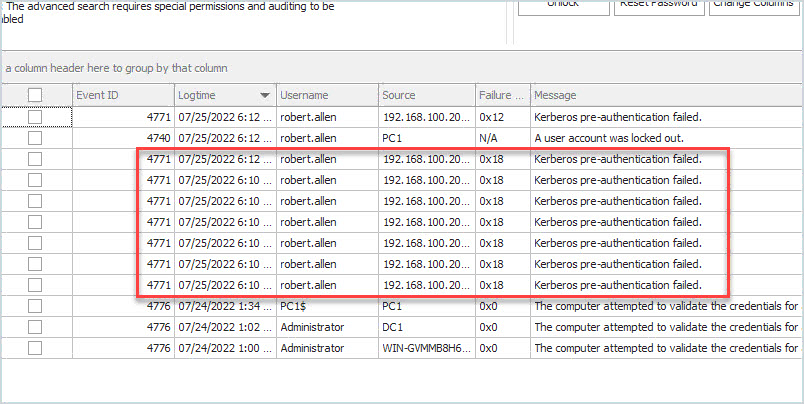
There will be times when event 4740 does not show the source computer. When that happens you can use the other logged events to help troubleshoot log out events. For example, if the above screenshot had no event 4740 I can look at 4771 and see the failed authentication attempt was from a computer with the IP 192.168.100.20.

In addition, you can unlock the account and reset the password all from one tool. The tool will display all locked accounts, you can select a single account or multiple accounts to unlock.

The unlock tool is part of the AD Pro Toolkit. Download your free trial here.

Step 3: Using PowerShell to Find the Source of Account Lockouts

Both the PowerShell and the GUI tool need auditing turned before the domain controllers will log any useful information.

1. Find the Domain Controller with the PDC Emulator Role

If you have a single domain controller (shame on you) then you can skip to the next step…hopefully you have at least two DCs.

The DC with the PDC emulator role will record every account lockout with an event ID of 4740.

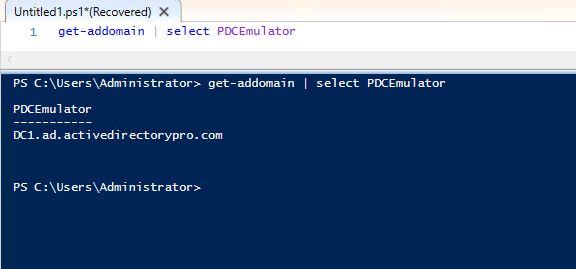
To find the DC that has the PDCEmulator role run this PowerShell command

get-addomain | select PDCEmulator

2: Finding event ID 4740 using PowerShell

All of the details you need are in event 4740. Now that you know which DC holds the pdcemulator role you can filter the logs for this event.

On the DC holding the PDCEmulator role open PowerShell and run this command

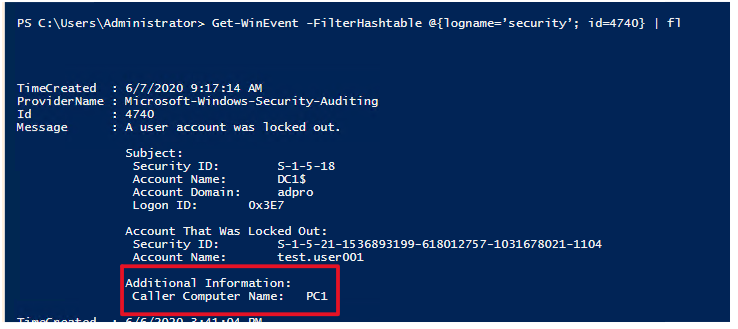
Get-WinEvent -FilterHashtable @{logname=’security’; id=4740}

This will search the security event logs for event ID 4740. If you have any account lockouts you should see a list like the below.

To display the details of these events and get the source of the lockout use this command.

Get-WinEvent -FilterHashtable @{logname=’security’; id=4740} | fl

This will display the caller computer name of the lockout. This is the source of the user account lockout.

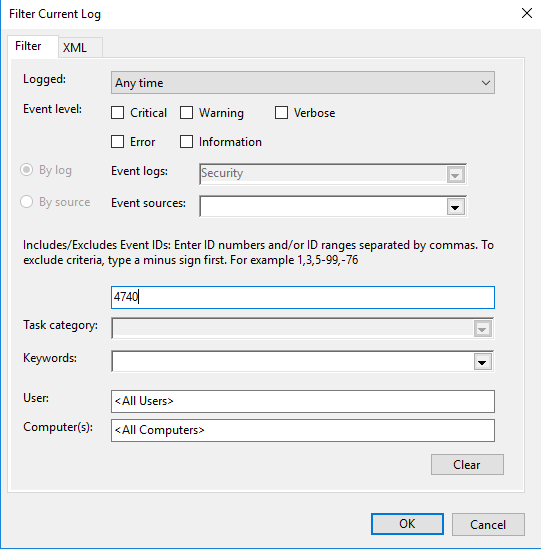
You can also open the event log and filter the events for 4740

Although this method works it takes a few manual steps and can be time consuming. You may also have staff that is not familiar with PowerShell and need to perform other functions like unlock or reset the user’s account.

That is why I created the Active Directory User Unlock GUI tool. This tool makes it super easy for staff to find all locked users and the source of account lockouts.

I hope you found this article useful. If you have questions or comments let me know by posting a comment below.

Source :
https://activedirectorypro.com/find-the-source-of-account-lockouts/

How to Find Which Logon Server You Authenticated to (Domain Controller)

There are times when you need to determine which domain controller you have authenticated to. This can be helpful for a number of reasons such as troubleshooting group policy, slow logins, application issues, map network drives or printers, and so on.

For example, recently I ran into an issue where single sign-on was not working for multiple applications. I was troubleshooting the issue on multiple virtual desktops and noticed that single sign on was working on one of them. I thought this was strange considering all the virtual desktops were the exact same. That is when I checked which domain controller it authenticated against and noticed it was DC2 and all the others were DC1.

How to Check Logon Server

You can check the logon server with either the command line or PowerShell.

Option 1 – Using the Command Line

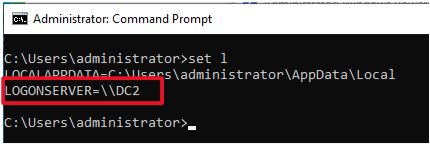
Open the command line, type the command below, and press enter

set l

In the screenshot above I authenticated to the DC2 domain controller. The set l command displays everything from the set command that starts with l so it’s displaying the localappdata also. You could just type set logon to see only the logonserver.

Option 2 – Using PowerShell

Open PowerShell, type the command below, and press enter

$env:LOGONSERVER

Find Domain Controller Group Policy Was Applied From

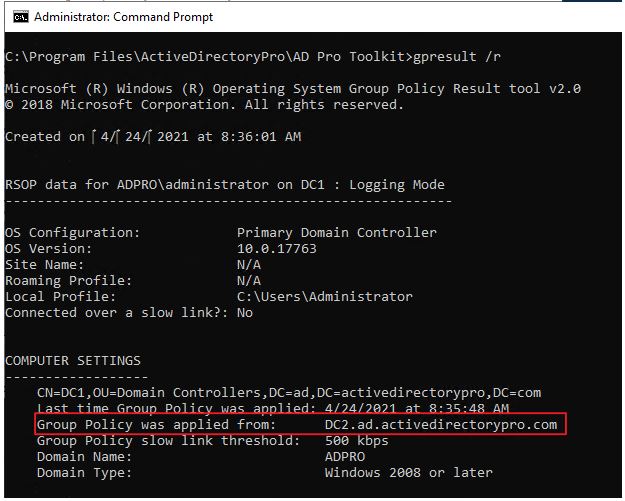
If you need to know which domain controller a computer or user applied its group policy settings from then run the gpresult /r command.

gpresult /r

You can see in the above screenshot the group policy was applied from DC2.

Make sure you check the user settings section as the policy could apply from a different domain controller.

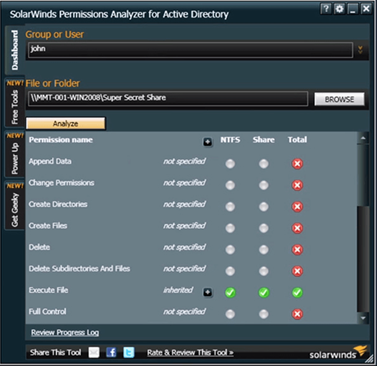
Recommended Tool: Permissions Analyzer for Active Directory

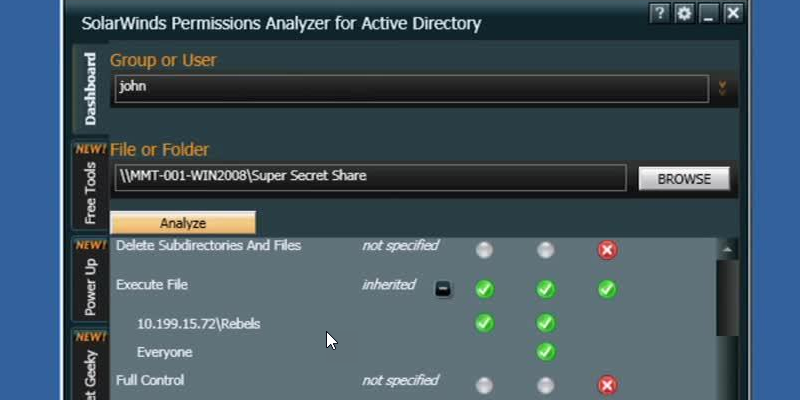
This FREE tool lets you get instant visibility into user and group permissions and allows you to quickly check user or group permissions for files, network, and folder shares.

You can analyze user permissions based on an individual user or group membership.

This is a Free tool, download your copy here.

3 thoughts on “How to Find Which Logon Server You Authenticated to (Domain Controller)”

Source :
https://activedirectorypro.com/find-logon-server-domain-controller/

How to Demote a Domain Controller (Step-by-Step Guide)

Do you need to demote a domain controller?

Is your domain controller dead and do you want to manually remove it?

No problem.

In this guide, I’ll walk through two options to remove a domain controller. If you still have access to the server then option 1 is the preferred choice.

  • Option 1: Demote a Domain Controller Using Server Manager
    • Use this option if you still have access to the server.
  • Option 2: Manually Remove a Domain Controller
    • Use this option if the server is dead or you no longer have access to it.

In both examples, I’ll be using Windows Server 2016 server but these steps will work for Server 2012 and up.

Tip #1 Starting with Server 2008 domain controller metadata is cleaned up automatically. Windows Server 2003 server or earlier will require using the ntdsutil command to cleanup metadata. With that said you still need to manually remove the server from sites and services.

Tip #2 Make sure there are no other services running on the server (like DNS or DHCP) before shutting down the server. If you can avoid this you may save yourself a big headache.

Tip #3 If the domain controller you are removing has FSMO roles configured they will get transferred to another DC automaticallyYou can check this with the netdom query FSMO command.

Video Tutorial

https://youtube.com/watch?v=-RUtkm3PvA4%3Ffeature%3Doembed

If you don’t like video tutorials or want more details, then continue reading the instructions below.

Option 1: Demote a Domain Controller Using Server Manager

This is Microsoft’s recommended method for removing a domain controller.

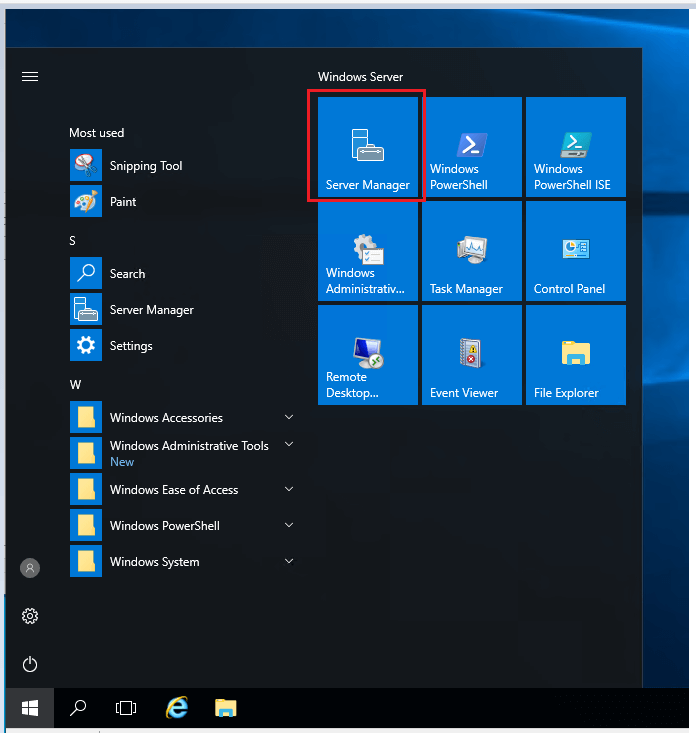
Step 1. Open Server Manager

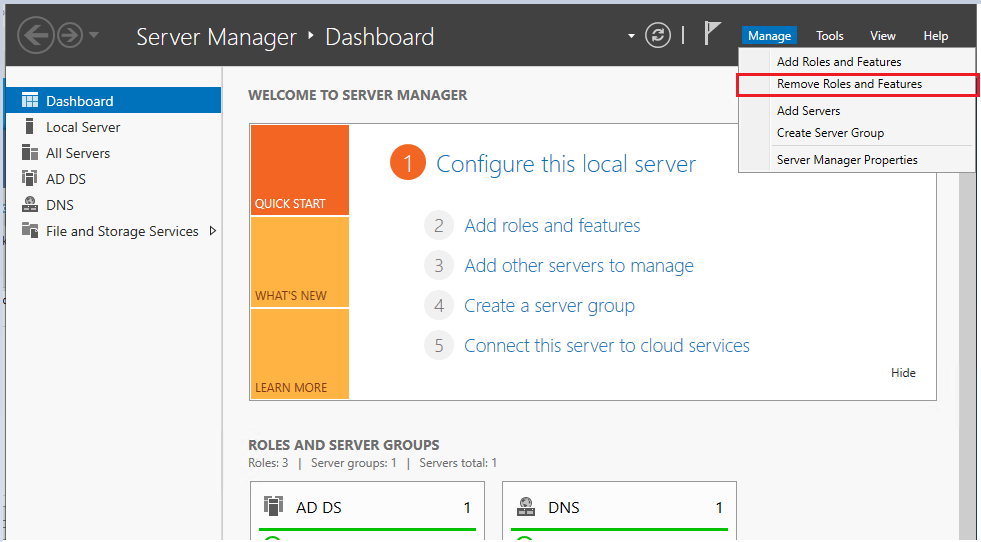
Step 2. Select Manage ->”Remove Roles and Features”

Click next on the “Before you begin page”

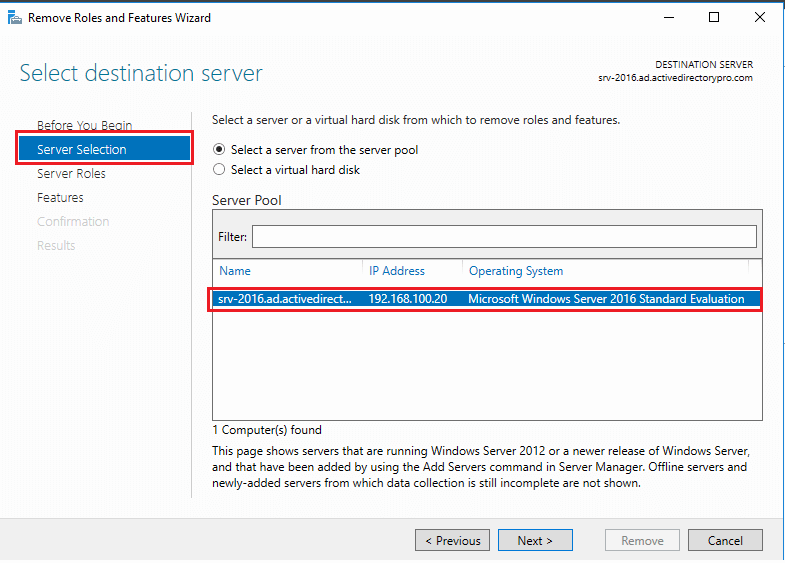
Step 3. On the server selection page, select the server you want to demote and click the next button.

In this example, I’m demoting server “srv-2016”

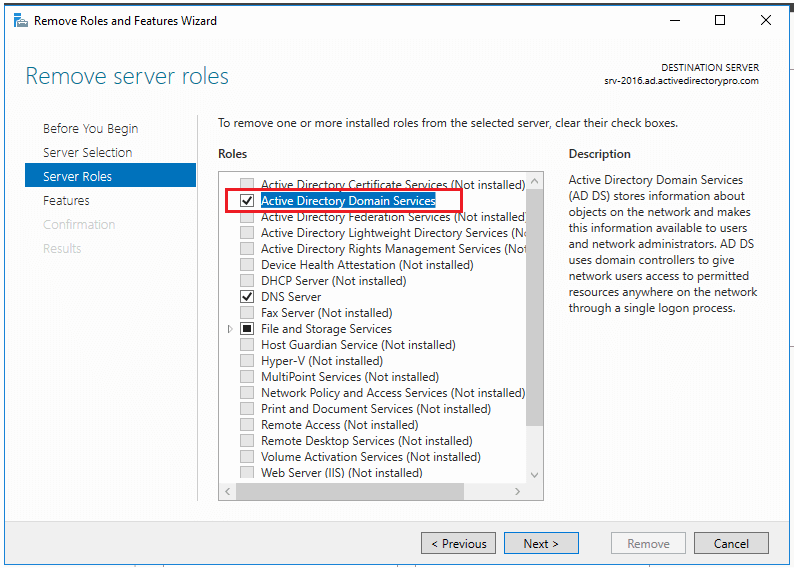
Step 4. Uncheck “Active Directory Domain Services” on the Server Roles page.

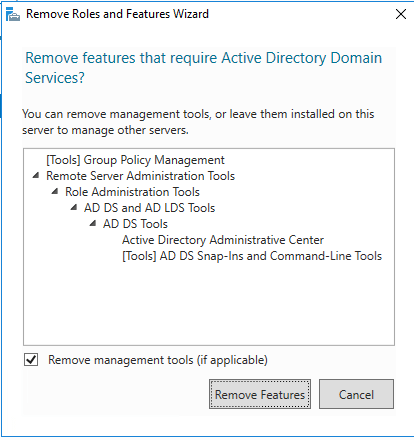
When you uncheck you will get a popup to remove features that require Active Directory Domain Services.

If you will plan on using the server to manage Active Directory then keep these installed. In this example, I plan to decommission the server so I will remove these management tools.

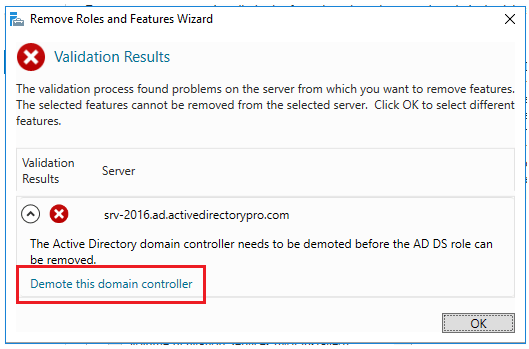
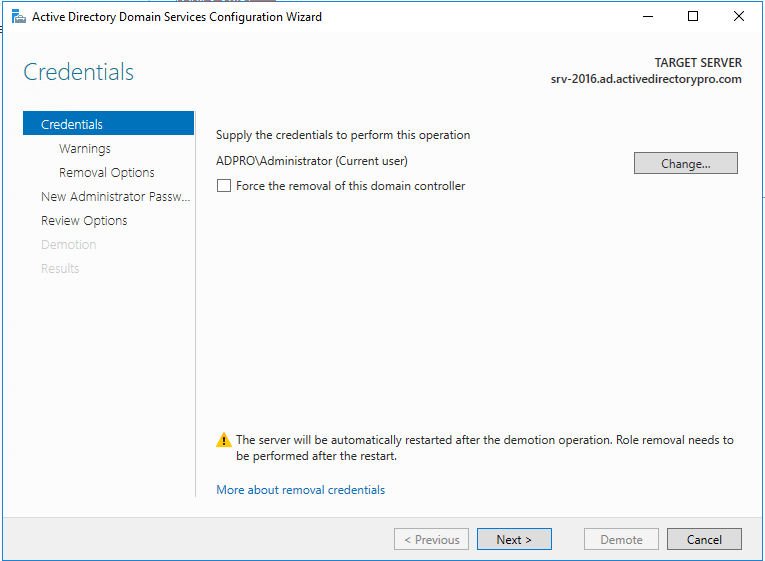
Step 5. Select Demote this domain controller

On the next screen make sure you DO NOT select “Force the removal of this domain controller”. You should only select this if you are removing the last domain controller in the domain.

You can also change credentials on this screen if needed.

Click Next

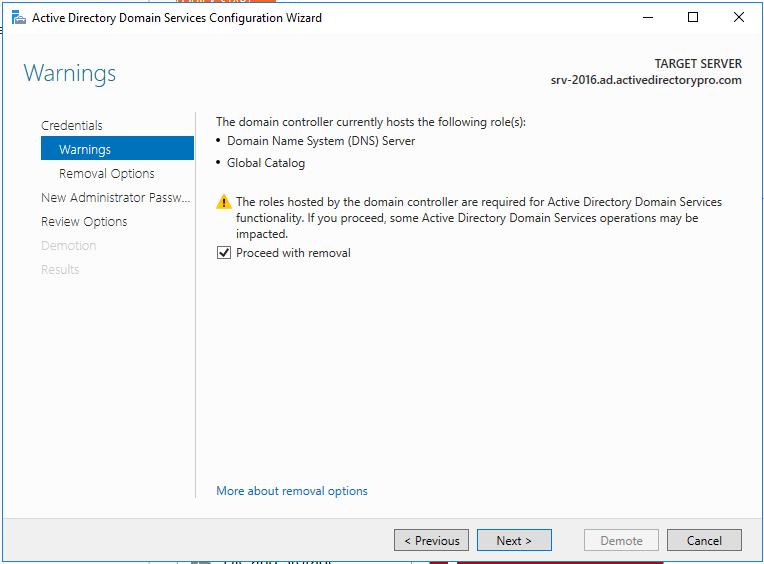
Step 6. On the warnings screen, it will give you a warning this server hosts additional roles. If you have client computers using this server for DNS you will need to update them to point to a different server since the DNS role will be removed.

Check the box “Proceed with removal and click next

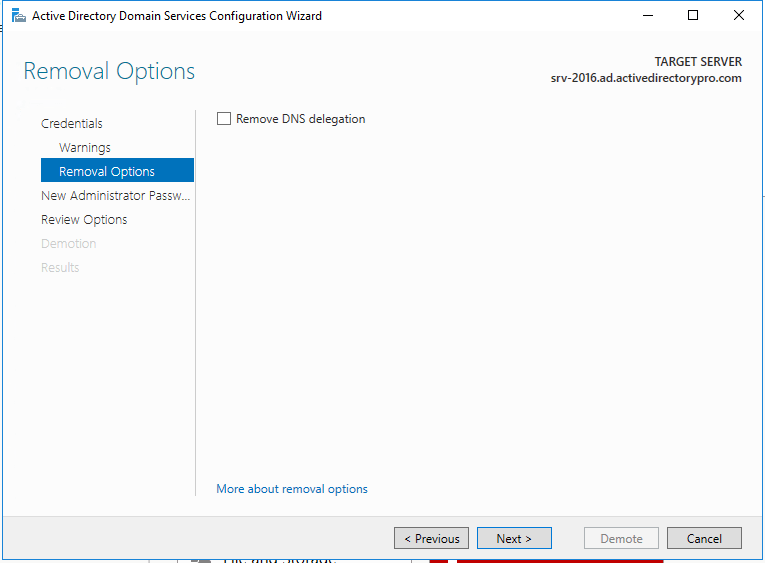
Step 7. If you have DNS delegation you can select “Remove DNS delegation and click next. In most cases, you will not have DNS delegation and can uncheck this box.

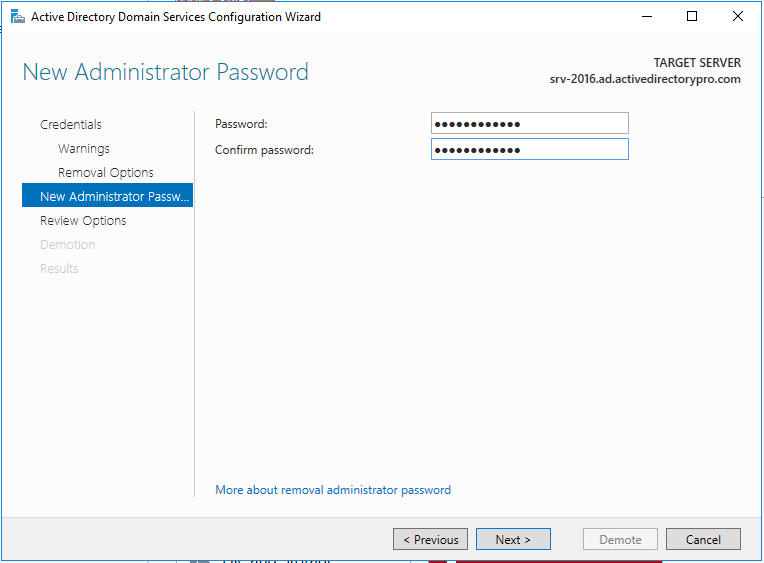
Step 8. Now put in the new administrator password. This will be for the local administrator account on this server.

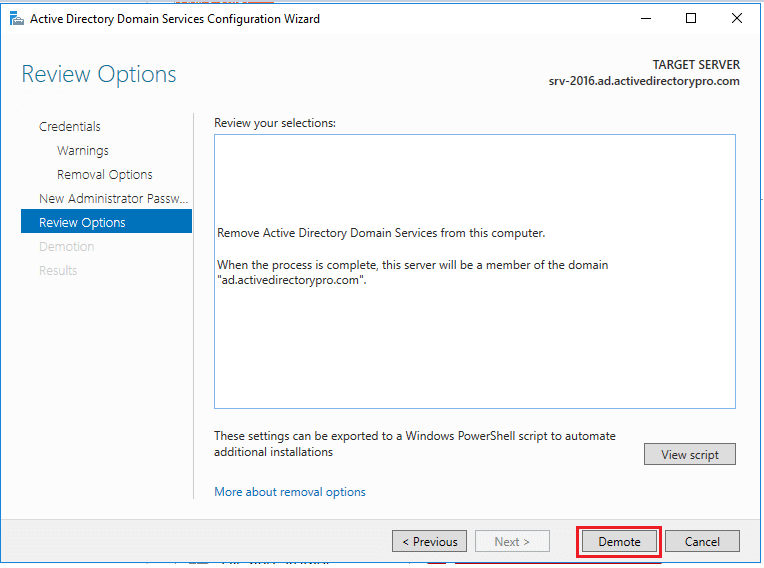
Step 9. Review options and click “Demote”

#Tip – There is a “view script” button that generates a PowerShell script to automate all the steps we just walked through. If you have additional domain controllers to remove you could use this script.

When you click demote the server will be demoted and rebooted. Once it reboots the server will be a member server. You can log in with domain credentials to the server.

Related: How to Change Domain Controller IP Address

Additional Cleanup Steps

For some reason, Microsoft decided not to include sites and services in the cleanup process. Maybe it’s left there in case you want to promote the server back to a domain controller. If you are not going to promote the server back to a DC then follow these steps.

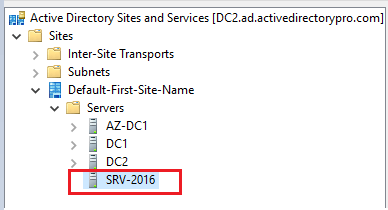
  1. Open Active Directory Sites and Services and remove the server

You can see above the server I just demoted is still listed in sites and services. I’ll just right-click on it and delete it.

That is it for option 1. You can go into the “Domain Controllers” folder and verify the server is removed. It’s also a good idea to run dcdiag after removing a DC to make sure your environment has no major errors.

You may also need to review and test replication. You can use the repadmin command to test for replication issues.

Option 2: Manually Remove a Domain Controller

Use this option if the server is dead, disconnected, or you just can’t access it. There is really only 1 step.

Step 1. On another domain controller or computer with RSAT tools open “Active Directory Users and Computers”

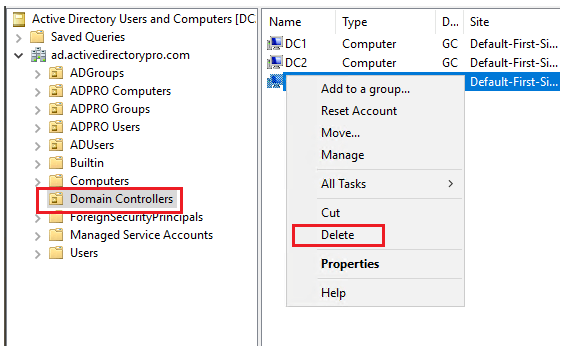
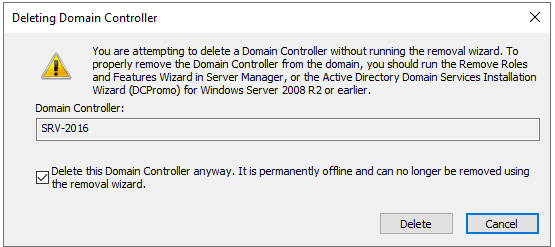
Go to the domain Controllers folder. Right click the domain controller you want to remove and click delete.

On the next screen select the box “Delete this Domain Controller anyway” and click delete”

If the DC is a global catalog server you will get an additional message to confirm the deletion. I’m going to click Yes.

That is pretty much it. Easy hu?

The last step would be to remove the server from Sites and Services just like I showed you in option 1.

As I mentioned at the top of this article starting with server 2008 the metadata cleanup is done automatically with both options. Most how to guides will tell you to open the command prompt and run the ntdsutil to cleanup the metadata. This is not needed if your server operating system is 2008 or above.

It seems easier to just manually remove the DC than going through the server manager wizard. Technically I’m not sure what the difference is but Microsoft recommends using the removal wizard if you can. Use the manual method as a last option.

Summary

In this guide, I showed you two methods for removing a domain controller. Microsoft has made this process very easy by automatically cleaning up the metadata starting with server 2008. As networks and systems are constantly changing there may come a time when you need to remove a domain controller. I’ve provided some Microsoft links below if you would like to read more about this topic.

Sources

How to Find Inactive User Accounts in Active Directory

Did you know inactive user accounts can lead to major security risks?

Center for Internet Security says “it is easier for a threat actor to gain unauthorized access through valid user credentials than through hacking accounts”.

This is just one reason why you should be searching Active Directory for inactive user accounts and disabling them on a regular schedule.

I think you will be surprised at how many inactive and dormant accounts you will find.

In this guide, I’ll show you two methods for finding these risky accounts.

Table of Contents:

How are Inactive User Accounts Identified?

This part is a little long but it explains what user attribute is used to find inactive user accounts. If you are not interested in this then skip to the examples.

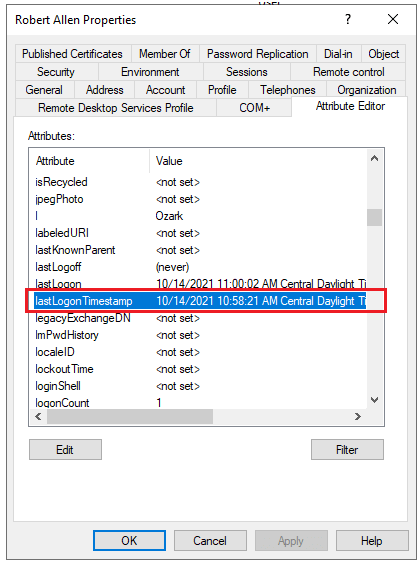
User accounts have an attribute called “lastLogonTimeStamp” the purpose of this attribute is to help identify inactive user and computer accounts. Yes, it can be used for computer accounts also.

There are certain logon types that will update the lastLogonTimeStamp attribute they are, Interactive, Network, and Service logons. Interactive logon is what he cares about, this is when someone logs on at a console.

Let’s look at this attribute in ADUC GUI.

Open an account, click on the Attribute Editor tab and go down to the lastLogonTimestamp attribute.

lastLogonTimestamp in ADUC

What is the lastLogon value used for?

You can see in the above screenshot there is also a lastLogon value, you will also see this when using PowerShell. The lastLogon value is not replicated to all domain controllers where the lastLogonTimestamp is. This is important because with the lastLogon attribute you would have to query every domain controller to find out when a user logged on. Microsoft understood this and that is why they introduced the lastLogonTimestamp attribute way back in 2003.

You could technically use the lastLogon to find an inactive account but it’s much more difficult.

Now let’s look at this value with PowerShell.

For some reason, Microsoft renamed this value to LastLogonDate in PowerShell.

Why I have no idea but it’s the same value. If you happen to know why Microsoft renamed it in PowerShell please comment below.

Open up PowerShell and run this command.

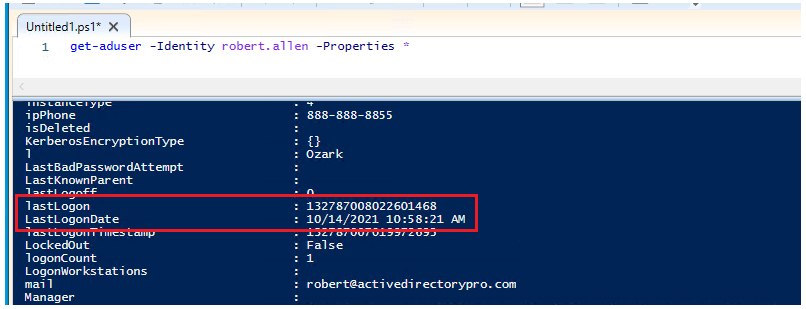
get-aduser -identity username -properties *

Here is a screenshot of the same account in my domain.

LastLogonDate in PowerShell

You can see that lastLogonTimestamp and LastLogonDate have the same data and time.

Just remember this.

PowerShell = LastLogonDate
ADUC GUI = lastLogonTimestamp

Using these attributes we can search Active Directory for inactive user accounts.

If you want to know all the technical nerdy stuff about the lastlogonTimestamp attribute then check out this article by Ned Pyle (Microsoft employee) – The LastLogonTimeStamp Attribute – What it was designed for and how it works

Why You Should be Removing Inactive User Accounts

Security is the #1 reason for cleaning up inactive user accounts. Here is the complete list.

  1. Security Risks – CIS controls #5 says “There are many ways to covertly obtain access to user accounts, including weak passwords, accounts still valid after a user leaves the enterprise, dormant or lingering test accounts, shared accounts that have not been changed in months or years, service accounts embedded in applications for scripts” I highly recommend you download the CIS controls it is a great source to help defend and secure environments.
  2. Inventory & Tracking Issues – Active Directory is a centralized database. Not only can you use it to track your assets but it can be integrated with other systems for a complete asset management solution. If you don’t cleanup your AD assets then your inventory system will inaccurate.
  3. Ease of management – Kinda along the same lines as#2. A cluttered AD environment leads to a difficult and stressful environment to manage. Think about running a PowerShell script or trying to deploy software to hundreds of computers or users. You will get a lot of returned errors when trying to manage an environment with stale and inactive accounts.
  4. Data Integrity – A lot of these have the same thing, data integrity. Again AD is a centralized database and can be integrated with many systems. If the data in AD is incorrect then all systems connected to AD will be incorrect.
  5. Licensing – Here is a real world exampe. You AD User accounts sync with a 3rd party system such as McAfee. Mcafee charges you based on user accounts. If you have hundreds of inactive accounts syncing with 3rd party products you could be paying for a lot of extra licenses you don’t need. This is the case when syncing AD with cloud products also.

Best Practices for Removing Inactive User Accounts
Here are some best practices for cleaning up inactive users or computer accounts.
  • Never immediatly remove accounts that are identified as inactive. Disabled them first for at least 30 days (longer the better).
  • Search for accounts with a lastLogonTimestamp that is 45 days or older, meaning the AD account shows no logon activity for 45 days or longer.
  • Disable the accounts for at least 30 days, I typically go with 60. With remote access, VPNs, laptops sometimes AD doesn’t get updated. By disabling an account first its very easy to re-enable it and give the user their access back.
  • Add a description to the account with the date disabled and your initians. This is very helpful for other admins in case someone asks why an account is disabled.
  • An inactive on premise account might not mean an inactive Office 365 account. This would be for hybrid environments that sync with Office 365. The disabling of the account vs immedialy deleting is critical for these types of environments. You could have users working from home that never authenticate to the on prem AD environment but log into office 365 daily.
  • Run the cleanup process every month.

Example 1: Find Inactive User Accounts with PowerShell

To find inactive accounts with PowerShell you will need the RSAT tools installed or run these commands on the domain controller.

All of these examples use the LastLogonDate attribute that I went over in the first part of this article.

Find inactive accounts in the last 60 days


$When = ((Get-Date).AddDays(-60)).Date
Get-ADUser -Filter {LastLogonDate -lt $When} -Properties * | select-object samaccountname,givenname,surname,LastLogonDate

Find inactive accounts in the last 30 days


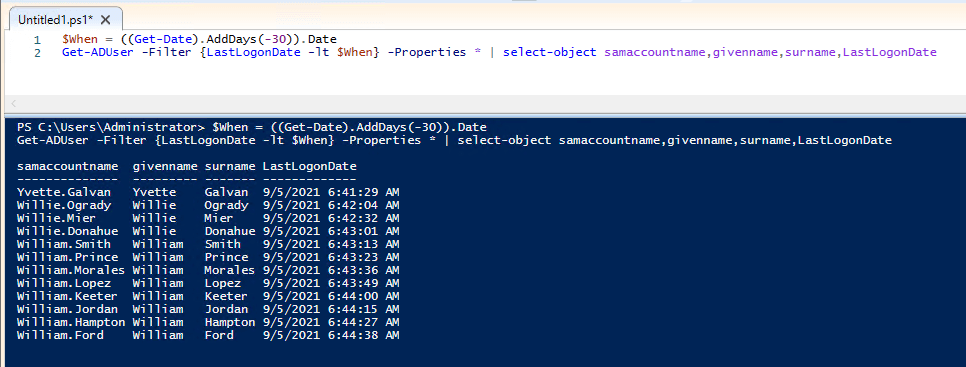
$When = ((Get-Date).AddDays(-30)).Date
Get-ADUser -Filter {LastLogonDate -lt $When} -Properties * | select-object samaccountname,givenname,surname,LastLogonDate

Here is an example from my domain.

PowerShell inactive accounts in last 30 days

You can export the results to CSV by adding | export-csv -path c:\ps\inactiveusers.csv

$When = ((Get-Date).AddDays(-30)).Date
Get-ADUser -Filter {LastLogonDate -lt $When} -Properties * | select-object samaccountname,givenname,surname,LastLogonDate | export-csv -path c:\ps\inactiveusers.csv

To limit the scope to an organizational unit use the SearchBase parameter with the distinguished name of the OU.

$When = ((Get-Date).AddDays(-30)).Date
Get-ADUser -Filter {LastLogonDate -lt $When} -SearchBase "OU=Accounting,OU=ADPRO Users,DC=ad,DC=activedirectorypro,DC=com" -Properties * | select-object samaccountname,givenname,surname,LastLogonDate

Find inactive users and disable the accounts

$When = ((Get-Date).AddDays(-30)).Date
Get-ADUser -Filter {LastLogonDate -lt $When} -Properties * | select-object samaccountname,givenname,surname,LastLogonDate | Disable-ADAccount

In the above example, I added | Disable-ADAccount at the end to disable all inactive accounts.

You can also use these commands to search computer accounts just change Get-ADUser to Get-ADComputer

As you can see It’s easy to identify inactive user accounts with PowerShell by filtering on the user’s LastLogonDate. If you are into PowerShell you can create a very powerful tool for cleaning up AD.

If you are not into PowerShell or just want a simple GUI tool then check out example 2.

Example 2: Find Inactive User Accounts with the AD Cleanup Tool

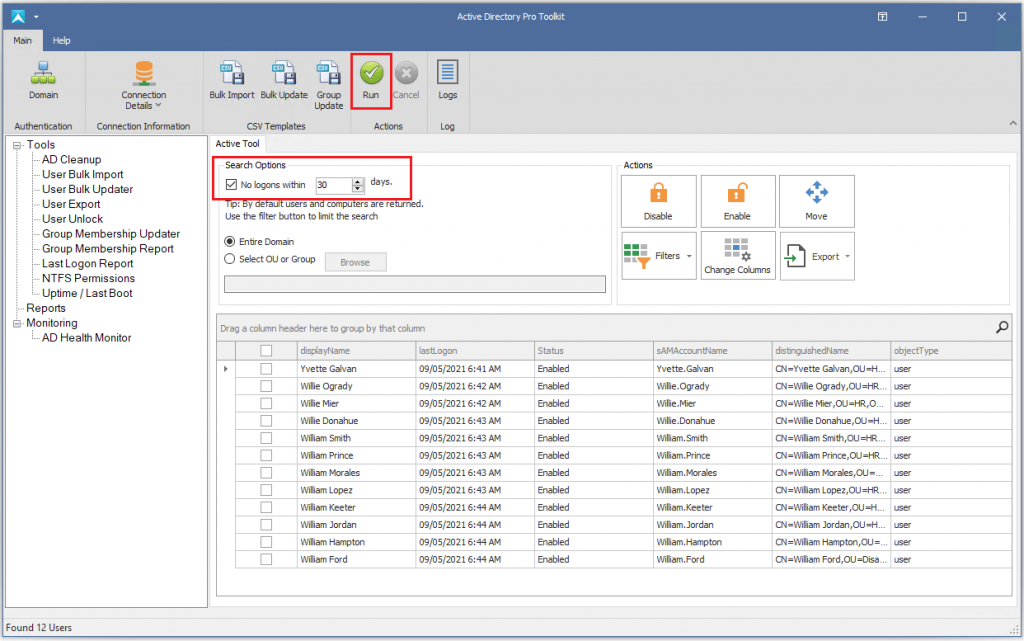
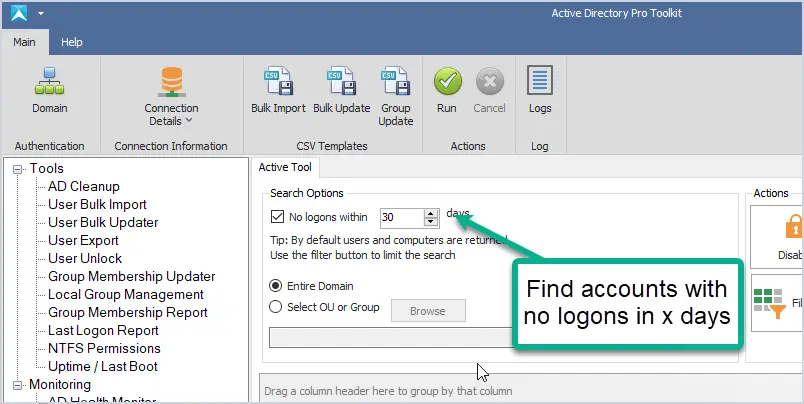
The AD Cleanup Tool makes it extremely easy to find inactive users and computers. I also added filters to quickly find expired users, disabled and users with no logon history. These are often forgotten accounts that also should be part of the cleanup process.

Let’s look at an example

To find all inactive accounts for the last 30 days just enter 30 in the search options and click run. You can enter any number into the search options box.

Search inactive accounts in the last 30 days

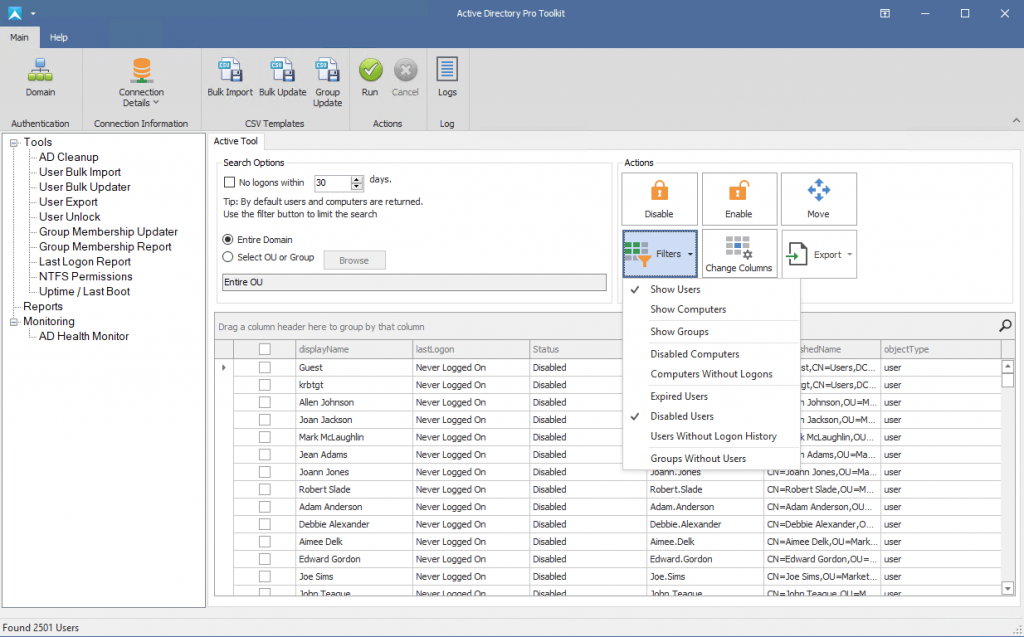
By default, this tool will display both inactive user and computers. To view just user accounts, uncheck “show Computers” from the filters dropdown.

Change the filter to list just user accounts

This searches the entire domain.

You can limit the search by choosing an OU or group. For example, I want to check for inactive accounts in all of my accounting security groups. I click browse and now I can select all my groups or any OUs.

Select OU or groups to search

To disable or move the accounts I just select them and then click the action button.

I’m going to move these accounts to an Inactive OU I created. I click the move button then select the OU.

Select OU to move accounts into

Now I’ll check ADUC to verify the accounts have been moved. This makes it easy to see all the accounts that I’m going to disable because they are identified as inactive.

If you wanted to see all disabled user accounts, just drop down the filters list and select disabled users.

Display all disabled user accounts

In the screenshot above you can also quickly display all expired user accounts and users with no logon history by simply selecting them in the filter. You can then take action on these accounts by moving or disabling them.

There are a lot of options with this tool and the easy to use interface saves you valuable time when it comes to cleaning up your AD environment.

Summary

I showed you two examples for finding and removing inactive user accounts in Active Directory. I highly recommend you add this to your monthly maintenance checklist. Security is a big concern with Active Directory but as I pointed out there are several reasons why this is an important task. PowerShell is a great option for finding inactive accounts but does require knowledge of scripting. For those that are not into scripting or just want a quick and simple solution, there is the AD Cleanup GUI Tool.

Source :
https://activedirectorypro.com/find-inactive-user-accounts-in-active-directory/

How to Move Users to Another Domain

Moving users to another domain tutorial

In this tutorial, I will demonstrate moving Active Directory users from one domain to another.

I’m going to move 2747 users from one domain (running server 2019) to a new domain running server 2022. You can move accounts to an existing domain or a new one.

The tools used in this guide will work with domain controllers running 2008 and later operating systems. Also, you can move accounts in the same domain forest, a different forest, domain trust, or no trust.

Reasons for moving users:

  • Creating a test environment
  • Merging with another company
  • Moving or upgrading to a new server
  • No trust between domains
  • Moving users to a single domain (consolidating domains)

Steps for Moving Users From One Domain To Another Domain

To complete the move I will use some PowerShell scripts to re-create the OUs and groups. I’ll then use the export and import tool from the AD Pro Toolkit to move the accounts.

Note

This method does not migrate computer user profiles or SID history. It will move user data from Active Directory such as OUs, group membership, and user fields (address, manager, phone number, state, etc).

Video Tutorial

https://youtube.com/watch?v=RYXqXjMulhc%3Ffeature%3Doembed

If you don’t like video tutorials or want more details, then continue reading the instructions below.

1. Export users from the source domain

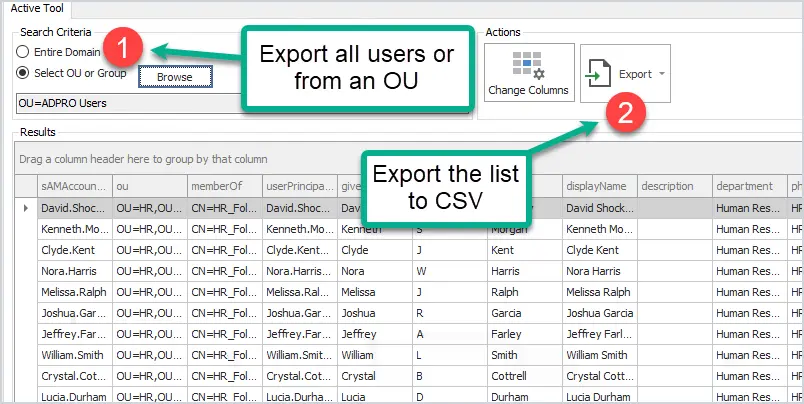
First, you need to export a list of users to a CSV file. This can be done with PowerShell or the User Export Tool.

With the export tool, you can select to export from the entire domain, an OU or group.

step 1 export users

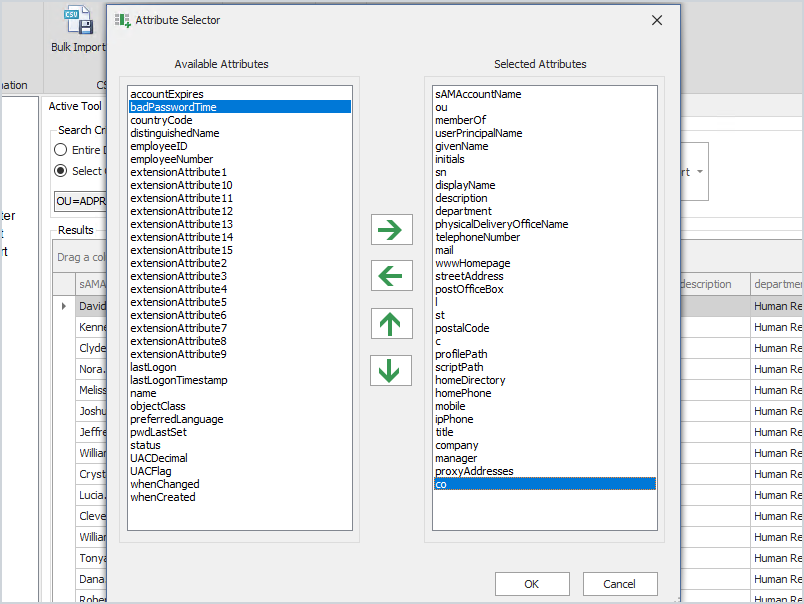
You can also change the columns to preserve user settings when moving to the new domain.

select user attributes

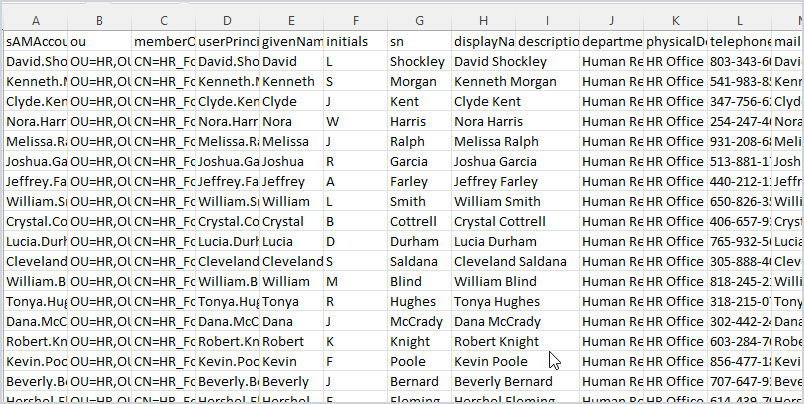
Below is a screenshot of the CSV file exported from my source domain. I exported 2747 users and it includes 31 columns of user properties. Again, you can use the attribute selector to add or remove columns. These user properties will be preserved and imported into the other domain.

csv example

2. Modify CSV File for the new domain

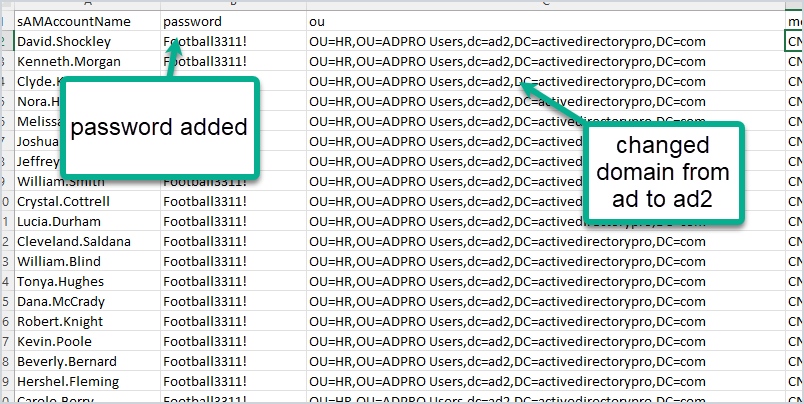
To import these accounts into the new domain you will need to add a password column. If it is a different domain you will also need to modify the OU path. I’m going from ad.activedirectorypro.com to ad2.activedirectorypro.com so I’ll need to update the ou path. You can easily do this in excel with a search and replace.

You can change additional details in the CSV to reflect the new domain. For example, you can change proxyAddresses to the new domain name or change the userPrincipalName.

step 2 modify csv file

Now I’m ready to import all 2747 accounts into the new domain. This will import them into the new domain, add them into the OUs, add to groups and keep their user settings from the old domain.

3. Import Users Into the New Domain (or existing domain)

If you are moving the users to an existing domain you probably don’t need to create OUs or groups. If it’s a new domain and you want to replicate the AD structure of the source domain then you can use some PowerShell scripts. See the links below for step by step instructions.

Next, open the bulk import tool.

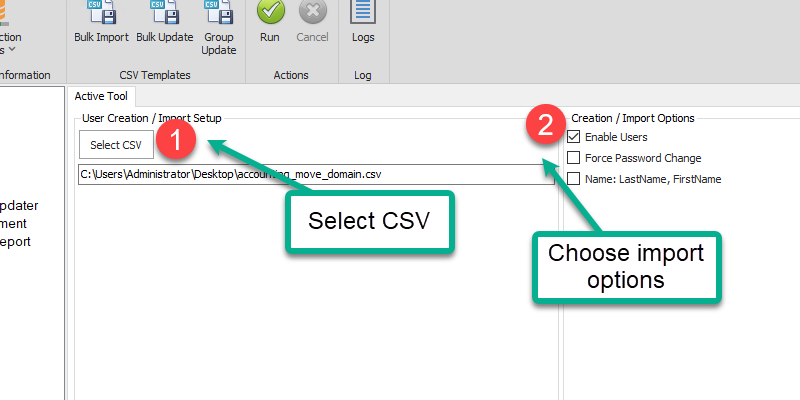
Select the CSV file, your import options, and click run.

step 3 import users into new domain

When the import is complete you can check the logs and Active Directory to verify the import.

verify import of users

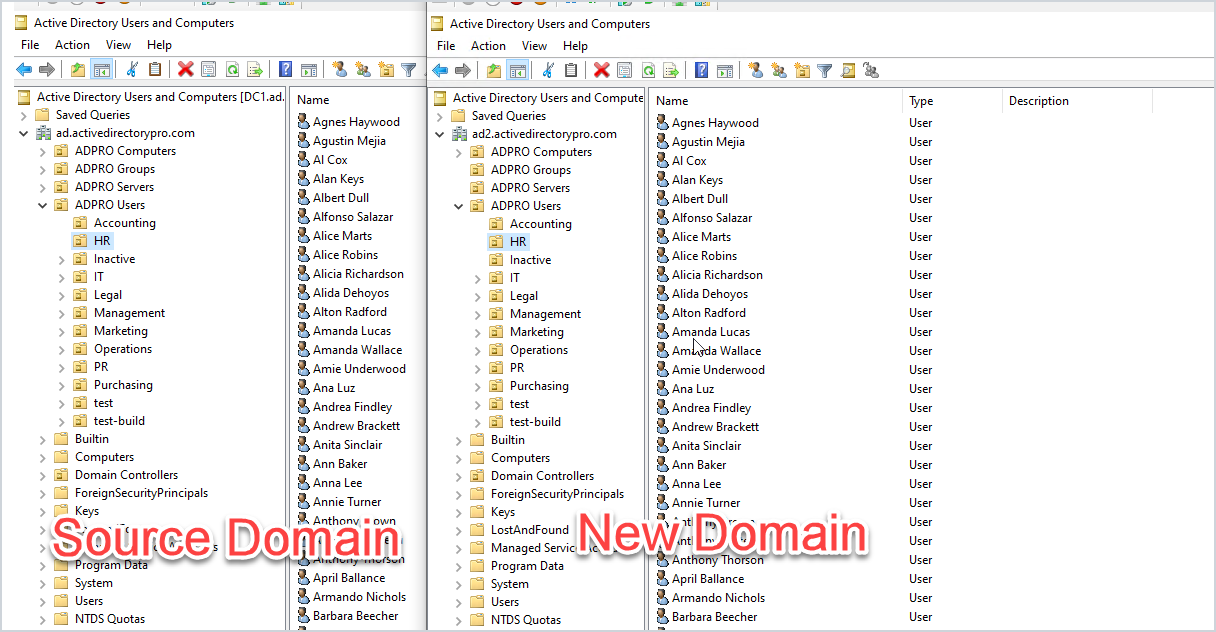
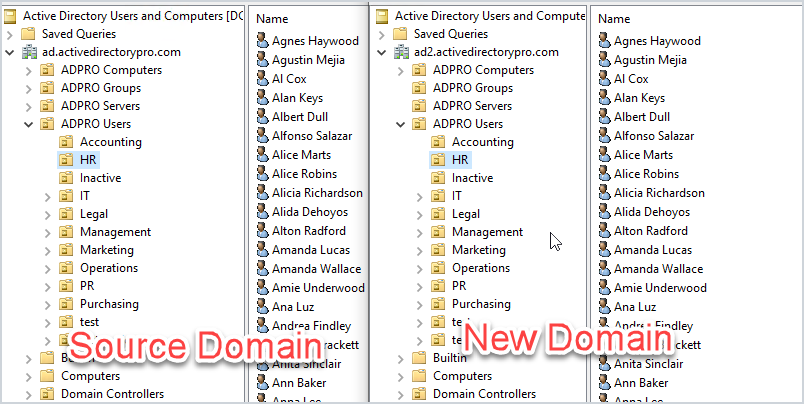
Above you can see a screenshot of the source and the new domain. All of the accounts are imported into the same OUs and groups.

Using the export and import tool makes it really easy to move users to a new domain while keeping their group membership and user properties from Active Directory. It also is very flexible as you can move users from an old domain such as 2008 to a newer server like 2019 or later.

You also don’t have to worry about trust relationships or connections between the two domains.

Below are some PowerShell commands to help you verify the numbers in Active Directory.

Count the Number of Active Directory Objects using PowerShell

Here are some PowerShell commands I used to count the number of objects in the source domain.

Get the number of AD users

(Get-ADUser -filter *).count

The above command gets the count for all users in the domain. To get the count for just an OU use this command. Change the SearchBase to the path of your root OU.

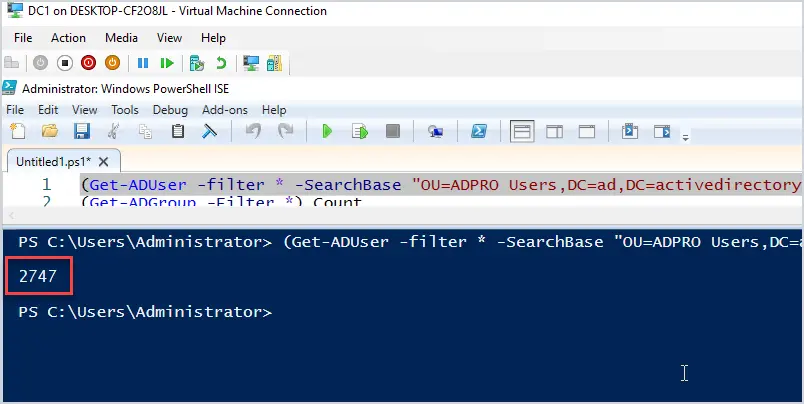
(Get-ADUser -filter * -SearchBase "OU=ADPRO Users,DC=ad,DC=activedirectorypro,DC=com").count
use powershell to count ad objects

2747 is the number of users in my source domain so this means all the users imported into the new domain successfully.

Get the number of AD Computers

(Get-ADComputer -Filter *).count

Get the number of Organizational Units

(Get-ADOrganizationalUnit -filter *).count

Get the number of AD Security groups

(Get-ADGroup -Filter *).Count

Conclusion

That’s how you move users from one domain to another using tools from the AD Pro Toolkit and PowerShell. An alternative to moving users to another domain is by using the Microsoft Active Directory Migration Tool. The ADMT (Active Directory Migration Tool) will migrate SID and computer profiles. The only problem with this tool is it is not updated, has no support, and often fails. It also is not as flexible as the method I demonstrated in this guide.

Have you ever moved users to a new domain?

If so, how did it go?

Let me know in the comments section below.

Source :
https://activedirectorypro.com/moving-users-to-another-domain/

How to Transfer FSMO Roles (2 Easy Steps)

how to transfer fsmo roles

Do you need to transfer FSMO roles to another domain controller?

No problem, it is very is to do.

In this tutorial, I’ll show you step-by-step instructions to transfer the FSMO roles from one domain controller to another. I’ll show you two methods: the first is using PowerShell and the second is using the ADUC GUI.

Why Transfer FSMO roles?

By default, when Active Directory is installed all five FSMO roles are assigned to the first domain controller in the forest root domain. Transferring FSMO roles is often needed for several reasons including:

It is recommended to only transfer FSMO roles when the current role holder is operational and is accessible on the network. For a complete list of considerations see the MS article Transfer or seize FSMO Roles in Active Directory Services.

Step 1: List Current FSMO Role Holders

Before moving the FSMO roles it is a good idea to check which domain controllers hold which roles.

You can list which domain controllers hold FSMO roles with these two PowerShell commands:

Get domain level FSMO roles

get-addomain | select InfrastructureMaster, PDCEmulator, RIDMaster

Get forest level FSMO roles

Get-ADForest | select DomainNamingMaster, SchemaMaster

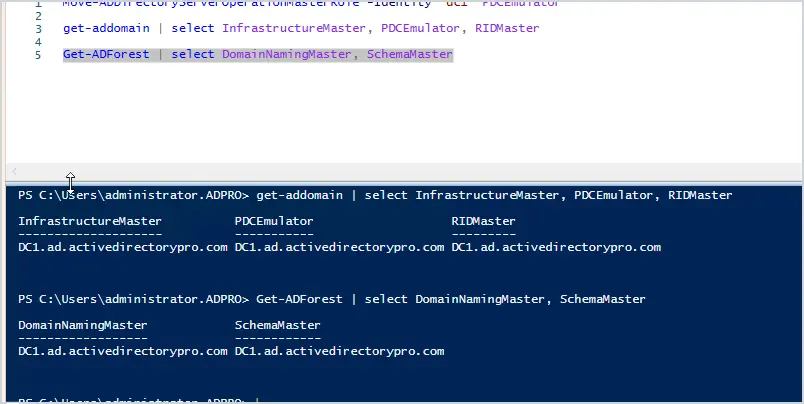
Below is a screenshot of the results in my domain.

get fsmo roles

List of installed roles in my domain:

  • InfrastructureMaster is on DC1
  • PDCEmulator is on DC2
  • RIDMaster is on DC2
  • DomainNamingMaster is on DC1
  • Schemamaster is on DC1

I want to move all the roles from DC2 to DC1, I’ll demonstrate this below.

Step 2: Transfer FSMO Roles

I’ll first demonstrate transferring roles with PowerShell, it is by far the easier option of the two (in my opinion).

You want to log into the server that you will be transferring the roles to, in my case it is DC1.

To move a role with PowerShell you will use the Move-ADDirectoryServerOperationMasterRole cmdlet, then the hostname of the server to transfer to.

Transfer PDCEmulator

Move-ADDirectoryServerOperationMasterRole -Identity "dc1" PDCEmulator

Transfer RIDMaster

Move-ADDirectoryServerOperationMasterRole -Identity "dc1" RIDMaster

Transfer InfrastrctureMaster

Move-ADDirectoryServerOperationMasterRole -Identity "dc1" Infrastructuremaster

Transfer DomainNamingMaster

Move-ADDirectoryServerOperationMasterRole -Identity "dc1" DomainNamingmaster

Transfer SchemaMaster

Move-ADDirectoryServerOperationMasterRole -Identity "dc1" SchemaMaster

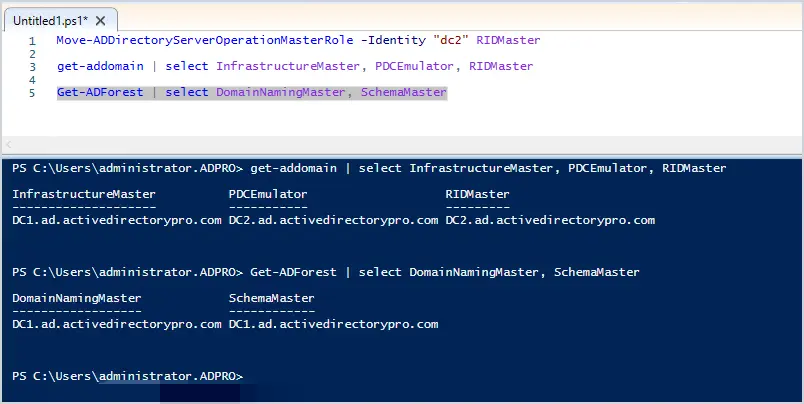
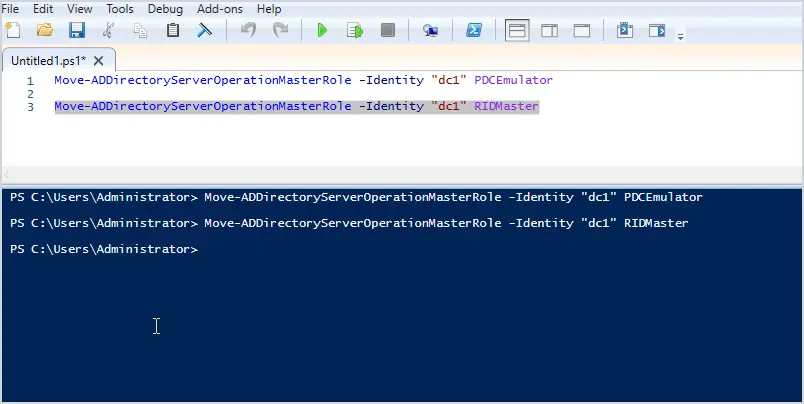
Here is a screenshot of when I moved PDCEmulator and RIDMaster to DC1.

transfer fsmo roles with powershell

Now if I re-run the commands to list the FSMO roles I should see them all on DC1.

list fsmo roles again

Yes, I have confirmed all the roles are now on DC1. As you can see moving FSMO roles with PowerShell is very easy to do.

Now let’s see how to transfer FSMO roles using the Active Directory Users and Computers GUI.

Transfer FSMO Roles Using ADUC GUI

Just like PowerShell you need to log into the server that you will be transferring to. I’m transferring from DC2 to DC1 so I’ll log into DC1.

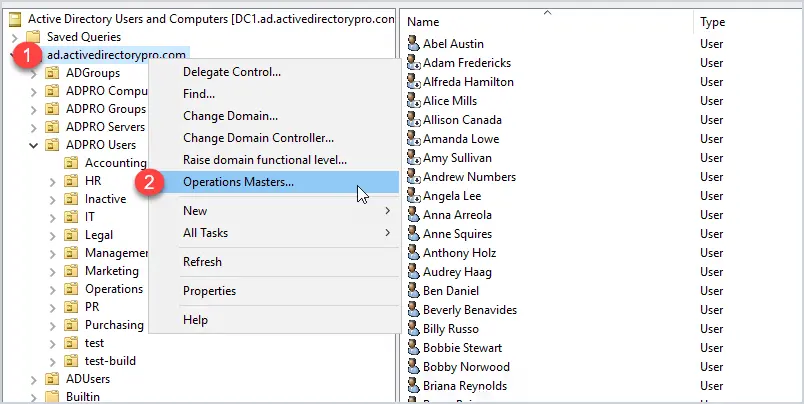
Open the Active Directory Users and Computers console, then right-click on the domain and click on operations masters.

move operations masters roles with GUI

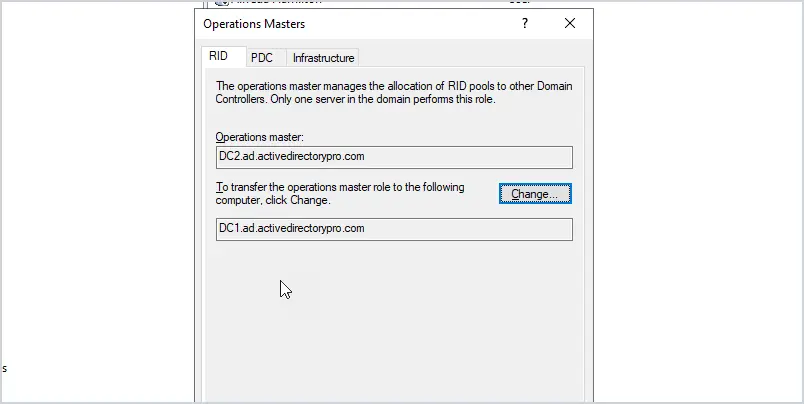
You should now see a screen with three tabs (RID, PDC, and Infrastructure).

transfer RID role with gui

To transfer one of these roles just click on the change button. You can’t select which domain controller to transfer the role to, that is why you need to log into the server that you want to transfer to. if I wanted to transfer the RID role to DC3 I would log into that server.

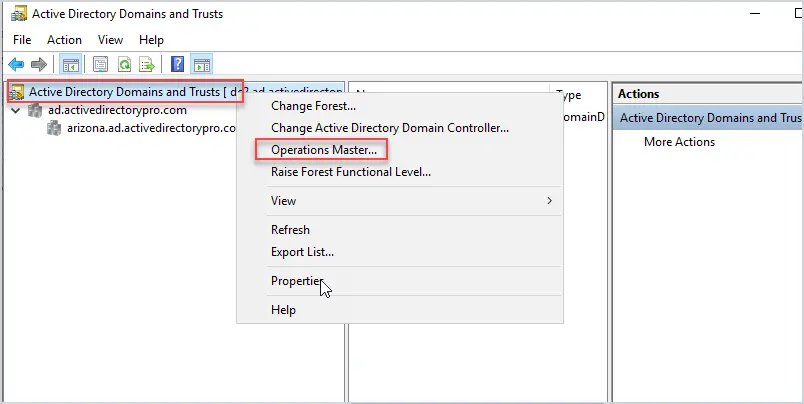
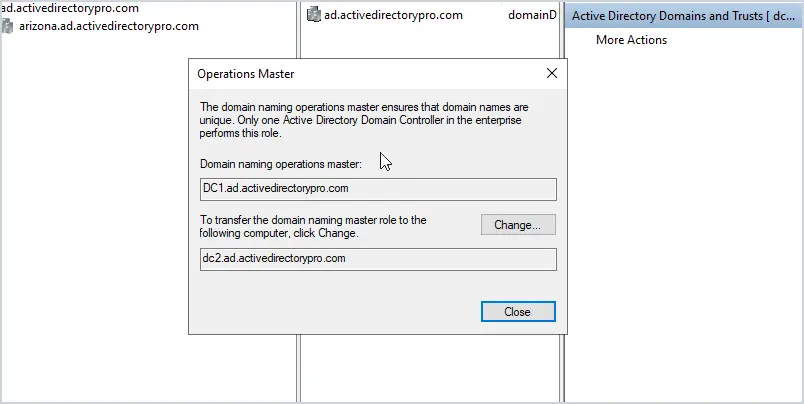
To transfer the domain naming operations master role you will need to open Active Directory Domains and Trusts. Right-click on “Active Directory Domains and Trusts” and select “Operations Master”.

move operations master role with gui

Now click change to transfer the role to another DC.

moving roles

To transfer the schema master role follow these steps.

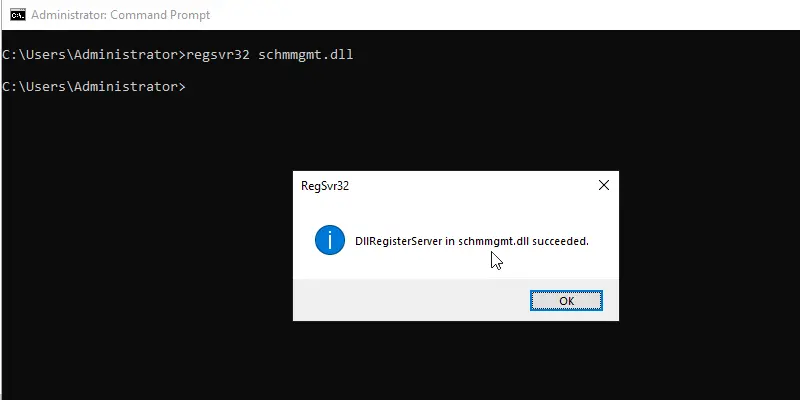
Open a command line and run the command regsvr32 schmmgmt.dll

register schmngmt.dll

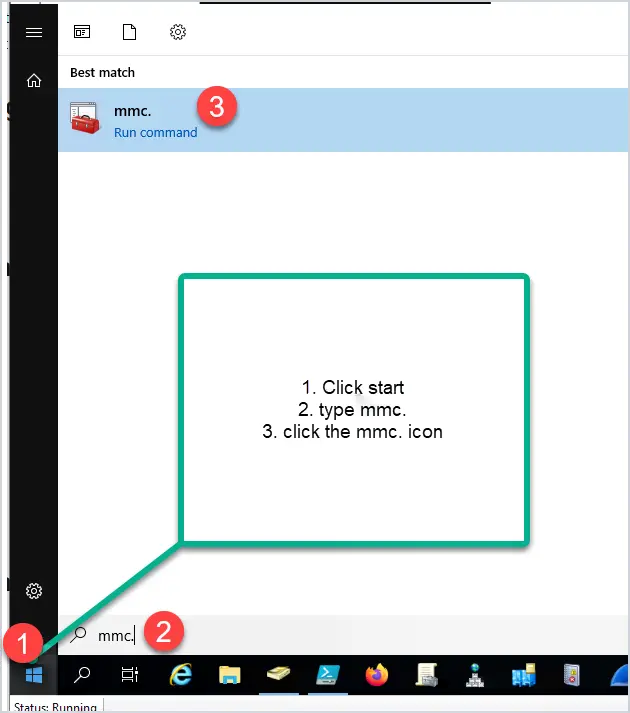
Next, you need to open an MMC console. To do this click on start then type mmc. and click the icon.

open mmc console

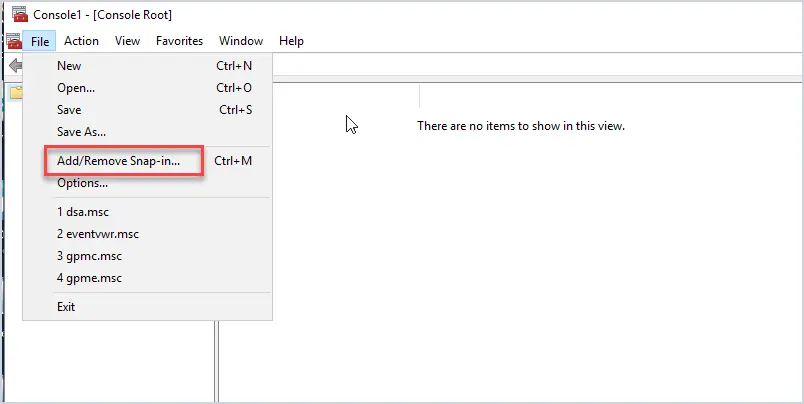
Next, click File, then Add/Remove Snap-in

add remove to mmc console

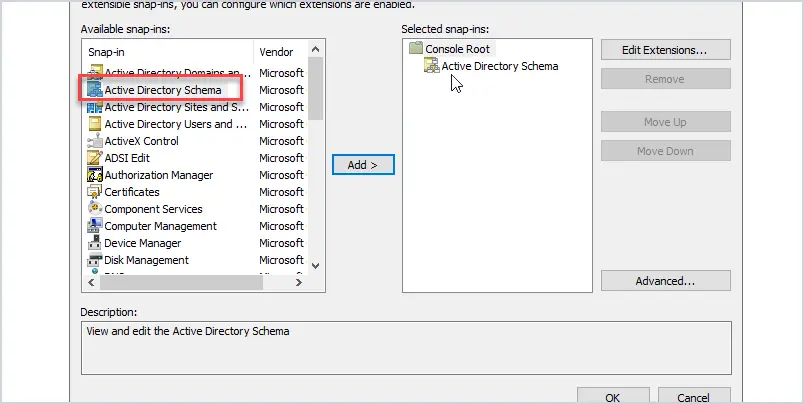
Add “Active Directory Schema” from the list and click ok.

add active directory schema to mmc console

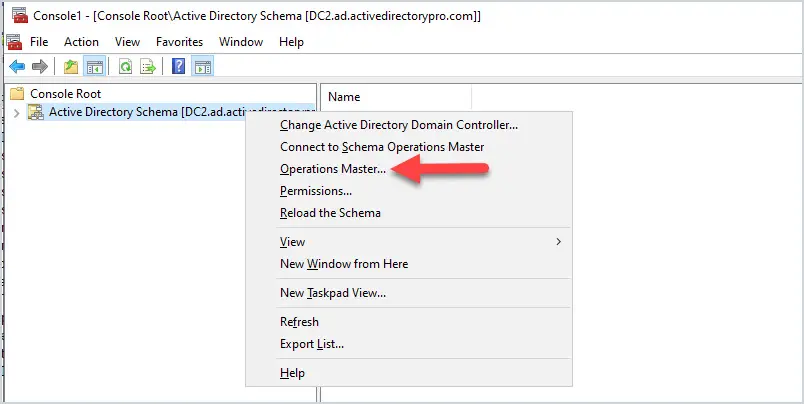
Right click on “Active Directory Schema” and change the domain controller to the server you want to transfer the role to.

In this example, I’ll change the domain controller to DC2.

Now you can right-click on Active Directory schema and select “Operations Master” to transfer the schema master role.

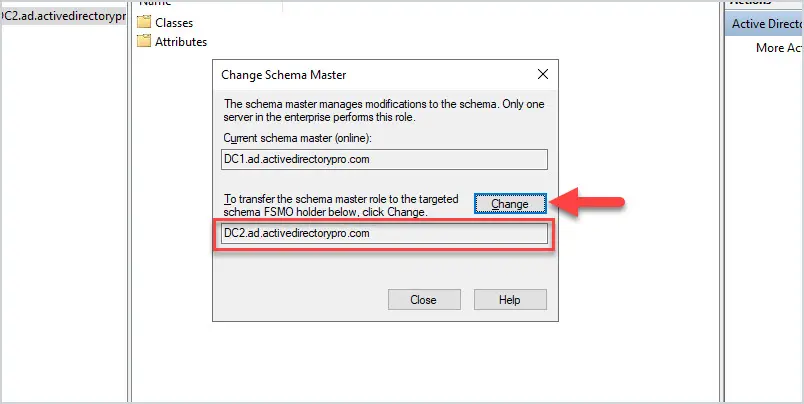
Confirm the role is changing to the correct DC and click the “change” button.

As you can see transferring FSMO roles with the GUI takes a lot of extra steps and that is why I prefer to use PowerShell. But if you are not into Powershell then the GUI works just fine.

Summary

Moving FSMO roles to another server is not a daily task but is necessary at times. Microsoft recommends the server be online when moving roles. The steps in this tutorial should help you when it comes time to move roles.

Source :
https://activedirectorypro.com/transfer-fsmo-roles/

Active Directory Tools and Management Software (2022 Update)

A list of the best Active Directory tools to help you simplify and automate Microsoft Active Directory management tasks.

The native Windows Administrative Tools are missing many features that administrators need to effectively do their jobs. Things like bulk operations and automation are just not possible with the Active Directory users and computer consoles.

The good news is there are many useful Active Directory Tools to choose from that can help you manage domain users, groups, and computers, generate reports, find security weaknesses, and more.

Check it out:

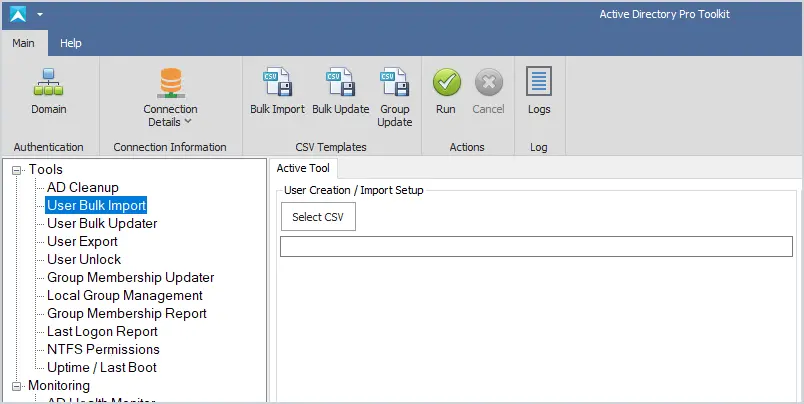
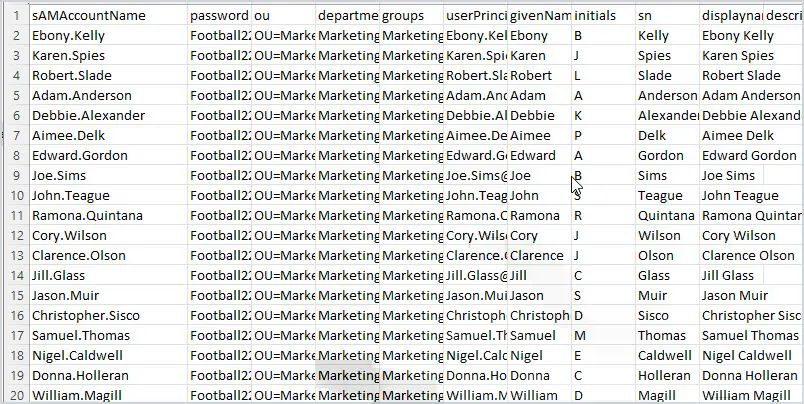
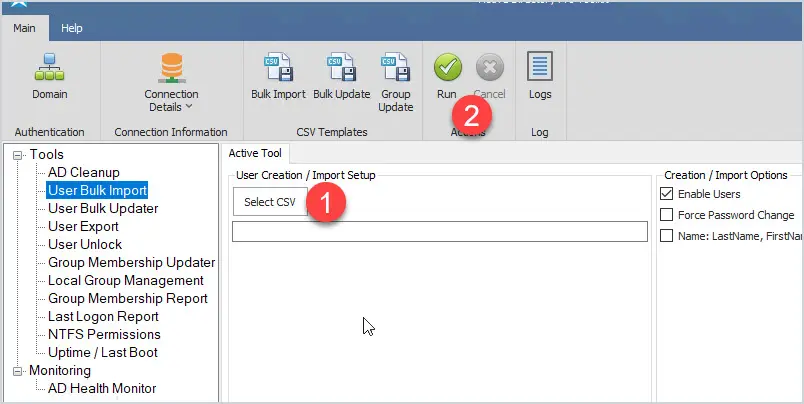
1. AD Bulk User Import

bulk user import tool

The Bulk Import tool makes it easy to import new user accounts into Active Directory from CSV. Includes a CSV template, sets multiple user attributes, and adds users to groups during the import. Automate the creation of new user accounts and simplify the user account provisioning process.

Key Features

  • Easily bulk import new accounts
  • Includes a CSV template
  • Logs the import process
  • Add users to groups during the import process

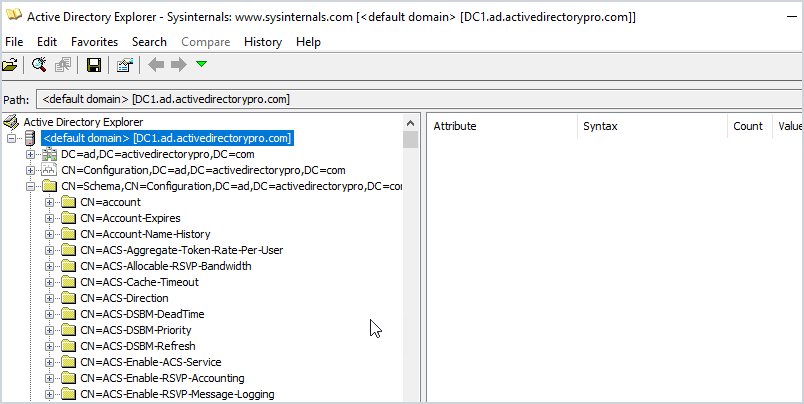
2. Active Directory Explorer

active directory explorer

Active Directory Explorer is a browser to navigate the AD database, objects, permissions, and schema objects within Active Directory. The interface is similar to Active Directory users and computers but allows you to view advanced settings. This is not a tool you would use on a daily basis, this would be used for very specific tasks such as viewing an object’s attributes and security sessions.

Another neat feature is the ability to save a snapshot of the AD database. You can then load it for offline viewing and explore it like it was a live database. Again not a common use case.

Key Features

  • Easily explore the Active Directory database
  • View all object attributes
  • View the Active Directory Schema
  • Take a snapshot of the Database and view offline

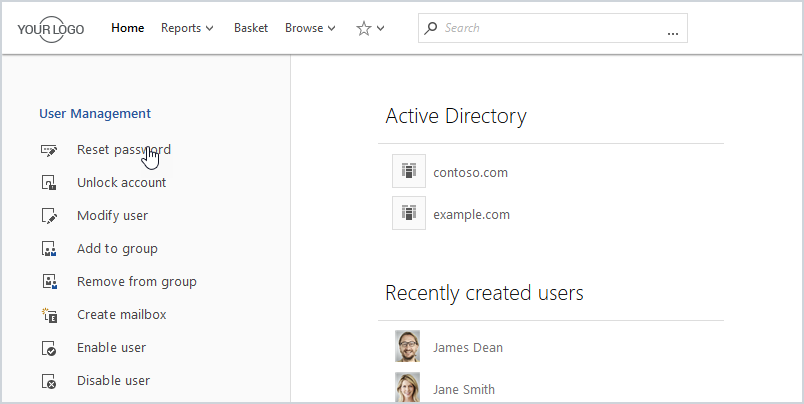
3. Adaxes

adaxes

Adaxes is a premium product that automates many AD management tasks, like user provisioning, assigning permissions, creating mailboxes, delegation, and much more. All management tasks are done from a web interface and can be accessed from laptops, tablets, and phones. The web interface is fully customizable so you can view just want you to need. Also includes a user self service portal and a password self service portal.

Key Features

  • Roles based access control
  • Fully automate AD tasks
  • Web interface

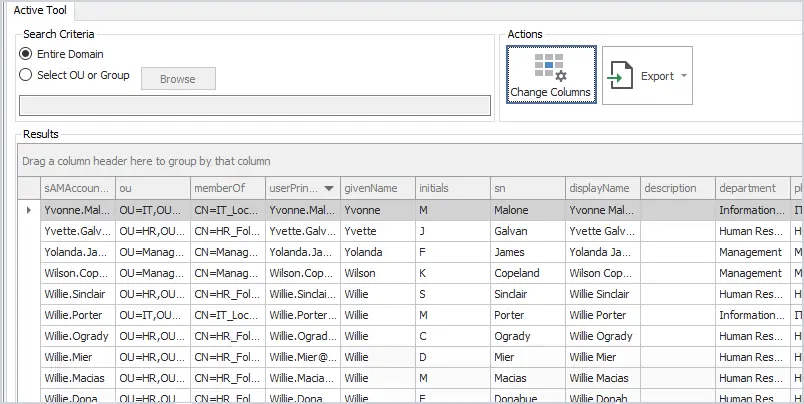
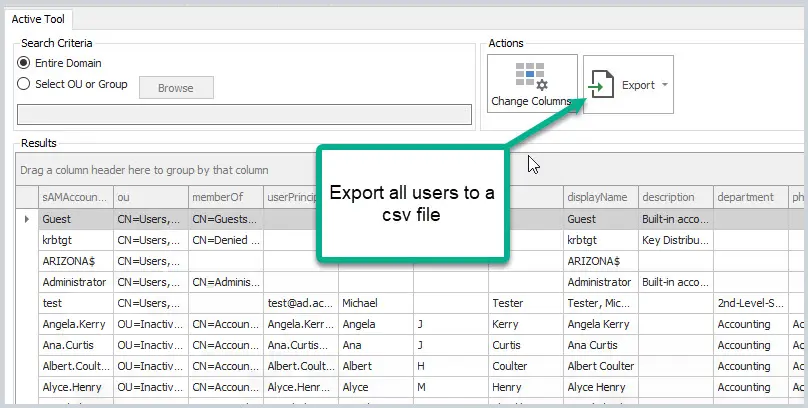
4. User Export Tool

user export tool

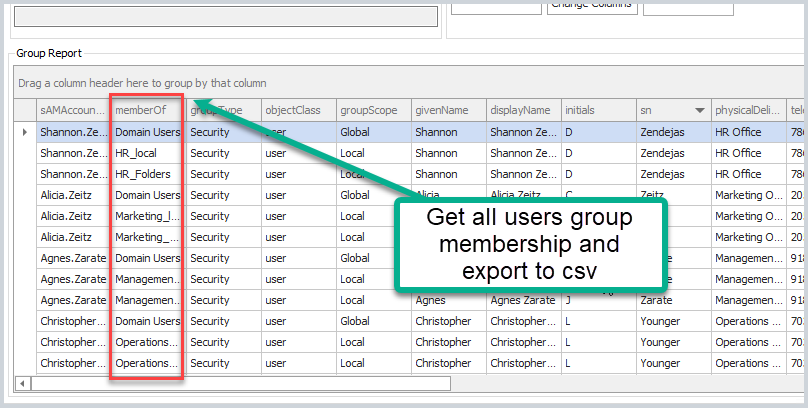
The user export tool lets you export all uses plus all common user fields to a CSV. Over 40 user fields can be added to the export by clicking the change columns button. This is a great tool if you need a report of all users, the groups they are a member of, OU, and more.

Key Features

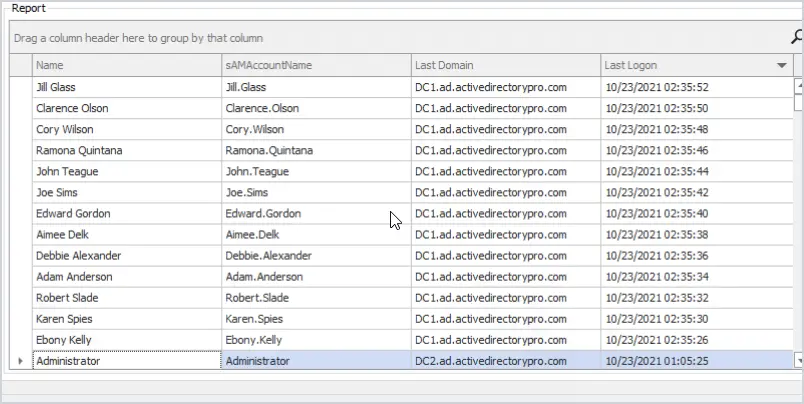
  • Find users TRUE last logon date from all domain controllers
  • Export report to a CSV file
  • Filter and search columns
  • Easy to report on OUs or groups

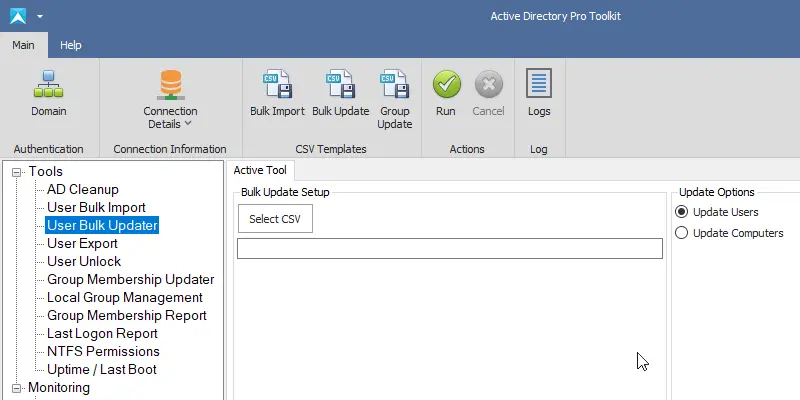
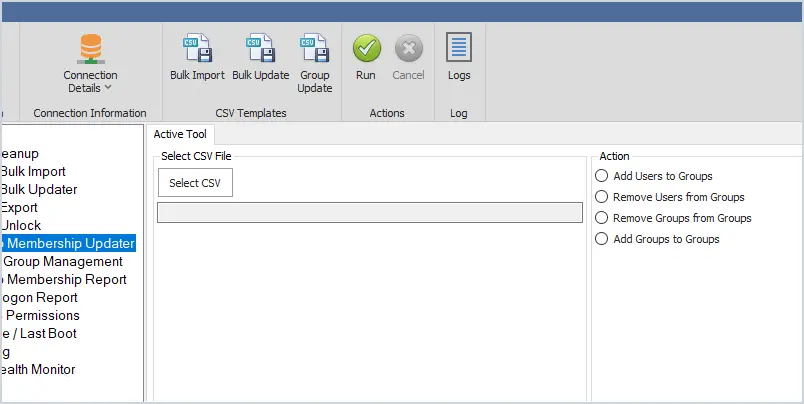
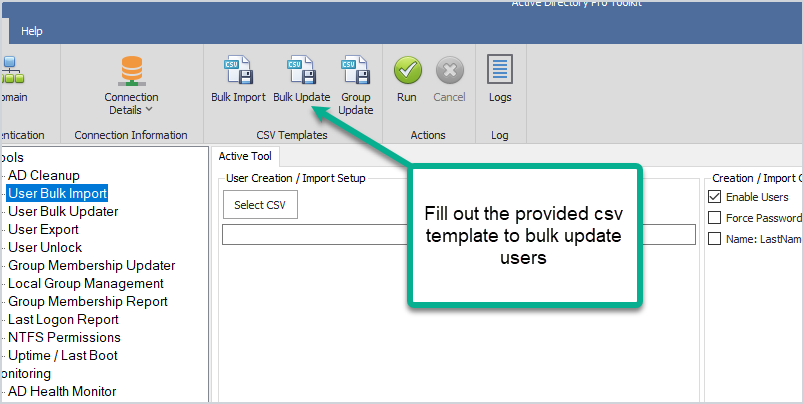
5. Bulk User Updater

bulk updater

This tool lets you bulk update user account properties from CSV file. Some popular use cases are bulk updating user’s proxyaddresses, employeeid, addresses, manager, addresses, state, country, and so on.

All changes are sent to a log file which lets you keep track of changes and check for errors. This is a very popular tool!

Key Features

  • Bulk update user account properties
  • Includes CSV template
  • Logs changes and errors
  • Saves a lot of time

6. AD Cleanup Tool

ad cleanup tool

The AD Cleanup tool searches your domain for stale and inactive user accounts based on the account’s lastlogon attribute. You can also find disabled, expired, accounts that have never been used and empty groups.

It is recommended to run a cleanup process on your domain at least once a month, this tool can help simplify that cleanup process and secure your domain.

Key Features

  • Quickly find old user and computer accounts
  • Limit the scope to OUs and groups
  • Bulk move and disable old accounts
  • Find all expired user accounts

7. SolarWinds Server & Application Monitor

solarwinds sam

This utility was designed to Monitor Active Directory and other critical services like Azure, DNS, and DHCP. It will quickly spot domain controller issues, replication, performance issues with cloud services, failed logon attempts, and much more.
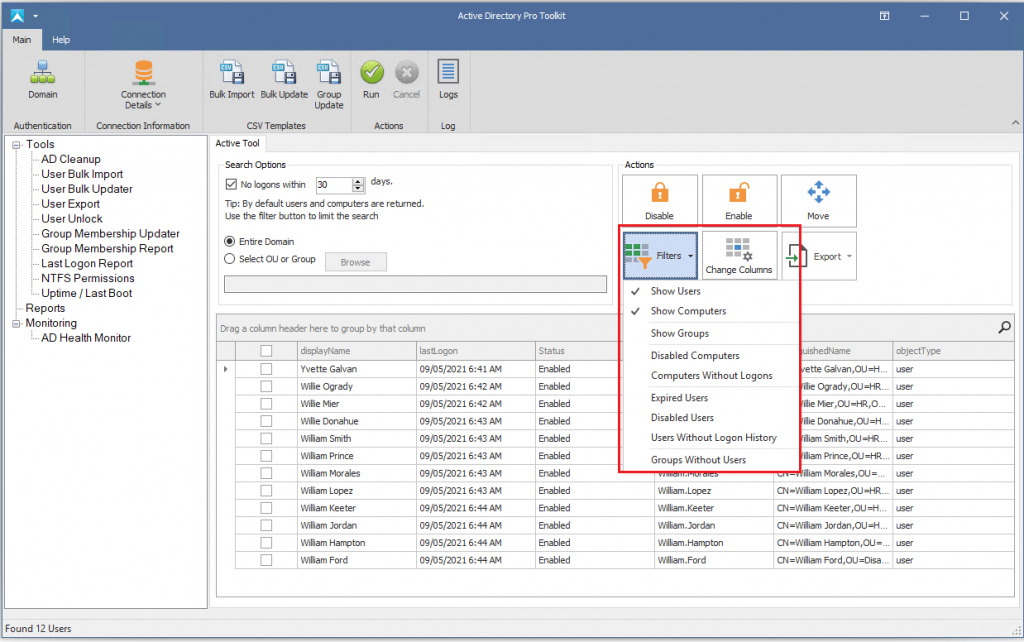
This is a premium tool that has a big price tag but it’s an incredible product. You can monitor all resources including applications, hardware, processes, and cloud systems. Everything is accessed from a single web console, you can get email alerts based on various thresholds.
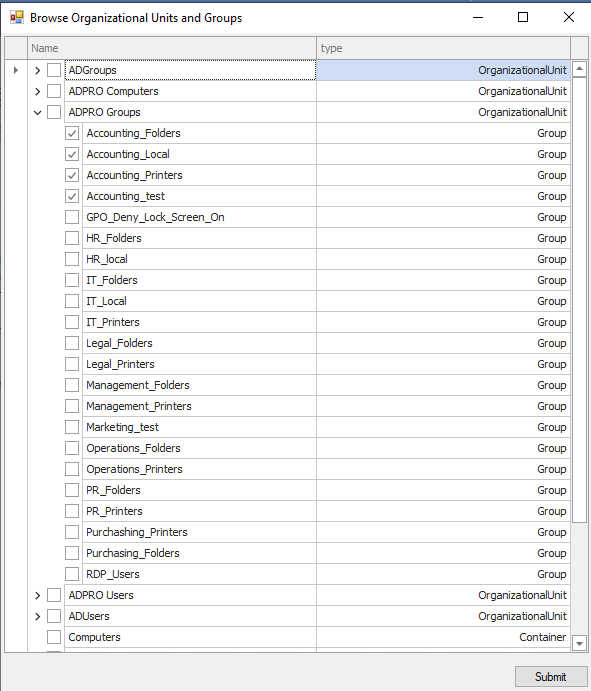
Key Features
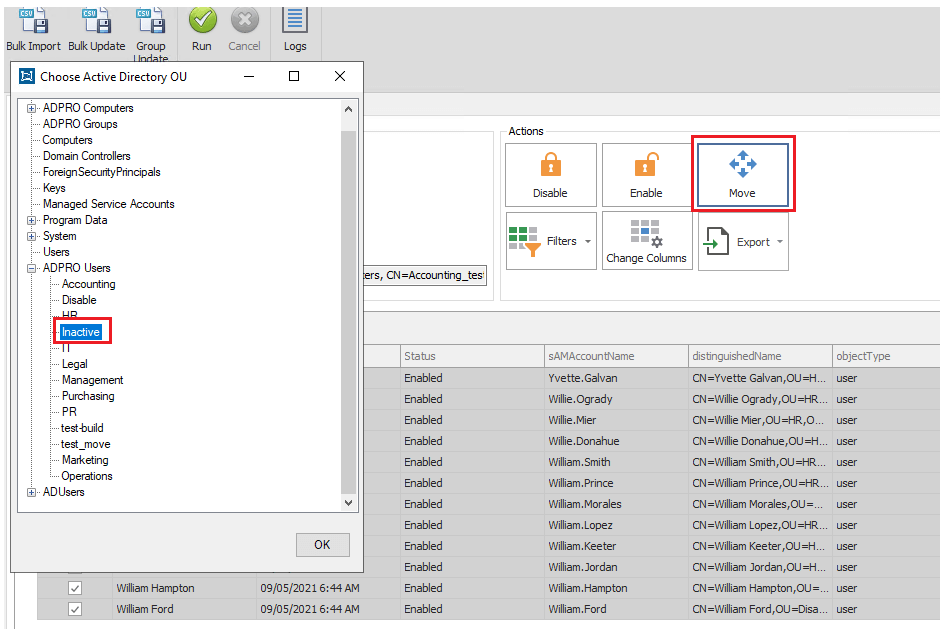
  • Customizable dashboard
  • Email alerts
  • 1200 out of box templates
  • Diagnose AD replication issues
  • Monitor account logins

SolarWinds Server Monitor provides a fully functional 30-day free trial.

8. Active Directory Health Monitor

ad heatlh monitor

If you want a simple tool to monitor your Active Directory services then this is a great tool.
Check the health of your domain controllers with this easy to use tool. Runs 27 health checks on your servers to check for critical errors. Click on any failed test to quickly see the details.

Also includes an option to test DNS and check event logs for critical events.

Key Features

  • Quickly check domain controller health
  • Check DNS health
  • Very easy to use
  • Export report to csv file

9. User Unlock and Lockout Troubleshooter

troubleshoot account lockouts

Find all locked users with the click of a button. Unlock, reset passwords or show advanced details like the source of the lockout and more. To pull the source computer you need to have auditing enabled, check the administrator guide for how to enable this.

Key Features

  • Find the source of account lockouts
  • Fast and easy to use
  • Unlock multiple accounts at once
  • Reset and unlock accounts from a single interface

10. Bulk Group Membership Updater

group membershi updater

Bulk add or remove users to Active Directory groups. You can bulk add users to a single group or multiple groups all at once. Very easy to use and saves a lot of time. Just add the users to the CSV template and the name of the group or groups you want to add them to.

Key Features

  • Easily bulk add users to groups
  • Bulk remove users from groups
  • Add groups to groups

11. Last Logon Reporter

user last logon reporter

The last logon reporter will get the user’s TRUE last logon time from all domain controllers in your domain. You can limit the search to the entire domain, organizational unit, or groups.

12. AD FastReporter

ad fast reporter

AD FastReporter has a large list of pre-built reports to pick from. Report on users, computers, groups, contacts, printers, group policy objects, and organizational units. Very easy to use but does have an older style interface.

Here is a small example of the reports you can run:

  • All users
  • Deleted Users
  • Users with a home directory
  • users without logon script
  • All computers
  • All domain controllers
  • Computers created in the last 30 days
  • Users created in the last 30 days

13. Local Group Report

local group manager

This tool gets the local groups and group members on remote computers. You can quickly sort or filter the groups to get a list of all users and groups that have local administrator rights.

Click here to watch a demo.

Key Features

  • Easily get group membership on remote computers
  • Quickly find how as administrator rights
  • Filter for any group or member

14. Group Membership Report Tool

get users group membership

Report and export group membership has never been easier, select from the entire domain, groups, or organizational unit. This tool also helps to find nested security groups.

Key Features

  • The fastest way to get all domain gruops and group membership
  • Export report to a CSV
  • Limit scope to an OU or group

15. Dovestones AD Reporting

dovestones ad reporting

Dovestones AD Reporting tool contains a large number of pre built reports. You can customize the report by selecting user attributes and defining which users to export.

16. Computer Uptime Report

computer uptime

Get the uptime and last boot of remote computers. Report on the entire domain or select from an OU or group.

Very helpful during maintenance days to verify if computers have rebooted.

17. SolarWinds Permissions Analyzer

solarwinds permissions analyer

This FREE tool lets you get instant visibility into user and group permissions. Quickly check user or group permissions for files, network, and folder shares.

Analyze user permissions based on an individual user or group membership.

Download Free Tool

18. NTFS Permissions Reporter

ntfs permissions tool

The NTFS permissions tool will report folder security for local, remote, and UNC folder permissions. The grid view comes with a powerful filter so you can search and limit the results to find specific permissions such as Active Directory groups.

19. Windows PowerShell

Windows PowerShell is a very powerful tool that can automate many Active Directory and Windows tasks. The problem is it can be complex to learn some of the advanced functions. With that said there are plenty of cmdlets that can be used in a single line of code to do some pretty cool things in Windows.

  • Create new user account: New-Aduser
  • Create computer account: New-ADComputer
  • Create a security group: New-ADGroup
  • Create a organizational unit: New-ADOrganizationalUnit
  • Get domain details: Get-ADDomin
  • Get domain password policy: Get-ADDefaultDomainPasswordPolicy
  • Get group policy: get-GPO -all
  • Get all services: get-service
  • Find locked user accounts: Search-ADAccount -LockedOut

20. Windows sysinternals

windows sysinternals

The Sysinternals is a suite of small GUI programs and command line utilities designed to troubleshoot and diagnose your Windows systems and applications. They are all portable, which means you don’t need to install them, you can just run the exe or commands with no installation required.

These utilities were created way back in 1996 by Mark Russinovich and then later acquired by Microsoft. There are a bunch of tools included I will list some of the popular ones.

  • Process Monitor – Shows real time file system, registry and process activity.
  • PsExec – Lets you execute programs on a remote system
  • PsKill – Kill local and remote processes
  • Sysmon – Logs system activity about process creations, network connection and changes to files
  • Psinfo – Shows info about a local or remote computer

All-in-one Active Directory Toolkit

Our AD Pro Toolkit includes 12 Active Directory tools in a single interface.

Tools included in the AD Pro Toolkit:

  • Bulk User Import
  • Bulk User Updater
  • AD Cleanup Tool
  • Last Logon Reporter
  • User Export to CSV
  • Unlock and Account Troubleshooter
  • Group Reporter
  • Group Management Tool
  • NTFS Permissions Report
  • Local Group Management
  • AD Health Monitor
  • Uptime last boot

Download a Free trial of the AD Pro Toolkit

What are the benefits of Active Directory Tools?

The main benefit is it will save you time and make managing Active Directory easier. One of the most popular tasks of working with Active Directory is to create new user accounts. The built-in tools provide no options for bulk importing new accounts so it becomes very time-consuming. With the AD Pro Toolkit you can easily bulk import, bulk update, and disable user accounts.

Below is a picture of how you would create an account with the built-in (ADUC) Active Directory Users and Computers console. Everything has to be manually entered and you have to go back and add users to groups.

Using Active Directory tools like the AD Bulk Import tool, you can bulk import thousands of accounts at once. Plus you can automatically set user accounts fields and add users to groups. Let me show you how easy it is.

Step 1: Fill out the provided CSV template.

The template includes all the common user fields you need to create a new account. Just fill out what you need and save the file.

Step 2: Import new account

With this tool just select your CSV file and click run. This will import all of the account information from the CSV and automatically bulk create new Active Directory user accounts.

You can watch the import process and when complete you have a log file of the import.

You will at some point be asked to export users to a CSV and again there is no easy built in option for this. When I was an administrator at a large organization I would get this request at least once a week and it was a pain. When I developed the user export tool this process became so easy I was able to have other staff members take it over.

The above picture is from the user export tool. This tool lets you easily export all users from the entire domain, an OU, or a group.

The ease of use is another benefit as many people don’t have time to learn PowerShell. PowerShell is a great tool and can do many things but it can be complex and time-consuming to learn. The AD Pro Toolkit has a very simple interface and you can start using it right away to perform many advanced tasks in your domain.

Frequently Asked Questions

Below are questions and answers regarding the AD Pro Toolkit.

Does the AD Pro Tool support multiple domains?

Yes. It will auto-detect your domains based on current credentials. You can click the domain button to change authentication and connect to other domains or domain controllers.

Do you have a tool to help with account lockouts?

Yes, the user unlock tool can quickly display all locked users and the source of the lockout.

What is required to use the toolkit?

To create and bulk modify users you will need these rights in your Active Directory domain. This is often done by putting your account in the domain administrator group but can also be done by delegating these rights. Some tools like the last logon reporter, export, and group membership require no special permissions.

Do I need to know PowerShell or scripting?

No. All tools are very easy to use and require no scripting or PowerShell experience.

Is there a way to bulk update the manager, telephone numbers, and other user fields?

Yes, this is exactly what the bulk updater tool was created for. You can easily bulk update from a large list of user fields.

Can I bulk export or import on a scheduled task?

We are working on this right now. AD Cleanup, bulk import, update, and export tools will include an option to run on a scheduled task or from a script.

I was just hired and Active Directory is a mess. Can the Pro toolkit help?

The AD Cleanup tool can help you find old user and computer accounts and bulk disable or move them. We have many customers that use this tool to cleanup their domain environments.

Source :
https://activedirectorypro.com/tools/

How to Deploy a Domain Controller in Azure

In this guide, I will demonstrate how to deploy a domain controller in Azure.

Deploying a Domain Controller in Azure can be used to add additional Domain Controllers to your on-premises environment. It’s also an easy way to create an Active Directory test lab.

Note: The VM I create in this demo is for testing, the settings are not optimal for a production domain controller. If you want to deploy a Domain Controller in Azure for production you will need to determine the right settings for your organization, such as VM size (CPU, Mem), redundancy options, disks, and network settings, all of which will increase the cost.

Tip #1: For a production DC, DO NOT give it a public IP or allow public inbound ports.

Tip #2: To add an azure domain controller to your on-premises environment you will need a VPN tunnel from your network to Azure. I will go over this in a separate guide.

Tip #3: For production, the Azure virtual network must not overlap your on-premises network. For testing, it doesn’t matter (assuming you will not be connecting to your on-premises network).

Let’s get started.

Part 1: Create a Virtual Machine

If you don’t have an Azure account you can create one for free. Microsoft gives you a $200 Azure credit for 30 days. This is plenty of credits to create several VMs and use other Azure resources.

Step 1. Sign in to your azure portal, https://portal.azure.com

Step 2. Click on “Virtual machines”

select virtual machines

Step 3. Click on Create and select “Azure virtual machine”

Step 4. Enter basic information for the new VM

  • Subscription: Select the subscription you want to use for the VM.
  • Resource group: Select an existing or create a new resource group.
  • Virtual machine name: Give your VM a name.
  • Region: Choose your region, you typically want a region that is close to you.
  • Availability options: This is for redundancy and will ensure your VMs are still running if one Azure data center has a failure. You want this for production VMs. I’m just creating a test VM so I’ll choose “No infrastructure redundancy required.”
  • Security Type: I’ll choose Standard.
  • Image: Pick the OS you want to use, I’ll pick “Windows Server 2019 Datacenter”.
  • Size: You will need to determine the size of VM you need. For testing reasons, I’ll choose a small VM to keep costs low.
  • Username and password: This will be the administrator account for the VM.
  • Public inbound ports: For production, you want this set to “none”. For testing, I’ll leave RDP open.
  • Licensing: If you have an existing license you can use select the box, this can save money on each VM.

Here is a screenshot of the Basics settings for my VM.

virtual machine basic settings

Now click Next to go to the Disks page.

Step 5. Enter disk details for the VM.

Determine the disk type to use, for testing I use the standard HDD.

virtual machine disk settings

Click next to go to networking.

Step 6. Network settings

  • Virtual network: Select an existing or create a new virtual network.
  • Subnet: Select or create a subnet.

You create a virtual network and then use subnetting to segment the address space. For example, I’m using the 10.1.0.0/16 address space then I segment 10.1.10.0/24 (256 addresses) with subnetting. I’ll use the 10.1.10.0/24 subnet block for my servers.

virtual machine create virtual network
  • Public IP: A public IP will be added automatically. For testing, this is OK, for production set this to none.
  • NIC network security group: This is s stateful firewall for your virtual network. I’ll choose standard.
  • Public inbound ports: For production, you want to select none. For testing, you can use RDP to access the VM.
virtual machine network inbound ports

Click next to “Management”

Step 7: Management Settings

The only thing I want to point out on this page is the “Auto-shutdown” option. For testing with Azure, this is a great feature to help save costs. You get charged for the VM running even if you are not using it. I’m not going to be using this test domain controller 24/7 so I’ll have it auto shut down at 7:00 PM each night. Do not do this for a production domain controller.

virtual machine auto shutdown

Step 8: Click Review + create

Microsoft will validate your settings and show any warnings or settings that were missed. You will also get a cost estimate but keep in mind it is just an estimate.

virtual machine validation check

When ready click the “Create” button to create the VM.

You will get a progress page so you can watch the status of the deployment. It took about 5 minutes for my VM to be created.

virtual machine deployment completed

Part 2: Configure VM with Static IP Addresses

Domain controllers need a static IP address and the DNS pointing to itself. For on-premises DCs you would just go into the NIC settings and manually configure the IP settings. With Azure VMs it’s recommended to set this at the Virtual Network Interface.

Go to VM Networking settings.

In the right-hand menu for your VM under settings click on “Networking”.

configure vm static ip

Now click on the Network Interface for the VM (You will have a different name).

virtual network network interface

Next click on “IP Configurations” in the left menu under settings.

Next click on “ipconfig1” under IP configurations.

ip configuration

Change the IP from “Dynamic” to “Static” and enter the IP address you want the domain controller to have, it must be an IP from the subnet you assigned to your virtual network. I’ll give my DC the IP address 10.1.10.10.

set static ip address on vm

Click “Save”. The network interface will be restarted to set the IP address.

Go back to the Network Interface and click on “DNS servers”.

network interface dns settings

Set the DNS server to the IP address of the domain controller.

set dns servers for nic

Now on the VM, your server should be configured with the settings from above. Below I run ipconfig /all to verify my IP settings.

ipconfig for virtual machine

Part 3: Install Active Directory Domain Services
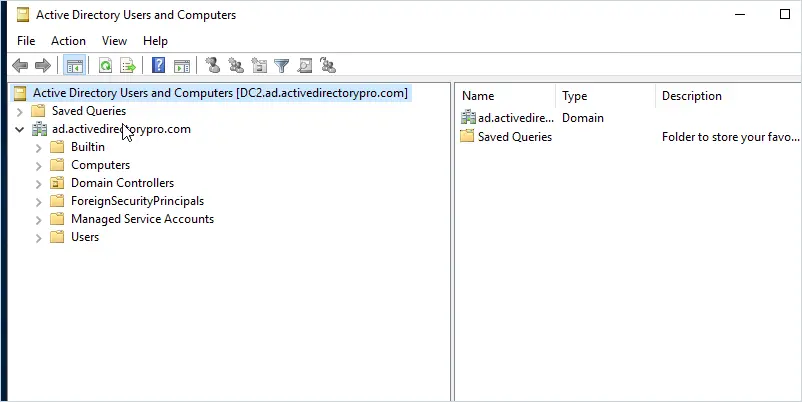
With a VM created and the IP settings configured we can move forward with installing Active Directory on the server. If you have installed ADDS before this is not new, it’s the same as installing it on an on-premises server.

Go to the server manager and click on “Add roles and features”

server manager add roles

Before you begin – click “Next”.

Installation type – select “role based” and click “Next”.

Server Selection – select the hostname of your server and click “Next”.

Server Roles – select “Active Directory Domain Services”.

You will get a pop-up to add additional features. Click “Add Features”.

install active directory domain services

Click “Next”.

Features – no features need to be added so click “Next”.

AD DS – Click “Next”.

Confirmation – Click “Install”.

The installation will start.

When finished click the yellow icon in the upper right corner and click on “Promote this server to a domain controller”.

promote to domain controller

Deployment Configuration

I’m creating a new domain so I’m going to pick “Add a new forest”. If you’re adding another DC to your existing domain you would pick the first option “Add a domain controller to an existing domain”.

domain controller deployment config

Domain Controller Options

For a new test domain, the default settings are good. Add a DSRM password and click next.

domain controller options

DNS Options

Click next on this screen.

Additional Options

Enter a NetBIOS name and click “Next”

netbios domain name

Paths

I always leave these as default settings

Review Options

Review your settings and click “Next”

Prerequisites Check

If the Prerequisites pass click on “Install”

deployment check

When done installing the server will reboot and will now be a domain controller.

domain controller install completed.

Nice work. If you followed along you should now have a domain controller running in the Azure cloud.

You can now deploy additional Azure VMs and connect them to this domain controller. You can also use this domain controller to add additional DCs to your on-premises environment.

Part 4: Additional Settings and Tips

Here are a few additional settings and tips I recommend.

  1. You will need to create a new site in Active Directory Sites & Services with the new subnet.
  2. You should adjust the domain controller DNS settings for redundancy.
  3. A VPN tunnel is required from your on-premises network to Azure.
  4. If you are testing and use a public IP with open ports (RDP 3389), then I recommend using fake/dummy data in Active Directory. Their server might get comprised due to the internet exposure so don’t use real data such as real usernames and passwords.
  5. You can use the Azure firewall to limit access to the VM from your IP address.
  6. Use Bastion for secure remote connectivity.
  7. Explore the many options that Azure has to offer, it’s very impressive everything it has to offer.

Do you plan to use domain controllers running in Azure? Let me know in the comments below.

Resources

Recommended Tool: Permissions Analyzer for Active Directory

This FREE tool lets you get instant visibility into user and group permissions and allows you to quickly check user or group permissions for files, network, and folder shares.

You can analyze user permissions based on an individual user or group membership.

This is a Free tool, download your copy here.

8 thoughts on “How to Deploy a Domain Controller in Azure”

Source :
https://activedirectorypro.com/deploy-domain-controller-azure/