Securing your hybrid multi-cloud environment just got easier. We are excited to announce Palo Alto Networks VM-Series Virtual Next-Generation Firewalls (NGFWs) are now available on Nutanix Cloud Clusters (NC2)™ for Microsoft Azure with Nutanix Flow Virtual Networking™.
NC2 on Azure leverages a new bare metal-as-a-service (BMaaS) offering, which is jointly engineered by Nutanix® and Microsoft® teams for cloud-like infrastructure consumption without the need to purchase more hardware up-front. It leverages the power of the hybrid cloud to extend workloads to Azure seamlessly from on-premises. NC2 provides a consistent experience to provision and manage Nutanix clusters on-premises or deployed in Azure, enabling workload mobility across clouds.
During last month’s Microsoft Ignite, Nutanix announced the availability of NC2 on Microsoft Azure to easily extend on-premises data and workloads to Azure, creating a true hybrid cloud. With Palo Alto Networks VM-Series virtual firewall insertion, you can secure your Nutanix AHV workloads on overlay networks deployed using VPCs (virtual private clouds) within Flow Virtual Networking. Nutanix AHV provides a modern, secure virtualization platform for all your virtual machines (VM) and container workloads without additional licensing or investment on Nutanix hyperconverged infrastructure (HCI).
Simplify Multi-Cloud Security with VM-Series Virtual NGFWs
With VM-Series virtual firewalls, your Nutanix AHV workloads will have advanced security features that deliver the required application layer of security for total coverage. Leverage network security and visibility across your hybrid cloud – both on-premises and on Microsoft Azure – without complex reconfiguration. With this validation, you can gain consistent security and visibility across your hybrid cloud environment.
You can find the perfect balance of security, speed and value through the advanced Cloud-Delivered Security Services available with the VM-Series Virtual Firewall. Get simple security for public clouds, private clouds and on-premises data for total coverage and protection from known and unknown threats.
Palo Alto Networks VM-Series Virtual Firewalls are monitored, configured and managed by Palo Alto Networks Panorama™ firewall management tools. With Panorama, you gain network security capabilities that provide a single pane of glass to manage security and policies while alleviating the need to jump between interfaces. You can now easily manage the security postures of their virtual environments, physical data centers and even public clouds.
Prevent Lateral Movement with Microsegmentation and Nutanix Flow Network Security™
As your virtualized and cloud environments grow, so does your attack surface. This increases the risk of bad actors gaining access to your internal network. Once attackers bypass perimeter security controls, they can move laterally across the environment in search of data to steal or hold for ransom. Because of this, it’s essential to redefine your security approach to include lateral, east-west, network traffic and perimeter network security.
With Nutanix Flow Network Security, you can leverage advanced network security using microsegmentation, or managed virtual-machine-level software firewalls, to gain visibility into your workloads on your virtual networks. Even when a VM moves across segments or clouds, the risk of network threats, malware and ransomware is reduced with a unified security policy approach.
Flow Network Security is an application-centric microsegmentation solution that protects east-west traffic to your environments by allowing you to control east-west VM-to-VM traffic. It reduces the risk of threats spreading laterally across the data center and enforces a perimeter around every individual VM.
Check It Out For Yourself
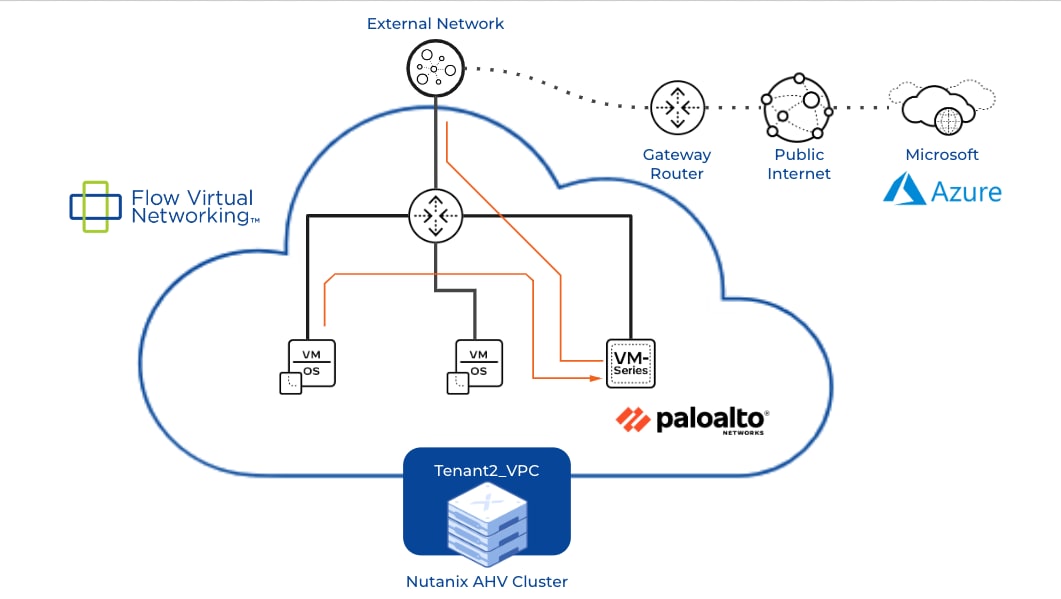
In this use case, all external traffic for subnets and VMs of the VPC traverse through the VM-Series Virtual Firewall. Configured application layer (L7) security policies are enforced via the policy-based routing capability available in the Flow Virtual Networking VPC’s section.
Azure flow chart of Virtual Networking for Nutanix AHV Cluster.
Workload mobility doesn’t have to mean complex security reconfiguration. As NC2 on Microsoft Azure extends your on-premises deployments, Palo Alto Networks ensures that you have the seamless security and visibility you need to safeguard your hybrid cloud environment.
Find Out How to Do More
See how Palo Alto Networks and Nutanix work together to deliver enhanced security capabilities and integrated solutions that secure the enterprise. Learn more about our VM-Series Virtual Firewalls and other Nutanix integrations, which give customers access to next-generation security controls that stop threats before they cause damage.
Cortex XDR 3.5 and Cortex XDR Agent 7.9 Deliver Stronger Security, Better Search and Broader Coverage, Including iOS Support
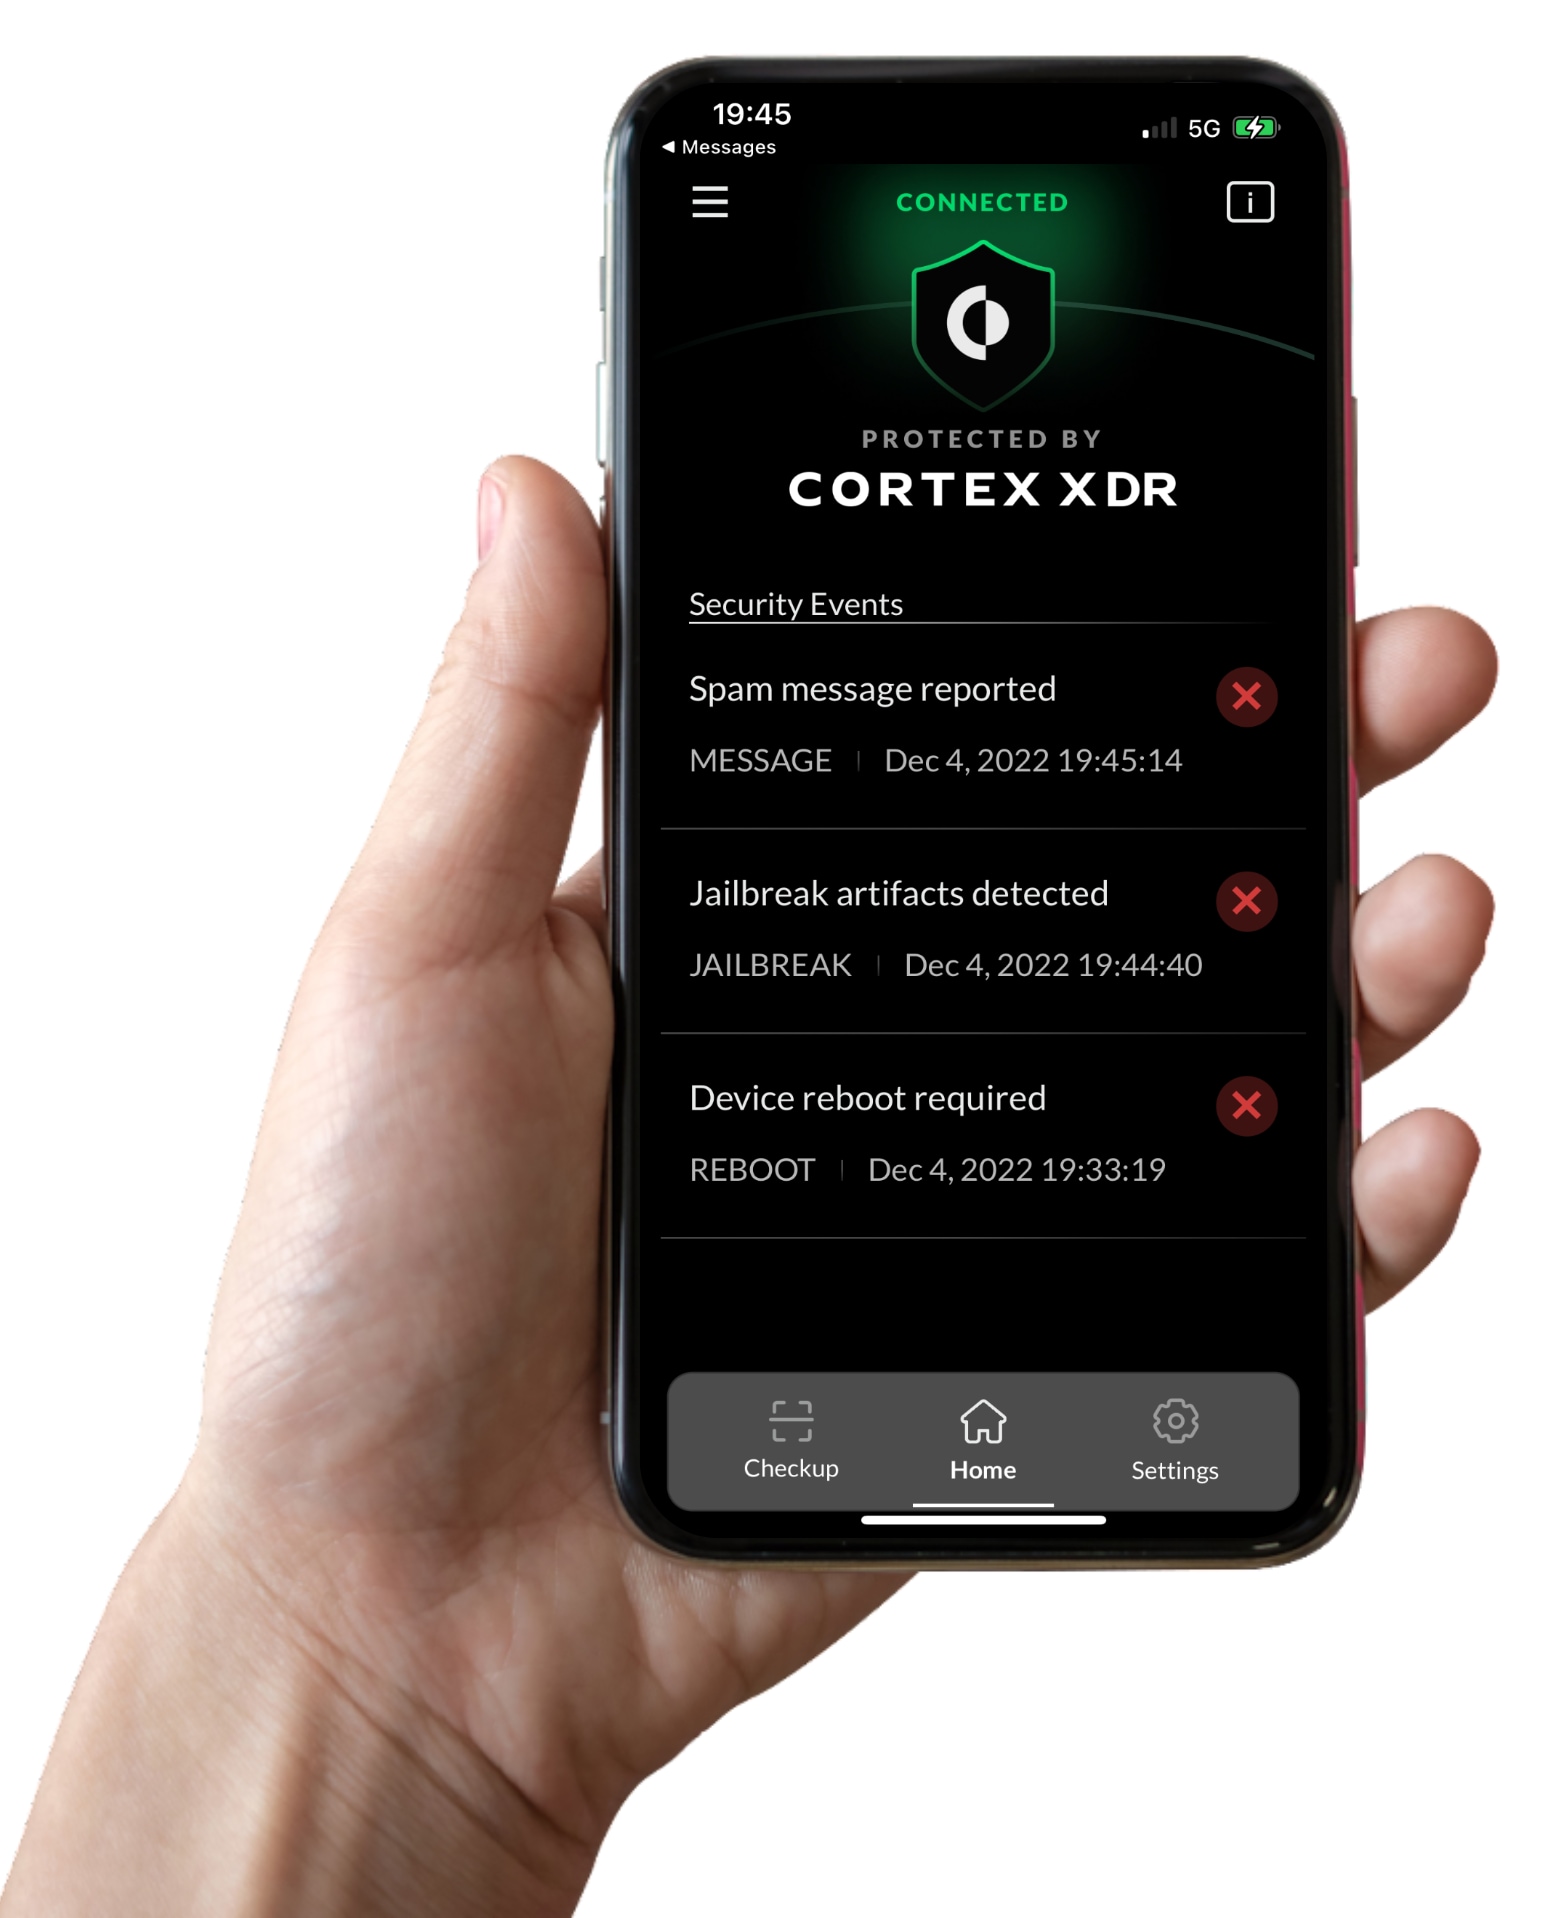
Your employees probably expect to work from anywhere, at any time they want, on any device. With the rise of remote work, users are accessing business apps and data from mobile devices more than ever before. Cortex XDR Mobile for iOS lets you protect your users from mobile threats, such as malicious URLs in text messages and malicious or unwanted spam calls.
Cortex XDR Mobile for iOS is just one of over 40 new features in our Cortex XDR 3.5 and Cortex XDR Agent 7.9 releases. In addition to iOS protection, we’ve bolstered endpoint security, improved the flexibility of XQL Search, and expanded visibility and normalization to additional data sources. Even more new advancements make it easier than ever to manage alert exceptions and granularly control access to alerts and incidents.
Let’s dive in and take a deeper look at the new capabilities of Cortex XDR 3.5 and Cortex XDR Agent 7.9.
iOS Protection with Cortex XDR Mobile
With the rapid shift to remote work, flexible BYOD policies are a must have, now, for many companies. Whether employees are working at home, from a café, or in a corporate office, they often have a phone within reach, and for good reason. 62% of U.S. workers say mobile phones or tablets help them be productive at work, according to a broad 2021 survey.
Phishing and Smishing and Spam, Oh My!
If you own a smartphone (like 85% of Americans do) you’ve probably received suspicious text messages claiming your bank or Amazon or PayPal account has been blocked. Or you’ve received messages saying that you need to click a link to complete a USPS shipment. And if you are receiving these messages, you can assume your users are also receiving similar messages. It’s only a matter of time before a user clicks one of these links and supplies their credentials, possibly even the same credentials they use at work. These smishing attacks, or phishing performed through SMS, are on the rise.If your organization is like many others, you’ve probably deployed an email security solution that filters spam and phishing URLs. However, you may not be protecting your mobile devices – BYOD or corporate-owned – from spam calls and phishing attacks.
With Cortex XDR Mobile for iOS, you can now secure iOS devices from advanced threats like smishing. The Cortex XDR agent blocks malicious URLs in SMS messages with URL filtering powered by Unit 42 threat intelligence. It can also block spam calls, safeguarding your users from unwanted and potentially fraudulent calls. Users can also report a spam call or message, allowing the Cortex XDR administrator to block the phone number.
Hunting Down Jailbroken Devices
Some of your iPhone users might “jailbreak” their phones to remove software restrictions imposed by Apple. Once they gain root access to their phones, they can install software not available in the App Store. Jailbreaking increases the risk of downloading malware. It can also create stability issues.
The Cortex XDR agent detects jailbroken devices, including evasion techniques designed to thwart security tools. Overall, the Cortex XDR provides strong protection for iPhones and iPads, while balancing privacy and usability requirements.
Now you can protect a broad set of endpoints, mobile devices and cloud workloads in your organization, including Windows, Linux, Mac, Android, Chrome and now iOS, with the Cortex XDR agent.
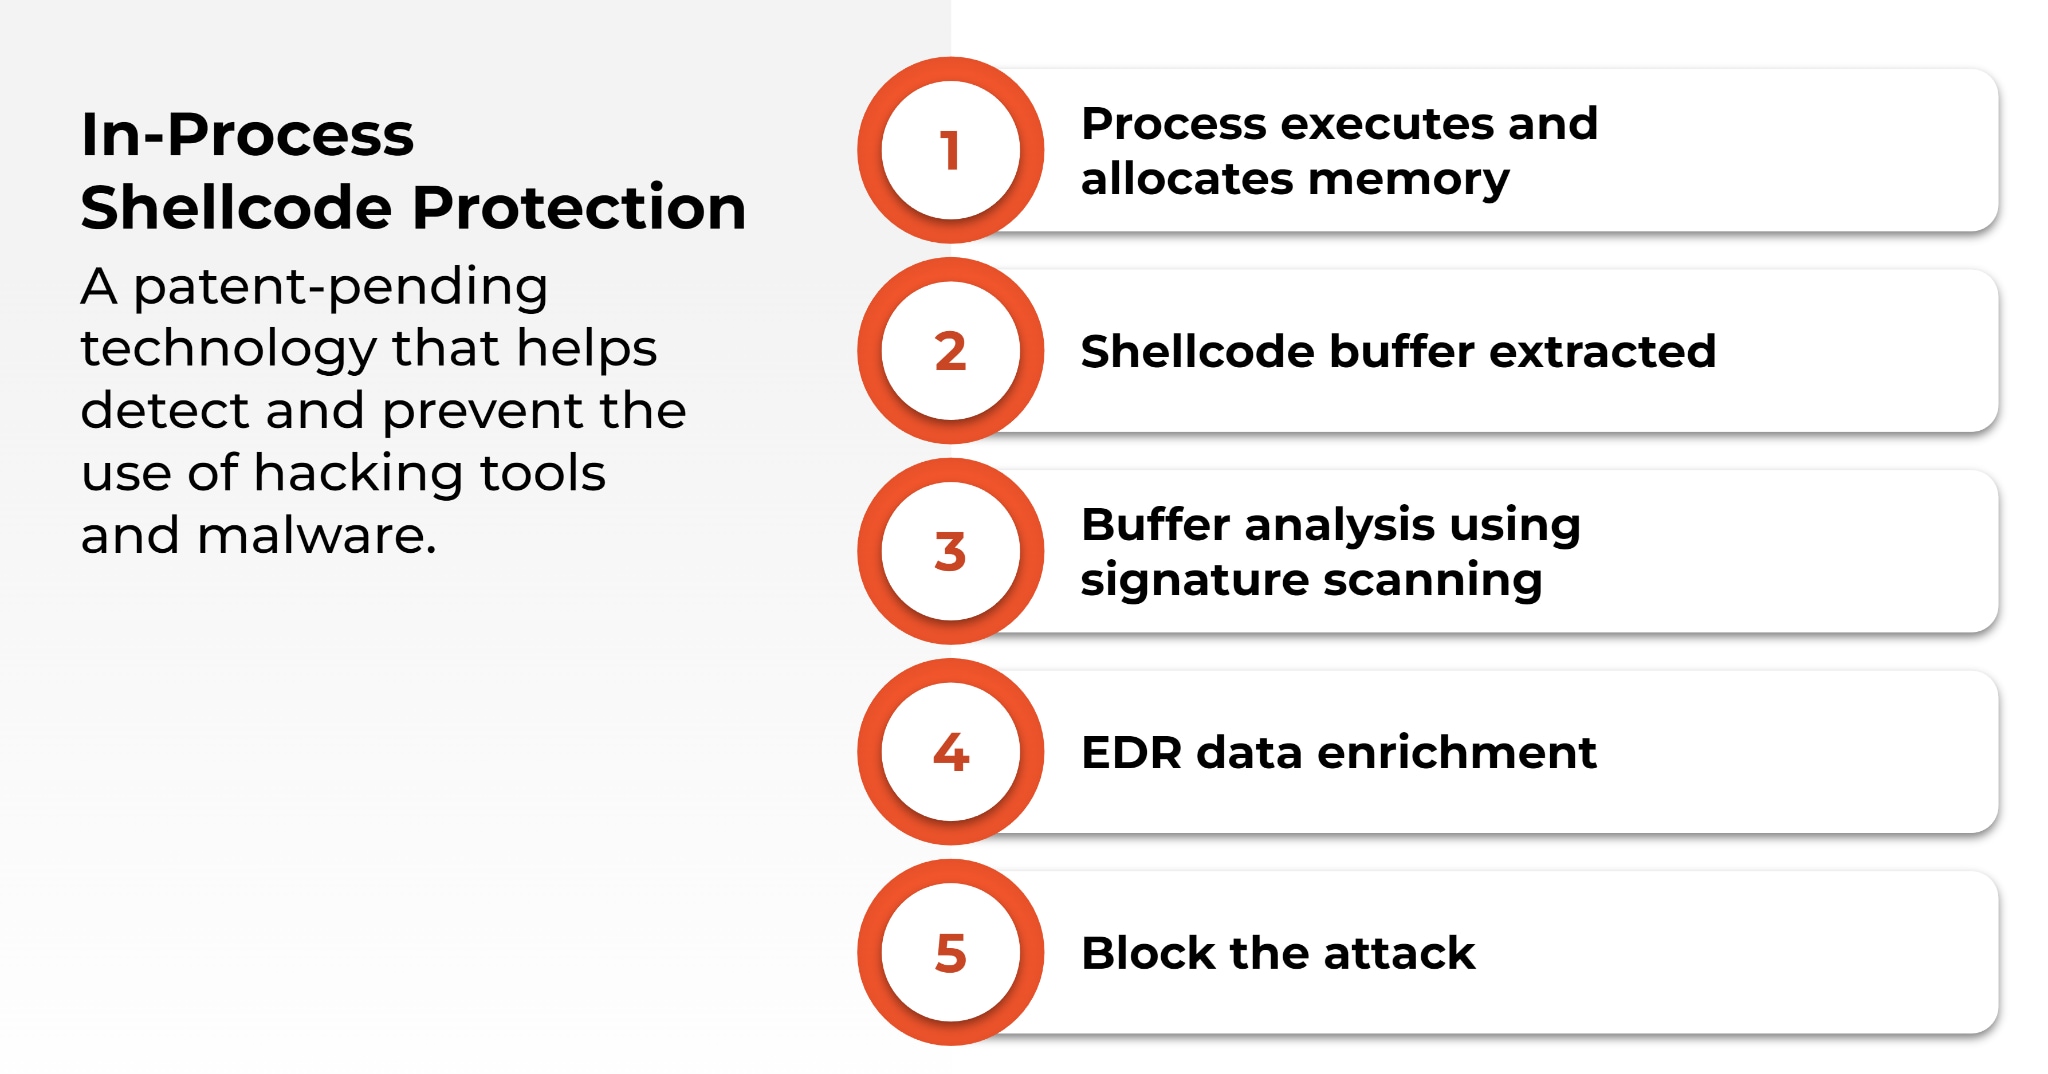
In-Process Shellcode Protection
Threat actors can attempt to bypass endpoint security controls using shellcode to load malicious code into memory. Cortex XDR’s patent-pending in-process shellcode protection module blocks these attempts. To understand how, let’s look at a common attack sequence.
After threat actors have gained initial access to a host, they typically perform a series of steps, including analyzing the host operating system and delivering a malicious payload to the host.
They may use a stager to deliver the payload directly into memory rather than installing malware on the host machine. By loading the payload directly into memory, they can circumvent many antivirus solutions that will either ignore or perform more limited security checks on memory.
Many red team tools or hacking tools, such as Cobalt Strike, Sliver or Brute Ratel, have made it easier for attackers to perform these sophisticated steps.
If a process, including a benign process, executes and allocates memory in a suspicious way, the Cortex XDR agent will single out that memory allocation and extract and analyze the buffer. If the Cortex XDR agent detects any signature or indicator that the payload is malicious, the agent conducts additional analysis on the process and shellcode, including analyzing the behavior of the code and the process, using EDR data enrichment.
If the Cortex XDR agent determines the shellcode or the process loaded by the shellcode are malicious, it will terminate the process that loaded the shellcode and the allocated memory. By killing the process chain, or the “causality,” Cortex XDR prevents the malicious software from executing.
Our in-process shellcode protection will block red team and hacking tools from loading malicious code, without needing to individually identify and block each tool.
This means that if a never-before-seen hacking tool is released, Cortex XDR can prevent the tool from using shellcode to load a payload into memory.
Cortex XDR will terminate the implant once it’s loaded on the machine before it can do anything malicious.
Financial Malware and Cryptomining Protection
Whether stealing from bank accounts or mining for cryptocurrency, cybercriminals always have new tricks up their collective sleeves. To combat these dangerous threats, we’ve added two new behavior-based protection modules in Cortex XDR Agent 7.9. Let’s take a brief look at these threats and how you can mitigate them with Cortex XDR.
Banking Trojans emerged over a decade ago, typically stealing banking credentials by manipulating web browser sessions and logging keystrokes. Criminals deployed large networks of Trojans, such as Zeus, Trickbot, Emotet and Dridex, over the years. They infected millions of computers, accessed bank accounts, and transferred funds from victims. Now, threat actors often use these Trojans to deliver other types of malware to victims’ devices, like ransomware.
Cryptojacking, or malicious and unauthorized mining for cryptocurrency, is an easy way for threat actors to make money. Threat actors often target cloud services to mine cryptocurrency because cloud services provide greater scale, allowing them to mine cryptocurrency faster than a traditional endpoint. According to Unit 42 research, 23% of organizations with cloud assets are affected by cryptojacking, and it’s still the most common attack on unsecured Kubernetes clusters.
The new banking malware threat protection and cryptominers protection modules in the Cortex XDR agent automatically detect and stop the behaviors associated with these attacks. For example, to block banking malware, the module will block attempts to infect web browsers during process creation, as well as block other browser injection techniques. The cryptominers protection module will detect unusual cryptographic API or GPU access and other telltale signs of cryptojacking.
Both of these modules augment existing banking and cryptomining protection already available with Cortex XDR. You can enable, disable or set these modules to alert-only mode on Windows, Linux and macOS endpoints. You can also create exceptions per module or module rule for granular policy control.
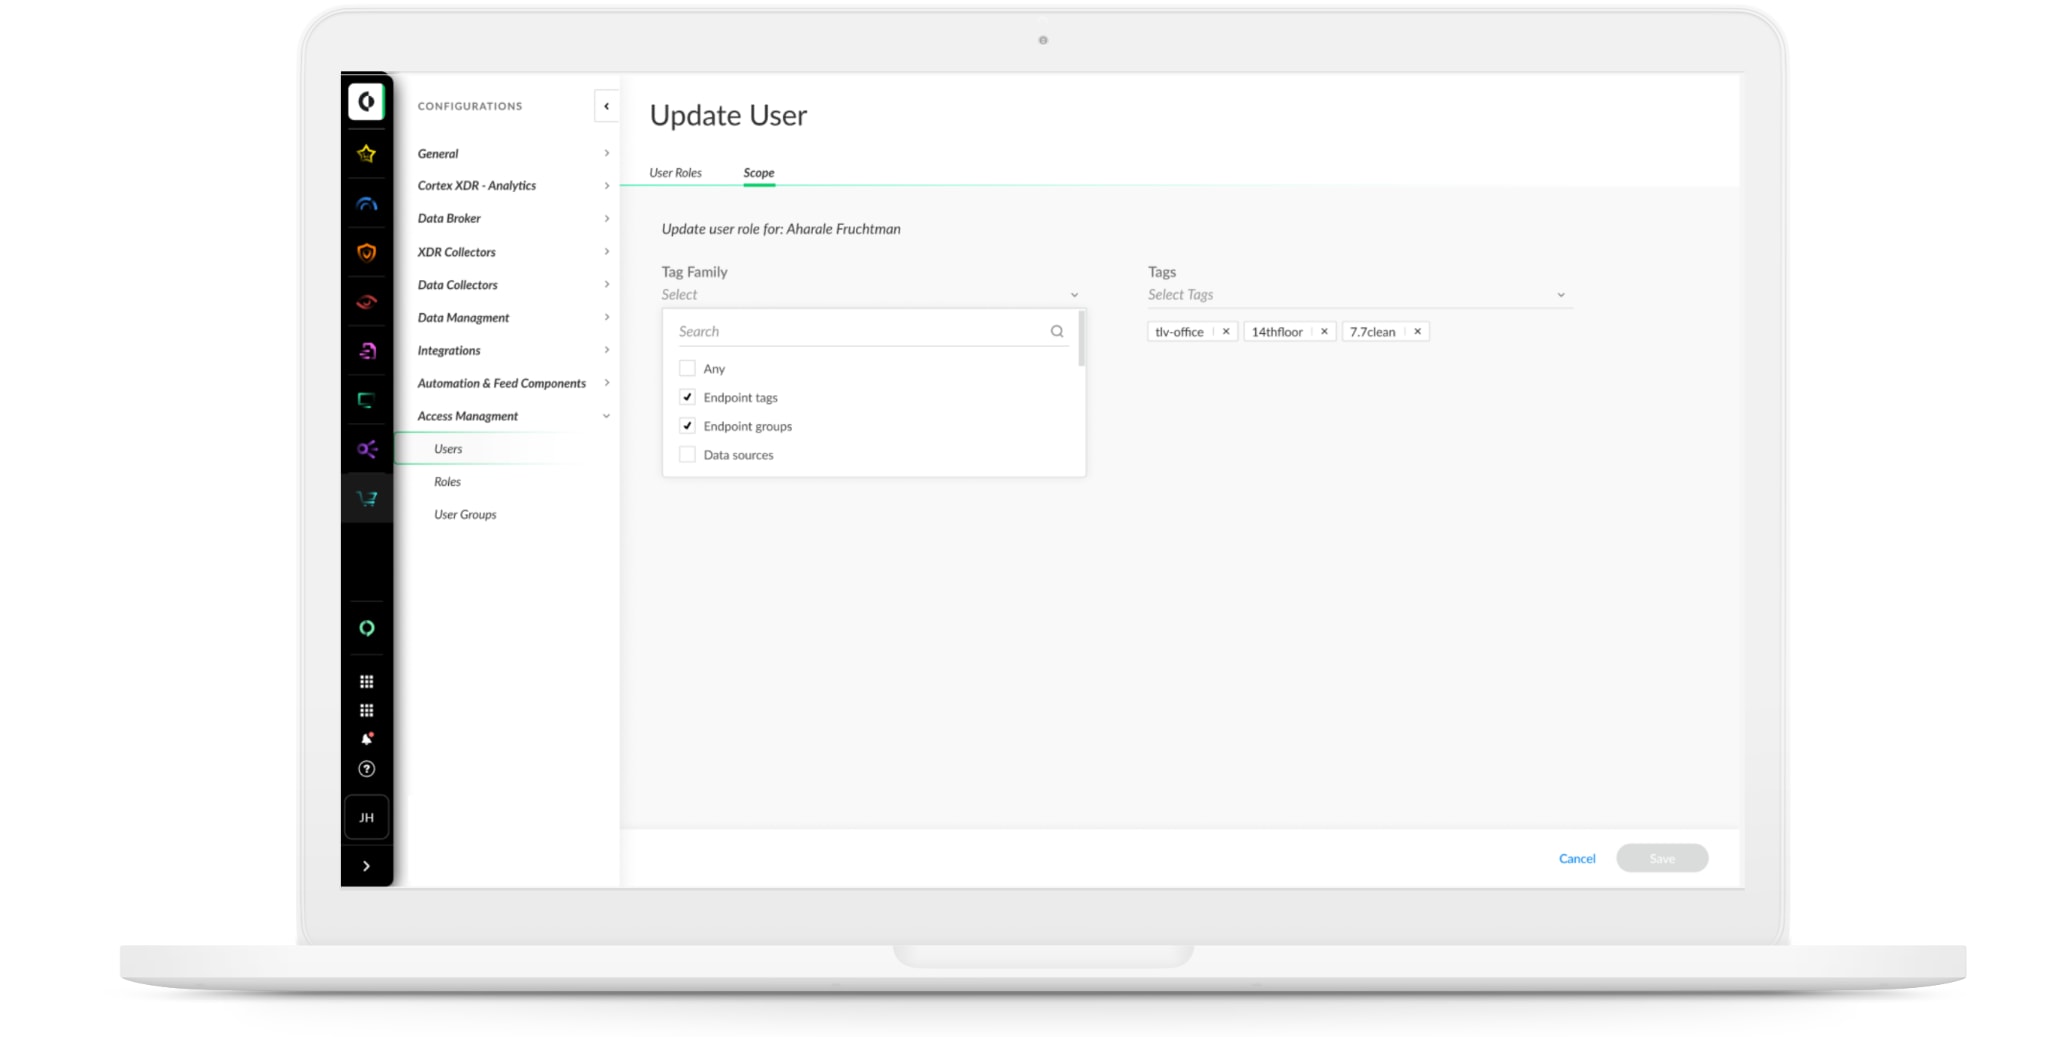
Scope-Based Access Control for Alerts and Incidents
To address data privacy and security requirements, you might wish to control which Cortex XDR alerts and incidents your users can view. With Cortex XDR 3.5, you can control which alerts and incidents users can access based on endpoint and endpoint group tags.
You can tag endpoints or endpoint groups by geographic location, organization, business unit, department or any other segmentation of your choice. Then, you can flexibly manage access to alerts and incidents based on the tags you’ve defined.
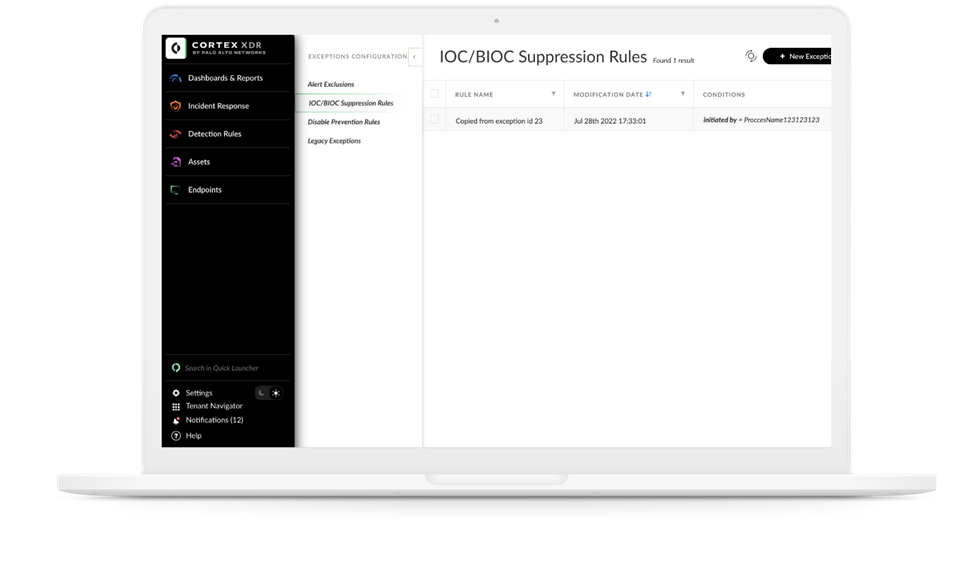
Alert Management Made Simple
Cortex XDR 3.5 provides several enhancements to ease alert management and reduce noise. First, you can now view and configure alert exclusions and agent exception policies from a central location. You are able to configure which alerts to suppress. You can also configure exceptions to IOC and BIOC rules to prevent matching events from triggering alerts.
A new Disable Prevention Rules feature enables you to granularly exclude prevention actions triggered by specific security modules. The Legacy Exceptions window shows legacy “allow list rules,” which are still available.
XQL Search Integration with Vulnerability Assessment
To help you quickly hunt down threats and discover high risk assets, we have enhanced our XQL search capability. Now you can uncover vulnerable endpoints and gain valuable exposure context for investigations by viewing Common Vulnerabilities and Exposures (CVEs), as well as installed applications per endpoint. You can also list all CVEs detected in your organization, together with the endpoints and applications impacted by each CVE.
In addition, XQL search supports several new options that offer greater flexibility and control to streamline investigation and response. Notably, a new top stage command reveals the top values for a specific field quickly, with minimal memory usage. By default the top stage command displays the top ten results.
Reverse-engineering reveals close similarities to BlackMatter ransomware, with some improvements
A postmortem analysis of multiple incidents in which attackers eventually launched the latest version of LockBit ransomware (known variously as LockBit 3.0 or ‘LockBit Black’), revealed the tooling used by at least one affiliate. Sophos’ Managed Detection and Response (MDR) team has observed both ransomware affiliates and legitimate penetration testers use the same collection of tooling over the past 3 months.
Leaked data about LockBit that showed the backend controls for the ransomware also seems to indicate that the creators have begun experimenting with the use of scripting that would allow the malware to “self-spread” using Windows Group Policy Objects (GPO) or the tool PSExec, potentially making it easier for the malware to laterally move and infect computers without the need for affiliates to know how to take advantage of these features for themselves, potentially speeding up the time it takes them to deploy the ransomware and encrypt targets.
A reverse-engineering analysis of the LockBit functionality shows that the ransomware has carried over most of its functionality from LockBit 2.0 and adopted new behaviors that make it more difficult to analyze by researchers. For instance, in some cases it now requires the affiliate to use a 32-character ‘password’ in the command line of the ransomware binary when launched, or else it won’t run, though not all the samples we looked at required the password.
We also observed that the ransomware runs with LocalServiceNetworkRestricted permissions, so it does not need full Administrator-level access to do its damage (supporting observations of the malware made by other researchers).
Most notably, we’ve observed (along with other researchers) that many LockBit 3.0 features and subroutines appear to have been lifted directly from BlackMatter ransomware.
Is LockBit 3.0 just ‘improved’ BlackMatter?
Other researchers previously noted that LockBit 3.0 appears to have adopted (or heavily borrowed) several concepts and techniques from the BlackMatter ransomware family.
We dug into this ourselves, and found a number of similarities which strongly suggest that LockBit 3.0 reuses code from BlackMatter.
Anti-debugging trick
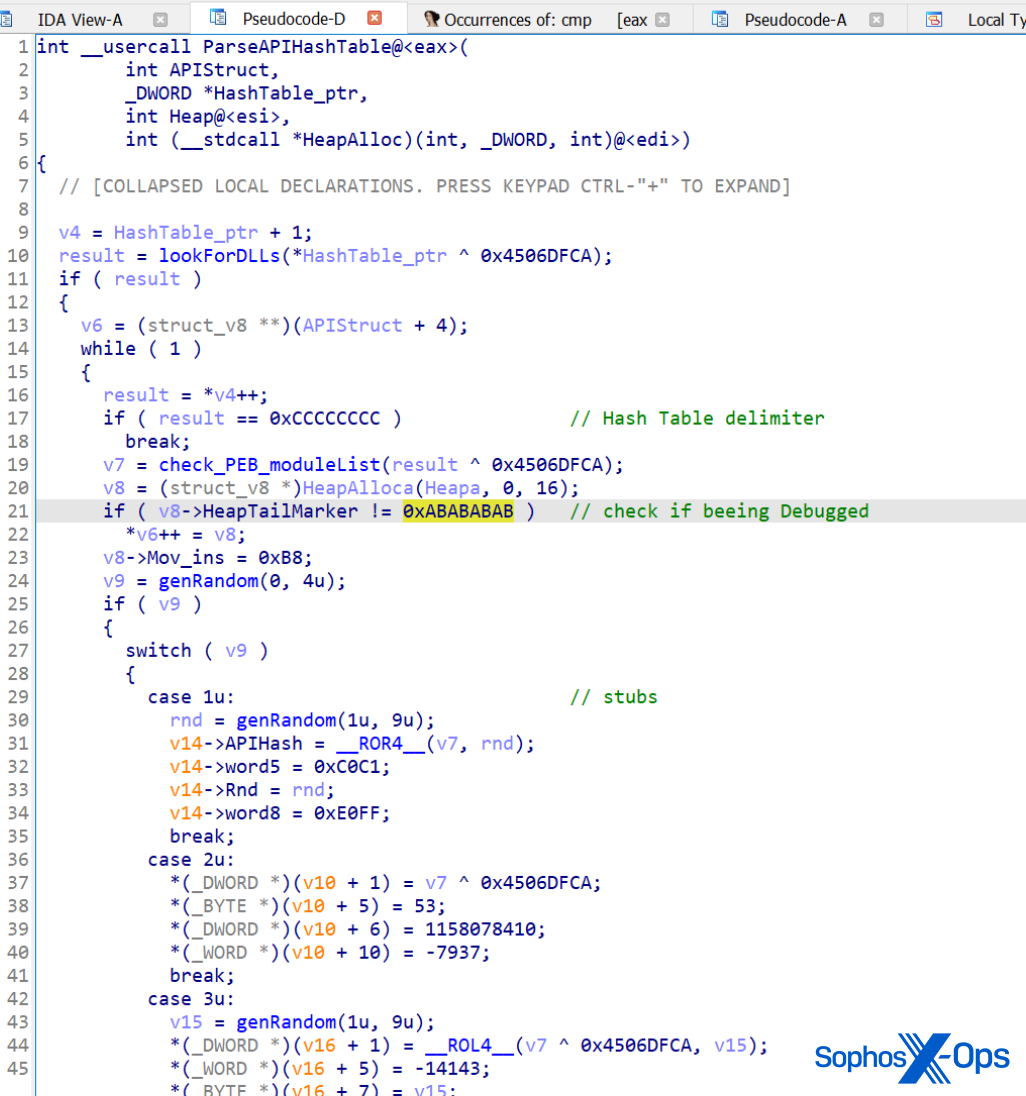
Blackmatter and Lockbit 3.0 use a specific trick to conceal their internal functions calls from researchers. In both cases, the ransomware loads/resolves a Windows DLL from its hash tables, which are based on ROT13.
It will try to get pointers from the functions it needs by searching the PEB (Process Environment Block) of the module. It will then look for a specific binary data marker in the code (0xABABABAB) at the end of the heap; if it finds this marker, it means someone is debugging the code, and it doesn’t save the pointer, so the ransomware quits.
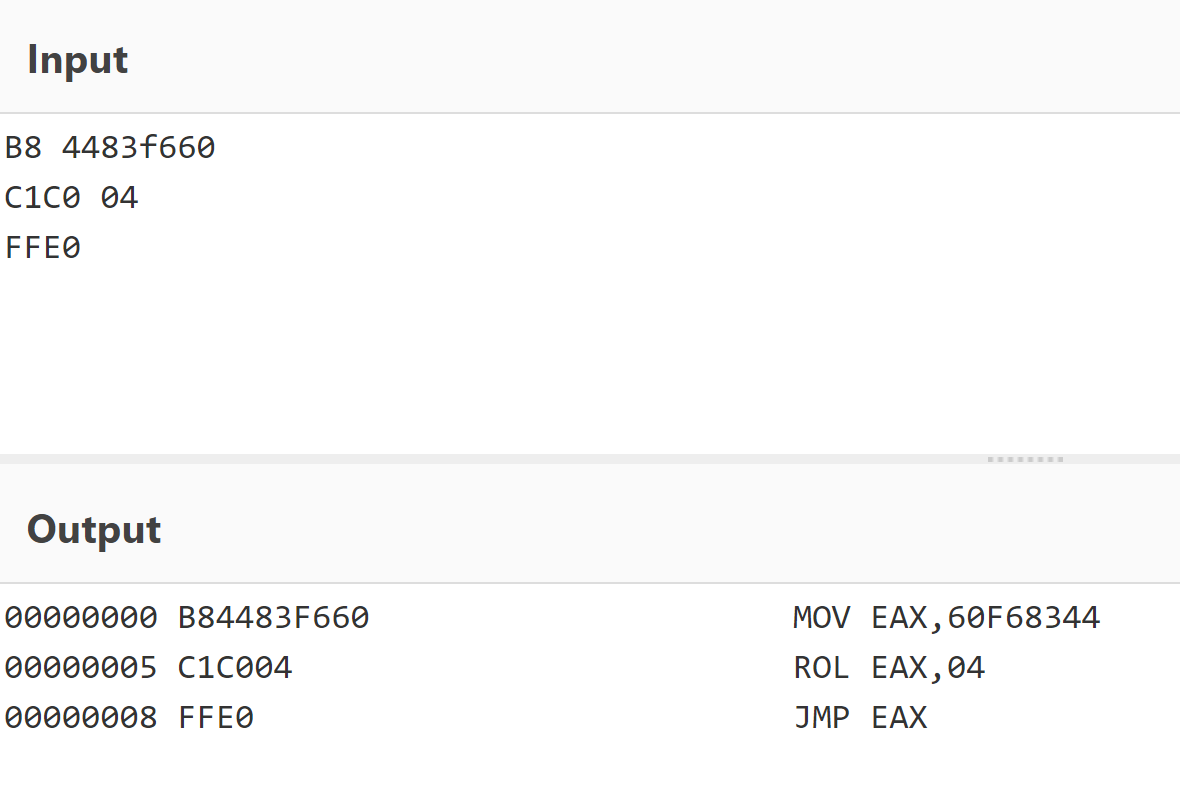
After these checks, it will create a special stub for each API it requires. There are five different types of stubs that can be created (randomly). Each stub is a small piece of shellcode that performs API hash resolution on the fly and jumps to the API address in memory. This adds some difficulties while reversing using a debugger.
The first stub, as an example (decoded with CyberChef)
Obfuscation of strings
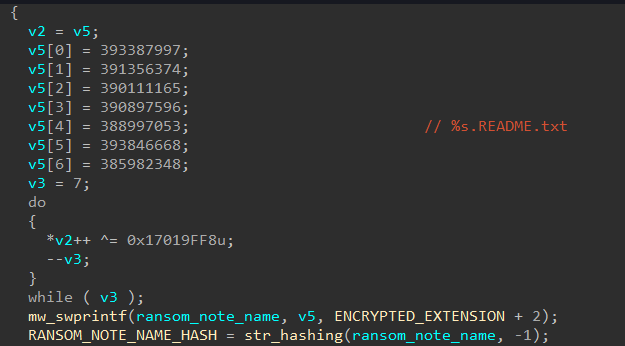
Many strings in both LockBit 3.0 and BlackMatter are obfuscated, resolved during runtime by pushing the obfuscated strings on to the stack and decrypting with an XOR function. In both LockBit and BlackMatter, the code to achieve this is very similar.
Georgia Tech student Chuong Dong analyzed BlackMatter and showed this feature on his blog, with the screenshot above.
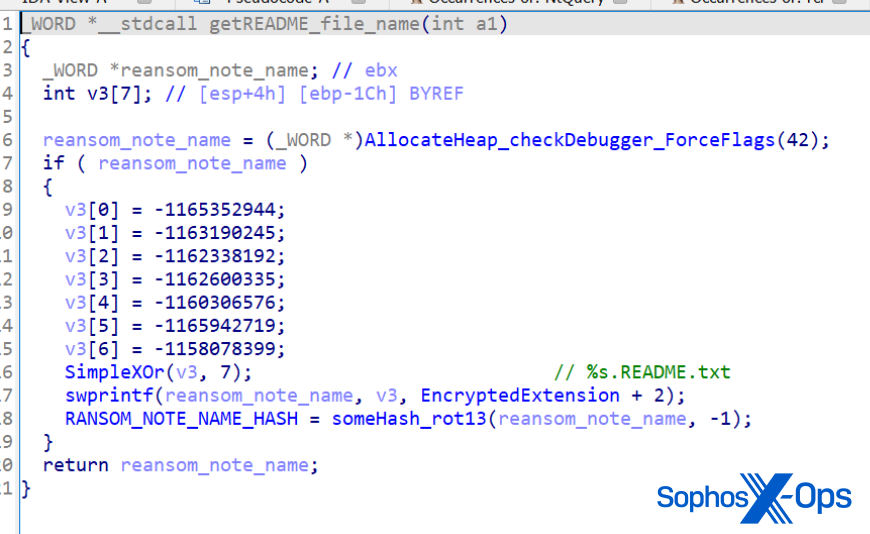
LockBit’s string obfuscation, in comparison
By comparison, LockBit 3.0 has adopted a string obfuscation method that looks and works in a very similar fashion to BlackMatter’s function.
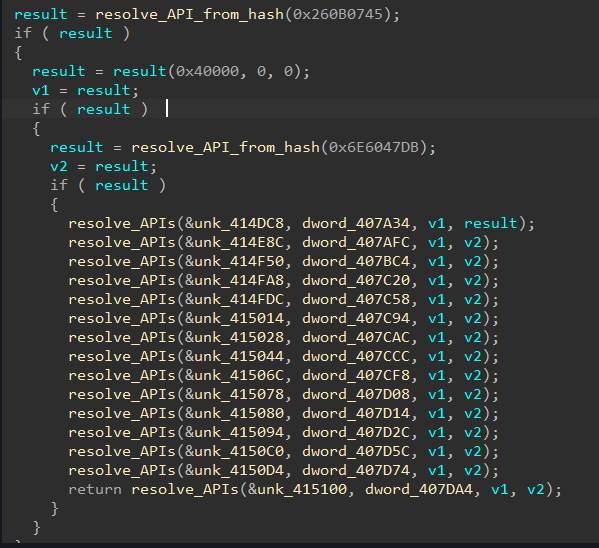
API resolution
LockBit uses exactly the same implementation as BlackMatter to resolve API calls, with one exception: LockBit adds an extra step in an attempt to conceal the function from debuggers.
BlackMatter’s dynamic API resolution (image credit: Chuong Dong)
The array of calls performs precisely the same function in LockBit 3.0.
LockBit’s dynamic API resolution
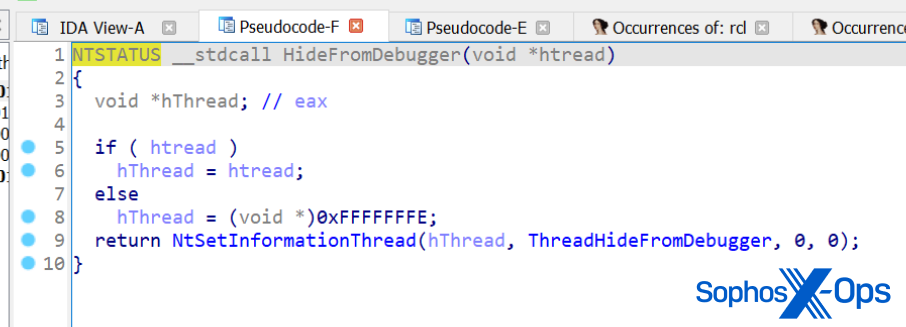
Hiding threads
Both LockBit and BlackMatter hide threads using the NtSetInformationThread function, with the parameter ThreadHideFromDebugger. As you probably can guess, this means that the debugger doesn’t receive events related to this thread.
LockBit employs the same ThreadHideFromDebugger feature as an evasion technique
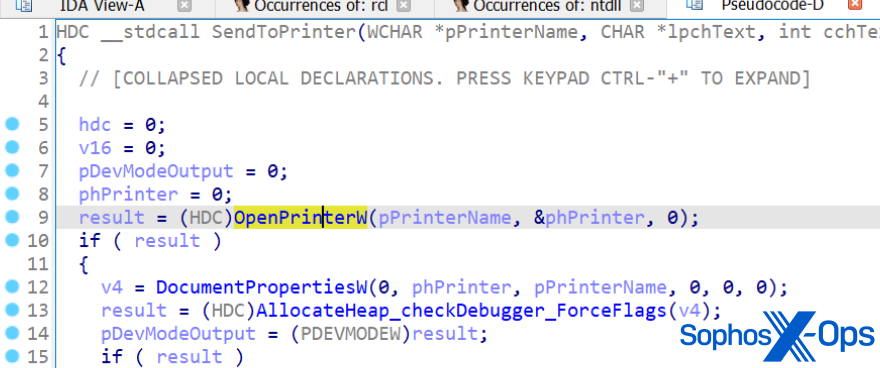
Printing
LockBit, like BlackMatter, sends ransom notes to available printers.
LockBit can send its ransom notes directly to printers, as BlackMatter can do
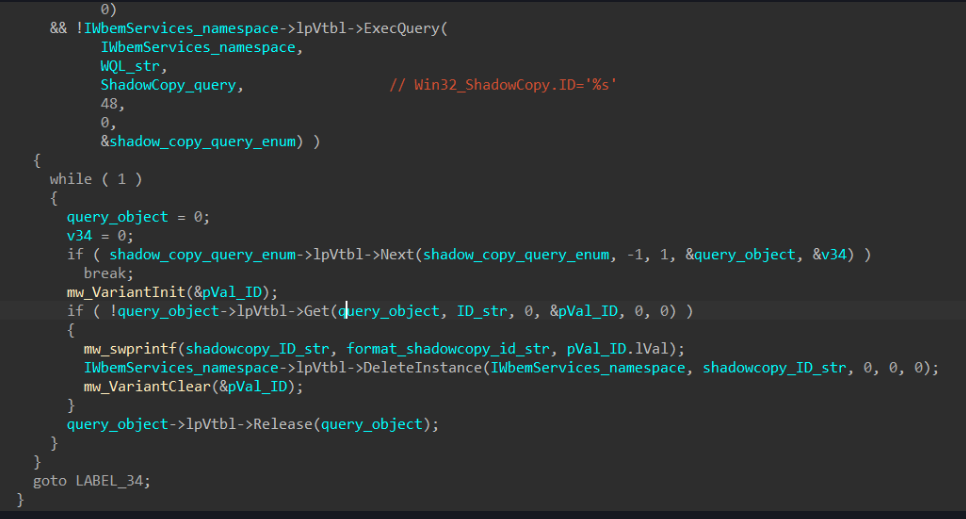
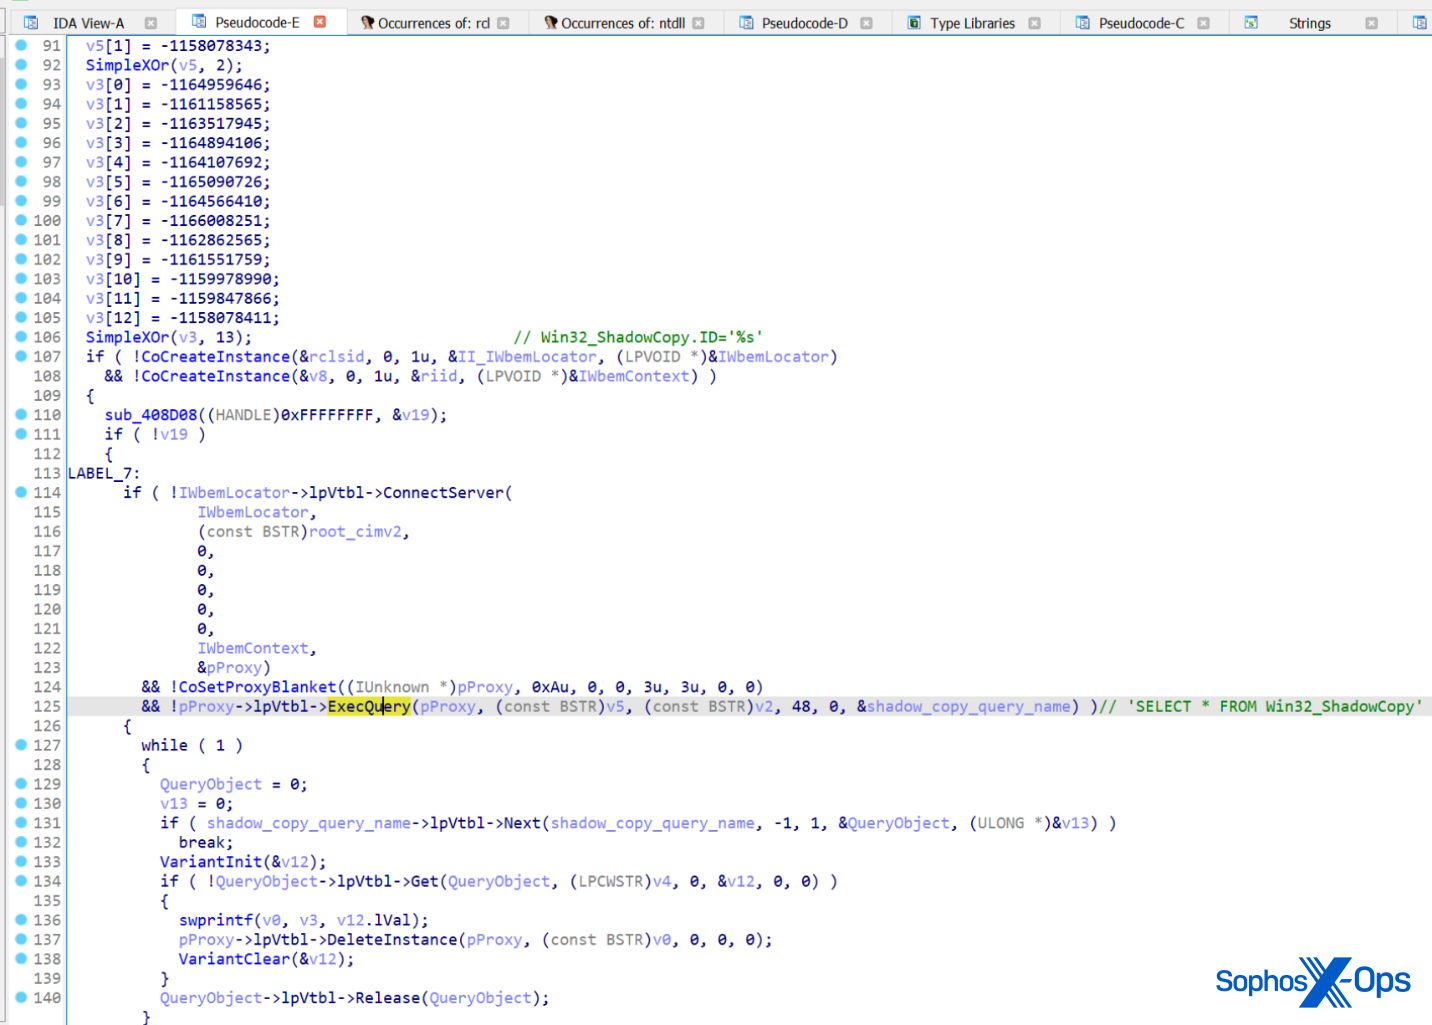
Deletion of shadow copies
Both ransomware will sabotage the infected computer’s ability to recover from file encryption by deleting the Volume Shadow Copy files.
LockBit calls the IWbemLocator::ConnectServer method to connect with the local ROOT\CIMV2 namespace and obtain the pointer to an IWbemServices object that eventually calls IWbemServices::ExecQuery to execute the WQL query.
BlackMatter code for deleting shadow copies (image credit: Chuong Dong)
LockBit’s method of doing this is identical to BlackMatter’s implementation, except that it adds a bit of string obfuscation to the subroutine.
LockBit’s deletion of shadow copies
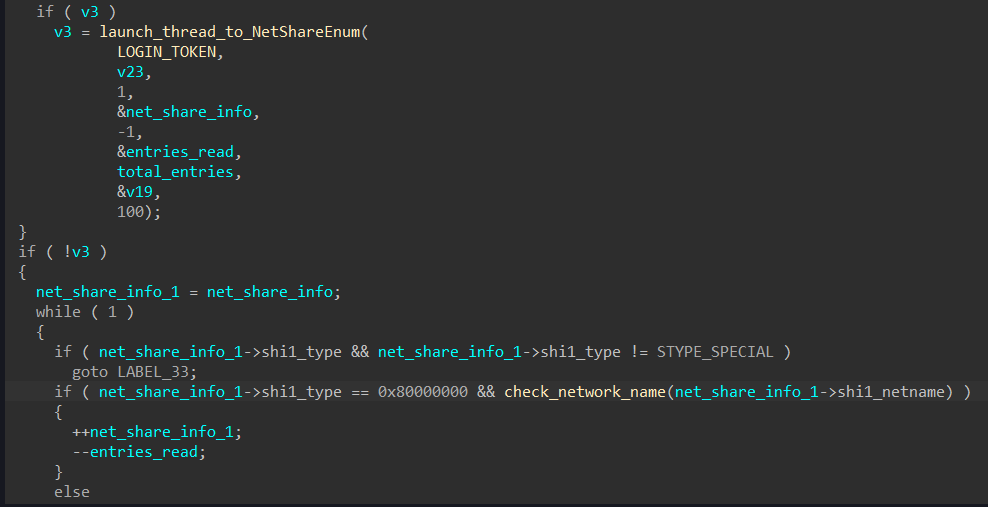
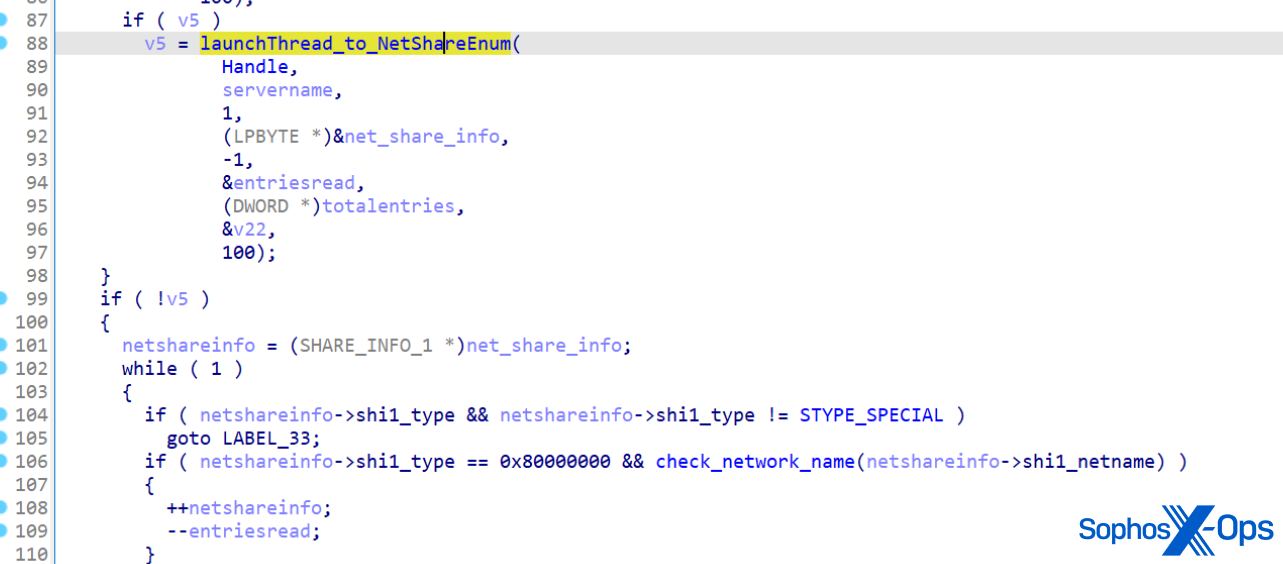
Enumerating DNS hostnames
Both LockBit and BlackMatter enumerate hostnames on the network by calling NetShareEnum.
BlackMatter calls NetShareEnum() to enumerate hostnames… (image credit: Chuong Dong)
In the source code for LockBit, the function looks like it has been copied, verbatim, from BlackMatter.
…as does LockBit
Determining the operating system version
Both ransomware strains use identical code to check the OS version – even using the same return codes (although this is a natural choice, since the return codes are hexadecimal representations of the version number).
BlackMatter’s code for checking the OS version (image credit: Chuong Dong)LockBit’s OS enumeration routine
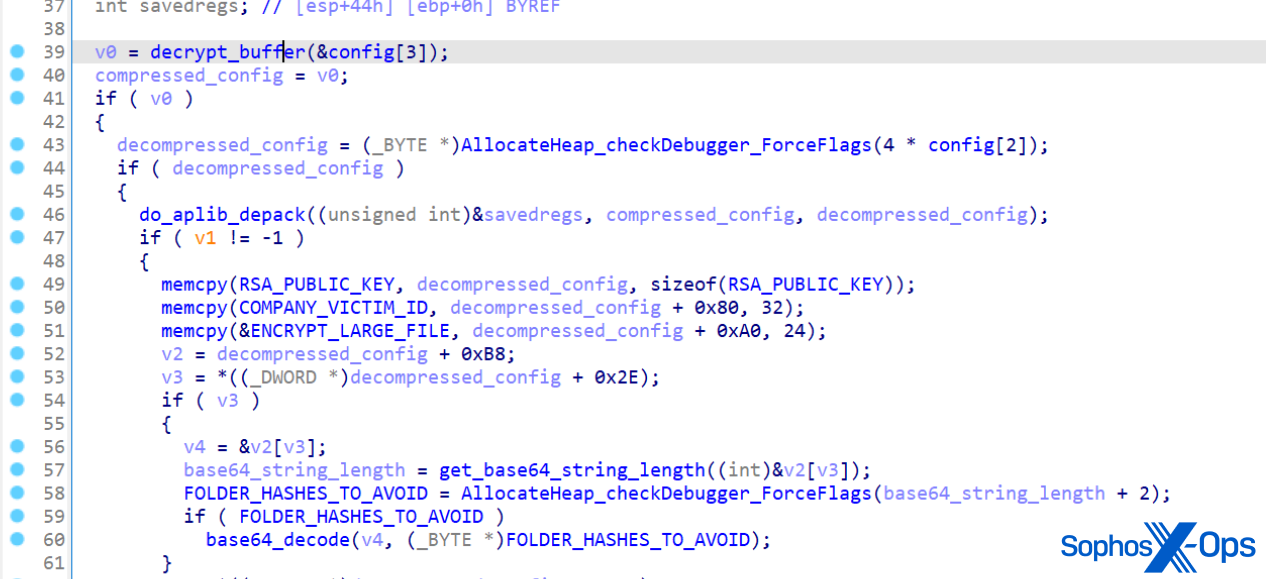
Configuration
Both ransomware contain embedded configuration data inside their binary executables. We noted that LockBit decodes its config in a similar way to BlackMatter, albeit with some small differences.
For instance, BlackMatter saves its configuration in the .rsrc section, whereas LockBit stores it in .pdata.
And LockBit uses a different linear congruential generator (LCG) algorithm for decoding.
LockBit’s config decryption routine
Some researchers have speculated that the close relationship between the LockBit and BlackMatter code indicates that one or more of BlackMatter’s coders were recruited by LockBit; that LockBit bought the BlackMatter codebase; or a collaboration between developers. As we noted in our white paper on multiple attackers earlier this year, it’s not uncommon for ransomware groups to interact, either inadvertently or deliberately.
Either way, these findings are further evidence that the ransomware ecosystem is complex, and fluid. Groups reuse, borrow, or steal each other’s ideas, code, and tactics as it suits them. And, as the LockBit 3.0 leak site (containing, among other things, a bug bounty and a reward for “brilliant ideas”) suggests, that gang in particular is not averse to paying for innovation.
LockBit tooling mimics what legitimate pentesters would use
Another aspect of the way LockBit 3.0’s affiliates are deploying the ransomware shows that they’re becoming very difficult to distinguish from the work of a legitimate penetration tester – aside from the fact that legitimate penetration testers, of course, have been contracted by the targeted company beforehand, and are legally allowed to perform the pentest.
The tooling we observed the attackers using included a package from GitHub called Backstab. The primary function of Backstab is, as the name implies, to sabotage the tooling that analysts in security operations centers use to monitor for suspicious activity in real time. The utility uses Microsoft’s own Process Explorer driver (signed by Microsoft) to terminate protected anti-malware processes and disable EDR utilities. Both Sophos and other researchers have observed LockBit attackers using Cobalt Strike, which has become a nearly ubiquitous attack tool among ransomware threat actors, and directly manipulating Windows Defender to evade detection.
Further complicating the parentage of LockBit 3.0 is the fact that we also encountered attackers using a password-locked variant of the ransomware, called lbb_pass.exe , which has also been used by attackers that deploy REvil ransomware. This may suggest that there are threat actors affiliated with both groups, or that threat actors not affiliated with LockBit have taken advantage of the leaked LockBit 3.0 builder. At least one group, BlooDy, has reportedly used the builder, and if history is anything to go by, more may follow suit.
LockBit 3.0 attackers also used a number of publicly-available tools and utilities that are now commonplace among ransomware threat actors, including the anti-hooking utility GMER, a tool called AV Remover published by antimalware company ESET, and a number of PowerShell scripts designed to remove Sophos products from computers where Tamper Protection has either never been enabled, or has been disabled by the attackers after they obtained the credentials to the organization’s management console.
We also saw evidence the attackers used a tool called Netscan to probe the target’s network, and of course, the ubiquitous password-sniffer Mimikatz.
Incident response makes no distinction
Because these utilities are in widespread use, MDR and Rapid Response treats them all equally – as though an attack is underway – and immediately alerts the targets when they’re detected.
We found the attackers took advantage of less-than-ideal security measures in place on the targeted networks. As we mentioned in our Active Adversaries Report on multiple ransomware attackers, the lack of multifactor authentication (MFA) on critical internal logins (such as management consoles) permits an intruder to use tooling that can sniff or keystroke-capture administrators’ passwords and then gain access to that management console.
It’s safe to assume that experienced threat actors are at least as familiar with Sophos Central and other console tools as the legitimate users of those consoles, and they know exactly where to go to weaken or disable the endpoint protection software. In fact, in at least one incident involving a LockBit threat actor, we observed them downloading files which, from their names, appeared to be intended to remove Sophos protection: sophoscentralremoval-master.zip and sophos-removal-tool-master.zip. So protecting those admin logins is among the most critically important steps admins can take to defend their networks.
For a list of IOCs associated with LockBit 3.0, please see our GitHub.
Acknowledgments
Sophos X-Ops acknowledges the collaboration of Colin Cowie, Gabor Szappanos, Alex Vermaning, and Steeve Gaudreault in producing this report.
Discover the seven network security measures that can help mitigate the risk of a ransomware attack.
66% of organizations were hit by ransomware last year* demonstrating that adversaries have become considerably more capable at executing attacks at scale than ever before.
Modern attacks leverage legitimate IT tools such as Remote Desktop Protocol (RDP) to gain access to networks, making initial detection notoriously difficult. The root of the problem is that there’s too much implicit trust in the use of these tools which has repeatedly proven unwise.
Implementing robust network security measures is a sure-fire way to mitigate this risk. In our new whitepaper, Best Practices for Securing Your Network from Ransomware, and in this article, we share practical network security tips to help elevate your ransomware protection.
1. Micro-segment your network
Micro-segmenting allows you to limit the lateral movement of threats. One way to achieve this is to create small zones or VLANs and connect them via managed switches and a firewall to apply anti-malware and IPS protection between segments. This lets you identify and block threats attempting to move laterally across your network.
2. Replace remote-access VPN with a Zero Trust Network Access solution (ZTNA)
ZTNA is the modern replacement for remote-access VPN. It eliminates the inherent trust and broad access that VPN provides, instead using the principles of Zero Trust: trust nothing, verify everything. To learn more about the benefits of ZTNA over VPN, read our article here.
3. Implement the strongest possible protection
Always deploy the highest level of protection on your firewall, endpoints, servers, mobile devices, and remote access tools. In particular:
Ensure your firewall has TLS 1.3 inspection, next-gen IPS, and streaming DPI with machine learning and sandboxing for protection from the latest zero-day threats
Ensure your endpoints have modern next-gen protection capabilities to guard against credential theft, exploits, and ransomware
4. Reduce the surface area of cyberattacks
We recommend that you review your firewall rules and eliminate any remote access or RDP system access through VPN, NAT, or port-forwarding, and ensure that any traffic flows are properly protected. Eliminating exposure from remote access goes a long way in reducing the number of in-roads for attackers to launch ransomware attacks.
5. Keep your firmware and software patched and up-to-date
This is important for both your network infrastructure (such as your firewall or remote-access software or clients) and your systems given that every update includes important security patches for previously discovered vulnerabilities.
6. Use multi-factor authentication (MFA)
Ensure your network operates on a zero-trust model where every user and device has to continually earn trust by verifying their identity. Also, enforce a strong password policy and consider adopting authentication solutions like Windows Hello for Business.
7. Instantly respond to cyberattacks
Use automation technologies and human expertise to accelerate cyber incident response and remediation. Ensure your network security infrastructure helps you automatically respond to active attacks so you can isolate a compromised host before it can cause serious damage.
An increasingly popular way to achieve this is via a managed detection and response (MDR) service. MDR is a fully managed, 24/7 service delivered by experts who specialize in detecting and responding to cyberattacks that technology solutions alone cannot prevent. To learn more on the benefits of MDR, read our article here.
Learn more
To explore these best practices in greater detail and to learn how Sophos network security solutions elevate your ransomware protection, download our whitepaper here.
Sophos provides everything you need to fully secure your network from attacks, including firewalls, ZTNA, switches, wireless, remote-edge devices, messaging protection, MDR, next-gen endpoint protection, EDR and XDR. Plus, everything’s managed via a single cloud management console — Sophos Central — and works together to deliver Synchronized Security and cross-product threat detection and response.
For more information and to discuss how Sophos can help you, speak with one of our advisors or visit www.sophos.com today.
4,986 IT professionals in small and mid-sized organizations (SMBs) share their real-world experiences
For most small and mid-sized organizations, the reality of ‘moving to the cloud’ has been a gradual transition of on-premises resources to the cloud, with many now running hybrid environments.
To understand the reality of cloud security today for SMBs, Sophos commissioned a survey of 4,984 IT professionals across 31 countries whose organizations use Infrastructure as a Service (IaaS). This vendor-agnostic study was conducted by Vanson Bourne, a leading independent research agency.
The findings highlight considerable gaps in cloud defenses for SMB organizations together with opportunities for improvement. They also demonstrate the real-world benefits of strong cloud practice on an organization’s experience of cyberthreats.
The Cloud Is a Growing Target for Cyberattacks
As use of the cloud increases, so does the focus it receives from cyber criminals. The survey revealed major changes in IaaS users’ experience of cyberattacks over the last year:
56% experienced an increase in volume of attacks on their organization
59% experienced an increase in complexity of attacks on their organization
53% experienced an increase in impact of attacks on their organization
67% reported that their organization was hit by ransomware
It is clear that the challenge facing defenders in the cloud is increasing rapidly.
Strong Cloud Practice Reduces Threat Exposure
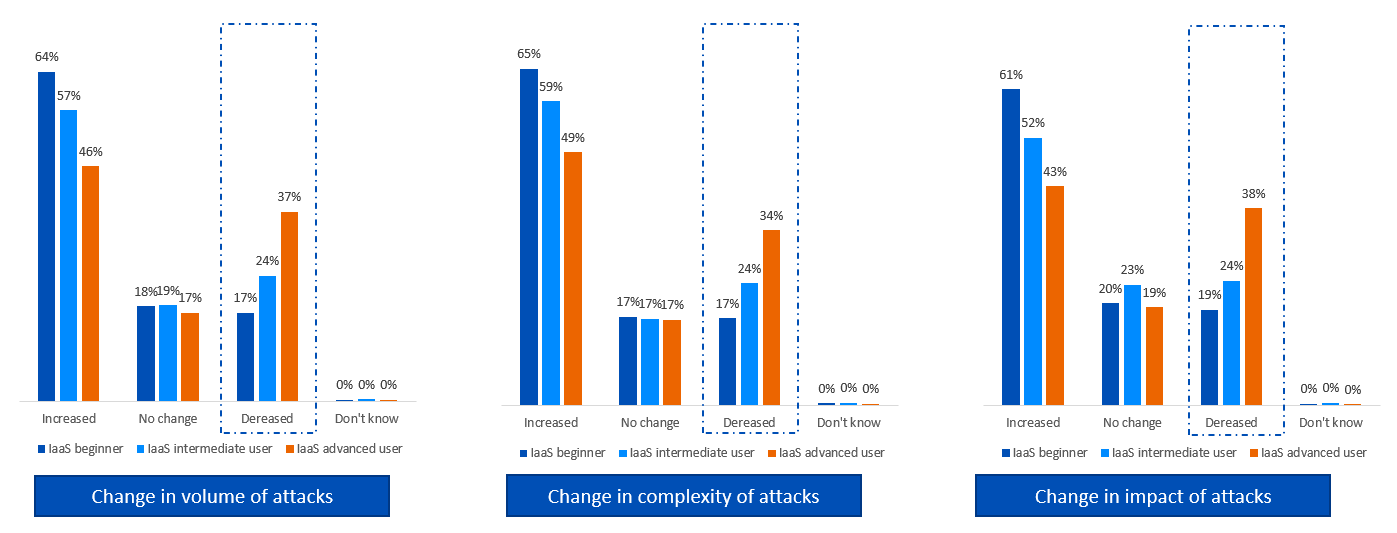
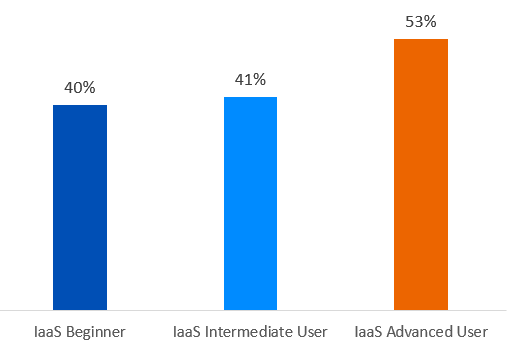
The good news is that advanced IaaS users are twice as likely to report a decrease in attack volume, complexity and impact over the last year than beginners. For example, 38% of advanced users reported that the impact of attacks had decreased over the last year compared to 19% of beginners.
With regards to volume, complexity, and impact, how has your organization’s experience of cyberattacks changed over the last year? (4,984 respondents that define themselves as Infrastructure as a Service users).
The data also reveals that advanced cloud users are far less likely to have experienced an increase in the volume, complexity, and impact of an attack; for example, 61% of beginners reported an increase in attack impact compared to only 43% of advanced users.
Attack Surface Weaknesses Revealed
Resource misconfigurations and unpatched vulnerabilities leave the door wide open for ransomware actors and other adversaries to get into your environment and carry out their attack.
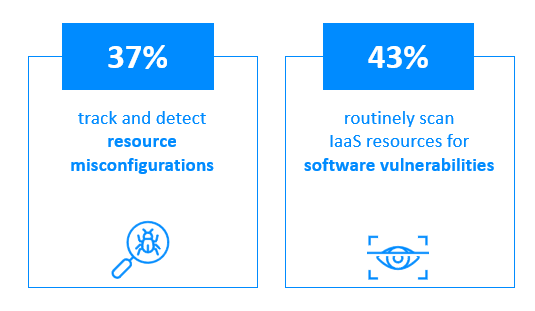
Unfortunately, most SMBs are highly exposed in this area. Only 37% of survey respondents said their organization tracks and detects resource misconfigurations in their IaaS infrastructure. What’s more, fewer than half (47%) said they routinely scan IaaS resources for software vulnerabilities.
IT Teams Are Blind to Resources and Configurations
Adversaries commonly exploit stolen credentials and access data to access and compromise accounts. Once inside an organization, it’s often fairly easy for them to escalate privileges and move laterally across the victim’s infrastructure to carry out their attack.
Having visibility of all your resources and their configurations so you can quickly spot compromise and then take action is an important element of an effective cloud security strategy.
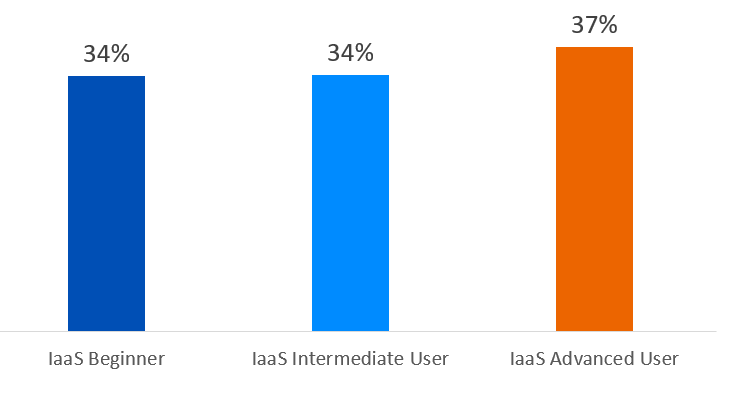
However, the survey reveals that this is a major security gap for almost two in three cloud users. Interestingly – and concerningly – there is little variation according to level of cloud experience: 34% of beginner and intermediate IaaS users have visibility of all resources and their configurations in their IaaS infrastructure, and this rises to just 37% for advanced users. This is a clear opportunity for organizations to elevate their cloud defenses.
Percentage of respondents that said their organization has visibility of all IaaS resources and their configurations
24/7 Threat Detection and Response Capabilities
The reality is that not all threats can be prevented automatically as attackers increasingly exploit legitimate IT tools and unpatched vulnerabilities to avoid triggering protection solutions. Stopping today’s most advanced attacks requires a combination of technology and human expertise.
Threat detection and response is a 24/7 activity with adversaries conducting attacks at any time of day or night. However, the study revealed very few organizations have the necessary resources to hunt down and neutralize active adversaries around the clock.
In fact, only one in three (33%) IaaS users says their organization has the resources to continuously detect, investigate and remove threats in their IaaS infrastructure. And only one in four (40%) has processes in place to respond to IaaS infrastructure security incidents 24/7, with intermediate and advanced IaaS users a little better positioned than beginners.
Percentage of respondents that said their organization has processes in place to respond to security incidents in their IaaS infrastructure 24/7.
As the challenges facing defenders continues to grow, many organizations are turning to managed detection and response (MDR) services, with Gartner anticipating that 50% of organizations will use MDR by 2025*.
Secure Access To Cloud Resources
The role of the firewall in securing access to on-premises resources is already well established. When it comes to securing the cloud, you need to apply the same principles you used for hardware firewalls to virtual firewalls.
Given the parallels between traditional and virtual firewalls it is perhaps surprising that the survey revealed that fewer than half of organizations have strong defenses in place here: only 40% have IPS in place to secure their IaaS infrastructure and just 44% use a WAF to protect web-facing applications and APIs.
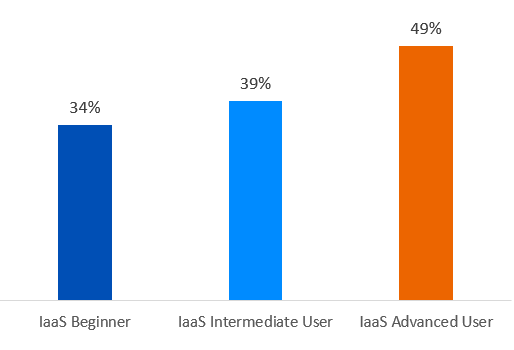
Interestingly, this is one area where we see advanced users reporting much higher adoption of best practices than beginner and intermediate users. Almost half (49%) of advanced IaaS users have IPS in place compared to 34% of beginners, and 53% of advanced users deploy WAF to secure their cloud-based resources compared with just 40% of those in the early stages of their IaaS journey.
Percentage of respondents that said their organization has IPS in place to defend their IaaS infrastructure against known threatsPercentage of respondents that said they use web application firewalls (WAF) to protect web-facing applications and APIs
To Sum Up
Just as the use of the cloud is an ongoing process of transition for many organizations, so is cloud security. Many of the principles are the same as for traditional on-premises security, with adaptations to reflect the differences in cloud usage and threat risk.
By addressing the security gaps highlighted in this research, small and mid-sized organizations can elevate their defenses and minimize their risk of experiencing a major cloud security incident.
How Sophos Can Help
Sophos is a global cloud security specialist, working with all leading cloud providers including AWS, Azure, Google Cloud (GCP) and Oracle. Today, Sophos secures over 530,000 organizations around the world and we are proud to be the only vendor named a Gartner Peer Insights Customers’ Choice for both endpoint and network security**. Our cloud security solutions include:
Sophos Cloud Native Security (CNS) provides complete cloud security coverage, enabling you to protect all your servicers, from on-premises to single and multi-cloud, Windows to Linux.
Sophos Firewall offers powerful network visibility, protection, and response to secure your public, private, and hybrid cloud environments. With preconfigured virtual machines in both Azure and AWS, you can be up and running quickly.
Sophos MDR is our market-leading 24/7 managed detection and response service. We use the tools you already have in place, including your cloud provider telemetry, to identify and stop advanced, human-led attacks before they can impact your business.
For more information on Sophos solutions and to arrange a test drive, speak to your Sophos adviser or visit www.sophos.com.
* Gartner Market Guide for Managed Detection and Response 2021
**Gartner Peer Insights content consists of the opinions of individual end users based on their own experiences with the vendors listed on the platform, should not be construed as statements of fact, nor do they represent the views of Gartner or its affiliates. Gartner does not endorse any vendor, product or service depicted in this content nor makes any warranties, expressed or implied, with respect to this content, about its accuracy or completeness, including any warranties of merchantability or fitness for a particular purpose. Gartner Peer Insights Customers’ Choice constitute the subjective opinions of individual end-user reviews, ratings, and data applied against a documented methodology; they neither represent the views of, nor constitute an endorsement by, Gartner or its affiliates.
Discover the six endpoint security measures that can help mitigate the risk of a ransomware attack.
With 66% of organizations hit by attacks last year, ransomware remains one of greatest cyber threats to organizations across the globe.
The barrier to entry for would-be ransomware actors is now lower than ever, largely due to the seismic shift to the ‘as-a-service’ model that has put advanced threat tactics into the hands of nearly any criminal that wants them. Furthermore, as cyber defenses continue to get stronger, ransomware operators have evolved their approaches in an attempt to bypass today’s advanced protection technologies, abusing legitimate IT tools and even learning new programming languages to evade detection.
Endpoint protection remains one of the most effective ways to defend your devices from ransomware, but it must configured properly to deliver optimum protection. In our recently updated report Endpoint Best Practices to Block Ransomware, and in this article, we share practical endpoint security tips to help elevate your ransomware defenses.
1.Turn on all policies and ensure all features are enabled
Policies are designed to stop specific threats. Regularly checking that all protection options are enabled ensures your endpoints are protected against current and emerging ransomware.
Sophos customers managing their endpoint protection through Sophos Central benefit from the “Account Health Check” tool, which automatically assesses your account configuration to identify potential security gaps and guides you in how to optimize protection. You can learn more about this feature here.
2.Regularly review your exclusions
Exclusions prevent trustworthy directories and file types from being scanned for malware. They are sometimes used to reduce system delays and minimize the risk of false-positive security alerts. Over time, a growing list of excluded directories and file types can impact many people across a network. Malware that manages to make its way into excluded directories — perhaps accidentally moved by a user — will likely succeed. Regularly check your list of exclusions within your threat protection settings and limit the number of exclusions.
3.Enable multi-factor authentication (MFA)
MFA provides an additional layer of security after the first factor, which is often a password. Enabling MFA across your applications is critical for all users who have access to your security console. Doing so ensures access to your endpoint protection solution is secure and not prone to accidental or deliberate attempts to change your settings that can otherwise leave your endpoint devices vulnerable to attacks. MFA is also critical to secure RDP.
4.Ensure every endpoint is protected and up to date
Check your devices regularly to find out if they’re protected and up to date. A device not functioning correctly may not be protected and could be vulnerable to a ransomware attack. Endpoint security tools often provide this telemetry. An IT hygiene maintenance program is also helpful for regularly checking for any potential IT issues.
5.Maintain good IT hygiene
Regularly evaluating your IT hygiene ensures your endpoints and the software installed on them run at peak efficiency. It also mitigates your cybersecurity risk and can save you time when you remediate future incidents.
6.Proactively hunt for active adversaries across your network
In today’s threat landscape, malicious actors are more cunning than ever, often deploying legitimate tools and stolen credentials to avoid detection. To identify and stop these attacks, it’s essential to proactively hunt for advanced threats and active adversaries. Once found, you also need to be able to take appropriate actions to quickly stop them. Tools such as extended detection and response (XDR) enable security analysts to conduct threat hunting and neutralization. Organizations with these technologies should take full advantage of them.
Many organizations struggle to maintain round-the-clock coverage to defend against advanced ransomware attacks — that’s why managed detection and response (MDR) services are key. MDR services provide 24/7 threat hunting delivered by experts who specialize in detecting and responding to cyberattacks that technology solutions alone cannot prevent. They also provide the highest level of protection against advanced, human-led ransomware attacks. To learn more on the benefits of MDR, read our article here.
To explore these best practices in greater detail and to learn how Sophos security solutions elevate your ransomware protection, download our whitepaper here.
Learn More
Sophos Endpoint reduces the attack surface and prevents attacks from running. It combines anti-exploit, anti-ransomware, deep learning AI, and control technology to stop attacks before they impact your systems. It integrates powerful extended detection and response (XDR) with automated detections and investigations, so you can minimize the time to detect and respond to threats.
Weighing the lessons of Sun Tzu and how they apply to cybersecurity.
Sun Tzu sought to revolutionize the way war was fought. That’s saying quite a bit, since he was born in 544 BCE and lived during an era when most wars were little more than gruesome bludgeoning events between one or more groups armed with axes, clubs and sharp sticks.
While not much information about Sun Tzu’s life has survived, we know he was employed by the then-ruler of the Kingdom of Wei in what is now the northeastern heart of China. He was a Chinese general and philosopher who envisioned the psychological aspects of war, which was a completely original approach to armed conflict in ancient China.
Many historians believe Sun Tzu’s book was intended to help his colleagues engage in the many regional conflicts they faced. Today, Sun Tzu’s the Art of War is a bestseller that has transcended 2,000 years and hundreds of wars. The book has become a kind of Rosetta Stone of military theory, cited by theorists and translated well beyond the battlefield to gain prevalence in business schools worldwide and now cybersecurity.
The Art of Cyberwar: preparation.
Adapting Sun Tzu’s many well-known quotes to cybersecurity is pretty straightforward. We looked for three that could best describe important aspects of cybersecurity: preparation, planning and knowledge. For preparation, we settled on a re-quote of this well-known warning:
Cyber warfare is of vital importance to any company. It is a matter of life and death, a road to safety or ruin.
Despite his military background, Sun Tzu claimed that direct fighting was not the best way to win battles. But when fighting was necessary, it was wise to carefully prepare for every possibility. That’s the lesson commonly ignored by companies who, after a severe breach, found themselves fined, shamed and scorned because they neglected their network security and failed to protect themselves from attackers. To prepare, we not only need the most advanced technology possible, but we must also train the workforce and make cybersecurity everyone’s business.
The Art of Cyberwar: planning.
In the realm of planning, we considered how the “art” is also a source of wisdom for attackers:
Where we intend to fight must not be made known. Force the enemy to prepare against possible attacks from several different points and cause them to spread their defenses in many directions; the numbers we shall have to face at any given moment will be proportionately few.
This re-quote relates to other stratagems where Sun Tzu urges his generals to never underestimate their enemies and to plan for all possibilities. The same goes for cyber attackers. They will pick the easy battles to ensure they have the upper-hand. Therefore, as we engage our defense, it is wise to plan our defenses as though we are already targeted and have been breached.
The Art of Cyberwar: knowledge.
Sun Tzu guides us away from making rash emotional decisions by emphasizing the importance of knowledge. He suggested that leaders gain as much knowledge as possible when preparing for battle, but not to limit themselves to the enemy’s strengths and weaknesses.
If you know the enemy and know yourself, you need not fear the result of a hundred battles. If you know yourself but not the enemy, for every victory gained you will also suffer a defeat. If you know neither the enemy nor yourself, you will succumb in every battle.
This bit of advice is a direct quote and accurately describes how cybersecurity should operate. Businesses must maximize the power of threat intelligence by giving IT teams the means to analyze real-time analytics and transform every scrap of data into actionable insights. IT teams should also be empowered to consider everything that could happen and assess the best course of action before, during and after a breach.
Explore and learn about the Art of Cyber War.
War theorists have long-standing debates about categorizing military activity preparations and execution. General Carl von Clausewitz stands next to Sun Tzu as one of the best-known and most respected thinkers on the subject. Paraphrasing from Clausewitz’s book Von Kriege (On War) published in 1832), he observes that the preparation for war is scientific, but the conduct of battle is artistic. As a science, we study logistics, technology and other elements depending on need. As an art, we rely on individual talent and grit to exploit opportunities that increase the likelihood of victory. Clausewitz also believed that war belonged to the province of social life, as are all conflicts of great human interest.
Cyberwar also fits these definitions. For instance, consider business activity as a combination of science, art and social life. As businesses compete in the marketplace, they carefully analyze the competition, create ways to appeal to audiences and press for social engagement and interaction. Shouldn’t we apply the same level of attention and resources for our cybersecurity? We think Sun Tzu would rub his beard and nod profoundly.
Cyberattacks for this year already eclipse the full-year totals from 2017, 2018 and 2019, according to the mid-year update to the 2022 SonicWall Cyber Threat Report. And new attack vectors are coming online every day. Without adequate preparation, planning and knowledge, companies and their customers are at a high risk of falling victim to devastating cyberattacks.
Summary: Dell EMC PowerScale OneFS remediation is available for multiple vulnerabilities that may potentially be exploited by malicious users to compromise the affected system.
Article Content
Impact
Critical
Overview
Proprietary Code CVEs
Description
CVSS Base Score
CVSS Vector String
CVE-2022-24411
Dell PowerScale OneFS 8.2.2 and later contain an elevation of privilege vulnerability. A local attacker with ISI_PRIV_LOGIN_SSH and/or ISI_PRIV_LOGIN_CONSOLE may potentially exploit this vulnerability, leading to elevation of privilege. This may potentially allow users to circumvent PowerScale Compliance Mode guarantees.
7.8
CVSS:3.1/AV:L/AC:L/PR:L/UI:N/S:U/C:H/I:H/A:H
CVE-2022-24412
Dell EMC PowerScale OneFS 8.2.x – 9.3.0.x contain an improper handling of value vulnerability. An unauthenticated remote attacker may potentially exploit this vulnerability, leading to denial-of-service.
7.5
CVSS:3.1/AV:N/AC:L/PR:N/UI:N/S:U/C:N/I:N/A:H
CVE-2022-23161
Dell PowerScale OneFS versions 8.2.x – 9.3.0.x contain a denial-of-service vulnerability in SmartConnect. An unprivileged network attacker may potentially exploit this vulnerability, leading to denial-of-service.
7.5
CVSS:3.1/AV:N/AC:L/PR:N/UI:N/S:U/C:N/I:N/A:H
CVE-2022-23160
Dell PowerScale OneFS 8.2.x – 9.3.0 contain an Improper Handling of Insufficient Permissions vulnerability. An remote malicious user may potentially exploit this vulnerability, leading to gaining write permissions on read-only files.
5.4
CVSS:3.1/AV:N/AC:L/PR:L/UI:N/S:U/C:N/I:L/A:L
CVE-2022-23159
Dell PowerScale OneFS 8.2.x – 9.3.0.x contain a missing release of memory after effective lifetime vulnerability. An authenticated user with ISI_PRIV_LOGIN_SSH and/or ISI_PRIV_LOGIN_CONSOLE and ISI_PRIV_AUTH_PROVIDERS privileges may potentially exploit this vulnerability, leading to a Denial-Of-Service. This can also impact a cluster in Compliance mode. Dell recommends to update at the earliest opportunity.
4.8
CVSS:3.1/AV:N/AC:H/PR:L/UI:R/S:U/C:N/I:N/A:H
CVE-2022-23163
Dell PowerScale OneFS 8.2.x – 9.3.0.x contain a denial of service vulnerability. A local attacker with minimal privileges may potentially exploit this vulnerability, leading to denial of service/data unavailability.
4.7
CVSS:3.1/AV:L/AC:H/PR:L/UI:N/S:U/C:N/I:N/A:H
CVE-2022-24413
Dell PowerScale OneFS 8.2.2-9.3.x contain a time-of-check-to-time-of-use vulnerability. A local user with access to the filesystem may potentially exploit this vulnerability, leading to data loss.
Dell Technologies recommends all customers consider both the CVSS base score and any relevant temporal and environmental scores that may impact the potential severity associated with a particular security vulnerability.
Disable netbios support if enabled (default setting: disabled):Open an SSH connection on any node in the cluster and log on using the “root” account.Run the following command:#isi smb settings global modify –support-netbios noTo verify that the service is disabled, run the following command:#isi smb settings global view | grep NetBIOSIf the service is disabled, the following output is displayed:#Support NetBIOS: No
CVE-2022-23161
Configure a valid FQDN in the SmartConnect service name field for every SmartConnect subnet on the cluster:#isi network subnets modify <subnet> –sc-service-name cluster-sc.example.com
CVE-2017-12613
none
CVE-2022-23160
Configure SMB share permissions of any SyncIQ target directory to prevent writes.
The information in this Dell Technologies Security Advisory should be read and used to assist in avoiding situations that may arise from the problems described herein. Dell Technologies distributes Security Advisories to bring important security information to the attention of users of the affected product(s). Dell Technologies assesses the risk based on an average of risks across a diverse set of installed systems and may not represent the actual risk to your local installation and individual environment. It is recommended that all users determine the applicability of this information to their individual environments and take appropriate actions. The information set forth herein is provided “as is” without warranty of any kind. Dell Technologies expressly disclaims all warranties, either express or implied, including the warranties of merchantability, fitness for a particular purpose, title and non-infringement. In no event shall Dell Technologies, its affiliates or suppliers, be liable for any damages whatsoever arising from or related to the information contained herein or actions that you decide to take based thereon, including any direct, indirect, incidental, consequential, loss of business profits or special damages, even if Dell Technologies, its affiliates or suppliers have been advised of the possibility of such damages. Some states do not allow the exclusion or limitation of liability for consequential or incidental damages, so the foregoing limitation shall apply to the extent permissible under law.
In this final installation of our three-part blog series, we lay out countermeasures that enterprises can do to protect their machines. We’ll also discuss our responsible disclosure as well as the feedback we got from the vendors we evaluated.
Countermeasures
We found that only two of the four vendors analyzed support authentication. Neither of them has authentication enabled by default, which leaves the machines vulnerable to attacks by malicious users. Enabling authentication is essential for protecting Industry 4.0 features from abuse.
Resource access control systems are important for reducing the impact of attacks. Many technologies allow access to all a controller’s resources, which can be dangerous. A correct approach is to adopt resource access control systems that grant limited access. This will help to ensure that only authorized users have access to the controller’s resources and that these resources are protected from unauthorized access.
When it comes to integrators and end users, we suggest these countermeasures:
Context-aware industrial intrusion prevention and detection systems (IPS/IDSs): These devices, which have recently seen a surge in popularity in the catalogues of security vendors, are equipped with network engines that can capture real-time traffic associated with industrial protocols to detect attacks.
Network segmentation: Correct network architecting is of great importance. As our research has revealed, all the tested machines expose interfaces that could be abused by miscreants.
Correct patching: Modern CNC machines are equipped with full-fledged operating systems and complex software, which might inevitably contain security vulnerabilities. This was indeed the case with the machines that we tested.
Responsible Disclosure
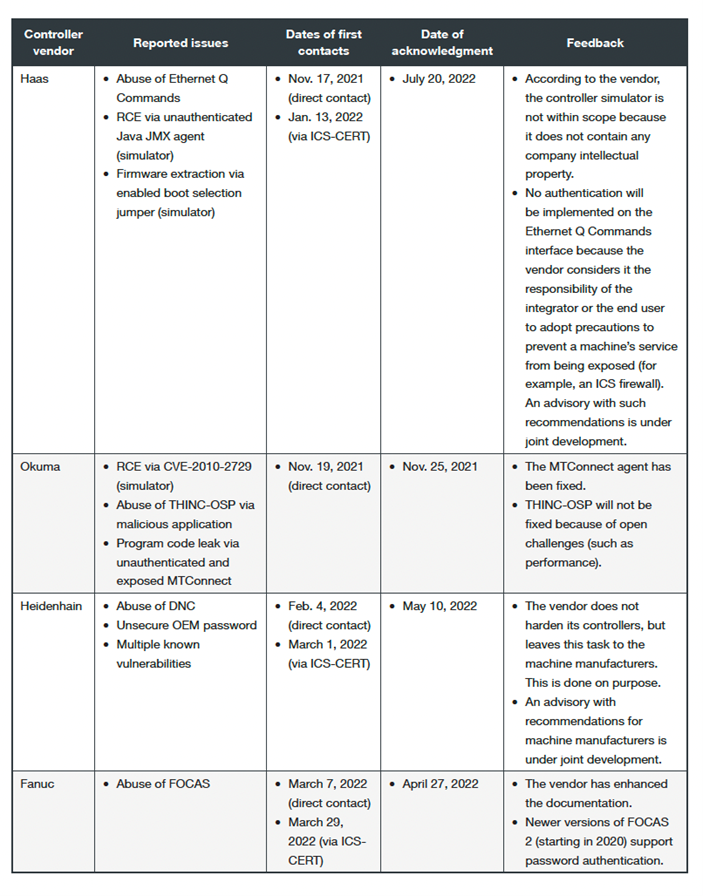
We contacted the affected vendors while tackling controllers sequentially, with our first contact in November 2021 and the last one in March 2022. The Industrial Control Systems Cyber Emergency Response Team (ICS CERT) at Cybersecurity & Infrastructure Security Agency extended invaluable help during the discussion which we are grateful for.
Table 1. A summary of our responsible disclosure process
As of this writing, all four vendors have replied to our concerns and most of them have addressed, to varying degrees, our findings in a reasonable time frame. More importantly, all of them have expressed interest in our research and have decided to improve either their documentation or their communication efforts with their machine manufacturers, with the final effort of offering end users more secure solutions.
In part one, we discussed what numerical control machines do and their basic concepts. These concepts are important to understand the machines better, offering a wider view of their operations. We also laid out how we evaluated the chosen vendors for our research.
For this blog, we will continue discussing our evaluated vendors and highlighting findings that we discovered during our research.
Haas
Figure 1. The Haas simulator we used for preliminary testing (left) and the Haas CNC machine (Super Mini Mill 2) by Celada we used for verification (right)
Haas was the first vendor we focused on because of the fast availability of its controller. We began our analysis by conducting port scanning on the controller simulator and identifying the protocols exposed by the controller. After that, we evaluated the options with which an attacker could abuse the protocols to perform attacks aimed at the security of the machine and verified these attacks in practice on a real-world machine installation.
Okuma
Figure 2. The Okuma simulator we used for the development of the malicious application and during the initial testing
Okuma stands out in the market of CNC controllers for one interesting feature: the modularity of its controller. While the vendor offers in the device’s simplest form a tiny controller, it also provides a mechanism, called THINC API, to highly customize the functionalities of the controller. With this technology, any developer can implement a program that, once installed, runs in the context of the controller, in the form of an extension. This approach is very similar to how a mobile application, once installed, can extend a smartphone’s functionalities.
Heidenhain
Figure 3. The Hartford 5A-65E machine, running on a Heidenhain TNC 640 controller, that we used in our experiments at Celada
In the spirit of the Industry 4.0 paradigm, Heidenhain offers the Heidenhain DNC interface to integrate machines on modern, digital shop floors. Among the many scenarios, Heidenhain DNC enables the automatic exchange of data with machine and production data acquisition (MDA/PDA) systems, higher level enterprise resource planning (ERP) and manufacturing execution systems (MESs), inventory management systems, computer-aided design and manufacturing (CAD/CAM) systems, production activity control systems, simulation tools, and tool management systems
In our evaluation, we had access to the library provided by Heidenhain to the integrators to develop interfaces for the controller. The manufacturer provides this library, called RemoTools SDK,35 to selected partners only.
Fanuc
Figure 4. The Yasuda YMC 430 + RT10 machine, running on a Fanuc controller, that we used in our experiments at the Polytechnic University of Milan
Like Heidenhain, Fanuc offers an interface, called FOCAS,36 for the integration of CNC machines in smart network environments. Even though this technology offers a restricted set of remote-call possibilities compared with the other vendors’ (that is, a limited number of management features), our experiments showed that a miscreant could potentially conduct attacks like damage, DoS, and hijacking.
What we found
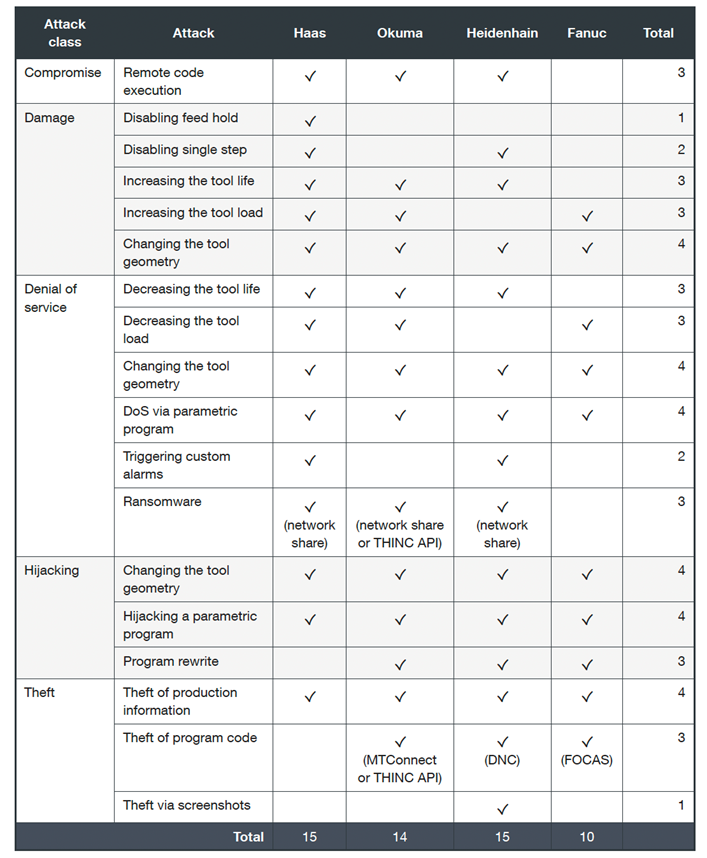
As our evaluation identified 18 different attacks (or variations), we grouped them into five classes: compromise, damage, and denial of service (DoS):
Table 1. A summary of the attacks we identified in our research
Controller manufacturers like Haas, Okuma, and Heidenhain have been found to have a similar number of issues, around 15. Fanuc had 10 confirmed attacks. Unfortunately, our research shows that this domain lacks awareness concerning security and privacy. This creates serious and compelling problems.
The need for automation-facing features like remote configuration of tool geometry or parametric programming with values determined by networked resources is becoming more common in manufacturing.
With these findings, we determined countermeasures that enterprises can do to mitigate such risks, which we’ll discuss in our final installation. In the last part, we’ll also discuss our responsible disclosure process.
 XQL Search Integration with Vulnerability Assessment