By: Peter Girnus, Aliakbar Zahravi June 09, 2023 Read time: 3 min (681 words)
We look into BatCloak engine, its modular integration into modern malware, proliferation mechanisms, and interoperability implications as malicious actors take advantage of its fully undetectable (FUD) capabilities.
UPDATE as of 6/15/2023 7:30PM (PHT): We’ve updated this entry to include indicators of compromise (IOCs) for BatCloak.
In our recent investigation, we discovered the use of heavily obfuscated batch files utilizing the advanced BatCloak engine to deploy various malware families at different instances. Running analysis and sample collection from September 2022 to June 2023, we found that these batch files are designed to be fully undetectable (FUD) and have demonstrated a remarkable ability to persistently evade security solutions. As a result, threat actors can load various malware families and exploits by leveraging highly obfuscated batch files seamlessly. Our initial research titled “The Dark Evolution: Advanced Malicious Actors Unveil Malware Modification Progression” delves into the continuing evolution of BatCloak, uncovering the modifications that have propelled modern malware to new levels of security evasion.
This is the first entry in a three-part technical research series taking an in-depth look at the continuing evolution of the highly evasive batch obfuscation engine BatCloak. The second part of this series, “SeroXen Incorporates Latest BatCloak Engine Iteration,” will look into the remote access trojan (RAT) SeroXen, a piece of malware gaining popularity for its stealth and, in its latest iterations, targets gamers, enthusiast communities, and organizations. Aside from the RAT’s own tools, we will look into the updated BatCloak engine included as SeroXen’s loading mechanism. The third and last part of this series, “SeroXen Mechanisms: Exploring Distribution, Risks, and Impact,” will detail the distribution mechanisms of SeroXen and BatCloak. We also include our security insights on the community and demographic impact of this level of sophistication when it comes to batch FUD obfuscation.
Defying detection: A preview of BatCloak engine’s efficacy
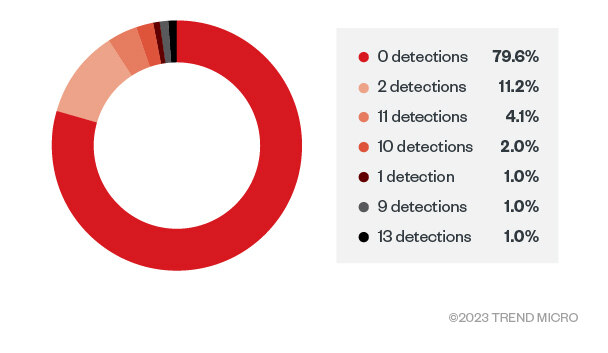
We analyzed hundreds of batch samples sourced from a public repository. The results showed a staggering 80% of the retrieved samples exhibiting zero detections from security solutions. This finding underscores the ability of BatCloak to evade traditional detection mechanisms employed by security providers. Moreover, when considering the overall sample set of 784, the average detection rate was less than one, emphasizing the challenging nature of identifying and mitigating threats associated with BatCloak-protected pieces of malware.
Figure 1. BatCloak detection counts from a public repository; samples and detection results collected from September 2022 to June 2023
Understanding the evolving landscape of advanced malware techniques such as FUD obfuscator BatCloak enables us to develop more effective strategies for combating the ever-evolving threats posed by these sophisticated adversaries. These findings highlight the pressing need for enhanced approaches to malware detection and prevention, such as a cutting-edge multilayered defensive strategy and comprehensive security solutions.
Security teams and organizations are advised to exercise a zero-trust approach. Teams should implement solutions capable of combining multiple rules, filters, and analysis techniques, including data stacking and machine learning to address the need for precise detection, as these tools can analyze individual and dynamic file signatures and observe patterns via heuristics and behavioral analysis. When uncertain of intrusions, behaviors, and routines, assume compromise or breach immediately to isolate affected artifacts or tool chains. With a broader perspective and rapid response, an organization can address these and keep the rest of its systems protected. Multilayered technologies and solutions, such as Trend Micro XDR™️, efficiently monitor, detect, and block tiered threats and attacks, as well as their clones and modified versions.
Instead of marking the end of an infection or an attack prior to the target because of siloed solutions, an extended detection and response capability across endpoint, servers, workloads, email, network, cloud, and identity observed from a single platform like Trend Vision One™️ can mitigate these risks by considering adversarial tactics, techniques, and procedures (TTPs) to profile the entirety of a routine. Trend Vision One also correlates with a connected threat intelligence system and rapidly prioritizes and responds with the necessary security and defensive actions as far left of the routine as possible.
Download the first part of our analysis on BatCloak engine here, and the indicators of compromise (IOCs) here and below :
By: Trend Micro June 29, 2023 Read time: 5 min (1290 words)
Risk Management of Human and Machine Identity in a Zero Trust Security Context
In today’s business world’s dynamic and ever-changing digital landscape, organizations encounter escalating security challenges that demand a more business-friendly and pertinent approach. Conventional security measures frequently lead to adverse effects on business operations.
However, the advent of Zero Trust security offers organizations the opportunity to embrace a risk-based response strategy that effectively mitigates these risks. The concept of identity is central to the effectiveness of security functions, which serves as a critical factor in guaranteeing the precision and security of transactions and data storage.
Identity and the Evolving Role of Humans and Machines
All security functions are fundamentally centered around identity. The statement, “Who did what to what, when,” encapsulates the core significance of identity in security. The accuracy and integrity of this statement rely on the accuracy and integrity of each identity clause. By ensuring the integrity of these identity clauses, organizations can automate the risk management process with high confidence in the outcomes.
Traditionally, security systems were designed assuming that human operators were solely responsible for all decisions made by machines. However, with the advent of computers and the increasing reliance on automated processes, this operator-centric model has become increasingly inadequate.
While humans and their associated accounts are often the primary targets of security measures, they merely represent the activity of the machines they interact with. In a Zero Trust deployment, embracing the concept of “machine as proxy human” becomes crucial. This approach allows organizations to apply security rules and surveillance to all devices, treating them like a malicious human is operating behind them.
By considering machines as proxy humans within the context of Zero Trust, organizations can extend security measures to encompass all devices and systems within their environment. This includes user devices, servers, IoT devices, and other interconnected components. Organizations can enforce strict access controls by treating machines as potential threat actors, applying behavioral analytics, and continuously monitoring for suspicious activities or deviations from expected behavior.
This shift in mindset enables organizations to proactively detect and respond to potential security threats, regardless of whether they originate from human actors or compromised machines. It allows for a more comprehensive and robust security posture, as security measures are applied at the device level, reducing the risk of unauthorized access, data breaches, and other security incidents.
Recognizing the centrality of identity in security and embracing the concept of “machine as proxy human” in a Zero Trust deployment enhances the effectiveness and comprehensiveness of security measures. By treating all devices as potential threat actors and applying security rules and surveillance accordingly, organizations can strengthen their risk management process, automate security controls, and mitigate the risks associated with human and machine-based security threats.
Applying Zero Trust to Machine-Human Approach
Treating all accounts, human or not, as machine/service accounts offer architectural flexibility in a Zero Trust environment. This approach allows organizations to apply consistent security measures to unknown devices, users, networks, and known entities, regardless of how frequently they change.
However, harmonized identity telemetry is crucial for this machine-human approach to be effective. Subscriber Identity Modules (SIM cards) and additional credentials facilitate Zero Trust management in 4G and 5G environments.
Organizations can incorporate a Software Bill of Materials (SBOM) into their Zero Trust solution to address the risks associated with the software. A SBOM is a comprehensive inventory that identifies the software components within an organization’s infrastructure, including internally developed and third-party/vendor-provided software.
By implementing a SBOM in a Zero Trust environment, organizations can establish a baseline for expected software behavior. This baseline includes the software’s version, dependencies, and associated digital signatures. Any deviations from this baseline can be identified as potential security threats or indicators of compromise.
One of the significant advantages of incorporating SBOM into a Zero Trust solution is the ability to monitor unexpected behaviors. Organizations can detect any suspicious activities or unauthorized modifications by continuously monitoring the software components and comparing their actual behavior against the established baseline. This proactive monitoring helps incident responders and risk management teams identify potential threats early and respond effectively to mitigate the risks.
Furthermore, SBOM facilitates supply chain component mapping, crucial for incident response and risk management. With a detailed inventory of software components, organizations can trace the origin of each component and identify potential vulnerabilities or compromised elements within their supply chain. This mapping capability enhances incident response capabilities by providing visibility into the interconnectedness of various software components and their potential impact on the organization’s overall security.
Ultimately incorporating SBOM into a Zero Trust solution helps organizations address software-related risks more effectively. By establishing baselines for expected software behavior and monitoring for any deviations, organizations can detect and respond to potential threats promptly. SBOM also facilitates supply chain component mapping, enabling organizations to enhance their incident response capabilities and mitigate the risks associated with software vulnerabilities and compromises.
Recommendations
Zero Trust security offers a surveillance-based approach that continuously checks and cross-references identity, assesses behavioral risk, and compares it to potential losses and revenue. This approach brings several recommendations for organizations looking to enhance their security posture:
Changes to executive responsibility and board governance require the adoption of Zero Trust security With the increasing importance of cybersecurity in today’s digital landscape, executive leadership, and board members need to prioritize and understand the significance of Zero Trust security. This includes making it a strategic focus and allocating resources for its implementation. By recognizing the value of Zero Trust and incorporating it into governance structures, organizations can ensure a top-down commitment to robust security practices.
Zero Trust can help organizations meet government and customer requirements for supply chain resiliency Supply chains have become more vulnerable to cyber threats, and government regulations and customer expectations emphasize supply chain resiliency. Zero Trust security measures can provide transparency, control, and trust within the supply chain ecosystem. Organizations can demonstrate their commitment to supply chain security and meet compliance requirements by establishing rigorous authentication, continuous monitoring, and granular access controls.
Operational risk management automation tools in Zero Trust can streamline security management and reduce enterprise risk and total cost of ownership Zero Trust security frameworks offer automation tools that streamline security management processes. Organizations can reduce human error and enhance operational efficiency by automating tasks such as identity verification, access controls, and threat detection. This automation minimizes security risks and reduces the total cost of ownership associated with managing complex security infrastructures.
Simplification of security management in Zero Trust can address the security skills gap by enabling reliance on junior or offshore staff for incident diagnoses The shortage of skilled cybersecurity professionals is a significant challenge for many organizations. Zero Trust can alleviate this skills gap by simplifying security management and enabling the reliance on junior or offshore staff for incident diagnoses. With streamlined processes, intuitive security controls, and automated monitoring, organizations can empower less experienced staff to effectively handle security incidents, optimizing resources and addressing the skills shortage.
By prioritizing identity integrity and leveraging the benefits of Zero Trust, organizations can establish a robust security framework that maximizes enterprise functionality while minimizing risk. In an increasingly unstable world where cyber threats continue to evolve, adopting a sophisticated, nuanced, and cost-effective security approach such as Zero Trust becomes essential for organizations to thrive and maintain resilience in the face of emerging challenges.
Ready to take your organization’s security to the next level? Download our comprehensive report on “Zero Trust: Enforcing Business Risk Reduction Through Security Risk Reduction” to gain valuable insights and practical strategies for implementing a business-friendly security approach. Discover how Zero Trust can minimize negative impacts, enhance risk management, and safeguard digital assets. Click here to download the report now!
By: Lucas Silva, RonJay Caragay, Arianne Dela Cruz, Gabriel Cardoso June 30, 2023 Read time: 7 min (1889 words)
Recently, the Trend Micro incident response team engaged with a targeted organization after having identified highly suspicious activities through the Targeted Attack Detection (TAD) service. In the investigation, malicious actors used malvertising to distribute a piece of malware via cloned webpages of legitimate organizations. In this case, the distribution involved a webpage of the well-known application WinSCP, an open-source Windows application for file transfer.
Advertising platforms like Google Ads enable businesses to display advertisements to target audiences to boost traffic and increase sales. Malware distributors abuse the same functionality in a technique known as malvertising, where chosen keywords are hijacked to display malicious ads that lure unsuspecting search engine users into downloading certain types of malware.
The targeted organization conducted a joint investigation with the Trend team and discovered that cybercriminals performed the following unauthorized and malicious activities within the company’s network:
Stole top-level administrator privileges and used these privileges to conduct unauthorized activities
Attempted to establish persistence and backdoor access to the customer environment using remote management tools like AnyDesk
Attempted to steal passwords and tried to access backup servers
It is highly likely that the enterprise would have been substantially affected by the attack if intervention had been sought later, especially since the threat actors had already succeeded in gaining initial access to domain administrator privileges and started establishing backdoors and persistence.
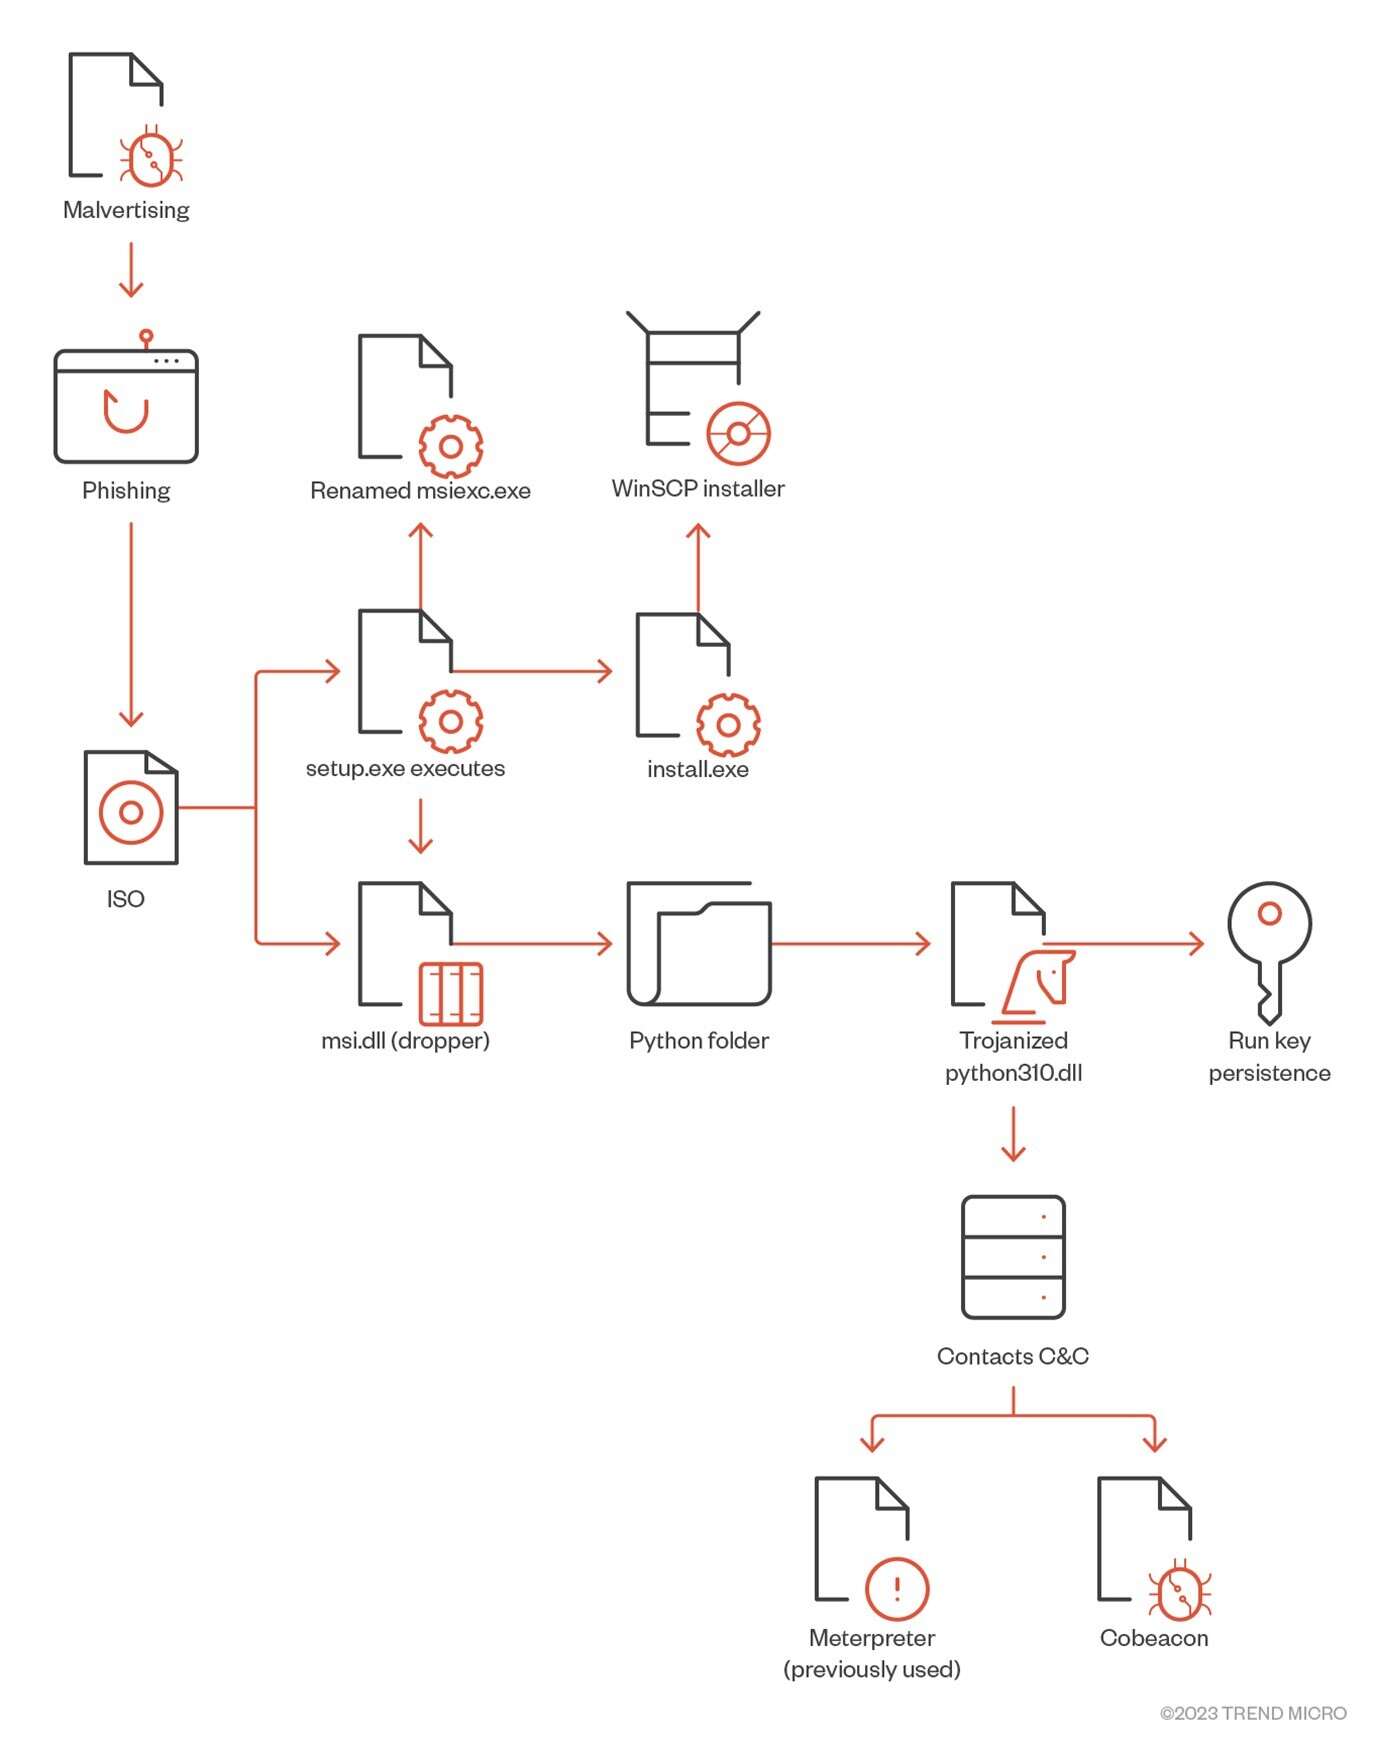
The following chart represents how the infection starts.
Figure 1. Infection chain of the observed attack
In the following sections, we discuss the details of this case: how threat actors made the initial access, what kind of attacks they carried out, and the lessons that can be drawn from this event.
Deep dive into the infection chain
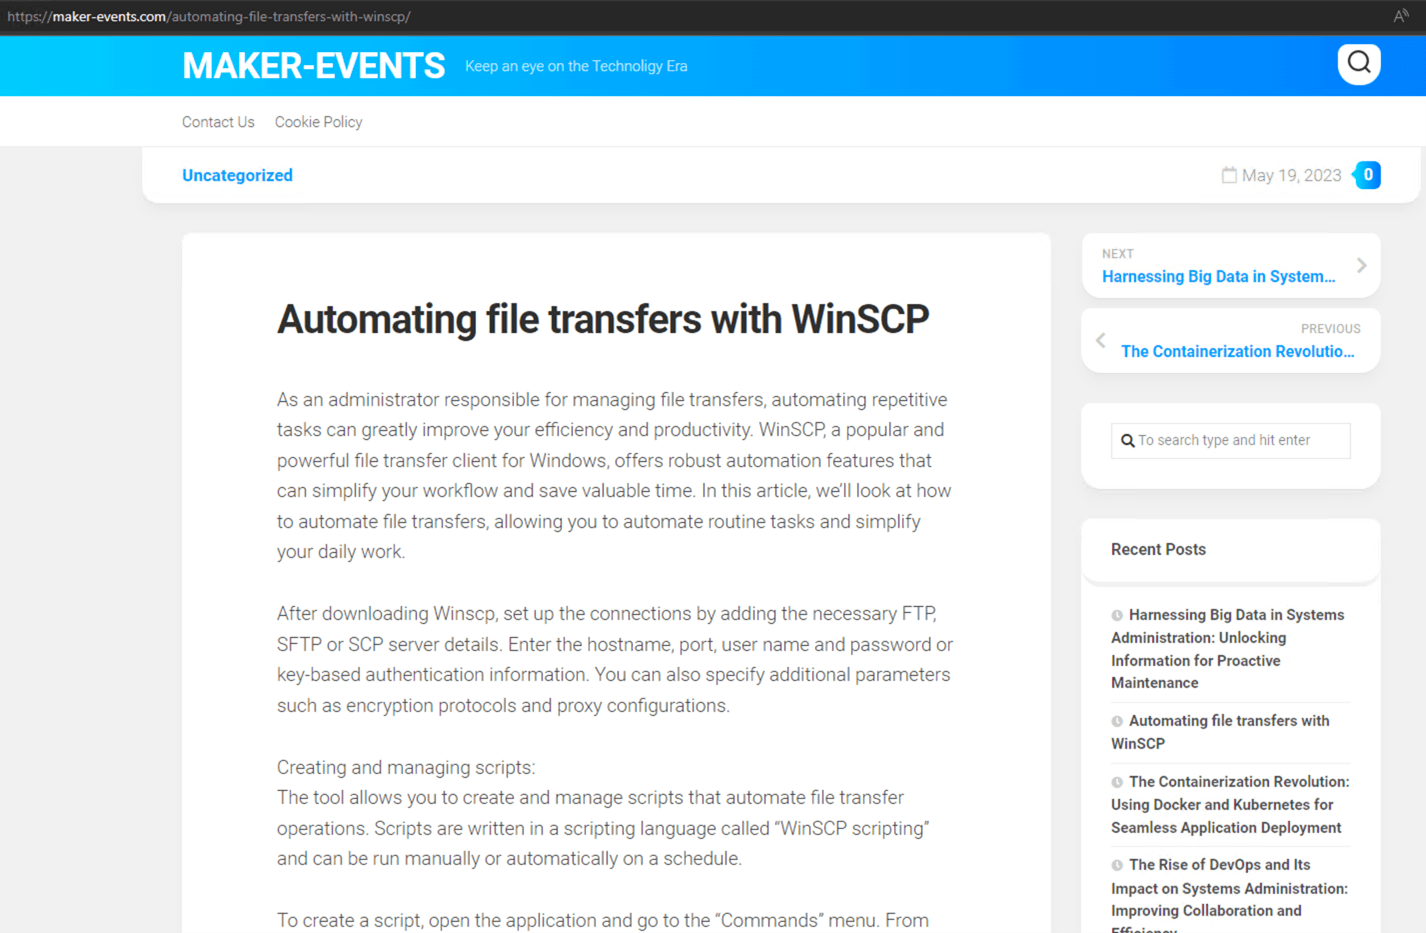
The infection starts once the user searches for “WinSCP Download” on the Bing search engine. A malicious ad for the WinSCP application is displayed above the organic search results. The ad leads to a suspicious website containing a tutorial on how to use WinSCP for automating file transfer.
Figure 2. A suspicious site from a malvertisement
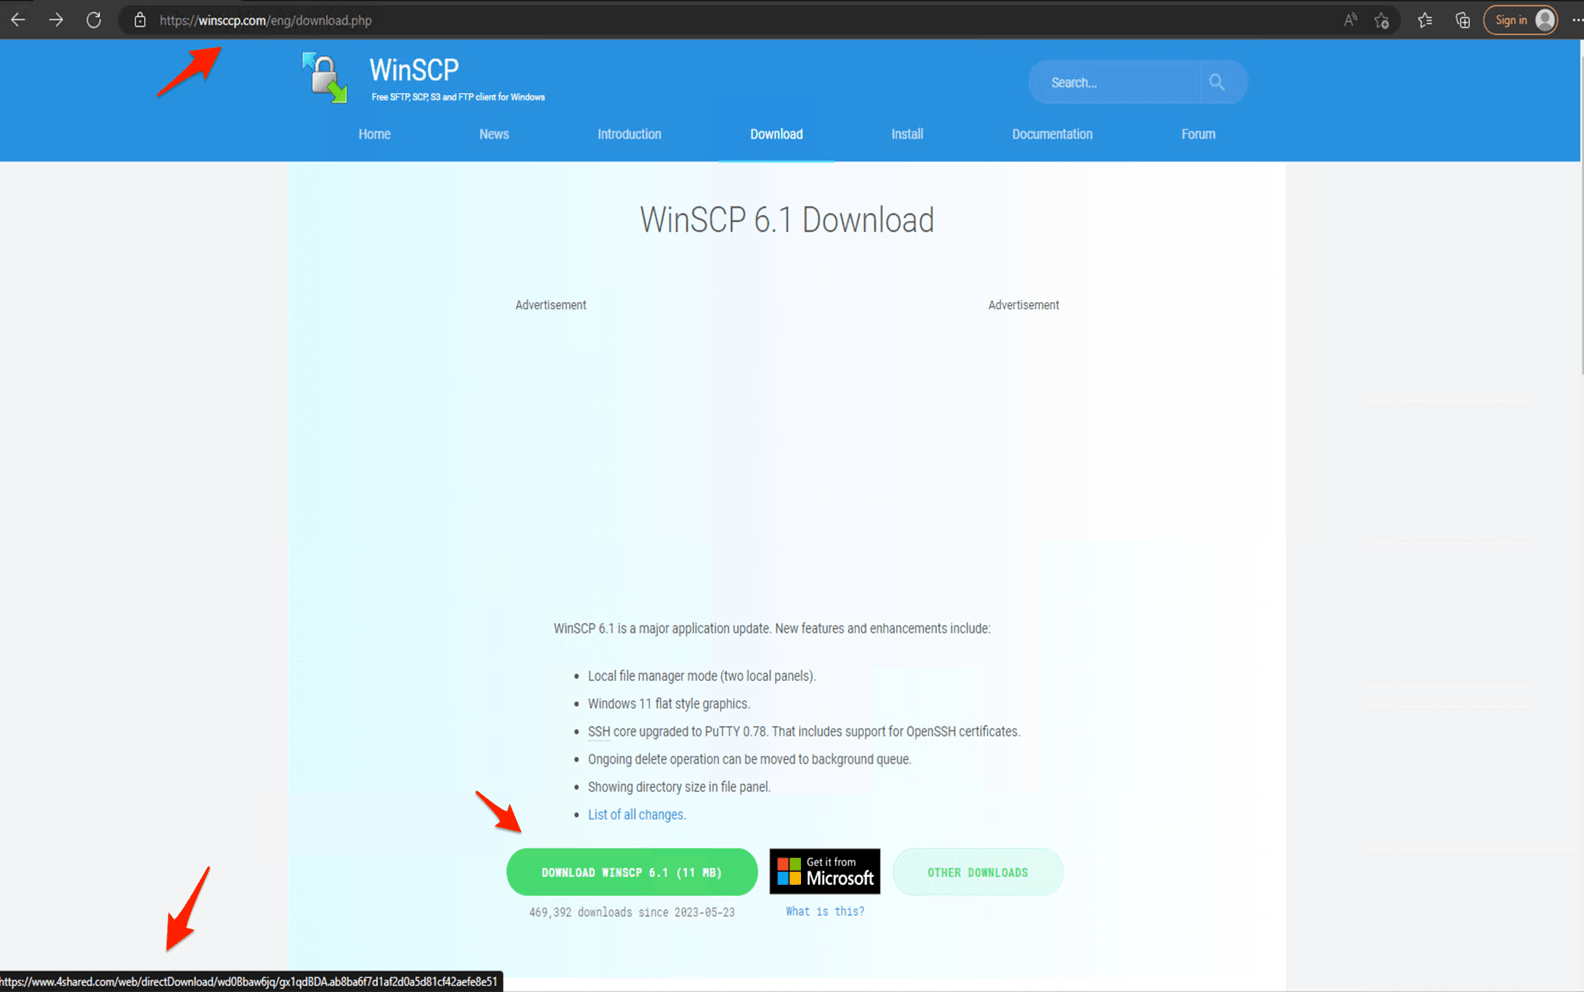
From this first page, the user is then redirected to a cloned download webpage of WinSCP (winsccp[.]com). Once the user selects the “Download” button, an ISO file is downloaded from an infected WordPress webpage (hxxps://events.drdivyaclinic[.]com). Recently, the malicious actor changed their final stage payload URL to the file-sharing service 4shared.
Figure 3. Malicious download site
The overall infection flow involves delivering the initial loader, fetching the bot core, and ultimately, dropping the payload, typically a backdoor.
In summary, the malicious actor uses the following malvertising infection chain:
A user searches for an application by entering a search term in a search bar (such as Google or Bing). In this example, the user wants to download the WinSCP application and enters the search term “WinSCP Download” on the Bing search bar.
Above the organic search results, the user finds a malvertisement for the WinSCP application that leads to a malicious website.
Once the user selects the “Download” button, this begins the download of an ISO file to their system.
On Twitter, user @rerednawyerg first spotted the same infection chain mimicking the AnyDesk application. Once the user mounts the ISO, it contains two files, setup.exe and msi.dll. We list the details of these two files here:
Setup.exe: A renamed msiexec.exe executable
Msi.dll: A delayed-loaded DLL (not loaded until a user’s code attempts to reference a symbol contained within the DLL) that will act as a dropper for a real WinSCP installer and a malicious Python execution environment responsible for downloading Cobalt Strike beacons.
Figure 4. The files downloaded once a user mounts the ISO
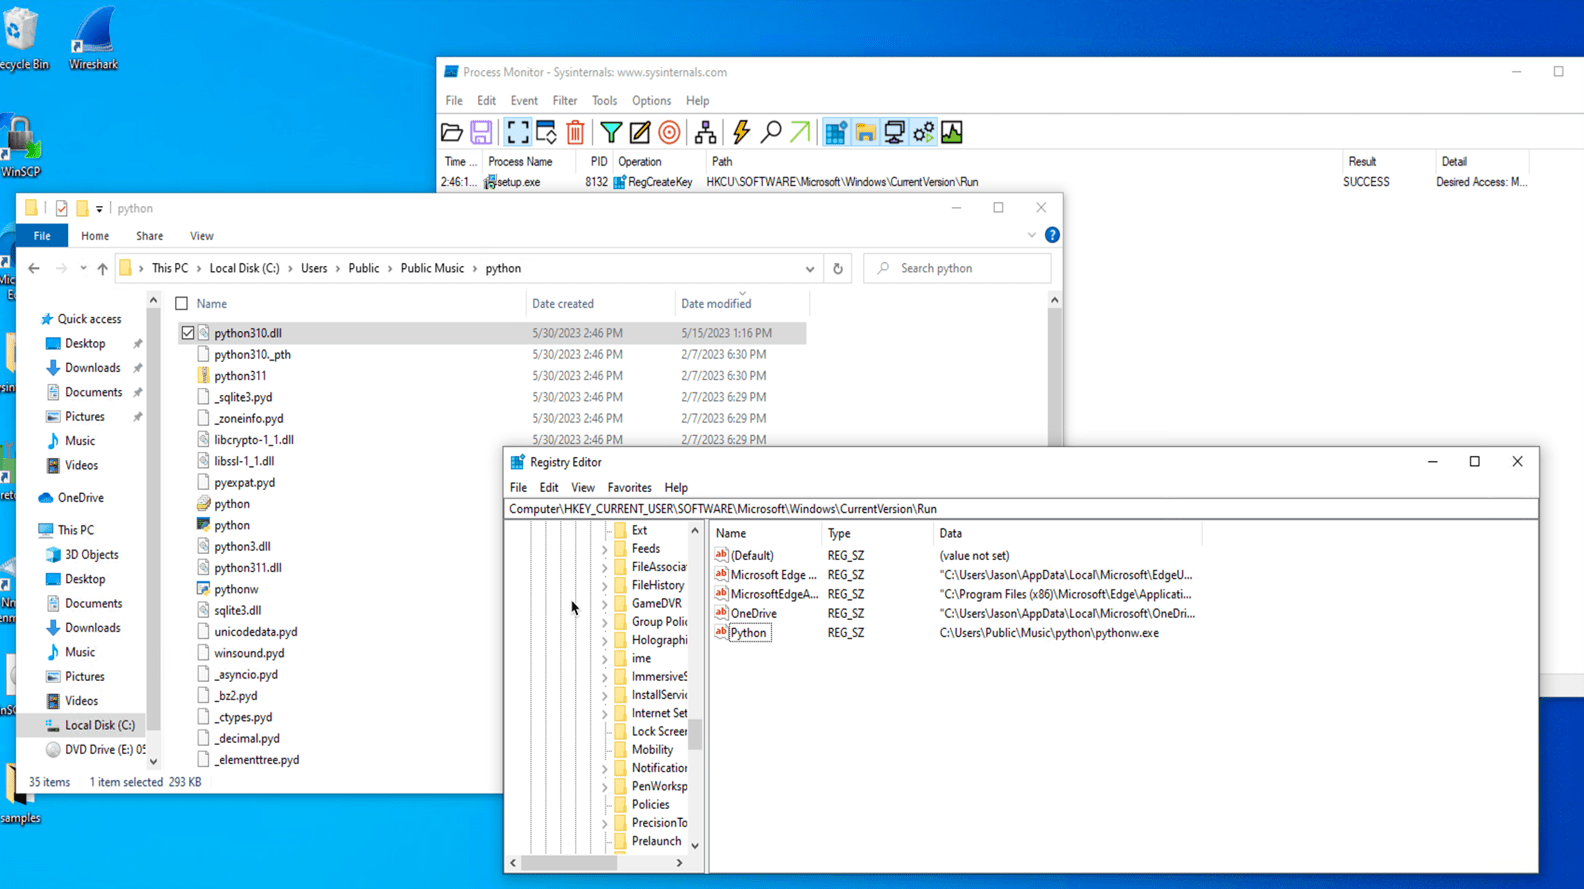
Once setup.exe is executed, it will call the msi.dll that will later extract a Python folder from the DLL RCDATA section as a real installer for WinSCP to be installed on the machine. Two installations of Python3.10 will be created — a legitimate python installation in %AppDataLocal%\Python-3.10.10 and another installation in %Public%\Music\python containing a trojanized python310.dll. Finally, the DLL will create a persistence mechanism to make a run key named “Python” and the value C:\Users\Public\Music\python\pythonw.exe.
Figure 5. The run key named “Python”
When the executable pythonw.exe starts, it loads a modified/trojanized obfuscated python310.dll that contains a Cobalt Strike beacon that connects to 167[.]88[.]164[.]141.
The following command-and-control (C&C) servers are used to obtain the main beacon module:
File name
C&C
pp.py
hxxps://167.88.164.40/python/pp2
work2.py
hxxps://172.86.123.127:8443/work2z
work2-2.py
hxxps://193.42.32.58:8443/work2z
work3.py
hxxps://172.86.123.226:8443/work3z
Multiple scheduled tasks executing batch files for persistence were also created in the machine. These batch files execute Python scripts leading to in-memory execution of Cobalt Strike beacons. Interestingly, the Python scripts use the marshal module to execute a pseudo-compiled (.pyc) code that is leveraged to download and execute the malicious beacon module in memory.
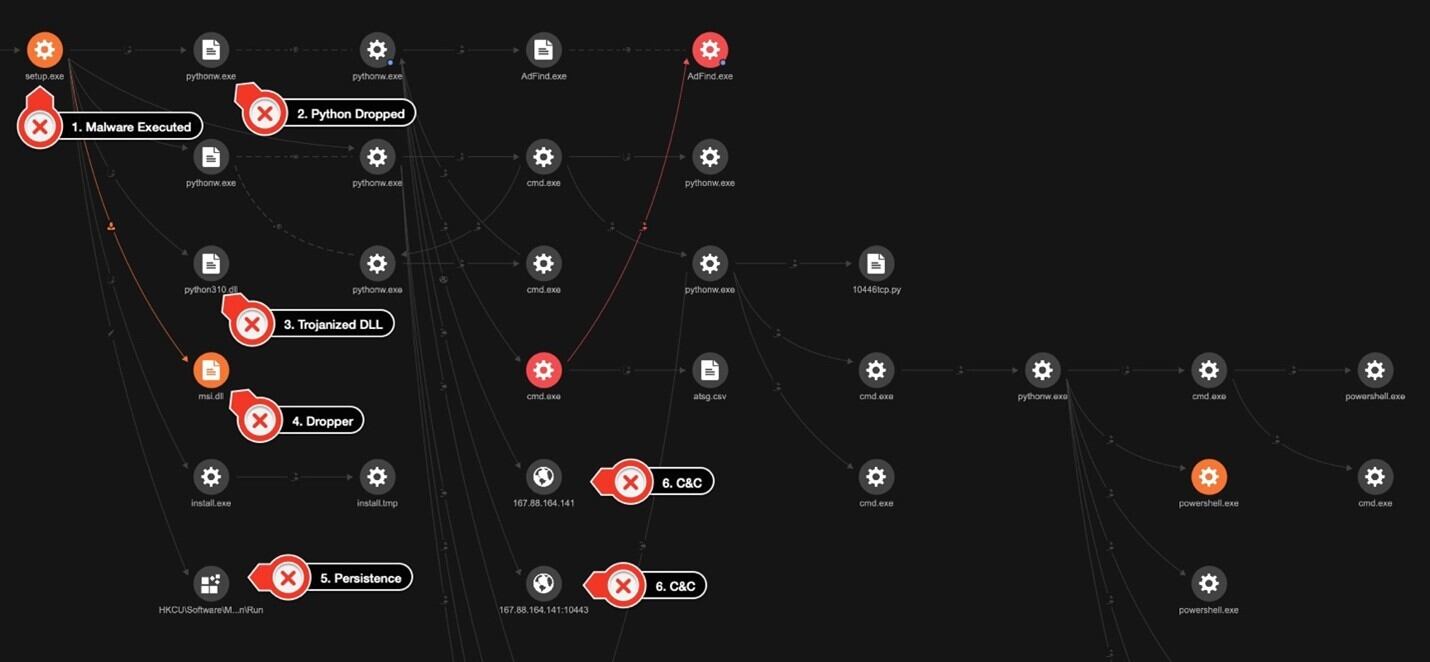
The Trend Vision One™ platform was able to generate the following Workbench for the previously mentioned kill chain.
Figure 6. Kill chain for the executed malware
The threat actor used a few other tools for discovery in the customer’s environment. First, they used AdFind, a tool designed to retrieve and display information from Active Directory (AD) environments. In the hands of a threat actor, AdFind can be misused for enumeration of user accounts, privilege escalation, and even password hash extraction.
In this case, the threat actor used it to fetch information on the operating system using the command adfind.exe -f objectcategory=computer -csv name cn OperatingSystem dNSHostName. The command specifies that it wants to retrieve the values of the name, common name (CN), operating system, and dNSHostName attributes for each computer object and output its result in a CSV format.
The threat actor used the following PowerShell command to gather user information and to save it into a CSV file:
We also observed that the threat actor used AccessChk64, a command-line tool developed by Sysinternals that is primarily used for checking the security permissions and access rights of objects in Windows. Although the threat actor’s purpose for using the tool in this instance is not clear, it should be noted that the tool can be used for gaining insights on what permissions are assigned to users and groups, as well as for privilege escalation and the identification of files, directories, or services with weak access control settings.
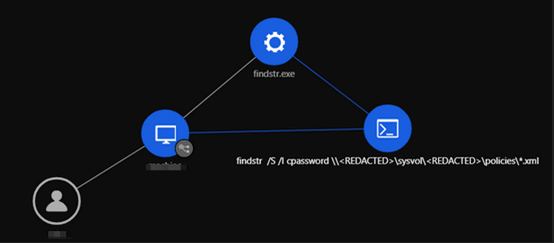
The threat actor then used findstr, a command-line tool in Windows used for searching strings or regular expressions within files by using the command findstr /S /I cpassword \\<REDACTED>\sysvol\<REDACTED>\policies\*.xml.
It is possible that the purpose of this command is to identify any XML files that contain the string cpassword. This is interesting from a security context since cpassword is associated with a deprecated method of storing passwords in Group Policy Preferences within AD.
Figure 7. How finsdtr is used in the attack
We also observed the execution of scripts with PowerShell. For instance, the command IEX (New-Object Net.Webclient).DownloadString(‘hxxp://127[.]0[.]0[.]1:40347/’); Invoke-FindLocalAdminAccess -Thread 50” it invokes a PowerShell function called Invoke-FindLocalAdminAccess and passes the parameter -Thread with a value of 50. This function is likely part of a script that performs actions related to finding local administrator access on a system.
Another PowerShell script used by the threat actor was PowerView. PowerView, which belongs to the PowerSploit collection of scripts used to assist in penetration testing and security operations, focuses on AD reconnaissance and enumeration and is commonly used by threat actors to gather information about the AD environment.
PowerShell Expand-Archive command was used to extract the ZIP files.
WMI was used to launch CoBeacon remotely across the environment.
C:\WINDOWS\system32\cmd.exe /C wmic /NODE:”<REDACTED>” process call createC:\users\public\videos\python\pythonw.exe C:\users\public\videos\python\work2-2.py
To obtain high-privileged credentials and escalate privileges, the threat actor used a Python script also containing the marshal module to execute a pseudo-compiled code for LaZagne. Another script to obtain Veeam credentials following the same structure was also identified in the environment.
PsExec, BitsAdmin, and curl were used to download additional tools and to move laterally across the environment.
The threat actor dropped a detailed KillAV BAT script (KillAV is a type of malicious software specifically designed to disable or bypass antivirus or antimalware programs installed on a target system) to tamper with Trend protections. However, due to the agent’s Self-Protection features and VSAPI detections, the attempt failed. The threat actors also made attempts to stop Windows Defender through a different KillAV BAT script.
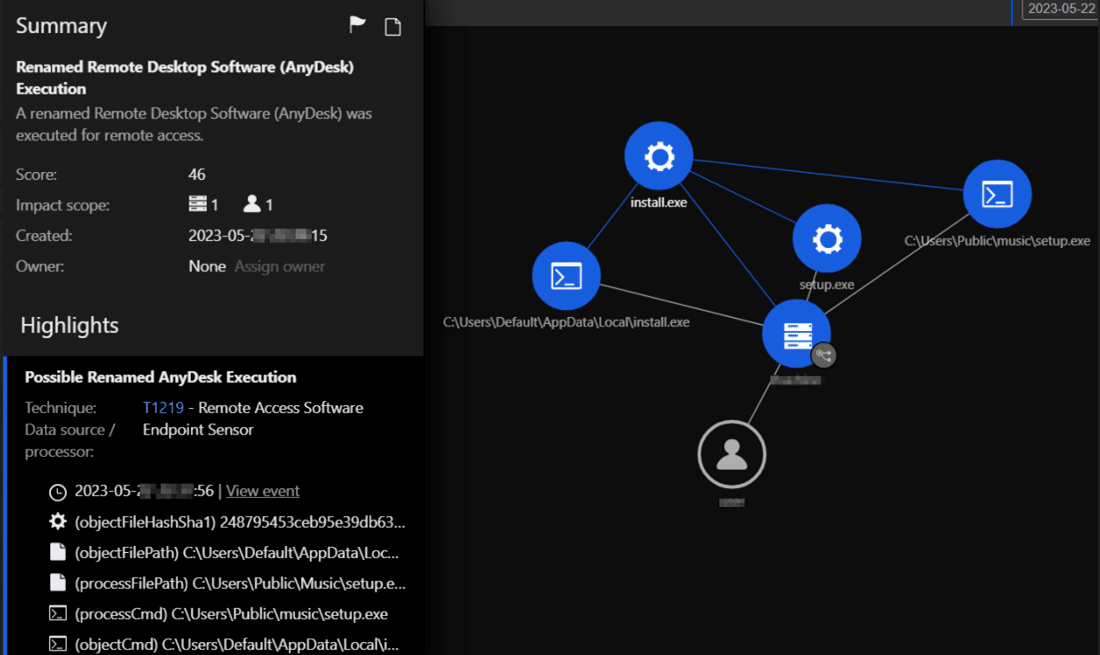
Finally, the threat actor installed the AnyDesk remote management tool (renamed install.exe) in the environment to maintain persistence.
Figure 8. Remote management tool installed for persistence
After a diligent and proactive response, the attacker was successfully evicted from the network before they could reach their goal or execute their final payload. The incident response team also presented immediate countermeasures as well as medium- and long-term security procedures for implementation.
BlackCat uses the same tools, techniques, and procedures (TTPs)
In another investigation, following the same TTPs described previously described, we were able to identify that this activity led to a BlackCat (aka ALPHV) infection. Along with other types of malware and tools already mentioned, we were able to identify the use of the anti-antivirus or anti-endpoint detection and response (EDR) SpyBoyterminator in an attempt to tamper with protection provided by agents.
In order to exfiltrate the customer data, the threat actor used PuTTY Secure Copy client (PSCP) to transfer the gathered information. Investigating one of the C&C domains used by the threat actor behind this infection also led to the discovery of a possible related Cl0p ransomware file.
Figure 9. Files indicating possible Cl0p ransomware file
Conclusion and recommendations
In recent years, attackers have become increasingly adept at exploiting vulnerabilities that victims themselves are unaware of and have started employing behaviors that organizations do not anticipate. In addition to a continuous effort to prevent any unauthorized access, early detection and response within an organization’s network is critical. Immediacy in remediation is also essential, as delays in reaction time could lead to serious damage.
By understanding attack scenarios in detail, organizations can not only identify vulnerabilities that could lead to compromise and critical damage but also take necessary measures to prevent them.
Organizations can protect themselves by taking the following security measures:
Educate employees about phishing. Conduct training sessions to educate employees about phishing attacks and how to identify and avoid them. Emphasize the importance of not selecting suspicious links and not downloading files from unknown sources.
Monitor and log activities. Implement a centralized logging system to collect and analyze logs from various network devices and systems. Monitor network traffic, user activities, and system logs to detect any unusual or suspicious behavior.
Define normal network traffic for normal operations. Defining normal network traffic will help identify abnormal network traffic, such as unauthorized access.
Improve incident response and communication. Develop an incident response plan to guide your organization’s response in case of future breaches. Establish clear communication channels to inform relevant stakeholders, including employees, customers, and regulatory bodies, about a breach and the steps being taken to address it.
Engage with a cybersecurity professional. If your organization lacks the expertise or resources to handle the aftermath of a breach effectively, consider engaging with a reputable cybersecurity firm to assist with incident response, forensic analysis, and security improvements.
Indicators of Compromise (IOCs)
The full list of IOCs can be found here and below :
By: Trend Micro June 27, 2023 Read time: 4 min (1183 words)
Organizations face increasingly sophisticated cyber threats and vulnerabilities in today’s rapidly evolving digital landscape. Traditional security models can no longer protect sensitive data and mitigate risks. This is where Zero Trust comes into play, offering a comprehensive approach to security that can help organizations tackle emerging challenges.
In this article, we will explore how Zero Trust can benefit your organization, focusing on its ability to enhance security, secure supply chains, and align with international regulatory frameworks.
How Zero Trust Helps Your Organization
Zero Trust is designed to seek and eliminate shadow IT and inefficiencies within an organization. This approach can help reduce both operational and capital costs, effectively minimizing enterprise risks. Zero Trust also improves data hygiene by identifying systems with higher-than-average data risks, ensuring a more secure data environment.
Implementing Zero Trust also allows organizations to reduce the risk of brand-impacting security incidents and customer-facing outages. Zero Trust ensures uninterrupted business operations. Moreover, it provides fine-grained control over roaming and data sovereignty, granting organizations greater flexibility and security.
Moreover, Zero Trust enables multiple business functions to utilize a single access method. This consolidation improves security measures while reducing customers’ effort to complete transactions, ultimately enhancing the overall customer experience.
Zero Trust can be leveraged in numerous use cases, addressing different organizational security and risk management needs. Its versatility and adaptability make it a practical approach to securing digital environments effectively.
Secure Supply Chain Assurance: Importance and Zero Trust Applications
Zero Trust is crucial in securing the supply chain, as it helps identify revenue-impacting vulnerability chains within an enterprise. These chains can include business processes, security processes, and supply chains, collectively referred to as the attack surface.
Organizations can proactively identify and break potential kill chains within the supply chain by utilizing Zero Trust principles. Attack Surface Mapping and Cyber Asset Attack Surface Mapping (CAASM) enable the scanning and mitigating of current, potential, and near-miss supply chain attacks, reducing the risk of cascading failures.
Attack Surface Mapping involves identifying and mapping all the possible entry points, weaknesses, and exposure areas in an organization’s network, systems, and applications. It provides a comprehensive view of the organization’s attack surface, including external-facing systems and internal assets and connections.
Cyber Asset Attack Surface Mapping (CAASM) focuses explicitly on the assets within an organization’s supply chain. It examines the digital assets and dependencies in the supply chain ecosystem, including third-party vendors, partners, and interconnected systems. By analyzing the attack surface of the supply chain, organizations can identify potential weaknesses and vulnerabilities that attackers could exploit.
These mapping techniques enable organizations to proactively scan and assess their current security posture, identify potential risks, and prioritize mitigation efforts. Organizations can take appropriate measures to strengthen their defenses, patch vulnerabilities, and implement security controls by understanding the attack surface and potential attack vectors.
Zero Trust Frameworks: DISA NSA vs. NIST
Zero Trust frameworks can vary based on organizational needs and security requirements. The DISA NSA Zero Trust Reference Architecture is suitable for large critical infrastructure entities, while the NIST approach caters to entities in the early stages of their security maturity journey.
The DISA NSA framework provides a comprehensive and adaptable blueprint, focusing on Device Trust, User Trust, Data Trust, and Network Trust. Organizations can establish trust across various infrastructure components by implementing rigorous authentication, authorization, and continuous monitoring. This approach enhances risk management accuracy and reduces infrastructure costs, making it suitable for large critical infrastructure entities.
On the other hand, the NIST approach follows a risk-based strategy, emphasizing continuous monitoring, granular access controls, and dynamic policy enforcement. It promotes a “never trust, always verify” mindset, advocating for robust authentication mechanisms, network segmentation, and encryption. This framework offers flexibility and scalability, making it well-suited for organizations at various stages of their security maturity journey.
To leverage the strengths of both frameworks, organizations can incorporate complementary design elements tailored to their specific needs. Organizations can establish a robust Zero Trust architecture that addresses their unique security requirements by combining the DISA NSA and NIST approaches.
Ultimately, implementing Zero Trust principles provides organizations with a proactive and holistic security approach, reducing the risk of breaches, protecting sensitive data, and ensuring the resilience of their infrastructure. By embracing these frameworks, organizations can strengthen their security posture and effectively combat the ever-evolving cyber threats of today’s digital landscape.
Zero Trust and International Regulatory Frameworks
Zero Trust is a security framework that has gained significant attention and adoption in recent years. It aligns with various international regulatory frameworks, ensuring organizations meet stringent data protection, privacy, and security requirements.
General Data Protection Regulation (GDPR)
Zero Trust principles align closely with the core principles of GDPR, which emphasize the protection of personal data, privacy, and accountability. By implementing Zero Trust measures, organizations establish robust security controls, mitigate the risk of data breaches, and protect personal data. Through solid authentication, access controls, data segmentation, and encryption, Zero Trust helps organizations meet GDPR requirements, ensuring compliance with data protection regulations.
California Consumer Privacy Act (CCPA)
The CCPA highlights the importance of safeguarding consumers’ personal information. Zero Trust principles provide valuable contributions to adequate data protection and privacy practices. With strong authentication mechanisms, data segmentation, and encryption, organizations can enhance their data security measures and meet CCPA obligations. Zero Trust’s emphasis on continuous monitoring and granular access controls ensures that organizations maintain control over the processing and sharing of personal information, thus meeting CCPA compliance requirements.
Payment Card Industry Data Security Standard (PCI DSS)
PCI DSS establishes rigorous security measures to protect cardholder data. Zero Trust provides a solid foundation for meeting PCI DSS requirements by focusing on secure access controls, continuous monitoring, and encryption. Zero Trust’s “never trust, always verify” principle aligns with the need for stringent authentication mechanisms and restricted access to cardholder data. Organizations can establish a robust security posture by implementing Zero Trust and maintaining compliance with the PCI DSS standards.
Zero Trust principles offer organizations a powerful approach to achieving compliance with international regulatory frameworks. By aligning with the General Data Protection Regulation (GDPR), California Consumer Privacy Act (CCPA), and Payment Card Industry Data Security Standard (PCI DSS), Zero Trust enhances data protection, privacy, and security practices. Conclusion
In an era of increasing cyber threats and supply chain vulnerabilities, adopting a Zero Trust approach is essential for organizations aiming to strengthen their security measures and ensure the integrity of their supply chains. By implementing Zero Trust principles, organizations can enhance security, streamline business functions, and align with international regulatory frameworks.
The versatility of Zero Trust frameworks, such as DISA NSA and NIST, allows organizations to tailor their security strategies to their specific needs. Embracing Zero Trust is a proactive step towards safeguarding sensitive data and critical operations and a crucial component of building trust with customers and partners in an ever-evolving digital landscape.
Download our comprehensive report on Zero Trust frameworks and their implementation strategies today. Gain valuable insights, practical guidance, and actionable steps to strengthen security measures. Click here to download the report and stay one step ahead in the ever-evolving digital landscape.
CDNs help keep Microsoft 365 fast and reliable for end users. Cloud services like Microsoft 365 use CDNs to cache static assets closer to the browsers requesting them to speed up downloads and reduce perceived end user latency. The information in this topic will help you learn about Content Delivery Networks (CDNs) and how they’re used by Microsoft 365.
What exactly is a CDN?
A CDN is a geographically distributed network consisting of proxy and file servers in datacenters connected by high-speed backbone networks. CDNs are used to reduce latency and load times for a specified set of files and objects in a web site or service. A CDN may have many thousands of endpoints for optimal servicing of incoming requests from any location.
CDNs are commonly used to provide faster downloads of generic content for a web site or service such as Javascript files, icons and images, and can also provide private access to user content such as files in SharePoint Online document libraries, streaming media files, and custom code.
CDNs are used by most enterprise cloud services. Cloud services like Microsoft 365 have millions of customers downloading a mix of proprietary content (such as emails) and generic content (such as icons) at one time. It’s more efficient to put images everyone uses, like icons, as close to the user’s computer as possible. It isn’t practical for every cloud service to build CDN datacenters that store this generic content in every metropolitan area, or even in every major Internet hub around the world, so some of these CDNs are shared.
How do CDNs make services work faster?
Downloading common objects like site images and icons over and over again can take up network bandwidth that can be better used for downloading important personal content, like email or documents. Because Microsoft 365 uses an architecture that includes CDNs, the icons, scripts, and other generic content can be downloaded from servers closer to client computers, making the downloads faster. This means faster access to your personal content, which is securely stored in Microsoft 365 datacenters.
CDNs help to improve cloud service performance in several ways:
CDNs shift part of the network and file download burden away from the cloud service, freeing up cloud service resources for serving user content and other services by reducing the need to serve requests for static assets.
CDNs are purpose built to provide low-latency file access by implementing high performance networks and file servers, and by leveraging updated network protocols such as HTTP/2 with highly efficient compression and request multiplexing.
CDN networks use many globally distributed endpoints to make content available as close as possible to users.
The Microsoft 365 CDN
The built-in Microsoft 365 Content Delivery Network (CDN) allows Microsoft 365 administrators to provide better performance for their organization’s SharePoint Online pages by caching static assets closer to the browsers requesting them, which helps to speed up downloads and reduce latency. The Microsoft 365 CDN uses the HTTP/2 protocol for improved compression and download speeds.
Note
The Microsoft 365 CDN is only available to tenants in the Production (worldwide) cloud. Tenants in the US Government, China and Germany clouds do not currently support the Microsoft 365 CDN.
The Microsoft 365 CDN is composed of multiple CDNs that allow you to host static assets in multiple locations, or origins, and serve them from global high-speed networks. Depending on the kind of content you want to host in the Microsoft 365 CDN, you can add public origins, private origins or both.
Content in public origins within the Microsoft 365 CDN is accessible anonymously, and can be accessed by anyone who has URLs to hosted assets. Because access to content in public origins is anonymous, you should only use them to cache non-sensitive generic content such as Javascript files, scripts, icons and images. The Microsoft 365 CDN is used by default for downloading generic resource assets like the Microsoft 365 client applications from a public origin.
Private origins within the Microsoft 365 CDN provide private access to user content such as SharePoint Online document libraries, sites and proprietary images. Access to content in private origins is secured with dynamically generated tokens so it can only be accessed by users with permissions to the original document library or storage location. Private origins in the Microsoft 365 CDN can only be used for SharePoint Online content, and you can only access assets through redirection from your SharePoint Online tenant.
The Microsoft 365 CDN service is included as part of your SharePoint Online subscription.
Although not a part of the Microsoft 365 CDN, you can use these CDNs in your Microsoft 365 tenant for access to SharePoint development libraries, custom code and other purposes that fall outside the scope of the Microsoft 365 CDN.
Azure CDN
Note
Beginning in Q3 2020, SharePoint Online will begin caching videos on the Azure CDN to support improved video playback and reliability. Popular videos will be streamed from the CDN endpoint closest to the user. This data will remain within the Microsoft Purview boundary. This is a free service for all tenants and it does not require any customer action to configure.
You can use the Azure CDN to deploy your own CDN instance for hosting custom web parts, libraries and other resource assets, which allows you to apply access keys to your CDN storage and exert greater control over your CDN configuration. Use of the Azure CDN isn’t free, and requires an Azure subscription.
Microsoft’s Ajax CDN is a read-only CDN that offers many popular development libraries including jQuery (and all of its other libraries), ASP.NET Ajax, Bootstrap, Knockout.js, and others.
To include these scripts in your project, simply replace any references to these publicly available libraries with references to the CDN address instead of including it in your project itself. For example, use the following code to link to jQuery:
For more information about how to use the Microsoft Ajax CDN, see Microsoft Ajax CDN.
How does Microsoft 365 use content from a CDN?
Regardless of what CDN you configure for your Microsoft 365 tenant, the basic data retrieval process is the same.
Your client (a browser or Office client application) requests data from Microsoft 365.
Microsoft 365 either returns the data directly to your client or, if the data is part of a set of content hosted by the CDN, redirects your client to the CDN URL.a. If the data is already cached in a public origin, your client downloads the data directly from the nearest CDN location to your client.b. If the data is already cached in a private origin, the CDN service checks your Microsoft 365 user account’s permissions on the origin. If you have permissions, SharePoint Online dynamically generates a custom URL composed of the path to the asset in the CDN and two access tokens, and returns the custom URL to your client. Your client then downloads the data directly from the nearest CDN location to your client using the custom URL.
If the data isn’t cached at the CDN, the CDN node requests the data from Microsoft 365 and then caches the data for time after your client downloads the data.
The CDN figures out the closest datacenter to the user’s browser and, using redirection, downloads the requested data from there. CDN redirection is quick, and can save users a lot of download time.
How should I set up my network so that CDNs work best with Microsoft 365?
Minimizing latency between clients on your network and CDN endpoints is the key consideration for ensuring optimal performance. You can use the best practices outlined in Managing Microsoft 365 endpoints to ensure that your network configuration permits client browsers to access the CDN directly rather than routing CDN traffic through central proxies to avoid introducing unnecessary latency.
Is there a list of all the CDNs that Microsoft 365 uses?
The CDNs in use by Microsoft 365 are always subject to change and in many cases there are multiple CDN partners configured in the event one is unavailable. The primary CDNs used by Microsoft 365 are:
CDN
Company
Usage
Link
Microsoft 365 CDN
Microsoft Azure
Generic assets in public origins, SharePoint user content in private origins
There are many factors involved in measuring specific differences in performance between data downloaded directly from Microsoft 365 and data downloaded from a specific CDN, such as your location relative to your tenant and to the nearest CDN endpoint, the number of assets on a page that are served by the CDN, and transient changes in network latency and bandwidth. However, a simple A/B test can help to show the difference in download time for a specific file.
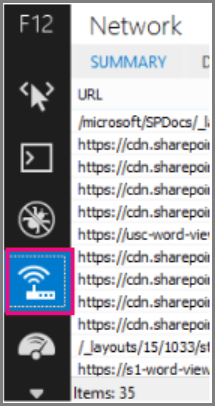
The following screenshots illustrate the difference in download speed between the native file location in Microsoft 365 and the same file hosted on the Microsoft Ajax Content Delivery Network. These screenshots are from the Network tab in the Internet Explorer 11 developer tools. These screenshots show the latency on the popular library jQuery. To bring up this screen, in Internet Explorer, press F12 and select the Network tab, which is symbolized with a Wi-Fi icon.
This screenshot shows the library uploaded to the master page gallery on the SharePoint Online site itself. The time it took to upload the library is 1.51 seconds.
The second screenshot shows the same file delivered by Microsoft’s CDN. This time the latency is around 496 milliseconds. This is a large improvement and shows that a whole second is shaved off the total time to download the object.
Is my data safe?
We take great care to protect the data that runs your business. Data stored in the Microsoft 365 CDN is encrypted both in transit and at rest, and access to data in the Microsoft 365 SharePoint CDN is secured by Microsoft 365 user permissions and token authorization. Requests for data in the Microsoft 365 SharePoint CDN must be referred (redirected) from your Microsoft 365 tenant or an authorization token won’t be generated.
To ensure that your data remains secure, we recommend that you never store user content or other sensitive data in a public CDN. Because access to data in a public CDN is anonymous, public CDNs should only be used to host generic content such as web script files, icons, images and other non-sensitive assets.
Note
3rd party CDN providers may have privacy and compliance standards that differ from the commitments outlined by the Microsoft 365 Trust Center. Data cached through the CDN service may not conform to the Microsoft Data Processing Terms (DPT), and may be outside of the Microsoft 365 Trust Center compliance boundaries.
For in-depth information about privacy and data protection for Microsoft 365 CDN providers, visit the following:
Learn more about Microsoft 365 privacy and data protection at the Microsoft Trust Center
Learn more about Azure privacy and data protection at the Azure Trust Center
How can I secure my network with all these 3rd party services?
Using an extensive set of partner services allows Microsoft 365 to scale and meet availability requirements and enhance the user experience when using Microsoft 365. The 3rd party services Microsoft 365 leverages include both certificate revocation lists; such as crl.microsoft.com or sa.symcb.com, and CDNs; such as r3.res.outlook.com. Every CDN FQDN generated by Microsoft 365 is a custom FQDN for Microsoft 365. If you’re sent to a FQDN at the request of Microsoft 365, you can be assured that the CDN provider controls the FQDN and the underlying content at that location.
For customers that want to segregate requests destined for a Microsoft 365 datacenter from requests that are destined for a 3rd party, we’ve written up guidance on Managing Microsoft 365 endpoints.
Is there a list of all the FQDNs that leverage CDNs?
The list of FQDNs and how they leverage CDNs change over time. Refer to our published Microsoft 365 URLs and IP address ranges page to get up to date on the latest FQDNs that leverage CDNs.
Can I use my own CDN and cache content on my local network?
We’re continually looking for new ways to support our customers’ needs and are currently exploring the use of caching proxy solutions and other on-premises CDN solutions.
Although it isn’t a part of the Microsoft 365 CDN, you can also use the Azure CDN for hosting custom web parts, libraries and other resource assets, which allows you to apply access keys to your CDN storage and exert greater control over your CDN configuration. Use of the Azure CDN isn’t free, and requires an Azure subscription. For more information on how to configure an Azure CDN instance, see Quickstart: Integrate an Azure storage account with Azure CDN.
I’m using Azure ExpressRoute for Microsoft 365, does that change things?
Azure ExpressRoute for Microsoft 365 provides a dedicated connection to Microsoft 365 infrastructure that is segregated from the public internet. This means that clients will still need to connect over non-ExpressRoute connections to connect to CDNs and other Microsoft infrastructure that isn’t explicitly included in the list of services supported by ExpressRoute. For more information about how to route specific traffic such as requests destined for CDNs, see Implementing ExpressRoute for Microsoft 365.
Can I use CDNs with SharePoint Server on-premises?
Using CDNs only makes sense in a SharePoint Online context and should be avoided with SharePoint Server. This is because all of the advantages around geographic location don’t hold true if the server is located on-premises or geographically close anyway. Additionally, if there’s a network connection to the servers where it’s hosted, then the site may be used without an Internet connection and therefore can’t retrieve the CDN files. Otherwise, you should use a CDN if there’s one available and stable for the library and files you need for your site.
Office 365 requires connectivity to the Internet. The endpoints below should be reachable for customers using Office 365 plans, including Government Community Cloud (GCC).
Start with Managing Office 365 endpoints to understand our recommendations for managing network connectivity using this data. Endpoints data is updated as needed at the beginning of each month with new IP Addresses and URLs published 30 days in advance of being active. This cadence allows for customers who don’t yet have automated updates to complete their processes before new connectivity is required. Endpoints may also be updated during the month if needed to address support escalations, security incidents, or other immediate operational requirements. The data shown on this page below is all generated from the REST-based web services. If you’re using a script or a network device to access this data, you should go to the Web service directly.
Endpoint data below lists requirements for connectivity from a user’s machine to Office 365. For detail on IP addresses used for network connections from Microsoft into a customer network, sometimes called hybrid or inbound network connections, see Additional endpoints for more information.
The endpoints are grouped into four service areas representing the three primary workloads and a set of common resources. The groups may be used to associate traffic flows with a particular application, however given that features often consume endpoints across multiple workloads, these groups can’t effectively be used to restrict access.
Data columns shown are:
ID: The ID number of the row, also known as an endpoint set. This ID is the same as is returned by the web service for the endpoint set.
Category: Shows whether the endpoint set is categorized as Optimize, Allow, or Default. This column also lists which endpoint sets are required to have network connectivity. For endpoint sets that aren’t required to have network connectivity, we provide notes in this field to indicate what functionality would be missing if the endpoint set is blocked. If you’re excluding an entire service area, the endpoint sets listed as required don’t require connectivity.You can read about these categories and guidance for their management in New Office 365 endpoint categories.
ER: This is Yes if the endpoint set is supported over Azure ExpressRoute with Office 365 route prefixes. The BGP community that includes the route prefixes shown aligns with the service area listed. When ER is No, this means that ExpressRoute is not supported for this endpoint set.Some routes may be advertised in more than one BGP community, making it possible for endpoints within a given IP range to traverse the ER circuit, but still be unsupported. In all cases, the value of a given endpoint set’s ER column should be respected.
Addresses: Lists the FQDNs or wildcard domain names and IP address ranges for the endpoint set. Note that an IP address range is in CIDR format and may include many individual IP addresses in the specified network.
Ports: Lists the TCP or UDP ports that are combined with listed IP addresses to form the network endpoint. You may notice some duplication in IP address ranges where there are different ports listed.
Note
Microsoft has begun a long-term transition to providing services from the cloud.microsoft namespace to simplify the endpoints managed by our customers. If you are following existing guidance for allowing access to required endpoints as listed below, there’s no further action required from you.
Default Optional Notes: Some Office 365 features require endpoints within these domains (including CDNs). Many specific FQDNs within these wildcards have been published recently as we work to either remove or better explain our guidance relating to these wildcards.
Default Optional Notes: Connection to the speech service is required for Office Dictation features. If connectivity is not allowed, Dictation will be disabled.
No
officespeech.platform.bing.com
TCP: 443
147
Default Required
No
*.office.com, www.microsoft365.com
TCP: 443, 80
152
Default Optional Notes: These endpoints enables the Office Scripts functionality in Office clients available through the Automate tab. This feature can also be disabled through the Office 365 Admin portal.
A TeamViewer company profile allows the ability within the TeamViewer Management Consoleto manage user permissions and access centrally.
Company admins can add existing users to the license and create new TeamViewer accounts. Both will allow users to log into any TeamViewer application and license the device so they may make connections.
Before starting
It is highly recommended to utilize a Master Account for a company profile, which will be the account that manages all licenses and users.
Each company profile must have one TeamViewer Core multi-userlicense activated; this license can be combined with other licenses of the TeamViewer product family (e.g., Assist AR, Remote Management, IoT, etc. ), but cannot be combined with another TeamViewer Core license.
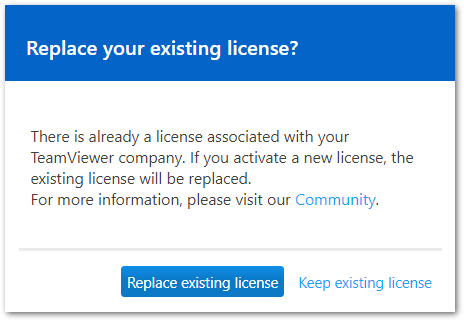
📌Note: If a company admin attempts to activate a second TeamViewer license, they will need to choose between keeping the existing license or replacing it with the new license.
📌Note: In some cases (with older company profiles and an active perpetual license), multiple core TeamViewer licenses may be activated to one company profile. One subscription license may be added to an existing perpetual license for such company profiles.
License management
Through the TeamViewer Management Console, company admins can manage the licensing of their users directly, including:
Assign/un-assign the license to various members of the company profile.
Reserve one or more channels for specific teams or persons via Channel Groups.
💡Hint: To ensure the license on your company profile best matches your use case, we highly recommend reaching out to our TeamViewer licensing experts.You may find local numbers here.
How to create a company profile
To create a company profile, please follow the instructions below:
On the left-hand side, under the Company header, select User management
In the text box provided, enter the desired company name and click Create.
📌Note: The name of a company profile must be unique and cannot be re-used. If another company profile already uses a name, an error will appear, requesting another name be used instead.
Once the company profile is created, User management will load with the user that created the company profile as a company administrator.
How to add a new user
To add a new user, please follow the instructions below:
Under User management, click the icon of a person with a + sign. Click on Add user.
On the General tab, add the user’s name and email address and enter a password for the user and click Add user.
💡Hint: Other settings for the user can be adjusted under Advanced, Licenses, and Permissions.
The user will now appear under the User management tab. An email is sent to the user with instructions on activating their account.
📌Note: If the user does not activate their account via email, they will receive an error that the account has not yet been activated when trying to sign in.
How to add an existing user
Users that already have an existing TeamViewer account can request to join a company profile using a few simple steps:
Under User management, click the icon of a person with a + sign. Select Add existing account.
Once the user opens the link within a browser, they must sign in with their TeamViewer account. Once logged in, they will be prompted to enter the email address of the company administrator. Once completed, they must tick the box I allow to transfer my account and click Join Company.
The company admin will receive a join request via email. The user will appear in user management, where the company admin can approve or decline the addition of the user to the company profile
📌Notes:
Every user that joins a company profile will be informed that the company admin will take over full management of their account, including the ability to connect to and control all their devices. It is recommended never to join a company profile the user does not know or fully trust.
A user can only be part of one company profile.
How to set user permissions
Users of a company profile have multiple options that can be set by the current company admin, including promoting other users to administrator or company administrator. Permissions are set for each user individually. To access user permissions:
In the User management tab, hovering the cursor over the desired user’s account will produce a three-dots menu (⋮) to the far right of the account. Click this menu and select Edit user from the drop-down.
Once in Edit user, select the Permissions tab. Overall permissions for the account can be changed using the drop-down under the Role header.
Four options are available:
Company administrator: Can make changes to company settings, other administrator accounts, and user accounts.
User administrator: Can make changes to other user accountsbut cannot change company settings or company administrator accounts.
Member: Cannot change the company profile or other users.
Customized permissions: The company admin sets permissions for each aspect of the account.
Once the appropriate role is selected, click Save in the window’s upper-left corner.
📌Note: Changes to user permissions are automatic once saved.
How to remove/deactivate/delete users
Along with adding new or existing accounts, company admins can remove, deactivate, or even delete users from the company profile.
📌Note: A current company admin of that license can only remove a TeamViewer account currently connected to a company profile. TeamViewer Customer Support is unable to remove any account from a company profile.
To remove, deactivate or delete an account, please follow the instructions below:
In the User management tab, hovering the cursor over the desired user’s account will produce a three-dots menu (⋮) to the far right of the account. In the drop-down menu that appears are the three options
Select Delete account, Remove user or Deactivate user.
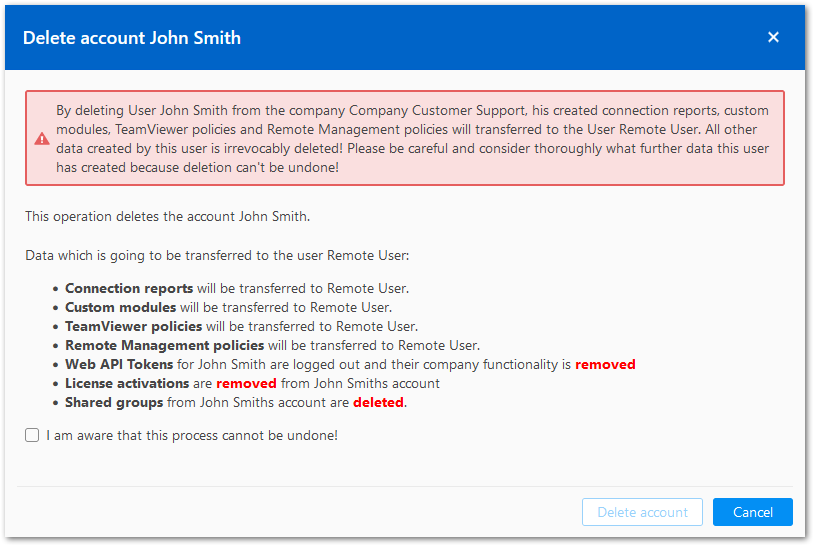
Consequences of deleting an account
When an account is deleted, the account is not only removed from the company profile but deleted from TeamViewer altogether. The user can no longer use the account or access any information associated with it as it no longer exists.
📌Note: When an account is deleted, the email address associated with the account can be re-used to create a new TeamViewer account.
When a TeamViewer account is deleted from a company profile:
Connection reports, custom modules, and TeamViewer/Remote management policies will be transferred to the current company admin.
Web API Tokens for the deleted user are logged out, and their company functionality is removed
License activations are removed from the deleted user’s account
Shared groups from the deleted user’s account are deleted.
Once the company admin checks the box to confirm that this process cannot be undone, the Delete account button becomes available. Once pressed, the account is deleted.
📌Note: Deletion of any TeamViewer account deletion is irreversible. Only a new account can be created after deletion. All user data will be lost.
Remove user
When an account is removed, the account is removed from the company profile and reverted to a free TeamViewer account. The account is reverted to a free account, and the user is still able to log in with the account. All information associated with the account is still accessible.
When an account is removed from a company profile:
Connection reports, custom modules, and TeamViewer /Remote management policies will be transferred to the current company admin.
Contacts in the contact bookare transferred to the current company admin
Web API Tokens for the user’s account are logged out and their company functionality is removed
License activations are removed from the user’s account
📌Note: Groups & devices in the Computers & Contacts of the removed user’s account are not affected. Any groups shared also will remain shared.
Once the company admin checks the box to confirm that this process cannot be undone, the Remove user button becomes available. Once pressed, the account is removed from the company profile and reverted to a free TeamViewer account.
📌Note: Once a user account is removed from the current company profile, it can request to join another company profile.
Deactivate user
When an account is deactivated, the account is reverted to inactive. The deactivated account is still associated with the company profile but cannot be used to log into TeamViewer on a free or licensed device. The account is rendered completely unusable.
📌Note: When an account is deactivated, the email address associated with the account cannot be used to create a new free TeamViewer account.
💡Hint: To view inactivated users within the company profile, select the drop-down menu under User Status and check the box for Inactive. All inactive users will now appear in user management.
How to reactivate inactive users
When Deactivate user is selected, the account disappears from user management. They are, however, still a part of the Company Profile and can be reactivated back to the license instantly at any time.
To view inactivated users within the company profile, select the menu under User Status and check the box for Inactive. All inactive users will now appear in user management.
Once the user is located, hover the cursor over the account. Select the three-dots menu (⋮) to the right of the user’s account and select Activate user
The user’s original permissions status is reverted, and the account can again be used with any TeamViewer device.
Troubleshooting
Below you will find answers to some common issues encountered when interacting with a company profile.
▹User(s) on a company profile show a free license
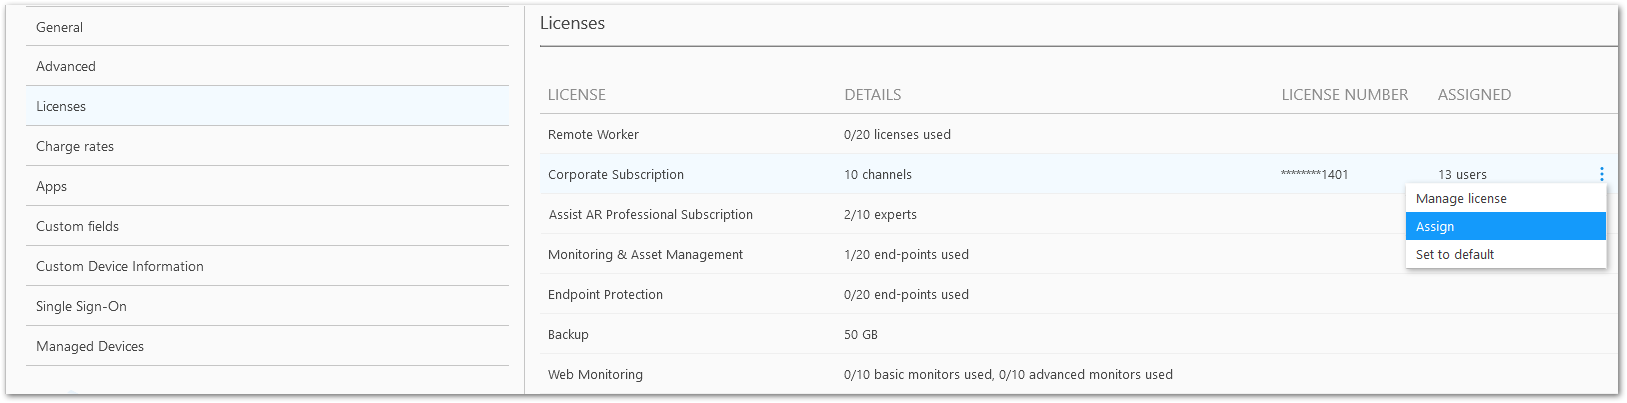
In some cases, older users on a company profile may appear as ‘free’ users, especially after upgrading or changing a license. The company admin can resolve this:
Click Company administration on the left-hand side:
Select the Licenses tab and locate the license. Hovering the cursor over the license will produce a three-dots menu (⋮). Click the menu and select Assign from the drop-down.
The users who show ‘free’ will appear in Unassigned. Select the desired users and click the Add button at the bottom of the page.
📌Note: Affected users should log out and then back in to see the licensing changes.
▹Your account is already associated with a company
If a user who is already associated with one company profile attempts to join another company profile, the following pop-up will appear:
The user’s account must be removed from the current company profile to resolve this. The steps required vary depending on whether it is their active or expired company profile or if they are associated with a company profile created by another account.
SCENARIO 1: As company administrator of an active company profile
If a user who created a company profile wishes to delete the company profile associated with their account, they will need to perform the following steps:
Remove all other accounts: Before deleting a company profile, the company admin must remove all other accounts. Perform these steps for each user on the company profile
Remove the company admin account: Once all other accounts have been removed, the company admin will remove their account. This will delete the company profile altogether
The user is immediately logged out and can now follow the process to add their account to an existing company profile
SCENARIO 2: As company administrator of an expired company profile
In some cases, the user may have created a company profile on an older license that is no longer used or active. In such cases, the company profile will appear as expired in the Management Console.
In such cases, it is still possible to delete the company profile:
Click Company administration on the left-hand side.
On the General tab, select Delete company.
A pop-up will appear confirming the request to delete the company profile. Check the box at the bottom to validate, and select Delete company.
SCENARIO 3: The account is a member of a company profile
📌Note: Only a company administrator can remove a user from their company profile – not even TeamViewer can remove a user from a company profile, regardless of the request’s origin.
If the user is a member of another company profile, they will need to contact the company admin of that license to request removal.
Once removed, they can then request to join the correct company profile.
You have the possibility to restrict remote access to your device by using the Block and Allowlist feature in the TeamViewer full version and the TeamViewer Host.
You can find the feature easily by clicking in your TeamViewer full version on the Gear icon (⚙) in the upper right corner of the TeamViewer (Classic) application, then Security ➜ Block and Allowlist.
Let´s begin with the difference between a blocklist and an allowlist.
This article applies to all TeamViewer (Classic) users.
What is a Blocklist?
The Blocklist generally lets you prevent certain partners or devices from establishing a connection to your computer. TeamViewer accounts or TeamViewer IDs on the blocklist cannot connect to your computer.
📌Note: You will still be able to set up outgoing TeamViewer sessions with partners on the blocklist.
What is an Allowlist?
If you add TeamViewer accounts to the Allowlist, only these accounts will be able to connect to your computer. The possibility of a connection to your computer through other TeamViewer accounts or TeamViewer IDs will be denied
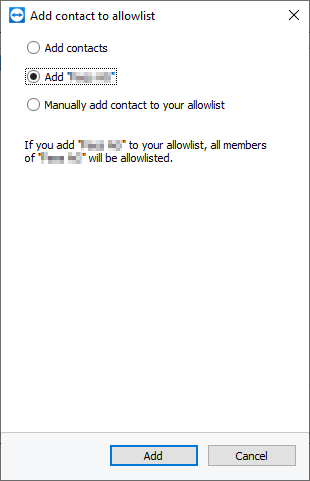
If you have joined a company profile with your TeamViewer account, you can also place the entire company profile on the Allowlist. Thus only the TeamViewer accounts that are part of the company profile can access this device.
📌Note: To work with a company profile you will need a TeamViewer Premium or Corporate license
How to set up a Blocklist?
If you would like to deny remote access to your device to specific persons or TeamViewer IDs, we recommend setting up a Blocklist.
You can find the feature easily by clicking in your TeamViewer full version on the Gear icon (⚙) in the upper right corner of the TeamViewer (Classic) application, then Security ➜ Block and Allowlist ➜ Click on Configure…
A new window will open. Activate the first option Deny access for the following partners and click on Add
📌Note: If you activate the Also apply for meetings check box, these settings will also be applied to meetings. Contacts from your blocklist are excluded from being able to join your meetings.
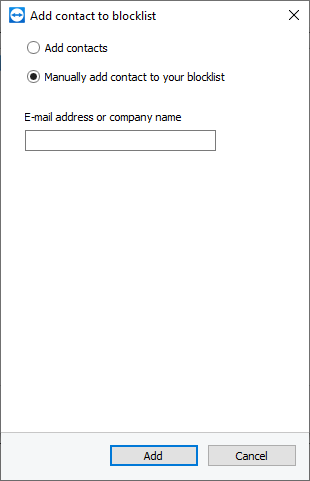
After clicking on Add, you can either choose partners saved on your Computers & Contacts list or add TeamViewer IDs/contacts manually to your blocklist.
How to set up an Allowlist?
If you would like to allow only specific TeamViewer accounts or TeamViewer IDs remote access to your device, we recommend setting up an Allowlist.
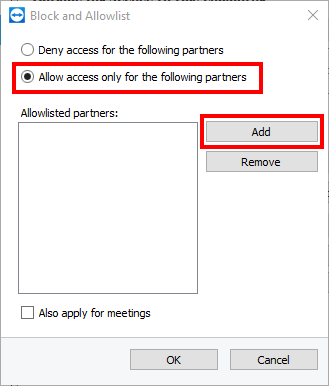
You can find the feature easily by clicking in your TeamViewer full version on the Gear icon (⚙) in the upper right corner of the TeamViewer (Classic) application, then Security ➜ Block and Allowlist ➜ Click on Configure…
A new window will open. Activate the second option Allow access only for the following partners and click on Add
📌Note: If you activate the Also apply for meetings check box, these settings will also be applied to meetings. Only contacts from your allowlist will then be able to join your meetings.
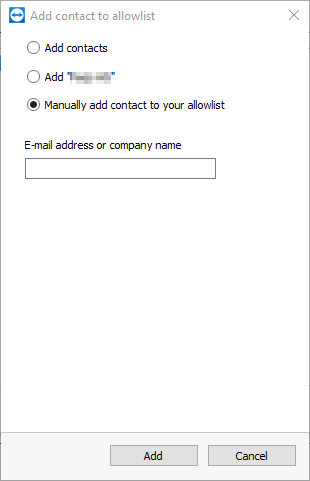
After clicking on Add, you can either choose partners saved on your Computers & Contacts list, add TeamViewer IDs/contacts manually to your blocklist, or add the whole company you are part of (only visible if you are part of a company profile).
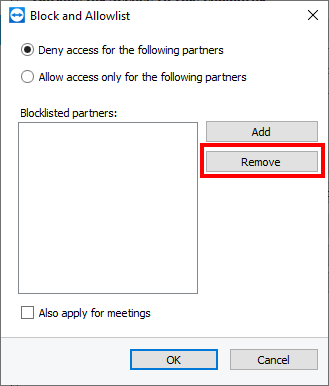
How to delete blocklisted/allowlisted partners?
If you no longer wish to have certain partners block or allowlisted, you can easily remove them from the list.
To do so navigate in your TeamViewer full version to the Gear icon (⚙) in the upper right corner of the TeamViewer (Classic) application, then Security ➜ Block and Allowlist ➜ Click on Configure… and choose whether you would like to remove partners from the Blocklist or from the Allowlist by choosing either Deny access for the following partners (Blocklist) or Allow access only for the following partner (Allowlist). Now click on the partners you would like to remove and finally click Remove ➜ OK
📌Note: You can choose multiple partners at once by pressing CTRG when clicking on the different partners.
This article provides a step-by-step guide to activating Two-factor authentication for connections (also known as TFA for connections).This feature enables you to allow or deny connections via push notifications on a mobile device.
This article applies to all Windows users using TeamViewer (Classic) 15.17 (and newer) and macOS and Linux users in version 15.22 (and newer).
What is Two-factor authentication for connections?
TFA for connections offers an extra layer of protection to desktop computers.
When enabled, connections to that computer need to be approved using a push notification sent to specific mobile devices.
Enabling Two-factor authentication for connections and adding approval devices
Windows and Linux:
1. In the TeamViewer (Classic) application, click the gear icon at the top right menu.
2. Click on the Security tab on the left.
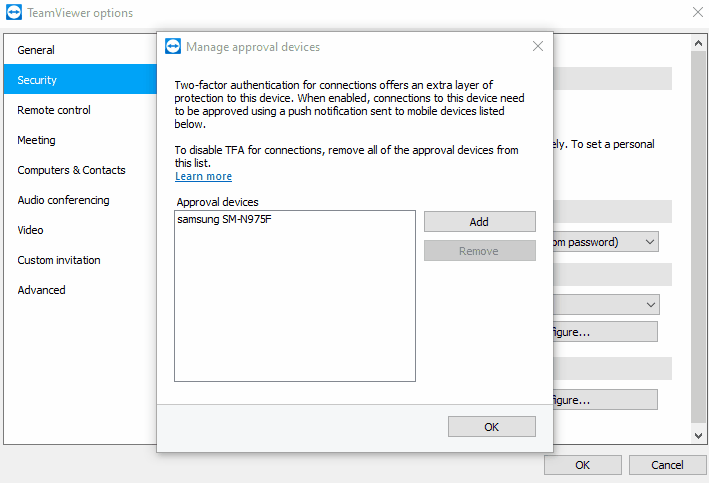
3. You will find the Two-factor authentication for connections section at the bottom.
4. Click on Configure… to open the list of approval devices.
5. To add a new mobile device to receive the push notifications, click Add.
6. You will now see a QR code that needs to be scanned by your mobile device.
Below please find a step-by-step gif for Windows, Linux, and macOS:
Windows
Linux
macOS
7. On the mobile device, download and install the TeamViewer Remote Control app:
8. In the TeamViewer Remote Control app, go to Settings → TFA for connections.
9. You will see a short explanation and the option to open the camera to scan the QR code.
10. Tap on Scan QR code and you will be asked to give the TeamViewer app permission to access the camera.
11. After permission is given, the camera will open. Point the camera at the QR code on the desktop computer (see Step 6 above).
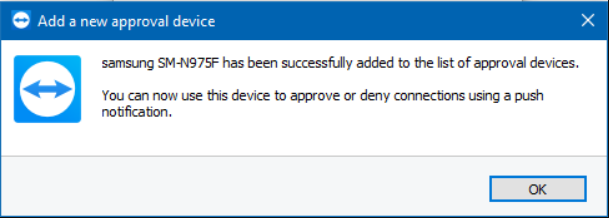
12. The activation will happen automatically, and a success message will be displayed.
13. The new device is now included in the list of approval devices.
14. From now on, any connection to this desktop computer will need to be approved using a push notification.
📌 Note:TFA for connections cannot be remotely disabled if the approval device is not accessible. Due to this, we recommend setting up an additional approval device as a backup.
Removing approval devices
1. Select an approval device from the list and click Remove or the X.
2. You will be asked to confirm the action.
3. By clicking Remove again, the mobile device will be removed from the list of approval devices and won’t receive any further push notifications.
4. If the Approval devices list is empty, Two-factor authentication for connections will be completely disabled.
Below please find a step by step gif for Windows, Linux and macOS:
▹ Windows:
▹ Linux:
▹ macOS:
Remote connections when Two-factor authentication for connections is enabled
TFA for connections does not replace any existing authentication method. When enabled, it adds an extra security layer against unauthorized access.
When connecting to a desktop computer protected by TFA for connections, a push notification will be sent to all of the approval devices.
You can either:
accept/deny the connection request via the system notification:
accept/deny the connection request by tapping the TeamViewer notification. It will lead to you the following screen within the TeamViewer application to accept/deny the connection:
Multiple approval devices
All approval devices in the list will receive a push notification.
The first notification that is answered on any of the devices will be used to allow or deny the connection.
TeamViewer offers the possibility to activate Account Recovery based on the zero-trust principle.
This is a major security enhancement for your TeamViewer account and a unique offering on the market.
This article applies to all users.
What is Zero Knowledge Account Recovery
In cases where you cannot remember your TeamViewer Account credentials, you click on I forgot my password, which triggers an email with a clickable link that leads you to the option of resetting your password.
The regular reset process leads you to a page where you can set a new password for your account.
The Zero Knowledge Account Recovery acts as another layer of security for this process as the reset process requires you to enter the unique 64 characters Zero Knowledge Account Recovery Code for your account to prove your identity. Important to note is that this happens without any intervention and knowledge of the TeamViewer infrastructure.
Activate Zero Knowledge Account Recover
To activate Zero Knowledge Account Recovery please follow the steps below:
2. Click Edit profile under your profile name (upper right corner).
3. Go to Security in the left menu
4. Click the Activate Zero knowledge account recovery button
📌 Note: The password recovery code is a unique 64 characters code that allows you to regain access if you forgot your password. It is absolutely essential that you print/download your recovery code and keep this in a secure place.
⚠ IMPORTANT: Without the recovery code you won’t be able to recover your account. Access to your account will be irreversibly lost. The data is encrypted with the key and you are the only owner of this key. TeamViewer has no access to it.
5. A PopUp window appears sharing the above information. Click on Generate Recovery Code to proceed.
6. The Recovery Code is shown. You have to download or print the code as well as you tick the check box confirming that you acknowledge and understand that if you lose your zero knowledge account recovery code, you won’t be able to recover your password and you will lose access to your account forever
⚠ Do not tick the box unless you understand the meaning.
7. Once you either downloaded or printed the recovery code and ticked the acknowledge box, you can activate the Zero knowledge account recovery by clicking Activate.
Deactivate Zero Knowledge Account Recovery
To deactivate Zero Knowledge Account Recovery please follow the steps below:
2. Click Edit profile under your profile name (upper right corner).
3. Go to Security in the left menu
4. Click the Deactivate Zero knowledge account recovery button
5. A PopUp appears. You have to tick the check box confirming that you acknowledge and understand that if you will be deactivating your zero knowledge account recovery
6. Click Deactivate to deactivate the Zero Knowledge Account recovery for your TeamViewer Account.
Reset your password
To reset your password for your TeamViewer account, please follow the steps below: (More info here: Reset account password)