Welcome to the most complete guide on WordPress speed optimization!
This is my attempt to sum up WordPress speed + core web vitals in 1 post (it’s loooong).
I’ve constantly updated it to reflect new changes ever since I first published this 10 years ago. You have updates to things like core web vitals, plugin changelogs, and Cloudflare Enterprise happening every day. While site speed has gotten complex, the basics have stayed the same: use lightweight themes/plugins on fast servers (ideally with a performant cache plugin/CDN).
Why this tutorial is different:
First, my recommendations on tools/plugins/services are arguably better than what other people tell you to use. I’m very transparent about SiteGround’s slow TTFB and cache plugin, Kinsta’s overpriced service + lack of resources, NitroPack being blackhat, RocketCDN’s poor performance, and Elementor/Divi being slow. I’ve also written extensive reviews/tutorials on nearly every major host, cache plugin, CDN, and core web vital you can find in my nav menu.
Which is the 2nd reason it’s different: configuration guides! I have tons of them. Need help configuring FlyingPress, LiteSpeed Cache, or Perfmatters? Want to improve TTFB or LCP? Or maybe you’re wondering which Cloudflare settings to use. I have detailed guides on all those.
If you have suggestions on making this tutorial better (or you have a question), drop me a comment. I’m all ears. I’m not for hire because I spend so much time writing these guides 🙂
Good luck and fair seas!
- Testing Tools
- DNS
- Hosting
- Page Builders
- CDN
- Cache Plugins
- Other Caching
- Plugins
- CSS + JavaScript
- Third-Party Code
- Fonts
- Images
- Videos
- Comments
- LCP
- CLS
- Preload, Prefetch, Preconnect
- Database
- Background Tasks
- Mobile
- WooCommerce
- Security
- PHP Version
- Make Sure Optimizations Are Working
- Speed Plugins
- Get Help
- My Setup
1. Testing Tools
Find bottlenecks on your site before jumping in.
- Chrome Dev Tools – the coverage report shows your largest CSS/JS files and where they’re loaded from (plugins + third-party code are common culprits). So many parts of speed and web vitals are related to CSS/JS and it’s best to tackle it at the source. Removing things you don’t need is better than trying to optimize it.
- KeyCDN Performance Test – measure TTFB in 10 global locations. This is mainly improved with better hosting and using a performant CDN with full page caching (like APO or FlyingProxy). It also shows DNS lookup times and TLS which can be improved with a fast DNS (i.e. Cloudflare) and configuring their SSL/TLS settings.
- PageSpeed Insights – most items come down to reducing or optimizing CSS, JS, fonts, images, TTFB, and above the fold content. For example, preload your LCP image and exclude it from lazy load, then move large plugins/elements below the fold so they can be delayed. Focus on recommendations in PSI’s opportunities + diagnostics sections, and monitor your core web vitals report in Search Console.
- CLS Debugger – see your website’s layout shifts (CLS) on mobile/desktop in a GIF.
- WP Hive – Chrome extension that lets you search the WordPress plugin repository and see whether a plugin impacts memory usage and PageSpeed scores, but only measures “out of the box settings” and not when content is added to the frontend.
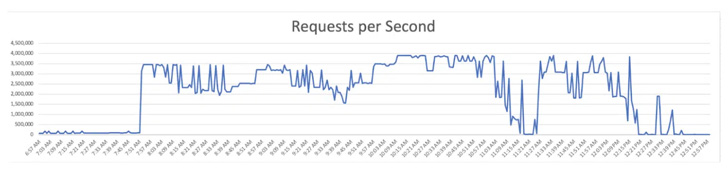
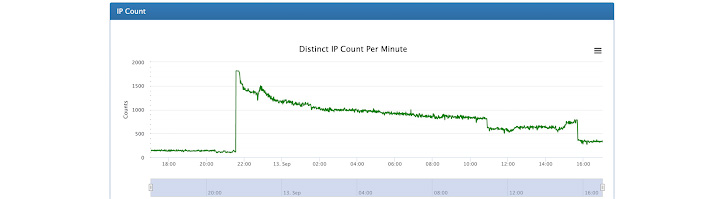
- Wordfence Live Traffic Report – see bots hitting your site in real-time. AhrefsBot, SemrushBot, compute.amazonaws.com and other bots can be blocked if you’re using their service. Since most bot protection services don’t block these service’s bots, you’ll need to do this manually with something like Cloudflare firewall rules.
- WP-Optimize – see which plugins add database overhead and remove old tables left behind by plugins/themes you deleted. Does a better than job cache plugins with scheduled cleanups because it can keep a certain number of post revisions while removing junk (cache plugins delete them all, leaving you with no backups).
- cdnperf.com + dnsperf.com – you can these as baseline for choosing a DNS/CDN provider, but it doesn’t include StackPath’s CDN (removed from cdnperf and used by RocketCDN), QUIC.cloud’s CDN or CDN (used on LiteSpeed), and other services.
- Waterfall Charts – testing “scores” isn’t nearly as effective as measuring things in a Waterfall chart. Google’s video on optimizing LCP is a great resource and shows you the basics. You can find one in WebPageTest, Chrome Dev Tools, and GTmetrix.
- Diagnostic Plugins – the speed plugins section lists all plugins mentioned in the guide. It includes diagnostic plugins like Query Monitor (this is probably best for finding bottlenecks), WP Server Stats, WP Hosting Benchmark, and WP Crontrol.
2. DNS
A slow DNS causes latency which is part of TTFB (and TTFB is part of LCP).
Whoever you registered your domain through is who you’re using for a DNS. GoDaddy, NameCheap, and even Amazon Route 53 (used on Kinsta) don’t perform well on dnsperf.com. Better options include Cloudflare, QUIC.cloud, or Google (if using Google Domains). I usually recommend Cloudflare since it’s free and can be used on any setup by changing nameservers.

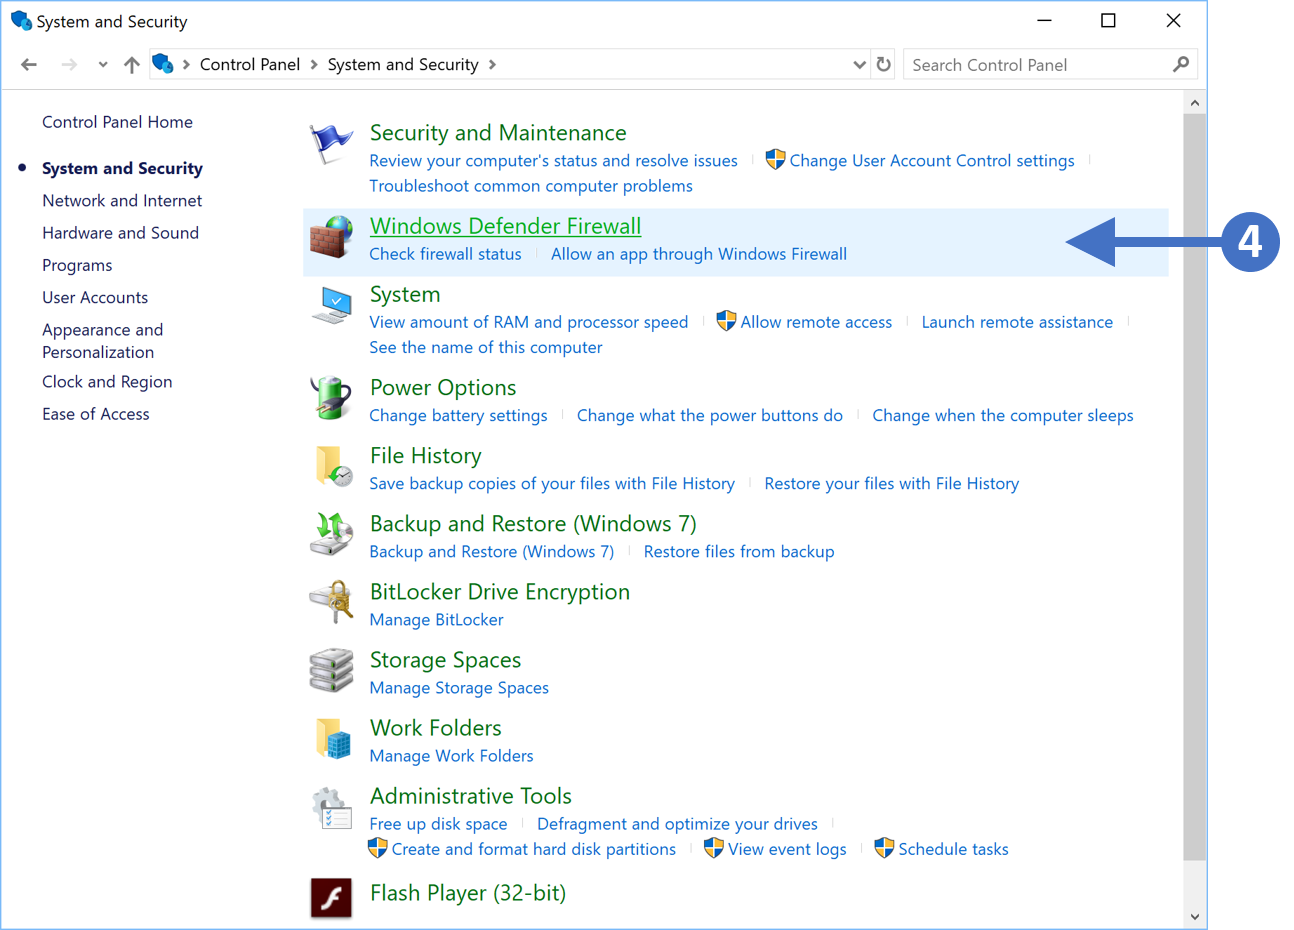
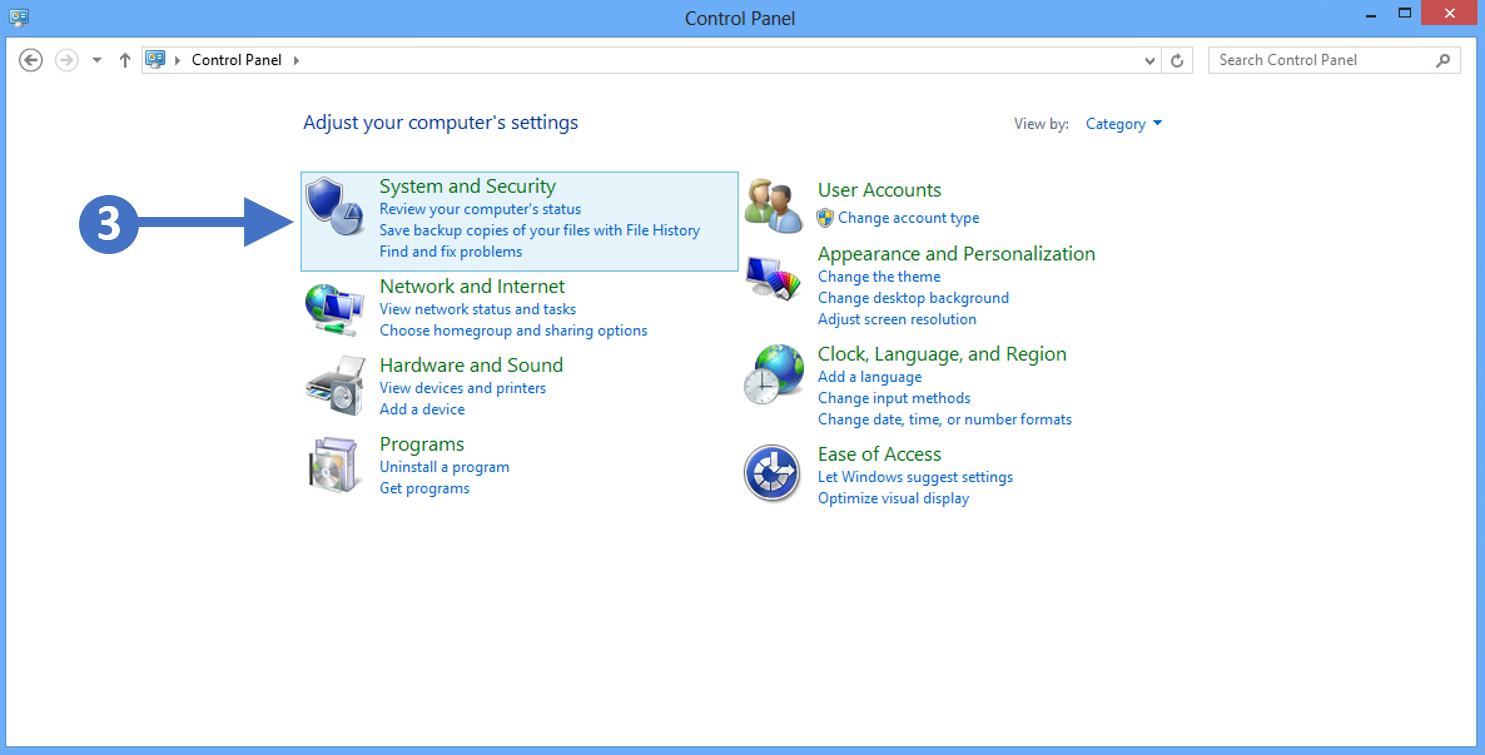
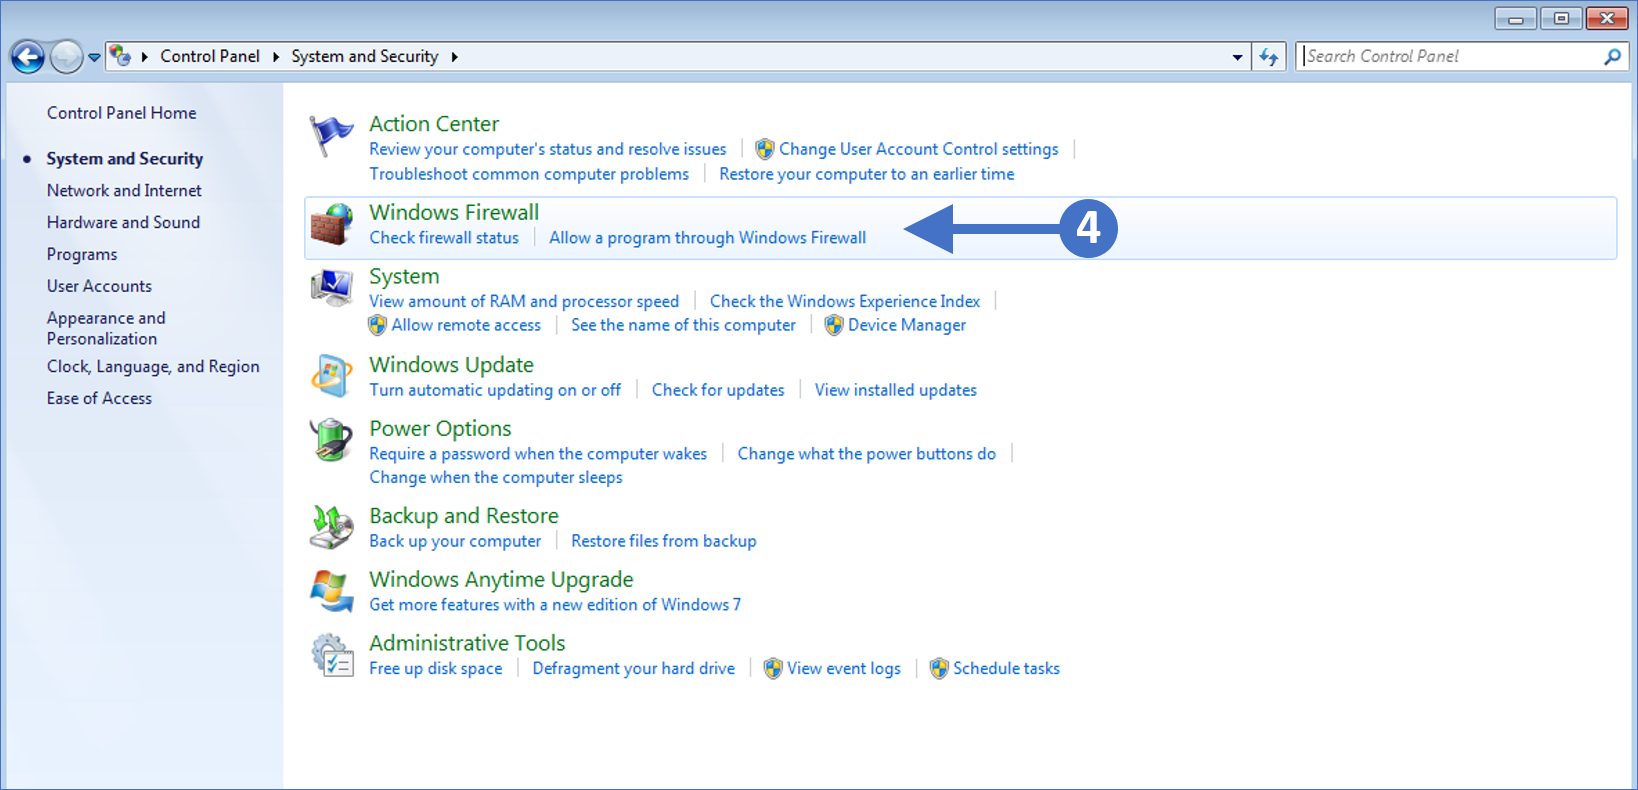
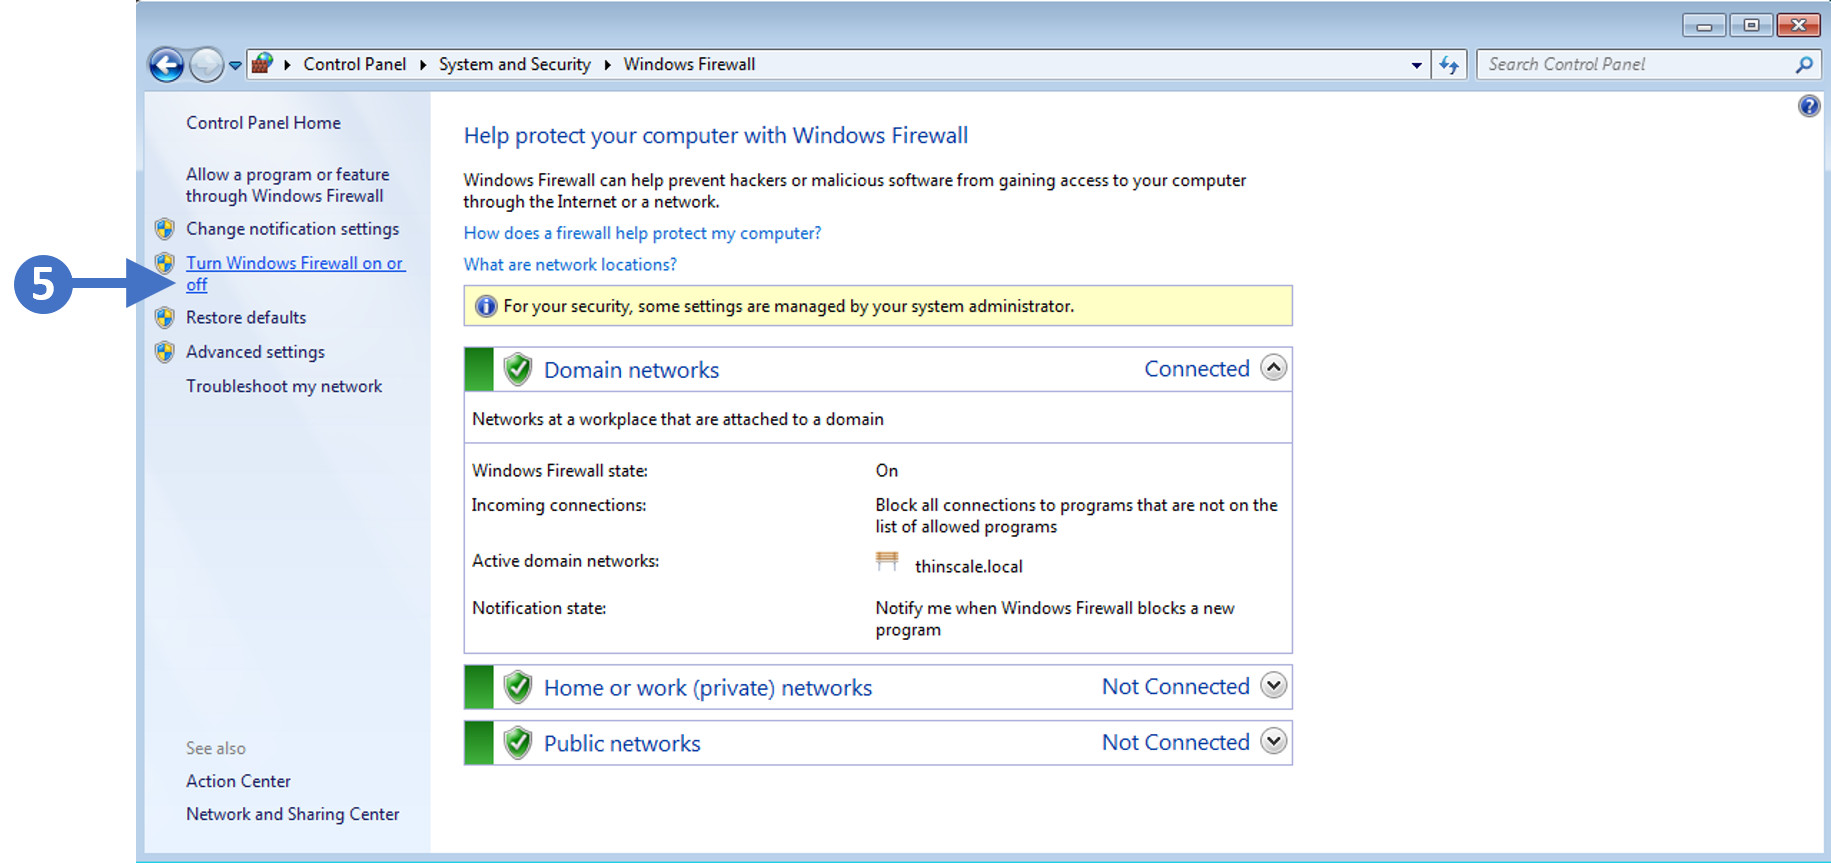
3. Hosting
Rocket.net with their free Cloudflare Enterprise will outperform any “mainstream host” since you get 32 CPU cores + 128GB RAM, NVMe storage, Redis, and Cloudflare’s full page caching + Argo Smart Routing. I use them and average a <150ms global TTFB (or click through my posts).
12 things to know about hosting/TTFB
- Hosting is the #1 factor of site speed.
- TTFB is a key indicator of hosting performance.
- TTFB is part of core web vitals and is 40% of LCP.
- TTFB also affects INP (since latency is part of TTFB).
- SpeedVitals tests TTFB in 35 locations – use this tool!
- Test your site 3 times to get accurate numbers in SpeedVitals.
- Doing this ensures your caching and CDN are working properly.
- Check your average TTFB worldwide in your 3rd SpeedVitals test.
- Google flags your TTFB if it’s over 600ms, but under 200ms is better.
- PageSpeed Insights (and other testing tools) only test TTFB in 1 location.
- WP Hosting Benchmark also tests hosting performance (here are my results).
- Combining a good host/CDN is arguably the best way to improve TTFB (using a host with improved specs on top of Cloudflare Enterprise hits 2 birds with 1 stone).

Mainstream hosts (like SiteGround, Hostinger, and WPX) don’t have a lot of CPU/RAM, use slower SATA SSDs, and are shared hosting with strict CPU limits which force you to upgrade plans. Cloud hosting is faster, but Kinsta still uses SATA SSDs with low CPU/RAM, PHP workers, and monthly visits (Redis also costs $100/month). Cloudways Vultr HF is who I previously used, but again, they start with only 1 CPU + 1GB RAM on slower Apache servers, PHP-FPM, and GZIP.
Here are Rocket.net’s:
All plans use 32 CPU cores + 128GB RAM with NVMe (faster than SATA), Redis (better than memcached), LiteSpeed’s PHP, and Brotli (smaller compression than GZIP). They have no PHP worker limits since only about 10% of traffic hits your origin due to their Cloudflare Enterprise.
| SiteGround | Hostinger | Kinsta | Cloudways Vultr HF | Rocket.net | |
|---|---|---|---|---|---|
| Hosting type | Shared | Shared | Cloud | Cloud | Private cloud |
| Storage | SATA | SATA | SATA | NVMe | NVMe |
| CPU cores | Not listed | 1-2 | 12 | 1 | 32 |
| RAM (GB) | Not listed | .768 – 1.536 | 8 | 1 | 128 |
| Object cache | Memcached | x | Redis ($100/mo) | Redis (Pro) | Redis |
| Server | Nginx | LiteSpeed | Nginx | Apache | Nginx |
| PHP processing | FastCGI | LiteSpeed | FastCGI | FPM | LiteSpeed |
| Compression | Brotli | Brotli | Brotli | GZIP | Brotli |
| CPU limits | Very common | Low memory | Low PHP workers | Average | None |
Why you need Cloudflare Enterprise
Because you get Enterprise features like 270+ PoPs, prioritized routing, full page caching, HTTP/3, WAF, and image optimization. 3 problems with most CDNs are their small network (PoPs) and no full page caching or image optimization. For example, WP Rocket’s RocketCDN uses StackPath which was removed from cdnperf.com and doesn’t include image optimization with a mediocre Tbps speed of 65+. SiteGround’s CDN only has 14 PoPs. QUIC.cloud CDN (for LiteSpeed) and BunnyCDN are good, but they still don’t beat Cloudflare Enterprise. Sure, you can pay $5/mo for Cloudflare’s APO, but you’re still missing out on all other Enterprise features.
3 popular hosts with Cloudflare Enterprise
Rocket.net’s Cloudflare Enterprise is free, setup automatically, and uses full page caching (unlike Cloudways). And unlike Kinsta’s, Rocket.net has Argo Smart Routing (specifically good for WooCommerce sites), load balancing, and image optimization. Rocket.net CEO Ben Gabler also used to be StackPath’s Chief Product Officer and went as far as building Rocket.net’s data centers in the same locations as Cloudflare’s. And unlike both hosts, Rocket.net doesn’t limit PHP workers (there’s no CPU limits) and monthly visit limits are 10-25 times more than Kinsta’s.
| Cloudflare Enterprise (Kinsta) | Cloudflare Enterprise (Cloudways) | Cloudflare Enterprise (Rocket.net) | |
|---|---|---|---|
| CDN PoPs | 270 | 270 | 270 |
| Prioritized routing | ✓ | ✓ | ✓ |
| Full page caching | ✓ | x | ✓ |
| HTTP/3 | ✓ | ✓ | ✓ |
| WAF | ✓ | ✓ | ✓ |
| Argo smart routing | x | ✓ | ✓ |
| Load balancing | x | ✓ | ✓ |
| Image optimization | x | ✓ | ✓ |
| Automatic configuration | x | x | ✓ |
| Price | Free | $5/mo (1 domain) | Free |
Problems with mainstream hosts
I’ve written some pretty bad reviews about SiteGround’s slow TTFB, CPU limits, and why SG Optimizer does a poor job with core web vitals (they also control several Facebook Groups and threaten to sue people who write bad reviews). Hostinger writes fake reviews and is only cheap because you get less resources like CPU/RAM. Kinsta and WP Engine are way too expensive for how many resources, PHP workers, and monthly visits you get. Along with major incidents like WPX’s worldwide outage and SiteGround’s DNS getting blocked by Google for 4 days (both WPX and SiteGround denied responsibility). One thing is clear: most mainstream hosts appear to be more interested in profits than performance. Please do your own research before getting advice.
Getting started on Rocket.net
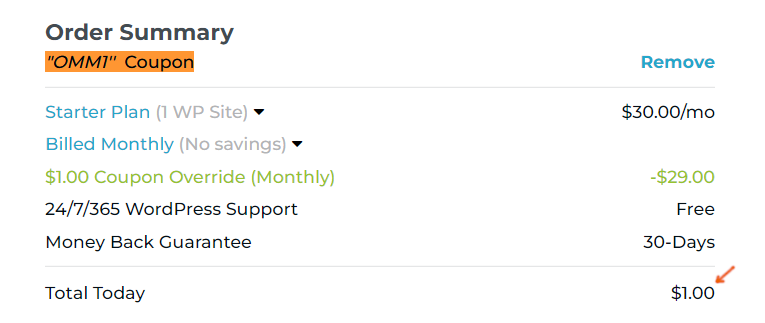
Step 1: Create a Rocket.net account and you’ll be prompted to add a coupon. Sign up with coupon OMM1 to get your first month for $1 (renews at $30/mo or $25/mo when paying yearly). If you sign up with my coupon or affiliate links, I get a commission which I seriously appreciate.
Step 2: Request a free migration. They did this the same day and let me review my website before it was launched with no downtime. For the record, their support is better than Kinsta’s and you can reach out to Ben Gabler or his team (via phone/chat/email) if you have questions.
Step 3: Upgrade to PHP 8.1 and ask support to install Redis (they use Redis Object Cache). These are the only things I did since Cloudflare Enterprise and backups are both automatic.
Step 4: Retest your TTFB in SpeedVitals and click through your pages to see the difference. You can also search their TrustPilot profile for people mentioning “TTFB” where they’re rated 4.9/5.


I was previously on Cloudways Vultr HF which was great, but their Cloudflare Enterprise doesn’t use full page caching (yet) and is $5/mo with annoying challenge pages. Even if their Cloudflare Enterprise was identical, Rocket.net still outperforms them with better specs like more CPU/RAM, Brotli, and LiteSpeed’s PHP (plus better support, easier to use, and usually pricing). While Cloudways is a big improvement than most hosts, you’re already spending $18/mo for Vultr HF’s lowest 1 CPU plan with Cloudflare Enterprise. At that point, the extra $7/mo you’d be spending at Rocket.net is worth it. Rocket.net’s dashboard is also much easier.
For small sites on a budget, NameHero’s Turbo Cloud plan is similar to Hostinger between LiteSpeed, cPanel, and pricing. However, NameHero’s Turbo Cloud plan has about 1.5x more resources (3 CPU + 3GB RAM) with NVMe storage. NameHero’s support/uptimes are also better shown in TrustPilot reviews. This is one the fastest setups on a budget… you get a LiteSpeed server + LiteSpeed Cache + QUIC.cloud CDN, and email hosting. The main con is their data centers are only in the US and Netherlands. If these aren’t close to your visitors, make sure to setup QUIC.cloud’s CDN which has HTML caching (ideally the paid plan which uses all 70 PoPs).


4. Page Builders
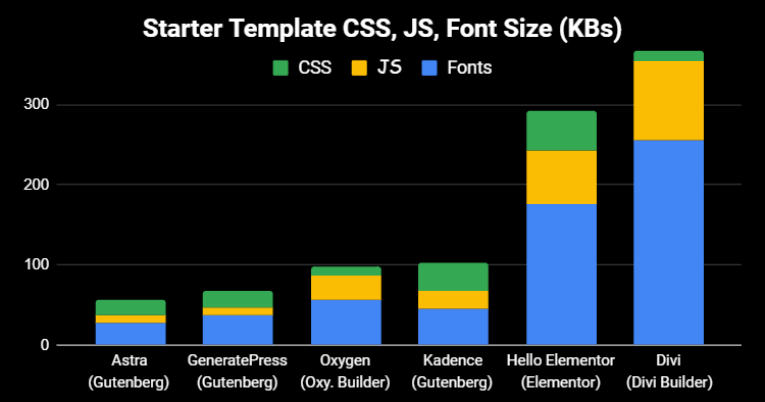
Elementor/Divi are slower than Gutenberg/Oxygen.
Since multiple PSI items are related to CSS/JS/fonts, many people are replacing them with lightweight alternatives. The last thing you want to do is use a slow page builder then install a bunch of “extra functionality plugins” which add even more CSS/JS. Don’t fall into this trap. If you don’t want to ditch your page builder completely, there are still ways you can optimize it.
- Divi/Elementor add extra CSS/JS/fonts to your site.
- Adding more page builder plugins can slow it down more.
- GeneratePress (what I use), Kadence, Blocksy, Oxygen are faster.
- If using Elementor, try the settings under Elementor → Experiments.
- Same thing with Divi (Divi → Theme Options → General → Performance).
- If using Astra Starter Sites, use a template built in Gutenberg (not Elementor).
- Use CSS for your header/footer/sidebar (instead of bloated page builder code).
- Elementor has a theme customizer setting to host fonts locally + preload them.
- If you don’t use Elementor font icons, disable them or use custom icons instead.
- If you don’t use elementor-dialog.js for popups, disable it (i.e. using Perfmatters).
- Many page builder plugins are module-based, so disable modules you don’t use.
- Simplify your design by using less widgets/columns (here’s a YouTube video on it).
- If you preload critical images in FlyingPress or Perfmatters, this excludes above the fold images from lazy load and preloads them to improve LCP. However, it doesn’t work with Elementor image widgets (go through your page builder + cache plugin documentation).
- Background images aren’t lazy loaded by default because they’re loaded from a separate CSS file. Some cache plugins support a lazy-bg class you can use to lazy load backgrounds.
- WP Johnny offers page builder removal services but he’s expensive and usually a busy guy.

5. CDN
Have a slow TTFB in KeyCDN’s performance test?
A performant CDN with HTML caching (and other CDN features) can be the difference maker. While cdnperf.com is a good baseline, there are other things to consider.
Start by looking at their network page (you’ll see BunnyCDN’s network has more PoPs and faster a Tbps than StackPath). Also look at the features (for example, RocketCDN only serves files from the CDN and nothing else while other CDNs do a lot more than just “serving files.” Cloudflare’s dashboard has hundreds of optimizations to improve speed, security, and CPU usage. Aside from choosing a good CDN, make sure to also take advantage of everything it offers. Or just use a service like FlyingProxy/Rocket.net that integrates Cloudflare Enterprise.
| CDN | PoPs | Price | Rating |
|---|---|---|---|
| Cloudflare | 270 | Freemium | 2.1 |
| BunnyCDN | 93 | $.01 – $.06/GB | 4.8 |
| QUIC.cloud | 70 | Free or $.02 – $.08/GB | 3.0 |
| Google Cloud CDN | 100+ | Varies where purchased | N/A |
| CloudFront | 310 | Free 50GB/yr then $0.02 – $.16/GB | 4.4 |
| KeyCDN | 40 | $.01 – $.11/GB | 4.5 |
| StackPath (Used By RocketCDN) | 50 | Varies where purchased or $7.99/mo | 2.3 |
| SiteGround CDN | 14 | Free on SiteGround | N/A |
| WPX XDN | 25 | Free on WPX | N/A |
Cloudflare – it’s hard to beat Cloudflare with 270+ data centers and all the robust features. Open your Cloudflare dashboard and use the recommendations below to configure settings.
Free Cloudflare Features I Recommend Using
- CDN – in your DNS settings, find your domain and change the proxy status to Proxied (orange cloud). This is needed for several Cloudflare features to work.
- TLS version – set minimum TLS version to 1.2 and make sure TLS 1.3 is enabled.
- Firewall rules – often used to block access to wp-login, XML-RPC, and “hacky” countries. Firewalls block attacks along with unwanted requests to the server.
- Bot protection – block spammy bots from hitting your server. I would also check your Wordfence live traffic report to see bots hitting your website in real time and manually block bots like AhrefsBot + SemrushBot if you don’t use them. Bot fight mode can add a JS file to your site (invisible.js) and cause PSI errors (so test this).
- Brotli – this only works if your host supports Brotli, otherwise GZIP will be used.
- Early hints – while the server is waiting for a response, preload/preconnect hints are sent to the browser so resources load sooner, reducing your server think time.
- Browser cache TTL – 1 year is good for static sites (my blog is mostly static so this is what I use) or use 1 month for dynamic sites. This is recommended by Google and can fix serve static assets with an efficient cache policy in PageSpeed Insights.
- Crawler hints – helps search engines efficiently time crawling and save resources.
- Cache reserve – improves cache hit ratio by making sure specific content is being served from Cloudflare even when the content hasn’t been requested for months.
- Workers – deploy code on Cloudflare’s edge servers (try the playground). Workers are serverless with automatic scaling + load balancing. Obviously involves coding knowledge and can reduce LCP by 80%. It can also be used for external cron jobs.
- Cache everything page rule – most common page rule which caches HTML and improves TTFB, but I recommend APO or Super Page Cache for Cloudflare instead.
- HTTP/3 – not true HTTP/3 but still a nice feature (test your site using HTTP/3 test).
- 0-RTT connection resumption – good for repeat visitors, latency, mobile speed.
- Hotlink protection – saves bandwidth by stopping people from copying your images and using them on their own website while they’re hosted on your server.
- Zaraz – offload third-party scripts to Cloudflare like Google Analytics, Facebook Pixel, chatbots, and custom HTML. But test your results against delaying these.
- Monitor bandwidth/analytics – the more bandwidth you offload to Cloudflare the better. This should lighten the load on your server while reducing CPU usage.
Paid Cloudflare Features
- APO – caches HTML which can improve TTFB in multiple global locations.
- WAF – block unwanted requests, improve security, and reduce CPU usage.
- Argo + Tiered Cache – route traffic using efficient paths with Tiered Cache.
- Image optimizations – I prefer these over plugins. Between all 3 (image resizing, Mirage, Polish), you don’t have to use a bloated image optimization plugin and they usually do a better job. You have features like compression/WebP and they also have mobile optimizations like serving smaller images to reduce mobile LCP.
- Signed Exchanges – improves LCP when people click links in Google’s search results via prefetching which Google says can lead to a substantial improvement.
- Load Balancing – creates a failover so your traffic is re-routed from unhealthy origins to healthy origins. Can reduce things like latency, TLS, and general errors.
- Cloudflare Enterprise – majors benefits include prioritized routing, more PoPs, Argo + Tiered Cache, full page caching, image optimization, and other features depending where you get it from. The easiest/cheapest way is to use a host with Cloudflare Enterprise or FlyingProxy (I recommend Rocket.net’s who even built their data centers in the same locations as Cloudflare). It’s just more thought out than Cloudways/Kinsta. You could also consider using Cloudflare Pro which has some of these features. It requires more configuration but gives you more control.

BunnyCDN – Gijo suggests Cloudflare + BunnyCDN which is what I’ve used for a long time. If you’re using FlyingPress, FlyingCDN is powered by BunnyCDN with Bunny Optimizer + geo-replication. It’s also cheaper than buying these directly through BunnyCDN and easy to setup.
QUIC.cloud – use this if you’re on LiteSpeed. You’ll want to use the standard (paid) plan since the free plan only uses 6 PoPs and doesn’t have DDoS protection. It has HTML caching which is similar to Cloudflare’s full page caching and is also needed for LSC’s image/page optimizations.

RocketCDN – uses StackPath which was removed from cdnsperf.com and has less PoPs, slower Tbps, no image optimization, no HTML caching, and no other features besides serving files from a CDN. Also isn’t “unlimited” like WP Rocket advertises since they will cut you off at some point.
SiteGround CDN – not a lot of PoPs/features and you have to use their DNS to use it (which if you remember, was blocked by Google for 4 days). I personally wouldn’t trust this with my site.
6. Cache Plugins
Let’s summarize 5 popular cache plugins in 10 lines or less.
FlyingPress – optimizes for core web vitals and real-world browsing better than the last 3. When a new core web vital update comes out (like fetchpriority resource hints), Gijo is almost always first to add it. Awesome features not found in most cache plugins: preloading critical images lets you set the number of images usually shown above the fold to exclude them from lazy load while preloading them. FlyingPress can also lazy render HTML elements, self-host YouTube placeholders, and it has a lazy-bg helper class for lazy loading background images. FlyingCDN uses BunnyCDN with Bunny Optimizer + geo-replication (great choice). The remove unused CSS feature is faster than WP Rocket’s since it loads used CSS in a separate file (instead of inline) which Perfmatters agrees is faster for visitors. Really, the main thing it doesn’t have is server-level caching. I moved from WP Rocket to FlyingPress and saw a big difference in speed.
| SG Optimizer | WP Rocket | FlyingPress | |
|---|---|---|---|
| Server-side caching | ✓ | x | x |
| Delay JavaScript | x | ✓ | ✓ |
| Remove unused CSS | x | Inline | Separate file |
| Critical CSS | x | ✓ | ✓ |
| Preload critical images | x | x | By number |
| Exclude above the fold images | By class | By URL | By number |
| Lazy load background images | x | Inline | Helper class |
| Fetchpriority resource hint | x | x | ✓ |
| Lazy render HTML elements | x | x | ✓ |
| Add missing image dimensions | x | ✓ | ✓ |
| YouTube iframe preview image | x | ✓ | ✓ |
| Self-host YouTube placeholder | x | x | ✓ |
| Host fonts locally | x | x | ✓ |
| Font-display: swap | x | ✓ | ✓ |
| Preload links | x | ✓ | ✓ |
| CDN (beyond Cloudflare) | SiteGround CDN | StackPath | BunnyCDN |
| CDN PoPs | 14 | 60 | 93 |
| CDN Tbps | N/A | 65 | 80 |
| Dynamic caching | ✓ | x | x |
| CDN geo-replication | x | x | ✓ |
| CDN image optimization | ✓ | x | ✓ |
| CDN image resizing for mobile | x | x | ✓ |
| Documented APO compatibility | x | x | ✓ |
LiteSpeed Cache – also does a great job optimizing for web vitals and real users, but different than FlyingPress. Mainly because it should only be used on LiteSpeed, it’s free, and it has faster server-side caching. However, the settings can be complicated. While some settings are similar to FlyingPress like loading used CSS in a separate file and lazy loading HTML elements, it has its own unique features such as localizing third-party resources, ESI, guest mode, LQIP, and HTML caching through QUIC. Use LSC if you’re on a LiteSpeed host. Anything else, I’d use FlyingPress.
WP Rocket – removing unused CSS is slower for visitors and RocketCDN isn’t a good CDN. WP Rocket doesn’t self-host fonts (or even recommend it) or video placeholders. Excluding above the fold images from lazy load and preloading them individually is tedious. Still no image optimization or documented APO compatibility. While Gijo releases many new features and updates FlyingPress to address core web vital updates, it seems WP Rocket has fallen behind. Two good things about WP Rocket are automatic delaying of JavaScript and documentation.
SiteGround Optimizer – great for caching, not for web vitals. Lacks way too many features and has a history of compatibility issues the developers blame on third-party plugins/themes if you check support threads. My advice is to only use it for caching, disable everything else, then use FlyingPress or WP Rocket (just make sure page caching is only enabled in 1 plugin and disabled in the other). Of course, SiteGround will glorify their cache plugin even when it’s clearly inferior.
NitroPack – don’t use this! The only reason you get better “scores” is because it moves elements off the main-thread so they can’t be detected in speed testing tools. This leads to great (but false) scores and it doesn’t actually do a good job making your website load faster compared to other plugins. Google “NitroPack blackhat” and you’ll find plenty of articles on it.
7. Other Caching
Cache plugins are just 1 layer.
Check whether your host supports object cache (Redis/memcached), OPcache, and HTTP accelerators like Varnish/FastCGI. Most do but they need to be enabled or set up manually.
You also have CDN caching which is its own layer. All these are meant for different things and you should ideally use most (if not all) them. People get scared they’re using too much caching, but as long as you’re only using 1 type of layer (not both Redis + memcached), it’s a good thing.
- OPcache – enable in your host (can help reduce CPU usage).
- Browser cache – enable in your cache plugin (stores files in browsers).
- HTTP accelerators – enable in your host (probably Varnish or FastCGI).
- Object cache – Redis generally uses memory more efficiently than memcached and is good for large/eCommerce sites. Once it’s enabled in your host, you’ll connect it your site using a plugin (i.e. LiteSpeed Cache, W3 Total Cache, SG Optimizer, WP Redis). Check your host’s documentation/support on which plugin is best. For example, Rocket.net requires you to install the WP Redis plugin while Cloudways requires you to install the Redis addon.
- CDN cache – APO is not the same as a cache everything page rule or the Super Page Cache plugin. QUIC also does HTML caching, then there are services that include Cloudflare’s full page cache like Rocket.net’s Cloudflare Enterprise, FlyingProxy, and SiteGround Optimizer. The key thing is that you’re caching HTML somewhere as it can significantly improve TTFB.
8. Plugins
Watch out for plugins that:
- Add CSS/JS to the frontend – use the Chrome Dev Tools coverage report to see which plugins add CSS and JS. This includes plugins that inject third-party JavaScript or fonts.
- Increase CPU usage – common with plugins that collect “statistics” like Wordfence’s live traffic report, Query Monitor, and Broken Link Checker. But can really be from any plugin. WP Hive tells you if a plugin increases memory usage when browsing the WP plugin repo.
- Add database bloat – use WP-Optimize to see which plugins (or specific plugin modules) add the most database overhead. This is explained more in this guide’s database section.
- Load above the fold – slow plugins are bad enough, but loading them above the fold is even worse. When plugins load below the fold, you can delay them (i.e. comment plugins).
- Use jQuery – Perfmatters has a script manager setting to show dependencies. Once it’s enabled, head to the script manager → jQuery and it shows you all plugins using jQuery. Felix Arntz wrote an article on how removing jQuery can reduce JavaScript by up to 80%.

Lightweight Alternatives
- Social Sharing – Grow Social.
- Tables – Gutenberg block (no plugin).
- Gallery – Gutenberg block (no plugin).
- Buttons – Gutenberg block (no plugin).
- Comments – native comments (no plugin).
- Image Optimization – image CDN (no plugin).
- Translate – MultilingualPress, Polylang (not WPML).
- Security – no security plugin (Cloudflare, firewall, etc).
- Sliders – Soliloquy or MetaSlider (but ideally no sliders).
- Analytics – call me crazy but I only use Google Search Console.
- SEO – Rank Math or SEOPress (but most SEO plugins use jQuery).
- CSS – need custom styling or even a table of contents? Just use CSS.
- Backups – hosting backups or a lightweight alternative like UpdraftPlus.
In Query Monitor, the “queries by component” section shows your slow plugins. You can also use my list of 75+ common slow plugins. Finally, delete all plugins you’re not using (as well as their database tables in WP-Optimize), and disable plugin features/modules you’re not using.
| Plugin | Category | Memory Impact | PageSpeed Impact |
|---|---|---|---|
| All In One SEO | SEO | x | x |
| Broken Link Checker | SEO | x | ✓ |
| Disqus | Comments | ✓ | x |
| Divi Builder | Page Builder | x | x |
| Elementor | Page Builder | x | x |
| Elementor Premium Addons | Page Builder | ✓ | x |
| Elementor Pro | Page Builder | x | x |
| Elementor Ultimate Addons | Page Builder | ✓ | x |
| JetElements | Page Builder | x | x |
| Jetpack | Security | x | x |
| NextGEN Gallery | Gallery | x | x |
| Popup Builder | Popup | x | x |
| Site Kit by Google | Analytics | x | ✓ |
| Slider Revolution | Slider | x | x |
| Social Media Share Buttons | Social Sharing | ✓ | x |
| WooCommerce | WooCommerce | x | x |
| Wordfence | Security | x | ✓ |
| wpDiscuz | Comments | x | x |
| WPML | Translate | x | x |
| Yoast SEO | SEO | x | ✓ |
9. CSS + JavaScript
Probably the #1 reason for poor core web vitals.
New Optimizations
- Remove unused CSS – WP Rocket’s method of loading used CSS inline is slower for visitors but better for scores. You should ideally use FlyingPress, LiteSpeed Cache, or Perfmatters for this which loads used CSS in a separate file so it can be cached and doesn’t increase HTML size. You should only be using 1 plugin for this. If you’re not using an optimization plugin that does this, try DeBloat or PurifyCSS.
- Remove Gutenberg CSS – if you don’t use Gutenberg’s block library (i.e. you’re using classic editor), you can remove Gutenberg’s CSS which is loaded by default.
- Asset unloading plugins – remove CSS/JS (or entire plugins) from specific pages/posts where they don’t need to load. Common examples are only loading contact forms on the contact page, only loading social sharing plugins on posts, and disabling WooCommerce plugins where they’re not used. You can also disable specific files like jQuery and elementor-dialog if you don’t use them. I recommend Perfmatters especially if you’re using WP Rocket or SiteGround Optimizer because it has many optimizations not found in these plugins. Be sure to use test mode and dependencies in your script manager settings. For a free plugin, try Asset CleanUp.
- Critical CSS – loads above the fold CSS immediately which improves LCP. Most cache plugins do this while others (like SG Optimizer) don’t. If you make changes to stylesheets or custom CSS, regenerate critical CSS so it’s current with your site.
- Load CSS/JS non render-blocking – both deferring JavaScript and critical CSS help serve resources non render-blocking. Make sure they work in your cache plugin and exclude files from defer if they break your site. Or try Async JavaScript.
- Minify – Cloudflare lets you do this but you should use your cache plugin instead.
- Don’t combine – should almost always be off especially on big sites or on HTTP/2.
Optimizations Covered In Other Sections
- Page builders – Elementor/Divi add extra CSS/JS which can be optimized with their built-in performance settings, coding your header/footer/sidebar in CSS, disabling Elementor fonts/dialog, lazy loading background images in CSS, etc.
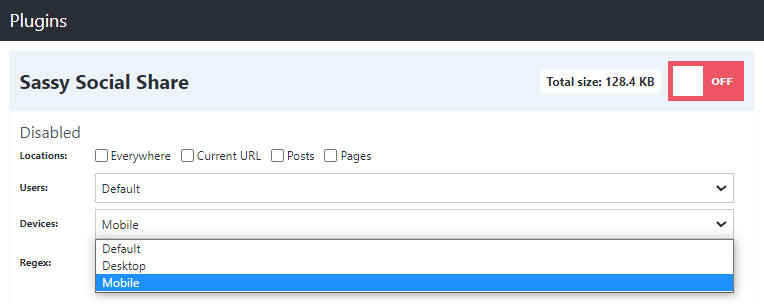
- Plugins – just look at the screenshot below (plugins are obviously a major factor).
- Third-party code – hosting files locally, delaying JavaScript, and using a smaller GA tracking code can reduce its size or delay so it doesn’t impact initial load times.
- Font Icons – disable these if you don’t use them or use Elementor’s custom icons.
- WooCommerce – disable scripts/styles on non-eCommerce content and disable Woo plugins where they don’t need to load (many load across the entire website).

10. Third-Party Code
This is anything on your site that has to pull info from a third-party domain (like Google Fonts, Google Analytics tracking code, or an embedded YouTube video). It’s a common reason for JS-related errors in PSI. Luckily, most of it can be optimized especially if it’s shown below the fold.
- Step 1: Host files locally – some third-party code can be hosted locally (see the table below). LiteSpeed Cache can localize resources, FlyingPress can host fonts/YouTube thumbnails locally, Perfmatters does fonts and analytics, and WP Rocket does nothing.
| Third-Party Code | URL(s) | Plugins To Host It Locally |
|---|---|---|
| Google Fonts | fonts.gstatic.com | Most optimization plugins, Elementor, OMGF |
| Google Analytics | google-analytics.com | Flying Analytics, Perfmatters |
| Gravatars | gravatar.com | Simple Local Avatar |
| YouTube Thumbnails | i.ytimg.com | FlyingPress, WP YouTube Lyte |
- Step 2: Delay JavaScript – for third-party code that can’t be hosted locally, delay its JavaScript if it’s loading below the fold (you can also delay plugins loading below the fold). WP Rocket does this automatically while other cache plugins make you add files manually. If your cache plugin doesn’t support this, use Perfmatters or Flying Scripts. In these, you’ll set a timeout period and can increase this if you’re not seeing good results. You can try offloading third-party code to Cloudflare Zaraz, but I prefer delaying its JS.
ga( '
ga('
google-analytics.com/analytics.js
analytics.js
gtagv4.js
analytics-minimal.js
/gtm.js
/gtag/js
gtag(
/gtm-
adsbygoogle.js
grecaptcha.execute
optimize.js
fbevents.js
fbq(
/busting/facebook-tracking/
disqus.com/embed.js
script.hotjar.com
wp-content/themes/script-name
wp-content/plugins/plugin-name
- Step 3: Prefetch or preconnect everything else – for all third-party code that can’t be hosted locally or delayed, add a DNS prefetch resource hint. Preconnect is usually only used for CDN URLs (not needed for Cloudflare), and third-party fonts (should be hosted locally). Or YouTube if you can’t eliminate requests using video optimizations in step #13.
- Google Analytics – Perfmatters + Flying Analytics can use a minimal analytics tracking code that’s just 1.5 KB. Perfmatters can also prevent a Doubleclick request by disabling display features, but both these should only be used if you don’t need certain data in GA.
- Avoid overtracking – one of the most common “mistakes” I see is sites using too many tracking tools: Analytics, Tag Manager, Heatmaps, Pixel, etc. Do you really need them all?

11. Fonts
Probably your largest files after CSS/JS.
Your GTmetrix Waterfall chart shows font load times, number of requests, and whether they’re served locally or from a third-party domain like fonts.gstatic.com or use.fontawesome.com. Be sure to keep tabs on your Waterfall chart as you make optimizations. Fonts can also cause FOIT and FOUT which cause layout shifts. A few simple tweaks can make your fonts load much faster.
- Reduce font families, weights, icons – try to only use 1 font family and only load the weights you actually use. Disable Font Awesome and Eicons if you don’t use them (Elementor has a tutorial on this). Some fonts also have larger file sizes than others.
- Use WOFF2 – the most lightweight/universal format which is faster than .ttf and .otf.
- Host locally – if your fonts are being served from fonts.gstatic.com, host them locally.
- Preload – fonts should be preloaded when they load above the fold or used in CSS files. Most cache/optimization plugins require you to manually add font files (and if there’s a crossorigin option like in Perfmatters, it should be used for fonts). Elementor hosts fonts locally and preloads them under Theme Customizer → Performance. PSI used to tell you which fonts to preload in “preload key requests” but I don’t think they do this anymore.
- Add font-display: optional – if you need to “ensure text remains visible during webfont load,” add font-display: optional to your font’s CSS. This is recommended by Google for the fastest performance while preventing layout shifts. It delays loading text up to 100ms. As of writing this, most plugins only support swap found in Elementor, Perfmatters, and most cache plugins. To use optional, you need to add it manually to your font’s CSS, use WP Foft Loader, or use swap until your optimization plugin supports optional. Preloading fonts that use font-display: optional completely eliminates layout shifts (FOIT) from fonts.
- Load fonts inline – Elementor and Divi have options to do this and so does FlyingPress.
- System fonts – system fonts generate 0 requests and are obviously best for speed, but even for someone who obsesses over performance, I’d rather have a better looking font.
- Use custom Icons for Elementor – replace Font Awesome and Eicons with custom icons.
- Serve Google Fonts from Cloudflare Workers – I’ll leave this here if you want to dive in.
12. Images
There are 7 PSI items related to image optimization, and that doesn’t even cover everything.

- Preload critical images and exclude them from lazy load – above the fold content should load immediately which is a big factor of LCP. Instead of delaying images with lazy load, you want the browser to download them immediately by using preload. The easiest way to do this (by far) is “preload critical images” in FlyingPress or Perfmatters. Instead of manually excluding/preloading above the fold images on every single page/post (because they’re usually different), you will set the number of images usually shown above the fold. In my case, it’s 3. This will preload your top 3 images while excluding them from lazy load. Currently, FlyingPress is the only cache plugin I know that supports fetchpriority which is recommended by Google to set things like your LCP image to “high priority.” Props to Gijo.
- LCP image – your most important image to optimize for lower LCP (shown in PSI).
- Background images – page builders serve background images in their CSS and won’t be lazy loaded, leading to ‘defer offscreen images’ errors. Some cache plugins have a lazy-bg helper class, Perfmatters has a CSS background images setting, and WP Rocket makes you move them to inline HTML. Check the documentation in your cache/image optimization plugin on how to lazy load them. You can also use Optimal or add a helper class yourself.
- Image CDNs – I use Cloudflare for image optimization but Bunny Optimizer and QUIC are good too. They usually do a better job than plugins (and it’s 1 less plugin on your website).
- Resize images for mobile – make sure your image optimization plugin (or image CDN) serves smaller images to mobile which should also improve your LCP on mobile. This is the “image resizing” feature in Cloudflare, or you could use ShortPixel Adaptive Images.
- Properly size images – resize large images to be smaller. My blog is 765px width so I crop/resize blog images to that size (the Zoom Chrome Extension is handy for getting the perfect dimensions when taking screenshots). I always recommend creating an “image dimensions cheat sheet” so you know the size of your blog, featured, sidebar images, etc.
- WebP – faster than JPEG/PNG and most image optimization plugins or CDNs can do this.
- Compression – Lighthouse test images at 85% so that’s usually a good compression level.
- CSS sprites – combines multiple small/decorative images into 1 image so it only creates 1 request. My old homepage used a CSS sprite and it was very fast. You can do it for sections like “featured on” where you show a bunch of logos. You would use a CSS sprite generator.
- Specify dimensions – most cache plugins can “add missing dimensions” otherwise you would need to add a width/height to the image’s HTML or CSS. This prevents layout shifts.
- Downgrade quality on slow connections – services like Cloudflare Mirage + Optimole serve low quality images on slow connections until a faster connection can be accessed.
- Hotlink protection – stops people from using your images when they’re hosted on your server and saves bandwidth. Common with sites using high quality images or if people copy your content. Can be enabled in your host or by using Cloudflare’s hotlink protection.
- Low quality images placeholders (LQIP) – if you’re using QUIC.cloud on LiteSpeed, these can prevent layout shifts but you need to make sure you’re doing it right or it will look bad.
13. Videos
Unless videos are optimized, they will probably be the slowest thing on a page.
While most cache plugins lazy load videos and replace iframes with a preview image, FlyingPress and WP YouTube Lyte are some of the only plugins that optimize placeholders.
- Lazy load videos – done in cache plugins, Perfmatters, or try WP YouTube Lyte.
- Replace YouTube iframes with preview images – the iframe (which is the heaviest element of the video) is only loaded once your visitors actually click the play button.
- Self-host YouTube placeholders – FlyingPress and WP YouTube Lyte can self-host placeholders to prevent i.ytimg.com requests shown in your “third-party code” report.
- Preconnect – if you’re not able to make the optimizations above and you still have third-party domains loading from YouTube, you can preconnect domains from youtube.com, i.ytimg.com, and Roboto which is currently being used as the font in the YouTube player.
14. Comments
Third-party comment plugins, Gravatars, or just lots of comments can slow down WordPress.
- Use native comments (not plugins).
- Cache Gravatars if using LiteSpeed Cache.
- Delay third-party comments plugins and Gravatars.
- Use a local avatar plugin to prevent Gravatar requests.
- If you must use Disqus, use the conditional load plugin.
- Break comments in your WordPress discussion settings.
- Try using a “load more comments” button especially on mobile.
- Lazy load comments/footer (can be done in FlyingPress or LSC).
- wpDiscuz has options for lazy loading and initiating AJAX loading after page.

15. LCP
Largest contentful paint is the core web vital people struggle with most.
View your “longest main-threads tasks” report in PageSpeed Insights and optimize those files. LCP includes 4 sub-parts and Google’s YouTube video is a nice resource for optimizing each one.

| LCP Sub-Part | Factors | LCP % |
|---|---|---|
| TTFB | Primarily hosting and CDNs + full page caching | ~40% |
| Resource load delay | Exclude above the fold content from optimizations, resource hints | <10% |
| Resource load time | Reduce image/CSS/JS sizes, critical CSS, CDN, cache expiration | ~40% |
| Element render delay | Render-blocking CSS/JS, JS file size, font-display optional | <10% |
Most LCP recommendations are scattered in this guide, so I’ll just go over them briefly.
- Exclude above the fold images from lazy load – you should never lazy load, delay, or defer anything that loads above the fold because this content should load immediately, which is why you should also use preload hints to help browsers download them faster.
- Prioritize above the fold images – preload above the fold images (or use fetchpriority). PSI shows your largest contentful paint image which is the most important to optimize.
- Reduce CSS, JS, font sizes – a big part of reducing load time is reducing their file sizes.
- Reduce TTFB – 40% of LCP can usually be improved with a better hosting + CDN setup.
- Eliminate render-blocking CSS/JS – render-blocking resources add delay (see video).
- Use font-display: optional – if fonts aren’t loaded properly, they can also add delay.
- Lazy render HTML elements – allows browsers to focus on the above the fold content.
- Preload, preconnect, prefetch – hints browsers to download specific resources faster.
- Increase cache expiration – also mentioned by Google (Cloudflare browser cache TTL).
- Choose the right cache plugin/settings – some have better optimizations than others.
- Enable Signed Exchanges (SXGs) – this is found in Cloudflare (Speed → Optimization).
- Use Cloudflare Workers – Google Engineer used Workers to improve LCP by about 80%.
- Move plugin content, ads, animations below the fold – that way, they can be delayed.
16. CLS
Layout shifts happen when things jump around while the page is loading.
You can use Google’s layout shift debugger to see these in a GIF. PSI also has an “avoid large layout shifts” item showing you which sections on your website contribute the most to CLS. Even with these recommendations, it’s hard to know why the section is causing a layout shift.
- Change font-display to swap or optional – do this if you see “ensure text remains visible during webfont load.” As shown in section #11, font-display: optional is the best method.
- Problems with loading CSS asynchronously – this is a setting in cache plugins that can add layout shifts caused by FOUC (flash of unstyled content). Ideally use the “remove unused CSS” method instead. If this breaks your site and you default back to loading CSS asynchronously, make sure you exclude problematic files causing FOUC, ensure critical CSS is working, and always regenerate critical CSS after updating stylesheets/custom CSS.
- Preload fonts – preloading fonts eliminates layout shifts when they use display: optional.
- Specify dimensions of images, videos, iframes, ads – the first 3 are easy (make sure a width and height are specified in images). Ads and other dynamic content should have reserved space by placing it in a div code. The width/height should be the ad’s largest size.
- Use CSS transform in animations – not a fan of animations but here’s documentation.
- Use separate mobile cache (when it makes sense) – if your mobile site is different than desktop and you’re not using a separate mobile cache, it can cause layout shifts. However, you’ll need to check your cache plugin’s documentation on when to use (and not use) this.
- Change cookie notice plugin – search your plugin’s support thread. It’s been reported some cookie plugins cause layout shifts. I recommend Gijo’s solution or this Cookie plugin.
17. Preload, Prefetch, Preconnect
These help browsers download high priority resources faster.
They prioritize above the fold content (preload + fetchpriority). Preload is also used in Cloudflare’s Early Hints and for downloading internal pages in the background so they load faster when visitors click them (link preloading + Flying Pages). Prefetch + preconnect help establish early connections to third-party domains if resources aren’t already being delayed.
Preload – commonly used for above the fold images (this can also be a WebP image) but can also be used for CSS/JS (i.e. the block library), videos, audio, Cloudflare workers, and other files.
<link rel="preload" href="/image.webp" as="image">
<link rel="preload" href="/font.woff2" as="font" crossorigin>
Fetchpriority – similar to preload only assigns a priority (low, high, auto). For example, if you have a large LCP image, you would assign that image’s priority to “high.” But if you have an image carousel that’s loading above the fold, you could assign the images with a low priority. FlyingPress is the only plugin I know currently supporting fetchpriority shown in the changelog.
<img src="lcp-image.webp" fetchpriority="high">Link preloading – there’s 2 main types: preloading links in the viewport so internal links in the immediate content load faster when clicked (supported by Flying Pages and FlyingPress). And “link preloading” where users hover over any internal link (or touch it on mobile), and the page will download in the background so by the time they actually click it, it appears to load instantly (found in cache plugins like WP Rocket). While neither improves scores, both improve perceived load time. Just be careful… preloading too many pages in the background will increase CPU usage especially if you have something like a WooCommerce store with internal links in images. If visitors are hovering over product images, this will cause lots of pages to download. Not good!

DNS Prefetch – this helps browsers anticipate third-party domains by performing a DNS lookup, but usually not needed since third-party domains should be hosted locally or delayed.
<link rel="dns-prefetch" href="https://connect.facebook.net">
<link rel="dns-prefetch" href="https://www.googletagservices.com">
Preconnect – establishes early connections to important third-party domains. Common with CDN URLs and third-party fonts like fonts.gstatic.com, use.fontawesome.com, and use.typekit. Most cache plugins add preconnect automatically when you add a CDN URL or when enabling “Google Font Optimization” (or a similar setting), but you’ll want to check their documentation.
<link rel="preconnect" href="/assets/vendor/gstatic" crossorigin>
<link rel="preconnect" href="https://cdn.yourdomain.com" crossorigin>
18. Database
There’s usually 3 problems with using your cache plugin to clean your database:
- It can’t take database backups.
- It can’t remove database tables left behind by old plugins.
- It deletes all post revisions, but you may want to keep a few.
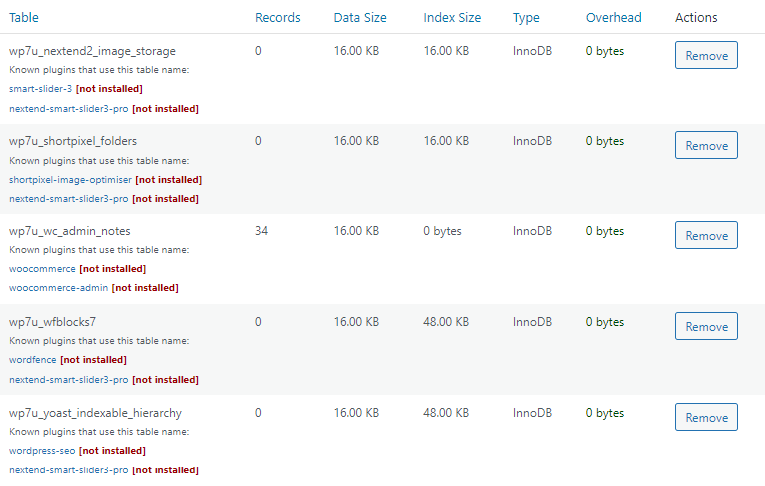
That’s why I recommend WP Optimize for database cleanups. Go through your database tables and look for tables that are not installed or inactive. You can delete these if you don’t plan on using the plugin (or theme) again since they will usually store info in the database for future use.
Certain plugin modules/features can also add lots of overhead especially if they collect data. Rank Math’s Google Analytics module adds lots of overhead, so consider disabling this Rank Math module and getting your analytics data directly from the Google Analytics website instead.
For ongoing database cleanup, WP-Optimize removes everything most cache plugins do, but it lets you keep a certain amount of post revisions so you have backups (I recommend 5-10). You can also connect UpdraftPlus which takes a database backup before scheduled optimizations.

19. Background Tasks
Background tasks can bog down your server and increase CPU usage.
These are common with cache plugins (preloading + automatic cache clearing), plugins that collect stats or create autoloads, and even WordPress core (Heartbeat, autosaves, pingbacks). Many of these can be disabled, limited, or scheduled during non-peak hours using a cron job.
- Control Preloading – the preloading in cache plugins is infamous for increasing CPU usage (WP Rocket’s preloading, LSC crawler, SG Optimizer’s preheat cache, etc). The first step is changing settings to only preload important sitemap URLs (i.e. page-sitemap.com + post-sitemap.com) instead of the full sitemap. Next, you can increase the preload interval.

- Automatic cache clearing – there are specific actions that trigger your entire cache to be cleared (and when the cache lifespan expires). Instead of constantly clearing cache with these actions, disable automatic cache clearing and use a cron job to clear it at a specific time (once at night). It’s best to use a cron job for both cache clearing + cache preloading.
- Disable WP-Cron – using an external cron to schedule tasks like the 2 items above helps reduce CPU usage. The first step is to add the code below your wp-config.php file. Next, setup a real cron job in your host, Cloudflare, or using a third-party service like EasyCron. Some hosts have specific instructions for adding a cron job, so check their documentation.
define('DISABLE_WP_CRON', true);Now add a real cron job.

wget -q -O - https://yourwebsite.com/wp-cron.php?doing_wp_cron >/dev/null 2>&1
- Remove unused CSS – decrease WP Rocket’s batch size and increase the cron interval.
- Link preloading – some cache plugins can “preload links” which sounds like a good idea because when users hover over a link, that page downloads in the background to make it load faster by the time users actually click it. But if your website has lots of links (such as a WooCommerce store with links in the product images), you’ll want to leave this setting off.
- Plugins – think of Query Monitor, Wordfence’s live traffic report, and backup/statistic plugins (they all run background tasks). You might be able schedule these, disable specific features in plugins, or delete the plugin completely. Plugins/themes can also leave behind autoloaded data when you delete them which can be cleaned up in the wp_options table.
- Autosaves – when you’re editing a post, WordPress autosaves a draft every minute. You can use a simple line of code (or Perfmatters) to increase this to something like 5 minutes.
define('AUTOSAVE_INTERVAL', 300); // seconds- Heartbeat – called every 15s and can usually be disabled in the frontend/backend, then limited in the post editor since you probably want to keep features there (like autosaves).
- Pingbacks – disable pingbacks since you don’t want a notification every time you add an internal link. You may want to leave trackbacks on to help notify blogs you linked to them.
- Post revisions – stored every time you hit save, publish, or update and accumulate over time. You can limit revisions in some optimization plugins, manually with code, or use WP-Optimize to run scheduled database cleanups while keeping a certain number of revisions.
define( 'WP_POST_REVISIONS', 10 );- Plugin data sharing – disable in plugins to save a little resources, sorry plugin developers!
- Bots – blocking spam bots and using Cloudflare’s crawler hints saves resources from bots.
- Comment spam – I use Antispam Bee and blacklist these words in the Discussion settings.
- Hosting features – WP Johnny has nice tips on disabling unused services in your hosting account like the DNS, email, FTP/SFTP, proxies, or other services if you’re not using them.
- Bloat removal plugins – using plugins like Unbloater + Disable WooCommerce Bloat help.
20. Mobile
Poor mobile scores in PSI is a common issue. Most desktop optimizations transfer over to mobile so start with “general optimizations” first. Otherwise, here are mobile-specific tips.
- Resize images for mobile – image CDNs and adaptive image plugins do this.
- Reduce latency – use a faster DNS, faster TLS versions, and Cloudflare’s 0-RTT.
- Replace sliders/galleries with static images – use responsive editing to do this.
- Remove unused CSS/JS – Perfmatters can disable unused CSS/JS by device type.
- Don’t use AMP – lots of challenges and most WordPress users agree not to use it.
- Fix mobile layout shifts – Google’s layout shift debugger tests mobile layout shifts.
- Use mobile caching – enable this in your cache plugin or use one that supports this.
- Know when to use separate mobile cache – check your cache plugin documentation.
- Downgrade image quality on slow connections – try Cloudflare Mirage or Optimole.
- Check your responsiveness – even if you use a responsive theme, check this manually.
- Add a “load more comments” button on mobile – helps if you have lots of comments.

21. WooCommerce
WooCommerce sites often have more plugins, scripts, styles, and are more resource-hungry than static sites. You will need to optimize your website even more if you want good results.
- Hosting – wphostingbenchmarks.com ran tests for multiple WooCommerce hosts, although I think there are much better options than the ones tested (I would personally lean towards something like Rocket.net, GridPane, RunCloud). Obviously very important.
- Remove WooCommerce admin bloat – Disable WooCommerce Bloat is good for this.
- Cloudflare Argo + Tiered Cache – specifically good for speeding up dynamic requests.
- Redis – also specifically good for WooCommerce (especially Redis Object Cache Pro).
- Go easy on WooCommerce Extensions – just like other plugins, be minimal with these.
- Unload WooCommerce plugins – Woo plugins are infamously bad with loading across your entire site. Use your asset unloading plugin to disable them where they’re not used.
- Product image size – Appearance → Customize → WooCommerce → Product Images.
- Increase memory limit – WooCommerce sites usually require increasing it even more.
- Browser cache TTL – Google recommends 1 year but 1 month is good for dynamic sites.
- Elasticsearch – speeds up searches especially for websites with thousands of products.
- Delete expired transients – these can build up quickly so delete them more frequently.
22. Security
With the right optimizations (and a firewall), you shouldn’t need a security plugin.

A few other tips:
- Hide your WordPress version.
- Use a host that takes security seriously.
- Add security headers (try the HTTP Headers plugin).
- Use Cloudflare firewall rules (i.e. only access wp-login from your IP).
- Disable file editing to prevent hackers from editing theme/plugin files.
- Follow security-related social media accounts like Cloudflare/Wordfence.
- Check for known vulnerabilities before updating things (especially plugins).
23. PHP Version
Only 7% of websites use PHP 8.
Come on y’all, you already know higher PHP versions are faster and more secure. Google “update PHP version [your host]” and you’ll find instructions. If updating breaks your site, just revert back to your older version (or remove incompatible plugins that aren’t maintained well).

24. Make Sure Optimizations Are Working
You set things up, but are they working? Make sure they are.
- Caching – cache plugins should have documentation to check if the caching is working.
- Redis/memcached – LiteSpeed Cache’s connection test and most Redis plugins tell you.

- CDN Analytics – how many requests are you blocking from bots, hotlink protection, and WAF? What is your cache hit ratio (hopefully around 90%)? CDN analytics are very useful.
- Dr. Flare – Chrome Extension to view tons of Cloudflare stats like your cache hit ratio, uncached requests, non-Cloudflare requests, how much % was reduced by Polish/Minify.
- CDN rewrites – are your files actually being served from your CDN? Check your CDN Analytics, Dr. Flare, or view your source code to make sure files are being served from the CDN when using a CDN URL, like this: cdn.mywebsite.com/wp-content/uploads/logo.png. If you’re using BunnyCDN, you may be able to serve more files from BunnyCDN by adding your CDN URL to your cache plugin on top of using BunnyCDN’s plugin. It worked for me.
- APO – verify Cloudflare’s APO is working by testing your website in uptrends.com then making sure headers exactly match with what Cloudflare shows in the documentation.

- Asynchronous CSS – if you’re using this, cache plugins should also have documentation.
- External cron jobs – check the logs in your hosting account to make sure these are firing.
- Waterfall charts – after each optimization, you should ideally check its impact using a Waterfall chart (better than running another PageSpeed Insights test and testing scores).
- Clear cache – you may need to clear cache or regenerate critical CSS to see your changes.
25. Speed Plugins
Here’s the full list.
Obviously you don’t need all these especially if you’re using a cache/optimization plugin that already does some of these, Cloudflare image optimizations, or you can code things manually.
26. Get Help
Still need help? I’m not for hire, but here’s what I got:
DIY
- Search the WP Speed Matters Facebook Group.
- Plugins like Perfmatters have great documentation.
- Gijo Varghese and WP Johnny also put on quality articles.
- My other articles (if you liked this one, I have plenty more).
Hire Help
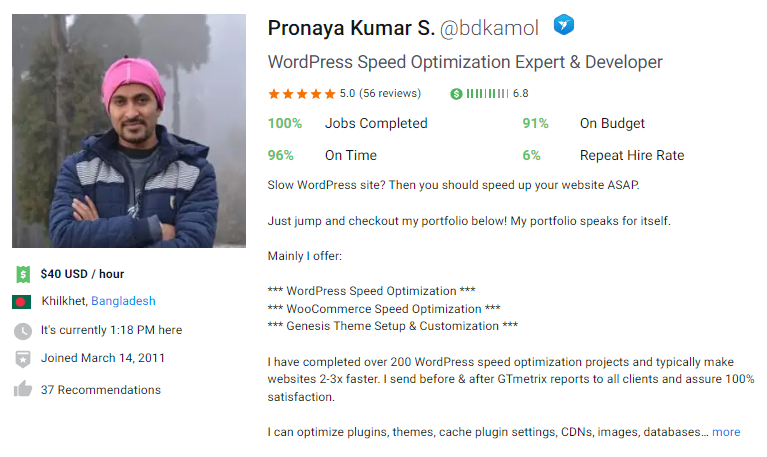
- BDKamol – Pronaya mainly works with Gutenberg, WooCommerce, and Genesis. He’s been helping me for over 10 years even when I launched my first website and had no visitors. He points me in the right direction and was a key part in launching my new blog, helping me with things like custom coding, CSS styling, theme/plugin recommendations, etc. Pronaya lives in Bangladesh and his communication (and my trust in him) are 100%.
- WP Johnny – he’s a busy guy but you can try hiring him and his team. I was lucky enough to have him help me remove my page builder (which I regret using in the first place and should have known better). While the work is great, it can take awhile to get things done.
- WP Fix It – hired them once to improve issues related to core web vitals. While I was very happy with the work, they closed my tickets without notice saying the project was done, even when I told them I would pay more since truly fixing the issues required more work.
27. My Setup
This will cost about $500/year.
It assumes you already have a lightweight theme (i.e. GeneratePress/Kadence) and pay yearly for Rocket.net since you get 2 months free. It also assumes you’re using Rocket.net’s lower $25/mo plan (I pay $50/mo for the Business plan). For my site, this is the best setup I’ve found.
My blog costs around $800/year which is a lot cheaper than I was paying (mainly because hosting gets expensive as you scale). Scaling on Rocket.net is reasonable since monthly visits and RAM are both 10x Kinsta’s and there’s no PHP worker limits since only about 10% of traffic hits the origin (due to Ben Gabler’s Cloudflare Enterprise setup who I suggest reaching out to).
LiteSpeed is also solid and can be cheaper since LiteSpeed Cache is free and email hosting is often included. Check out NameHero, ChemiCloud, and Scala (they seem to have good specs and TrustPilot reviews). RunCloud, GridPane, and JohnnyVPS are probably best for larger sites.
Cloudways is who I was using. I still think they’re better than most hosts but it gets expensive with all the add-ons, they use Apache servers, and Cloudflare Enterprise + Breeze need work.
| Service | Price | Notes |
|---|---|---|
| Rocket.net | $25/mo | Read my full reviewOMM1 = $1 first month1 year = 2 months free |
| Cloudflare Enterprise | Free on Rocket.net | No configurationFull page cachingI trust their config |
| GeneratePress | $249 (one-time) | Less CSS/JSUses GutenbergI use the “Search” theme |
| GenerateBlocks | $39/yr | More block templates |
| FlyingPress | $3.5/mo (renewal price) | Gijo’s pluginGreat for CWVAnd for real usersConfigure the settings |
| Google Workspace | $6/mo | Most cloud host don’t support email hosting |
| Perfmatters | $24.95/yr | Asset unloadingBloat removalOptimizations not found in WP Rocket or SG OptimizerConfigure the settings |
| Total Yearly Price | $477.95/yr | Plus one-time cost of GeneratePress |
Of course I use other tools/plugins, but that’s my foundation.
I hope you learned something new! Drop me a comment with any questions/suggestions.
Cheers,
Tom
Source :
https://onlinemediamasters.com/slow-wordpress-site/


