How GRC protects the value of organizations — A simple guide to data quality and integrity

Contemporary organizations understand the importance of data and its impact on improving interactions with customers, offering quality products or services, and building loyalty.

Data is fundamental to business success. It allows companies to make the right decisions at the right time and deliver the high-quality, personalized products and services that customers expect.

There is a challenge, though.

Businesses are collecting more data than ever before, and new technologies have accelerated this process dramatically. As a result, organizations have significant volumes of data, making it hard to manage, protect, and get value from it.

Here is where Governance, Risk, and Compliance (GRC) comes in. GRC enables companies to define and implement the best practices, procedures, and governance to ensure the data is clean, safe, and reliable across the board.

More importantly, organizations can use GRC platforms like StandardFusion to create an organizational culture around security. The objective is to encourage everyone to understand how their actions affect the business’s success.

Now, the big question is:

Are organizations getting value from their data?

To answer that, first, it’s important to understand the following two concepts.

Data quality

Data quality represents how reliable the information serves an organization’s specific needs — mainly supporting decision-making.

Some of these needs might be:

  • Operations – Where and how can we be more efficient?
  • Resource distribution – Do we have any excess? Where? And why?
  • Planning – How likely is this scenario to occur? What can we do about it?
  • Management – What methods are working? What processes need improvement?

From a GRC standpoint, companies can achieve data quality by creating rules and policies so the entire organization can use that data in the same ways. These policies could, for example, define how to label, transfer, process, and maintain information.

Data Integrity

Data integrity focuses on the trustworthiness of the information in terms of its physical and logical validity. Some of the key characteristics to ensure the usability of data are:

  • Consistency
  • Accuracy
  • Validity
  • Truthfulness

GRC’s goal for data integrity is to keep the information reliable by eliminating unwanted changes between updates or modifications. It is all about the data’s accuracy, availability, and trust.

How GRC empowers organizations achieve high-quality data

Organizations that want to leverage their data to generate value must ensure the information they collect is helpful and truthful. The following are the key characteristics of high-quality data:

  • Completeness: The expected data to make decisions is present.
  • Uniqueness: There is no duplication of data.
  • Timeliness: The data is up-to-date and available to use when needed.
  • Validity: The information has the proper format and matches the requirements.
  • Accuracy: The data describes the object correctly in a real-world context.
  • Consistency: The data must be the same across multiple databases
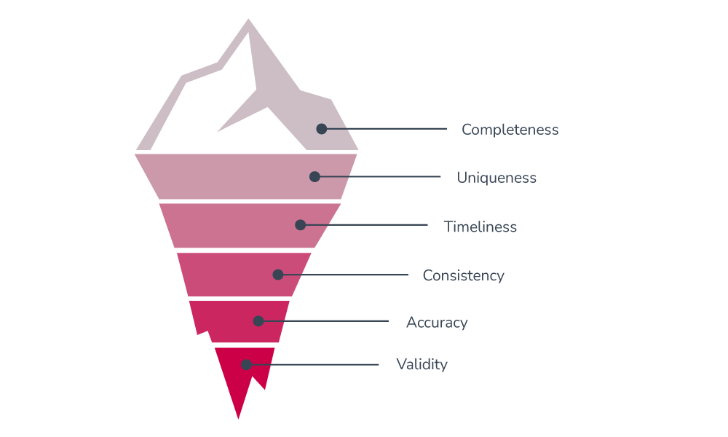
A powerful way to make sure the company’s data maintains these six characteristics is by leveraging the power of GRC.

Why?

Because GRC empowers organizations to set standards, regulations, and security controls to avoid mistakes, standardize tasks and guide personnel when collecting and dealing with vital information.

GRC helps organizations answer the following questions:

  • How is the company ensuring that data is available for internal decision and for the clients?
  • Is everyone taking the proper steps to collect and process data?
  • Have redundancies been removed?
  • Is the organization prepared for unexpected events?
  • Does the organization have a backup system?
  • Are the key processes standardized?

Overall, GRC aims to build shared attitudes and actions towards security.

Why every organization needs high-quality data and how GRC helps

Unless the data companies collect is high-quality and trustworthy, there’s no value in it — it becomes a liability and a risk for the organization.

Modern companies recognize data as an essential asset that impacts their bottom line. Furthermore, they understand that poor data quality can damage credibility, reduce sales, and minimize growth.

In today’s world, organizations are aiming to be data-driven. However, becoming a data-driven organization is tough without a GRC program.

How so?

Governance, Risk, and Compliance enable organizations to protect and manage data quality by creating standardized, controlled, and repeatable processes. This is key because every piece of data an organization process has an associated risk.

By understanding these risks, companies can implement the necessary controls and policies for handling and extracting data correctly so that every department can access the same quality information.

Organizations without structured data can’t provide any value, and they face the following risks:

  • Missed opportunities: Many leads are lost because of incomplete or inaccurate data. Also, incorrect data means wrong insights, resulting in missing critical business opportunities.
  • Lost revenue: According to 2021 Gartner’s research, the average financial impact of poor data quality on organizations is $12.9 million annually.
  • Poor customer experience: When data quality is poor, organizations can’t identify customers’ pain points and preferences. As a result, the offer of products or services doesn’t match customers’ needs and expectations.
  • Lack of compliance: In some industries where regulations control relationships or customer transactions, maintaining good-quality data can be the difference between compliance and fines of millions of dollars. GRC is vital to keep compliance in the loop as new regulations evolve worldwide.
  • Increased expenses: A few years ago, IBM’s research showed that businesses lost 3.1 trillion dollars in the US alone. How? Spending time to find the correct data, fixing errors, and just hunting for information and confirmed sources.
  • Misanalysis: Around 84% of CEOs are concerned about the quality of data they are deciding on. Wrong data will lead to bad decisions and ultimately damage operations, finances, HR, and every area within the company.
  • Reputational damage: In today’s world, customers spend a lot of their time reading reviews before making a decision. For instance, if a company fails to satisfy its customers, everyone will know.
  • Reduced efficiency: Poor data quality forces employees to do manual data quality checks, losing time and money.

To sum up:

Having the right processes to manipulate data will prevent organizations from missing business opportunities, damaging their reputation, and doing unnecessary repetitive tasks.

How GRC supports data-driven business and what are the key benefits of clean data

Data-driven businesses embrace the use of data (and its analysis) to get insights that can improve the organization. The efficient management of big data through GRC tools helps identify new business opportunities, strengthen customer experiences, grow sales, improve operations, and more.

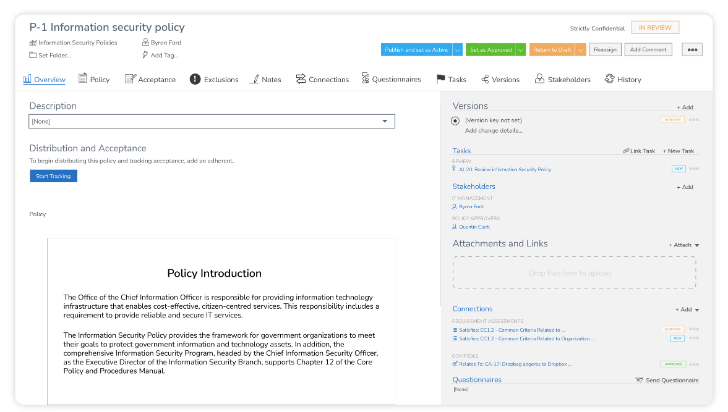
For example, GRC helps data-driven businesses by allowing them to create and manage the right policies to process and protect the company’s data.
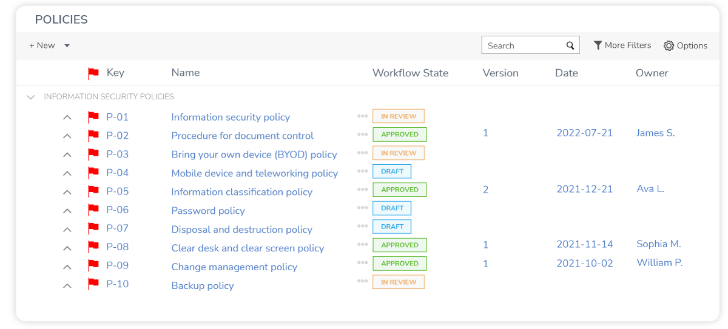
More importantly, organizations can also control individual policies to ensure they have been distributed and acknowledged accordingly.
In terms of benefits, although clean data has numerous “easy-to-identify” benefits, many others are not easily identified. Trusting data not just improves efficiency and results; it also helps with fundamental, vital factors that affect business performance and success.

What are these factors?

Fundamental benefits:

  • Profits/Revenue
  • Internal communication
  • Employees confidence to share information
  • Company’s reputation
  • Trust

Operational benefits:

  • Efficiency
  • Business outcome
  • Privacy issues
  • Customer satisfaction
  • Better audience-targeting

How GRC protect the value of businesses and their data

In this contemporary world, companies should be measured not only via existing financial measurements but also by the amount of monetizable data they can capture, consume, store and use. More importantly, how the data helps the organization’s internal processes to be faster and more agile.

When people think of high-quality data and big data, they usually associate these two with big organizations, especially technology and social media platforms. However, big quality data gives organizations of any size plenty of benefits.

Data quality and integrity help organizations to:

  • Understand their clients
  • Enhance business operations
  • Understand industry best practices
  • Identify the best partnership options
  • Strengthen business culture
  • Deliver better results
  • Make more money

Using the right GRC platform helps companies create and control the policies and practices to ensure their data is valid, consistent, accurate, and complete — allowing them to get all these benefits.

The key to using GRC tools is that businesses can produce what customers expect on a greater scale and with higher precision and velocity.

Now, what does this have to do with value?

By protecting the value of data, organizations are protecting their overall worth. Indeed, GRC empowers companies to create a culture of value, giving everyone education and agency so they can make better decisions.

Also, GRC helps companies tell better security stories. These stories aim to build trust with customers and partners, enter new markets, and shorten sale cycles.
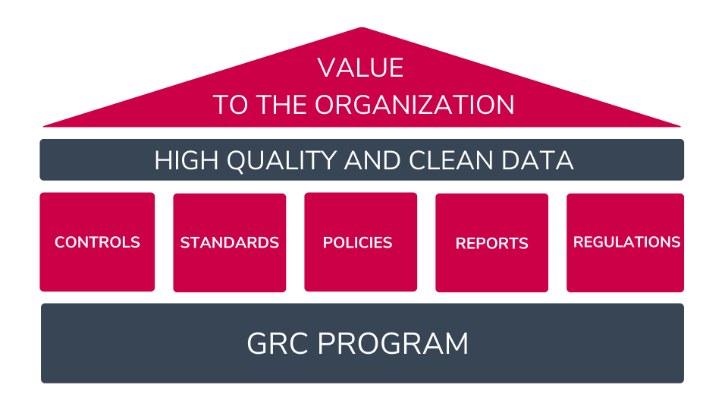
To summarize:

A better understanding of customers and processes — through data — will lead to better products and services, enhanced experiences, and long-lasting relationships with customers. All these represent growth and more revenue for companies.

What happens when a company’s data is not safe? Can it damage their value?

Trust is a vital component of any interaction (business or personal) and, as such, is mandatory for organizations to protect it — without trust, there is no business.

When data is not protected, the chances of breaches are higher, causing direct and indirect costs.

Direct costs are:

  • Fines
  • Lawsuits
  • Stolen information
  • Compensations
  • Potential business loss

Indirect costs are:

  • Reputation/Trust
  • PR activities
  • Lost revenue from downtime
  • New and better protection

Often, reputation damages can cause long-term harm to organizations, making it hard for them to acquire and maintain business. In fact, reputation loss is the company’s biggest worry, followed by financial costs, system damage, and downtime.

So, what does all this mean?

It’s not just about collecting data; it is also about how companies reduce risks and leverage and protect the data they have. GRC integrates data security, helping organizations be better prepared against unauthorized access, corruption, or theft.

Moreover, GRC tools can help elevate data security by controlling policies, regulations, and predictable issues within the organization.

The bottom line?

When companies can’t get or maintain customers because of a lack of trust, the organization’s value will be significantly lower — or even zero. Unfortunately, this is even more true for small and medium size companies.

How to use GRC to achieve and maintain high-quality data?

Many organizations have trouble managing their data, which, unfortunately, leads to poor decisions and a lack of trust from employees and customers.

Moreover, although companies know how costly wrong information is, many are not working on ensuring quality data through the right processes and controls. In fact, Harward Business Review said that 47% of newly created data records have at least one critical error.

Why is that?

Because there is a lack of focus on the right processes and systems that need to be in place to ensure quality data.

What do poor processes cause?

  • Human errors
  • Wrong data handling
  • Inaccurate formatting
  • Different sets of data for various departments
  • Unawareness of risks
  • Incorrect data input or extraction

Fortunately, GRC’s primary goal is to develop the right policies and procedures to ensure everyone in the organization appropriately manages the data.

GRC aims to create a data structure based on the proper governance that will dictate how people organize and handle the company’s information. As a result, GRC will empower companies to be able to extract value from their data.

That is not everything.

Governance, Risk, and Compliance allow organizations to understand the risks associated with data handling and guide managers to create and distribute the policies that will support any data-related activity.

The following are some of the ways GRC is used to achieve and maintain high-quality data:

  • Data governance: Data governance is more than setting rules and telling people what to do. Instead, it is a collection of processes, roles, policies, standards, and metrics that will lead to a cultural change to ensure effective management of information throughout the organization.
  • Education: Achieving good data quality is not easy. It requires a deep understanding of data quality principles, processes, and technologies. GRC facilitates the education process by allowing the organization to seamlessly implement, share, and communicate its policies and standards to every department.
  • Everyone is involved: Everyone must understand the organization’s goal for data quality and the different processes and approaches that will be implemented. GRC focuses on cultural change.
  • Be aware of threats: When managing data, each process has risks associated with it. The mission of GRC is for the organization to recognize and deal with potential threats effectively. When companies are aware of risks, they can implement the necessary controls and rules to protect the data.
  • One single source of truth: A single source of truth ensures everyone in the organization makes decisions based on the same consistent and accurate data. GRC can help by defining the governance over data usage and manipulation. Furthermore, GRC makes it easy to communicate policies, see who the policy creator is, and ensure employees are acting according to the standards.

Get a free consultation with StandardFusion to learn more about how GRC and data governance can boost your organization’s value.

Source :
https://thehackernews.com/2022/09/how-grc-protects-value-of-organizations.html

How to set up the Surveillance Station of QNAP NAS?

Introduction

To satisfy the increasing demand for embedded network surveillance solutions on NAS, QNAP unveiled a value-added application ‘Surveillance Station’ on its All-in-One Turbo NAS Series. The Surveillance Station enables users to configure and connect many IP cameras at the same time and manage functions including live audio & video monitoring, recording, and playback. Installation and configuration can be easily carried out remotely in a web browser in a few steps. Various recording modes are provided: continuous recording, motion-detection recording, and scheduled recording. Users can flexibly define the recording settings according their security plans.
The Surveillance Station supports a large number of IP camera brands. You can find a list of supported cameras at: https://www.qnap.com/compatibility.

Contents

  • Plan your home/office network topology
  • Set up the IP Cameras
  • Configure the Surveillance Station on the QNAP NAS
  • Configure Alarm Recording on the QNAP NAS
  • Play Video Files from the Surveillance Station

Plan Your Home/Office Network Topology

Write down your plan of the home/office network before starting to set up the surveillance system. Consider the following when doing so:

  • The IP address of the NAS
  • The IP address of the cameras
  • The IP address of your router and the wireless SSID

Your computer, the NAS, and the IP cameras should be installed to the same router in LAN. Assign fixed IP addresses for the NAS and the IP cameras.
For example:

  • The LAN IP of the router: 192.168.1.100
  • Camera 1 IP: 192.168.1.10 (fixed IP)
  • Camera 2 IP: 192.168.1.20 (fixed IP)
  • NAS IP: 192.168.1.60 (fixed IP)

Set up the IP Cameras

Configure the IP address for both IP cameras using the following steps.
You can download a camera IP Finder from official website of your camera’s vendor.
The name of the IP finder may differ between vendors. IP Finder is a utility that helps you search for the IP address of the camera.
CONNECT the IP camera to your home/office network with a network cable and run the IP Finder. Set the IP address of the cameras so that they are on the same LAN as the computer. You will then be able to login to the configuration page of the camera with a web browser. Enter the IP address of the first camera as 192.168.1.10. The default gateway should be set as the LAN IP of the router (192.168.1.100 in our example).

Note: The default IP and ID of administrator may differ based on what camera model is used.

ENTER the web configuration page of the IP camera.
You will then be able to view the monitoring image.

GO to ‘Network/ Network’ and check the IP settings of the camera.

NEXT, if you are using a Wireless IP CAM, please go to “Network/Wireless” and configure the wireless setting of your camera. Please ensure the camera’s settings are completed.

Repeat the above steps to set up the second camera.
To summarize, so far you have finished the following settings:

  • Camera 1 IP: 192.168.1.10
  • Camera 2 IP: 192.168.1.20

Note:
If you forget the camera settings, please press the reset button at the back of the camera for 5-10 seconds. The camera will be restored to default settings. You can then set the IP address and login to the camera’s configuration page with using the default login name and password. The reset function may differ by the brand of the camera. Please refer to the camera’s user manual in advance.

Configure the Surveillance Station on the QNAP NAS

Go to “Control Panel” > “System Settings” >”Network” > “TCP/IP” and press the “Edit” button to specify a fixed IP to the NAS: 192.168.1.60. The default gateway should be the same as the LAN IP of your router, which is 192.168.1.100 in our example.

Install Surveillance Station

  • Auto installation: Go to “App Center” > “Surveillance” > “Surveillance Station” and click “Add to QTS” to start installation.
  • Manual installation: Download the Surveillance Station QPKG from the App Center on the QNAP website. Then you can install it by clicking the “Install Manually” button and by selecting the location of the Surveillance Station QPKG to start installing.

Please note: To ensure proper operations of Surveillance Station, we recommend rebooting the Turbo NAS after its installation is completed.

In the Surveillance Station, please go to “Settings” and select “Camera 1” then click “” to add the camera configuration, e.g. name, model, IP address, recording setting and recording schedule.

In our demonstration we will assign the following IPs to each camera:
Camera 1 IP: 192.168.1.10
Camera 2 IP: 192.168.1.20

Note:
Before applying the settings, you may click “Test” on the right to ensure the connection to the IP camera is successful.

You can enable or change the recording option of the camera in next page. Click “next” to move to the next page.

On this page, you will see the “Schedule Settings.” In the table, 0~23 represents the time period. For example, 0 means 00:00~01:00, 1 means 01:00~02:00. You can set a continuous recording in any period that you want.

Then you will see the “Confirm Settings” on the next page.

After you have added the network cameras to the NAS, go to the “Monitor” page. The first time you access this page by browser, you have to install the ActiveX control (QMon.cab) in order to view the images of Camera 1 and Camera 2.

Note:
You can use the Surveillance Station in Chrome, Firefox or IE. The browser will prompt you to install the “ActiveX control” (QMon.cab) before using Monitor or Playback functions. Please follow the on-screen instructions to complete the installation.

Note:
When you click on the monitoring screen of a camera, the frame will become orange. You can use the s configuration page.
In Surveillance Station 5, there is a new feature called “Instant Playback”. You can click the floating button to play recording and find recent event.

Configure Alarm Recording on the QNAP NAS

The Surveillance Station supports alarm recording by schedule. To use this function, go to “Camera Settings” > “Alarm Settings” in the Surveillance Station. You could select ‘Traditional Mode’ to do basic configurations or ‘Advanced Mode’ to define advanced alarm events.

  • Traditional Mode :
    You may define criteria enabling alarm recording then click ‘Apply’ to save the changes.
  • Advanced Mode :
    You may select the event on the left side and add an action on the right side by clicking “Add”.

Then you may choose the action type you need for this event.

The event “Motion Detection” has a corresponding action “Recording”.

Play Video Files from the Surveillance Station

You have to click or to enter the playback page and follow the steps below to play the video files on the remote Surveillance Station.

1. Drag and drop camera(s) from the server/camera tree to the respective playback window(s) to select the channel(s) for playback.

2. Select playback date from.You can examine each channel to know the time range when the files were recorded for each IP camera. The blue cells indicate regular recording files and the red cells indicate alarm recording files. If it is blank, it means no files are recorded at that time.

3. Clickto start the playback. You can control the speed and playback direction by dragging the button to right or left on the shuttle bar.

4. Specify the time to play back the recording files at that moment. You can view the preview image on the timeline bar to search the moment you want to play.

5. Clickto control all the playback windows to play back the recording files. When this function is enabled, the playback options (play, pause, stop, previous/next frame, previous/next file, speed adjustment) will be applied to all the playback windows.
Source :
https://www.qnap.com/en/how-to/tutorial/article/how-to-set-up-the-surveillance-station-of-qnap-nas

KB5004442—Manage changes for Windows DCOM Server Security Feature Bypass (CVE-2021-26414)

Summary

The Distributed Component Object Model (DCOM) Remote Protocol is a protocol for exposing application objects using remote procedure calls (RPCs). DCOM is used for communication between the software components of networked devices.  

Hardening changes in DCOM were required for CVE-2021-26414. Therefore, we recommended that you verify if client or server applications in your environment that use DCOM or RPC work as expected with the hardening changes enabled.

To address the vulnerability described in CVE-2021-26414, you must install updates released September 14, 2021 or later and enable the registry key described below in your environment. We recommended that you complete testing in your environment and enable these hardening changes as soon as possible. If you find issues during testing, you must contact the vendor for the affected client or server software for an update or workaround before early 2022.

Note We recommend that you update your devices to the latest security update available to take advantage of the advanced protections from the latest security threats.

Timeline

Update releaseBehavior change
June 8, 2021Hardening changes disabled by default but with the ability to enable them using a registry key.
June 14, 2022Hardening changes enabled by default but with the ability to disable them using a registry key.
March 14, 2023Hardening changes enabled by default with no ability to disable them. By this point, you must resolve any compatibility issues with the hardening changes and applications in your environment.

Registry setting to enable or disable the hardening changes

During the timeline phases in which you can enable or disable the hardening changes for CVE-2021-26414, you can use the following registry key:

  • Path : HKEY_LOCAL_MACHINE\SOFTWARE\Microsoft\Ole\AppCompat
  • Value Name: “RequireIntegrityActivationAuthenticationLevel”
  • Type: dword
  • Value Data: default = 0x00000000 means disabled. 0x00000001 means enabled. If this value is not defined, it will default to enabled.

Note You must enter Value Data in hexadecimal format. 

Important You must restart your device after setting this registry key for it to take effect.

Note Enabling the registry key above will make DCOM servers enforce an Authentication-Level of RPC_C_AUTHN_LEVEL_PKT_INTEGRITY or higher for activation.

Note This registry value does not exist by default; you must create it. Windows will read it if it exists and will not overwrite it.

New DCOM error events

To help you identify the applications that might have compatibility issues after we enable DCOM security hardening changes, we added new DCOM error events in the System log; see the tables below. The system will log these events if it detects that a DCOM client application is trying to activate a DCOM server using an authentication level that is less than RPC_C_AUTHN_LEVEL_PKT_INTEGRITY. You can trace to the client device from the server-side event log and use client-side event logs to find the application.

Server events

Event IDMessage
10036“The server-side authentication level policy does not allow the user %1\%2 SID (%3) from address %4 to activate DCOM server. Please raise the activation authentication level at least to RPC_C_AUTHN_LEVEL_PKT_INTEGRITY in client application.”(%1 – domain, %2 – user name, %3 – User SID, %4 – Client IP Address)

Client events

Event IDMessage
10037“Application %1 with PID %2 is requesting to activate CLSID %3 on computer %4 with explicitly set authentication level at %5. The lowest activation authentication level required by DCOM is 5(RPC_C_AUTHN_LEVEL_PKT_INTEGRITY). To raise the activation authentication level, please contact the application vendor.”
10038“Application %1 with PID %2 is requesting to activate CLSID %3 on computer %4 with default activation authentication level at %5. The lowest activation authentication level required by DCOM is 5(RPC_C_AUTHN_LEVEL_PKT_INTEGRITY). To raise the activation authentication level, please contact the application vendor.”(%1 – Application Path, %2 – Application PID, %3 – CLSID of the COM class the application is requesting to activate, %4 – Computer Name, %5 – Value of Authentication Level)

Availability

These error events are only available for a subset of Windows versions; see the table below.

Windows versionAvailable on or after these dates
Windows Server 2022September 27, 2021KB5005619
Windows 10, version 2004, Windows 10, version 20H2, Windows 10, version 21H1September 1, 2021KB5005101
Windows 10, version 1909August 26, 2021KB5005103
Windows Server 2019, Windows 10, version  1809August 26, 2021KB5005102
Windows Server 2016, Windows 10, version 1607September 14, 2021KB5005573
Windows Server 2012 R2 and Windows 8.1October 12, 2021KB5006714

Source :
https://support.microsoft.com/en-us/topic/kb5004442-manage-changes-for-windows-dcom-server-security-feature-bypass-cve-2021-26414-f1400b52-c141-43d2-941e-37ed901c769c

UniFi – Console and Gateway Recovery Mode

The Recovery Mode User Interface (UI) is a special interface for UniFi OS Consoles (UDMP, UNVR, etc.) and gateways used to recover from various failure modes (indicated on the LCM screen of that device). From the Recovery Mode, you can perform the following actions:

  • Reset to Factory Defaults: Completely reset the device. Note this will also wipe out any stored backup files.
  • Reboot: Restart the device and re-load the existing configuration.
  • Power-off: Initiate a software shutdown on the device, after which you can safely remove the power cable.
  • Check Filesystems: Check the integrity of the file system. 
  • Firmware Update: Upload a previously downloaded firmware image (.bin) file in order to upgrade the firmware.

You should only resort to using recovery mode if you are prompted by the LCM screen found on your device. 

Performing a Device Recovery

  1. Download the most recent firmware for your device. You can find information on our latest releases here.
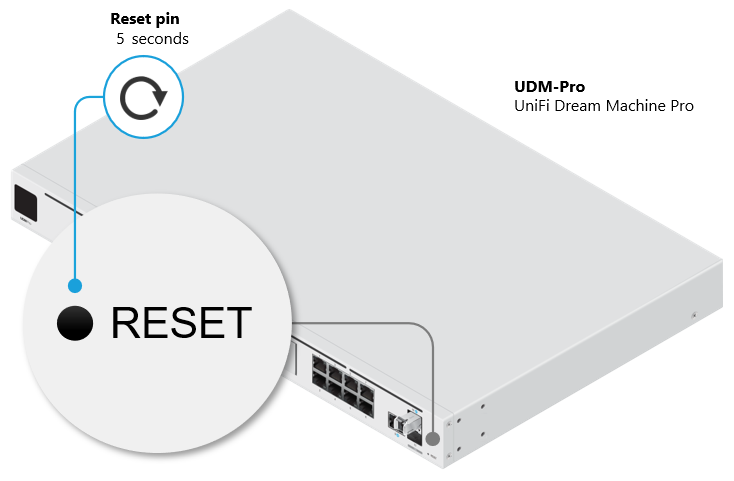
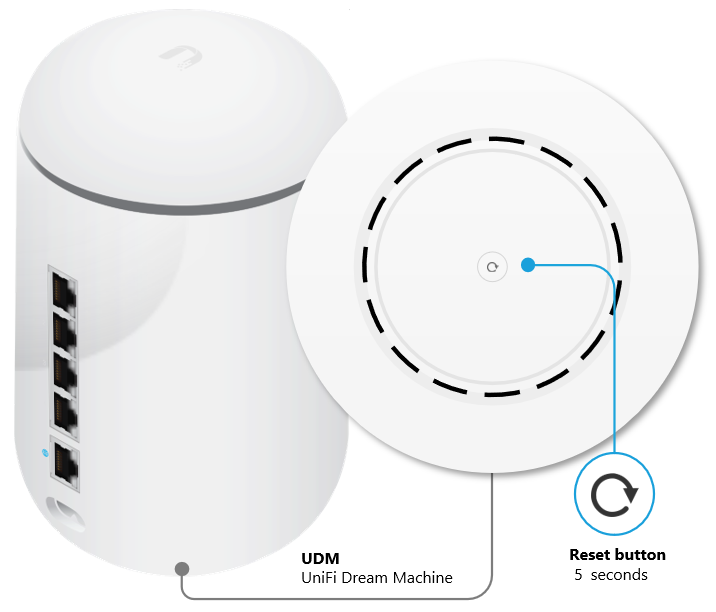
  2. Completely power-off the UniFi device and unplug it from its power source.
  3. Press and hold the reset button and then power on the device by connecting it to the power source once again.udm-pro-topology.pngudm-topology.png
  4. Keep the reset button pressed for about 5 seconds. After some time the display (in supported models) will indicate that the gateway is in Recovery Mode.
  5. Connect an Ethernet cable from your computer to the first LAN port (port 1) on the UniFi gateway.

    Note: Port 1 is always the first one. Either the top port, or the top left corner one, depending on the layout of your device’s ports.
  6. Configure a static IP address on your computer in the 192.168.1.0/24 range (for example 192.168.1.11). Windows ClientmacOS clientNote: If a wireless adapter is enabled and connected to another network it could conflict with the connection to the UniFi device. Disable the wireless adapter if necessary. 
  7. Open a compatible web browser navigate to http://192.168.1.30 to access the Recovery Mode UI. 

    Note: The Recovery Mode UI is accessible via HTTP only and not HTTPS. It is possible that your browser will automatically try to redirect your session to HTTPS. Make sure to navigate to the http://192.168.1.30 address and use a different browser if necessary.
  8. Select Firmware Update > Choose and browse your computer for the previously download firmware (.bin) image file.
  9. Wait for the upgrade process to complete and reboot the device afterwards.

    Source :
    https://help.ui.com/hc/en-us/articles/360043360253-UniFi-Console-and-Gateway-Recovery-Mode

UniFi – Login with SSH (Advanced)

We do not recommend using SSH unless instructed by one of our Support Engineers as part of advanced troubleshooting. Inexperienced users risk making changes that may degrade network performance, or even worse, completely break your deployment. Proceed with caution.

Requirements

1. You are connected to the same local network as the device/console you plan to connect with via SSH. This may consist of using a laptop connected to the same WiFi network, or hardwired directly to the device.

2. SSH is enabled. UniFi Network devices and UniFi OS Consoles have independent SSH settings.

  • UniFi OS Consoles – Following setup, SSH is automatically disabled. It must be enabled in your UniFi OS System Settings.
  • UniFi Network Devices – Following setup, SSH is automatically enabled. The credentials consist of a random string of characters.

3. The device you are using has a command line interface (CLI) capable of establishing a Secure Shell (SSH) connection. Linux and macOS devices can use their native terminal. Windows OS requires PowerShell or PuTTY.

Establishing an SSH Connection

The format of the command used to establish an SSH connection is as follows:

ssh <username>@<ip-address>

The <username> for UniFi OS Consoles (UDM Pro / UNVR / Cloud Key) and UniFi Gateways (UXG Pro) is always ‘root’. For example, a Dream Machine Pro (gateway) with an IP address of 192.168.1.1 can be accessed as follows:

ssh root@192.168.1.1

Note: The UXG will use <username> = ‘root’, but the <password> will be the shared password set in your UniFi Network Application.

Default Credentials

Prior to setup/adoption, devices have a set of default credentials. 

UniFi – Advanced Updating Techniques

We recommend that most users enable automatic updates.  Doing so allows you to specify when your UniFi deployment automatically checks for and installs updates. 

UniFi OS Console and application update preferences can be configured in your UniFi OS Settings. Please note, though, that self-hosted UniFi Network applications do not offer automatic updating.

UniFi Network device update preferences are set in your Network application’s System Settings. Devices managed by other UniFi applications are automatically updated within their respective applications.

Manually Update UniFi Devices via Web Application

Updating via the Device Property Panel

Use Case: You want to try Early Access firmware releases for specific devices, or you want to return to an official release after trying an EA release.

1. Copy the firmware release link from community.ui.com/releases.

image1.png

2. Paste the link in the address bar found in the Settings tab of the device’s properties panel.

image2.png

Updating via Your Network Cache

Use Case: You prefer to download and store updates in your Network application so they can be used by other devices, as opposed to downloading multiple, device-specific files from the internet. This is an ideal solution for reducing bandwidth within high-volume networks that host a large number of similar UniFi devices. It is also suitable for the advanced users who disable internet access on their UniFi device’s management network.

Device updates can be cached in your Network application’s System Settings. Once an update is cached, you can open to your UniFi Devices page and click Update Available.

Note: The Cache link will appear when you hover your cursor over an update.image3.png

Updating via SSH

Note: SSH updating is not a typical or recommended method. It is only prescribed to work around specific scenarios, such as when:

  • Prior traditional update attempts have failed. A successful SSH update will help verify if initial failures resulted from incorrect network configuration. For more details, see Troubleshooting Device Updates.
  • Your UniFi Network device is not being discovered or cannot be adopted because it has been preloaded with outdated firmware.
  • Your UniFI OS Console cannot be set up because it has been preloaded with an outdated version of UniFi OS.

UAP/USW (Internet) 

  1. Copy the update link from community.ui.com/releases.
  2. SSH into your device.
  3. Run the following command:upgrade paste_download_link_here Exupgrade https://dl.ui.com/unifi/firmware/UAL6/5.60.1.12923/BZ.mt7621_5.60.1+12923.210416.1641.bin

UAP/USW (No Internet) 

  1. Download the desired firmware update from community.ui.com/releases.
  2. Use the following SCP command to copy the file into the /tmp folder of your device. This requires a compatible SCP application (e.g., Terminal on macOS and Linux, PuTTY/PowerShell on Windows).scp /folder_path/firmwarefile.bin <user>@<IP of device>:/tmp/fwupdate.binExscp /Users/alexpro/Desktop/BZ.mt7621_5.60.1+12923.210416.1641.bin Alex@192.168.1.219:/tmp/fwupdate.bin 
  3. Enter your SSH password when prompted.
  4. Run the following command:syswrapper.sh upgrade2 &

UDM/UDM Pro/UXG Pro (Internet)

  1. Copy the update link from community.ui.com/releases.
  2. SSH into your device.
  3. Run the following command:ubnt-upgrade paste_download_link_here Exubnt-upgrade https://fw-download.ubnt.com/data/udm/7675-udmpro-1.12.22-36b5213eaa2446aca8486f0b51e64cd3.bin

UDM/UDM Pro/UXG Pro (No Internet)

  1. Download the desired firmware update from community.ui.com/releases.
  2. Use the following SCP command to copy the file into the /mnt/data folder of your device. This requires a compatible SCP application (e.g., Terminal on macOS and Linux, PuTTY/PowerShell on Windows).scp /folder_path/firmwarefile.bin <user>@<IP of device>:/mnt/data/fwupdate.binExscp /Users/alexpro/Desktop/7675-udmpro-1.12.22-36b5213eaa2446aca8486f0b51e64cd3.bin Alex@192.168.1.219:/mnt/data/fwupdate.bin 
  3. Enter your SSH password when prompted.
  4. Run the following command:ubnt-upgrade /mnt/data/fwupdate.bin

UCK G2, UCK G2 Plus, UDM SE, UDR, UDW, UNVR, UNVR Pro (Internet)

  1. Copy the update link from community.ui.com/releases.
  2. SSH into your device.
  3. Run the following command:ubnt-systool fwupdate paste_download_link_here Exubnt-systool fwupdate https://fw-download.ubnt.com/data/unifi-dream/dd49-UDR-2.4.10-cd3afa000ebf4a4fb15374481539961c.bin

UCK G2, UCK G2 Plus, UDM SE, UDR, UDW, UNVR, UNVR Pro (No Internet)

  1. Download the desired firmware update from community.ui.com/releases.
  2. Use the following SCP command to copy the file into the /tmp folder of your device. This requires a compatible SCP application (e.g., Terminal on macOS and Linux, PuTTY/PowerShell on Windows).scp /folder_path/firmwarefile.bin <user>@<IP of device>:/tmp/fwupdate.binExscp /Users/alexpro/Desktop/dd49-UDR-2.4.10-cd3afa000ebf4a4fb15374481539961c.bin 
  3. Enter your SSH password when prompted.
  4. Run the following command:ubnt-systool fwupdate /tmp/fwupdate.bin

USG (Internet) 

  1. Copy the update link from community.ui.com/releases.
  2. SSH into your device.
  3. Run the following command:upgrade paste_download_link_here Exupgrade https://dl.ui.com/unifi/firmware/UGW3/4.4.56.5449062/UGW3.v4.4.56.5449062.tar

USG (No Internet) 

  1. Download the desired firmware update from community.ui.com/releases.
  2. Rename the file: upgrade.tar
  3. Use the following SCP command to copy the file into the /home/<user> folder of your USG. This requires a compatible SCP application (e.g., Terminal on macOS and Linux, PuTTY/PowerShell on Windows).scp /folder_path/upgrade.tar <user>@<IP of device>:/home/<user>/upgrade.tarExscp /Users/alexpro/Desktop/upgrade.tar Alex@192.168.1.1:/home/Alex/upgrade.tar
  4. Enter your SSH password when prompted.
  5. SSH into your device.
  6. Run the following command:sudo syswrapper.sh upgrade upgrade.tar

Manually Update the Network Application

  1. Download the desired application update from community.ui.com/releases.
  2. SSH into your device.
  3. Run the following command (UDM/UDM Pro Only):unifi-os shell
  4. Remove previously installed files:rm /tmp/unifi_sysvinit_all.deb &> /dev/null
  5. Store the new application version on your device using the download link:curl -o “/tmp/unifi_sysvinit_all.deb” <network application link.deb>Excurl -o “/tmp/unifi_sysvinit_all.deb” https://dl.ui.com/unifi/6.2.26-a79cb15f05/unifi_sysvinit_all.deb
  6. Once downloaded, install the new version:apt-get install -y /tmp/unifi_sysvinit_all.deb
  7. Following installation, remove the downloaded file:rm /tmp/unifi_sysvinit_all.deb

Updating Devices in a Broken State

In rare occurrences, a device may stop functioning. UniFi APs may be updated using our TFTP Recovery. This should only be used if your AP completely stops functioning as a last resort prior to submitting an RMA. UniFi OS Consoles and gateways my be updated using Recovery Mode. This should only be used if prompted on your device’s LCM screen.

Source :
https://help.ui.com/hc/en-us/articles/204910064-UniFi-Advanced-Updating-Techniques

UniFi – Getting Support Files and Logs

It may be necessary to provide support files to our team when troubleshooting issues. These contain detailed logs and information about what is happening with your UniFi system. Although sensitive information is generally removed, we do not recommend sharing these publicly.

There are two support files to be aware of:

  • UniFi OS Support File: This contains logs related to your UniFi OS Console, the installed applications, your adopted UniFi devices, and the client devices connected. 
    Navigating to unifi.ui.com (or signing in locally via IP address) > select your UniFi OS Console > Console Settings > Download Support File. Note that it will have a *.tgz extension.
  • UniFi Network Support File: This only contains information about your UniFi Network application, your adopted UniFi Network devices, and the connected clients. This should only be used if you are self-hosting the UniFi Network application on a Windows, macOS or Linux machine.
    Navigate to your UniFi Network Application > Settings > System > Download Network Support File. Note that it will have a *.supp extension.

Advanced

If the UOS Console or UniFi applications are inaccessible and you are not able to download the support file, you can download the logs by following these instructions. Please note, our support engineer will provide detailed information on which of the following will be required for troubleshooting.

1. SSH into the machine: ssh root@192.168.1.1

Note: If you need to change your SSH password, do so in the UniFi OS Settings, by navigating to unifi.ui.com (or signing in locally via IP address) > select your UniFi OS Console > Settings > System.

2. Create ZIP files for the logs. The commands’ format will be: tar -zcvf <file name> <folders path>.

  • UniFi OS logs: tar -zcvf unifi-core-logs.tar.gz /data/unifi-core/logs/
  • UniFi local portal (ULP) logs: tar -zcvf ulp-go-logs.tar.gz /data/ulp-go/log/
  • UniFi Network logs:
    • For UniFi Dream Machine consoles:tar -zcvf unifi-logs.tar.gz /data/unifi/logs/
    • For UniFi Cloud Key Gen2 consoles:tar -zcvf unifi-logs.tar.gz /usr/lib/unifi/logs
  • UniFi Protect logs:
    • Without external disks: tar -zcvf unifi-protect-logs.tar.gz /data/unifi-protect/logs/
    • With external disks: tar -zcvf unifi-protect-logs.tar.gz /srv/unifi-protect/logs/
  • UniFi Talk logs:
    • tar -zcvf unifi-talk-logs.tar.gz /var/log/unifi-talk/
    • tar -zcvf unifi-talk-base-logs.tar.gz /var/log/unifi-base/
    • tar -zcvf unifi-talk-freeswitch-logs.tar.gz /var/log/freeswitch/
  • UniFi Connect logs: tar -zcvf unifi-connect-logs.tar.gz /data/unifi-connect/log/
  • System logs:
    • ubnt-systool support /tmp/system
    • tar zcvf system.tar.gz /tmp/system

3. Open a new terminal window and run the SCP command to copy the logs from the UniFi OS Console and onto your computer (or system).

Note: The period (.) in the path variable means it will be copied onto the currently opened directory in the terminal. And the asterisk (*) stands for “all”. So the following command will copy everything with the extension tar.gz (i.e. all the logs you prepared in Step 2). 

scp root@192.168.1.1:/root/\*.gz .

4. Close both terminal windows to close the sessions.

If other logs are needed, our support agent will guide you and provide the necessary commands.

Source :
https://help.ui.com/hc/en-us/articles/360049956374-UniFi-Getting-Support-Files-and-Logs

UniFi Network – Updating Third-Party, non-Console UniFi Network Applications (Linux – Advanced)

This article provides the steps to update the UniFi Network application to the current stable release on a Debian or Ubuntu system via APT (Advanced Package Tool). If you run into issues following the process described in this article, please take a look at the scripts provided in this Community post that includes UniFi Network software installation on Ubuntu 18.04 and 16.04 and Debian 8/9.

Requirements

In order to update the UniFi Network application via APT, it is necessary to create source files or edit lines in an existing sources.list file with Linux text editors: vi or nano. The repo structure should be permanent, but if there are any changes they will be pointed out in the UniFi Network software version release posts, found in the Release section of the Community.

Before upgrading the UniFi Network application, make sure that you have backed up the UniFi Network Database. You will need to make sure that the user has sudo permissions. For more information about adding a user to sudo list, see this Debian article.

UniFi Network APT Steps

1. Install required packages before you begin with the following command:

sudo apt-get update && sudo apt-get install ca-certificates apt-transport-https

Click to copy

2. Use the following command to add a new source list:

echo 'deb https://www.ui.com/downloads/unifi/debian stable ubiquiti' | sudo tee /etc/apt/sources.list.d/100-ubnt-unifi.list

Click to copy

3. Add the GPG Keys. To add the GPG Keys use one of the two methods described below (Method A is recommended). When using the commands below, it is assumed you have sudo and wget installed, more information about sudo can be found here, and wget here.

User Tip: For Ubuntu 18.04, run the following commands before installing UniFi in step 4.

wget -qO - https://www.mongodb.org/static/pgp/server-3.4.asc | sudo apt-key add -
echo "deb https://repo.mongodb.org/apt/ubuntu xenial/mongodb-org/3.4 multiverse" | sudo tee /etc/apt/sources.list.d/mongodb-org-3.4.list
sudo apt-get update

Click to copy

See an example of what scripts the Community is using to install the UniFi Network application on Ubuntu 16.04 and 18.04 in this Community post.

(Method A) Install the following trusted key into /etc/apt/trusted.gpg.d

sudo wget -O /etc/apt/trusted.gpg.d/unifi-repo.gpg https://dl.ui.com/unifi/unifi-repo.gpg 

Click to copy

(Method B) Using apt-key.

sudo apt-key adv --keyserver keyserver.ubuntu.com --recv 06E85760C0A52C50 

Click to copy

4. Install and upgrade the UniFi Network application.

Note: On some Distributions, it’s possible an incompatible Java release can be installed during this step. We recommend running the following command before proceeding with this step, to restrict Ubuntu from automatically installing Java 11. If you wish to undo this later, replace “hold” with “unhold”.

sudo apt-mark hold openjdk-11-*

Install and upgrade the UniFi Network application with the following command:

sudo apt-get update && sudo apt-get install unifi -y

Click to copy

5.  This step may not be required, depending on the Linux distro you have. If your distro does not come with MongoDB, and it’s not available in their repo, then please see the MongoDB installation guide. You can find the latest installation guide for Ubuntu here, and Debian here. We recommend at least MongoDB 2.6.10. Some users have changed the backend to use MongoDB 3 successfully too.

6. The UniFi Network application should now be accessible at the computer’s configured local or public IP address, by typing that IP address in a browser’s navigation bar (Chrome is recommended). If it is not launching, use the following command: sudo service unifi start.

Other helpful commands are:

  • To stop the UniFi service: sudo service unifi stop
  • To restart the UniFi service: sudo service unifi restart
  • To see the status of UniFi service: sudo service unifi status

warning_25x25.png  We strongly recommend staying with the stable release, but for those users who wish to do otherwise, click here to expand and see possible suite names, as well as code names in the table within.

Log Files Location

Log files will be essential for any troubleshooting you might perform. Find them here:

  • /usr/lib/unifi/logs/server.log
  • /usr/lib/unifi/logs/mongod.log

If your application is running on a Unix/Linux based system, then you will require superuser (sudo) privileges to access these log files.

User Notes & Tips

These notes have been added thanks to user collaboration. Click to expand.

Source :
https://help.ui.com/hc/en-us/articles/220066768-UniFi-Network-Updating-Third-Party-non-Console-UniFi-Network-Applications-Linux-Advanced-

UniFi Network – Updating Third-Party, non-Console UniFi Network Applications

We recommend hosting your Network Application on a UniFi OS Console for the most seamless updating experience. In addition to providing the ability to toggle automatic Network Application updates, you can also initiate manual updates through the GUI.

Updating the Network Application

Updating your Network Application is very similar to the initial setup. You can download the latest version here

You will be required to close any running instances of the Network Application prior to the installation. Do not worry, your network will still continue to function as normal (devices will remain connected with internet access, and traffic will continue to be routed). 

After executing the file, the setup wizard will guide you through the process of updating your application. We always recommend downloading a backup file, found in your System Settings.

Note: macOS users may be required to move the downloaded file into the Applications folder, or right-click > open the file in order to begin the installation.

(Advanced) Updating via CLI on Linux-hosted Applications

It is also possible to use APT for managing updates on Debian and Ubuntu based installations. You may refer to this article for more details. This should only be attempted by users with appropriate knowledge of Linux.

Source :
https://help.ui.com/hc/en-us/articles/6330410381335-UniFi-Network-Updating-Third-Party-non-Console-UniFi-Network-Applications

UniFi Network – Self-Hosting your UniFi Network Without a Console (Advanced)

We strongly recommend that users opt for a UniFi OS Console instead of self-hosting the Network Application on third-party operating systems. 

Self-hosting the UniFi Network application on a home computer or 3rd party virtual machine (VM) requires extensive knowledge of computer engineering, networking, and security. Invalid host specifications or configurations may lead to system crashes, poor performance, and compromised network security.

A UniFi OS Console, on the other hand, takes all the guessing out of the picture as it is already optimized for running all of our UniFi Applications. It is also a significantly more secure solution for remote access, as this is hosted on your physical premises, as opposed to a third-party virtual machine in the cloud.

Note: Although a UI SSO account is required for remote access, it is possible to setup and use UniFi OS Consoles as local-only devices without the need for an SSO account.

For advanced users hoping for a scalable cloud-hosting approach, we also offer our own UniFi OS Cloud Console.

Configuration of third-party hosts is outside of Ubiquiti’s official support scope. If you still wish to self-host the UniFi Network Application, please be aware of the risks and proceed with caution.

Download and install the UniFi Network Application

The UniFi Network Application may be downloaded for Microsoft Windows, macOS, and Linux from this page. The Network application is provided as a simple installer for Microsoft Windows and macOS hosts.

For Linux, a .deb file is provided. This can be installed using the dpkg command on Debian or Ubuntu.

After installing the UniFi Network Application, you may launch it and follow the instructions to complete setup. You can access the configuration page by typing https://<IP_of_Network_Application_host>:8443 into the navigation bar of a browser while the application is running.

Frequently Asked Questions

What are the UniFi Network application system requirements?
At a bare-minimum, we recommend the following system requirements (make sure to read the Release Notes for more details about a particular version):

  • Operating system:
    • Linux: Ubuntu Desktop / Server 16.04; Debian 9 “Stretch”
    • Windows: Windows 10; Windows Server 2016
    • macOS: Mavericks 10.9, 10.10 Yosemite, 10.11 El Capitan, 10.12 Sierra, 10.13 High Sierra, 10.14 Mojave, 10.15 Catalina.
  • CPU: x86-64 Processor (Intel / AMD x64 Processors)
  • RAM: 2GB
  • Network: 100Mbps Wired Ethernet
  • HDD: Minimum 10GB free (20GB or more preferred)
  • Java: Java Runtime Environment (JRE) 8
  • Web Browser: Google Chrome
  • MongoDB: version 3.2 or later. Mongo is offered bundled: default is 2.4.14 (for macOS and Windows only).

Note: You will need to continually increase your system specs as you begin to adopt and manage more devices.

Does the UniFi Network application have to run at all times?
Although this is not required, we strongly recommend running the UniFi Network Application at all times. This enables you to configure your system at all times. It is also a requirement for proper statistics and reporting. 

I’m getting a Java-related error during setup, what do I do?
The UniFi Network application requires Java, so you’ll need to install Java 8 for your specific platform before re-running the installer.

The install is not finishing successfully, what could it be?
Make sure that all system requirements above are met and that all ports used by UniFi are opened. 

I’m getting a “Your connection is not private” security warning when accessing the UniFi Network Application in my browser, should I be concerned?
No, there is nothing to worry about. Simply proceed to the next page by clicking Advanced > Proceed.

Source :
https://help.ui.com/hc/en-us/articles/360012282453-UniFi-Network-Self-Hosting-your-UniFi-Network-Without-a-Console-Advanced-