How to Make a Zip File on Mac

Managing lots of files at once can be difficult, especially when dealing with large ones. When struggling with the problem of moving lots of documents and files, an excellent solution is to create a zip file that compresses the files down to a more manageable size.

The good news is that macOS has a built-in tool for creating and unzipping zip files called Archive Utility. The bad news, however, is that it often receives quite a few complaints about things such as its disappointing compression ratio and limited feature set.

In this article, we’re going to tell you about one of the best archive utilities Mac users can use to get the very best results. Keep on reading to learn more!

Mac’s Built-in Archiver Utility

Archive Utility, the built-in archiver utility that comes pre-installed on macOS, can handle zip files, but when it comes to files in other formats or particularly big files, it may not be the best choice. Below are some of its drawbacks.
How to make a zip file on Mac

1. Only one supported format

There are some very common archive formats that Archive Utility simply can’t handle, including the very popular rar format.

2. Disappointing compression ratio

While it does reduce file size, Archive Utility doesn’t have as great of a space-saving impact on disk space as other archiving apps.

3. Limited key features

Archive Utility is missing key features such as archiving, encryption, and volume compression. This is because Apple has not significantly updated Archive Utility in the time since these types of features have become standard.

Unarchiver One Mac is the best free archiving tool for Mac. In seconds, it can archive and unarchive tons of file formats including RAR, Zip, 7z, gzip, bzip2, and lots more.

Unarchiver One can save you huge amounts of disk space by compressing large files into much smaller sizes. And unlike Archive Utility, it also supports encryption and volume compression.

1. How to set up Unarchiver One as the default unarchiving tool

Setting up Unarchiver One as your default unarchiving tool couldn’t be easier. To do so, follow the simple steps below.

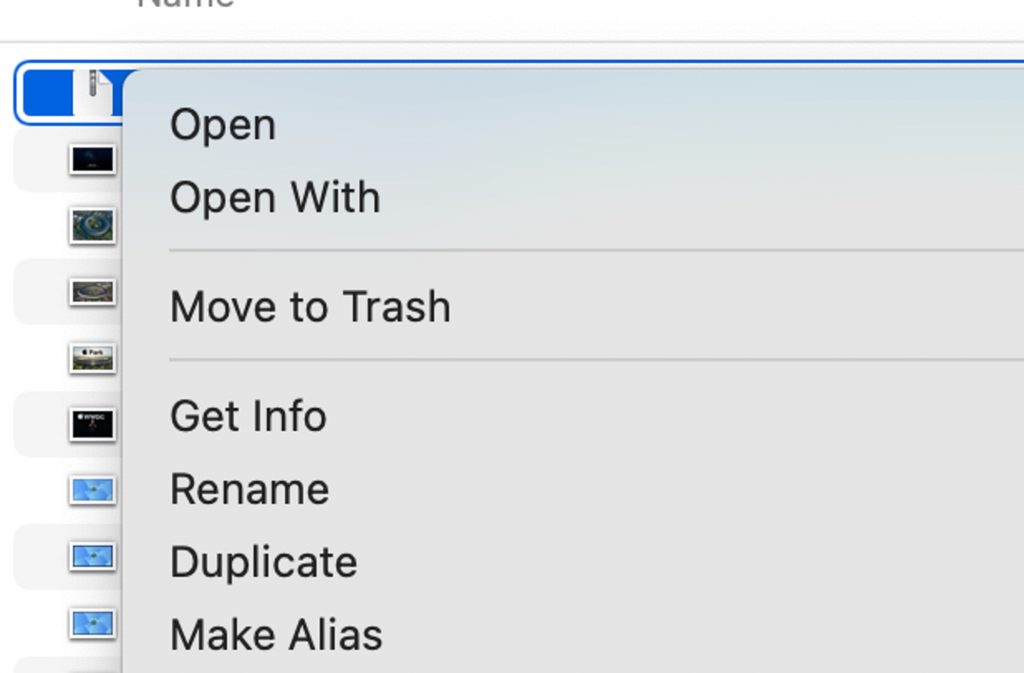
(1) Right-click on any compressed file and select ‘Get Info’.
How to make a zip file on Mac

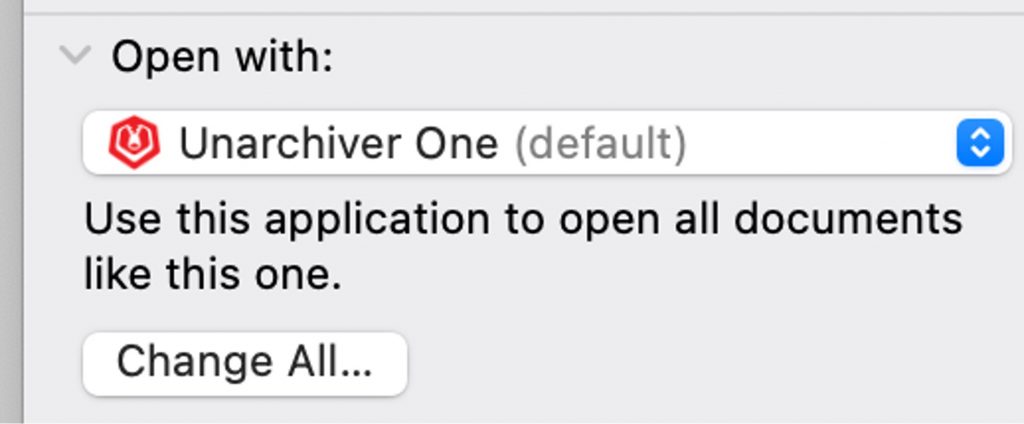
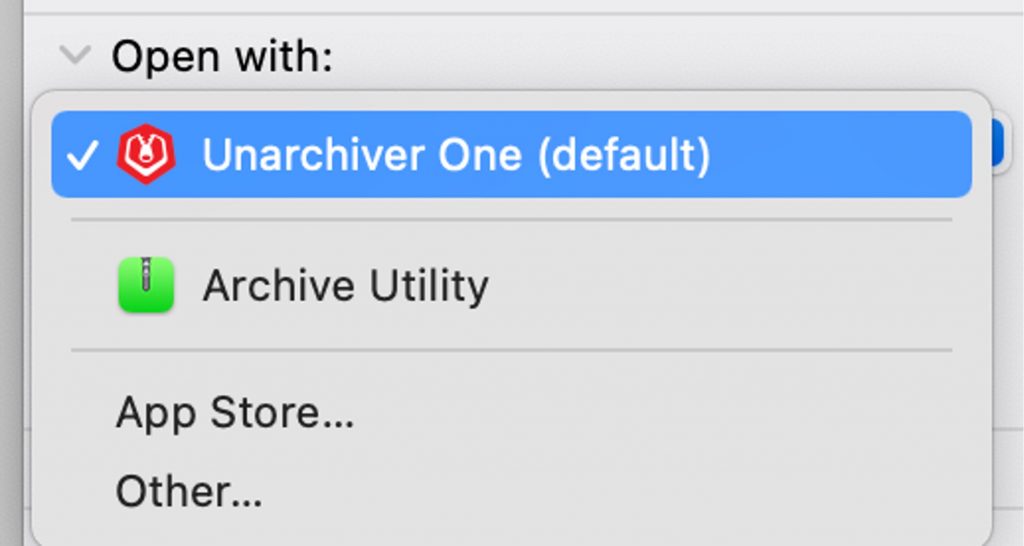
(2) Choose Unarchiver One as your default unarchiving tool.
How to make a zip file on Mac

(3) Click ‘Change All’.

How to make a zip file on Mac

2. How to unzip files on Mac

After setting Unarchiver One as your default unarchiving tool, you can open compressed files by simply double-clicking on them. However, there are also other ways to unzip files with Unarchiver One easily:

(1) Right-click on the compressed file.
Unarchiver One will quickly extract files to the current folder by just right-clicking on the compressed file and choosing ‘Open With > Unarchiver One’.

How to make a zip file on Mac_20220413_5

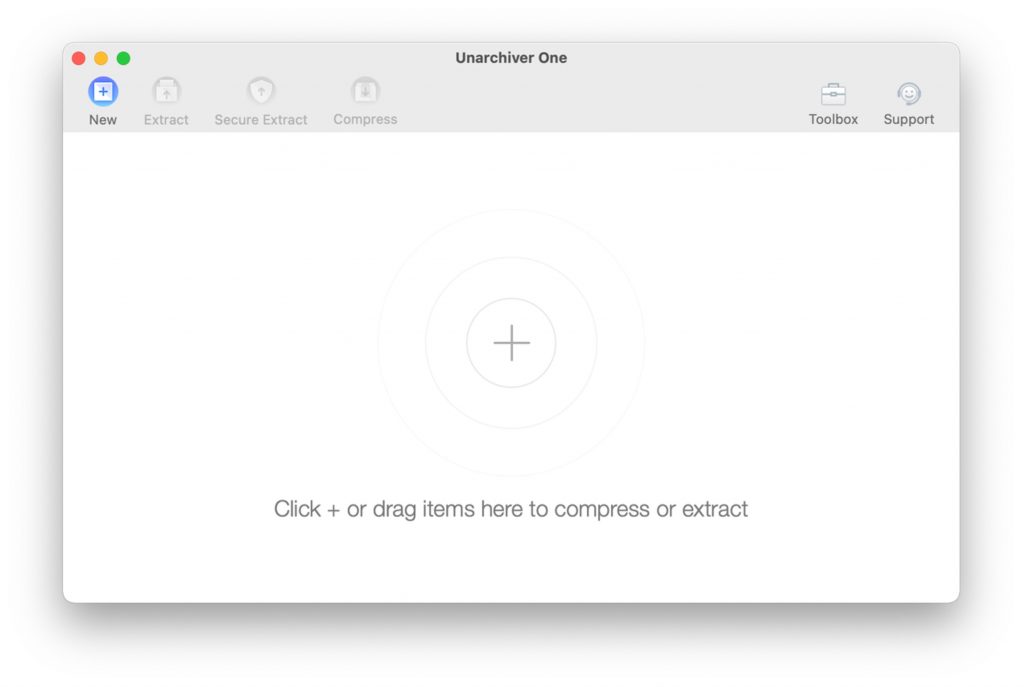
(2) Drag and drop archive files to Unarchiver One’s console.
Effortlessly drag and drop archive files to Unarchiver One’s console to easily browse and securely extract their contents with just one click.
How to make a zip file on Mac

3. How to make a zip file on Mac

There are two main ways to make a zip file with Unarchiver One.

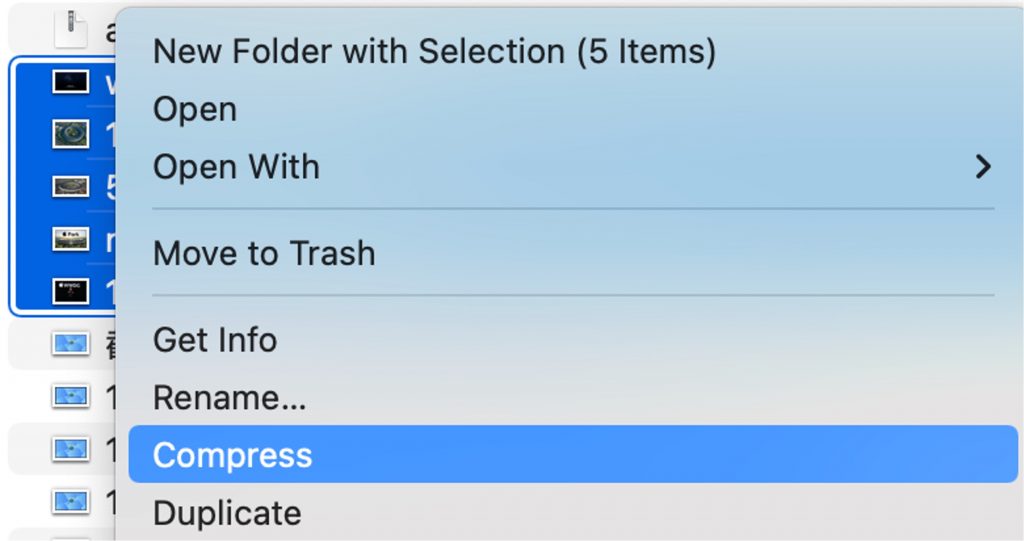
(1) Right-click on the files you want to compress.

  • First, follow the steps above and set up Unarchiver One as your default unarchiving tool.
  • Then choose all the files you want to compress and right-click on them.
  • After clicking on ‘Compress’ you’ll find that the archive file is instantly stored in the current folder!
How to make a zip file on Mac_20220413_6

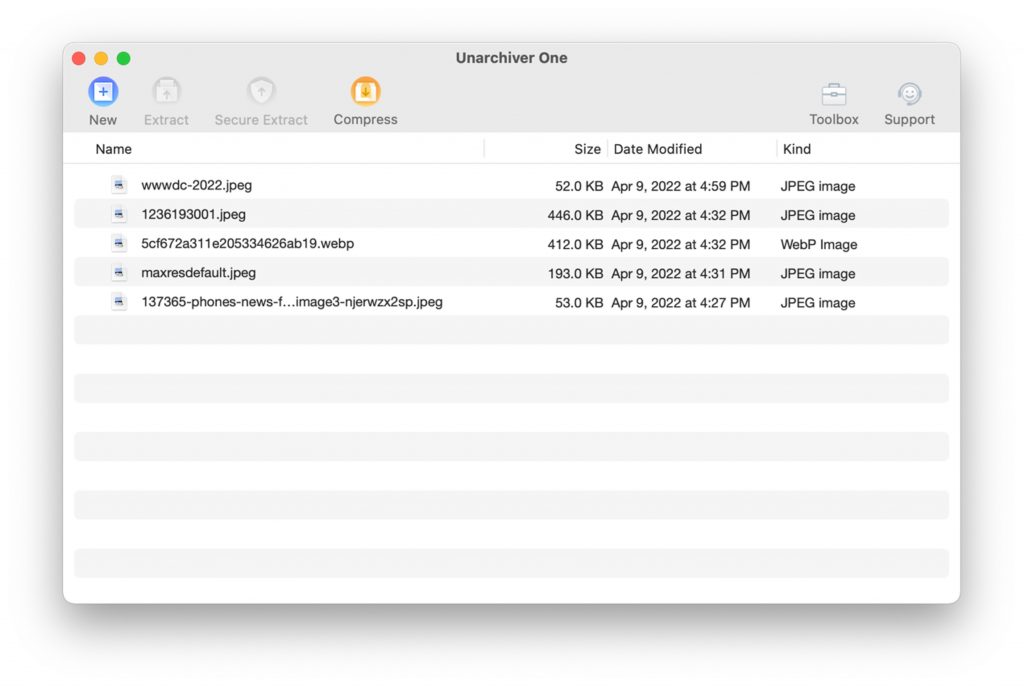
(2) Drag and drop all the files to Unarchiver One’s console.

  • Choose all the files you want to compress and drag and drop them into Unarchiver One’s console. Click on ‘Compress’.
How to make a zip file on Mac
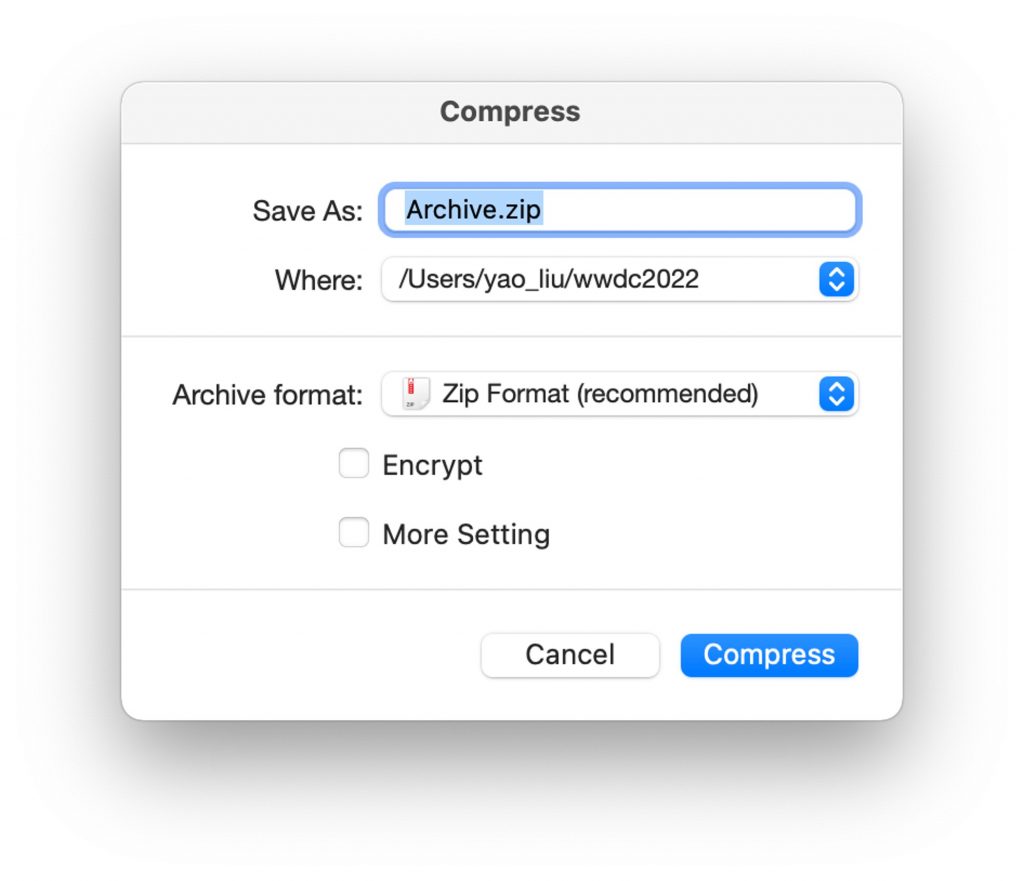
  • Choose where you want to save the compressed file and the specific archive format. In this step, you can also encrypt the file if required.
How to make a zip file on Mac

Source :
https://news.trendmicro.com/2022/04/14/how-to-make-a-zip-file-on-mac/
The Top 10 Most Popular Streaming App

Even though streaming video on demand has been around since well before the pandemic, it sure did skyrocket in use worldwide when the majority of people were stuck at home self-isolating. Streaming apps helped us survive being isolated from the outside world and restricted from doing the normal stuff that we do day-to-day.

There are lots of streaming apps out there, but during our ranking of the top ten apps, here’s what we were looking for most:

  1. Price — How much you’ll need to shell out to watch.
  2. Amount of content — Is there tons of selection and variety of content to binge-watch?
  3. Content quality — Are you going to get the best movies and TV shows or are you going to suffer from boredom?
  4. Unique content — Can you watch originals and one-of-a-kind show that others can’t provide?
  5. Content update frequency — After being a couch potato for a month, do you get any new content, or have they already shown everything they’ve got?

With that being said, let’s proceed with our list of top streaming apps!

  • Netflix
    • More than 200 million subscribers.
    • Worldwide service.
    • Has a wide range of content.
    • Best original content.
    • Between $9.99 and $19.99 for a monthly subscription.
    • Up to 4 simultaneous streams.
  • Disney+
    • 130 million subscribers.
    • Available in North and South America, North and Western Europe, and Asia-Pacific.
    • Full of shows that are safe for kids, heart-warming and nostalgic content.
    • Has great original content from Marvel.
    • $7.99 for a monthly subscription (an additional fee for movie content is required).
    • Up to 4 simultaneous streams.
  • Hulu & Hulu+ Live TV
    • Around 45 million subscribers.
    • Available in the United States.
    • Provides shows that have been previously aired.
    • Access to different live channels (Hulu+ Live TV).
    • Has original content.
    • Either $6.99 or $12.99 for a monthly subscription (Hulu).
    • Either $66.99 or 75.99 for a monthly subscription (Hulu + Live TV).
    • Up to 2 simultaneous streams.
  • HBO Max
    • More than 70 million subscribers.
    • Available in the US, Latin America, and Central and Eastern Europe.
    • Over 2,000 titles to choose from.
    • Has some very popular originals.
    • Either $9.99 or $14.99 for a monthly subscription.
    • Up to 3 simultaneous streams.
  • Peacock
    • 24 million subscribers.
    • Available in Austria, Germany, Ireland, Italy, the UK, and the US.
    • Provides classic TV shows and movies.
    • Available for free or premium ($4.99 for a monthly subscription).
    • Up to 3 simultaneous streams.
  • Paramount+
    • 32 million subscribers.
    • Available in Australia, Canada, Central America, South America, Northern Europe, and the Middle East.
    • Content from MTV, Comedy Central, Paramount, and CBS.
    • Either $4.99 or $9.99 for a monthly subscription (with or without commercial plans).
    • Up to 3 simultaneous streams.
  • Amazon Prime Video
    • 175 million subscribers.
    • Available worldwide.
    • Around 12,000 titles to choose from.
    • Either $8.99 or $14.99 for a monthly subscription.
    • Up to 3 simultaneous streams.
  • Discovery+
    • 22 million subscribers.
    • Available in the US, Brazil, Canada, Japan, the UK, Spain, the Philippines, and more.
    • Content from different TV channels.
    • Around 1,500 different titles.
    • Either $4.99 or $6.99 for a monthly subscription (ad-free for the higher price).
    • Up to 4 simultaneous streams.
  • Apple TV+
    • 20 million subscribers.
    • Available worldwide.
    • Only shows original content.
    • $4.99 for a monthly subscription.
    • Up to 6 simultaneous streams.
  • iQIYI
    • 103 million subscribers.
    • Available worldwide.
    • iQIYI originals and other licensed content from vendors.
    • Either $0.99 or $6.99 for a monthly subscription (upgrade to VIP for more content).
    • Up to 2 or 4 simultaneous streams (depending on the plan).

Aside from the ones listed above, here are some other available streaming apps.

  • iFlix
    • 25 million subscribers.
    • Available in Asia.
  • YouTube Premium
    • 50 million subscribers.
    • Available in 101 countries.
  • ESPN+
    • 21 million subscribers.
    • Available in the United States.
  • Rakuten TV
  • Viki
  • Crunchyroll
  • WeTV

There are lots of new and emerging apps out there, but we need to be wary about the apps we install on our devices, specifically on our mobile phones (especially Android devices). If you accidentally download a malicious app, it could steal your private information or even hijack your phone. Read more about this potential danger here.

With that being said, it’s a great idea to download Trend Micro Mobile Security so that you can verify that the apps you use are 100% safe. Trend Micro Mobile Security also safeguards against fraudulent sites, identity theft, and features performance-boosting tools.

Once your device is protected, you can easily find a comfortable area to relax in and start binge-watching your favorite shows and movies using your chosen streaming service!

Source :
https://news.trendmicro.com/2022/04/27/popular-streaming-apps-netflix-disney-plus-hbo-max-youtube/

How to Completely Uninstall Apps on Mac

Most people don’t realize it, but when you uninstall apps on Mac, they almost always leave behind what is commonly referred to as “leftovers”. These leftovers are files that were required by the app or program to function when it was installed, but now it’s been removed, they are merely taking up valuable storage space on your Mac. Over time, as you use your Mac and install and uninstall various apps, these leftovers can really begin to pile up — eventually significantly slowing down your Mac.

Fortunately, there are several ways that you can remove these leftovers during the uninstallation process, and in this article, we will show you three of them. They vary slightly in complexity, but if you’re looking for the absolute easiest way possible, you’ll want to skip to number 2!

1. Uninstall programs using Finder


This method is one that most people are completely comfortable using, but with a slight twist.

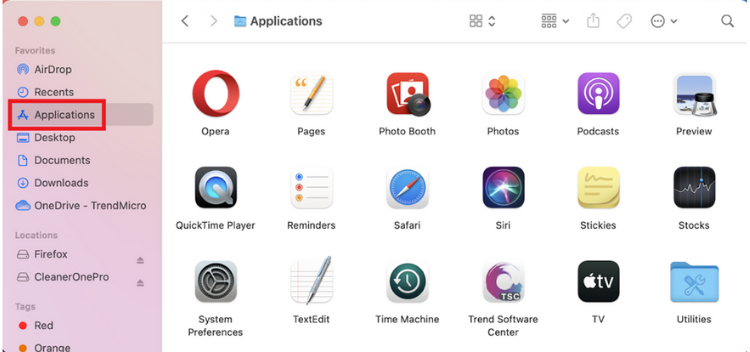
1. Open Finder and select Applications.

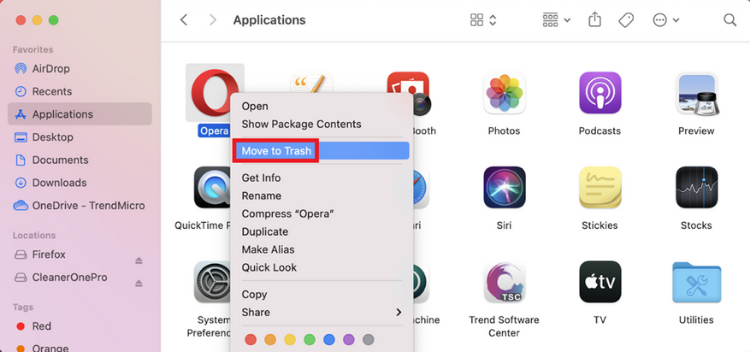
2. Locate the app you want to delete and right-click on it. Select Move to Trash.

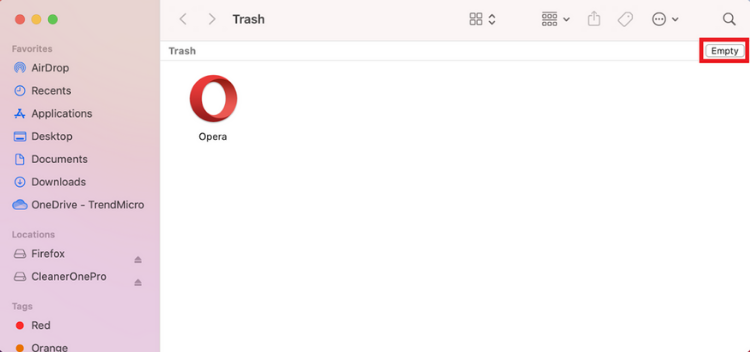
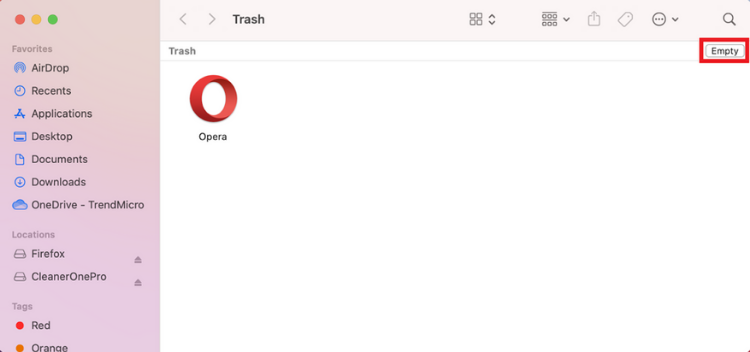
3. Open Trash by clicking on its icon on the Dock. Select Empty.

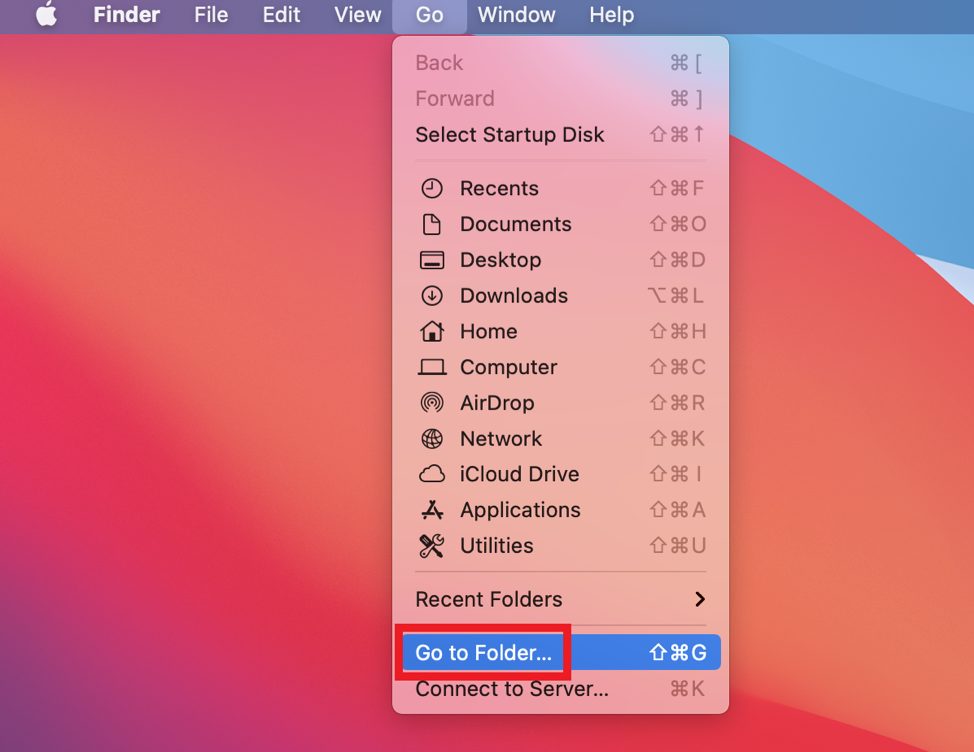
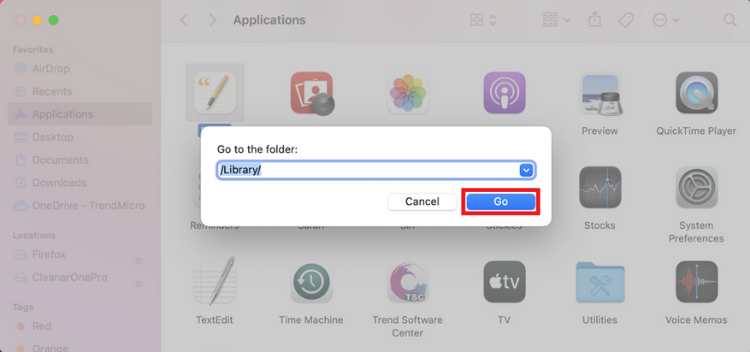
4. Now here’s how to delete the leftovers. In Finder, select Go > Go to Folder.

5. Type “/Library/” in the search box and select Go.

6. Type the removed app’s name into the search box. Right-click on any of its associated files and select Move to Trash. After you’ve removed all the leftover files, empty the Trash folder once again.

2. Automatically remove apps using Cleaner One Pro (the easy way!)


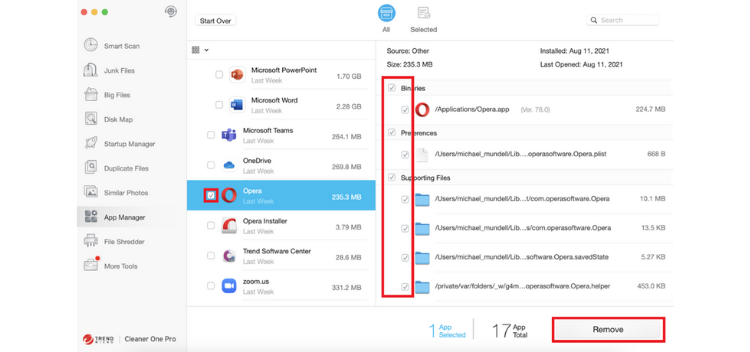
One of the great features of Cleaner One Pro is its ability to completely remove apps, including any leftovers, with the click of a button. It really couldn’t be any easier!

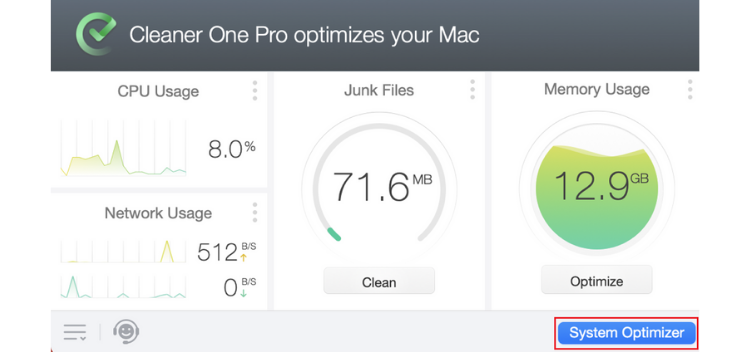
1. Open Cleaner One Pro and select System Optimizer.

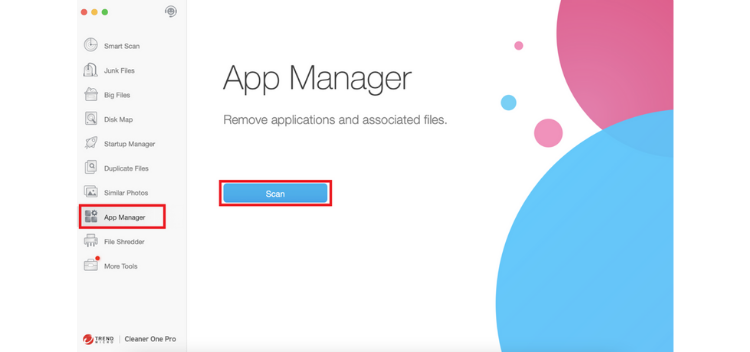
2. Select App Manager > Scan.

3. Hit the checkbox to the left of the app you wish to completely remove. Verify that all the checkboxes next to the app’s associated files are selected and click on Remove.

Compared to the other options that are available for completely removing apps (like the two mentioned in this article), there is no more straightforward method than using Cleaner One Pro . To read more about Cleaner One Pro and all its other excellent features, click here.

3. Delete apps using Terminal


For most people, this method will be overly technical and come with too much risk, but it does work.

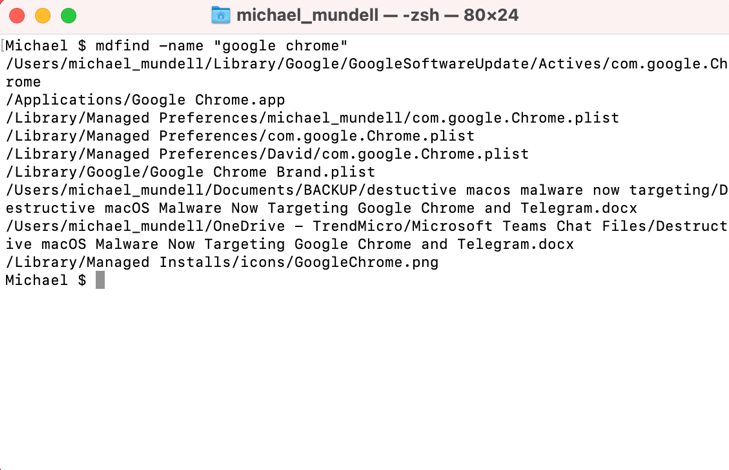
1. Open Terminal and type mdfind -name “application name” and press Enter. For example, if you wanted to remove Google Chrome, you would type mdfind -name “google chrome”.

2. This will return all files associated with the name of the app, but it doesn’t mean you should delete them all. If you are using this method of uninstallation, you should have a pretty good idea of what you’re looking for, but in general, you should be searching for .app files, .plist files, settings and preferences, caches, and other accessory files.

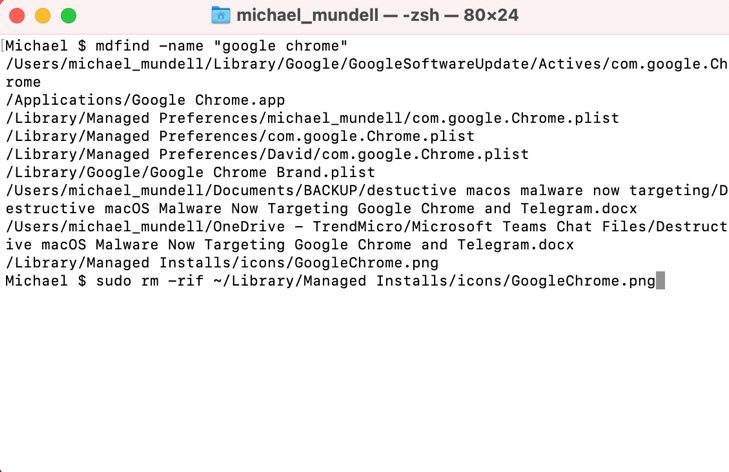
3. Once you have located the files you wish to remove, you can do so using the rm command by typing “sudo rm -rif ~” + the directory and file name. For example, “sudo rm -rif ~/Library/Managed Installs/icons/GoogleChrome.png”. Please note, the rn command is irreversible, so please exercise caution.

Consistency is key


Whichever method you opt to use, you’ll be doing your Mac a big favor in the long run. By removing all the associated files every time you remove an app, your Mac isn’t going to eventually get bogged down by them. Trust us, after your Mac is still running super quick in years to come, you’ll be glad you took our advice!

Source :
https://news.trendmicro.com/2021/09/03/how-to-completely-uninstall-apps-on-mac/
How to Clear Browsing History on Safari on iPhone & Mac

Your browsing history is a vital piece of information that can define your personality, your drives, and your likes and dislikes. That’s why third parties love to collect this information for targeted advertising and, sometimes, malicious activities.

To prevent others from collecting your browsing history, make it a habit to delete it now and then. Here’s some simple steps on how to delete browsing history on your Safari browser.

For Mac

1. Open your Safari App and click History on the top menu options.
2. Click Clear History. A pop-up menu will appear and you can choose how far back you want to clear your browsing history.

How to Clear Browsing History on Safari on iPhone and Mac_1110_

You can also clear specific safari browsing history:

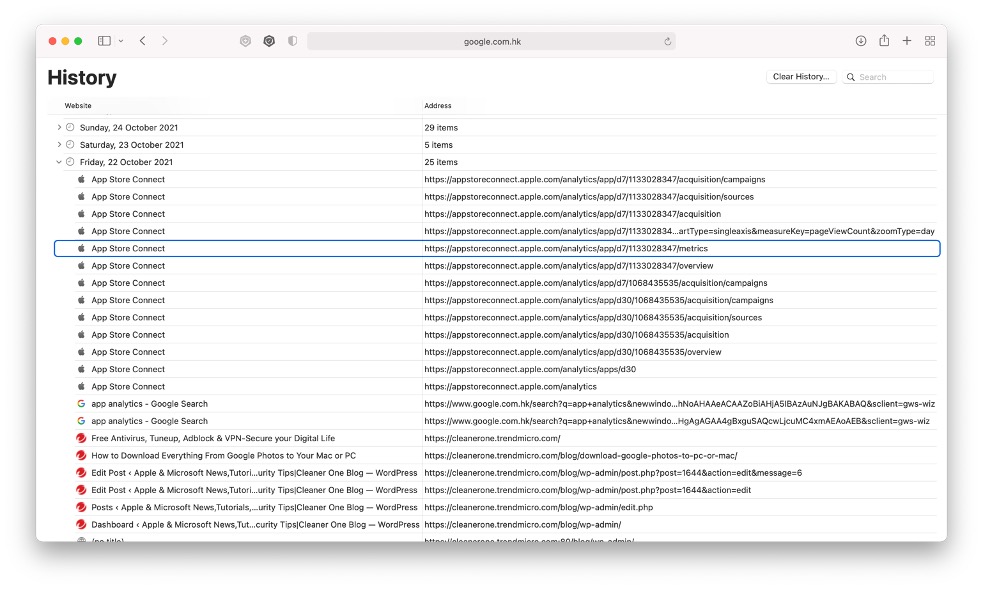
  • In Safari, press Command-Yor select History > Show All History.
  • From the long list, click once on a history item to select it.
  • Right-click to bring up a menu, then choose Delete.
How to Clear Browsing History on Safari on iPhone and Mac_1110_

Manually clearing search and browsing history from your safari can be tedious. However, there is also an automatic solution you can try: Antivirus One , from Trend Micro.

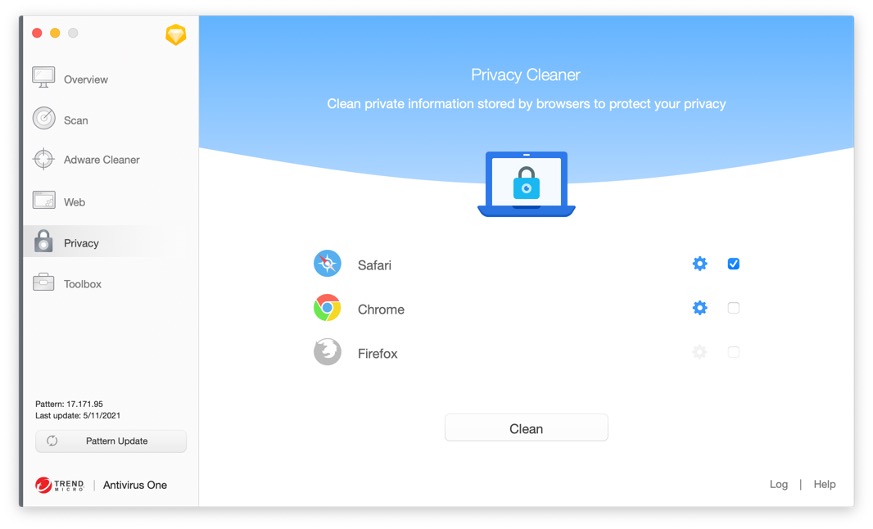
The privacy cleaner feature in Antivirus One can help you clean sensitive browsing information to protect your privacy. Here, you can select Safari and then click the “Clean” button to remove all browsing info in a few seconds.

How to Clear Browsing History on Safari on iPhone and Mac_1110_

For iPhone

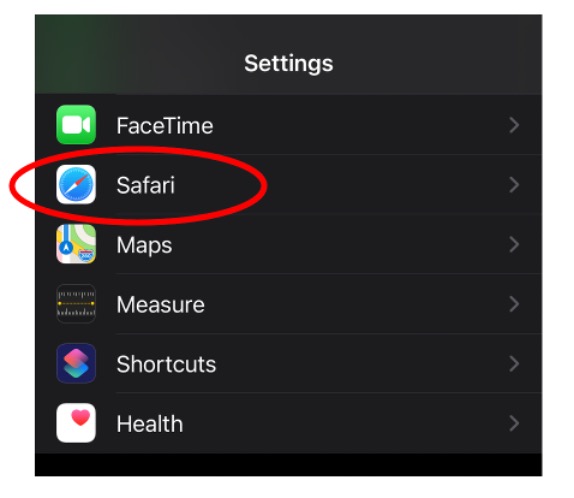
1. Go to Settings and click Safari.

How to Clear Browsing History on Safari on iPhone and Mac_1110_

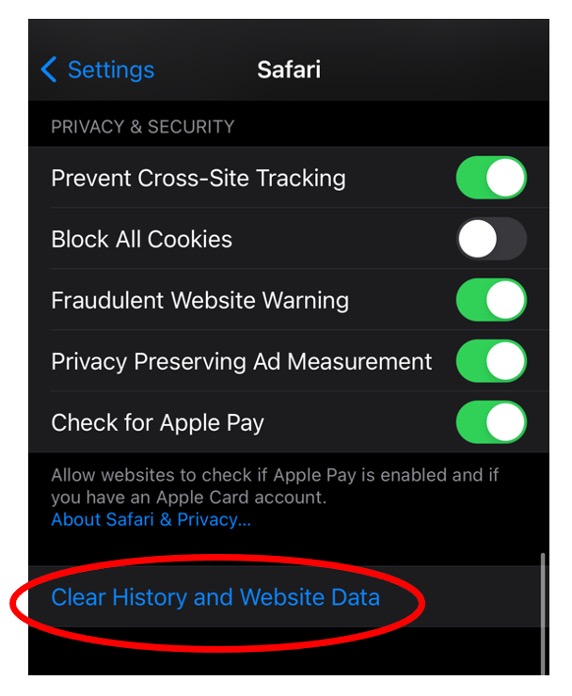
2. Tap “Clear History and Website Data”.

How to Clear Browsing History on Safari on iPhone and Mac_1110_

This will remove history, cookies, and browsing data from Safari.

How to Clear Browsing History on Safari on iPhone and Mac_1110_

If this article has been of use and/or interest to you, please do SHARE with friends and family — and remember to give Antivirus One a go.Get Antivirus One

Source :
https://news.trendmicro.com/2021/11/10/how-to-clear-browsing-history-on-safari-on-iphone-mac/

How to Remove Bing on Chrome, Firefox, and Edge

Users have been complaining that the search engine, Bing, loads as the default instead of Google. Annoying, but don’t fret! We’ve put together a simple guide on how to get rid of Bing and restore your preferred search engine.

On Google Chrome

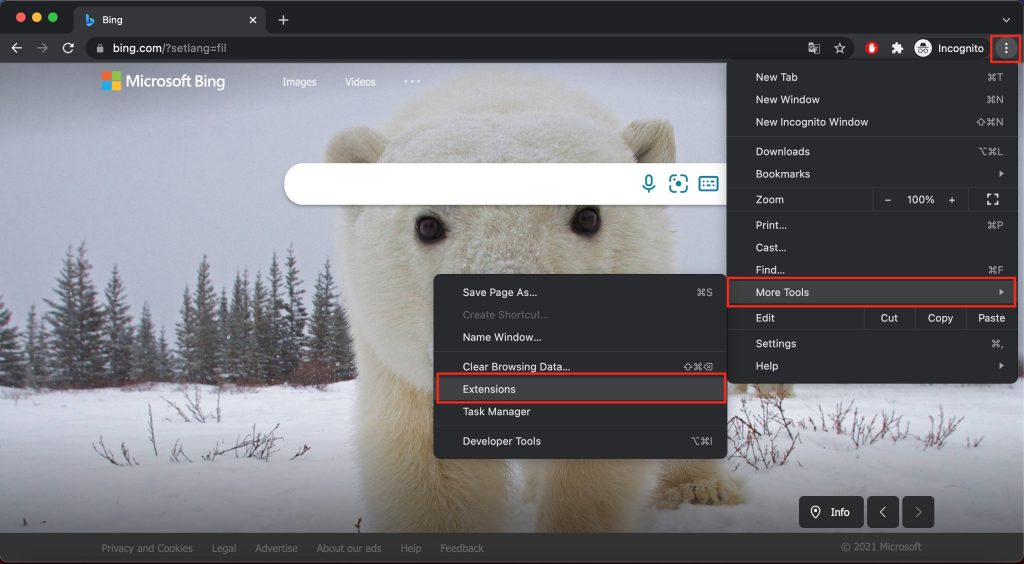
1. Open Google Chrome and click the 3-dots menu.
2. Select More Tools, then choose Extensions.

3. Remove any Bing Extensions you see.
4. Go back to the Menu, then select Settings.

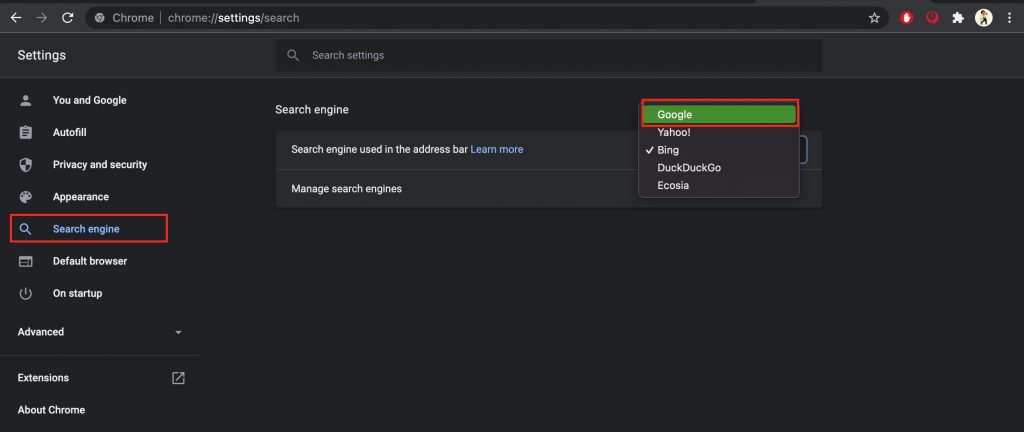
5. Look for Search Engine and click it.

6. On the right side, choose your preferred Search Engine (Google, Yahoo, DuckDuckGo or Ecosia).
7. Restart Google Chrome.  If it still uses Bing as your search engine, we suggest resetting or reinstalling Chrome.

On Mozilla Firefox

1. Open Mozilla Firefox and click the hamburger menu (3 horizontal lines).
2. Select Add-ons and themes.

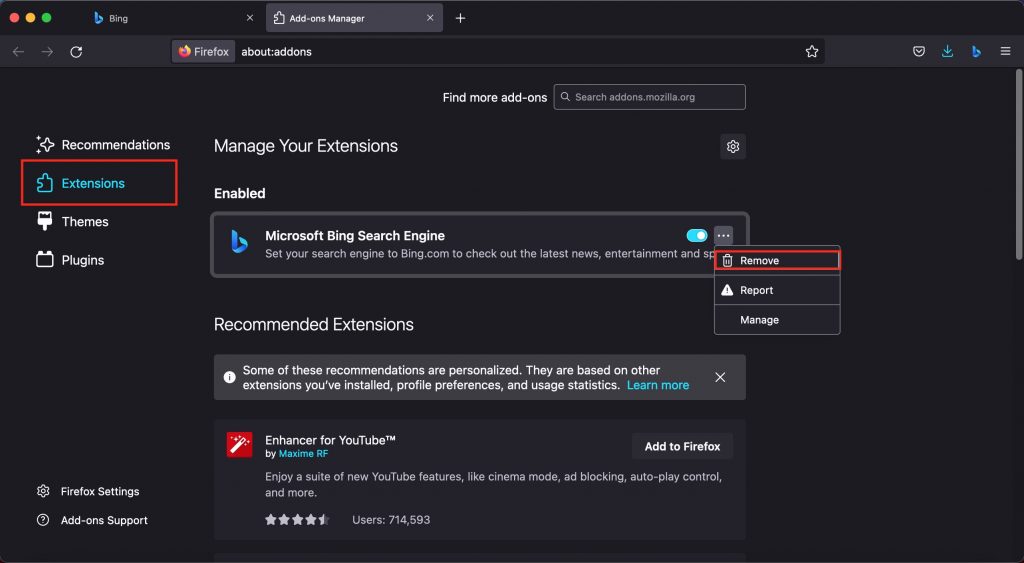
3. Choose Extensions on the left side, then remove any Bing extensions you see.

4. Go back to the Menu, then select Settings.
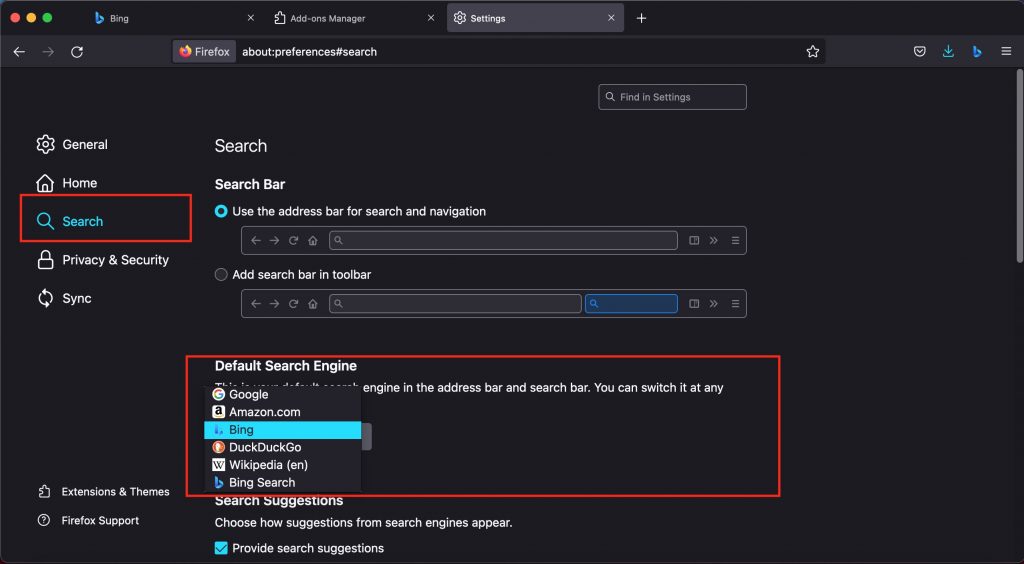
5. On the left side, click Search and look for the Default Search Engine section on the right side.

6. Choose your preferred Search Engine (Google, Amazon.com, DuckDuckGo or Wikipedia).
7. Restart Firefox. If it still uses Bing as your search engine, we suggest resetting or reinstalling Firefox.

On Microsoft Edge

1. Open Microsoft Edge.
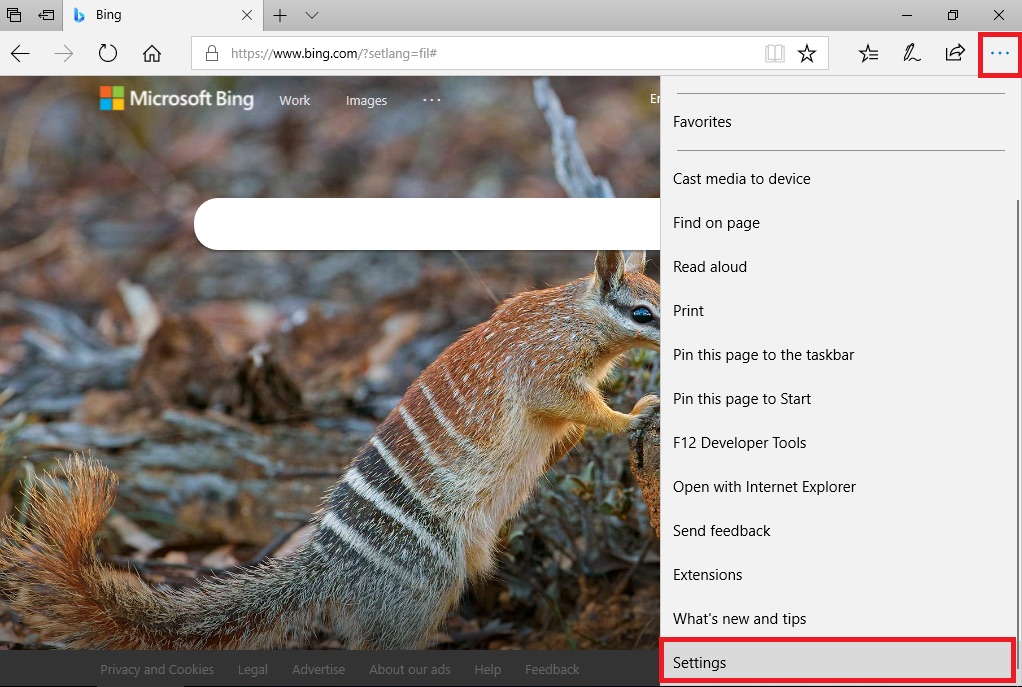
2. Click the 3-dots menu on the upper right corner, then select Settings.

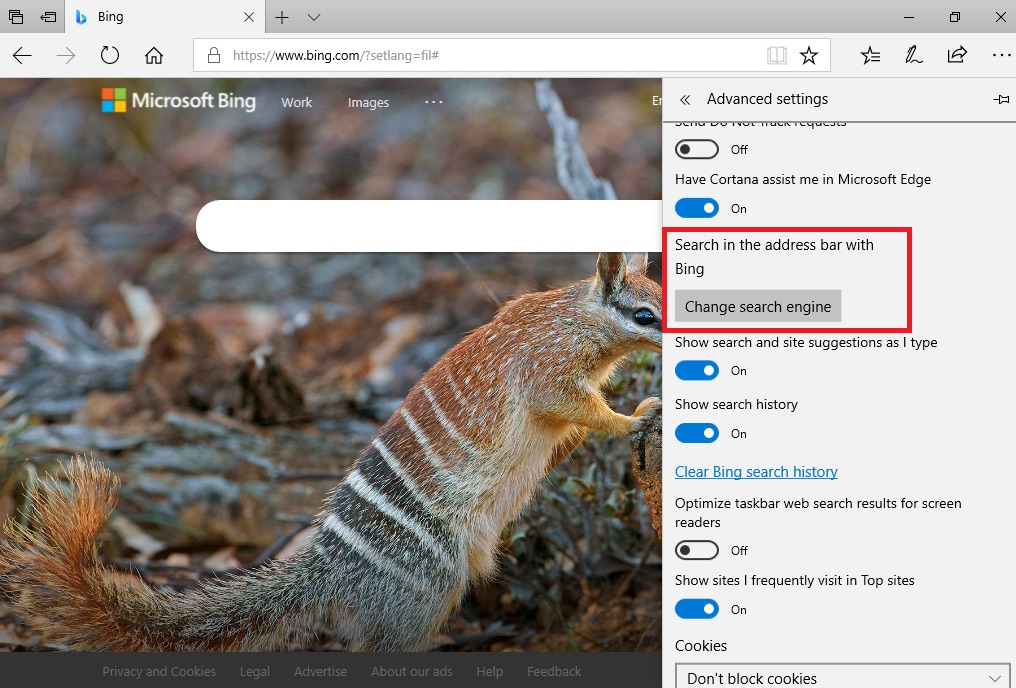
3. Select View Advance Settings and click the Change search engine button.

4. Choose your preferred Search Engine then click the Set as default button.

We hope this short guide has helped you get things back to normal! If you’ve found it a useful article, please do SHARE with friends and family.

Source :
https://news.trendmicro.com/2021/11/17/how-to-remove-bing-on-chrome-firefox-and-edge/

Top 10 Most Used Search Engines & Tips for Browsing

In the modern world, searching for information is simple. There’s no need to go from one library to another, flipping through numerous pages, or checking the table of contents before you get to what you’re looking for. Simply typing words on the internet will give you limitless results — all you need to do is narrow them down.

What is a Search Engine?

If you need to find something, like a website or page that contains your needed information, you’ll need to go and visit a search engine page to query keywords.

A search engine is a program or application that checks, hunts, and searches the web for sites based on keywords. It uses these keywords and returns pages that are connected to what you have typed.

Search engines use web crawlers or web spiders to catalog the World Wide Web. These crawling bots are used for indexing contents. They will scan, check, assess and inspect site pages and their information across the web.

Notable Search Engines and Their Brief Histories

Archie — During the 1990s, the very first search engine arrived, named Archie. Its purpose was to search FTP sites to create indexes of files that are downloadable.

Veronica and Jughead — Created around 1992/93, they both searched file names and titles in Gopher index systems.

Infoseek — In 1994, Webmasters would submit and provide a page in real-time with this program.

Yahoo Search — Also created in 1994, it created a collection of favorable web pages with description of each website.

LooksmartExcite and AltaVista — These search engines were created in 1995 and tried to compete with Yahoo.

Backrub — Created around 1996, Google’s initial project, Backrub, was a search engine that utilized backlinks for searches. It ranked pages depending on citations from other sites.

Ask Jeeves — Started in 1996, this search engine used human editors that tried to match search queries.

Google — Officially launched in 1998.

MSN Search — Relied on three different search engines: Looksmart, Overture and Inktomi.

Snap — A somewhat complex search engine, released in 2005, that shows search volumes, revenues and advertisers.

Bing — Rebranded name for MSN/Live Search.

Schema.Org — In 2011, Microsoft, Google and Yahoo collaborated to create Schema.org to create structured internet data.

Top 10 Most Used Search Engines

The following list contains the top ten from across the world:

1. Google:“Just google it” is a ubiquitous expression nowadays. Google is the most popular across all search engines — even more than all others combined. According to statistics, around 78% of desktops and laptops uses Google.

2. Yahoo: In the past, Yahoo had competed with Google. But as the years went on, Yahoo users had declined significantly. Now it is mostly used as a backup search engine in case the dominant one is down.

3. Bing: Microsoft Bing (or just Bing) is owned by Microsoft. Its origin came from MSN Search and Windows Live Search. This search engine is proud of its ‘decision’ engine which provides suggestions on the sides.

4. AOL Search: Known before as American Online Search. This search engine is used mostly by older people accustomed to AOL.

5. Duck Duck Go: Some say that Duck Duck Go is for and by Hipsters. But the main reason users choose this search engine is that it does not track search history and avoids spammy websites.

6. Baidu: This search engine is the 3rd largest out there. Baidu dominates the Chinese market and is the first choice in China. This engine has a sophisticated online censorship system since there’s many restrictions in its operating region.

7. Yandex: If Baidu has China as its market, then Yandex has the Russian market.

8. Ask: Its origin is the older “Ask Jeeves”. Since it could not compete with Google, it’s now powered by Google — if you can’t beat ‘em, join ‘em!

9. Naver: South Korea is another huge tech and communications market with its own search engine, Naver.

10.Seznam: The search engine popular in the Czech Republic and C. Europe.

And some honorable mentions:

  • Ecosia — Donates surplus income to organizations that plant trees.
  • Dogpile — Shows results from the top 3 search engines (Google, Bing and Baidu).
  • Gigablast — An open-source search engine.
  • Qwant — A popular, EU-based search engine.

Tips For Using Search Engines

Search engines are brilliant tools to immediately get the information we want. However, since search engines generally do not have much security capability, you should invest in a security product to provide and efficient browsing.

1. Install the Maximum Security tool bar to prevent you from visiting malicious websites.

You can install the Trend Micro Maximum Security toolbar service, which warns you of security risks relevant to the websites you visit.

When you search online, it monitors and rates websites in search engines such as Google, Bing, Baidu, and Yahoo. The Trend Micro Toolbar provides Page Ratings that show if the page is safesuspiciousdangeroustrusted or untested.

  • A Mac User? No problem. Trend Micro Antivirus for Mac has the same toolbar feature to protect your online activity.

2. Install AdBlock One to stop annoying ads.

In addition, be sure to also use AdBlock One for Safari. This app stops annoying online ads from bothering you and helps load web pages faster — a significant boost in securing and improving your digital life.

Without AdBlock One

With AdBlock One

Get AdBlock OneIt’s free

If you’ve found this article an interesting and/or useful read, please do SHARE with family and friends.

Source :
https://news.trendmicro.com/2021/11/25/top-10-most-used-search-engines-tips-for-browsing/

What Is Other Storage on Mac and How to Clean It

Because it can contain so many different kinds of files, the Other category is a difficult source of clutter to deal with, and frequently causes frustration to Mac users. In this article, we’ll show you the steps to take to clean it up — and get more from your Mac!

What Is Other on Your Mac’s Storage?

The Other category in Mac storage contains files that don’t easily fit into the typical categories of Document, Photo, App, Video, Audio, etc. Other storage on Mac can hold a wide range of files, including system files, temp. files, and cached files. But not all the files in the Other category on Mac are as easy to justify as cached files or archives. “Bloatware” (such as junk files) refers to programs that aren’t useful but take up a lot of space, decreasing performance.

The file types considered Other in Mac storage may include:

  • MacOS system files and folders.
  • Temporary files.
  • Common document and file types (for instance, PDF, DOC, PSD).
  • Archives and disk images (such as ZIP, ISO, DMG).
  • App plugins, add-ons, and extensions.
  • Files from your library (such as Application support, iCloud files, and screensavers).
  • Cached files (user cache, browser cache, and system cache).
  • Files not recognized by a Spotlight search, such as a virtual machine hard drive.

How to Check Other Storage on Your Mac

1. Click the Apple icon in the top-left corner and select About This Mac.

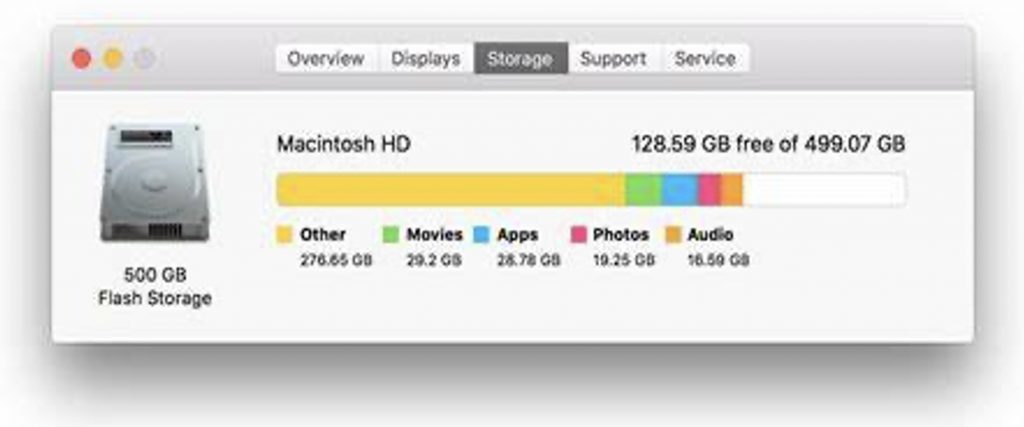
2. Choose the Storage tab. You’ll see a chart showing the types of files that are taking up storage on your Mac. If you’re reaching your limit, it’s time to clear out that Other storage!

How to Find Other Storage Files on Your Mac

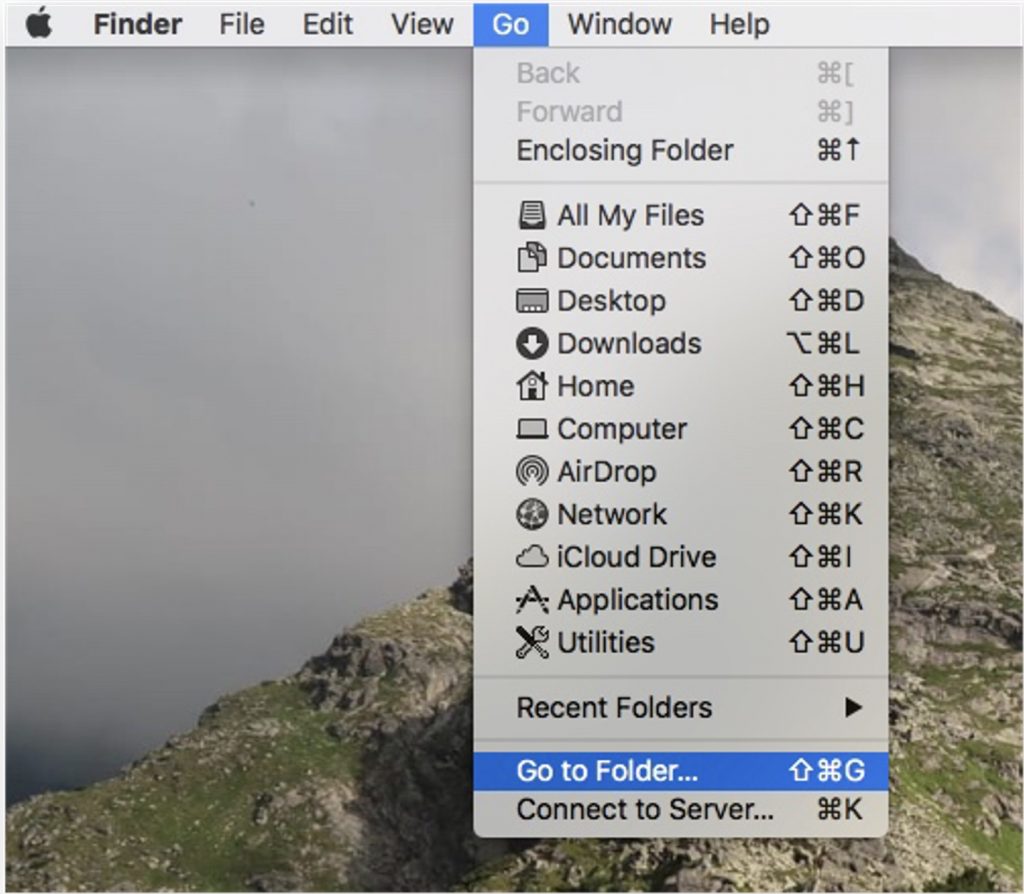
1. Open Finder and click Go in the menu bar.

2. Select Go to Folder.

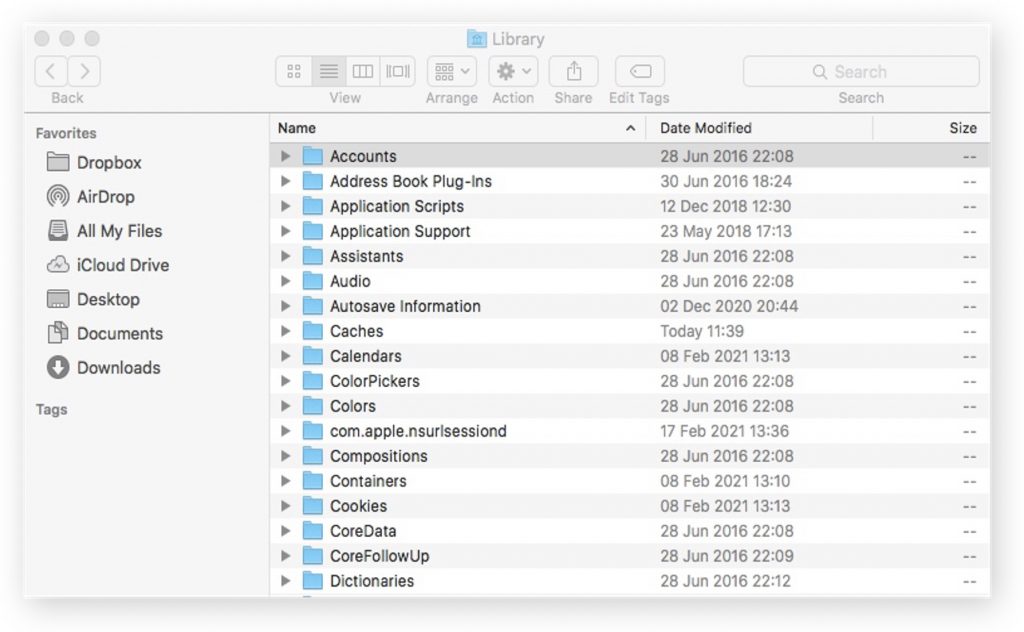
3. Enter ~/Library and press enter (or click Go).

4. The library will appear, which contains all files and folders categorized as Other. What follows is quite a risky and time-consuming process. Be sure to do your research and know your file names — as the wrong deletion can be catastrophic.

The One-Stop Solution: Trend Micro’s Cleaner One Pro

Cleaner One Pro is an easy-to-use, all-in-one disk cleaning and utility optimization app that will help you boost your Mac’s performance. It will take care of the Other problem automatically.

Cleaner One Pro includes several housecleaning tools, including:

  • Memory Optimizer
  • Junk Cleaner
  • File Scanner
  • Duplicate Files Finder
  • App Manager
  • File Shredder
  • Memory Disk map

These functions are all rolled into one easy-to-use interface for maximum efficiency and simplicity. Click the link above or the button at the bottom of this page to get more from your Mac.

How to Delete Other Storage on Your Mac

After successfully opening the window above, you now want to go through these three primary folders:

1. ~/Downloads
2. ~/Library/Caches
3. ~/Documents/Logs

When you’re done going through these folders and deleting as necessary, empty the Trash and restart your Mac. But be careful what you delete — you do not want to jeopardize your device by deleting the wrong file!

Furthermore, while deleting files, remember that the Other label DOES NOT signify junk files. Some files in this category exist for a reason: for example, some cache files are needed in order to make your system work faster, while ZIP archive files can contain important system documents and data. Good luck!

As always, if this article has been of use and/or interest to you, please do SHARE it with family and friends to help keep the online community secure and protected.

Source :
https://news.trendmicro.com/2021/12/27/what-is-other-storage-on-mac-and-how-to-clean-it-2/

How to Transfer Photos From iPhone to Mac

Eventually, if you’re shutter-happy enough, you’ll need to transfer your iPhone’s photos to your Mac to save the precious space on your mobile device. Simply sending a few photos as an email attachment is fine for a small number of photos, but in this article, we share several easier and more convenient ways of exporting your iPhone’s photos to your Mac.

Transfer Photos from iPhone to Mac with a USB Cable

Connecting your device using a Lightning-to-USB cable is the most common way of transferring pictures from an iPhone to a Mac. Below are several ways you can do this using a few different apps.

How to Use Finder to Transfer Photos from iPhone to Mac

Starting with macOS Catalina, there is no iTunes. However, you can easily sync your iPhone with your Mac using Finder. Here’s how to do it:

1. Connect your iPhone to your Mac with a Lightning-to-USB cable.
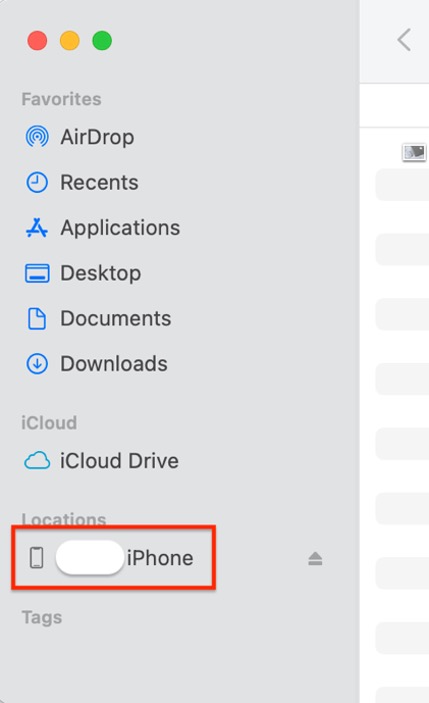
2. Open Finder. Your iPhone should appear in Finder’s sidebar under Locations.

Sync Pictures_20220221_1

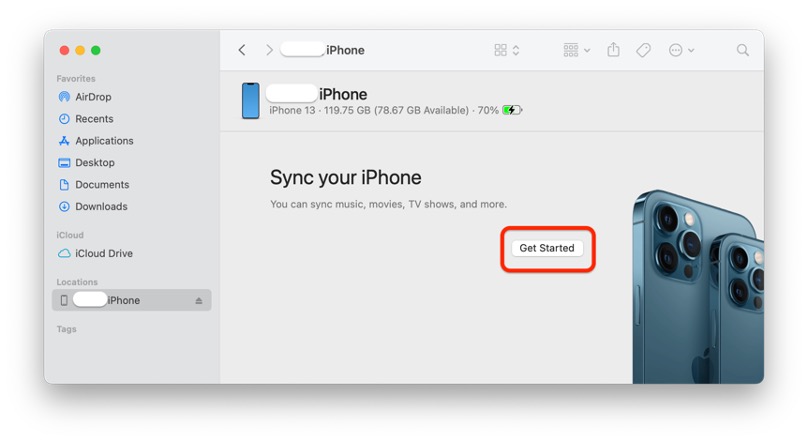
3. In the sidebar, select your iPhone. If prompted, confirm that you trust your iPhone.
4. Click Get Started.

Sync Pictures_20220221_2

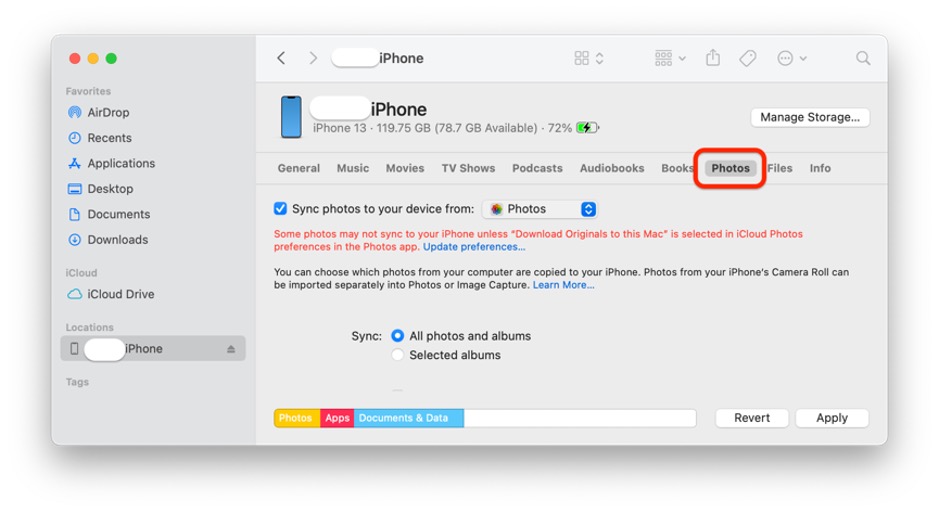
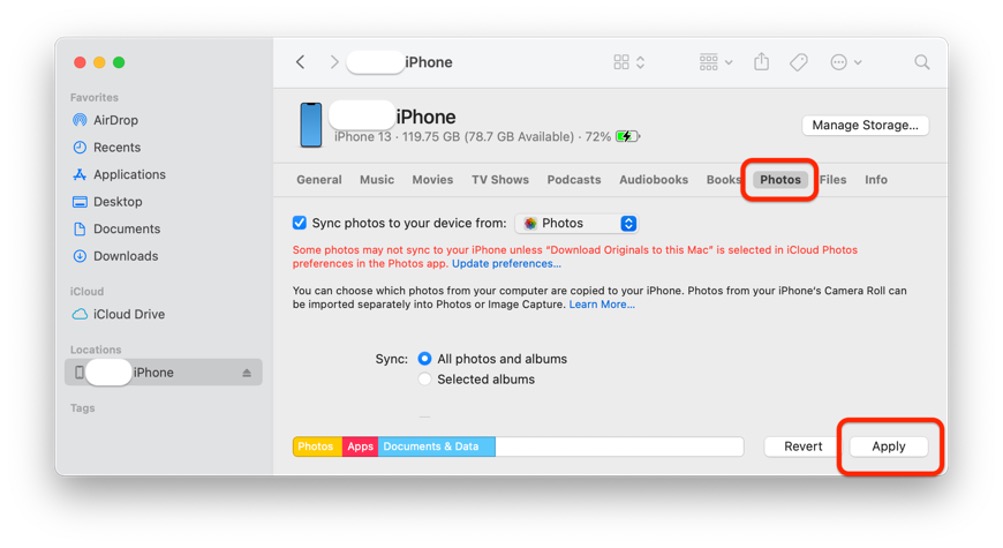
5. At the top of the window, click Photos and then check the Sync photos to your device from: box.

Sync Pictures_20220221_3

6. Use the drop-down menu to choose the folder or app on your iPhone that you want to sync photos from.
7. Use the checkboxes at the bottom of the window to choose whether you want to sync all your photos and albums or only selected albums.
8. Click Apply.

Sync Pictures_20220221_4

How to Use the Photos App to Transfer Photos from iPhone to Mac

Below are instructions on how to transfer photos from iPhone to Mac using the Photos app:

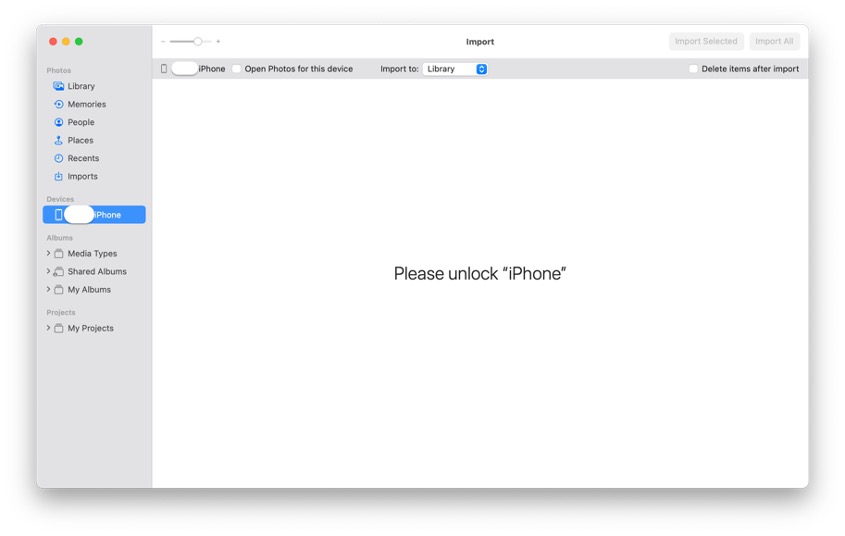
1. Connect your iPhone to Mac using a Lightning-to-USB cable.
2. Once prompted, confirm that you are using a trusted device. You will only need to do this if you haven’t synced your photos using this method before.
3. Open the Photos app on your Mac if it doesn’t automatically open.
4. In the sidebar, select your iPhone.

Sync Pictures_20220221_5

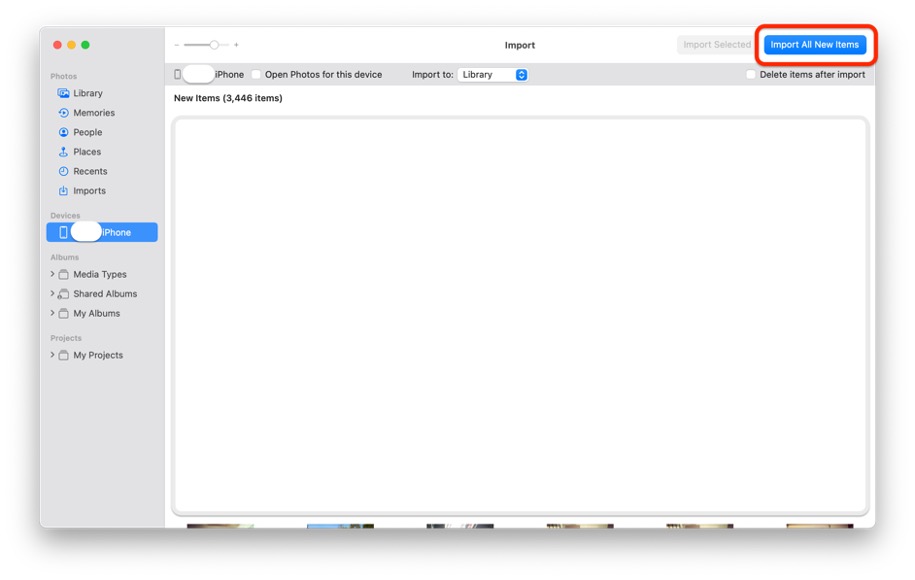
5. In the upper menu of the Photos app, choose Import.
6. Click Import All New Photos, or select the photos you need and click Import Selected.

Sync Pictures_20220221_6

Use Image Capture to Transfer Photos from iPhone to Mac

Another method for transferring photos from your iPhone to your Mac involves using the native Image Capture app. This method lets you quickly and easily download your photos to a folder of your choice.

It is primarily intended for use with digital cameras and scanners, but it can also be used with iPhones with no issue.

1. Connect your iPhone to your Mac using a Lightning-to-USB cable and allow access to the device when prompted.
2. Open Image Capture on your Mac.
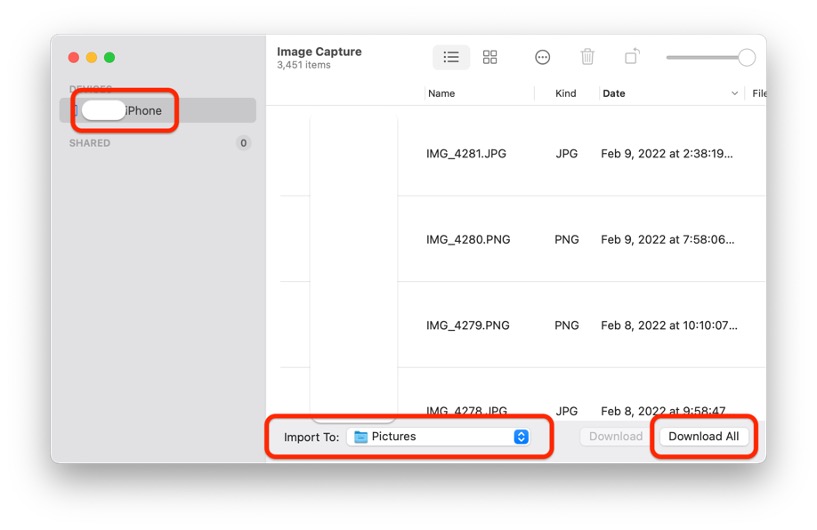
3. In the sidebar, select your iPhone under the Devices category.
4. At the bottom of the window, use the Import To drop-down menu to choose the location to save your pictures.

Sync Pictures_20220221_7

5. Select the pictures you want to import and click the Download button, or if you want to transfer all your photos, click Download All.

Transfer Photos from iPhone to Mac wirelessly

There are several options for transferring photos even if you don’t have a Lightning-to-USB cable. Here they are:

Use AirDrop to Transfer Photos from iPhone to Mac

AirDrop works great for transferring photos between your iPhone and Mac, and vice versa. Please ensure both devices are connected to the same Wi-Fi network and no more than around 30 feet from each other.

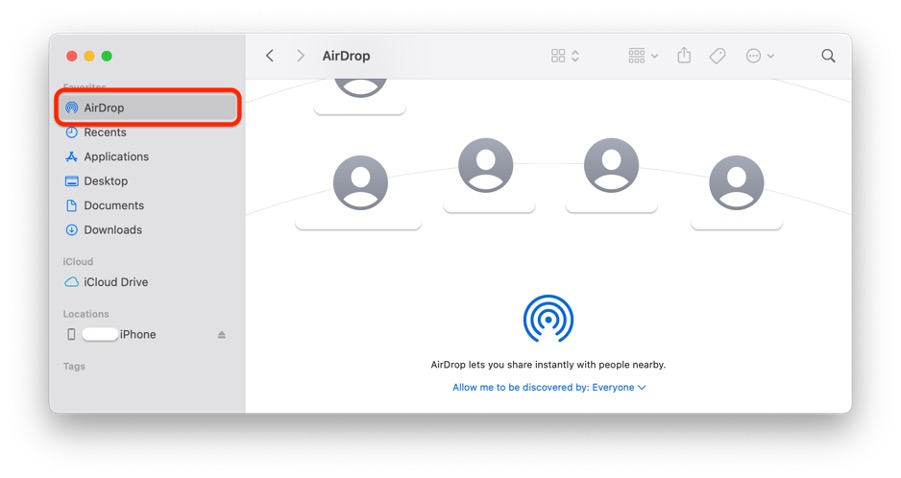
1. First, make sure your Mac is discoverable by everyone. Open Finder on your Mac, click Go in the menu bar, and select AirDrop. A Finder window will open with the AirDrop icon at the bottom.

Sync Pictures_20220221_8

2. Make sure that Everyone is selected under the Allow me to be discovered by: drop-down menu.
3. On your iPhone, open the Photos app and select the pictures you want to transfer.
4. Tap the Share button and select AirDrop.

Sync Pictures_20220221_9

5. Select the device you want to transfer your photos to and click Done. Depending on your Mac’s settings, you may be asked where you want to save the photos.

Use iCloud to Transfer Photos from iPhone to Mac

iCloud lets you synchronize your photos between your iPhone and Mac. Because the two devices will be regularly synchronized, this method is very efficient.

1. Make sure to sign in to your Apple ID on your iPhone and Mac and that they are both connected to Wi-Fi.
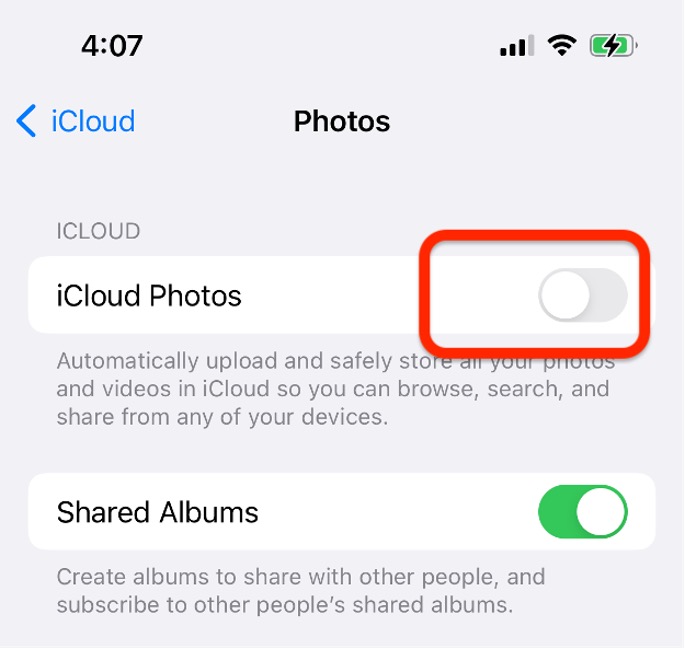
2. On your iPhone, go to Settings > Your Apple ID > iCloud > Photos.
3. Enable the slider next to iCloud Photos.

Sync Pictures_20220221_10

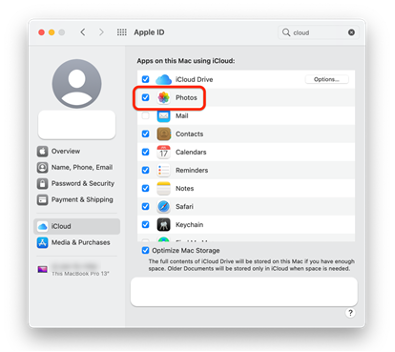
4. On your Mac, go to the Apple menu and select System Preferences.
5. For macOS Catalina or later (Big Sur and Monterey), go to iCloud or Apple, then choose iCloud.
6. Check the boxes next to iCloud Drive and Photos.

Sync Pictures_20220221_11

Note: remember to switch off sync after transferring if you want to delete photos on your iPhone and keep them on your Mac because as long as sync is enabled, any changes you make to photos on one device will automatically be synced to the other.

Got lots of duplicates?

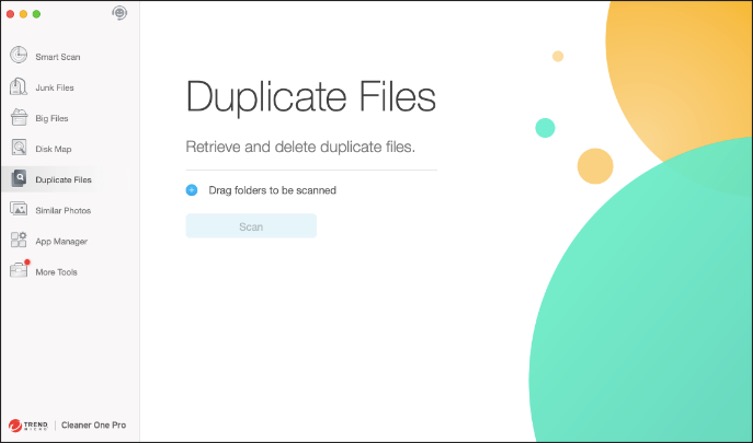
Transferring photos to your Mac is a great way to reclaim some of the precious storage space on your iPhone, but if you’ve got lots of duplicate photos, you’re going to have a nightmare of a time sorting through them on your Mac. Fortunately, Cleaner One Pro is on hand to help out!

Cleaner One Pro makes the time-consuming process of finding and removing similar photos and duplicate files a thing of the past! Simply run a quick scan on your Mac to detect and remove everything hogging storage space.

Sync Pictures_20220221_COP
Sync Pictures_20220221_COP_2

Source :
https://news.trendmicro.com/2022/02/22/how-to-transfer-photos-from-iphone-to-mac/

How to Free Up Memory on Mac

If your Mac frequently performs slowly or freezing all the time, you see a “Your system has run out of application memory” message or occasionally seeing the dreadful spinning beach ball, chances of these can be signs that your memory, or RAM, is being used to the max.

What is RAM on Mac?

Random Access Memory (RAM) is a computer’s temporary data storage device. It stores the information the computer is actively using so that it can be accessed quickly. The more running programs your computer has, the more it uses memory to perform properly. It’s essential for your computer to work properly.

It is different from the internal storage on your Mac. You keep all your files in internal storage but you can’t choose what to save in your RAM as your computer needs flexibility in moving files in or out of that memory all the time.

It works similarly like when you are working in an office. The bigger the office the more people can do different tasks simultaneously. Like in a computer, the more RAM you have the more process your computer can handle at once.

When you launch a program, your computer gathers the program’s files from the hard drive. Once the files are retrieved, the computer needs a working area to process the data and allow you to interact with it. This is your RAM. Your computer places your program’s files in RAM temporarily while you are working with them so that your computer can access that information faster and efficiently.

Why it is necessary to Add more RAM

By default, most Macs were shipped with around 8GB of RAM. Old files and cluttered caches can reduce your Mac’s available RAM and cause your system to slow down. Some applications require a lot of RAM to work efficiently, such as video editing apps and 3D design software.

Adding more RAM is one of the easiest, most cost-effective ways to improve the performance of your MAC, primarily because most computers are shipped with a minimal amount of memory.

Free up Memory with System Activity Monitor

If installing more RAM isn’t an option, you can start looking at the Activity Monitor to show how much memory is being used – that will help you identify if an app is using up more than it should be.

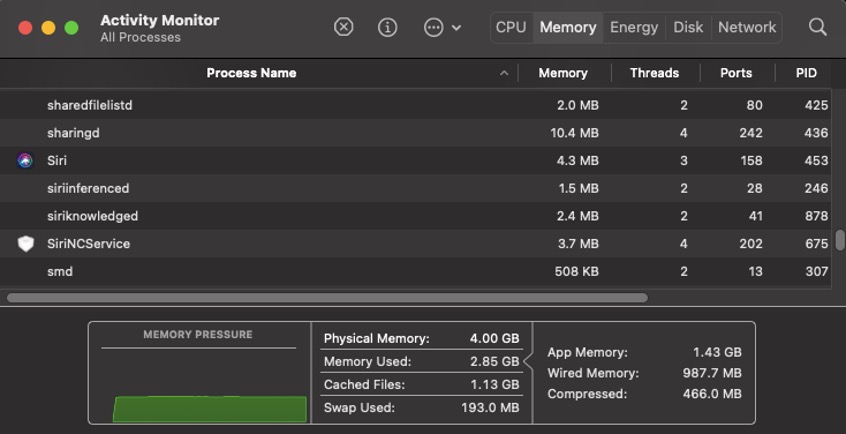
Activity Monitor comes with your Mac. You can find it in Utilities, or start typing Activity Monitor into Spotlight. If you select the Memory tab, this shows a list of all the active apps and processes on your Mac and how much memory each of them is using.

How to free up memory on Mac_20220317_1

You should see a Memory Pressure chart and the breakdown of how your memory is being used.

The most important thing to look at is the Memory Pressure chart, which shows up in green, yellow, or red based on whether your Mac needs more RAM or not. If it is all green, it means your RAM is still efficient. Yellow means your Mac might be needing an upgrade, and red means your Mac definitely needs that added RAM.

When you find the suspect app to be using resources even though you weren’t using them, select it and click on Information (i).

How to free up memory on Mac_20220317_1

This will show more information about the process including the memory it used. If you want to close this app, you can just click on Quit. Then it will ask if you are sure to quit this process. You can choose Quit or Force Quit. Force Quite is useful for frozen apps.

Note: If you are not familiar with the process, it’s better not to close as it may be required by your Mac.

Reduce Memory Usage on Mac

We now know the fix we can do when our Mac is running out of memory. It is still better if we can prevent it from happening especially if we only have limited options to upgrade our Mac’s memory.

There are a few things you can do to maximize what is available. This may also help speed up your Mac.

1. Make your Desktop Clean all the time.

Cluttered documents, images, and different types of files are worth cleaning or at least sorting them to a different folder/location. The macOS is designed to manage your Desktop icon as an active window. The more icons the more memory will be used.

2. Manage Memory Usage in Finder

The Finder application is designed by default to show all files available on the system. Try changing the default display of Finder to not show All My Files.

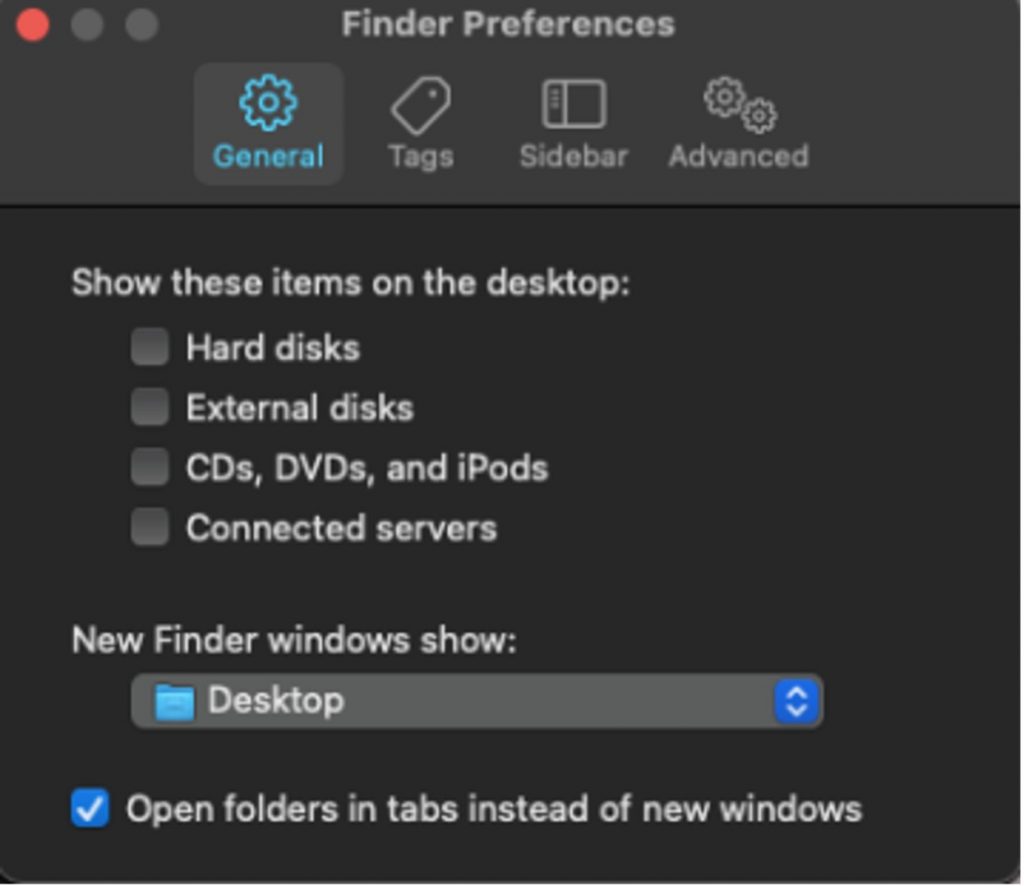
  • Open Finder and click on Finder > Preferences
  • Under General choose a folder to be shown when you open a new Finder window.
How to free up memory on Mac_20220317_3

3. Close Unwanted Finder Windows or merge them.

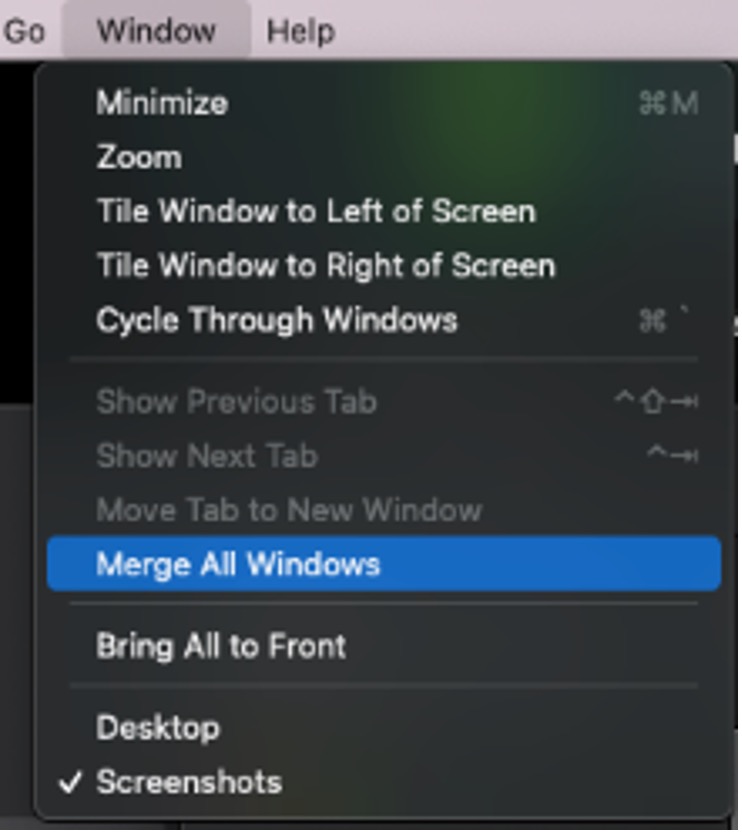
Each Finder window can have an impact on RAM usage. You can close them all at once by using the keyboard shortcut, pressing Command + Option + W, or merging all the Finder windows together.

In the Finder, click on Window > Merge All Windows.

How to free up memory on Mac_20220317_4

4. Disable Items that launches at Start up

Check if there are apps set to run during start-up or after you log in on your Mac as most of these might not be really essential for your everyday use of your computer.

How to stop apps from starting automatically:

  • Open System Preferences > Click on Users & Groups.
  • Click on your User name on the sidebar on the left if that’s not already selected.
  • Click on Login Items.
  • Select an app in the list that you don’t want to run during startup and click on the (-) button.

5. Close web browser tabs

It’s best practice to keep minimal open browser tabs at the same time as recent macOS will see the websites open in Safari listed as a separate process in Activity Monitor. It would also be best to close Safari or the browser you use from time to time.

6. Delete browser extensions

Browser extensions are tools for quick access to features while surfing the internet. But sometimes they just consume more memory. Check your browsers for unwanted browser extensions you don’t really need.

7. Free up more disk space on your Mac

You may also need to clear some space on your Mac from time to time. The recommendation is to keep 20% of your drive space free. You could delete large unused files, old downloads, and old apps. Large unused files can be installer packages you used a long time ago that you already forgot. You can also look for duplicate files or similar photos.

Best App to Free up RAM and Optimize memory usage on Mac

Cleaner One Pro is an all-in-one disk cleaning app with an easy-to-use interface so you can effortlessly visualize, manage and free up your storage space to keep your Mac optimized for the best performance.

Its key features include:

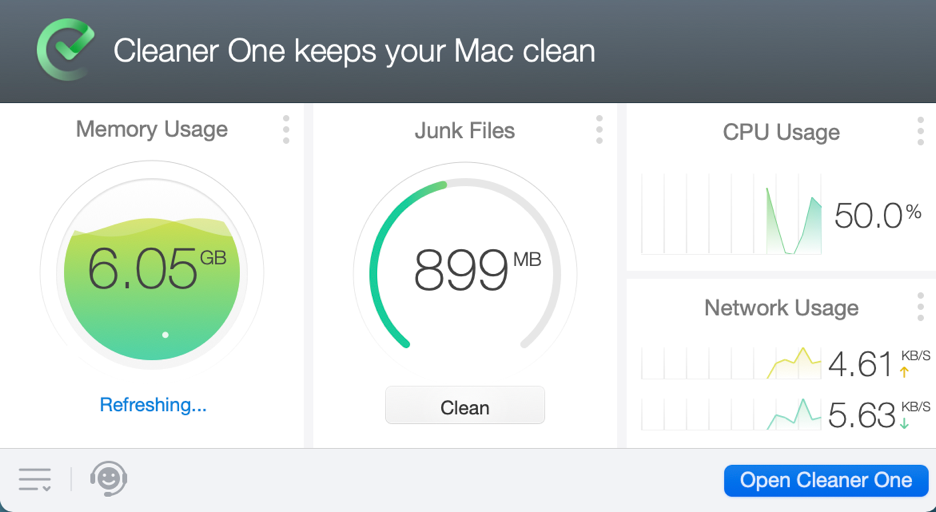
  • Quick Optimizer – Quick Optimizer monitors your CPU Usage, Network Usage and Memory Usage, while scanning and deleting Junk Files in just one click.
  • Junk Files – Remove temporary files and hidden hidden leftover files in one click.
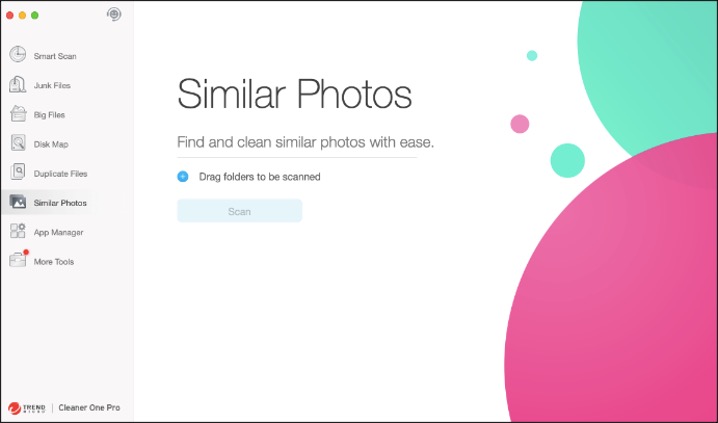
  • Similar Photos – Offer an abundance of useful features to get rid of similar looking images.
  • Big Files – Filter and manage large files on your disk and free up more storage space.
  • Disk Map – Analyze your storage usage in a visual and interactive map.
  • Duplicate Files – Retrieve and delete duplicate files.
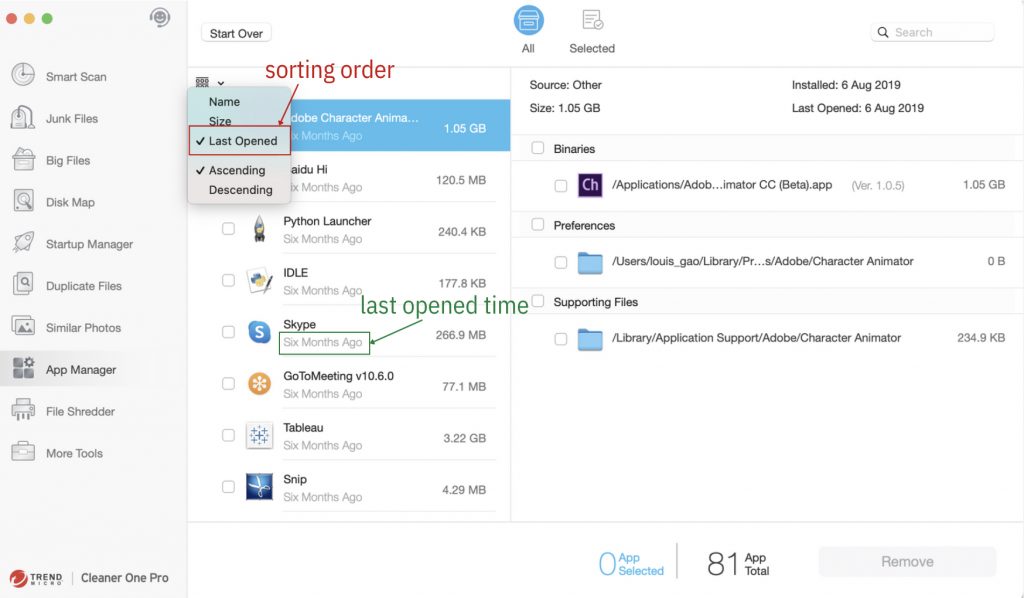
  • App Manager – View and manage apps by name, size or date. Remove unwanted apps and associated files. Batch remove multiple apps.
  • Startup Manager – Easily manage startup apps and services. Speed up boot time and enhance the performance.

Cleaner One Pro is available from Apple’s App Store and the Trend Micro website. Download and claim your free trial today!

You may check our article about Cleaner one Pro for more information:


Source :
https://news.trendmicro.com/2022/03/17/how-to-free-up-memory-on-mac/
Trend Micro fixes actively exploited remote code execution bug

Japanese cybersecurity software firm Trend Micro has patched a high severity security flaw in the Apex Central product management console that can let attackers execute arbitrary code remotely.

Apex Central is a web-based management console that helps system admins manage Trend Micro products and services (including antivirus and content security products and services) throughout the network.

They can also use it to deploy components (e.g., antivirus pattern files, scan engines, and antispam rules) via manual or pre-scheduled updates.

The vulnerability (CVE-2022-26871) is a high severity arbitrary file upload weakness in the file handling module that unauthenticated attackers can abuse for remote code execution.

On Thursday, Trend Micro said it observed attempts to exploit the vulnerability in the wild as part of an ongoing attack.

“Trend Micro has observed an active attempt of exploitation against this vulnerability in-the-wild (ITW) in a very limited number of instances, and we have been in contact with these customers already,” the company said.

CISA orders federal agencies to patch

The Japanese antivirus vendor also urged customers of affected products (on-premise and as a Service) to update to the latest released version as soon as possible.

“Please note that the SaaS version has already been deployed on the backend and no further action is required from SaaS customers on this issue,” the company added for SaaS customers.

When asked how many customers were targeted in these attacks and if any of their networks were breached following these exploitation attempts, Trend Micro spokesperson Funda Cizgenakad told BleepingComputer that the company is “not able to comment on customers” since “this is confidential.”

On Thursday, following Trend Micro’s disclosure, the Cybersecurity and Infrastructure Security Agency (CISA) ordered federal civilian agencies to patch the actively exploited Apex Central bug within the next three weeks, until April 21, 2022.

The cybersecurity agency also urged private and public sector organizations in the US to prioritize patching this actively exploited bug to decrease their networks’ exposure to ongoing attacks.

CISA added the Trend Micro flaw to its Known Exploited Vulnerabilities Catalog, a list of security bugs exploited in the wild, with seven others, including a critical Sophos firewall bug.

Source :
https://www.bleepingcomputer.com/news/security/trend-micro-fixes-actively-exploited-remote-code-execution-bug/