Cloud VPN vs. Traditional VPN: Which One’s Best for Your Business?

16.08.2023

Are you struggling to decide between a cloud VPN vs. traditional VPN for your business? 

You’re not alone. Many companies grapple with this decision, still determining which option best meets their needs.

The pain of making the wrong choice is real. Opt for a solution that doesn’t align with your business needs, and you could face slow connection speeds, increased security risks, or even inflated costs. Worse, you might be locked into a solution that doesn’t scale with your business, leading to even more headaches.

The world of VPNs can be complex and confusing, with each type boasting its features, benefits, and drawbacks. It’s easy to feel overwhelmed, unsure of which path to take.

In this article, we’ll demystify the differences between cloud VPN vs. traditional VPN, providing you with the information you need to make an informed decision. We’ll explore how each type works, its advantages, and its key differences. 

What is a Cloud VPN? 

Cloud VPN is a service that provides secure and private internet access to users. Cloud VPNs are hosted in the cloud, meaning they can be accessed from anywhere worldwide, making them an ideal choice for businesses with a remote workforce or multiple office locations.

Cloud VPNs are more scalable, flexible, and efficient than their traditional counterparts. They can quickly adapt to the needs of businesses, whether it’s accommodating growth, supporting mobile devices, or providing global accessibility. 

This adaptability makes Cloud VPNs popular for companies looking to secure their data without sacrificing convenience or performance.

How Do Cloud VPNs Work?

Cloud VPNs create a secure pathway, an encrypted tunnel, between the user’s device and the internet. This tunnel acts as a safe conduit for data to travel, ensuring that all information passing through it’s protected from external threats such as hackers or malware.

When users connect to a Cloud VPN, their device communicates with the VPN server in the cloud. The server then encrypts the user’s data before it’s sent over the internet. This encryption makes the data unreadable to anyone who might intercept it, ensuring its security.

A Cloud VPN also masks the user’s IP address, replacing it with the IP address of the VPN server. This provides an additional layer of privacy, preventing third parties from tracking the user’s online activities or determining their physical location.

Types of Cloud VPNs

Businesses come in all shapes and sizes, and so do their networking needs. That’s why Cloud VPNs are versatile, offering different types to suit various requirements. Here are the two main types of Cloud VPNs:

Remote Access VPNs 

Designed for the modern workforce, these VPNs allow individual users to securely access a private network from anywhere. Ideal for remote workers or teams spread across multiple locations, they ensure secure access to company resources.

Site-to-Site Connection VPNs

Site-to-site connection VPNs connect entire networks, providing a secure bridge for data to travel between different office locations or between a business and its partners or clients. Ideal for companies with multiple office locations.

The Main Benefits of Cloud VPNs 

Cloud VPNs offer several advantages over traditional VPNs. These include:

Direct Cloud Access

Cloud VPNs provide direct access to cloud services, reducing latency and improving performance.

Global Accessibility

They are hosted in the cloud and can be accessed from anywhere worldwide.

Flexibility 

They can be easily scaled up or down based on the needs of the business.

Scalability 

They can support many users without the need for significant hardware investment.

Mobile Support

They are designed to work well with mobile devices, supporting the modern mobile workforce.

Cost Efficiency 

They eliminate the need for expensive hardware and maintenance costs associated with traditional VPNs.

What is a Traditional VPN (remote VPN)?

A traditional VPN, also known as a remote VPN, is a technology that creates a secure connection over a less secure network between the user’s computer and a private network. 

Remote workers widely use this technology to access company resources they wouldn’t otherwise be able to reach. It’s also used by individuals who want to ensure their online activity is private and secure.

How Do Remote VPNs Work?

A cloud VPN vs. traditional VPN comparison reveals how remote VPNs function. These systems create a secure tunnel between the user’s device and the VPN server. The data traveling through this tunnel is encrypted, offering a safe method for transmitting information between the remote user and the company network.

The VPN server, acting as a go-between, conceals your IP address and gives the impression that your traffic originates from its IP address. This covers your online activities from your ISP and creates the illusion that you’re located where the VPN server is. This can be particularly useful for accessing content that is region-restricted.

In a hosted VPN service, the server is maintained by a third-party provider, reducing the burden on your IT resources.

Advantages of Traditional VPNs

Traditional VPNs offer several benefits, including:

  • Security: Traditional VPNs use advanced encryption protocols to secure your data, protecting your information from hackers and other cyber threats.
  • Privacy: By masking your IP address, a VPN ensures that your online activities remain private.
  • Remote access: VPNs allow remote workers to securely access their company’s network from anywhere in the world.
  • Bypassing geo-restrictions: VPNs can make it appear as though you’re browsing from a different location, allowing you to access content that may be region-locked.
  • Cost-effective: Many VPN services are available at a relatively low cost, and the security benefits they provide can save businesses money in the long run by preventing data breaches.

Cloud VPN vs. Traditional VPN: the Main Differences

Regarding cloud VPN vs. traditional VPN, it’s essential to understand that both have strengths and weaknesses. However, the transition from traditional VPN to cloud VPN has really underscored how good the cloud is at addressing the limitations of traditional VPN technologies.

Cloud VPNs eliminate network choke points by allowing users to connect directly to the required network, whether cloud-based or on-premises. This direct connection reduces bandwidth consumption and latency, enhancing user experience. 

Also, cloud VPNs centralize remote access security, simplifying setting up and maintaining security policies across all cloud platforms.

Unlike traditional VPNs, which have hard limits on bandwidth and user numbers, cloud VPNs can scale to meet changing business requirements. Still, as we delve deeper into the differences, you’ll see that the choice between cloud and traditional VPNs depends on your business’s needs.

Features 

Cloud VPNs are known for their scalability, cost-efficiency, and enhanced security features. They’re implemented as cloud-based services, making them more flexible and globally accessible. On the other hand, traditional VPNs are network appliances that provide secure, remote access to company networks but may lack the flexibility and scalability of their cloud counterparts.

Performance

Performance is a key differentiator. Cloud VPNs, running in data centers, offer high-speed connections not limited by network speed, unlike hardware VPNs. They also eliminate backhaul, allowing users to connect directly to cloud-based networks, improving network performance and reducing latency.

Support

In terms of support, Cloud VPNs have an edge. They can quickly adopt new security features and vulnerability patches, making them more secure than on-premise VPNs. Traditional VPNs, however, may require more time and resources to implement such updates.

Pricing 

Pricing is a significant factor in cloud VPN vs. traditional VPN. Cloud VPNs are generally more affordable, with usage-based VPN-as-a-Service (VPNaaS) fees being more cost-effective than the expenses associated with deploying, maintaining, and upgrading VPN hardware.

So, Which Should You Choose: A Cloud Vpn or a Traditional Vpn?

Choosing between a cloud VPN vs. a traditional VPN for your business largely depends on your specific needs and circumstances. However, it’s crucial to consider the evolution of technology and the increasing demand for robust, flexible, and secure networking solutions.

Cloud VPNs offer a more flexible and scalable solution than traditional VPNs. On the other hand, traditional VPNs have been a staple in the security landscape for decades.

However, as businesses adapt to an increasingly digital landscape, the demand for secure, remote access to resources is rising. This has led to the emergence of alternatives to both cloud VPN and traditional VPN. 

Two such alternatives are:

  • Zero Trust Network Access (ZTNA)This modern approach to network access enhances security by verifying every connection attempt and limiting access privileges to only what users need to perform their tasks. This reduces the risk of data breaches and ensures a secure network environment.
  • Software-Defined Perimeter (SDP): Offering a flexible, scalable, and secure solution, the SDP model creates a dynamic, individualized perimeter for each user. This adaptability ensures robust security without compromising user experience, making it an attractive business option.

We offer a comprehensive solution that implements the Zero Trust model, providing businesses with a secure, flexible, and scalable alternative to both Cloud VPN and Traditional VPN. This solution combines the strengths of both ZTNA and SDP, ensuring that your business is equipped with the most robust and adaptable network security measures available today.

Ready to secure your business’s digital infrastructure and enhance your network’s performance? Want to benefit from a solution that aligns with your specific needs? Book a demo today!

Source :
https://www.perimeter81.com/blog/network/cloud-vpn-vs-traditional-vpn

What network ports are used by Synology DSM services?

Last updated: Aug 10, 2023

Details

The operations of DSM services require specific ports to be opened to ensure normal functionality. In this article, you can find the network ports and protocols required by DSM services for operations.

Contents

Resolution

Setup Utilities

TypePort NumberProtocol
Synology Assistant9999, 9998, 9997UDP

Backup

TypePort NumberProtocol
Active Backup for Business5510 (Synology NAS)1TCP
443 (vCenter Server and ESXi host), 902 (ESXi host),
445 (SMB for Hyper-V host), 5985 (HTTP for Hyper-V host), 5986 (HTTPS for Hyper-V host)
TCP
Data Replicator, Data Replicator II, Data Replicator III9999, 9998, 9997, 137, 138, 139, 445TCP
DSM 5.2 Data Backup, rsync, Shared Folder Sync, Remote Time Backup873, 22 (if encrypted over SSH)TCP
Hyper Backup (destination)6281 (remote Synology NAS), 22 (rsync with transfer encryption enabled), 873 (rsync without transfer encryption)TCP
Hyper Backup Vault6281,
For DSM 7.0 or above: 5000 (HTTP), 5001 (HTTPS)
TCP
DSM 5.2 Archiving Backup6281TCP
LUN Backup3260 (iSCSI), 873, 22 (if encrypted over SSH)TCP
Snapshot Replication5566 (Advanced LUNs and shared folders)TCP
3261 (Legacy Advanced LUNs)TCP

Download

TypePort NumberProtocol
BTFor DSM 2.0.1 or above: 16881,
For DSM 2.0.1-3.0401 or below: 6890-6999
TCP/UDP
eMule4662TCP
4672UDP

Web Applications

TypePort NumberProtocol
DSM5000 (HTTP), 5001 (HTTPS)TCP

Mail Service

TypePort NumberProtocol
IMAP143TCP
IMAP over SSL/TLS993TCP
POP3110TCP
POP3 over SSL/TLS995TCP
SMTP25TCP
SMTP-SSL465TCP
SMTP-TLS587TCP

File Transferring

TypePort NumberProtocol
AFP548TCP
CIFS/SMBsmbd: 139 (netbios-ssn), 445 (microsoft-ds)TCP/UDP
Nmbd: 137, 138UDP
FTP, FTP over SSL, FTP over TLS21 (command),
20 (data connection in Active Mode), 1025-65535 (data connection in Passive Mode)2
TCP
iSCSI3260, 3263, 3265TCP
NFS111, 892, 2049TCP/UDP
TFTP69UDP
WebDAV5005, 5006 (HTTPS)TCP

Packages

TypePort NumberProtocol
Audio Station1900 (UDP), 5000 (HTTP), 5001 (HTTPS), 5353 (Bonjour service), 6001-6010 (AirPlay control/timing)TCP/UDP
C2 Identity Edge Server389 (LDAP), 7712 (HTTP), 8864TCP
53UDP
Central Management System5000 (HTTP), 5001 (HTTPS)TCP
CIFS Scale-out Cluster49152-49252TCP/UDP
17909, 17913, 19998, 24007, 24008, 24009-24045, 38465-38501, 4379TCP
Cloud Station6690TCP
DHCP Server53, 67, 68TCP/UDP
DNS Server53 (named)TCP/UDP
LDAP Server (formerly Directory Server)389 (LDAP), 636 (LDAP with SSL)TCP
Download Station5000 (HTTP), 5001 (HTTPS)TCP
File Station5000 (HTTP), 5001 (HTTPS)TCP
Hybrid Share50051 (catalog), 443 (API), 4222 (NATS)TCP
iTunes Server3689TCP
Log Center (syslog server)514 (additional port can be added)TCP/UDP
Logitech® Media Server3483, 9002TCP
MailPlus Server1344, 4190, 5000 (HTTP), 5001 (HTTPS), 5252, 8500 – 8520, 8893, 9526 – 9529, 10025, 10465, 10587, 11211, 11332 – 11334, 12340, 24245, 24246TCP
MailPlus web client5000 (HTTP), 5001 (HTTPS)TCP
Mail Station80 (HTTP), 443 (HTTPS)TCP
Media Server1900 (UPnP), 50001 (content browsing), 50002 (content streaming)TCP/UDP
Migration Assistant7400-7499 (DRBD), 22 (SSH)3DRBD
Note Station5000 (HTTP), 5001 (HTTPS)TCP
Photo Station, Web Station80 (HTTP), 443 (HTTPS)TCP
Presto File Server3360, 3361TCP/UDP
Proxy Server3128TCP
RADIUS Server1812, 18120UDP
SMI-S Provider5988 (HTTP), 5989 (HTTPS)TCP
Surveillance Station5000 (HTTP), 5001 (HTTPS)TCP
Synology Calendar5000 (HTTP), 5001 (HTTPS)TCP
Synology CardDAV Server8008 (HTTP), 8443 (HTTPS)TCP
Synology Chat5000 (HTTP), 5001 (HTTPS)TCP
Synology Contacts5000 (HTTP), 5001 (HTTPS)TCP
Synology Directory Server88 (Kerberos), 389 (LDAP), 464 (Kerberos password change)TCP/UDP
135 (RPC Endpoint Mapper), 636 (LDAP SSL), 1024 (RPC), 3268 (LDAP GC), 3269 (LDAP GC SSL), 49152 (RPC)4, 49300-49320 (RPC)TCP
Synology Drive Server80 (link sharing), 443 (link sharing), 5000 (HTTP), 5001 (HTTPS), 6690 (file syncing/backup)TCP
Synology High Availability (HA)123 (NTP), ICMP, 5000 (HTTP), 5001 (HTTPS),
1234, 9997, 9998, 9999 (Synology Assistant), 874, 5405, 5406, 7400-7999 (HA)
TCP/UDP
Synology Moments5000 (HTTP), 5001 (HTTPS)TCP
Synology Photos5000 (HTTP), 5001 (HTTPS)TCP
Video Station1900 (UDP), 5000 (HTTP), 5001 (HTTPS), 9025-9040, 5002, 5004, 65001 (for using the HDHomeRun network tuner)TCP/UDP
Virtual Machine Manager2379-2382 (cluster network), ICMP, 3260-3265 (iSCSI), 5000 (HTTP), 5001 (HTTPS), 5566 (replication), 16509, 16514, 30200-30300, 5900-5999 (QEMU), 2385 (Redis Server)TCP
VPN Server (OpenVPN)1194UDP
VPN Server (PPTP)1723TCP
VPN Server (L2TP/IPSec)500, 1701, 4500UDP

Mobile Applications

TypePort NumberProtocol
DS audio5000 (HTTP), 5001 (HTTPS)TCP
DS cam5000 (HTTP), 5001 (HTTPS)TCP
DS cloud6690TCP
DS file5000 (HTTP), 5001 (HTTPS)TCP
DS finder5000 (HTTP), 5001 (HTTPS)TCP
DS get5000 (HTTP), 5001 (HTTPS)TCP
DS note5000 (HTTP), 5001 (HTTPS)TCP
DS photo80(HTTP), 443 (HTTPS)TCP
DS video5000 (HTTP), 5001 (HTTPS)TCP
MailPlus5000 (HTTP), 5001 (HTTPS)TCP
Synology Drive5000 (HTTP), 5001 (HTTPS)TCP
Synology Moments5000 (HTTP), 5001 (HTTPS)TCP
Synology Photos5000 (HTTP), 5001 (HTTPS)TCP

Peripheral Equipment

TypePort NumberProtocol
Bonjour5353UDP
LPR515UDP
Network Printer (IPP)/CUPS631TCP
Network MFP3240-3259TCP
UPS3493TCP

System

TypePort NumberProtocol
LDAP389, 636 (SLAPD)TCP
MySQL3306TCP
NTP123UDP
Resource Monitor/SNMP161TCP/UDP
SSH/SFTP22TCP
Telnet23TCP
WS-Discovery3702UDP
WS-Discovery5357 (Nginx)TCP

Notes:

  1. For the backup destination of Synology NAS, Hyper-V, or physical Windows/Linux/macOS devices.
  2. The default range varies according to your Synology product models.
  3. For the SSH service that runs on a customized port, make sure the port is accessible.
  4. Only Synology Directory Server version 4.10.18-0300 requires port 49152.

Further reading

Source :
https://kb.synology.com/en-global/DSM/tutorial/What_network_ports_are_used_by_Synology_services

What does the Allow, Deny & Discard do on an Sonicwall Access Rule?

Last Update : 07/25/2022

Description

This article explains the 3 Actions available on an access rule

Resolution

Firewall rules, in general, based on concept of Implicit Deny.  Implicit Deny basically means that the default answer to whether a communication is allowed to transit the firewall is always No or Deny.  Therefore, the majority of Access Rules tend to be Allow.  A firewall will process a communication, inbound or outbound, based on the highest priority rule to the lowest.  Once a rule is found with conditions that match, that rule is executed by the firewall.  Allow, Deny & Discard is the action that the firewall will take for any communication that meets the conditions of a particular Access Rule.  Should a communication come into the firewall and no Access Rule meets the condition to allow it through, the firewall will Drop the communication.

Gen7 Add access rule dialog box

Image

Allow – This means that the firewall will permit the communication to continue through the firewall to its destination.

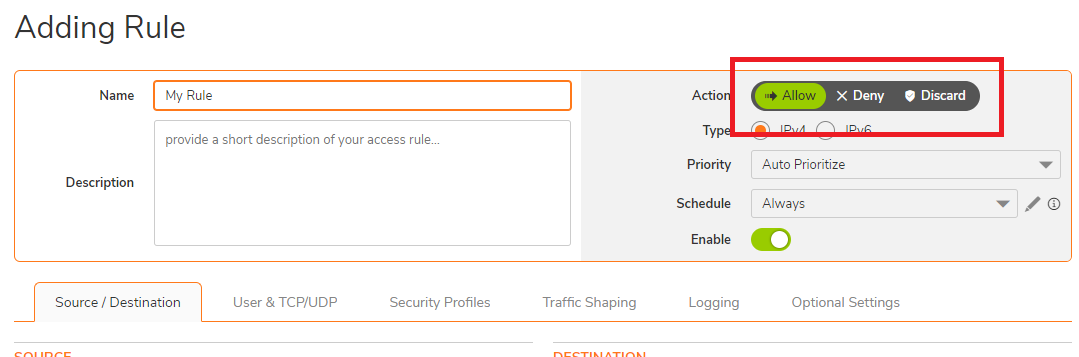
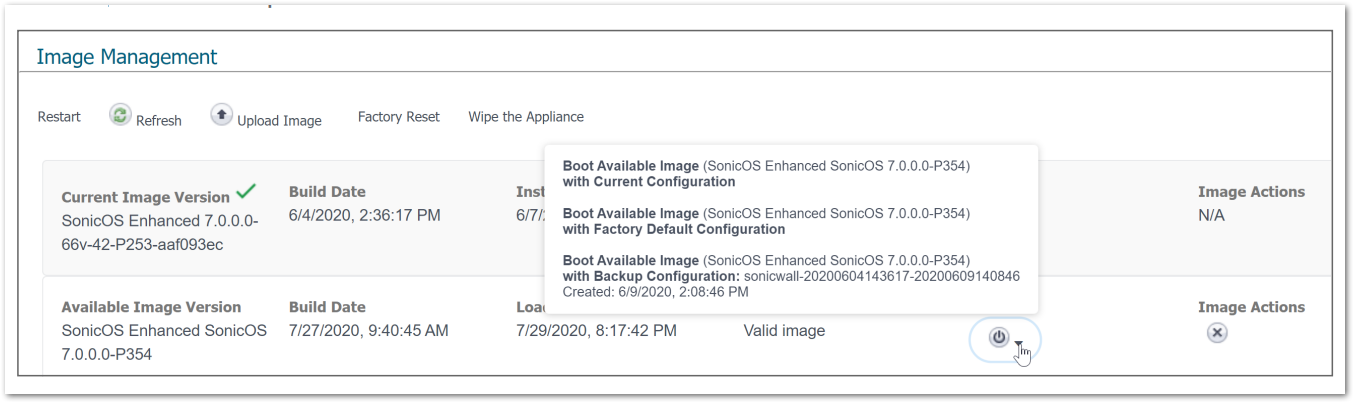
 NOTE: When creating a new access rule, the default Action on your firewall is set to Allow. 

Gen6 Add access rule dialog box

Deny – This means that when a communication is found to match the conditions of an Access Rule with the Deny action, the communication will not be permitted to proceed.  The communication is Dropped by the firewall.  A RST (reset) packet sent back to the originating device and the communication will be ended.  The RST packet is a communication that goes back to the originator of the traffic stating that the connection has been closed.  Under most circumstances, you should not have to write a Deny rule as Deny is the default action as described above.

 NOTE: Be advised that the RST packet is a normal part of network communications and is not unique to the SonicWall.

Discard – This option is much like Deny in that it will stop and drop the communication.  In this instance, the firewall will not send a RST packet as described in the Deny action above.  When the RST packet does not go back as with Deny, the originator has no confirmation that there is a device to respond at the IP address that is trying to reach.  Even if the originator suspects that it is a security function that is stopping it, they will still not know anything for sure.  This is essentially Stealth Mode applied at the Access Rule level.

Related Articles

Categories

Source :
https://www.sonicwall.com/support/knowledge-base/what-does-the-allow-deny-discard-do-on-an-access-rule/220725123655973/

Accessing Safemode when Sonicwall firewall is not reachable via CLI or GUI

Last Update : 05/09/2023

Description

This article describes how to put a SonicWall into safe mode through the GUI or through the command line interface (CLI).

You may require to follow this article for the following:

  • Firewall not accessible any longer due to configuration issues or other causes
  • Perform a firmware upgrade when it fails via normal means.
  • Perform a ROM/Safemode version upgrade.
  • Viewing the bootlogs or other diagnostic information.

 NOTE: Factory Reset via safemode is a required step when the device turns on but it is not reachable. A backup of the settings will be required after the factory reset or the firewall has to be reconfigured from scratch.

Resolution

ACCESSING SAFEMODE WHEN FIREWALL IS NOT REACHABLE VIA CLI/UI:

  1. Using a paperclip or similarly sized object, press and hold down the RST button located in the small hole on the front or back of the device (depending on the appliance) for at least 60 Seconds. Once the test light on the device becomes solid or begins to blink then the SonicWall is in safe mode.

     NOTE: On an NSsp 13700 or NSa Series appliance, press the button, but you do not need to hold it down.
  2. Connect a computer directly to the following Interface, depending on what model SonicWall you have, via an ethernet cable.
    1. Manually assign a static IP / subnet mask and Gateway (gateway will be the safemode firewall IP) on the connected computers NIC depending on the SonicWall appliance.
    2. Open the browser on the client connected to the firewall and go to: http://Enterherethe_Safemode_Firewall_IP

      Generation/ModelInterface to be used while in SafemodeSafemode Firewall IPRecommended IP to be set on clientGeneration 5X0192.168.168.168192.168.168.10 | 255.255.255.0Generation 6 & 7 | SOHO & TZ Devices
      X0192.168.168.168192.168.168.10 |  255.255.255.0Generation 6 & 7 | NSa/SM/NSsp DevicesMGMT Interface192.168.1.254192.168.1.10 | 255.255.255.0 
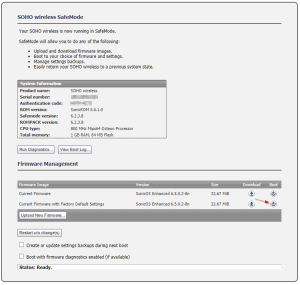
CAUTION: Safemode is only available via HTTP so you have to manually type http:// otherwise the browser will automatically take you to https://.

       NOTE: For new safe mode options on Gen7, please refer: Safemode options on SonicWall Gen 7 devices

ACCESSING SAFEMODE VIA CLI

 NOTE: There is an E-CLI command safemode that restarts the firewall in SafeMode for Generation 7 (NSsp 13700 or NSa).

  1.  If you’re unfamiliar with how to access the SonicWall management using CLI please reference How to login to the appliance using the Command Line Interface (CLI).
  2. Once logged into the CLI, input the following commands.

    Safemode
    yes
  3. The SonicWall will reboot and enter safe mode.
    Image
  4. Reference the steps above to login to the safe mode GUI, beginning with “Connect a computer directly to the following Interface…”

Below you can find some additional information about what you can do in SafeMode:

Reset your firewall to Factory Default

  1. Select Current Firmware with Factory Default Settings and confirm.
  2. Your firewall will restart to factory default.
  3. After the reboot, login to the SonicWall management GUI via X0 Interface on the default firewall IP (192.168.168.168).
     NOTE: Make sure to modify the NIC Settings of the client connected to X0 to match the new firewall default settings (Gateway: 192.168.168.168 and NetMask: 255.255.255.0).

    Image

Upgrading the Gen 6 Firmware or ROM Version from Safe Mode

  1. Download the desired firmware version from MySonicWall.com or have the desired ROM Version on hand. ROM Packs are only available via SonicWall technical support.
     NOTE: Upgrading the ROM version only applies to Generation 6 NSA SonicWalls – 2600, 3600, 4600, 5600, and 6600. Unless you have been requested to upgrade the ROM version by SonicWall technical support do not attempt to do so.  
  2. Select Upload New Firmware and follow the prompt in the pop-up window to upload the firmware or ROM version to the SonicWall.
  3. You should now see the New Firmware or Uploaded ROM Pack on the safe mode GUI. You can boot to the new firmware or ROM by clicking the boot icon on the far right.
     NOTE: Booting to a new firmware or ROM version will reboot the SonicWall and exit safe mode. Make sure you’re completely finished with the SonicWall’s safe mode before selecting boot. 
  4. After the reboot, login to the SonicWall management GUI as you normally would. Navigate to Monitor | Current Status | System Status.
  5. On the Status screen you should see the new firmware version listed under Firmware Version or the new ROM version listed under Safemode Version.

Gen 7 (Using SafeMode to Upgrade Firmware):

  1. Once we enter the url in the web browser to get to the safe mode page on SonicWall Gen 7 devices, we need to authenticate using Maintenance Key.
  2. In the Maintenance Key prompt, type in or paste the key you got from MySonicWall and then click Authenticate. If your appliance is running SonicOS 7.0.1 and is not yet registered, use its Auth Code as the key. (To find the Maintenance key, please refer to: Safemode options on SonicWall Gen 7 devices)
    Image

  3. Safe mode page is displayed

    Image
  4. Click Upload Image, and then browse to the location where you saved the SonicOS firmware image, select the file, and click Upload.
  5. Click the Boot button in the row for Available Image Version and select one of the following:
    1. Boot Available Image with Current Configuration: Use this option to restart the appliance with your current configuration settings.
    2. Boot Available Image with Factory Default Configuration: Use this option to restart the appliance with factory default configuration settings. The configuration settings revert to default values, but logs and local backups remain in place.
    3. Boot Available Image with Backup Configuration: Use this option to restart the appliance with saved backup configuration settings. You can choose which backup to use. 

      Image
  6. In the confirmation dialog, click Boot to proceed.
  7. Wait while the firmware is installed, then booted. 
  8. Login to the SonicWall management GUI as you normally would.

Related Articles

Categories

Source :
https://www.sonicwall.com/support/knowledge-base/accessing-safemode-when-firewall-is-not-reachable-via-cli-or-gui/170507123738054/

How can I access the SonicWall Management Interface?

Last Update: 03/13/2023

Description

The SonicWall UTM appliance has a web-based graphical user interface for configuring the security appliance. This is the primary means of configuring the device.

Resolution

By default all the interfaces (ports like WAN,OPT or X1,X2) are unconfigured except the LAN or X0 interface. The LAN or X0 interface is pre-configured with an ip address of 192.168.168.168 and subnet mask of 255.255.255.0.

You could also determine the LAN or X0 interface IP address by using the Setup Tool (Windows SetupTool – https://software.sonicwall.com/UtilityTools/SetupTool.exe)

Image
Your UTM appliance package will contain, among other things, an Ethernet cable. Connect one end of the cable to the LAN or X0 interface of the SonicWall and the other end to a computer. Make sure the LED alongside LAN or X0 is lit solid.

As the UTM appliance is not pre-configured with DHCP, the computer connected to it must be configured with a static IP address. Set the computer IP address in the same subnet as the SonicWall LAN or X0.

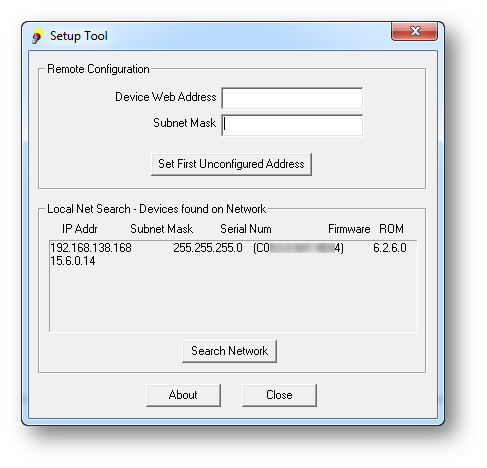
 EXAMPLE:192.168.168.2 with subnet mask of 255.255.255.0.

Open an Internet browser and enter 192.168.168.168 in the address bar.

As this is the first time you are accessing the SonicWall UTM management interface, you will be presented with a wizard. You could follow the wizard to set a new admin password and other information. You could skip the wizard and login directly to the interface by clicking the click here link in the wizard prompt. 

Quick Configuration for Gen6 Appliances with SonicOS 6.5 & above.
Image

When attempting to login directly you will be prompted for a username and password. By default the username is admin and the password is password. Once successfully logged in you can change the password under Manage | Appliance | Base Settings | Administrator Name & Password.

Further configuration of the device can be done either manually, by navigating the tabs on the left-hand side of the interface, or by using the wizard. The wizard can be accessed by clicking on the Wizards icon at the top of the interface.

TROUBLESHOOTING
  • Make sure there is physical connectivity between the computer and the SonicWall.
  • It is always recommended to connect the computer directly to SonicWall instead of through a switch or hub.
  • The LAN or X0 interface LED should be lit solid. If the computer is a PC, the Network Connection Status should show connected.
  • Although SonicWall is Auto DBX capable, try a cross-over cable.
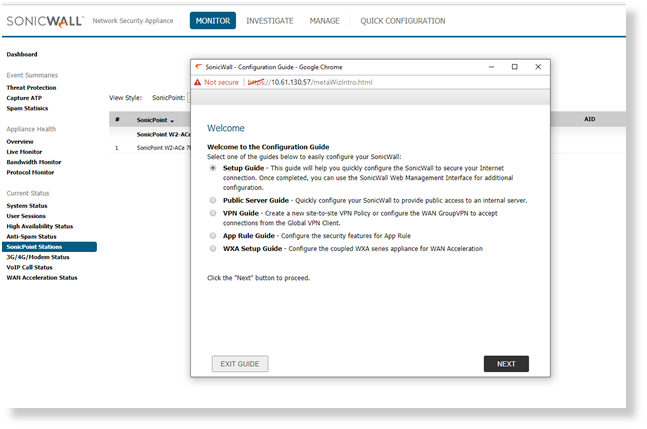
     TIP: If physical connection has been established but the user is unable to access the management interface try doing a ping to the IP address 192.168.168.168 from the computer.
    If the ping test passes and the user is unable to open the interface page in the browser,  try the following:
  1.  Reboot the SonicWall.
  2.  Clear the browser cache.

See also:

Related Articles

Categories

Source :
https://www.sonicwall.com/support/knowledge-base/how-can-i-access-the-sonicwall-management-interface/170503695604558/

Sonicwall Application Rule Common Configurations

Last Update 03/26/2020

Description

This document explains in detail how the SonicWall rulebase works and provides common configurations.

Topics include:

  • Application Rule tips
  • The SonicOS rulebase
  • App Rules positive matching
  • Inspection of encrypted traffic
  • Methods of designing a rulebase

Resolution

The SonicOS Rulebase
SonicWall has two rulebases, one for Stateful Packet Inspection (SPI), and one for Deep Packet Inspection (DPI). The SPI rulebase deals with socket filters that are defined between source and destination address objects to a combination of destination port and protocol, or a range of ports, called a service. Optionally, source ports can also be defined within the service which is more useful for legacy UDP services than for modern services that randomize the source port. A connection is established with the first UDP packet, or after a successful TCP handshake. All other protocols behave like UDP and establish a connection with the first packet.

App Rules, in contrast, monitor traffic of established connections. When an application is detected and a rule matches, the rule action is applied such as dropping the connection.
Access Rules are processed top-down, which means that on the first rule that is matched, (counted from the top) the rule action is applied, and the rulebase is exited. No further rulebase processing follows. This is the industry standard implementation for SPI rules. In contrast, no industry standard implementation exists for App Rules. In addition to standard top-down behavior known from SPI rules, some vendors match top down, but do not drop out with the first match. SonicOS does something in-between: rule order is non-deterministic because rules are internally optimized for processing speed. App Rules cannot overlap. Per definition, only one rule can match. If a matching rule is found, the rule action is applied.

Access Rules have Allowed, Deny, and Discard actions. The difference between Deny and Discard is that Deny sends a segment with TCP RST flag back, whereas Discard silently drops the packet. It is best to use Discard in most cases, unless that breaks something like long living dormant TCP connections that lack higher layer health monitoring as can be found in some legacy custom applications. Both actions terminate the connection and remove it from the connection table. App Rules can apply various actions but Allowed is not one of them. The reason is that App Rules check on an already established connection. By the very nature on how DPI works, the connection has to be established so that the DPI engine can look for clues within the data traffic to determine the application.

Access Rules are enforced between zones that have interfaces assigned. One zone may match to one or multiple interfaces. App Rules are enforced on ingress of a zone, or globally. Both Access Rules and App Rules can be assigned address objects and address groups. Only one object can be assigned per rule. If multiple objects in a rule are desired, a group needs to be created. Groups can be nested.
In addition to defining source and destination address objects in App Rules, source address exclusions can be defined so that App Rules do not overlap. Both Access Rules and App Rules can have socket services assigned. In contrast to Access Rules, App Rules cannot have service groups. Services are less often used in App Rules because App Signatures generally match independent of sockets. The reason to assign a service is to limit application matches to one specific socket, such as an Application on a cleartext HTTP socket that needs to be dropped. App Rules also may match on indirect traffic such as DNS when inspecting a Web session on an HTTP socket. This is often not obvious. In addition to dropping the connection that carries the service, control connections, or peripheral connections like DNS can be targeted by signatures within one App. This is a reason that one typically wants to leave the socket out of the match criteria for an App Rule.

App Rules match on applications which is the main difference to Access Rules that only match on a socket. A variety of match objects can be defined to match within a certain context such as file names, as well as categories, applications, and application sub lists like Social Networking, Facebook, and Like button. The same connection can match many different applications such as HTTP and Netflix. Users are treated as a filter – after a rule was matched. Users are not part of the match criteria of the rule itself. Vendors are not consistent in the implementation of users. Many implement it like SonicWall but some also make the user a match criteria. In SonicOS, an action is applied to all include users minus those users that overlap with exclude users. There is only one rule check; no other rule check is performed regardless whether the user matches or not. Access Rules and App Rules are similar in their behavior to unmatched users. Access Rules apply the inverse of the action such as Deny instead of Allowed, or vice versa. App Rules do not have an Allowed action by their very nature. Unmatched users are simply not applied any action. If the action is Drop, not matched traffic is simply passed without logging. The same is true for the No Action that produces a log for matched users. Remember that not matched users include all user(s) in exclude and all other users not in include. In other words, a rule is applied only to all include users that are not in exclude. All non-defined users are treated as not matching.

Exclude is a concept present in many objects in SonicOS. An exclude is a minus to an include, which means applied to the rule is only what is left of the include, once the exclude was subtracted. No matching of the rule applies to anything in the exclude. This is a bit complicated, but exclude users only matters if also at least partially part of the include. An exclude that does not overlap with an include has no function. This is the same behavior for other object types.

The user concept in SonicOS is a filter after a rule match was made. Only the leftover of include users after subtracting excluded users is applied to that particular matched rule. Users that do not match are no longer processed in the rulebase. This is important to understand.

Image

App Rules
IF source:

  • src-zone
  • src-ip MINUS excluded src-ip

AND IF destination:

  • dst-ip

AND IF application:

  • Apps identified by DPI MINUS excluded Apps, limited to socket

THEN

  • user MINUS excluded users filter
  • action: Drop, BWM, no-DPI, log, nothing

App Rules Positive Matching

While an Access Rule can determine the socket within the first one to three segments within a connection, App Rules match can only be determined deeper into the connection life, after the connection was established. This puts positive matching at a conundrum. How for instance do you permit a connection with Netflix, before you even know that the connection carries Netflix? And how do you make sure after Netflix in a connection stream was detected, that it does not carry other traffic, such as tunneled VPN traffic?

These are interesting questions, and essentially, there is no precise solution. Vendors differ in the implementation of App Rules. Some vendors focus on winning over firewall operators that are used to
maintaining SPI rulebases with hundreds or thousands of simple rules, by hiding the abstracts of an App Rules under the hood. The nice thing is that operators can treat App Rules the same way as Access Rules. It is also nice that migrating an Access Rule base into next-gen land is as easy as swapping socket service objects for App objects. The big disadvantage of this approach is that this is a very rough interface abstraction. A hacker who studies that specific interface abstraction can make traffic look like Netflix and tunnel malicious traffic through a rule that allows Netflix traffic.

SonicWall decided for the sake of efficacy not to implement such user interface abstraction. With SonicOS App Rules follow very closely the inner working of the DPI engine. If an App is detected, the operator can decide what to do about traffic following the detection. If we want to allow Netflix traffic, we really do not care about detecting Netflix at all. We care about detecting traffic that is NOT Netflix so that we can drop this. Whatever we do not drop, is implicitly allowed at the end of the App Rule base. This is the opposite from an Access Rule base where everything is implicitly dropped at the end of the rulebase. Rules are written in a way to disallow all the things that we do not want in our network excluding those Apps that we want. The easiest way to do this is per category. We drop traffic for instance from the entire Multimedia category, with the exclusion of Netflix that we are allowing. This would drop any traffic for which an App Signature exists in the category Multimedia that is NOT Netflix. At the same time, we still can drop traffic from other categories such as Proxies and protect ourselves from an evasion attack.

Inspection of Encrypted Traffic

Access Rules work the same whether traffic is cleartext or encrypted – unless traffic is tunneled within an encrypted connection. For App Rules, all encrypted traffic looks like tunneled as the App detection has to happen within the encrypted traffic stream.
SonicOS solves this problem via DPI-SSL. DPI-SSL client-side intercepts traffic from a client, decrypts it, scans it, re-encrypts it and sends it off on its way to the server. On the return wing, the opposite happens. Vendors who do not implement such functionality fly blind. They have devices that can be easily evaded by SSL or SSH encrypted traffic that already today makes up over 60% of the Internet traffic.

Methods of Designing a Rulebase

The first decision that is made is whether a rule should be an Access Rule or an App Rule. If a rule does not contain a service, or a socket can be clearly defined, then an Access Rule is the better approach. If a rule uses a generic socket, or can run on dynamic sockets, then an Access Rule needs to be chosen. As described above, Access Rules can be negative or positive, hence explicitly permit traffic, or drop traffic. App Rules by design can only be negative. Also, remember that App Rules cannot overlap, hence unlike with Access Rules, rule order does not matter. The author prepared a worksheet where you can turn a positive match into a negative match for an entire category. To allow an application, you deny the entire App Category with the exception of the allowed application. This is a simple approach to configure a positive match on an App Rule.

When you design rules with users, make sure to summarize users into user groups for common applications that are dropped. Again, focus on what is dropped. If you have a combination of networks with users, and networks without users, make sure that you put these networks without users in the src-ip exclude field when referencing a user. Because if you do not do that, the rule is skipped as networks without users would not match any include users, the rule is skipped, and you drop out of the rulebase. Everything that you do not explicitly deny in an App Rules is automatically allowed, just the opposite from an Access Rule where everything that is not explicitly allowed is implicitly denied at the end of the rulebase.

Examples
Admin: YouTube, Vudu, Hulu
Faculty: YouTube and Vudu
Students: YouTube
Nobody: Netflix
Rule 1: Netflix DENY Admin, Faculty, Students
Rule 2: Hulu DENY Faculty, Students
Rule 3: Vudu: DENY Students
Rule 4: MULTIMEDIA except Netflix, Hulu, Vudu DENY all-users

Make use of the spreadsheet to carefully plan out your rulebase before configuring it. On Tab Applications, chose a category in column B. Then in columns D through H check the field to TRUE for the users you want this application allowed. If you do not use users, simply use column D only. Columns J through N is the negative representation, converting a positive match to a negative match as it is entered in an App Rule. App Rules can only drop a connection AFTER an App was recognized. Hence, we cannot permit an App explicitly. Create an App Rule where you deny all users that show TRUE in columns J through N for that application. Put those apps that are allowed, FALSE in J through N, into the exclude Apps. Keep in mind that in SonicOS App Rules cannot overlap. Create non-overlapping rules with the help of excludes. In App Rules, the user group is only applied to include users. All users that are not in include, or excluded, are dropping out of the rule base without any action, and the packet is allowed. If you need a final explicit deny rule, you build rules with all app categories that are not users and simply drop this traffic.

Related Articles

Categories

Source :
https://www.sonicwall.com/support/knowledge-base/application-rule-common-configurations/180208123013371/

The five-day job: A BlackByte ransomware intrusion case study

July 6, 2023

As ransomware attacks continue to grow in number and sophistication, threat actors can quickly impact business operations if organizations are not well prepared. In a recent investigation by Microsoft Incident Response (previously known as Microsoft Detection and Response Team – DART) of an intrusion, we found that the threat actor progressed through the full attack chain, from initial access to impact, in less than five days, causing significant business disruption for the victim organization.

Our investigation found that within those five days, the threat actor employed a range of tools and techniques, culminating in the deployment of BlackByte 2.0 ransomware, to achieve their objectives. These techniques included:

  • Exploitation of unpatched internet-exposed Microsoft Exchange Servers
  • Web shell deployment facilitating remote access
  • Use of living-off-the-land tools for persistence and reconnaissance
  • Deployment of Cobalt Strike beacons for command and control (C2)
  • Process hollowing and the use of vulnerable drivers for defense evasion
  • Deployment of custom-developed backdoors to facilitate persistence
  • Deployment of a custom-developed data collection and exfiltration tool
BlackByte 2.0 ransomware attack chain by order of stages: initial access and privilege escalation, persistence and command and control, reconnaissance, credential access, lateral movement, data staging and exfiltration, and impact.
Figure 1. BlackByte 2.0 ransomware attack chain

In this blog, we share details of our investigation into the end-to-end attack chain, exposing security weaknesses that the threat actor exploited to advance their attack. As we learned from Microsoft’s tracking of ransomware attacks and the cybercriminal economy that enables them, disrupting common attack patterns could stop many of the attacker activities that precede ransomware deployment. This case highlights that common security hygiene practices go a long way in preventing, identifying, and responding to malicious activity as early as possible to mitigate the impact of ransomware attacks. We encourage organizations to follow the outlined mitigation steps, including ensuring that internet-facing assets are up to date and configured securely. We also share indicators of compromise, detection details, and hunting guidance to help organizations identify and respond to these attacks in their environments.  

Forensic analysis

Initial access and privilege escalation

To obtain initial access into the victim’s environment, the threat actor was observed exploiting the ProxyShell vulnerabilities CVE-2021-34473, CVE-2021-34523, and CVE-2021-31207 on unpatched Microsoft Exchange Servers. The exploitation of these vulnerabilities allowed the threat actor to:

  • Attain system-level privileges on the compromised Exchange host
  • Enumerate LegacyDN of users by sending Autodiscover requests, including SIDs of users
  • Construct a valid authentication token and use it against the Exchange PowerShell backend
  • Impersonate domain admin users and create a web shell by using the New-MailboxExportRequest cmdlet
  • Create web shells to obtain remote control on affected servers

The threat actor was observed operating from the following IP to exploit ProxyShell and access the web shell:

  • 185.225.73[.]244

Persistence

Backdoor

After gaining access to a device, the threat actor created the following registry run keys to run a payload each time a user signs in:

Registry keyValue nameValue data
HKEY_CURRENT_USER\Software\Microsoft\Windows\CurrentVersion\Run  MsEdgeMsErundll32 C:\Users\user\Downloads\api-msvc.dll,Default  
HKEY_CURRENT_USER\Software\Microsoft\Windows\CurrentVersion\Run  MsEdgeMsErundll32 C:\temp\api-msvc.dll,Default  
HKEY_CURRENT_USER\Software\Microsoft\Windows\CurrentVersion\Run  MsEdgeMsErundll32 C:\systemtest\api-system.png,Default

The file api-msvc.dll (SHA-256: 4a066569113a569a6feb8f44257ac8764ee8f2011765009fdfd82fe3f4b92d3e) was determined to be a backdoor capable of collecting system information, such as the installed antivirus products, device name, and IP address. This information is then sent via HTTP POST request to the following C2 channel:

  • hxxps://myvisit[.]alteksecurity[.]org/t

The organization was not using Microsoft Defender Antivirus, which detects this malware as Trojan:Win32/Kovter!MSR, as the primary antivirus solution, and the backdoor was allowed to run.

An additional file, api-system.png, was identified to have similarities to api-msvc.dll. This file behaved like a DLL, had the same default export function, and also leveraged run keys for persistence.

Cobalt Strike Beacon

The threat actor leveraged Cobalt Strike to achieve persistence. The file sys.exe (SHA-256: 5f37b85687780c089607670040dbb3da2749b91b8adc0aa411fd6280b5fa7103), detected by Microsoft Defender Antivirus as Trojan:Win64/CobaltStrike!MSR, was determined to be a Cobalt Strike Beacon and was downloaded directly from the file sharing service temp[.]sh:

  • hxxps://temp[.]sh/szAyn/sys.exe

This beacon was configured to communicate with the following C2 channel:

  • 109.206.243[.]59:443

AnyDesk

Threat actors leverage legitimate remote access tools during intrusions to blend into a victim network. In this case, the threat actor utilized the remote administration tool AnyDesk, to maintain persistence and move laterally within the network. AnyDesk was installed as a service and was run from the following paths:

  • C:\systemtest\anydesk\AnyDesk.exe
  • C:\Program Files (x86)\AnyDesk\AnyDesk.exe
  • C:\Scripts\AnyDesk.exe

Successful connections were observed in the AnyDesk log file ad_svc.trace involving anonymizer service IP addresses linked to TOR and MULLVAD VPN, a common technique that threat actors employ to obscure their source IP ranges.

Reconnaissance

We found the presence and execution of the network discovery tool NetScan being used by the threat actor to perform network enumeration using the following file names:

  • netscan.exe (SHA-256:1b9badb1c646a19cdf101ac4f6fdd23bc61eaab8c9f925eb41848cea9fd0738e)
  • netapp.exe (SHA-256:1b9badb1c646a19cdf101ac4f6fdd23bc61eaab8c9f925eb41848cea9fd0738e)

Additionally, execution of AdFind (SHA-256: f157090fd3ccd4220298c06ce8734361b724d80459592b10ac632acc624f455e), an Active Directory reconnaissance tool, was observed in the environment.

Credential access

Evidence of likely usage of the credential theft tool Mimikatzwas also uncovered through the presence of a related log file mimikatz.log. Microsoft IR assesses that Mimikatz was likely used to attain credentials for privileged accounts.

Lateral movement

Using compromised domain admin credentials, the threat actor used Remote Desktop Protocol (RDP) and PowerShell remoting to obtain access to other servers in the environment, including domain controllers.

Data staging and exfiltration

In one server where Microsoft Defender Antivirus was installed, a suspicious file named explorer.exe was identified, detected as Trojan:Win64/WinGoObfusc.LK!MT, and quarantined. However, because tamper protection wasn’t enabled on this server, the threat actor was able to disable the Microsoft Defender Antivirus service, enabling the threat actor to run the file using the following command:

explorer.exe P@$$w0rd

After reverse engineering explorer.exe, we determined it to be ExByte, a GoLang-based tool developed and commonly used in BlackByte ransomware attacks for collection and exfiltration of files from victim networks. This tool is capable of enumerating files of interest across the network and, upon execution, creates a log file containing a list of files and associated metadata. Multiple log files were uncovered during the investigation in the path:

  • C:\Exchange\MSExchLog.log

Analysis of the binary revealed a list of file extensions that are targeted for enumeration.

Figure-2.-Binary-analysis-showing-file-extensions-enumerated-by-explorer.exe_
Figure 2. Binary analysis showing file extensions enumerated by explorer.exe

Forensic analysis identified a file named data.txt that was created and later deleted after ExByte execution. This file contained obfuscated credentials that ExByte leveraged to authenticate to the popular file sharing platform Mega NZ using the platform’s API at:

  • hxxps://g.api.mega.co[.]nz
Figure 3. Binary analysis showing explorer.exe functionality for connecting to file sharing service MEGA NZ

We also determined that this version of Exbyte was crafted specifically for the victim, as it contained a hardcoded device name belonging to the victim and an internal IP address.

ExByte execution flow

Upon execution, ExByte decodes several strings and checks if the process is running with privileged access by reading \\.\PHYSICALDRIVE0:

  • If this check fails, ShellExecuteW is invoked with the IpOperation parameter RunAs, which runs explorer.exe with elevated privileges.

After this access check, explorer.exe attempts to read the data.txt file in the current location:

  • If the text file doesn’t exist, it invokes a command for self-deletion and exits from memory:
C:\Windows\system32\cmd.exe /c ping 1.1.1.1 -n 10 > nul & Del <PATH>\explorer.exe /F /Q
  • If data.txt exists, explorer.exe reads the file, passes the buffer to Base64 decode function, and then decrypts the data using the key provided in the command line. The decrypted data is then parsed as JSON below and fed for login function:
{    “a”:”us0”,    “user”:”<CONTENT FROM data.txt>”}

Finally, it forms a URL for sign-in to the API of the service MEGA NZ:

  • hxxps://g.api.mega.co[.]nz/cs?id=1674017543

Data encryption and destruction

On devices where files were successfully encrypted, we identified suspicious executables, detected by Microsoft Defender Antivirus as Trojan:Win64/BlackByte!MSR, with the following names:

  • wEFT.exe
  • schillerized.exe

The files were analyzed and determined to be BlackByte 2.0 binaries responsible for encryption across the environment. The binaries require an 8-digit key number to encrypt files.

Two modes of execution were identified:

  • When the -s parameter is provided, the ransomware self-deletes and encrypts the machine it was executed on.
  • When the -a parameter is provided, the ransomware conducts enumeration and uses an Ultimate Packer Executable (UPX) packed version of PsExec to deploy across the network. Several domain admin credentials were hardcoded in the binary, facilitating the deployment of the binary across the network.

Depending on the switch (-s or -a), execution may create the following files:

  • C:\SystemData\M8yl89s7.exe (UPX-packed PsExec with a random name; SHA-256: ba3ec3f445683d0d0407157fda0c26fd669c0b8cc03f21770285a20b3133098f)
  • C:\SystemData\wEFT.exe (Additional BlackByte binary)
  • C:\SystemData\MsExchangeLog1.log (Log file)
  • C:\SystemData\rENEgOtiAtES (A vulnerable (CVE-2019-16098) driver RtCore64.sys used to evade detection by installed antivirus software; SHA-256: 01aa278b07b58dc46c84bd0b1b5c8e9ee4e62ea0bf7a695862444af32e87f1fd)
  • C:\SystemData\iHu6c4.ico (Random name – BlackBytes icon)
  • C:\SystemData\BB_Readme_file.txt (BlackByte ReadMe file)
  • C:\SystemData\skip_bypass.txt (Unknown)

BlackByte 2.0 ransomware capabilities

Some capabilities identified for the BlackByte 2.0 ransomware were:

  • Antivirus bypass
    • The file rENEgOtiAtES created matches RTCore64.sys, a vulnerable driver (CVE-2049-16098) that allows any authenticated user to read or write to arbitrary memory
    • The BlackByte binary then creates and starts a service named RABAsSaa calling rENEgOtiAtES, and exploits this service to evade detection by installed antivirus software
  • Process hollowing
    • Invokes svchost.exe, injects to it to complete device encryption, and self-deletes by executing the following command:
      • cmd.exe /c ping 1.1.1.1 -n 10 > Nul & Del “PATH_TO_BLACKBYTE” /F /Q
  • Modification / disabling of Windows Firewall
    • The following commands are executed to either modify existing Windows Firewall rules, or to disable Windows Firewall entirely:
      • cmd /c netsh advfirewall set allprofiles state off
      • cmd /c netsh advfirewall firewall set rule group=”File and Printer Sharing” new enable=Yes
      • cmd /c netsh advfirewall firewall set rule group=”Network Discovery” new enable=Yes
  • Modification of volume shadow copies
    • The following commands are executed to destroy volume shadow copies on the machine:
      • cmd /c vssadmin Resize ShadowStorge /For=B:\ /On=B:\ /MaxSize=401MB
      • cmd /c vssadmin Resize ShadowStorage /For=B:\ /On=B:\ /MaxSize=UNBOUNDED
  • Modification of registry keys/values
    • The following commands are executed to modify the registry, facilitating elevated execution on the device:
      • cmd /c reg add HKLM\SOFTWARE\Microsoft\Windows\CurrentVersion\Policies\System /v LocalAccountTokenFilterPolicy /t REG_DWORD /d 1 /f
      • cmd /c reg add HKLM\SOFTWARE\Microsoft\Windows\CurrentVersion\Policies\System /v EnableLinkedConnections /t REG_DWORD /d 1 /f
      • cmd /c reg add HKLM\\SYSTEM\\CurrentControlSet\\Control\\FileSystem /v LongPathsEnabled /t REG_DWORD /d 1 /f
  • Additional functionality
    • Ability to terminate running services and processes
    • Ability to enumerate and mount volumes and network shares for encryption
    • Perform anti-forensics technique timestomping (sets the file time of encrypted and ReadMe file to 2000-01-01 00:00:00)
    • Ability to perform anti-debugging techniques

Recommendations

To guard against BlackByte ransomware attacks, Microsoft recommends the following:

  • Ensure that you have a patch management process in place and that patching for internet-exposed devices is prioritized; Understand and assess your cyber exposure with advanced vulnerability and configuration assessment tools like Microsoft Defender Vulnerability Management
  • Implement an endpoint detection and response (EDR) solution like Microsoft Defender for Endpoint to gain visibility into malicious activity in real time across your network
  • Ensure antivirus protections are updated regularly by turning on cloud-based protection and that your antivirus solution is configured to block threats
  • Enable tamper protection to prevent components of Microsoft Defender Antivirus from being disabled
  • Block inbound traffic from IPs specified in the indicators of compromise section of this report
  • Block inbound traffic from TOR exit nodes
  • Block inbound access from unauthorized public VPN services
  • Restrict administrative privileges to prevent authorized system changes

Conclusion

BlackByte ransomware attacks target organizations that have infrastructure with unpatched vulnerabilities.  As outlined in the Microsoft Digital Defense Report, common security hygiene practices, including keeping systems up to date, could protect against 98% of attacks.

As new tools are being developed by threat actors, a modern threat protection solution like Microsoft 365 Defender is necessary to prevent and detect the multiple techniques used in the attack chain, especially where the threat actor attempts to evade or disable specific defense mechanisms. Hunting for malicious behavior should be performed regularly in order to detect potential attacks that could evade detections, as a complementary activity for continuous monitoring from security tools alerts and incidents.

To understand how Microsoft can help you secure your network and respond to network compromise, visit https://aka.ms/MicrosoftIR.

Microsoft 365 Defender detections

Microsoft Defender Antivirus

Microsoft Defender Antivirus detects this threat as the following malware:

  • Trojan:Win32/Kovter!MSR
  • Trojan:Win64/WinGoObfusc.LK!MT
  • Trojan:Win64/BlackByte!MSR
  • HackTool:Win32/AdFind!MSR
  • Trojan:Win64/CobaltStrike!MSR

Microsoft Defender for Endpoint

The following alerts might indicate threat activity related to this threat. Note, however, that these alerts can be also triggered by unrelated threat activity.

  • ‘CVE-2021-31207’ exploit malware was detected
  • An active ‘NetShDisableFireWall’ malware in a command line was prevented from executing.
  • Suspicious registry modification.
  • ‘Rtcore64’ hacktool was detected
  • Possible ongoing hands-on-keyboard activity (Cobalt Strike)
  • A file or network connection related to a ransomware-linked emerging threat activity group detected
  • Suspicious sequence of exploration activities
  • A process was injected with potentially malicious code
  • Suspicious behavior by cmd.exe was observed
  • ‘Blackbyte’ ransomware was detected

Microsoft Defender Vulnerability Management

Microsoft Defender Vulnerability Management surfaces devices that may be affected by the following vulnerabilities used in this threat:

  • CVE-2021-34473
  • CVE-2021-34523
  • CVE-2021-31207
  • CVE-2019-16098

Hunting queries

Microsoft 365 Defender

Microsoft 365 Defender customers can run the following query to find related activity in their networks:

ProxyShell web shell creation events

DeviceProcessEvents| where ProcessCommandLine has_any ("ExcludeDumpster","New-ExchangeCertificate") and ProcessCommandLine has_any ("-RequestFile","-FilePath")

Suspicious vssadmin events

DeviceProcessEvents| where ProcessCommandLine has_any ("vssadmin","vssadmin.exe") and ProcessCommandLine has "Resize ShadowStorage" and ProcessCommandLine has_any ("MaxSize=401MB"," MaxSize=UNBOUNDED")

Detection for persistence creation using Registry Run keys

DeviceRegistryEvents | where ActionType == "RegistryValueSet" | where (RegistryKey has @"Microsoft\Windows\CurrentVersion\RunOnce" and RegistryValueName == "MsEdgeMsE")      or (RegistryKey has @"Microsoft\Windows\CurrentVersion\RunOnceEx" and RegistryValueName == "MsEdgeMsE")    or (RegistryKey has @"Microsoft\Windows\CurrentVersion\Run" and RegistryValueName == "MsEdgeMsE")| where RegistryValueData startswith @"rundll32"| where RegistryValueData endswith @".dll,Default"| project Timestamp,DeviceId,DeviceName,ActionType,RegistryKey,RegistryValueName,RegistryValueData

Microsoft Sentinel

Microsoft Sentinel customers can use the TI Mapping analytics (a series of analytics all prefixed with ‘TI map’) to automatically match the malicious domain indicators mentioned in this blog post with data in their workspace. If the TI Map analytics are not currently deployed, customers can install the Threat Intelligence solution from the Microsoft Sentinel Content Hub to have the analytics rule deployed in their Sentinel workspace. More details on the Content Hub can be found here:  https://learn.microsoft.com/azure/sentinel/sentinel-solutions-deploy

Microsoft Sentinel also has a range of detection and threat hunting content that customers can use to detect the post exploitation activity detailed in this blog in addition to Microsoft 365 Defender detections list above.

Indicators of compromise

The table below shows IOCs observed during our investigation. We encourage our customers to investigate these indicators in their environments and implement detections and protections to identify past related activity and prevent future attacks against their systems.

IndicatorTypeDescription
4a066569113a569a6feb8f44257ac8764ee8f2011765009fdfd82fe3f4b92d3eSHA-256api-msvc.dll (Backdoor installed through RunKeys)
5f37b85687780c089607670040dbb3da2749b91b8adc0aa411fd6280b5fa7103SHA-256sys.exe (Cobalt Strike Beacon)
01aa278b07b58dc46c84bd0b1b5c8e9ee4e62ea0bf7a695862444af32e87f1fdSHA-256rENEgOtiAtES (Vulnerable driver RtCore64.sys created by BlackByte binary)
ba3ec3f445683d0d0407157fda0c26fd669c0b8cc03f21770285a20b3133098fSHA-256[RANDOM_NAME].exe (UPX Packed PsExec created by BlackByte binary)
1b9badb1c646a19cdf101ac4f6fdd23bc61eaab8c9f925eb41848cea9fd0738eSHA-256“netscan.exe”, “netapp.exe (Netscan network discovery tool)
f157090fd3ccd4220298c06ce8734361b724d80459592b10ac632acc624f455eSHA-256AdFind.exe (Active Directory information gathering tool)
hxxps://myvisit[.]alteksecurity[.]org/tURLC2 for backdoor api-msvc.dll
hxxps://temp[.]sh/szAyn/sys.exeURLDownload URL for sys.exe
109.206.243[.]59IP AddressC2 for Cobalt Strike Beacon sys.exe
185.225.73[.]244IP AddressOriginating IP address for ProxyShell exploitation and web shell interaction

NOTE: These indicators should not be considered exhaustive for this observed activity.

Appendix

File extensions targeted by BlackByte binary for encryption:

.4dd.4dl.accdb.accdc.accde.accdr.accdt.accft
.adb.ade.adf.adp.arc.ora.alf.ask
.btr.bdf.cat.cdb.ckp.cma.cpd.dacpac
.dad.dadiagrams.daschema.db.db-shm.db-wal.db3.dbc
.dbf.dbs.dbt.dbv. dbx. dcb. dct. dcx
. ddl. dlis. dp1. dqy. dsk. dsn. dtsx. dxl
. eco. ecx. edb. epim. exb. fcd. fdb. fic
. fmp. fmp12. fmpsl. fol.fp3. fp4. fp5. fp7
. fpt. frm. gdb. grdb. gwi. hdb. his. ib
. idb. ihx. itdb. itw. jet. jtx. kdb. kexi
. kexic. kexis. lgc. lwx. maf. maq. mar. masmav
. mdb. mpd. mrg. mud. mwb. myd. ndf. nnt
. nrmlib. ns2. ns3. ns4. nsf. nv. nv2. nwdb
. nyf. odb. ogy. orx. owc. p96. p97. pan
. pdb. pdm. pnz. qry. qvd. rbf. rctd. rod
. rodx. rpd. rsd. sas7bdat. sbf. scx. sdb. sdc
. sdf. sis. spg. sql. sqlite. sqlite3. sqlitedb. te
. temx. tmd. tps. trc. trm. udb. udl. usr
. v12. vis. vpd. vvv. wdb. wmdb. wrk. xdb
. xld. xmlff. abcddb. abs. abx. accdw. and. db2
. fm5. hjt. icg. icr. kdb. lut. maw. mdn
. mdt       

Shared folders targeted for encryption (Example: \\[IP address]\Downloads):

UsersBackupVeeamhomeshome
mediacommonStorage ServerPublicWeb
ImagesDownloadsBackupDataActiveBackupForBusinessBackups
NAS-DCDCBACKUPDirectorFilesshare 

File extensions ignored:

.ini.url.msilog.log.ldf.lock.theme.msi
.sys.wpx.cpl.adv.msc.scr.key.ico
.dll.hta.deskthemepack.nomedia.msu.rtp.msp.idx
.ani.386.diagcfg.bin.mod.ics.com.hlp
 .spl.nls.cab.exe.diagpkg.icl.ocx.rom
.prf.thempack.msstyles.icns.mpa.drv.cur.diagcab
.cmd.shs      

Folders ignored:

windowsbootprogram files (x86)windows.oldprogramdata
intelbitdefendertrend microwindowsappsappdata
application datasystem volume informationperflogsmsocache 

Files ignored:

bootnxtntldrbootmgrthumbs.db
ntuser.datbootsect.bakautoexec.baticoncache.db
bootfont.bin   

Processes terminated:

teracopyteamviewernsservicensctrluranium
processhackerprocmonpestudioprocmon64x32dbg
x64dbgcff explorerprocexppslisttcpview
tcpvcondbgviewrammaprammap64vmmap
ollydbgautorunsautorunsscfilemonregmon
idaqidaq64immunitydebuggerwiresharkdumpcap
hookexplorerimportrecpetoolslordpesysinspector
proc_analyzersysanalyzersniff_hitwindbgjoeboxcontrol
joeboxserverresourcehackerfiddlerhttpdebuggerdumpit
rammaprammap64vmmapagntsvccntaosmgr
dbeng50dbsnmpencsvcinfopathisqlplussvc
mbamtraymsaccessmsftesqlmspubmydesktopqos
mydesktopservicemysqldmysqld-ntmysqld-optNtrtscan
ocautoupdsocommocssdonenoteoracle
outlookPccNTMonpowerpntsqbcoreservicesql
sqlagentsqlbrowsersqlservrsqlwritersteam
synctimetbirdconfigthebatthebat64thunderbird
tmlistenvisiowinwordwordpadxfssvccon
zoolz    

Services terminated:

CybereasonRansomFreevnetdbpcdSamSsTeraCopyService
msftesqlnsServiceklvssbridge64vapiendpointShMonitor
SmcinstSmcServiceSntpServicesvcGenericHostSwi_
TmCCSFtmlistenTrueKeyTrueKeySchedulerTrueKeyServiceHelper
WRSVCMcTaskManagerOracleClientCache80mfefirewbengine
mfemmsRESvcmfevtpsacsvrSAVAdminService
SepMasterServicePDVFSServiceESHASRVSDRSVCFA_Scheduler
KAVFSKAVFS_KAVFSGTkavfsslpklnagentmacmnsvc
masvcMBAMServiceMBEndpointAgentMcShieldaudioendpointbuilder
AntivirusAVPDCAgentbedbgEhttpSrv
MMSekrnEPSecurityServiceEPUpdateServicentrtscan
EsgShKernelmsexchangeadtopologyAcrSch2SvcMSOLAP$TPSAMAIntel(R) PROSet Monitoring
msexchangeimap4ARSMunistoresvc_1af40aReportServer$TPSMSOLAP$SYSTEM_BGC
W3SvcMSExchangeSRSReportServer$TPSAMAZoolz 2 ServiceMSOLAP$TPS
aphidmonitorserviceSstpSvcMSExchangeMTAReportServer$SYSTEM_BGCSymantec System Recovery
UI0DetectMSExchangeSAMSExchangeISReportServerMsDtsServer110
POP3SvcMSExchangeMGMTSMTPSvcMsDtsServerIisAdmin
MSExchangeESEraserSvc11710Enterprise Client ServiceMsDtsServer100NetMsmqActivator
stc_raw_agentVSNAPVSSPDVFSServiceAcrSch2SvcAcronis
CASAD2DWebSvcCAARCUpdateSvcMcAfeeavpsusDLPAgentService
mfewcBMR Boot ServiceDefWatchccEvtMgrccSetMgr
SavRoamRTVsc screenconnectransomsqltelemetrymsexch
vncteamviewermsolapveeambackup
sqlmemtasvsssophossvc$
mepocswuauserv   

Drivers that Blackbyte can bypass:

360avflt.sys360box.sys360fsflt.sys360qpesv.sys5nine.cbt.sys
a2acc.sysa2acc64.sysa2ertpx64.sysa2ertpx86.sysa2gffi64.sys
a2gffx64.sysa2gffx86.sysaaf.sysaalprotect.sysabrpmon.sys
accessvalidator.sysacdriver.sysacdrv.sysadaptivaclientcache32.sysadaptivaclientcache64.sys
adcvcsnt.sysadspiderdoc.sysaefilter.sysagentrtm64.sysagfsmon.sys
agseclock.sysagsyslock.sysahkamflt.sysahksvpro.sysahkusbfw.sys
ahnrghlh.sysaictracedrv_am.sysairship-filter.sysajfsprot.sysalcapture.sys
alfaff.sysaltcbt.sysamfd.sysamfsm.sysamm6460.sys
amm8660.sysamsfilter.sysamznmon.sysantileakfilter.sysantispyfilter.sys
anvfsm.sysapexsqlfilterdriver.sysappcheckd.sysappguard.sysappvmon.sys
arfmonnt.sysarta.sysarwflt.sysasgard.sysashavscan.sys
asiofms.sysaswfsblk.sysaswmonflt.sysaswsnx.sysaswsp.sys
aszfltnt.sysatamptnt.sysatc.sysatdragent.sysatdragent64.sys
aternityregistryhook.sysatflt.sysatrsdfw.sysauditflt.sysaupdrv.sys
avapsfd.sysavc3.sysavckf.sysavfsmn.sysavgmfi64.sys
avgmfrs.sysavgmfx64.sysavgmfx86.sysavgntflt.sysavgtpx64.sys
avgtpx86.sysavipbb.sysavkmgr.sysavmf.sysawarecore.sys
axfltdrv.sysaxfsysmon.sysayfilter.sysb9kernel.sysbackupreader.sys
bamfltr.sysbapfecpt.sysbbfilter.sysbd0003.sysbddevflt.sys
bdfiledefend.sysbdfilespy.sysbdfm.sysbdfsfltr.sysbdprivmon.sys
bdrdfolder.sysbdsdkit.sysbdsfilter.sysbdsflt.sysbdsvm.sys
bdsysmon.sysbedaisy.sysbemk.sysbfaccess.sysbfilter.sys
bfmon.sysbhdrvx64.sysbhdrvx86.sysbhkavka.sysbhkavki.sys
bkavautoflt.sysbkavsdflt.sysblackbirdfsa.sysblackcat.sysbmfsdrv.sys
bmregdrv.sysboscmflt.sysbosfsfltr.sysbouncer.sysboxifier.sys
brcow_x_x_x_x.sysbrfilter.sysbrnfilelock.sysbrnseclock.sysbrowsermon.sys
bsrfsflt.sysbssaudit.sysbsyaed.sysbsyar.sysbsydf.sys
bsyirmf.sysbsyrtm.sysbsysp.sysbsywl.sysbwfsdrv.sys
bzsenspdrv.sysbzsenth.sysbzsenyaradrv.syscaadflt.syscaavfltr.sys
cancelsafe.syscarbonblackk.syscatflt.syscatmf.syscbelam.sys
cbfilter20.syscbfltfs4.syscbfsfilter2017.syscbfsfilter2020.syscbsampledrv.sys
cdo.syscdrrsflt.syscdsgfsfilter.syscentrifyfsf.syscfrmd.sys
cfsfdrvcgwmf.syschange.syschangelog.syschemometecfilter.sys
ciscoampcefwdriver.sysciscoampheurdriver.sysciscosam.sysclumiochangeblockmf.syscmdccav.sys
cmdcwagt.syscmdguard.syscmdmnefs.syscmflt.syscode42filter.sys
codex.sysconduantfsfltr.syscontainermonitor.syscpavfilter.syscpavkernel.sys
cpepmon.syscrexecprev.syscrncache32.syscrncache64.syscrnsysm.sys
cruncopy.syscsaam.syscsaav.syscsacentr.syscsaenh.sys
csagent.syscsareg.syscsascr.syscsbfilter.syscsdevicecontrol.sys
csfirmwareanalysis.syscsflt.syscsmon.syscssdlp.sysctamflt.sys
ctifile.sysctinet.sysctrpamon.sysctx.syscvcbt.sys
cvofflineflt32.syscvofflineflt64.syscvsflt.syscwdriver.syscwmem2k64.sys
cybkerneltracker.syscylancedrv64.syscyoptics.syscyprotectdrv32.syscyprotectdrv64.sys
cytmon.syscyverak.syscyvrfsfd.syscyvrlpc.syscyvrmtgn.sys
datanow_driver.sysdattofsf.sysda_ctl.sysdcfafilter.sysdcfsgrd.sys
dcsnaprestore.sysdeepinsfs.sysdelete_flt.sysdevmonminifilter.sysdfmfilter.sys
dgedriver.sysdgfilter.sysdgsafe.sysdhwatchdog.sysdiflt.sys
diskactmon.sysdkdrv.sysdkrtwrt.sysdktlfsmf.sysdnafsmonitor.sys
docvmonk.sysdocvmonk64.sysdpmfilter.sysdrbdlock.sysdrivesentryfilterdriver2lite.sys
drsfile.sysdrvhookcsmf.sysdrvhookcsmf_amd64.sysdrwebfwflt.sysdrwebfwft.sys
dsark.sysdsdriver.sysdsfemon.sysdsflt.sysdsfltfs.sys
dskmn.sysdtdsel.sysdtpl.sysdwprot.sysdwshield.sys
dwshield64.syseamonm.syseaseflt.syseasyanticheat.syseaw.sys
ecatdriver.sysedevmon.sysednemfsfilter.sysedrdrv.sysedrsensor.sys
edsigk.syseectrl.syseetd32.syseetd64.syseeyehv.sys
eeyehv64.sysegambit.sysegfilterk.sysegminflt.sysegnfsflt.sys
ehdrv.syselock2fsctldriver.sysemxdrv2.sysenigmafilemondriver.sysenmon.sys
epdrv.sysepfw.sysepfwwfp.sysepicfilter.sysepklib.sys
epp64.sysepregflt.syseps.sysepsmn.sysequ8_helper.sys
eraser.sysesensor.sysesprobe.sysestprmon.sysestprp.sys
estregmon.sysestregp.sysestrkmon.sysestrkr.syseventmon.sys
evmf.sysevscase.sysexcfs.sysexprevdriver.sysfailattach.sys
failmount.sysfam.sysfangcloud_autolock_driver.sysfapmonitor.sysfarflt.sys
farwflt.sysfasdriverfcnotify.sysfcontrol.sysfdrtrace.sys
fekern.sysfencry.sysffcfilt.sysffdriver.sysfildds.sys
filefilter.sysfileflt.sysfileguard.sysfilehubagent.sysfilemon.sys
filemonitor.sysfilenamevalidator.sysfilescan.sysfilesharemon.sysfilesightmf.sys
filesystemcbt.sysfiletrace.sysfile_monitor.sysfile_protector.sysfile_tracker.sys
filrdriver.sysfim.sysfiometer.sysfiopolicyfilter.sysfjgsdis2.sys
fjseparettifilterredirect.sysflashaccelfs.sysflightrecorder.sysfltrs329.sysflyfs.sys
fmdrive.sysfmkkc.sysfmm.sysfortiaptfilter.sysfortimon2.sys
fortirmon.sysfortishield.sysfpav_rtp.sysfpepflt.sysfsafilter.sys
fsatp.sysfsfilter.sysfsgk.sysfshs.sysfsmon.sys
fsmonitor.sysfsnk.sysfsrfilter.sysfstrace.sysfsulgk.sys
fsw31rj1.sysgagsecurity.sysgbpkm.sysgcffilter.sysgddcv.sys
gefcmp.sysgemma.sysgeprotection.sysggc.sysgibepcore.sys
gkff.sysgkff64.sysgkpfcb.sysgkpfcb64.sysgofsmf.sys
gpminifilter.sysgroundling32.sysgroundling64.sysgtkdrv.sysgumhfilter.sys
gzflt.syshafsnk.syshbflt.syshbfsfltr.syshcp_kernel_acq.sys
hdcorrelatefdrv.syshdfilemon.syshdransomoffdrv.syshdrfs.sysheimdall.sys
hexisfsmonitor.syshfileflt.syshiofs.syshmpalert.syshookcentre.sys
hooksys.syshpreg.syshsmltmon.syshsmltwhl.syshssfwhl.sys
hvlminifilter.sysibr2fsk.sysiccfileioad.sysiccfilteraudit.sysiccfiltersc.sys
icfclientflt.sysicrlmonitor.sysiderafilterdriver.sysielcp.sysieslp.sys
ifs64.sysignis.sysiguard.sysiiscache.sysikfilesec.sys
im.sysimffilter.sysimfilter.sysimgguard.sysimmflex.sys
immunetprotect.sysimmunetselfprotect.sysinisbdrv64.sysino_fltr.sysintelcas.sys
intmfs.sysinuse.sysinvprotectdrv.sysinvprotectdrv64.sysionmonwdrv.sys
iothorfs.sysipcomfltr.sysipfilter.sysiprotect.sysiridiumswitch.sys
irongatefd.sysisafekrnl.sysisafekrnlmon.sysisafermonisecureflt.sys
isedrv.sysisfpdrv.sysisirmfmon.sysisregflt.sysisregflt64.sys
issfltr.sysissregistry.sysit2drv.sysit2reg.sysivappmon.sys
iwdmfs.sysiwhlp.sysiwhlp2.sysiwhlpxp.sysjdppsf.sys
jdppwf.sysjkppob.sysjkppok.sysjkpppf.sysjkppxk.sys
k7sentry.syskavnsi.syskawachfsminifilter.syskc3.syskconv.sys
kernelagent32.syskewf.syskfac.syskfileflt.syskisknl.sys
klam.sysklbg.sysklboot.syskldback.syskldlinf.sys
kldtool.sysklfdefsf.sysklflt.sysklgse.sysklhk.sys
klif.sysklifaa.sysklifks.sysklifsm.sysklrsps.sys
klsnsr.sysklupd_klif_arkmon.syskmkuflt.syskmnwch.syskmxagent.sys
kmxfile.syskmxsbx.sysksfsflt.sysktfsfilter.sysktsyncfsflt.sys
kubwksp.syslafs.syslbd.syslbprotect.syslcgadmon.sys
lcgfile.syslcgfilemon.syslcmadmon.syslcmfile.syslcmfilemon.sys
lcmprintmon.sysldsecdrv.syslibwamf.syslivedrivefilter.sysllfilter.sys
lmdriver.syslnvscenter.syslocksmith.syslragentmf.syslrtp.sys
magicbackupmonitor.sysmagicprotect.sysmajoradvapi.sysmarspy.sysmaxcryptmon.sys
maxproc64.sysmaxprotector.sysmbae64.sysmbam.sysmbamchameleon.sys
mbamshuriken.sysmbamswissarmy.sysmbamwatchdog.sysmblmon.sysmcfilemon32.sys
mcfilemon64.sysmcstrg.sysmearwfltdriver.sysmessage.sysmfdriver.sys
mfeaack.sysmfeaskm.sysmfeavfk.sysmfeclnrk.sysmfeelamk.sys
mfefirek.sysmfehidk.sysmfencbdc.sysmfencfilter.sysmfencoas.sys
mfencrk.sysmfeplk.sysmfewfpk.sysminiicpt.sysminispy.sys
minitrc.sysmlsaff.sysmmpsy32.sysmmpsy64.sysmonsterk.sys
mozycorpfilter.sysmozyenterprisefilter.sysmozyentfilter.sysmozyhomefilter.sysmozynextfilter.sys
mozyoemfilter.sysmozyprofilter.sysmpfilter.sysmpkernel.sysmpksldrv.sys
mpxmon.sysmracdrv.sysmrxgoogle.sysmscan-rt.sysmsiodrv4.sys
msixpackagingtoolmonitor.sysmsnfsflt.sysmspy.sysmssecflt.sysmtsvcdf.sys
mumdi.sysmwac.sysmwatcher.sysmwfsmfltr.sysmydlpmf.sys
namechanger.sysnanoavmf.sysnaswsp.sysndgdmk.sysneokerbyfilter
netaccctrl.sysnetaccctrl64.sysnetguard.sysnetpeeker.sysngscan.sys
nlcbhelpi64.sysnlcbhelpx64.sysnlcbhelpx86.sysnlxff.sysnmlhssrv01.sys
nmpfilter.sysnntinfo.sysnovashield.sysnowonmf.sysnpetw.sys
nprosec.sysnpxgd.sysnpxgd64.sysnravwka.sysnrcomgrdka.sys
nrcomgrdki.sysnregsec.sysnrpmonka.sysnrpmonki.sysnsminflt.sys
nsminflt64.sysntest.sysntfsf.sysntguard.sysntps_fa.sys
nullfilter.sysnvcmflt.sysnvmon.sysnwedriver.sysnxfsmon.sys
nxrmflt.sysoadevice.sysoavfm.sysoczminifilter.sysodfsfilter.sys
odfsfimfilter.sysodfstokenfilter.sysoffsm.sysomfltlh.sysosiris.sys
ospfile_mini.sysospmon.sysparity.syspassthrough.syspath8flt.sys
pavdrv.syspcpifd.syspctcore.syspctcore64.syspdgenfam.sys
pecfilter.sysperfectworldanticheatsys.syspervac.syspfkrnl.syspfracdrv.sys
pgpfs.syspgpwdefs.sysphantomd.sysphdcbtdrv.syspkgfilter.sys
pkticpt.sysplgfltr.sysplpoffdrv.syspointguardvista64f.syspointguardvistaf.sys
pointguardvistar32.syspointguardvistar64.sysprocmon11.sysproggerdriver.syspsacfileaccessfilter.sys
pscff.syspsgdflt.syspsgfoctrl.syspsinfile.syspsinproc.sys
psisolator.syspwipf6.syspwprotect.syspzdrvxp.sysqdocumentref.sys
qfapflt.sysqfilter.sysqfimdvr.sysqfmon.sysqminspec.sys
qmon.sysqqprotect.sysqqprotectx64.sysqqsysmon.sysqqsysmonx64.sys
qutmdrv.sysranpodfs.sysransomdefensexxx.sysransomdetect.sysreaqtor.sys
redlight.sysregguard.sysreghook.sysregmonex.sysrepdrv.sys
repmon.sysrevefltmgr.sysreveprocprotection.sysrevonetdriver.sysrflog.sys
rgnt.sysrmdiskmon.sysrmphvmonitor.sysrpwatcher.sysrrmon32.sys
rrmon64.sysrsfdrv.sysrsflt.sysrspcrtw.sysrsrtw.sys
rswctrl.sysrswmon.sysrtologon.sysrtw.sysruaff.sys
rubrikfileaudit.sysruidiskfs.sysruieye.sysruifileaccess.sysruimachine.sys
ruiminispy.sysrvsavd.sysrvsmon.sysrw7fsflt.sysrwchangedrv.sys
ryfilter.sysryguard.syssafe-agent.syssafsfilter.syssagntflt.sys
sahara.syssakfile.syssakmfile.syssamflt.syssamsungrapidfsfltr.sys
sanddriver.syssanta.syssascan.syssavant.syssavonaccess.sys
scaegis.sysscauthfsflt.sysscauthiodrv.sysscensemon.sysscfltr.sys
scifsflt.syssciptflt.syssconnect.sysscred.syssdactmon.sys
sddrvldr.syssdvfilter.sysse46filter.syssecdodriver.syssecone_filemon10.sys
secone_proc10.syssecone_reg10.syssecone_usb.syssecrmm.syssecufile.sys
secure_os.syssecure_os_mf.syssecurofsd_x64.syssefo.syssegf.sys
segiraflt.syssegmd.syssegmp.syssentinelmonitor.sysserdr.sys
serfs.syssfac.syssfavflt.syssfdfilter.syssfpmonitor.sys
sgresflt.sysshdlpmedia.sysshdlpsf.syssheedantivirusfilterdriver.syssheedselfprotection.sys
shldflt.syssi32_file.syssi64_file.syssieflt.syssimrep.sys
sisipsfilefiltersk.sysskyamdrv.sysskyrgdrv.sysskywpdrv.sys
slb_guard.syssld.syssmbresilfilter.syssmdrvnt.syssndacs.sys
snexequota.syssnilog.syssnimg.syssnscore.syssnsrflt.sys
sodatpfl.syssoftfilterxxx.syssoidriver.syssolitkm.syssonar.sys
sophosdt2.syssophosed.syssophosntplwf.syssophossupport.sysspbbcdrv.sys
spellmon.sysspider3g.sysspiderg3.sysspiminifilter.sysspotlight.sys
sprtdrv.syssqlsafefilterdriver.syssrminifilterdrv.syssrtsp.syssrtsp64.sys
srtspit.sysssfmonm.sysssrfsf.sysssvhook.sysstcvsm.sys
stegoprotect.sysstest.sysstflt.sysstkrnl64.sysstoragedrv.sys
strapvista.sysstrapvista64.syssvcbt.sysswcommfltr.sysswfsfltr.sys
swfsfltrv2.sysswin.syssymafr.syssymefa.syssymefa64.sys
symefasi.syssymevent.syssymevent64x86.syssymevnt.syssymevnt32.sys
symhsm.syssymrg.syssysdiag.syssysmon.syssysmondrv.sys
sysplant.sysszardrv.sysszdfmdrv.sysszdfmdrv_usb.sysszedrdrv.sys
szpcmdrv.systaniumrecorderdrv.systaobserveflt.systbfsfilt.systbmninifilter.sys
tbrdrv.systdevflt.systedrdrv.systenrsafe2.systesmon.sys
tesxnginx.systesxporter.systffregnt.systfsflt.systgfsmf.sys
thetta.systhfilter.systhreatstackfim.systkdac2k.systkdacxp.sys
tkdacxp64.systkfsavxp.systkfsavxp64.systkfsft.systkfsft64.sys
tkpcftcb.systkpcftcb64.systkpl2k.systkpl2k64.systksp2k.sys
tkspxp.systkspxp64.systmactmon.systmcomm.systmesflt.sys
tmevtmgr.systmeyes.systmfsdrv2.systmkmsnsr.systmnciesc.sys
tmpreflt.systmumh.systmums.systmusa.systmxpflt.sys
topdogfsfilt.systrace.systrfsfilter.systritiumfltr.systrpmnflt.sys
trufos.systrustededgeffd.systsifilemon.systss.syststfilter.sys
tstfsredir.syststregredir.systsyscare.systvdriver.systvfiltr.sys
tvmfltr.systvptfile.systvspfltr.systwbdcfilter.systxfilefilter.sys
txregmon.sysuamflt.sysucafltdriver.sysufdfilter.sysuncheater.sys
upguardrealtime.sysusbl_ifsfltr.sysusbpdh.sysusbtest.sysuvmcifsf.sys
uwfreg.sysuwfs.sysv3flt2k.sysv3flu2k.sysv3ift2k.sys
v3iftmnt.sysv3mifint.sysvarpffmon.sysvast.sysvcdriv.sys
vchle.sysvcmfilter.sysvcreg.sysveeamfct.sysvfdrv.sys
vfilefilter.sysvfpd.sysvfsenc.sysvhddelta.sysvhdtrack.sys
vidderfs.sysvintmfs.sysvirtfile.sysvirtualagent.sysvk_fsf.sys
vlflt.sysvmwvvpfsd.sysvollock.sysvpdrvnt.sysvradfil2.sys
vraptdef.sysvraptflt.sysvrarnflt.sysvrbbdflt.sysvrexpdrv.sys
vrfsftm.sysvrfsftmx.sysvrnsfilter.sysvrsdam.sysvrsdcore.sys
vrsdetri.sysvrsdetrix.sysvrsdfmx.sysvrvbrfsfilter.sysvsepflt.sys
vsscanner.sysvtsysflt.sysvxfsrep.syswats_se.syswbfilter.sys
wcsdriver.syswdcfilter.syswdfilter.syswdocsafe.syswfp_mrt.sys
wgfile.syswhiteshield.syswindbdrv.syswindd.syswinfladrv.sys
winflahdrv.syswinfldrv.syswinfpdrv.syswinload.syswinteonminifilter.sys
wiper.syswlminisecmod.syswntgpdrv.syswraekernel.syswrcore.sys
wrcore.x64.syswrdwizfileprot.syswrdwizregprot.syswrdwizscanner.syswrdwizsecure64.sys
wrkrn.syswrpfv.syswsafefilter.syswscm.sysxcpl.sys
xendowflt.sysxfsgk.sysxhunter1.sysxhunter64.sysxiaobaifs.sys
xiaobaifsr.sysxkfsfd.sysxoiv8x64.sysxomfcbt8x64.sysyahoostorage.sys
yfsd.sysyfsd2.sysyfsdr.sysyfsrd.syszampit_ml.sys
zesfsmf.syszqfilter.syszsfprt.syszwasatom.syszwpxesvr.sys
zxfsfilt.syszyfm.syszzpensys.sys  

Further reading

For the latest security research from the Microsoft Threat Intelligence community, check out the Microsoft Threat Intelligence Blog: https://aka.ms/threatintelblog.

To get notified about new publications and to join discussions on social media, follow us on Twitter at https://twitter.com/MsftSecIntel.

Source :
https://www.microsoft.com/en-us/security/blog/2023/07/06/the-five-day-job-a-blackbyte-ransomware-intrusion-case-study/

8 Essential Tips for Data Protection and Cybersecurity in Small Businesses

Michelle Quill — June 6, 2023

Small businesses are often targeted by cybercriminals due to their lack of resources and security measures. Protecting your business from cyber threats is crucial to avoid data breaches and financial losses.

Why is cyber security so important for small businesses?

Small businesses are particularly in danger of cyberattacks, which can result in financial loss, data breaches, and damage to IT equipment. To protect your business, it’s important to implement strong cybersecurity measures.

Here are some tips to help you get started:

One important aspect of data protection and cybersecurity for small businesses is controlling access to customer lists. It’s important to limit access to this sensitive information to only those employees who need it to perform their job duties. Additionally, implementing strong password policies and regularly updating software and security measures can help prevent unauthorized access and protect against cyber attacks. Regular employee training on cybersecurity best practices can also help ensure that everyone in the organization is aware of potential threats and knows how to respond in the event of a breach.

When it comes to protecting customer credit card information in small businesses, there are a few key tips to keep in mind. First and foremost, it’s important to use secure payment processing systems that encrypt sensitive data. Additionally, it’s crucial to regularly update software and security measures to stay ahead of potential threats. Employee training and education on cybersecurity best practices can also go a long way in preventing data breaches. Finally, having a plan in place for responding to a breach can help minimize the damage and protect both your business and your customers.

Small businesses are often exposed to cyber attacks, making data protection and cybersecurity crucial. One area of particular concern is your company’s banking details. To protect this sensitive information, consider implementing strong passwords, two-factor authentication, and regular monitoring of your accounts. Additionally, educate your employees on safe online practices and limit access to financial information to only those who need it. Regularly backing up your data and investing in cybersecurity software can also help prevent data breaches.

Small businesses are often at high risk of cyber attacks due to their limited resources and lack of expertise in cybersecurity. To protect sensitive data, it is important to implement strong passwords, regularly update software and antivirus programs, and limit access to confidential information.

It is also important to have a plan in place in case of a security breach, including steps to contain the breach and notify affected parties. By taking these steps, small businesses can better protect themselves from cyber threats and ensure the safety of their data.

Tips for protecting your small business from cyber threats and data breaches are crucial in today’s digital age. One of the most important steps is to educate your employees on cybersecurity best practices, such as using strong passwords and avoiding suspicious emails or links.

It’s also important to regularly update your software and systems to ensure they are secure and protected against the latest threats. Additionally, implementing multi-factor authentication and encrypting sensitive data can add an extra layer of protection. Finally, having a plan in place for responding to a cyber-attack or data breach can help minimize the damage and get your business back on track as quickly as possible.

Small businesses are attackable to cyber-attacks and data breaches, which can have devastating consequences. To protect your business, it’s important to implement strong cybersecurity measures. This includes using strong passwords, regularly updating software and systems, and training employees on how to identify and avoid phishing scams.

It’s also important to have a data backup plan in place and to regularly test your security measures to ensure they are effective. By taking these steps, you can help protect your business from cyber threats and safeguard your valuable data.

To protect against cyber threats, it’s important to implement strong data protection and cybersecurity measures. This can include regularly updating software and passwords, using firewalls and antivirus software, and providing employee training on safe online practices. Additionally, it’s important to have a plan in place for responding to a cyber attack, including backing up data and having a designated point person for handling the situation.

In today’s digital age, small businesses must prioritize data protection and cybersecurity to safeguard their operations and reputation. With the rise of remote work and cloud-based technology, businesses are more vulnerable to cyber attacks than ever before. To mitigate these risks, it’s crucial to implement strong security measures for online meetings, advertising, transactions, and communication with customers and suppliers. By prioritizing cybersecurity, small businesses can protect their data and prevent unauthorized access or breaches.

Here are 8 essential tips for data protection and cybersecurity in small businesses.

8 Essential Tips for Data Protection and Cybersecurity in Small Businesses

1. Train Your Employees on Cybersecurity Best Practices

Your employees are the first line of defense against cyber threats. It’s important to train them on cybersecurity best practices to ensure they understand the risks and how to prevent them. This includes creating strong passwords, avoiding suspicious emails and links, and regularly updating software and security systems. Consider providing regular training sessions and resources to keep your employees informed and prepared.

2. Use Strong Passwords and Two-Factor Authentication

One of the most basic yet effective ways to protect your business from cyber threats is to use strong passwords and two-factor authentication. Encourage your employees to use complex passwords that include a mix of letters, numbers, and symbols, and to avoid using the same password for multiple accounts. Two-factor authentication adds an extra layer of security by requiring a second form of verification, such as a code sent to a mobile device, before granting access to an account. This can help prevent unauthorized access even if a password is compromised.

3. Keep Your Software and Systems Up to Date

One of the easiest ways for cybercriminals to gain access to your business’s data is through outdated software and systems. Hackers are constantly looking for vulnerabilities in software and operating systems, and if they find one, they can exploit it to gain access to your data. To prevent this, make sure all software and systems are kept up-to-date with the latest security patches and updates. This includes not only your computers and servers but also any mobile devices and other connected devices used in your business. Set up automatic updates whenever possible to ensure that you don’t miss any critical security updates.

4. Use Antivirus and Anti-Malware Software

Antivirus and anti-malware software are essential tools for protecting your small business from cyber threats. These programs can detect and remove malicious software, such as viruses, spyware, and ransomware before they can cause damage to your systems or steal your data. Make sure to install reputable antivirus and anti-malware software on all devices used in your business, including computers, servers, and mobile devices. Keep the software up-to-date and run regular scans to ensure that your systems are free from malware.

5. Backup Your Data Regularly

One of the most important steps you can take to protect your small business from data loss is to back up your data regularly. This means creating copies of your important files and storing them in a secure location, such as an external hard drive or cloud storage service. In the event of a cyber-attack or other disaster, having a backup of your data can help you quickly recover and minimize the impact on your business. Make sure to test your backups regularly to ensure that they are working properly and that you can restore your data if needed.

6. Carry out a risk assessment

Small businesses are especially in peril of cyber attacks, making it crucial to prioritize data protection and cybersecurity. One important step is to assess potential risks that could compromise your company’s networks, systems, and information. By identifying and analyzing possible threats, you can develop a plan to address security gaps and protect your business from harm.

For Small businesses making data protection and cybersecurity is a crucial part. To start, conduct a thorough risk assessment to identify where and how your data is stored, who has access to it, and potential threats. If you use cloud storage, consult with your provider to assess risks. Determine the potential impact of breaches and establish risk levels for different events. By taking these steps, you can better protect your business from cyber threats

7. Limit access to sensitive data

One effective strategy is to limit access to critical data to only those who need it. This reduces the risk of a data breach and makes it harder for malicious insiders to gain unauthorized access. To ensure accountability and clarity, create a plan that outlines who has access to what information and what their roles and responsibilities are. By taking these steps, you can help safeguard your business against cyber threats.

8. Use a firewall

For Small businesses, it’s important to protect the system from cyber attacks by making data protection and reducing cybersecurity risk. One effective measure is implementing a firewall, which not only protects hardware but also software. By blocking or deterring viruses from entering the network, a firewall provides an added layer of security. It’s important to note that a firewall differs from an antivirus, which targets software affected by a virus that has already infiltrated the system.

Small businesses can take steps to protect their data and ensure cybersecurity. One important step is to install a firewall and keep it updated with the latest software or firmware. Regularly checking for updates can help prevent potential security breaches.

Conclusion

Small businesses are particularly vulnerable to cyber attacks, so it’s important to take steps to protect your data. One key tip is to be cautious when granting access to your systems, especially to partners or suppliers. Before granting access, make sure they have similar cybersecurity practices in place. Don’t hesitate to ask for proof or to conduct a security audit to ensure your data is safe.

Source :
https://onlinecomputertips.com/support-categories/networking/tips-for-cybersecurity-in-small-businesses/

Introducing the Cloudflare Radar Internet Quality Page

23/06/2023

Internet connections are most often marketed and sold on the basis of “speed”, with providers touting the number of megabits or gigabits per second that their various service tiers are supposed to provide. This marketing has largely been successful, as most subscribers believe that “more is better”. Furthermore, many national broadband plans in countries around the world include specific target connection speeds. However, even with a high speed connection, gamers may encounter sluggish performance, while video conference participants may experience frozen video or audio dropouts. Speeds alone don’t tell the whole story when it comes to Internet connection quality.

Additional factors like latency, jitter, and packet loss can significantly impact end user experience, potentially leading to situations where higher speed connections actually deliver a worse user experience than lower speed connections. Connection performance and quality can also vary based on usage – measured average speed will differ from peak available capacity, and latency varies under loaded and idle conditions.

The new Cloudflare Radar Internet Quality page

A little more than three years ago, as residential Internet connections were strained because of the shift towards working and learning from home due to the COVID-19 pandemic, Cloudflare announced the speed.cloudflare.com speed test tool, which enabled users to test the performance and quality of their Internet connection. Within the tool, users can download the results of their individual test as a CSV, or share the results on social media. However, there was no aggregated insight into Cloudflare speed test results at a network or country level to provide a perspective on connectivity characteristics across a larger population.

Today, we are launching these long-missing aggregated connection performance and quality insights on Cloudflare Radar. The new Internet Quality page provides both country and network (autonomous system) level insight into Internet connection performance (bandwidth) and quality (latencyjitter) over time. (Your Internet service provider is likely an autonomous system with its own autonomous system number (ASN), and many large companies, online platforms, and educational institutions also have their own autonomous systems and associated ASNs.) The insights we are providing are presented across two sections: the Internet Quality Index (IQI), which estimates average Internet quality based on aggregated measurements against a set of Cloudflare & third-party targets, and Connection Quality, which presents peak/best case connection characteristics based on speed.cloudflare.com test results aggregated over the previous 90 days. (Details on our approach to the analysis of this data are presented below.)

Users may note that individual speed test results, as well as the aggregate speed test results presented on the Internet Quality page will likely differ from those presented by other speed test tools. This can be due to a number of factors including differences in test endpoint locations (considering both geographic and network distance), test content selection, the impact of “rate boosting” by some ISPs, and testing over a single connection vs. multiple parallel connections. Infrequent testing (on any speed test tool) by users seeking to confirm perceived poor performance or validate purchased speeds will also contribute to the differences seen in the results published by the various speed test platforms.

And as we announced in April, Cloudflare has partnered with Measurement Lab (M-Lab) to create a publicly-available, queryable repository for speed test results. M-Lab is a non-profit third-party organization dedicated to providing a representative picture of Internet quality around the world. M-Lab produces and hosts the Network Diagnostic Tool, which is a very popular network quality test that records millions of samples a day. Given their mission to provide a publicly viewable, representative picture of Internet quality, we chose to partner with them to provide an accurate view of your Internet experience and the experience of others around the world using openly available data.

Connection speed & quality data is important

While most advertisements for fixed broadband and mobile connectivity tend to focus on download speeds (and peak speeds at that), there’s more to an Internet connection, and the user’s experience with that Internet connection, than that single metric. In addition to download speeds, users should also understand the upload speeds that their connection is capable of, as well as the quality of the connection, as expressed through metrics known as latency and jitter. Getting insight into all of these metrics provides a more well-rounded view of a given Internet connection, or in aggregate, the state of Internet connectivity across a geography or network.

The concept of download speeds are fairly well understood as a measure of performance. However, it is important to note that the average download speeds experienced by a user during common Web browsing activities, which often involves the parallel retrieval of multiple smaller files from multiple hosts, can differ significantly from peak download speeds, where the user is downloading a single large file (such as a video or software update), which allows the connection to reach maximum performance. The bandwidth (speed) available for upload is sometimes mentioned in ISP advertisements, but doesn’t receive much attention. (And depending on the type of Internet connection, there’s often a significant difference between the available upload and download speeds.) However, the importance of upload came to the forefront in 2020 as video conferencing tools saw a surge in usage as both work meetings and school classes shifted to the Internet during the COVID-19 pandemic. To share your audio and video with other participants, you need sufficient upload bandwidth, and this issue was often compounded by multiple people sharing a single residential Internet connection.

Latency is the time it takes data to move through the Internet, and is measured in the number of milliseconds that it takes a packet of data to go from a client (such as your computer or mobile device) to a server, and then back to the client. In contrast to speed metrics, lower latency is preferable. This is especially true for use cases like online gaming where latency can make a difference between a character’s life and death in the game, as well as video conferencing, where higher latency can cause choppy audio and video experiences, but it also impacts web page performance. The latency metric can be further broken down into loaded and idle latency. The former measures latency on a loaded connection, where bandwidth is actively being consumed, while the latter measures latency on an “idle” connection, when there is no other network traffic present. (These specific loaded and idle definitions are from the device’s perspective, and more specifically, from the speed test application’s perspective. Unless the speed test is being performed directly from a router, the device/application doesn’t have insight into traffic on the rest of the network.) Jitter is the average variation found in consecutive latency measurements, and can be measured on both idle and loaded connections. A lower number means that the latency measurements are more consistent. As with latency, Internet connections should have minimal jitter, which helps provide more consistent performance.

Our approach to data analysis

The Internet Quality Index (IQI) and Connection Quality sections get their data from two different sources, providing two different (albeit related) perspectives. Under the hood they share some common principles, though.

IQI builds upon the mechanism we already use to regularly benchmark ourselves against other industry players. It is based on end user measurements against a set of Cloudflare and third-party targets, meant to represent a pattern that has become very common in the modern Internet, where most content is served from distribution networks with points of presence spread throughout the world. For this reason, and by design, IQI will show worse results for regions and Internet providers that rely on international (rather than peering) links for most content.

IQI is also designed to reflect the traffic load most commonly associated with web browsing, rather than more intensive use. This, and the chosen set of measurement targets, effectively biases the numbers towards what end users experience in practice (where latency plays an important role in how fast things can go).

For each metric covered by IQI, and for each ASN, we calculate the 25th percentile, median, and 75th percentile at 15 minute intervals. At the country level and above, the three calculated numbers for each ASN visible from that region are independently aggregated. This aggregation takes the estimated user population of each ASN into account, biasing the numbers away from networks that source a lot of automated traffic but have few end users.

The Connection Quality section gets its data from the Cloudflare Speed Test tool, which exercises a user’s connection in order to see how well it is able to perform. It measures against the closest Cloudflare location, providing a good balance of realistic results and network proximity to the end user. We have a presence in 285 cities around the world, allowing us to be pretty close to most users.

Similar to the IQI, we calculate the 25th percentile, median, and 75th percentile for each ASN. But here these three numbers are immediately combined using an operation called the trimean — a single number meant to balance the best connection quality that most users have, with the best quality available from that ASN (users may not subscribe to the best available plan for a number of reasons).

Because users may choose to run a speed test for different motives at different times, and also because we take privacy very seriously and don’t record any personally identifiable information along with test results, we aggregate at 90-day intervals to capture as much variability as we can.

At the country level and above, the calculated trimean for each ASN in that region is aggregated. This, again, takes the estimated user population of each ASN into account, biasing the numbers away from networks that have few end users but which may still have technicians using the Cloudflare Speed Test to assess the performance of their network.

The new Internet Quality page includes three views: Global, country-level, and autonomous system (AS). In line with the other pages on Cloudflare Radar, the country-level and AS pages show the same data sets, differing only in their level of aggregation. Below, we highlight the various components of the Internet Quality page.

Global

The top section of the global (worldwide) view includes time series graphs of the Internet Quality Index metrics aggregated at a continent level. The time frame shown in the graphs is governed by the selection made in the time frame drop down at the upper right of the page, and at launch, data for only the last three months is available. For users interested in examining a specific continent, clicking on the other continent names in the legend removes them from the graph. Although continent-level aggregation is still rather coarse, it still provides some insight into regional Internet quality around the world.

Further down the page, the Connection Quality section presents a choropleth map, with countries shaded according to the values of the speed, latency, or jitter metric selected from the drop-down menu. Hovering over a country displays a label with the country’s name and metric value, and clicking on the country takes you to the country’s Internet Quality page. Note that in contrast to the IQI section, the Connection Quality section always displays data aggregated over the previous 90 days.

Country-level

Within the country-level page (using Canada as an example in the figures below), the country’s IQI metrics over the selected time frame are displayed. These time series graphs show the median bandwidth, latency, and DNS response time within a shaded band bounded at the 25th and 75th percentile and represent the average expected user experience across the country, as discussed in the Our approach to data analysis section above.

Below that is the Connection Quality section, which provides a summary view of the country’s measured upload and download speeds, as well as latency and jitter, over the previous 90 days. The colored wedges in the Performance Summary graph are intended to illustrate aggregate connection quality at a glance, with an “ideal” connection having larger upload and download wedges and smaller latency and jitter wedges. Hovering over the wedges displays the metric’s value, which is also shown in the table to the right of the graph.

Below that, the Bandwidth and Latency/Jitter histograms illustrate the bucketed distribution of upload and download speeds, and latency and jitter measurements. In some cases, the speed histograms may show a noticeable bar at 1 Gbps, or 1000 ms (1 second) on the latency/jitter histograms. The presence of such a bar indicates that there is a set of measurements with values greater than the 1 Gbps/1000 ms maximum histogram values.

Autonomous system level

Within the upper-right section of the country-level page, a list of the top five autonomous systems within the country is shown. Clicking on an ASN takes you to the Performance page for that autonomous system. For others not displayed in the top five list, you can use the search bar at the top of the page to search by autonomous system name or number. The graphs shown within the AS level view are identical to those shown at a country level, but obviously at a different level of aggregation. You can find the ASN that you are connected to from the My Connection page on Cloudflare Radar.

Exploring connection performance & quality data

Digging into the IQI and Connection Quality visualizations can surface some interesting observations, including characterizing Internet connections, and the impact of Internet disruptions, including shutdowns and network issues. We explore some examples below.

Characterizing Internet connections

Verizon FiOS is a residential fiber-based Internet service available to customers in the United States. Fiber-based Internet services (as opposed to cable-based, DSL, dial-up, or satellite) will generally offer symmetric upload and download speeds, and the FiOS plans page shows this to be the case, offering 300 Mbps (upload & download), 500 Mbps (upload & download), and “1 Gig” (Verizon claims average wired speeds between 750-940 Mbps download / 750-880 Mbps upload) plans. Verizon carries FiOS traffic on AS701 (labeled UUNET due to a historical acquisition), and in looking at the bandwidth histogram for AS701, several things stand out. The first is a rough symmetry in upload and download speeds. (A cable-based Internet service provider, in contrast, would generally show a wide spread of download speeds, but have upload speeds clustered at the lower end of the range.) Another is the peaks around 300 Mbps and 750 Mbps, suggesting that the 300 Mbps and “1 Gig” plans may be more popular than the 500 Mbps plan. It is also clear that there are a significant number of test results with speeds below 300 Mbps. This is due to several factors: one is that Verizon also carries lower speed non-FiOS traffic on AS701, while another is that erratic nature of in-home WiFi often means that the speeds achieved on a test will be lower than the purchased service level.

Traffic shifts drive latency shifts

On May 9, 2023, the government of Pakistan ordered the shutdown of mobile network services in the wake of protests following the arrest of former Prime Minister Imran Khan. Our blog post covering this shutdown looked at the impact from a traffic perspective. Within the post, we noted that autonomous systems associated with fixed broadband networks saw significant increases in traffic when the mobile networks were shut down – that is, some users shifted to using fixed networks (home broadband) when mobile networks were unavailable.

Examining IQI data after the blog post was published, we found that the impact of this traffic shift was also visible in our latency data. As can be seen in the shaded area of the graph below, the shutdown of the mobile networks resulted in the median latency dropping about 25% as usage shifted from higher latency mobile networks to lower latency fixed broadband networks. An increase in latency is visible in the graph when mobile connectivity was restored on May 12.

Bandwidth shifts as a potential early warning sign

On April 4, UK mobile operator Virgin Media suffered several brief outages. In examining the IQI bandwidth graph for AS5089, the ASN used by Virgin Media (formerly branded as NTL), indications of a potential problem are visible several days before the outages occurred, as median bandwidth dropped by about a third, from around 35 Mbps to around 23 Mbps. The outages are visible in the circled area in the graph below. Published reports indicate that the problems lasted into April 5, in line with the lower median bandwidth measured through mid-day.

Submarine cable issues cause slower browsing

On June 5, Philippine Internet provider PLDT Tweeted an advisory that noted “One of our submarine cable partners confirms a loss in some of its internet bandwidth capacity, and thus causing slower Internet browsing.” IQI latency and bandwidth graphs for AS9299, a primary ASN used by PLDT, shows clear shifts starting around 06:45 UTC (14:45 local time). Median bandwidth dropped by half, from 17 Mbps to 8 Mbps, while median latency increased by 75% from 37 ms to around 65 ms. 75th percentile latency also saw a significant increase, nearly tripling from 63 ms to 180 ms coincident with the reported submarine cable issue.

Conclusion

Making network performance and quality insights available on Cloudflare Radar supports Cloudflare’s mission to help build a better Internet. However, we’re not done yet – we have more enhancements planned. These include making data available at a more granular geographical level (such as state and possibly city), incorporating AIM scores to help assess Internet quality for specific types of use cases, and embedding the Cloudflare speed test directly on Radar using the open source JavaScript module.

In the meantime, we invite you to use speed.cloudflare.com to test the performance and quality of your Internet connection, share any country or AS-level insights you discover on social media (tag @CloudflareRadar on Twitter or @radar@cloudflare.social on Mastodon), and explore the underlying data through the M-Lab repository or the Radar API.

Watch on Cloudflare TV

https://customer-rhnwzxvb3mg4wz3v.cloudflarestream.com/debcbed2114d086c870059ac604eca49/iframe?preload=true&poster=https%3A%2F%2Fcustomer-rhnwzxvb3mg4wz3v.cloudflarestream.com%2Fdebcbed2114d086c870059ac604eca49%2Fthumbnails%2Fthumbnail.jpg%3Ftime%3D1s%26height%3D600

We protect entire corporate networks, help customers build Internet-scale applications efficiently, accelerate any website or Internet applicationward off DDoS attacks, keep hackers at bay, and can help you on your journey to Zero Trust.

Visit 1.1.1.1 from any device to get started with our free app that makes your Internet faster and safer.

To learn more about our mission to help build a better Internet, start here. If you’re looking for a new career direction, check out our open positions.

 Discuss on Hacker News

Source :
https://blog.cloudflare.com/introducing-radar-internet-quality-page/

Content Delivery Networks (CDNs)

  • Article
  • 02/17/2023
  • 7 contributors

Feedback

In this article

  1. What exactly is a CDN?
  2. How do CDNs make services work faster?
  3. The Microsoft 365 CDN
  4. Other Microsoft CDNs

Show 11 more

This article applies to Microsoft 365 Enterprise.

CDNs help keep Microsoft 365 fast and reliable for end users. Cloud services like Microsoft 365 use CDNs to cache static assets closer to the browsers requesting them to speed up downloads and reduce perceived end user latency. The information in this topic will help you learn about Content Delivery Networks (CDNs) and how they’re used by Microsoft 365.

What exactly is a CDN?

A CDN is a geographically distributed network consisting of proxy and file servers in datacenters connected by high-speed backbone networks. CDNs are used to reduce latency and load times for a specified set of files and objects in a web site or service. A CDN may have many thousands of endpoints for optimal servicing of incoming requests from any location.

CDNs are commonly used to provide faster downloads of generic content for a web site or service such as Javascript files, icons and images, and can also provide private access to user content such as files in SharePoint Online document libraries, streaming media files, and custom code.

CDNs are used by most enterprise cloud services. Cloud services like Microsoft 365 have millions of customers downloading a mix of proprietary content (such as emails) and generic content (such as icons) at one time. It’s more efficient to put images everyone uses, like icons, as close to the user’s computer as possible. It isn’t practical for every cloud service to build CDN datacenters that store this generic content in every metropolitan area, or even in every major Internet hub around the world, so some of these CDNs are shared.

How do CDNs make services work faster?

Downloading common objects like site images and icons over and over again can take up network bandwidth that can be better used for downloading important personal content, like email or documents. Because Microsoft 365 uses an architecture that includes CDNs, the icons, scripts, and other generic content can be downloaded from servers closer to client computers, making the downloads faster. This means faster access to your personal content, which is securely stored in Microsoft 365 datacenters.

CDNs help to improve cloud service performance in several ways:

  • CDNs shift part of the network and file download burden away from the cloud service, freeing up cloud service resources for serving user content and other services by reducing the need to serve requests for static assets.
  • CDNs are purpose built to provide low-latency file access by implementing high performance networks and file servers, and by leveraging updated network protocols such as HTTP/2 with highly efficient compression and request multiplexing.
  • CDN networks use many globally distributed endpoints to make content available as close as possible to users.

The Microsoft 365 CDN

The built-in Microsoft 365 Content Delivery Network (CDN) allows Microsoft 365 administrators to provide better performance for their organization’s SharePoint Online pages by caching static assets closer to the browsers requesting them, which helps to speed up downloads and reduce latency. The Microsoft 365 CDN uses the HTTP/2 protocol for improved compression and download speeds.

 Note

The Microsoft 365 CDN is only available to tenants in the Production (worldwide) cloud. Tenants in the US Government, China and Germany clouds do not currently support the Microsoft 365 CDN.

The Microsoft 365 CDN is composed of multiple CDNs that allow you to host static assets in multiple locations, or origins, and serve them from global high-speed networks. Depending on the kind of content you want to host in the Microsoft 365 CDN, you can add public origins, private origins or both.

Microsoft 365 CDN conceptual diagram.

Content in public origins within the Microsoft 365 CDN is accessible anonymously, and can be accessed by anyone who has URLs to hosted assets. Because access to content in public origins is anonymous, you should only use them to cache non-sensitive generic content such as Javascript files, scripts, icons and images. The Microsoft 365 CDN is used by default for downloading generic resource assets like the Microsoft 365 client applications from a public origin.

Private origins within the Microsoft 365 CDN provide private access to user content such as SharePoint Online document libraries, sites and proprietary images. Access to content in private origins is secured with dynamically generated tokens so it can only be accessed by users with permissions to the original document library or storage location. Private origins in the Microsoft 365 CDN can only be used for SharePoint Online content, and you can only access assets through redirection from your SharePoint Online tenant.

The Microsoft 365 CDN service is included as part of your SharePoint Online subscription.

For more information about how to use the Microsoft 365 CDN, see Use the Microsoft 365 content delivery network with SharePoint Online.

To watch a series of short videos that provide conceptual and HOWTO information about using the Microsoft 365 CDN, visit the SharePoint Developer Patterns and Practices YouTube channel.

Other Microsoft CDNs

Although not a part of the Microsoft 365 CDN, you can use these CDNs in your Microsoft 365 tenant for access to SharePoint development libraries, custom code and other purposes that fall outside the scope of the Microsoft 365 CDN.

Azure CDN

 Note

Beginning in Q3 2020, SharePoint Online will begin caching videos on the Azure CDN to support improved video playback and reliability. Popular videos will be streamed from the CDN endpoint closest to the user. This data will remain within the Microsoft Purview boundary. This is a free service for all tenants and it does not require any customer action to configure.

You can use the Azure CDN to deploy your own CDN instance for hosting custom web parts, libraries and other resource assets, which allows you to apply access keys to your CDN storage and exert greater control over your CDN configuration. Use of the Azure CDN isn’t free, and requires an Azure subscription.

For more information on how to configure an Azure CDN instance, see Quickstart: Integrate an Azure storage account with Azure CDN.

For an example of how the Azure CDN can be used to host SharePoint web parts, see Deploy your SharePoint client-side web part to Azure CDN.

For information about the Azure CDN PowerShell module, see Manage Azure CDN with PowerShell.

Microsoft Ajax CDN

Microsoft’s Ajax CDN is a read-only CDN that offers many popular development libraries including jQuery (and all of its other libraries), ASP.NET Ajax, Bootstrap, Knockout.js, and others.

To include these scripts in your project, simply replace any references to these publicly available libraries with references to the CDN address instead of including it in your project itself. For example, use the following code to link to jQuery:

HTMLCopy

<script src=https://ajax.aspnetcdn.com/ajax/jquery-2.1.1.js> </script>

For more information about how to use the Microsoft Ajax CDN, see Microsoft Ajax CDN.

How does Microsoft 365 use content from a CDN?

Regardless of what CDN you configure for your Microsoft 365 tenant, the basic data retrieval process is the same.

  1. Your client (a browser or Office client application) requests data from Microsoft 365.
  2. Microsoft 365 either returns the data directly to your client or, if the data is part of a set of content hosted by the CDN, redirects your client to the CDN URL.a. If the data is already cached in a public origin, your client downloads the data directly from the nearest CDN location to your client.b. If the data is already cached in a private origin, the CDN service checks your Microsoft 365 user account’s permissions on the origin. If you have permissions, SharePoint Online dynamically generates a custom URL composed of the path to the asset in the CDN and two access tokens, and returns the custom URL to your client. Your client then downloads the data directly from the nearest CDN location to your client using the custom URL.
  3. If the data isn’t cached at the CDN, the CDN node requests the data from Microsoft 365 and then caches the data for time after your client downloads the data.

The CDN figures out the closest datacenter to the user’s browser and, using redirection, downloads the requested data from there. CDN redirection is quick, and can save users a lot of download time.

How should I set up my network so that CDNs work best with Microsoft 365?

Minimizing latency between clients on your network and CDN endpoints is the key consideration for ensuring optimal performance. You can use the best practices outlined in Managing Microsoft 365 endpoints to ensure that your network configuration permits client browsers to access the CDN directly rather than routing CDN traffic through central proxies to avoid introducing unnecessary latency.

You can also read Microsoft 365 Network Connectivity Principles to understand the concepts behind optimizing Microsoft 365 network performance.

Is there a list of all the CDNs that Microsoft 365 uses?

The CDNs in use by Microsoft 365 are always subject to change and in many cases there are multiple CDN partners configured in the event one is unavailable. The primary CDNs used by Microsoft 365 are:

CDNCompanyUsageLink
Microsoft 365 CDNMicrosoft AzureGeneric assets in public origins, SharePoint user content in private originsMicrosoft Azure CDN
Azure CDNMicrosoftCustom code, SharePoint Framework solutionsMicrosoft Azure CDN
Microsoft Ajax CDN (read only)MicrosoftCommon libraries for Ajax, jQuery, ASP.NET, Bootstrap, Knockout.js etc.Microsoft Ajax CDN

What performance gains does a CDN provide?

There are many factors involved in measuring specific differences in performance between data downloaded directly from Microsoft 365 and data downloaded from a specific CDN, such as your location relative to your tenant and to the nearest CDN endpoint, the number of assets on a page that are served by the CDN, and transient changes in network latency and bandwidth. However, a simple A/B test can help to show the difference in download time for a specific file.

The following screenshots illustrate the difference in download speed between the native file location in Microsoft 365 and the same file hosted on the Microsoft Ajax Content Delivery Network. These screenshots are from the Network tab in the Internet Explorer 11 developer tools. These screenshots show the latency on the popular library jQuery. To bring up this screen, in Internet Explorer, press F12 and select the Network tab, which is symbolized with a Wi-Fi icon.

Screenshot of F12 Network.

This screenshot shows the library uploaded to the master page gallery on the SharePoint Online site itself. The time it took to upload the library is 1.51 seconds.

Screenshot of load time 1.51s.

The second screenshot shows the same file delivered by Microsoft’s CDN. This time the latency is around 496 milliseconds. This is a large improvement and shows that a whole second is shaved off the total time to download the object.

Screenshot of load times in 469 ms.

Is my data safe?

We take great care to protect the data that runs your business. Data stored in the Microsoft 365 CDN is encrypted both in transit and at rest, and access to data in the Microsoft 365 SharePoint CDN is secured by Microsoft 365 user permissions and token authorization. Requests for data in the Microsoft 365 SharePoint CDN must be referred (redirected) from your Microsoft 365 tenant or an authorization token won’t be generated.

To ensure that your data remains secure, we recommend that you never store user content or other sensitive data in a public CDN. Because access to data in a public CDN is anonymous, public CDNs should only be used to host generic content such as web script files, icons, images and other non-sensitive assets.

 Note

3rd party CDN providers may have privacy and compliance standards that differ from the commitments outlined by the Microsoft 365 Trust Center. Data cached through the CDN service may not conform to the Microsoft Data Processing Terms (DPT), and may be outside of the Microsoft 365 Trust Center compliance boundaries.

For in-depth information about privacy and data protection for Microsoft 365 CDN providers, visit the following:

How can I secure my network with all these 3rd party services?

Using an extensive set of partner services allows Microsoft 365 to scale and meet availability requirements and enhance the user experience when using Microsoft 365. The 3rd party services Microsoft 365 leverages include both certificate revocation lists; such as crl.microsoft.com or sa.symcb.com, and CDNs; such as r3.res.outlook.com. Every CDN FQDN generated by Microsoft 365 is a custom FQDN for Microsoft 365. If you’re sent to a FQDN at the request of Microsoft 365, you can be assured that the CDN provider controls the FQDN and the underlying content at that location.

For customers that want to segregate requests destined for a Microsoft 365 datacenter from requests that are destined for a 3rd party, we’ve written up guidance on Managing Microsoft 365 endpoints.

Is there a list of all the FQDNs that leverage CDNs?

The list of FQDNs and how they leverage CDNs change over time. Refer to our published Microsoft 365 URLs and IP address ranges page to get up to date on the latest FQDNs that leverage CDNs.

You can also use the Microsoft 365 IP Address and URL Web service to request the current Microsoft 365 URLs and IP address ranges formatted as CSV or JSON.

Can I use my own CDN and cache content on my local network?

We’re continually looking for new ways to support our customers’ needs and are currently exploring the use of caching proxy solutions and other on-premises CDN solutions.

Although it isn’t a part of the Microsoft 365 CDN, you can also use the Azure CDN for hosting custom web parts, libraries and other resource assets, which allows you to apply access keys to your CDN storage and exert greater control over your CDN configuration. Use of the Azure CDN isn’t free, and requires an Azure subscription. For more information on how to configure an Azure CDN instance, see Quickstart: Integrate an Azure storage account with Azure CDN.

I’m using Azure ExpressRoute for Microsoft 365, does that change things?

Azure ExpressRoute for Microsoft 365 provides a dedicated connection to Microsoft 365 infrastructure that is segregated from the public internet. This means that clients will still need to connect over non-ExpressRoute connections to connect to CDNs and other Microsoft infrastructure that isn’t explicitly included in the list of services supported by ExpressRoute. For more information about how to route specific traffic such as requests destined for CDNs, see Implementing ExpressRoute for Microsoft 365.

Can I use CDNs with SharePoint Server on-premises?

Using CDNs only makes sense in a SharePoint Online context and should be avoided with SharePoint Server. This is because all of the advantages around geographic location don’t hold true if the server is located on-premises or geographically close anyway. Additionally, if there’s a network connection to the servers where it’s hosted, then the site may be used without an Internet connection and therefore can’t retrieve the CDN files. Otherwise, you should use a CDN if there’s one available and stable for the library and files you need for your site.

See also

Microsoft 365 Network Connectivity Principles

Assessing Microsoft 365 network connectivity

Managing Microsoft 365 endpoints

Microsoft 365 URLs and IP address ranges

Use the Microsoft 365 content delivery network with SharePoint Online

Microsoft Trust Center

Tune Microsoft 365 performance

Source :
https://learn.microsoft.com/en-us/microsoft-365/enterprise/content-delivery-networks?view=o365-worldwide