QR codes link the offline to the online. What started as a way to streamline manufacturing in the automotive industry is now a widespread technology helping connect the physical world to digital content. And as the world embraced remote, no-touch solutions during the Covid pandemic, QR codes became especially popular. QR codes offer convenience and immediacy for businesses and consumers, but cybercriminals also take advantage of them. Here’s what you need to know about QR codes and how to stay safe when using them.
Why QR codes?
Due to their size and structure, the two-dimensional black and white barcodes we call QR codes are very versatile. And since most people carry a smartphone everywhere, they can quickly scan QR codes with their phone’s camera. Moreover, since QR codes are relatively easy to program and accessible for most smartphone users, they can be an effective communication tool.
They also have many uses. For example, QR codes may link to a webpage, start an app or file download, share contact information, initiate a payment, and more. Covid forced businesses to be creative with touchless experiences, and QR codes provide a convenient way to transform a physical touchpoint into a digital interaction. During Covid, QR codes became a popular way to look at restaurant menus, communicate Covid policies, check in for an appointment, and view marketing promotions, among other scenarios.
As a communication tool, QR codes can transmit a lot of information from one person to another, making it easy for someone to take action online and interact further with digital content.
What hackers do with QR codes
QR codes are inherently secure, and no personally identifiable information (PII) is transmitted while you’re scanning them. However, the tricky part about QR codes is that you don’t know what information they contain until you scan them. So just looking at the QR code won’t tell you if it’s entirely trustworthy or not.
For example, cybercriminals may try to replace or sticker over a QR code in a high-traffic, public place. Doing so can trick people into scanning a malicious QR code. Or, hackers might send malicious QR codes digitally by email, text, or social media. The QR code scam might target a specific individual, or cybercriminals may design it to attract as many scans as possible from a large number of people.
Once scanned, a malicious QR code may take you to a phishing website, lead you to install malware on your device, redirect a payment to the wrong account, or otherwise compromise the security of your private information.
In the same way that cybercriminals try to get victims to click phishing links in email or social media, they lure people into scanning a QR code. These bad actors may be after account credentials, financial information, PII, or even company information. With that information, they can steal your identity or money or even break into your employer’s network for more valuable information (in other words, causing a data breach).
Pay attention to context. Where is the code available? What does the code claim to do (e.g., will it send you to a landing page)? Is there someone you can ask to confirm the purpose of the QR code? Did someone send it unprompted? Is it from a business or individual you’ve never heard of? Just like with phishing links, throw it out when in doubt.
Look closely at the code. Some codes may have specific colors or branding to indicate the code’s purpose and destination. Many codes are generic black and white designs, but sometimes there are clues about who made the code.
Check the link before you click. If you scan the QR code and a link appears, double-check it before clicking. Is it a website URL you were expecting? Is it a shortened link that masks the full URL? Is the webpage secure (HTTPS)? Do you see signs of a phishing attack (branding is slightly off, strange URL, misspelled words, etc.)? If it autogenerates an email or text message, who is the recipient and what information is it sending them? If it’s a payment form, who is receiving the payment? Read carefully before taking action.
Practice password security. Passwords and account logins remain one of the top targets of cyber attacks. Stolen credentials give cybercriminals access to valuable personal and financial information. Generate every password for every account with a random password generator, ideally built into a password manager for secure storage and autofill. Following password best practices ensures one stolen password results in minimal damage.
Layer with MFA. Adding multi-factor authentication to logins further protects against phishing attacks that steal passwords. With MFA in place, a hacker still can’t access an account after using a stolen password. By requiring additional login data, MFA can prevent cybercriminals from gaining access to personal or business accounts.
QR codes remain a popular marketing and communication tool. They’re convenient and accessible, so you can expect to encounter them occasionally. Though cyber attacks via QR codes are less common, you should still stay vigilant for signs of phishing and social engineering via QR codes. To prevent and mitigate attacks via QR codes, start by building a solid foundation of digital security with a trusted password manager.
The OpenSSL Technical Committee (OTC) was recently made aware of several potential attacks against the OpenSSL libraries which might permit information leakage via the Spectre attack.1 Although there are currently no known exploits for the Spectre attacks identified, it is plausible that some of them might be exploitable.
Local side channel attacks, such as these, are outside the scope of our security policy, however the project generally does introduce mitigations when they are discovered. In this case, the OTC has decided that these attacks will not be mitigated by changes to the OpenSSL code base. The full reasoning behind this is given below.
The Spectre attack vector, while applicable everywhere, is most important for code running in enclaves because it bypasses the protections offered. Example enclaves include, but are not limited to:
The reasoning behind the OTC’s decision to not introduce mitigations for these attacks is multifold:
Such issues do not fall under the scope of our defined security policy. Even though we often apply mitigations for such issues we do not mandate that they are addressed.
Maintaining code with mitigations in place would be significantly more difficult. Most potentially vulnerable code is extremely non-obvious, even to experienced security programmers. It would thus be quite easy to introduce new attack vectors or fix existing ones unknowingly. The mitigations themselves obscure the code which increases the maintenance burden.
Automated verification and testing of the attacks is necessary but not sufficient. We do not have automated detection for this family of vulnerabilities and if we did, it is likely that variations would escape detection. This does not mean we won’t add automated checking for issues like this at some stage.
These problems are fundamentally a bug in the hardware. The software running on the hardware cannot be expected to mitigate all such attacks. Some of the in-CPU caches are completely opaque to software and cannot be easily flushed, making software mitigation quixotic. However, the OTC recognises that fixing hardware is difficult and in some cases impossible.
Some kernels and compilers can provide partial mitigation. Specifically, several common compilers have introduced code generation options addressing some of these classes of vulnerability:
GCC has the -mindirect-branch, -mfunction-return and -mindirect-branch-register options
LLVM has the -mretpoline option
MSVC has the /Qspectre option
Nicholas Mosier, Hanna Lachnitt, Hamed Nemati, and Caroline Trippel, “Axiomatic Hardware-Software Contracts for Security,” in Proceedings of the 49th ACM/IEEE International Symposium on Computer Architecture (ISCA), 2022.↩
Posted by OpenSSL Technical Committee May 13th, 2022 12:00 am
An update to Raspberry Pi OS Bullseye has removed the default ‘pi’ user to make it harder for attackers to find and compromise Internet-exposed Raspberry Pi devices using default credentials.
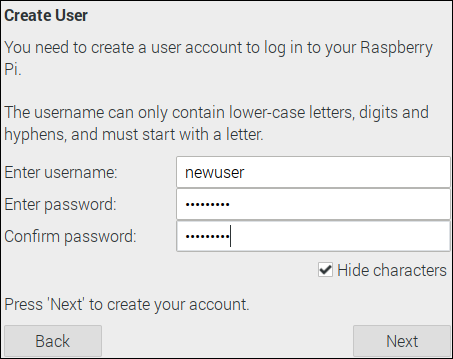
Starting with this latest release, when installing the OS, you will first be prompted to create an account by choosing a username and password (before this change, the OS installer would only ask for a custom password).
You can no longer skip this step since the setup wizard will be launched when first booting the device (previously, you could hit Cancel to use the default pi/raspberry credentials).
While you can still choose to use a ‘pi’ username and ‘raspberry’ as your password, you will be warned that it’s not a wise choice.
“We are not getting rid of the ‘pi’ user on existing installs. We are not stopping anyone from entering ‘pi’ and ‘raspberry’ as the username and password on a new install,” said Simon Long, Senior Principal EngineerSenior at Raspberry Pi.
“All we are doing is making it easy for people who care about security to not have a default ‘pi’ user – which is something people have been requesting for some time now.”
Raspberry Pi OS account creation wizard (Raspberry Pi )
When booting the image for the first time, Raspberry Pi OS Lite image users will also be asked to create a new account via command line text prompts.
If you want to run Raspberry Pi headless, you can create the user before booting into the OS by setting a username and a password via the Settings dialog before writing the image or adding a userconf file to the boot partition containing a username:encrypted-password pair.
Existing installations are not affected by this change. However, users can still switch to non-default credentials by updating their existing image and running the sudo rename-user command.
“This isn’t that much of a weakness – just knowing a valid user name doesn’t really help much if someone wants to hack into your system; they would also need to know your password, and you’d need to have enabled some form of remote access in the first place,” Long explained.
“But nonetheless, it could potentially make a brute-force attack slightly easier, and in response to this, some countries are now introducing legislation to forbid any Internet-connected device from having default login credentials.”
For instance, the UK wants to enforce new regulations asking that IoT devices no longer come with default usernames and passwords but, instead ask customers to choose custom credentials, “not resettable to any universal factory default value.”
Over the past year, we’ve been trialling a beta of Raspberry Pi OS in glorious 64-bit. Now it’s time to open it up to a wider audience.
The ARMv8-A architecture, which encompasses the 64-bit AArch64 architecture and associated A64 instruction set, was first introduced into the Raspberry Pi line with Raspberry Pi 3 in 2016. From that point on, it has been possible to run a full 64-bit operating system on our flagship products, and many third-party operating systems are available. However, we have continued to build our Raspberry Pi OS releases on the 32-bit Raspbian platform, aiming to maximise compatibility between devices and to avoid customer confusion.
Product
Processor
ARM core
Debian/Raspbian ARM port (maximum)
Architecture width
Raspberry Pi 1
BCM2835
ARM1176
arm6hf
32 bit
Raspberry Pi 2
BCM2836
Cortex-A7
armhf
32 bit
Raspberry Pi Zero
BCM2835
ARM1176
arm6hf
32 bit
Raspberry Pi Zero 2
BCM2710
Cortex-A53
arm64
64 bit
Raspberry Pi 3
BCM2710
Cortex-A53
arm64
64 bit
Raspberry Pi 4
BCM2711
Cortex-A72
arm64
64 bit
As you can see from the table above, it is easy to be confused about which products will support which Debian/Raspbian ports. Using arm6hf (Raspbian’s derivative of armhf with ARMv7-only instructions removed but floating-point instructions retained) provides us with an operating system which will run on every device we have ever manufactured, all the way back to 2011.
But we’ve come to realise that there are reasons to choose a 64-bit operating system over a 32-bit one. Compatibility is a key concern: many closed-source applications are only available for arm64, and open-source ones aren’t fully optimised for the armhf port. Beyond that there are some performance benefits intrinsic to the A64 instruction set: today, these are most visible in benchmarks, but the assumption is that these will feed through into real-world application performance in the future.
A more theoretical concern is that 32-bit pointers only allow you to address 4GB of memory. On Raspberry Pi 4, we use the ARM Large Physical Address Extension (LPAE) to access up to 8GB of memory, subject to the constraint that any process is limited to accessing 3GB (we reserve the top 1GB of the virtual address space for the kernel). Very few processes require more memory than this: happily Chromium, which is probably the most memory-intensive application in Raspberry Pi OS, spawns a process per tab. But some use cases will benefit from being able to allocate the entire memory of an 8GB Raspberry Pi 4 from a single process.
The 64-bit version of Chromium, installed by default, has no version of the WidevineCDM library and therefore, it is not possible to play streaming media such as Netflix or Disney+. To instead choose the 32-bit version just do the following within a terminal window:
So, head to the downloads page and grab your copy of 64-bit Raspberry Pi OS today. Let us know in the comments if your use case benefits (or suffers!) from the move to 64-bit.
If you have already managed multiple Wi-Fi access points, you should know that this can be a nightmare … But with good choices for hardware and a controller, this becomes easier. It’s the main goal of the Unifi controller: manage most of the tasks on a wireless network to avoid issues. It’s available on Raspberry Pi and I will show you how to install it.
How to install and configure Unifi controller on Raspberry Pi? Start by adding the Ubiquiti server to the list of repositories for Raspberry Pi OS. Then, the Unifi controller can be installed with apt and managed as a system service.
The installation is straightforward, you can install it like any Debian package. But the access points configuration is not so easy and I saw no article explaining this. As I’m using it at work, I can show you all the configuration steps with real access points and clients.
Before switching to Ubiquiti products, I remember having tested many brands to solve my issues, but none of them could not support over 10-20 users simultaneously (I even tested a fireproof model from D-Link, something like this one on Amazon ^^). So I definitely recommend trying Ubiquiti, this is cheap compared to other famous brands but works very well. Let’s see how to do this!
Ubiquiti Networks is an American company, selling hardware for wireless technologies like access points, routers and cameras. They started with wireless devices, and they are now diversifying upon a broader range of products. The latest innovative product concerns the solar technology, they help you to manage solar farms.
Anyway, the product that interests us today is a software: Unifi controller. The goal of this product is to manage access points and wireless devices from a unique web interface. From the interface, you can see all the access points and broadcast a unique SSID. The controller will handle the roaming between access points and load distribution.
Raspberry Pi Course Sale: 10% off today. Take it to the next level. I’m here to help you get started on Raspberry Pi, and learn all the skills you need in the correct order.YES, I WANT TO IMPROVE
Why do I need these products?
These products target mainly companies and large areas but you can have the same needs at home if you get some issues with your Wi-Fi connection (rooms with no network, roaming, stability, etc.). If you need over one access point to cover all the house, it could be interesting to install these products at home.
For example, let’s say you install three access points and the controller somewhere. You’ll have only one Wi-Fi SSID in all the area (outdoor included). And you can move from one side to another without disconnection.
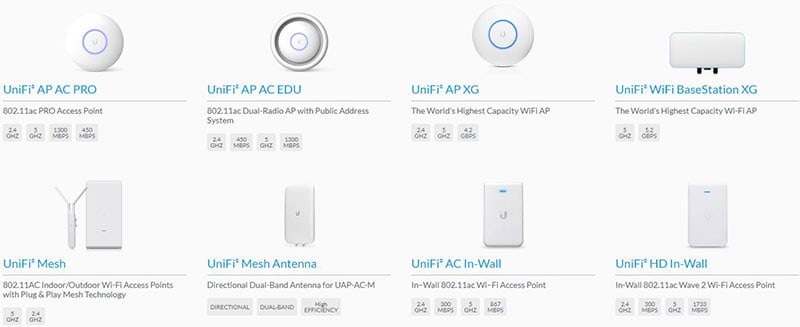
Ubiquiti products
Ubiquiti products are distributed by resellers, but are also available on several e-commerce websites:
To test these products, you don’t need many things. Just buy one or more access points and build your professional wireless network. Here is the link: Ubiquiti Unifi AP on Amazon.
You have several packages available: Only one, 2 AP (access point), 4 AP, etc. Choose the one you prefer, but there is not a big saving by taking big packs, so you can try with one or two, and order the others after.
Whatever your choice, a PoE switch will make the installation easier If you want to start without it, there is a last option. Ubiquiti provides an adapter with the AP (power cord + network = PoE Network), but you need a power outlet and two RJ45 cables instead of only one cable for everything. Here is the link to the PoE injector on Amazon, make sure to check the AP power requirements are they are not all the same (a Pro AP needs PoE-48 for example).
Unifi controller installation
Now that you understand what are the Unifi products, we can move to the controller installation.
Installation on Raspberry Pi OS
As for any tutorial on this site, you firstly need to install Raspberry Pi OS on your Raspberry Pi. Any version will do the job (I’m doing it with Raspberry Pi OS Lite). If you don’t know how to do this, read my article on How to install Raspberry Pi OS on your Raspberry Pi.
Once installed, update it and reboot: sudo apt update sudo apt upgrade sudo reboot
And enable SSH access with: sudo service ssh start This way you can follow this tutorial from your computer (if needed, check this post to learn more about this).
Set a static IP address
As our Raspberry Pi will be like a server on our network, we need to use:
A wired connection If you want a fast Wi-Fi network, you need to have your controller and your access point on a good connection. So, I don’t recommend setting up the controller with a Wi-Fi connection (at home it’s probably ok).
A static IP address The Raspberry Pi will become an important node on your network, so we need to fix its IP. By default, the Raspberry Pi use the DHCP to get a random IP among those available.
For the static IP, you can either fix the IP in the DHCP server (your Internet router probably), or set a static IP in the Raspberry Pi configuration.
Master your Raspberry Pi in 30 days Sale: 25% off today. Download the eBook. Uncover the secrets of the Raspberry Pi in a 30 days challenge.GET IT NOW!
Unifi controller installation
Now we are ready to start the installation. For these steps you have two choices:
Download and install directly the official Debian package from the website.
Add a new repository to manage the Unifi package with apt.
On the Ubiquiti downloads page you can find the Debian package to install the controller. You can download it and install it on your Raspberry Pi. But I don’t recommend it.
Because the Controller has many updates, about every month you have to download and install a new versionmanually. There is a repository available and it’s easier to manage all updates with apt rather than doing everything manually.
Connect with SSH to your Raspberry Pi.
Add the repository in the apt configuration file: echo 'deb https://www.ui.com/downloads/unifi/debian stable ubiquiti' | sudo tee /etc/apt/sources.list.d/100-ubnt-unifi.list
Add the key to the trusted keys: sudo wget -O /etc/apt/trusted.gpg.d/unifi-repo.gpg https://dl.ui.com/unifi/unifi-repo.gpg This allows us to use software from the previous repository
Run apt update to update the available packages list : sudo apt update
And finally, install the Unifi package: sudo apt install unifi Answer yes and wait a few seconds for the installation process to finish.
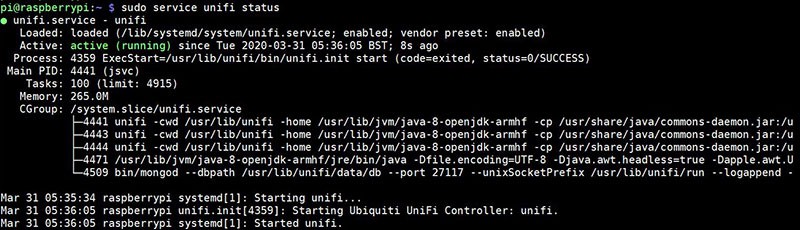
This is the end of the installation procedure, but your controller may not work yet. You can check the service status with: sudo service unifi status If you get an error like this one on a fresh Raspberry Pi OS installation:
Starting Ubiquiti UniFi Controller: unifi
Cannot locate Java Home
Then you need to install Java to start the Unifi service. Currently, the Unifier controller requires Java 8. You may already have it from another application, but if you have this error, here is how to fix it: sudo apt install openjdk-8-jre And finally start the Unifi service: sudo service unifi start You can find more details about Java in this tutorial.
Check the status again if you want: If everything is ok, you can move on to the next part to know how to use the software.You may also like:
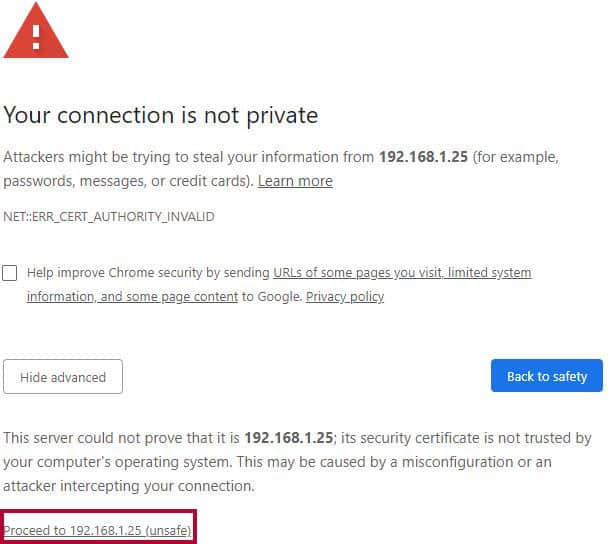
To access the web interface, go to https://<IP>:8443 For example, in my case it’s https://192.168.1.25:8443/ You’ll get a browser warning because we don’t have a secured certificate for the moment. Accept the exception and move to the next page to configure everything you need to get started:
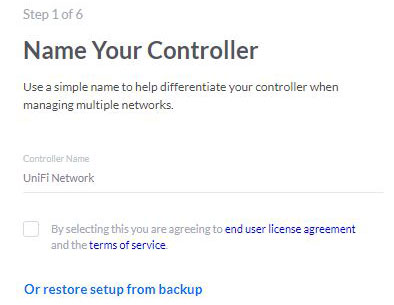
Step1: Start by giving a name to his controller and click on “Next”
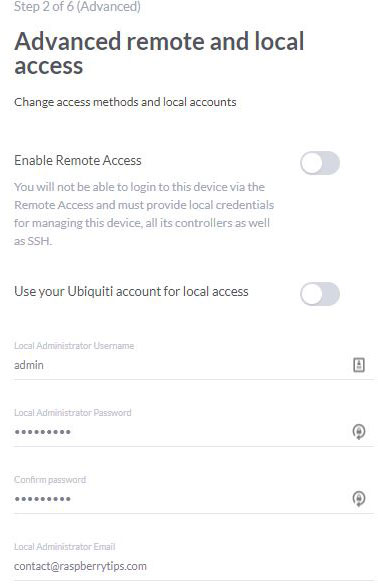
Step 2: Choose if you want to enable the cloud interface (default) or not (advanced). It depends on what you are trying to do. If you are always on the same network (home or in a company), you don’t really need the cloud panel. But it can be useful for remote sites.
If you keep the default option, fill the form to create an Unifi account.
On the advanced option, you have a form like this: If you enable one option, you need to create a cloud account AND a local account. I don’t need it for my test, so I disable everything.
Step 3: Sign in or configure options. This step is also different depending on your choice in the previous step You may need to sign in your account, or just to configure two additional options (auto backup and auto-optimize). Keep them enabled if asked.
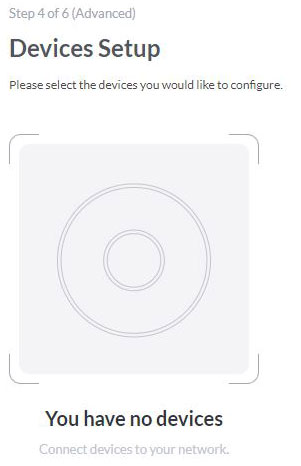
Step 4: Configure your devices. You can just skip this, it’s not required for now. You can add devices at anytime in the interface
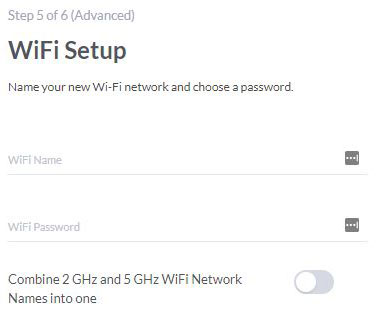
Step5: You can finally configure your Wi-Fi settings now. You can also change this in the interface, so just pick something to get started.
Step6: Finally, you also need to review your settings and you are ready to go.
Good job! You will now be redirected to the web panel. We can finally see it and configure more things if needed.
Web interface overview
Once logged in the web interface, you’ll get many submenus to manage everything. For the moment, it should be pretty empty, but in the left bar you can see:
Dashboard: Here you can have a preview of your network performance (number of APs and clients). Most of this dashboard needs the Unifi Security Gateway, so it’s not an important page.
Statistics: In this page you can monitor clients and traffic in the whole network. For the moment, nothing here 🙂
Map: In this one you can upload a map of your building, and place all APs on it. This way you can know where they are and see the global Wi-Fi coverage (approximately).
Devices: This page shows you all the Unifi devices you have on your network. It’s the most important page, you will manage APs from here.
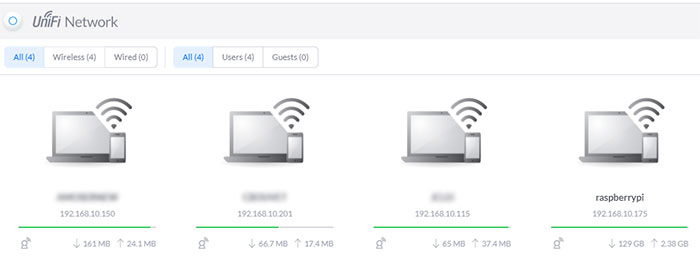
Clients: Same thing for the clients. You’ll see here all the connected clients with information about them (IP, AP, network usage, …):
Insights: Here you can see miscellaneous information. I’m using this mainly to see known clients (not connected now, but you can check the history, block or unblock them).
Events: This window shows you all the recent logs on your network This can be clients connections, AP upgrades, roaming, …
Alerts: Same thing with errors and warnings.
Settings: And this is the page where you’ll configure everything. We’ll use it to create the wireless network.
Chat support: If you need help from Unifi, you can ask for help here.
Now that you have visited the whole interface, we can move forward to configure the access point.
Add the first access point
Physical preparation
There are two possibilities for the access point cabling.
With a PoE switch:
Plug the access point to the POE Switch with an RJ45 cable.
Basically, that’s it. The status light should turn on and you can move to the next step.
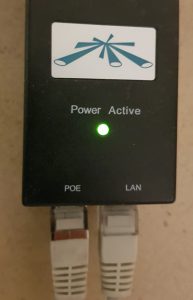
Without PoE switch:
You must have a POE adapter like this: (it’s available on Amazon if you don’t have one with your access point: check it here).
Connect the LAN port to your switch or wall network socket.
Connect the POE port to the access point.
If the access point LED starts to blink, it’s ok.
Software configuration
Now that we powered on the access point, we can go back to the Unifi web interface for the next steps:
Access the web interface: https://IP:8443.
Click on “Devices” in the left menu.
You should now see your access point in the list: The controller is seeing it, but we need to tell that it’s an access point for this controller.
Click on “Adopt” at the end of the line. The adoption process starts, after a few seconds, you should get the “Connected” status.
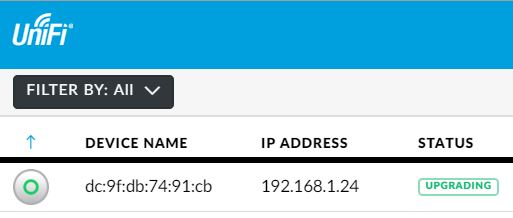
If needed (probably), you can upgrade the AP firmware to the latest version by clicking “Upgrade”. Your access point will take a few minutes to download and update the firmware.
Anyway, the first access point is ready, and we can now create the wireless network (SSID).
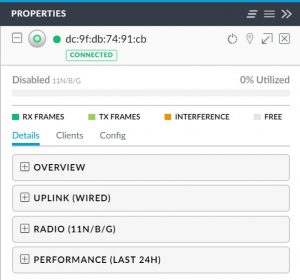
You can click on the line to see and change other settings for the access point (on the right).
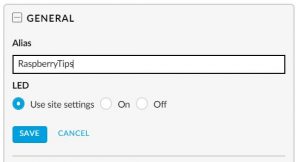
For example, you can set an alias for each access point to know which one is which. In the properties window, click on the config tab and set an alias.
Change everything you want on the access point and move to the SSID creation.
Create your wireless network
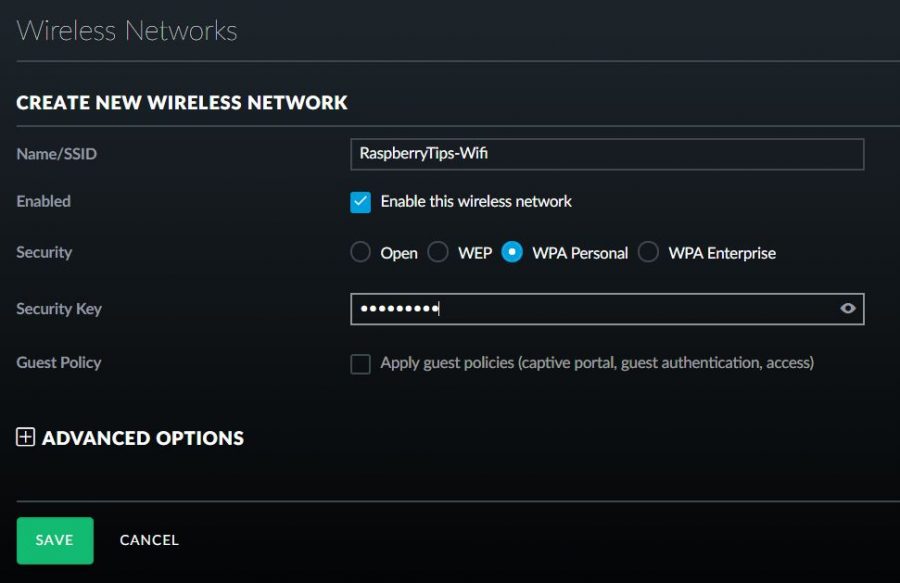
Creating a wireless network is basically setting an SSID, a password and a security type. You can do this in the “Settings” menu from the left bar:
In settings, click on “Wireless Networks”.
Then click on the “Create a new wireless network” button:
In the new window, choose an SSID, a security type and a password: Choose WPA-Personal for security, WEP is not secure. And prefer a long password (ideally a phrase from 15 to 30 characters).
Click “Save”.
The access points will restart with the new settings. After a few seconds, the new wireless network is available for all your devices.
Connect to it and check that everything works fine. By default, the Unifi controller will give you an IP address within your main network. You have nothing else to do, but you can change it in Settings > LAN.
Then go back to the different menus to see information and statistics about your device. Enjoy 🙂
Related questions
Do I need to keep the Raspberry Pi on? Not really. As soon as the Raspberry Pi stops, the controller is no longer available but the access point continue to work. You can still access the Wi-Fi network, but you lose controller’s features like roaming between APs.
Do the Unifi controller have advanced features you don’t talk about? Yes, a lot. I made a quick tutorial, but you can do a lot more: schedule downtimes, create guest access with VLAN or not, Radius with Active Directory, filter MAC address, block and unblock clients, etc …
How to reset an Unifi access point? If you lose access to an access point or have strange scenarios in the adoption process, you can reset it to factory defaults. To do this, use the reset button near the RJ45 socket. While the access point is on, let the button pressed for 10 seconds and then wait for the reset.
Conclusion
That’s it, you know how to install and configure an Unifi controller on your Raspberry Pi. This controller is running perfectly on my Raspberry Pi (3B+ and 4). I don’t know how many clients it would handle, but at home it’s more than enough.
If you have questions on this topic, leave a comment below and I’ll help you. I’m using this software at work for five years now, so I may have the answer 😉


 (it’s available on Amazon if you don’t have one with your access point:
 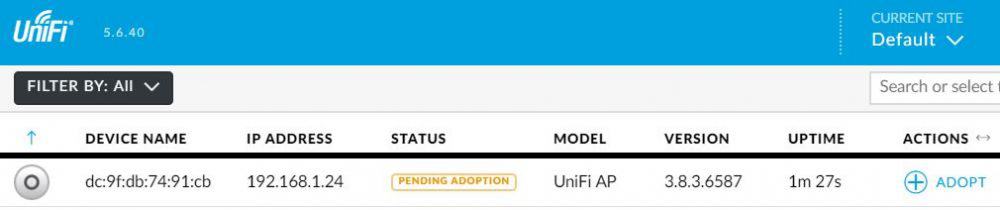 The controller is seeing it, but we need to tell that it’s an access point for this controller.
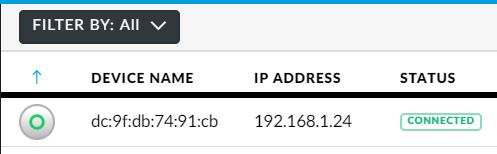


 Choose WPA-Personal for security, WEP is not secure.