Protect Your iOS Devices with Cortex XDR Mobile

Cortex XDR 3.5 and Cortex XDR Agent 7.9 Deliver Stronger Security, Better Search and Broader Coverage, Including iOS Support

Your employees probably expect to work from anywhere, at any time they want, on any device. With the rise of remote work, users are accessing business apps and data from mobile devices more than ever before. Cortex XDR Mobile for iOS lets you protect your users from mobile threats, such as malicious URLs in text messages and malicious or unwanted spam calls.

Cortex XDR Mobile for iOS is just one of over 40 new features in our Cortex XDR 3.5 and Cortex XDR Agent 7.9 releases. In addition to iOS protection, we’ve bolstered endpoint security, improved the flexibility of XQL Search, and expanded visibility and normalization to additional data sources. Even more new advancements make it easier than ever to manage alert exceptions and granularly control access to alerts and incidents.

Let’s dive in and take a deeper look at the new capabilities of Cortex XDR 3.5 and Cortex XDR Agent 7.9.

iOS Protection with Cortex XDR Mobile

With the rapid shift to remote work, flexible BYOD policies are a must have, now, for many companies. Whether employees are working at home, from a café, or in a corporate office, they often have a phone within reach, and for good reason. 62% of U.S. workers say mobile phones or tablets help them be productive at work, according to a broad 2021 survey.

Phishing and Smishing and Spam, Oh My!

If you own a smartphone (like 85% of Americans do) you’ve probably received suspicious text messages claiming your bank or Amazon or PayPal account has been blocked. Or you’ve received messages saying that you need to click a link to complete a USPS shipment. And if you are receiving these messages, you can assume your users are also receiving similar messages. It’s only a matter of time before a user clicks one of these links and supplies their credentials, possibly even the same credentials they use at work. These smishing attacks, or phishing performed through SMS, are on the rise.If your organization is like many others, you’ve probably deployed an email security solution that filters spam and phishing URLs. However, you may not be protecting your mobile devices – BYOD or corporate-owned – from spam calls and phishing attacks.Screenshot of being protected by Cortex XDR, showing security events.

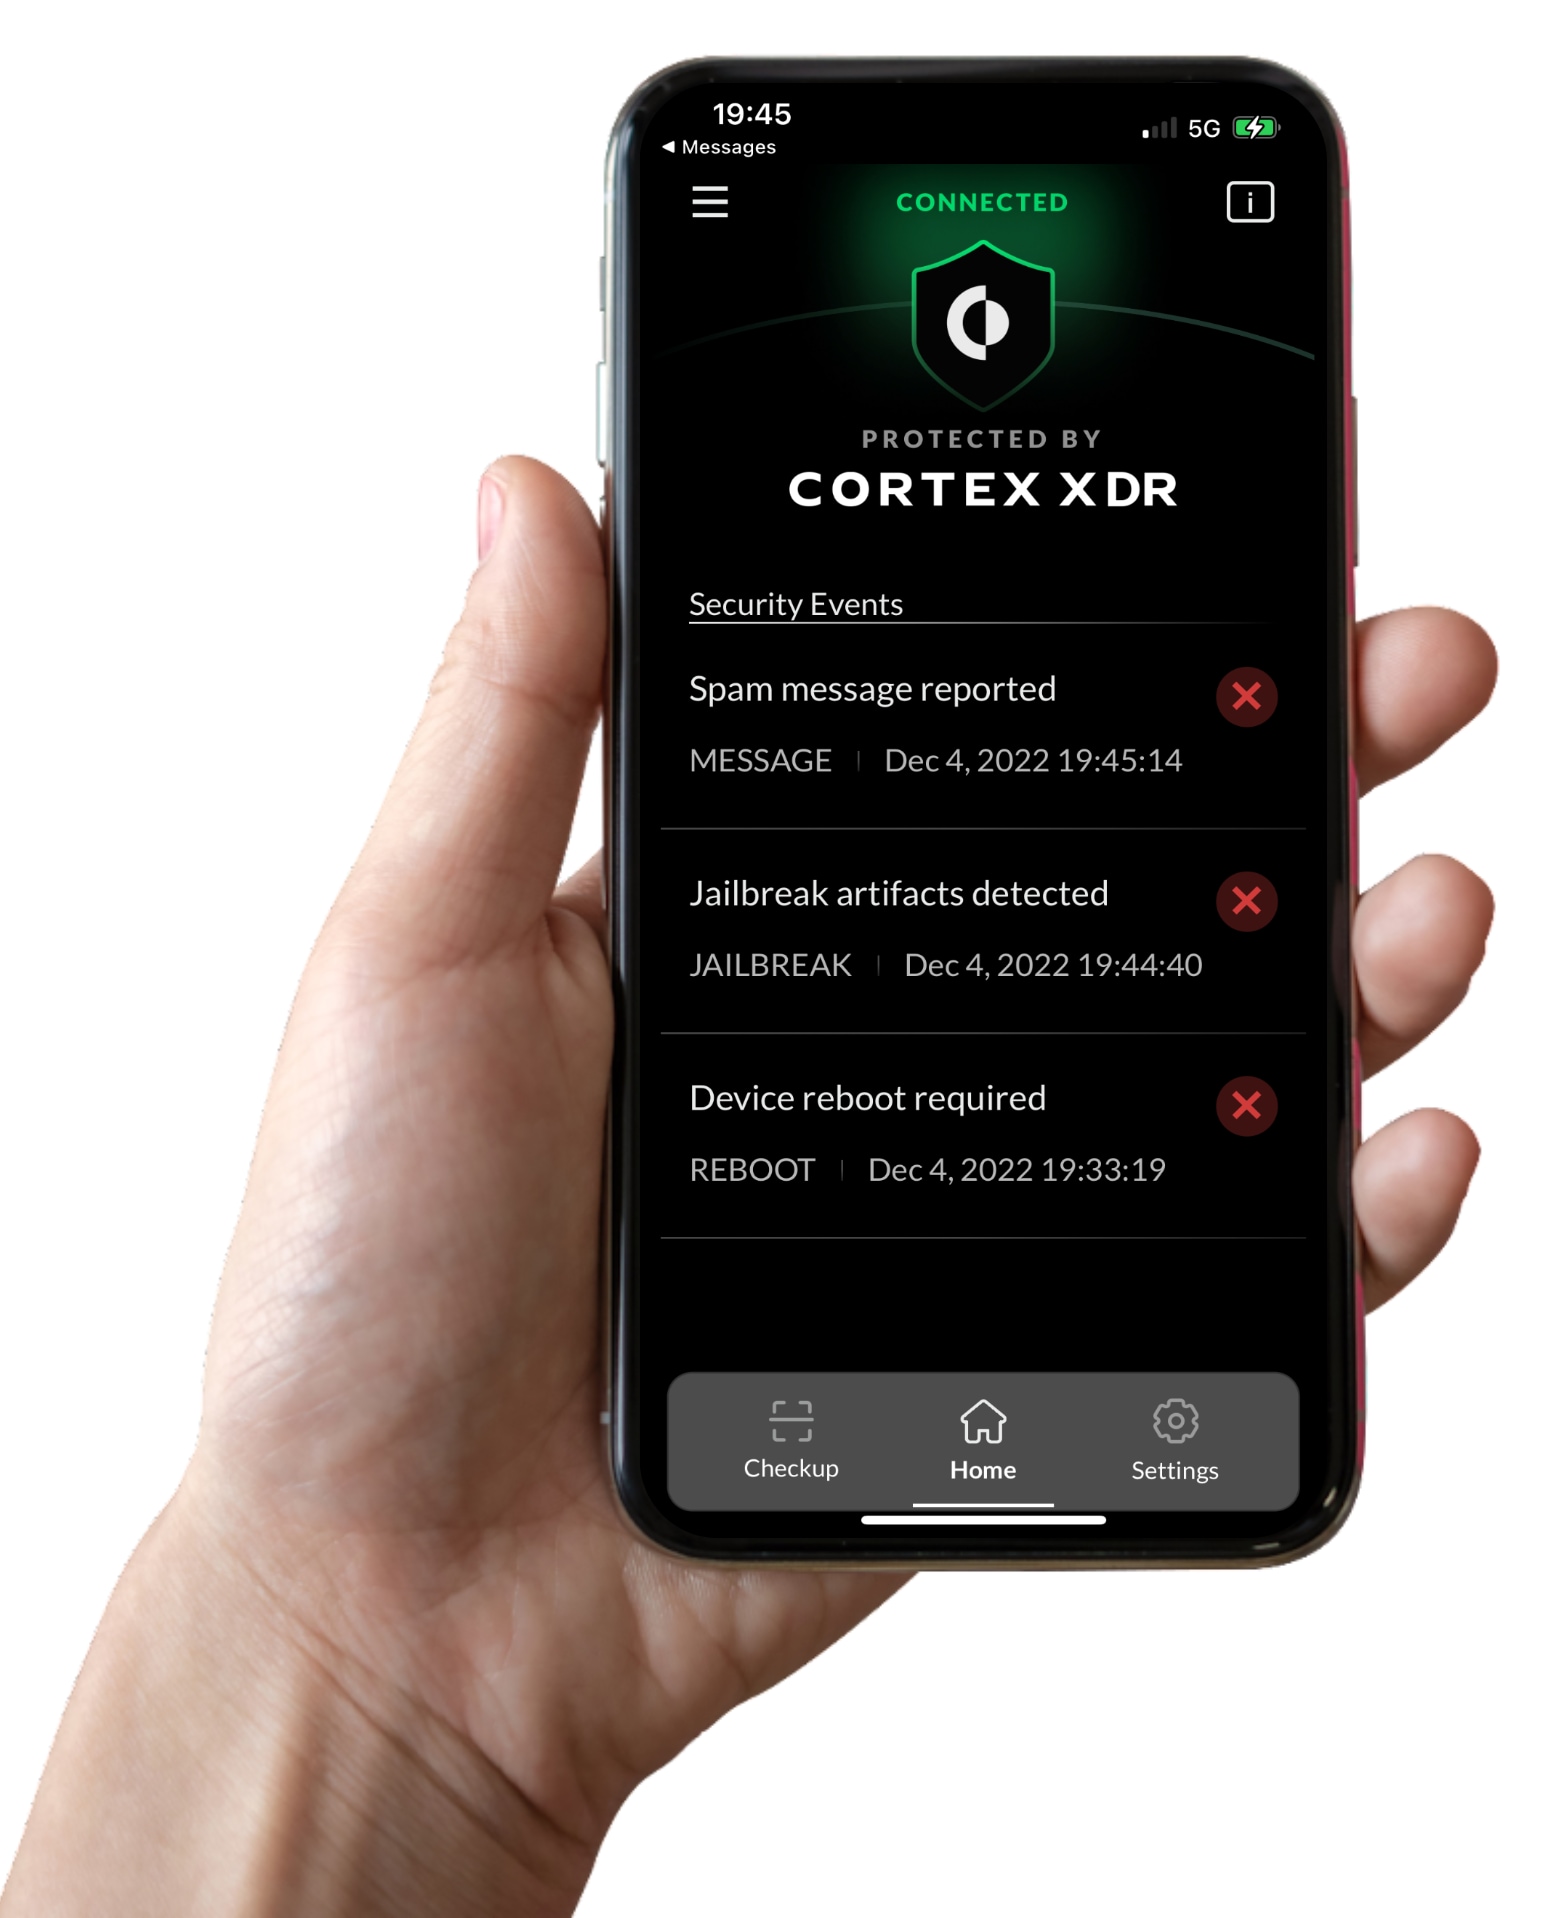
With Cortex XDR Mobile for iOS, you can now secure iOS devices from advanced threats like smishing. The Cortex XDR agent blocks malicious URLs in SMS messages with URL filtering powered by Unit 42 threat intelligence. It can also block spam calls, safeguarding your users from unwanted and potentially fraudulent calls. Users can also report a spam call or message, allowing the Cortex XDR administrator to block the phone number.

Hunting Down Jailbroken Devices

Some of your iPhone users might “jailbreak” their phones to remove software restrictions imposed by Apple. Once they gain root access to their phones, they can install software not available in the App Store. Jailbreaking increases the risk of downloading malware. It can also create stability issues.

The Cortex XDR agent detects jailbroken devices, including evasion techniques designed to thwart security tools. Overall, the Cortex XDR provides strong protection for iPhones and iPads, while balancing privacy and usability requirements.

Now you can protect a broad set of endpoints, mobile devices and cloud workloads in your organization, including Windows, Linux, Mac, Android, Chrome and now iOS, with the Cortex XDR agent.

In-Process Shellcode Protection

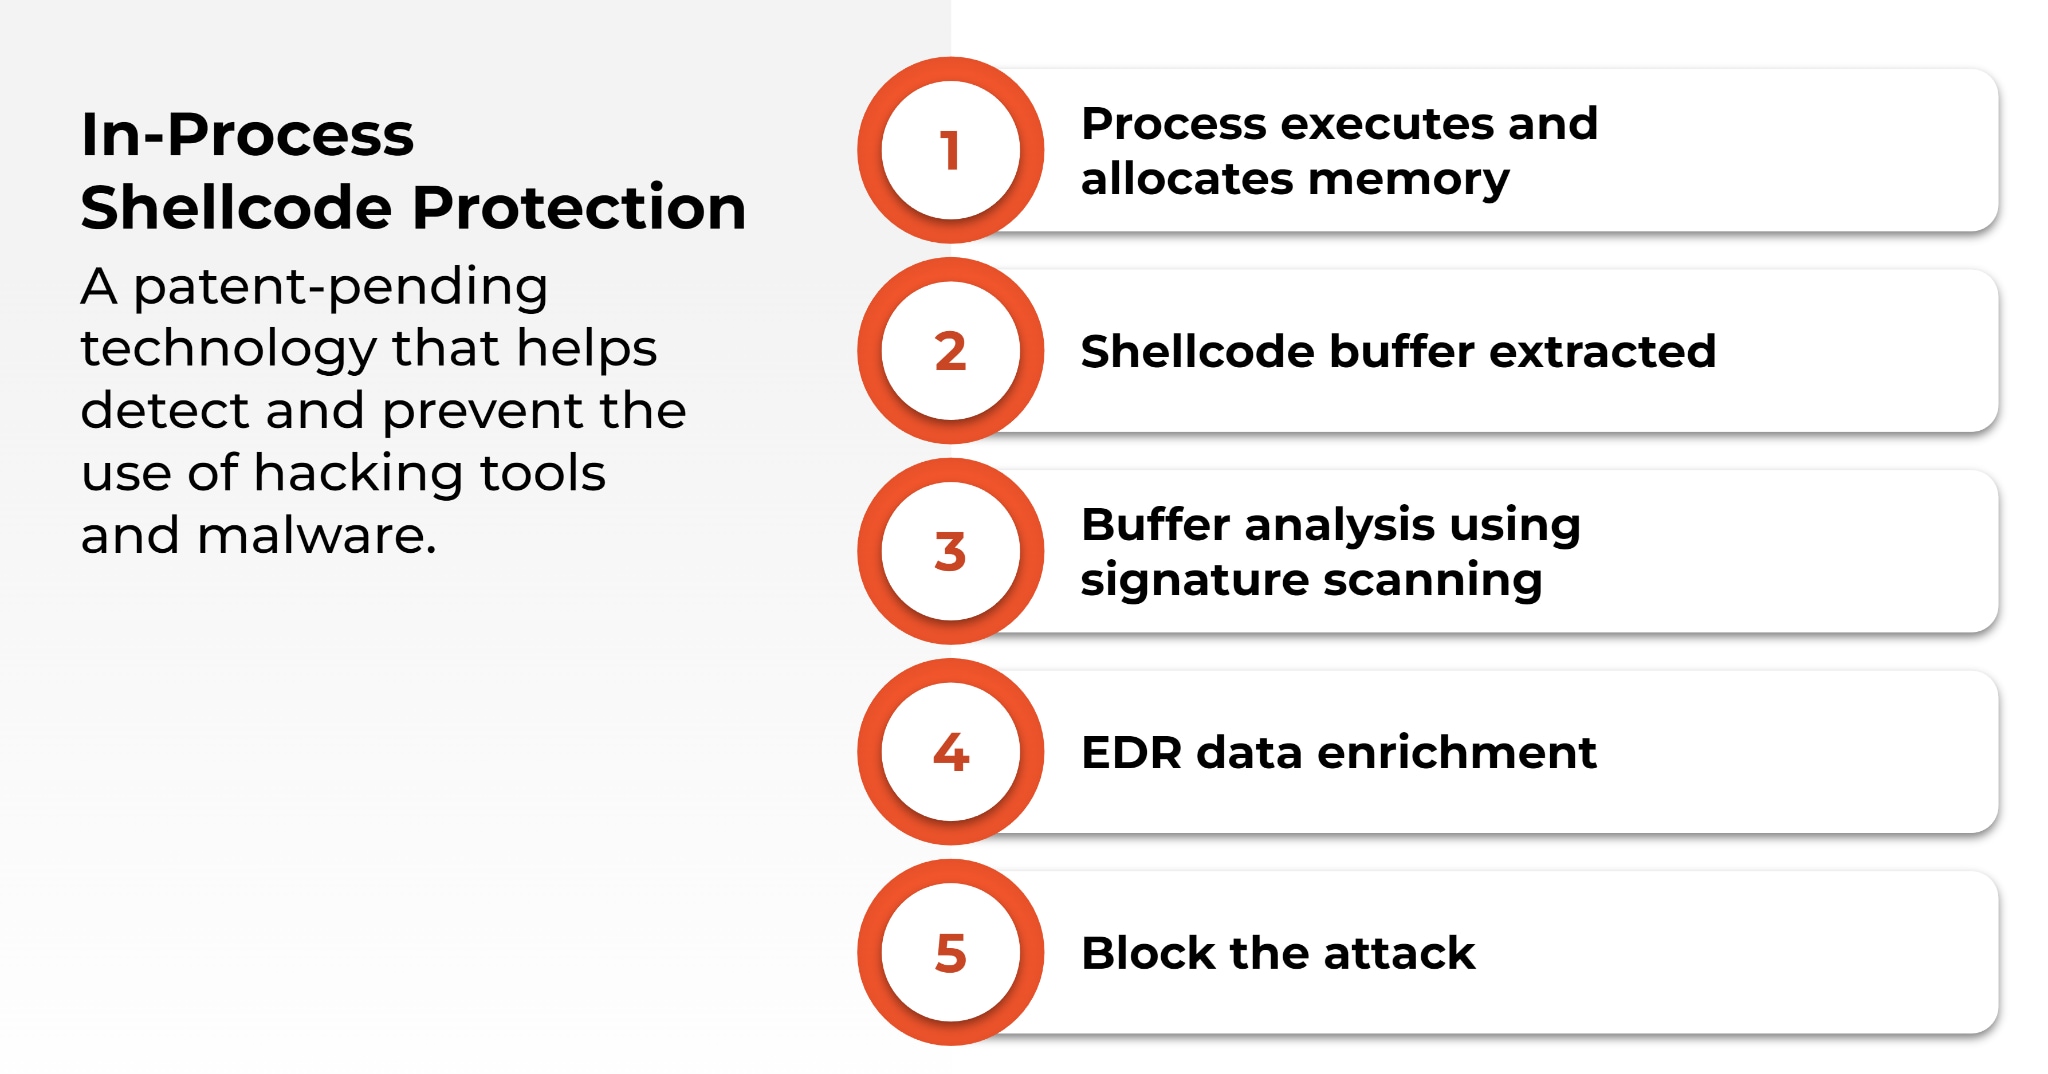
Threat actors can attempt to bypass endpoint security controls using shellcode to load malicious code into memory. Cortex XDR’s patent-pending in-process shellcode protection module blocks these attempts. To understand how, let’s look at a common attack sequence.

After threat actors have gained initial access to a host, they typically perform a series of steps, including analyzing the host operating system and delivering a malicious payload to the host.

They may use a stager to deliver the payload directly into memory rather than installing malware on the host machine. By loading the payload directly into memory, they can circumvent many antivirus solutions that will either ignore or perform more limited security checks on memory.

Many red team tools or hacking tools, such as Cobalt Strike, Sliver or Brute Ratel, have made it easier for attackers to perform these sophisticated steps.

If a process, including a benign process, executes and allocates memory in a suspicious way, the Cortex XDR agent will single out that memory allocation and extract and analyze the buffer. If the Cortex XDR agent detects any signature or indicator that the payload is malicious, the agent conducts additional analysis on the process and shellcode, including analyzing the behavior of the code and the process, using EDR data enrichment.

If the Cortex XDR agent determines the shellcode or the process loaded by the shellcode are malicious, it will terminate the process that loaded the shellcode and the allocated memory. By killing the process chain, or the “causality,” Cortex XDR prevents the malicious software from executing.

In-process shellcode protection is a patent-pending technology that helps detect and prevent the use of hacking tools and malware.

Our in-process shellcode protection will block red team and hacking tools from loading malicious code, without needing to individually identify and block each tool.

This means that if a never-before-seen hacking tool is released, Cortex XDR can prevent the tool from using shellcode to load a payload into memory.

Cortex XDR will terminate the implant once it’s loaded on the machine before it can do anything malicious.

Financial Malware and Cryptomining Protection

Whether stealing from bank accounts or mining for cryptocurrency, cybercriminals always have new tricks up their collective sleeves. To combat these dangerous threats, we’ve added two new behavior-based protection modules in Cortex XDR Agent 7.9. Let’s take a brief look at these threats and how you can mitigate them with Cortex XDR.

Banking Trojans emerged over a decade ago, typically stealing banking credentials by manipulating web browser sessions and logging keystrokes. Criminals deployed large networks of Trojans, such as Zeus, Trickbot, Emotet and Dridex, over the years. They infected millions of computers, accessed bank accounts, and transferred funds from victims. Now, threat actors often use these Trojans to deliver other types of malware to victims’ devices, like ransomware.

Cryptojacking, or malicious and unauthorized mining for cryptocurrency, is an easy way for threat actors to make money. Threat actors often target cloud services to mine cryptocurrency because cloud services provide greater scale, allowing them to mine cryptocurrency faster than a traditional endpoint. According to Unit 42 research, 23% of organizations with cloud assets are affected by cryptojacking, and it’s still the most common attack on unsecured Kubernetes clusters.

The new banking malware threat protection and cryptominers protection modules in the Cortex XDR agent automatically detect and stop the behaviors associated with these attacks. For example, to block banking malware, the module will block attempts to infect web browsers during process creation, as well as block other browser injection techniques. The cryptominers protection module will detect unusual cryptographic API or GPU access and other telltale signs of cryptojacking.

Both of these modules augment existing banking and cryptomining protection already available with Cortex XDR. You can enable, disable or set these modules to alert-only mode on Windows, Linux and macOS endpoints. You can also create exceptions per module or module rule for granular policy control.

Scope-Based Access Control for Alerts and Incidents

To address data privacy and security requirements, you might wish to control which Cortex XDR alerts and incidents your users can view. With Cortex XDR 3.5, you can control which alerts and incidents users can access based on endpoint and endpoint group tags.

Screenshot showing the update user page.

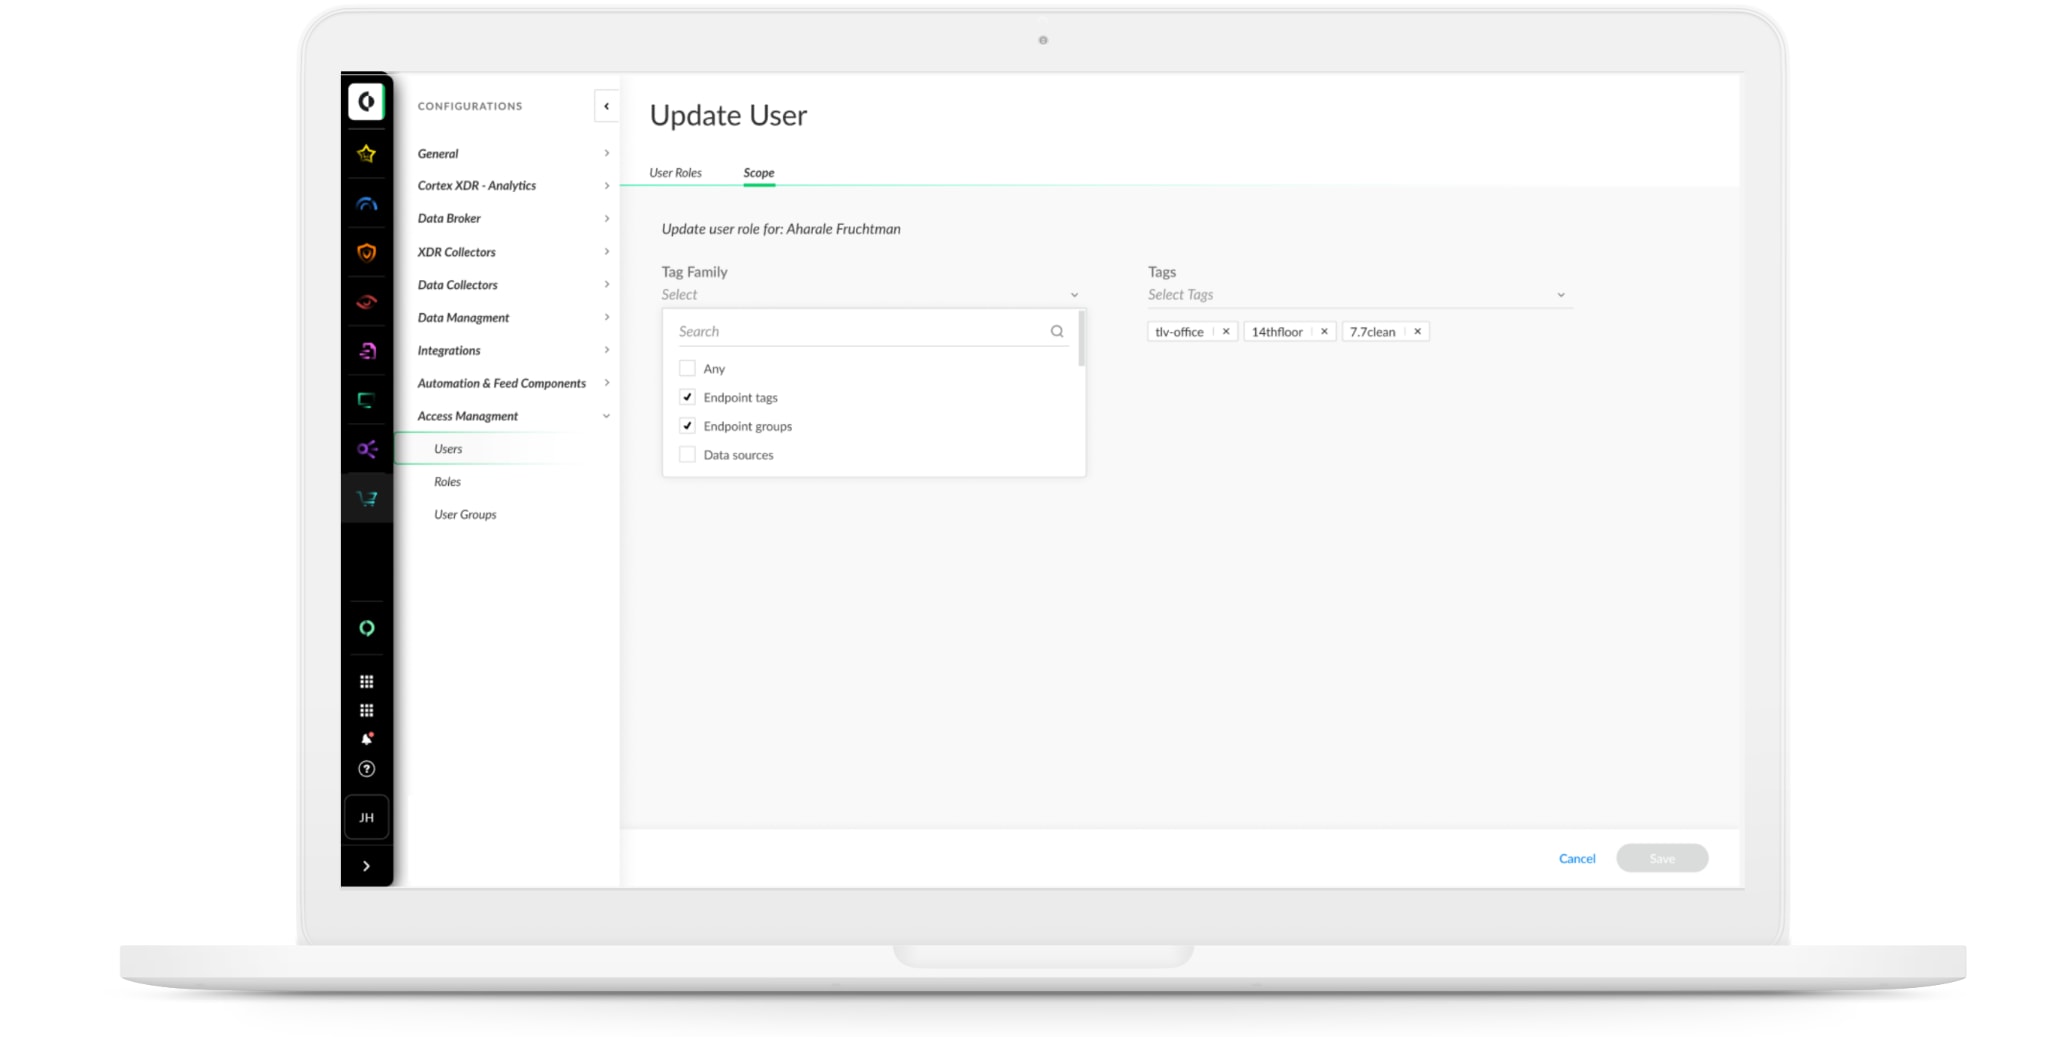
You can tag endpoints or endpoint groups by geographic location, organization, business unit, department or any other segmentation of your choice. Then, you can flexibly manage access to alerts and incidents based on the tags you’ve defined.

Alert Management Made Simple

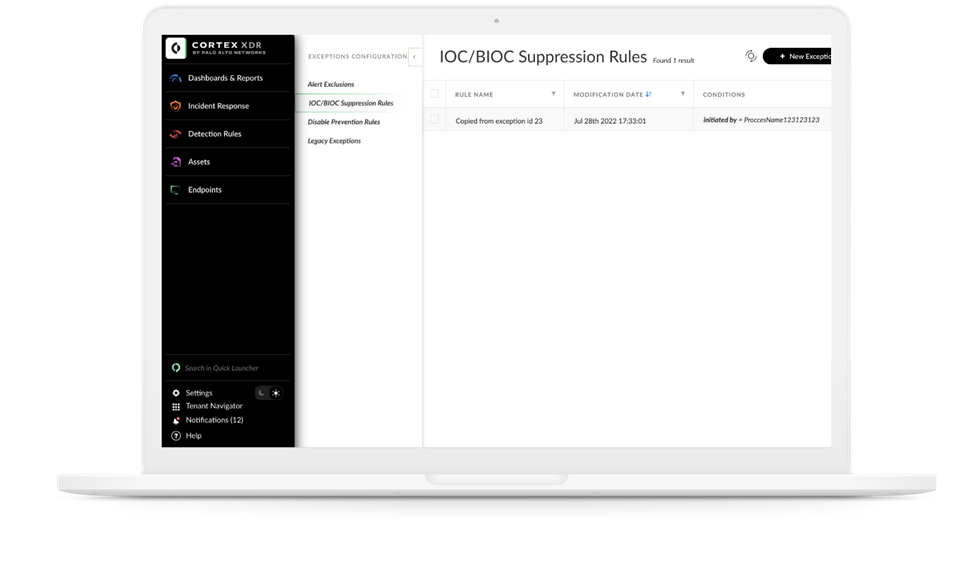
Cortex XDR 3.5 provides several enhancements to ease alert management and reduce noise. First, you can now view and configure alert exclusions and agent exception policies from a central location. You are able to configure which alerts to suppress. You can also configure exceptions to IOC and BIOC rules to prevent matching events from triggering alerts.

A new Disable Prevention Rules feature enables you to granularly exclude prevention actions triggered by specific security modules. The Legacy Exceptions window shows legacy “allow list rules,” which are still available.

Screenshot of Cortex XDR page on IOC/BIOC suppression rules. XQL Search Integration with Vulnerability Assessment

To help you quickly hunt down threats and discover high risk assets, we have enhanced our XQL search capability. Now you can uncover vulnerable endpoints and gain valuable exposure context for investigations by viewing Common Vulnerabilities and Exposures (CVEs), as well as installed applications per endpoint. You can also list all CVEs detected in your organization, together with the endpoints and applications impacted by each CVE.

In addition, XQL search supports several new options that offer greater flexibility and control to streamline investigation and response. Notably, a new top stage command reveals the top values for a specific field quickly, with minimal memory usage. By default the top stage command displays the top ten results.

For a complete list of new features, see the Cortex XDR 3.5 and Cortex XDR Agent 7.9 release notes. To learn more about the in-process shellcode protection feature, attend the session “Today’s Top Endpoint Threats, and Advancements to Stop Them” on Tuesday, December 13, at 10:30 AM PST at the Ignite ’22 Conference.

Source :
https://www.paloaltonetworks.com/blog/2022/12/ios-devices-with-cortex-xdr-mobile/

LockBit 3.0 ‘Black’ attacks and leaks reveal wormable capabilities and tooling

Reverse-engineering reveals close similarities to BlackMatter ransomware, with some improvements

A postmortem analysis of multiple incidents in which attackers eventually launched the latest version of LockBit ransomware (known variously as LockBit 3.0 or ‘LockBit Black’), revealed the tooling used by at least one affiliate. Sophos’ Managed Detection and Response (MDR) team has observed both ransomware affiliates and legitimate penetration testers use the same collection of tooling over the past 3 months.

Leaked data about LockBit that showed the backend controls for the ransomware also seems to indicate that the creators have begun experimenting with the use of scripting that would allow the malware to “self-spread” using Windows Group Policy Objects (GPO) or the tool PSExec, potentially making it easier for the malware to laterally move and infect computers without the need for affiliates to know how to take advantage of these features for themselves, potentially speeding up the time it takes them to deploy the ransomware and encrypt targets.

A reverse-engineering analysis of the LockBit functionality shows that the ransomware has carried over most of its functionality from LockBit 2.0 and adopted new behaviors that make it more difficult to analyze by researchers. For instance, in some cases it now requires the affiliate to use a 32-character ‘password’ in the command line of the ransomware binary when launched, or else it won’t run, though not all the samples we looked at required the password.

We also observed that the ransomware runs with LocalServiceNetworkRestricted permissions, so it does not need full Administrator-level access to do its damage (supporting observations of the malware made by other researchers).

Most notably, we’ve observed (along with other researchers) that many LockBit 3.0 features and subroutines appear to have been lifted directly from BlackMatter ransomware.

Is LockBit 3.0 just ‘improved’ BlackMatter?

Other researchers previously noted that LockBit 3.0 appears to have adopted (or heavily borrowed) several concepts and techniques from the BlackMatter ransomware family.

We dug into this ourselves, and found a number of similarities which strongly suggest that LockBit 3.0 reuses code from BlackMatter.

Anti-debugging trick

Blackmatter and Lockbit 3.0 use a specific trick to conceal their internal functions calls from researchers. In both cases, the ransomware loads/resolves a Windows DLL from its hash tables, which are based on ROT13.

It will try to get pointers from the functions it needs by searching the PEB (Process Environment Block) of the module. It will then look for a specific binary data marker in the code (0xABABABAB) at the end of the heap; if it finds this marker, it means someone is debugging the code, and it doesn’t save the pointer, so the ransomware quits.

After these checks, it will create a special stub for each API it requires. There are five different types of stubs that can be created (randomly). Each stub is a small piece of shellcode that performs API hash resolution on the fly and jumps to the API address in memory. This adds some difficulties while reversing using a debugger.

Screenshot of disassembler code
LockBit’s 0xABABABAB marker

SophosLabs has put together a CyberChef recipe for decoding these stub shellcode snippets.

Output of a CyberChef recipe
The first stub, as an example (decoded with CyberChef)

Obfuscation of strings

Many strings in both LockBit 3.0 and BlackMatter are obfuscated, resolved during runtime by pushing the obfuscated strings on to the stack and decrypting with an XOR function. In both LockBit and BlackMatter, the code to achieve this is very similar.

Screenshot of disassembler code
BlackMatter’s string obfuscation (image credit: Chuong Dong)

Georgia Tech student Chuong Dong analyzed BlackMatter and showed this feature on his blog, with the screenshot above.

Screenshot of disassembler code
LockBit’s string obfuscation, in comparison

By comparison, LockBit 3.0 has adopted a string obfuscation method that looks and works in a very similar fashion to BlackMatter’s function.

API resolution

LockBit uses exactly the same implementation as BlackMatter to resolve API calls, with one exception: LockBit adds an extra step in an attempt to conceal the function from debuggers.

Screenshot of disassembler code
BlackMatter’s dynamic API resolution (image credit: Chuong Dong)

The array of calls performs precisely the same function in LockBit 3.0.

Screenshot of disassembler code
LockBit’s dynamic API resolution

Hiding threads

Both LockBit and BlackMatter hide threads using the NtSetInformationThread function, with the parameter ThreadHideFromDebugger. As you probably can guess, this means that the debugger doesn’t receive events related to this thread.

Screenshot of disassembler code
LockBit employs the same ThreadHideFromDebugger feature as an evasion technique

Printing

LockBit, like BlackMatter, sends ransom notes to available printers.

Screenshot of disassembler code
LockBit can send its ransom notes directly to printers, as BlackMatter can do

Deletion of shadow copies

Both ransomware will sabotage the infected computer’s ability to recover from file encryption by deleting the Volume Shadow Copy files.

LockBit calls the IWbemLocator::ConnectServer method to connect with the local ROOT\CIMV2 namespace and obtain the pointer to an IWbemServices object that eventually calls IWbemServices::ExecQuery to execute the WQL query.

Screenshot of disassembler code
BlackMatter code for deleting shadow copies (image credit: Chuong Dong)

LockBit’s method of doing this is identical to BlackMatter’s implementation, except that it adds a bit of string obfuscation to the subroutine.

Screenshot of disassembler code
LockBit’s deletion of shadow copies

Enumerating DNS hostnames

Both LockBit and BlackMatter enumerate hostnames on the network by calling NetShareEnum.

Screenshot of disassembler code
BlackMatter calls NetShareEnum() to enumerate hostnames… (image credit: Chuong Dong)

In the source code for LockBit, the function looks like it has been copied, verbatim, from BlackMatter.

Screenshot of disassembler code
…as does LockBit

Determining the operating system version

Both ransomware strains use identical code to check the OS version – even using the same return codes (although this is a natural choice, since the return codes are hexadecimal representations of the version number).

Screenshot of disassembler code
BlackMatter’s code for checking the OS version (image credit: Chuong Dong)
Screenshot of disassembler code
LockBit’s OS enumeration routine

Configuration

Both ransomware contain embedded configuration data inside their binary executables. We noted that LockBit decodes its config in a similar way to BlackMatter, albeit with some small differences.

For instance, BlackMatter saves its configuration in the .rsrc section, whereas LockBit stores it in .pdata

Screenshot of disassembler code
BlackMatter’s config decryption routine (image credit: Chuong Dong)

And LockBit uses a different linear congruential generator (LCG) algorithm for decoding.

Screenshot of disassembler code
LockBit’s config decryption routine

Some researchers have speculated that the close relationship between the LockBit and BlackMatter code indicates that one or more of BlackMatter’s coders were recruited by LockBit; that LockBit bought the BlackMatter codebase; or a collaboration between developers. As we noted in our white paper on multiple attackers earlier this year, it’s not uncommon for ransomware groups to interact, either inadvertently or deliberately.

Either way, these findings are further evidence that the ransomware ecosystem is complex, and fluid. Groups reuse, borrow, or steal each other’s ideas, code, and tactics as it suits them. And, as the LockBit 3.0 leak site (containing, among other things, a bug bounty and a reward for “brilliant ideas”) suggests, that gang in particular is not averse to paying for innovation.

LockBit tooling mimics what legitimate pentesters would use

Another aspect of the way LockBit 3.0’s affiliates are deploying the ransomware shows that they’re becoming very difficult to distinguish from the work of a legitimate penetration tester – aside from the fact that legitimate penetration testers, of course, have been contracted by the targeted company beforehand, and are legally allowed to perform the pentest.

The tooling we observed the attackers using included a package from GitHub called Backstab. The primary function of Backstab is, as the name implies, to sabotage the tooling that analysts in security operations centers use to monitor for suspicious activity in real time. The utility uses Microsoft’s own Process Explorer driver (signed by Microsoft) to terminate protected anti-malware processes and disable EDR utilities. Both Sophos and other researchers have observed LockBit attackers using Cobalt Strike, which has become a nearly ubiquitous attack tool among ransomware threat actors, and directly manipulating Windows Defender to evade detection.

Further complicating the parentage of LockBit 3.0 is the fact that we also encountered attackers using a password-locked variant of the ransomware, called lbb_pass.exe , which has also been used by attackers that deploy REvil ransomware. This may suggest that there are threat actors affiliated with both groups, or that threat actors not affiliated with LockBit have taken advantage of the leaked LockBit 3.0 builder. At least one group, BlooDy, has reportedly used the builder, and if history is anything to go by, more may follow suit.

LockBit 3.0 attackers also used a number of publicly-available tools and utilities that are now commonplace among ransomware threat actors, including the anti-hooking utility GMER, a tool called AV Remover published by antimalware company ESET, and a number of PowerShell scripts designed to remove Sophos products from computers where Tamper Protection has either never been enabled, or has been disabled by the attackers after they obtained the credentials to the organization’s management console.

We also saw evidence the attackers used a tool called Netscan to probe the target’s network, and of course, the ubiquitous password-sniffer Mimikatz.

Incident response makes no distinction

Because these utilities are in widespread use, MDR and Rapid Response treats them all equally – as though an attack is underway – and immediately alerts the targets when they’re detected.

We found the attackers took advantage of less-than-ideal security measures in place on the targeted networks. As we mentioned in our Active Adversaries Report on multiple ransomware attackers, the lack of multifactor authentication (MFA) on critical internal logins (such as management consoles) permits an intruder to use tooling that can sniff or keystroke-capture administrators’ passwords and then gain access to that management console.

It’s safe to assume that experienced threat actors are at least as familiar with Sophos Central and other console tools as the legitimate users of those consoles, and they know exactly where to go to weaken or disable the endpoint protection software. In fact, in at least one incident involving a LockBit threat actor, we observed them downloading files which, from their names, appeared to be intended to remove Sophos protection: sophoscentralremoval-master.zip and sophos-removal-tool-master.zip. So protecting those admin logins is among the most critically important steps admins can take to defend their networks.

For a list of IOCs associated with LockBit 3.0, please see our GitHub.

Acknowledgments

Sophos X-Ops acknowledges the collaboration of Colin Cowie, Gabor Szappanos, Alex Vermaning, and Steeve Gaudreault in producing this report.

Source :
https://news.sophos.com/en-us/2022/11/30/lockbit-3-0-black-attacks-and-leaks-reveal-wormable-capabilities-and-tooling/

7 Cyber Security Tips for SMBs

When the headlines focus on breaches of large enterprises like the Optus breach, it’s easy for smaller businesses to think they’re not a target for hackers. Surely, they’re not worth the time or effort?

Unfortunately, when it comes to cyber security, size doesn’t matter.

Assuming you’re not a target leads to lax security practices in many SMBs who lack the knowledge or expertise to put simple security steps in place. Few small businesses prioritise cybersecurity, and hackers know it. According to Verizon, the number of smaller businesses being hit has climbed steadily in the last few years – 46% of cyber breaches in 2021 impacted businesses with fewer than 1,000 employees.

Cyber security doesn’t need to be difficult#

Securing any business doesn’t need to be complex or come with a hefty price tag. Here are seven simple tips to help the smaller business secure their systems, people and data.

1 — Install anti-virus software everywhere#

Every organisation has anti-virus on their systems and devices, right? Unfortunately, business systems such as web servers get overlooked all too often. It’s important for SMBs to consider all entry points into their network and have anti-virus deployed on every server, as well as on employees’ personal devices.

Hackers will find weak entry points to install malware, and anti-virus software can serve as a good last-resort backstop, but it’s not a silver bullet. Through continuous monitoring and penetration testing you can identify weaknesses and vulnerabilities before hackers do, because it’s easier to stop a burglar at the front door than once they’re in your home.

2 — Continuously monitor your perimeter#

Your perimeter is exposed to remote attacks because it’s available 24/7. Hackers constantly scan the internet looking for weaknesses, so you should scan your own perimeter too. The longer a vulnerability goes unfixed, the more likely an attack is to occur. With tools like Autosploit and Shodan readily available, it’s easier than ever for attackers to discover internet facing weaknesses and exploit them.

Even organisations that cannot afford a full-time, in-house security specialist can use online services like Intruder to run vulnerability scans to uncover weaknesses.

Intruder is a powerful vulnerability scanner that provides a continuous security review of your systems. With over 11,000 security checks, Intruder makes enterprise-grade scanning easy and accessible to SMBs.

Intruder will promptly identify high-impact flaws, changes in the attack surface, and rapidly scan your infrastructure for emerging threats.

3 — Minimise your attack surface#

Your attack surface is made up of all the systems and services exposed to the internet. The larger the attack surface, the bigger the risk. This means exposed services like Microsoft Exchange for email, or content management systems like WordPress can be vulnerable to brute-forcing or credential-stuffing, and new vulnerabilities are discovered almost daily in such software systems. By removing public access to sensitive systems and interfaces which don’t need to be accessible to the public, and ensuring 2FA is enabled where they do, you can limit your exposure and greatly reduce risk.

A simple first step in reducing your attack surface is by using a secure virtual private network (VPN). By using a VPN, you can avoid exposing sensitive systems directly to the internet whilst maintaining their availability to employees working remotely. When it comes to risk, prevention is better than cure – don’t expose anything to the internet unless it’s absolutely necessary!

4 — Keep software up to date#

New vulnerabilities are discovered daily in all kinds of software, from web browsers to business applications. Just one unpatched weakness could lead to full compromise of a system and a breach of customer data; as TalkTalk discovered when 150,000 of its private data records were stolen.

According to a Cyber Security Breaches Survey, businesses that hold electronic personal data of their customers are more likely than average to have had breaches. Patch management is an essential component of good cyber hygiene, and there are tools and services to help you check your software for any missing security patches.

5 — Back up your data #

Ransomware is on the increase. In 2021, 37% of businesses and organisations were hit by ransomware according to research by Sophos. Ransomware encrypts any data it can access, rendering it unusable, and can’t be reversed without a key to decrypt the data.

Data loss is a key risk to any business either through malicious intent or a technical mishap such as hard disk failure, so backing up data is always recommended. If you back up your data, you can counter attackers by recovering your data without needing to pay the ransom, as systems affected by ransomware can be wiped and restored from an unaffected backup without the attacker’s key.

6 — Keep your staff security aware#

Cyber attackers often rely on human error, so it’s vital that staff are trained in cyber hygiene so they recognise risks and respond appropriately. The Cyber Security Breaches Survey 2022 revealed that the most common types of breaches were staff receiving fraudulent emails or phishing attacks (73%), followed by people impersonating the organisation in emails or online (27%), viruses, spyware and malware (12%), and ransomware (4%).

Increasing awareness of the benefits of using complex passwords and training staff to spot common attacks such as phishing emails and malicious links, will ensure your people are a strength rather than a vulnerability.

— Protect yourself relative to your risk#

Cyber security measures should always be appropriate to the organisation. For example, a small business which handles banking transactions or has access to sensitive information such as healthcare data should employ far more stringent security processes and practices than a pet shop.

That’s not to say a pet shop doesn’t have a duty to protect customer data, but it’s less likely to be a target. Hackers are motivated by money, so the bigger the prize the more time and effort will be invested to achieve their gains. By identifying your threats and vulnerabilities with a tool like Intruder, you can take appropriate steps to mitigate and prioritize which risks need to be addressed and in which order.

It’s time to raise your cyber security game#

Attacks on large companies dominate the news, which feeds the perception that SMBs are safe, when the opposite is true. Attacks are increasingly automated, so SMBs are just as vulnerable targets as larger enterprises, more so if they don’t have adequate security processes in place. And hackers will always follow the path of least resistance. Fortunately, that’s the part Intruder made easy…

About Intruder#

Intruder is a cyber security company that helps organisations reduce their attack surface by providing continuous vulnerability scanning and penetration testing services. Intruder’s powerful scanner is designed to promptly identify high-impact flaws, changes in the attack surface, and rapidly scan the infrastructure for emerging threats. Running thousands of checks, which include identifying misconfigurations, missing patches, and web layer issues, Intruder makes enterprise-grade vulnerability scanning easy and accessible to everyone. Intruder’s high-quality reports are perfect to pass on to prospective customers or comply with security regulations, such as ISO 27001 and SOC 2.

Intruder offers a 14-day free trial of its vulnerability assessment platform. Visit their website today to take it for a spin!

Found this article interesting? Follow us on Twitter  and LinkedIn to read more exclusive content we post.

Source :
https://thehackernews.com/2022/11/7-cyber-security-tips-for-smbs.html

How to setup SMTP Relay in Office 365

If you plan to keep your existing on-prem exchange server then it can be used / utilized as a SMTP Relay server. Else, if you plan to decommission the exchange server for good, you can utilize Office365 as a SMTP Relay server to relay the emails.

There are three ways to setup SMTP Relay in Office 365:

  • SMTP Auth client Submission
  • Direct Send
  • Office 365 SMTP Relay

I recommend using either Office 365 SMTP Relay method or Direct Send method to configure SMTP Relay in Office 365. Please refer to the section Direct Send vs Office 365 SMTP Relay which will help you decide which one to use for your organization.

Below are some suggestions which can help you choose between Office 365 SMTP Relay and Direct Send method.

📌 Direct Send Method does not work if you want to send the email to External recipients for example any Gmail, Yahoo, Hotmail email address. Direct End method can send an email to External recipients if the External Organization is also using Office 365 to host the mailboxes.

📌If your requirement is to send emails to Internal and any External domain recipients then choose Office 365 SMTP Relay Method.

1. SMTP Auth client Submission Method

Below are the Pre-requisites for using SMTP Auth client submission method to configure SMTP relay in Office365:

  • Licensed Office365 User Mailbox is required.
  • SMTP AUTH must be enabled for Mailbox which will be used to send the emails.
  • Device must support TLS 1.2 or above (Please check the vendor documentation to confirm this).

If your authentication policy disables basic authentication for SMTP, clients cannot use the SMTP AUTH protocol. Microsoft will disable Basic authentication for all new and existing tenants starting from 1st Oct 2022. Therefore, this is my least recommended option for configuration of SMTP relay in Office 365.

Direct Send vs Office 365 SMTP Relay

Direct Send method and Office 365 SMTP Relay method both use MX Endpoint of your domain to configure SMTP Relay. Both can be used when your environment has SMTP AUTH disabled.

Use Direct Send when you need to send messages to recipients in your own organization who have mailboxes in Office 365. Direct send will not work if you want to send email to External email address (Gmail, yahoo, hotmail etc.). However, If the external recipient mailboxes are also hosted on Office 365, it will work fine.

Direct Send does not require your device or application to have a static IP address to configure it. However, Static IP address is recommended so that an SPF record can be created for your domain. The SPF record helps avoid your messages being flagged as spam.

Direct Send and Office 365 Relay both does not require your device to Support TLS.

Direct Send method Office 365 SMTP Relay
Source:Microsoft. How Direct Send Works ?
FeatuesDirect SendOffice 365 SMTP Relay
Send to Internal UsersYesYes
Send to External UsersNo (Yes, for external recipients having Office365 Mailboxes)Yes
Network Port RequirementPort 25Port 25
TLS RequirementOptionalOptional
Requires AuthenticationNoneDevice / Printer / Application must have Static IP address assigned.

2. Configure SMTP Relay in Office 365 using Direct Send method

In the previous section of this blog post, I have explianed the difference between Direct Send and Office 365 SMTP Relay method. If Direct Send meets your requirements and you do not have any requirements for sending an email to External recipients like Gmail, yahoo, hotmail etc. You can follow below steps to configure it.

1. Find MX Endpoint of your Domain

To find the MX Endpoint of your domain, You need to follow below steps:

  1. Login on Microsoft 365 admin center.
  2. Go to Settings and click on Domains.
  3. Click on your organization domain name. For example: techpress.net.
  4. Click on DNS records Tab.
  5. You can find MX Endpoint on DNS records tab. Click on it to Open.

You will find the MX Endpoint under Points to address or value column. Click on it to copy it on a notepad.

The format of the MX Endpoint is yourdomain-com.mail.protection.outlook.com

Locate MX Endpoint of your domain from Microsoft 365 admin center

2. Find the Static IP Address of the Device or Application [Optional]

As Microsoft Recommends to use Static IP Address for Direct Send Method but its not mandatory. If your Device or Application is not using a static IP address, make sure you assign a static IP address and then note down the IP Address of the device on a notepad. We will add static IP address of the device in your domain’s SPF record.

3. Update SPF Record [Optional]

This is also an optional step but highly recommended by Microsoft. Updating SPF record with Static IP Address of your Device or Application will help to avoid your emails being marked as SPAM. SPF records identifies which servers are allowed to send emails on behalf of the your domain.

Example:

  • Device / Printer IP Address: 10.20.1.56
  • Currently configured SPF recordv=spf1 include:spf.protection.outlook.com -all

Add your Device / Application IP Address in the SPF record as below:

v=spf1 ip4:10.20.1.56 include:spf.protection.outlook.com -all

4. Configure your Device / Application for Direct Send SMTP Relay

Last and final step is to configure your Device / Application and add SMTP relay details so that Device / Application can send emails using the Direct Send SMTP Relay. In our Example, we will be using a Printer to configure Direct Send. Let’s see which SMTP settings needs to be configured on the Printer.

If you want to configure SMTP Relay for a device other than your printer, You can still use below SMTP details to configure it.

SMTP ServerPortTLSUserNamePassword
MX Endpoint

For Example:
<yourdomain>-<domain extension.mail.protection.outlook.com
25Not Required (Recommendation is to enable if this option is available)Any Email Address of your domain. This user does not require a mailbox.
For example: myscanner@techpress.net
Not required (you can turn off SMTP Authentication)

Example:

I have captured a screenshot of one of my Printers to show you how to configure Direct Send. You can use the same settings to configure Direct Send on any other device as well. This screenshot is just for your reference:

Office 365 SMTP Relay Direct Send method Configuration on Konika Minolta printer

5. Create Bypass Spam Filtering Rule [Optional]

This step is optional and you do not need to create a bypass SPAM Filtering rule in Exchange Online. You have updated SPF record with your device IP address which should avoid the emails sent from your device to be marked as SPAM.

If your emails are still going into the SPAM folder. You can create a SPAM Bypass rule in office365 for the email ID which you have used to send the email from on the device. 

  • Login to Exchange online management portal
  • Click on Mail flow -> Rule -> Create a Rule.
Create SPAM Bypass rule for the Device IP on Exchange Admin Center

3. Configure using Office 365 SMTP Relay Method

Office 365 SMTP Relay Method - How it Works?
Source: Microsoft. Office 365 SMTP Relay Method – How it Works?

Direct Send method has limitations of sending the emails to external recipients. However, Office 365 SMTP Relay does not have that kind of limitation in place. You can use Office 365 SMTP Relay Method to send the email to any External recipient. Let’s check the steps to configure Office 365 Relay on your Device.

1. Find Public IP Address of the Device or Application

First thing you need to do is to find the public IP address of the Device or Application. If your device is not assigned with a Public IP and is using Dynamic IP address, Please update it to use Static IP Address. Copy the IP address in a notepad. We will need this IP Address while configuring a Connector in Exchange Online.

2. Create a Connector on Exchange Admin Center

Next step is to create a connector on Exchange Admin Center. Please follow below steps to create a connector:

  1. Login on Microsoft Exchange Admin Center
  2. Click on Mail Flow and then Connectors
  3. Click on + Add a connector
  4. On Add a Connector Page. Select Connection from Your organization’s email server and Connection to Office 365 and click on Next to proceed.
Create a new connector on Exchange Admin Center for configuration of SMTP Relay
  1. Provide a Connector Name and Description. Click on Next to Proceed.
Provide a Name and Description of the Connector
  1. On Authenticating sent email page. Select the option “By verifying that the IP address of the sending server matches one of the following addresses, which belongs exclusively to your organization“.

Add your Device / Application IP Addresses into the list. Add all Device’s IP addresses which you want to configure for Office 365 SMTP Relay. For example, In my organization I have 3 Printers which I want to configure for SMTP Relay. Therefore I have added the IP addresses of those 3 printers here.

Add Printer IP Addresses in Authenticating sent email
  1. On Review connector page, you can review the connector configuration and click on Create connector to create this Connector.
Review Connector page on Exchange Admin Center

3. Update SPF Record

Now you need to update the SPF record and add all the Device IP’s in the SPF record which you added in the connector created on Exchange Admin Center.

Example:

  • Device / Printer IP Addresses: 10.1.20.122, 10.2.1.11 and 10.2.5.89.
  • Currently configured SPF recordv=spf1 include:spf.protection.outlook.com -all

Add your Device / Application IP Addresses in the SPF record as below:

v=spf1 ip4:10.1.20.122 ip4:10.2.1.11 ipv4:10.2.5.89 include:spf.protection.outlook.com -all

4. Find MX Endpoint of your Domain

To find the MX Endpoint of your domain, You need to follow below steps:

  1. Login on Microsoft 365 admin center.
  2. Go to Settings and click on Domains.
  3. Click on your organization domain name. For example: techpress.net.
  4. Click on DNS records Tab.
  5. You can find MX Endpoint on DNS records pag. Click on it to Open.

You will find the MX Record under Points to address or value column. Click on it to copy it on a notepad.

The format of the MX Endpoint is yourdomain-com.mail.protection.outlook.com

Locate MX Endpoint of your domain from Microsoft 365 admin center

5. Configure your Device / Application for Office 365 SMTP Relay

Last and final step is to configure your Device / Application and add SMTP relay details so that Device / Application can send emails using the Office 365 SMTP Relay.

SMTP ServerPortTLSUserNamePassword
MX Endpoint

For Example:
<yourdomain>-<domain extension.mail.protection.outlook.com
25Not Required (Recommendation is to enable if this option is available)Any Email Address of your domain. This user does not require a mailbox.
For example: myscanner@techpress.net
Not required (you can turn off SMTP Authentication)

6. Create SPAM Bypass rule [Optional]

Please refer to the section of Configuration of SMTP Relay using Direct Send method where the steps to create SPAM bypass rule is given. This is an optional troubleshooting step and can be used in case the emails are being marked as SPAM.

Troubleshooting Office 365 SMTP Relay

Now we have setup Office 365 SMTP Relay. In case of any issues in email delivery, you can use below steps to troubleshoot.

Check SMTP AUTH at organization level

You can use below command to check SMTP AUTH at organization level. As we are not using SMTP client submission method, SMTP AUTH should be disabled.

Get-TransportConfig | Format-List SmtpClientAuthenticationDisabled

Copy

Check SMTP AUTH at Mailbox level

Get-CASMailbox "Sonia Neil " | fl SmtpClientAuthenticationDisabled

Copy

If you see the output of the command as SmtpClientAuthenticationDisabled: That means this setting is controlled by the corresponding SmtpClientAuthenticationDisabled parameter on the Set-TransportConfig cmdlet for the whole organization.

Test Port 25 using Telnet

If you are facing any issues in email delivery then you can verify if Port 25 is opened or blocked on the Firewall. If Port 25 is blocked then you may need to ask the Network admin to open it for the device IP which is sending emails. You can follow below steps to test Port 25 via Telnet.

  1. Launch Command Prompt on a PC (IP of the PC should be in the same subnet as Device / Printer / Application)
  2. Type Command telnet <MX EndPoint> 25 and press Enter.

(If telnet command is not recognized on the Windows 10 or Windows 11 PC. The Please first Install Telnet Client by going to Start menu -> Type “Turn Windows featured on or off” and find Telnet Client, Select it and click OK).

Install Telnet Client on Windows
  1. Once Telnet is installed on your Windows device. You can open a command prompt and type below command to test if Port 25 is opened or not.

Telnet <your MX endpoint> 25

Test Port 25 using Telnet

Once you enter on the above command, you should get a response from the server. Which means that Port 25 is opened.

Test Port 25 using Telnet

Send a Test email using Telnet

If you want to check the email delivery then you can use the Telnet command and send a test email. This test can confirm if there are any issues in email delivery. You can follow below steps to test a test email using telnet.

  1. Login on a computer in the same subnet as the Device / Printer / Application.
  2. Open Command prompt as administrator.
  3. Type command Telnet <your MX endpoint> 25.
Send a Test email using Telnet
  1. You will get a response back after press enter on the Telnet command. On Telnet Console Type below commands:

ehlo

mail from – Type from email address

rcpt to – Type recipient email address to send a test email.

If the recipient receives this test email then there is no issue witth email delivery.

ehlo
MAIL FROM:<myscanner@techpress.net>
250 2.1.0 Sender OK
RCPT TO:<internal email ID>
250 2.1.5 Recipient OK
DATA
354 Start mail input; end with <CRLF>.<CRLF>
SUBJECT:Hello World

This is a test message

Thanks,
John A.

. <Dot to end the email>

Copy

Check if ISP Public IP Address is banned

When you are sending an email using Telnet and if you get a message saying that your sending IP is banned. Then you need to unblock / remove your IP from banned list so that Devices on your network can send email.

Check if ISP Public IP Address is banned using Telnet

To remove your ISP Public IP Address from banned list, you need to login on https://senders.office.com and type your email ID and ISP Public IP Address of your organization. Follow the instuctions on the site to get your IP De-listed. This may take from 30 minutes to couple of hours to unblock your IP.

After you get your IP De-listed from https://senders.office.com. Try to send an email using Telnet again. This time if your IP is successfully de-listed, the recipient should receive the email.

Check if ISP Public IP Address is banned using Telnet

Test email has been received successfully.

Test email received using Telnet

Delisting / Unblock of ISP Public IP on Spamhaus.org

When you are sending an email using Telnet and if you get a message saying that service unavailable, Client host <your ISP Public IP address> blocked using Spamhaus. You need to visit the URL https://www.spamhaus.org/query/ip/<ISP Public IP Address> to get your IP De-listed.

Delisting / Unblock of ISP Public IP on Spamhaus.org

How to unblock your ISP Public IP on spamhaus.org

Please follow below steps to unblock your ISP Public IP from spamhaus.org.

  1. Once you land on https://www.spamhaus.org/query/ip/<ISP Public IP Address> site. Click on Show details and then click on “I am running my own mail server“.
Delisting / Unblock of ISP Public IP on Spamhaus.org
  1. Select I am running my own mail server and clicon on Next steps.
Delisting / Unblock of ISP Public IP on Spamhaus.org
  1. Complete the form for unblocking your ISP Public IP. Provide a NameEmail Address and Provide details regarding the issue. Once you complete this form. click on Submit button.
Delisting / Unblock of ISP Public IP on Spamhaus.org
  1. Form has been submitted. You can now wait for email verification link from Spamhaus.org.
Delisting / Unblock of ISP Public IP on Spamhaus.org
  1. Below is the email I received to verify my email address. Click on the link in the email for Email Verification.
Delisting / Unblock of ISP Public IP on Spamhaus.org
  1. Delisting has been successful. You can now try to use Telnet to send a test email to confirm email delivery issue has been rectifed. You can also check the Device / Printer / application to confirm if its able to send the email now.
Delisting / Unblock of ISP Public IP on Spamhaus.org

Conclusion

In this blog post, we have seem how to setup SMTP Relay in Office 365. There are three ways to configure it. But the most recommended option is Office 365 SMTP Relay Method. Second best method is Direct Send method which can be used if you do not have the requirements to send the emails to External recipients like gmail, yahoo etc.

Third method which is least recommended is SMTP Auth Submisson method. As It requires a licensed mailbox and SMTP AUTH to be enabled for that mailbox. There is a cost associated with licensed mailbox and Microsoft does not recommend SMTP AUTH to be enabled.

We have also see the troubleshooting steps in case of email delivery issues. These troubleshooting steps helped me fixed issues while working on Office 365 relay for Multiple clients.

Source :
https://techpress.net/office-365-smtp-relay-setup-and-configuration/

How to disable TLS 1.0 and TLS 1.1 on Windows servers

Transport Layer Security (TLS)  – TLS protocol is used to provide privacy and data integrity between two communicating applications. SSL and TLS are both cryptographic protocols but because SSL protocols does not providers sufficient level of security compared to TLS, SSL 2.0 and SSL 3.0 have been deprecated. TLS 1.0 was released in 1999, TLS 1.1 was released in 2006, TLS 1.2 was released in 2008 and TLS 1.3 was released in 2018.

Most of the companies and Internet Browsers are now moving to TLS 1.2 which is having better security algorithms than TLS 1.0 and TLS 1.1. TLS is more secure than SSL. Mozilla Firefox, Google Chrome, Apple and Microsoft are all ending support for TLS 1.0/1.1 in 2020, so its better to plan ahead of time and test all the applications and create Policies to disable TLS 1.0 and TLS 1.1 on Windows devices.

If you are interested in learning more about these protocols, differences between these protocols and security improvements – you can check Protocols RFC’s (Request for Comments) at these links TLS1.0 RFCTLS 1.1 RFCTLS 1.2 RFC and TLS 1.3 RFC. 

Similar other Blog posts:

Create a GPO in Active Directory to disable TLS 1.0 and TLS 1.1

We will be creating a Group policy object in Active directory to disable TLS 1.0 and TLS 1.1. You will need to create given registry keys and registry entries to control TLS protocols. Please find below steps to disable TLS 1.0 and TLS 1.1 on windows servers.

How to create a GPO in Active Directory to disable TLS 1.0 and TLS 1.1

  1. Login on a domain controller as a domain administrator.
  2. Open Group policy management console (Go to Start -> Run and type gpmc.msc and press Enter)
  3. Expand Group Policy Objects Folder. Right-click on it and Select New.
  1. Provide a Name of the GPO. For Example: Disable TLS 1.0 and TLS 1.1 Windows servers
  2. Right click on the Group policy “Disable TLS 1.0 and TLS 1.1 Windows Servers” and click on Edit.
  3. Go to Computer Configuration -> Preferences -> Windows settings -> Registry.
  4. Right click on Registry -> click on New -> click on Registry Item.
  1. In the next step, we will create registry keys and registry entries to Disable TLS 1.0 and TLS 1.1. Its recommended to disable SSL 2.0 and SSL 3.0 as well. Most of the newer Windows operating systems have TLS 1.2 enabled by default. However, If you want to control TLS 1.2 and TLS 1.3 then you can use the given registry keys for TLS 1.2 and TLS 1.3.

Registry Keys to disable TLS 1.0

[HKEY_LOCAL_MACHINE\SYSTEM\CurrentControlSet\Control\SecurityProviders\SCHANNEL\Protocols\TLS 1.0\Server] "Enabled"=dword:00000000
[HKEY_LOCAL_MACHINE\SYSTEM\CurrentControlSet\Control\SecurityProviders\SCHANNEL\Protocols\TLS 1.0\Server] "DisabledByDefault"=dword:00000001
[HKEY_LOCAL_MACHINE\SYSTEM\CurrentControlSet\Control\SecurityProviders\SCHANNEL\Protocols\TLS 1.0\Client] "Enabled"=dword:00000000
[HKEY_LOCAL_MACHINE\SYSTEM\CurrentControlSet\Control\SecurityProviders\SCHANNEL\Protocols\TLS 1.0\Client] "DisabledByDefault"=dword:00000001

Copy

Registry Keys to disable TLS 1.1

[HKEY_LOCAL_MACHINE\SYSTEM\CurrentControlSet\Control\SecurityProviders\SCHANNEL\Protocols\TLS 1.1\Server] "Enabled"=dword:00000001
[HKEY_LOCAL_MACHINE\SYSTEM\CurrentControlSet\Control\SecurityProviders\SCHANNEL\Protocols\TLS 1.1\Server] "DisabledByDefault"=dword:00000000
[HKEY_LOCAL_MACHINE\SYSTEM\CurrentControlSet\Control\SecurityProviders\SCHANNEL\Protocols\TLS 1.1\Client] "Enabled"=dword:00000001
[HKEY_LOCAL_MACHINE\SYSTEM\CurrentControlSet\Control\SecurityProviders\SCHANNEL\Protocols\TLS 1.1\Client] "DisabledByDefault"=dword:00000000

Copy

[HKEY_LOCAL_MACHINE\SYSTEM\CurrentControlSet\Control\SecurityProviders\SCHANNEL\Protocols\SSL 2.0\Server] "Enabled"=dword:00000000
[HKEY_LOCAL_MACHINE\SYSTEM\CurrentControlSet\Control\SecurityProviders\SCHANNEL\Protocols\SSL 2.0\Server] "DisabledByDefault"=dword:00000001
[HKEY_LOCAL_MACHINE\SYSTEM\CurrentControlSet\Control\SecurityProviders\SCHANNEL\Protocols\SSL 2.0\Client] "Enabled"=dword:00000000
[HKEY_LOCAL_MACHINE\SYSTEM\CurrentControlSet\Control\SecurityProviders\SCHANNEL\Protocols\SSL 2.0\Client] "DisabledByDefault"=dword:00000001

Copy

[HKEY_LOCAL_MACHINE\SYSTEM\CurrentControlSet\Control\SecurityProviders\SCHANNEL\Protocols\SSL 3.0\Server] "Enabled"=dword:00000000
[HKEY_LOCAL_MACHINE\SYSTEM\CurrentControlSet\Control\SecurityProviders\SCHANNEL\Protocols\SSL 3.0\Server] "DisabledByDefault"=dword:00000001
[HKEY_LOCAL_MACHINE\SYSTEM\CurrentControlSet\Control\SecurityProviders\SCHANNEL\Protocols\SSL 3.0\Client] "Enabled"=dword:00000000
[HKEY_LOCAL_MACHINE\SYSTEM\CurrentControlSet\Control\SecurityProviders\SCHANNEL\Protocols\SSL 3.0\Client] "DisabledByDefault"=dword:00000001

Copy

Registry Keys to Enable TLS 1.2 [Recommended]

[HKEY_LOCAL_MACHINE\SYSTEM\CurrentControlSet\Control\SecurityProviders\SCHANNEL\Protocols\TLS 1.2\Server] "Enabled"=dword:00000001
[HKEY_LOCAL_MACHINE\SYSTEM\CurrentControlSet\Control\SecurityProviders\SCHANNEL\Protocols\TLS 1.2\Server] "DisabledByDefault"=dword:00000000
[HKEY_LOCAL_MACHINE\SYSTEM\CurrentControlSet\Control\SecurityProviders\SCHANNEL\Protocols\TLS 1.2\Client] "Enabled"=dword:00000001
[HKEY_LOCAL_MACHINE\SYSTEM\CurrentControlSet\Control\SecurityProviders\SCHANNEL\Protocols\TLS 1.2\Client] "DisabledByDefault"=dword:00000000

Copy

Registry Keys to Enable TLS 1.3 [Optional]

[HKEY_LOCAL_MACHINE\SYSTEM\CurrentControlSet\Control\SecurityProviders\SCHANNEL\Protocols\TLS 1.3\Server] "Enabled"=dword:00000001
[HKEY_LOCAL_MACHINE\SYSTEM\CurrentControlSet\Control\SecurityProviders\SCHANNEL\Protocols\TLS 1.3\Server] "DisabledByDefault"=dword:00000000
[HKEY_LOCAL_MACHINE\SYSTEM\CurrentControlSet\Control\SecurityProviders\SCHANNEL\Protocols\TLS 1.3\Client] "Enabled"=dword:00000001
[HKEY_LOCAL_MACHINE\SYSTEM\CurrentControlSet\Control\SecurityProviders\SCHANNEL\Protocols\TLS 1.3\Client] "DisabledByDefault"=dword:00000000

Copy

After you click on Registry Item, A window will show where you can enter Information about the registry Item which you want to create. You need to provide below information about the registry Item:

  • Action: Select Update from the drop-down. Selecting Update will create the registry keys and registry entries if its not found on end users devices.
  • Hive: Select HKEY_LOCAL_MACHINE
  • Key Path: You can either browse to the registry path or provide a registry key to create / update.
  • Value Name: We will be creating two registry entries for each protocol. DisabledbyDefault and Enabled.
  • Value type: Select REG_DWORD.
  • Value type: Select 1 to Enable an 0 to disable.

Go through the process of creating an entry for each registry Item. Below screenshot shows that we have Disabled TLS 1.0, TLS 1.1 protocols and Enabled TLS 1.2 and TLS 1.3.

  1. Once you create all the registry Items in the Group policy management console for Disable TLS 1.0 and TLS 1.1 Windows Servers GPO. You can link the GPO to the Organization Unit (OU) containing windows servers.
  2. Please note that as this group policy object contains settings in Computer configuration which will target the Devices. A restart of the computer will be required so that registry entries can be created.

Disable TLS 1.0 and TLS 1.1 using IIS Crypto Tool

If your windows servers are not domain joined or you do not want to create group policy object in Active directory to disable deprecated SSL and TLS protocols. You can download and Install IIS Crypto tool on Windows server and manually select the checkboxes to Disable / Enable SSL / TLS protocols.

Please follow below steps to disable TLS 1.0 and TLS 1.1 using IIS Crypto Tool:

  1. Login on Windows Server using administrator credentials.
  2. Download IIS Crypto GUI tool.
  3. Launch IIS Crypto tool as an administrator.
  4. Uncheck SSL 2.0, SSL 3.0, TLS 1.0 and TLS 1.1 from Server Protocols.
  5. Uncheck SSL 2.0, SSL 3.0, TLS 1.0 and TLS 1.1 from Client Protocols.
  6. Reboot the server.
  7. Repeat Steps 1 to 6 on each server where you want to disable deprecated SSL and TLS protocols.
Disable deprecated SSL and TLS protocols using IIS Crypto Tool

Conclusion

In this blog post, we have seen how to disable TLS 1.0 and TLS 1.1 on windows servers. Its highly recommended to disable SSL 2.0 and SSL 3.0 as well. Newer Windows server operting systems have TLS 1.2 and TLS 1.3 enabled but you can still control these protocols using the given registry keys.

If you have only couple of servers and you do not want to create the Active directory group policy or your windows servers are standalone servers and not domain joined. You can use IIS Crypto tool to disable deprecated SSL and TLS protocols.

Source :
https://techpress.net/how-to-disable-tls-1-0-and-tls-1-1-on-windows-servers/

How to disable TLS 1.0 and TLS 1.1 using Powershell on Windows 11

Transport Layer Security (TLS)  – TLS protocol is used to provide privacy and data integrity between two communicating applications. SSL and TLS are both cryptographic protocols but because SSL protocols does not providers sufficient level of security compared to TLS, SSL 2.0 and SSL 3.0 have been deprecated. TLS 1.0 was released in 1999, TLS 1.1 was released in 2006, TLS 1.2 was released in 2008 and TLS 1.3 was released in 2018.

Most of the companies and Internet Browsers are now moving to TLS 1.2 which is having better security algorithms than TLS 1.0 and TLS 1.1. TLS is more secure than SSL. Mozilla Firefox, Google Chrome, Apple and Microsoft are all ending support for TLS 1.0/1.1 in 2020, so its better to plan ahead of time and test all the applications and create Policies to disable TLS 1.0 and TLS 1.1 on Windows machines.

If you are interested in learning more about these protocols, differences between these protocols and security improvements – you can check Protocols RFC’s (Request for Comments) at these links TLS1.0 RFCTLS 1.1 RFCTLS 1.2 RFC and TLS 1.3 RFC. 

Similar other Blog posts:

Disable SSL 2.0, SSL 3.0, TLS 1.0 and TLS 1.1 using Powershell

We can easily disable TLS 1.0 and TLS 1.1 using Powershell. However its recommended to also disable SSL 2.0, SSL 3.0 as well. We will be using below powershell code to create registry keys and registry entries. Once the registry keys are created, a reboot of that device will be required to complete the change.

Please note below Powershell Code needs to be run as an administrator as it needs to perform changes in Windows registry.

To run Powershell code on Windows 11 computer. Please use below steps:

  • Login on a Windows 11 PC as administrator.
  • Open Powershell Console as an administrator.
  • Run below piece of powershell code to enable / disable SSL / TLS Protocols.

Powershell code to disable SSL 2.0

 New-Item 'HKLM:\SYSTEM\CurrentControlSet\Control\SecurityProviders\SCHANNEL\Protocols\SSL 2.0\Client' -Force
 New-Item 'HKLM:\SYSTEM\CurrentControlSet\Control\SecurityProviders\SCHANNEL\Protocols\SSL 2.0\Server' -Force    
 Set-ItemProperty -Path 'HKLM:\SYSTEM\CurrentControlSet\Control\SecurityProviders\SCHANNEL\Protocols\SSL 2.0\Client' -Name 'Enabled'           -Value '0' -Type 'DWORD'
 Set-ItemProperty -Path 'HKLM:\SYSTEM\CurrentControlSet\Control\SecurityProviders\SCHANNEL\Protocols\SSL 2.0\Client' -Name 'DisabledByDefault' -value '1' -Type 'DWORD'
 Set-ItemProperty -Path 'HKLM:\SYSTEM\CurrentControlSet\Control\SecurityProviders\SCHANNEL\Protocols\SSL 2.0\Server' -name 'Enabled'           -value '0' –Type 'DWORD'
 Set-ItemProperty -Path 'HKLM:\SYSTEM\CurrentControlSet\Control\SecurityProviders\SCHANNEL\Protocols\SSL 2.0\Server' -name 'DisabledByDefault' -value '1' –Type 'DWORD'

Copy

Powershell code to disable SSL 3.0

New-Item 'HKLM:\SYSTEM\CurrentControlSet\Control\SecurityProviders\SCHANNEL\Protocols\SSL 3.0\Client' -Force
New-Item 'HKLM:\SYSTEM\CurrentControlSet\Control\SecurityProviders\SCHANNEL\Protocols\SSL 3.0\Server' -Force  
Set-ItemProperty -Path 'HKLM:\SYSTEM\CurrentControlSet\Control\SecurityProviders\SCHANNEL\Protocols\SSL 3.0\Client' -name 'Enabled'           -value '0' –Type 'DWORD'
Set-ItemProperty -Path 'HKLM:\SYSTEM\CurrentControlSet\Control\SecurityProviders\SCHANNEL\Protocols\SSL 3.0\Client' -name 'DisabledByDefault' -value '1' –Type 'DWORD'
Set-ItemProperty -Path 'HKLM:\SYSTEM\CurrentControlSet\Control\SecurityProviders\SCHANNEL\Protocols\SSL 3.0\Server' -name 'Enabled'           -value '0' –Type 'DWORD'
Set-ItemProperty -Path 'HKLM:\SYSTEM\CurrentControlSet\Control\SecurityProviders\SCHANNEL\Protocols\SSL 3.0\Server' -name 'DisabledByDefault' -value '1' –Type 'DWORD'  

Copy

Powershell code to disable TLS 1.0

New-Item 'HKLM:\SYSTEM\CurrentControlSet\Control\SecurityProviders\SCHANNEL\Protocols\TLS 1.0\Client' -Force
New-Item 'HKLM:\SYSTEM\CurrentControlSet\Control\SecurityProviders\SCHANNEL\Protocols\TLS 1.0\Server' -Force                                                                                                                                                            
Set-ItemProperty -Path 'HKLM:\SYSTEM\CurrentControlSet\Control\SecurityProviders\SCHANNEL\Protocols\TLS 1.0\Client' -name 'Enabled'           -value '0' –Type 'DWORD'
Set-ItemProperty -Path 'HKLM:\SYSTEM\CurrentControlSet\Control\SecurityProviders\SCHANNEL\Protocols\TLS 1.0\Client' -name 'DisabledByDefault' -value '1' –Type 'DWORD'
Set-ItemProperty -Path 'HKLM:\SYSTEM\CurrentControlSet\Control\SecurityProviders\SCHANNEL\Protocols\TLS 1.0\Server' -name 'Enabled'           -value '0' –Type 'DWORD'
Set-ItemProperty -Path 'HKLM:\SYSTEM\CurrentControlSet\Control\SecurityProviders\SCHANNEL\Protocols\TLS 1.0\Server' -name 'DisabledByDefault' -value '1' –Type 'DWORD'

Copy

Powershell code to disable TLS 1.1

New-Item 'HKLM:\SYSTEM\CurrentControlSet\Control\SecurityProviders\SCHANNEL\Protocols\TLS 1.1\Client' -Force
New-Item 'HKLM:\SYSTEM\CurrentControlSet\Control\SecurityProviders\SCHANNEL\Protocols\TLS 1.1\Server' -Force                                                                                                                                                                                 
Set-ItemProperty -Path 'HKLM:\SYSTEM\CurrentControlSet\Control\SecurityProviders\SCHANNEL\Protocols\TLS 1.1\Client' -name 'Enabled'           -value '0' –Type 'DWORD'
Set-ItemProperty -Path 'HKLM:\SYSTEM\CurrentControlSet\Control\SecurityProviders\SCHANNEL\Protocols\TLS 1.1\Client' -name 'DisabledByDefault' -value '1' –Type 'DWORD'
Set-ItemProperty -Path 'HKLM:\SYSTEM\CurrentControlSet\Control\SecurityProviders\SCHANNEL\Protocols\TLS 1.1\Server' -name 'Enabled'           -value '0' –Type 'DWORD'
Set-ItemProperty -Path 'HKLM:\SYSTEM\CurrentControlSet\Control\SecurityProviders\SCHANNEL\Protocols\TLS 1.1\Server' -name 'DisabledByDefault' -value '1' –Type 'DWORD'

Copy

Powershell code to Enable TLS 1.2

New-Item 'HKLM:\SYSTEM\CurrentControlSet\Control\SecurityProviders\SCHANNEL\Protocols\TLS 1.2\Client' -Force  
New-Item 'HKLM:\SYSTEM\CurrentControlSet\Control\SecurityProviders\SCHANNEL\Protocols\TLS 1.2\Server' -Force                                       
Set-ItemProperty -Path 'HKLM:\SYSTEM\CurrentControlSet\Control\SecurityProviders\SCHANNEL\Protocols\TLS 1.2\Client' -name 'Enabled'           -value '1' –Type 'DWORD'
Set-ItemProperty -Path 'HKLM:\SYSTEM\CurrentControlSet\Control\SecurityProviders\SCHANNEL\Protocols\TLS 1.2\Client' -name 'DisabledByDefault' -value '0' –Type 'DWORD'
Set-ItemProperty -Path 'HKLM:\SYSTEM\CurrentControlSet\Control\SecurityProviders\SCHANNEL\Protocols\TLS 1.2\Server' -name 'Enabled'           -value '1' –Type 'DWORD'
Set-ItemProperty -Path 'HKLM:\SYSTEM\CurrentControlSet\Control\SecurityProviders\SCHANNEL\Protocols\TLS 1.2\Server' -name 'DisabledByDefault' -value '0' –Type 'DWORD'    

Copy

Powershell code to Enable TLS 1.3

New-Item 'HKLM:\SYSTEM\CurrentControlSet\Control\SecurityProviders\SCHANNEL\Protocols\TLS 1.3\Client' -Force
New-Item 'HKLM:\SYSTEM\CurrentControlSet\Control\SecurityProviders\SCHANNEL\Protocols\TLS 1.3\Server' -Force
Set-ItemProperty -Path 'HKLM:\SYSTEM\CurrentControlSet\Control\SecurityProviders\SCHANNEL\Protocols\TLS 1.3\Client' -name 'Enabled'           -value '1' –Type 'DWORD'
Set-ItemProperty -Path 'HKLM:\SYSTEM\CurrentControlSet\Control\SecurityProviders\SCHANNEL\Protocols\TLS 1.3\Client' -name 'DisabledByDefault' -value '0' –Type 'DWORD'
Set-ItemProperty -Path 'HKLM:\SYSTEM\CurrentControlSet\Control\SecurityProviders\SCHANNEL\Protocols\TLS 1.3\Server'-name 'Enabled'            -value '1' –Type 'DWORD'
Set-ItemProperty -Path 'HKLM:\SYSTEM\CurrentControlSet\Control\SecurityProviders\SCHANNEL\Protocols\TLS 1.3\Server' -name 'DisabledByDefault' -value '0' –Type 'DWORD'

Copy

How to verify if TLS 1.0 and TLS 1.1 has been disabled on Windows 11

Please follow below steps to verify if SSL / TLS protocols are disabled or enabled.

  1. Login on Windows 11 PC as an administrator.
  2. Click on Windows Icon / Start Menu -> Search for Registry Editor.
  3. Launch Registry Editor.
  4. Browse to HKEY_LOCAL_MACHINE\SYSTEM\ControlSet001\Control\SecurityProviders\SCHANNEL\Protocols

You should find below registry keys / registry entries:

Disable TLS 1.0 and TLS 1.1 registry key
HKEY_LOCAL_MACHINE\SYSTEM\ControlSet001\Control\SecurityProviders\SCHANNEL\Protocols

Registry Keys to check if SSL 2.0 is disabled

[HKEY_LOCAL_MACHINE\SYSTEM\CurrentControlSet\Control\SecurityProviders\SCHANNEL\Protocols\SSL 2.0\Server] "Enabled"=dword:00000000
[HKEY_LOCAL_MACHINE\SYSTEM\CurrentControlSet\Control\SecurityProviders\SCHANNEL\Protocols\SSL 2.0\Server] "DisabledByDefault"=dword:00000001
[HKEY_LOCAL_MACHINE\SYSTEM\CurrentControlSet\Control\SecurityProviders\SCHANNEL\Protocols\SSL 2.0\Client] "Enabled"=dword:00000000
[HKEY_LOCAL_MACHINE\SYSTEM\CurrentControlSet\Control\SecurityProviders\SCHANNEL\Protocols\SSL 2.0\Client] "DisabledByDefault"=dword:00000001

Copy

Registry Keys to check if SSL 3.0 is disabled

[HKEY_LOCAL_MACHINE\SYSTEM\CurrentControlSet\Control\SecurityProviders\SCHANNEL\Protocols\SSL 3.0\Server] "Enabled"=dword:00000000
[HKEY_LOCAL_MACHINE\SYSTEM\CurrentControlSet\Control\SecurityProviders\SCHANNEL\Protocols\SSL 3.0\Server] "DisabledByDefault"=dword:00000001
[HKEY_LOCAL_MACHINE\SYSTEM\CurrentControlSet\Control\SecurityProviders\SCHANNEL\Protocols\SSL 3.0\Client] "Enabled"=dword:00000000
[HKEY_LOCAL_MACHINE\SYSTEM\CurrentControlSet\Control\SecurityProviders\SCHANNEL\Protocols\SSL 3.0\Client] "DisabledByDefault"=dword:00000001

Copy

Registry Keys to check if TLS 1.0 is disabled

[HKEY_LOCAL_MACHINE\SYSTEM\CurrentControlSet\Control\SecurityProviders\SCHANNEL\Protocols\TLS 1.0\Server] "Enabled"=dword:00000000
[HKEY_LOCAL_MACHINE\SYSTEM\CurrentControlSet\Control\SecurityProviders\SCHANNEL\Protocols\TLS 1.0\Server] "DisabledByDefault"=dword:00000001
[HKEY_LOCAL_MACHINE\SYSTEM\CurrentControlSet\Control\SecurityProviders\SCHANNEL\Protocols\TLS 1.0\Client] "Enabled"=dword:00000000
[HKEY_LOCAL_MACHINE\SYSTEM\CurrentControlSet\Control\SecurityProviders\SCHANNEL\Protocols\TLS 1.0\Client] "DisabledByDefault"=dword:00000001

Copy

Registry Keys to check if TLS 1.1 is disabled

[HKEY_LOCAL_MACHINE\SYSTEM\CurrentControlSet\Control\SecurityProviders\SCHANNEL\Protocols\TLS 1.1\Server] "Enabled"=dword:00000001
[HKEY_LOCAL_MACHINE\SYSTEM\CurrentControlSet\Control\SecurityProviders\SCHANNEL\Protocols\TLS 1.1\Server] "DisabledByDefault"=dword:00000000
[HKEY_LOCAL_MACHINE\SYSTEM\CurrentControlSet\Control\SecurityProviders\SCHANNEL\Protocols\TLS 1.1\Client] "Enabled"=dword:00000001
[HKEY_LOCAL_MACHINE\SYSTEM\CurrentControlSet\Control\SecurityProviders\SCHANNEL\Protocols\TLS 1.1\Client] "DisabledByDefault"=dword:00000000

Copy

Registry Keys to check if TLS 1.2 is Enabled

[HKEY_LOCAL_MACHINE\SYSTEM\CurrentControlSet\Control\SecurityProviders\SCHANNEL\Protocols\TLS 1.2\Server] "Enabled"=dword:00000001
[HKEY_LOCAL_MACHINE\SYSTEM\CurrentControlSet\Control\SecurityProviders\SCHANNEL\Protocols\TLS 1.2\Server] "DisabledByDefault"=dword:00000000
[HKEY_LOCAL_MACHINE\SYSTEM\CurrentControlSet\Control\SecurityProviders\SCHANNEL\Protocols\TLS 1.2\Client] "Enabled"=dword:00000001
[HKEY_LOCAL_MACHINE\SYSTEM\CurrentControlSet\Control\SecurityProviders\SCHANNEL\Protocols\TLS 1.2\Client] "DisabledByDefault"=dword:00000000

Copy

Registry Keys to check if TLS 1.3 is Enabled

[HKEY_LOCAL_MACHINE\SYSTEM\CurrentControlSet\Control\SecurityProviders\SCHANNEL\Protocols\TLS 1.3\Server] "Enabled"=dword:00000001
[HKEY_LOCAL_MACHINE\SYSTEM\CurrentControlSet\Control\SecurityProviders\SCHANNEL\Protocols\TLS 1.3\Server] "DisabledByDefault"=dword:00000000
[HKEY_LOCAL_MACHINE\SYSTEM\CurrentControlSet\Control\SecurityProviders\SCHANNEL\Protocols\TLS 1.3\Client] "Enabled"=dword:00000001
[HKEY_LOCAL_MACHINE\SYSTEM\CurrentControlSet\Control\SecurityProviders\SCHANNEL\Protocols\TLS 1.3\Client] "DisabledByDefault"=dword:00000000

Copy

Conclusion

In this blog post, we have checked the powershell codes to disable SSL 2.0, SSL 3.0, TLS 1.0 and TLS 1.1. We have checked the Powershell code to enable TLS 1.2 and TLS 1.3. Its highly recommended to disable old unsupported protocols to reduce the security risk on your computer.

Source :
https://techpress.net/how-to-disable-tls-1-0-and-tls-1-1-using-powershell-on-windows-11/

Disable Modern Standby in Windows 10

There are two power models in Windows 10, S3 and S0 Low Power idle (Modern Standby). Modern Standby in Windows 10 provides Instant On/Off Experience like smartphones.

Modern Standby enables S0 low power idle power plan which keeps your laptop or desktop in lowest power mode and also allow apps to receive the latest content such as incoming email, VoIP calls, Windows updates etc.

The system will enter Modern Standby when the user take any of below actions:

  • Presses the system power button.
  • Closes the lid of the laptop / desktop / tablet.
  • Selects Sleep from the power button from the Windows Start menu.
  • Waits for the system to idle and enter sleep automatically, according to the Power and sleep settings.

The amount of battery saving in Modern Standby is calculated by knowing how much time the system was in DRIPS (Deepest run-time idle platform state). DRIPS occurs when the system is consuming the lowest amount of power possible. If there is any background task (like receiving of email, windows update etc.) consumes power, the system is not considered to be in DRIPS mode.

Total Modern Standby session time = DRIPS time + non-DRIPS time

How to disable Modern Standby in Windows 10

There could be a scenario where you do not want to enable Modern Standby on windows 10 and want to use another available and supported power plan for example S3. In that case, you can simply disable Modern standby by following below steps. The steps given requires changes in the registry of the system which will require administrator rights.

  1. Login on the Windows 10 device.
  2. Click on Start and search for Registry Editor.
  3. Navigate to HKEY_LOCAL_MACHINE\SYSTEM\CurrentControlSet\Control\Power
  4. Right click on the right hand side pane and click on New -> DWORD (32-bit) Value
Create DWORD Reg Key modern standby
  1. Provide the name of registry entry PlatformAoAcOverride and set its value to 0.
  2. As this registry change is in HKEY_LOCAL_MACHINE, A restart of the PC would be required.
PlatformAoAcOverride registry entry to disable Modern Standby

Disable Modern Standby on Windows 10 using Command line

In the previous section we have seen how to disable Modern standby using GUI Interface of registry editor. If you do not prefer GUI and want to use a command to disable Modern Standby then you can follow below steps:

  1. Login on Windows 10 device.
  2. Go to Start and search for Command prompt.
  3. Right-click on Command prompt and click Run as administrator.
  4. Type below command and press enter.
  5. After this command is executed successfully, Restart your device.

reg add HKLM\System\CurrentControlSet\Control\Power /v PlatformAoAcOverride /t REG_DWORD /d 0​

Disable Modern Standby on Windows 10 using Command line

How to check If Modern Standby is supported in Windows 10

Not all devices support Modern standby but the number of systems which support Modern standby are increasing. I have been using Microsoft Surface Pro 4 laptop which supports Modern standby. Here’s how you can check if your device supports Modern Standby.

  1. Login on Windows 10 device.
  2. Click on Start and search for Command Prompt.
  3. Launch Command Prompt.
  4. Type command powercfg -a to check if Modern standby is supported.

Powercfg -a lists the sleep states available on your computer.

In below screenshot, you can see that this Windows 10 device is on Standby (S0 Low Power Idle) Network Connected State which means that Modern Standby is supported and enabled on this device.

If you run powercfg -a command on your system and it shows that S0 Low power idle is not supported then this could be a a limitaton by system’s hardware to support Modern standby. There is nothing you can do to enable it. The alternative is to keep using Standby S3 or any other supported power plan.

powercfg -a to check if modern standby is supported

Modern Standby (S0 Low power idle) can be in Network Connected mode or Network Disconnected mode.

  • Standby (S0 Low Power Idle) Network Connected: This means that Modern standby with network connectivity in sleep mode.
  • Standby (S0 Low Power Idle) Network Disconnected: This means that Modern standby without network connectivity while in sleep mode and the system spends most of the time in DRIPS.

FAQs on Modern Standby

Below are some of the frequently asked questions on Modern Standby:

1. Which versions of Windows supports Modern Standby ?

Windows 10 for desktop editions (Home, Pro, Enterprise, and Education) and Windows 11 Operating system.

2. How to Re-enable Modern Standby after creating PlatformAoAcOverride reg entry ?

If your device supports Modern Standby and you have created PlatformAoAcOverride reg entry under HKLM\System\CurrentControlSet\Control\Power reg key. Simply delete this registry entry and restart your device to enable Modern Standby again.

You can delete PlatformAoAcOverride registry entry manually by using registry editor or launch powershell console as an administrator and run below command to delete it.

Remove-ItemProperty 'HKLM:\System\CurrentControlSet\Control\Power' -Name PlatformAoAcOverride

3. Does my computer support Modern Standby ?

You can easily check this by running a command powercfg -a on the command prompt. If it says Standby (S0 Low Power Idle) Network Connected or Standby (S0 Low Power Idle) Network Disconnected then Modern Standby is supported and Enabled.

4. How to Identify and diagnose issues during a Modern Standby session ?

You can Identify and diagnose any issues related to Modern standby by running Powercfg /sleepstudy command on an elevated command prompt. You can then analyse the report which will be generated and saved at C:\WINDOWS\system32\sleepstudy-report.html location.

Please make sure to open command prompt as an administrator and then run powercfg /sleepstudy

powercfg /sleepstudy

5. How to find all the switches of powercfg command ?

To check the switches of powercfg command, you can run powercfg /? on the command prompt. This will list all available options with detailed information. I have run this command on my device which lists all the switches which can be used with powercfg command:

powercfg /?

C:\WINDOWS\system32>powercfg /?

POWERCFG /COMMAND [ARGUMENTS]

Description:
  Enables users to control power settings on a local system.

  For detailed command and option information, run "POWERCFG /? <COMMAND>"

Command List:
  /LIST, /L          Lists all power schemes.

  /QUERY, /Q         Displays the contents of a power scheme.

  /CHANGE, /X        Modifies a setting value in the current power scheme.

  /CHANGENAME        Modifies the name and description of a power scheme.

  /DUPLICATESCHEME   Duplicates a power scheme.

  /DELETE, /D        Deletes a power scheme.

  /DELETESETTING     Deletes a power setting.

  /SETACTIVE, /S     Makes a power scheme active on the system.

  /GETACTIVESCHEME   Retrieves the currently active power scheme.

  /SETACVALUEINDEX   Sets the value associated with a power setting
                     while the system is powered by AC power.

  /SETDCVALUEINDEX   Sets the value associated with a power setting
                     while the system is powered by DC power.

  /IMPORT            Imports all power settings from a file.

  /EXPORT            Exports a power scheme to a file.

  /ALIASES           Displays all aliases and their corresponding GUIDs.

  /GETSECURITYDESCRIPTOR
                     Gets a security descriptor associated with a specified
                     power setting, power scheme, or action.

  /SETSECURITYDESCRIPTOR
                     Sets a security descriptor associated with a
                     power setting, power scheme, or action.

  /HIBERNATE, /H     Enables and disables the hibernate feature.

  /AVAILABLESLEEPSTATES, /A
                     Reports the sleep states available on the system.

  /DEVICEQUERY       Returns a list of devices that meet specified criteria.

  /DEVICEENABLEWAKE  Enables a device to wake the system from a sleep state.

  /DEVICEDISABLEWAKE Disables a device from waking the system from a sleep
                     state.

  /LASTWAKE          Reports information about what woke the system from the
                     last sleep transition.

  /WAKETIMERS        Enumerates active wake timers.

  /REQUESTS          Enumerates application and driver Power Requests.

  /REQUESTSOVERRIDE  Sets a Power Request override for a particular Process,
                     Service, or Driver.

  /ENERGY            Analyzes the system for common energy-efficiency and
                     battery life problems.

  /BATTERYREPORT     Generates a report of battery usage.

  /SLEEPSTUDY        Generates a diagnostic system power transition report.

  /SRUMUTIL          Dumps Energy Estimation data from System Resource Usage
                     Monitor (SRUM).

  /SYSTEMSLEEPDIAGNOSTICS
                     The system sleep diagnostics report has been deprecated and
                     replaced with the system power report. Please use the command
                     "powercfg /systempowerreport" instead.

  /SYSTEMPOWERREPORT Generates a diagnostic system power transition report.

  /POWERTHROTTLING   Control power throttling for an application.

  /PROVISIONINGXML, /PXML    Generate an XML file containing power setting overrides.

Copy

Conclusion

Modern standby saves your laptop’s or desktop’s battery and keep your device active for longer. If you use your device intermittently or away from your device a lot then this can save a lot of energy. However, there could be a scenario where you do not want to enable Modern standby. In that case you can use the steps given in this blog post to create a registry entry and disable Modern standby.

Source :
https://techpress.net/disable-modern-standby-in-windows-10/

SSL/TLS connection issue fix: out-of-band update status and affected applications (Oct. 21, 2022)

[German]As of October 17, 2022, Microsoft has released several unscheduled updates for Windows. These updates fix a connection problem that can occur with SSL and TLS connections. Affected by this problem are probably all Windows client and server. Below I have listed all available updates and also give some hints where problems occur without these updates.


Advertising


Out-of-band updates with TLS fix

Microsoft made a mistake with the last updates for Windows (preview updates from September, security updates from October). As a result, various problems with SSL and TLS connections can occur. Microsoft has therefore released some : out-of-band updates on October 17, 2022 to fix the problem.

I had reportedthat  in the blog post Out-of-band updates for Windows fixes SSL-/TLS connection issues (also with Citrix) – October 17, 2022. However, Microsoft had not linked all the updates in its status pages (thanks to EP for pointing out the links), so that I could complete the list of updates for the affected Windows versions below:

The out-of-band updates KB5020439 and KB5020440 were added on October 18th.  These updates are only available for download in the Microsoft Update Catalog and have to be installed manually (just search for the KB numbers). Details about these updates can be found in the linked KB articles.

So only Windows 11 22H2 is missing the corresponding fix update. EP writes here that this fix will be added with the upcoming update KB5018496. This is currently released in the Windows Insider program as a pre-release version in the Release Preview channel (see).

Problems fixed with the updates

People have asked in comments which applications are actually affected by the TLS bugs. I don’t have a complete list, but would like to give some hints below as to what has come to my attention as a fix. Thanks to blog readers for the pointers.


Advertising


Citrix connectivity issue

With the October 2022 updates, administrators found that Citrix clients could no longer communicate with Citrix netscalers. I had reported on this in the blog postCitrix connections broken after Windows update KB5018410 (October 2022) (TLS problem). Affected people who installed the above updates reported that this fixed the connection problem.

KB5020387 fixes TLS 1.3 problem on Windows 10

On Windows, there was also the issue that there TLS 1.3 implementation was buggy on Windows 10 (it only works in Windows 11). I had raised a conflict case in the blog post Bug: Outlook no longer connects to the mail server (October 2022). Microsoft suggested disabling TLS 1.3 via registry intervention as a workaround. In this comment, someone suggests uninstalling updates KB5018410 (Windows 10) and KB5018427 (Windows 11).

Blog reader Harvester asked here, whether TLS 1.3 works with Windows 10 after installing the special updates, and then followed up with the results of his own tests.

Self-reply after tests : Schannel is working properly after having applied KB5020387 on a LTSC 2021 IoT Enterprise image (21H2), where Schannel was previously broken (on build 19044.2130, from October 11 2022)

We initially guessed that the IoT Enterprise SKU wasn’t supporting TLS 1.3, but now we confirmed that we hit the bug mentioned in the post.

“Fun” fact : while it as initially reported that TLS 1.3 was available starting from Windows 10 1903, the Schannel documentation was changed recently, and now state that only Windows 11 and Server 2022 support TLS 1.3: Protocols in TLS/SSL (Schannel SSP)

VPN and WebEx Meetings App

Within this German comment blog reader Marten reported, that the WebEx Meetings App could no longer connect to the WebEx Server (OnPrem) via VPN. The issue has been fixed via update.

Quest Migration Manager for Exchange

On Twitter, enno0815de has sent the following tweet, which refers to my message about the out-of-band updates with TLS fix. It says, anyone planning a domain migration using Quest Migration Manager for Exchange should also install the updates. Otherwise, the account will be locked out for the migration.


In a follow up tweet he adds: By some circumstance the Atelia class (Quest component) is deleted from the registry. Without the TLS fix, you lock the user out of AD completely.

Similar article:
Windows 10: Beware of a possible TLS disaster on October 2022 patchday
Citrix connections broken after Windows update KB5018410 (October 2022) (TLS problem)
Bug: Outlook no longer connects to the mail server (October 2022)
Out-of-band updates for Windows fixes SSL-/TLS connection issues (also with Citrix) – October 17, 2022

Source :
https://borncity.com/win/2022/10/22/fix-des-ssl-tls-verbindungsproblems-stand-der-sonderupdates-und-betroffene-anwendungen-21-10-2022/

Alert (AA22-277A) Impacket and Exfiltration Tool Used to Steal Sensitive Information from Defense Industrial Base Organization

Summary

Actions to Help Protect Against APT Cyber Activity:

• Enforce multifactor authentication (MFA) on all user accounts.
• Implement network segmentation to separate network segments based on role and functionality.
• Update software, including operating systems, applications, and firmware, on network assets.
• Audit account usage.

From November 2021 through January 2022, the Cybersecurity and Infrastructure Security Agency (CISA) responded to advanced persistent threat (APT) activity on a Defense Industrial Base (DIB) Sector organization’s enterprise network. During incident response activities, CISA uncovered that likely multiple APT groups compromised the organization’s network, and some APT actors had long-term access to the environment. APT actors used an open-source toolkit called Impacket to gain their foothold within the environment and further compromise the network, and also used a custom data exfiltration tool, CovalentStealer, to steal the victim’s sensitive data.

This joint Cybersecurity Advisory (CSA) provides APT actors tactics, techniques, and procedures (TTPs) and indicators of compromise (IOCs) identified during the incident response activities by CISA and a third-party incident response organization. The CSA includes detection and mitigation actions to help organizations detect and prevent related APT activity. CISA, the Federal Bureau of Investigation (FBI), and the National Security Agency (NSA) recommend DIB sector and other critical infrastructure organizations implement the mitigations in this CSA to ensure they are managing and reducing the impact of cyber threats to their networks.

Download the PDF version of this report: pdf, 692 KB

For a downloadable copy of IOCs, see the following files:

Technical Details

Threat Actor Activity

NoteThis advisory uses the MITRE ATT&CK® for Enterprise framework, version 11. See the MITRE ATT&CK Tactics and Techniques section for a table of the APT cyber activity mapped to MITRE ATT&CK for Enterprise framework.

From November 2021 through January 2022, CISA conducted an incident response engagement on a DIB Sector organization’s enterprise network. The victim organization also engaged a third-party incident response organization for assistance. During incident response activities, CISA and the trusted –third-party identified APT activity on the victim’s network.

Some APT actors gained initial access to the organization’s Microsoft Exchange Server as early as mid-January 2021. The initial access vector is unknown. Based on log analysis, the actors gathered information about the exchange environment and performed mailbox searches within a four-hour period after gaining access. In the same period, these actors used a compromised administrator account (“Admin 1”) to access the EWS Application Programming Interface (API). In early February 2021, the actors returned to the network and used Admin 1 to access EWS API again. In both instances, the actors used a virtual private network (VPN).

Four days later, the APT actors used Windows Command Shell over a three-day period to interact with the victim’s network. The actors used Command Shell to learn about the organization’s environment and to collect sensitive data, including sensitive contract-related information from shared drives, for eventual exfiltration. The actors manually collected files using the command-line tool, WinRAR. These files were split into approximately 3MB chunks located on the Microsoft Exchange server within the CU2\he\debug directory. See Appendix: Windows Command Shell Activity for additional information, including specific commands used.

During the same period, APT actors implanted Impacket, a Python toolkit for programmatically constructing and manipulating network protocols, on another system. The actors used Impacket to attempt to move laterally to another system.

In early March 2021, APT actors exploited CVE-2021-26855, CVE-2021-26857, CVE-2021-26858, and CVE-2021-27065 to install 17 China Chopper webshells on the Exchange Server. Later in March, APT actors installed HyperBro on the Exchange Server and two other systems. For more information on the HyperBro and webshell samples, see CISA MAR-10365227-2 and -3.

In April 2021, APT actors used Impacket for network exploitation activities. See the Use of Impacket section for additional information. From late July through mid-October 2021, APT actors employed a custom exfiltration tool, CovalentStealer, to exfiltrate the remaining sensitive files. See the Use of Custom Exfiltration Tool: CovalentStealer section for additional information.

APT actors maintained access through mid-January 2022, likely by relying on legitimate credentials.

Use of Impacket

CISA discovered activity indicating the use of two Impacket tools: wmiexec.py and smbexec.py. These tools use Windows Management Instrumentation (WMI) and Server Message Block (SMB) protocol, respectively, for creating a semi-interactive shell with the target device. Through the Command Shell, an Impacket user with credentials can run commands on the remote device using the Windows management protocols required to support an enterprise network.

The APT cyber actors used existing, compromised credentials with Impacket to access a higher privileged service account used by the organization’s multifunctional devices. The threat actors first used the service account to remotely access the organization’s Microsoft Exchange server via Outlook Web Access (OWA) from multiple external IP addresses; shortly afterwards, the actors assigned the Application Impersonation role to the service account by running the following PowerShell command for managing Exchange:

powershell add-pssnapin *exchange*;New-ManagementRoleAssignment – name:”Journaling-Logs” -Role:ApplicationImpersonation -User:<account>

This command gave the service account the ability to access other users’ mailboxes.

The APT cyber actors used virtual private network (VPN) and virtual private server (VPS) providers, M247 and SurfShark, as part of their techniques to remotely access the Microsoft Exchange server. Use of these hosting providers, which serves to conceal interaction with victim networks, are common for these threat actors. According to CISA’s analysis of the victim’s Microsoft Exchange server Internet Information Services (IIS) logs, the actors used the account of a former employee to access the EWS. EWS enables access to mailbox items such as email messages, meetings, and contacts. The source IP address for these connections is mostly from the VPS hosting provider, M247.

Use of Custom Exfiltration Tool: CovalentStealer

The threat actors employed a custom exfiltration tool, CovalentStealer, to exfiltrate sensitive files.

CovalentStealer is designed to identify file shares on a system, categorize the files, and upload the files to a remote server. CovalentStealer includes two configurations that specifically target the victim’s documents using predetermined files paths and user credentials. CovalentStealer stores the collected files on a Microsoft OneDrive cloud folder, includes a configuration file to specify the types of files to collect at specified times and uses a 256-bit AES key for encryption. See CISA MAR-10365227-1 for additional technical details, including IOCs and detection signatures.

MITRE ATT&CK Tactics and Techniques

MITRE ATT&CK is a globally accessible knowledge base of adversary tactics and techniques based on real-world observations. CISA uses the ATT&CK Framework as a foundation for the development of specific threat models and methodologies. Table 1 lists the ATT&CK techniques employed by the APT actors.

Initial Access
Technique TitleIDUse
Valid AccountsT1078Actors obtained and abused credentials of existing accounts as a means of gaining Initial Access, Persistence, Privilege Escalation, or Defense Evasion. In this case, they exploited an organization’s multifunctional device domain account used to access the organization’s Microsoft Exchange server via OWA.
Execution
Technique TitleIDUse
Windows Management InstrumentationT1047Actors used Impacket tools wmiexec.py and smbexec.py to leverage Windows Management Instrumentation and execute malicious commands.
Command and Scripting InterpreterT1059Actors abused command and script interpreters to execute commands.
Command and Scripting Interpreter: PowerShellT1059.001Actors abused PowerShell commands and scripts to map shared drives by specifying a path to one location and retrieving the items from another. See Appendix: Windows Command Shell Activity for additional information.
Command and Scripting Interpreter: Windows Command ShellT1059.003Actors abused the Windows Command Shell to learn about the organization’s environment and to collect sensitive data. See Appendix: Windows Command Shell Activity for additional information, including specific commands used.The actors used Impacket tools, which enable a user with credentials to run commands on the remote device through the Command Shell.
Command and Scripting Interpreter: PythonT1059.006The actors used two Impacket tools: wmiexec.py and smbexec.py.
Shared ModulesT1129Actors executed malicious payloads via loading shared modules. The Windows module loader can be instructed to load DLLs from arbitrary local paths and arbitrary Universal Naming Convention (UNC) network paths.
System ServicesT1569Actors abused system services to execute commands or programs on the victim’s network.
Persistence
Technique TitleIDUse
Valid AccountsT1078Actors obtained and abused credentials of existing accounts as a means of gaining Initial Access, Persistence, Privilege Escalation, or Defense Evasion.
Create or Modify System ProcessT1543Actors were observed creating or modifying system processes.
Privilege Escalation
Technique TitleIDUse
Valid AccountsT1078Actors obtained and abused credentials of existing accounts as a means of gaining Initial Access, Persistence, Privilege Escalation, or Defense Evasion. In this case, they exploited an organization’s multifunctional device domain account used to access the organization’s Microsoft Exchange server via OWA.
Defense Evasion
Technique TitleIDUse
Masquerading: Match Legitimate Name or LocationT1036.005Actors masqueraded the archive utility WinRAR.exe by renaming it VMware.exe to evade defenses and observation.
Indicator Removal on HostT1070Actors deleted or modified artifacts generated on a host system to remove evidence of their presence or hinder defenses.
Indicator Removal on Host: File DeletionT1070.004Actors used the del.exe command with the /f parameter to force the deletion of read-only files with the *.rar and tempg* wildcards.
Valid AccountsT1078Actors obtained and abused credentials of existing accounts as a means of gaining Initial Access, Persistence, Privilege Escalation, or Defense Evasion. In this case, they exploited an organization’s multifunctional device domain account used to access the organization’s Microsoft Exchange server via OWA.
Virtualization/Sandbox Evasion: System ChecksT1497.001Actors used Windows command shell commands to detect and avoid virtualization and analysis environments. See Appendix: Windows Command Shell Activity for additional information.
Impair Defenses: Disable or Modify ToolsT1562.001Actors used the taskkill command to probably disable security features. CISA was unable to determine which application was associated with the Process ID.
Hijack Execution FlowT1574Actors were observed using hijack execution flow.
Discovery
Technique TitleIDUse
System Network Configuration DiscoveryT1016Actors used the systeminfo command to look for details about the network configurations and settings and determine if the system was a VMware virtual machine.The threat actor used route print to display the entries in the local IP routing table.
System Network Configuration Discovery: Internet Connection DiscoveryT1016.001Actors checked for internet connectivity on compromised systems. This may be performed during automated discovery and can be accomplished in numerous ways.
System Owner/User DiscoveryT1033Actors attempted to identify the primary user, currently logged in user, set of users that commonly use a system, or whether a user is actively using the system.
System Network Connections DiscoveryT1049Actors used the netstat command to display TCP connections, prevent hostname determination of foreign IP addresses, and specify the protocol for TCP.
Process DiscoveryT1057Actors used the tasklist command to get information about running processes on a system and determine if the system was a VMware virtual machine.The actors used tasklist.exe and find.exe to display a list of applications and services with their PIDs for all tasks running on the computer matching the string “powers.”
System Information DiscoveryT1082Actors used the ipconfig command to get detailed information about the operating system and hardware and determine if the system was a VMware virtual machine.
File and Directory DiscoveryT1083Actors enumerated files and directories or may search in specific locations of a host or network share for certain information within a file system.
Virtualization/Sandbox Evasion: System ChecksT1497.001Actors used Windows command shellcommands to detect and avoid virtualization and analysis environments.
Lateral Movement
Technique TitleIDUse
Remote Services: SMB/Windows Admin SharesT1021.002Actors used Valid Accounts to interact with a remote network share using Server Message Block (SMB) and then perform actions as the logged-on user.
Collection
Technique TitleIDUse
Archive Collected Data: Archive via UtilityT1560.001Actor used PowerShell commands and WinRAR to compress and/or encrypt collected data prior to exfiltration.
Data from Network Shared DriveT1039Actors likely used net share command to display information about shared resources on the local computer and decide which directories to exploit, the powershell dircommand to map shared drives to a specified path and retrieve items from another, and the ntfsinfo command to search network shares on computers they have compromised to find files of interest.The actors used dir.exe to display a list of a directory’s files and subdirectories matching a certain text string.
Data Staged: Remote Data StagingT1074.002The actors split collected files into approximately
3 MB chunks located on the Exchange server within the CU2\he\debug directory.
Command and Control
Technique TitleIDUse
Non-Application Layer ProtocolT1095Actors used a non-application layer protocol for communication between host and Command and Control (C2) server or among infected hosts within a network.
Ingress Tool TransferT1105Actors used the certutil command with three switches to test if they could download files from the internet.The actors employed CovalentStealer to exfiltrate the files.
ProxyT1090Actors are known to use VPN and VPS providers, namely M247 and SurfShark, as part of their techniques to access a network remotely.
Exfiltration
Technique TitleIDUse
Schedule TransferT1029Actors scheduled data exfiltration to be performed only at certain times of day or at certain intervals and blend traffic patterns with normal activity.
Exfiltration Over Web Service: Exfiltration to Cloud StorageT1567.002The actor’s CovalentStealer tool stores collected files on a Microsoft OneDrive cloud folder.

DETECTION

Given the actors’ demonstrated capability to maintain persistent, long-term access in compromised enterprise environments, CISA, FBI, and NSA encourage organizations to:

  • Monitor logs for connections from unusual VPSs and VPNs. Examine connection logs for access from unexpected ranges, particularly from machines hosted by SurfShark and M247.
  • Monitor for suspicious account use (e.g., inappropriate or unauthorized use of administrator accounts, service accounts, or third-party accounts). To detect use of compromised credentials in combination with a VPS, follow the steps below:
    • Review logs for “impossible logins,” such as logins with changing username, user agent strings, and IP address combinations or logins where IP addresses do not align to the expected user’s geographic location.
    • Search for “impossible travel,” which occurs when a user logs in from multiple IP addresses that are a significant geographic distance apart (i.e., a person could not realistically travel between the geographic locations of the two IP addresses in the time between logins). Note: This detection opportunity can result in false positives if legitimate users apply VPN solutions before connecting to networks.
    • Search for one IP used across multiple accounts, excluding expected logins.
      • Take note of any M247-associated IP addresses used along with VPN providers (e.g., SurfShark). Look for successful remote logins (e.g., VPN, OWA) for IPs coming from M247- or using SurfShark-registered IP addresses.
    • Identify suspicious privileged account use after resetting passwords or applying user account mitigations.
    • Search for unusual activity in typically dormant accounts.
    • Search for unusual user agent strings, such as strings not typically associated with normal user activity, which may indicate bot activity.
  • Review the YARA rules provided in MAR-10365227-1 to assist in determining whether malicious activity has been observed.
  • Monitor for the installation of unauthorized software, including Remote Server Administration Tools (e.g., psexec, RdClient, VNC, and ScreenConnect).
  • Monitor for anomalous and known malicious command-line use. See Appendix: Windows Command Shell Activity for commands used by the actors to interact with the victim’s environment.
  • Monitor for unauthorized changes to user accounts (e.g., creation, permission changes, and enabling a previously disabled account).

CONTAINMENT AND REMEDIATION

Organizations affected by active or recently active threat actors in their environment can take the following initial steps to aid in eviction efforts and prevent re-entry:

  • Report the incident. Report the incident to U.S. Government authorities and follow your organization’s incident response plan.
  • Reset all login accounts. Reset all accounts used for authentication since it is possible that the threat actors have additional stolen credentials. Password resets should also include accounts outside of Microsoft Active Directory, such as network infrastructure devices and other non-domain joined devices (e.g., IoT devices).
  • Monitor SIEM logs and build detections. Create signatures based on the threat actor TTPs and use these signatures to monitor security logs for any signs of threat actor re-entry.
  • Enforce MFA on all user accounts. Enforce phishing-resistant MFA on all accounts without exception to the greatest extent possible.
  • Follow Microsoft’s security guidance for Active DirectoryBest Practices for Securing Active Directory.
  • Audit accounts and permissions. Audit all accounts to ensure all unused accounts are disabled or removed and active accounts do not have excessive privileges. Monitor SIEM logs for any changes to accounts, such as permission changes or enabling a previously disabled account, as this might indicate a threat actor using these accounts.
  • Harden and monitor PowerShell by reviewing guidance in the joint Cybersecurity Information Sheet—Keeping PowerShell: Security Measures to Use and Embrace.

Mitigations

Mitigation recommendations are usually longer-term efforts that take place before a compromise as part of risk management efforts, or after the threat actors have been evicted from the environment and the immediate response actions are complete. While some may be tailored to the TTPs used by the threat actor, recovery recommendations are largely general best practices and industry standards aimed at bolstering overall cybersecurity posture.

Segment Networks Based on Function

  • Implement network segmentation to separate network segments based on role and functionality. Proper network segmentation significantly reduces the ability for ransomware and other threat actor lateral movement by controlling traffic flows between—and access to—various subnetworks. (See CISA’s Infographic on Layering Network Security Through Segmentation and NSA’s Segment Networks and Deploy Application-Aware Defenses.)
  • Isolate similar systems and implement micro-segmentation with granular access and policy restrictions to modernize cybersecurity and adopt Zero Trust (ZT) principles for both network perimeter and internal devices. Logical and physical segmentation are critical to limiting and preventing lateral movement, privilege escalation, and exfiltration.

Manage Vulnerabilities and Configurations

  • Update softwareincluding operating systemsapplicationsand firmwareon network assets. Prioritize patching known exploited vulnerabilities and critical and high vulnerabilities that allow for remote code execution or denial-of-service on internet-facing equipment.
  • Implement a configuration change control process that securely creates device configuration backups to detect unauthorized modifications. When a configuration change is needed, document the change, and include the authorization, purpose, and mission justification. Periodically verify that modifications have not been applied by comparing current device configurations with the most recent backups. If suspicious changes are observed, verify the change was authorized.

Search for Anomalous Behavior

  • Use cybersecurity visibility and analytics tools to improve detection of anomalous behavior and enable dynamic changes to policy and other response actions. Visibility tools include network monitoring tools and host-based logs and monitoring tools, such as an endpoint detection and response (EDR) tool. EDR tools are particularly useful for detecting lateral connections as they have insight into common and uncommon network connections for each host.
  • Monitor the use of scripting languages (e.g., Python, Powershell) by authorized and unauthorized users. Anomalous use by either group may be indicative of malicious activity, intentional or otherwise.

Restrict and Secure Use of Remote Admin Tools

  • Limit the number of remote access tools as well as who and what can be accessed using them. Reducing the number of remote admin tools and their allowed access will increase visibility of unauthorized use of these tools.
  • Use encrypted services to protect network communications and disable all clear text administration services(e.g., Telnet, HTTP, FTP, SNMP 1/2c). This ensures that sensitive information cannot be easily obtained by a threat actor capturing network traffic.

Implement a Mandatory Access Control Model

  • Implement stringent access controls to sensitive data and resources. Access should be restricted to those users who require access and to the minimal level of access needed.

Audit Account Usage

  • Monitor VPN logins to look for suspicious access (e.g., logins from unusual geo locations, remote logins from accounts not normally used for remote access, concurrent logins for the same account from different locations, unusual times of the day).
  • Closely monitor the use of administrative accounts. Admin accounts should be used sparingly and only when necessary, such as installing new software or patches. Any use of admin accounts should be reviewed to determine if the activity is legitimate.
  • Ensure standard user accounts do not have elevated privileges Any attempt to increase permissions on standard user accounts should be investigated as a potential compromise.

VALIDATE SECURITY CONTROLS

In addition to applying mitigations, CISA, FBI, and NSA recommend exercising, testing, and validating your organization’s security program against threat behaviors mapped to the MITRE ATT&CK for Enterprise framework in this advisory. CISA, FBI, and NSA recommend testing your existing security controls inventory to assess how they perform against the ATT&CK techniques described in this advisory.

To get started:

  1. Select an ATT&CK technique described in this advisory (see Table 1).
  2. Align your security technologies against the technique.
  3. Test your technologies against the technique.
  4. Analyze the performance of your detection and prevention technologies.
  5. Repeat the process for all security technologies to obtain a set of comprehensive performance data.
  6. Tune your security program, including people, processes, and technologies, based on the data generated by this process.

CISA, FBI, and NSA recommend continually testing your security program, at scale, in a production environment to ensure optimal performance against the MITRE ATT&CK techniques identified in this advisory.

RESOURCES

CISA offers several no-cost scanning and testing services to help organizations reduce their exposure to threats by taking a proactive approach to mitigating attack vectors. See cisa.gov/cyber-hygiene-services.

U.S. DIB sector organizations may consider signing up for the NSA Cybersecurity Collaboration Center’s DIB Cybersecurity Service Offerings, including Protective Domain Name System (PDNS) services, vulnerability scanning, and threat intelligence collaboration for eligible organizations. For more information on how to enroll in these services, email dib_defense@cyber.nsa.gov.

ACKNOWLEDGEMENTS

CISA, FBI, and NSA acknowledge Mandiant for its contributions to this CSA.

APPENDIX: WINDOWS COMMAND SHELL ACTIVITY

Over a three-day period in February 2021, APT cyber actors used Windows Command Shell to interact with the victim’s environment. When interacting with the victim’s system and executing commands, the threat actors used /q and /c parameters to turn the echo off, carry out the command specified by a string, and stop its execution once completed.

On the first day, the threat actors consecutively executed many commands within the Windows Command Shell to learn about the organization’s environment and to collect sensitive data for eventual exfiltration (see Table 2).

CommandDescription / Use
net shareUsed to create, configure, and delete network shares from the command-line.[1] The threat actor likely used this command to display information about shared resources on the local computer and decide which directories to exploit.
powershell dirAn alias (shorthand) for the PowerShell Get-ChildItem cmdlet. This command maps shared drives by specifying a path to one location and retrieving the items from another.[2] The threat actor added additional switches (aka options, parameters, or flags) to form a “one liner,” an expression to describe commonly used commands used in exploitation: powershell dir -recurse -path e:\<redacted>|select fullname,length|export-csv c:\windows\temp\temp.txt. This particular command lists subdirectories of the target environment when.
systeminfoDisplays detailed configuration information [3], tasklist – lists currently running processes [4], and ipconfig – displays all current Transmission Control Protocol (TCP)/IP network configuration values and refreshes Dynamic Host Configuration Protocol (DHCP) and Domain Name System (DNS) settings, respectively [5]. The threat actor used these commands with specific switches to determine if the system was a VMware virtual machine: systeminfo > vmware & date /T, tasklist /v > vmware & date /T, and ipconfig /all >> vmware & date /.
route printUsed to display and modify the entries in the local IP routing table. [6] The threat actor used this command to display the entries in the local IP routing table.
netstatUsed to display active TCP connections, ports on which the computer is listening, Ethernet statistics, the IP routing table, IPv4 statistics, and IPv6 statistics.[7] The threat actor used this command with three switches to display TCP connections, prevent hostname determination of foreign IP addresses, and specify the protocol for TCP: netstat -anp tcp.
certutilUsed to dump and display certification authority (CA) configuration information, configure Certificate Services, backup and restore CA components, and verify certificates, key pairs, and certificate chains.[8] The threat actor used this command with three switches to test if they could download files from the internet: certutil -urlcache -split -f https://microsoft.com temp.html.
pingSends Internet Control Message Protocol (ICMP) echoes to verify connectivity to another TCP/IP computer.[9] The threat actor used ping -n 2 apple.com to either test their internet connection or to detect and avoid virtualization and analysis environments or network restrictions.
taskkillUsed to end tasks or processes.[10] The threat actor used taskkill /F /PID 8952 to probably disable security features. CISA was unable to determine what this process was as the process identifier (PID) numbers are dynamic.
PowerShell Compress-Archive cmdletUsed to create a compressed archive or to zip files from specified files and directories.[11] The threat actor used parameters indicating shared drives as file and folder sources and the destination archive as zipped files. Specifically, they collected sensitive contract-related information from the shared drives.

On the second day, the APT cyber actors executed the commands in Table 3 to perform discovery as well as collect and archive data.

CommandDescription / Use
ntfsinfo.exeUsed to obtain volume information from the New Technology File System (NTFS) and to print it along with a directory dump of NTFS meta-data files.[12]
WinRAR.exeUsed to compress files and subsequently masqueraded WinRAR.exe by renaming it VMware.exe.[13]

On the third day, the APT cyber actors returned to the organization’s network and executed the commands in Table 4.

CommandDescription / Use
powershell -ep bypass import-module .\vmware.ps1;export-mft -volume eThreat actors ran a PowerShell command with parameters to change the execution mode and bypass the Execution Policy to run the script from PowerShell and add a module to the current section: powershell -ep bypass import-module .\vmware.ps1;export-mft -volume e. This module appears to acquire and export the Master File Table (MFT) for volume E for further analysis by the cyber actor.[14]
set.exeUsed to display the current environment variable settings.[15] (An environment variable is a dynamic value pointing to system or user environments (folders) of the system. System environment variables are defined by the system and used globally by all users, while user environment variables are only used by the user who declared that variable and they override the system environment variables (even if the variables are named the same).
dir.exeUsed to display a list of a directory’s files and subdirectories matching the eagx* text string, likely to confirm the existence of such file.
tasklist.exe and find.exeUsed to display a list of applications and services with their PIDs for all tasks running on the computer matching the string “powers”.[16][17][18]
ping.exeUsed to send two ICMP echos to amazon.com. This could have been to detect or avoid virtualization and analysis environments, circumvent network restrictions, or test their internet connection.[19]
del.exe with the /f parameterUsed to force the deletion of read-only files with the *.rar and tempg* wildcards.[20]

References

[1] Microsoft Net Share

[2] Microsoft Get-ChildItem

[3] Microsoft systeminfo

[4] Microsoft tasklist

[5] Microsoft ipconfig

[6] Microsoft Route

[7] Microsoft netstat

[8] Microsoft certutil

[9] Microsoft ping

[10] Microsoft taskkill

[11] Microsoft Compress-Archive

[12] NTFSInfo v1.2

[13] rarlab

[14] Microsoft Import-Module

[15] Microsoft set (environment variable)

[16] Microsoft tasklist

[17] Mitre ATT&CK – Sofware: TaskList

[18] Microsoft find

[19] Microsoft ping

[20] Microsoft del

Revisions

October 4, 2022: Initial version

Source :
https://www.cisa.gov/uscert/ncas/alerts/aa22-277a

A potentially dangerous macro has been blocked

Macros can add a lot of functionality to Office, but they are often used by people with bad intentions to distribute malware to unsuspecting victims.

Macros aren’t required for everyday use like reading or editing a document in Word or using Excel workbooks. In most cases you can do everything you need to do in Office without allowing macros to run.

Note: If you’re an IT pro looking to configure this setting, or if you just want more advanced technical details, see Macros from the internet will be blocked by default in Office.

What should I do now?

Still wondering if you should proceed?

  • ❒ Were you expecting to receive a file with macros? Never open a file attachment you weren’t expecting, even if it appears to come from somebody you trust. Phishing attacks often appear to come from a person or organization you trust in an effort to get you to open them.
  • ❒ Are you being encouraged to enable content by a stranger? A common tactic of attackers is to create some pretense such as cancelling an order or reading a legal document. They’ll have you download a document and try to persuade you to allow macros to run. No legitimate company will make you open an Excel file to cancel an order and you don’t need macros just to read a document in Word.
  • ❒ Are you being encouraged to enable content by a pop-up message? If you downloaded the file from a website, you may see pop-ups or other messages encouraging you to enable active content. Those are also common tactics of attackers and should make you suspicious that the file is actually unsafe.

If a downloaded file from the internet or a file opened from a network share wants you to allow macros, and you’re not certain what those macros do, you should probably just delete that file. 

If you’re sure the file is safe and want to unblock macros

There are a few different ways to do it, depending on your situation.

Unblock a single file

In most cases you can unblock macros by modifying the properties of the file as follows:

  1. Open Windows File Explorer and go to the folder where you saved the file.
  2. Right-click the file and choose Properties from the context menu.
  3. At the bottom of the General tab, select the Unblock checkbox and select OK.
In file properties, near the bottom of the General tab, is a Security section with a checkbox for unblocking the file.

If you don’t see the Unblock checkbox in properties, then try one of the options below. 

Unblock all files from a specific network share or website

If you often download files or directly open files from a trusted cloud location, such as your company’s website or an internal file server, you can set the site as a trusted site in Windows so macros from the site won’t be checked. 

Important: You’ll trust all the macros from this site if you choose to apply this setting, so only do this if you know that every file opened from this location is trustworthy.

  1. Tap the start button or Windows key and type Internet Options.
  2. Select Internet Options from the search results and the Internet Properties dialog box will appear.
  3. On the Security tab, select Trusted Sites, then select Sites.
  4. Type the URL of the site or server that contains the Office files with the macros you want to run, and then select Add.Note: If you want to add URLs that begin with http:// or network shares, uncheck Require server verification (https:) for all sites in this zone.
  5. Select Close and then OK.

    Adding a trusted site in internet properties

Select a heading below for more information  

Unblock a single file you received through email

Unblock all files from a trusted folder on your computer’s hard drive

Unblock all macros from a trusted publisher

Still unable to unblock the macro? 

Visit the Microsoft Answers community to see what others have said or ask your own questions.

Source :
https://support.microsoft.com/en-us/topic/a-potentially-dangerous-macro-has-been-blocked-0952faa0-37e7-4316-b61d-5b5ed6024216