How to Recover Deleted Emails in Microsoft 365

When the CEO realizes they deleted a vital email thread three weeks ago, email recovery becomes suddenly becomes an urgent task. Sure, you can look in the Deleted Items folder in Outlook, but beyond that, how can you recover what has undergone “permanent” deletion? In this article, we review how you can save the day by bringing supposedly unrecoverable email back from the great beyond.

Deleted Email Recovery in Microsoft And Office 365

Email Recovery for Outlook in Exchange Online through Microsoft and Office can be as simple as dragging and dropping the wayward email from the Deleted Items folder to your Inbox. But what do you do when you can’t find the email you want to recover?

First, let’s look at how email recovery is structured in Microsoft 365. There are few more layers here than you might think! In Microsoft 365, deleted email can be in one of three states: Deleted, Soft-Deleted, or Hard-Deleted. The way you recover email and how long you have to do so depends on the email’s delete status and the applicable retention policy.

Email Recovery in Microsoft 365

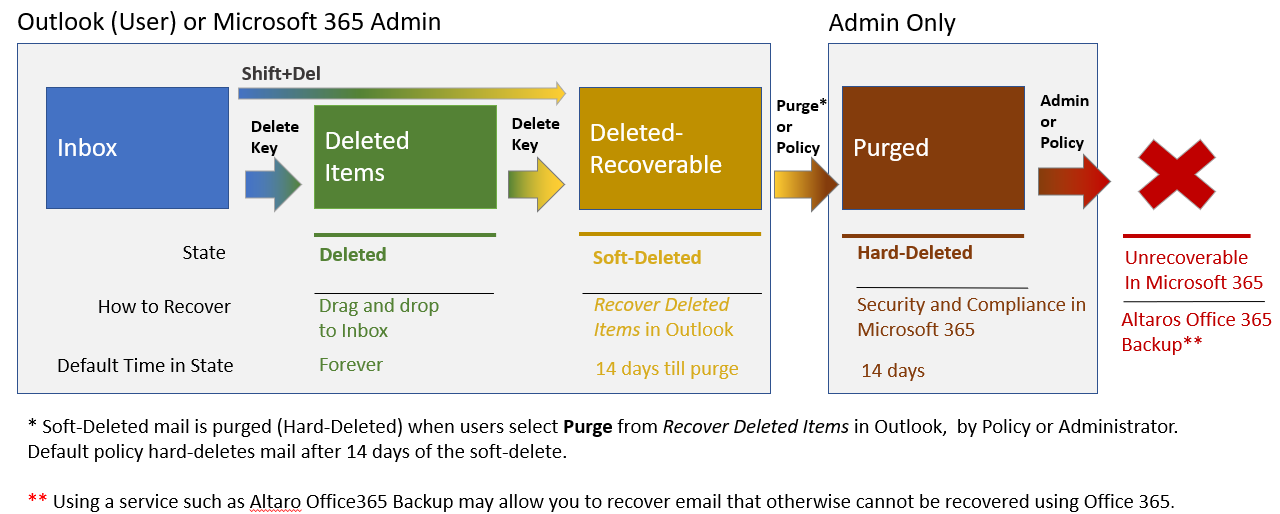
Let’s walk through the following graphic and talk about how email gets from one state to another, the default policies, how to recover deleted email in each state, and a few tips along the way.

Items vs. Email

Outlook is all about email yet also has tasks, contacts, calendar events, and other types of information. For example, you can delete calendar entries and may be called on to recover them, just like email. For this reason, the folder for deleted content is called “Deleted Items.” Also, when discussing deletions and recovery, it is common to refer to “items” rather than limiting the discussion to just email.

Policy

Various rules control the retention period for items in the different states of deletion. A policy is an automatically applied action that enforces a rule related to services. Microsoft 365 has hundreds of policies you can tweak to suit your requirements. See Overview of Retention policies for more information.

‘Deleted Items’ Email

When you press the Delete key on an email in Outlook, it’s moved to the Deleted Items folder. That email is now in the “Deleted” state, which simply means it moved to the Deleted Items folder. How long does Outlook retain deleted email? By default – forever! You can recover your deleted mail with just a drag and drop to your Inbox. Done!

If you can’t locate the email in the Deleted Items folder, double-check that you have the Deleted Items folder selected, then scroll to the bottom of the email list. Look for the following message:

Outlook Deleted Items Folder

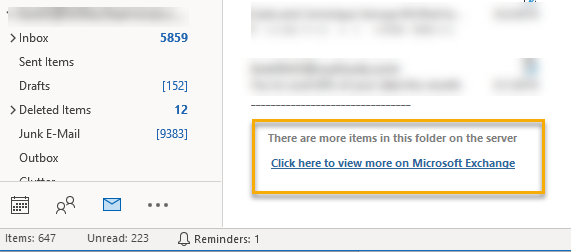
If you see the above message, your cache settings may be keeping only part of the content in Outlook and rest in the cloud. The cache helps to keep mailbox sizes lower on your hard drive, which in turn speeds up search and load times. Click on the link to download the missing messages.

But I Didn’t Delete It!

If you find content in the Deleted Items and are sure you did not delete it, you may be right! Administrators can set Microsoft 365 policy to delete old Inbox content automatically.

Mail can ‘disappear’ another way. Some companies enable a personal archive mailbox for users. When enabled, by default, any mail two years or older will “disappear” from your Inbox and the Deleted Items folder. However, there is no need to worry. While apparently missing, the email has simply moved to the Archives Inbox. A personal Archives Inbox shows up as a stand-alone mailbox in Outlook, as shown below.

Stand-alone mailbox in Outlook

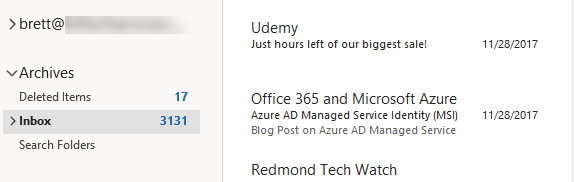
As a result, it’s a good idea to search the Archives Inbox, if it is present when searching for older messages.

Another setting to check is one that deletes email when Outlook is closed. Access this setting in Outlook by clicking “File,” then “Options,” and finally “Advanced” to display this window:

Outlook Advanced Options

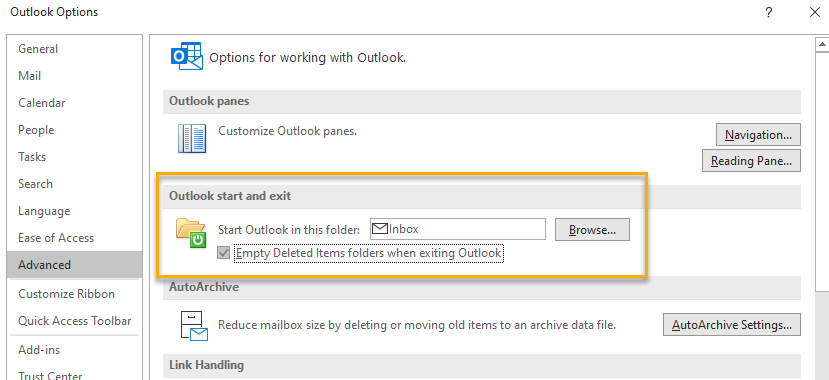
If enabled, Outlook empties the Deleted Items when closed. The deleted email then moves to the ‘soft-delete’ state, which is covered next. Keep in mind that with this setting, all emails will be permanently deleted after 28 days

‘Soft-Deleted’ Email

The next stage in the process is Soft-Deleted. Soft-Deleted email is in the Deleted-Items folder but is still easily recovered. At a technical level, the mail is deleted locally from Outlook and placed in the Exchange Online folder named Deletions, which is a sub-folder of Recoverable Items. Any content in Recoverable Items folder in Exchange Online is, by definition, considered soft-deleted.

You have, by default, 14 days to recover soft-deleted mail. The service administrator can change the retention period to a maximum of 30 days. Be aware that this can consume some of the storage capacity assigned to each user account and you could get charged for overages.

How items become soft-deleted

There are three ways to soft-delete mail or other Outlook items.

  1. Delete an item already in the Deleted Items folder. When you manually delete something that is already in the Deleted Items folder, the item is soft-deleted. Any process, manual or otherwise that deletes content from this folder results in a ‘soft-delete’
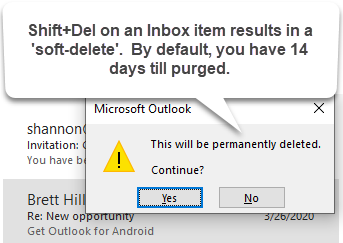
  2. Pressing Shift + Delete on an email in your Outlook Inbox will bring up a dialog box asking if you wish to “permanently” delete the email. Clicking Yes will remove the email from the Deleted-Items folder but only perform a soft-delete. You can still recover the item if you do so within the 14 day retention period.
Soft Deleting Items in Outlook
  1. The final way items can be soft-deleted is by using Outlook policies or rules. By default, there are no policies that will automatically remove mail from the Deleted-Items folder in Outlook. However, users can create rules that ‘permanently’ (soft-delete) email. If you’re troubleshooting missing email, have the user check for such rules as shown below. You can click Rules on the Home menu and examine any created rules in the Rules Wizard shown below.
Microsoft Outlook Policies and Rules

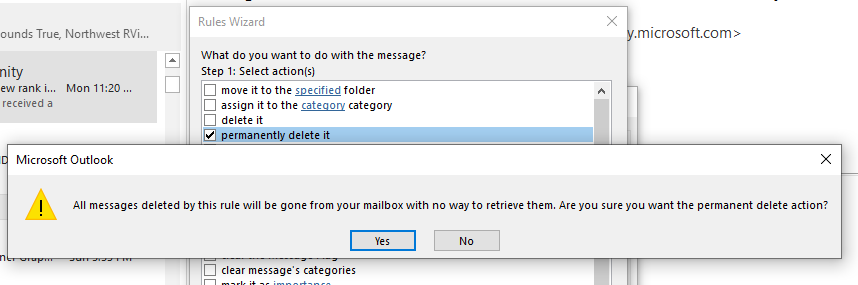
Note that the caution is a bit misleading as the rule’s action will soft-delete the email, which, as already stated, is not an immediate permanent deletion.

Recovering soft-deleted mail

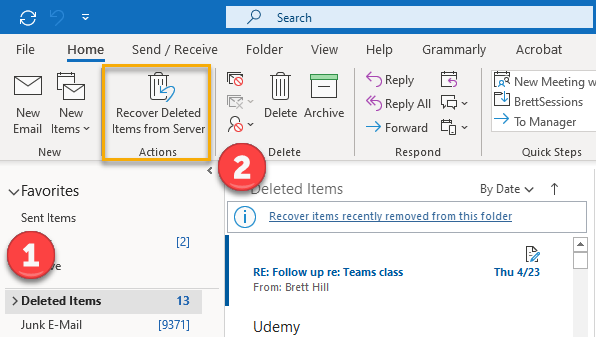
You can recover soft-deleted mail directly in Outlook. Be sure the Deleted Items folder is selected, then look for “Recover items recently removed from this folder at the top of the mail column, or the “Recover Deleted Items from Server” action on the Home menu bar.

Recovering soft-deleted mail in Outlook

Clicking on the recover items link opens the Recover Deleted Items window.

Recover Deleted Items, Microsoft Outlook

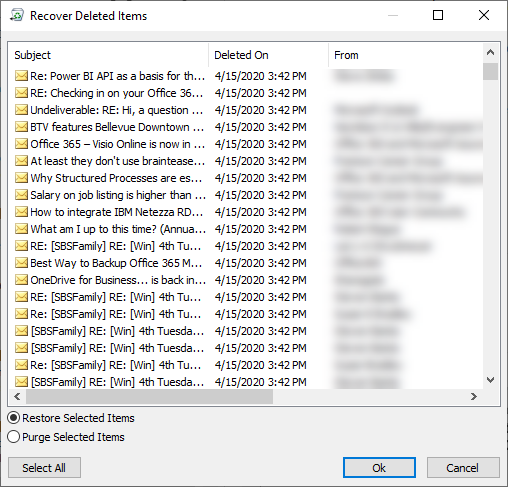
Click on the items you want to recover or Select All, and click OK.

NOTE: The recovered email returns to your Deleted Items folder. Be sure to move it into your Inbox.

If the email you’re looking for is not listed, it could have moved to the next stage: ‘Hard-Deleted.’

While users can recover soft-deleted email, Administrators can also recover soft-deleted email on their behalf using the ‘Hard-Deleted’ email recovery process described next (which works for both hard and soft deletions). Also, Microsoft has created two PowerShell commands very useful in this process for those who would rather script the tasks. You can use the Get-RecoverableItems and Restore-RecoverableItems cmdlets to search and restore soft-deleted email.

Hard-Deleted Email

The next stage for deletion is ‘Hard Delete.’ Technically, items are hard deleted when items moved from the Recoverable folder to the Purges folder in Exchange online. Administrators can still recover items in the folder with the recovery period set by policy which ranges from 14 (the default) to 30 (the maximum). You can extend the retention beyond 30 days by placing legal or litigation hold on the item or mailbox.

How items become Hard-Deleted

There are two ways content becomes hard-deleted.

  1. By policy, soft-deleted email is moved to the hard-deleted stage when the retention period expires.
  2. Users can hard-delete mail manually by selecting the Purge option in the Recover Deleted Items window shown above. (Again, choosing to ‘permanently delete’ mail with Shift + Del, results in a soft-delete, not a hard-delete.)

Recovering Hard-Deleted Mail

Once email enters the hard-delete stage, users can no longer recover the content. Only service administrators with the proper privileges can initiate recovery, and no administrators have those privileges by default, not even the global admin. The global admin does have the right to assign privileges so that they can give themselves (or others) the necessary rights. Privacy is a concern here since administrators with these privileges can search and export a user’s email.

Microsoft’s online documentation Recover deleted items in a user’s mailbox details the step-by-step instructions for recovering hard-deleted content. The process is a bit messy compared to other administrative tasks. As an overview, the administrator will:

  1. Assign the required permissions
  2. Search the Inbox for the missing email
  3. Copy the results to a Discovery mailbox where you can view mail in the Purged folder (optional).
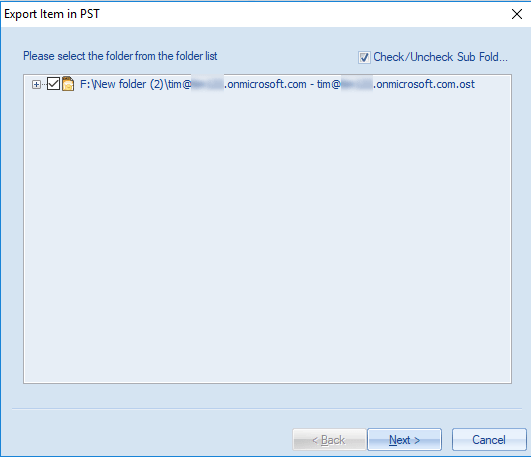
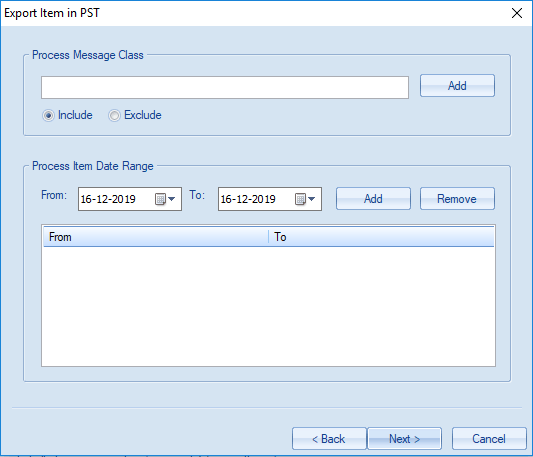
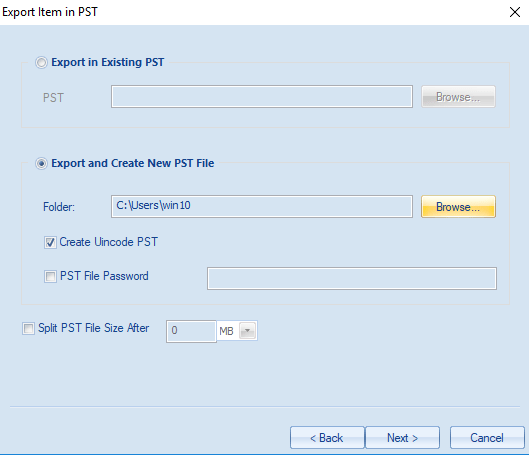
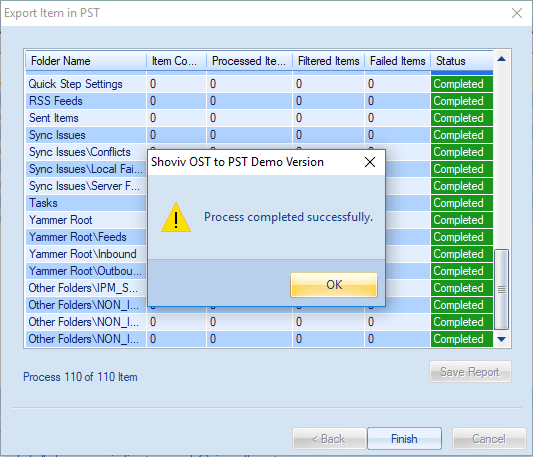
  4. Export the results to a PST file.
  5. Import the PST to Outlook on the user’s system and locate the missing email in the Purged folder

Last Chance Recovery

Once hard-deleted items are purged, they are no longer discoverable by any method by users or administrators. You should consider the recovery of such content as unlikely. That said, if the email you are looking for is not recoverable by any of the above methods, you can open a ticket with Microsoft 365 Support. In some circumstances, they may be able to find the email that has been purged but not yet overwritten. They may or may not be willing to look for the email, but it can’t hurt to ask, and it has happened.

What about using Outlook to backup email?

Outlook does allow a user to export email to a PST file. To do this, click File” in the Outlook main menu, then “Import & Export” as shown below.

Outlook Menu, Import Export

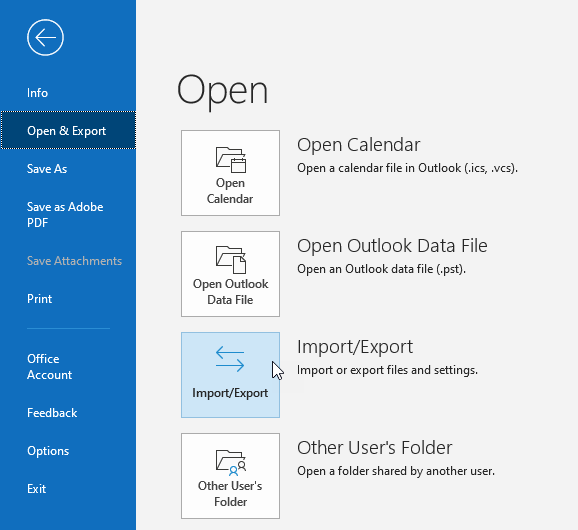
You can specify what you want to export and even protect the file with a password.

While useful from time to time, a backup plan that depends on users manually exporting content to a local file doesn’t scale and isn’t reliable. Consequently, don’t rely on this as a possible backup and recovery solution.

Alternative Strategies

After reading this, you may be thinking, “isn’t there an easier way?” A service like Altaro Office 365 Backup allows you to recover from point-in-time snapshots of an inbox or other Microsoft 365 content. Having a service like this when you get that urgent call to recover a mail from a month ago can be a lifesaver.

Summary

Users can recover most deleted email without administrator intervention. Often, deleted email simply sits in the Deleted folder until manually cleared. When that occurs, email enters the ‘soft-deleted stage,’ and is easily restored by a user within 14-days. After this period, the item enters the ‘hard-deleted’ state. A service administrator can recover hard-deleted items within the recovery window. After the hard-deleted state, email should be considered uncoverable. Policies can be applied to extend the retention times of deleted mail in any state. While administrators can go far with the web-based administration tools, the entire recovery process can be scripted with PowerShell to customize and scale larger projects or provide granular discovery. It is always a great idea to use a backup solution designed for Microsoft 365, such as Altaro Office 365 Backup.

Source :
https://www.altaro.com/hyper-v/recover-emails-microsoft-365/

Outlook Mobile Server settings you’ll need from your email provider

Outlook for Microsoft 365 Outlook for Microsoft 365 for Mac Microsoft 365 for home More…

Most email apps like Outlook are able to automatically configure email server settings. If you need server settings or help finding your server settings, click on one of the links below:

Find your Exchange mailbox server settings

If you’re connecting to an Exchange mailbox and not using Microsoft 365 email, or if you aren’t sure if you’re using Microsoft 365 email, do the following to look up your settings:

  1. Sign in to your account using Outlook Web App. For help signing in, see Sign in to Outlook Web App.
  2. In Outlook Web App, on the toolbar, select Settings Settings icon > Mail POP and IMAP.
  3. The POP3, IMAP4, and SMTP server name and other settings you may need to enter are listed on the POP and IMAP settings page.

What server settings do I need from my email provider?

To help you get the info you need, we’ve put together a handy chart of the email server settings you should ask for. You will most likely have to set up your email as an IMAP or POP account as well. What are POP and IMAP? Check with your provider if you’re not sure which to use.

Note: When you use an IMAP or POP account, only your email will sync to your device. Any calendar or contacts associated with that account will be stored only on your local computer.

Follow these instructions to get your email settings:

  1. Print out this page and keep it within reach.
  2. Call your email provider and ask them about the settings in the chart below.
  3. Write down the corresponding email server settings in the empty column.
  4. Return to your email app and enter the information to complete your email setup.

Note: You may only need some of the settings on this list. Find out from your email provider what you will need to access your email on your mobile device.

General Email Settings

SettingDescriptionWrite Your Setting HereExample
Email AddressThe email address you want to set up.yourname@contoso.com
PasswordThe password associated with your email account.——–
Display NameThe name you want your email recipients to see.Mike Rosoft
DescriptionAdd a description of your email account.Personal, work, etc.

Incoming Mail Server Settings

These settings are for sending email to your email provider’s mail server.

SettingDescriptionWrite Your Setting HereExample
Host NameYour incoming mail server name.outlook.office365.com
UsernameThe email address you want to set up.yourname@contoso.com
PortThe port number your incoming mail server uses.Most use 143 or 993 for IMAP, or 110 or 995 for POP.
Server or DomainThis is your email provider.yourprovider.com, gmail.com, etc.
SSL?Is your email encrypted using SSL?(SSL is enabled by default in the Outlook mobile app)SSL Enabled

Outgoing Mail Server Settings (SMTP)

These settings are for sending email to your email provider’s mail server.

SettingDescriptionWrite Your Setting HereExample
SMTP Host NameOutgoing mail server name. Most often smtp.yourprovider.comsmtp.office365.com
SMTP UsernameThe email address you want to set up.yourname@contoso.com
SMTP PasswordThe password associated with your email account.——–
SSL?Is your email encrypted using SSL?(SSL is enabled by default in the Outlook mobile app)SSL Enabled

Still having trouble? We’re listening.

  • If you’re using an email provider such as Gmail, Yahoo, etc. Contact them for help in setting up your email account.See Troubleshoot email setup on mobile Outlook mobile apps or check the server status of Outlook.com.
  • If you have a work or school account that uses Microsoft 365 for business or Exchange-based accounts, talk to your Microsoft 365 admin or technical support.

    Source :
    https://support.microsoft.com/en-us/office/server-settings-you-ll-need-from-your-email-provider-c82de912-adcc-4787-8283-45a1161f3cc3

How to Use Virtual Private Networks (VPNs) on Azure

In this article, we’re going to look at Virtual Private Networks in Azure and how you can use them. As you may know, a Virtual Private Network or VPN is an encrypted tunnel over the Internet or other shared networks, for example, a telco provider network.

VPNs use different technologies to encrypt the traffic, the most common ones are IPSec and OpenVPN SSL.

VPNs can connect branches (“sites”), and/or clients devices to a corporate network. Branch and Site VPN connections are most called Site-to-Site or S2S VPNs and are generally permanently connected. User and Device VPN tunnels are called Point-to-Site or P2S VPNs and are normally initiated by the user or automatically by an application but are disconnected after they’re no longer in use.

In Azure, you can have and use both types of VPNs but depending on the solution of choice it can be a different setup.

Let us first explore the VPN Service and Device Options you have in Azure.

VPN Services and Devices

In Azure there are three different options to build VPNs:

  • Using Virtual Network Gateways
  • Using Azure Virtual WAN
  • Using Network Virtual Appliances

All of them are capable of both Point-to-Site and Site-to-Site connections but they have different infrastructures underneath each of them.

Virtual Network Gateway

Virtual Network Gateways are a classic approach, that many network architects are familiar with. You deploy one VPN Virtual Network Gateway Service within a Virtual Network. That service combines Point-to-Site and Site-to-Site Gateways and can be deployed in different sizes.

Here’s a list of different VPN Gateway SKUs:

VPN
Gateway
Generation
SKUS2S/VNet-to-VNet
Tunnels
P2S
SSTP Connections
P2S
IKEv2/OpenVPN Connections
Aggregate
Throughput Benchmark
BGPZone-redundant
Generation1BasicMax. 10Max. 128Not Supported100 MbpsNot SupportedNo
Generation1VpnGw1Max. 30*Max. 128Max. 250650 MbpsSupportedNo
Generation1VpnGw2Max. 30*Max. 128Max. 5001 GbpsSupportedNo
Generation1VpnGw3Max. 30*Max. 128Max. 10001.25 GbpsSupportedNo
Generation1VpnGw1AZMax. 30*Max. 128Max. 250650 MbpsSupportedYes
Generation1VpnGw2AZMax. 30*Max. 128Max. 5001 GbpsSupportedYes
Generation1VpnGw3AZMax. 30*Max. 128Max. 10001.25 GbpsSupportedYes
Generation2VpnGw2Max. 30*Max. 128Max. 5001.25 GbpsSupportedNo
Generation2VpnGw3Max. 30*Max. 128Max. 10002.5 GbpsSupportedNo
Generation2VpnGw4Max. 30*Max. 128Max. 50005 GbpsSupportedNo
Generation2VpnGw5Max. 30*Max. 128Max. 1000010 GbpsSupportedNo
Generation2VpnGw2AZMax. 30*Max. 128Max. 5001.25 GbpsSupportedYes
Generation2VpnGw3AZMax. 30*Max. 128Max. 10002.5 GbpsSupportedYes
Generation2VpnGw4AZMax. 30*Max. 128Max. 50005 GbpsSupportedYes
Generation2VpnGw5AZMax. 30*Max. 128Max. 1000010 GbpsSupportedYes

As you can see, picking the right size depends on several factors, including the expected number of connected users/sites as well as your aggregate bandwidth internet connections.

Depending on the SKU, gateways are deployed with different sets of features. Normally Virtual Network Gateways are deployed in a pair, in an active/standby configuration without using Availability Zones in Azure. To use Availability Zones, you need to use a SKU with AZ at the end. If you want to switch from one SKU to another, that will require a 45-minute downtime. A switch from non-Availability Zone to Availability Zone will require a complete redeployment of the Virtual Network Gateway, which can take up to 2 hours.

Azure Virtual Network Gateway supports the following encryption standards for Site-to-Site tunnels.

IPsec/IKE policy for S2S VPN & VNet-to-VNet connections: PowerShell – Azure VPN Gateway | Microsoft Docs

If you want to use Point-to-Site it supports OpenVPN (SSL/TLS-based), Secure Sockets Tunneling Protocol (SSTP) or IKEv2 VPN, more information is available here:

About Azure Point-to-Site VPN connections – Azure VPN Gateway | Microsoft Docs

Azure Virtual Network Gateways are a traditional and proven way to deploy VPN solutions Azure, but they are not as flexible as other solutions.

Virtual WAN

In comparison to Azure Virtual Network Gateways, Virtual WAN Gateways work differently. The first major difference is that Virtual WAN makes a distinction between Point-to-Site Gateways and Site-to-Site Gateways. While in Azure Virtual Network Gateways both Gateways are one service, in Virtual WAN you have different Gateways for each use case.

Virtual WAN

Another major difference is that Azure Virtual WAN Gateways are deployed in scale units. These units can be scaled up and down on-demand, without any service interruption.

Edit VPN Gateway
Edit VPN Gateway

Another great feature is, that Virtual WAN Network Gateways are always deployed as highly available as possible. These Gateways are deployed in Virtual Machine Scale Sets and are by default deployed in Availability Zones if the Azure Region supports them. If an Azure Region does not yet support Azure Availability Zones, the Virtual Network Gateways are deployed in Availability Sets and as soon as the region supports Availability Zones, the backend is updated automatically.

Azure Virtual WAN Site-to-Site Gateways supports the following IPSec encryption standards.

Virtual WAN Site-to-site IPsec policies – Azure Virtual WAN | Microsoft Docs

Virtual WAN Site-to-Site Gateway can scale up to 20 Gbps throughput and 1.25 Gbps encryption capacity per VPN tunnel.

Point-to-Site Virtual WAN Gateways support IPSec and OpenVPN as listed below.

Virtual WAN Point-to-site IPsec policies – Azure Virtual WAN | Microsoft Docs

You can have up to 200 Scale units supporting 100,000 clients. The payment model for Virtual WAN Point-to-Site Clients is by connected users per minute. So, it’s completely paid as you go per connected user plus the amount of Gateway Scale Units.

With Virtual WAN, there is another very important point, routing between Site-to-Site VPN, Point-to-Site VPN and ExpressRoute Gateways is enabled by default without any additional efforts by the customer. You can get more details via the link below.

Architecture: Global transit network architecture – Azure Virtual WAN | Microsoft Docs

Network Virtual Appliances

Network Virtual Appliances are Virtual Machines running in a classical Virtual Network or Azure Virtual WAN. Those Appliances are third party and are available via the Microsoft Azure Marketplace.

Azure Virtual WAN: About Network Virtual Appliance in the hub | Microsoft Docs

Deploy highly available NVAs – Azure Architecture Center | Microsoft Docs

Those appliances are harder to integrate and make highly available. The configuration is completely the responsibility of the customer, but for certain scenarios, they can offer major benefits for customers. One major selling point is if your organization has already standardized on a particular vendor/appliance, using the same one in Azure will ensure consistency and lower the learning curve for your network engineers.

Those appliances are mostly supporting additional features like Quality of Service, special encryption protocols or VPN Client tunnel optimization. For example, Barracuda Networks uses its own VPN Tunnel and encryption protocol TINA between their appliances and devices.

TINA VPN Tunnels | Barracuda Campus

Then there are appliance partners who offer great VPN clients with additional features like filtering, split tunnelling by service or traffic optimization. Examples are Palo Alto Global Protect or FortiGate FortiClient.

GlobalProtect App for Windows (paloaltonetworks.com)

Product Downloads | Fortinet Product Downloads | Support

Those appliances are much harder to integrate into a classic hub and spoke environment, with Virtual WAN the process of deployment is more automated. If you use those NVAs, you also have additional license costs for the appliances, which must be paid to the OEM.

As already mentioned, feature sets of those Network Virtual Appliances are often much richer than with bare Azure Virtual Network Gateways and Virtual WAN Gateways.

How to Deploy a VPN

Let me guide you on how to deploy a VPN Tunnel with the different service offerings. As the nature of the three solutions is completely different, I will split them up into three separate parts.

Virtual Network Gateway

As there is already a lot of deployment documentation out there, I will not create a new one. Let me just point you to the right resources, so that you can start and deploy according to Microsoft best practices.

Tutorial – Create and manage a VPN gateway: Azure portal – Azure VPN Gateway | Microsoft Docs

Tutorial – Connect on-premises network to virtual network: Azure portal – Azure VPN Gateway | Microsoft Docs

Configure an Always-On VPN user tunnel – Azure VPN Gateway | Microsoft Docs

Configure an Always-On VPN tunnel – Azure VPN Gateway | Microsoft Docs

Additional documentation is available here.

VPN Gateway documentation | Microsoft Docs

Virtual WAN

With Virtual WAN, you also have a bunch of great documentation which goes into more detail. You can find the necessary documentation linked below.

Tutorial: Use Azure Virtual WAN to Create Site-to-Site connections | Microsoft Docs

Tutorial: Use Azure Virtual WAN to create a Point-to-Site connection to Azure | Microsoft Docs

Additional configurations for Point-to-Site in Virtual WAN can be found here.

Configure a P2S User VPN connection using Azure Active Directory authentication – Azure Virtual WAN | Microsoft Docs

Azure AD tenant for User VPN connections: Azure AD authentication – Azure Virtual WAN | Microsoft Docs

Configure an Always-On VPN user tunnel – Azure Virtual WAN | Microsoft Docs

Configure an Always-On VPN tunnel – Azure Virtual WAN | Microsoft Docs

I would also encourage you to take an additional look at the guides already available here on the DOJO.

What is Azure Virtual WAN? (altaro.com)

Azure Virtual WAN vs. Azure Route Server (altaro.com)

Deploy Azure virtual WAN in 2,5 Hours (altaro.com)

How to configure Azure virtual WAN VPN Site-2-Site with unmanaged VPN device (altaro.com)

As an additional option, you can pick a Network Virtual Appliance, if the Appliance of your choice is available in Virtual WAN. I would encourage you to make use of the more PaaS like the approach of Azure Virtual WAN.

Azure Virtual WAN: Create a Network Virtual Appliance (NVA) in the hub | Microsoft Docs

Network Virtual Appliance

The deployment of VPN Connections with Network Virtual Appliances is pretty diverse and depends on the vendor itself. Before I can point you to some example documentation, start with the documentation on how to deploy NVAs.

This documentation describes how to deploy an NVA in Azure.

Deploy highly available NVAs – Azure Architecture Center | Microsoft Docs

You should follow that guide to ensure that the NVA is deployed according to supported standards. As there are a lot of partners out there, please contact the vendor of your choice to get additional guidance.

Palo Alto

The first vendor with very good documentation on the deployment is Palo Alto. You can find their guides below.

Site-to-Site VPN – Set Up Site-to-Site VPN (paloaltonetworks.com)

Point-to-Site VPN – GlobalProtect (paloaltonetworks.com)

FortiNet

Another good NVA partner is FortiNet. You can find their docs below

Site-to-Site VPN – Administration Guide | FortiGate / FortiOS 7.0.1 | Fortinet Documentation Library

Point-to-Site VPN – Administration Guide | FortiGate / FortiOS 7.0.1 | Fortinet Documentation Library

Barracuda Networks

Barracuda is not that common among enterprise customers in Europe but offers a great portfolio of features including their own tunnelling protocol. Please find their docs below.

Site-to-Site VPN – Site-to-Site VPN | Barracuda Campus

Point-to-Site VPN – Client-to-Site VPN | Barracuda Campus

Troubleshooting Azure VPN

Within the Troubleshooting part, I will only concentrate on the troubleshooting guides for Azure Services, as the troubleshooting on NVA is extremely specific to the vendor.

For Azure Virtual Network Gateways, there are two good troubleshooting guides available in Microsoft’s Documentation.

One focuses on connections to Azure Virtual Network Gateways dropping or being unable to connect.

Troubleshoot an Azure site-to-site VPN connection that cannot connect – Azure VPN Gateway | Microsoft Docs

The other guide looks into the stability issues of a VPN tunnel.

Troubleshoot Azure Site-to-Site VPN disconnects intermittently – Azure VPN Gateway | Microsoft Docs

When looking into Azure Virtual WAN is more difficult, as you may not have access to the Monitoring and Troubleshooting logs. So, if you have the need for deeper troubleshooting, it makes sense to engage with Microsoft Support. In any case, you should have good monitoring in place according to documentation.

Monitoring Azure Virtual WAN | Microsoft Docs

Monitoring Virtual WAN using Azure Monitor Insights | Microsoft Docs

VPN Compared to other Microsoft Solutions

Sometimes Customers can confuse Azure VPN with other services available. Most commonly customers confuse Virtual Network Peering and Azure ExpressRoute with VPN Solutions.

Virtual Network Peering

Azure Virtual Network Peering is “only” a peering connection via the Microsoft Global Network between two Virtual Networks in Azure. It uses Software Defined Network technologies to connect the two networks and there is no Virtual Gateway necessary to do so. Virtual Network Peering is only used for interconnecting Virtual Networks within Azure and there is no option to use Virtual Network Peering to connect to the world outside of Microsoft Azure.

To learn more about peering, please visit the documentation below.

Azure Virtual Network peering | Microsoft Docs

Azure ExpressRoute

Microsoft Azure ExpressRoute is like VPN a connection to networks outside of the Microsoft Global Network. Its build to connect Customer Networks with the Microsoft PaaS Network via Peering or the Customer Private IaaS infrastructure using peering and private gateways.

The difference between Azure ExpressRoute and VPN is the fact that ExpressRoute is not leveraging internet connections or shared networks. With ExpressRoute you get a private end to end connection from your on-premises location to the Microsoft Global Network.

Those connections are more expensive but can offer more bandwidth or better Service Level Agreements, depending on your location and network service provider. ExpressRoute is not always better than VPN, always check your use case and your needs.

To be honest, Network Providers like to sell ExpressRoute due to better margins than with premium Internet connections. If you are interested in more information about that topic, you can visit some other articles here on the DOJO.

Microsoft Azure Peering Services Explained (altaro.com)

How to Use Azure ExpressRoute Global Reach to Interconnect Datacenters (altaro.com)

How to use Microsoft Global Network with Oracle, Google or AWS (altaro.com)

To learn more about Microsoft Azure ExpressRoute, you should also consult Microsoft Documentation on ExpressRoute.

ExpressRoute documentation | Microsoft Docs

Decision Tree

As is often the case with Microsoft’s service offerings there are several ways to achieve the same goal, here’s a flowchart I use when talking to customers about this.

Decision Tree

That chart should help, at least for the initial discussion and understanding, which solution is best for your situation.

Conclusion

The “right” solution depends on what you want to achieve with your architecture. Often, it’s a decision driven by costs and features. Please also take complexity and maybe newer security requirements and approaches into account.

For example, if you’re searching for RADIUS integration, and the only solution might be costly, maybe it’s better to reconsider the requirement and check if you can achieve the same security requirements with Azure Active Directory Authentication instead.

Enable MFA for VPN users: Azure AD authentication – Azure VPN Gateway | Microsoft Docs

Try to stay open-minded and don’t do things because that’s how it’s been done for years. Always prove requirements against our changing IT world.

Source :
https://www.altaro.com/hyper-v/virtual-private-networks-azure/

Microsoft Says Its Systems Were Also Breached in Massive SolarWinds Hack

The massive state-sponsored espionage campaign that compromised software maker SolarWinds also targeted Microsoft, as the unfolding investigation into the hacking spree reveals the incident may have been far more wider in scope, sophistication, and impact than previously thought.

News of Microsoft’s compromise was first reported by Reuters, which also said the company’s own products were then used to strike other victims by leveraging its cloud offerings, citing people familiar with the matter.

The Windows maker, however, denied the threat actor had infiltrated its production systems to stage further attacks against its customers.

In a statement to The Hacker News via email, the company said —

“Like other SolarWinds customers, we have been actively looking for indicators of this actor and can confirm that we detected malicious SolarWinds binaries in our environment, which we isolated and removed. We have not found evidence of access to production services or customer data. Our investigations, which are ongoing, have found absolutely no indications that our systems were used to attack others.”

Characterizing the hack as “a moment of reckoning,” Microsoft president Brad Smith said it has notified over 40 customers located in Belgium, Canada, Israel, Mexico, Spain, the UAE, the UK, and the US that were singled out by the attackers. 44% of the victims are in the information technology sector, including software firms, IT services, and equipment providers.

CISA Issues New Advisory

The development comes as the US Cybersecurity and Infrastructure Security Agency (CISA) published a fresh advisory, stating the “APT actor [behind the compromises] has demonstrated patience, operational security, and complex tradecraft in these intrusions.”

“This threat poses a grave risk to the Federal Government and state, local, tribal, and territorial governments as well as critical infrastructure entities and other private sector organizations,” it added.

But in a twist, the agency also said it identified additional initial infection vectors, other than the SolarWinds Orion platform, that have been leveraged by the adversary to mount the attacks, including a previously stolen key to circumvent Duo’s multi-factor authentication (MFA) to access the mailbox of a user via Outlook Web App (OWA) service.

Digital forensics firm Volexity, which tracks the actor under the moniker Dark Halo, said the MFA bypass was one of the three incidents between late 2019 and 2020 aimed at a US-based think tank.

The entire intrusion campaign came to light earlier this week when FireEye disclosed it had detected a breach that also pilfered its Red Team penetration testing tools.

Since then, a number of agencies have been found to be attacked, including the US departments of Treasury, Commerce, Homeland Security, and Energy, the National Nuclear Security Administration (NNSA), and several state department networks.

While many details continue to remain unclear, the revelation about new modes of attack raises more questions about the level of access the attackers were able to gain across government and corporate systems worldwide.

Microsoft, FireEye, and GoDaddy Create a Killswitch

Over the last few days, Microsoft, FireEye, and GoDaddy seized control over one of the main GoDaddy domains — avsvmcloud[.]com — that was used by the hackers to communicate with the compromised systems, reconfiguring it to create a killswitch that would prevent the SUNBURST malware from continuing to operate on victims’ networks.

For its part, SolarWinds has not yet disclosed how exactly the attacker managed to gain extensive access to its systems to be able to insert malware into the company’s legitimate software updates.

Recent evidence, however, points to a compromise of its build and software release system. An estimated 18,000 Orion customers are said to have downloaded the updates containing the back door.

Symantec, which earlier uncovered more than 2,000 systems belonging to 100 customers that received the trojanized SolarWinds Orion updates, has now confirmed the deployment of a separate second-stage payload called Teardrop that’s used to install the Cobalt Strike Beacon against select targets of interest.

The hacks are believed to be the work of APT29, a Russian threat group also known as Cozy Bear, which has been linked to a series of breaches of critical US infrastructure over the past year.

The latest slew of intrusions has also led CISA, the US Federal Bureau of Investigation (FBI), and the Office of the Director of National Intelligence (ODNI) to issue a joint statement, stating the agencies are gathering intelligence in order to attribute, pursue, and disrupt the responsible threat actors.

Calling for stronger steps to hold nation-states accountable for cyberattacks, Smith said the attacks represent “an act of recklessness that created a serious technological vulnerability for the United States and the world.”

“In effect, this is not just an attack on specific targets, but on the trust and reliability of the world’s critical infrastructure in order to advance one nation’s intelligence agency,” he added.

Microsoft Office 365 adds protection against downgrade and MITM attacks

Microsoft is working on adding SMTP MTA Strict Transport Security (MTA-STS) support to Exchange Online to ensure Office 365 customers’ email communication security and integrity.

Once MTA-STS is available in Office 365 Exchange Online, emails sent by users via Exchange Online will only one delivered using connections with both authentication and encryption, protecting against both email interception and attacks.

Protection against MITM and downgrade attacks

MTA-STS strengthens Exchange Online email security and solves multiple SMTP security problems including the lack of support for secure protocols, expired TLS certificates, and certs not issued by trusted third parties or matching server domain names.

Given that mail servers will still deliver emails even though a properly secured TLS connection can’t be created, SMTP connections are exposed to various attacks including downgrade and man-in-the-middle attacks.

“[D]owngrade attacks are possible where the STARTTLS response can be deleted, thus rendering the message in clear text,” Microsoft says. “Man-in-the-middle (MITM) attacks are also possible, whereby the message can be rerouted to an attacker’s server.”

“MTA-STS (RFC8461) helps thwart such attacks by providing a mechanism for setting domain policies that specify whether the receiving domain supports TLS and what to do when TLS can’t be negotiated, for example stop the transmission,” the company explains in a Microsoft 365 roadmap entry.

“Exchange Online (EXO) outbound mail flow now supports MTA-STS,” Microsoft also adds.https://www.youtube.com/embed/VY3YvrrHXJk?t=775

Exchange Online SMTP MTA Strict Transport Security (MTA-STS) support is currently in development and the company is planning to make it generally available during December in all environments, for all Exchange Online users.

DNSSEC and DANE for SMTP also coming

Microsoft is also working on including support for the DNSSEC (Domain Name System Security Extensions) and DANE for SMTP (DNS-based Authentication of Named Entities) to Office 365 Exchange Online.

Support for the two SMTP standards will be added to both inbound and outbound mail, “specific to SMTP traffic between SMTP gateways” according to the Microsoft 365 roadmap [12] and this blog post.

According to Microsoft, after including support for the two SMTP security standards in Exchange Online:

  1. DANE for SMTP will provide a more secure method for email transport. DANE uses the presence of DNS TLSA resource records to securely signal TLS support to ensure sending servers can successfully authenticate legitimate receiving email servers. This makes the secure connection resistant to downgrade and MITM attacks.
  2. DNSSEC works by digitally signing records for DNS lookup using public key cryptography. This ensures that the received DNS records have not been tampered with and are authentic. 

Microsoft is planning to release DANE and DNSSEC for SMTP in two phases, with the first one to include only outbound support during December 2020 and with the second to add inbound support by the end of next year.

Source :
https://www.bleepingcomputer.com/news/security/office-365-adds-protection-against-downgrade-and-mitm-attacks/

Microsoft Office 365 Security Recommendations

Summary

As organizations adapt or change their enterprise collaboration capabilities to meet “telework” requirements, many organizations are migrating to Microsoft Office 365 (O365) and other cloud collaboration services. Due to the speed of these deployments, organizations may not be fully considering the security configurations of these platforms.

This Alert is an update to the Cybersecurity and Infrastructure Security Agency’s May 2019 Analysis Report, AR19-133A: Microsoft Office 365 Security Observations, and reiterates the recommendations related to O365 for organizations to review and ensure their newly adopted environment is configured to protect, detect, and respond against would be attackers of O365.

Technical Details

Since October 2018, the Cybersecurity and Infrastructure Security Agency (CISA) has conducted several engagements with customers who have migrated to cloud-based collaboration solutions like O365. In recent weeks, organizations have been forced to change their collaboration methods to support a full “work from home” workforce.

O365 provides cloud-based email capabilities, as well as chat and video capabilities using Microsoft Teams. While the abrupt shift to work-from-home may necessitate rapid deployment of cloud collaboration services, such as O365, hasty deployment can lead to oversights in security configurations and undermine a sound O365-specific security strategy.

CISA continues to see instances where entities are not implementing best security practices in regard to their O365 implementation, resulting in increased vulnerability to adversary attacks.

Mitigations

The following list contains recommended configurations when deploying O365:

Enable multi-factor authentication for administrator accounts: Azure Active Directory (AD) Global Administrators in an O365 environment have the highest level of administrator privileges at the tenant level. This is equivalent to the Domain Administrator in an on-premises AD environment. The Azure AD Global Administrators are the first accounts created so that administrators can begin configuring their tenant and eventually migrate their users. Multi-factor authentication (MFA) is not enabled by default for these accounts. Microsoft has moved towards a “Secure by default” model, but even this must be enabled by the customer. The new feature, called “Security Defaults,”[1] assists with enforcing administrators’ usage of MFA. These accounts are internet accessible because they are hosted in the cloud. If not immediately secured, an attacker can compromise these cloud-based accounts and maintain persistence as a customer migrates users to O365.

Assign Administrator roles using Role-based Access Control (RBAC): Given its high level of default privilege, you should only use the Global Administrator account when absolutely necessary. Instead, using Azure AD’s numerous other built-in administrator roles instead of the Global Administrator account can limit assigning of overly permissive privileges to legitimate administrators.[2] Practicing the principle of “Least Privilege” can greatly reduce the impact if an administrator account is compromised.[3] Always assign administrators only the minimum permissions they need to do conduct their tasks.  

Enable Unified Audit Log (UAL): O365 has a logging capability called the Unified Audit Log that contains events from Exchange Online, SharePoint Online, OneDrive, Azure AD, Microsoft Teams, PowerBI, and other O365 services.[4] An administrator must enable the Unified Audit Log in the Security and Compliance Center before queries can be run. Enabling UAL allows administrators the ability to investigate and search for actions within O365 that could be potentially malicious or not within organizational policy.

Enable multi-factor authentication for all users: Though normal users in an O365 environment do not have elevated permissions, they still have access to data that could be harmful to an organization if accessed by an unauthorized entity. Also, threat actors compromise normal user accounts in order to send phishing emails and attack other organizations using the apps and services the compromised user has access to.

Disable legacy protocol authentication when appropriate: Azure AD is the authentication method that O365 uses to authenticate with Exchange Online, which provides email services. There are a number of legacy protocols associated with Exchange Online that do not support MFA features. These protocols include Post Office Protocol (POP3), Internet Message Access Protocol (IMAP), and Simple Mail Transport Protocol (SMTP). Legacy protocols are often used with older email clients, which do not support modern authentication. Legacy protocols can be disabled at the tenant level or at the user level. However, should an organization require older email clients as a business necessity, these protocols will presumably not be disabled. This leaves email accounts accessible through the internet with only the username and password as the primary authentication method. One approach to mitigate this issue is to inventory users who still require the use of a legacy email client and legacy email protocols and only grant access to those protocols for those select users. Using Azure AD Conditional Access policies can help limit the number of users who have the ability to use legacy protocol authentication methods. Taking this step will greatly reduce an organization’s attack surface.[5]

Enable alerts for suspicious activity: Enabling logging of activity within an Azure/0365 environment can greatly increase the owner’s effectiveness of identifying malicious activity occurring within their environment and enabling alerts will serve to enhance that. Creating and enabling alerts within the Security and Compliance Center to notify administrators of abnormal events will reduce the time needed to effectively identify and mitigate malicious activity.[6] At a minimum, CISA recommends enabling alerts for logins from suspicious locations and for accounts exceeding sent email thresholds.

Incorporate Microsoft Secure Score: Microsoft provides a built-in tool to measure an organization’s security posture with respect to its O365 services and offer enhancement recommendations.[7] These recommendations provided by Microsoft Secure Score do NOT encompass all possible security configurations, but organizations should still consider using Microsoft Secure Score because O365 service offerings frequently change. Using Microsoft Secure Score will help provide organizations a centralized dashboard for tracking and prioritizing security and compliance changes within O365.

Integrate Logs with your existing SIEM tool: Even with robust logging enabled via the UAL, it is critical to integrate and correlate your O365 logs with your other log management and monitoring solutions. This will ensure that you can detect anomalous activity in your environment and correlate it with any potential anomalous activity in O365.[8]

Solution Summary

CISA encourages organizations to implement an organizational cloud strategy to protect their infrastructure assets by defending against attacks related to their O365 transition and better securing O365 services.[9] Specifically, CISA recommends that administrators implement the following mitigations and best practices:

  1. Use multi-factor authentication. This is the best mitigation technique to protect against credential theft for O365 administrators and users.
  2. Protect Global Admins from compromise and use the principle of “Least Privilege.”
  3. Enable unified audit logging in the Security and Compliance Center.
  4. Enable Alerting capabilities.
  5. Integrate with organizational SIEM solutions.
  6. Disable legacy email protocols, if not required, or limit their use to specific users.

References

[1] Azure AD Security Defaults[2] Azure AD Administrator roles[3] Protect Global Admins[4] Unified audit log[5] Block Office 365 Legacy Email Authentication Protocols[6] Alert policies in the security and compliance center[7] Microsoft Secure Score[8] SIEM integration with Office 365 Advanced Threat Protection[9] Microsoft 365 security best practices

Alert (AA20-120A)

Source :
https://us-cert.cisa.gov/ncas/alerts/aa20-120a

Prepare your organization’s network for Microsoft Teams

Network requirements

If you’ve already optimized your network for Microsoft 365 or Office 365, you’re probably ready for Microsoft Teams. In any case – and especially if you’re rolling out Teams quickly as your first Microsoft 365 or Office 365 workload to support remote workers – check the following before you begin your Teams rollout:

  1. Do all your locations have internet access (so they can connect to Microsoft 365 or Office 365)? At a minimum, in addition to normal web traffic, make sure you’ve opened the following, for all locations, for media in Teams:TABLE 1PortsUDP ports 3478 through 3481IP addresses13.107.64.0/1852.112.0.0/14, and 52.120.0.0/14

 Important

If you need to federate with Skype for Business, either on-premises or online, you will need to configure some additional DNS records.

CNAME Records / Host nameTTLPoints to address or value
sip3600sipdir.online.lync.com
lyncdiscover3600webdir.online.lync.com
  1. Do you have a verified domain for Microsoft 365 or Office 365 (for example, contoso.com)?
    • If your organization hasn’t rolled out Microsoft 365 or Office 365, see Get started.
    • If your organization hasn’t added or configured a verified domain for Microsoft 365 or Office 365, see the Domains FAQ.
  2. Has your organization deployed Exchange Online and SharePoint Online?

Once you’ve verified that you meet these network requirements, you may be ready to Roll out Teams. If you’re a large multinational enterprise, or if you know you’ve got some network limitations, read on to learn how to assess and optimize your network for Teams.

 Important

For educational institutions: If your organization is an educational institution and you use a Student Information System (SIS), deploy School Data Sync before you roll out Teams.

Running on-premises Skype for Business Server: If your organization is running on-premises Skype for Business Server (or Lync Server), you must configure Azure AD Connect to synchronize your on-premises directory with Microsoft 365 or Office 365.

Best practice: Monitor your network using CQD and call analytics

Use the Call Quality Dashboard (CQD) to gain insight into the quality of calls and meetings in Teams. CQD can help you optimize your network by keeping a close eye on quality, reliability, and the user experience. CQD looks at aggregate telemetry for an entire organization where overall patterns can become apparent, which lets you identify problems and plan remediation. Additionally, CQD provides rich metrics reports that provide insight into overall quality, reliability, and user experience.

You’ll use call analytics to investigate call and meeting problems for an individual user.

Network optimization

The following tasks are optional and aren’t required for rolling out Teams, especially if you’re a small business and you’ve already rolled out Microsoft 365 or Office 365. Use this guidance to optimize your network and Teams performance or if you know you’ve got some network limitations.

You might want to do additional network optimization if:

  1. Teams runs slowly (maybe you have insufficient bandwidth)
  2. Calls keep dropping (might be due to firewall or proxy blockers)
  3. Calls have static and cut out, or voices sound like robots (could be jitter or packet loss)

For an in-depth discussion of network optimization, including guidance for identifying and fixing network impairments, read Microsoft 365 and Office 365 Network Connectivity Principles.

Network optimization taskDetails
Network plannerFor help assessing your network, including bandwidth calculations and network requirements across your org’s physical locations, check out the Network Planner tool, in the Teams admin center. When you provide your network details and Teams usage, the Network Planner calculates your network requirements for deploying Teams and cloud voice across your organization’s physical locations.For an example scenario, see Using Network Planner – example scenario.
Advisor for TeamsAdvisor for Teams is part of the Teams admin center. It assesses your Microsoft 365 or Office 365 environment and identifies the most common configurations that you may need to update or modify before you can successfully roll out Teams.
External Name ResolutionBe sure that all computers running the Teams client can resolve external DNS queries to discover the services provided by Microsoft 365 or Office 365 and that your firewalls are not preventing access. For information about configuring firewall ports, go to Microsoft 365 and Office 365 URLs and IP ranges.
Maintain session persistenceMake sure your firewall doesn’t change the mapped Network Address Translation (NAT) addresses or ports for UDP.
Validate NAT pool sizeValidate the network address translation (NAT) pool size required for user connectivity. When multiple users and devices access Microsoft 365 or Office 365 using Network Address Translation (NAT) or Port Address Translation (PAT), you need to ensure that the devices hidden behind each publicly routable IP address do not exceed the supported number. Ensure that adequate public IP addresses are assigned to the NAT pools to prevent port exhaustion. Port exhaustion will contribute to internal users and devices being unable to connect to the Microsoft 365 or Office 365 service.
Routing to Microsoft data centersImplement the most efficient routing to Microsoft data centers. Identify locations that can use local or regional egress points to connect to the Microsoft network as efficiently as possible.
Intrusion Detection and Prevention GuidanceIf your environment has an Intrusion Detection or Prevention System (IDS/IPS) deployed for an extra layer of security for outbound connections, be sure to allow all Microsoft 365 or Office 365 URLs.
Configure split-tunnel VPNWe recommend that you provide an alternate path for Teams traffic that bypasses the virtual private network (VPN), commonly known as [split-tunnel VPN](https://docs.microsoft.com/windows/security/identity-protection/vpn/vpn-routing). Split tunneling means that traffic for Microsoft 365 or Office 365 doesn’t go through the VPN but instead goes directly to Microsoft 365 or Office 365. Bypassing your VPN will have a positive impact on Teams quality, and it reduces load from the VPN devices and the organization’s network. To implement a split-tunnel VPN, work with your VPN vendor.Other reasons why we recommend bypassing the VPN:VPNs are typically not designed or configured to support real-time media.Some VPNs might also not support UDP (which is required for Teams).VPNs also introduce an extra layer of encryption on top of media traffic that’s already encrypted.Connectivity to Teams might not be efficient due to hair-pinning traffic through a VPN device.
Implement QoSUse Quality of Service (QoS) to configure packet prioritization. This will improve call quality in Teams and help you monitor and troubleshoot call quality. QoS should be implemented on all segments of a managed network. Even when a network has been adequately provisioned for bandwidth, QoS provides risk mitigation in the event of unanticipated network events. With QoS, voice traffic is prioritized so that these unanticipated events don’t negatively affect quality.
Optimize WiFiSimilar to VPN, WiFi networks aren’t necessarily designed or configured to support real-time media. Planning for, or optimizing, a WiFi network to support Teams is an important consideration for a high-quality deployment. Consider these factors:Implement QoS or WiFi Multimedia (WMM) to ensure that media traffic is getting prioritized appropriately over your WiFi networks.Plan and optimize the WiFi bands and access point placement. The 2.4 GHz range might provide an adequate experience depending on access point placement, but access points are often affected by other consumer devices that operate in that range. The 5 GHz range is better suited to real-time media due to its dense range, but it requires more access points to get sufficient coverage. Endpoints also need to support that range and be configured to leverage those bands accordingly.If you’re using dual-band WiFi networks, consider implementing band steering. Band steering is a technique implemented by WiFi vendors to influence dual-band clients to use the 5 GHz range.When access points of the same channel are too close together, they can cause signal overlap and unintentionally compete, resulting in a bad experience for the user. Ensure that access points that are next to each other are on channels that don’t overlap.Each wireless vendor has its own recommendations for deploying its wireless solution. Consult your WiFi vendor for specific guidance.

Bandwidth requirements

Teams is designed to give the best audio, video, and content sharing experience regardless of your network conditions. That said, when bandwidth is insufficient, Teams prioritizes audio quality over video quality.

Where bandwidth isn’t limited, Teams optimizes media quality, including up to 1080p video resolution, up to 30fps for video and 15fps for content, and high-fidelity audio.

This table describes how Teams uses bandwidth. Teams is always conservative on bandwidth utilization and can deliver HD video quality in under 1.2Mbps. The actual bandwidth consumption in each audio/video call or meeting will vary based on several factors, such as video layout, video resolution, and video frames per second. When more bandwidth is available, quality and usage will increase to deliver the best experience.

Bandwidth(up/down)Scenarios
30 kbpsPeer-to-peer audio calling
130 kbpsPeer-to-peer audio calling and screen sharing
500 kbpsPeer-to-peer quality video calling 360p at 30fps
1.2 MbpsPeer-to-peer HD quality video calling with resolution of HD 720p at 30fps
1.5 MbpsPeer-to-peer HD quality video calling with resolution of HD 1080p at 30fps
500kbps/1MbpsGroup Video calling
1Mbps/2MbpsHD Group video calling (540p videos on 1080p screen)

Microsoft 365 and Office 365 Network Connectivity Principles

Worldwide endpoints: Skype for Business Online and Teams

Proxy servers for Teams

Media in Teams: Why meetings are simple

Media in Teams: Deep dive into media flows

Identity models and authentication in Teams

How to roll out Teams

Teams Troubleshooting

Source :
https://docs.microsoft.com/en-us/microsoftteams/prepare-network

Change your Microsoft Office product key

This article applies to Office Home & Business, Office Professional, and individually purchased Office apps.If you bought multiple copies of Office and used the same Install button to install Office on multiple PCs, activation fails on the other PCs. This happens because each Install button is associated with a unique product key that can only be installed on one PC. To fix this, you can change the product key for the other PCs where you installed Office.

Note: After you change your product key, we recommend that you create a list to manage the product keys that you've installed. To learn how, see Manage multiple one-time-purchase Office installs that use the same Microsoft account.

Select your Office version below.

Office 2019, 2016 Office 2013 Office 365 Command line
  1. Sign in to your Services & subscriptions page with the email and password associated with the Microsoft account that was used to install Office.After you sign in, you should see a list of Office products that are associated with your Microsoft account.
  2. For the first product that's listed on the page, select View product key. Copy or write down the product key. This is likely the product key that was used multiple times to install Office.
  3. Select View product key for the remaining Office products and copy or write them down. These are likely the keys that you'll use to replace the key that was used multiple times.
  4. On a PC where Office activation is failing, open the Command Prompt as described below:
    Windows 10 and Windows 8.1Windows 7
    1. Select the Start button Windows Start button in Windows 8 and Windows 10 (lower-left corner).
    2. Type Command Prompt.
    3. Right-click the Command Prompt icon, and select Run as administrator.
    1. Select the Start button Windows 7 Start button (lower-left corner).
    2. Right-click Command Prompt and select Run as administrator.
  5. From the drop-down list below, select your Office version and Windows version (32-bit or 64-bit) and run the commands as described.

    Tip: If you get an Input Error: Can not find script file... message, it means that you used the wrong command. Don’t worry, running the wrong command won’t hurt anything. Double-check your Office and Windows versions and try a different command.

    1. Copy the following command, paste the command into the Command Prompt window, and then press Enter. cscript "C:\Program Files\Microsoft Office\Office16\OSPP.VBS" /dstatusThe command prompt displays the last five characters of the product key that was used to install Office on the PC. Our example below uses XXXXX to represent these characters.

      Command Prompt showing last five digits of product key

    2. Copy the following command, paste the command into the Command Prompt window, and replace XXXXX with the last 5 digits of the product key that was shown in the previous step. Press Enter to remove the product key.cscript "C:\Program Files\Microsoft Office\Office16\OSPP.VBS" /unpkey:XXXXX
    3. Copy the following command, paste the command into the Command Prompt window, and replace XXXXX-XXXXX-XXXXX-XXXXX-XXXXX with an unused product key from your list. Press Enter to change the key.cscript "C:\Program Files\Microsoft Office\Office16\OSPP.VBS" /inpkey:XXXXX-XXXXX-XXXXX-XXXXX-XXXXX

    Tips:

  6. Now start an Office app, such as Word, and select Next to activate Office over the Internet.
  7. Repeat this process for each PC where activation is failing.

Source :
https://support.office.com/en-us/article/change-your-office-product-key-d78cf8f7-239e-4649-b726-3a8d2ceb8c81?omkt=en-001&ui=en-US&rs=en-001&ad=US#ID0EABAAA=Command_line

How to convert OST to PST in Microsoft Outlook 2019/2016/2013/2010

To convert OST to PST in Outlook 2019/2016/2013/2010 a lot of users search for a perfect way. Numerous reasons are here that initiate users to convert OST to PST; the main is, PST files are easy to port and accessible. Here, by this blog, we will understand know-how to convert OST to PST in Outlook 2019/2016/2013/2010.

OST stands for Offline Storage Tables. The OST is a format that records Exchange Server mailbox organizers and folders in the disconnected zone or when web accessibility isn’t available. The OST format offers to execute the Outlook mailbox usefulness in the disconnected mode i.e., without interfacing with the Server. Despite the fact that Offline Storage Table records can’t be efficacy through external aggravations or some other disturbance, that makes it more best and impressive for standard business tasks.

Notwithstanding the Outlook version, regardless of whether it is Microsoft Outlook 2019, 2016, 2013, 2010, 2007 or any more seasoned ANSI release, inaccessible OST format file requires troubleshooting so as to recapture access to the information put away inside in the system. The most effortless approach to fix a wide range of OST issues, irrespective of harm or misfortune is to change over the OST record to Outlook PST document.

There are numerous strategies to execute the conversion process of OST data to PST file format; however, some strategies are harder while some are the most secure approaches to convert OST to PST in Outlook 2019/2016/2013/2010.

Know before Convert OST to PST in Outlook 2019/2010/2013/2010

You can’t extract information from the OST document to a PST legitimately. That implies you should sign in with the first profile so as to export the OST document information to PST. So, you’ll get a strategy given beneath.

OST file format is a duplicate copy of your Exchange mailbox; you can reproduce it by re-syncing with the mailbox.

There is no real way to change over an OST file format to a PST file format by utilizing Microsoft devices. If your unique email account isn’t accessible or if your OST file format deprives. For this situation, there’s just a single way you can change over the OST record to PST—by utilizing a professional third-party tool.

No. 1 Strategy: Utilize Outlook Archive feature

The first strategy to duplicate or move mailbox things into PST is based on the utilization of the Archive option given in Outlook. The option of Outlook offers to copy entire data of OST file into PST file format; however, it will not copy contact of OST file.

To get the copy of the OST file format, go with beneath commands.

  • Open Outlook profile that has that particular OST file.
  • Then, Click on the File tab, then, click on Info, and after that Click on the Clean-up Tools button.
  • Next, choose Archive from the choices
  • In the Archive comment box that shows up, guarantee that Archive this organizer and all subfolders alternative is chosen (it is chosen by default)
  • Next, choose the organizer that you have to export to PST (e.g.: Outbox)
  • In the Archive things more established than a box, give a date. Entire things that sent before till the predefined date will archive
  • Under Archive file: choice, provide the path destination to save the new PST
  • Finally, Click on the OK button to complete the execution of exportation.

No.2 Strategy: Drag and Drop Mailbox Items

Surely, drag and drop of Mailbox items are one of the best ways to relocate the OST file format into PST file format. To do the relocation through Drag and Drop mailbox items process, you need to Open a blank PST file in the Microsoft Outlook interface and then choose and drag the required mailbox from OST data into the PST blank page.

Although, with the drag and drop items technique, there are a few constraints too. This is time taking process. It will need to repeat the procedure for every OST file item that required to be relocated in the PST file format. This expects tender loving care as the procedure is tedious; thusly, a solitary slip-up will prompt a superfluous redundancy of the procedure.

Also, the organizer hierarchy, just as the default organizers, for example, Calendars, Contacts, Inbox, and so forth., can’t be legitimately moved and you have to make another PST document to deal with the whole information in an organized way.

No. 3 Strategy: Outlook Import & Export Wizard

Microsoft Outlook Import and Export wizard is a compelling method to change over OST information to PST file format in Outlook 2010 and different variants. With the procedure, you can move OST information to Excel and CSV documents. Although, you would need to be cautious while executing the means as this is a manual technique.

Additionally, you should be in fact capable to execute the built-in import/export technique. Any misstep may result in loss of access to your important information So, it is prescribed to back up the OST document before beginning the exporting procedure with the goal that you can reestablish the information if the need is while execution.

No.4 Strategy: Use Shoviv OST to PST Converter

As, there are many reasons as well strategies to save your OST data into PST file format; however, I’ve told you three strategies to convert OST file format to PST format. Although, those manual strategies have few risks of failure and take a lot of time of the client with tediousness. So, this tactic is for professionals, who just want to do their OST conversion with no time and misfortune.

Use Shoviv OST to PST Converter to do conversion hassle-free and efficient. The prominent OST to PST Converter tool gives a programmed utility to export numerous OST documents to Outlook PSTs, also extract entire mailbox items unblemished. The software additionally split and compact the PST documents to enable you to oversee them in a progressively organized way. Furthermore, it additionally straightforwardly export the OST file information to Office 365, which enormously assists on the off chance that you’re relocating your mailboxes to the cloud environment. Consequently, Microsoft MVPs suggest the product based OST transformation technique.

Professionally Convert OST to PST in Outlook 2019/2016/2013/2010:

Step 1: Download Shoviv OST to PST to Converter and Install and launch it on your system.

Step 2: Click on the Add OST Files button of Ribbon bar.

Step3: Using Add, Remove, Remove All and Search button, add required OST files and check them. Also, browse the temp path.

Note: If your OST file is highly corrupted or you want to recover the deleted items from your OST file go for the ‘Advance Scan’ option. Commonly it takes time to examine a document relies on the volume of information it incorporates. You can likewise abort the scan process by using the given Stop button in the interface.

Step 4: Now users can view the selected files in the folder list; the user can also expand the folder by making a right-click and can see the content of it.


Step 5: Make a right-click on selected files or click the OST to PST button of the ribbon bar and go with the “Save all Files in Outlook PST” option.

Step6: Check/Uncheck Subfolders option will appear, check the subfolder and proceed by clicking the Next.

Step 7: Now, you will be prompted to Filter page. apply the filter using Process Message Class and Process Item Date Range. Click the Next Button.

Step 8: In this page, users have the option to choose if a user wants to migrate in an existing PST or wants to create new PST and want to migrate in it. Here, user can also set size for the PST file, after given size resultant PST file will split. Provide the priority and click on the Next button.

Step 9: The conversion of OST to PST proceeds now, after successful conversion, a message “Process Completed Successfully” will appear, click Ok. Option to save the report is also given. Click on the Save Report button for this. Click Finish when all is done.

At variance with sparing Exchange OST mailboxes to Outlook PST file format, Convert OST to PST tool from Shoviv permits changing over the Offline records to numerous document arrangements including MSG, HTML, EML, and RTF.


Source :
https://www.shoviv.com/blog/convert-ost-to-pst-in-outlook-2007-2010-2013-2016/

Spear-Phishing Attacks Targeting Office 365 Users, SaaS Applications

Over the course of the last 15 years, cyber threats have gone from urban myths and corporate ghost stories to as mainstream as carjackings and burglaries. There isn’t a business owner of a small restaurant chain or a CEO of a Fortune 500 company who doesn’t think about the fallout of being breached.

I’m not here to tell you how the threats are getting more sophisticated, or how state-sponsored hacker groups are getting more and more funding; you already know that. But what I do want to share with you is something that I’m seeing daily. Targeted threats that you may have already witnessed and, unfortunately, been personally a victim of or know someone who has: Spear-phishing.

Are you an Office 365 user? Do you have customers who are Office 365 users? Are you a managed security service provider (MSSP) that administrators Office 365 for your clients? You probably need a solution that applies effective Office 365 security capabilities and controls.

With close to 200 million global users, Office 365 is a target — a big target. And spear-phishing attempts are good. Really good. Recently, Forbes ran a summary of the threat. Alarmingly, today’s most advanced spear-phishing attempts look like they come from your CFO, boss or trusted vendor. They provide credibility to the target and, many times, users take the bait. Money gets wired. Access to accounts are provided. Confidential information is exposed.

Traditional email security isn’t enough protection. Out-of-the-box, cloud-native security services aren’t enough protection. A lean, effective and modern Office 365 security or SaaS security solution is required.

How to stop spear-phishing attacks, advanced cyber threats

SonicWall Cloud App Security (CAS) combines advanced security for Office 365, G Suite and other top SaaS applications to protect users and data within cloud applications, including email, messaging, file sharing and file storage. This approach delivers advanced threat protection against targeted email threats like phishing attacks, business email compromise, zero-day threats, data loss and account takeovers.

CAS also seamlessly integrates with sanctioned SaaS applications using native APIs. This helps organizations deploy email security and CASB functionalities that are critical to protecting the SaaS landscape and ensure consistent policies across cloud applications being used.

Explore the five key reasons CAS may be able to protect your organization from spear-phishing and other advanced attacks.

  • CAS delivers next-gen security for Office 365, protecting email, data and user credentials from advanced threats (including advanced phishing) while ensuring compliance in the cloud
  • Monitor SaaS accounts for IOCs, such data leakage, account takeover, business email compromise (BEC) and fraud attempts
  • Block malware propagation in malicious email attachments and files, whether they are at-rest or traversing a SaaS environment, internally or cloud-to-cloud
  • Prevent data breaches using machine learning and/or AI-based user profiling and behavior analytics for incident detections and automated responses
  • Leverage Shadow IT to monitor cloud usage in real time, and set policies to block unsanctioned applications

In my over 10 years of observing various attacks and sitting in rooms with customers (not mine, fortunately) who have been breached, I can tell you that you don’t want it ever to be you or your customers. This threat is having more success than any I’ve seen — and they are very recent.

For more information, contact a SonicWall cybersecurity expert or explore the CAS solution in detail.


Source :
https://blog.sonicwall.com/en-us/2020/01/spear-phishing-attacks-targeting-office-365-users-saas-applications/