The role of government in stopping supply chain attacks and other threats to our way of life.
By Amber Wolff
April 26, 2023
How governments play a vital role in developing regulations, stopping supply chain attacks, and diminishing other threats to our way of life.
While new issues are always emerging in the world of cybersecurity, some have been present since the beginning, such as what role cybersecurity should play in government operations and, conversely, what role government should play in cybersecurity. The answer to this question continues to shift and evolve over time, but each new leap in technology introduces additional considerations. As we move into the AI era, how can government best keep citizens safe without constraining innovation and the free market — and how can the government use its defensive capabilities to retain an edge in the conflicts of tomorrow?
The day’s first session, “Cybersecurity and Military Defense in an Increasingly Digital World,” offered a deep dive into the latter question. Over the past 20 years, military conflicts have moved from involving just Land, Air and Sea to also being fought in Space and Cyber. While superior technology has given us an upper hand in previous conflicts, in some areas our allies — and our adversaries — are catching up or even surpassing us. In each great technological leap, companies and countries alike ascend and recede, and to keep our edge in the conflicts of the future, the U.S. will need to shed complacency, develop the right policies, move toward greater infrastructure security and tap the capabilities of the private sector.
SonicWall in particular is well-positioned to work with the federal government and the military. For years, we’ve helped secure federal agencies and defense deployments against enemies foreign and domestic, and have woked to shorten and simplify the acquisition and procurement process. Our list of certifications includes FIPS 140-2, Common Criteria, DoDIN APL, Commercial Solutions for Classified (CSfC), USGv6, IPv6 and TAA and others. And our wide range of certified solutions have been used in a number of government use cases, such as globally distributed networks in military deployments and federal agencies, tip-of-the-spear, hub-and-spoke, defense in-depth layered firewall strategies and more.
Because Zero Trust is just as important for federal agencies as it is for private sector organizations, SonicWall offers the SMA 1000, which offers Zero Trust Network Architecture that complies with federal guidelines, including the DoDIN APL, FIPS and CSfC, as well as the U.S. National Cybersecurity Strategy.
This new strategy was at the center of the day’s next session. In “The National Cyber Strategy as Roadmap to a Secure Cyber Future,” panelists outlined this strategic guidance, which was released just two months ago and offered a roadmap for how the U.S. should protect its digital ecosystem against malicious criminal and nation-state actors. The guidance consists of five pillars, all of which SonicWall is in accord with:
- Pillar One: Defend Critical Infrastructure
SonicWall offers several security solutions that align with Pillar One, including firewalls, intrusion prevention, VPN, advanced threat protection, email security, Zero-Trust network access and more. We’re also working to align with and conform to NIST SSDF and NIST Zero Trust Architecture standards. - Pillar Two: Disrupt and Dismantle Threat Actors
SonicWall uses its Email Security to disrupt and mitigate the most common ransomware vector: Phishing. And in 2022 alone, we helped defend against 493.3 million ransomware attacks.
- Pillar Three: Shape Market Forces to Drive Security and Resilience
This pillar shifts liability from end users to software providers that ignore best practices, ship insecure or vulnerable products or integrate unvetted or unsafe third-party software. And as part of our efforts to aign with the NIST SSDF, we’re implementing a Software Bill of Materials (SBOM).
- Pillar Four: Invest in a Resilient Future
Given CISA’s prominence in this guidance, any regulations created will likely include threat emulation testing, and will likely be mapped to threat techniques, such as MITRE ATT&CK. SonicWall Capture Client (our EDR solution) is powered by SentinelOne, which has been a participant in the MITRE ATT&CK evaluations since 2018 and was a top performer in the 2022 Evaluations.
- Pillar Five: Forge International Partnerships to Pursue Shared Goals
An international company, SonicWall recognizes the importance of international partnerships and works to comply with global regulations such as GDPR, HIPAA, PCI-DSS and more. By sharing threat intelligence and collaborating no mitigation strategies, we work with governments and the rest of the cybersecurity community to pursue shared cybersecurity goals.
And with the continued rise in cybercrime, realizing these goals has never been more important. In “The State of Cybersecurity: Year in Review,” Mandiant CEO Kevin Mandia summarized findings from the 1,163 intrusions his company investigated in 2022. The good news, Mandia said, is that we’re detecting threats faster. In just ten years, we’ve gone from averaging 200 days to notice there’s a problem, to just 16 days currently — but at the same time, an increase in the global median dwell time for ransomware shows there’s still work to be done.
Mandia also outined the evolution of how cybercriminals are entering networks, from Unix platforms, to Windows-based attacks, and from phishing, to spearphishing to vulnerabilities — bringing patch management once again to the fore.
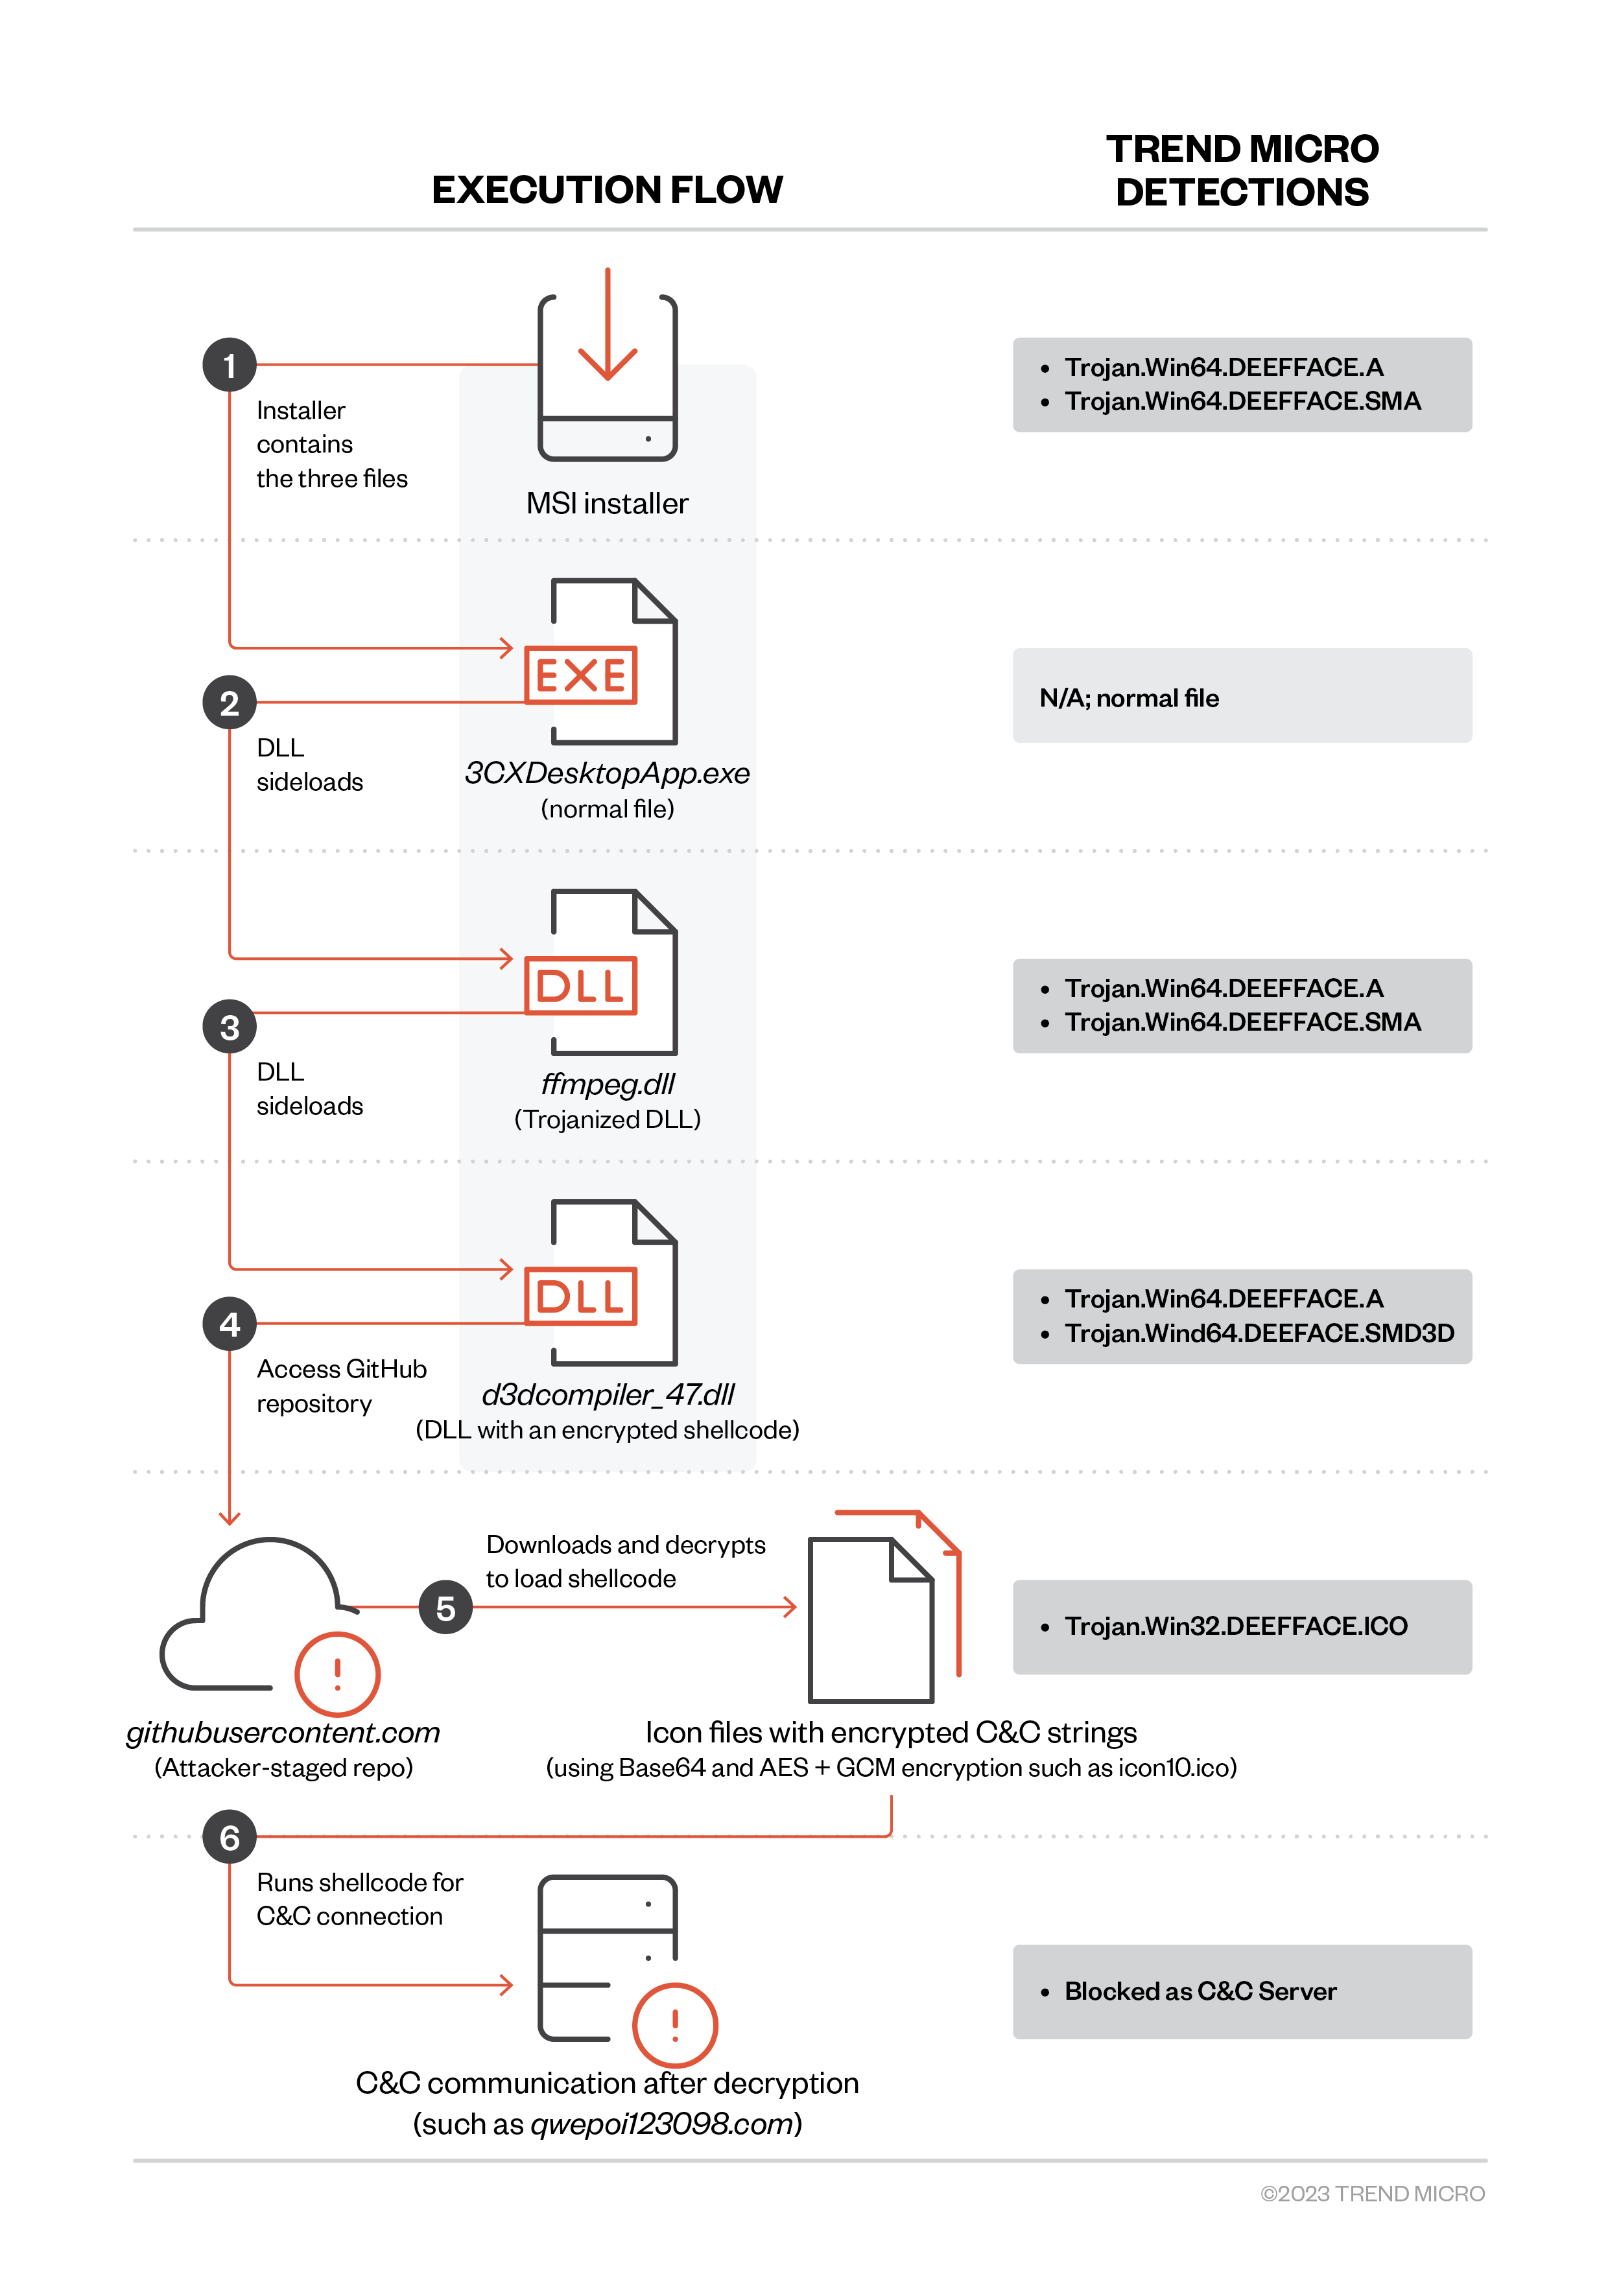
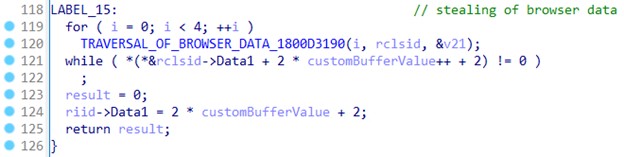
Deep within the RSAC Sandbox, where today’s defenders learn, play and test their skills, panelists convened to discuss how to stop attackers’ relentless attempts to shift left. “Software Supply Chain: Panel on Threat Intel, Trends, Mitigation Strategies” explained that while the use of third-party components increases agility, it comes with tremendous risk. More than 96% of software organizations rely on third-party code, 90% of which consists of open source—but the developers of this software are frequently single individuals or small groups who may not have time to incorporate proper security, or even know how. Our current strategy of signing at the end isn’t enough, panelists argued—to truly ensure safety, signing should be done throughout the process (otherwise known as “sign at the station”).
Israel provides an example of how a country can approach the issue of software supply chain vulnerability — among other things, the country has created a GitHub and browser extension allowing developers to check packages for malicious code — but much work would need to be done to implement the Israel model in the U.S. AI also provides some hope, but given its current inability to reliably detect malicious code, we’re still a long way from being able to rely on it. In the meantime, organizations will need to rely on tried-and-true solutions such as SBOMs to help guard against supply chain attacks in the near future.
But while AI has tremendous potential to help defenders, it also has terrible potential to aid attackers. In “ChatGPT: A New Generation of Dynamic Machine-Based Attacks,” the speakers highlighted ways that attackers are using the new generation of AI technology to dramatically improve social engineering attempts, expand their efforts to targets in new areas, and even write ransomware and other malicious code. In real time, the speakers demonstrated the difference between previous phishing emails and phishing generated by ChatGPT, including the use of more natural language, the ability to instantly access details about the target and the ability to imitate a leader or colleague trusted by the victim with a minimum of effort. These advancements will lead to a sharp increase in victims of phishing attacks, as well as things like Business Email Compromise.
And while there are guardrails in place to help prevent ChatGPT from being used maliciously, they can be circumvented with breathtaking ease. With the simple adjustment of a prompt, the speakers demonstrated, ransomware and other malicious code can be generated. While this code isn’t functional on its own, it’s just one or two simple adjustments away — and this capability could be used to rapidly increase the speed with which attacks are launched.
These capabilities are especially concerning given the rise in state-sponsored attacks. In “State of the Hack 2023: NSA’s Perspective,” NSA Director of Cybersecurity Rob Joyce addressed a packed house regarding the NSA’s work to prevent the increasing wave of nation-state threats. The two biggest nation-state threats to U.S. cybersecurity continue to be Russia and China, with much of the Russian effort centering around the U.S.’ assistance in the Russia/Ukraine conflict.
As we detailed in our SonicWall 2023 Cyber Threat Report, since the beginning of the conflict, attacks by Russia’s military and associated groups have driven a massive spike in cybercrime in Ukraine. The good news, Joyce said, is that Russia is currently in intelligence-gathering mode when it comes to the U.S., and is specifically taking care not to release large-scale NotPetya-type attacks. But Russia also appears to be playing the long game, and is showing no signs of slowing or scaling back their efforts.
China also appears to be biding its time — but unlike Russia, whose efforts appear to be focused around traditional military dominance, China is seeking technological dominance. Exploitation by China has increased so much that we’ve become numb to it, Joyce argued. And since these nation-state sponsored attackers don’t incur much reputational damage for their misdeeds, they’ve become increasingly brazen in their attacks, going so far as to require any citizen who finds a zero-day to pass details to the government and hosting competitions for building exploits and finding vulnerabilities. And the country is also making efforts to influence international tech standards in an attempt to tip scales in their favor for years to come.
The 2023 RSA Conference has offered a wealth of information on a wide variety of topics, but it will soon draw to a close. Thursday is the last day to visit the SonicWall booth (#N-5585 in Moscone North) and enjoy demos and presentations on all of our latest technology. Don’t head home without stopping by — and don’t forget to check back for the conclusion of our RSAC 2023 coverage!
Source :
https://blog.sonicwall.com/en-us/2023/04/rsa-report-cybersecurity-is-national-security/