Microsoft finally pulled back the curtain on Windows 11 last month. The company once said that Windows 10 would be the last ever version of the desktop operating system, but plans changed. Windows 11 will roll out to the general public later this year. As long as you’ve got a compatible device, you’ll be able to upgrade and take advantage of all the new features. But what if you’d prefer to stay on Windows 10 for the time being? Thankfully, if you want to block Windows 11, you can do so with relative ease. Read on to find out how.
Microsoft already made it clear that the Windows 11 update won’t be forced upon Windows 10 users at launch. If you want to upgrade, you will have to do so manually by heading to Settings > Update & Security > Windows Update. Simply avoid that menu once Windows 11 launches and you should not have to worry about the update trying to install itself any time soon.
As Ghacks notes in an extensive guide, you can go even further to block Windows 11. If you Windows 10 Pro, Education, or Enterprise, it is possible to delay feature update installations. You can do so with the Group Policy Editor and Windows Registry, but you might not want to take action yet. Windows 10 version 21H2 is also in the works, and you will block it as well if you disable feature updates.
It might be best to hold off, but here’s what you need to do to block Windows 11:
Block Windows 11 with Group Policy Editor
Open the Start Menu.
Type gpedit.msc and load the Group Policy Editor once it is displayed in the search results.
Go to Local Computer Policy > Computer Configuration > Administrative Templates > Windows Components > Windows Update > Windows Update for Business
Double-click on “Select the target feature update version”.
Set the policy to Enabled.
Type 21H1 into the field.
Close the Group Policy Editor.
Block Windows 11 with Registry Editor
Open the Start Menu.
Type regedit.exe and select the Registry Editor search result.
Go to HKEY_LOCAL_MACHINE\SOFTWARE\Policies\Microsoft\Windows\WindowsUpdate.
Set the Dword TargetReleaseVersion to 1. If the value does not exist, right-click on Windows Update, and select New > Dword (32-bit) Value.
Set the value of TargetReleaseVersionInfo to 21H1. If the value does not exist, right-click on Windows Update, and select New > String Value.
There are sure to be some bugs and issues in Windows 11 at launch. The new features and refreshed design should be enough to convince most users to update, but now you know how to block it. Microsoft plans to support Windows 10 through 2025. In other words, there’s no rush to update if you’re happy with what Windows 10 currently offers.
This article describes some of the new features in Windows Server 2022. Windows Server 2022 is built on the strong foundation of Windows Server 2019 and brings many innovations on three key themes: security, Azure hybrid integration and management, and application platform. Also, Windows Server 2022 Datacenter: Azure Edition helps you use the benefits of cloud to keep your VMs up to date while minimizing downtime.
Security
The new security capabilities in Windows Server 2022 combine other security capabilities in Windows Server across multiple areas to provide defense-in-depth protection against advanced threats. Advanced multi-layer security in Windows Server 2022 provides the comprehensive protection that servers need today.
Secured-core server
Secured-core server provides protections that are useful against sophisticated attacks and can provide increased assurance when handling mission critical data in some of the most data sensitive industries. It is built on three key pillars: simplified security, advanced protection, and preventative defense.
Simplified security
When you buy hardware from an OEM for Secured-core server, you have assurance that the OEM has provided a set of hardware, firmware, and drivers that satisfy the Secured-core promise. Windows Server systems will have easy configuration experiences in the Windows Admin Center to enable the security features of Secured-core.
Advanced protection
Secured-core servers use hardware, firmware, and operating system capabilities to the fullest extent to provide protection against current and future threats. The protections enabled by a Secured-core server are targeted to create a secure platform for critical applications and data used on that server. The Secured-core functionality spans the following areas:
Hardware root-of-trustTrusted Platform Module 2.0 (TPM 2.0) come standard with servers capable of using Secured-core servers. TPM 2.0 provides a secure store for sensitive keys and data, such as measurements of the components loaded during boot. This hardware root-of-trust raises the protection provided by capabilities like BitLocker, which uses TPM 2.0 and facilitates creating attestation-based workflows that can be incorporated into zero-trust security strategies.
Firmware protectionThere is a clear rise in security vulnerabilities being reported in the firmware space given the high privileges that firmware runs with and the relative opacity of what happens in firmware to traditional anti-virus solutions. Recent reports show that malware and ransomware platforms are adding firmware capabilities raising the risk of firmware attacks that have already been seen targeting enterprise resources like Active Directory domain controllers. Using processor support for Dynamic Root of Trust of Measurement (DRTM) technology, along with DMA protection, Secured-core systems isolate the security critical hypervisor from attacks such as this.
Virtualization-based security (VBS)Secured-core servers support VBS and hypervisor-based code integrity (HVCI). VBS and HVCI protect against the entire class of vulnerabilities used in cryptocurrency mining attacks given the isolation VBS provides between the privileged parts of the operating system such as the kernel and the rest of the system. VBS also provides more capabilities that customers can enable, such as Credential Guard, which better protects domain credentials.
Preventative defense
Enabling Secured-core functionality helps proactively defend against and disrupt many of the paths attackers may use to exploit a system. This set of defenses also enables IT and SecOps teams better utilize their time across the many areas that need their attention.
Secure connectivity
Transport: HTTPS and TLS 1.3 enabled by default on Windows Server 2022
Secure connections are at the heart of today’s interconnected systems. Transport Layer Security (TLS) 1.3 is the latest version of the internet’s most deployed security protocol, which encrypts data to provide a secure communication channel between two endpoints. HTTPS and TLS 1.3 is now enabled by default on Windows Server 2022, protecting the data of clients connecting to the server. It eliminates obsolete cryptographic algorithms, enhances security over older versions, and aims to encrypt as much of the handshake as possible. Learn more about supported TLS versions and about supported cipher suites.
Secure DNS: Encrypted DNS name resolution requests with DNS-over-HTTPS
DNS Client in Windows Server 2022 now supports DNS-over-HTTPS (DoH) which encrypts DNS queries using the HTTPS protocol. This helps keep your traffic as private as possible by preventing eavesdropping and your DNS data being manipulated. Learn more about configuring the DNS client to use DoH.
Server Message Block (SMB): SMB AES-256 encryption for the most security conscious
Windows Server now supports AES-256-GCM and AES-256-CCM cryptographic suites for SMB encryption and signing. Windows will automatically negotiate this more advanced cipher method when connecting to another computer that also supports it, and it can also be mandated through Group Policy. Windows Server still supports AES-128 for down-level compatibility.
SMB: East-West SMB encryption controls for internal cluster communications
Windows Server failover clusters now support granular control of encrypting and signing intra-node storage communications for Cluster Shared Volumes (CSV) and the storage bus layer (SBL). This means that when using Storage Spaces Direct, you can decide to encrypt or sign east-west communications within the cluster itself for higher security.
SMB over QUIC
SMB over QUIC updates the SMB 3.1.1 protocol in Windows Server 2022 Datacenter: Azure Edition and supported Windows clients to use the QUIC protocol instead of TCP. By using SMB over QUIC along with TLS 1.3, users and applications can securely and reliably access data from edge file servers running in Azure. Mobile and telecommuter users no longer need a VPN to access their file servers over SMB when on Windows. More information can be found at the SMB over QUIC documentation.
Azure hybrid capabilities
You can increase your efficiency and agility with built-in hybrid capabilities in Windows Server 2022 that allow you to extend your data centers to Azure more easily than ever before.
Azure Arc enabled Windows Servers
Azure Arc enabled servers with Windows Server 2022 brings on-premises and multi-cloud Windows Servers to Azure with Azure Arc. This management experience is designed to be consistent with how you manage native Azure virtual machines. When a hybrid machine is connected to Azure, it becomes a connected machine and is treated as a resource in Azure. More information can be found at the Azure Arc enables servers documentation.
Windows Admin Center
Improvements to Windows Admin Center to manage Windows Server 2022 include capabilities to both report on the current state of the Secured-core features mentioned above, and where applicable, allow customers to enable the features. More information on these and many more improvements to Windows Admin Center can be found at the Windows Admin Center documentation.
Azure Automanage – Hotpatch
Hotpatch, part of Azure Automanage, is supported in Windows Server 2022 Datacenter: Azure Edition. Hotpatching is a new way to install updates on new Windows Server Azure Edition virtual machines (VMs) that doesn’t require a reboot after installation. More information can be found at the Azure Automanage documentation.
Application platform
There are several platform improvements for Windows Containers, including application compatibility and the Windows Container experience with Kubernetes. A major improvement includes reducing the Windows Container image size by up to 40%, which leads to a 30% faster startup time and better performance.
You can now also run applications that depend on Azure Active Directory with group Managed Services Accounts (gMSA) without domain joining the container host, and Windows Containers now support Microsoft Distributed Transaction Control (MSDTC) and Microsoft Message Queuing (MSMQ).
There are several other enhancements that simplify the Windows Container experience with Kubernetes. These enhancements include support for host-process containers for node configuration, IPv6, and consistent network policy implementation with Calico.
In addition to platform improvements, Windows Admin Center has been updated to make it easy to containerize .NET applications. Once the application is in a container, you can host it on Azure Container Registry to then deploy it to other Azure services, including Azure Kubernetes Service.
With support for Intel Ice Lake processors, Windows Server 2022 supports business-critical and large-scale applications, such as SQL Server, that require up to 48 TB of memory and 2,048 logical cores running on 64 physical sockets. Confidential computing with Intel Secured Guard Extension (SGX) on Intel Ice Lake improves application security by isolating applications from each other with protected memory.
Nested virtualization is a feature that allows you to run Hyper-V inside of a Hyper-V virtual machine (VM). Windows Server 2022 brings support for nested virtualization using AMD processors, giving more choices of hardware for your environments. More information can be found at the nested virtualization documentation.
Microsoft Edge browser
Microsoft Edge is included with Windows Server 2022, replacing Internet Explorer as the default browser. It is built on Chromium open source and backed by Microsoft security and innovation. It can be used with Server Core or Server with Desktop Experience installation options, and supports HTTP/3 which uses the QUIC protocol. More information can be found at the Microsoft Edge Enterprise documentation. Note that Microsoft Edge, unlike the rest of Windows Server, follows the Modern Lifecycle for its support lifecycle. For details, see Microsoft Edge lifecycle documentation.
Storage
Storage Migration Service
Enhancements to Storage Migration Service in Windows Server 2022 makes it easier to migrate storage to Windows Server or to Azure from more source locations. Here are the features that are available when running the Storage Migration Server orchestrator on Windows Server 2022:
Migrate local users and groups to the new server.
Migrate storage from failover clusters, migrate to failover clusters, and migrate between standalone servers and failover clusters.
Migrate storage from a Linux server that uses Samba.
More easily sync migrated shares into Azure by using Azure File Sync.
Migrate to new networks such as Azure.
Migrate NetApp CIFS servers from NetApp FAS arrays to Windows servers and clusters.
Adjustable storage repair speed
User adjustable storage repair speed is a new feature in Storage Spaces Direct that offers more control over the data resync process by allocating resources to either repair data copies (resiliency) or run active workloads (performance). This helps improve availability and allows you to service your clusters more flexibly and efficiently.
Storage bus cache with Storage Spaces on standalone servers
Storage bus cache is now available for standalone servers. It can significantly improve read and write performance, while maintaining storage efficiency and keeping the operational costs low. Similar to its implementation for Storage Spaces Direct, this feature binds together faster media (for example, NVMe or SSD) with slower media (for example, HDD) to create tiers. A portion of the faster media tier is reserved for the cache. To learn more, see Enable storage bus cache with Storage Spaces on standalone servers.
SMB compression
Enhancement to SMB in Windows Server 2022 and Windows 11 allows a user or application to compress files as they transfer over the network. Users no longer have to manually zip files in order to transfer much faster on slower or more congested networks. For details, see SMB Compression.
Ransomware operators such as Magniber and Vice Society are actively exploiting vulnerabilities in Windows Print Spooler to compromise victims and spread laterally across a victim’s network to deploy file-encrypting payloads on targeted systems.
“Multiple, distinct threat actors view this vulnerability as attractive to use during their attacks and may indicate that this vulnerability will continue to see more widespread adoption and incorporation by various adversaries moving forward,” Cisco Talos said in a report published Thursday, corroborating an independent analysis from CrowdStrike, which observed instances of Magniber ransomware infections targeting entities in South Korea.
While Magniber ransomware was first spotted in late 2017 singling out victims in South Korea through malvertising campaigns, Vice Society is a new entrant that emerged on the ransomware landscape in mid-2021, primarily targeting public school districts and other educational institutions. The attacks are said to have taken place since at least July 13.
Since June, a series of “PrintNightmare” issues affecting the Windows print spooler service has come to light that could enable remote code execution when the component performs privileged file operations –
CVE-2021-1675 – Windows Print Spooler Remote Code Execution Vulnerability (Patched on June 8)
CVE-2021-34527 – Windows Print Spooler Remote Code Execution Vulnerability (Patched on July 6-7)
CVE-2021-34481 – Windows Print Spooler Remote Code Execution Vulnerability (Patched on August 10)
CVE-2021-36936 – Windows Print Spooler Remote Code Execution Vulnerability (Patched on August 10)
CVE-2021-36947 – Windows Print Spooler Remote Code Execution Vulnerability (Patched on August 10)
CVE-2021-34483 – Windows Print Spooler Elevation of Privilege Vulnerability (Patched on August 10)
CVE-2021-36958 – Windows Print Spooler Remote Code Execution Vulnerability (Unpatched)
CrowdStrike noted it was able to successfully prevent attempts made by the Magniber ransomware gang at exploiting the PrintNightmare vulnerability.
Vice Society, on the other hand, leveraged a variety of techniques to conduct post-compromise discovery and reconnaissance prior to bypassing native Windows protections for credential theft and privilege escalation.
Specifically, the attacker is believed to have used a malicious library associated with the PrintNightmare flaw (CVE-2021-34527) to pivot to multiple systems across the environment and extract credentials from the victim.
“Adversaries are constantly refining their approach to the ransomware attack lifecycle as they strive to operate more effectively, efficiently, and evasively,” the researchers said. “The use of the vulnerability known as PrintNightmare shows that adversaries are paying close attention and will quickly incorporate new tools that they find useful for various purposes during their attacks.”
(Original post June 30, 2021) The CERT Coordination Center (CERT/CC) has released a VulNote for a critical remote code execution vulnerability in the Windows Print spooler service, noting: “while Microsoft has released an update for CVE-2021-1675, it is important to realize that this update does not address the public exploits that also identify as CVE-2021-1675.” An attacker can exploit this vulnerability—nicknamed PrintNightmare—to take control of an affected system.
CISA encourages administrators to disable the Windows Print spooler service in Domain Controllers and systems that do not print. Additionally, administrators should employ the following best practice from Microsoft’s how-to guides, published January 11, 2021: “Due to the possibility for exposure, domain controllers and Active Directory admin systems need to have the Print spooler service disabled. The recommended way to do this is using a Group Policy Object.”
Microsoft is aware of and investigating a remote code execution vulnerability that affects Windows Print Spooler and has assigned CVE-2021-34527 to this vulnerability. This is an evolving situation and we will update the CVE as more information is available.
A remote code execution vulnerability exists when the Windows Print Spooler service improperly performs privileged file operations. An attacker who successfully exploited this vulnerability could run arbitrary code with SYSTEM privileges. An attacker could then install programs; view, change, or delete data; or create new accounts with full user rights.
An attack must involve an authenticated user calling RpcAddPrinterDriverEx().
Please ensure that you have applied the security updates released on June 8, 2021, and see the FAQ and Workaround sections in this CVE for information on how to help protect your system from this vulnerability.
Exploitability
The following table provides an exploitability assessment for this vulnerability at the time of original publication.Publicly DisclosedExploitedExploitability AssessmentYesYesExploitation Detected
Workarounds
Determine if the Print Spooler service is running (run as a Domain Admin)
Run the following as a Domain Admin:
Get-Service -Name Spooler
If the Print Spooler is running or if the service is not set to disabled, select one of the following options to either disable the Print Spooler service, or to Disable inbound remote printing through Group Policy:
Option 1 – Disable the Print Spooler service
If disabling the Print Spooler service is appropriate for your enterprise, use the following PowerShell commands:
Stop-Service -Name Spooler -Force
Set-Service -Name Spooler -StartupType Disabled
Impact of workaround Disabling the Print Spooler service disables the ability to print both locally and remotely.
Option 2 – Disable inbound remote printing through Group Policy
You can also configure the settings via Group Policy as follows:
Disable the “Allow Print Spooler to accept client connections:” policy to block remote attacks.
Impact of workaround This policy will block the remote attack vector by preventing inbound remote printing operations. The system will no longer function as a print server, but local printing to a directly attached device will still be possible.
Is this the vulnerability that has been referred to publicly as PrintNightmare?
Yes, Microsoft has assigned CVE-2021-34527 to this vulnerability.
Is this vulnerability related to CVE-2021-1675?
This vulnerability is similar but distinct from the vulnerability that is assigned CVE-2021-1675, which addresses a different vulnerability in RpcAddPrinterDriverEx(). The attack vector is different as well. CVE-2021-1675 was addressed by the June 2021 security update.
Did the June 2021 update introduce this vulnerability?
No, the vulnerability existed before the June 2021 security update. Microsoft strongly recommends installing the June 2021 updates.
What specific roles are known to be affected by the vulnerability?
Domain controllers are affected. We are still investigating if other types of roles are also affected.
All versions of Windows are listed in the Security Updates table. Are all versions exploitable?
The code that contains the vulnerability is in all versions of Windows. We are still investigating whether all versions are exploitable. We will update this CVE when that information is evident.
Why did Microsoft not assign a CVSS score to this vulnerability?
We are still investigating the issue so we cannot assign a score at this time.
Why is the severity of this vulnerability not defined?
We are still investigating. We will make this information available soon.
Acknowledgements
Microsoft recognizes the efforts of those in the security community who help us protect customers through coordinated vulnerability disclosure. See Acknowledgements for more information.
As part of a recent decommission / security audit, we needed to remove an old WINS server. For desktop client this is fairly easy as they are all assigned through DHCP so it was just a case of removing WINS from the DHCP scope options.
For the hundreds of servers it is set manually, which to remove one by one would take a long time and be pretty boring for the person tasked with it. So I decided the simplest option would be to use PowerShell.
First I wanted to check if servers had WINS enabled so I could reduce the amount of server I would need to run the disable script against.
I am going to use Get-WmiObject and the Win32_NetworkAdapterConfiguration class as this is the simplest way I found to do this in PowerShell.
We will use a text file with a list of server names and a variable called $WINSServer that will be used to filter only network interfaces that have WINS set.
Below is the script to check for WINS and output to PowerShell windows I am just getting all adapters that have WINSPriamryServer value set to the IP in the $WINSServer variable and then selecting the objects to be outputted.
If you wanted to export to a csv or text file just add a | after the WINSPrimaryServer at the end of the script and do either Out-file or Export-csv and the path to export too.
Below is the link to the script location on Github it called Check-Wins.ps1
This guidance will help customers address threats taking advantage of the recently disclosed Microsoft Exchange Server on-premises vulnerabilities CVE-2021-26855, CVE-2021-26858, CVE-2021-26857, and CVE-2021-27065, which are being exploited. We strongly urge customers to immediately update systems. Failing to address these vulnerabilities can result in compromise of your on-premises Exchange Server and, potentially, other parts of your internal network.
Mitigating these vulnerabilities and investigating whether an adversary has compromised your environment should be done in parallel. Applying the March 2021 Exchange Server Security Updates is critical to prevent (re)infection, but it will not evict an adversary who has already compromised your server. Based on your investigation, remediation may be required. This guide will help you answer these questions:
Microsoft will continue to monitor these threats and provide updated tools and investigation guidance to help organizations defend against, identify, and remediate associated attacks. We will update this guidance with new details and recommendations as we continue to expand our knowledge of these threats and the threat actors behind them, so come back to this page for updates.
How does the attack work?
Microsoft released security updates for four different on premises Microsoft Exchange Server zero-day vulnerabilities (CVE-2021-26855, CVE-2021-26858, CVE-2021-26857, and CVE-2021-27065). These vulnerabilities can be used in combination to allow unauthenticated remote code execution on devices running Exchange Server. Microsoft has also observed subsequent web shell implantation, code execution, and data exfiltration activities during attacks. This threat may be exacerbated by the fact that numerous organizations publish Exchange Server deployments to the internet to support mobile and work-from-home scenarios.
In many of the observed attacks, one of the first steps attackers took following successful exploitation of CVE-2021-26855, which allows unauthenticated remote code execution, was to establish persistent access to the compromised environment via a web shell. A web shell is a piece of malicious code, often written in typical web development programming languages (e.g., ASP, PHP, JSP), that attackers implant on web servers to provide remote access and code execution to server functions. Web shells allow adversaries to execute commands and to steal data from a web server or use the server as launch pad for further attacks against the affected organization. Therefore, it is critical to not only immediately mitigate the vulnerabilities, but also remove any additional backdoors, such as web shells that attackers may have created.
Am I vulnerable to this threat?
If you are running Exchange Server 2010, 2013, 2016, or 2019 you must apply the March 2021 Security Update to protect yourself against these threats.
To determine if your Exchange Servers are vulnerable to this attack, the following methods can be used:
Using Microsoft Defender for Endpoint
Scanning your Exchange servers using Nmap
Microsoft Defender for Endpoint
Microsoft Defender for Endpoint customers can use the threat analytics article in Microsoft 365 security center to understand their risk. This requires your Exchange Servers to be onboarded to Microsoft Defender for Endpoint. See instructions for onboarding servers that are not currently monitored.
Scanning using Nmap script
For servers not onboarded to Microsoft Defender for Endpoint, use this Nmap script to scan a URL/IP to determine vulnerability: http-vuln-cve2021-26855.nse.
How do I mitigate the threat?
The best and only complete mitigation for these threats is to update to a supported version of Exchange Server and ensure it is fully updated. If it’s not possible to immediately move to the current Exchange Server Cumulative Update and apply security updates, additional strategies for mitigation are provided below. These lesser mitigation strategies are only a temporary measure while you install the latest Cumulative Update and Security Updates.
Immediate temporary mitigations
The following mitigation options can help protect your Exchange Server until the necessary Security Updates can be installed. These solutions should be considered temporary, but can help enhance safety while additional mitigation and investigation steps are being completed.
Run EOMT.ps1 (Recommended) – The Exchange On-premises Mitigation Tool (EOMT.ps1) mitigates CVE-2021-26855 and attempts to discover and remediate malicious files. When run, it will first check if the system is vulnerable to CVE-2021-26855 and, if so, installs a mitigation for it. It then automatically downloads and runs Microsoft Safety Scanner (MSERT). This is the preferred approach when your Exchange Server has internet access.
Run ExchangeMitigations.ps1– The ExchangeMitigations.ps1 script applies mitigations but doesn’t perform additional scanning. This is an option for Exchange Servers without internet access or for customers who do not want Microsoft Safety Scanner to attempt removing malicious activity it finds.
Applying the current Exchange Server Cumulative Update
The best, most complete mitigation is to get to a current Cumulative Update and apply all Security Updates. This is the recommended solution providing the strongest protection against compromise.
Apply security hotfixes to older Cumulative Updates
To assist organizations that may require additional time and planning to get to a supported Cumulative Update, security hotfixes have been made available. It’s important to note that applying these security hotfixes to older Cumulative Updates will mitigate against these specific Exchange vulnerabilities, but it will not address other potential security risks your Exchange Server may be vulnerable to. This approach is only recommended as a temporary solution while you move to a supported Cumulative Update.
To reduce the risk of exploitation of the vulnerabilities, the Exchange Server can be isolated from the public internet by blocking inbound connections over port 443.
Blocking port 443 from receiving inbound internet traffic provides temporary protection until Security Updates can be applied, but it reduces functionality as it could inhibit work-from-home or other non-VPN remote work scenarios and does not protect against adversaries who may already be present in your internal network.
The most comprehensive way to complete this is to use your perimeter firewalls that are currently routing inbound 443 traffic to block this traffic. You can use Windows Firewall to accomplish this, but you will have to remove all inbound 443 traffic rules prior to blocking the traffic.
Have I been compromised?
To determine if your Exchange Servers have been compromised due to these vulnerabilities, multiple options have been made available:
Microsoft Defender for Endpoint
Publicly available tools published by Microsoft
If Microsoft Defender for Endpoint is not running, skip directly to the publicly available tools section. If it is running, we recommend that you follow both methods.
Microsoft Defender for Endpoint
Check the threat analytics article in Microsoft 365 security center to determine if any indications of exploitation are observed. The Analyst report tab in the Microsoft 365 Security Center threat analytics article contains a continuously updated detailed description of the threat, actor, exploits, and TTPs. On the Overview page, the Impacted assets section lists all impacted devices. The Related incidents section shows any alerts for detected exploitation or post-exploitation activity.
If you have devices that are flagged as impacted (see Impacted assets section) and have active alerts and incidents, click the incidents to further understand the extent of the attack.
Microsoft Defender for Endpoint blocks multiple components of this threat and has additional detections for associated malicious behaviors. These are raised as alerts in the Microsoft Defender Security Center. Additionally, Microsoft Defender for Endpoint prevents some critical behaviors observed in attacks, such as attempts to exploit the CVE-2021-27065 post-authentication file-write vulnerability that can be combined with CVE-2021-26855 to elevate privileges.
Microsoft Defender for Endpoint also detects post-exploitation activity, including some techniques that attackers use to maintain persistence on the machine. Note that alerts marked “Blocked” indicate that the detected threat is also remediated. Alerts marked “Detected” require security analyst review and manual remediation.
You can use advanced hunting to search for unexpected files dropped or executing in Exchange folders, which could be web shells or other attacker artifacts. See more advanced hunting queries relevant to this threat in the Analyst report in Threat Analytics and in our GitHub queries repository.
Publicly available tools published by Microsoft
The following tools have been made available by Microsoft to aid customers in investigating whether their Microsoft Exchange Servers have been compromised. We recommend customers to run both tools as part of their investigation:
Exchange On-Premises Mitigation Tool
Download and run EOMT.ps1 as an administrator on your Exchange Server to automatically run the latest version of Microsoft Safety Scanner (MSERT). MSERT discovers and remediates web shells, which are backdoors that adversaries use to maintain persistence on your server.
After completing the scan, EOMT.ps1 reports any malicious files it discovers and removes. If malicious files are discovered and removed by the tool, follow the web shell remediation workflow. If no malicious files are found, it will report “No known threats detected.”
If this initial scan does not find evidence of malicious files, a full scan can be run via “.\EOMT.ps1 -RunFullScan”. This may take a few hours or days, depending on your environment and the number of files on the Exchange Server.
If the script is unable to download Microsoft Safety Scanner (MSERT), you can download and copy MSERT manually to your Exchange Server. Run this executable directly as an administrator. Follow the on-screen instructions to run a Quick or Full scan. A new version of MSERT should be downloaded each time it is run to ensure it contains the latest protections
Test-ProxyLogon.ps1
Run the Test-ProxyLogon.ps1 script as administrator to analyze Exchange and IIS logs and discover potential attacker activity.
IMPORTANT: We recommend re-downloading this tool at a minimum of once per day if your investigation efforts span multiple days, as we continue to make updates to improve its usage and output.
Step 1 – Review script output to determine risk:
If the script does not find attacker activity, it outputs the message Nothing suspicious detected
If attacker activity was found, the script reports the vulnerabilities for which it found evidence of use and collects logs that it stores in the specified output path in the Test-ProxyLogonLogs directory. Continue following these steps for remediation. Below is an example of the output:
Step 2 – Investigate CVE-2021-27065:
If CVE-2021-27065 is detected, then investigate the logs specified for lines containing Set-OabVirtualDirectory. This indicates that a file was written to the server.
Investigate web server directories for new or recently modified .aspx files or other file types that may contain unusual <script> blocks.
This indicates an adversary may have dropped a web shell file. Below is an example of such a <script> block.
Does the tool output for AnchorMailbox contain /ews/exchange.asmx?
This indicates an attacker may be exfiltrating your email.
If yes, inspect the Exchange web services (EWS) logs in \V15\Logging\EWS to verify if the adversary accessed a mailbox, and then proceed to the corresponding remediation workflow.
What remediation steps should I take?
The steps in Have I been compromised? section help establish the scope of possible exploitation: scanning, unauthorized email access, establishment of persistence via web shells, or post-exploitation activity.
Decide between restoring your Exchange Server or moving your mail services to the cloud. You can engage with FastTrack for data migration assistance for Office 365 customers with tenants of 500+ eligible licenses.
Follow applicable remediation workflows:
Was post-compromise activity related to credential harvesting or lateral movement detected by Microsoft Defender for Endpoint or during manual investigation?
Engage your incident response plan. Share the investigation details to your incident response team.
If you are engaging with CSS Security or Microsoft Detection and Response Team (DART), and you are a Microsoft Defender for Endpoint customer, see instructions for onboarding Windows Server to Microsoft Defender for Endpoint.
Were web shells detected?
Clean and restore your Exchange Server:
Preserve forensic evidence if your organization requires evidence preservation.
Disconnect the Exchange Server from the network, either physically or virtually via firewall rules.
Restart Exchange Server.
Stop W3WP services.
Remove any malicious ASPX files identified via the investigation steps above.
Delete all temporary ASP.NET files on the system using the following script:
Consider submitting suspected malicious files to Microsoft for analysis following this guidance: Submit files for analysis by Microsoft and include the string “ExchangeMarchCVE” in the Additional Information text box of the submission form.
Was mailbox access and exfiltration detected?
Disconnect Exchange Server from the network.
Apply Security Updates.
Run a full EOMT.ps1 scan via “.\EOMT.ps1 -RunFullScan”. Have I been compromised? for additional instructions for running EOMT.ps1.
Resume operation.
Was scan-only adversary behavior detected?
Disconnect Exchange Server from the network.
Apply Security Updates.
Resume operation.
How can I better protect myself and monitor for suspicious activity?
Additional protection and investigation capabilities are available if Microsoft Defender Antivirus and Microsoft Defender for Endpoint are running on the Exchange Server. If neither are yet installed, installing both now can provide additional protection moving forward and is strongly advised.
If you are an existing Microsoft Defender for Endpoint customer but have Exchange servers that are not onboarded, see instructions for onboarding Windows Server to Microsoft Defender for Endpoint.
Microsoft’s Detection and Response Team (DART) Microsoft 365 Defender Team CSS Security Incident Response
This blog and its contents are subject to the Microsoft Terms of Use. All code and scripts are subject to the applicable terms on Microsoft’s GitHub Repository (e.g., the MIT License).
We have been actively working with customers through our customer support teams, third-party hosters, and partner network to help them secure their environments and respond to associated threats from the recent Exchange Server on-premises attacks. Based on these engagements we realized that there was a need for a simple, easy to use, automated solution that would meet the needs of customers using both current and out-of-support versions of on-premises Exchange Server.
Microsoft has released a new, one-click mitigation tool, Microsoft Exchange On-Premises Mitigation Tool to help customers who do not have dedicated security or IT teams to apply these security updates. We have tested this tool across Exchange Server 2013, 2016, and 2019 deployments. This new tool is designed as an interim mitigation for customers who are unfamiliar with the patch/update process or who have not yet applied the on-premises Exchange security update.
By downloading and running this tool, which includes the latest Microsoft Safety Scanner, customers will automatically mitigate CVE-2021-26855 on any Exchange server on which it is deployed. This tool is not a replacement for the Exchange security update but is the fastest and easiest way to mitigate the highest risks to internet-connected, on-premises Exchange Servers prior to patching. We recommend that all customers who have not yet applied the on-premises Exchange security update:
Then, follow the more detailed guidance here to ensure that your on-premises Exchange is protected.
If you are already using Microsoft Safety Scanner, it is still live and we recommend keeping this running as it can be used to help with additional mitigations.
Once run, the Run EOMT.ps1 tool will perform three operations:
Mitigate against current known attacks using CVE-2021-26855 using a URL Rewrite configuration. Scan the Exchange Server using the Microsoft Safety Scanner. Attempt to reverse any changes made by identified threats.
Before running the tool, you should understand:
The Exchange On-premises Mitigation Tool is effective against the attacks we have seen so far, but is not guaranteed to mitigate all possible future attack techniques. This tool should only be used as a temporary mitigation until your Exchange servers can be fully updated as outlined in our previous guidance.
We recommend this script over the previous ExchangeMitigations.ps1 script as it tuned based on the latest threat intelligence. If you have already started with the other script, it is fine to switch to this one.
This is a recommended approach for Exchange deployments with Internet access and for those who want to attempt automated remediation.
Thus far, we have not observed any impact to Exchange Server functionality when these mitigation methods are deployed.
For more technical information, examples, and guidance please review the GitHub documentation.
Microsoft is committed to helping customers and will continue to offer guidance and updates that can be found at https://aka.ms/exchangevulns.
MICROSOFT MAKES NO WARRANTIES, EXPRESS, IMPLIED, OR STATUTORY, AS TO THE INFORMATION IN THIS GUIDANCE. The Exchange On-premises Mitigation Tool is available through the MIT License, as indicated in the GitHub Repository where it is offered.
From the above topic, we can guess that today, we are going to discuss the top 10 DNS attacks and how to mitigate them. DNS stands for Domain Name System which remains under constant attacks, and thus we can assume there is no end in sight because the threats are growing increasingly nowadays.
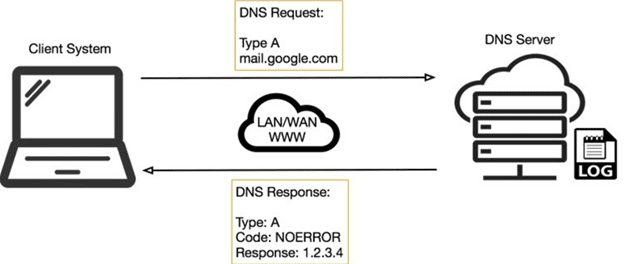
DNS generally uses UDP fundamentally and in some cases, uses TCP as well. When it uses the UDP protocol, which is connectionless and can be tricked easily.
Thus DNS protocol is remarkably popular as a DDoS tool, and DNS, recognized as the internet’s phonebook, which is a component of the global internet foundation that transmutes between well-known names and the number that a computer needed to enter a website and send an email.
DNS has long been the target of attackers looking to take all custom of corporate and secret data, hence, the warnings in the past year indicate a worsening of the condition.
As per the IDC’s research, the average costs correlated with a DNS mugging rose by 49% associated with a year earlier. However, in the U.S., the average price of a DNS attack trims out at more than $1.27 million.
Approximately half of the respondents (48%) state that wasting more than $500,000 to a DNS attack, and about 10% say that they lost more than $5 million on each break. In extension, the preponderance of U.S. companies says that it needed more than one day to determine a DNS attack.
Shockingly, as per the information both in-house and cloud applications were destroyed, the 100% growth of threats in the in-house application interlude, frothingly it is now the most widespread destruction experienced that IDC composed.
Thus the “DNS attacks are running away from real brute-force to more complicated attacks running from the internal network. Thus the complicated attack will push the organizations to use intelligent mitigation tools so that they can easily cope with insider threats.”
Therefore we have provided the top 10 DNS attacks and the proper solutions to fix them, so that it will be easy for the organizations to recognize the attacks and can quickly solve it.
FamousDNS Attacks Type:
DNSCache PoisoningAttack
Distributed Reflection Denial of Service (DRDoS)
DNS Hijacking
Phantom Domain Attack
TCP SYN Floods
Random Subdomain Attack
DNS Tunneling
DNS Flood Attack
Domain Hijacking
Botnet-based Attacks
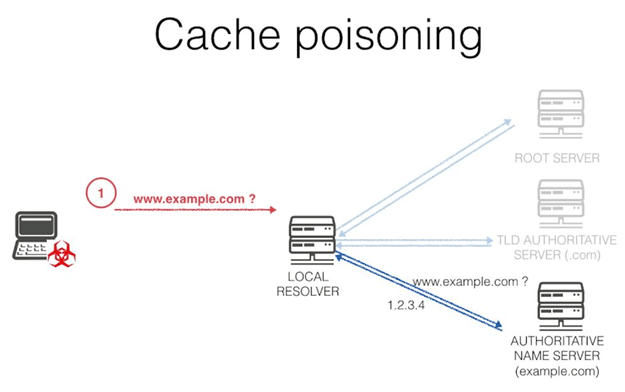
DNSCache PoisoningAttack
At first, we have the cache poisoning, it’s one of the frequent attacks, and its main aim is to take the web users towards the scam websites, as for example, a user accesses gmail.com through the web browser to consult their mailbox.
Moreover, the DNS is becoming poisoned, and it’s not the gmail.com page which is exposed but a scam page determined by the criminal, in order, for example, to reclaim the email box accesses. Thus the users accessing the correct domain name will not see that the website they’re entering is not the right one but a scam one.
Cache poisoning
Basically, it generates an excellent possibility for cybercriminals to use phishing techniques to steal information, both identification information or credit card information from ingenuous victims. The attack can be devastating, depending on several factors, the attacker’s purpose, and the DNS poisoning impact.
DNS Attack Mitigation –Cache poisoning
As per the information, there are several forms to solve or to prevent this attack. For beginners, the IT teams should configure DNS servers to rely as small as possible on trust relations with other DNS servers. Performing so will make it more difficult for attackers to practice their DNS servers to debased their targets’ servers. There is another method to prevent cache poisoning attacks, as IT teams should also configure their DNS name servers to:-
To restrict recursive queries.
To store only data associated with the requested domain.
To restrict query responses to only given information about the demanded domain.
Not only this, but there are also some cache poisoning tools accessible to help organizations for preventing cache poisoning outbreaks. And the most famous cache poisoning prevention tool is the DNSSEC (Domain Name System Security Extension), a tool that is produced by the Internet Engineering Task Force, which provides reliable DNS data authentication.
Distributed Reflection Denial of Service (DRDoS)
Distributed reflective denial of service (DRDoS) attacks concentrate on bringing down the availability of an asset within an authoritative volume of UDP acknowledgments. In some instances, the attacker would transfer a DNS, NTP, etc.
They demand a parodied source IP, with the purpose of a more extensive acknowledgment being transferred to the host who indeed continues at the address that was forged.
DRDoS Attack
UDP is the protocol of different choices for this variety of attacks, as it does not build a connection state. For example, suppose a spoofed source of IP in the SYN package of a TCP connection would cause immediate termination just because the SYN/ACK will go away.
This practice makes reflection potential and possible, meanwhile, regulating these attacks at the proper scale, the idea of shared reflection becomes clear; hence, various endpoints transmitting spoofed UDP offers, generating acknowledgments that will be concentrated upon a target.
Once these response packs begin to appear, the goal experiences a loss of availability.
How to Prevent?
Usually, organizations should commence on preparing for DDoS attacks in advance, it is exceedingly harder to answer after an attack because it is already underway.
Moreover, DDoS attacks can’t be stopped, therefore some steps can be taken to make it more troublesome for an attacker to perform a network unresponsive. The following steps will help you to scatter organizational assets to bypass performing a single deep target to an attacker.
First, locate servers in different data centers.
Assure that your data centers are located on various networks.
Make sure that data centers have several paths.
Make sure that the data centers, or the networks that the data centers are related to, have no essential security holes or single points of failure.
An organization that relies on servers and Internet port, for them, it is essential to make sure that devices are geographically scattered and not located in a particular data center.
Moreover, if the resources are already geographically dispersed, then it’s essential to inspect each data station is having more than one channel to the internet and assure that not all data stations are attached to the corresponding internet provider.
DNS Hijacking
DNS hijacking is a method in which an individual can divert to the doubtful DNS (Domain Name System). However, it may be achieved by using malicious software or unauthorized alteration of a server.
DNS Hijacking
Meanwhile, the individual has the authority of the DNS; they can guide others who obtain it to a web page that seems identical but carries extra content like advertisements. They can also guide users to pages carrying malware or a third-party search engine as well.
How to Prevent?
A DNS name server is a compassionate foundation that needs necessary protection measures because it can be hijacked and used by several hackers to raise DDoS attacks on others, thus, here we have mentioned some prevention of DNS hijacking.
See for resolvers on your network.
Critically restrict access to a name server.
Utilize measures against cache poisoning.
Instantly patch known vulnerabilities.
Separate the authoritative name server from the resolver.
Restrain zone alterations.
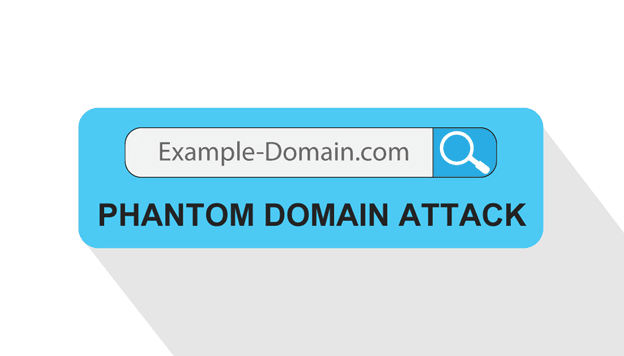
Phantom domain attack
Phantom domain attacks are kind of comparable to casual subdomain attacks. Thus in this kind of attack, the attackers attack your DNS resolver and overpower it to use up supplies to determine that’s what we name “phantom” domains, as these phantom domains will never respond to the queries.
Phantom Domain Attack
The main motive of this attack is to let the DNS resolver server await for the answer for a long time, ultimately leading to failure or deteriorated DNS performance problems.
How to Prevent?
To identify phantom domain attacks, you can analyze your log messages. Moreover, you can also follow the steps that we have mentioned below to mitigate this attack.
First, increase the number of recursive clients.
Use a proper sequence of the following parameters to gain optimum results.
Restrict recursive queries per server and Restrict recursive inquiries per zone.
Empower to hold down for non-responsive servers and Check recursive queries per zone.
When you allow any of the options, the failure values are set at an excellent level for overall operations. However, you should keep the default charges while using these commands, moreover, it guarantees that you know the consequences if you want to replace the default values.
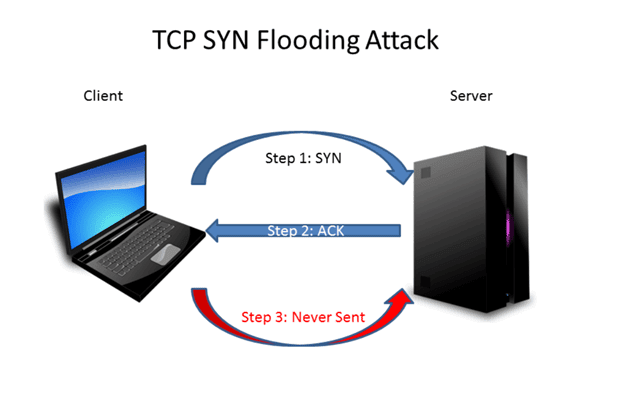
TCP SYN Floods
An SYN Flood is a simple form of Denial-of-Service (DDoS) attack that can target any operation related to the internet and thus implementing Transmission Control Protocol (TCP) services.
An SYN wave is a type of TCP State-Exhaustion attack that endeavors to utilize the connection element tables present in common infrastructure elements, for example, load balancers, firewalls, Intrusion Prevention Systems (IPS), and the utilization servers themselves.
TCP SYN Flooding Attack
Hence, This type of attack can bring down even high-capacity devices fitted to managing millions of links. Moreover, a TCP SYN flood attack occurs when the attacker overflows the system with SYN questions to destroy the target and make it incapable of reacting to new real connection offers.
Thus it encourages all of the target server’s information ports into a half-open state.
How to Prevent?
So, the firewalls and IPS devices, while important to network security, are not sufficient to protect a network from complex DDoS attacks.
Nowadays, the more sophisticated attack methodologies demand a multi-faceted program that allows users to look beyond both internet foundation and network availability.
Thus there are some capabilities that you can count for more powerful DDoS security and faster mitigation of TCP SYN flood attacks.
At first, provide proper support to both inline and out-of-band deployment to assure that there is not only one single point of collapse on the network.
Extensive network distinctness with the capacity to see and examine traffic from various parts of the network.
Different sources of threat intelligence, including statistical exception detection, customizable entrance alerts, and fingerprints of known threats that assure fast and reliable detection.
Extensible to handle attacks of all sizes, extending from low-end to high-end and high-end to low-end.
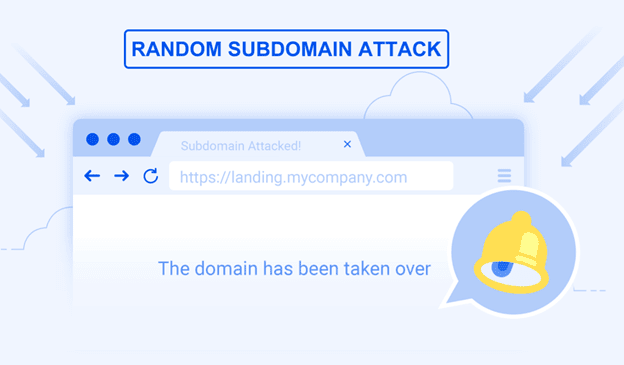
Random Subdomain Attack
This is not the most prevalent type of DNS attack, but it can happen from time to time on several networks. Hence, the random subdomain attacks can often be identified as DoS attacks, as their creation adheres to the same goal as simple DoS.
Incase, spoilers send a lot of DNS inquiries against a healthy and active domain name. However, the questions will not target the primary domain name, but it will harm a lot of non-existing subdomains.
Random Subdomain Attack
Basically, the main motive of this attack is to build a DoS that will immerse the authorized DNS server that receives the primary domain name, and finally let the interruption of all DNS record lookups.
Thus It’s an attack that’s hard to identify, as the queries will come from infected users who don’t even understand they’re sending certain types of questions, from what are eventually legitimate computers.
How to Prevent?
Thus we have provided you a simple method for preventing the random subdomain attack only in a 30-minute.
In the beginning, you have to learn the techniques to mitigate the attacks that generate extreme traffic on resolvers and web resources that are connected with the victim the names that can be taken down.
Next, Hear about modern capabilities like Response Rate Limiting for preserving DNS experts that provoke attacks.
DNS tunneling
This is a cyber attack that is used to carry encoded data from different applications inside DNS acknowledgments and queries.
DNS Tunneling
Meanwhile, this system wasn’t formerly created to attack multitudes, but to bypass interface controls, now it is mostly used to achieve remote attacks.
To implement DNS tunneling, attackers demand to gain entrance to a settled system, as well as access to an internal DNS server, a domain name, and a DNS authoritative server.
How to Prevent?
To configure the firewall to identify and block DNS tunneling by designing an application rule that uses some protocol object, we have mentioned three steps to mitigate these types of attacks.
Create an access rule.
Create a protocol object.
Create an application rule.
DNS Flood Attack
This is one of the most primary types of DNS attacks, and in this Distributed Denial of Service (DDoS), the intruder will hit your DNS servers.
The main motive of this kind of DNS flood is to completely overload your server so that it cannot maintain serving DNS requests because all the treated DNS zones influence the purpose of resource records.
DNS Flood Attack
Thus this kind of attack is relieved easily as the source usually comes from one single IP. However, it can get complicated when it becomes a DDoS where a hundred or thousand gatherings are involved.
While a lot of questions will be immediately identified as malicious bugs and a lot of legitimate requests will be made to mislead defense devices, hence, this makes the mitigation method a little bit difficult sometimes.
How to Prevent?
Domain Name System (DNS) has developed a target of the Distributed Denial of Service (DDoS) attacks. When a DNS is below a DDoS flood attack, all the domain data under that DNS enhances unreachable, thus ultimately creating the unavailability of those appropriate domain names.
Hence, for this type of attack, we have introduced a method that includes the periodic stale content update and manages a list of the most commonly queried domain names of several DNS servers. Hence our simulation outcomes show that our method can work more than 70% of the total cache replies during a massive DNS Flood attack.
Domain Hijacking
This type of attack involves settings in your DNS servers and domain registrar that can manage your traffic away from the actual servers to new destinations.
Domain hijacking is usually affected by a lot of determinants related to exploiting a vulnerability in the domain name registrar’s system, but can also be performed at the DNS level when attackers take command of your DNS records.
Hence when the attacker hijacked your domain name, it will be used to originate malicious movements such as installing up a fake page of repayment systems like PayPal, Visa, or bank systems. Attackers will produce an identical copy of the real website that reads critical personal knowledge, such as email addresses, usernames, and passwords.
How to Prevent?
Thus you can simply mitigate the domain hijacking by practicing a few steps that we have mentioned below.
Upgrade your DNS in the application foundation.
Use DNSSEC.
Secure access.
Client lock.
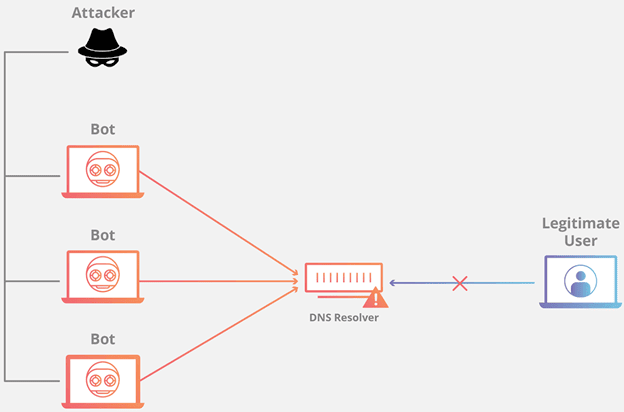
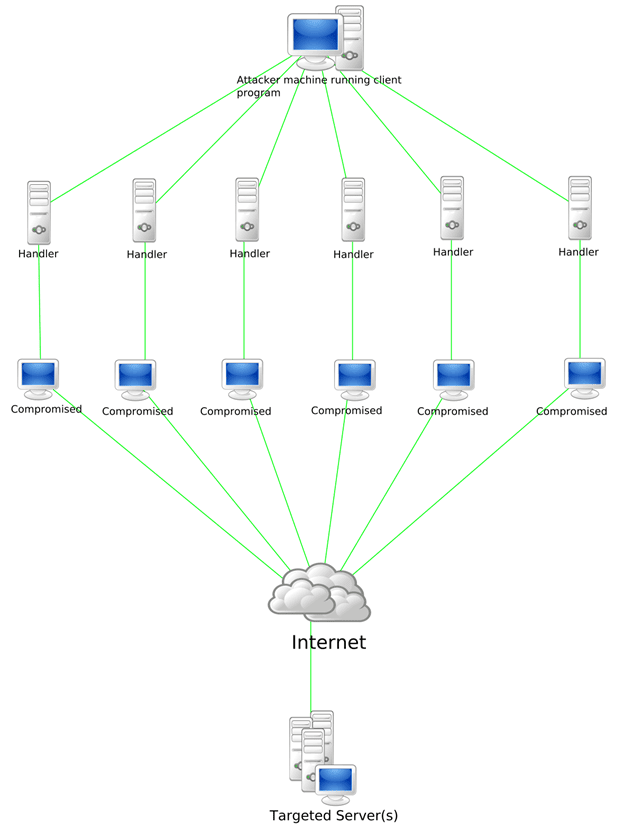
Botnet-based Attacks
If we talk about the botnet, then let me clarify that it is a number of Internet-connected devices, and it can be practiced to implement a distributed denial-of-service attack (DDoS attack), which steal data, transmit spam, and enables the attacker to obtain access to the device and its connection.
Botnet-based Attacks
Moreover, botnets are diverse and evolving threats, hence, all these attacks are bound to develop in parallel with our growing dependence on digital devices, the internet, and new future technologies.
The botnets can be counted as attacks, as well as programs for future attacks, with this as the foundational prospect, this study explores how a botnet described and organized, how it is created, and used.
How to Prevent?
This is one of the frequent DNS attacks which have been faced by the victims every day, thus to mitigate these type of attacks, we have mentioned below few steps so that it will be helpful for you.
At first, understand your vulnerabilities properly.
Next, secure the IoT devices.
Identify both your mitigation myths from facts.
Discover, classify and control.
Conclusion
As you see, DNS service is essential for preserving your companies’ websites and online assistance working day-to-day. Thus if you’re looking for methods to evade these kinds of DNS attacks, then this post will be helpful for you. So, what do you think about this? Simply share all your views and thoughts in the comment section below. And if you liked this post then simply do not forget to share this post with your friends and family.
The massive state-sponsored espionage campaign that compromised software maker SolarWinds also targeted Microsoft, as the unfolding investigation into the hacking spree reveals the incident may have been far more wider in scope, sophistication, and impact than previously thought.
News of Microsoft’s compromise was first reported by Reuters, which also said the company’s own products were then used to strike other victims by leveraging its cloud offerings, citing people familiar with the matter.
The Windows maker, however, denied the threat actor had infiltrated its production systems to stage further attacks against its customers.
In a statement to The Hacker News via email, the company said —
“Like other SolarWinds customers, we have been actively looking for indicators of this actor and can confirm that we detected malicious SolarWinds binaries in our environment, which we isolated and removed. We have not found evidence of access to production services or customer data. Our investigations, which are ongoing, have found absolutely no indications that our systems were used to attack others.”
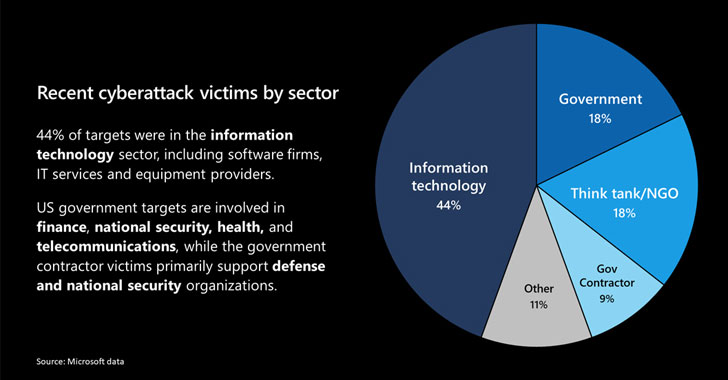
Characterizing the hack as “a moment of reckoning,” Microsoft president Brad Smith said it has notified over 40 customers located in Belgium, Canada, Israel, Mexico, Spain, the UAE, the UK, and the US that were singled out by the attackers. 44% of the victims are in the information technology sector, including software firms, IT services, and equipment providers.
CISA Issues New Advisory
The development comes as the US Cybersecurity and Infrastructure Security Agency (CISA) published a fresh advisory, stating the “APT actor [behind the compromises] has demonstrated patience, operational security, and complex tradecraft in these intrusions.”
“This threat poses a grave risk to the Federal Government and state, local, tribal, and territorial governments as well as critical infrastructure entities and other private sector organizations,” it added.
But in a twist, the agency also said it identified additional initial infection vectors, other than the SolarWinds Orion platform, that have been leveraged by the adversary to mount the attacks, including a previously stolen key to circumvent Duo’s multi-factor authentication (MFA) to access the mailbox of a user via Outlook Web App (OWA) service.
Digital forensics firm Volexity, which tracks the actor under the moniker Dark Halo, said the MFA bypass was one of the three incidents between late 2019 and 2020 aimed at a US-based think tank.
The entire intrusion campaign came to light earlier this week when FireEye disclosed it had detected a breach that also pilfered its Red Team penetration testing tools.
Since then, a number of agencies have been found to be attacked, including the US departments of Treasury, Commerce, Homeland Security, and Energy, the National Nuclear Security Administration (NNSA), and several state department networks.
While many details continue to remain unclear, the revelation about new modes of attack raises more questions about the level of access the attackers were able to gain across government and corporate systems worldwide.
Microsoft, FireEye, and GoDaddy Create a Killswitch
Over the last few days, Microsoft, FireEye, and GoDaddy seized control over one of the main GoDaddy domains — avsvmcloud[.]com — that was used by the hackers to communicate with the compromised systems, reconfiguring it to create a killswitch that would prevent the SUNBURST malware from continuing to operate on victims’ networks.
For its part, SolarWinds has not yet disclosed how exactly the attacker managed to gain extensive access to its systems to be able to insert malware into the company’s legitimate software updates.
Recent evidence, however, points to a compromise of its build and software release system. An estimated 18,000 Orion customers are said to have downloaded the updates containing the back door.
Symantec, which earlier uncovered more than 2,000 systems belonging to 100 customers that received the trojanized SolarWinds Orion updates, has now confirmed the deployment of a separate second-stage payload called Teardrop that’s used to install the Cobalt Strike Beacon against select targets of interest.
The hacks are believed to be the work of APT29, a Russian threat group also known as Cozy Bear, which has been linked to a series of breaches of critical US infrastructure over the past year.
The latest slew of intrusions has also led CISA, the US Federal Bureau of Investigation (FBI), and the Office of the Director of National Intelligence (ODNI) to issue a joint statement, stating the agencies are gathering intelligence in order to attribute, pursue, and disrupt the responsible threat actors.
Calling for stronger steps to hold nation-states accountable for cyberattacks, Smith said the attacks represent “an act of recklessness that created a serious technological vulnerability for the United States and the world.”
“In effect, this is not just an attack on specific targets, but on the trust and reliability of the world’s critical infrastructure in order to advance one nation’s intelligence agency,” he added.
One of the many features of an Active Directory Password Policy is the maximum password age. Traditional Active Directory environments have long using password aging as a means to bolster password security. Native password aging in the default Active Directory Password Policy is relatively limited in configuration settings.
Let’s take a look at a few best practices that have changed in regards to password aging. What controls can you enforce in regards to password aging using the default Active Directory Password Policy? Are there better tools that organizations can use regarding controlling the maximum password age for Active Directory user accounts?
What password aging best practices have changed?
Password aging for Active Directory user accounts has long been a controversial topic in security best practices.
While many organizations still apply more traditional password aging rules, noted security organizations have provided updated password aging guidance. Microsoft has said that they are dropping the password-expiration policies from the Security baseline for Windows 10 v1903 and Windows Server v1903. The National Institute of Standards and Technology (NIST) has long offered a cybersecurity framework and security best practice recommendations.
“Verifiers SHOULD NOT require memorized secrets to be changed arbitrarily (e.g., periodically). However, verifiers SHALL force a change if there is evidence of compromise of the authenticator.” NIST helps to explain the guidance change in their FAQ page covering the Digital Identity Guidelines.
It states: “Users tend to choose weaker memorized secrets when they know that they will have to change them in the near future. When those changes do occur, they often select a secret that is similar to their old memorized secret by applying a set of common transformations such as increasing a number in the password. This practice provides a false sense of security if any of the previous secrets has been compromised since attackers can apply these same common transformations. But if there is evidence that the memorized secret has been compromised, such as by a breach of the verifier’s hashed password database or observed fraudulent activity, subscribers should be required to change their memorized secrets. However, this event-based change should occur rarely, so that they are less motivated to choose a weak secret with the knowledge that it will only be used for a limited period of time.”
With the new guidance from the above organizations and many others, security experts acknowledge that password aging, at least in itself, is not necessarily a good strategy to prevent the compromise of passwords in the environment.
The recent changes in password aging guidance also apply to traditional Microsoft Active Directory Password Policies.
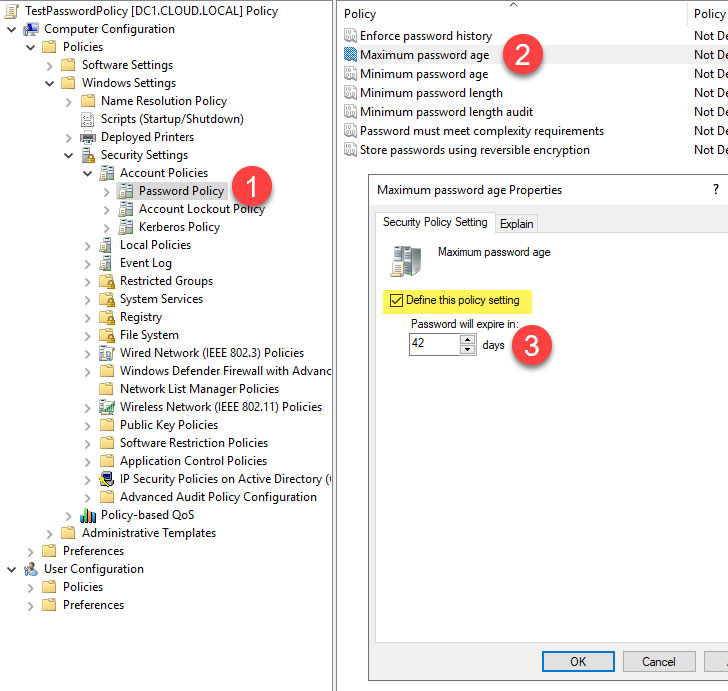
Active Directory Password Policy Password Aging
The capabilities of the password change policies in default Active Directory Password Policies are limited. You can configure the maximum password age, and that is all. By default, Active Directory includes the following Password Policy settings:
Enforce password history
Maximum password age
Minimum password age
Minimum password length
Minimum password length audit
Password must meet complexity requirements
Store passwords using reversible encryption
When you double click the maximum password age, you can configure the maximum number of days a user can use the same password.
When you look at the explanation given for the password age, you will see the following in the Group Policy setting:
“This security setting determines the period of time (in days) that a password can be used before the system requires the user to change it. You can set passwords to expire after a number of days between 1 and 999, or you can specify that passwords never expire by setting the number of days to 0. If the maximum password age is between 1 and 999 days, the minimum password age must be less than the maximum password age. If the maximum password age is set to 0, the minimum password age can be any value between 0 and 998 days.”
Defining the maximum password age with Active Directory Password Policy
With the default policy setting, you really can either turn the policy on or off and then set the number of days before the user password expires. What if you had further options to control the maximum password age and set different values based on the password complexity?
Specops Length Based Password Policy
As mentioned, recent guidance from many cybersecurity best practice authorities recommends against forced password changes and details the reasons for this change. However, many organizations may still leverage password aging as a part of their overall password security strategy to protect against user passwords falling into the wrong hands. What if IT admins had features in addition to what is provided by Active Directory?
Specops Password Policy provides many additional features when compared to the default Active Directory Password Policy settings, including password expiration. One of the options contained in the Specops Password Policy is called “Length based password aging.
Using this setting, organizations can define different “levels” of password expiration based on the user password’s length. It allows much more granularity in how organizations configure password aging in an Active Directory environment compared to using the default Active Directory Password Policy configuration settings.
It also allows targeting the weakest passwords in the environment and forcing these to age out the quickest. You will note in the screenshot. The length-based password aging in Specops Password Policy is highly configurable.
It includes the following settings:
Number of expiration levels – Enter how many expiration levels there will be. An expiration level determines how many extra days the user will have until their password expires and they are required to change it. This depends on how long the user’s password is. To increase the number of levels, move the slider to the right. The maximum number of expiration levels that can exist is 5.
Characters per level – The number of additional characters per level that define the extra days in password expiration
Extra days per level – How many additional expiration days each level is worth.
Disable expiration for the last level – Passwords that meet the requirements for the final expiration level in the list will not expire.
Configuring the Length based password policy in Specops Password Policy
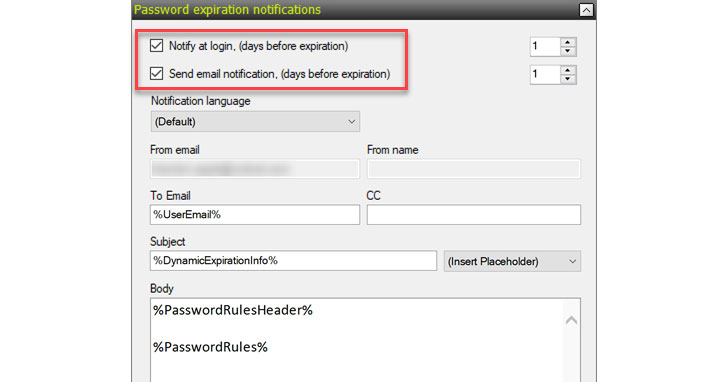
Specops allows easily notifying end-users when their password is close to expiring. It will inform end-users at login or by way of sending an email notification. You can configure the days before expiration value for each of these settings.
Configuring password expiration notifications in Specops Password Policy
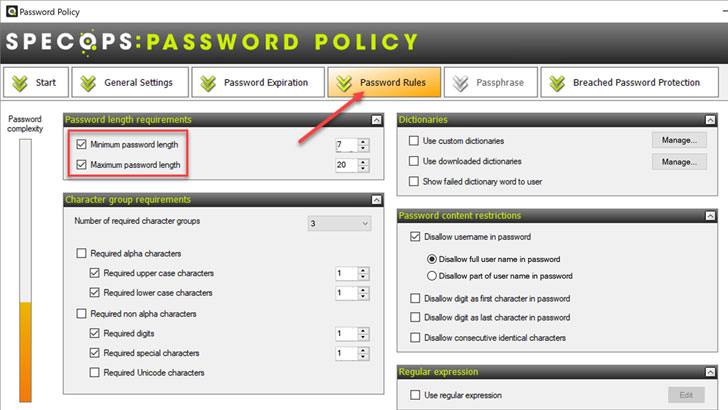
Organizations define the minimum and maximum password length configurations in the Password Rules area of the Specops Password Policy configuration. If you change the minimum and maximum password length configuration, the password length values in each level of the length-based password expiration will change as well.
Configuring the minimum and maximum password length
Combined with other Specops Password Policy features, such as breached password protection, the length-based password expiration strengthens enterprise password policies for both on-premises and remote workers.
Wrapping Up
Password aging has long been a feature of Active Directory Password Policies in most enterprise environments. However, as attackers get better at compromising passwords, new security best practice guidance is no longer recommending organizations make use of standard password aging.
Specops Password Policy provides compelling password aging capabilities that allow extending password aging features compared to default Active Directory Password Policies. By adding expiration levels, Specops Password Policy allows effectively targeting weak passwords in the environment by quickly aging these passwords out. End-users can use strong passwords much longer.
Organizations can even decide never to expire specific passwords that meet the defined password length. Using Specops Password Policy features, including length-based password expiration, helps to ensure more robust password security in the environment. Click here to learn more.


 To remove the WINS IP and set NetBios option, we will use the set method in the WMI class.
 Once the script has run WINS should be removed and NetBios over Tcpip should be disabled this can be checked under the advanced properties on the NIC.


