In this report, we highlight the notable email threats of 2021, including over 33.6 million high-risk email threats (representing a 101% increase from 2020’s numbers) that we’ve detected using the Trend Micro Cloud App Security platform.
Email is an integral cog in the digital transformation machine. This was especially true in 2021, when organizations found themselves trying to keep business operations afloat in the middle of a pandemic that has forever changed how people work. At a time when the workplace had already largely shifted from offices to homes, malicious actors continued to favor email as a low-effort yet high-impact attack vector to disseminate malware.
Email is not only popular among cybercriminals for its simplicity but also for its efficacy. In fact, 74.1% of the total threats blocked by Trend Micro in 2021 are email threats. Meanwhile, the 2021 Internet Crime Report by the FBI’s Internet Crime Complaint Center (IC3) states that there was “an unprecedented increase in cyberattacks and malicious cyber activity” last year, with business email compromise (BEC) being among the top incidents.
In this report, we discuss the notable email threats of 2021 based on the data that we’ve gathered using the Trend Micro™ Cloud App Security™, a security solution that supplements the preexisting security features in email and collaboration platforms.
Download our infographic
Malware detections surge as attacks become more elaborate, targeted
The Trend Micro Cloud App Security solution detected and thwarted a total of 3,315,539 total malware files in 2021. More urgently, this number represents an increase of a whopping 196% from 2020’s numbers. There were also huge spikes in both known and unknown malware detections in 2021 at 133.8% and 221%, respectively.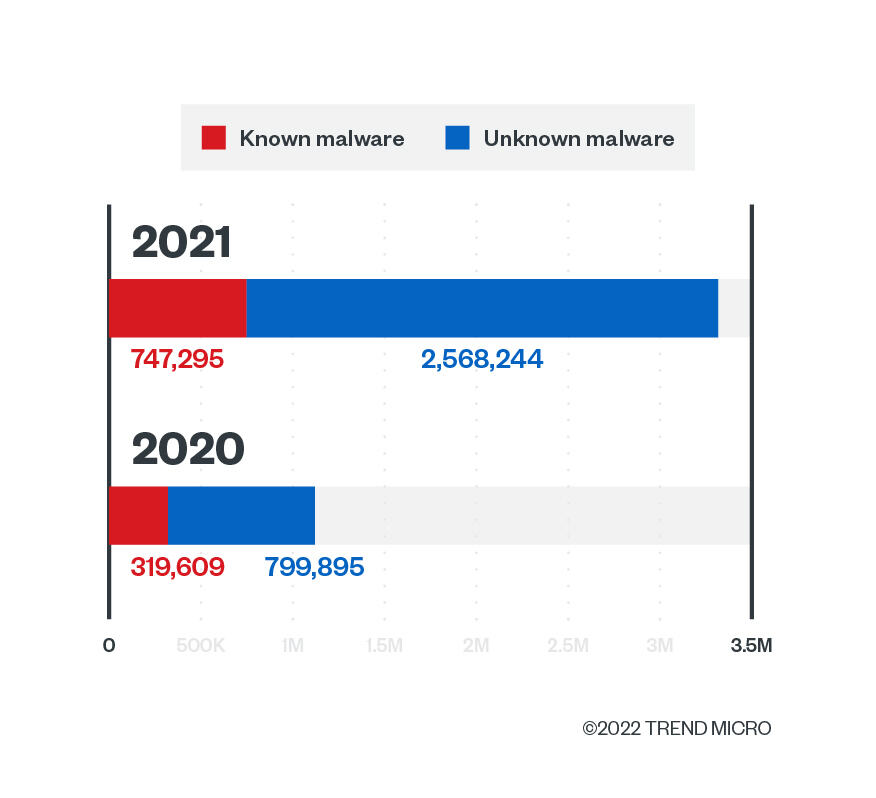
Cybercriminals worked overtime to attach malware in malicious emails in 2021 using advanced tactics and social engineering lures. In January, we saw how Emotet sent spam emails that used hexadecimal and octal representations of IP addresses for detection evasion in its delivery of malware such as TrickBot and Cobalt Strike.
In May last year, we reported on Panda Stealer, an information stealer that targets cryptocurrency wallets and credentials via spam emails. We also shared an update on APT-C-36 (aka Blind Eagle), an advanced persistent threat (APT) group targeting South American entities using a spam campaign that used fraudulent emails impersonating Colombia’s national directorate of taxes and customs and even fake infidelity email lures.
QAKBOT operators also resumed their spam campaign in late 2021 after an almost three-month hiatus and abused hijacked email threads to lead victims to both QAKBOT and the SquirrelWaffle malware loader.
Meanwhile, ransomware detections continued to decline in 2021, a consistent trend that we have been seeing in previous years. Last year, the Trend Micro Cloud App Security solution detected and blocked 101,215 ransomware files — a 43.4% decrease compared to 2020’s detections.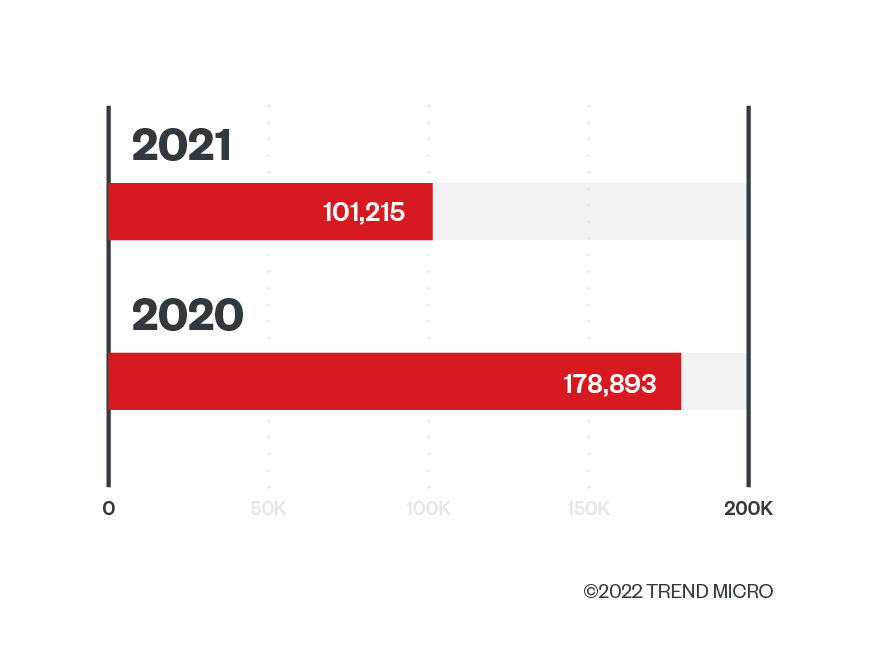
The reason behind this continuing decline is possibly two-fold: One, unlike legacy ransomware that focuses on the quantity of victims, modern ransomware focuses on waging highly targeted and planned attacks to yield bigger profits. Since today’s ransomware actors no longer abide by the spray-and-pray ransomware model, the number of attacks are no longer as massive as the number that we witnessed in ransomware’s early days. We identified the other reason in our year-end roundup report: That is, it’s possible that ransomware detections are down because our cybersecurity solutions continue to block an increasing number of ransomware affiliate tools each year, including TrickBot and BazarLoader. This could have prevented ransomware attacks from being successfully executed on victim environments.
Known, unknown, and overall credential phishing attacks rose in 2021
Based on Trend Micro Cloud App Security data, 6,299,883 credential phishing attacks were detected and blocked in 2021, which accounts for a 15.2% overall increase. Similar to last year, the number of known credential phishing attacks is greater than the unknown ones. However, this year, the percentage of increase is at a staggering 72.8%.
When comparing 2020 and 2021’s numbers, we saw an 8.4% increase in the number of detections for known credential phishing links, while a 30% growth is observed in the number of detections for unknown credential phishing links.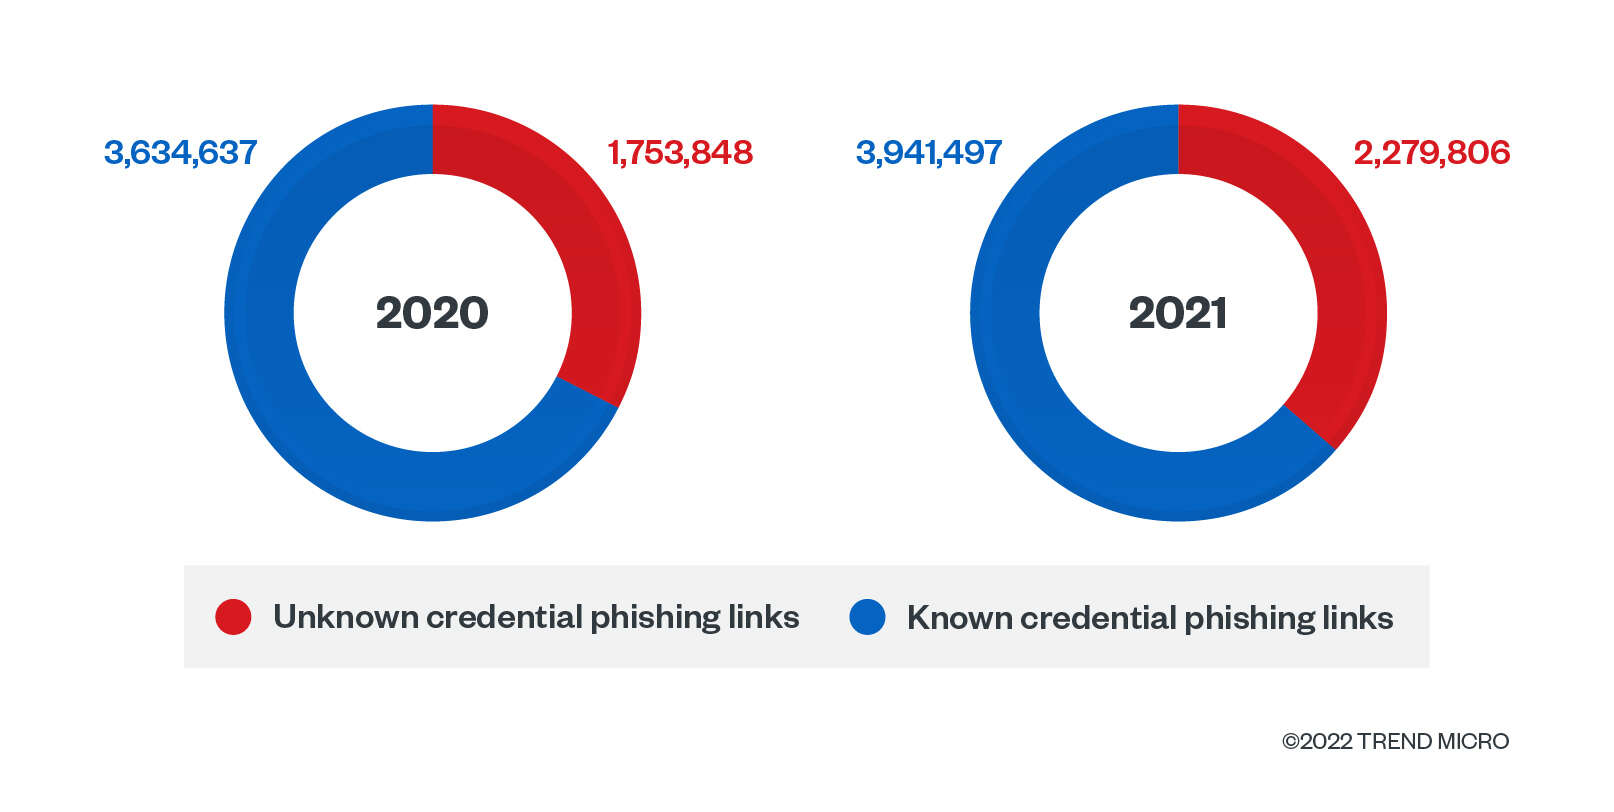
Abnormal Security noted the increase in overall credential phishing attacks in one 2021 report and stated that credential phishing is attributed to 73% of all advanced threats that they’ve analyzed.
We have also documented the rise in credential phishing attacks from previous years. In fact, in the first half of 2019, the Trend Micro Cloud App Security solution detected and blocked 2.4 million credential phishing attacks alone.
BEC’s small numbers bring big business losses

The Trend Micro Cloud App Security solution intercepted a total of 283,859 BEC attacks in 2021. Compared with 2020’s BEC detections, this number represents a 10.61% decrease. Interestingly, there is an 82.7% increase in this year’s BEC attacks that were detected using Writing Style DNA, while there is a 38.59% decrease in attacks that have been blocked using the antispam engine.
Overall, BEC numbers have consistently been on a downward trend since 2020. But the reduction in BEC victims doesn’t equate to a dip in cybercriminal profits. According to the FBI’s IC3, BEC accounted for US$2.4 billion in adjusted losses for both businesses and consumers in 2021. According to the same organization, BEC losses have reached over US$43 billion between June 2016 and December 2021 for both domestic and international incidents.
We have also observed how BEC actors continuously tweak their tactics for ill gain. In August last year, our telemetry showed a gradual increase in BEC detections. Upon investigation, we discovered that instead of impersonating company executives and upper management personnel, this BEC-related email campaign impersonated and targeted ordinary employees for money transfers and bank payroll account changes.
Covid-19 lures, cybercriminal campaigns behind massive jump in phishing numbers
The Trend Micro Cloud App Security solution data shows that a total of 16,451,166 phishing attacks were detected and blocked in 2021. This is a 137.6% growth from 2020’s phishing numbers.
In contrast to last year’s numbers, we saw a significant jump in phishing attacks detected via spam count this year — a whopping 596% increase, to be specific. Meanwhile, we observed a notable 15.26% increase in credential phishing count compared to last year.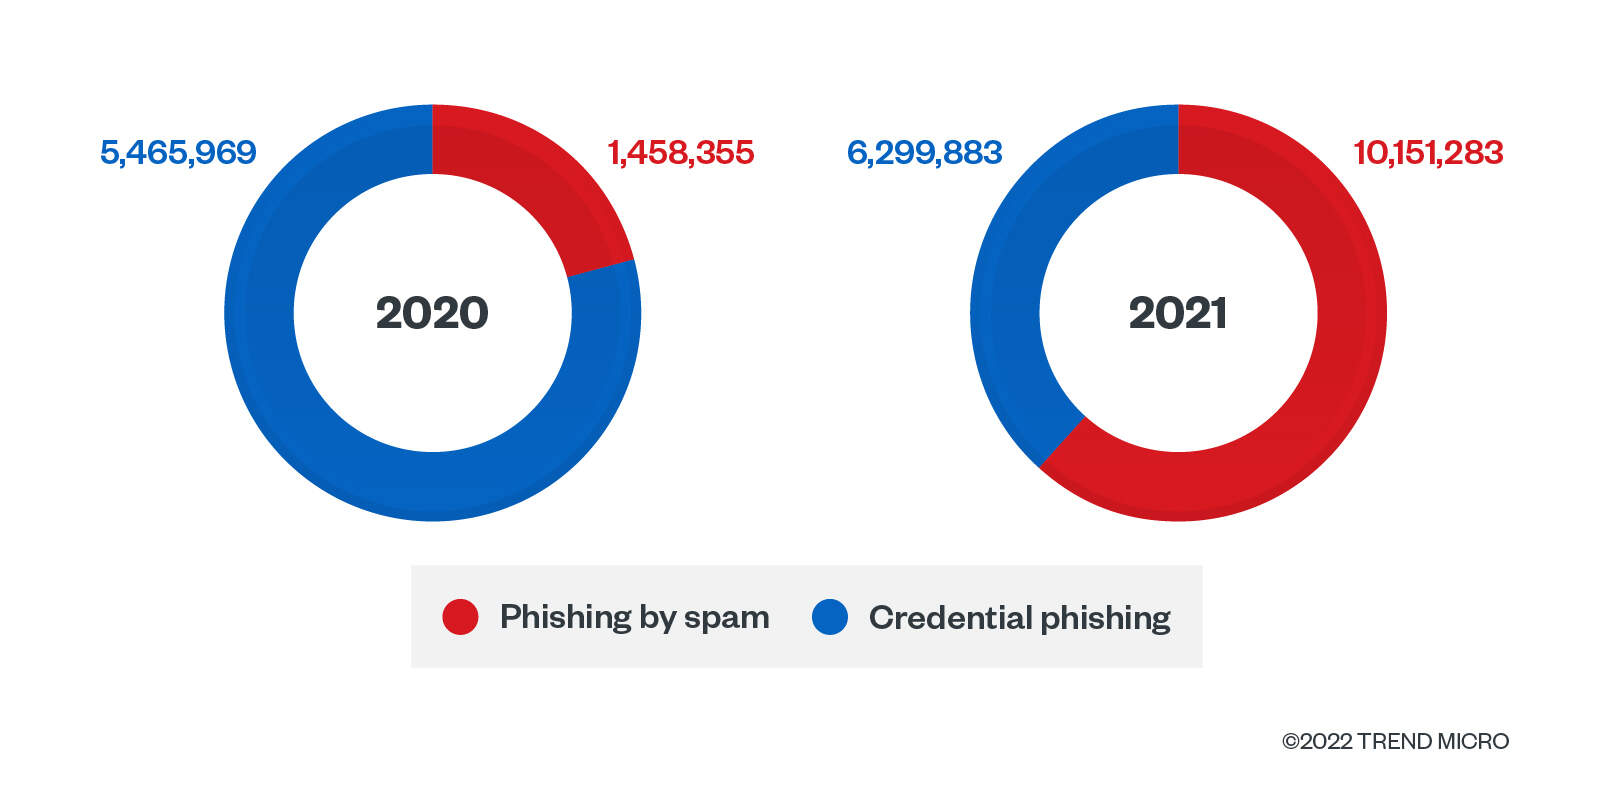
These high numbers reflect organizations’ sentiments about phishing attacks. According to a survey in an Osterman Research report titled “How to Reduce the Risk of Phishing and Ransomware,” organizations were “concerned” or “extremely concerned” about phishing attempts making their way to end users and employees failing to spot phishing and social engineering attacks before accessing a link or attachment.
While they kicked off majority of Covid-19-related phishing emails and sites in 2020, cybercriminals still exploited the global pandemic for financial gain. Last year, Mexico-based medical laboratory El Chopo shared that a fraudulent website that looked identical to the company’s had been launched. On that website, users could schedule a vaccination appointment after paying MXN2,700 (approximately US$130). To make the fake website appear credible, the malicious actors behind it added fake contact information such as email addresses and social media pages that victims can use for inquiries.
Early last year, we reported on a wave of phishing emails that pretended to be coming from national postal systems. This campaign attempted to steal credit card numbers from 26 countries. We also investigated a spear-phishing campaign that used Pegasus spyware-related emails to lead victims into downloading a file stealer. This campaign targeted high-ranking political leaders, activists, and journalists in 11 countries.
Protect emails, endpoints, and cloud-based services and apps from attacks with Trend Micro Cloud App Security
Organizations should consider a comprehensive multilayered security solution such as Trend Micro Cloud App Security. It supplements the preexisting security features in email and collaboration platforms like Microsoft 365 and Google Workspace (formerly known as G Suite) by using machine learning (ML) to analyze and detect any suspicious content in the message body and attachments of an email. It also acts as a second layer of protection after emails and files have passed through Microsoft 365 or Gmail’s built-in security.
Trend Micro Cloud App Security uses technologies such as sandbox malware analysis, document exploit detection, and file, email, and web reputation technologies to detect malware hidden in Microsoft 365 or PDF documents. It provides data loss prevention (DLP) and advanced malware protection for Box, Dropbox, Google Drive, SharePoint Online, OneDrive for Business, and Salesforce while also enabling consistent DLP policies across multiple cloud-based applications. It also offers seamless integration with an organization’s existing cloud setup, preserving full user and administrator functionality, providing direct cloud-to-cloud integration through vendor APIs, and minimizing the need for additional resources by assessing threat risks before sandbox malware analysis.
Trend Micro Cloud App Security stands on the cutting edge of email and software-as-a-service (SaaS) security, offering ML-powered features that combat two of the primary email-based threats: BEC and credential phishing. Writing Style DNA can help determine if an email is legitimate by using ML to check a user’s writing style based on past emails and then comparing suspicious emails against it. Computer vision, on the other hand, combines image analysis and ML to check branded elements, login forms, and other site content. It then pools this information with site reputation elements and optical character recognition (OCR) to check for fake and malicious sites — all while reducing instances of false positives to detect credential phishing email.
This security solution also comes with an option to rescan historical URLs in users’ email metadata and perform continued remediation (automatically taking configured actions or restoring quarantined messages) using newer patterns updated by Web Reputation Services.
This is a significant option since users’ email metadata might include undetected suspicious or dangerous URLs that have only recently been discovered. The examination of such metadata is thus an important part of forensic investigations that help determine if your email service has been affected by attacks. This solution also officially supports the Time-of-Click Protection feature to protect Exchange Online users against potential risks when they access URLs in incoming email messages.
Trend Micro Cloud App Security also comes with the advanced and extended security capabilities of Trend Micro XDR, providing investigation, detection, and response across your endpoints, email, and servers.
Source :
https://www.trendmicro.com/vinfo/us/security/research-and-analysis/threat-reports/roundup/trend-micro-cloud-app-security-threat-report-2021


