On December 18, 2023, right before the end of Holiday Bug Extravaganza, we received a submission for a Local File Inclusion vulnerability in Shield Security, a WordPress plugin with more than 50,000+ active installations. It’s important to note that this vulnerability is limited to just the inclusion of PHP files, however, it could be leveraged by an attacker who has the ability to upload PHP files but can not directly access those files to execute.
Props to hir0ot who discovered and responsibly reported this vulnerability through the Wordfence Bug Bounty Program. This researcher earned a bounty of $938.00 for this discovery during our Bug Bounty Program Extravaganza.
All Wordfence Premium, Wordfence Care, and Wordfence Response customers, as well as those still using the free version of our plugin, are protected against any exploits targeting this vulnerability by the Wordfence firewall’s built-in Directory Traversal and Local File Inclusion protection.
We contacted the Shield Security Team on December 21, 2023, and received a response on December 23, 2023. After providing full disclosure details, the developer released a patch on December 23, 2023. We would like to commend the Shield Security Team for their prompt response and timely patch, which was released on the same day.
We urge users to update their sites with the latest patched version of Shield Security, which is version 18.5.10, as soon as possible.
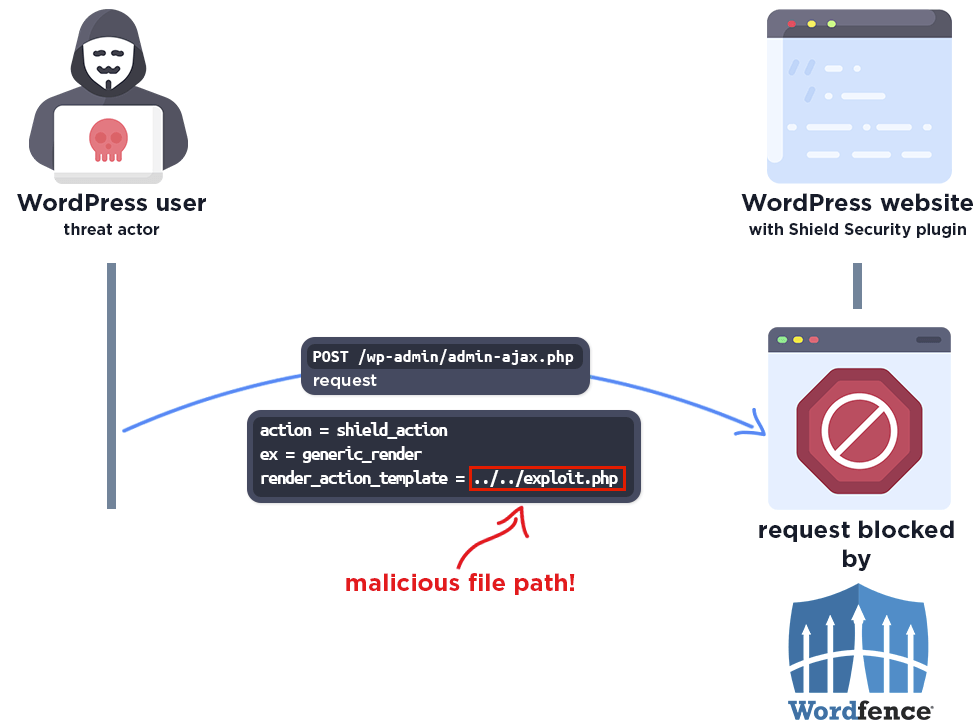
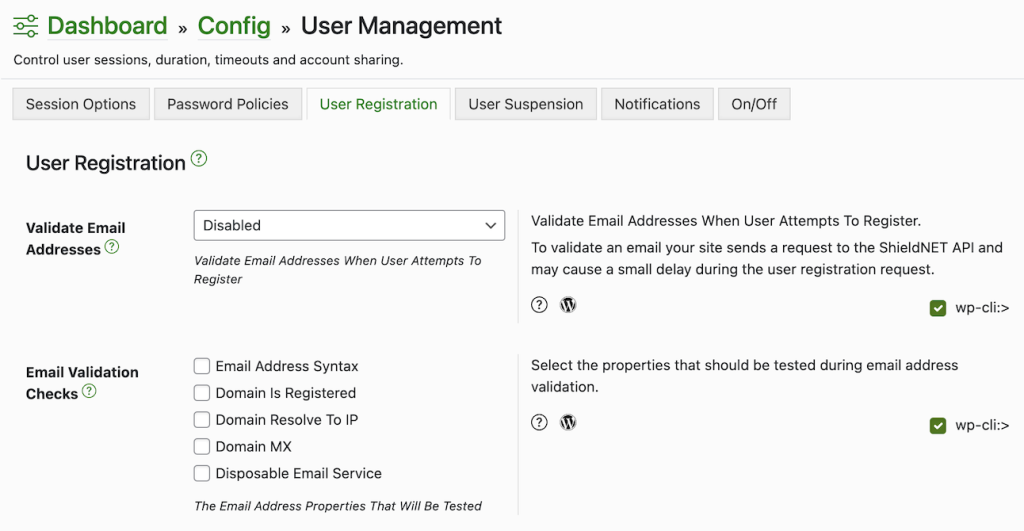
The Shield Security – Smart Bot Blocking & Intrusion Prevention Security plugin for WordPress is vulnerable to Local File Inclusion in all versions up to, and including, 18.5.9 via the render_action_template parameter. This makes it possible for an unauthenticated attacker to include and execute PHP files on the server, allowing the execution of any PHP code in those files.
Technical Analysis
Shield Security is a WordPress website security plugin that offers several features to stop attackers, protect and monitor the website, including a firewall, malware scanner and also logs activities.
The plugin includes a template management system that renders .twig, .php or .html files. Unfortunately, the insecure implementation of the plugin’s file template including and rendering functionality allows for arbitrary file inclusion in vulnerable versions. The template path is set with the setTemplate() function.
The renderPhp() function in the Render class uses the path_join() function to join the template file. It then checks that the template file is an existing file and includes it.
Examining the code reveals that there is no file path sanitization anywhere in these functions. This makes it possible to include arbitrary PHP files from the server.
The file inclusion is limited to PHP files in the vulnerability. This means that threat actors cannot exploit one of the most popular remote code execution methods via a log file poisoning attack. Since the plugin also uses isFile() function to file checking, the other popular remote code execution method using wrappers attack is also not possible. Nevertheless, the attacker has several options to include and exploit a malicious PHP file and execute on the server. This can be achieved by chaining the attack and exploiting vulnerabilities in other plugins. However, it’s worth mentioning that the attack possibilities are limited. This would likely be leveraged in an instance where an attacker has access to upload a PHP file, but does not have direct access to the file to execute it.
Wordfence Firewall
The following graphic demonstrates the steps to exploitation an attacker might take and at which point the Wordfence firewall would block an attacker from successfully exploiting the vulnerability.
The Wordfence firewall rule detects the malicious file path and blocks the request.
Disclosure Timeline
December 18, 2023 – We receive the submission of the Local File Inclusion vulnerability in Shield Security via the Wordfence Bug Bounty Program. December 20, 2023 – We validate the report and confirm the proof-of-concept exploit. December 21, 2023 – We initiate contact with the plugin vendor asking that they confirm the inbox for handling the discussion. December 23, 2023 – The vendor confirms the inbox for handling the discussion. December 23, 2023 – We send over the full disclosure details. The vendor acknowledges the report and begins working on a fix. December 23, 2023 – The fully patched version of the plugin, 18.5.10, is released.
Conclusion
In this blog post, we detailed a Local File Inclusion vulnerability within the Shield Security plugin affecting versions 18.5.9 and earlier. This vulnerability allows unauthenticated threat actors to include and execute PHP files on the server, allowing the execution of any PHP code in those files, which can be used for complete site compromise. The vulnerability has been fully addressed in version 18.5.10 of the plugin.
We encourage WordPress users to verify that their sites are updated to the latest patched version of Shield Security.
All Wordfence Premium, Wordfence Care, and Wordfence Response customers, as well as those still using the free version of our plugin, are protected against any exploits targeting this vulnerability by the Wordfence firewall’s built-in Directory Traversal and Local File Inclusion protection.
If you know someone who uses this plugin on their site, we recommend sharing this advisory with them to ensure their site remains secure, as this vulnerability poses a significant risk.
Just in time for Data Privacy Day 2024 on January 28, the EU Commission is calling for evidence to understand how the EU’s General Data Protection Regulation (GDPR) has been functioning now that we’re nearing the 6th anniversary of the regulation coming into force.
We’re so glad they asked, because we have some thoughts. And what better way to celebrate privacy day than by discussing whether the application of the GDPR has actually done anything to improve people’s privacy?
The answer is, mostly yes, but in a couple of significant ways – no.
Overall, the GDPR is rightly seen as the global gold standard for privacy protection. It has served as a model for what data protection practices should look like globally, it enshrines data subject rights that have been copied across jurisdictions, and when it took effect, it created a standard for the kinds of privacy protections people worldwide should be able to expect and demand from the entities that handle their personal data. On balance, the GDPR has definitely moved the needle in the right direction for giving people more control over their personal data and in protecting their privacy.
In a couple of key areas, however, we believe the way the GDPR has been applied to data flowing across the Internet has done nothing for privacy and in fact may even jeopardize the protection of personal data. The first area where we see this is with respect to cross-border data transfers. Location has become a proxy for privacy in the minds of many EU data protection regulators, and we think that is the wrong result. The second area is an overly broad interpretation of what constitutes “personal data” by some regulators with respect to Internet Protocol or “IP” addresses. We contend that IP addresses should not always count as personal data, especially when the entities handling IP addresses have no ability on their own to tie those IP addresses to individuals. This is important because the ability to implement a number of industry-leading cybersecurity measures relies on the ability to do threat intelligence on Internet traffic metadata, including IP addresses.
Location should not be a proxy for privacy
Fundamentally, good data security and privacy practices should be able to protect personal data regardless of where that processing or storage occurs. Nevertheless, the GDPR is based on the idea that legal protections should attach to personal data based on the location of the data – where it is generated, processed, or stored. Articles 44 to 49 establish the conditions that must be in place in order for data to be transferred to a jurisdiction outside the EU, with the idea that even if the data is in a different location, the privacy protections established by the GDPR should follow the data. No doubt this approach was influenced by political developments around government surveillance practices, such as the revelations in 2013 of secret documents describing the relationship between the US NSA (and its Five Eyes partners) and large Internet companies, and that intelligence agencies were scooping up data from choke points on the Internet. And once the GDPR took effect, many data regulators in the EU were of the view that as a result of the GDPR’s restrictions on cross-border data transfers, European personal data simply could not be processed in the United States in a way that would be consistent with the GDPR.
This issue came to a head in July 2020, when the European Court of Justice (CJEU), in its “Schrems II” decision1, invalidated the EU-US Privacy Shield adequacy standard and questioned the suitability of the EU standard contractual clauses (a mechanism entities can use to ensure that GDPR protections are applied to EU personal data even if it is processed outside the EU). The ruling in some respects left data protection regulators with little room to maneuver on questions of transatlantic data flows. But while some regulators were able to view the Schrems II ruling in a way that would still allow for EU personal data to be processed in the United States, other data protection regulators saw the decision as an opportunity to double down on their view that EU personal data cannot be processed in the US consistent with the GDPR, therefore promoting the misconception that data localization should be a proxy for data protection.
In fact, we would argue that the opposite is the case. From our own experience and according to recent research2, we know that data localization threatens an organization’s ability to achieve integrated management of cybersecurity risk and limits an entity’s ability to employ state-of-the-art cybersecurity measures that rely on cross-border data transfers to make them as effective as possible. For example, Cloudflare’s Bot Management product only increases in accuracy with continued use on the global network: it detects and blocks traffic coming from likely bots before feeding back learnings to the models backing the product. A diversity of signal and scale of data on a global platform is critical to help us continue to evolve our bot detection tools. If the Internet were fragmented – preventing data from one jurisdiction being used in another – more and more signals would be missed. We wouldn’t be able to apply learnings from bot trends in Asia to bot mitigation efforts in Europe, for example. And if the ability to identify bot traffic is hampered, so is the ability to block those harmful bots from services that process personal data.
The need for industry-leading cybersecurity measures is self-evident, and it is not as if data protection authorities don’t realize this. If you look at any enforcement action brought against an entity that suffered a data breach, you see data protection regulators insisting that the impacted entities implement ever more robust cybersecurity measures in line with the obligation GDPR Article 32 places on data controllers and processors to “develop appropriate technical and organizational measures to ensure a level of security appropriate to the risk”, “taking into account the state of the art”. In addition, data localization undermines information sharing within industry and with government agencies for cybersecurity purposes, which is generally recognized as vital to effective cybersecurity.
In this way, while the GDPR itself lays out a solid framework for securing personal data to ensure its privacy, the application of the GDPR’s cross-border data transfer provisions has twisted and contorted the purpose of the GDPR. It’s a classic example of not being able to see the forest for the trees. If the GDPR is applied in such a way as to elevate the priority of data localization over the priority of keeping data private and secure, then the protection of ordinary people’s data suffers.
Applying data transfer rules to IP addresses could lead to balkanization of the Internet
The other key way in which the application of the GDPR has been detrimental to the actual privacy of personal data is related to the way the term “personal data” has been defined in the Internet context – specifically with respect to Internet Protocol or “IP” addresses. A world where IP addresses are always treated as personal data and therefore subject to the GDPR’s data transfer rules is a world that could come perilously close to requiring a walled-off European Internet. And as noted above, this could have serious consequences for data privacy, not to mention that it likely would cut the EU off from any number of global marketplaces, information exchanges, and social media platforms.
This is a bit of a complicated argument, so let’s break it down. As most of us know, IP addresses are the addressing system for the Internet. When you send a request to a website, send an email, or communicate online in any way, IP addresses connect your request to the destination you’re trying to access. These IP addresses are the key to making sure Internet traffic gets delivered to where it needs to go. As the Internet is a global network, this means it’s entirely possible that Internet traffic – which necessarily contains IP addresses – will cross national borders. Indeed, the destination you are trying to access may well be located in a different jurisdiction altogether. That’s just the way the global Internet works. So far, so good.
But if IP addresses are considered personal data, then they are subject to data transfer restrictions under the GDPR. And with the way those provisions have been applied in recent years, some data regulators were getting perilously close to saying that IP addresses cannot transit jurisdictional boundaries if it meant the data might go to the US. The EU’s recent approval of the EU-US Data Privacy Framework established adequacy for US entities that certify to the framework, so these cross-border data transfers are not currently an issue. But if the Data Privacy Framework were to be invalidated as the EU-US Privacy Shield was in the Schrems II decision, then we could find ourselves in a place where the GDPR is applied to mean that IP addresses ostensibly linked to EU residents can’t be processed in the US, or potentially not even leave the EU.
If this were the case, then providers would have to start developing Europe-only networks to ensure IP addresses never cross jurisdictional boundaries. But how would people in the EU and US communicate if EU IP addresses can’t go to the US? Would EU citizens be restricted from accessing content stored in the US? It’s an application of the GDPR that would lead to the absurd result – one surely not intended by its drafters. And yet, in light of the Schrems II case and the way the GDPR has been applied, here we are.
A possible solution would be to consider that IP addresses are not always “personal data” subject to the GDPR. In 2016 – even before the GDPR took effect – the Court of Justice of the European Union (CJEU) established the view in Breyer v. Bundesrepublik Deutschland that even dynamic IP addresses, which change with every new connection to the Internet, constituted personal data if an entity processing the IP address could link the IP addresses to an individual. While the court’s decision did not say that dynamic IP addresses are always personal data under European data protection law, that’s exactly what EU data regulators took from the decision, without considering whether an entity actually has a way to tie the IP address to a real person3.
The question of when an identifier qualifies as “personal data” is again before the CJEU: In April 2023, the lower EU General Court ruled in SRB v EDPS4 that transmitted data can be considered anonymised and therefore not personal data if the data recipient does not have any additional information reasonably likely to allow it to re-identify the data subjects and has no legal means available to access such information. The appellant – the European Data Protection Supervisor (EDPS) – disagrees. The EDPS, who mainly oversees the privacy compliance of EU institutions and bodies, is appealing the decision and arguing that a unique identifier should qualify as personal data if that identifier could ever be linked to an individual, regardless of whether the entity holding the identifier actually had the means to make such a link.
If the lower court’s common-sense ruling holds, one could argue that IP addresses are not personal data when those IP addresses are processed by entities like Cloudflare, which have no means of connecting an IP address to an individual. If IP addresses are then not always personal data, then IP addresses will not always be subject to the GDPR’s rules on cross-border data transfers.
Although it may seem counterintuitive, having a standard whereby an IP address is not necessarily “personal data” would actually be a positive development for privacy. If IP addresses can flow freely across the Internet, then entities in the EU can use non-EU cybersecurity providers to help them secure their personal data. Advanced Machine Learning/predictive AI techniques that look at IP addresses to protect against DDoS attacks, prevent bots, or otherwise guard against personal data breaches will be able to draw on attack patterns and threat intelligence from around the world to the benefit of EU entities and residents. But none of these benefits can be realized in a world where IP addresses are always personal data under the GDPR and where the GDPR’s data transfer rules are interpreted to mean IP addresses linked to EU residents can never flow to the United States.
Keeping privacy in focus
On this Data Privacy Day, we urge EU policy makers to look closely at how the GDPR is working in practice, and to take note of the instances where the GDPR is applied in ways that place privacy protections above all other considerations – even appropriate security measures mandated by the GDPR’s Article 32 that take into account the state of the art of technology. When this happens, it can actually be detrimental to privacy. If taken to the extreme, this formulaic approach would not only negatively impact cybersecurity and data protection, but even put into question the functioning of the global Internet infrastructure as a whole, which depends on cross-border data flows. So what can be done to avert this?
First, we believe EU policymakers could adopt guidelines (if not legal clarification) for regulators that IP addresses should not be considered personal data when they cannot be linked by an entity to a real person. Second, policymakers should clarify that the GDPR’s application should be considered with the cybersecurity benefits of data processing in mind. Building on the GDPR’s existing recital 49, which rightly recognizes cybersecurity as a legitimate interest for processing, personal data that needs to be processed outside the EU for cybersecurity purposes should be exempted from GDPR restrictions to international data transfers. This would avoid some of the worst effects of the mindset that currently views data localization as a proxy for data privacy. Such a shift would be a truly pro-privacy application of the GDPR.
Visit 1.1.1.1 from any device to get started with our free app that makes your Internet faster and safer.
To learn more about our mission to help build a better Internet, start here. If you’re looking for a new career direction, check out our open positions.
01/02/2024 Matthew Prince John Graham-Cumming Grant Bourzikas
11 min read
On Thanksgiving Day, November 23, 2023, Cloudflare detected a threat actor on our self-hosted Atlassian server. Our security team immediately began an investigation, cut off the threat actor’s access, and on Sunday, November 26, we brought in CrowdStrike’s Forensic team to perform their own independent analysis.
Yesterday, CrowdStrike completed its investigation, and we are publishing this blog post to talk about the details of this security incident.
We want to emphasize to our customers that no Cloudflare customer data or systems were impacted by this event. Because of our access controls, firewall rules, and use of hard security keys enforced using our own Zero Trust tools, the threat actor’s ability to move laterally was limited. No services were implicated, and no changes were made to our global network systems or configuration. This is the promise of a Zero Trust architecture: it’s like bulkheads in a ship where a compromise in one system is limited from compromising the whole organization.
From November 14 to 17, a threat actor did reconnaissance and then accessed our internal wiki (which uses Atlassian Confluence) and our bug database (Atlassian Jira). On November 20 and 21, we saw additional access indicating they may have come back to test access to ensure they had connectivity.
They then returned on November 22 and established persistent access to our Atlassian server using ScriptRunner for Jira, gained access to our source code management system (which uses Atlassian Bitbucket), and tried, unsuccessfully, to access a console server that had access to the data center that Cloudflare had not yet put into production in São Paulo, Brazil.
They did this by using one access token and three service account credentials that had been taken, and that we failed to rotate, after the Okta compromise of October 2023. All threat actor access and connections were terminated on November 24 and CrowdStrike has confirmed that the last evidence of threat activity was on November 24 at 10:44.
(Throughout this blog post all dates and times are UTC.)
Even though we understand the operational impact of the incident to be extremely limited, we took this incident very seriously because a threat actor had used stolen credentials to get access to our Atlassian server and accessed some documentation and a limited amount of source code. Based on our collaboration with colleagues in the industry and government, we believe that this attack was performed by a nation state attacker with the goal of obtaining persistent and widespread access to Cloudflare’s global network.
“Code Red” Remediation and Hardening Effort
On November 24, after the threat actor was removed from our environment, our security team pulled in all the people they needed across the company to investigate the intrusion and ensure that the threat actor had been completely denied access to our systems, and to ensure we understood the full extent of what they accessed or tried to access.
Then, from November 27, we redirected the efforts of a large part of the Cloudflare technical staff (inside and outside the security team) to work on a single project dubbed “Code Red”. The focus was strengthening, validating, and remediating any control in our environment to ensure we are secure against future intrusion and to validate that the threat actor could not gain access to our environment. Additionally, we continued to investigate every system, account and log to make sure the threat actor did not have persistent access and that we fully understood what systems they had touched and which they had attempted to access.
CrowdStrike performed an independent assessment of the scope and extent of the threat actor’s activity, including a search for any evidence that they still persisted in our systems. CrowdStrike’s investigation provided helpful corroboration and support for our investigation, but did not bring to light any activities that we had missed. This blog post outlines in detail everything we and CrowdStrike uncovered about the activity of the threat actor.
The only production systems the threat actor could access using the stolen credentials was our Atlassian environment. Analyzing the wiki pages they accessed, bug database issues, and source code repositories, it appears they were looking for information about the architecture, security, and management of our global network; no doubt with an eye on gaining a deeper foothold. Because of that, we decided a huge effort was needed to further harden our security protocols to prevent the threat actor from being able to get that foothold had we overlooked something from our log files.
Our aim was to prevent the attacker from using the technical information about the operations of our network as a way to get back in. Even though we believed, and later confirmed, the attacker had limited access, we undertook a comprehensive effort to rotate every production credential (more than 5,000 individual credentials), physically segment test and staging systems, performed forensic triages on 4,893 systems, reimaged and rebooted every machine in our global network including all the systems the threat actor accessed and all Atlassian products (Jira, Confluence, and Bitbucket).
The threat actor also attempted to access a console server in our new, and not yet in production, data center in São Paulo. All attempts to gain access were unsuccessful. To ensure these systems are 100% secure, equipment in the Brazil data center was returned to the manufacturers. The manufacturers’ forensic teams examined all of our systems to ensure that no access or persistence was gained. Nothing was found, but we replaced the hardware anyway.
We also looked for software packages that hadn’t been updated, user accounts that might have been created, and unused active employee accounts; we went searching for secrets that might have been left in Jira tickets or source code, examined and deleted all HAR files uploaded to the wiki in case they contained tokens of any sort. Whenever in doubt, we assumed the worst and made changes to ensure anything the threat actor was able to access would no longer be in use and therefore no longer be valuable to them.
Every member of the team was encouraged to point out areas the threat actor might have touched, so we could examine log files and determine the extent of the threat actor’s access. By including such a large number of people across the company, we aimed to leave no stone unturned looking for evidence of access or changes that needed to be made to improve security.
The immediate “Code Red” effort ended on January 5, but work continues across the company around credential management, software hardening, vulnerability management, additional alerting, and more.
Attack timeline
The attack started in October with the compromise of Okta, but the threat actor only began targeting our systems using those credentials from the Okta compromise in mid-November.
The following timeline shows the major events:
October 18 – Okta compromise
We’ve written about this before but, in summary, we were (for the second time) the victim of a compromise of Okta’s systems which resulted in a threat actor gaining access to a set of credentials. These credentials were meant to all be rotated.
Unfortunately, we failed to rotate one service token and three service accounts (out of thousands) of credentials that were leaked during the Okta compromise.
One was a Moveworks service token that granted remote access into our Atlassian system. The second credential was a service account used by the SaaS-based Smartsheet application that had administrative access to our Atlassian Jira instance, the third account was a Bitbucket service account which was used to access our source code management system, and the fourth was an AWS environment that had no access to the global network and no customer or sensitive data.
The one service token and three accounts were not rotated because mistakenly it was believed they were unused. This was incorrect and was how the threat actor first got into our systems and gained persistence to our Atlassian products. Note that this was in no way an error on the part of Atlassian, AWS, Moveworks or Smartsheet. These were merely credentials which we failed to rotate.
November 14 09:22:49 – threat actor starts probing
Our logs show that the threat actor started probing and performing reconnaissance of our systems beginning on November 14, looking for a way to use the credentials and what systems were accessible. They attempted to log into our Okta instance and were denied access. They attempted access to the Cloudflare Dashboard and were denied access.
Additionally, the threat actor accessed an AWS environment that is used to power the Cloudflare Apps marketplace. This environment was segmented with no access to global network or customer data. The service account to access this environment was revoked, and we validated the integrity of the environment.
November 15 16:28:38 – threat actor gains access to Atlassian services
The threat actor successfully accessed Atlassian Jira and Confluence on November 15 using the Moveworks service token to authenticate through our gateway, and then they used the Smartsheet service account to gain access to the Atlassian suite. The next day they began looking for information about the configuration and management of our global network, and accessed various Jira tickets.
The threat actor searched the wiki for things like remote access, secret, client-secret, openconnect, cloudflared, and token. They accessed 36 Jira tickets (out of a total of 2,059,357 tickets) and 202 wiki pages (out of a total of 194,100 pages).
The threat actor accessed Jira tickets about vulnerability management, secret rotation, MFA bypass, network access, and even our response to the Okta incident itself.
The wiki searches and pages accessed suggest the threat actor was very interested in all aspects of access to our systems: password resets, remote access, configuration, our use of Salt, but they did not target customer data or customer configurations.
November 16 14:36:37 – threat actor creates an Atlassian user account
The threat actor used the Smartsheet credential to create an Atlassian account that looked like a normal Cloudflare user. They added this user to a number of groups within Atlassian so that they’d have persistent access to the Atlassian environment should the Smartsheet service account be removed.
November 17 14:33:52 to November 20 09:26:53 – threat actor takes a break from accessing Cloudflare systems
During this period, the attacker took a break from accessing our systems (apart from apparently briefly testing that they still had access) and returned just before Thanksgiving.
November 22 14:18:22 – threat actor gains persistence
Since the Smartsheet service account had administrative access to Atlassian Jira, the threat actor was able to install the Sliver Adversary Emulation Framework, which is a widely used tool and framework that red teams and attackers use to enable “C2” (command and control), connectivity gaining persistent and stealthy access to a computer on which it is installed. Sliver was installed using the ScriptRunner for Jira plugin.
This allowed them continuous access to the Atlassian server, and they used this to attempt lateral movement. With this access the Threat Actor attempted to gain access to a non-production console server in our São Paulo, Brazil data center due to a non-enforced ACL. The access was denied, and they were not able to access any of the global network.
Over the next day, the threat actor viewed 120 code repositories (out of a total of 11,904 repositories). Of the 120, the threat actor used the Atlassian Bitbucket git archive feature on 76 repositories to download them to the Atlassian server, and even though we were not able to confirm whether or not they had been exfiltrated, we decided to treat them as having been exfiltrated.
The 76 source code repositories were almost all related to how backups work, how the global network is configured and managed, how identity works at Cloudflare, remote access, and our use of Terraform and Kubernetes. A small number of the repositories contained encrypted secrets which were rotated immediately even though they were strongly encrypted themselves.
We focused particularly on these 76 source code repositories to look for embedded secrets, (secrets stored in the code were rotated), vulnerabilities and ways in which an attacker could use them to mount a subsequent attack. This work was done as a priority by engineering teams across the company as part of “Code Red”.
As a SaaS company, we’ve long believed that our source code itself is not as precious as the source code of software companies that distribute software to end users. In fact, we’ve open sourced a large amount of our source code and speak openly through our blog about algorithms and techniques we use. So our focus was not on someone having access to the source code, but whether that source code contained embedded secrets (such as a key or token) and vulnerabilities.
November 23 – Discovery and threat actor access termination begins
Our security team was alerted to the threat actor’s presence at 16:00 and deactivated the Smartsheet service account 35 minutes later. 48 minutes later the user account created by the threat actor was found and deactivated. Here’s the detailed timeline for the major actions taken to block the threat actor once the first alert was raised.
15:58 – The threat actor adds the Smartsheet service account to an administrator group. 16:00 – Automated alert about the change at 15:58 to our security team. 16:12 – Cloudflare SOC starts investigating the alert. 16:35 – Smartsheet service account deactivated by Cloudflare SOC. 17:23 – The threat actor-created Atlassian user account is found and deactivated. 17:43 – Internal Cloudflare incident declared. 21:31 – Firewall rules put in place to block the threat actor’s known IP addresses.
November 24 – Sliver removed; all threat actor access terminated
10:44 – Last known threat actor activity. 11:59 – Sliver removed.
Throughout this timeline, the threat actor tried to access a myriad of other systems at Cloudflare but failed because of our access controls, firewall rules, and use of hard security keys enforced using our own Zero Trust tools.
To be clear, we saw no evidence whatsoever that the threat actor got access to our global network, data centers, SSL keys, customer databases or configuration information, Cloudflare Workers deployed by us or customers, AI models, network infrastructure, or any of our datastores like Workers KV, R2 or Quicksilver. Their access was limited to the Atlassian suite and the server on which our Atlassian runs.
A large part of our “Code Red” effort was understanding what the threat actor got access to and what they tried to access. By looking at logging across systems we were able to track attempted access to our internal metrics, network configuration, build system, alerting systems, and release management system. Based on our review, none of their attempts to access these systems were successful. Independently, CrowdStrike performed an assessment of the scope and extent of the threat actor’s activity, which did not bring to light activities that we had missed and concluded that the last evidence of threat activity was on November 24 at 10:44.
We are confident that between our investigation and CrowdStrike’s, we fully understand the threat actor’s actions and that they were limited to the systems on which we saw their activity.
Conclusion
This was a security incident involving a sophisticated actor, likely a nation-state, who operated in a thoughtful and methodical manner. The efforts we have taken ensure that the ongoing impact of the incident was limited and that we are well-prepared to fend off any sophisticated attacks in the future. This required the efforts of a significant number of Cloudflare’s engineering staff, and, for over a month, this was the highest priority at Cloudflare. The entire Cloudflare team worked to ensure that our systems were secure, the threat actor’s access was understood, to remediate immediate priorities (such as mass credential rotation), and to build a plan of long-running work to improve our overall security based on areas for improvement discovered during this process.
We are incredibly grateful to everyone at Cloudflare who responded quickly over the Thanksgiving holiday to conduct an initial analysis and lock out the threat actor, and all those who contributed to this effort. It would be impossible to name everyone involved, but their long hours and dedicated work made it possible to undertake an essential review and change of Cloudflare’s security while keeping our global network running and our customers’ service running.
We are grateful to CrowdStrike for having been available immediately to conduct an independent assessment. Now that their final report is complete, we are confident in our internal analysis and remediation of the intrusion and are making this blog post available.
IOCs Below are the Indications of Compromise (IOCs) that we saw from this threat actor. We are publishing them so that other organizations, and especially those that may have been impacted by the Okta breach, can search their logs to confirm the same threat actor did not access their systems.
Indicator
Indicator Type
SHA256
Description
193.142.58[.]126
IPv4
N/A
Primary threat actor Infrastructure, owned by M247 Europe SRL (Bucharest, Romania)
198.244.174[.]214
IPv4
N/A
Sliver C2 server, owned by OVH SAS (London, England)
Visit 1.1.1.1 from any device to get started with our free app that makes your Internet faster and safer.
To learn more about our mission to help build a better Internet, start here. If you’re looking for a new career direction, check out our open positions.
AnyDesk confirmed today that it suffered a recent cyberattack that allowed hackers to gain access to the company’s production systems. BleepingComputer has learned that source code and private code signing keys were stolen during the attack.
AnyDesk is a remote access solution that allows users to remotely access computers over a network or the internet. The program is very popular with the enterprise, which use it for remote support or to access colocated servers.
The company reports having 170,000 customers, including 7-Eleven, Comcast, Samsung, MIT, NVIDIA, SIEMENS, and the United Nations.
AnyDesk hacked
In a statement shared with BleepingComputer late Friday afternoon, AnyDesk says they first learned of the attack after detecting indications of an incident on their production servers.
After conducting a security audit, they determined their systems were compromised and activated a response plan with the help of cybersecurity firm CrowdStrike.
AnyDesk did not share details on whether data was stolen during the attack. However, BleepingComputer has learned that the threat actors stole source code and code signing certificates.
The company also confirmed ransomware was not involved but didn’t share too much information about the attack other than saying their servers were breached, with the advisory mainly focusing on how they responded to the incident.
As part of their response, AnyDesk says they have revoked security-related certificates and remediated or replaced systems as necessary. They also reassured customers that AnyDesk was safe to use and that there was no evidence of end-user devices being affected by the incident.
“We can confirm that the situation is under control and it is safe to use AnyDesk. Please ensure that you are using the latest version, with the new code signing certificate,” AnyDesk said in a public statement.
While the company says that no authentication tokens were stolen, out of caution, AnyDesk is revoking all passwords to their web portal and suggests changing the password if it’s used on other sites.
“AnyDesk is designed in a way which session authentication tokens cannot be stolen. They only exist on the end user’s device and are associated with the device fingerprint. These tokens never touch our systems, “AnyDesk told BleepingComputer in response to our questions about the attack.
“We have no indication of session hijacking as to our knowledge this is not possible.”
The company has already begun replacing stolen code signing certificates, with Günter Born of BornCity first reporting that they are using a new certificate in AnyDesk version 8.0.8, released on January 29th. The only listed change in the new version is that the company switched to a new code signing certificate and will revoke the old one soon.
BleepingComputer looked at previous versions of the software, and the older executables were signed under the name ‘philandro Software GmbH’ with serial number 0dbf152deaf0b981a8a938d53f769db8. The new version is now signed under ‘AnyDesk Software GmbH,’ with a serial number of 0a8177fcd8936a91b5e0eddf995b0ba5, as shown below.
Signed AnyDesk 8.0.6 (left) vs AnyDesk 8.0.8 (right) Source: BleepingComputer
Certificates are usually not invalidated unless they have been compromised, such as being stolen in attacks or publicly exposed.
While AnyDesk had not shared when the breach occurred, Born reported that AnyDesk suffered a four-day outage starting on January 29th, during which the company disabled the ability to log in to the AnyDesk client.
“my.anydesk II is currently undergoing maintenance, which is expected to last for the next 48 hours or less,” reads the AnyDesk status message page.
“You can still access and use your account normally. Logging in to the AnyDesk client will be restored once the maintenance is complete.”
Yesterday, access was restored, allowing users to log in to their accounts, but AnyDesk did not provide any reason for the maintenance in the status updates.
However, AnyDesk has confirmed to BleepingComputer that this maintenance is related to the cybersecurity incident.
It is strongly recommended that all users switch to the new version of the software, as the old code signing certificate will soon be revoked.
Furthermore, while AnyDesk says that passwords were not stolen in the attack, the threat actors did gain access to production systems, so it is strongly advised that all AnyDesk users change their passwords. Furthermore, if they use their AnyDesk password at other sites, they should be changed there as well.
Every week, it feels like we learn of a new breach against well-known companies.
Updated: Jan 22, 2024, 15:17 PM By Claire Broadley Content Manager REVIEWED By Jared Atchison President and co-owner
Is Gmail blocking emails that you send? You’re not alone.
Google has always been strict in blocking rogue senders in its fight against spam.
In 2024, it’s tightening up the rules and enforcing tighter anti-spam limits. That means emails you send to Gmail mailboxes won’t arrive if you’re not compliant.
The amount of spam emails that Google’s servers deal with is mind-bogglingly huge. About half of all emails sent daily are spam, and according to The Tech Report, about 1.8 billion people use Gmail. It has a vested interest in keeping spam out of its customers’ inboxes.
This article explains who’s impacted by Google’s new sending requirements, what exactly will change this year, and what you need to do to ensure your emails are delivered.
Gmail is likely blocking your emails for one of 2 reasons. Either you’re on a spam blacklist already, or you don’t comply with its new requirements for bulk senders.
Reason 1. Google Put Your Domain On a Spam Blacklist
It only takes a few people to click Mark as Spam in Gmail for your domain reputation to be impacted. This can result in Gmail adding your email to a blacklist if the spam complaints build up.
Once you’re on a blacklist, you’ll have to earn the trust of email providers to be removed.
“Getting off a blacklist is often not a straightforward task. It’s usually not just a case of requesting your removal – you’ll also have to show what you’ve done to resolve the issues that lead to your blacklisting in the first place. ”
-Rachel Adnyana, Email Deliverability Expert at SendLayer
Blacklists are not new, but the threshold for being added to one is lower than it once was.
The telltale sign that you’re on a blacklist is an error like this:
421-4.7.0 unsolicited mail originating from your IP address. To protect our users from spam, mail sent from your IP address has been temporarily rate limited.
550-5.7.1 Our system has detected an unusual rate of unsolicited mail originating from your IP address. To protect our users from spam, mail sent from your IP address has been blocked.
You may see a different 500 error when sending an email if you’re impacted by this. You can look through the SendLayer error library if you see an error you don’t understand.
We’ll explain how you can resolve this problem in just a minute. First, let’s look at the other possible cause of emails to Gmail being blocked.
Reason 2. Your Emails Aren’t Authenticated
Emails are often sent without authentication, but they are sometimes delivered anyway.
If you have a WordPress website, it’ll send emails without authentication by default. You will likely find them in your spam folder.
Some Gmail users will find their contact form emails don’t arrive at all.
As email providers become less tolerant of unauthenticated emails, we’re seeing more support tickets from customers whose WordPress emails go to spam. Some say they used to be delivered, but now aren’t. It’s confusing when this happens. “I didn’t change anything, so why did my emails stop sending?”
It’s not that your website changed. It’s more likely that the rules for detecting spam got tougher. Soon, senders who don’t authenticate their emails will be blocked from emailing Gmail recipients at all.
The telltale sign is an error like this:
550-5.7.26 This mail is unauthenticated, which poses a security risk to the sender and Gmail users, and has been blocked. The sender must authenticate with at least one of SPF or DKIM. For this message, DKIM checks did not pass and SPF check for example.com did not pass with ip: 192.186.0.1.
As you can see, Google is cracking down on domains that don’t have SPF, DMARC, and DKIM configured. If you’re not sure what that means, I’ll explain more in the next section.
Who Do Gmail’s New Rules Apply To?
Initially, the SPF, DMARC, and DKIM requirement will apply to bulk senders. Google defines a bulk sender as a domain that has, at some point, sent more than 5,000 emails to Gmail recipients in a single day.
‘Gmail recipients’ means anyone with an email ending @gmail.com or @googlemail.com, and people who are using custom domains or Google Workspace to receive emails.
You only need to send 5,000 emails once to be considered a bulk sender forever. Remember: this applies to all emails you send from your domain.
Email authentication is best practise and should be set up to maintain good deliverability — even if you’re not considered a bulk sender.
How to Stop Gmail Blocking Your Emails
Now to the important part. How do you stop Gmail blocking the emails you send?
Email deliverability issues can seriously harm your business. If you use Google Workspace, they could even prevent you from sending emails to your own employees.
If your newsletters are considered to be spam, and people mark them as such, that could mean your purchase receipts don’t get through in the future.
No matter why Gmail is blocking your emails, the solutions are the same. First, let’s set up a free reporting tool so you can see your email spam complaints.
1. Set Up Google Postmaster Tools (Bulk Senders)
Google Postmaster Tools is a free tool that will show you exactly what your spam complaint rate is.
If you send a large number of emails, it’s worth creating an account because it will allow you to understand your current standing with Gmail.
You’ll need to authenticate your domain before your spam complaint rate appears. If you’ve already authenticated it for services like Google Analytics, you may find that setup is almost instant.
If you see any spikes in Postmaster Tools’ spam reporting, or you’re consistently maintaining a level of spam complaints over 0.1%, you might not be able to send emails to Gmail recipients (and that includes customers on Google Workspace).
The absolute maximum spam complaint rate that Google will tolerate is 0.3%.
If your spam complaints are trending higher, it’s a sign you need to get to the bottom of the causes. People could be marking emails as spam for all kinds of reasons, but here are a few that Google has specifically highlighted:
You might be sending emails to people who are not expecting to receive them.
Trying to get people on a mailing list to inflate the size can be tempting. After all, you’ll cast a wider net when you send out a marketing email.
But it will could your deliverability too. More people will mark your emails as spam if you don’t give them any choice.
You might not be making it easy for people to unsubscribe.
You need to have a way for people to unsubscribe from your emails. You also need to implement a one-click unsubscribe list header if your email marketing platform supports that.
People could be sending spam through your website forms.
This is surprisingly common. If you don’t protect your contact form from spam, the junk email that passes through it hurts your deliverability because it appears to come from your domain.
You have a security issue on your website and you’re spamming people without even knowing.
In WordPress, there are a few common causes of poor security:
Poor security on your WordPress admin account, meaning your passwords are easy to guess and other people can get into your dashboard.
Nulled plugins, which can contain malicious code, including code that sends spam or phishing emails.
Poor security on your hosting account; for example, if you have a VPS, you need to watch out for hackers getting access and setting up SMTP relays that blast out emails without you knowing.
All in all, this is about keeping a close eye on what you’re sending and who you’re sending to.
2. Authenticate Emails From WordPress
If you’re still using WordPress without an SMTP plugin, we highly recommend that you install one to stop messages to Gmail from being blocked.
WP Mail SMTP steps in to handle all outgoing email from your WordPress site, routing it through a proper email provider. That authenticates the emails and stops them from being blocked.
WP Mail SMTP easy to set up thanks to the Setup Wizard and it supports many popular email platforms.
You can also purchase the additional plugin setup service if you need a hand getting your email authentication working.
The Pro version of WP Mail SMTP is worth it because it adds lots of useful email logging and routing features. But if you just need to fix blocked emails to Gmail, the free version of WP Mail SMTP will do that.
We already talked about issues that can arise without proper authentication.
You can authenticate your emails by ensuring they have the correct email headers: DKIM, SPF, and DMARC.
These 3 records prove that the emails you send are from you — the domain owner — not a random person pretending to be you.
In the past, you could get away without setting up these records, but Google will no longer allow you to skip this. If you’re seeing the 5.7.26 error from Gmail, you need to review your DNS records to figure out what’s missing.
Your email provider(s) will typically provide all 3 records and explain how to add them to your DNS. If you need a little more help, we have a few blog posts to help you understand what’s required:
Just to add: Google also requires a PTR record, which is sometimes called forward reverse DNS, or full circle DNS.
Your web host or email provider should handle the creation and management of your PTR record, but it’s worth checking that it has been set up, just to rule out any future problems. See our post on What is a PTR record? to find out more.
The From Email is the sender email — the email address your emails appear to come from.
You should send emails from an email address at the same domain as your website. In other words, don’t authenticate your domain and send emails from a totally different account elsewhere. Make sure everything matches.
WP Mail SMTP has settings specifically to allow you to set the from email (and the corresponding from name):
What about real email addresses vs fake ones? It’s good practise to avoid using noreply@domain.com (or any non-existent email address) as a From Email.
5. Send Email With TLS
When you’re sending emails through WordPress (or any other platform) using an SMTP server, you should use a provider that uses TLS to make the connection.
TLS stands for Transport Layer Security. It’s better than SSL because it’s more secure, and the end goal is that TLS will eventually replace the older SSL protocol.
We don’t need to go into a huge amount of detail on this. Most email providers will support TLS so you may already be using it. But it’s worth double-checking your account to make sure you’re using the latest settings.
6. Add Unsubscribe Links to Marketing Emails
Most businesses send transactional emails and marketing emails.
So what’s the difference?
Transactional emails are emails that are necessary for the normal operation of your business. Password reset emails, renewal reminders, and receipts are all transactional. These kinds of emails usually need to be delivered immediately to be effective.
Marketing emails are emails you send to promote your products and services. They don’t necessarily need to be sent immediately, and they are not essential for a customer.
There are 2 things to think about here.
First, marketing emails must have an unsubscribe link in the footer of the email. The link doesn’t have to be huge, but it has to be clearly visible.
Second, you should also make sure that your newsletters have a one-click unsubscribe link at the top.
In Gmail, this link triggers an instant unsubscribe popup. This is going to be important if you want to prevent your emails from being blocked in the future.
The one-click unsubscribe link near the subject line is triggered by list unsubscribe headers. Your email provider should be able to add these headers for you.
If you’re not sure what to ask for, the header is the technical part of the email that we don’t normally see; here’s what it looks like:
One question we’re asked a lot is this: Do transactional emails need to have unsubscribe links? They do not. However:
Include unsubscribe links in all marketing emails.
Don’t send emails that have a mixture of transactional and marketing content in them to try to get around this rule.
It’s OK to give people the choice of which email marketing lists they want to be subscribed to, but Google is clear that you must also provide an option to unsubscribe from all marketing emails.
7. Use Double Optins Where Possible
Google recommends that everyone who sends marketing emails uses double optins.
A double optin means that someone has to choose to join your list and confirm their choice, usually by clicking a confirmation link.
While Google won’t block emails to Gmail if you don’t use double optins, the truth is that single optins result in higher spam complaints. So implementing them will keep that important spam complaint rate low.
The downside of double optins is that you’ll grow your list more slowly because you will sign up fewer leads.
Recovering From a Gmail Block
If your WordPress emails are being blocked to Gmail recipients, running through this guide should help you to figure out the reason why.
If Google is rejecting emails from your domain because it’s missing some crucial DNS records, adding them might resolve the problem quickly.
If your domain or IP is on a blacklist, it’ll take longer to recover. You’ll need to earn the trust of email providers and slowly improve your domain or IP reputation.
Make it easy for people to leave your mailing lists and don’t send them emails they don’t want. This will reduce the likelihood of them marking emails as spam, therefore keeping your spam complaint rate low.
It can take time to clean up your lists, but removing people who aren’t opening your emails is a good first step. Re-engagement workflows typically unsubscribe people who aren’t responsive, helping to reduce spam complaints, and automatically unsubscribing invalid email addresses can also help.
Email providers like Brevo or SMTP.com are used to helping customers with these issues. If you’re concerned, reach out to them for advice. They may be able to change your sender IP or help you look into your bounce rates to diagnose the problem.
It’s difficult to say how long recovery will take. It depends on the reason you were blocked and the severity of the problem. Either way, prevention is always better than the cure.
If WordPress emails are not being delivered to Gmail and you can’t figure out why, our support team is standing by to help.
Ready to fix your emails? Get started today with the best WordPress SMTP plugin. If you don’t have the time to fix your emails, you can get full White Glove Setup assistance as an extra purchase, and there’s a 14-day money-back guarantee for all paid plans.
If this article helped you out, please follow us on Facebook and Twitter for more WordPress tips and tutorials.
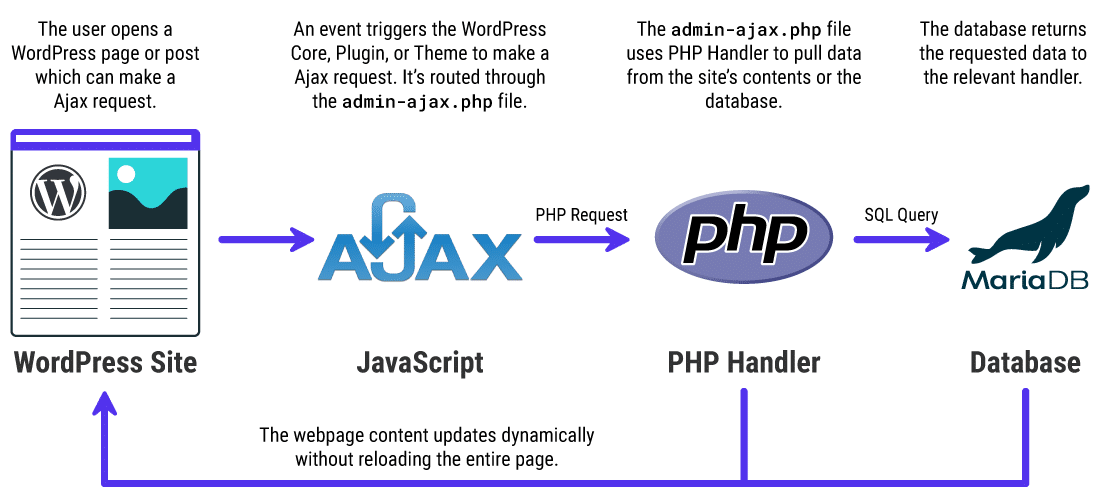
Ajax is a JavaScript-based web technology that helps you to build dynamic and interactive websites. WordPress uses Ajax to power many of its core admin area features such as auto-saving posts, user session management, and notifications.
By default, WordPress directs all Ajax calls through the admin-ajax.php file located in the site’s /wp-admin directory.
Numerous simultaneous Ajax requests can lead to high admin-ajax.php usage, resulting in a considerably slowed down server and website. It’s one of the most common problems faced by many unoptimized WordPress sites. Typically, it manifests itself as a slow website or an HTTP 5xx error (mostly 504 or 502 errors).
In this article, you’ll learn about WordPress’ admin-ajax.php file, how it works, its benefits and drawbacks, and how you can diagnose and fix the high admin-ajax.php usage issue.
Ready to go? Let’s roll out!
What Is the admin-ajax.php File?
The admin-ajax.php file contains all the code for routing Ajax requests on WordPress. Its primary purpose is to establish a connection between the client and the server using Ajax. WordPress uses it to refresh the page’s contents without reloading it, thus making it dynamic and interactive to the users.
A basic overview of how Admin Ajax works on WordPress
Since the WordPress core already uses Ajax to power its various backend features, you can use the same functions to use Ajax on WordPress. All you need to do is register an action, point it to your site’s admin-ajax.php file, and define how you want it to return the value. You can set it to return HTML, JSON, or even XML.
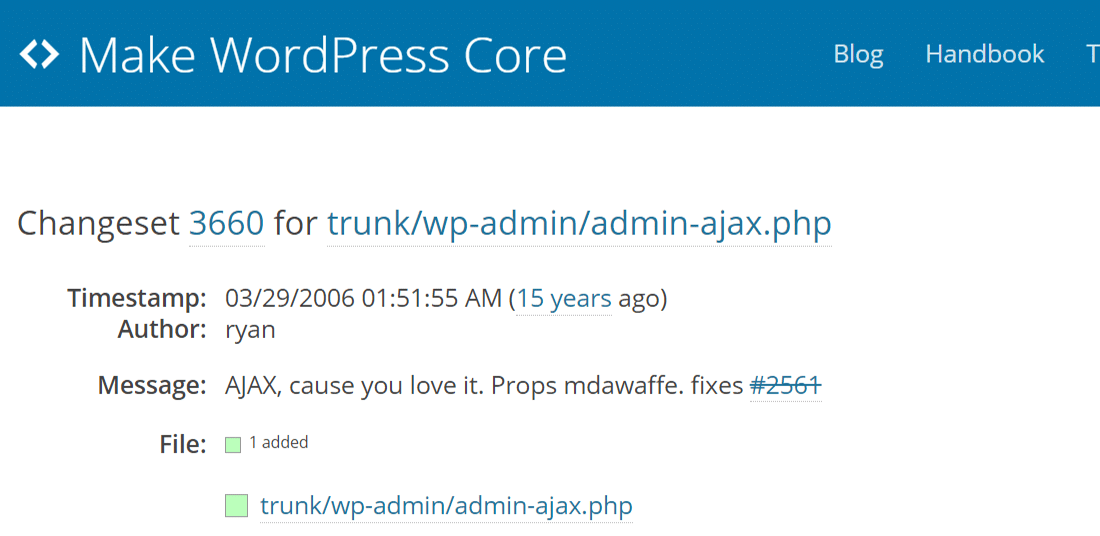
admin-ajax.php file in WordPress
As per WordPress Trac, the admin-ajax.php file first appeared in WordPress 2.1. It’s also referred to as Ajax Admin in the WordPress development community.
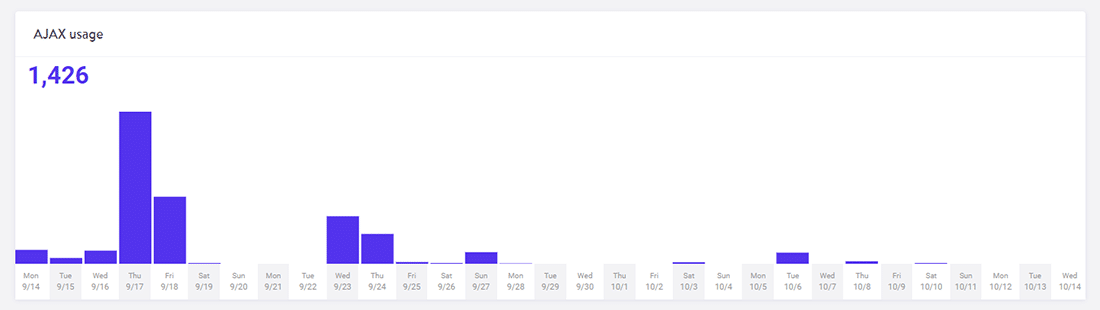
Checking Ajax usage in MyKinsta dashboard
The chart above only shows the amount of admin-ajax.php requests, not where they might be coming from. It’s a great way to see when the spikes are occurring. You can combine it with other techniques mentioned in this post to narrow down the primary cause.
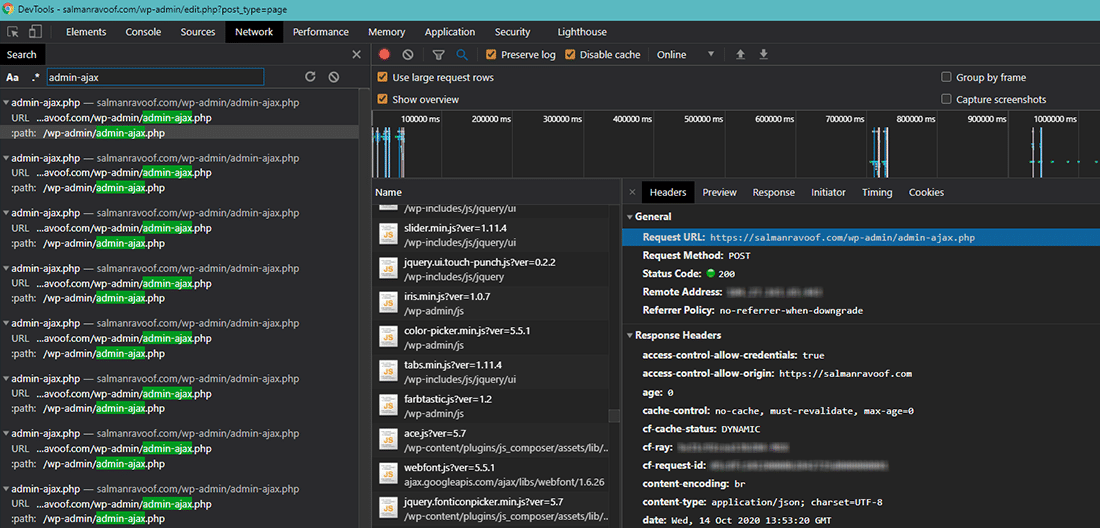
Checking the number of admin-ajax.php requests in Chrome DevTools
You can also use Chrome DevTools to see how many requests are being sent to admin-ajax.php. You can also check out the Timings tab under the Network section to find out how much time it takes to process these requests.
As for finding the exact reason behind high admin-ajax.php usage, there are primarily two main causes: one due to frontend, and the other due to backend. We’ll discuss both below.
Unlock more growth, zero guesswork
Subscribe to our newsletter – we’re serving up the latest web dev news and tips you’ll actually use.
How to Debug High admin-ajax.php Usage on WordPress
Third-party plugins are one of the most common reasons behind high admin-ajax.php usage. Typically, this issue is seen on the site’s frontend and shows up frequently in speed test reports.
But plugins aren’t the only culprit here as themes, the WordPress core, the webserver, and a DDoS attack can also be the reason behind high Admin Ajax usage.
Let’s explore them in more detail.
How to Determine the Origin of High admin-ajax.php Usage for Plugins and Themes
Just because a plugin uses Ajax doesn’t mean that it’ll slow down your site.
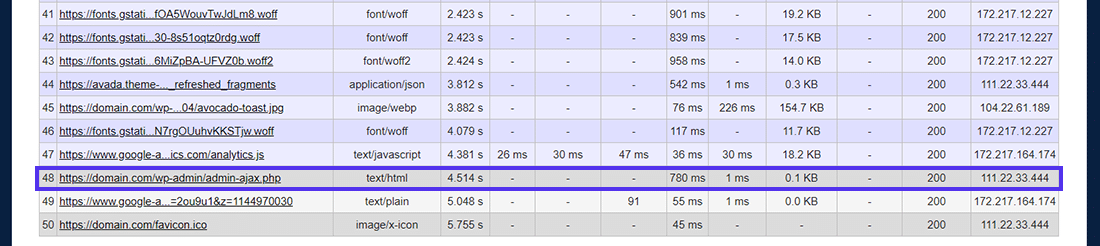
Viewing the admin-ajax.php request in WebPageTest report
Usually, Admin Ajax loads towards the end of the page load. Also, you can set Ajax requests to load asynchronously, so it can have little to no effect on the page’s perceived performance for the user.
As you can see in the WebPageTest report above, admin-ajax.php loads towards the end of the requests queue, but it still takes up 780 ms. That’s a lot of time for just one request.
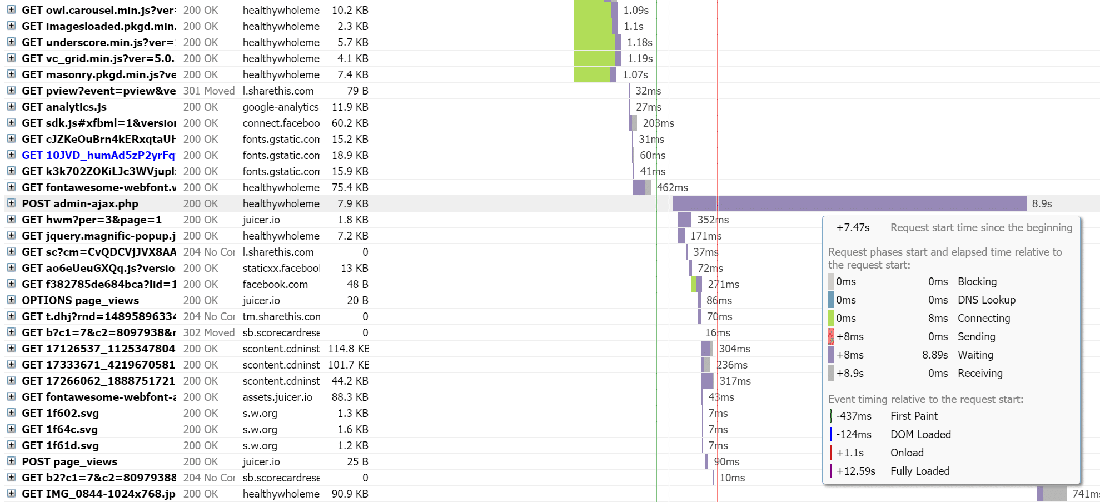
GTmetrix report indicating a serious admin-ajax.php usage spike
When developers don’t implement Ajax properly on WordPress, it can lead to drastic performance issues. The above GTmetrix report is a perfect example of such behavior.
You can also use GTmetrix to dig into individual post and response data. You can use this feature to pinpoint what’s causing the issue.
To do that, go to GTmetrix report’s Waterfall tab, and then find and click the POST admin-ajax.php item. You’ll see three tabs for this request: Headers, Post, and Response.
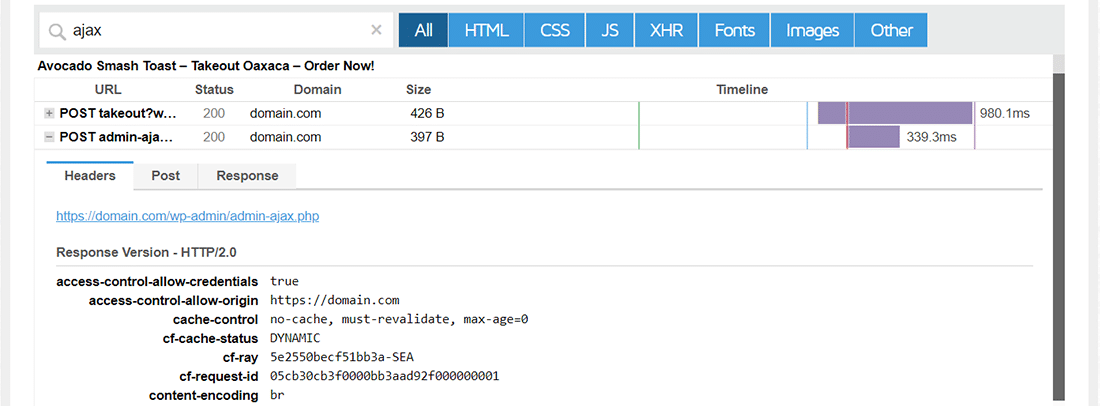
POST admin-ajax.php request’s Headers data
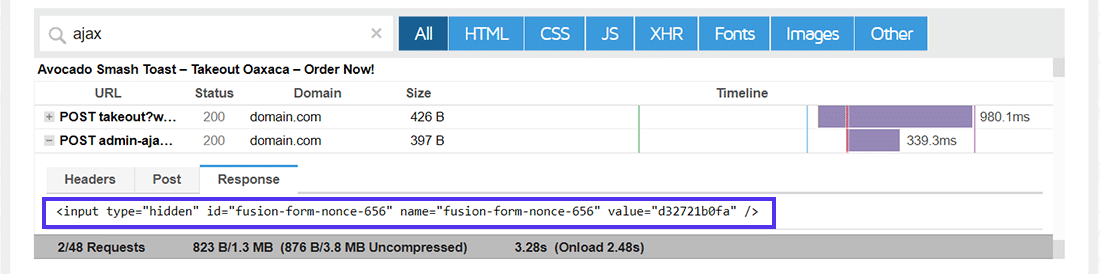
Checking out the request’s Post and Response tabs will give you some hints to find out the reasons behind the performance issue. For this site, you can see clues in the Response tab.
POST admin-ajax.php request’s Response data
You can see that part of the response has something to do with an input tag with id set to “fusion-form-nonce-656”.
A quick search of this clue will lead you to ThemeFusion’s website, the creators of Avada theme. Hence, you can conclude that the request is originating from the theme, or any of the plugins it’s bundled with.
In such a case, you must first ensure that the Avada theme and all its related plugins are fully updated. If that doesn’t fix the issue, then you can try disabling the theme and see if that fixes the issue.
Unlike disabling a plugin, disabling a theme isn’t feasible in most scenarios. Hence, try optimizing the theme to remove any bottlenecks. You can also reach out to the theme’s support team to see if they can suggest a better solution.
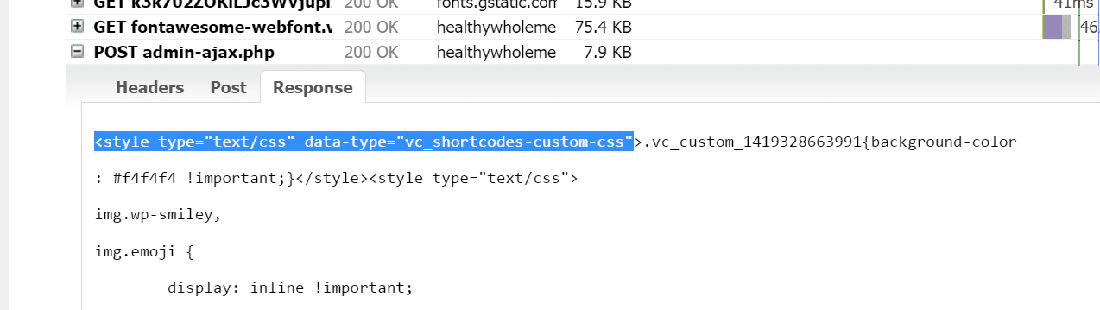
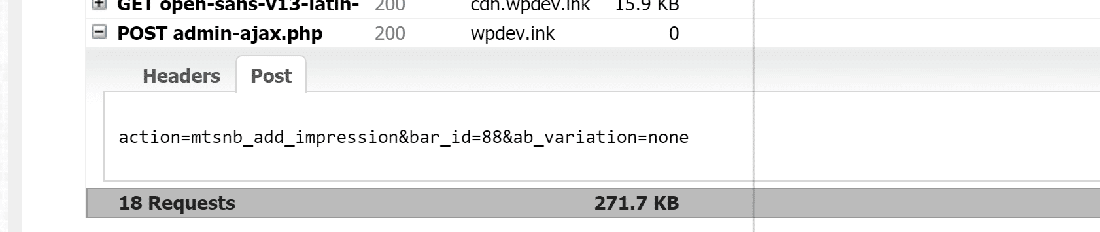
Testing another slow website in GTmetrix led to finding similar issues with Visual Composer page builder and Notification Bar plugins.
Another POST admin-ajax.php request’s Response dataPOST admin-ajax.php request’s Post data
Thankfully, if you cannot resolve an issue with the plugin, you most like have many alternative plugins available to try out. For example, when it comes to page builders you could also try out Beaver Builder or Elementor.
One platform, dozens of premium hosting features
The list is too long for this section. But you can find them all here. (Hint: you’ll save $275 worth of premium features, included in all WordPress plans.)
How to Determine the Origin of High admin-ajax.php
Sometimes, the Post and Response data presented in speed test reports may not be as clear and straightforward. Here, finding the origin of high admin-ajax.php usage isn’t as easy. In such cases, you can always do it the old-school way.
Disable all your site’s plugins, clear your site’s cache (if any), and then run a speed test again. If admin-ajax.php is still present, then the most likely culprit is the theme. But if it’s nowhere to be found, then you must activate each plugin one-by-one and run the speed tests each time. By process of elimination, you’ll lock down on the issue’s origin.
Diagnosing Backend Server Issues with admin-ajax.php
The second most common reason for high admin-ajax.php usage is the WordPress Heartbeat API generating frequent Ajax calls, leading to high CPU usage on the server. Typically, this is caused because of many users logged into the WordPress backend dashboard. Hence, you won’t see this show up in speed tests.
By default, the Heartbeat API polls the admin-ajax.php file every 15 seconds to auto-save posts or pages. If you’re using a shared hosting server, then you don’t have many server resources dedicated to your site. If you’re editing a post or page and leave the tab open for a significant time, then it can rack up a lot of Admin Ajax requests.
For example, when you’re writing or editing posts, a single user alone can generate 240 requests in an hour!
Frequent autosave admin-ajax.php requests
That’s a lot of requests on the backend with just one user. Now imagine a site where there are multiple editors logged in concurrently. Such a site can rack up Ajax requests rapidly, generating high CPU usage.
That was the situation discovered by DARTDrones when the company was preparing its WooCommerce site for an expected surge in traffic following an appearance on Shark Tank.
Before being featured on the television show, the DARTDrones site was receiving over 4,100 admin-ajax.php calls in a day with only 2,000 unique visitors. That’s a weak requests-to-visits ratio.
Heavy admin-ajax.php usage on dartdrones.com
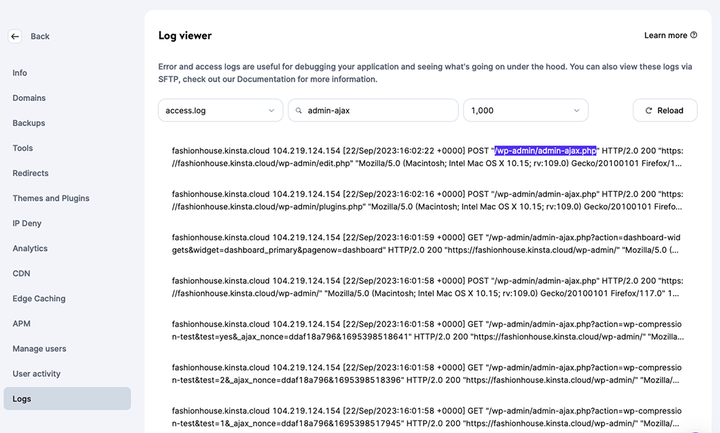
Investigators noticed the /wp-admin referrer URL and correctly determined the root cause. These requests were due to DARTDrones’ admins and editors updating the site frequently in anticipation of the show.
WordPress has fixed this Heartbeat API issue partially long ago. For instance, you can reduce the frequency of requests generated by the Heartbeat API on hosts with limited resources. It also suspends itself after one hour of keyboard/mouse/touch inactivity.
Overwhelming your site with a DDoS attack or spam bots can also lead to high admin-ajax.php usage. However, such an attack doesn’t necessarily target increasing Admin Ajax requests. It’s just collateral damage.
If your site is under a DDoS attack, your priority should be to get it behind a robust CDN/WAF like Cloudflare or Sucuri. Every hosting plan with Kinsta includes free Cloudflare integration and Kinsta CDN, which can help you offload your website’s resources to a large extent.
WordPress uses Ajax in its Heartbeat API to implement many of its core features. However, it can lead to increased load times if not used correctly. This is typically caused due to a high frequency of requests to the admin-ajax.php file.
In this article, you learned the various causes for high admin-ajax.php usage, how to diagnose what’s responsible for this symptom, and how you can go about fixing it. In most cases, following this guide should get your site back up and running smoothly in no time.
However, in some cases upgrading to a server with higher resources is the only viable solution. Especially for demanding use cases such as ecommerce and membership sites. If you’re running such a site, consider upgrading to a managed WordPress host who is experienced with these types of performance issues.
If you’re still struggling with high admin-ajax.php usage on your WordPress site, let us know in the comments section.
Save time and costs, plus maximize site performance, with $275+ worth of enterprise-level integrations included in every Managed WordPress plan. This includes a high-performance CDN, DDoS protection, malware and hack mitigation, edge caching, and Google’s fastest CPU machines. Get started with no long-term contracts, assisted migrations, and a 30-day money-back guarantee.
Check out our plans or talk to sales to find the plan that’s right for you.
Salman Ravoof
Salman Ravoof is a self-taught web developer, writer, creator, and a huge admirer of Free and Open Source Software (FOSS). Besides tech, he’s excited by science, philosophy, photography, arts, cats, and food. Learn more about him on his website, and connect with Salman on Twitter.
Welcome to the sixteenth edition of Cloudflare’s DDoS Threat Report. This edition covers DDoS trends and key findings for the fourth and final quarter of the year 2023, complete with a review of major trends throughout the year.
What are DDoS attacks?
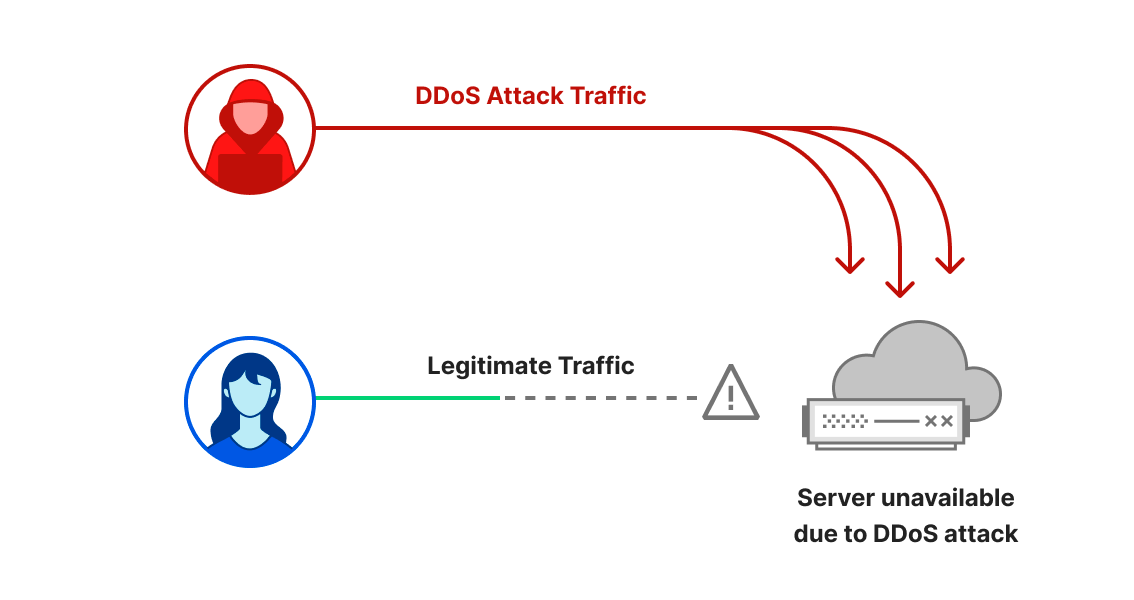
DDoS attacks, or distributed denial-of-service attacks, are a type of cyber attack that aims to disrupt websites and online services for users, making them unavailable by overwhelming them with more traffic than they can handle. They are similar to car gridlocks that jam roads, preventing drivers from getting to their destination.
There are three main types of DDoS attacks that we will cover in this report. The first is an HTTP request intensive DDoS attack that aims to overwhelm HTTP servers with more requests than they can handle to cause a denial of service event. The second is an IP packet intensive DDoS attack that aims to overwhelm in-line appliances such as routers, firewalls, and servers with more packets than they can handle. The third is a bit-intensive attack that aims to saturate and clog the Internet link causing that ‘gridlock’ that we discussed. In this report, we will highlight various techniques and insights on all three types of attacks.
Previous editions of the report can be found here, and are also available on our interactive hub, Cloudflare Radar. Cloudflare Radar showcases global Internet traffic, attacks, and technology trends and insights, with drill-down and filtering capabilities for zooming in on insights of specific countries, industries, and service providers. Cloudflare Radar also offers a free API allowing academics, data sleuths, and other web enthusiasts to investigate Internet usage across the globe.
To learn how we prepare this report, refer to our Methodologies.
Key findings
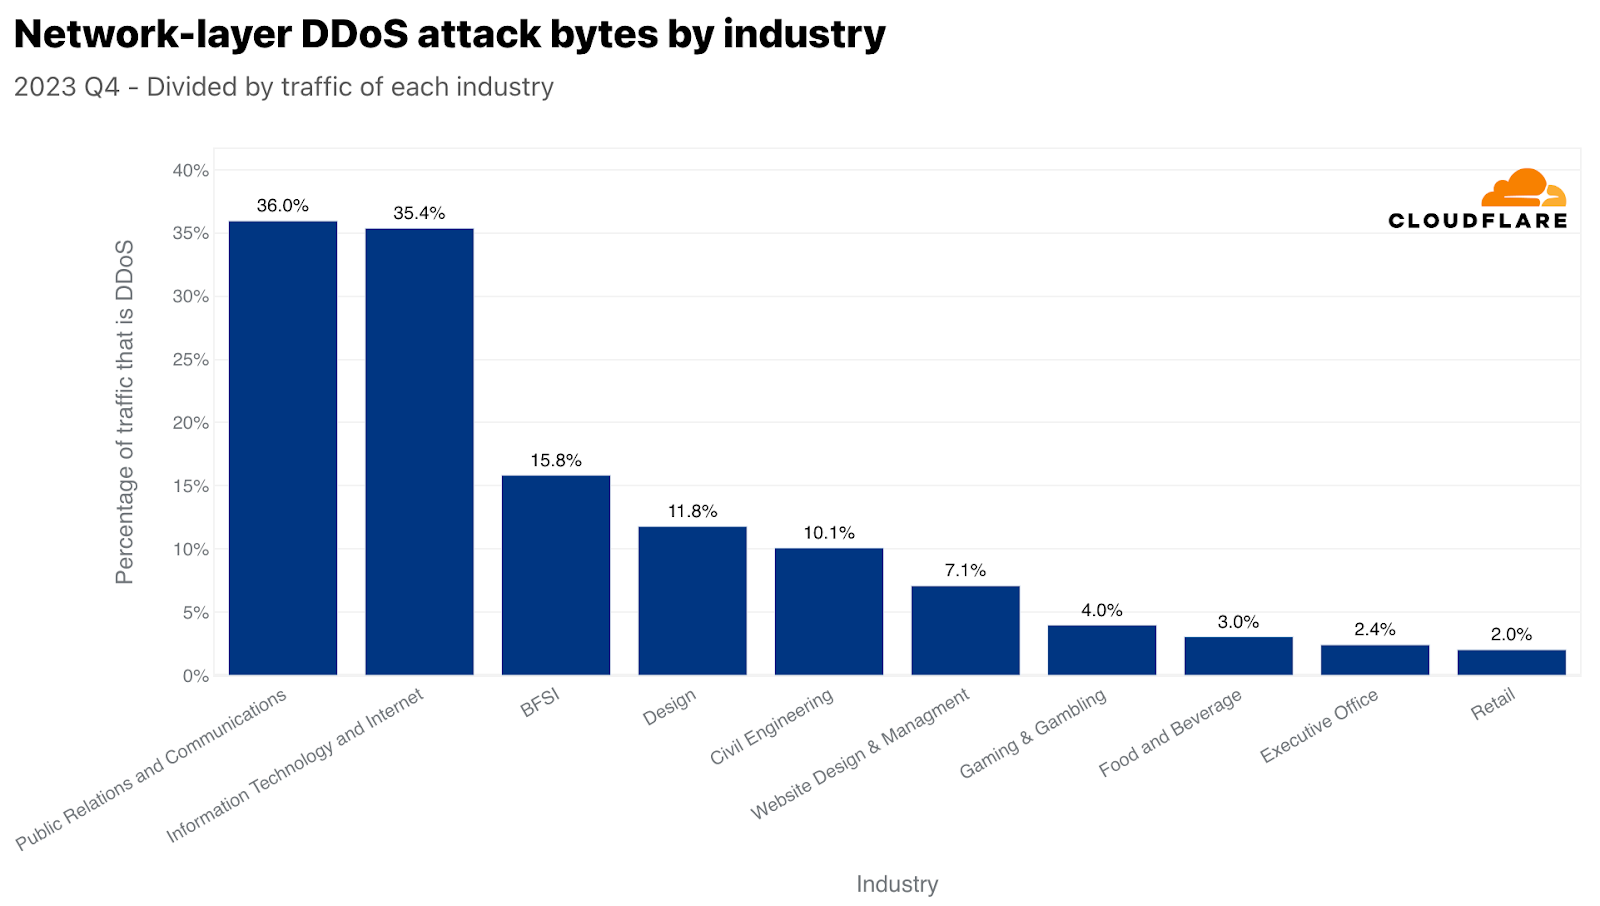
In Q4, we observed a 117% year-over-year increase in network-layer DDoS attacks, and overall increased DDoS activity targeting retail, shipment and public relations websites during and around Black Friday and the holiday season.
In Q4, DDoS attack traffic targeting Taiwan registered a 3,370% growth, compared to the previous year, amidst the upcoming general election and reported tensions with China. The percentage of DDoS attack traffic targeting Israeli websites grew by 27% quarter-over-quarter, and the percentage of DDoS attack traffic targeting Palestinian websites grew by 1,126% quarter-over-quarter — as the military conflict between Israel and Hamas continues.
In Q4, there was a staggering 61,839% surge in DDoS attack traffic targeting Environmental Services websites compared to the previous year, coinciding with the 28th United Nations Climate Change Conference (COP 28).
For an in-depth analysis of these key findings and additional insights that could redefine your understanding of current cybersecurity challenges, read on!
Illustration of a DDoS attack
Hyper-volumetric HTTP DDoS attacks
2023 was the year of uncharted territories. DDoS attacks reached new heights — in size and sophistication. The wider Internet community, including Cloudflare, faced a persistent and deliberately engineered campaign of thousands of hyper-volumetric DDoS attacks at never before seen rates.
These attacks were highly complex and exploited an HTTP/2 vulnerability. Cloudflare developed purpose-built technology to mitigate the vulnerability’s effect and worked with others in the industry to responsibly disclose it.
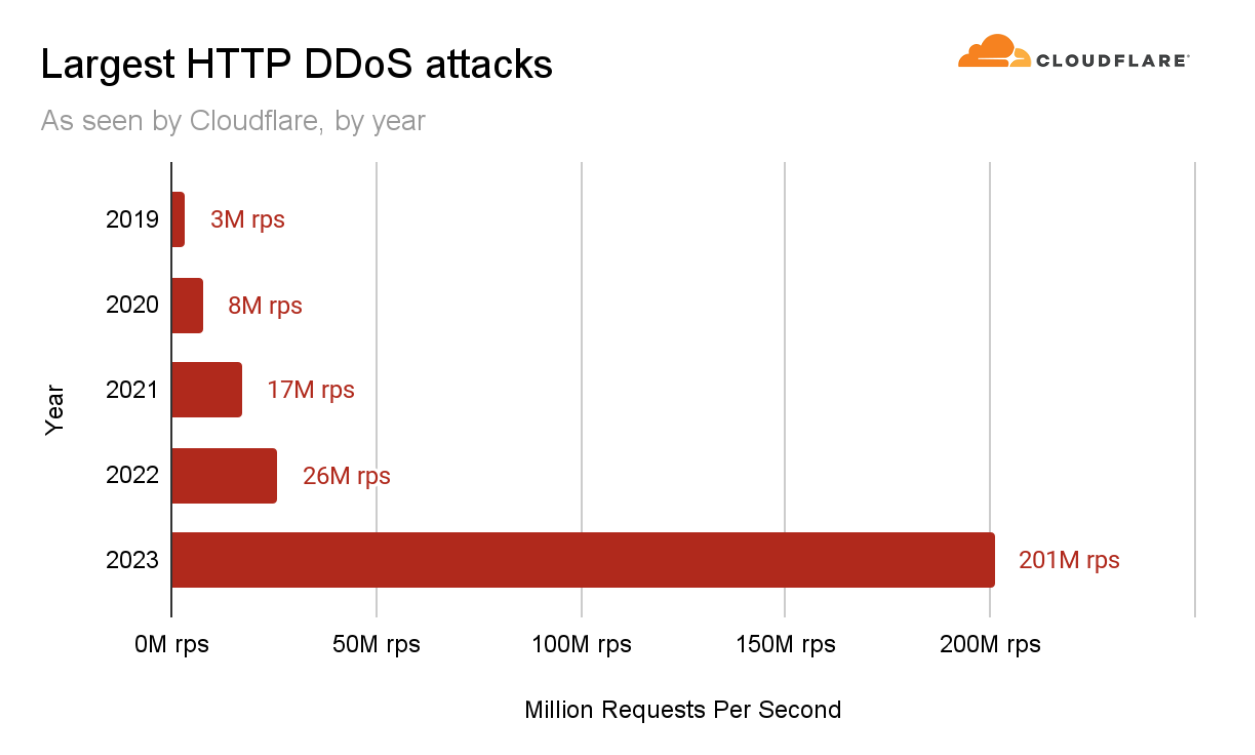
As part of this DDoS campaign, in Q3 our systems mitigated the largest attack we’ve ever seen — 201 million requests per second (rps). That’s almost 8 times larger than our previous 2022 record of 26 million rps.
Largest HTTP DDoS attacks as seen by Cloudflare, by year
Growth in network-layer DDoS attacks
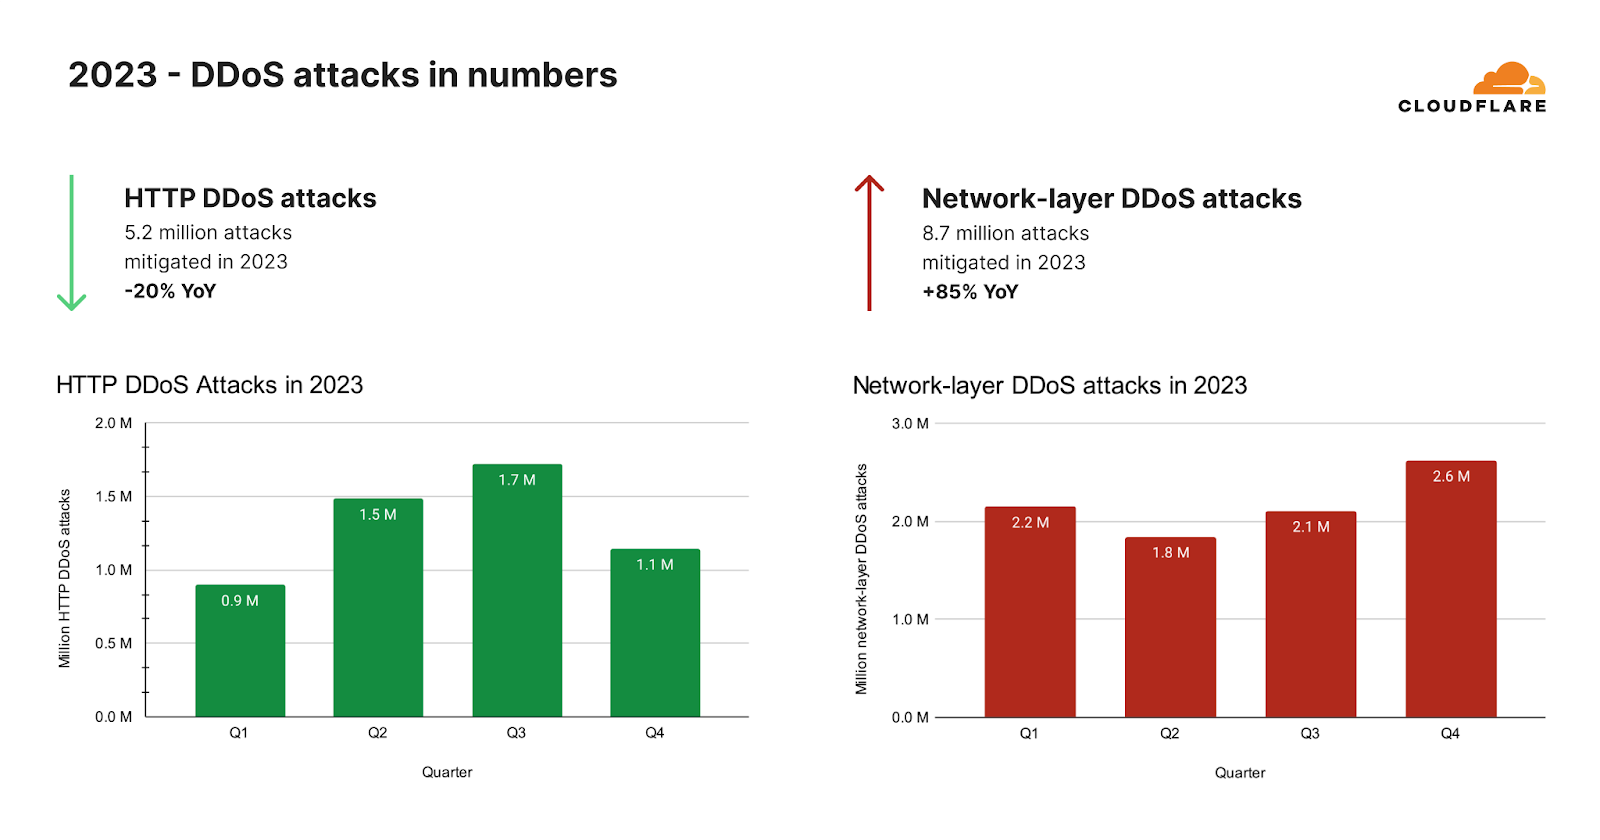
After the hyper-volumetric campaign subsided, we saw an unexpected drop in HTTP DDoS attacks. Overall in 2023, our automated defenses mitigated over 5.2 million HTTP DDoS attacks consisting of over 26 trillion requests. That averages at 594 HTTP DDoS attacks and 3 billion mitigated requests every hour.
Despite these astronomical figures, the amount of HTTP DDoS attack requests actually declined by 20% compared to 2022. This decline was not just annual but was also observed in 2023 Q4 where the number of HTTP DDoS attack requests decreased by 7% YoY and 18% QoQ.
On the network-layer, we saw a completely different trend. Our automated defenses mitigated 8.7 million network-layer DDoS attacks in 2023. This represents an 85% increase compared to 2022.
In 2023 Q4, Cloudflare’s automated defenses mitigated over 80 petabytes of network-layer attacks. On average, our systems auto-mitigated 996 network-layer DDoS attacks and 27 terabytes every hour. The number of network-layer DDoS attacks in 2023 Q4 increased by 175% YoY and 25% QoQ.
HTTP and Network-layer DDoS attacks by quarter
DDoS attacks increase during and around COP 28
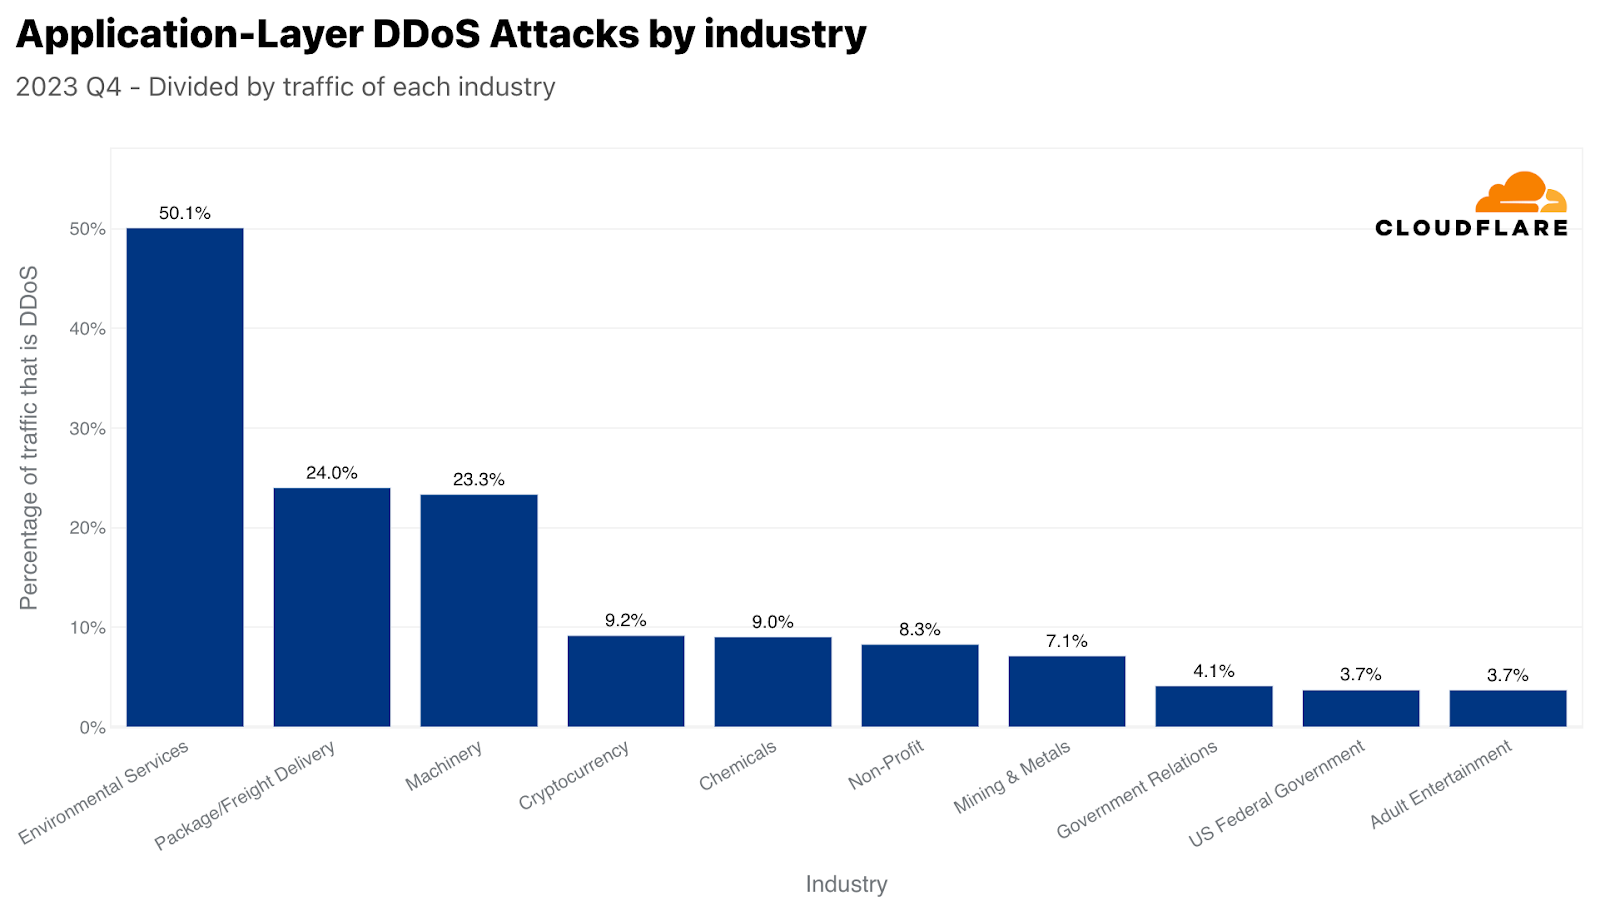
In the final quarter of 2023, the landscape of cyber threats witnessed a significant shift. While the Cryptocurrency sector was initially leading in terms of the volume of HTTP DDoS attack requests, a new target emerged as a primary victim. The Environmental Services industry experienced an unprecedented surge in HTTP DDoS attacks, with these attacks constituting half of all its HTTP traffic. This marked a staggering 618-fold increase compared to the previous year, highlighting a disturbing trend in the cyber threat landscape.
This surge in cyber attacks coincided with COP 28, which ran from November 30th to December 12th, 2023. The conference was a pivotal event, signaling what many considered the ‘beginning of the end’ for the fossil fuel era. It was observed that in the period leading up to COP 28, there was a noticeable spike in HTTP attacks targeting Environmental Services websites. This pattern wasn’t isolated to this event alone.
Looking back at historical data, particularly during COP 26 and COP 27, as well as other UN environment-related resolutions or announcements, a similar pattern emerges. Each of these events was accompanied by a corresponding increase in cyber attacks aimed at Environmental Services websites.
In February and March 2023, significant environmental events like the UN’s resolution on climate justice and the launch of United Nations Environment Programme’s Freshwater Challenge potentially heightened the profile of environmental websites, possibly correlating with an increase in attacks on these sites.
This recurring pattern underscores the growing intersection between environmental issues and cyber security, a nexus that is increasingly becoming a focal point for attackers in the digital age.
DDoS attacks and Iron Swords
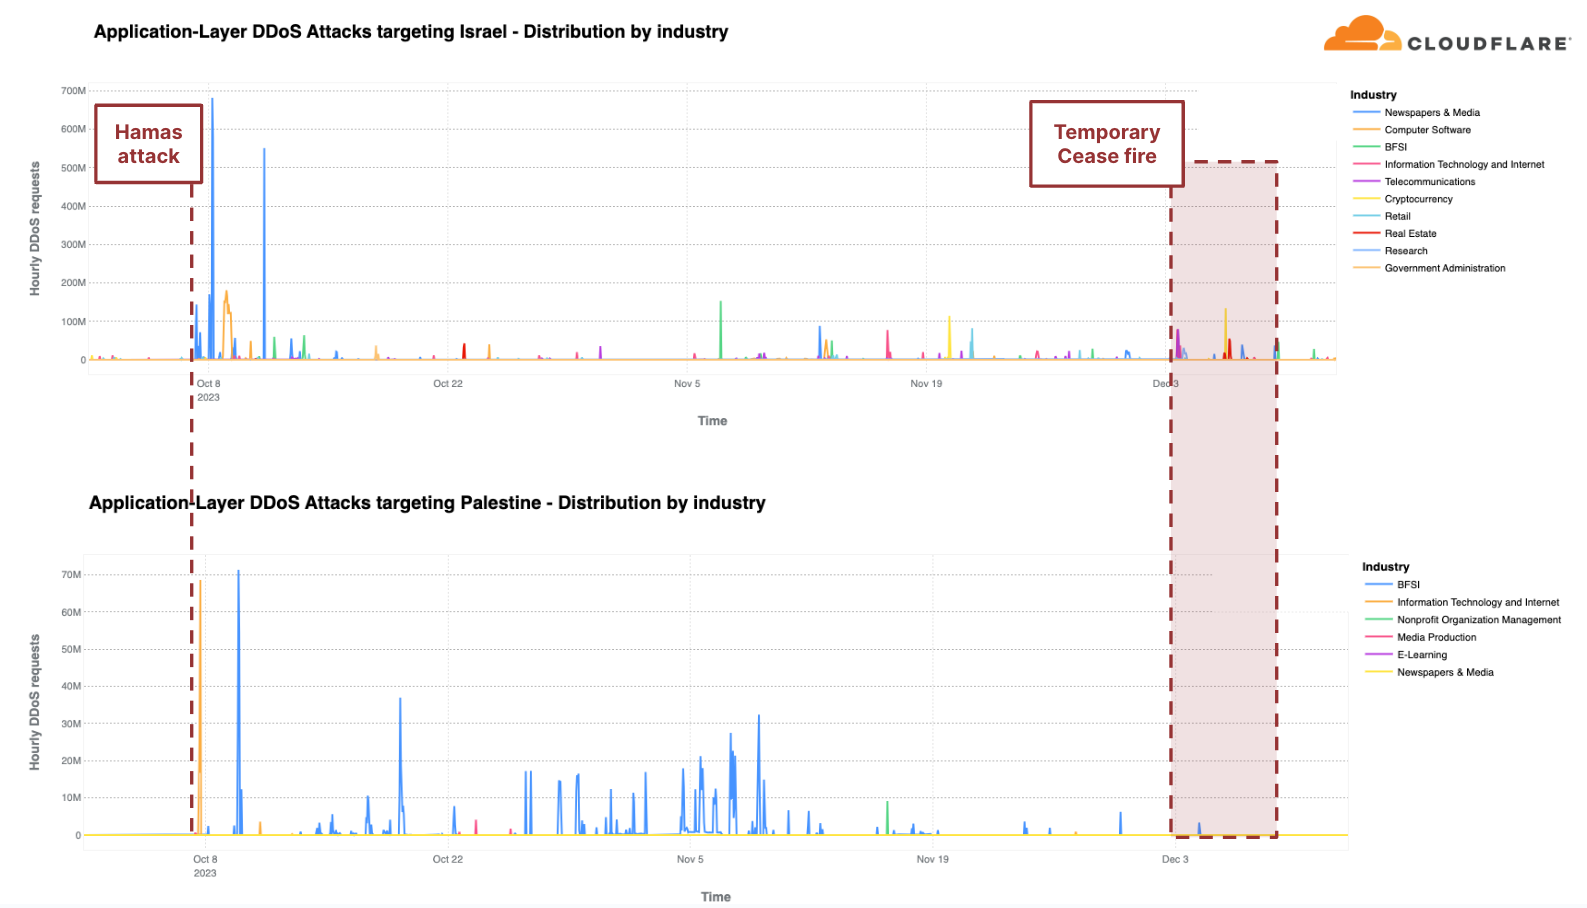
It’s not just UN resolutions that trigger DDoS attacks. Cyber attacks, and particularly DDoS attacks, have long been a tool of war and disruption. We witnessed an increase in DDoS attack activity in the Ukraine-Russia war, and now we’re also witnessing it in the Israel-Hamas war. We first reported the cyber activity in our report Cyber attacks in the Israel-Hamas war, and we continued to monitor the activity throughout Q4.
DDoS attacks targeting Israeli and Palestinian websites, by industry
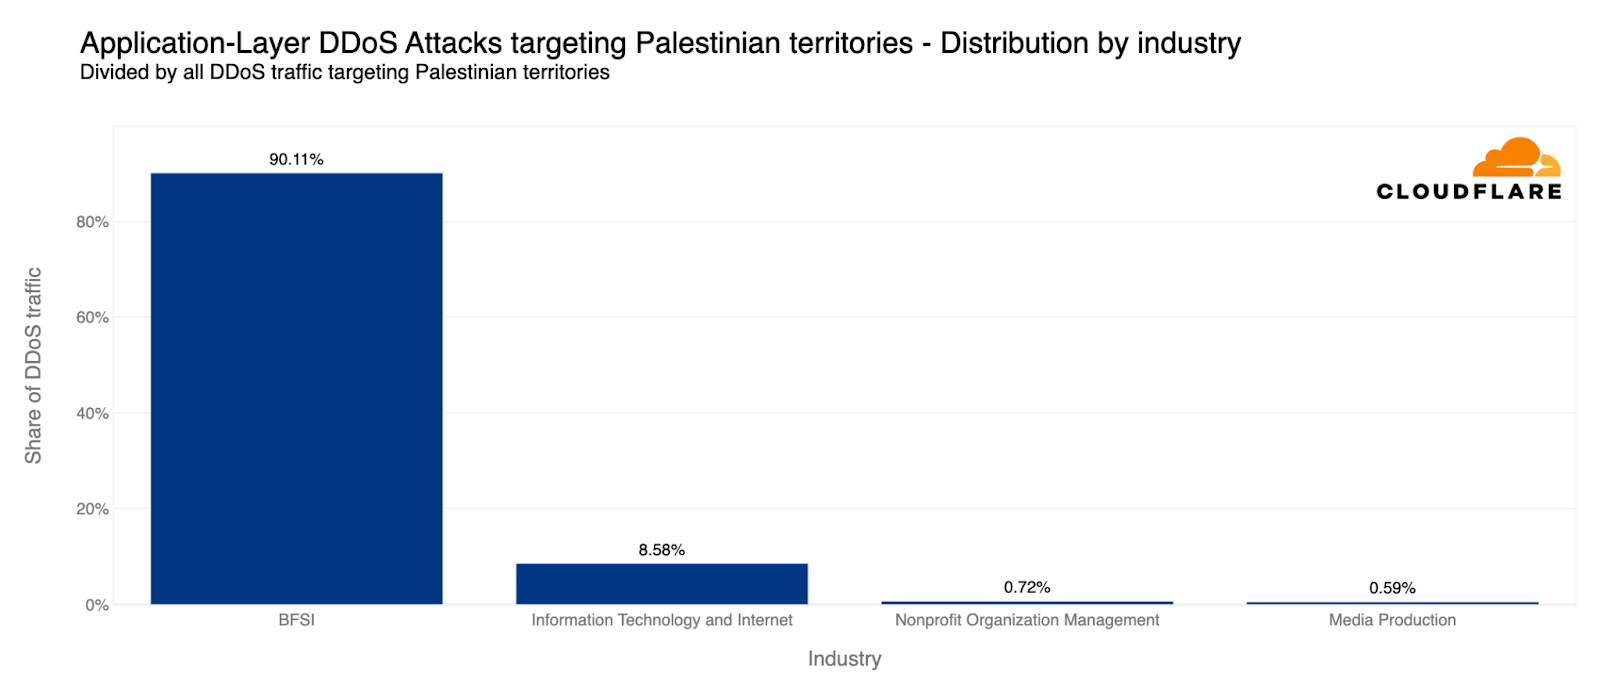
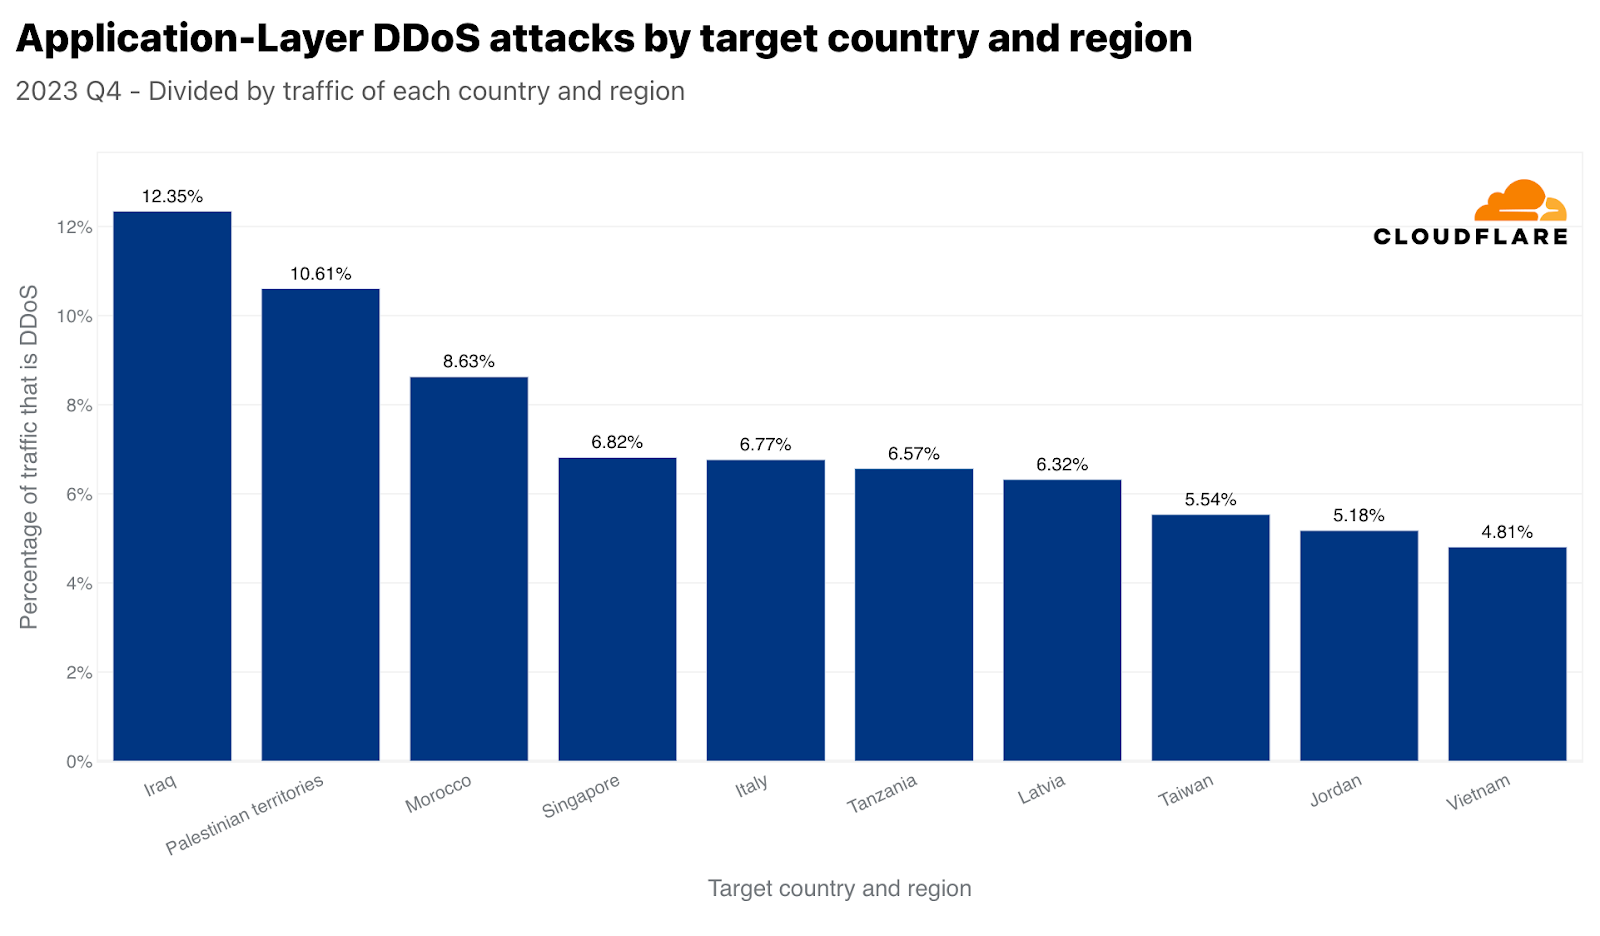
Relative to each region’s traffic, the Palestinian territories was the second most attacked region by HTTP DDoS attacks in Q4. Over 10% of all HTTP requests towards Palestinian websites were DDoS attacks, a total of 1.3 billion DDoS requests — representing a 1,126% increase in QoQ. 90% of these DDoS attacks targeted Palestinian Banking websites. Another 8% targeted Information Technology and Internet platforms.
Top attacked Palestinian industries
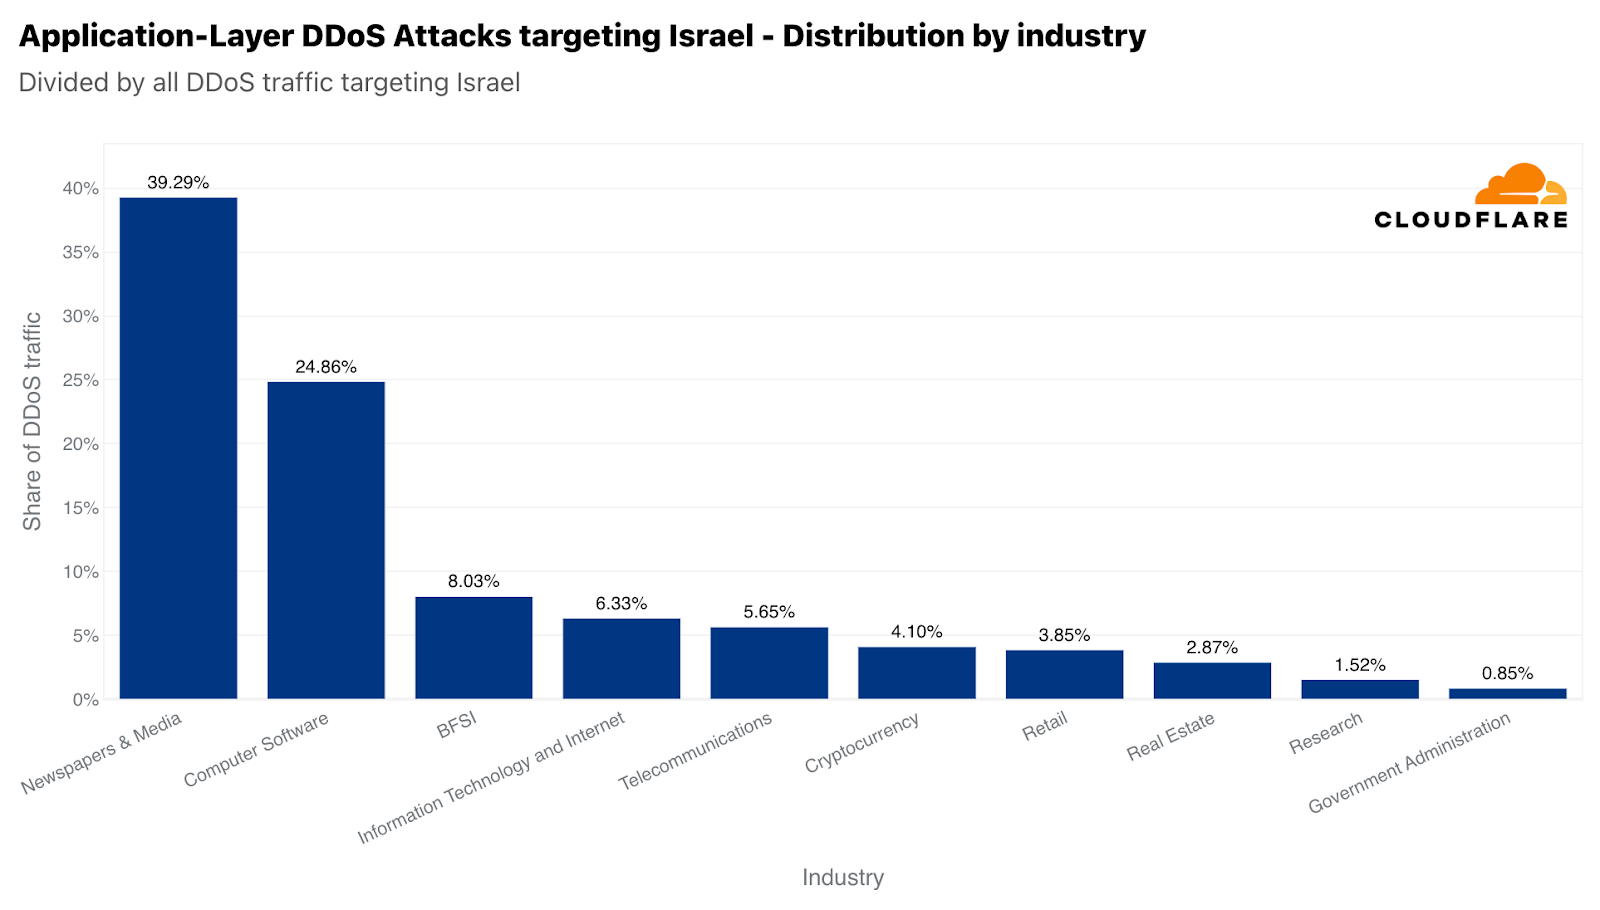
Similarly, our systems automatically mitigated over 2.2 billion HTTP DDoS requests targeting Israeli websites. While 2.2 billion represents a decrease compared to the previous quarter and year, it did amount to a larger percentage out of the total Israel-bound traffic. This normalized figure represents a 27% increase QoQ but a 92% decrease YoY. Notwithstanding the larger amount of attack traffic, Israel was the 77th most attacked region relative to its own traffic. It was also the 33rd most attacked by total volume of attacks, whereas the Palestinian territories was 42nd.
Of those Israeli websites attacked, Newspaper & Media were the main target — receiving almost 40% of all Israel-bound HTTP DDoS attacks. The second most attacked industry was the Computer Software industry. The Banking, Financial Institutions, and Insurance (BFSI) industry came in third.
Top attacked Israeli industries
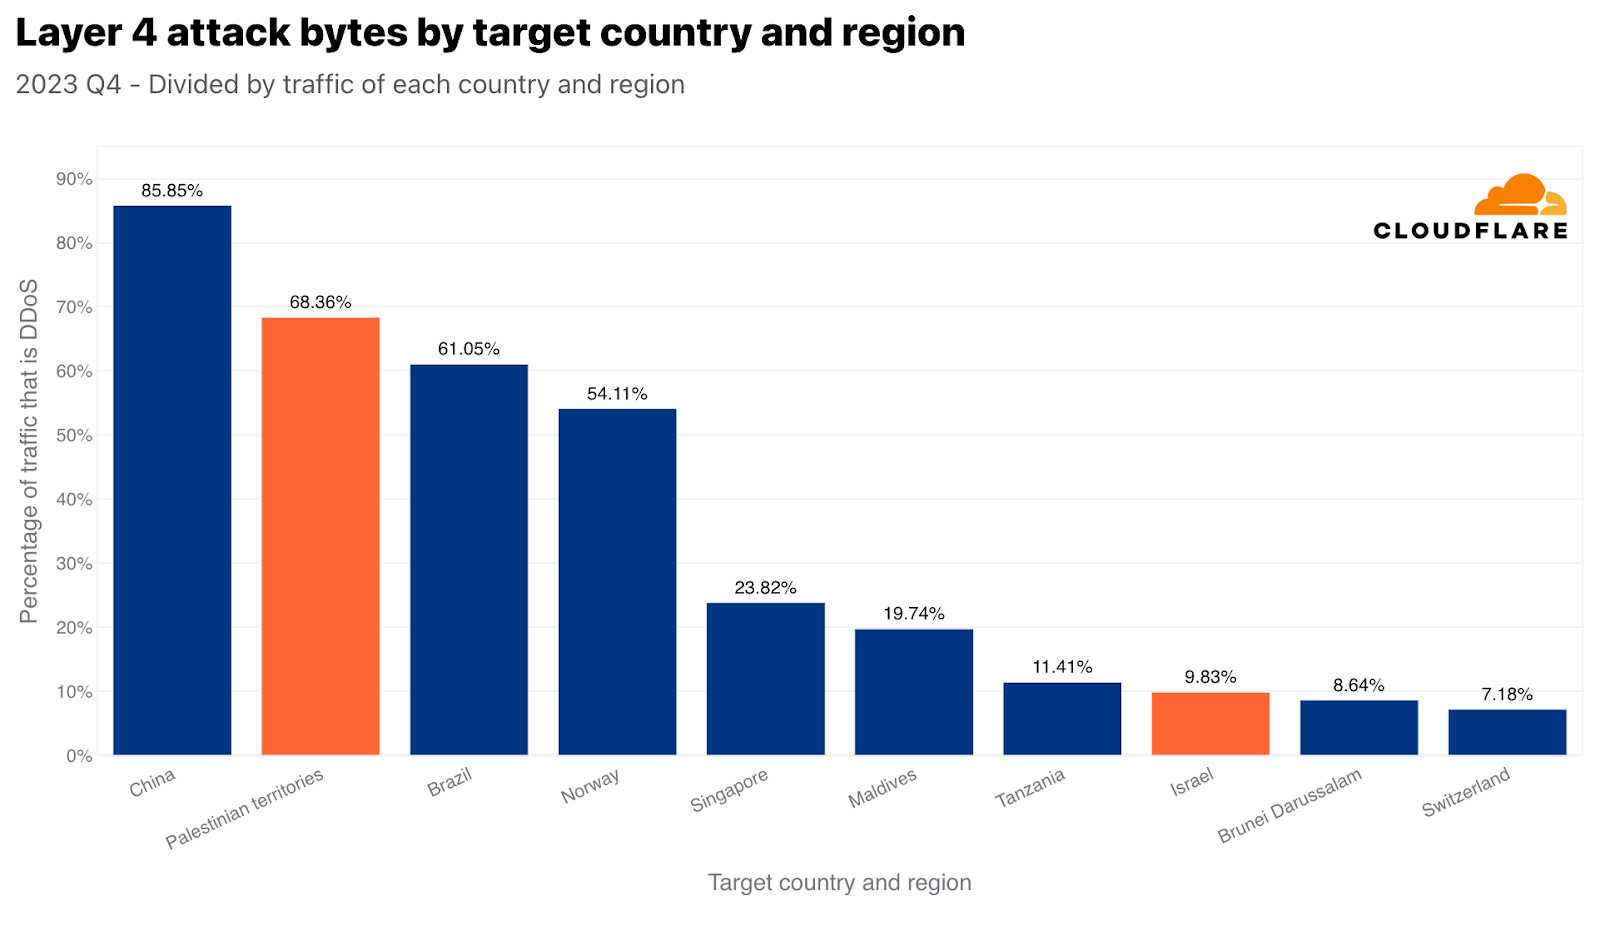
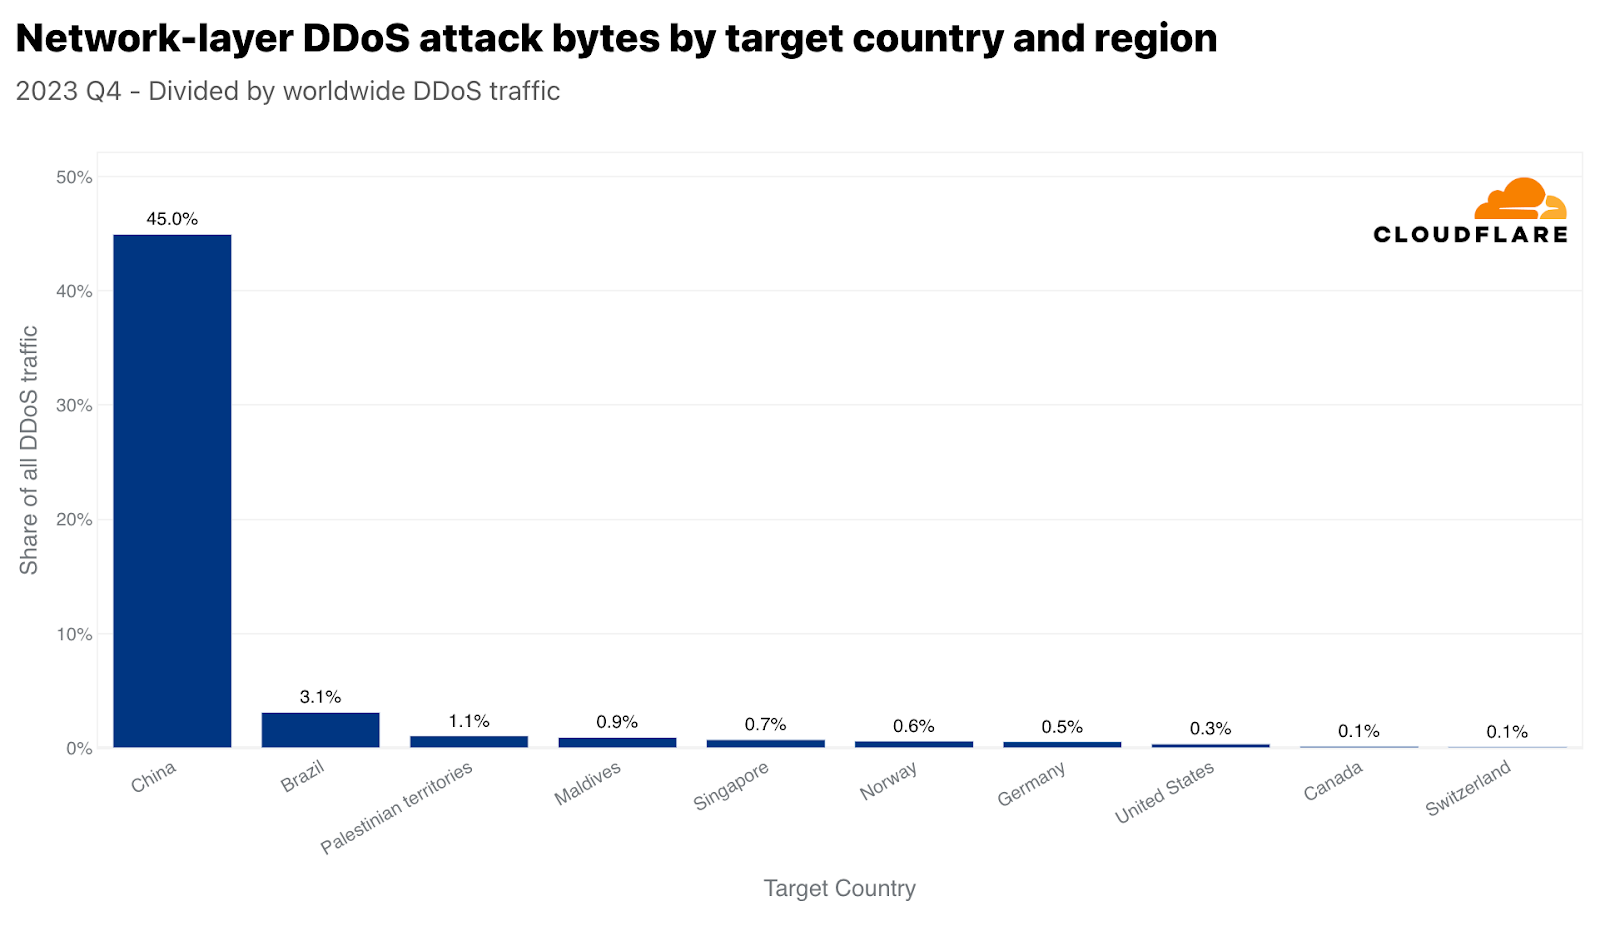
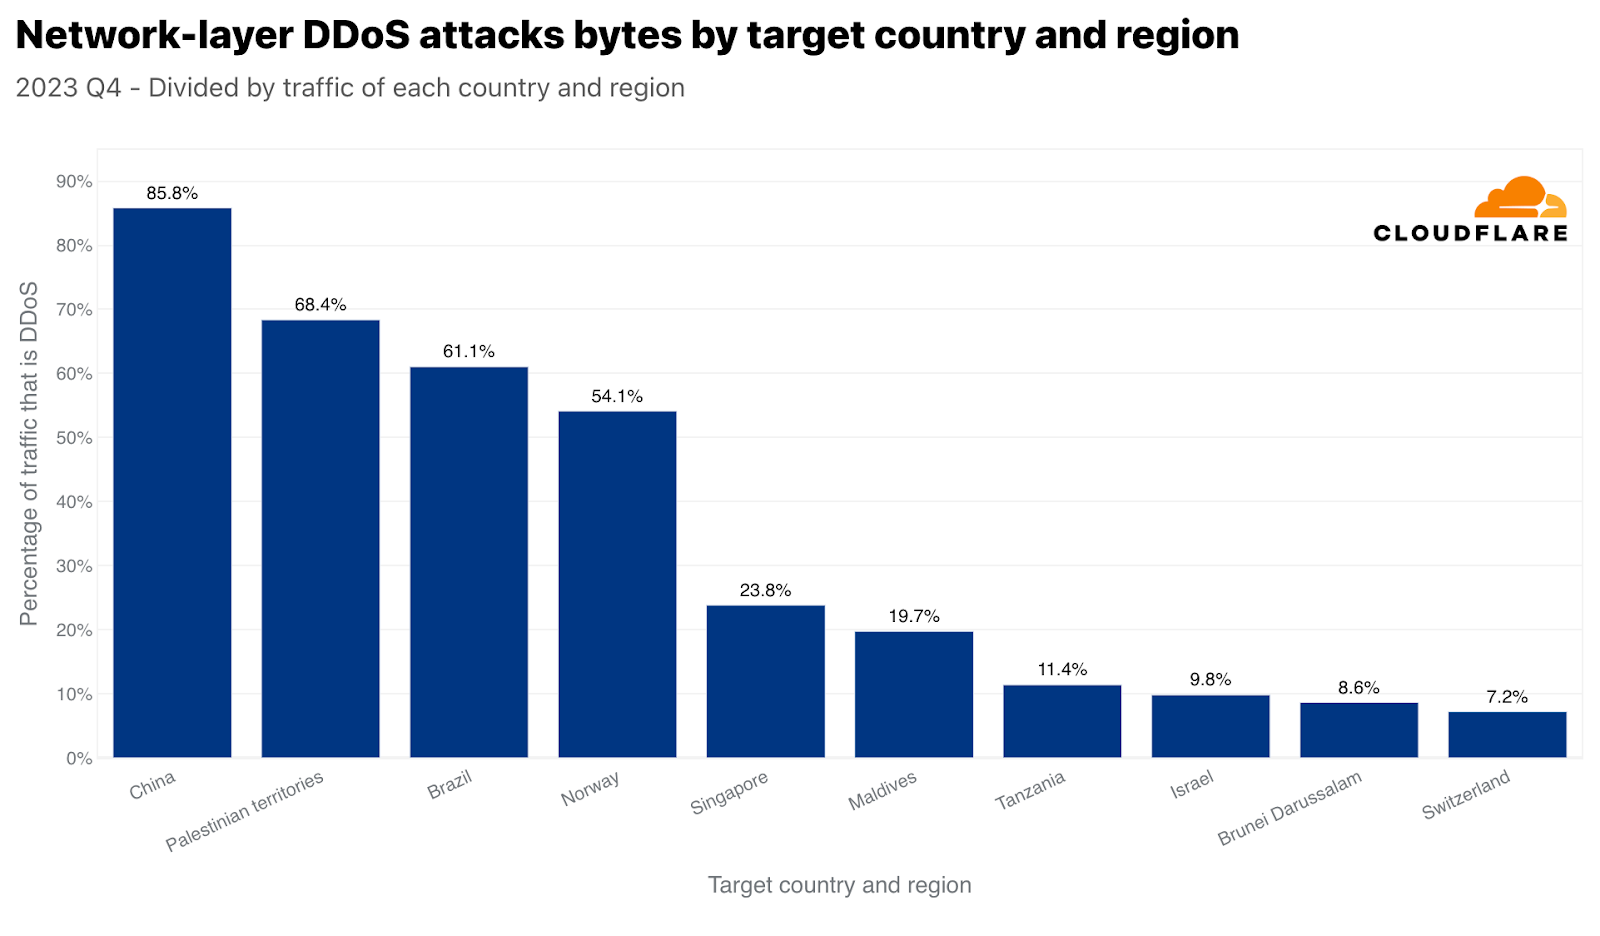
On the network layer, we see the same trend. Palestinian networks were targeted by 470 terabytes of attack traffic — accounting for over 68% of all traffic towards Palestinian networks. Surpassed only by China, this figure placed the Palestinian territories as the second most attacked region in the world, by network-layer DDoS attack, relative to all Palestinian territories-bound traffic. By absolute volume of traffic, it came in third. Those 470 terabytes accounted for approximately 1% of all DDoS traffic that Cloudflare mitigated.
Israeli networks, though, were targeted by only 2.4 terabytes of attack traffic, placing it as the 8th most attacked country by network-layer DDoS attacks (normalized). Those 2.4 terabytes accounted for almost 10% of all traffic towards Israeli networks.
Top attacked countries
When we turned the picture around, we saw that 3% of all bytes that were ingested in our Israeli-based data centers were network-layer DDoS attacks. In our Palestinian-based data centers, that figure was significantly higher — approximately 17% of all bytes.
On the application layer, we saw that 4% of HTTP requests originating from Palestinian IP addresses were DDoS attacks, and almost 2% of HTTP requests originating from Israeli IP addresses were DDoS attacks as well.
Main sources of DDoS attacks
In the third quarter of 2022, China was the largest source of HTTP DDoS attack traffic. However, since the fourth quarter of 2022, the US took the first place as the largest source of HTTP DDoS attacks and has maintained that undesirable position for five consecutive quarters. Similarly, our data centers in the US are the ones ingesting the most network-layer DDoS attack traffic — over 38% of all attack bytes.
HTTP DDoS attacks originating from China and the US by quarter
Together, China and the US account for a little over a quarter of all HTTP DDoS attack traffic in the world. Brazil, Germany, Indonesia, and Argentina account for the next twenty-five percent.
Top source of HTTP DDoS attacks
These large figures usually correspond to large markets. For this reason, we also normalize the attack traffic originating from each country by comparing their outbound traffic. When we do this, we often get small island nations or smaller market countries that a disproportionate amount of attack traffic originates from. In Q4, 40% of Saint Helena’s outbound traffic were HTTP DDoS attacks — placing it at the top. Following the ‘remote volcanic tropical island’, Libya came in second, Swaziland (also known as Eswatini) in third. Argentina and Egypt follow in fourth and fifth place.
Top source of HTTP DDoS attacks with respect to each country’s traffic
On the network layer, Zimbabwe came in first place. Almost 80% of all traffic we ingested in our Zimbabwe-based data center was malicious. In second place, Paraguay, and Madagascar in third.
Top source of Network-layer DDoS attacks with respect to each country’s traffic
Most attacked industries
By volume of attack traffic, Cryptocurrency was the most attacked industry in Q4. Over 330 billion HTTP requests targeted it. This figure accounts for over 4% of all HTTP DDoS traffic for the quarter. The second most attacked industry was Gaming & Gambling. These industries are known for being coveted targets and attract a lot of traffic and attacks.
Top industries targeted by HTTP DDoS attacks
On the network layer, the Information Technology and Internet industry was the most attacked — over 45% of all network-layer DDoS attack traffic was aimed at it. Following far behind were the Banking, Financial Services and Insurance (BFSI), Gaming & Gambling, and Telecommunications industries.
Top industries targeted by Network-layer DDoS attacks
To change perspectives, here too, we normalized the attack traffic by the total traffic for a specific industry. When we do that, we get a different picture.
Top attacked industries by HTTP DDoS attacks, by region
We already mentioned in the beginning of this report that the Environmental Services industry was the most attacked relative to its own traffic. In second place was the Packaging and Freight Delivery industry, which is interesting because of its timely correlation with online shopping during Black Friday and the winter holiday season. Purchased gifts and goods need to get to their destination somehow, and it seems as though attackers tried to interfere with that. On a similar note, DDoS attacks on retail companies increased by 16% compared to the previous year.
Top industries targeted by HTTP DDoS attacks with respect to each industry’s traffic
On the network layer, Public Relations and Communications was the most targeted industry — 36% of its traffic was malicious. This too is very interesting given its timing. Public Relations and Communications companies are usually linked to managing public perception and communication. Disrupting their operations can have immediate and widespread reputational impacts which becomes even more critical during the Q4 holiday season. This quarter often sees increased PR and communication activities due to holidays, end-of-year summaries, and preparation for the new year, making it a critical operational period — one that some may want to disrupt.
Top industries targeted by Network-layer DDoS attacks with respect to each industry’s traffic
Most attacked countries and regions
Singapore was the main target of HTTP DDoS attacks in Q4. Over 317 billion HTTP requests, 4% of all global DDoS traffic, were aimed at Singaporean websites. The US followed closely in second and Canada in third. Taiwan came in as the fourth most attacked region — amidst the upcoming general elections and the tensions with China. Taiwan-bound attacks in Q4 traffic increased by 847% compared to the previous year, and 2,858% compared to the previous quarter. This increase is not limited to the absolute values. When normalized, the percentage of HTTP DDoS attack traffic targeting Taiwan relative to all Taiwan-bound traffic also significantly increased. It increased by 624% quarter-over-quarter and 3,370% year-over-year.
Top targeted countries by HTTP DDoS attacks
While China came in as the ninth most attacked country by HTTP DDoS attacks, it’s the number one most attacked country by network-layer attacks. 45% of all network-layer DDoS traffic that Cloudflare mitigated globally was China-bound. The rest of the countries were so far behind that it is almost negligible.
Top targeted countries by Network-layer DDoS attacks
When normalizing the data, Iraq, Palestinian territories, and Morocco take the lead as the most attacked regions with respect to their total inbound traffic. What’s interesting is that Singapore comes up as fourth. So not only did Singapore face the largest amount of HTTP DDoS attack traffic, but that traffic also made up a significant amount of the total Singapore-bound traffic. By contrast, the US was second most attacked by volume (per the application-layer graph above), but came in the fiftieth place with respect to the total US-bound traffic.
Top targeted countries by HTTP DDoS attacks with respect to each country’s traffic
Similar to Singapore, but arguably more dramatic, China is both the number one most attacked country by network-layer DDoS attack traffic, and also with respect to all China-bound traffic. Almost 86% of all China-bound traffic was mitigated by Cloudflare as network-layer DDoS attacks. The Palestinian territories, Brazil, Norway, and again Singapore followed with large percentages of attack traffic.
Top targeted countries by Network-layer DDoS attacks with respect to each country’s traffic
Attack vectors and attributes
The majority of DDoS attacks are short and small relative to Cloudflare’s scale. However, unprotected websites and networks can still suffer disruption from short and small attacks without proper inline automated protection — underscoring the need for organizations to be proactive in adopting a robust security posture.
In 2023 Q4, 91% of attacks ended within 10 minutes, 97% peaked below 500 megabits per second (mbps), and 88% never exceeded 50 thousand packets per second (pps).
Two out of every 100 network-layer DDoS attacks lasted more than an hour, and exceeded 1 gigabit per second (gbps). One out of every 100 attacks exceeded 1 million packets per second. Furthermore, the amount of network-layer DDoS attacks exceeding 100 million packets per second increased by 15% quarter-over-quarter.
DDoS attack stats you should know
One of those large attacks was a Mirai-botnet attack that peaked at 160 million packets per second. The packet per second rate was not the largest we’ve ever seen. The largest we’ve ever seen was 754 million packets per second. That attack occurred in 2020, and we have yet to see anything larger.
This more recent attack, though, was unique in its bits per second rate. This was the largest network-layer DDoS attack we’ve seen in Q4. It peaked at 1.9 terabits per second and originated from a Mirai botnet. It was a multi-vector attack, meaning it combined multiple attack methods. Some of those methods included UDP fragments flood, UDP/Echo flood, SYN Flood, ACK Flood, and TCP malformed flags.
This attack targeted a known European Cloud Provider and originated from over 18 thousand unique IP addresses that are assumed to be spoofed. It was automatically detected and mitigated by Cloudflare’s defenses.
This goes to show that even the largest attacks end very quickly. Previous large attacks we’ve seen ended within seconds — underlining the need for an in-line automated defense system. Though still rare, attacks in the terabit range are becoming more and more prominent.
1.9 Terabit per second Mirai DDoS attacks
The use of Mirai-variant botnets is still very common. In Q4, almost 3% of all attacks originate from Mirai. Though, of all attack methods, DNS-based attacks remain the attackers’ favorite. Together, DNS Floods and DNS Amplification attacks account for almost 53% of all attacks in Q4. SYN Flood follows in second and UDP floods in third. We’ll cover the two DNS attack types here, and you can visit the hyperlinks to learn more about UDP and SYN floods in our Learning Center.
DNS floods and amplification attacks
DNS floods and DNS amplification attacks both exploit the Domain Name System (DNS), but they operate differently. DNS is like a phone book for the Internet, translating human-friendly domain names like “www.cloudfare.com” into numerical IP addresses that computers use to identify each other on the network.
Simply put, DNS-based DDoS attacks comprise the method computers and servers used to identify one another to cause an outage or disruption, without actually ‘taking down’ a server. For example, a server may be up and running, but the DNS server is down. So clients won’t be able to connect to it and will experience it as an outage.
A DNS flood attack bombards a DNS server with an overwhelming number of DNS queries. This is usually done using a DDoS botnet. The sheer volume of queries can overwhelm the DNS server, making it difficult or impossible for it to respond to legitimate queries. This can result in the aforementioned service disruptions, delays or even an outage for those trying to access the websites or services that rely on the targeted DNS server.
On the other hand, a DNS amplification attack involves sending a small query with a spoofed IP address (the address of the victim) to a DNS server. The trick here is that the DNS response is significantly larger than the request. The server then sends this large response to the victim’s IP address. By exploiting open DNS resolvers, the attacker can amplify the volume of traffic sent to the victim, leading to a much more significant impact. This type of attack not only disrupts the victim but also can congest entire networks.
In both cases, the attacks exploit the critical role of DNS in network operations. Mitigation strategies typically include securing DNS servers against misuse, implementing rate limiting to manage traffic, and filtering DNS traffic to identify and block malicious requests.
Top attack vectors
Amongst the emerging threats we track, we recorded a 1,161% increase in ACK-RST Floods as well as a 515% increase in CLDAP floods, and a 243% increase in SPSS floods, in each case as compared to last quarter. Let’s walk through some of these attacks and how they’re meant to cause disruption.
Top emerging attack vectors
ACK-RST floods
An ACK-RST Flood exploits the Transmission Control Protocol (TCP) by sending numerous ACK and RST packets to the victim. This overwhelms the victim’s ability to process and respond to these packets, leading to service disruption. The attack is effective because each ACK or RST packet prompts a response from the victim’s system, consuming its resources. ACK-RST Floods are often difficult to filter since they mimic legitimate traffic, making detection and mitigation challenging.
CLDAP floods
CLDAP (Connectionless Lightweight Directory Access Protocol) is a variant of LDAP (Lightweight Directory Access Protocol). It’s used for querying and modifying directory services running over IP networks. CLDAP is connectionless, using UDP instead of TCP, making it faster but less reliable. Because it uses UDP, there’s no handshake requirement which allows attackers to spoof the IP address thus allowing attackers to exploit it as a reflection vector. In these attacks, small queries are sent with a spoofed source IP address (the victim’s IP), causing servers to send large responses to the victim, overwhelming it. Mitigation involves filtering and monitoring unusual CLDAP traffic.
SPSS floods
Floods abusing the SPSS (Source Port Service Sweep) protocol is a network attack method that involves sending packets from numerous random or spoofed source ports to various destination ports on a targeted system or network. The aim of this attack is two-fold: first, to overwhelm the victim’s processing capabilities, causing service disruptions or network outages, and second, it can be used to scan for open ports and identify vulnerable services. The flood is achieved by sending a large volume of packets, which can saturate the victim’s network resources and exhaust the capacities of its firewalls and intrusion detection systems. To mitigate such attacks, it’s essential to leverage in-line automated detection capabilities.
Cloudflare is here to help – no matter the attack type, size, or duration
Cloudflare’s mission is to help build a better Internet, and we believe that a better Internet is one that is secure, performant, and available to all. No matter the attack type, the attack size, the attack duration or the motivation behind the attack, Cloudflare’s defenses stand strong. Since we pioneered unmetered DDoS Protection in 2017, we’ve made and kept our commitment to make enterprise-grade DDoS protection free for all organizations alike — and of course, without compromising performance. This is made possible by our unique technology and robust network architecture.
It’s important to remember that security is a process, not a single product or flip of a switch. Atop of our automated DDoS protection systems, we offer comprehensive bundled features such as firewall, bot detection, API protection, and caching to bolster your defenses. Our multi-layered approach optimizes your security posture and minimizes potential impact. We’ve also put together a list of recommendations to help you optimize your defenses against DDoS attacks, and you can follow our step-by-step wizards to secure your applications and prevent DDoS attacks. And, if you’d like to benefit from our easy to use, best-in-class protection against DDoS and other attacks on the Internet, you can sign up — for free! — at cloudflare.com. If you’re under attack, register or call the cyber emergency hotline number shown here for a rapid response.
Visit 1.1.1.1 from any device to get started with our free app that makes your Internet faster and safer.
To learn more about our mission to help build a better Internet, start here. If you’re looking for a new career direction, check out our open positions.
Spam registrations are common on WordPress websites. WordPress is the most popular content management system in the world, with over 60 percent market share. This makes it a prime target for scammers. It’s also, unfortunately, easy to create fake user accounts on the platform, requiring only an account name, email address, and password – all things spammers can simply invent.
Fake registrations can cause extensive issues, such as hogging resources, spreading malware, and creating an unmanageable user base.
WordPress doesn’t have a default functionality to combat spam user registrations, butthe good news is that plugins like Shield Security PRO can fill in the gap. Let’s take a look at some strategies for preventing spam user registrations.
Introduction to spam registrations in WordPress
WordPress spam registrations are when spammers create accounts on sites without any intention of using them for authentic purposes. Typically, spammers use automated programs or bots to create these accounts. Spammers may also use bots and spam accounts for phishing purposes, trying to acquire sensitive information from users and webmasters to compromise their security.
Website owners often underestimate the harm spam registrations can cause. These range from immediate annoyances to long-term security problems and data distortion.
For example, spam registrations can clog your inbox, causing surges of email notifications informing you of fake sign-ups for your website. Processing and deleting these emails and accounts without getting rid of legitimate users is time-consuming and challenging.
Spam registrations can also overload server resources, affecting performance. Spam bots can make frequent login attempts, using up your bandwidth and making your website run slower for legitimate users.
There can also be some considerable long-term consequences. Users may tire of spam comments and stop interacting with your content. You may also struggle to analyse user data, distorting your view of how your site is functioning. This can lead to security vulnerabilities and damage your site’s SEO.
Strategies to prevent WordPress user registration spam
This section covers various strategies and techniques that you can implement to prevent new user registration spam and improve the overall security of your WordPress site.
Install a WordPress security plugin
The first strategy is to install a WordPress security plugin. Choosing the right security plugin not only helps prevent spam registrations on your WordPress site, but it also gives you access to a wide range of security features.
Shield Security PRO is the best plugin for improving the overall security of your WordPress site. The plugin’s key features include bad bot detection and blocking, invisible CAPTCHA codes, human and bot spam prevention, traffic rate limiting, and malware scanning.
Here’s a rundown of Shield Security PRO’s features and how they can help protect your site:
CrowdSec Integration – crowdsourced IP Block lists that contain known IPs of bots & spammers that are instantly blocked access.
Disable WordPress registration
Using a plugin like ShieldPRO is the best choice to ensure the ongoing security of your WordPress site. However, there are also manual methods you can employ to help prevent user registration spam.
Disabling user registration in WordPress is one strategy. This approach eliminates the problem of spam signups entirely. You could try this option if you don’t need to collect user information, run a website with limited resources, or simply want to provide audiences with information for free.
The steps to disable registration on your WordPress site are as follows:
From the WordPress dashboard, go to Settings > General.
Next, go to “Membership” and uncheck the “Anyone can register” box.
It’s worth considering that this technique prevents you from collecting visitor details, which stops you from building email lists or marketing directly to your audience. It also reduces personalisation opportunities and limits community building.
Add CAPTCHA to your user registration form
You can also try adding CAPTCHA to your user registration form. This prevents automated spam registrations by identifying bots before they can create accounts.
Various forms of CAPTCHA plugins for your site exist, including:
reCAPTCHA: Google reCAPTCHA is a free service that combines text and images in a user-friendly interface, designed to weed out bots
hCAPTCHA: hCAPTCHA is a free service that uses images and action-based tests to identify bots. This service is customisable and prioritises user privacy.
ShieldPRO’s AntiBot Detection Engine (ADE) avoids the need to use CAPTCHA at all. Since the plugin automatically detects and blocks bots, there’s no reason to test your visitors for signs of nuts and bolts.
Implement geoblocking
You can also try geoblocking, a security method that limits website access to specific regions. It works by filtering IP addresses by location, only letting specific IPs enter the site.
Geoblocking prevents spam from regions known for high levels of malicious activity. However, it also comes with various drawbacks. For example, it causes false positives, blocking legitimate site users just because they are in the wrong country. Spammers can also bypass it with proxy sites and VPNs.
Fortunately, ShieldPRO’s automated IP blocking technology more accurately and effectively stops spam users by blocking them after a specified number of offences. It detects malicious activity regardless of the traffic’s origin.
Require manual approval for user registration
Manual user approvals can also mitigate spam registrations, offering significant benefits. The approach drastically reduces the chances of bot sign-up while also permitting you to collect legitimate user details.
Drawbacks include the time-intensive nature of this method and the lack of scalability for larger WordPress sites. You may need to hire multiple full-time operatives to manage website administration, which can get pricey, fast.
Turn on email activation for user registration
Email activation for user registration is another popular technique to guard against spam registrations. It works by getting users to click a link in their email account to verify their details.
Shield Security PRO features a built-in email-checking feature. This tests to see if the email has a valid structure and is registered to a legitimate domain. It also checks if there are any mail exchange records for the domain, and determines if the email address goes to a disposable domain. These checks help to flag fake and temporary email addresses in user registrations.
Block spam IP addresses
One of the primary ways Shield Security PRO works is by blocking malicious IP addresses once they’ve behaved badly enough to qualify as a bot. There is no one clear action an IP address can do on your site that proves it’s a bot. However, certain patterns of behaviour give bots away clear as day.
“When you look at the activity as a whole” says Paul Goodchild, creator of Shield Security PRO, “a bot’s activity on a site is clearly distinguishable from human users.”
The plugin then uses this clear indication as a signal to block the IP address entirely, stopping malicious activity in its tracks. The plugin also uses CrowdSec technology to minimise the risk of false positives and enable as many legitimate sign-ups as possible.
Secure your WordPress site with ShieldPRO today
The damaging impact of spam user registrations can be substantial. It can cause clogged inboxes, distorted user analytics, and server overload. The long-term consequences are diminished website SEO, reputational damage, and security vulnerabilities due to phishing and malware.
Fortunately, there are various methods to prevent spam user registrations on WordPress websites. The most effective option is to use a plugin like Shield SecurityPRO. This plugin keeps malicious bots off your website. Since most spam user registrations come from bots, this means you can rest a lot easier.
If you’re curious about ShieldPRO and would like to explore the powerful features for protecting your WordPress sites, click here to get started today. (14-day satisfaction guarantee!)
You’ll get all PRO features, including AI Malware Scanning, WP Config File Protection, Plugin and Theme File Guard, import/export, exclusive customer support, and so much more.
This article helps answer frequently asked questions regarding SonicOS 7.1.1.
Q. What is SonicOS 7.1.1? A. SonicOS 7.1.1 is the feature release available on all Gen 7 firewalls which brings in new capabilities around security, content filtering, integrations and virtual platforms.
Q. Will we be able to manage SonicOS 7.1 from NSM 2.3.5? A. NSM 2.3.5 will not support SonicOS 7.1. The support for SonicOS 7.1 will be available from NSM 2.4.0, which will be released early next year (2024). Please read the following article on NSM Compatibility with SonicOS 7.1.
Q. What are the new features available on SonicOS 7.1.1? A. The major features implemented in SonicOS 7.1.1 are DNS Filtering, reputation-based content filtering, Wi-Fi 6 access-point management, Network Access Control (NAC) integration with Aruba ClearPass, NSv bootstrapping, auto-update firmware and some other enhancements with storage and user interface (UI) for ease of use.
Q. How can existing firewall customers running SonicOS 7 upgrade/migrate to SonicOS 7.1.1? A. You can upgrade the firewall to SonicOS 7.1 on box without using a migration tool.
Q. How can existing firewall customers running SonicOS6.5 and previous versions upgrade to SonicOS 7.1.1? A. Users will be required to make use of our Secure Upgrade Program to upgrade their existing hardware models to Gen 7. They will then need to migrate their settings to the new firewall running 7.1.1 OS Learn more about the Secure Upgrade Program
Q. Are there any new features in 7.1.1 that will require new licenses? A. The DNS Filtering feature is a licensed feature that will be available as an a la carte license for Gen 7 firewalls without the APSS bundle.
Q. Do I need any additional licensing if I already have the APSS license available on my current Gen 7 firewall? A. No.
Q. Can I perform a firmware/OS upgrade on my existing NSv NGFW running SonicOS 7.1.1? A. The downgrade of firmware from SonicOS 7.1 to SonicOS 7.0 is not supported. Please refer to this article when upgrading your firewall: How can I upgrade SonicOS Firmware?
Q. Is there any change in behavior with regard to Policy Mode with 7.1.1? A. There is no change in behavior with regard to Policy Mode in SonicOS 7.1.1. The NSv 270, 470 and 870 will continue to support both Global and Policy Mode. The NSsp15700 will continue to support only Policy Mode.
Q. What is CFS 5.0? How does it differ from CFS 4.0? A. Content Filtering Service 5.0 brings category extension with CFS 4.0. SonicOS 7.0.1 supported 64 categories and that has been increased to 89. Content Filtering 5.0 brings in performance improvements along with reputation-based blocking.
Q. What is upgrade behavior when a user upgrades from SonicOS 7.0.1 to SonicOS 7.1.1 with regard to CFS policies? A. There will be no impact on the existing CFS policies, however as CFS 5.0 brings in reputation-based blocking, users will be required to configure the CFS policies with the new reputation parameter in CFS 5.0. Please refer to this upgrade article.
Q. Can we downgrade the firewall from SonicOS 7.1 to SonicOS 7.0? A. The downgrade of firmware from SonicOS 7.1 to SonicOS 7.0 is not supported. Please refer to this article when upgrading your firewall.
Q. What is DNS Filtering? How is it different from the current DNS capabilities in SonicOS 7.0.1? A. DNS Filtering inspects the DNS traffic in real time and provides the ability to block threats and access to malicious websites. DNS Filtering blocks threats before they can reach your network. The DNS security capabilities on 7.0.1 include DNS Tunnel Detection and DNS Sinkholes. Please read DNS Security to understand them in detail.
Q. What is the upgrade behavior when users upgrade from SonicOS 7.0.1 to SonicOS 7.1.1 with regard to DNS proxy and sink-holing? A. The upgrade from SonicOS 7.0.1 to SonicOS 7.1.1 would have no impact on the behavior that was there previous to the SonicOS 7.1 upgrade.
Q. What does the NAC integration feature do? A. SonicWall Next-Generation Firewalls (NGFWs) provide Restful threat API which integrates with Aruba ClearPass as network access control (NAC). ClearPass can pass the security context vectors using the restful API which is included with SonicWall NGFWs. ClearPass can pass security context vectors including Source IP, Source MAC, User ID, User Role, Domain, Device Category, Device Family, Device Name, OS Type, Hostname and Health Posture to SonicWall NGFWs to enforce real-time rules based on Device Type, OS and Device Health Posture at every point of control. When an alert is generated on a client machine, it can be shared by ClearPass to SonicWall NGFWs which would trigger a range of predetermined, policy-based actions from quarantine to blocking.
Q. Does this NAC integration feature work with any NAC providers? A. No, this NAC integration only works with Aruba ClearPass.
Q. Which access point models can I integrate with firewalls running SonicOS 7.1.1? A. With the launch of SonicOS 7.1.1, users will now also be able to integrate and manage Wi-Fi 6 APs like 621, 641 and 681.
Q. How can I automate NSv deployment using the bootstrapping feature? Which platforms support this feature? Bootstrapping helps with NSv automated deployments. Token-based registration will help ease the bootstrapping process. KVM already supported bootstrapping in SonicOS 7.0.1. With the launch of 7.1.1, other platforms like VMWare, Hyper-V, AWS and Azure will also support bootstrapping features.
Q. How is the bootstrapping process different between private cloud and public cloud? A. The bootstrapping process is not different between private cloud and public cloud. SonicOS supports bootstrapping on AWS, Azure, VMware, KVM and Hyper-V.
Q. What are the new parameters that will be stored in secondary storage modules with the launch of 7.1.1? A. TSR , exp, PCAP, threat logs and appflow logs will be stored in the secondary storage module as part of SonicOS 7.1.1
Q. Will the new features available in SonicOS 7.1.1 be available in the Capture Threat Assessment (CTA) report? A. During the launch, the new features in SonicOS 7.1.1 will not be included in the CTA report.
Q. Are the new features available on NSM? A. Yes. The upcoming NSM version 2.4 is planned to support the new features on SonicOS 7.1.1.
Q. Can I manage SonicOS 7.1.1 on the previous versions of NSM (prior to 2.4)? A. You can upgrade the SonicOS version to 7.1.1, but the new features which are part of 7.1.1 will not be available on NSM versions prior to 2.4
Q. What are the best practices to be followed on SonicOS 7.1.1? A. Please follow the best practices when upgrading the firewall from SonicOS 7.0.1 to SonicOS 7.1 documented here.
The migration tool is not required for the configuration migration from SonicOS 7.0 to SonicOS 7.1. Any customer migrating from Gen 6 to SonicOS 7.1 would need to upgrade to SonicOS 7.0.1 using the migration tool and then migrate to SonicOS 7.1.
DNS Filtering is the first line of defense and works independent of Content Filtering Services (CFS). Please follow the admin guides for seamless configuration with best practices.
Q. What is the new website for URL rating and reputation lookup with CFS 5.0? A. https://cfssupportapi.global.sonicwall.com/
Q. How can I check the URL rating on the firewall UI? A. Device –> Diagnostics –> URL Rating Request Tool
Q. What is the performance impact of enabling the new SonicOS 7.1 features on an existing firewall? A. We do not expect there to be any impact on the performance of an existing firewall because of new features.
Q. Can DNS proxy 4to4 and 4to6 features work alongside DNS filtering? Can this be accomplished by adding an additional DNS proxy-only rule alongside a DNS filtering rule for X0 Interface? If so, what will take precedence/priority? A. DNS rules give the choice of either proxy or filtering on a single rule. When proxy is enabled, Client 4to4 or 4to6 DNS queries can be proxied. When DNS filtering is enabled, only Client 4to4 Requests DNS queries will be proxied and filtered. —While DNS proxies will process both DNS TCP and DNS UDP, DNS filtering is only for DNS UDP. —Both proxy or filtering DNS rules can be stacked, the most specific match will be applied, and the lookup precedence/priority is top-down. —To have DNS proxy 4to6 alongside DNS filtering, the proxy rule must explicitly have source zone and address of the 4to6 Clients for the traffic to hit the rule and the policy to be applied
Q. Can DNS Filtering be applied on custom zones or is it restricted to default zones, LAN, DMZ and WLAN? A. DNS Filtering can be applied to LAN, DMZ and WLAN zones as well as custom zones with Trusted, Public and Wireless Security Types.
Q. How long does a cache entry last before we request a category for a specific domain again? A. The cache entry of a domain would depend on the TTL of the domain.
Q. Are there plans to support DNS over TLS and DNS over HTTPS? A. Yes. DNS over TLS and DNS over HTTPS will be available in a future release.
Q. Will the DNS Filtering license be included with any existing bundle or does the customer need to buy it separately? A. DNS Filtering will be available with APSS and there will be a la carte SKUs for EPSS, TPSS and HW only.
Q. What happens to the WNM managed access-point when the firewall is upgraded to SonicOS 7.1?
A. Please note that if you have 600 series access points on the network connected to a WLAN zone of a firewall with 7.0.x managed by WNM, after the update to 7.1 the access points will be acquired by the firewall. All WNM settings will not be available. Please “Disable SonicPoint/SonicWave management” on the WLAN zone for seamless management.
What is the minimum recommended length of twisted pair copper cable that I should use with my SonicWall firewalls’ HA ports for high availability?
Resolution
Question:
What is the minimum recommended length of twisted pair copper cable that I should use with my SonicWall firewalls’ HA ports for high availability?
Answer:
At present, there is no officially published minimum length for a twisted pair cable from IEEE or ANSI, though there is information about maximum lengths for twisted pair cable.
However, sometimes customers want to use a cable that is only several inches in length for this. The reason why is because it looks neat and tidy, and it’s one less cable that has to be strung through a rackmount cable channel. However, using such a small cable often causes problems. Customers have reported issues where the firewalls appear to lock up, and they can neither be managed, nor can they pass traffic.
The reason why this occurs, is because the extremely short HA cable causes problems with the transmissions of the HA heartbeats. In an HA pair, when the idle unit does not receive heartbeats for the configured interval and time threshold, it will go active. However, if the other unit in the HA pair is still active, both units’ interfaces will be competing for the addressing, which means there is an IP conflict between all of each firewall’s interfaces. This will prevent the devices from being managed, and it will also prevent them from passing traffic.
With regards to cable length, the following needs to be considered: — 1.) Crosstalk
Crosstalk is when a signal sent on one circuit interferes with another signal sent on a separate but adjacent circuit. This is usually caused by circuits being close together. With ethernet cabling, this effect is reduced by twisting the circuit pairs. This reduces the circuits’ ability to interfere with one another while traveling the length of the copper media. With an extremely short cable, there is usually not enough twisted pair to prevent crosstalk interference.
2.) Return Loss
Return loss is essentially the loss of a signal’s power which is returned or reflected by a discontinuity in the cabling (ie: a point in the transmission line where the signal cannot conduct fully to the next leg of the pathway). It is desirable to have a high level of return loss (ie: the loss of reflectivity). Low return loss can be caused by problems at the termination point of the cable, or by a device which is in line with the transmission pathway. A shorter cable presents a potential for lower return loss, because there is less wire to degrade the reflection of signals.
3.) Cable Quality
The quality of cabling will vary from vendor to vendor, depending upon how accurate the equipment is which is used in the manufacturing process. Some vendors do not twist their cabling as effeciently as others do, and some have lower-quality crimps than others. Cables which are crimped by individuals often suffer greatly by comparison to manufactured cables, as one can only be so precise with a hand-crimping tool. The most common problem with custom cables is a loss of twisting near the termination point of the cable. Most vendors who make cables less than half of 1 meter in length do not have those cables certified by any standards body.
For high availability, SonicWall support recommends using a patch or crossover (NSA units have MDIx autosensing capabilities on their interfaces) cable which is no shorter than 1 meter in length (about three feet). There are many posted discussions on this topic available to read online, however, this post from a Fluke Networks employee at forucms.bicsi.org sums up these discussions very well.
http://forums.bicsi.org/Topic2210-4-1.aspx#bm2215 —- “If you are talking specifically about patch cords, then 0.5 m is the implied minimum length in ANSI/TIA/EIA-568-B.2-1 for a certified patch cord. That’s because the math for the limit lines really does not work below this. Infact, getting a certified patch cord of 0.5 is going to be tricky. Many vendors only offer a certified patch cord of 1.0 m or longer.”