Migration is the act of moving your UniFi devices from one host device to another. This is useful when:
You are replacing your UniFi OS Console with a new one of the same model.
You are upgrading your UniFi OS Console to a different model (e.g., a UDM to a UDM Pro).
You are offloading devices to a dedicated UniFi OS Console (e.g., moving cameras from a Cloud Key or UDM to a UNVR).
You are moving from a self-hosted Network application to a UniFi OS Console.
Note: This is not meant to be used as a staging file for setting up multiple applications on different hosts.
Types of Backups
UniFi OS Backups
UniFi OS backup files contain your entire system configuration, including your UniFi OS Console, user, application, and device settings. Assuming Remote Access is enabled, UniFi OS Cloud backups are created weekly by default. You can also generate additional Cloud backups or download localized backups at any time.
UniFi OS backups are useful when:
Restoring a prior system configuration after making network changes.
Migrating all applications to a new UniFi OS Console that is the same model as the original.
Note: Backups donot include data stored on an HDD, such as recorded Protect camera footage.
Application Backups
Each UniFi application allows you to back up and export its configuration. Application backups contain settings and device configurations specific to the respective application.
Application backups are useful when:
You want to restore a prior application configuration without affecting your other applications.
You want to migrate a self-hosted Network application to a UniFi OS Console.
You want to migrate your devices between two different UniFi OS Console models.
You need to back up a self-hosted Network application.
Note: Backups donot include data stored on an HDD, such as recorded Protect camera footage.
UniFi OS Console Migration
UniFi OS backups also allow you to restore your system configuration should you ever need to replace your console with one ofthesame model.
To do so:
First, ensure that you have already generated a Cloud backup, or downloaded a local backup. If not, please do so in your UniFi OS Settings.
Replace your old UniFi OS Console with the new one. All other network connections should remain unchanged.
Restore your system configuration on the new UniFi OS Console using the backup file. This can be done either during the initial setup or afterwards in your UniFi OS settings.
Note: Currently, UniFi OS backups cannot be used to perform cross-console migrations, but this capability will be added in a future update.
If you are migrating between two different console models, you will need to restore each application’s configuration with their respective backups. Please note, though, that these file(s) will not include UniFi OS users or settings.
See below for more information on using the configuration backups during migrations.
Migrating UniFi Network
Before migrating, we recommend reviewing your Device Authentication Credentials found in your Network application’s System Settings. These can be used to recover adopted device(s) if the migration is unsuccessful.
Standard Migration
This is used when all devices are on the same Layer 2 network (i.e., all devices are on the same network/VLAN as the management application’s host device).
Note: If you are a home user managing devices in a single location and have not used the set-inform command or other advanced Layer 3 adoption methods, this is most likely the method for you.
Download the desired backup file (*.unf) from your original Network application’s System Settings.
Ensure that your new Network application is up to date. Backups cannot be used to restore older application versions.
Replace your old UniFi OS Console with the new one. All other network connections should remain unchanged.
Restore the backup file in the Network application’s System Settings.
Ensure that all devices appear as online in the new application. If they do not, you can try Layer 3 adoption, or factory-reset and readopt your device(s) to the new Network application.
If a device continues to appear as Managed by Other, click on it to open its properties panel, then use its Device Authentication Credentials (from the original Network application’s host device) to perform an Advanced Adoption.
Migrating Applications That Manage Layer 3 Devices
This method is for users that have performed Layer 3 device adoption (i.e., devices are on a different network/VLAN than the application’s host device). This may also be useful when migrating to a Network application host that is NOT also a gateway.
Download the desired backup file (*.unf) from your original Network application’s System Settings.
Enable the Override Inform Host field on the original Network application’s host device, then enter the IP address of the new host device. This will tell your devices where they should establish a connection in order to be managed. Once entered, all devices in the old application should appear as Managed by Other.
Note: When migrating to a Cloud Console, you can copy the Inform URL from the Cloud Console’s dashboard. Be aware that you will need to remove the initial http:// and the ending :8080/inform.
Ensure that your new Network application is up to date. Backups cannot be used to restore older application versions.
Restore the backup file in the Network application’s System Settings.
Ensure that all devices appear as online in the new application. If they do not, you can try Layer 3 adoption, or factory-reset and readopt your device(s) to the new application.
If a device continues to appear as Managed by Other, click on it to open its properties panel, then use its Device Authentication Credentials (from the original Network application’s host) to perform an Advanced Adoption.
Exporting Individual Sites from a Multi-Site Host
Certain Network application hosts (e.g., Cloud Key, Cloud Console, self-hosted Network applications) can manage multiple sites. Site exportation allows you to migrate specific sites from one multi-site host to another. To do so:
Click Export Site in your Network application’s System Settings to begin the guided walkthrough.
Select the device(s) you wish to migrate to your new Network application.
Enter the Inform URL of your new host. This will tell your devices where they should establish a connection in order to be managed. Once entered, all devices in the old application should appear as Managed by Other in the new one.
Note: When migrating to a Cloud Console, you can copy the Inform URL from the Cloud Console’s dashboard. Be aware that you will need to remove the initial http:// and the ending :8080/inform.
Go to your new Network application and select Import Site from the Site switcher located in the upper-left corner of your dashboard.
Note: You may need to enable Multi-Site Management in your System Settings.
Ensure that all devices appear as online in the new application. If they do not, you try Layer 3 adoption, or factory-reset and readopt your device(s) to the new application.
If a device continues to appear as Managed by Other, click on it to open its properties panel, then use its Device Authentication Credentials (from the original Network application’s host) to perform an Advanced Adoption.
Migrating UniFi Protect
We recommend saving your footage with the Export Clips function before migrating. Although we provide HDD migration instructions, it is not an officially supported procedure due to nuances in the RAID array architecture.
Standard Migration
Download the desired backup file (*.zip) from the original Protect application’s settings.
Ensure that your new Protect application is up to date. Backups cannot be used to restore older application firmware.
Replace your old UniFi OS Console with the new one. All other camera connections should remain unchanged.
Restore the backup file in the Protect application’s settings.
HDD Migration
Full HDD migration is not officially supported; however, some users have been able to perform successful migrations by ensuring consistent ordering when ejecting and reinstalling drives into their new console to preserve RAID arrays.
Note: This is only possible if both UniFi OS Consoles are the same model.
Remove the HDDs from the old console. Record which bay each one was installed in, but do not install them in the new console yet.
Turn on the new console and complete the initial setup wizard. Do not restore a Protect application or Cloud backup during initial setup!
Upgrade the new console and its Protect application to a version that is either the same or newer than the original console.
Shut down the new console, and then install the HDDs in the same bays as the original console.
Turn on the new console again. The Protect application should start with its current configuration intact, and all exported footage should be accessible.
We recommend installing the G4 Doorbell with the standard wiring of one G4 Doorbell, one chime and one transformer (or the G4 Doorbell Power Supply, available on the US store only); or no chime with the chime function disabled.
More complex installations are supported, but correct wiring may depend on deployment-specific characteristics not covered in these diagrams. Any advanced configurations should be conducted by a qualified electrician.
Before you begin the wiring process, separate the G4 Doorbell wires into left and right as shown in the images below.
Affected models of the S7-1500 CPU product family do not contain an Immutable Root of Trust in Hardware. With this the integrity of the code executed on the device can not be validated during load-time. An attacker with physical access to the device could use this to replace the boot image of the device and execute arbitrary code.
As exploiting this vulnerability requires physical tampering with the product, Siemens recommends to assess the risk of physical access to the device in the target deployment and to implement measures to make sure that only trusted personnel have access to the physical hardware.
The vulnerability is related to the hardware of the product. Siemens has released new hardware versions for several CPU types of the S7-1500 product family in which this vulnerability is fixed and is working on new hardware versions for remaining PLC types to address this vulnerability completely. See the chapter “Additional Information” below for more details.AFFECTED PRODUCTS AND SOLUTION
As a general security measure, Siemens strongly recommends to protect network access to devices with appropriate mechanisms. In order to operate the devices in a protected IT environment, Siemens recommends to configure the environment according to Siemens’ operational guidelines for Industrial Security (Download: https://www.siemens.com/cert/operational-guidelines-industrial-security), and to follow the recommendations in the product manuals. Additional information on Industrial Security by Siemens can be found at: https://www.siemens.com/industrialsecurityPRODUCT DESCRIPTION
SIMATIC Drive Controllers have been designed for the automation of production machines, combining the functionality of a SIMATIC S7-1500 CPU and a SINAMICS S120 drive control.
SIMATIC S7-1500 CPU products have been designed for discrete and continuous control in industrial environments such as manufacturing, food and beverages, and chemical industries worldwide.
The SIMATIC S7-1500 MFP CPUs provide functionality of standard S7-1500 CPUs with the possibility to run C/C++ Code within the CPU-Runtime for execution of own functions / algorithms implemented in C/C++ and an additional second independent runtime environment to execute C/C++ applications parallel to the STEP 7 program if required.
The SIMATIC S7-1500 ODK CPUs provide functionality of standard S7-1500 CPUs but additionally provide the possibility to run C/C++ Code within the CPU-Runtime for execution of own functions / algorithms implemented in C/C++. They have been designed for discrete and continuous control in industrial environments such as manufacturing, food and beverages, and chemical industries worldwide.
SIPLUS extreme products are designed for reliable operation under extreme conditions and are based on SIMATIC, LOGO!, SITOP, SINAMICS, SIMOTION, SCALANCE or other devices. SIPLUS devices use the same firmware as the product they are based on.VULNERABILITY CLASSIFICATION
The vulnerability classification has been performed by using the CVSS scoring system in version 3.1 (CVSS v3.1) (https://www.first.org/cvss/). The CVSS environmental score is specific to the customer’s environment and will impact the overall CVSS score. The environmental score should therefore be individually defined by the customer to accomplish final scoring.
An additional classification has been performed using the CWE classification, a community-developed list of common software security weaknesses. This serves as a common language and as a baseline for weakness identification, mitigation, and prevention efforts. A detailed list of CWE classes can be found at: https://cwe.mitre.org/.Vulnerability CVE-2022-38773Affected devices do not contain an Immutable Root of Trust in Hardware. With this the integrity of the code executed on the device can not be validated during load-time. An attacker with physical access to the device could use this to replace the boot image of the device and execute arbitrary code.
CWE-1326: Missing Immutable Root of Trust in Hardware
ACKNOWLEDGMENTS
Siemens thanks the following party for its efforts:
Yuanzhe Wu and Ang Cui from Red Balloon Security for coordinated disclosure
ADDITIONAL INFORMATION
Siemens has released the following new hardware versions of the S7-1500 product family. They contain a new secure boot mechanism that resolves the vulnerability:
SIMATIC S7-1500 CPU 1511-1 PN (6ES7511-1AL03-0AB0)
SIMATIC S7-1500 CPU 1513-1 PN (6ES7513-1AM03-0AB0)
SIMATIC S7-1500 CPU 1511F-1 PN (6ES7511-1FL03-0AB0)
SIMATIC S7-1500 CPU 1513F-1 PN (6ES7513-1FM03-0AB0)
SIMATIC S7-1500 CPU 1513R-1 PN (6ES7513-1RM03-0AB0)
SIMATIC S7-1500 CPU 1515R-2 PN (6ES7515-2RN03-0AB0)
Siemens is working on new hardware versions for additional PLC types to address this vulnerability further.For further inquiries on security vulnerabilities in Siemens products and solutions, please contact the Siemens ProductCERT:
During the fall of 2022, a few friends and I took a road trip from Chicago, IL to Washington, DC to attend a cybersecurity conference and (try) to take a break from our usual computer work.
While we were visiting the University of Maryland, we came across a fleet of electric scooters scattered across the campus and couldn’t resist poking at the scooter’s mobile app. To our surprise, our actions caused the horns and headlights on all of the scooters to turn on and stay on for 15 minutes straight.
When everything eventually settled down, we sent a report over to the scooter manufacturer and became super interested in trying to more ways to make more things honk. We brainstormed for a while, and then realized that nearly every automobile manufactured in the last 5 years had nearly identical functionality. If an attacker were able to find vulnerabilities in the API endpoints that vehicle telematics systems used, they could honk the horn, flash the lights, remotely track, lock/unlock, and start/stop vehicles, completely remotely.
At this point, we started a group chat and all began to work with the goal of finding vulnerabilities affecting the automotive industry. Over the next few months, we found as many car-related vulnerabilities as we could. The following writeup details our work exploring the security of telematic systems, automotive APIs, and the infrastructure that supports it.
Findings Summary
During our engagement, we found the following vulnerabilities in the companies listed below:
Kia, Honda, Infiniti, Nissan, Acura
Fully remote lock, unlock, engine start, engine stop, precision locate, flash headlights, and honk vehicles using only the VIN number
Fully remote account takeover and PII disclosure via VIN number (name, phone number, email address, physical address)
Ability to lock users out of remotely managing their vehicle, change ownership
For Kia’s specifically, we could remotely access the 360-view camera and view live images from the car
Mercedes-Benz
Access to hundreds of mission-critical internal applications via improperly configured SSO, including…
Multiple Github instances behind SSO
Company-wide internal chat tool, ability to join nearly any channel
SonarQube, Jenkins, misc. build servers
Internal cloud deployment services for managing AWS instances
Internal Vehicle related APIs
Remote Code Execution on multiple systems
Memory leaks leading to employee/customer PII disclosure, account access
Hyundai, Genesis
Fully remote lock, unlock, engine start, engine stop, precision locate, flash headlights, and honk vehicles using only the victim email address
Fully remote account takeover and PII disclosure via victim email address (name, phone number, email address, physical address)
Ability to lock users out of remotely managing their vehicle, change ownership
BMW, Rolls Royce
Company-wide core SSO vulnerabilities which allowed us to access any employee application as any employee, allowed us to…
Access to internal dealer portals where you can query any VIN number to retrieve sales documents for BMW
Access any application locked behind SSO on behalf of any employee, including applications used by remote workers and dealerships
Ferrari
Full zero-interaction account takeover for any Ferrari customer account
IDOR to access all Ferrari customer records
Lack of access control allowing an attacker to create, modify, delete employee “back office” administrator user accounts and all user accounts with capabilities to modify Ferrari owned web pages through the CMS system
Ability to add HTTP routes on api.ferrari.com (rest-connectors) and view all existing rest-connectors and secrets associated with them (authorization headers)
Spireon
Multiple vulnerabilities, including:
Full administrator access to a company-wide administration panel with ability to send arbitrary commands to an estimated 15.5 million vehicles (unlock, start engine, disable starter, etc.), read any device location, and flash/update device firmware
Remote code execution on core systems for managing user accounts, devices, and fleets. Ability to access and manage all data across all of Spireon
Ability to fully takeover any fleet (this would’ve allowed us to track & shut off starters for police, ambulances, and law enforcement vehicles for a number of different large cities and dispatch commands to those vehicles, e.g. “navigate to this location”)
Full administrative access to all Spireon products, including the following…
1.2 million user accounts (end user accounts, fleet managers, etc.)
Ford
Full memory disclosure on production vehicle Telematics API discloses
Discloses customer PII and access tokens for tracking and executing commands on vehicles
Discloses configuration credentials used for internal services related to Telematics
Ability to authenticate into customer account and access all PII and perform actions against vehicles
Customer account takeover via improper URL parsing, allows an attacker to completely access victim account including vehicle portal
Reviver
Full super administrative access to manage all user accounts and vehicles for all Reviver connected vehicles. An attacker could perform the following:
Track the physical GPS location and manage the license plate for all Reviver customers (e.g. changing the slogan at the bottom of the license plate to arbitrary text)
Update any vehicle status to “STOLEN” which updates the license plate and informs authorities
Access all user records, including what vehicles people owned, their physical address, phone number, and email address
Access the fleet management functionality for any company, locate and manage all vehicles in a fleet
Porsche
Ability to send retrieve vehicle location, send vehicle commands, and retrieve customer information via vulnerabilities affecting the vehicle Telematics service
Toyota
IDOR on Toyota Financial that discloses the name, phone number, email address, and loan status of any Toyota financial customers
Jaguar, Land Rover
User account IDOR disclosing password hash, name, phone number, physical address, and vehicle information
SiriusXM
Leaked AWS keys with full organizational read/write S3 access, ability to retrieve all files including (what appeared to be) user databases, source code, and config files for Sirius
Vulnerability Writeups
(1) Full Account Takeover on BMW and Rolls Royce via Misconfigured SSO
While testing BMW assets, we identified a custom SSO portal for employees and contractors of BMW. This was super interesting to us, as any vulnerabilities identified here could potentially allow an attacker to compromise any account connected to all of BMWs assets.
For instance, if a dealer wanted to access the dealer portal at a physical BMW dealership, they would have to authenticate through this portal. Additionally, this SSO portal was used to access internal tools and related devops infrastructure.
The first thing we did was fingerprint the host using OSINT tools like gau and ffuf. After a few hours of fuzzing, we identified a WADL file which exposed API endpoints on the host via sending the following HTTP request:
GET /rest/api/application.wadl HTTP/1.1
Host: xpita.bmwgroup.com
The HTTP response contained all available REST endpoints on the xpita host. We began enumerating the endpoints and sending mock HTTP requests to see what functionality was available.
One immediate finding was that we were able to query all BMW user accounts via sending asterisk queries in the user field API endpoint. This allowed us to enter something like “sam*” and retrieve the user information for a user named “sam.curry” without having to guess the actual username.
HTTP Request
GET /reset/api/users/example* HTTP/1.1
Host: xpita.bmwgroup.com
HTTP Response
HTTP/1.1 200 OK
Content-type: application/json

{“id”:”redacted”,”firstName”:”Example”,”lastName”:”User”,”userName”:”example.user”}
Once we found this vulnerability, we continued testing the other accessible API endpoints. One particularly interesting one which stood out immediately was the “/rest/api/chains/accounts/:user_id/totp” endpoint. We noticed the word “totp” which usually stood for one-time password generation.
When we sent an HTTP request to this endpoint using the SSO user ID gained from the wildcard query paired with the TOTP endpoint, it returned a random 7-digit number. The following HTTP request and response demonstrate this behavior:
HTTP Request
GET /rest/api/chains/accounts/unique_account_id/totp HTTP/1.1
Host: xpita.bmwgroup.com
HTTP Response
HTTP/1.1 200 OK
Content-type: text/plain

9373958
For whatever reason, it appeared that this HTTP request would generate a TOTP for the user’s account. We guessed that this interaction worked with the “forgot password” functionality, so we found an example user account by querying “example*” using our original wildcard finding and retrieving the victim user ID. After retrieving this ID, we initiated a reset password attempt for the user account until we got to the point where the system requested a TOTP code from the user’s 2FA device (e.g. email or phone).
At this point, we retrieved the TOTP code generated from the API endpoint and entered it into the reset password confirmation field.
It worked! We had reset a user account, gaining full account takeover on any BMW employee and contractor user.
At this point, it was possible to completely take over any BMW or Rolls Royce employee account and access tools used by those employees.
To demonstrate the impact of the vulnerability, we simply Googled “BMW dealer portal” and used our account to access the dealer portal used by sales associates working at physical BMW and Rolls Royce dealerships.
After logging in, we observed that the demo account we took over was tied to an actual dealership, and we could access all of the functionality that the dealers themselves had access to. This included the ability to query a specific VIN number and retrieve sales documents for the vehicle.
With our level of access, there was a huge amount of functionality we could’ve performed against BMW and Rolls Royce customer accounts and customer vehicles. We stopped testing at this point and reported the vulnerability.
The vulnerabilities reported to BMW and Rolls Royce have since been fixed.
(2) Remote Code Execution and Access to Hundreds of Internal Tools on Mercedes-Benz and Rolls Royce via Misconfigured SSO
Early in our testing, someone in our group had purchased a Mercedes-Benz vehicle and so we began auditing the Mercedes-Benz infrastructure. We took the same approach as BMW and began testing the Mercedes-Benz employee SSO.
We weren’t able to find any vulnerabilities affecting the SSO portal itself, but by exploring the SSO website we observed that they were running some form of LDAP for the employee accounts. Based on our high level understanding of their infrastructure, we guessed that the individual employee applications used a centralized LDAP system to authenticate users. We began exploring each of these websites in an attempt to find a public registration so we could gain SSO credentials to access, even at a limited level, the employee applications.
After fuzzing random sites for a while, we eventually found the “umas.mercedes-benz.com” website which was built for vehicle repair shops to request specific tools access from Mercedes-Benz. The website had public registration enabled as it was built for repair shops and appeared to write to the same database as the core employee LDAP system.
We filled out all the required fields for registration, created a user account, then used our recon data to identify sites which redirected to the Mercedes-Benz SSO. The first one we attempted was a pretty obvious employee tool, it was “git.mercedes-benz.com”, short for Github. We attempted to use our user credentials to sign in to the Mercedes-Benz Github and saw that we were able to login. Success!
The Mercedes-Benz Github, after authenticating, asked us to set up 2FA on our account so we could access the app. We installed the 2FA app and added it to our account, entered our code, then saw that we were in. We had access to “git.mercedes-benz.com” and began looking around.
After a few minutes, we saw that the Github instance had internal documentation and source code for various Mercedes-Benz projects including the Mercedes Me Connect app which was used by customers to remotely connect to their vehicles. The internal documentation gave detailed instructions for employees to follow if they wanted to build an application for Mercedes-Benz themselves to talk to customer vehicles and the specific steps one would have to take to talk to customer vehicles.
At this point, we reported the vulnerability, but got some pushback after a few days of waiting on an email response. The team seemed to misunderstand the impact, so they asked us to demonstrate further impact.
We used our employee account to login to numerous applications which contained sensitive information and achieved remote code execution via exposed actuators, spring boot consoles, and dozens of sensitive internal applications used by Mercedes-Benz employees. One of these applications was the Mercedes-Benz Mattermost (basically Slack). We had permission to join any channel, including security channels, and could pose as a Mercedes-Benz employee who could ask whatever questions necessary for an actual attacker to elevate their privileges across the Benz infrastructure.
To give an overview, we could access the following services:
Multiple employee-only Githubs with sensitive information containing documentation and configuration files for multiple applications across the Mercedes-Benz infrastructure
Spring boot actuators which lead to remote code execution, information disclosure, on sensitive employee and customer facing applications Jenkins instances
AWS and cloud-computing control panels where we could request, manage, and access various internal systems
XENTRY systems used to communicate with customer vehicles
Internal OAuth and application-management related functionality for configuring and managing internal apps
Hundreds of miscellaneous internal services
(3) Full Account Takeover on Ferrari and Arbitrary Account Creation allows Attacker to Access, Modify, and Delete All Customer Information and Access Administrative CMS Functionality to Manage Ferrari Websites
When we began targeting Ferrari, we mapped out all domains under the publicly available domains like “ferrari.com” and browsed around to see what was accessible. One target we found was “api.ferrari.com”, a domain which offered both customer facing and internal APIs for Ferrari systems. Our goal was to get the highest level of access possible for this API.
We analyzed the JavaScript present on several Ferrari subdomains that looked like they were for use by Ferrari dealers. These subdomains included `cms-dealer.ferrari.com`, `cms-new.ferrari.com` and `cms-dealer.test.ferrari.com`.
One of the patterns we notice when testing web applications is poorly implemented single sign on functionality which does not restrict access to the underlying application. This was the case for the above subdomains. It was possible to extract the JavaScript present for these applications, allowing us to understand the backend API routes in use.
When reverse engineering JavaScript bundles, it is important to check what constants have been defined for the application. Often these constants contain sensitive credentials or at the very least, tell you where the backend API is, that the application talks to.
For this application, we noticed the following constants were set:
From the above constants we can understand that the base API URL is `https://api.ferrari.com/cms/dws/back-office/` and a potential API key for this API is `REDACTED`.
Digging further into the JavaScript we can look for references to `apiUrl` which will inform us as to how this API is called and how the API key is being used. For example, the following JavaScript sets certain headers if the API URL is being called:
})).url.startsWith(x.a.apiUrl) && !["/back-office/dealers", "/back-office/dealer-settings", "/back-office/locales", "/back-office/currencies", "/back-office/dealer-groups"].some(t => !!e.url.match(t)) && (e = (e = e.clone({
                                    headers: e.headers.set("Authorization", "" + (s || void 0))
                                })).clone({
                                    headers: e.headers.set("x-api-key", "" + a)
                                }));
All the elements needed for this discovery were conveniently tucked away in this JavaScript file. We knew what backend API to talk to and its routes, as well as the API key we needed to authenticate to the API.
Within the JavaScript, we noticed an API call to `/cms/dws/back-office/auth/bo-users`. When requesting this API through Burp Suite, it leaked all of the users registered for the Ferrari Dealers application. Furthermore, it was possible to send a POST request to this endpoint to add ourselves as a super admin user.
While impactful, we were still looking for a vulnerability that affected the broader Ferrari ecosystem and every end user. Spending more time deconstructing the JavaScript, we found some API calls were being made to `rest-connectors`:
The following request unlocked the final piece in the puzzle. Sending the following request revealed a treasure trove of API credentials for Ferrari: :
GET /cms/dws/back-office/rest-connector-models HTTP/1.1
To explain what this endpoint’s purpose was: Ferrari had configured a number of backend APIs that could be communicated with by hitting specific paths. When hitting this API endpoint, it returned this list of API endpoints, hosts and authorization headers (in plain text).
This information disclosure allowed us to query Ferrari’s production API to access the personal information of any Ferrari customer. In addition to being able to view these API endpoints, we could also register new rest connectors or modify existing ones.
HTTP Request
GET /core/api/v1/Users?email=ian@ian.sh HTTP/1.1
Host: fcd.services.ferrari.com
HTTP Response
HTTP/1.1 200 OK
Content-type: application/json

…"guid":"2d32922a-28c4-483e-8486-7c2222b7b59c","email":"ian@ian.sh","nickName":"ian@ian.sh","firstName":"Ian","lastName":"Carroll","birthdate":"1963-12-11T00:00:00"…
The API key and production endpoints that were disclosed using the previous staging API key allowed an attacker to access, create, modify, and delete any production user account. It additionally allowed an attacker to query users via email address or nickname.
Additionally, an attacker could POST to the “/core/api/v1/Users/:id/Roles” endpoint to edit their user roles, setting themselves to have super-user permissions or become a Ferrari owner.
This vulnerability would allow an attacker to access, modify, and delete any Ferrari customer account with access to manage their vehicle profile.
(4) SQL Injection and Regex Authorization Bypass on Spireon Systems allows Attacker to Access, Track, and Send Arbitrary Commands to 15 million Telematics systems and Additionally Fully Takeover Fleet Management Systems for Police Departments, Ambulance Services, Truckers, and Many Business Fleet Systems
When identifying car-related targets to hack on, we found the company Spireon. In the early 90s and 2000s, there were a few companies like OnStar, Goldstar, and FleetLocate which were standalone devices which were put into vehicles to track and manage them. The devices have the capabilities to be tracked and receive arbitrary commands, e.g. locking the starter so the vehicle cannot start.
Sometime in the past, Spireon had acquired many GPS Vehicle Tracking and Management Companies and put them under the Spireon parent company.
We read through the Spireon marketing and saw that they claimed to have over 15 million connected vehicles. They offered services directly to customers and additionally many services through their subsidiary companies like OnStar.
We decided to research them as, if an attacker were able to compromise the administration functionality for these devices and fleets, they would be able to perform actions against over 15 million vehicles with very interesting functionalities like sending a cities police officers a dispatch location, disabling vehicle starters, and accessing financial loan information for dealers.
Our first target for this was very obvious: admin.spireon.com
The website appeared to be a very out of date global administration portal for Spireon employees to authenticate and perform some sort of action. We attempted to identify interesting endpoints which were accessible without authorization, but kept getting redirected back to the login.
Since the website was so old, we tried the trusted manual SQL injection payloads but were kicked out by a WAF that was installed on the system
We switched to a much simpler payload: sending an apostrophe, seeing if we got an error, then sending two apostrophes and seeing if we did not get an error. This worked! The system appeared to be reacting to sending an odd versus even number of apostrophes. This indicated that our input in both the username and password field was being passed to a system which could likely be vulnerable to some sort of SQL injection attack.
For the username field, we came up with a very simple payload:
victim' #
The above payload was designed to simply cut off the password check from the SQL query. We sent this HTTP request to Burp Suite’s intruder with a common username list and observed that we received various 301 redirects to “/dashboard” for the username “administrator” and “admin”.
After manually sending the HTTP request using the admin username, we observed that we were authenticated into the Spireon administrator portal as an administrator user. At this point, we browsed around the application and saw many interesting endpoints.
The functionality was designed to manage Spireon devices remotely. The administrator user had access to all Spireon devices, including those of OnStar, GoldStar, and FleetLocate. We could query these devices and retrieve the live location of whatever the devices were installed on, and additionally send arbitrary commands to these devices. There was additional functionality to overwrite the device configuration including what servers it reached out to download updated firmware.
Using this portal, an attacker could create a malicious Spireon package, update the vehicle configuration to call out to the modified package, then download and install the modified Spireon software.
At this point, an attacker could backdoor the Spireon device and run arbitrary commands against the device.
Since these devices were very ubiquitous and were installed on things like tractors, golf carts, police cars, and ambulances, the impact of each device differed. For some, we could only access the live GPS location of the device, but for others we could disable the starter and send police and ambulance dispatch locations.
We reported the vulnerability immediately, but during testing, we observed an HTTP 500 error which disclosed the API URL of the backend API endpoint that the “admin.spireon.com” service reached out to. Initially, we dismissed this as we assumed it was internal, but after circling back we observed that we could hit the endpoint and it would trigger an HTTP 403 forbidden error.
Our goal now was seeing if we could find some sort of authorization bypass on the host and what endpoints were accessible. By bypassing the administrator UI, we could directly reach out to each device and have direct queries for vehicles and user accounts via the backend API calls.
We fuzzed the host and eventually observed some weird behavior:
By sending any string with “admin” or “dashboard”, the system would trigger an HTTP 403 forbidden response, but would return 404 if we didn’t include this string. As an example, if we attempted to load “/anything-admin-anything” we’d receive 403 forbidden, while if we attempted to load “/anything-anything” it would return a 404.
We took the blacklisted strings, put them in a list, then attempted to enumerate the specific endpoints with fuzzing characters (%00 to %FF) stuck behind the first and last characters.
During scanning, we saw that the following HTTP requests would return a 200 OK response:
GET /%0dadmin
GET /%0ddashboard
Through Burp Suite, we sent the HTTP response to our browser and observed the response: it was a full administrative portal for the core Spireon app. We quickly set up a match and replace rule to modify GET /admin and GET /dashboard to the endpoints with the %0d prefix.
After setting up this rule, we could browse to “/admin” or “/dashboard” and explore the website without having to perform any additional steps. We observed that there were dozens of endpoints which were used to query all connected vehicles, send arbitrary commands to connected vehicles, and view all customer tenant accounts, fleet accounts, and customer accounts. We had access to everything.
At this point, a malicious actor could backdoor the 15 million devices, query what ownership information was associated with a specific VIN, retrieve the full user information for all customer accounts, and invite themselves to manage any fleet which was connected to the app.
For our proof of concept, we invited ourselves to a random fleet account and saw that we received an invitation to administrate a US Police Department where we could track the entire police fleet.
(5) Mass Assignment on Reviver allows an Attacker to Remotely Track and Overwrite the Virtual License Plates for All Reviver Customers, Track and Administrate Reviver Fleets, and Access, Modify, and Delete All User Information
In October, 2022, California announced that it had legalized digital license plates. We researched this for a while and found that most, if not all of the digital license plates, were done through a company called Reviver.
If someone wanted a digital license plate, they’d buy the virtual Reviver license plate which included a SIM card for remotely tracking and updating the license plate. Customers who uses Reviver could remotely update their license plates slogan, background, and additionally report if the car had been stolen via setting the plate tag to “STOLEN”.
Since the license plate could be used to track vehicles, we were super interested in Reviver and began auditing the mobile app. We proxied the HTTP traffic and saw that all API functionality was done on the “pr-api.rplate.com” website. After creating a user account, our user account was assigned to a unique “company” JSON object which allowed us to add other sub-users to our account.
The company JSON object was super interesting as we could update many of the JSON fields within the object. One of these fields was called “type” and was default set to “CONSUMER”. After noticing this, we dug through the app source code in hopes that we could find another value to set it to, but were unsuccessful.
At this point, we took a step back and wondered if there was an actual website we could talk to versus proxying traffic through the mobile app. We looked online for a while before getting the idea to perform a reset password on our account which gave us a URL to navigate to.
Once we opened the password reset URL, we observed that the website had tons of functionality including the ability to administer vehicles, fleets, and user accounts. This was super interesting as we now had a lot more API endpoints and functionality to access. Additionally, the JavaScript on the website appeared to have the names of the other roles that our user account could be (e.g. specialized names for user, moderator, admin, etc.)
We queried the “CONSUMER” string in the JavaScript and saw that there were other roles that were defined in the JavaScript. After attempting to update our “role” parameter to the disclosed “CORPORATE” role, we refreshed out profile metadata, then saw that it was successful! We were able to change our roles to ones other than the default user account, opening the door to potential privilige escalation vulnerabilities.
It appeared that, even though we had updated our account to the “CORPORATE” role, we were still receiving authorization vulnerabilities when logging into the website. We thought for a while until realizing that we could invite users to our modified account which had the elevated role, which may then grant the invited users the required permissions since they were invited via an intended way versus mass assigning an account to an elevated role.
After inviting a new account, accepting the invitation, and logging into the account, we observed that we no longer received authorization errors and could access fleet management functionality. This meant that we could likely (1) mass assign our account to an even higher elevated role (e.g. admin), then (2) invite a user to our account which would be assigned the appropriate permissions.
This perplexed us as there was likely some administration group which existed in the system but that we had not yet identified. We brute forced the “type” parameter using wordlists until we noticed that setting our group to the number “4” had updated our role to “REVIVER_ROLE”. It appeared that the roles were indexed to numbers, and we could simply run through the numbers 0-100 and find all the roles on the website.
The “0” role was the string “REVIVER”, and after setting this on our account and re-inviting a new user, we logged into the website normally and observed that the UI was completely broken and we couldn’t click any buttons. From what we could guess, we had the administrator role but were accessing the account using the customer facing frontend website and not the appropriate administrator frontend website. We would have to find the endpoints used by administrators ourselves.
Since our administrator account theoretically had elevated permissions, our first test was simply querying a user account and seeing if we could access someone else’s data: this worked!
We could take any of the normal API calls (viewing vehicle location, updating vehicle plates, adding new users to accounts) and perform the action using our super administrator account with full authorization.
At this point, we reported the vulnerability and observed that it was patched in under 24 hours. An actual attacker could remotely update, track, or delete anyone’s REVIVER plate. We could additionally access any dealer (e.g. Mercedes-Benz dealerships will often package REVIVER plates) and update the default image used by the dealer when the newly purchased vehicle still had DEALER tags.
The Reviver website also offered fleet management functionality which we had full access to.
(6) Full Remote Vehicle Access and Full Account Takeover affecting Hyundai and Genesis
This vulnerability was written up on Twitter and can be accessed on the following thread:
My Hyper-V host is Server 2012 R2. I have a virtual machine (Server 2012 R2) with a checkpoint. When I right click on the checkpoint, there is no “Delete checkpoint… ” option. I need to delete this checkpoint so that it is merged with the parent VHDX. What is the best method for doing this?
– Question from social.technet.microsoft.com
Have you ever encountered the situation where your Hyper-V cannot delete checkpoint because of “Delete” option missing? Right-clicking on the Hyper-V checkpoint, there are only “Settings”, “Export”, “Rename” and “Help” options left, why would this happen?
There are many reasons may cause Hyper-V snapshot delete option not available, such as connection error with the host, or a backup toolfailure. The most likely scenario is that the checkpoint created by a third-party tool was not deleted properly by the same tool.
More specifically, the checkpoints and associated .AVHDX files should be merged and deleted at the end of a backup – only the newer .AVHDX files should be kept. However, sometimes the checkpoints may be corrupted because the VM is in a locked or backed up state, or some other reason is preventing the deletion and merging. In this case, you may find the delete option missing, and Hyper-V cannot delete this checkpoint.
How to fix this? I will provide you 3 proven solutions, you can try them one by one. *They also work for cleaning up after a failed Hyper-V checkpoint.
How to solve Hyper-V cannot delete checkpoint (3 solutions)
When you are unable to delete checkpoint in Hyper-V, you can first try some regular troubleshooting means. If they cannot solve this issue, don’t worry, there are still some alternatives can help you delete Hyper-V checkpoint properly. I will cover all of them below.
Solution 1. Troubleshooting steps that you should try first
Before taking other measures, you can try some simple ways in Hyper-V Manager to see if you can make snapshot removal work. That is:
Right-click on the host name in Hyper-V Manager and select Refresh.
Close and restart the Hyper-V Manager.
Highlight the target checkpoint and use the [Delete] key on the keyboard. It should pop up a window confirming whether to delete the checkpoint or not.
If none of these ways can help, then you may need to try delete checkpoint Hyper-V with PowerShell.
Solution 2. Properly delete Hyper-V checkpoint with PowerShell
Hyper-V PowerShell module is a bundle of cmdlets for creating, configuring and managing Microsoft Hyper-V hosts and virtual machines. It can be more a time efficient method than using GUI. You can use it remove any Hyper-V checkpoint that has no delete option.
Launch Windows PowerShell as administrator on the Hyper-V host, input and execute the following command to delete the checkpoint:
Once the command succeeded, you can see the merge progress for the particular VM. It may take some time depending on the snapshot size. After that, you should be able to modify the virtual machine configuration again.
If this method still cannot delete your Hyper-V checkpoint, turn to the next one.
Solution 3. Export and import Hyper-V VM to resolve checkpoint cannot delete
You can try Hyper-V export VM and import as suggested by some other users, which are also said can be used to solve the problem.
1. Launch Hyper-V Manager. Right-click on the name of the target checkpoint, and select Export…
2. In the pop-up window, click Browse to specify a network share as the storage destination to the exported files. And then click Export.
3. Right-click on the host name and select Import Virtual Machine… Click Next on the pop-up wizard.
4. On Locate Folder page, click Browse… to specify the folder containing the exported VM files. Click Next to continue.
5. On Select Virtual Machine page, select the virtual machine to import, then click Next.
4. On Choose Import Type page, choose the type of import to perform:
Register the virtual machine in-place (use the existing unique ID): use the exported files in-place, and when the import has completed, the export files become the running state files and can’t be removed. The ID will be the same as the exported one.
Restore the virtual machine (use the existing unique ID): restore the VM to the specified or default location, with the same ID as the exported one. When the import has completed, the exported files remain intact and can be removed or imported again.
Copy the virtual machine (create a new unique ID): restore the VM to the specified or default location, and create a new unique ID. Which means the exported files remain intact and can be removed or imported again, and you can import the VM to the same host multiple times.
Click Next to continue.
5. Choose the second or the third option, the wizard will add 2 more pages for selecting storage.
On Choose Destination page, you can check Store the virtual machine in a different location option, and click Browse… to specify Virtual machine configuration folder, Checkpoint store, and Smart paging folder. Leave the option unchecked the wizard will import the files to default Hyper-V folders. Then click Next.
6. On Choose Storage Folders page, you can click Browse… to specify where you want to store the imported virtual hard disks for this VM, or leave the default location unchanged. Then click Next.
7. On Summary page, review the settings and click Finish to start restore.
Furthere reading: FAQ about Hyper-V delete checkpoint
The above describes how to solve the problem that the delete option disappears and the hyper-v checkpoint cannot be deleted. Besides, many users may have some other confusion about checkpoints. I have compiled some common questions and their answers here.
Q: Where are checkpoints stored on a Hyper-V host?
In general, the default location for storing checkpoint configuration files is:
And the default locations for storing AVHDX files (checkpoint storages) are:
Windows Server 2012R2 / Windows 8.1: C:UsersPublicDocumentsHyper-VVirtual Hard Disks
Windows Server 2012 / Windows 8: C:ProgramDataMicrosoftWindowsHyper-VNew Virtual MachineVirtual Hard Disks
Q: Can you directly delete checkpoint files (.avhdx)?
Whenever a checkpoint is deleted, Hyper-V merges the .vhdx and .avhdx files automatically, and the .avhdx files should be removed from the disk after the Hyper-V checkpoint merging process is complete. So a proper checkpoint deletion does not result in data loss.
It’s not a good idea to delete the .avhdx file in VM folder directly, because it may cause the checkpoint tree to fail.
The normal steps to delete a checkpoint is:
Open the Hyper-V Manager -> Select the virtual machine for which you need to remove checkpoints -> Locate the Checkpoints tab -> Right-click on the desired checkpoint -> click “Delete Checkpoint”. If asked to confirm the action, make sure the checkpoint is correct and click “Delete” again.
Note if you need to delete all subsequent checkpoints, right-click the earliest checkpoint and click “Delete Checkpoint Subtree”.
If you find some orphaned Hyper-V AVHDX files in the VM folder, but no snapshots on that VM, this may be because incomplete deletion or merging, you can refer to: delete Hyper-V AVHDX file without checkpoints.
Q: Hyper-V checkpoint delete vs merge
A checkpoint is any new change or save between the old state and the present, it stops writing to the actual disk and writes to the change disk.
Once you are satisfied and delete the checkpoint, the changes are written back/merged to the actual disk and are write enabled again. Therefore, deleting a checkpoint and merging a checkpoint are actuallythe same thing.
If you don’t want the changes, you just need to revert them and any changes since the checkpoint will be deleted.
Q: Can Hyper-V checkpoints be used as regular backup means?
The answer is NO. VM snapshot and backup are different from each other. Microsoft’s Hyper-V checkpoint is not a replacement of backup.
When you create a backup, you are creating a copy of your virtual machine. It stores complete data of VM. Backups in Hyper-V can be used to restore a whole VM and do not affect the performance.
When you create a checkpoint, you are creating a differencing disk based on the original virtual machine hard disk. If the original disk is damaged, the child disk is easy to be lost or damaged as well. All changes made after the checkpoint are re-directed to the child disk and leaves the original virtual machine disk read-only.
Meanwhile, checkpoints are running out of the memory of disk with a rapid speed, which will gradually to the poor performance of your virtual machines.
In short, Hyper-V checkpoint is just a secure “undo” button. If you want to test something quickly and restore the VM to a stable state, checkpoint in Hyper-V is convenient and fast to execute the process. But, if you want long-term and independent protection for VMs, you still need to find effective Hyper-V backup solution.
Better option for long-term protection: Image-based VM backup
As mentioned above, if you are looking for long-term data protection and the ability to quickly restore VMs to a usable state in the event of a disaster, then you are more suited to an image-based VM backup solution.
Here I’d like to introduce you AOMEI Cyber Backup, this free Hyper-V backup solution is designed to protect virtual machines from any data threats, whether you are using Hyper-V in Microsoft Windows Server 2022 / 2019 / 2016 / 2012 R2, Microsoft Windows 11 / 10 / 8 / 8.1 or Hyper-V Server 2019 / 2016 / 2012 R2.
You can use the software to simplify Hyper-V backup and management. If offers you the following benefits:
Easy-to-use: User-friendly interface to complete backup and restore process based on several clicks. Perpetual Free: No time limit for AOMEI Cyber Backup Free Edition to protect up to multiple virtual machines. Auto Backup Schedule: Schedule backups for multiple VMs at once and auto run it without powering off VMs. Centralized Management: Create and manage Hyper-V VM backups from the central console without installing Agent on each VM. Flexible Backup Strategy: Flexibly tracking data and store backups to different storages. Role Assignment: allows one administrator to create sub-accounts with limited privileges.
Please hit the button below to download and use AOMEI Cyber Backup for free:
*You can choose to install this VM backup software on either Windows or Linux system.
3 easy steps to perform free VM backup:
1. Open AOMEI Cyber Backup web client, and access to Source Device >> Hyper-V >> Add Hyper-V to bind your Hyper-V host, then enter the required information and click Confirm.
2. Access to Backup Task >> Create New Task to configure your Hyper-V backup task. In the opened wizard, you can select Hyper-V virtual machines to back up, the storages to save the backups.
Also, you can configure Schedule to select backup method as full / incremental backup, and specify the backup frequency on basis of daily / weekly / monthly to automatically run the Hyper-V backup task.
3. Start Backup: click Start Backup and select Add the schedule and start backup now, or Add the schedule only.
When completing the Hyper-V backup solution, you can monitor the backing up process on the main interface, and you can also check the Backup Log to see if there are any errors that result in your backup failure.
When you want to Restore a VM from the backup, you can select any backup version from the history, and Restore to original location easily.
✍While the Free Edition covers most of the VM backup needs, you can also upgrade to enjoy:
Backup Cleanup: Specify retention policy to delete old VM backups automatically, thus saving storage space.
Restore to new location: Make a clone of a virtual machine in the same or another datastore/host, without reinstalling or configuring a new VM.
Summary
If you find your Hyper-V snapshot no delete option, I summarized several ways to solve the problem Hyper-V cannot delete checkpoint in this article. Hope it could be helpful to you.
Besides this, you may encounter some other issues, such as Hyper-V VM running slow, stuck at restoring or saved state, Hyper-V VM no internet, failed to change state, etc. To prevent your virtual machines from getting all kinds of errors and eventual crashes, it’s always recommended to back up your VMs that are loaded with important data.
In this guide, I’ll show you how to deploy the open source time tracking app Kimai in a Docker container. Kimai is free, browser-based (so it’ll work on mobile devices), and is extremely flexible for just about every use case.
It has a stopwatch feature where you can start/stop/pause a worklog timer. Then, it accumulates the total into daily, weekly, monthly or yearly reports, which can be exported or printed as invoices.
It supports single or multi users, so you can even track time for your entire department. All statistics are visible on a beautiful dashboard, which makes historical time-tracking a breeze.
Why use Kimai Time Tracker?
For my scenario, I am salaried at work. However, since I’m an IT Manager, I often find myself working after hours or on weekends to patch servers, reboot systems, or perform system and infrastructure upgrades. Normally, I use a pen and paper or a notetaking app to track overtime, although this is pretty inefficent. Sometimes I forget when I started or stopped, or if I’ve written down the time on a notepade at home, I can’t view that time at work.
And when it comes to managing a team of others who also perform after hours maintenance, it becomes even harder to track their total overtime hours.
Over the past few weeks, I stumbled across Kimai and really love all the features. Especially when I can spin it up in a docker or docker compose container!
In this tutorial, we will be installing Kimai for 1 user using standard Docker run commands. Other users can be added from the webui after initial setup.
Step 1: SSH into your Docker Host
Open Putty and SSH into your server that is running docker and docker compose.
Step 2: Create Kimai Database container
Enter the command below to create a new database to use with Kimai. You can copy and paste into Putty by right-clicking after copy, or CTRL+SHIFT+V into other ssh clients.
Next, start the Kimai container using the already created database. If you look at the Kimai github page, you’ll notice that this isn’t the same command as what shows there.
Here’s the original command (which I’m not using):
And here’s my command. I had to explicitly add TRUSTED_HOSTS, the ADMINMAIL and ADMINPASS, and change the ${HOSTNAME} to the IP address of your docker host. Otherwise, I wasn’t able to access Kimai from other computers on my local network.
Green = change port here if already in use
Red = Add the IP address of your docker host
Orange = Manually specifying the admin email and password. This is what you’ll use to log in with.
Note that 8 characters is the minimum for the password.
Step 4: Log In via Web Browser
Next, Kimai should now be running!
To check, you can go to your http://dockerIP:8001 in a web browser (192.168.68.141:8001)
Then simply log in with the credentials you created.
Step 5: Basic Setup
This app is extremely powerful and customizeable, so I won’t be going over all the available options since everyone has different needs.
Like I mentioned earlier, I’m using Kimai for overtime tracking only, so the first step for me is to create a new “customer”.
Create a Customer
This is sort of unintuitive, but you need to create a customer before you can start tracking time to a project. I’m creating a generic “Employee” customer.
Click Customers on the left sidebar, then click the + button in the top right corner.
Create A Project
Click Projects on the left sidebar:
Then click the + button in the top right corner.
Add a name, choose the customer you just created, and then choose a date range.
Create An Activity
Click Activity on the left, then create an activity. I’m calling mine Overtime Worked and assigning it to the Project “Overtime 2021” I just created.
Step 6: Change “Timetracking Mode” to Time-clock
Click Settings. Under Timetracking mode, change it to Time-Clock. This will let you click the Play button to start/stop time worked vs having to manually enter start and stop times.
Step 7: Start Tracking Time!
To start tracking time, simply click the timer widget in the top right corner.
A screen will pop up asking you what project and activity you want to apply the time to.
The selfhosted stopwatch will start tracking time right after. You can then view the timesheets for yourself under the My Times section or for all users under the Timesheets or Reporting tabs.
Wrapping Up
Hopefully this guide helped you get Kimai installed and setup! If you have any questions, feel free to let me know in the comments below and I’ll do my best to help you out.
My Homelab Equipment
Here is some of the gear I use in my Homelab. I highly recommend each of them.
This article describes the steps involved in creating Polices using SonicOS APIs that will let you access internal devices or servers behind the SonicWall firewall.
Cause
SonicWall by default does not allow inbound traffic which not a part of a session that was initiated by an internal device on the network. This is done to protect the devices in the internal network from malicious access. If required certain parts of the network can be opened to external access, for example Webservers, Exchange servers and so on.
To open the network, we need to specify an access rule from the external network to the internal network and a NAT Policy so we direct traffic only to the intended device.
With APIs this can be achieved on scale for example you can create multiple Access Rules and NAT policies with one command and all the attributes can be specified into Json Objects.
Resolution
Manually opening Ports / enabling Port forwarding to allow traffic from the Internet to a Server behind the SonicWall using sonicos API involves the following steps:
Step1: Enabling the API Module.
Step2:Getting into Swagger.
Step3:Login to the SonicWall with API.
Step4:Create Address Objects and Service Objects with API.
Step5:Creating NAT Policy with API.
Step6: Creating Access Rules with API.
Step7:Committing all the configurational changes made with APIs.
Step8: Log out the SonicWall with API:
Scenario Overview
The following walk-through details allowing TCP 3389 From the Internet to a Terminal Server on the Local Network.Once the configuration is complete, Internet Users can RDP into the Terminal Server using the WAN IP address.Although the examples below show the LAN Zone and TCP 3389 they can apply to any Zone and any Port that is required.
Click on the Link https://sonicos-api.sonicwall.com
Swagger will prepopulate your SonicWalls’s IP, MGMT Port, Firmware so it can give you a list of applicable APIs.
NOTE: All the APIs required for configuring Port Forwarding will be listed in this Article.
Step3:Login to the SonicWall with API:
curl -k -i -u “admin:password” -X POST https://192.168.168.168:443/api/sonicos/auth
“admin:password” – Replace this with your SonicWalls username : password
https://192.168.168.168:443/– Replace this with your SonicWalls Public or private IP address
Command Output should contain a string: “success”: true
NOTE: You are free to choose Swagger, Postman, Git bash or any application that allows API calls, if you are using a Linux based operating system you can execute cURL from the terminal.For this article I am using Git bash on Windows.
Step4:Create Address Objects and Service Objects with API:
curl -k -i -X POST “https://192.168.168.168:443/api/sonicos/address-objects/ipv4” -H “accept: application/Json” -H “Content-Type: application/Json” -d “{\”address_object\”:{\”ipv4\”:{\”name\”:\”Term Server Private\”,\”zone\”:\”LAN\”,\”host\”:{\”ip\”:\”192.168.168.10\”}}}}” && curl -k -i -X POST “https://192.168.168.168:443/api/sonicos/address-objects/ipv4” -H “accept: application/Json” -H “Content-Type: application/Json” -d “{\”address_object\”:{\”ipv4\”:{\”name\”:\”Term Server Public\”,\”zone\”:\”WAN\”,\”host\”:{\”ip\”:\”1.1.1.1\”}}}}”
Output of the First command where we have parsed the address object data on the command instead of creating a separate File:
Output of the second Command where we have used a file called @add instead of specifying data on the command:
TIP: If you are creating only one Address Object then the First command should be sufficient, if you are creating multiple address objects then the second command should be used.
CAUTION: I have the add.Json file saved on to my desktop and hence I was able to call it into the command, if you have created the Json the file in a different location then make sure you are executing the command from that location.
https://192.168.168.168:443 – Replace that with the IP of the SonicWall
@serviceobj.Json is a file that contains the Attributes of the service object:
{
“service_object”: {
“name”: “Terminal Server 3389”,
“TCP”: {
“begin”: 3389,
“end”: 3389
}
}
}
Output of the command:
3. Committing the changes made to the SonicWall: We need to do this to be able to use the Address Objects and service objects that we just created to make a NAT Policy and an Access Rule.
curl -k -X POST “https://192.168.168.168:443/api/sonicos/config/pending” -H “accept: application/Json”
https://192.168.168.168:443 – Replace that with the IP of the SonicWall
https://192.168.168.168:443 – Replace that with the IP of the SonicWall
@accessrule.Json is a file that contains the Attributes of the access rule:
{
“access_rules”: [
{
“ipv4”: {
“name”: “Inbound 3389”,
“enable”: true,
“from”: “WAN”,
“to”: “LAN”,
“action”: “allow”,
“source”: {
“address”: {
“any”: true
},
“port”: {
“any”: true
}
},
“service”: {
“name”: “Terminal Server 3389”
},
“destination”: {
“address”: {
“name”: “Term Server Public”
}
}
}
}
]
}
Output of the command:
Step7: Committing all the configurational changes made with APIs:
1. We have already committed Address objects and Service Objects in Step 4, In this step we are committing the NAT Policy and the Access Rule to the SonicWalls configuration:
curl -k -X POST “https://192.168.168.168:443/api/sonicos/config/pending” -H “accept: application/Json”
https://192.168.168.168:443 – Replace that with the IP of the SonicWall
We have Only used the POST method in most of the API calls for this Article because we are only Adding things into the configuration, there are other methods Like GET,DELETE,PUT and etc. I recommend that you go through https://sonicos-api.sonicwall.com for more API commands.
Step8: Log out the SonicWall with API:
1. It is recommended to log out from the SonicWall via API once the desired configuration is committed.
https://192.168.168.168:443 – Replace that with the IP of the SonicWall
“admin:password” – is the actual username and password for the SonicWall.
Output of the command:
CAUTION: Caution: If you miss to perform the action in Step 7 and Execute the command in Step 8 you will lose all the configuration changes made in the current session.
Summary:We have successfully configured a Port Forwarding for a user in the Internet to access a Term Server that is behind a Firewall on port 3389 using sonicos API.
NOTE: It is always recommended to use Client VPN for RDP connections this article here is just an example.
FQDN: cloudgmsams.sonicwall.com Zero Touch FQDN: cloudttams.global.sonicwall.com IP: 213.244.188.168, 213.244.188.188
For AWS-FRA Colo
FQDN: cscmafra.sonicwall.com Zero Touch FQDN: cscmafratt.global.sonicwall.com, cscmafratta.global.sonicwall.com IP: 18.197.234.66, 18.197.234.59
SonicWall NSM:
For Oregon AWS Colo
FQDN: nsm-uswest.sonicwall.com (Use it in GMS settings under Administration Page) Zero Touch FQDN: nsm-uswest-zt.sonicwall.com (Use it in ZeroTouch Settings under Diag page) IP: 13.227.130.81, 13.227.130.63, 3.227.130.69, 13.227.130.12, 52.39.29.75, 44.233.105.101, 44.227.248.206
For AWS-FRA Colo
FQDN: nsm-eucentral.sonicwall.com (Use it in GMS settings under Administration Page) Zero Touch FQDN: nsm-eucentral-zt.sonicwall.com (Use it in ZeroTouch Settings under Diag page) IP: 13.227.130.70, 13.227.130.69, 13.227.130.15, 13.227.130.92, 18.156.16.24, 18.157.240.148, 3.127.176.56
An internet outage can have major consequences for a digital business, especially when it happens during peak usage times and on holidays. Outages can lead to revenue loss, complaints, and customer churn.
Of course, internet outages regularly impact companies across all verticals, including some of the largest internet companies in the world. And they can happen when you least expect them.
Read on to learn about some of the most impactful internet outages to date and some steps you can take to keep your business out of harm’s way.
Historical Internet Outages You Need to Know About
1. Amazon Web Services
Amazon Web Services (AWS) experienced a major outage in December 2021, lasting for several hours. The outage impacted operations for many leading businesses, including Netflix, Disney, Spotify, DoorDash, and Venmo.
Amazon blames the outage on an automation error causing multiple systems to act abnormally. The outage also prevented users from accessing some cloud services.
This outage proved the largest and safest cloud providers are also susceptible to downtime.
2. Facebook
Facebook as well suffered a major outage in 2021, leaving billions of users unable to access its services, including its main social network, Instagram, and WhatsApp.
According to Facebook, the cause of the outage was a configuration change on its backbone routers responsible for transmitting traffic across its data centers. The outage lasted roughly six hours, an eternity for a social network.
3. Fastly
Cloud service provider Fastly had its network go down in June 2021, taking down several sizeable global news websites, including the New York Times and CNN. It also impacted retailers like Target and Amazon, and several other organizations.
The outage resulted from a faulty software update, stemming from a misconfiguration, causing disruptions across multiple servers.
4. British Airways
British Airways experienced a massive IT failure in 2017 during one of the busiest travel weekends in the United Kingdom.
This event created a nightmare scenario for the organization and its customers. Altogether, it grounded 672 flights and stranded tens of thousands of customers.
According to the company, the outage ensued when an engineer disconnected the data center’s power supply. A massive power surge came next, bringing the business’s network down in the process.
5. Google
Google had a major service outage in 2020. It only lasted about forty-five minutes, but it still impacted users worldwide.
Services including Gmail, YouTube, and Google Calendar all crashed. So did Google Home apps. The outage also impacted third-party applications using Google for authentication.
The issue happened due to inadequate storage capacity for the company’s authentication services.
6. Dyn
Undoubtedly, one of the biggest distributed denial of service (DDoS) attacks in history occurred in 2016 against Dyn, which was a major backbone provider.
The attack occurred in three waves, overwhelming the company’s servers. As a result, many internet users were unable to access partnering platforms like Twitter, Spotify, and Netflix.
While the internet outage lasted only about an hour, Verizon experienced a sharp drop in traffic volume. Naturally, many customers complained about the loss of service.
At first, the company reported the incident was the result of someone cutting fiber cables. However, it was unrelated and turned out to be a “software issue” during routine network maintenance activities.
8. Microsoft
Another major internet outage occurred at Microsoft when its Azure service went under in December 2021. Azure’s Active Directory service crashed for about ninety minutes.
Compared to some other outages, this one was relatively small. Nonetheless, it prevented users from signing in to Microsoft services such as Office 365. Although applications remained online, users couldn’t access them, making this a major productivity killer for many organizations worldwide.
9. Comcast
There was an internet outage at Comcast in November 2021, which happened when its San Francisco backbone shut down for about two hours.
Following the outage, a broader issue occurred, spanning multiple U.S. cities, including hubs like Philadelphia and Chicago. Several thousand customers lost service, leaving them unable to access basic network functionality during the height of the pandemic.
10. Akamai Edge DNS
Akamai, a global content delivery provider, experienced an outage with its DNS service in 2021. The Akamai outage resulted from a faulty software configuration update activating a bug in its Secure Edge Content Delivery Network.
In a similar fashion to other attacks against service providers, Akamai’s outage caused widespread damage. Other websites—including American Airlines, Fox News, and Steam—all experienced performance issues following the incident.
11. Cox Communications
Cox Communications reported a major internet outage in March 2022, impacting nearly seven thousand customers in the Las Vegas region.
The problem resulted from an NV Energy backhoe damaging a transmission line and triggering a power event. The surge caused a cable modem to reset, and many customers tried to reconnect simultaneously. As a result, it took several hours for service to resume.
12. Slack
The recent Slack outage in January 2021 created havoc for distributed workers who rely on the platform for communication and collaboration.
The platform’s outage impacted organizations across the US, UK, Germany, Japan, and India, with interruptions occurring for about two and a half hours. Slack says the issue came from scaling problems on the AWS Transit Gateway, which couldn’t accommodate a spike in traffic.
Best Practices for Avoiding Internet Outages
At the end of the day, there’s nothing you can do to prevent outages entirely, especially if your business relies on multiple third-party systems. Eventually, your company or a partner will experience some level of service disruption. It’s best to plan for them and, where possible, enable systems to ‘fail gracefully.’
As part of your resiliency planning, here are some steps to mitigate damage, maximize uptime, and keep your organization safe, along with some best practices to help you avoid disruptions from network and connectivity issues.
Set Up a Backup Internet Solution
It’s impossible to protect your business from local internet outages completely. They can stem from issues like local construction, service disruptions, and more.
Consider setting up a backup internet solution as a workaround, so you never lose connectivity. For example, you may choose to combine broadband with a wireless failover solution.
Consider a Multi-Cloud Strategy
If your business is in the cloud, it’s a good idea to explore a multi-cloud strategy. By spreading your workloads across multiple cloud providers, you can prevent cloud service disruptions from knocking your digital applications offline. This approach can also improve uptime and resiliency.
Use Website Performance and Availability Monitoring
One of the best ways to protect your business is to use website performance and availability monitoring. It provides real-time visibility into how end users are interacting with and experiencing your website.
A robust website performance and availability monitoring solution can provide actionable insights into the health and stability of your website. As a result, you can track uptime and performance over time and troubleshoot issues when they occur.
The Pingdom Approach to Website Performance Monitoring
SolarWinds® Pingdom® provides real-time and historical end-user experience monitoring, giving your team deep visibility from a single pane of glass. With Pingdom, it’s possible to protect against the kind of outages helping your company make headlines for the wrong reasons.
This post was written by Justin Reynolds. Justin is a freelance writer who enjoys telling stories about how technology, science, and creativity can help workers be more productive. In his spare time, he likes seeing or playing live music, hiking, and traveling.
Threat actors continue to adapt to the latest technologies, practices, and even data privacy laws—and it’s up to organizations to stay one step ahead by implementing strong cybersecurity measures and programs.
Here’s a look at how cybercrime will evolve in 2023 and what you can do to secure and protect your organization in the year ahead.
With the rapid modernization and digitization of supply chains come new security risks. Gartner predicts that by 2025, 45% of organizations worldwide will have experienced attacks on their software supply chains—this is a three-fold increase from 2021. Previously, these types of attacks weren’t even likely to happen because supply chains weren’t connected to the internet. But now that they are, supply chains need to be secured properly.
The introduction of new technology around software supply chains means there are likely security holes that have yet to be identified, but are essential to uncover in order to protect your organization in 2023.
If you’ve introduced new software supply chains to your technology stack, or plan to do so sometime in the next year, then you must integrate updated cybersecurity configurations. Employ people and processes that have experience with digital supply chains to ensure that security measures are implemented correctly.
It should come as no surprise that with the increased use of smartphones in the workplace, mobile devices are becoming a greater target for cyber-attack. In fact, cyber-crimes involving mobile devices have increased by 22% in the last year, according to the Verizon Mobile Security Index (MSI) 2022 with no signs of slowing down in advance of the new year.
As hackers hone in on mobile devices, SMS-based authentication has inevitably become less secure. Even the seemingly most secure companies can be vulnerable to mobile device hacks. Case in point, several major companies, including Uber and Okta were impacted by security breaches involving one-time passcodes in the past year alone.
This calls for the need to move away from relying on SMS-based authentication, and instead to multifactor authentication (MFA) that is more secure. This could include an authenticator app that uses time-sensitive tokens, or more direct authenticators that are hardware or device-based.
Organizations need to take extra precautions to prevent attacks that begin with the frontline by implementing software that helps verify user identity. According to the World Economic Forum’s 2022 Global Risks Report, 95% of cybersecurity incidents are due to human error. This fact alone emphasizes the need for a software procedure that decreases the chance of human error when it comes to verification. Implementing a tool like Specops’ Secure Service Desk helps reduce vulnerabilities from socially engineered attacks that are targeting the help desk, enabling a secure user verification at the service desk without the risk of human error.
As more companies opt for cloud-based activities, cloud security—any technology, policy, or service that protects information stored in the cloud—should be a top priority in 2023 and beyond. Cyber criminals become more sophisticated and evolve their tactics as technologies evolve, which means cloud security is essential as you rely on it more frequently in your organization.
The most reliable safeguard against cloud-based cybercrime is a zero trust philosophy. The main principle behind zero trust is to automatically verify everything—and essentially not trust anyone without some type of authorization or inspection. This security measure is critical when it comes to protecting data and infrastructure stored in the cloud from threats.
Ransomware attacks continue to increase at an alarming rate. Data from Verizon discovered a 13% increase in ransomware breaches year-over-year. Ransomware attacks have also become increasingly targeted — sectors such as healthcare and food and agriculture are just the latest industries to be victims, according to the FBI.
With the rise in ransomware threats comes the increased use of Ransomware-as-a-Service (RaaS). This growing phenomenon is when ransomware criminals lease out their infrastructure to other cybercriminals or groups. RaaS kits make it even easier for threat actors to deploy their attacks quickly and affordably, which is a dangerous combination to combat for anyone leading the cybersecurity protocols and procedures. To increase protection against threat actors who use RaaS, enlist the help of your end-users.
End-users are your organization’s frontline against ransomware attacks, but they need the proper training to ensure they’re protected. Make sure your cybersecurity procedures are clearly documented and regularly practiced so users can stay aware and vigilant against security breaches. Employing backup measures like password policy software, MFA whenever possible, and email-security tools in your organization can also mitigate the onus on end-user cybersecurity.
Data privacy laws are getting stricter—get ready #
We can’t talk about cybersecurity in 2023 without mentioning data privacy laws. With new data privacy laws set to go into effect in several states over the next year, now is the time to assess your current procedures and systems to make sure they comply. These new state-specific laws are just the beginning; companies would be wise to review their compliance as more states are likely to develop new privacy laws in the years to come.
Data privacy laws often require changes to how companies store and processing data, and implementing these new changes might open you up to additional risk if they are not implemented carefully. Ensure your organization is in adherence to proper cyber security protocols, including zero trust, as mentioned above.
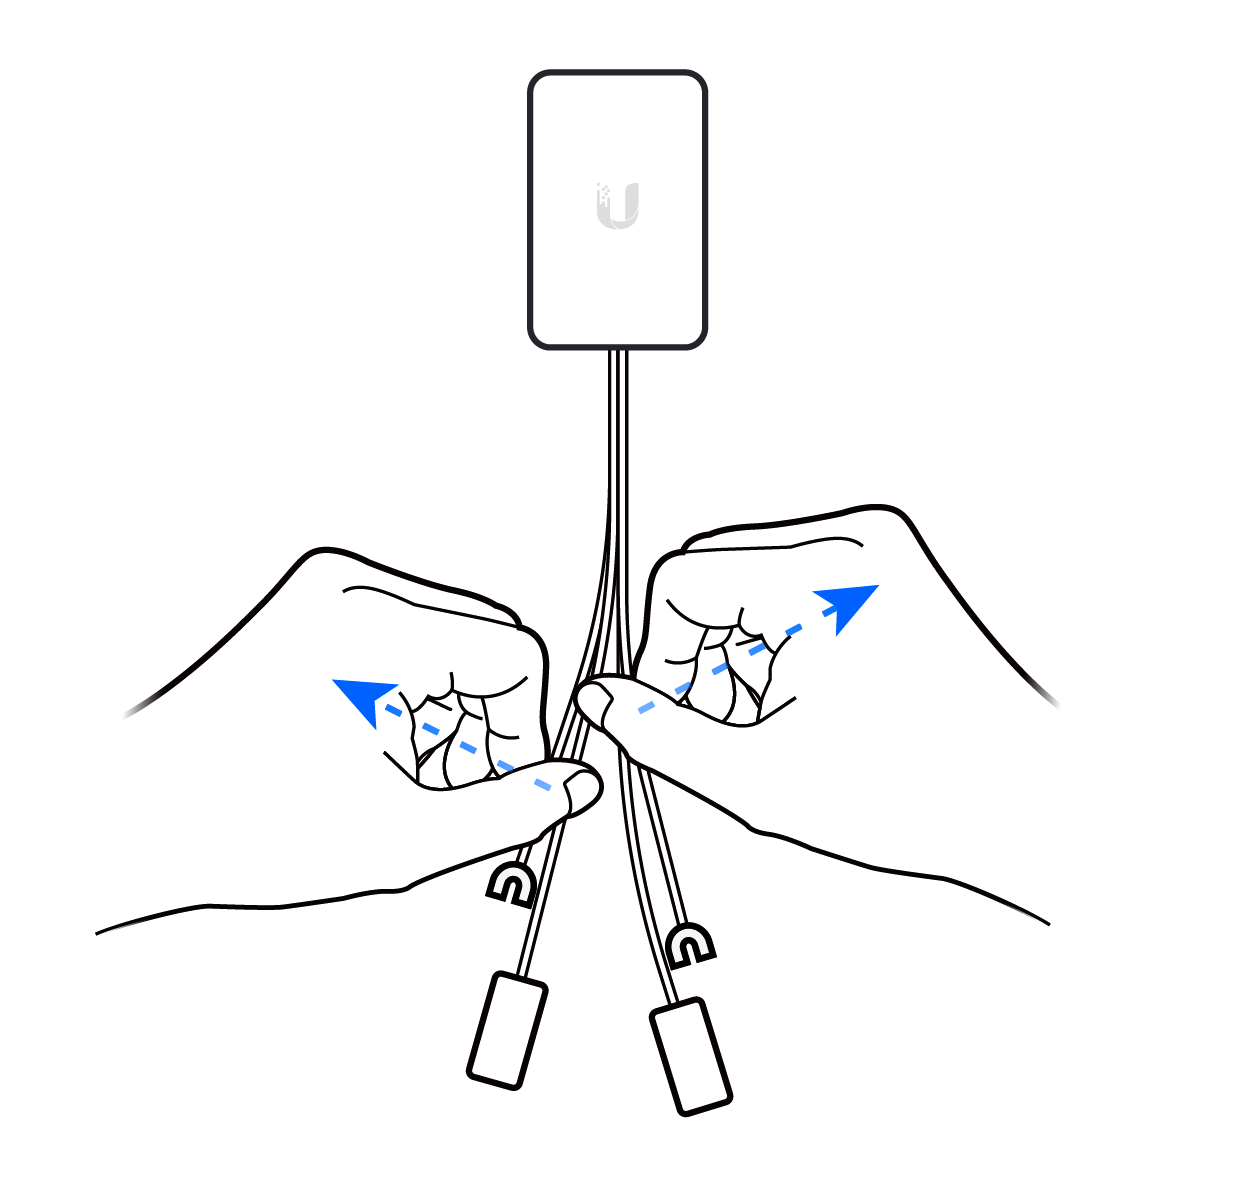

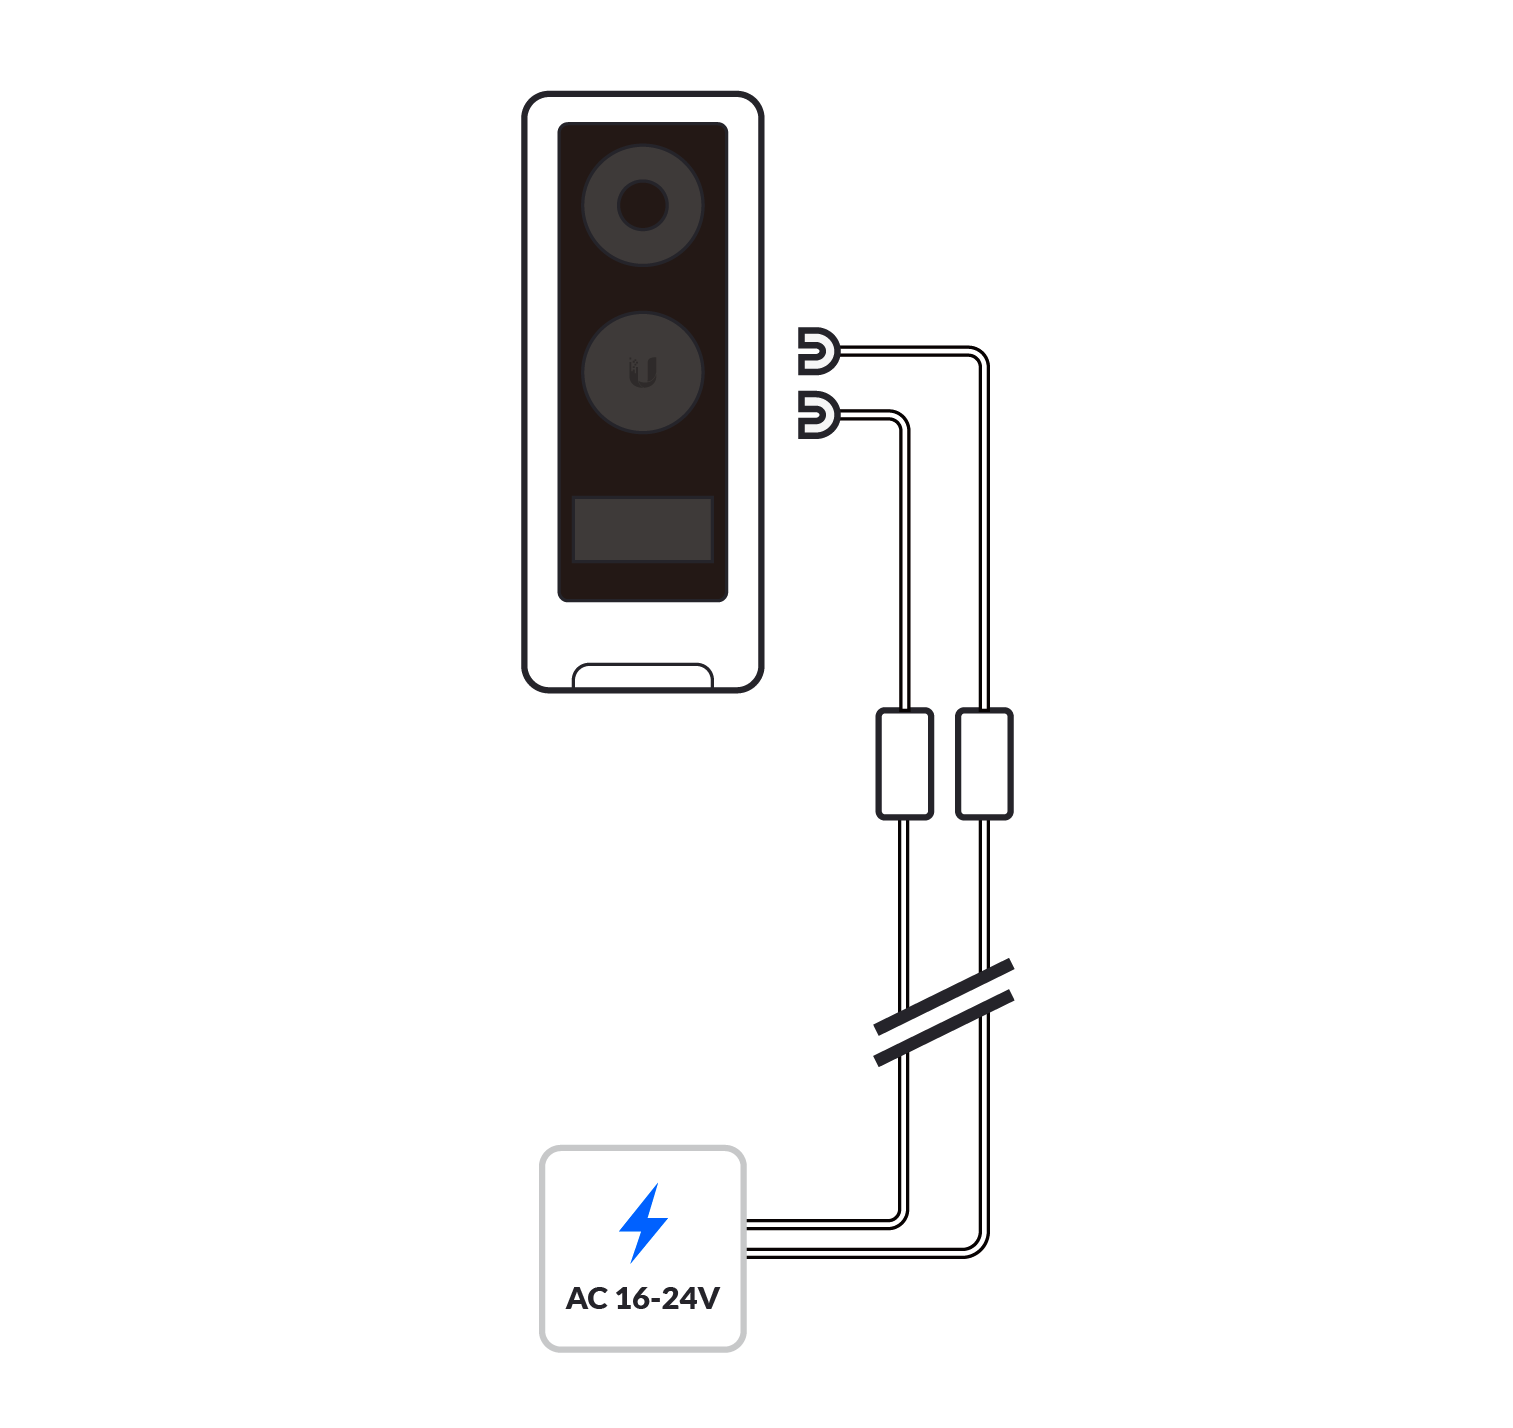
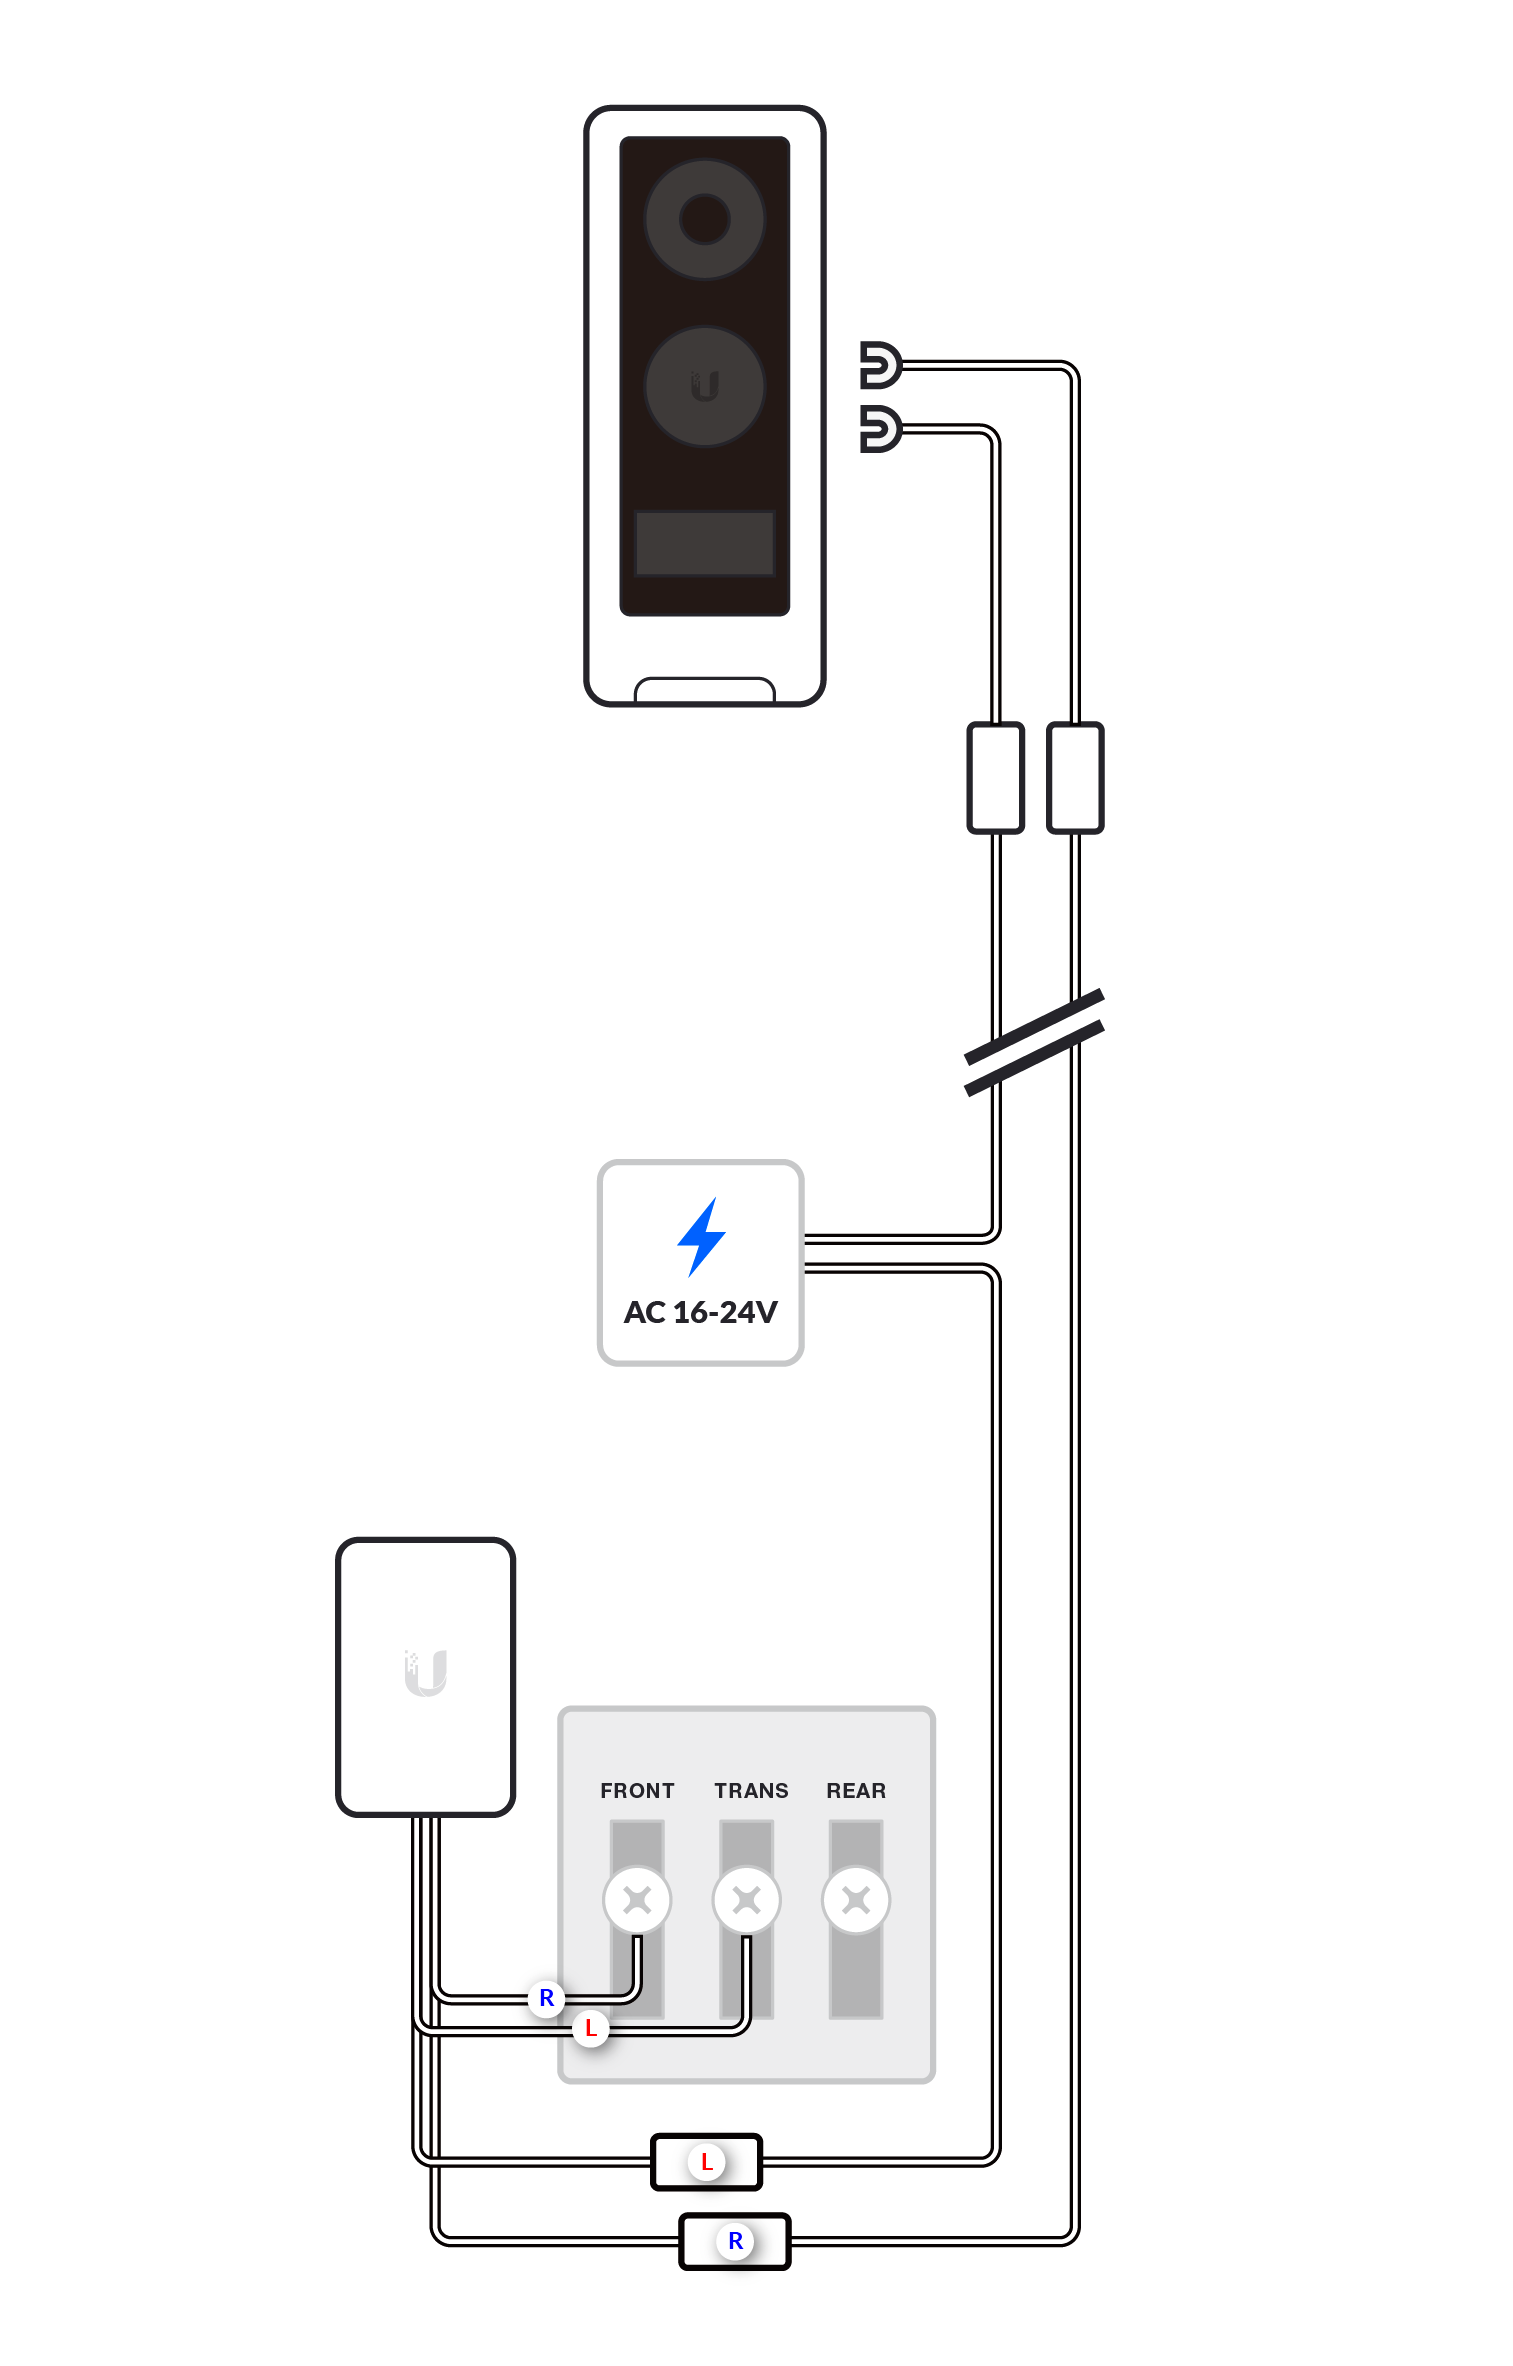
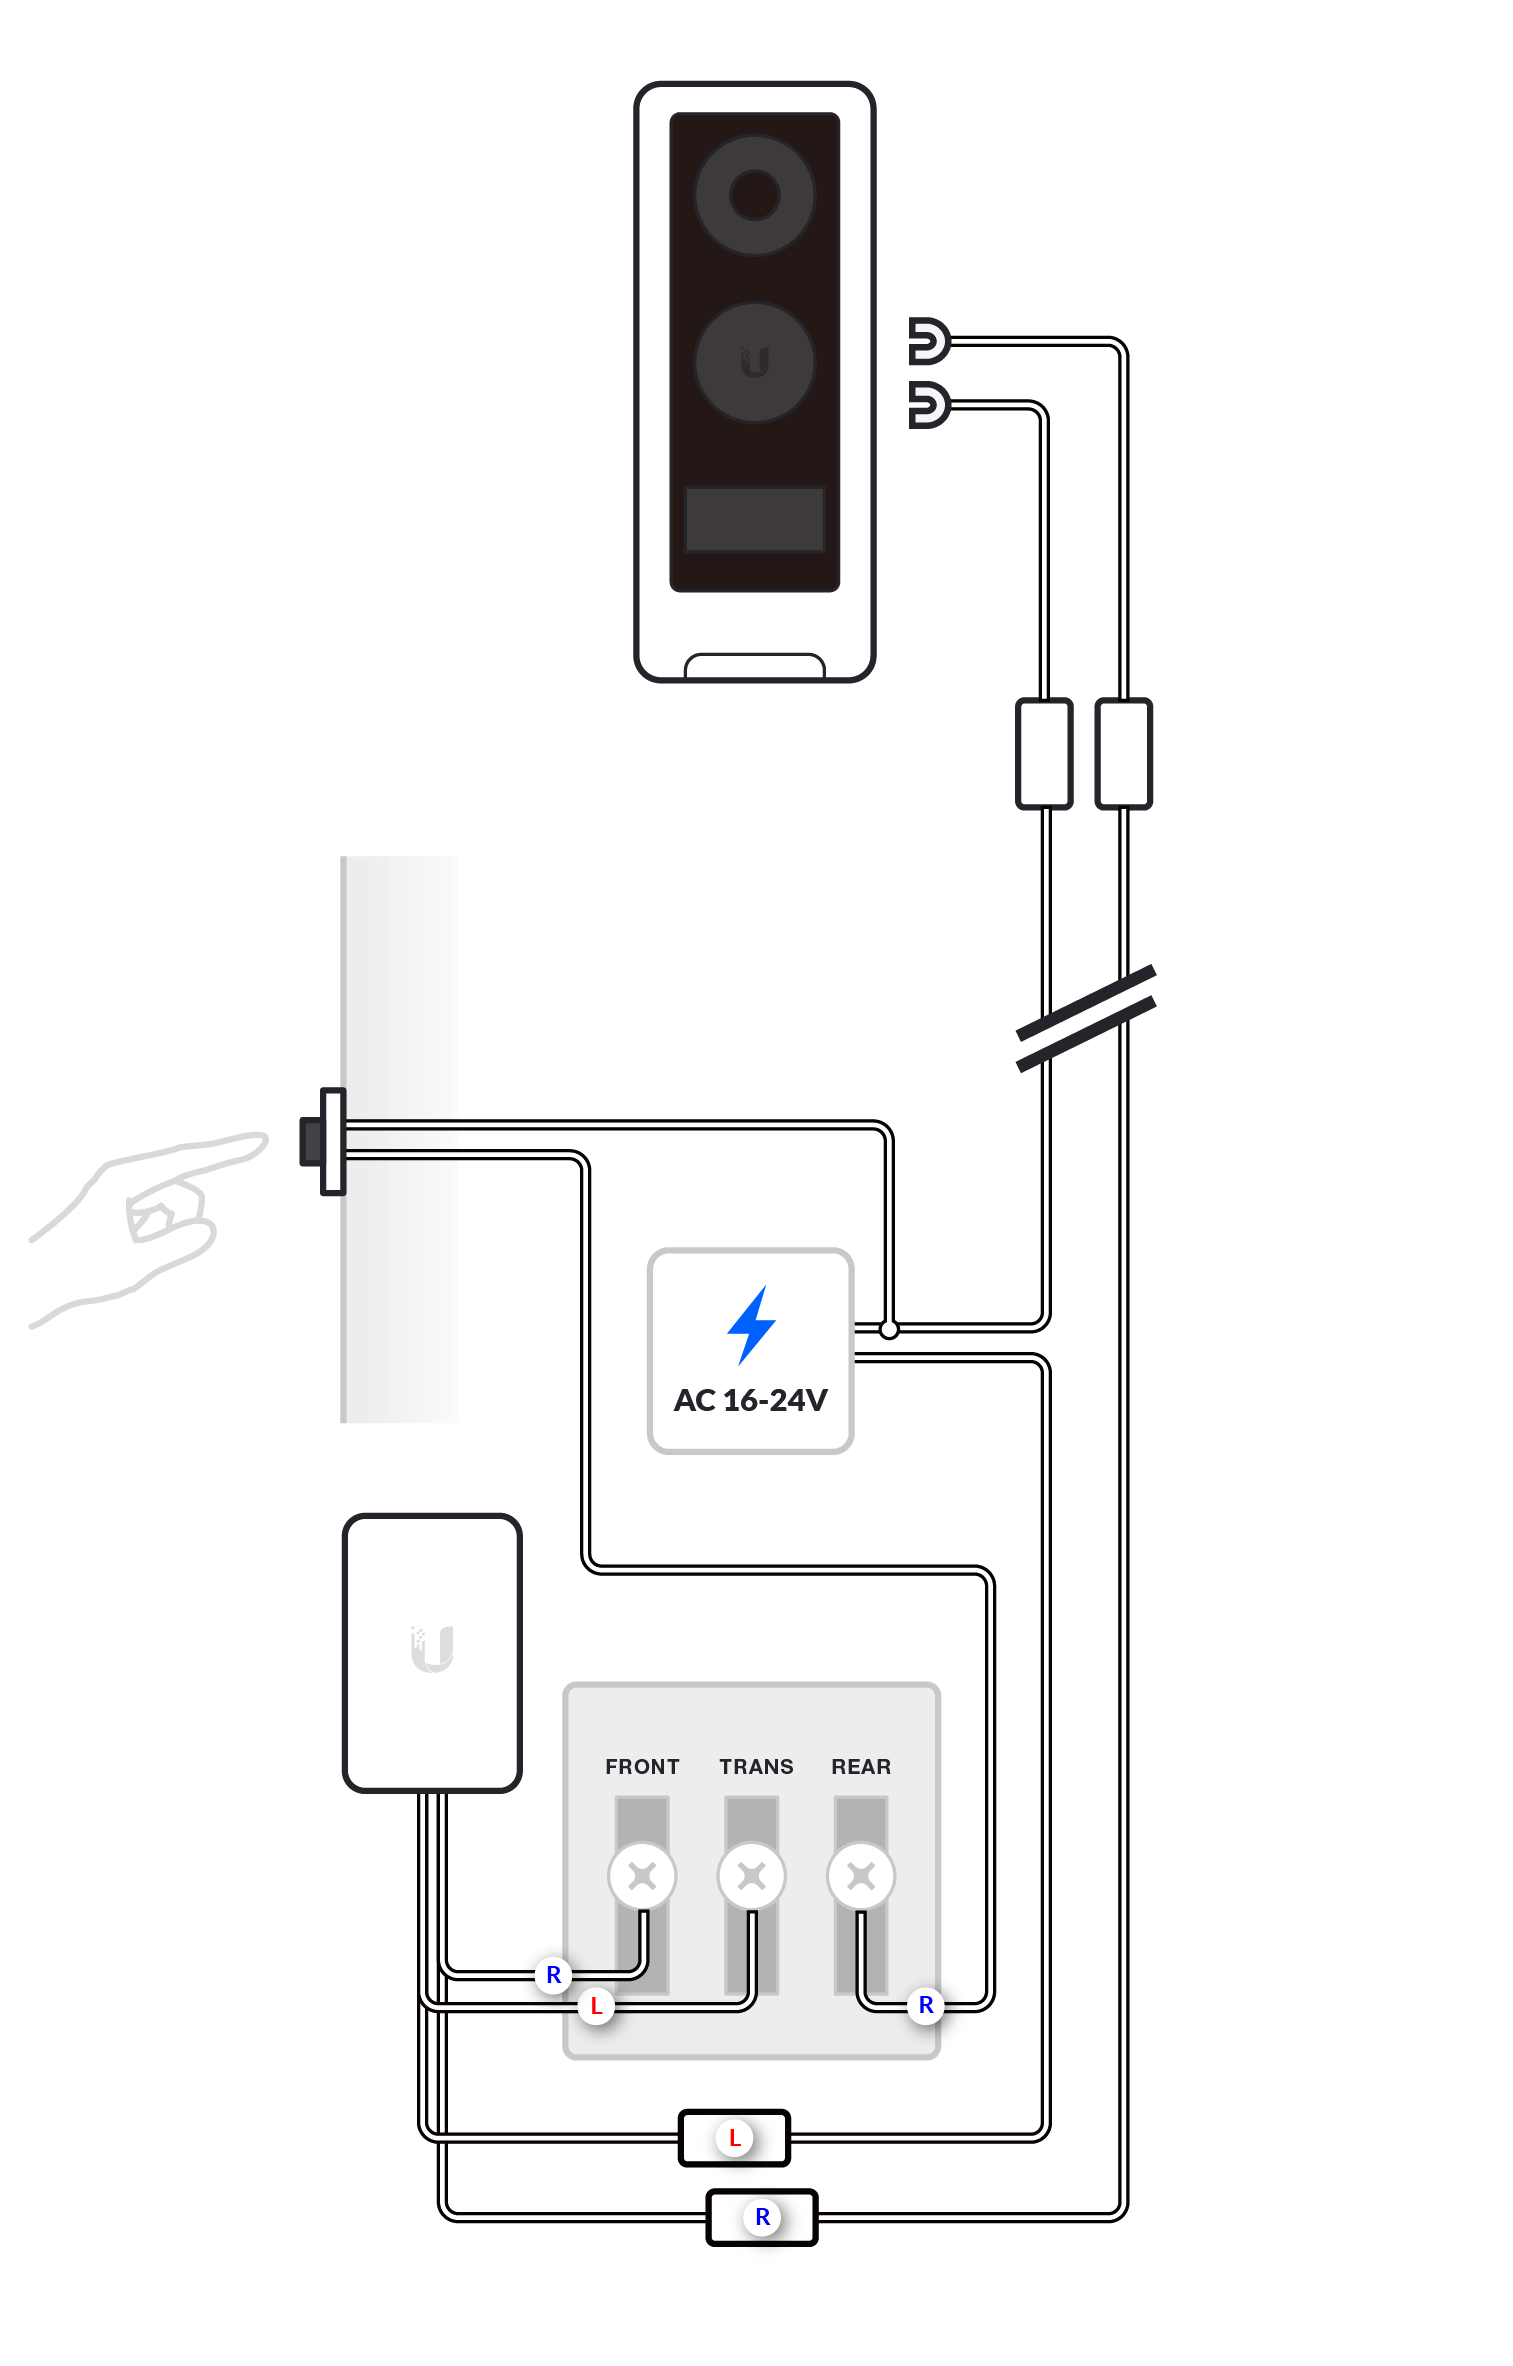
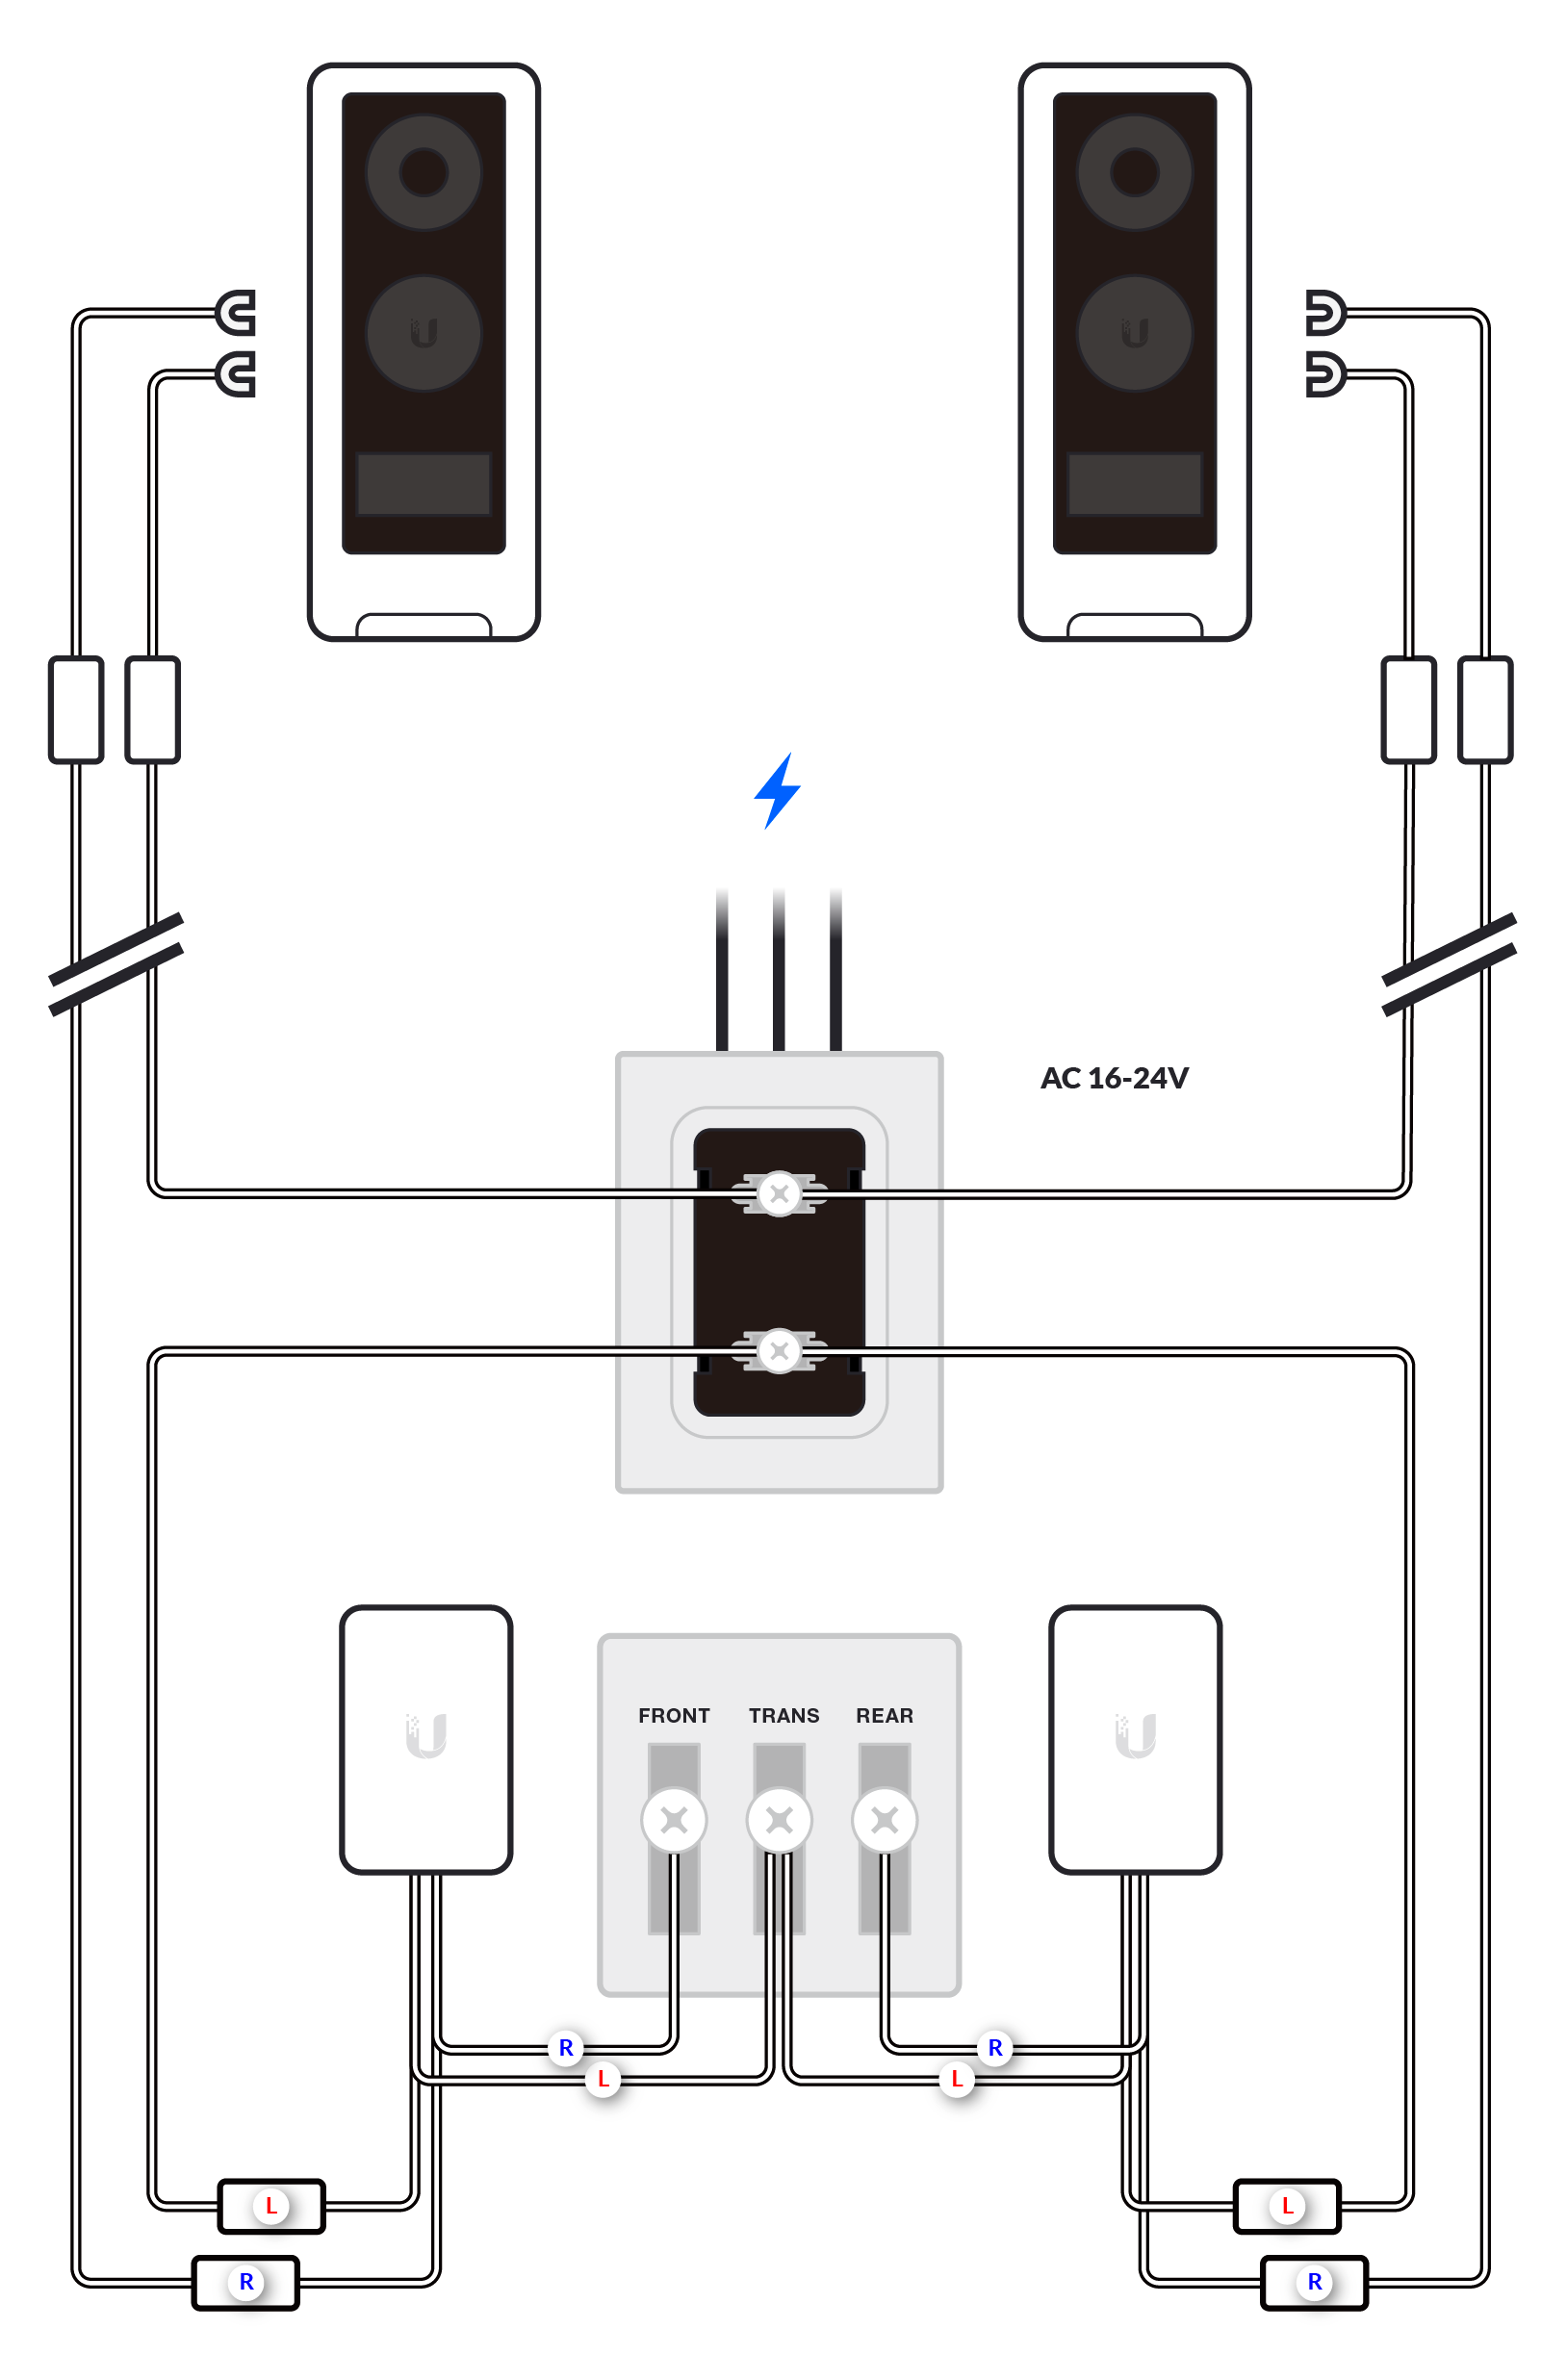
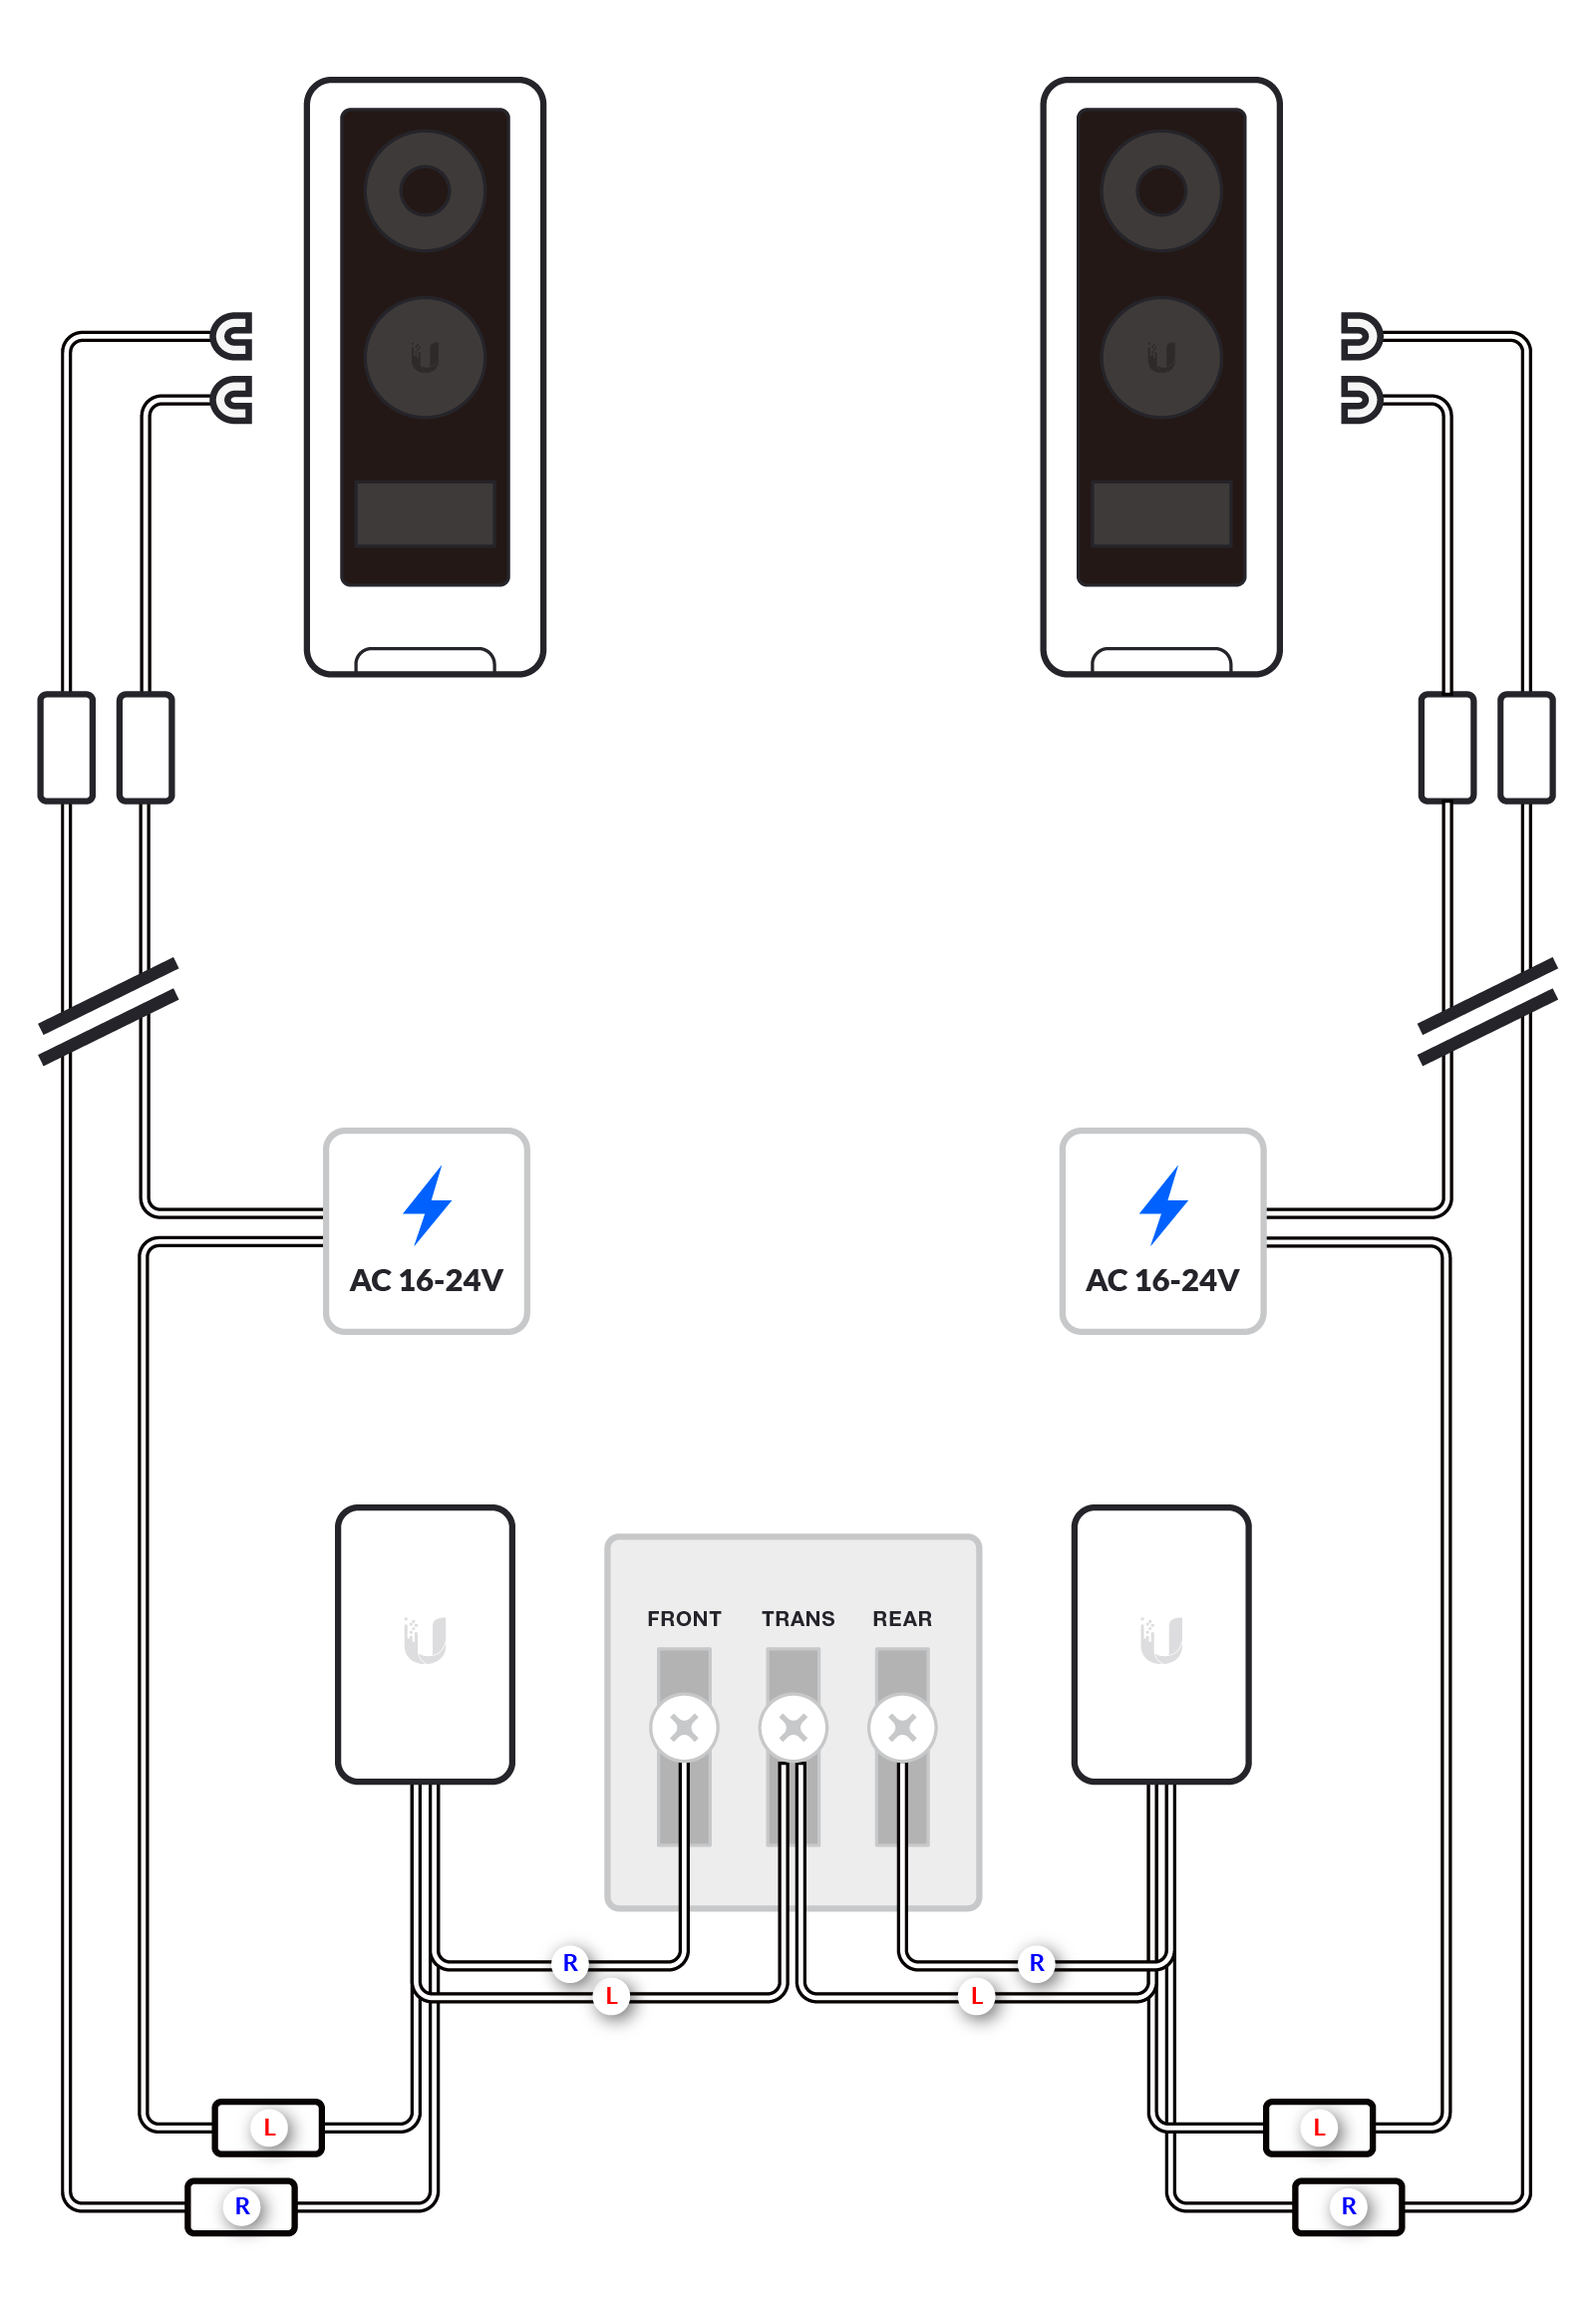
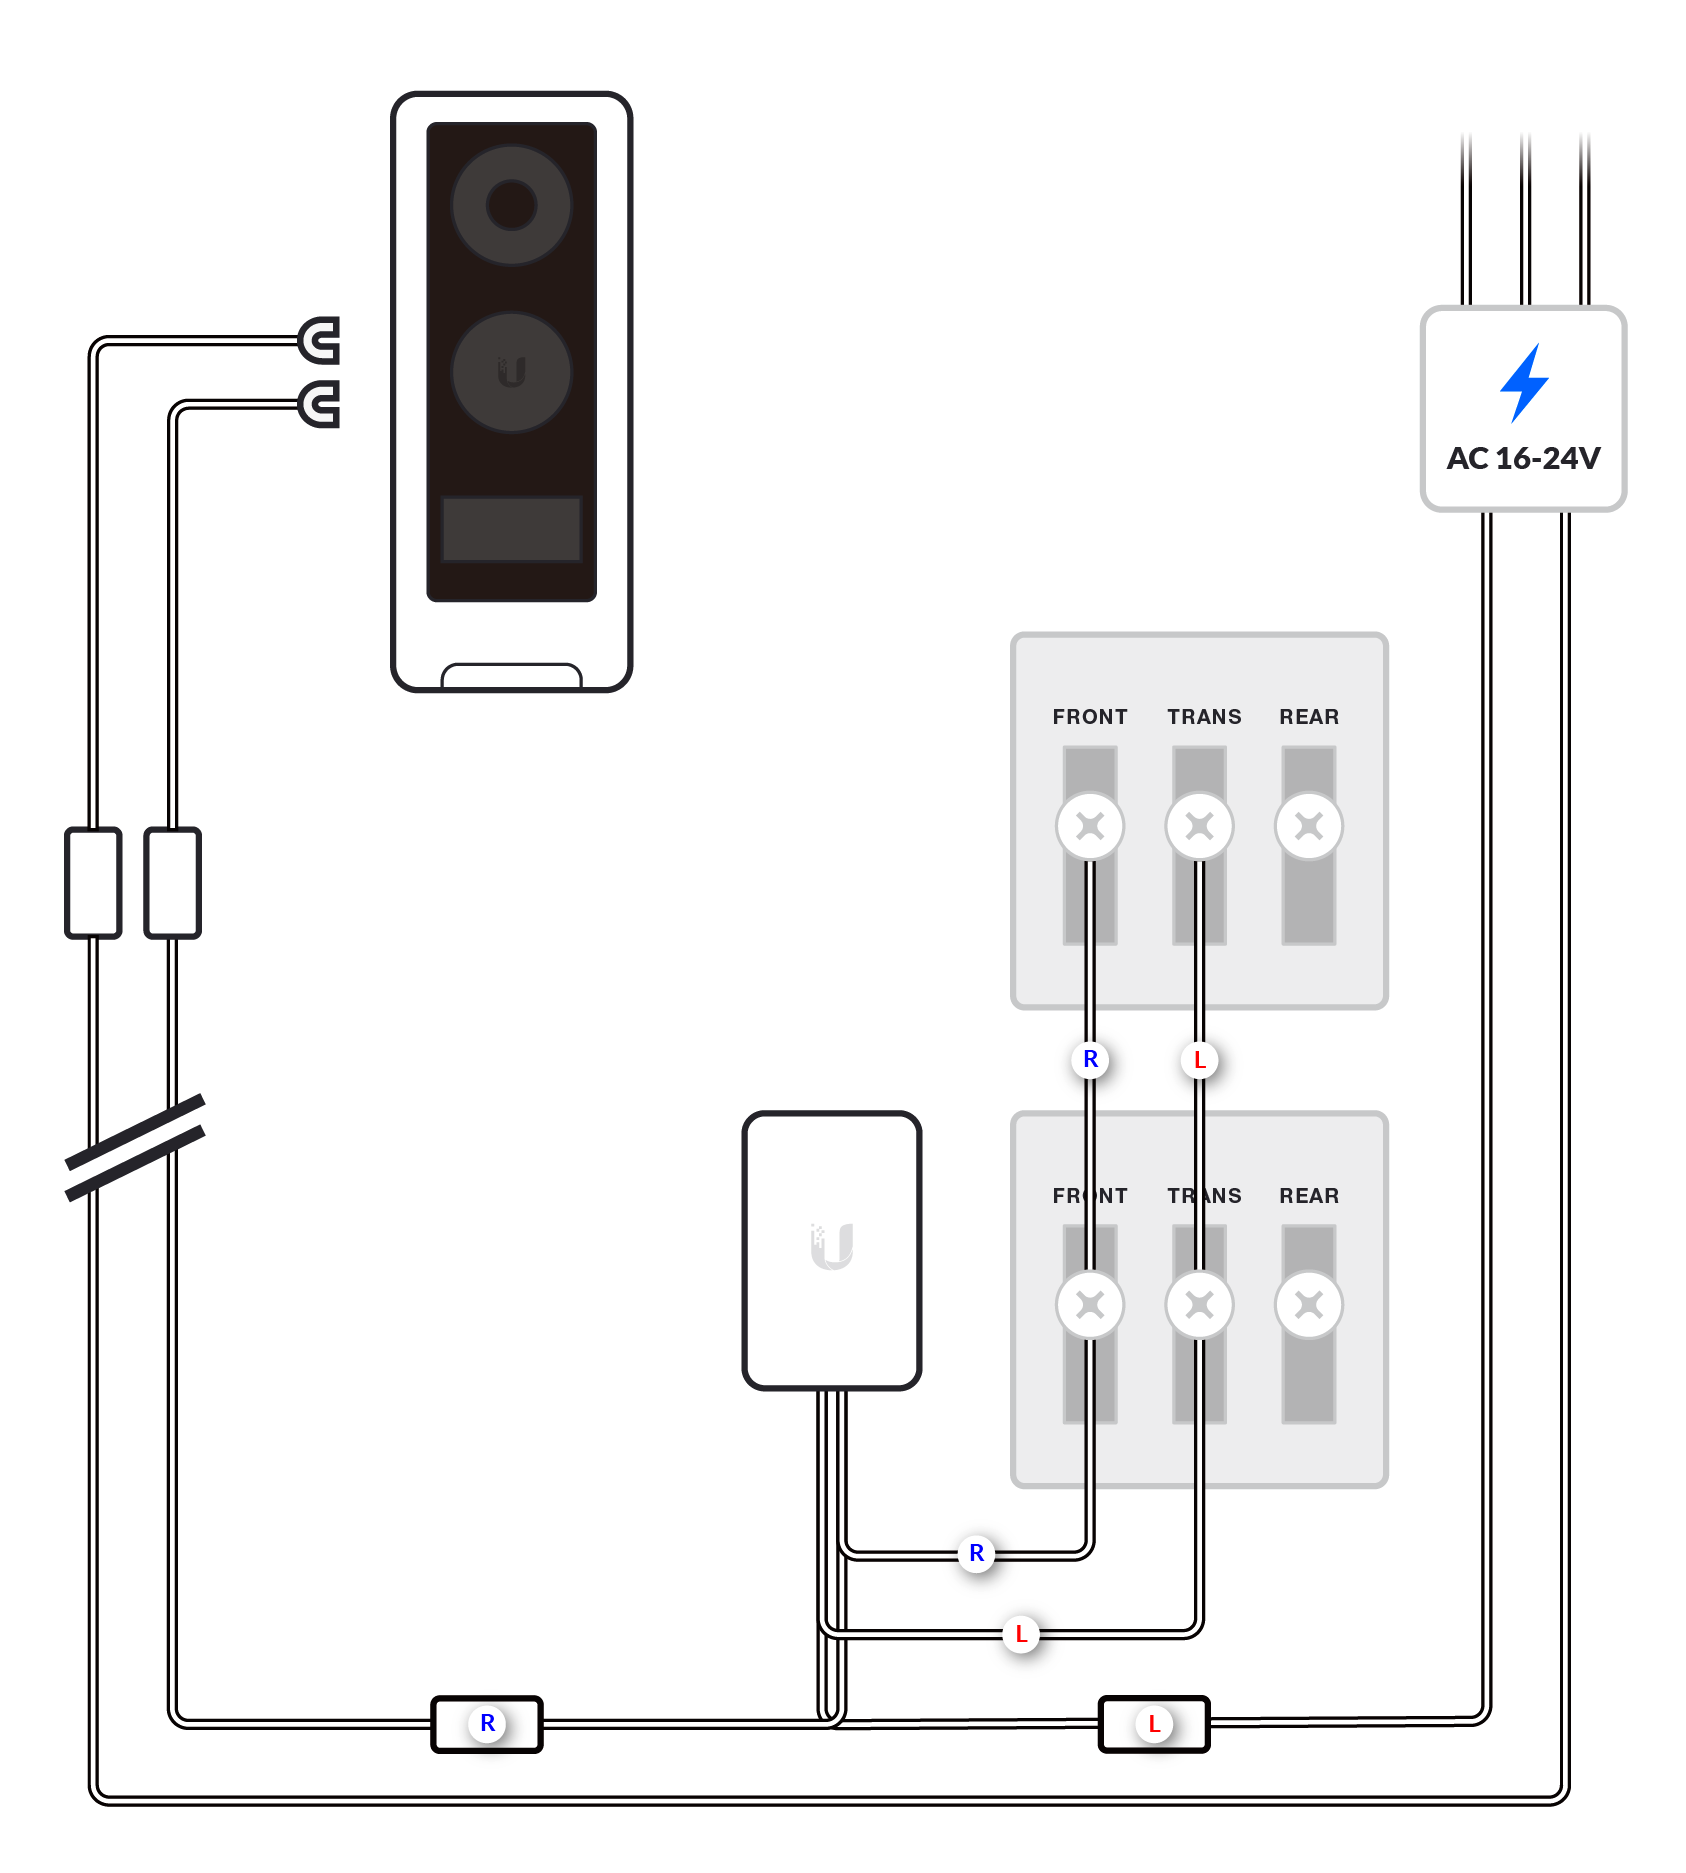
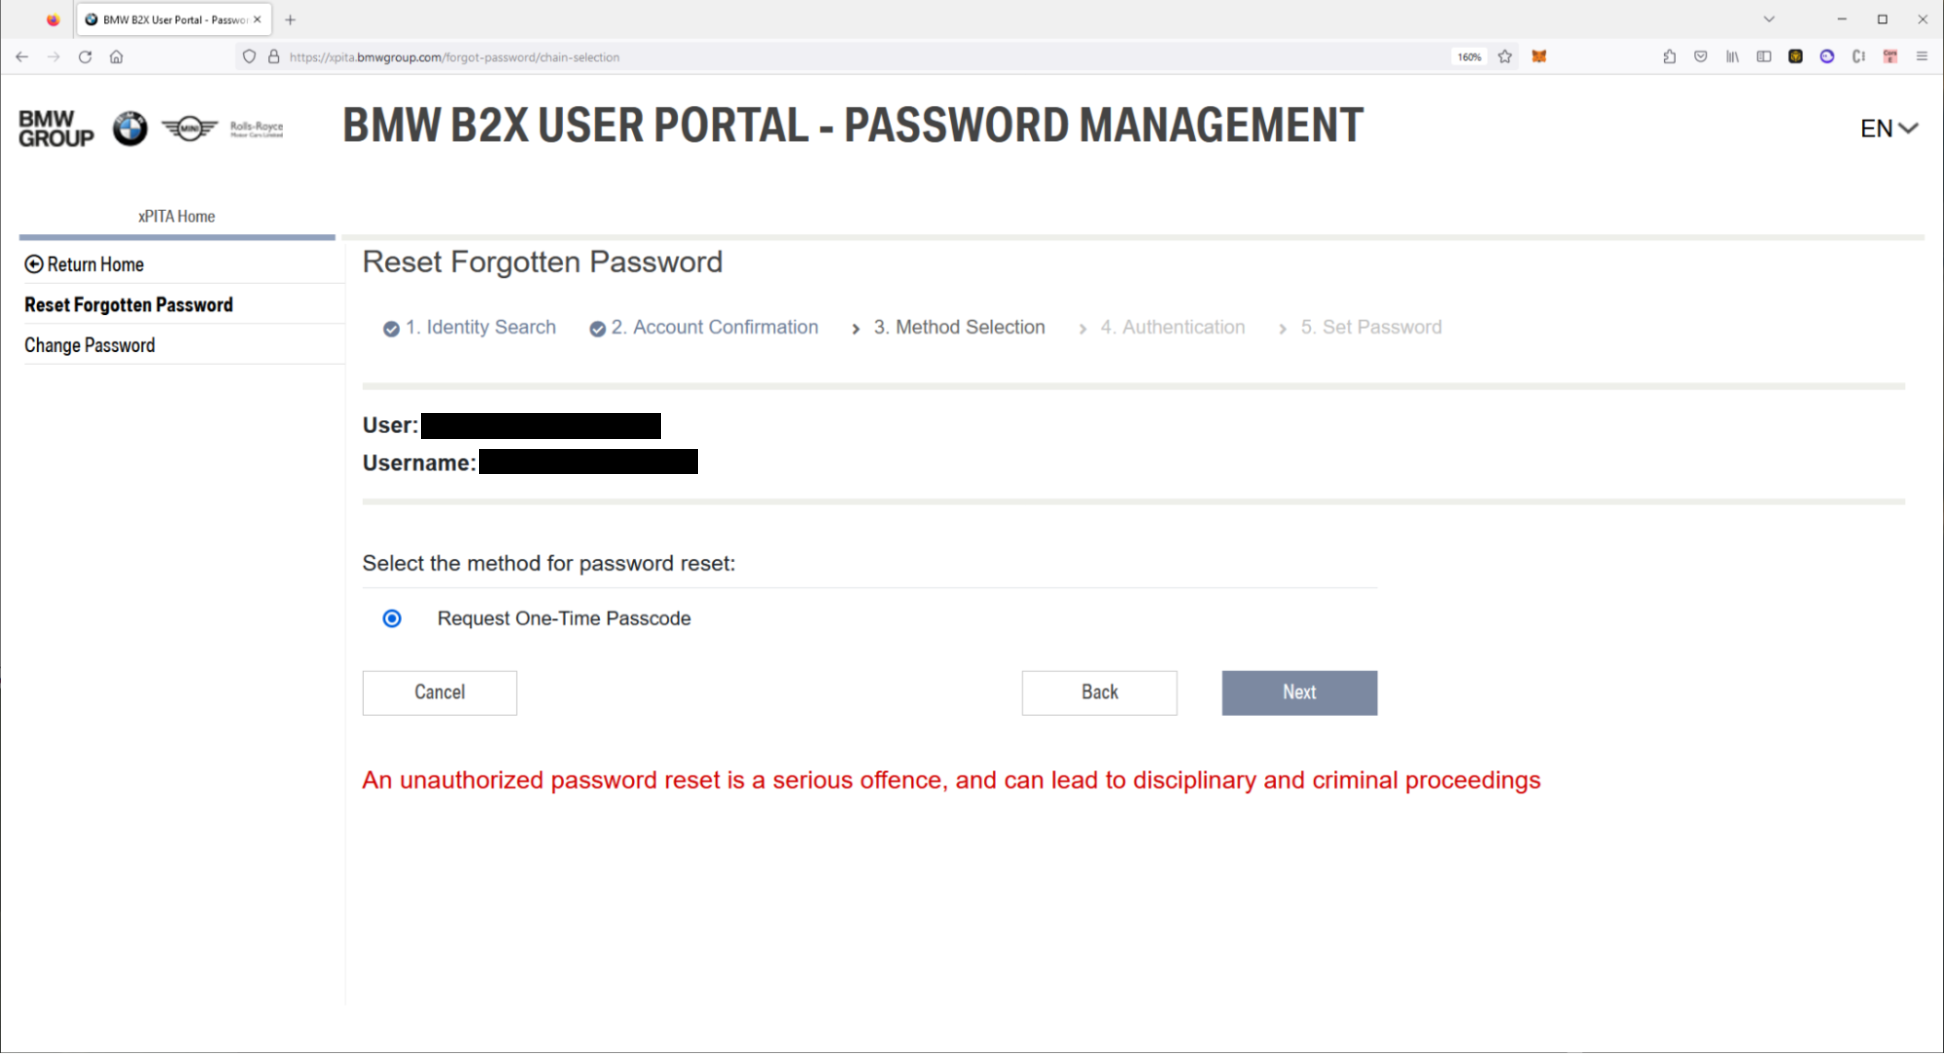
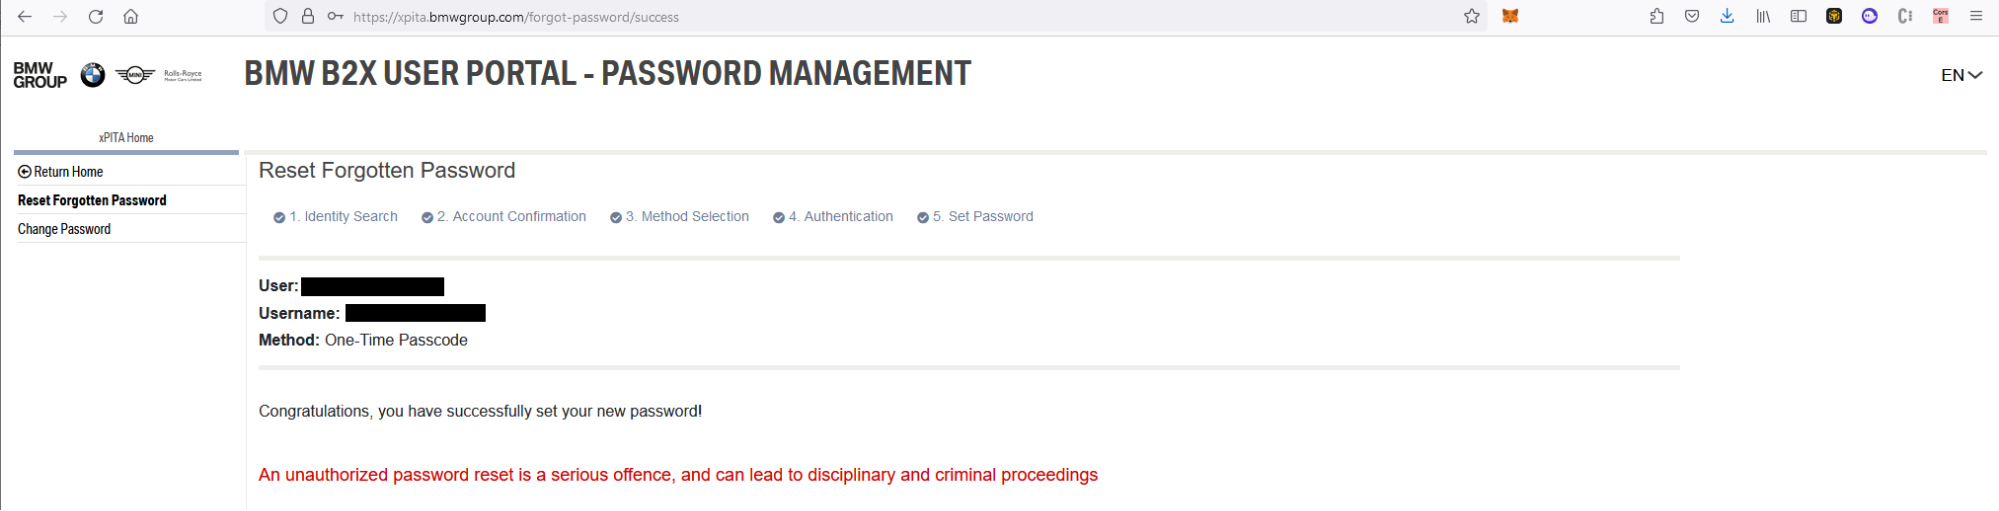
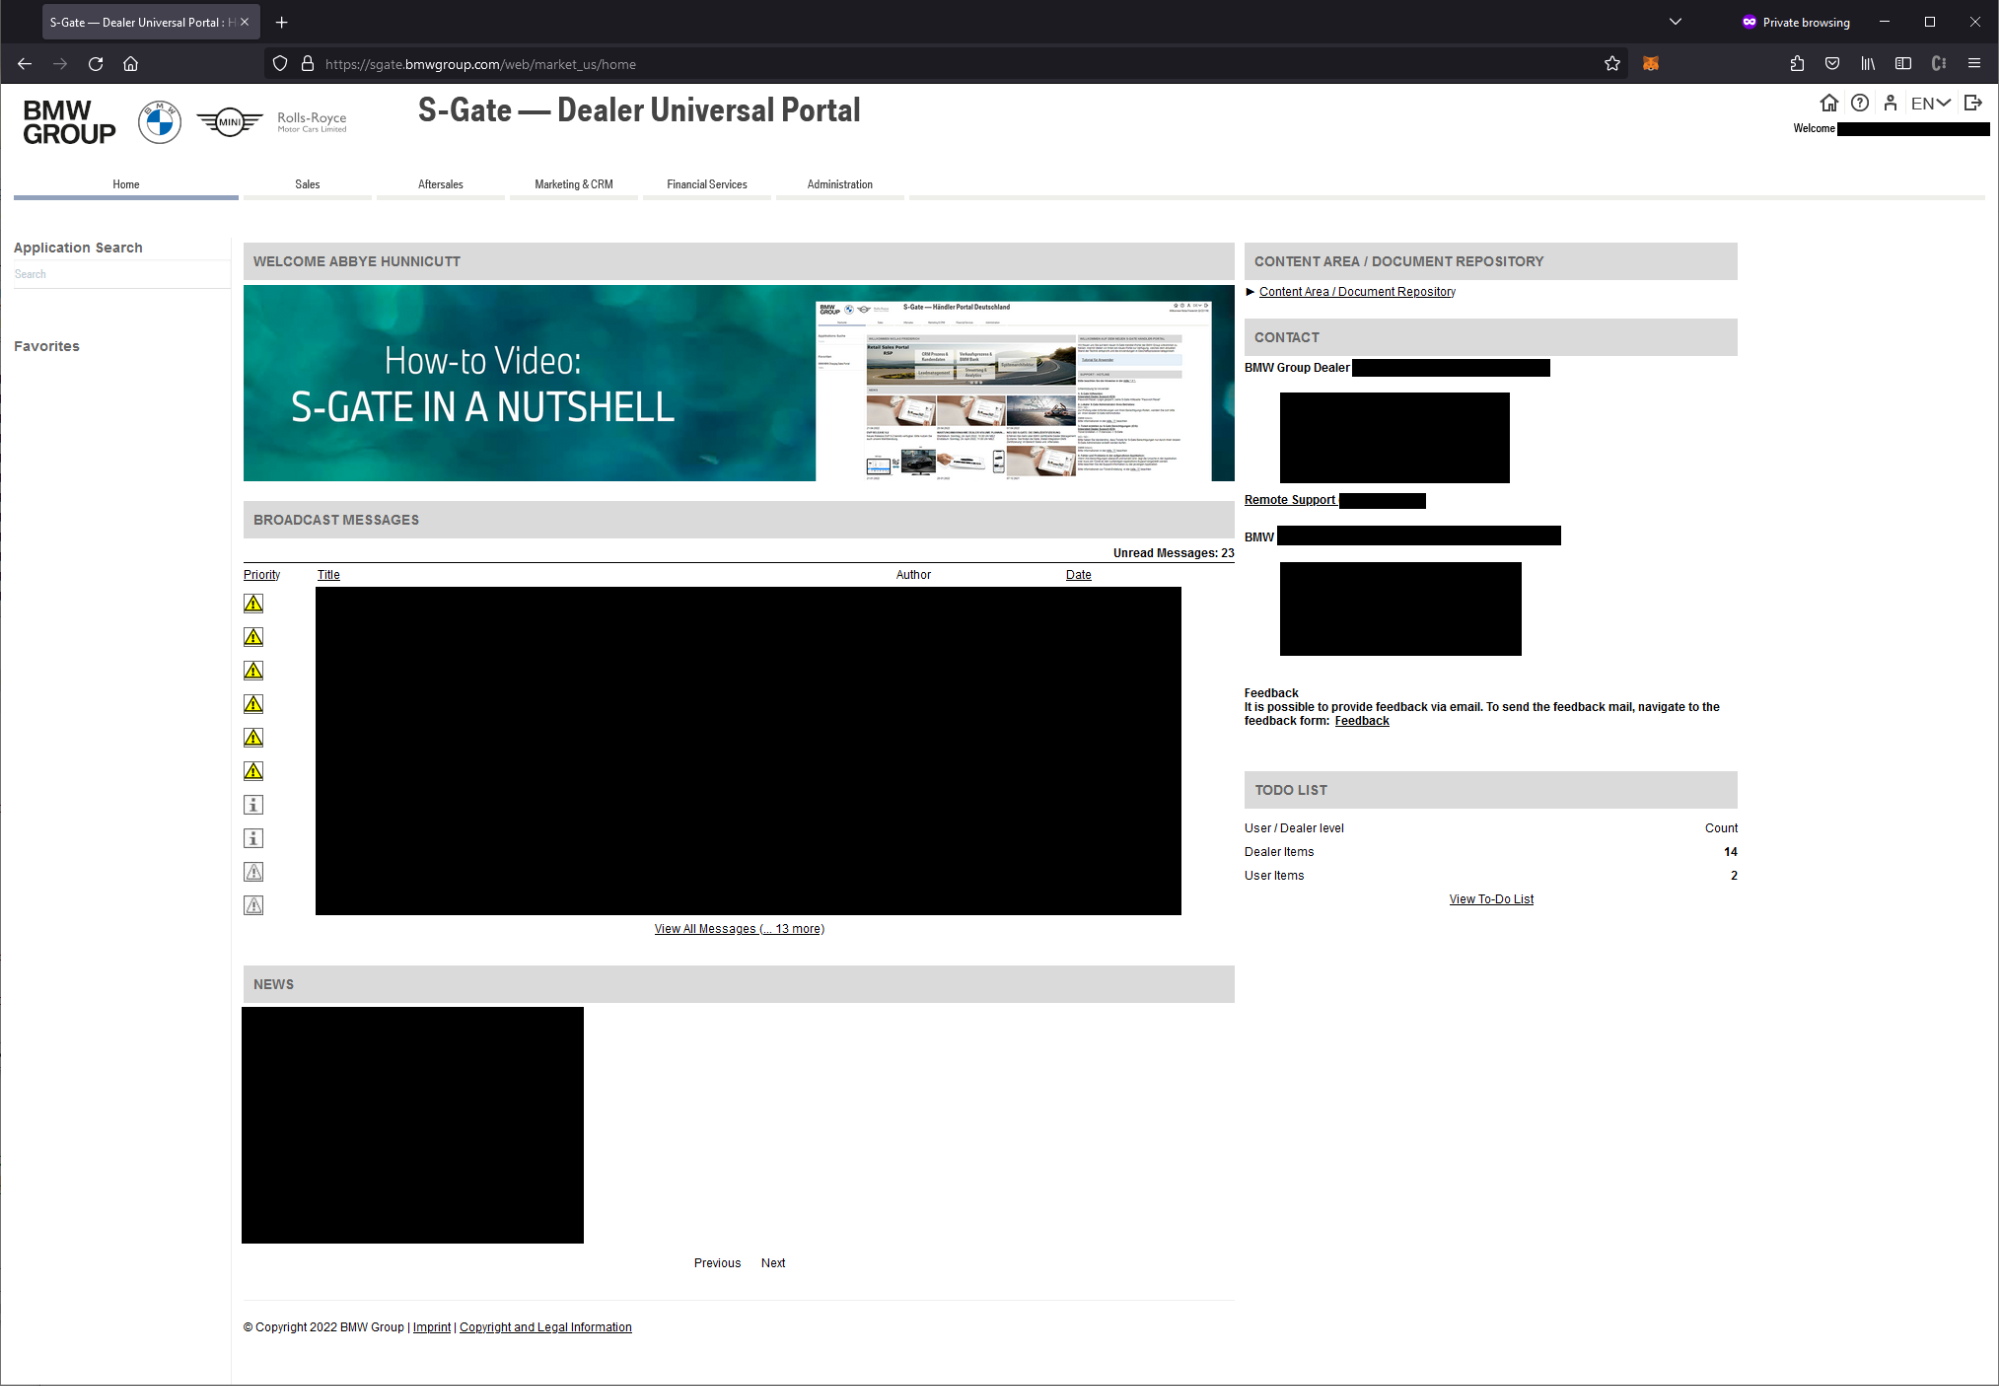
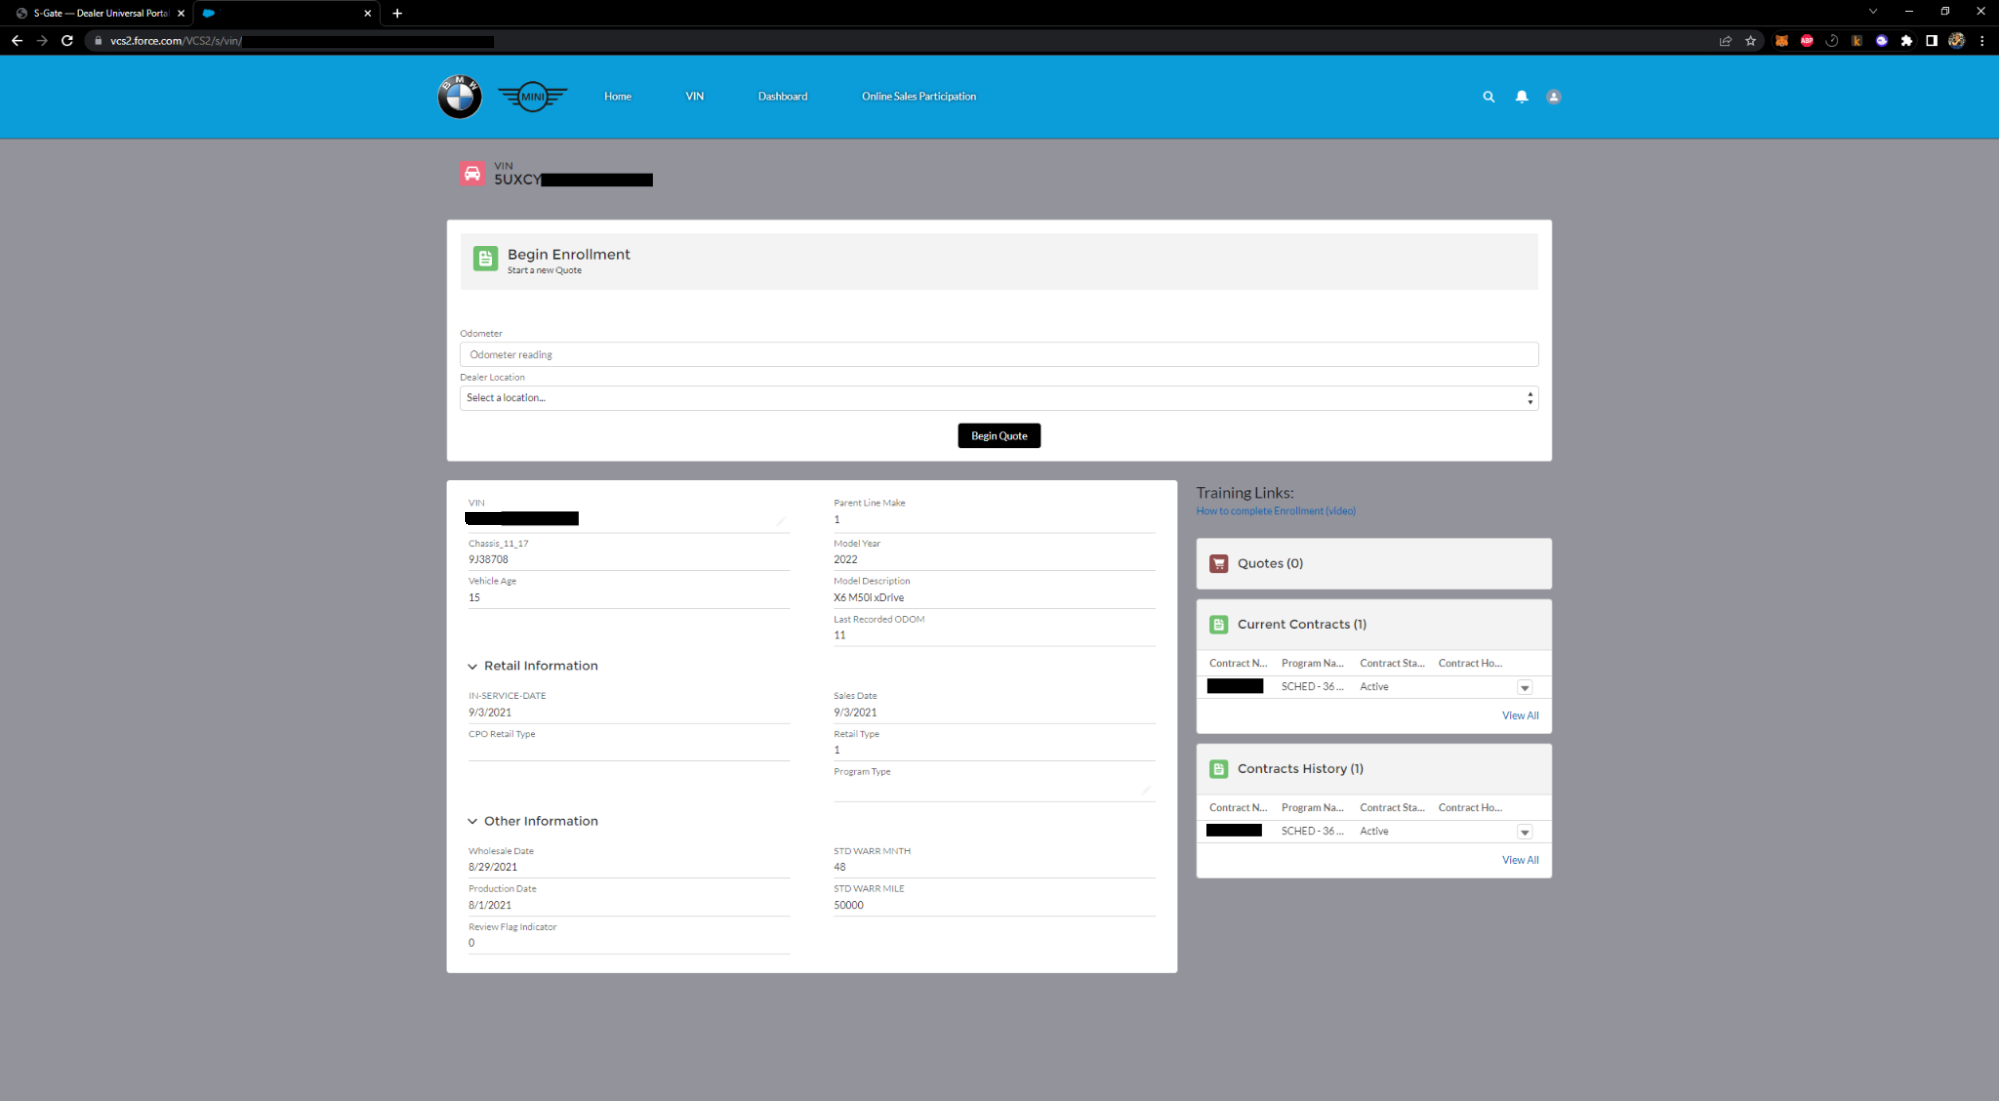
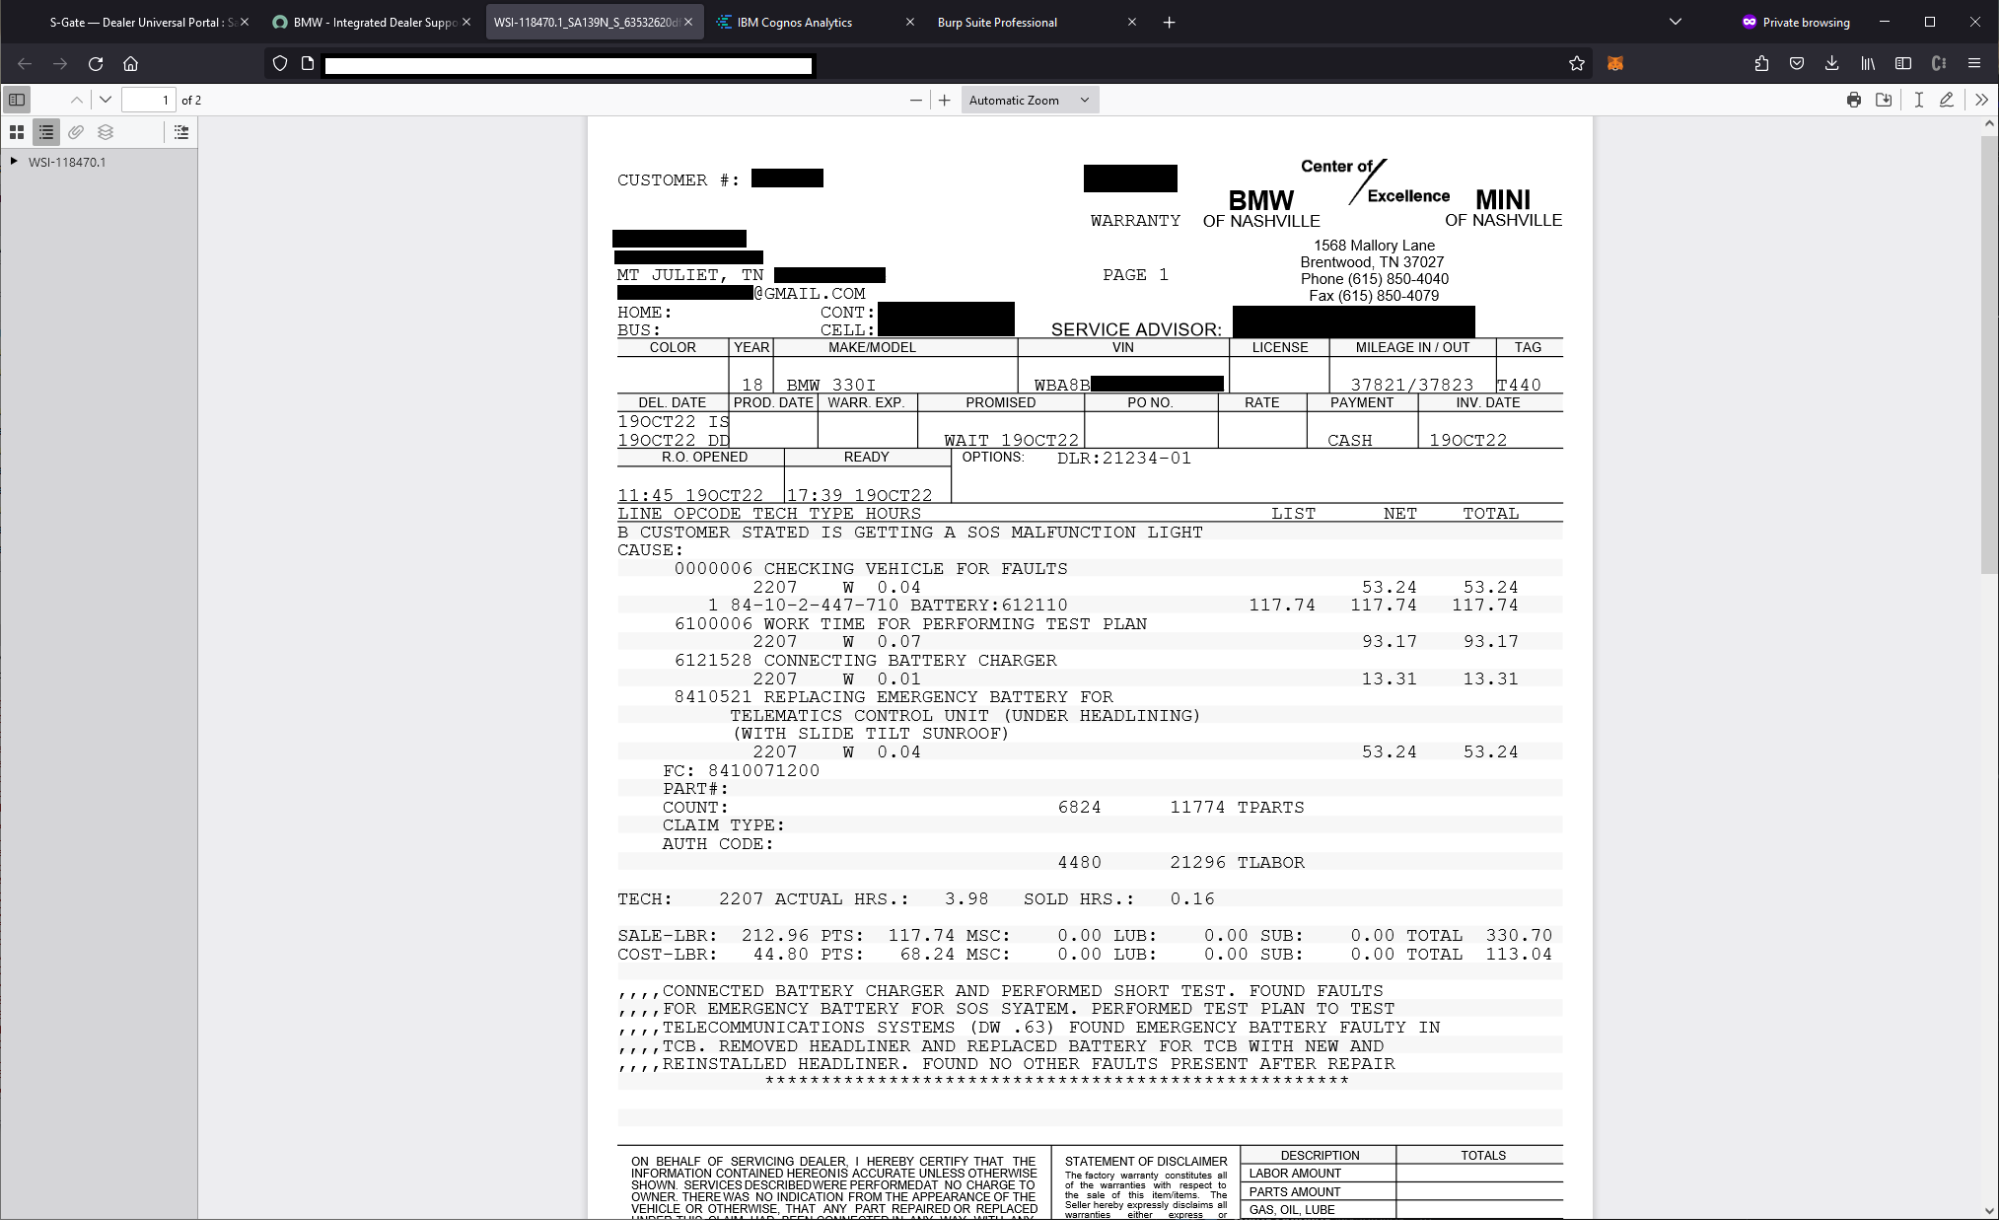
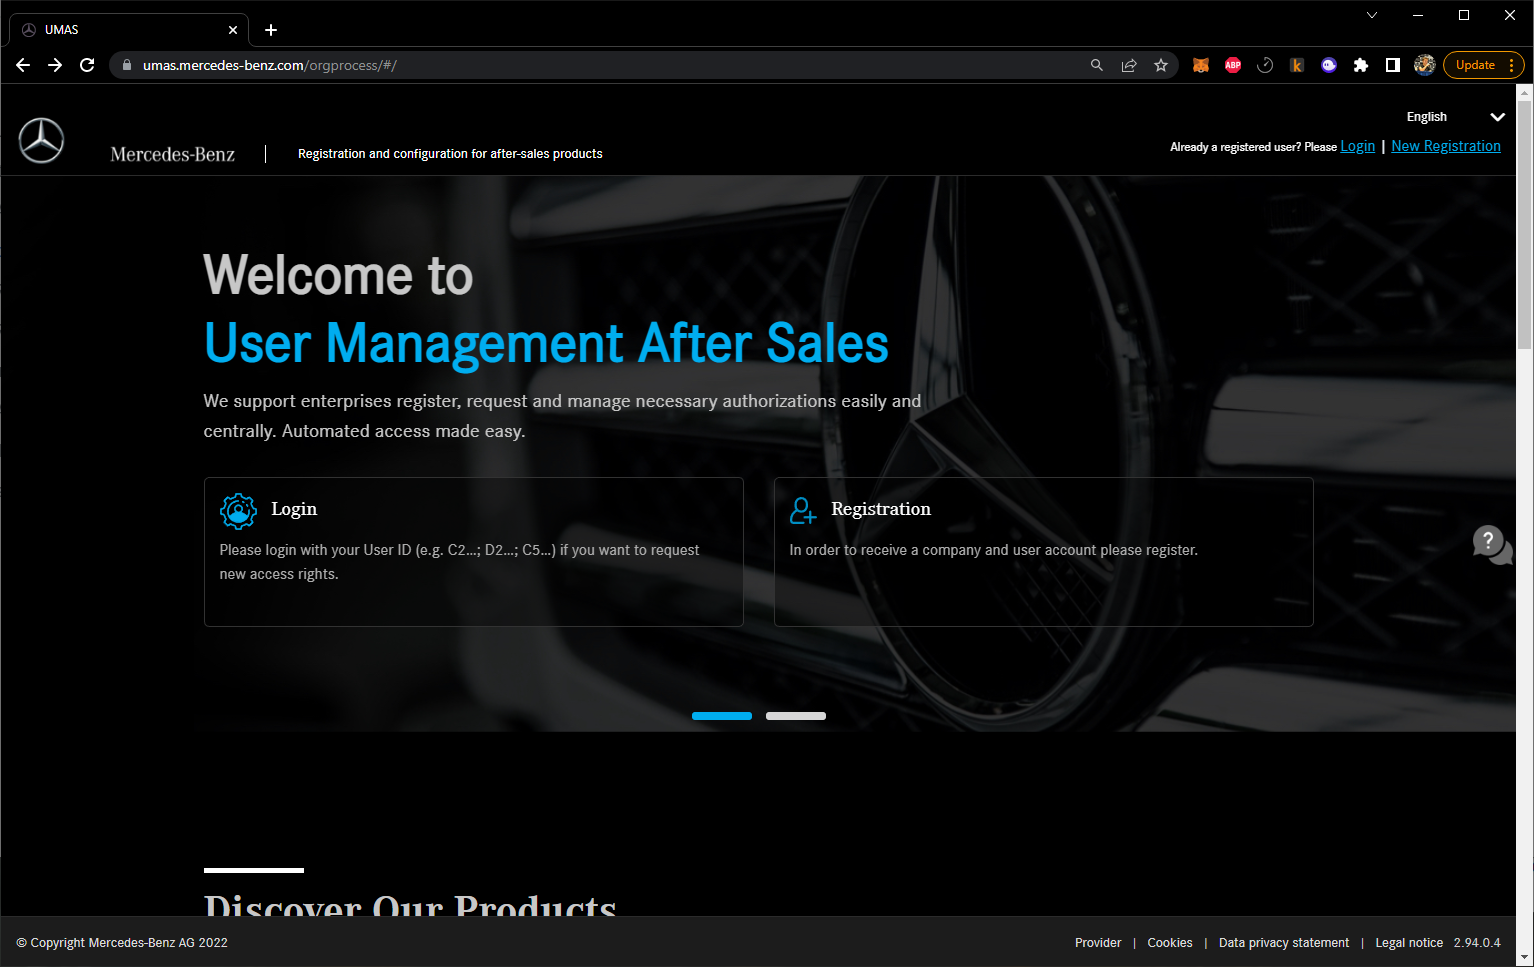

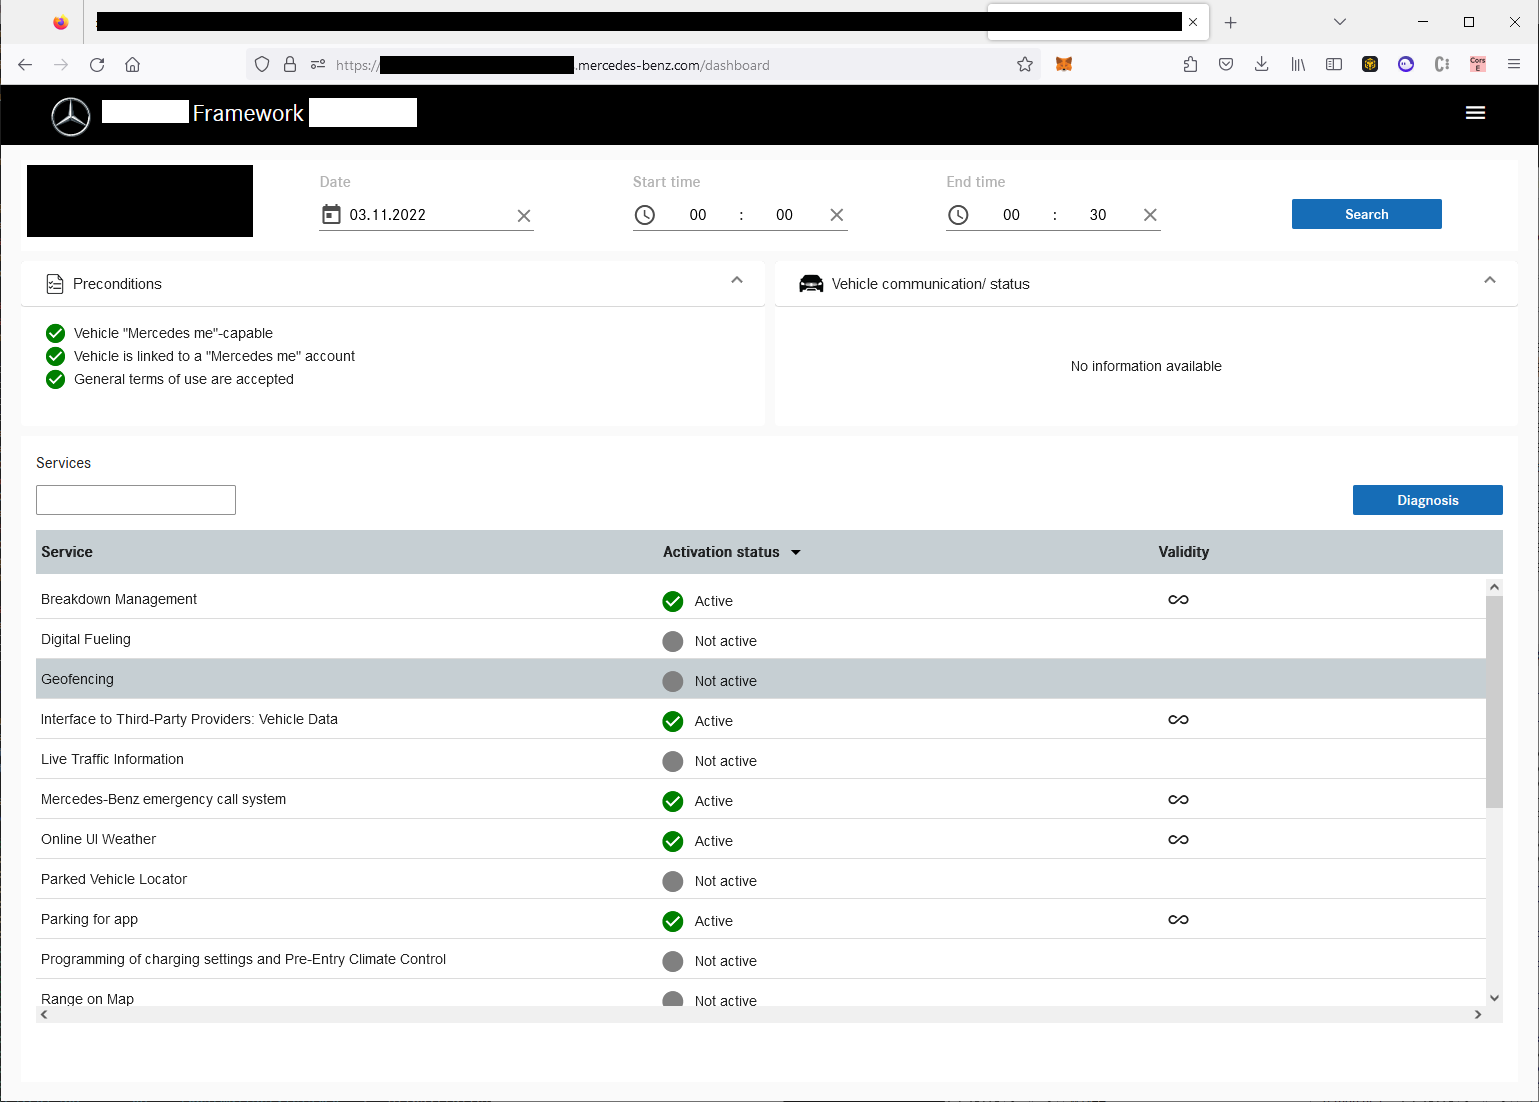
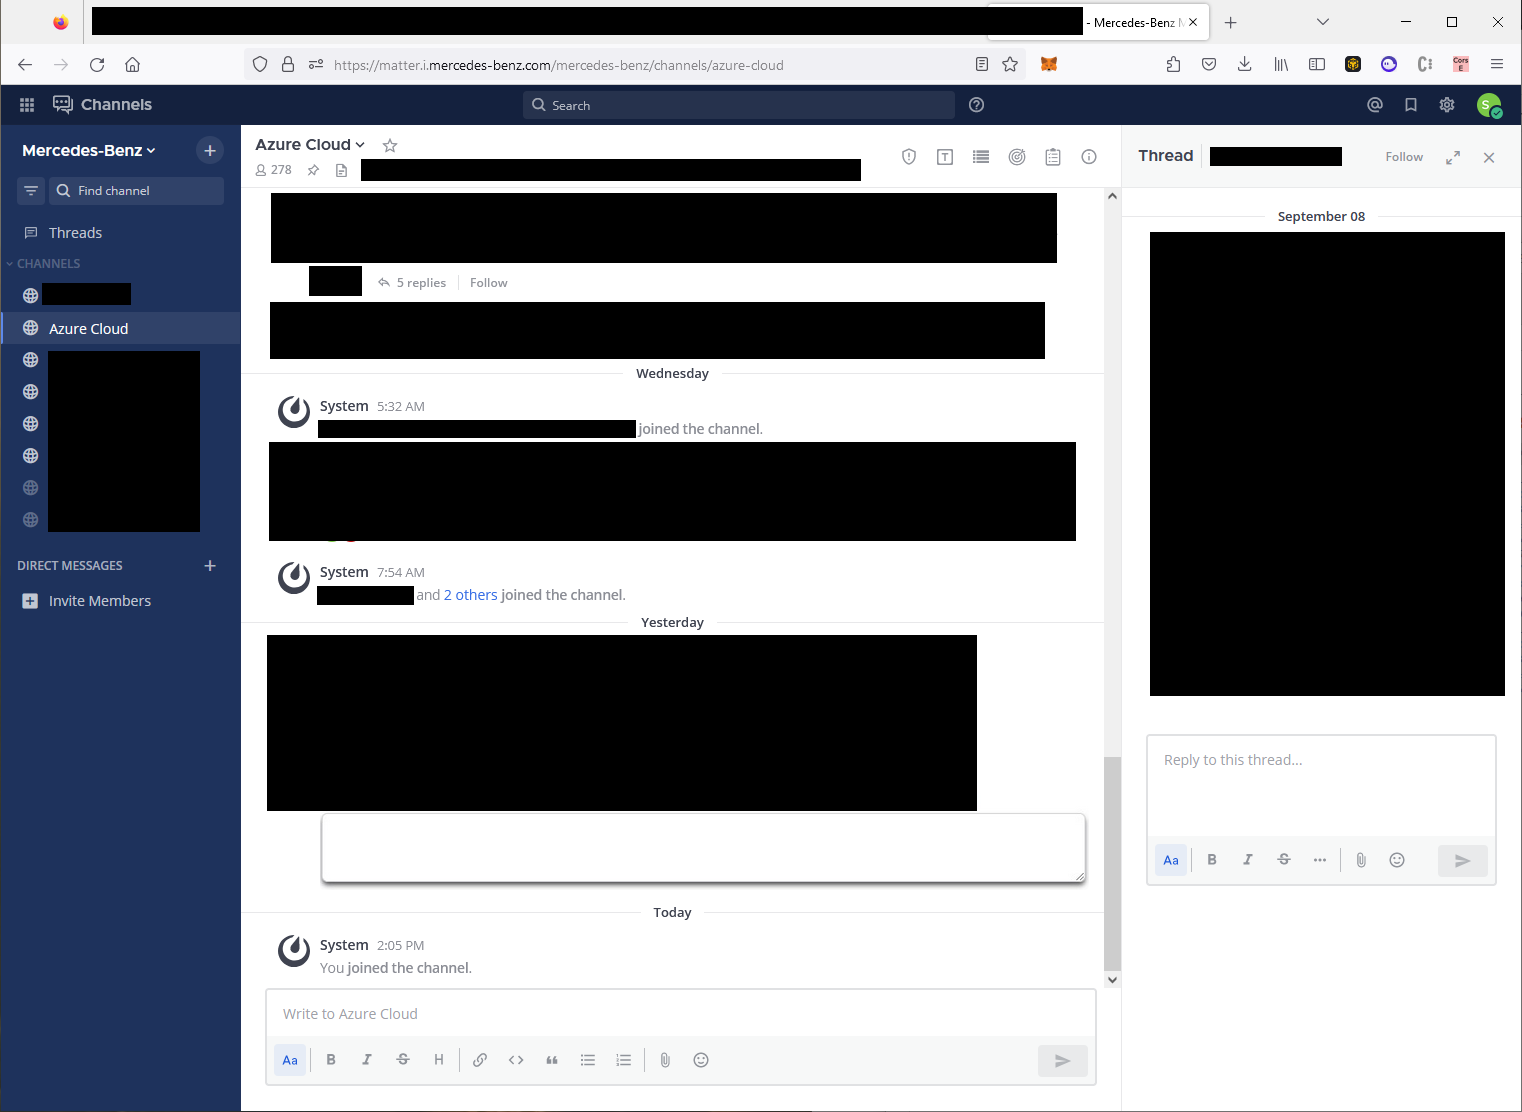
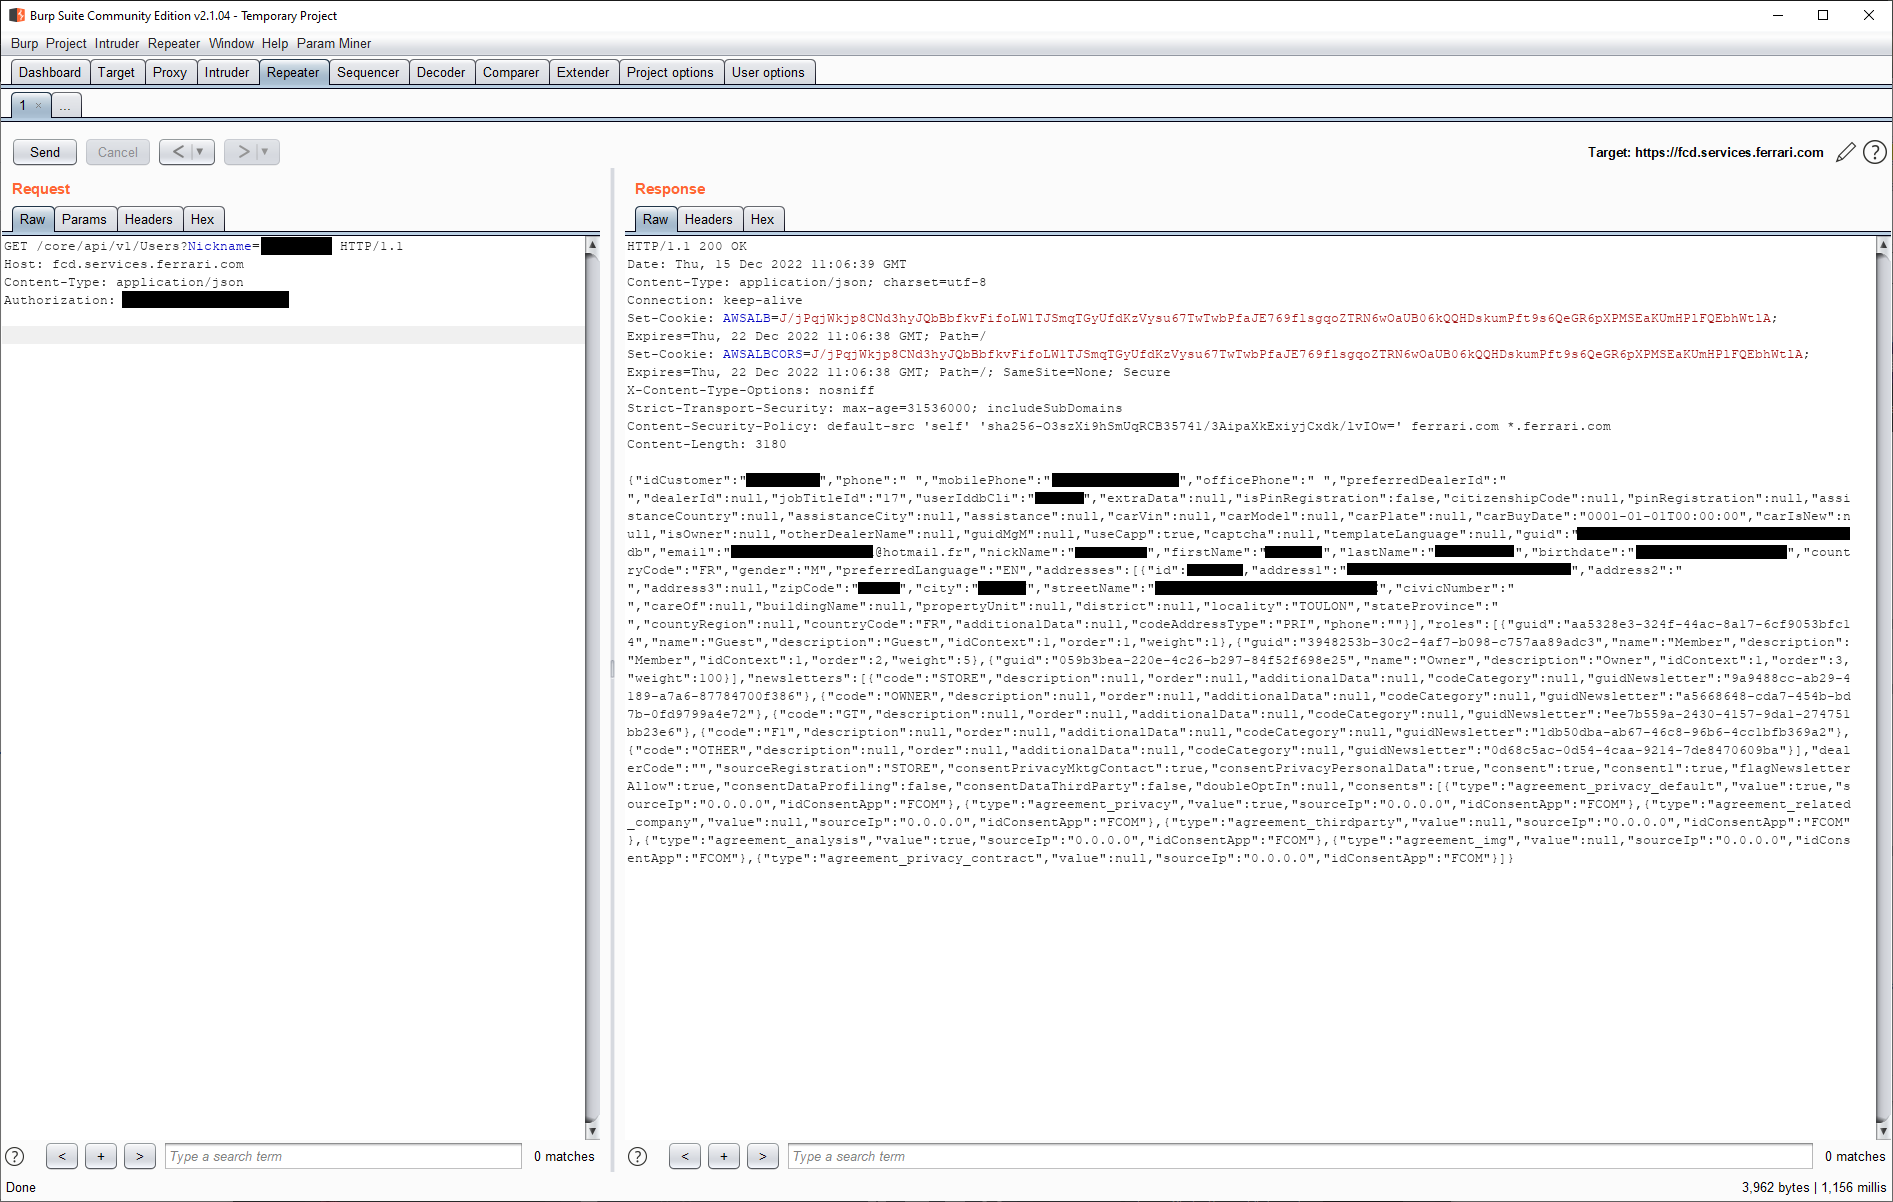
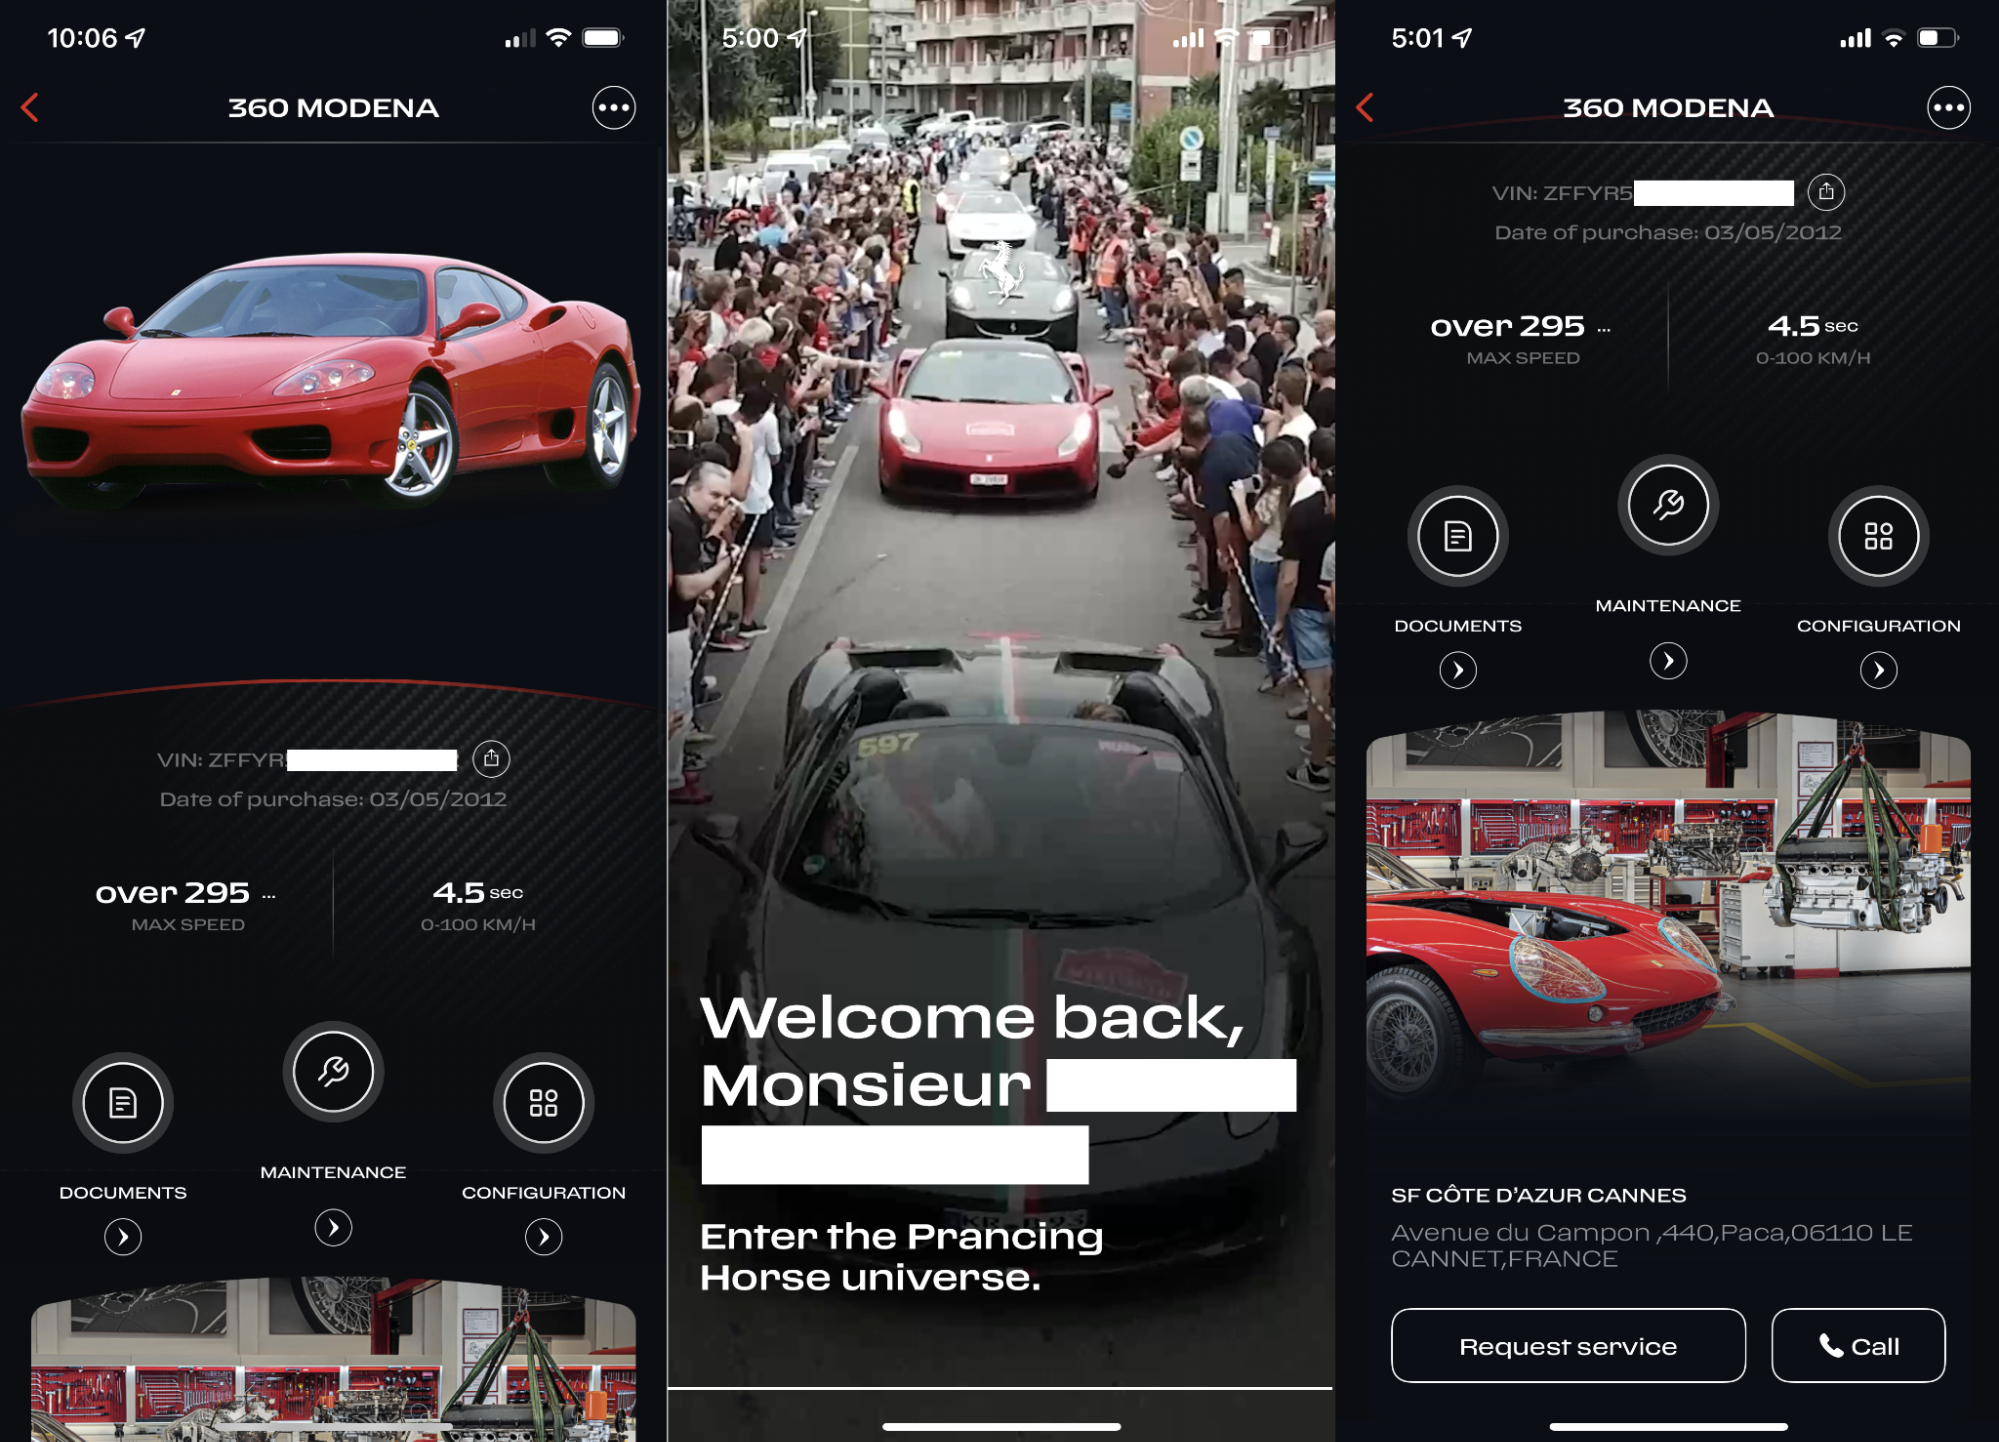
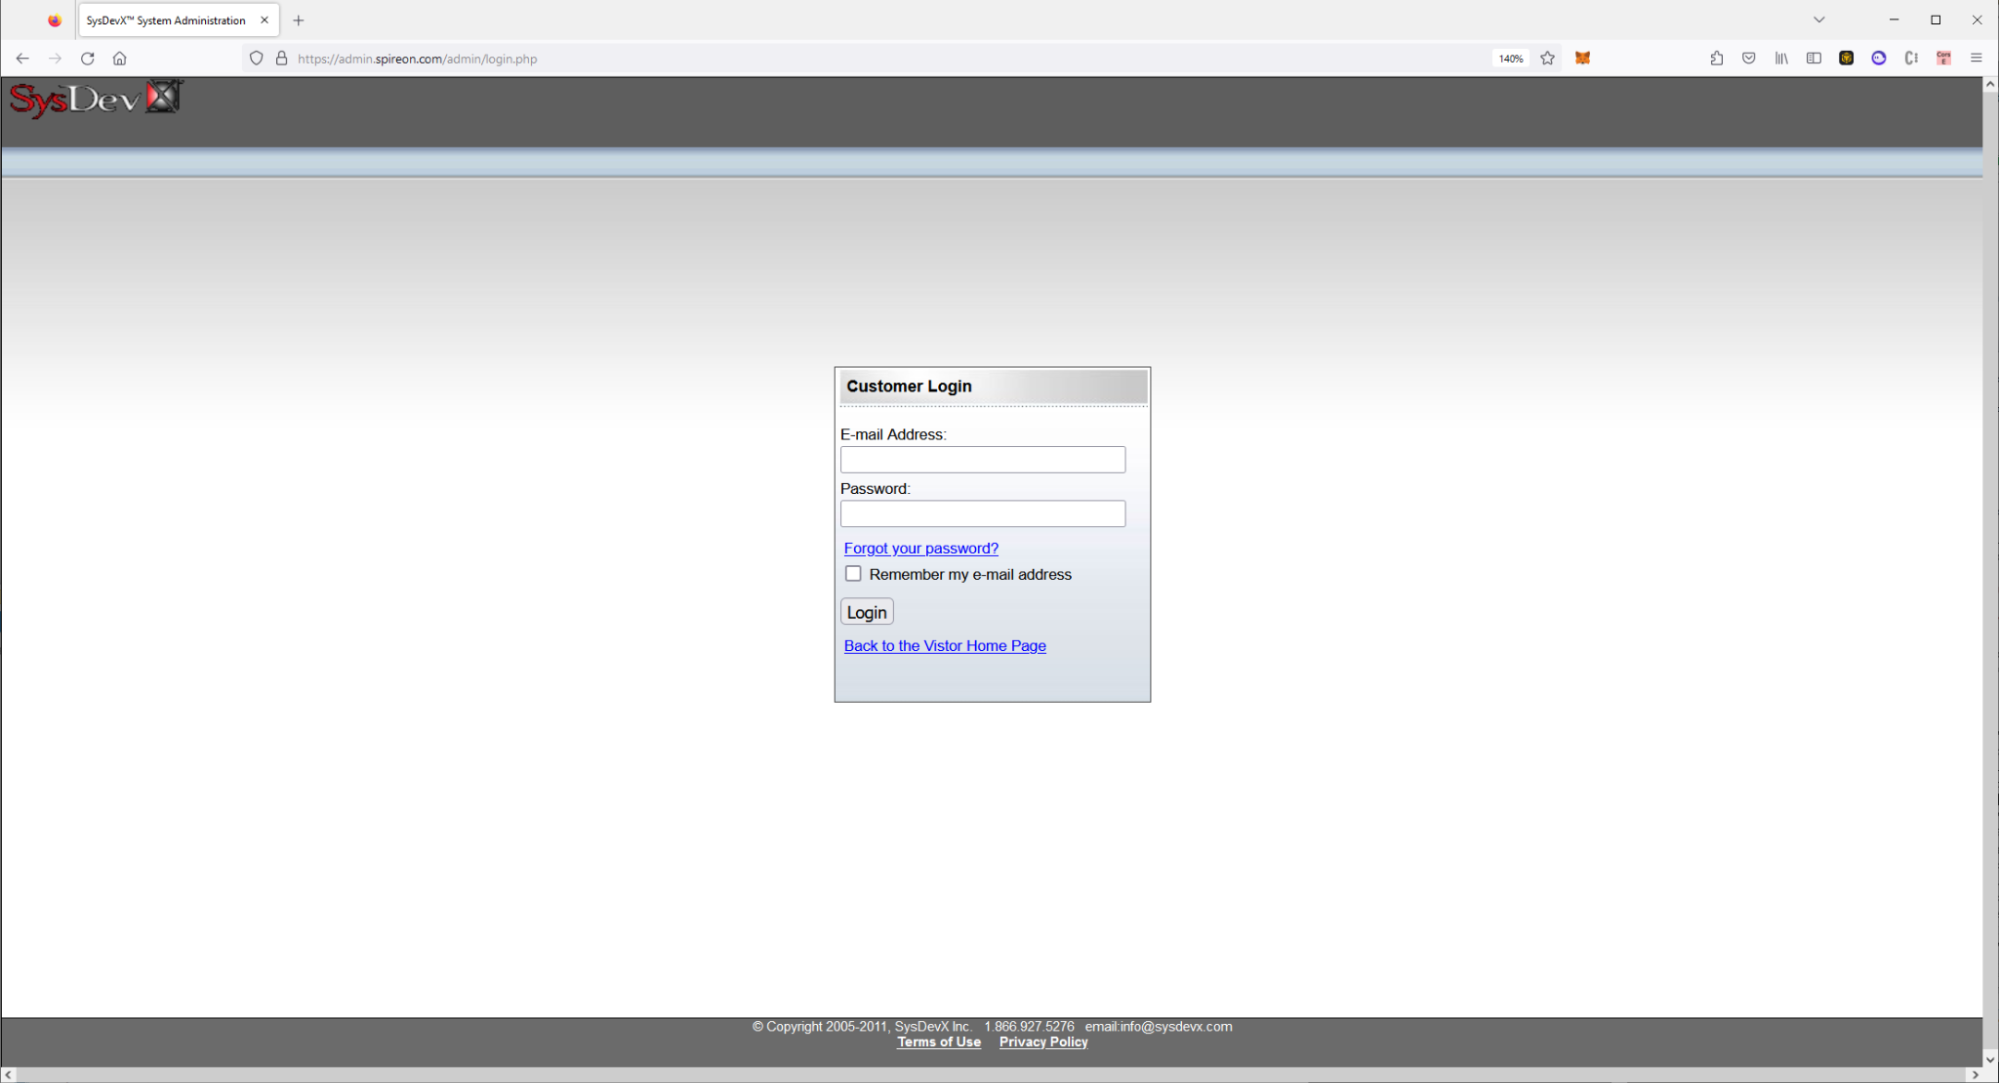
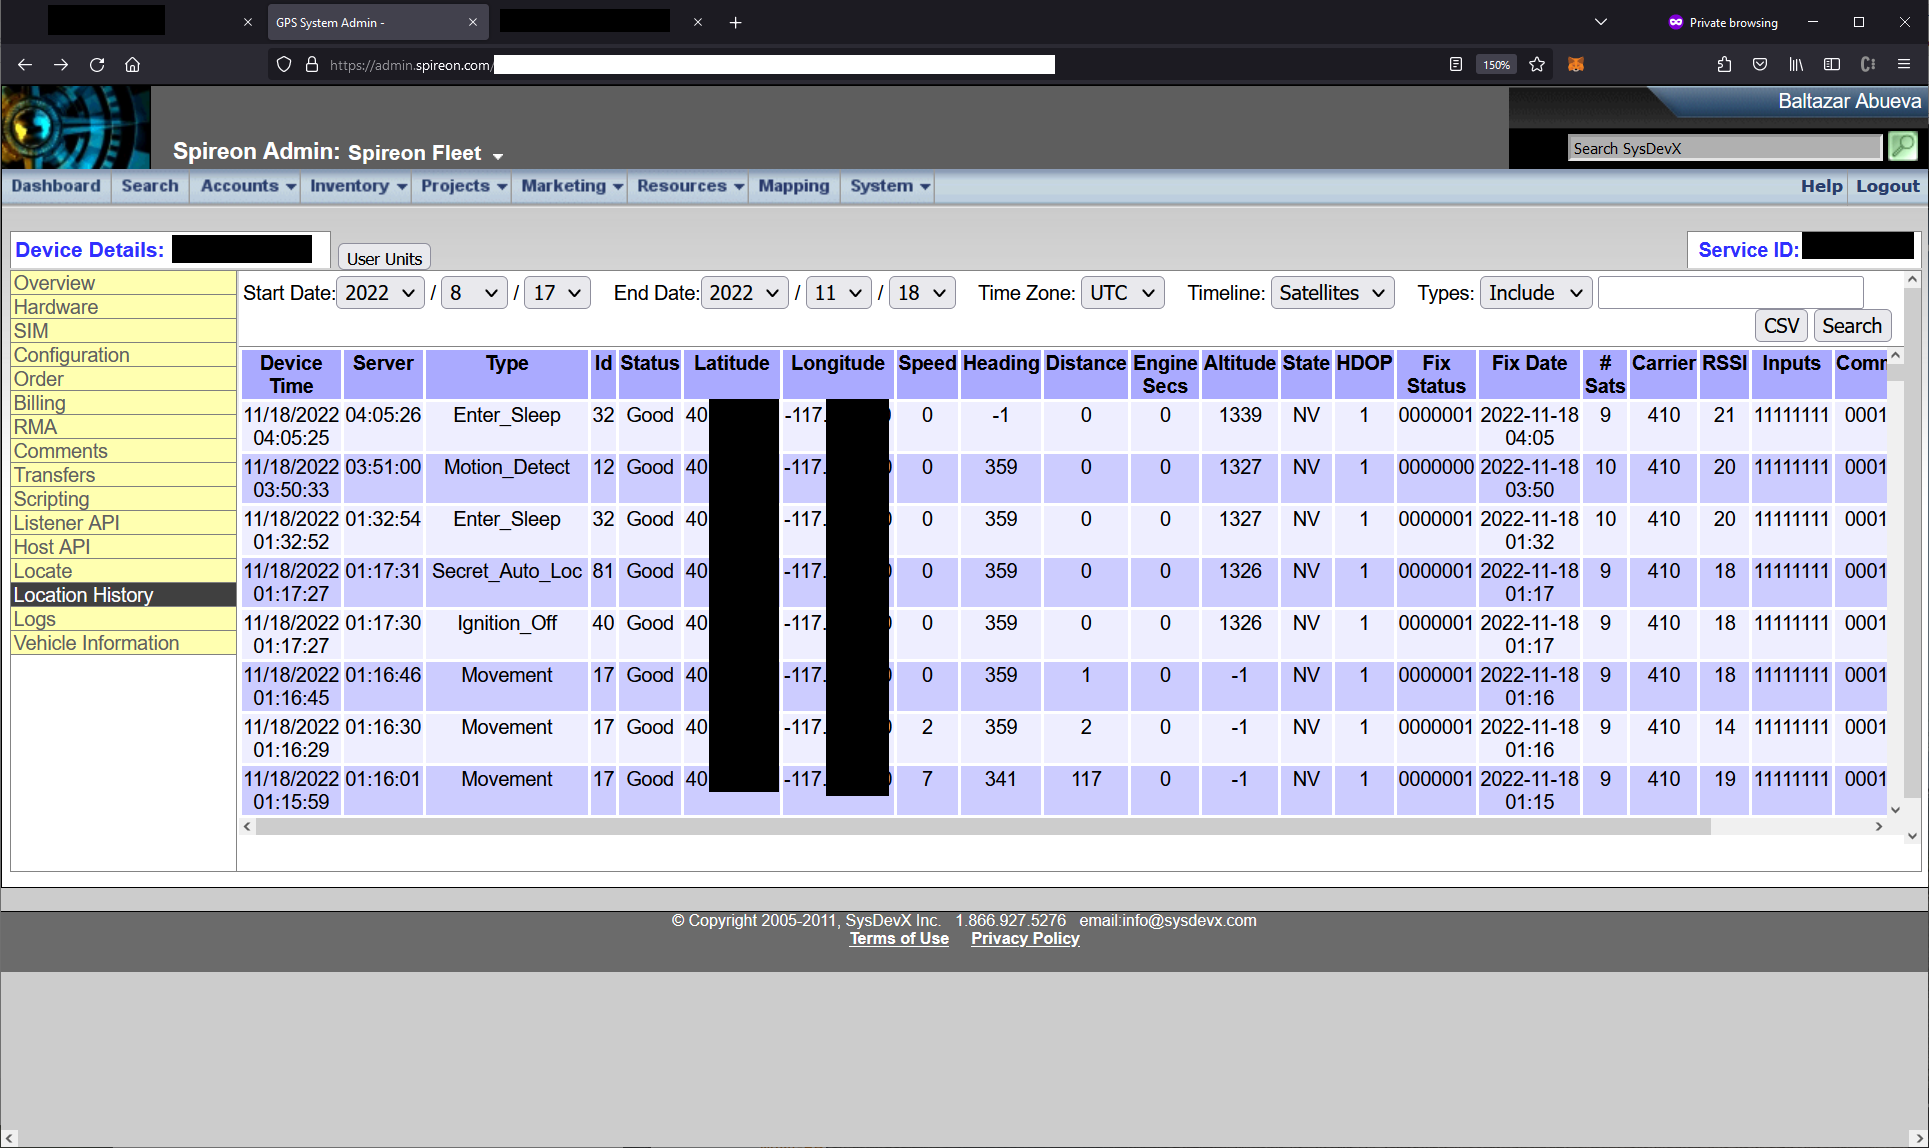
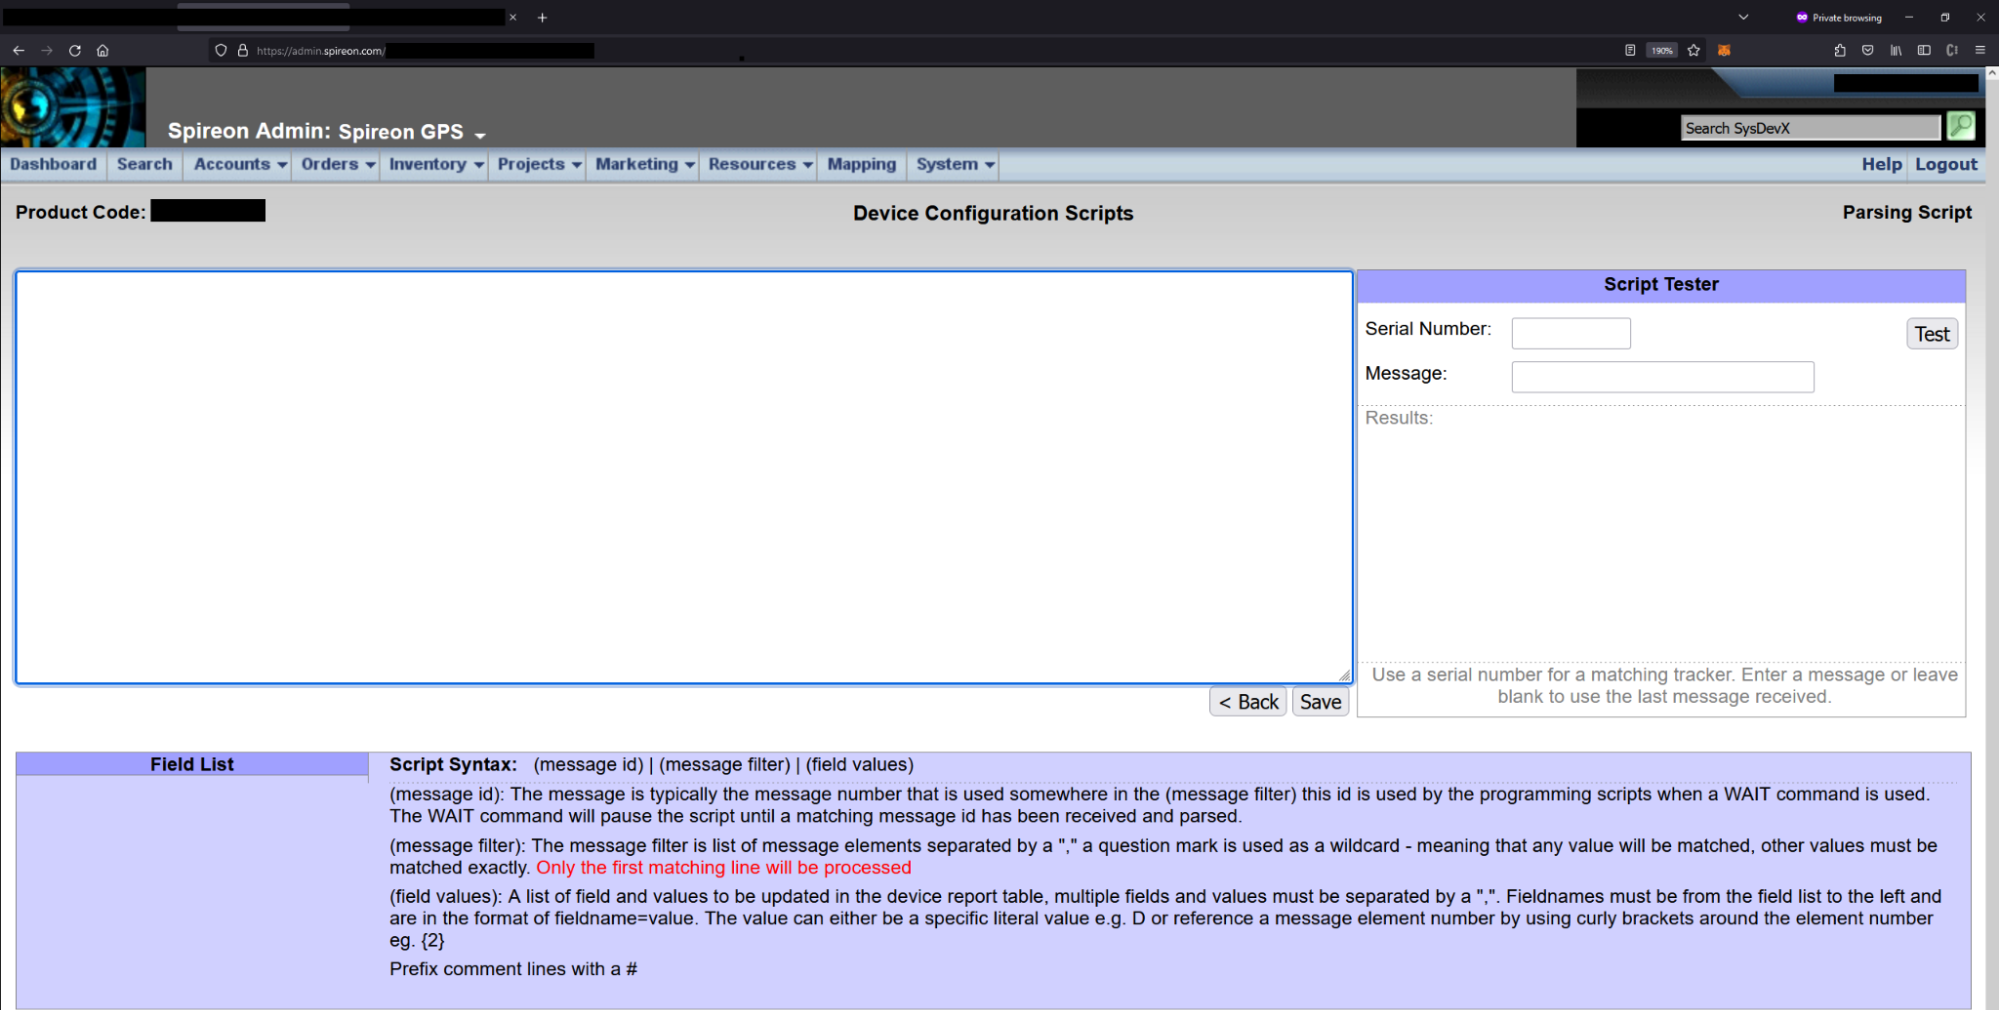
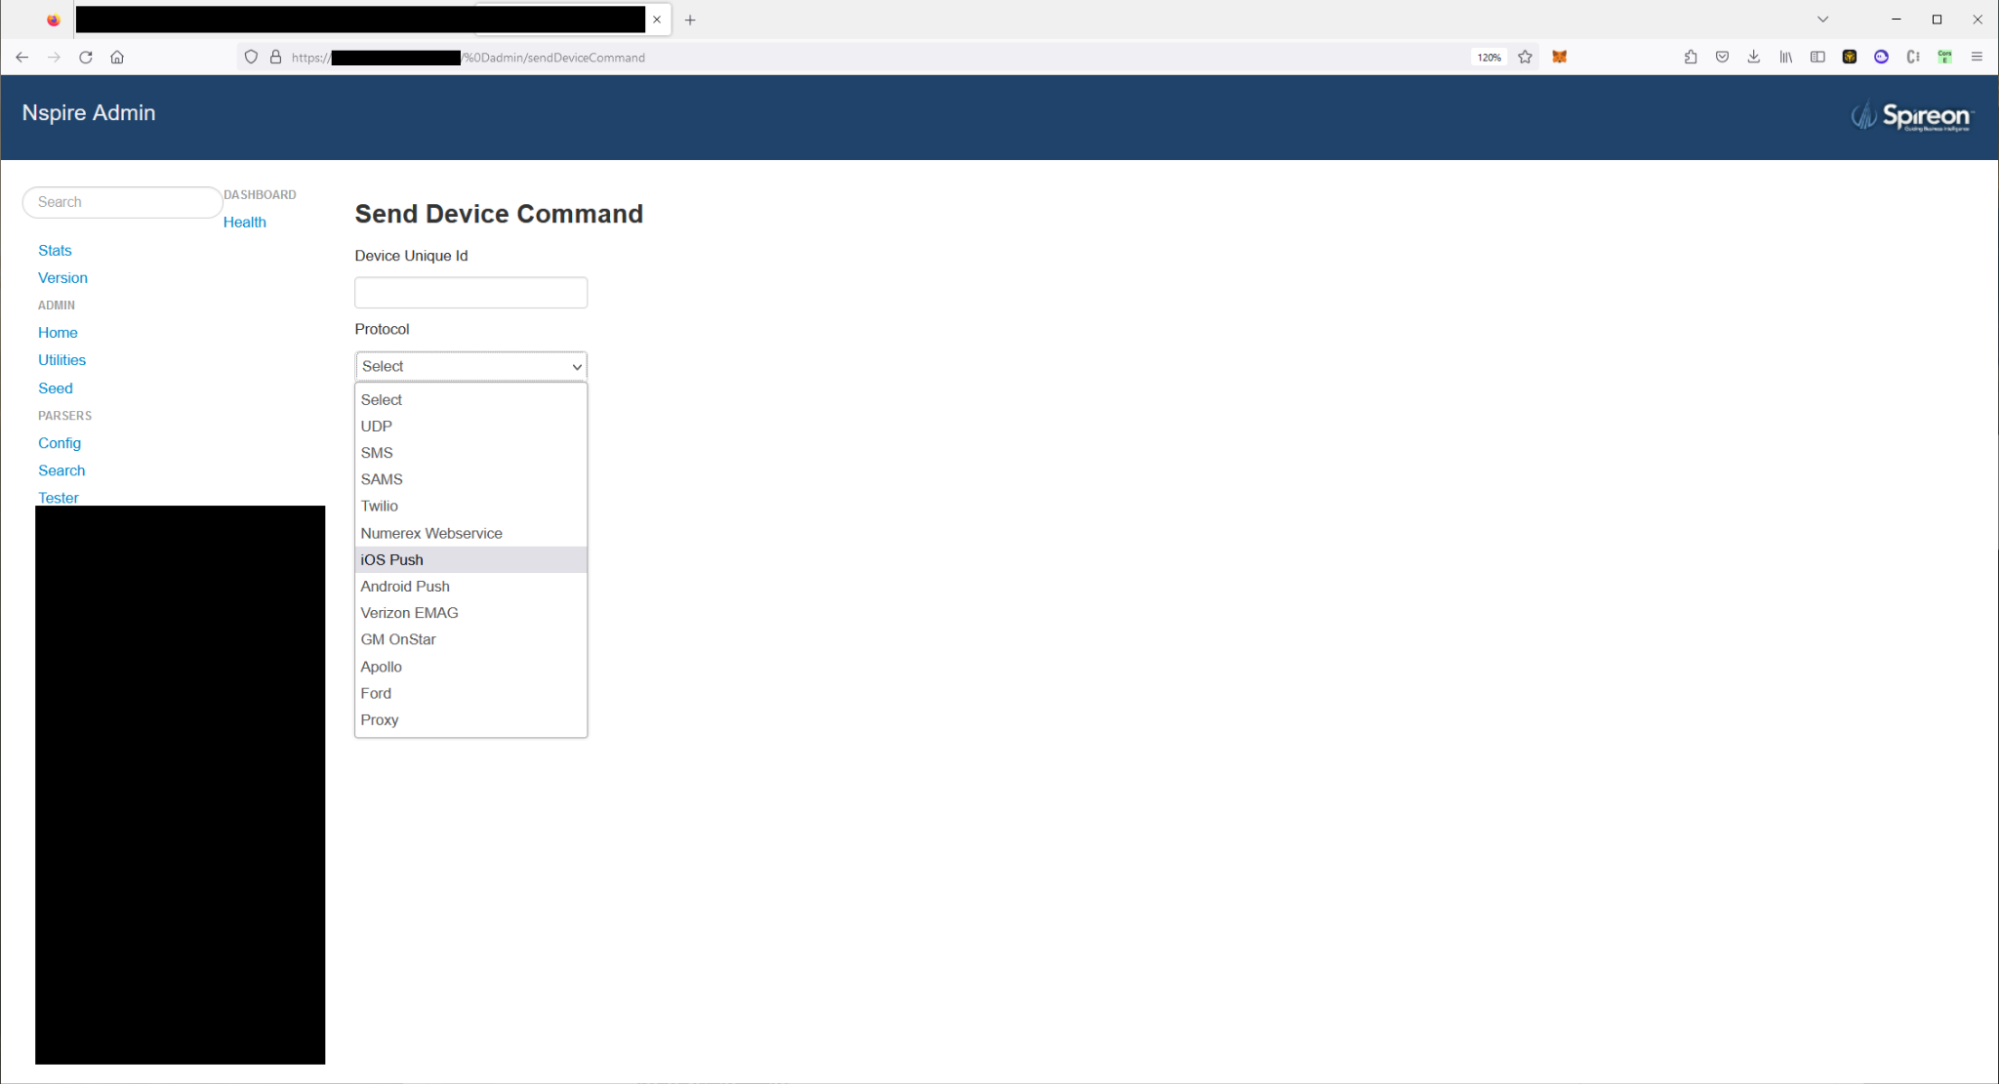
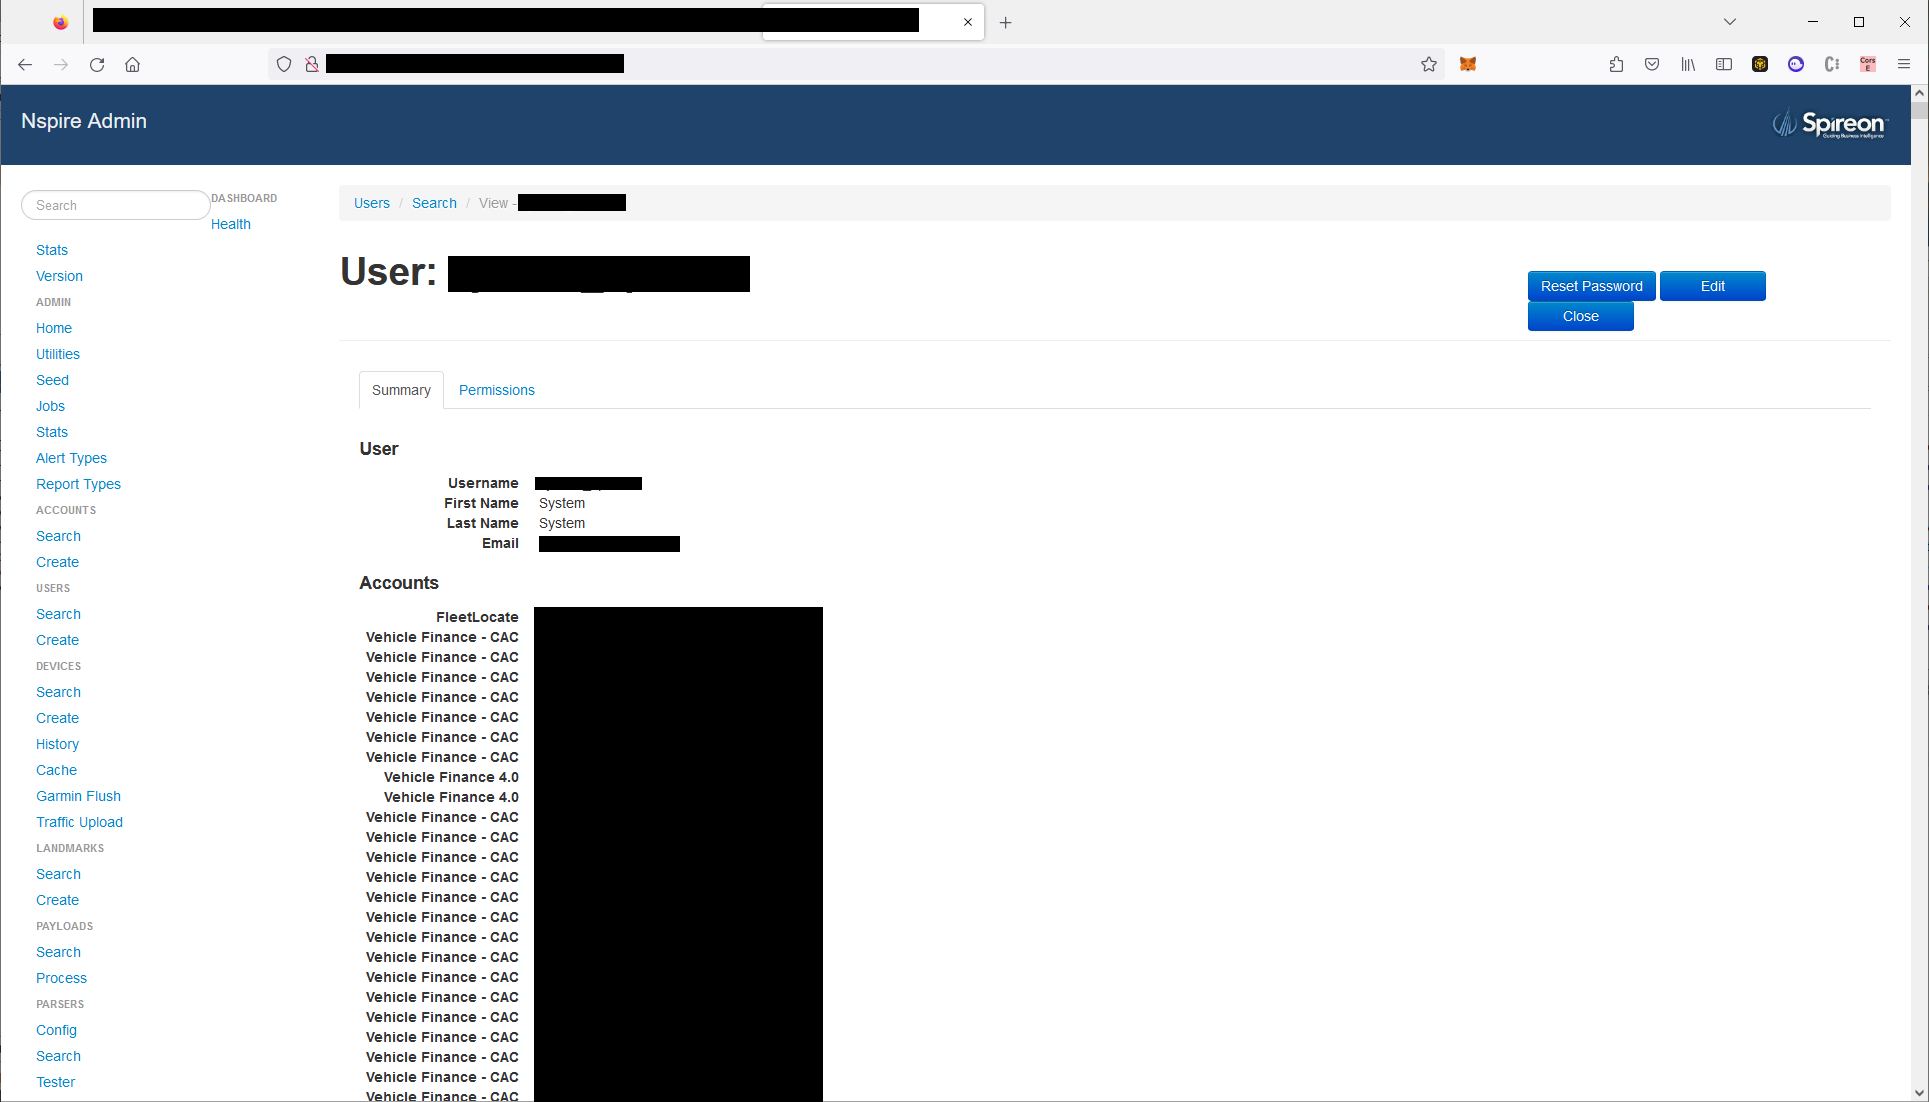
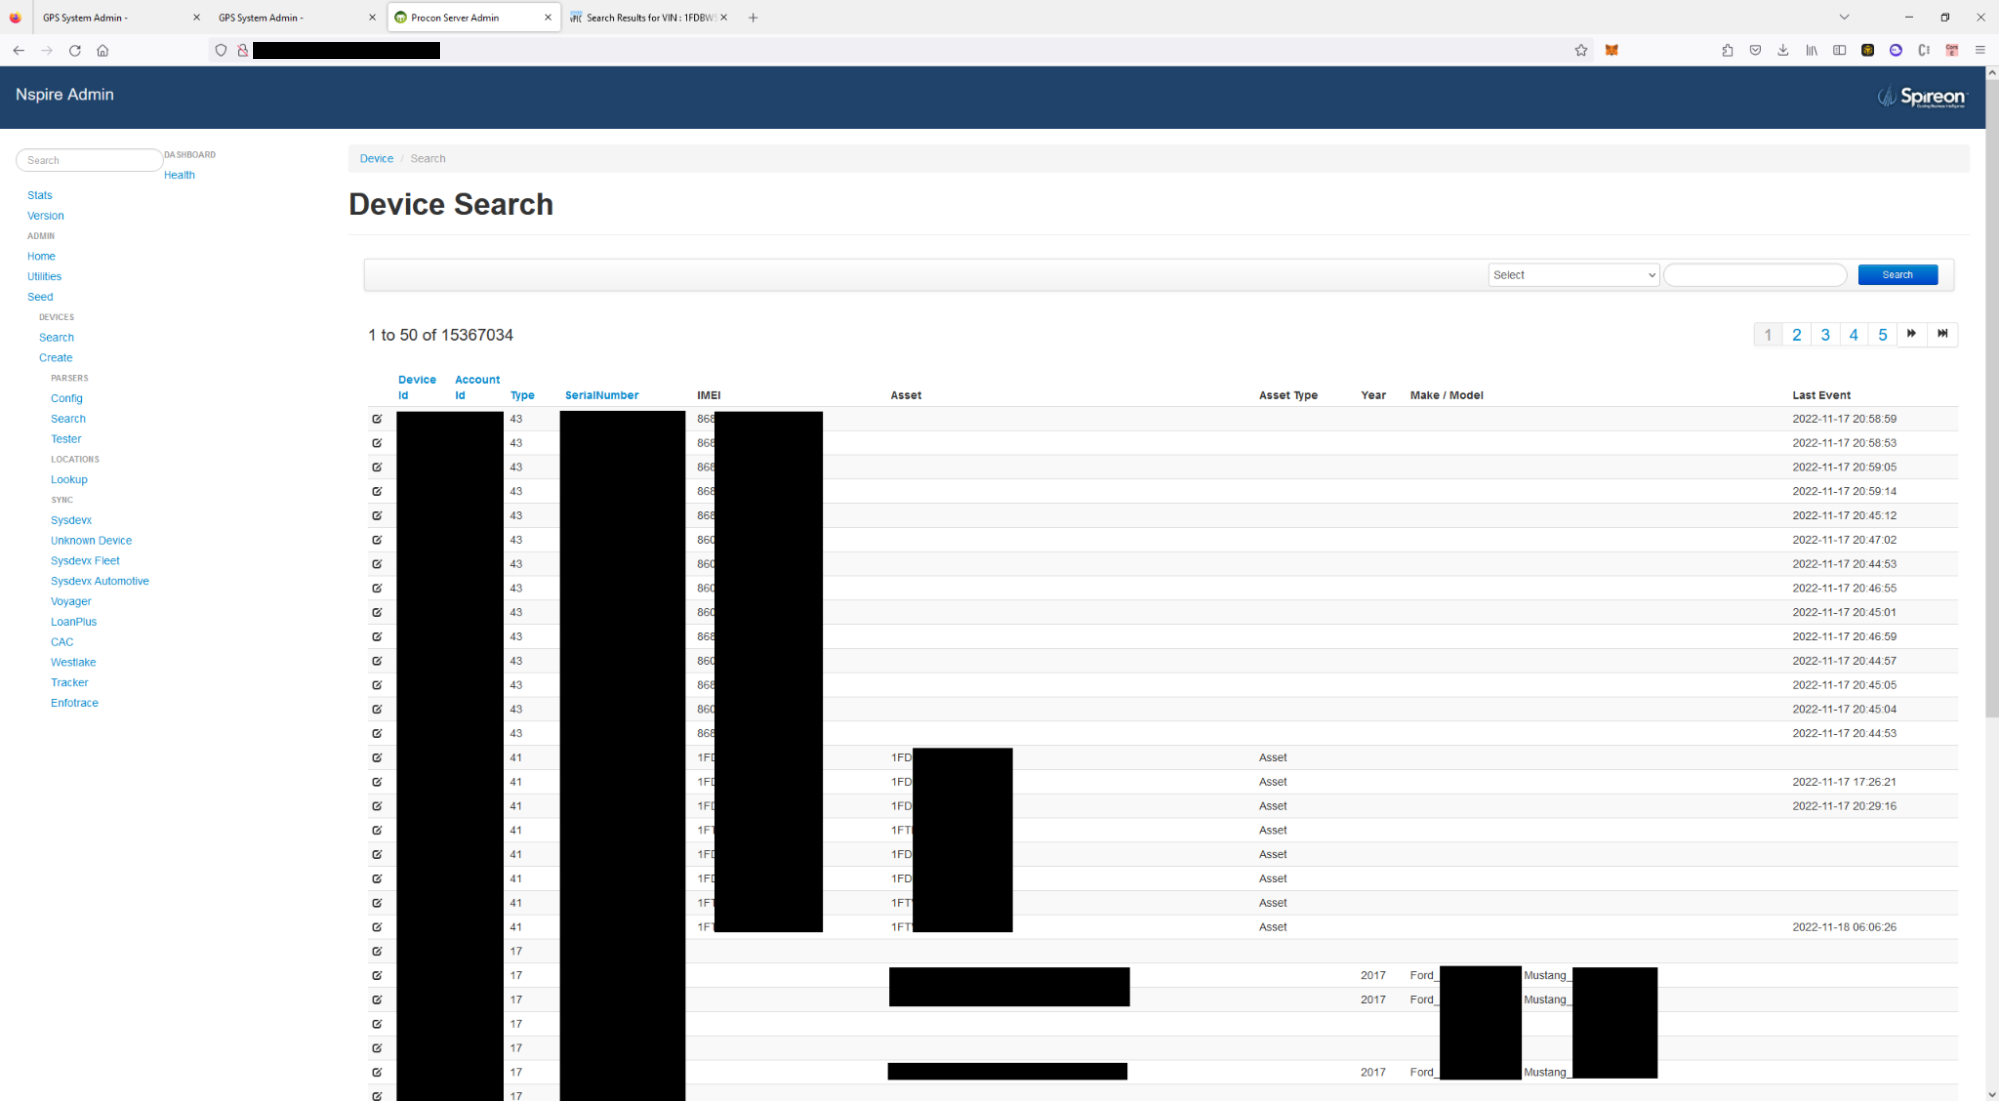
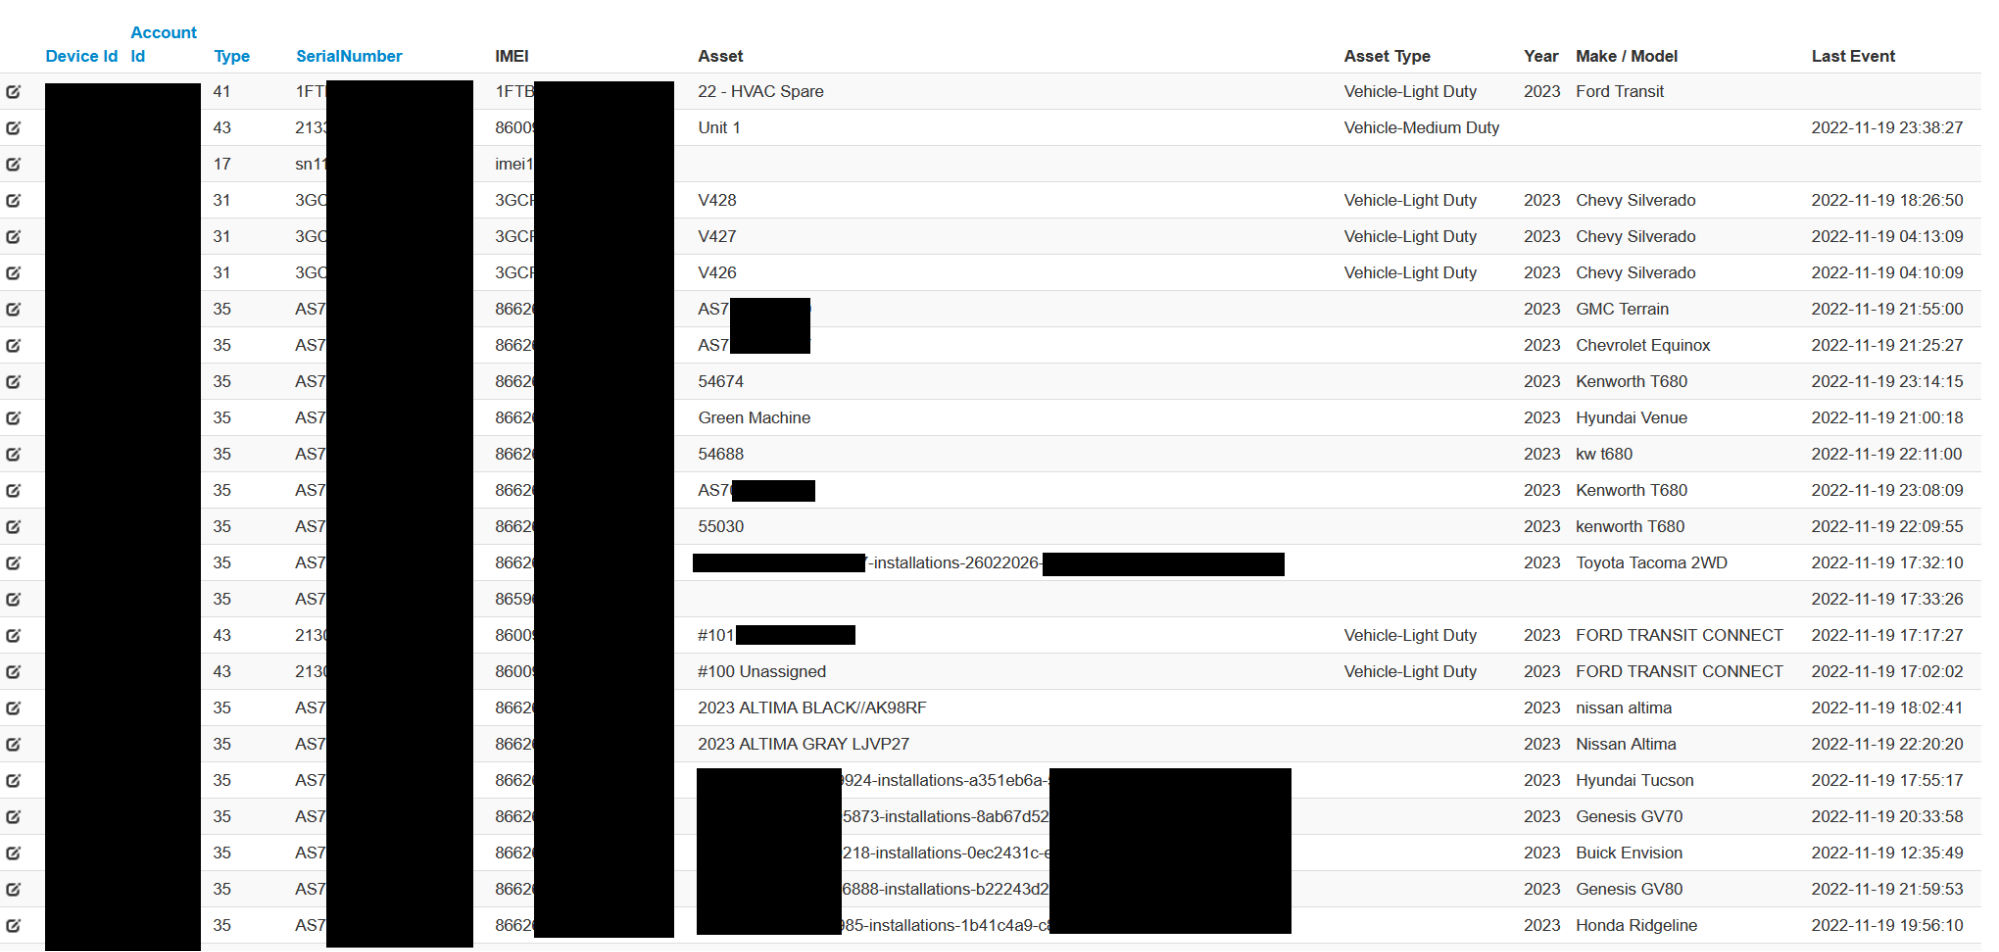
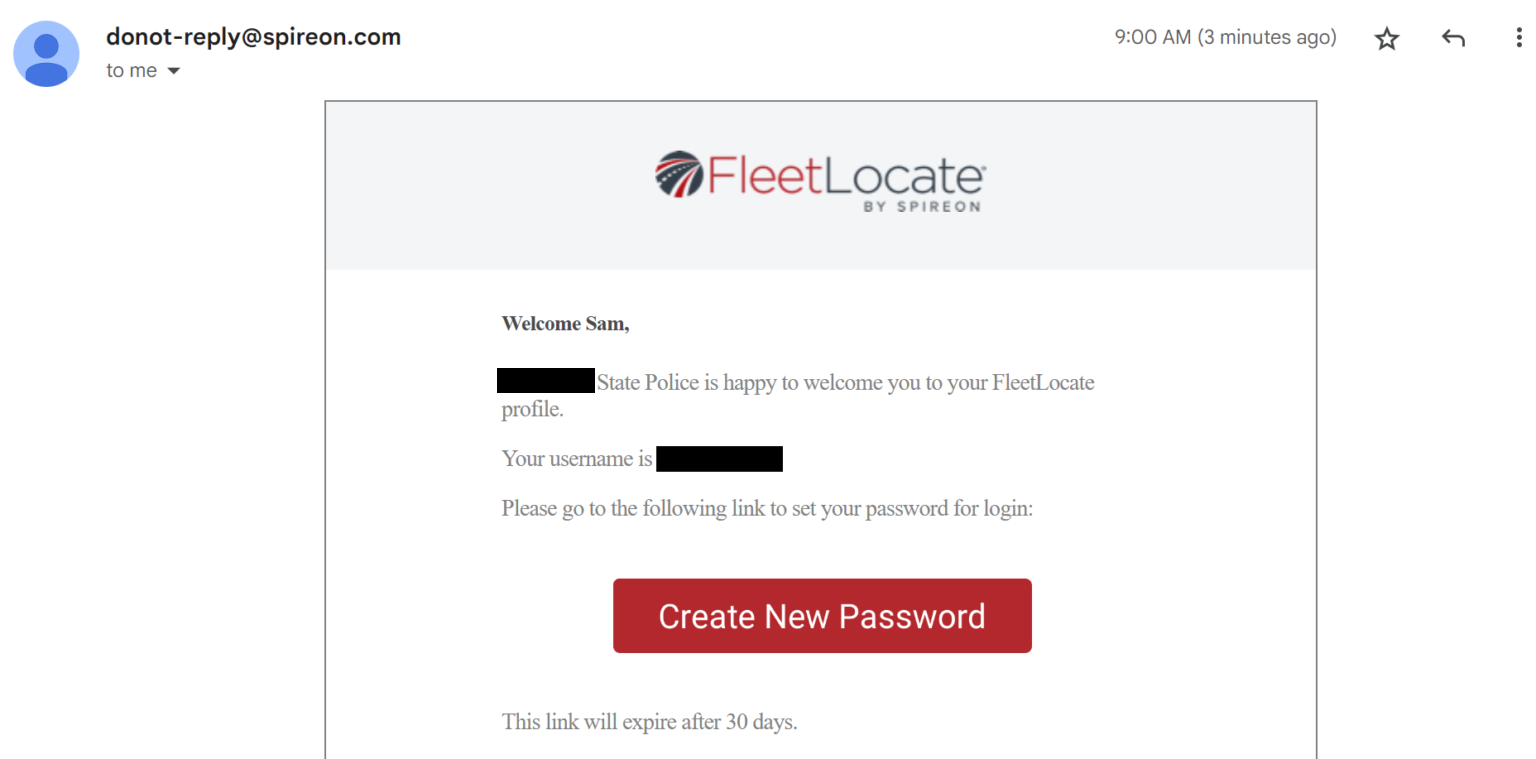
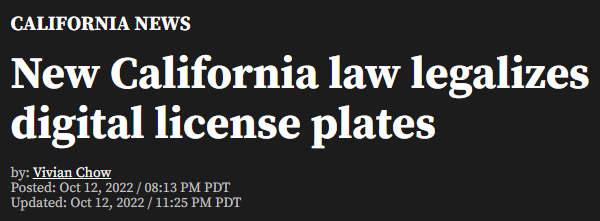
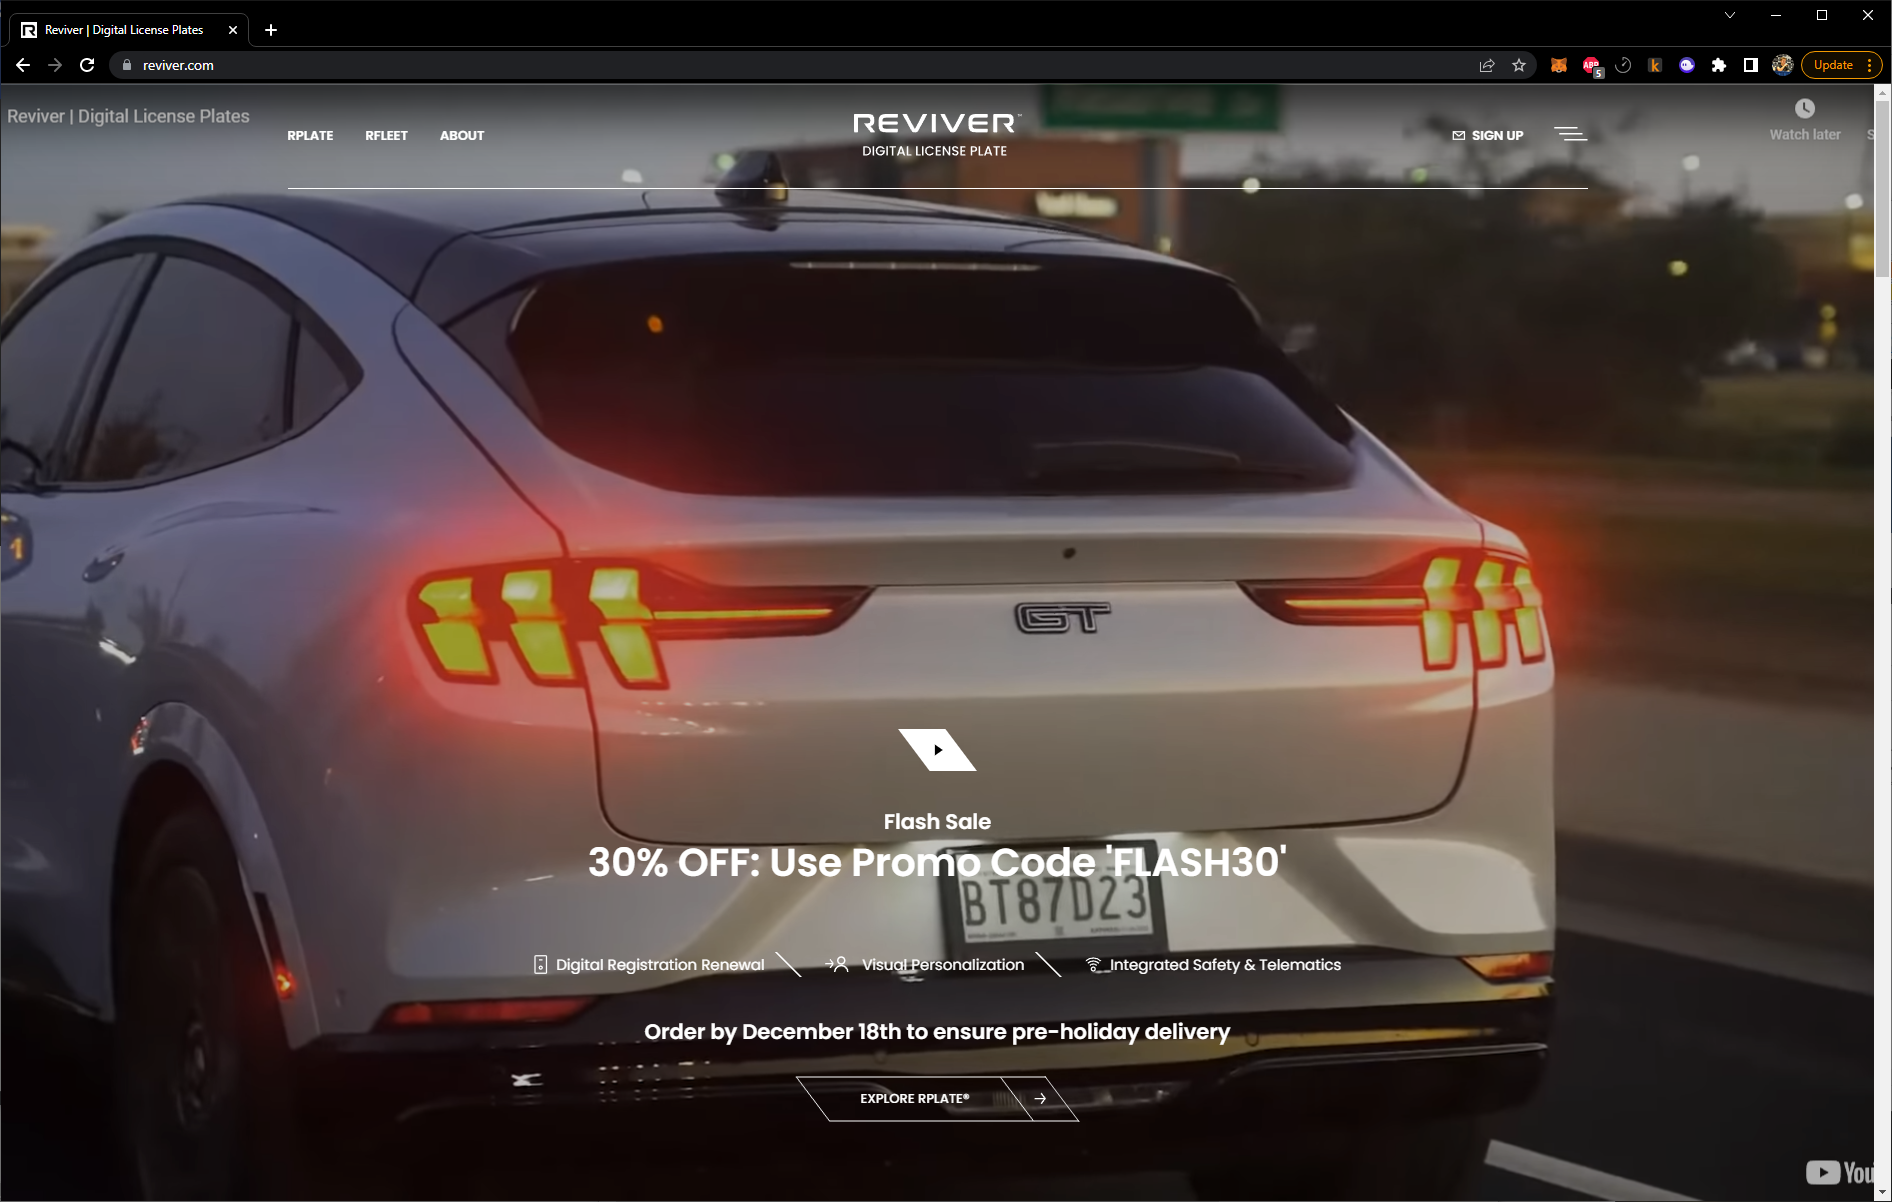
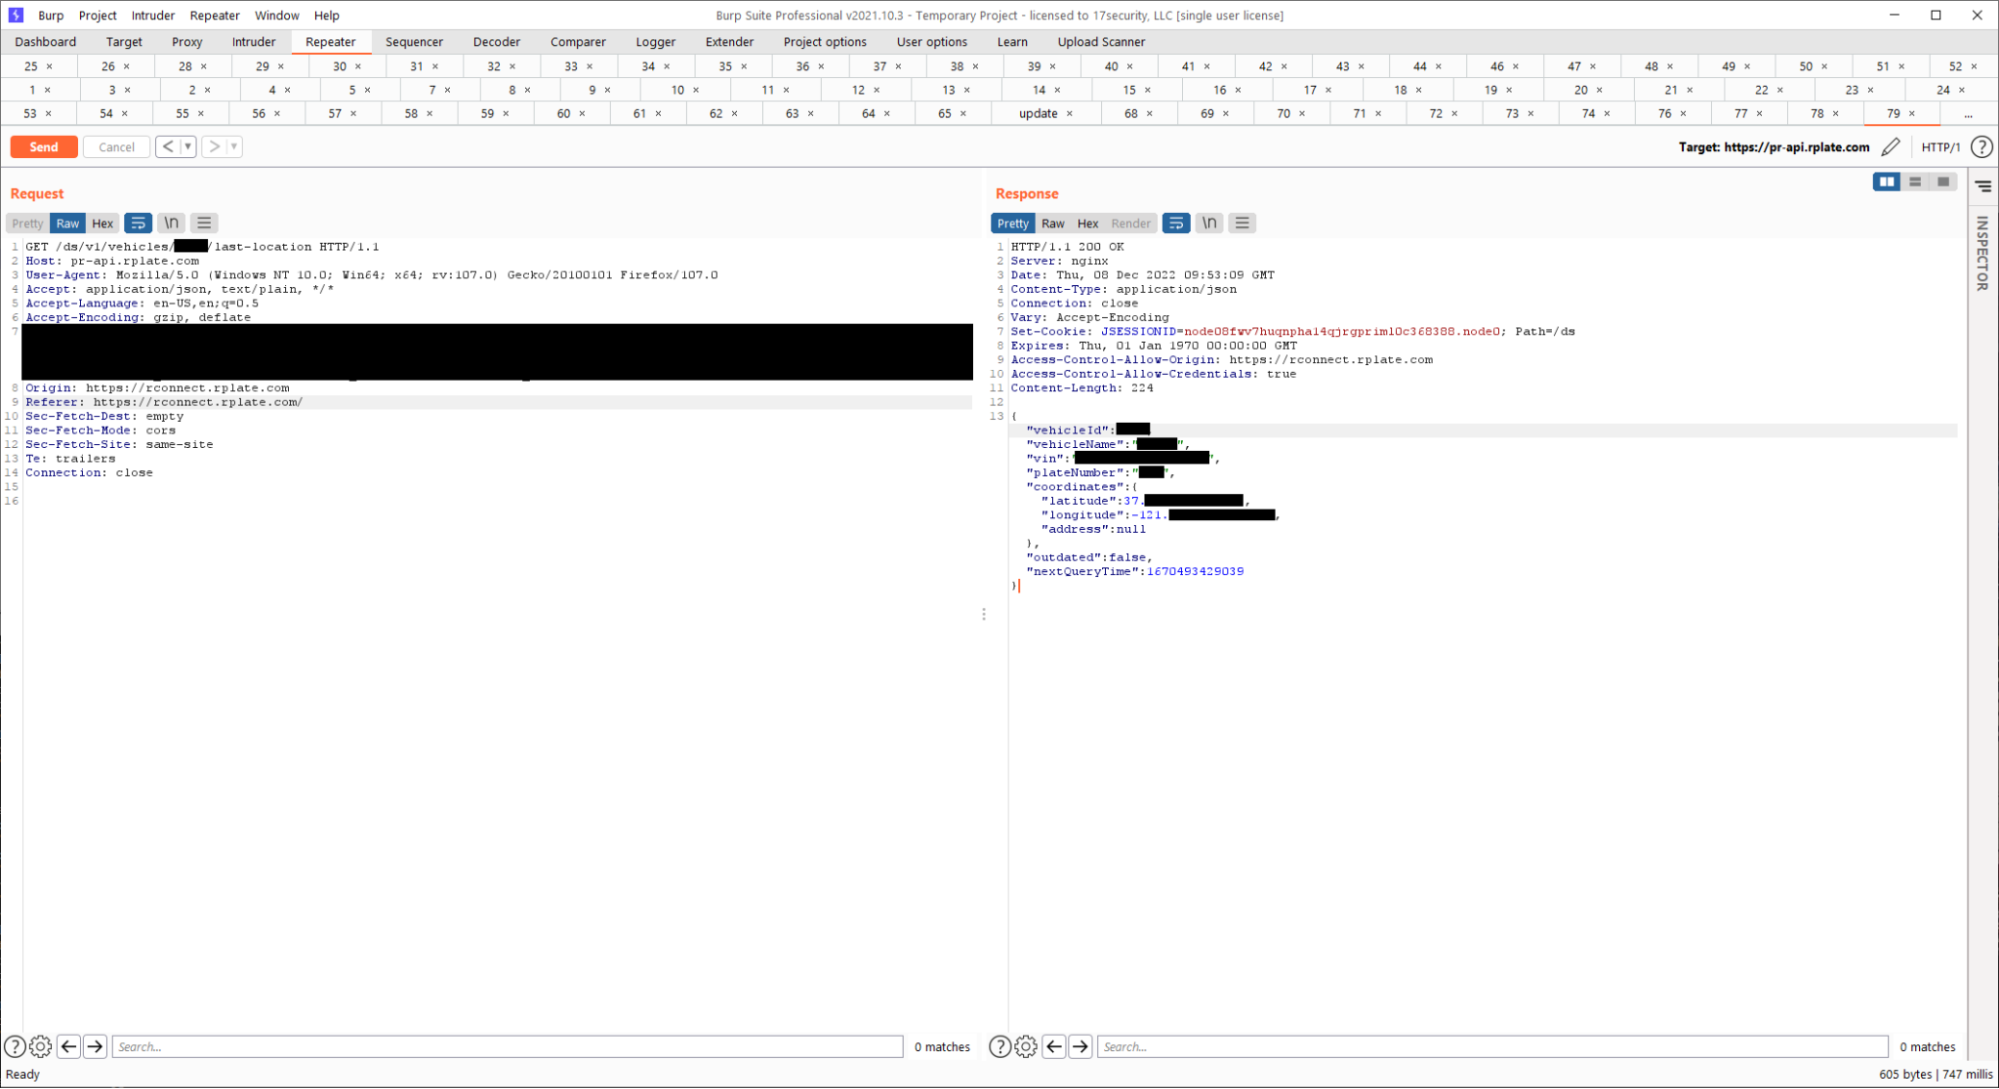
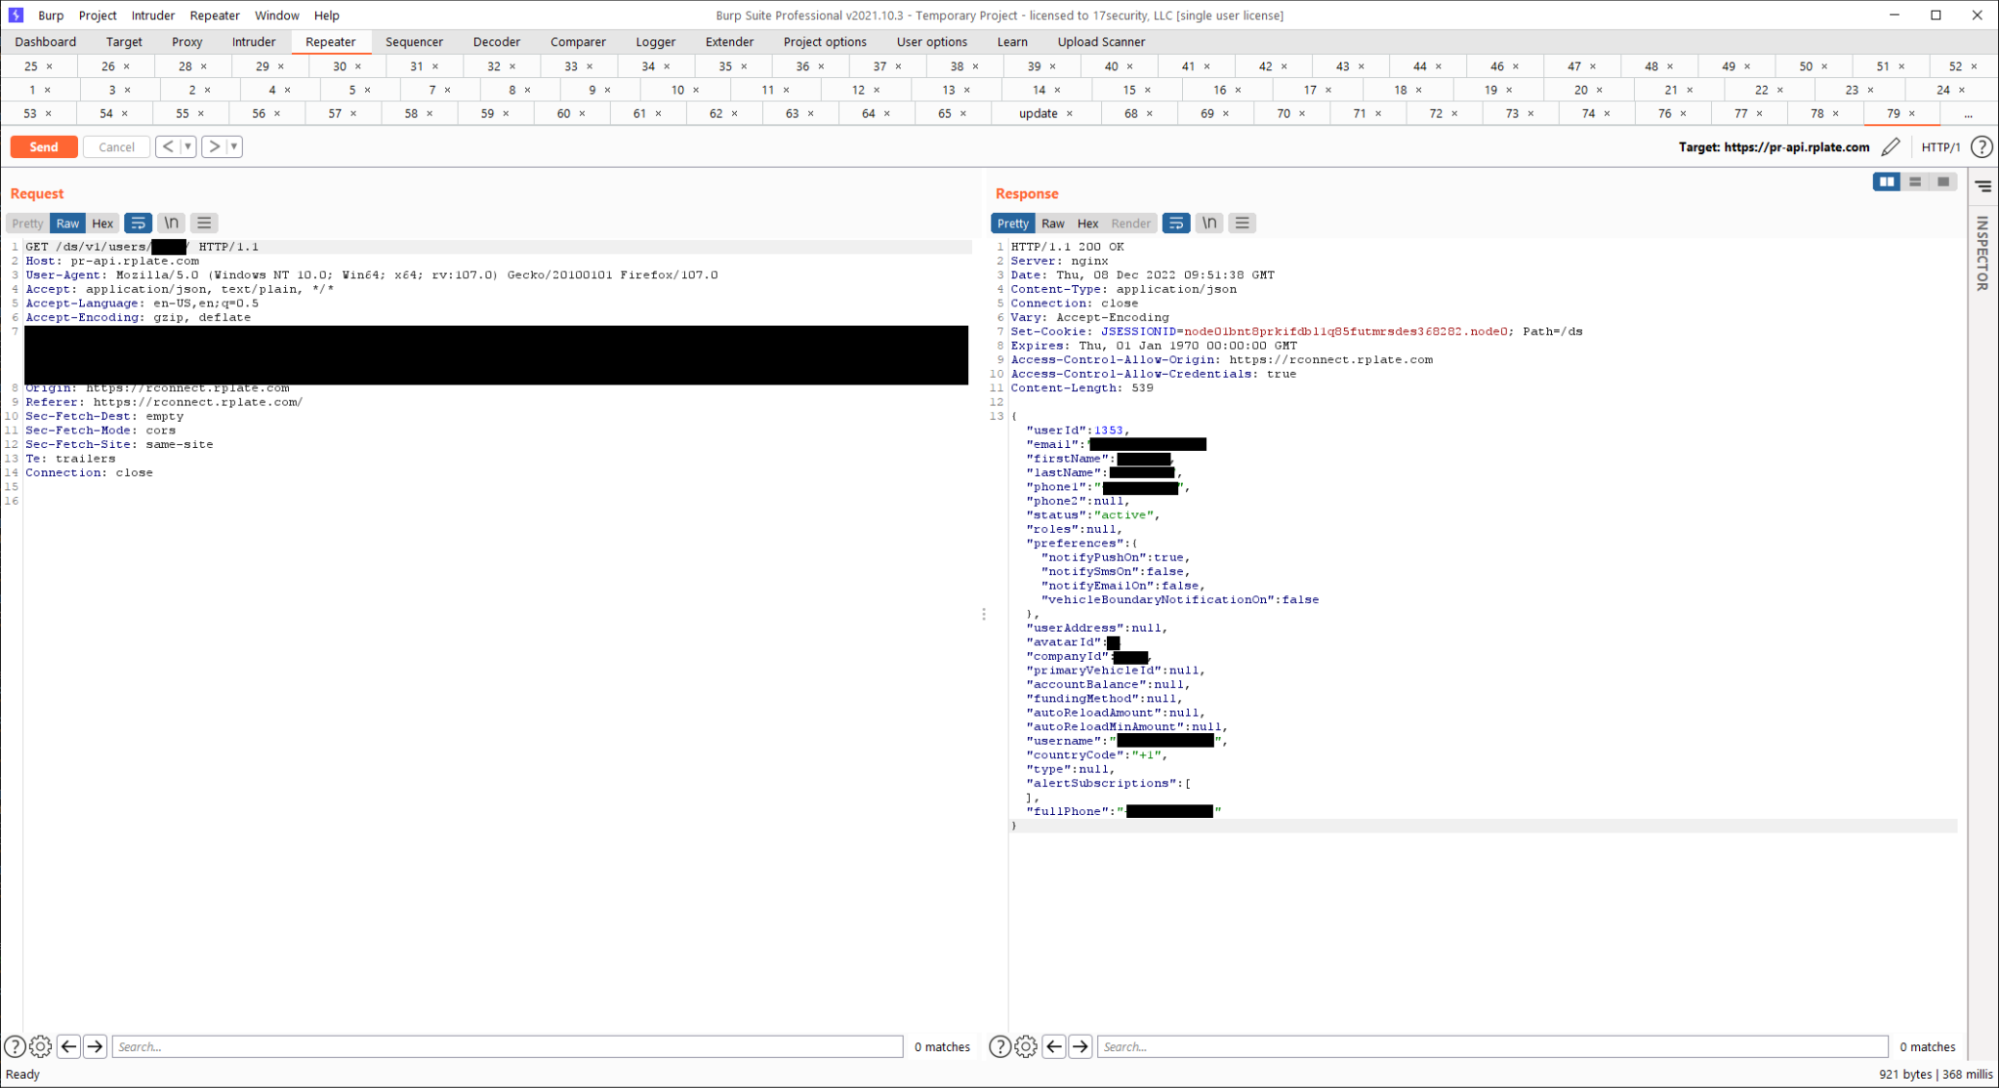
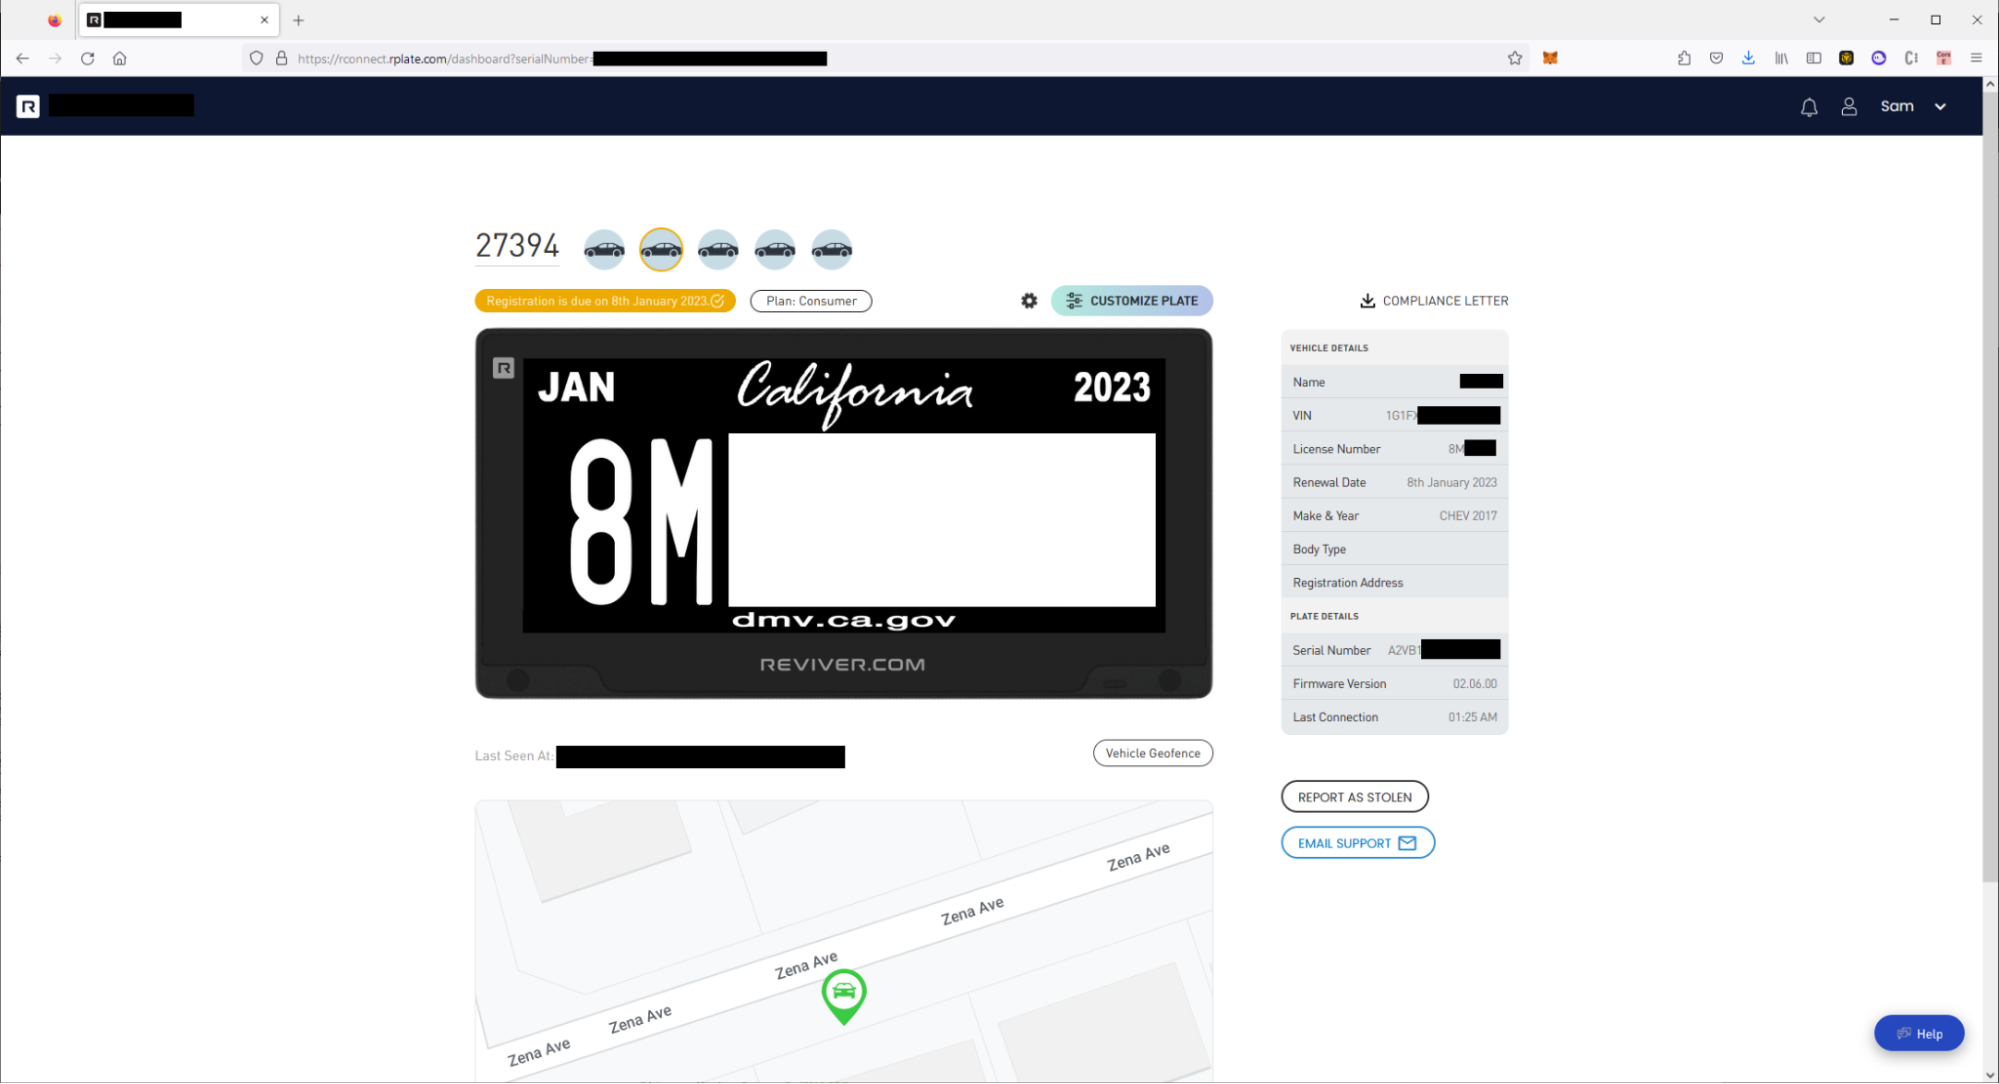
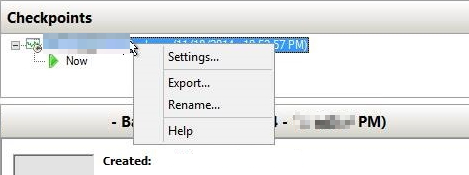
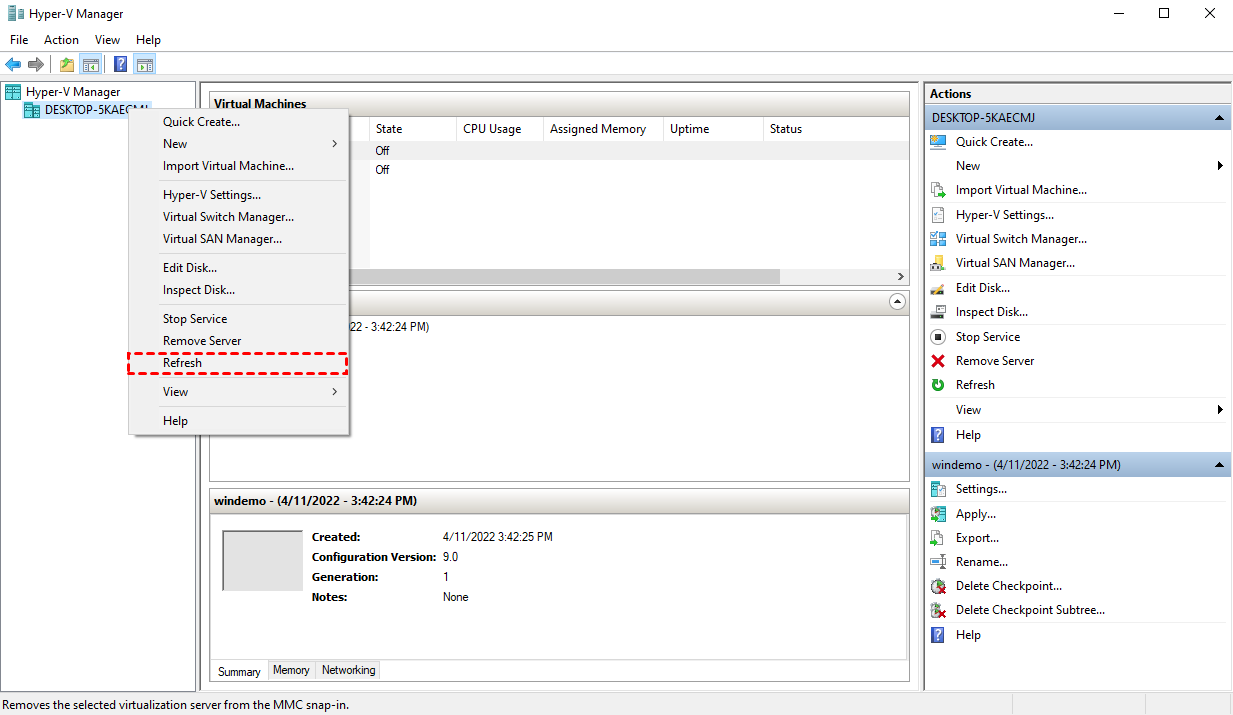
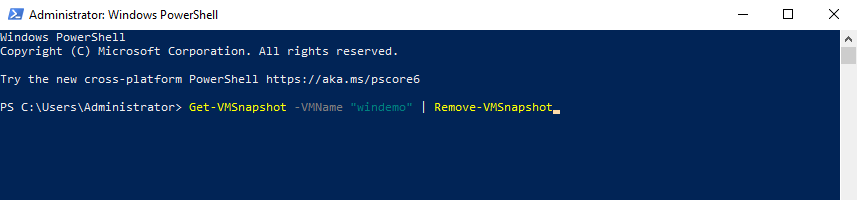
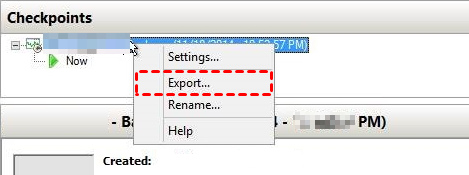

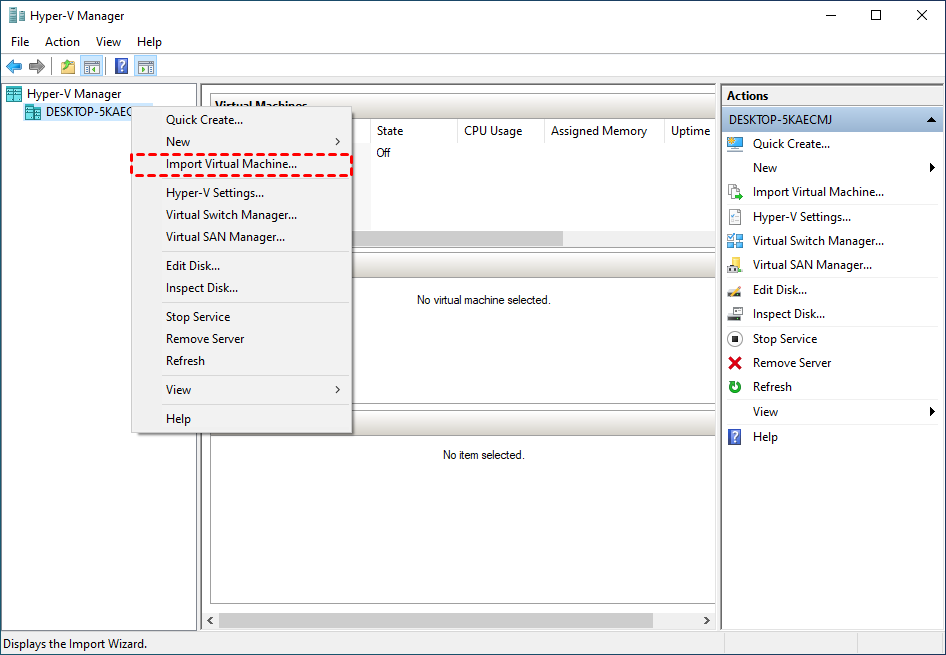

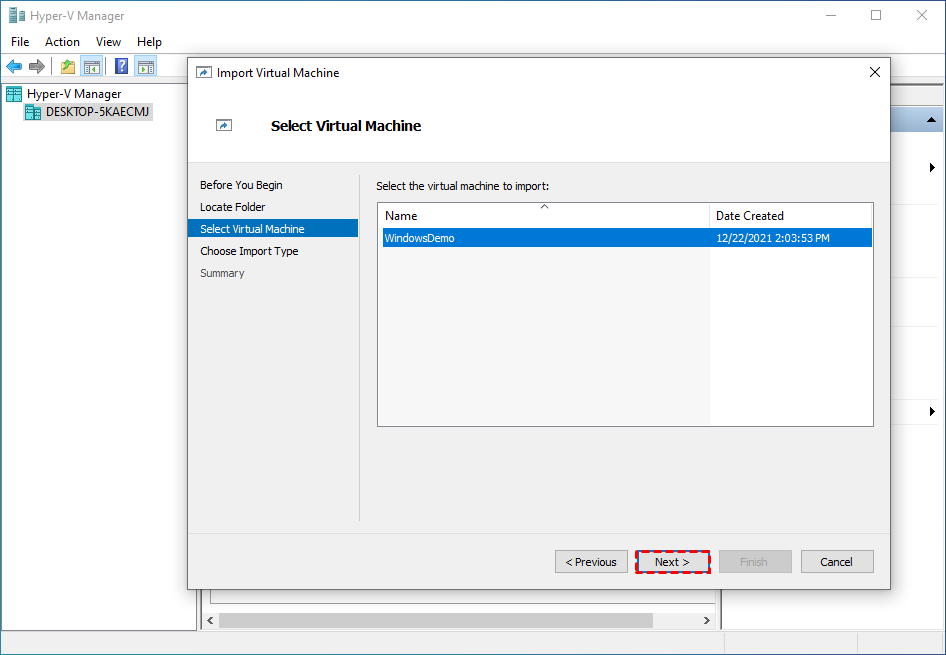
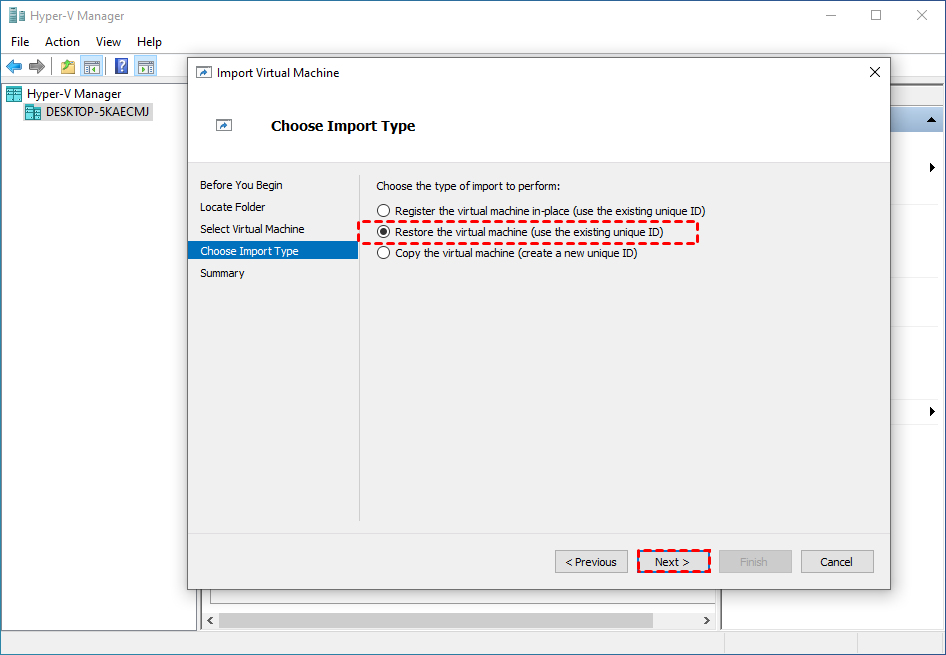

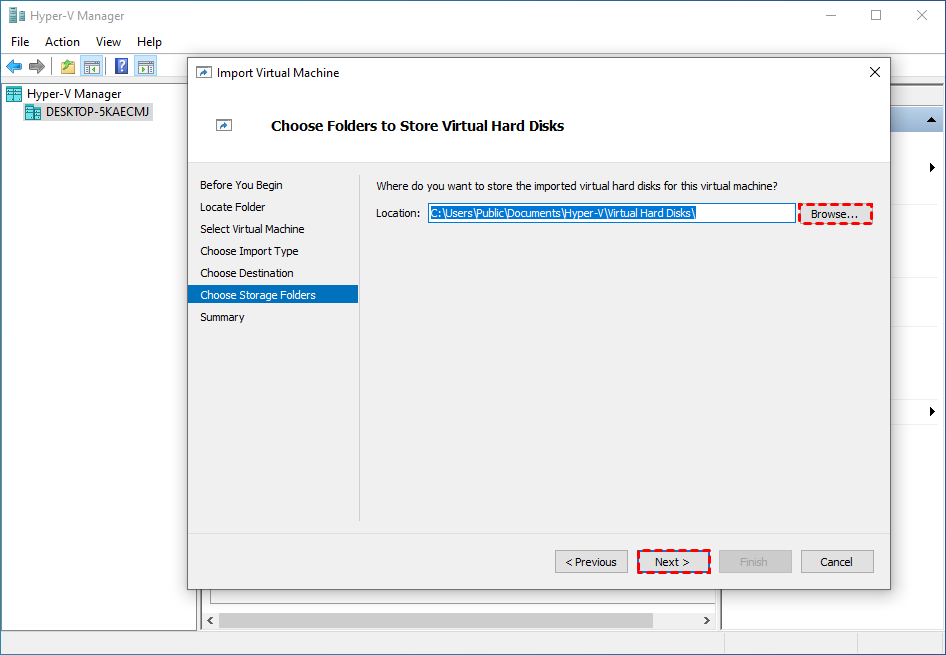
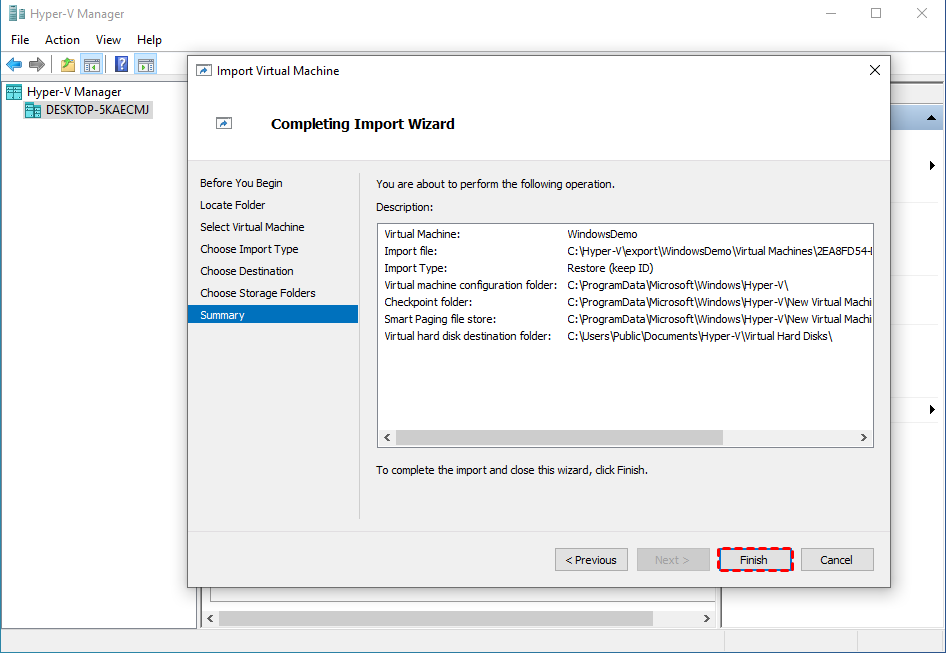


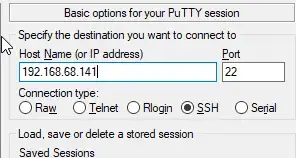
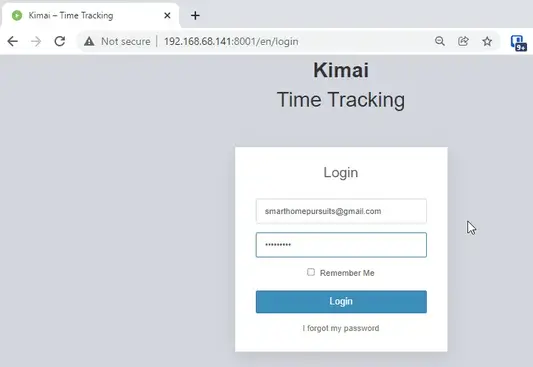
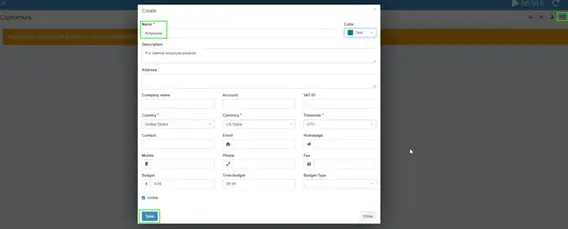
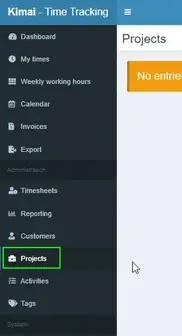

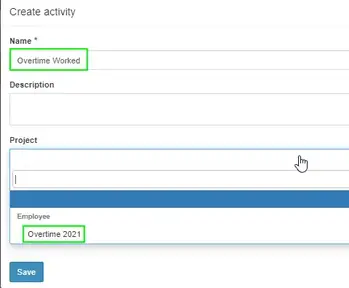
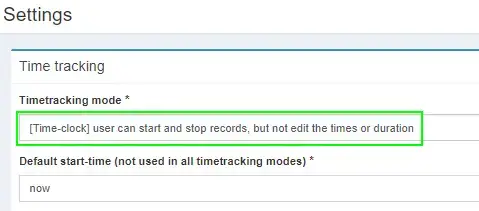

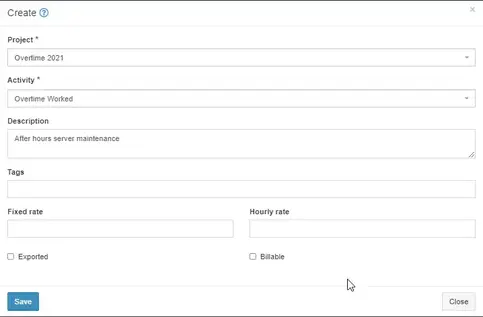
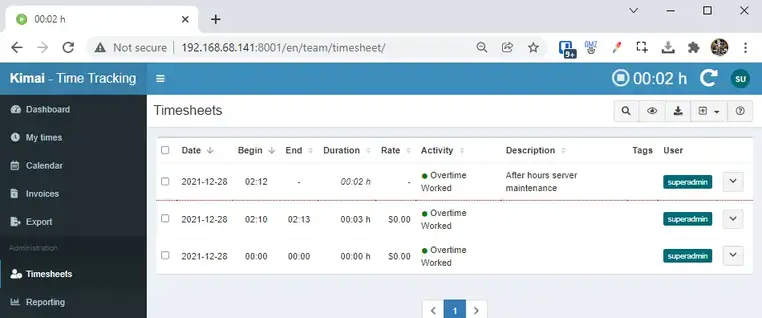

 NOTE: All the APIs required for configuring Port Forwarding will be listed in this Article.


 TIP: If you are creating only one Address Object then the First command should be sufficient, if you are creating multiple address objects then the second command should be used.
 CAUTION: I have the add.Json file saved on to my desktop and hence I was able to call it into the command, if you have created the Json the file in a different location then make sure you are executing the command from that location.


