A novel phishing technique called browser-in-the-browser (BitB) attack can be exploited to simulate a browser window within the browser in order to spoof a legitimate domain, thereby making it possible to stage convincing phishing attacks.
According to penetration tester and security researcher, who goes by the handle mrd0x on Twitter, the method takes advantage of third-party single sign-on (SSO) options embedded on websites such as “Sign in with Google” (or Facebook, Apple, or Microsoft).
While the default behavior when a user attempts to sign in via these methods is to be greeted by a pop-up window to complete the authentication process, the BitB attack aims to replicate this entire process using a mix of HTML and CSS code to create an entirely fabricated browser window.
“Combine the window design with an iframe pointing to the malicious server hosting the phishing page, and it’s basically indistinguishable,” mrd0x said in a technical write-up published last week. “JavaScript can be easily used to make the window appear on a link or button click, on the page loading etc.”
Interestingly, the technique has been abused in the wild at least once before. In February 2020, Zscaler disclosed details of a campaign that leveraged the BitB trick to siphon credentials for video game digital distribution service Steam by means of fake Counter-Strike: Global Offensive (CS: GO) websites.
“Normally, the measures taken by a user to detect a phishing site include checking to see if the URL is legitimate, whether the website is using HTTPS, and whether there is any kind of homograph in the domain, among others,” Zscaler researcher Prakhar Shrotriya said at the time.
“In this case, everything looks fine as the domain is steamcommunity[.]com, which is legitimate and is using HTTPS. But when we try to drag this prompt from the currently used window, it disappears beyond the edge of the window as it is not a legitimate browser pop-up and is created using HTML in the current window.”
While this method significantly makes it easier to mount effective social engineering campaigns, it’s worth noting that potential victims need to be redirected to a phishing domain that can display such a fake authentication window for credential harvesting.
“But once landed on the attacker-owned website, the user will be at ease as they type their credentials away on what appears to be the legitimate website (because the trustworthy URL says so),” mrd0x added.
Google is officially buying threat intelligence and incident response company Mandiant in an all-cash deal approximately valued at $5.4 billion, the two technology firms announced Tuesday.
Mandiant is expected to be folded into Google Cloud upon the closure of the acquisition, which is slated to happen later this year, adding to the latter’s growing portfolio of security offerings such as BeyondCorp Enterprise, VirusTotal, Chronicle, and the Cybersecurity Action Team.
“Today, organizations are facing cybersecurity challenges that have accelerated in frequency, severity and diversity, creating a global security imperative,” Google said in a statement.
“To address these risks, enterprises need to be able to detect and respond to adversaries quickly; analyze and automate threat intelligence to scale threat detection across organizations; orchestrate and automate remediation; validate their protection against known threats; and visualize their IT environment in order to identify and simulate new threats.”
Mandiant became a standalone entity again in June 2021 when FireEye, which acquired the company in 2013, sold its products business and the FireEye brand for $1.2 billion to a consortium led by private-equity firm Symphony Technology Group.
Symphony, which also acquired McAfee Enterprise for $4 billion in March 2021, combined the two businesses to launch Trellix earlier this year.
The cybersecurity firm is best known for uncovering and investigating the supply chain compromise of SolarWinds, a devastatingcyber attack that affected thousands of its downstream customers and went unnoticed for months until its discovery in December 2020.
“The acquisition will complement Google Cloud’s existing strengths in security,” Mandiant said, stating the deal will “deliver an end-to-end security operations suite with even greater capabilities as well as advisory services helping customers address critical security challenges and stay protected at every stage of the security lifecycle.”
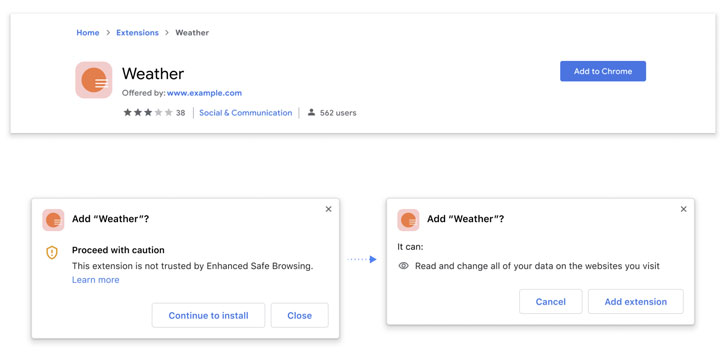
Google on Thursday said it’s rolling out new security features to Chrome browser aimed at detecting suspicious downloads and extensions via its Enhanced Safe Browsing feature, which it launched a year ago.
To this end, the search giant said it will now offer additional protections when users attempt to install a new extension from the Chrome Web Store, notifying if it can be considered “trusted.”
Currently, 75% of all add-ons on the platform are compliant, the company pointed out, adding “any extensions built by a developer who follows the Chrome Web Store Developer Program Policies, will be considered trusted by Enhanced Safe Browsing.”
Enhanced Safe Browsing involves sharing real-time data with Google Safe Browsing to proactively safeguard users against dangerous sites. The company also noted that its integration with Safe Browsing’s blocklist API helped improve privacy and security, with the number of malicious extensions disabled by the browser jumping by 81%.
Also coming to Chrome is a new download protection feature that scans downloaded files for malware by using metadata about the downloaded file, alongside giving users the option to send the file to be scanned for a more in depth analysis.
“If you choose to send the file, Chrome will upload it to Google Safe Browsing, which will scan it using its static and dynamic analysis classifiers in real time,” Google said. “After a short wait, if Safe Browsing determines the file is unsafe, Chrome will display a warning.”
Despite the file being labeled as potentially dangerous, users still have the option to open the file without scanning. Should users opt to scan the file, the company said the uploaded files are deleted from Safe Browsing a short time after scanning.
While it didn’t specify the exact timeframe for when this removal would happen, in accordance with Google Chrome Privacy Whitepaper, the company “logs the transferred data in its raw form and retains this data for up to 30 days” for all Safe Browsing requests, after which only anonymized statistics are retained.
The new features are available starting with Chrome 91, the version of the browser that was released on May 26. Users can turn on Enhanced Safe Browsing by visiting Settings > Privacy and security > Security > Enhanced protection.
Hardware security keys—such as those from Google and Yubico—are considered the most secure means to protect accounts from phishing and takeover attacks.
But a new research published on Thursday demonstrates how an adversary in possession of such a two-factor authentication (2FA) device can clone it by exploiting an electromagnetic side-channel in the chip embedded in it.
The vulnerability (tracked as CVE-2021-3011) allows the bad actor to extract the encryption key or the ECDSA private key linked to a victim’s account from a FIDO Universal 2nd Factor (U2F) device like Google Titan Key or YubiKey, thus completely undermining the 2FA protections.
“The adversary can sign in to the victim’s application account without the U2F device, and without the victim noticing,” NinjaLab researchers Victor Lomne and Thomas Roche said in a 60-page analysis.
“In other words, the adversary created a clone of the U2F device for the victim’s application account. This clone will give access to the application account as long as the legitimate user does not revoke its second factor authentication credentials.”
The whole list of products impacted by the flaw includes all versions of Google Titan Security Key (all versions), Yubico Yubikey Neo, Feitian FIDO NFC USB-A / K9, Feitian MultiPass FIDO / K13, Feitian ePass FIDO USB-C / K21, and Feitian FIDO NFC USB-C / K40.
Besides the security keys, the attack can also be carried out on NXP JavaCard chips, including NXP J3D081_M59_DF, NXP J3A081, NXP J2E081_M64, NXP J3D145_M59, NXP J3D081_M59, NXP J3E145_M64, and NXP J3E081_M64_DF, and their respective variants.
The key-recovery attack, while doubtless severe, needs to meet a number of prerequisites in order to be successful.
An actor will have first to steal the target’s login and password of an account secured by the physical key, then stealthily gain access to Titan Security Key in question, not to mention acquire expensive equipment costing north of $12,000, and have enough expertise to build custom software to extract the key linked to the account.
“It is still safer to use your Google Titan Security Key or other impacted products as a FIDO U2F two-factor authentication token to sign in to applications rather than not using one,” the researchers said.
To clone the U2F key, the researchers set about the task by tearing the device down using a hot air gun to remove the plastic casing and expose the two microcontrollers soldered in it — a secure enclave (NXP A700X chip) that’s used to perform the cryptographic operations and a general-purpose chip that acts as a router between the USB/NFC interfaces and the authentication microcontroller.
Once this is achieved, the researchers say it’s possible to glean the ECDSA encryption key via a side-channel attack by observing the electromagnetic radiations coming off the NXP chip during ECDSA signatures, the core cryptographic operation of the FIDO U2F protocol that’s performed when a U2F key is registered for the first time to work with a new account.
A side-channel attack typically works based on information gained from the implementation of a computer system, rather than exploiting a weakness in the software. Often, such attacks leverage timing information, power consumption, electromagnetic leaks, and acoustic signals as a source of data leakage.
By acquiring 6,000 such side-channel traces of the U2F authentication request commands over a six-hour period, the researchers said they were able to recover the ECDSA private key linked to a FIDO U2F account created for the experiment using an unsupervised machine learning model.
Although the security of a hardware security key isn’t diminished by the above attack due to the limitations involved, a potential exploitation in the wild is not inconceivable.
“Nevertheless, this work shows that the Google Titan Security Key (or other impacted products) would not avoid [an] unnoticed security breach by attackers willing to put enough effort into it,” the researchers concluded. “Users that face such a threat should probably switch to other FIDO U2F hardware security keys, where no vulnerability has yet been discovered.”
For more than a decade, we’ve been building products to help people transform the way they work.
Now, work itself is transforming in unprecedented ways. For many of us, work is no longer a physical place we go to, and interactions that used to take place in person are being rapidly digitized. Office workers no longer have impromptu discussions at the coffee machine or while walking to meetings together, and instead have turned their homes into workspaces. Frontline workers, from builders on a construction site to delivery specialists keeping critical supply chains moving, are turning to their phones to help get their jobs done. While doctors treating patients and local government agencies engaging with their communities are accelerating how they can use technology to deliver their services.
Amidst this transformation, time is more fragmented—split between work and personal responsibilities—and human connections are more difficult than ever to establish and maintain.
These are unique challenges, but they also represent a significant opportunity to help people succeed in this highly distributed and increasingly digitized world. With the right solution in place, people are able to collaborate more easily, spend time on what matters most, and foster human connections, no matter where they are.
That solution is Google Workspace: everything you need to get anything done, now in one place. Google Workspace includes all of the productivity apps you know and love—Gmail, Calendar, Drive, Docs, Sheets, Slides, Meet, and many more. Whether you’re returning to the office, working from home, on the frontlines with your mobile device, or connecting with customers, Google Workspace is the best way to create, communicate, and collaborate.https://www.youtube.com/embed/bE31y5HbukA
With Google Workspace, we’re introducing three major developments:
a new, deeply integrated user experience that helps teams collaborate more effectively, frontline workers stay connected, and businesses power new digital customer experiences
a new brand identity that reflects our ambitious product vision and the way our products work together
new ways to get started with solutions tailored to the unique needs of our broad range of customers
New user experience
At Next OnAir in July, we announced a better home for work. One that thoughtfully brings together core tools for communication and collaboration—like chat, email, voice and video calling, and content management and collaboration—into a single, unified experience to ensure that employees have access to everything they need in one place. This integrated experience is now generally available to all paying customers of Google Workspace.
In the coming months we’ll also be bringing this new experience to consumers to help them do things like set up a neighborhood group, manage a family budget, or plan a celebration using integrated tools like Gmail, Chat, Meet, Docs, and Tasks.
We’ve already made it easier for business users to connect with customers and partners using guest access features in Chat and Drive, and in the coming weeks, you’ll be able to dynamically create and collaborate on a document with guests in a Chat room. This makes it easy to share content and directly work together with those outside your organization, and ensure that everyone has access and visibility to the same information.
When every minute you spend at work is a minute you could be helping your daughter with her homework, efficiency is everything. We’ve been working hard to add helpful features that make it easier to get your most important work done. For example, in Docs, Sheets, and Slides, you can now preview a linked file without having to open a new tab—which means less time spent moving between apps, and more time getting work done. And beginning today, when you @mention someone in your document, a smart chip will show contact details, including for those outside your organization, provide context and even suggest actions like adding that person to Contacts or reaching out via email, chat or video.
By connecting you to relevant content and people right in Docs, Sheets and Slides, Google Workspace helps you get more done from where you already are.
We also recognize that reinforcing human connections is even more important when people are working remotely and interacting with their customers digitally. It’s what keeps teams together and helps build trust and loyalty with your customers.
Back in July, we shared that we’re bringing Meet picture-in-picture to Gmail and Chat, so you can actually see and hear the people you’re working with, while you’re collaborating. In the coming months, we’ll be rolling out Meet picture-in-picture to Docs, Sheets, and Slides, too. This is especially powerful for customer interactions where you’re pitching a proposal or walking through a document. Where before, you could only see the file you were presenting, now you’ll get all those valuable nonverbal cues that come with actually seeing someone’s face.
And because we know many companies are implementing a mix of remote and in-person work environments, Meet supports a variety of devices with the best of Google AI built-in. From helpful and inclusive Series One hardware kits that provide immersive sound and effortlessly scalability, to native integrations with Chromecast and Nest Smart Displays that make your work experience more enjoyable—whether that’s at home or in the office.
New brand identity
10 years ago, when many of our products were first developed, they were created as individual apps that solved distinct challenges—like a better email with Gmail, or a new way for individuals to collaborate together with Docs. Over time, our products have become more integrated, so much so that the lines between our apps have started to disappear.
Our new Google Workspace brand reflects this more connected, helpful, and flexible experience, and our icons will reflect the same. In the coming weeks, you will see new four-color icons for Gmail, Drive, Calendar, Meet, and our collaborative content creation tools like Docs, Sheets, Slides that are part of the same family. They represent our commitment to building integrated communication and collaboration experiences for everyone, all with helpfulness from Google.https://www.youtube.com/embed/uZXa0N0-Zu0
We are also bringing Google Workspace to our education and nonprofit customers in the coming months. Education customers can continue to access our tools via G Suite for Education, which includes Classroom, Assignments, Gmail, Calendar, Drive, Docs, Sheets, Slides, and Meet. G Suite for Nonprofits will continue to be available to eligible organizations through the Google for Nonprofits program.
New ways to get started
Simplicity, helpfulness, flexibility—these guiding principles apply both to the way people experience our products and to the way we do business. All of our customers share a need for transformative solutions—whether to power remote work, support frontline workers, create immersive digital experiences for their own customers, or all of the above—but their storage, management, and security and compliance needs often vary greatly.
In order to provide more choice and help customers get the most out of Google Workspace, we are evolving our editions to provide more tailored offerings. Our new editions for smaller businesses are aimed at those often looking to make fast, self-serviced purchases. Our editions for larger enterprises are designed to help organizations that have more complex implementation needs and often require technical assistance over the course of a longer buying and deployment cycle.
You can learn more about these new offerings on our pricing page. And existing customers can read more here.
Empowering our customers and partners
You, our customers and our users, are our inspiration as we work together to navigate the change ahead. This is an incredibly challenging time, but we believe it’s also the beginning of a new approach to working together. One that is more productive, collaborative, and impactful.
Google Workspace embodies our vision for a future where work is more flexible, time is more precious, and enabling stronger human connections becomes even more important. It’s a vision we’ve been building toward for more than a decade, and one we’re excited to bring to life together with you.
Trust is very important when it comes to the relationship between a user and their smartphone. While phone functionality and design can enhance the user experience, security is fundamental and foundational to our relationship with our phones.There are multiple ways to build trust around the security capabilities that a device provides and we continue to invest in verifiable ways to do just that.
The Internet of Secure Things Alliance (ioXt) manages a security compliance assessment program for connected devices. ioXt has over 200 members across various industries, including Google, Amazon, Facebook, T-Mobile, Comcast, Zigbee Alliance, Z-Wave Alliance, Legrand, Resideo, Schneider Electric, and many others. With so many companies involved, ioXt covers a wide range of device types, including smart lighting, smart speakers, webcams, and Android smartphones.
The core focus of ioXt is “to set security standards that bring security, upgradability and transparency to the market and directly into the hands of consumers.” This is accomplished by assessing devices against a baseline set of requirements and relying on publicly available evidence. The goal of ioXt’s approach is to enable users, enterprises, regulators, and other stakeholders to understand the security in connected products to drive better awareness towards how these products are protecting the security and privacy of users.
ioXt’s baseline security requirements are tailored for product classes, and the ioXt Android Profile enables smartphone manufacturers to differentiate security capabilities, including biometric authentication strength, security update frequency, length of security support lifetime commitment, vulnerability disclosure program quality, and preloaded app risk minimization.
We believe that using a widely known industry consortium standard for Pixel certification provides increased trust in the security claims we make to our users. NCC Group has published an audit report that can be downloaded here. The report documents the evaluation of Pixel 4/4 XL and Pixel 4a against the ioXt Android Profile.
Security by Default is one of the most important criteria used in the ioXt Android profile. Security by Default rates devices by cumulatively scoring the risk for all preloads on a particular device. For this particular measurement, we worked with a team of university experts from the University of Cambridge, University of Strathclyde, and Johannes Kepler University in Linz to create a formula that considers the risk of platform signed apps, pregranted permissions on preloaded apps, and apps communicating using cleartext traffic.
In partnership with those teams, Google created Uraniborg, an open source tool that collects necessary attributes from the device and runs it through this formula to come up with a raw score. NCC Group leveraged Uraniborg to conduct the assessment for the ioXt Security by Default category.
As part of our ongoing certification efforts, we look forward to submitting future Pixel smartphones through the ioXt standard, and we encourage the Android device ecosystem to participate in similar transparency efforts for their devices.
Acknowledgements: This post leveraged contributions from Sudhi Herle, Billy Lau and Sam Schumacher
More than 80 million Chrome users have installed one of 295 Chrome extensions that hijack and insert ads inside Google and Bing search results.
The malicious extensions were discovered by AdGuard, a company that provides ad-blocking solutions, while the company’s staff was looking into a series of fake ad-blocking extensions that were available on the official Chrome Web Store.
A subsequent investigation into the fake ad blockers unearthed a larger group of malicious activity spreading across 295 extensions.
Besides fake ad blockers, AdGuard said it also found extensions posing as weather forecast widgets and screenshot capture utilities.
However, the vast majority of the malicious extensions (245 out of the 295 extensions) were simplistic utilities that had no other function than to apply a custom background for Chrome’s “new tab” page.
In a technical analysis shared with ZDNet, AdGuard said all extensions loaded malicious code from the fly-analytics.com domain, and then proceeded to quietly inject ads inside Google and Bing search results.
Almost all the 295 extensions were still available on the official Chrome Web Store earlier today, when we received the list from AdGuard.https://platform.twitter.com/embed/index.html?creatorScreenName=ZDNet&dnt=false&embedId=twitter-widget-0&frame=false&hideCard=false&hideThread=false&id=1290674805365264386&lang=en&origin=https%3A%2F%2Fwww.zdnet.com%2Farticle%2Fcluster-of-295-chrome-extensions-caught-hijacking-google-and-bing-search-results%2F&siteScreenName=ZDNet&theme=light&widgetsVersion=223fc1c4%3A1596143124634&width=550px
Extensions started being pulled down from the store after we reached out to Google’s Web Store team and after AdGuard published a blog post detailing their findings.
The same blog post also details additional bad practices on the Chrome Web Store, such as store moderators allowing a large number of copycat extensions to clone popular add-ons, capitalize on their brands, reach millions of users, while also containing malicious code that performs ad fraud or cookie stuffing.
The full list of 295 ad-injecting extensions is available below, at the end of this article.
When Google removes an extension from the Chrome Web Store for malicious activity, the extension is also disabled in users’ browsers and marked as “malware” in Chrome’s Extension section.
Users still have to manually uninstall it from their browsers.
VirusTotal, the famous multi-antivirus scanning service owned by Google, recently announced new threat detection capabilities it added with the help of an Israeli cybersecurity firm.
VirusTotal provides a free online service that analyzes suspicious files and URLs to detect malware and automatically shares them with the security community. With the onslaught of new malware types and samples, researchers rely on the rapid discovery and sharing provided by VirusTotal to keep their companies safe from attacks.
VirusTotal relies on a continuous stream of new malware discoveries to protect its members from significant damage.
Cynet, the creator of the autonomous breach protection platform, has now integrated its Cynet Detection Engine into VirusTotal.
The benefits of this partnership are twofold. First, Cynet provides the VirusTotal partner network cutting-edge threat intelligence from its ML-based detection engine (CyAI) that actively protects the company's clients around the globe.
CyAI is a continuously learning and evolving detection model that routinely contributes information about new threats that are not available in VirusTotal. Although many vendors are using AI/ML models, the ability of the models to detect new threats vary greatly.
Cynet routinely outperforms third party and open source detection platforms and is frequently relied upon in incident response cases when underlying threats remain hidden from other solutions.
For example, Cynet recently conducted an Incident Response engagement for a large telecom provider. Cynet discovered several malicious files that did not appear in the VirusTotal database.
Contributing information on these newly discovered files helps our entire industry perform better and protect businesses against cyber-attacks.
Second, Cynet will leverage intelligence in VirusTotal to inform its CyAI model in order to continuously improve its detection capabilities and accuracy.
Cynet AI is continually evolving, constantly learning new datasets in order to improve its accuracy and decrease its already-low false positive ratio. Comparing files found to be malicious by CyAI against files also found to be malicious by other providers helps to quickly validate Cynet's findings.
Android 10 is here! With this release, we focused on making your everyday life easier with features powered by on-device machine learning, as well as supporting new technologies like Foldables and 5G. At the same time, with almost 50 changes related to privacy and security, Android 10 gives you greater protection, transparency, and control over your data. This builds on top of our ongoing commitment to provide industry-leading security and privacy protections on Android. We also built new tools that empower people of all abilities, and help you find the right balance with technology.
Here are the 10 things you should know, centered on innovation, security and privacy and digital wellbeing:
Simpler, smarter, and more helpful
1. Smart Reply now suggests actions. So when someone sends you a message with an address or a YouTube video, you can open and navigate in Google Maps or open up the video in YouTube—no copying and pasting required. And Smart Reply now works across all your favorite messaging apps.
2. Come to the dark side… with Dark Theme. You can enable Dark Theme for your entire phone or for specific apps like Photos and Calendar. It’s easier on your eyes, and your phone battery too.
3. Take advantage of larger, edge-to-edge screens with the new gesture navigation. With simple swipes, you can go backwards, pull up the homescreen, and fluidly move between tasks. After switching, you won’t want to go back to visible buttons.
4. With a single tap, Live Caption will automatically caption videos, podcasts and audio messages across any app—even stuff you record yourself. Live Caption will become available this fall, starting with Pixel.
New privacy and security features put you in control
5. You can choose to only share location data with apps while you’re using them. You’ll also receive reminders when an app that you are not actively using is accessing your location, so you can decide whether or not to continue sharing.
6. In a new Privacy section under Settings, you’ll find important controls like Web & App Activity and Ad Settings in one place.
7. With Google Play system updates, important security and privacy fixes can now be sent to your phone from Google Play, in the same way your apps update. So you get these fixes as soon as they’re available, without having to wait for a full OS update.
Find the right balance with technology for you and your family
8. You have greater control over where and when notifications will alert you. Mark notifications as “Silent” and they won’t make noise or appear on your lockscreen, so you're only alerted by notifications when you want to be.
9. Now Family Link is part of every device running Android 10, right in settings under Digital Wellbeing. Parents can use these tools to set digital ground rules like daily screen time limits, device bedtime, time limits on specific apps, and more. They can also review the apps children install on their devices, as well as their usage.
10. Want to be in the zone but not off the grid? Digital Wellbeing now brings you Focus mode. Select the apps you find distracting—such as email or the news—and silence them until you come out of Focus mode. Sign up for the Beta to try it.
There’s lots more in Android 10, including a new enterprise feature that lets you use different keyboards for your personal and work profiles, app timers for specific websites so you can balance your time on the web, new gender-inclusive emoji, and support for direct audio streaming to hearing aid devices.
Android 10 begins rolling out to Pixel phones today, and we’re working with our partners to launch and upgrade devices to Android 10 this year. Learn more at android.com/10.
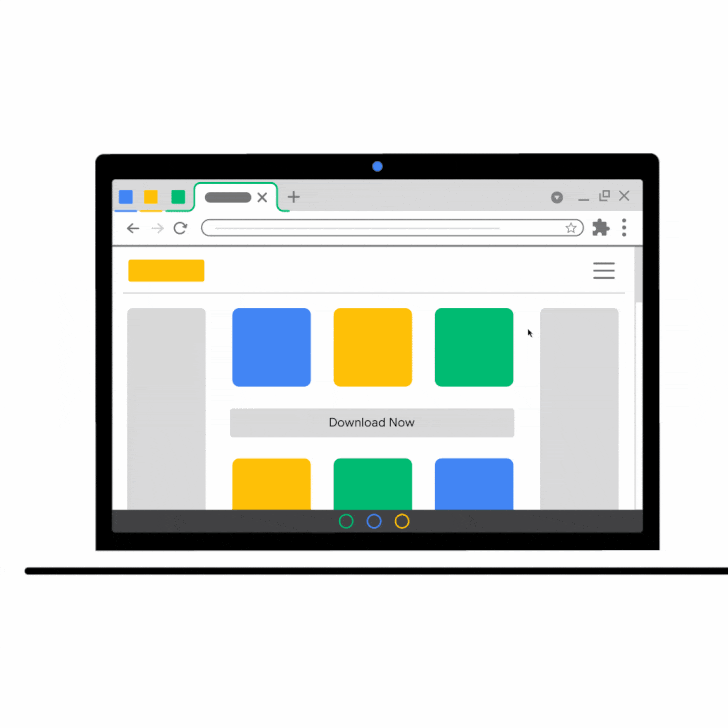
When you minify HTML it removes the unnecessary characters and lines in the source code. Indentation, comments, empty lines, etc. are not required in HTML. They just make the file easier to read. Cutting out all this unnecessary stuff can shave down your file size considerably. When you minify HTML code on your website, the server will send a much smaller page to the client making your website load quicker.
WordPress creates pages on demand by executing PHP code to put together the HTML version of your site and querying your database to get the content to insert into that HTML. There is no physical file that we can download and minify ourselves, so we will need to use a bit of PHP code inside the functions.php file of your theme. This code will compress the output HTML before being sent to your visitors. Below are two screenshots that show a webpage before and after HTML Minification.
Before HTML Minification
After HTML Minification
Step 1: Create a Child Theme
Before we edit the functions.php file, it’s always best to create a child theme. Using a child theme will allow you to revert back to the parent theme if there are problems. Also, any changes you make will not be deleted if your parent theme gets updated.
If you prefer not to create a child theme or you do not feel comfortable doing this on your own, there is a great lightweight plugin you can use called Code Snippets. Code Snippets is an easy, clean and simple way to add code snippets to your site. It removes the need to add custom snippets to your theme’s functions.php file.
Step 2: Edit your Child Theme functions.php File
There are 2 different ways we can edit the functions.php file in your child theme.
Inside WordPress Control Panel
While you are logged into WordPress you can access and edit the functions.php file of your theme by going to Appearance > Editor and selecting Theme Functions on the right hand side of the page.
Edit the File Directly in cPanel
Log into your cPanel File Manager. Go to the public_html/wp-content/themes/ and choose the folder of your current theme or child theme if you have created one. The functions.php file will be inside your theme folder.
Copy and paste the code below inside your functions.php file and save.
classFLHM_HTML_Compression{protected$flhm_compress_css=true;protected$flhm_compress_js=true;protected$flhm_info_comment=true;protected$flhm_remove_comments=true;protected$html;publicfunction__construct($html){if(!empty($html)){$this->flhm_parseHTML($html);}}publicfunction__toString(){return$this->html;}protectedfunctionflhm_bottomComment($raw,$compressed){$raw=strlen($raw);$compressed=strlen($compressed);$savings=($raw-$compressed)/$raw*100;$savings=round($savings,2);return'<!--HTML compressed, size saved '.$savings.'%. From '.$raw.' bytes, now '.$compressed.' bytes-->';}protectedfunctionflhm_minifyHTML($html){$pattern='/<(?<script>script).*?<\/script\s*>|<(?<style>style).*?<\/style\s*>|<!(?<comment>--).*?-->|<(?<tag>[\/\w.:-]*)(?:".*?"|\'.*?\'|[^\'">]+)*>|(?<text>((<[^!\/\w.:-])?[^<]*)+)|/si';preg_match_all($pattern,$html,$matches,PREG_SET_ORDER);$overriding=false;$raw_tag=false;$html='';foreach($matchesas$token){$tag=(isset($token['tag']))?strtolower($token['tag']):null;$content=$token[0];if(is_null($tag)){if(!empty($token['script'])){$strip=$this->flhm_compress_js;}elseif(!empty($token['style'])){$strip=$this->flhm_compress_css;}elseif($content=='<!--wp-html-compression no compression-->'){$overriding=!$overriding;continue;}elseif($this->flhm_remove_comments){if(!$overriding&&$raw_tag!='textarea'){$content=preg_replace('/<!--(?!\s*(?:\[if [^\]]+]|<!|>))(?:(?!-->).)*-->/s','',$content);}}}else{if($tag=='pre'||$tag=='textarea'){$raw_tag=$tag;}elseif($tag=='/pre'||$tag=='/textarea'){$raw_tag=false;}else{if($raw_tag||$overriding){$strip=false;}else{$strip=true;$content=preg_replace('/(\s+)(\w++(?<!\baction|\balt|\bcontent|\bsrc)="")/','$1',$content);$content=str_replace(' />','/>',$content);}}}if($strip){$content=$this->flhm_removeWhiteSpace($content);}$html.=$content;}return$html;}publicfunctionflhm_parseHTML($html){$this->html=$this->flhm_minifyHTML($html);if($this->flhm_info_comment){$this->html.="\n".$this->flhm_bottomComment($html,$this->html);}}protectedfunctionflhm_removeWhiteSpace($str){$str=str_replace("\t",' ',$str);$str=str_replace("\n",'',$str);$str=str_replace("\r",'',$str);while(stristr($str,' ')){$str=str_replace(' ',' ',$str);}return$str;}}functionflhm_wp_html_compression_finish($html){returnnewFLHM_HTML_Compression($html);}functionflhm_wp_html_compression_start(){ob_start('flhm_wp_html_compression_finish');}add_action('get_header','flhm_wp_html_compression_start');
PHP
Step 3: Make Sure Everything is Working
After you have added the code, you can check to see if the HTML is being minified on Google Chrome by right clicking the page and selecting “View page source.” If everything is working correctly, it should look like the example picture I gave at the top of this page.
I highly recommend you check all aspects of your website after you add this code. Check and make sure all plugins and theme functionality is working properly.
If you enjoyed this tutorial, please be sure to follow us on Facebook and Twitter. You can also find us on Freelancer if you need some help with your WordPress website or web development issues.