Over the years, Google has done much to alleviate the pain of editing Microsoft Office files on Chromebooks, but in my opinion, the progress has felt like walking through mud. The only time we see significant improvements to this experience is when Google feels like making them. I’ve had a support ticket submitted since 2019 that complains about some of these issues, and no one addressed it. (23 days ago it was finally moved)
We have an on-going investigation in an internal doc (can’t be published here). But one thing to share is to re-confirm this issue reproduces on stock Android 11 as long as the user is using the internal Files app (Settings > Storage > Files) and not the Files By Google app where files open as editable instead of read-only.Chromium Bug report from 2019, comment from last year
Now, a new update in ChromeOS Canary, which was spotted a little while ago by C2 Productions on Twitter, shows the company testing out a new pop-up dialogue for Office Editing on its laptop operating system.
In the Files app, double-clicking a .docx or another Office-type file in your local storage will now present you with an option to either open it in Google Docs or Microsoft Office itself. Of course, you’ll have to have the app installed in order to trigger this, as well as the “Enable Office files upload workflow” developer flag enabled.
to be fair, you’ve been able to select which program you’d like to open your files in for a few years now by selecting the “Open with” dropdown at the top of the Files app. This additional in-your-face pop-up is just more helpful and takes the burden off of the user to think about manually swapping the default program. Most device owners don’t do this, in my experience, and I can see why this change is being made.
What’s even more interesting, however, is what else this flag enables. Another image, which was also provided by C2 Productions, shows off a new “Move and Upload option for Office documents. You see, in order to edit files in the installed Office program, it has to be in One Drive. In the past, my frustration with writing traditional files on a Chromebook came from exactly this. No matter what I did to modify them from the local storage or Google Drive, they would open in ‘Read only’ mode.
Okay, so the simple solution all of these years was to get a few lines of code to automate the copy-and-paste process of moving your docs into Microsoft’s cloud? Well, why didn’t they think of this sooner? Choosing “Microsoft Office” from the aforementioned pop-up then presents you with the option to do exactly that – move your information over to Google’s biggest competitor and allow you to use their tools.
It’s effectively an arrow pointing out of Google’s house saying “We tried, we can’t fix it – just go use the other guys”. It wouldn’t be right for me to skip mentioning the fact that Google Docs’ “Native Office Editing” updates have been really well implemented, but most people still prefer the name brand that Microsoft has brought to the table for the past few decades, and I can’t blame them.
I only care that this issue is permanently resolved and becomes a thing of the past. Anyone who chooses to use a Chromebook over a Windows machine should still be able to edit their files without the two companies fueding and pointing fingers at each other. I spent countless hours going back and forth between Google and Microsoft and both of them blamed the other for the ‘Read Only’ problem. This isn’t a perfect solution, but it’s better than we’ve had up until this point, so I’ll take it.
Reverse-engineering reveals close similarities to BlackMatter ransomware, with some improvements
A postmortem analysis of multiple incidents in which attackers eventually launched the latest version of LockBit ransomware (known variously as LockBit 3.0 or ‘LockBit Black’), revealed the tooling used by at least one affiliate. Sophos’ Managed Detection and Response (MDR) team has observed both ransomware affiliates and legitimate penetration testers use the same collection of tooling over the past 3 months.
Leaked data about LockBit that showed the backend controls for the ransomware also seems to indicate that the creators have begun experimenting with the use of scripting that would allow the malware to “self-spread” using Windows Group Policy Objects (GPO) or the tool PSExec, potentially making it easier for the malware to laterally move and infect computers without the need for affiliates to know how to take advantage of these features for themselves, potentially speeding up the time it takes them to deploy the ransomware and encrypt targets.
A reverse-engineering analysis of the LockBit functionality shows that the ransomware has carried over most of its functionality from LockBit 2.0 and adopted new behaviors that make it more difficult to analyze by researchers. For instance, in some cases it now requires the affiliate to use a 32-character ‘password’ in the command line of the ransomware binary when launched, or else it won’t run, though not all the samples we looked at required the password.
We also observed that the ransomware runs with LocalServiceNetworkRestricted permissions, so it does not need full Administrator-level access to do its damage (supporting observations of the malware made by other researchers).
Most notably, we’ve observed (along with other researchers) that many LockBit 3.0 features and subroutines appear to have been lifted directly from BlackMatter ransomware.
Is LockBit 3.0 just ‘improved’ BlackMatter?
Other researchers previously noted that LockBit 3.0 appears to have adopted (or heavily borrowed) several concepts and techniques from the BlackMatter ransomware family.
We dug into this ourselves, and found a number of similarities which strongly suggest that LockBit 3.0 reuses code from BlackMatter.
Anti-debugging trick
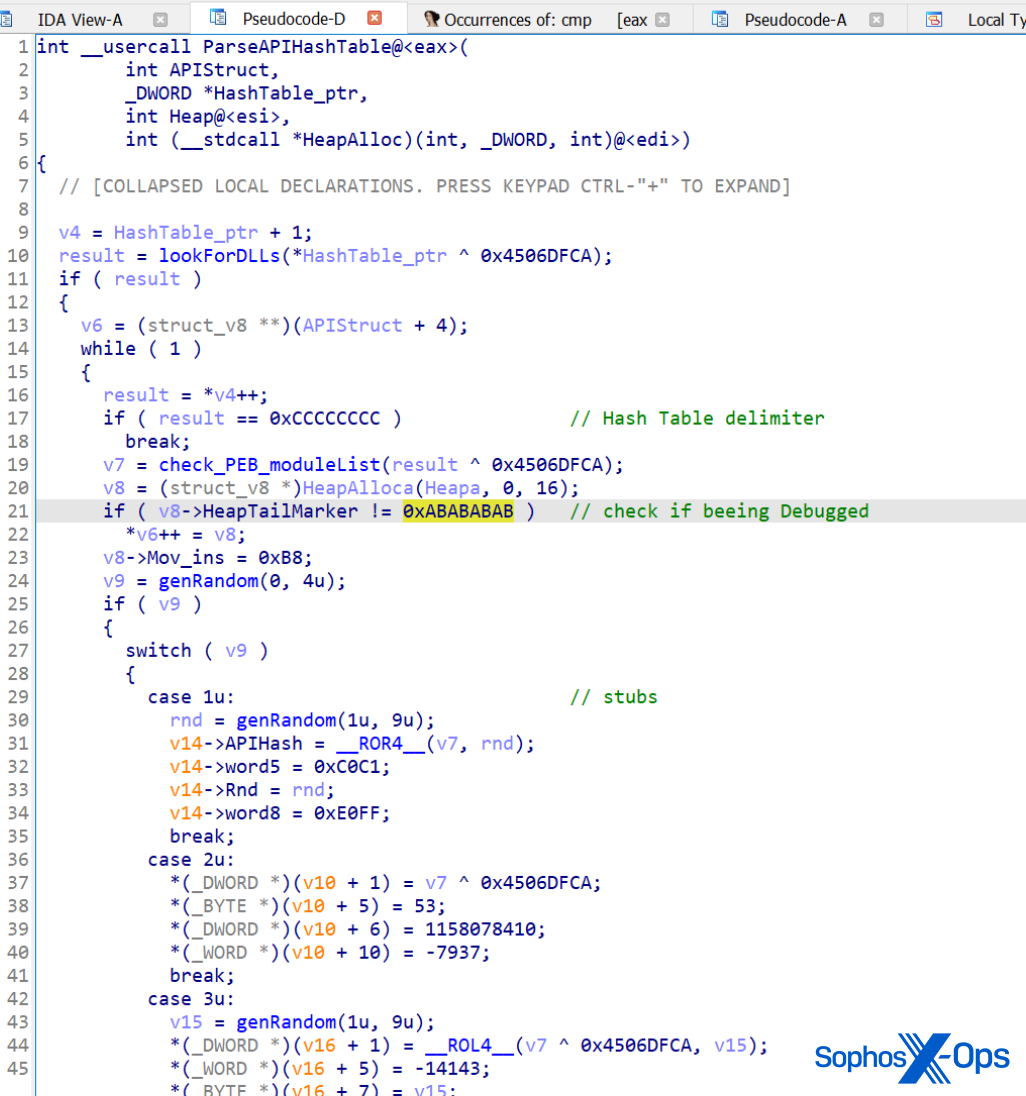
Blackmatter and Lockbit 3.0 use a specific trick to conceal their internal functions calls from researchers. In both cases, the ransomware loads/resolves a Windows DLL from its hash tables, which are based on ROT13.
It will try to get pointers from the functions it needs by searching the PEB (Process Environment Block) of the module. It will then look for a specific binary data marker in the code (0xABABABAB) at the end of the heap; if it finds this marker, it means someone is debugging the code, and it doesn’t save the pointer, so the ransomware quits.
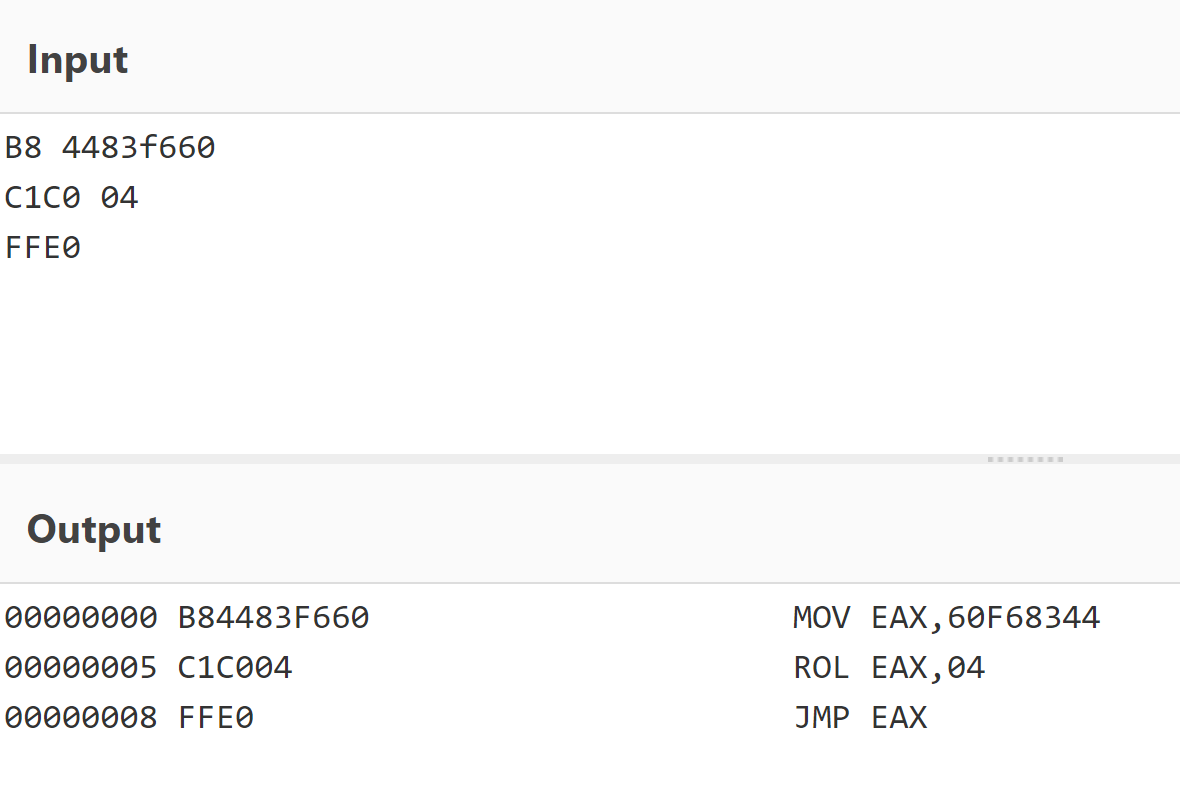
After these checks, it will create a special stub for each API it requires. There are five different types of stubs that can be created (randomly). Each stub is a small piece of shellcode that performs API hash resolution on the fly and jumps to the API address in memory. This adds some difficulties while reversing using a debugger.
The first stub, as an example (decoded with CyberChef)
Obfuscation of strings
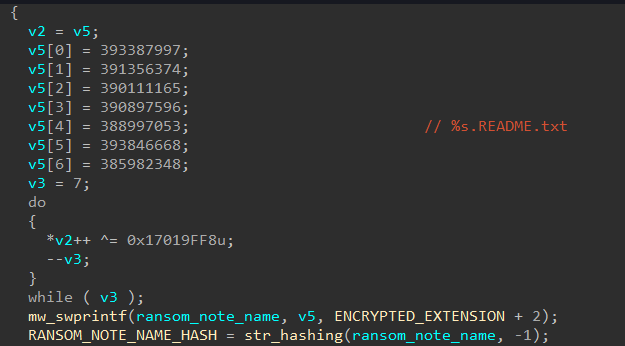
Many strings in both LockBit 3.0 and BlackMatter are obfuscated, resolved during runtime by pushing the obfuscated strings on to the stack and decrypting with an XOR function. In both LockBit and BlackMatter, the code to achieve this is very similar.
Georgia Tech student Chuong Dong analyzed BlackMatter and showed this feature on his blog, with the screenshot above.
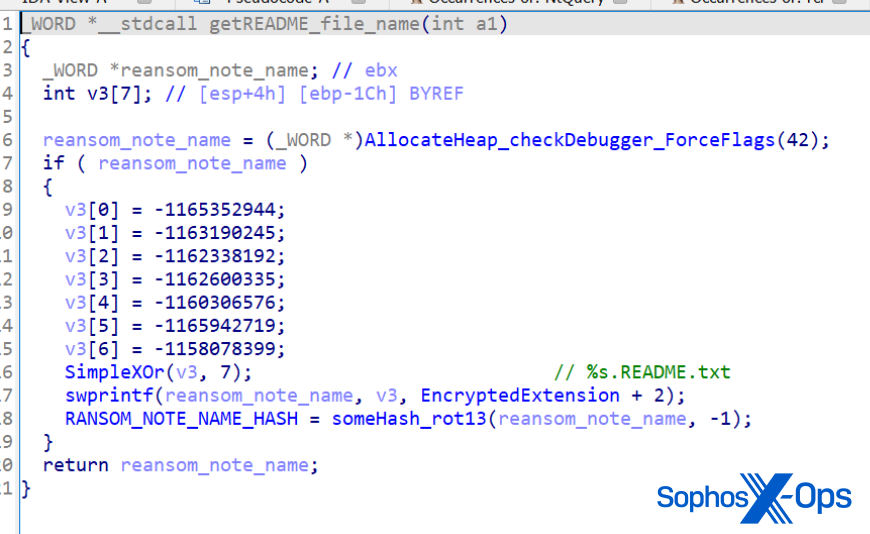
LockBit’s string obfuscation, in comparison
By comparison, LockBit 3.0 has adopted a string obfuscation method that looks and works in a very similar fashion to BlackMatter’s function.
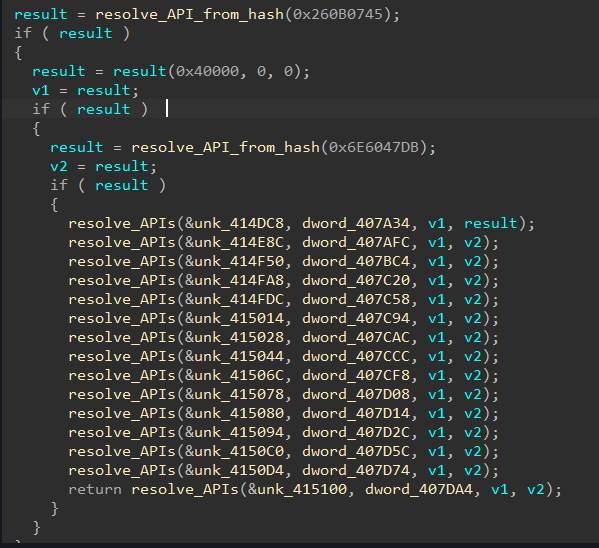
API resolution
LockBit uses exactly the same implementation as BlackMatter to resolve API calls, with one exception: LockBit adds an extra step in an attempt to conceal the function from debuggers.
BlackMatter’s dynamic API resolution (image credit: Chuong Dong)
The array of calls performs precisely the same function in LockBit 3.0.
LockBit’s dynamic API resolution
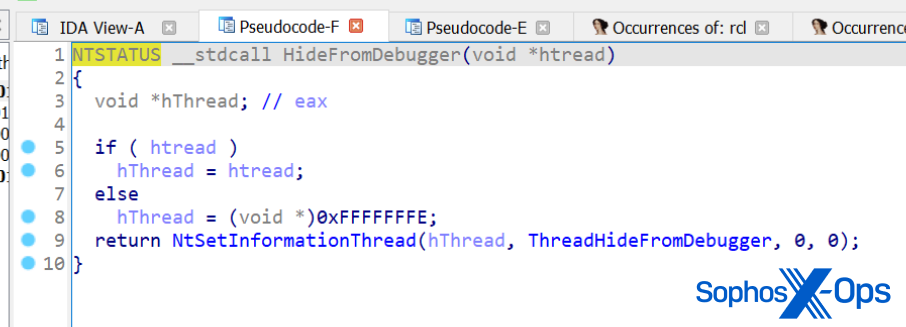
Hiding threads
Both LockBit and BlackMatter hide threads using the NtSetInformationThread function, with the parameter ThreadHideFromDebugger. As you probably can guess, this means that the debugger doesn’t receive events related to this thread.
LockBit employs the same ThreadHideFromDebugger feature as an evasion technique
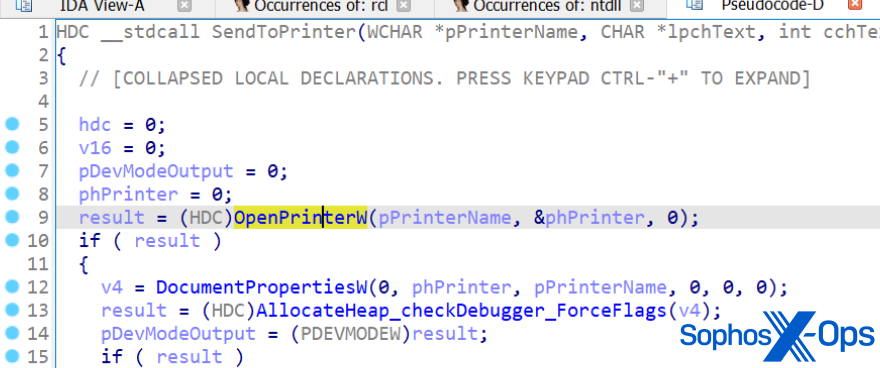
Printing
LockBit, like BlackMatter, sends ransom notes to available printers.
LockBit can send its ransom notes directly to printers, as BlackMatter can do
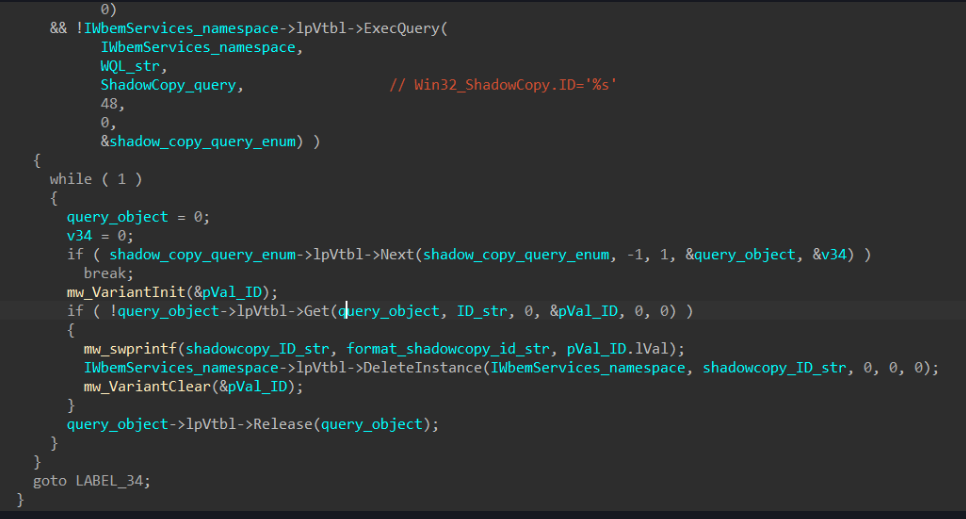
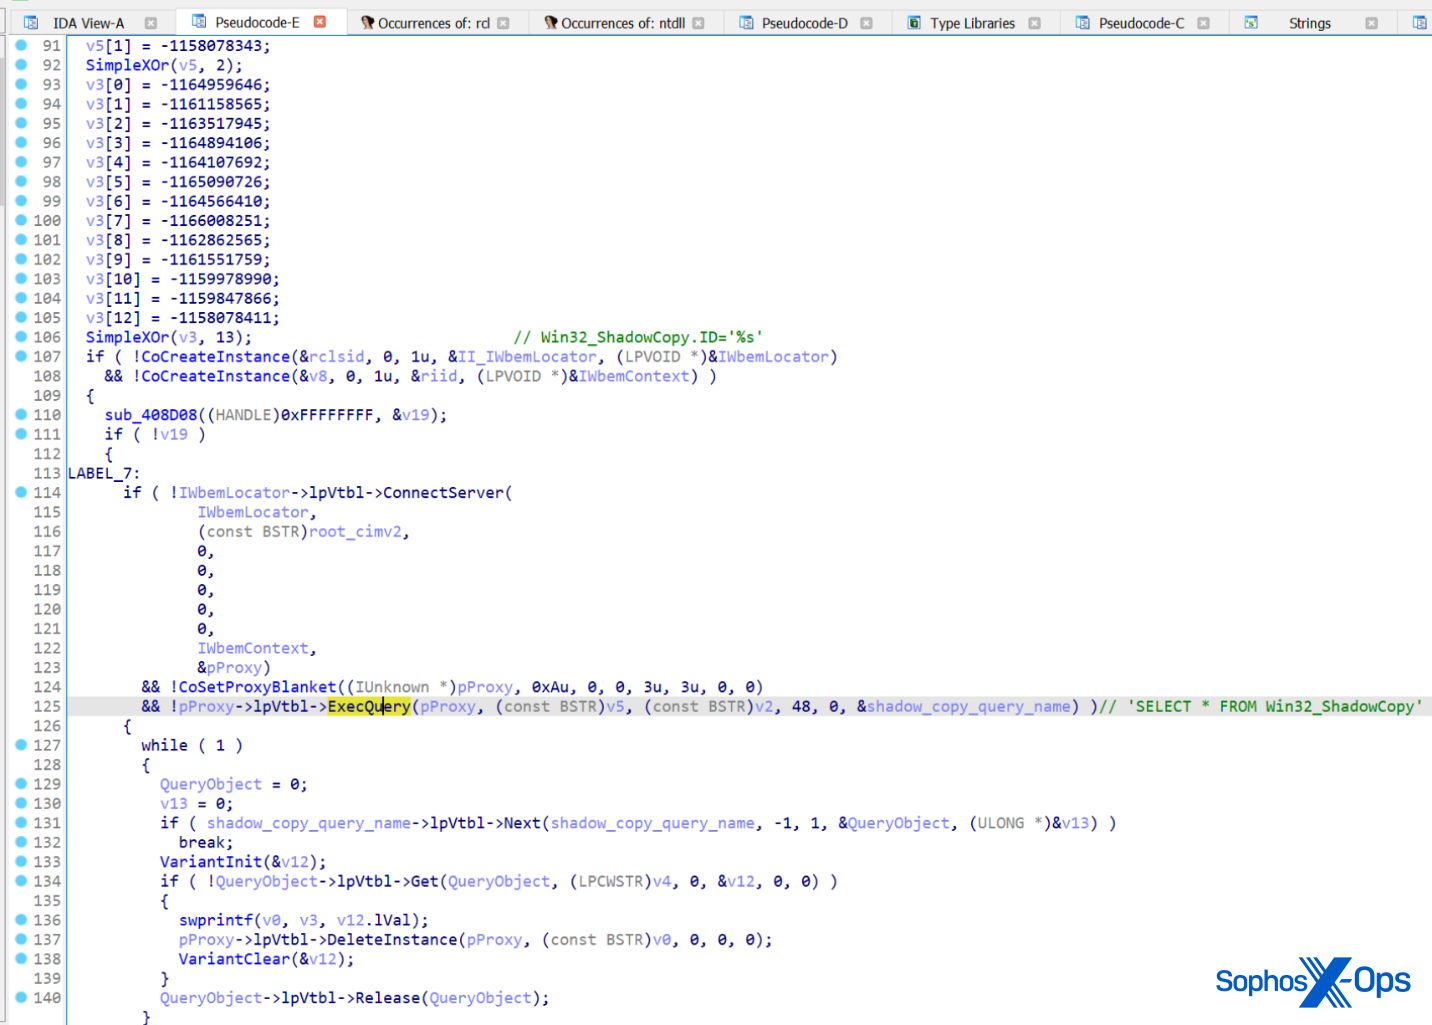
Deletion of shadow copies
Both ransomware will sabotage the infected computer’s ability to recover from file encryption by deleting the Volume Shadow Copy files.
LockBit calls the IWbemLocator::ConnectServer method to connect with the local ROOT\CIMV2 namespace and obtain the pointer to an IWbemServices object that eventually calls IWbemServices::ExecQuery to execute the WQL query.
BlackMatter code for deleting shadow copies (image credit: Chuong Dong)
LockBit’s method of doing this is identical to BlackMatter’s implementation, except that it adds a bit of string obfuscation to the subroutine.
LockBit’s deletion of shadow copies
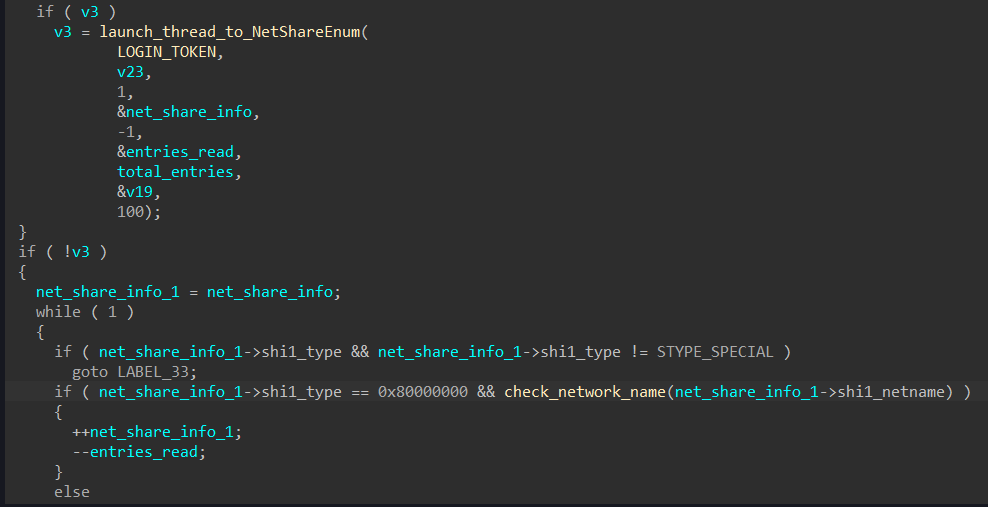
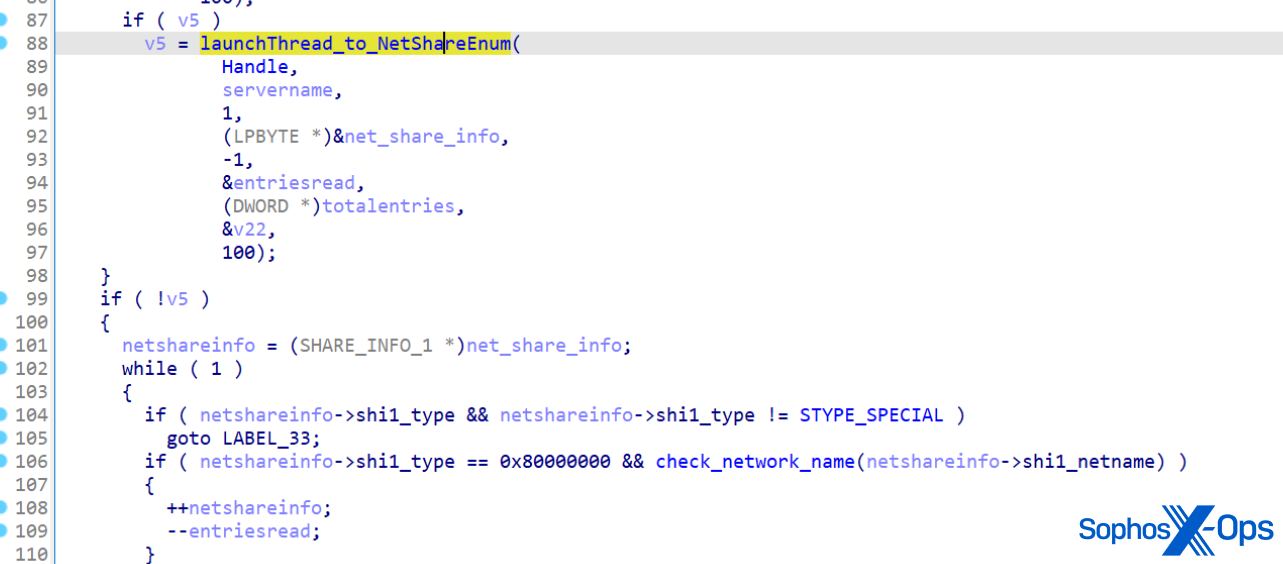
Enumerating DNS hostnames
Both LockBit and BlackMatter enumerate hostnames on the network by calling NetShareEnum.
BlackMatter calls NetShareEnum() to enumerate hostnames… (image credit: Chuong Dong)
In the source code for LockBit, the function looks like it has been copied, verbatim, from BlackMatter.
…as does LockBit
Determining the operating system version
Both ransomware strains use identical code to check the OS version – even using the same return codes (although this is a natural choice, since the return codes are hexadecimal representations of the version number).
BlackMatter’s code for checking the OS version (image credit: Chuong Dong)LockBit’s OS enumeration routine
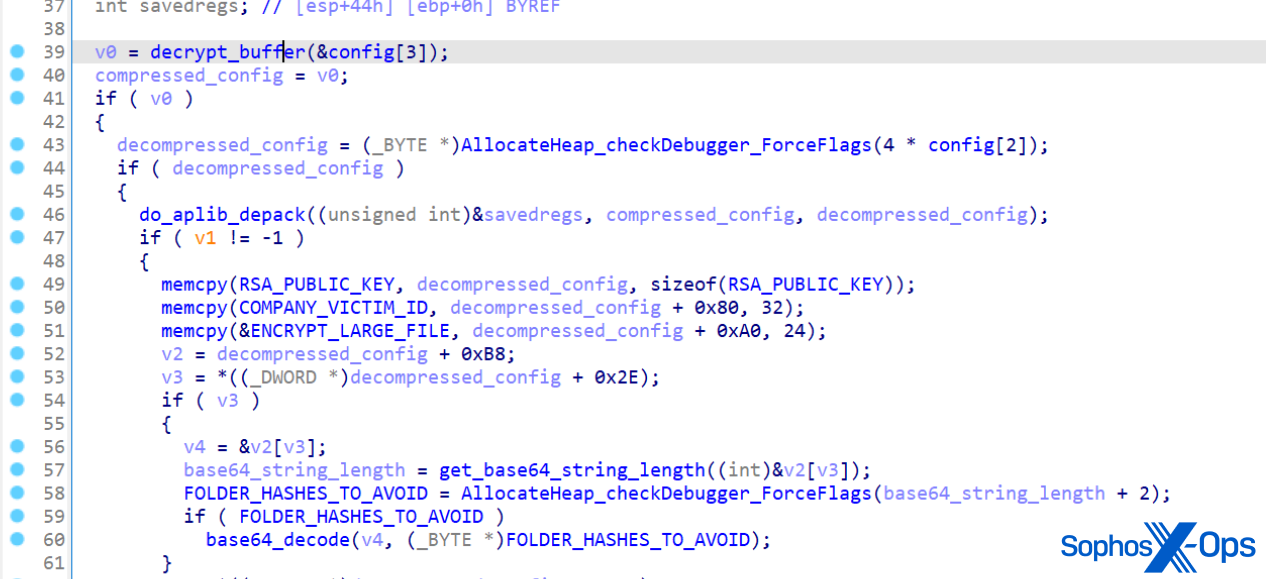
Configuration
Both ransomware contain embedded configuration data inside their binary executables. We noted that LockBit decodes its config in a similar way to BlackMatter, albeit with some small differences.
For instance, BlackMatter saves its configuration in the .rsrc section, whereas LockBit stores it in .pdata.
And LockBit uses a different linear congruential generator (LCG) algorithm for decoding.
LockBit’s config decryption routine
Some researchers have speculated that the close relationship between the LockBit and BlackMatter code indicates that one or more of BlackMatter’s coders were recruited by LockBit; that LockBit bought the BlackMatter codebase; or a collaboration between developers. As we noted in our white paper on multiple attackers earlier this year, it’s not uncommon for ransomware groups to interact, either inadvertently or deliberately.
Either way, these findings are further evidence that the ransomware ecosystem is complex, and fluid. Groups reuse, borrow, or steal each other’s ideas, code, and tactics as it suits them. And, as the LockBit 3.0 leak site (containing, among other things, a bug bounty and a reward for “brilliant ideas”) suggests, that gang in particular is not averse to paying for innovation.
LockBit tooling mimics what legitimate pentesters would use
Another aspect of the way LockBit 3.0’s affiliates are deploying the ransomware shows that they’re becoming very difficult to distinguish from the work of a legitimate penetration tester – aside from the fact that legitimate penetration testers, of course, have been contracted by the targeted company beforehand, and are legally allowed to perform the pentest.
The tooling we observed the attackers using included a package from GitHub called Backstab. The primary function of Backstab is, as the name implies, to sabotage the tooling that analysts in security operations centers use to monitor for suspicious activity in real time. The utility uses Microsoft’s own Process Explorer driver (signed by Microsoft) to terminate protected anti-malware processes and disable EDR utilities. Both Sophos and other researchers have observed LockBit attackers using Cobalt Strike, which has become a nearly ubiquitous attack tool among ransomware threat actors, and directly manipulating Windows Defender to evade detection.
Further complicating the parentage of LockBit 3.0 is the fact that we also encountered attackers using a password-locked variant of the ransomware, called lbb_pass.exe , which has also been used by attackers that deploy REvil ransomware. This may suggest that there are threat actors affiliated with both groups, or that threat actors not affiliated with LockBit have taken advantage of the leaked LockBit 3.0 builder. At least one group, BlooDy, has reportedly used the builder, and if history is anything to go by, more may follow suit.
LockBit 3.0 attackers also used a number of publicly-available tools and utilities that are now commonplace among ransomware threat actors, including the anti-hooking utility GMER, a tool called AV Remover published by antimalware company ESET, and a number of PowerShell scripts designed to remove Sophos products from computers where Tamper Protection has either never been enabled, or has been disabled by the attackers after they obtained the credentials to the organization’s management console.
We also saw evidence the attackers used a tool called Netscan to probe the target’s network, and of course, the ubiquitous password-sniffer Mimikatz.
Incident response makes no distinction
Because these utilities are in widespread use, MDR and Rapid Response treats them all equally – as though an attack is underway – and immediately alerts the targets when they’re detected.
We found the attackers took advantage of less-than-ideal security measures in place on the targeted networks. As we mentioned in our Active Adversaries Report on multiple ransomware attackers, the lack of multifactor authentication (MFA) on critical internal logins (such as management consoles) permits an intruder to use tooling that can sniff or keystroke-capture administrators’ passwords and then gain access to that management console.
It’s safe to assume that experienced threat actors are at least as familiar with Sophos Central and other console tools as the legitimate users of those consoles, and they know exactly where to go to weaken or disable the endpoint protection software. In fact, in at least one incident involving a LockBit threat actor, we observed them downloading files which, from their names, appeared to be intended to remove Sophos protection: sophoscentralremoval-master.zip and sophos-removal-tool-master.zip. So protecting those admin logins is among the most critically important steps admins can take to defend their networks.
For a list of IOCs associated with LockBit 3.0, please see our GitHub.
Acknowledgments
Sophos X-Ops acknowledges the collaboration of Colin Cowie, Gabor Szappanos, Alex Vermaning, and Steeve Gaudreault in producing this report.
Discover the six endpoint security measures that can help mitigate the risk of a ransomware attack.
With 66% of organizations hit by attacks last year, ransomware remains one of greatest cyber threats to organizations across the globe.
The barrier to entry for would-be ransomware actors is now lower than ever, largely due to the seismic shift to the ‘as-a-service’ model that has put advanced threat tactics into the hands of nearly any criminal that wants them. Furthermore, as cyber defenses continue to get stronger, ransomware operators have evolved their approaches in an attempt to bypass today’s advanced protection technologies, abusing legitimate IT tools and even learning new programming languages to evade detection.
Endpoint protection remains one of the most effective ways to defend your devices from ransomware, but it must configured properly to deliver optimum protection. In our recently updated report Endpoint Best Practices to Block Ransomware, and in this article, we share practical endpoint security tips to help elevate your ransomware defenses.
1.Turn on all policies and ensure all features are enabled
Policies are designed to stop specific threats. Regularly checking that all protection options are enabled ensures your endpoints are protected against current and emerging ransomware.
Sophos customers managing their endpoint protection through Sophos Central benefit from the “Account Health Check” tool, which automatically assesses your account configuration to identify potential security gaps and guides you in how to optimize protection. You can learn more about this feature here.
2.Regularly review your exclusions
Exclusions prevent trustworthy directories and file types from being scanned for malware. They are sometimes used to reduce system delays and minimize the risk of false-positive security alerts. Over time, a growing list of excluded directories and file types can impact many people across a network. Malware that manages to make its way into excluded directories — perhaps accidentally moved by a user — will likely succeed. Regularly check your list of exclusions within your threat protection settings and limit the number of exclusions.
3.Enable multi-factor authentication (MFA)
MFA provides an additional layer of security after the first factor, which is often a password. Enabling MFA across your applications is critical for all users who have access to your security console. Doing so ensures access to your endpoint protection solution is secure and not prone to accidental or deliberate attempts to change your settings that can otherwise leave your endpoint devices vulnerable to attacks. MFA is also critical to secure RDP.
4.Ensure every endpoint is protected and up to date
Check your devices regularly to find out if they’re protected and up to date. A device not functioning correctly may not be protected and could be vulnerable to a ransomware attack. Endpoint security tools often provide this telemetry. An IT hygiene maintenance program is also helpful for regularly checking for any potential IT issues.
5.Maintain good IT hygiene
Regularly evaluating your IT hygiene ensures your endpoints and the software installed on them run at peak efficiency. It also mitigates your cybersecurity risk and can save you time when you remediate future incidents.
6.Proactively hunt for active adversaries across your network
In today’s threat landscape, malicious actors are more cunning than ever, often deploying legitimate tools and stolen credentials to avoid detection. To identify and stop these attacks, it’s essential to proactively hunt for advanced threats and active adversaries. Once found, you also need to be able to take appropriate actions to quickly stop them. Tools such as extended detection and response (XDR) enable security analysts to conduct threat hunting and neutralization. Organizations with these technologies should take full advantage of them.
Many organizations struggle to maintain round-the-clock coverage to defend against advanced ransomware attacks — that’s why managed detection and response (MDR) services are key. MDR services provide 24/7 threat hunting delivered by experts who specialize in detecting and responding to cyberattacks that technology solutions alone cannot prevent. They also provide the highest level of protection against advanced, human-led ransomware attacks. To learn more on the benefits of MDR, read our article here.
To explore these best practices in greater detail and to learn how Sophos security solutions elevate your ransomware protection, download our whitepaper here.
Learn More
Sophos Endpoint reduces the attack surface and prevents attacks from running. It combines anti-exploit, anti-ransomware, deep learning AI, and control technology to stop attacks before they impact your systems. It integrates powerful extended detection and response (XDR) with automated detections and investigations, so you can minimize the time to detect and respond to threats.
In this final installation of our three-part blog series, we lay out countermeasures that enterprises can do to protect their machines. We’ll also discuss our responsible disclosure as well as the feedback we got from the vendors we evaluated.
Countermeasures
We found that only two of the four vendors analyzed support authentication. Neither of them has authentication enabled by default, which leaves the machines vulnerable to attacks by malicious users. Enabling authentication is essential for protecting Industry 4.0 features from abuse.
Resource access control systems are important for reducing the impact of attacks. Many technologies allow access to all a controller’s resources, which can be dangerous. A correct approach is to adopt resource access control systems that grant limited access. This will help to ensure that only authorized users have access to the controller’s resources and that these resources are protected from unauthorized access.
When it comes to integrators and end users, we suggest these countermeasures:
Context-aware industrial intrusion prevention and detection systems (IPS/IDSs): These devices, which have recently seen a surge in popularity in the catalogues of security vendors, are equipped with network engines that can capture real-time traffic associated with industrial protocols to detect attacks.
Network segmentation: Correct network architecting is of great importance. As our research has revealed, all the tested machines expose interfaces that could be abused by miscreants.
Correct patching: Modern CNC machines are equipped with full-fledged operating systems and complex software, which might inevitably contain security vulnerabilities. This was indeed the case with the machines that we tested.
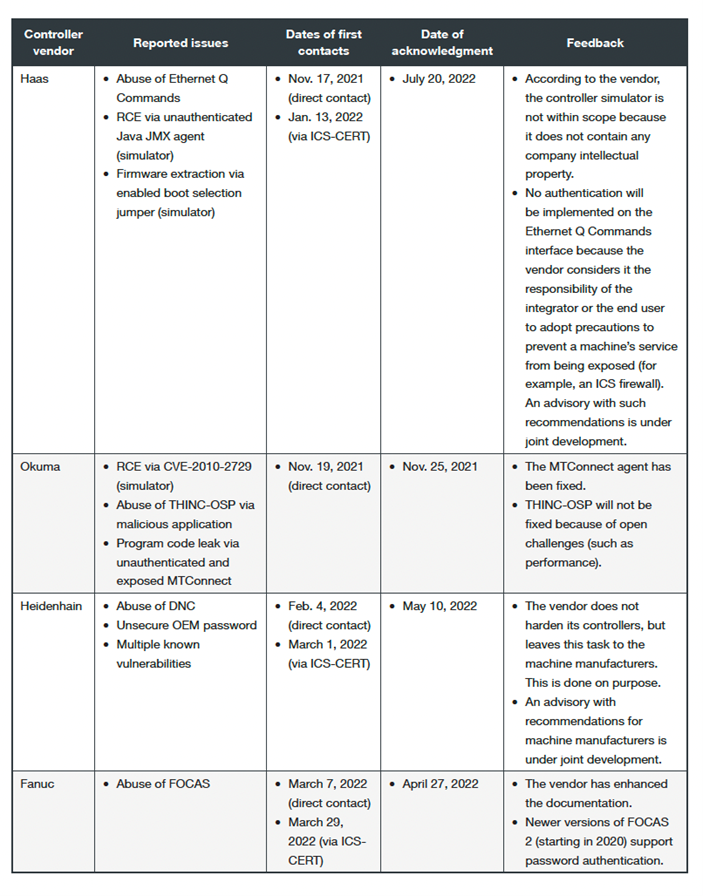
Responsible Disclosure
We contacted the affected vendors while tackling controllers sequentially, with our first contact in November 2021 and the last one in March 2022. The Industrial Control Systems Cyber Emergency Response Team (ICS CERT) at Cybersecurity & Infrastructure Security Agency extended invaluable help during the discussion which we are grateful for.
Table 1. A summary of our responsible disclosure process
As of this writing, all four vendors have replied to our concerns and most of them have addressed, to varying degrees, our findings in a reasonable time frame. More importantly, all of them have expressed interest in our research and have decided to improve either their documentation or their communication efforts with their machine manufacturers, with the final effort of offering end users more secure solutions.
In part one, we discussed what numerical control machines do and their basic concepts. These concepts are important to understand the machines better, offering a wider view of their operations. We also laid out how we evaluated the chosen vendors for our research.
For this blog, we will continue discussing our evaluated vendors and highlighting findings that we discovered during our research.
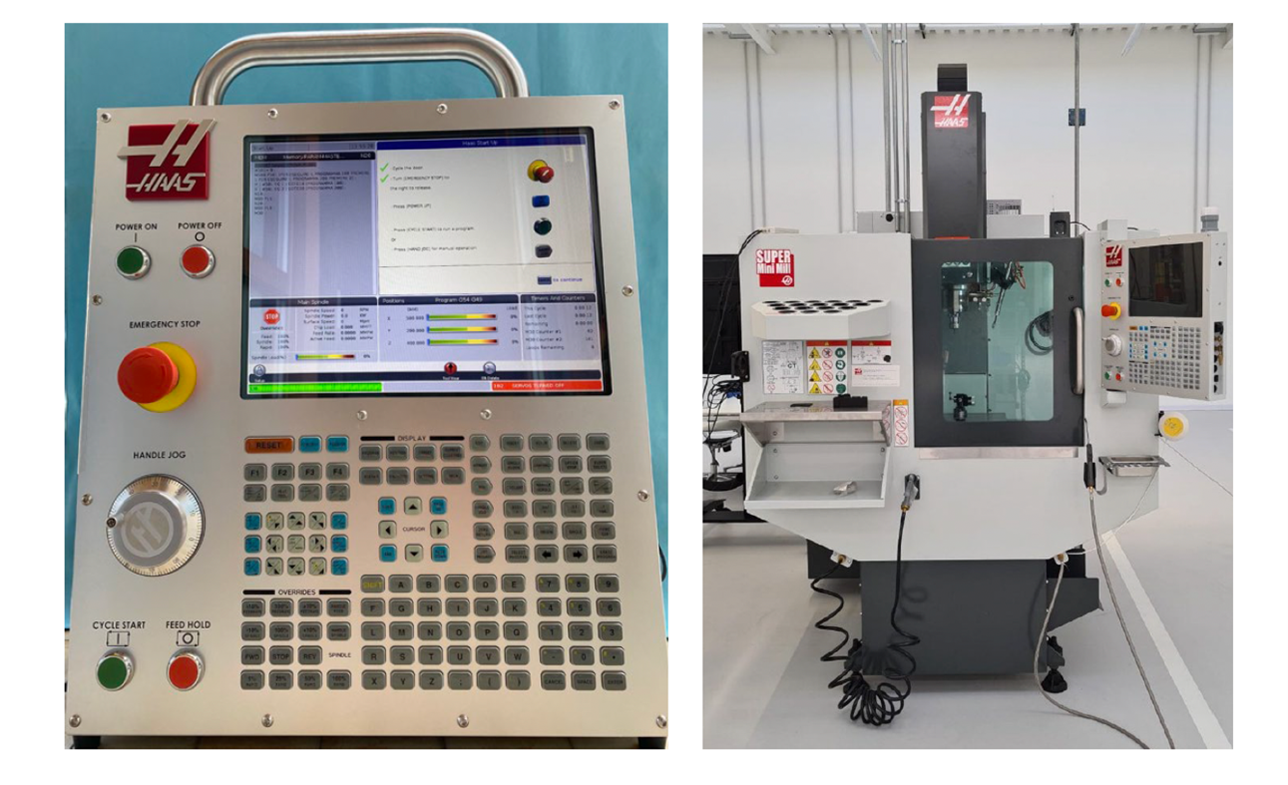
Haas
Figure 1. The Haas simulator we used for preliminary testing (left) and the Haas CNC machine (Super Mini Mill 2) by Celada we used for verification (right)
Haas was the first vendor we focused on because of the fast availability of its controller. We began our analysis by conducting port scanning on the controller simulator and identifying the protocols exposed by the controller. After that, we evaluated the options with which an attacker could abuse the protocols to perform attacks aimed at the security of the machine and verified these attacks in practice on a real-world machine installation.
Okuma
Figure 2. The Okuma simulator we used for the development of the malicious application and during the initial testing
Okuma stands out in the market of CNC controllers for one interesting feature: the modularity of its controller. While the vendor offers in the device’s simplest form a tiny controller, it also provides a mechanism, called THINC API, to highly customize the functionalities of the controller. With this technology, any developer can implement a program that, once installed, runs in the context of the controller, in the form of an extension. This approach is very similar to how a mobile application, once installed, can extend a smartphone’s functionalities.
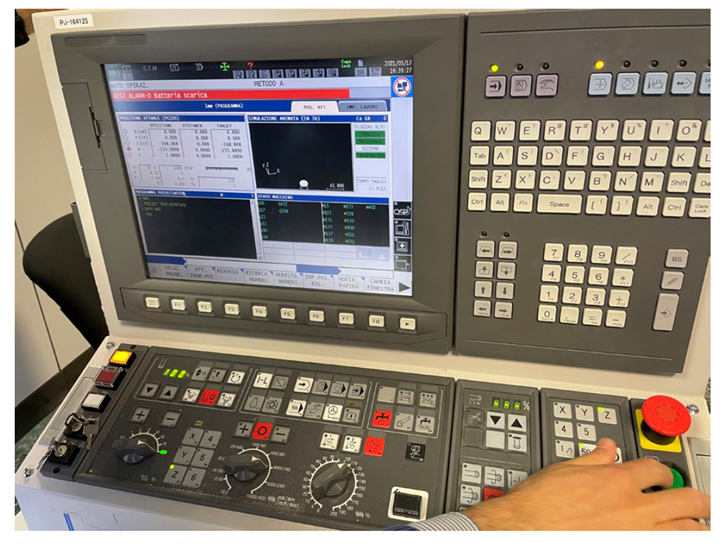
Heidenhain
Figure 3. The Hartford 5A-65E machine, running on a Heidenhain TNC 640 controller, that we used in our experiments at Celada
In the spirit of the Industry 4.0 paradigm, Heidenhain offers the Heidenhain DNC interface to integrate machines on modern, digital shop floors. Among the many scenarios, Heidenhain DNC enables the automatic exchange of data with machine and production data acquisition (MDA/PDA) systems, higher level enterprise resource planning (ERP) and manufacturing execution systems (MESs), inventory management systems, computer-aided design and manufacturing (CAD/CAM) systems, production activity control systems, simulation tools, and tool management systems
In our evaluation, we had access to the library provided by Heidenhain to the integrators to develop interfaces for the controller. The manufacturer provides this library, called RemoTools SDK,35 to selected partners only.
Fanuc
Figure 4. The Yasuda YMC 430 + RT10 machine, running on a Fanuc controller, that we used in our experiments at the Polytechnic University of Milan
Like Heidenhain, Fanuc offers an interface, called FOCAS,36 for the integration of CNC machines in smart network environments. Even though this technology offers a restricted set of remote-call possibilities compared with the other vendors’ (that is, a limited number of management features), our experiments showed that a miscreant could potentially conduct attacks like damage, DoS, and hijacking.
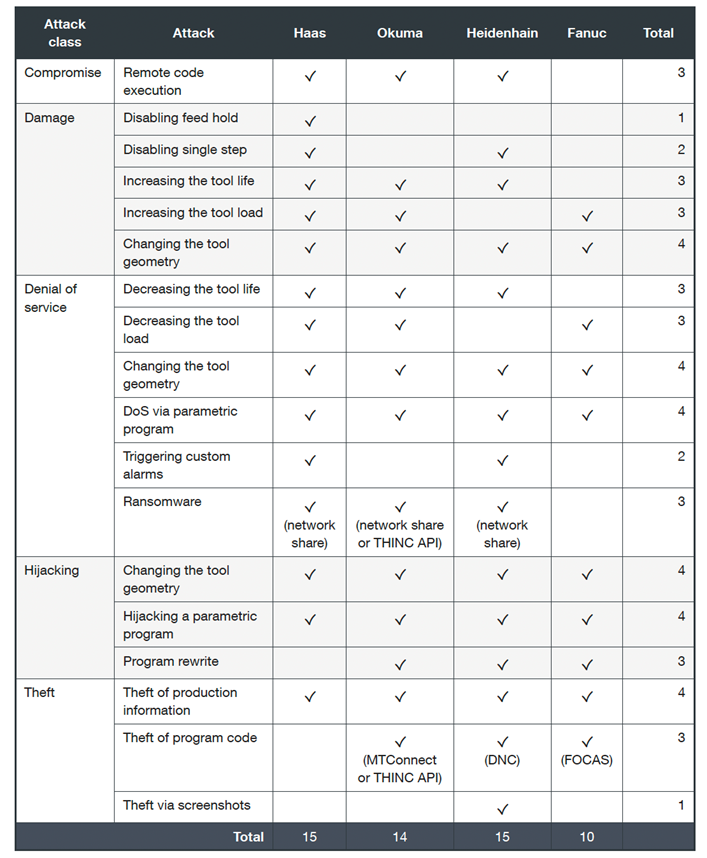
What we found
As our evaluation identified 18 different attacks (or variations), we grouped them into five classes: compromise, damage, and denial of service (DoS):
Table 1. A summary of the attacks we identified in our research
Controller manufacturers like Haas, Okuma, and Heidenhain have been found to have a similar number of issues, around 15. Fanuc had 10 confirmed attacks. Unfortunately, our research shows that this domain lacks awareness concerning security and privacy. This creates serious and compelling problems.
The need for automation-facing features like remote configuration of tool geometry or parametric programming with values determined by networked resources is becoming more common in manufacturing.
With these findings, we determined countermeasures that enterprises can do to mitigate such risks, which we’ll discuss in our final installation. In the last part, we’ll also discuss our responsible disclosure process.
Computer numerical controls (CNCs) are machines used to produce products in a factory setting. They have been in use for many years, and in the last decade, their use has become more widespread due to increased connectivity. This increased connectivity has made them more software-dependent and therefore more vulnerable to attacks. This vulnerability is due to the heterogeneity of technologies used in factories and the lack of awareness among users of how to best secure these systems.
This three-part blog series explores the risks associated with CNC machines. We performed a security evaluation on four representative vendors and analyzed technological developments that satisfy the Industry 4 .0 paradigm while conducting practical attacks against real-world installations.
For our research, we picked vendors that are:
Are geographically distributed (that is, with headquarters and subsidiaries spread across the world) and resell on a global scale.
Have been on the market for decades.
Have a large, estimated size, for example, with a total annual revenue of at least a billion US dollars.
Use technologies widely adopted in the domain and present in different manufacturing sectors.
Understanding numerical control machines
A machine tool is a device that uses cutting tools to remove material from a workpiece. This process, called machining, results in the desired geometry of the workpiece. Machining is a subtractive process, meaning that the material is removed from the original geometry to create the desired shape.
Numerical control (NC) is a technology that allows machines to be controlled by computers. This technology has revolutionized machine tools, making them more accurate and allowing for greater flexibility in their use. NC machine tools are now widely used in production systems and can be used on other types of machines, such as lasers and bending machines.
Basic concepts
To facilitate the understanding of what we discovered in our research, we introduce some basic concepts related to the use of machine tools:
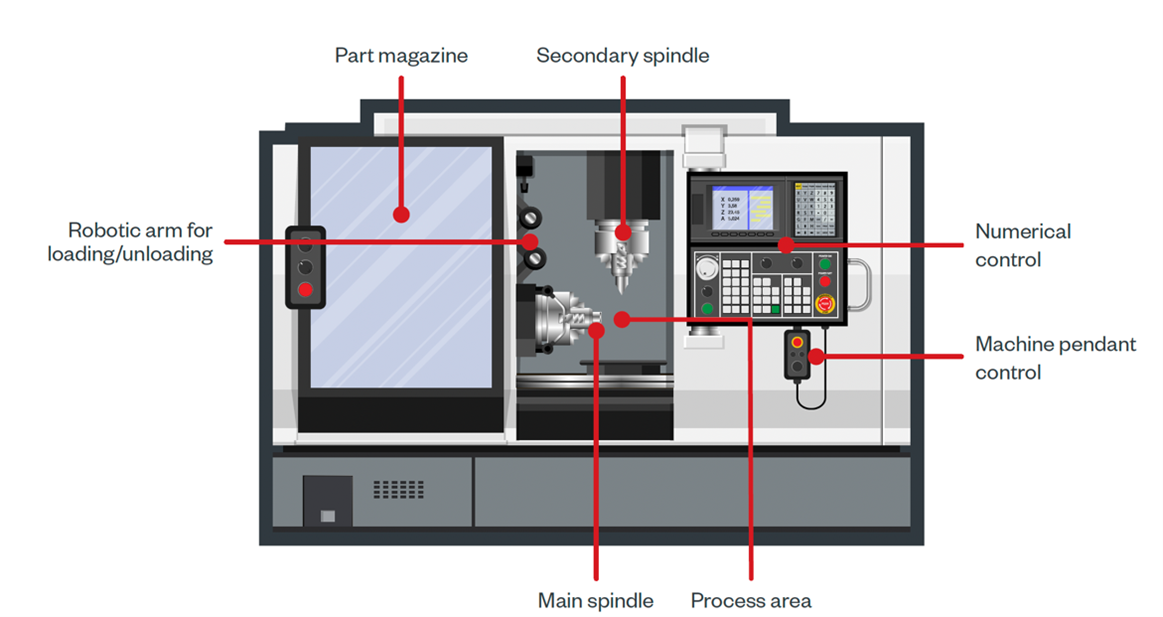
Figure 1. Parts of a CNC machine
Numerical control. The NC is the most critical element of the machine, as it controls the entire process. This system includes visual programming functions to speed up the setup of production cycles. Additionally, the NC is always equipped with a human-machine interface (HMI) to facilitate operator interaction with control.
Programming. Initially developed in the 1950s, G-code (aka RS-274) is the predominant programming language in the world of machine tools. It is presented as a series of instructions initialized by a letter address, which follow one another on successive lines separated by paragraph breaks; each of these lines is called a “block.” Each letter address specifies the type of movement or function called by the user in that part of the program.
Parametric programming. Parametric programming is a way to make programs that are adjustable to different values. This is done by using variables that the user can input, and then the program will change based on those values. This is used in machine tools to help with things like feedback and closed-loop controls between production systems.
Single step. This allows for running the work program one line of code at a time. In this way, the operator can check the correspondence of executed code to the best possible working conditions and determine if intervention by modification is necessary.
Feed hold. The “feed hold” function is mainly used to check the correct execution of complex features by inspecting the work area before proceeding with further steps in the process. In fact, chips coming from the removal of the material being processed could be deposited in work areas or on measuring probes, potentially invalidating the measurements, or inducing defects downstream of the machining if they are not removed.
Tools. The machining process is a manufacturing technique that uses an element called a tool to remove excess material from a raw piece. The tool cutting is made possible by the relative speed between the manufacturing part and the cutting tool edge, also known as the cutting speed or surface speed. In addition to this parameter, the feed rate (speed of tool moving along workpiece) also affects chip removal process. Many types of tools are available depending on the type of processing needed.
Evaluating vendors
For all vendors that we included in our research scope, we conducted an equal evaluation of their machines:
The “Industry 4.0–ready” technologies are interfaces and related protocols used by machines in smart environments to transmit information outwards, towards centralized systems like production data for better management or cost reduction; they also enable remote management such that an operator can change the executed program without needing local access.
We identified potential vulnerabilities in the exposed services using automated scanners like Nessus. These included known or misconfigurations that could pose as dangerous, which we ignored to focus on domain-specific abuse cases for CNC interfaces instead.
We then went deep into the CNC-specific technologies previously identified, by analyzing the risks of abuses and conducting practical attacks on the controllers. For this, we developed attack tools that exploited the weaknesses we identified in the domain-specific interfaces with the aid of proprietary APIs we got access to.
We collected evidence of our concerns and collaborated with vendors to suggest mitigations. All evidence came from tests we conducted on real-world installations, but we also used simulators for preliminary testing or when the machines were not immediately available.
Now that we have established a better understanding of numerical control machines and their basic concepts, we will further explore the vendors we chose for this research in part two of the series. There, we’ll discuss how we evaluated vendors and what we discovered during our research.
When the headlines focus on breaches of large enterprises like the Optus breach, it’s easy for smaller businesses to think they’re not a target for hackers. Surely, they’re not worth the time or effort?
Unfortunately, when it comes to cyber security, size doesn’t matter.
Assuming you’re not a target leads to lax security practices in many SMBs who lack the knowledge or expertise to put simple security steps in place. Few small businesses prioritise cybersecurity, and hackers know it. According to Verizon, the number of smaller businesses being hit has climbed steadily in the last few years – 46% of cyber breaches in 2021 impacted businesses with fewer than 1,000 employees.
Securing any business doesn’t need to be complex or come with a hefty price tag. Here are seven simple tips to help the smaller business secure their systems, people and data.
Every organisation has anti-virus on their systems and devices, right? Unfortunately, business systems such as web servers get overlooked all too often. It’s important for SMBs to consider all entry points into their network and have anti-virus deployed on every server, as well as on employees’ personal devices.
Hackers will find weak entry points to install malware, and anti-virus software can serve as a good last-resort backstop, but it’s not a silver bullet. Through continuous monitoring and penetration testing you can identify weaknesses and vulnerabilities before hackers do, because it’s easier to stop a burglar at the front door than once they’re in your home.
Your perimeter is exposed to remote attacks because it’s available 24/7. Hackers constantly scan the internet looking for weaknesses, so you should scan your own perimeter too. The longer a vulnerability goes unfixed, the more likely an attack is to occur. With tools like Autosploit and Shodan readily available, it’s easier than ever for attackers to discover internet facing weaknesses and exploit them.
Even organisations that cannot afford a full-time, in-house security specialist can use online services like Intruder to run vulnerability scans to uncover weaknesses.
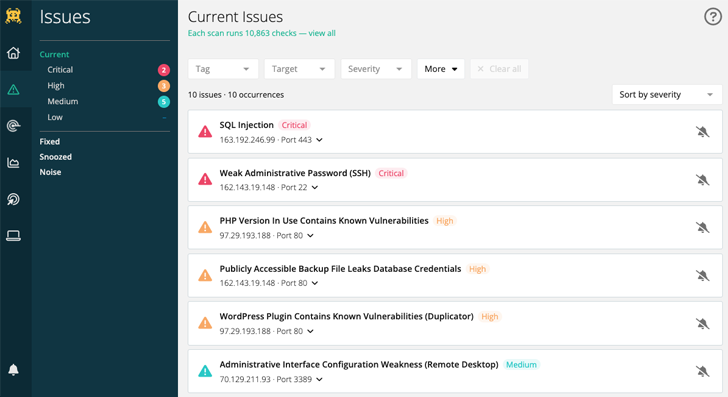
Intruder is a powerful vulnerability scanner that provides a continuous security review of your systems. With over 11,000 security checks, Intruder makes enterprise-grade scanning easy and accessible to SMBs.
Intruder will promptly identify high-impact flaws, changes in the attack surface, and rapidly scan your infrastructure for emerging threats.
Your attack surface is made up of all the systems and services exposed to the internet. The larger the attack surface, the bigger the risk. This means exposed services like Microsoft Exchange for email, or content management systems like WordPress can be vulnerable to brute-forcing or credential-stuffing, and new vulnerabilities are discovered almost daily in such software systems. By removing public access to sensitive systems and interfaces which don’t need to be accessible to the public, and ensuring 2FA is enabled where they do, you can limit your exposure and greatly reduce risk.
A simple first step in reducing your attack surface is by using a secure virtual private network (VPN). By using a VPN, you can avoid exposing sensitive systems directly to the internet whilst maintaining their availability to employees working remotely. When it comes to risk, prevention is better than cure – don’t expose anything to the internet unless it’s absolutely necessary!
New vulnerabilities are discovered daily in all kinds of software, from web browsers to business applications. Just one unpatched weakness could lead to full compromise of a system and a breach of customer data; as TalkTalk discovered when 150,000 of its private data records were stolen.
According to a Cyber Security Breaches Survey, businesses that hold electronic personal data of their customers are more likely than average to have had breaches. Patch management is an essential component of good cyber hygiene, and there are tools and services to help you check your software for any missing security patches.
Ransomware is on the increase. In 2021, 37% of businesses and organisations were hit by ransomware according to research by Sophos. Ransomware encrypts any data it can access, rendering it unusable, and can’t be reversed without a key to decrypt the data.
Data loss is a key risk to any business either through malicious intent or a technical mishap such as hard disk failure, so backing up data is always recommended. If you back up your data, you can counter attackers by recovering your data without needing to pay the ransom, as systems affected by ransomware can be wiped and restored from an unaffected backup without the attacker’s key.
Cyber attackers often rely on human error, so it’s vital that staff are trained in cyber hygiene so they recognise risks and respond appropriately. The Cyber Security Breaches Survey 2022 revealed that the most common types of breaches were staff receiving fraudulent emails or phishing attacks (73%), followed by people impersonating the organisation in emails or online (27%), viruses, spyware and malware (12%), and ransomware (4%).
Increasing awareness of the benefits of using complex passwords and training staff to spot common attacks such as phishing emails and malicious links, will ensure your people are a strength rather than a vulnerability.
Cyber security measures should always be appropriate to the organisation. For example, a small business which handles banking transactions or has access to sensitive information such as healthcare data should employ far more stringent security processes and practices than a pet shop.
That’s not to say a pet shop doesn’t have a duty to protect customer data, but it’s less likely to be a target. Hackers are motivated by money, so the bigger the prize the more time and effort will be invested to achieve their gains. By identifying your threats and vulnerabilities with a tool like Intruder, you can take appropriate steps to mitigate and prioritize which risks need to be addressed and in which order.
Attacks on large companies dominate the news, which feeds the perception that SMBs are safe, when the opposite is true. Attacks are increasingly automated, so SMBs are just as vulnerable targets as larger enterprises, more so if they don’t have adequate security processes in place. And hackers will always follow the path of least resistance. Fortunately, that’s the part Intruder made easy…
Intruder is a cyber security company that helps organisations reduce their attack surface by providing continuous vulnerability scanning and penetration testing services. Intruder’s powerful scanner is designed to promptly identify high-impact flaws, changes in the attack surface, and rapidly scan the infrastructure for emerging threats. Running thousands of checks, which include identifying misconfigurations, missing patches, and web layer issues, Intruder makes enterprise-grade vulnerability scanning easy and accessible to everyone. Intruder’s high-quality reports are perfect to pass on to prospective customers or comply with security regulations, such as ISO 27001 and SOC 2.
Intruder offers a 14-day free trial of its vulnerability assessment platform. Visit their website today to take it for a spin!
Found this article interesting? Follow us on Twitter and LinkedIn to read more exclusive content we post.
Wordfence 7.8.0 is out! A huge thanks to our quality assurance team, our team of developers and our ops team for planning, implementing and releasing Wordfence 7.8.0. This release has several fixes to make Wordfence even more robust, and includes a fundamental change in the way our signup works.
Since our launch in 2012, the signup flow for Wordfence has not required you to leave your own WordPress installation and come to our website. We briefly required this, but removed it 10 days after launch.
Wordfence has grown to a community of over 4 million active websites and a very large number of paying customers. Wordfence is now downloaded over 30,000 times every day. Today we spend a huge amount of money on providing the services that our free and paid community needs to stay secure. Privacy laws have also changed profoundly since 2012.
Scaling up our operations has required us to get better at capacity planning, which means knowing how many installations we’re getting, how many are bots or spam, who is communicating with our servers during a scan, and whether it is a real website running Wordfence, a nulled plugin or someone simply using our resources to power something unrelated to Wordfence.
Privacy laws have also added the need for us to be able to communicate with our free customers to alert them to privacy policy and terms of use changes.
This has required us to adjust our signup flow to match other popular plugins out there, like Akismet. Many customers may find this is a clearer signup workflow because we no longer need to shoehorn a complex user experience into a set of modals on a site where we don’t control presentation.
This change will not disrupt any of our existing free or paid customers. If you have a free API key that Wordfence automatically fetched when you installed it, that key will remain valid and your site will continue uninterrupted. If you have a paid Wordfence API key, your key will continue to work without disruption. We are not requiring any existing customers to visit our site to install a new key.
The only users this affects are new free Wordfence installations. The installation process is quite simple. You install Wordfence and are directed to our site. You can choose a paid or free option. If you choose the paid option, you’ll go through our checkout process as usual. If you choose free, we’ll email you your key. The email includes a button that you can click to automatically take you back to your site where your key will be automatically installed. The email also includes your Wordfence key in case you need to manually install it.
A side benefit of this new process is that our free customers will now have a record of their API key in their email inbox for future reference.
We’re including the full changelog for Wordfence 7.8.0 below. You’ll notice that we’ve mentioned that additional WooCommerce support is on its way, so keep an eye out for that.
Thanks for choosing Wordfence!
Mark Maunder – Wordfence Founder & CEO.
Wordfence 7.8.0 Changelog
Change: Updated Wordfence registration workflow
For new installations of Wordfence, registering for a new license key now occurs on wordfence.com instead of within the plugin interface. Allows us to provide a more complete signup experience for our free and paid customers. Also allows us to do better capacity planning.
Improvement: Added feedback when login form is submitted with 2FA
When logging in with two-factor authentication, the “Log In” button is now disabled during processing, so that it is clear the button was clicked. Sometimes on slower sites, it was hard to tell whether the login was going through, leading users to click more than once.
Fix: Restored click support on login button when using 2FA with WooCommerce
Clicking the “Log In” button after entering a 2FA code on a WooCommerce site was no longer working, while pressing “Enter” still worked. Both methods now work as expected. Additional support for WooCommerce is coming in the near future.
Fix: Corrected display issue with reCAPTCHA score history graph
The reCAPTCHA score history graph was sometimes displayed larger than intended when switching tabs. It now has a set size, so that it does not become unusually large.
Fix: Prevented errors on PHP caused by corrupted login timestamps
One Wordfence user reported an error on PHP 8, and upon investigation, we found that a timestamp for some user records contained invalid data instead of the expected timestamp. We don’t expect this to occur on other sites, but in case another plugin had modified the value, we now check the value before formatting it as a timestamp.
Fix: Prevented deprecation notices on PHP 8.2 related to dynamic properties
Future versions of PHP will no longer allow use of variables on an object unless they are previously declared. This is still allowed even in PHP 8.2, but PHP 8.2 can log a warning about the upcoming change, so Wordfence has been updated to declare a few variables where necessary, before using them.
This article lists all the Windows 11 build numbers, Windows 11 version numbers, and release date details. The Windows 11 build numbers are frequently updated, and this article will also be updated frequently.
As per Microsoft, Windows 11 will have an annual feature update cadence. Windows 11 feature updates will be released in the second half of the calendar year. The new updates will come with 24 months of support for Home, Pro, Pro for Workstations, and Pro Education editions. For the Enterprise and Education editions, there are 36 months of support.
Microsoft has released two significant updates since the launch of Windows 11, namely 21H2 and 22H2. The newest version is 22H2, also referred to as the Windows 11 2022 update. Eligible devices should get the Windows 11 22H2 update via Windows Update.
Windows 11’s build number follows a standard format, which I will go into more detail about in one of the topics. If you’re seeking information on the Windows 11 version history, I’ve covered nearly all the updates in this article.
Windows 11 will be offered as a free upgrade to eligible Windows 10 devices using a phased and measured approach with a focus on quality. The latest version of Windows 11 is version 22H2, and the update is also offered to customers via Windows Update. Listed below are some guides that will help you upgrade to Windows 11 in production.
The build number shows the specific build of operating system that you are running. Every Windows operating system gets assigned with a unique build number. The build number of Windows 11 changes whenever there is a new version released.
For example, the Windows 11 versions 21H2 and 22H2 have the following build numbers.
Windows 11 Version 22H2 (original release) – The OS build number is 22621.
Windows 11 Version 21H2 (original release) – The OS build number is 22000.
There are many ways to find the build number of the Windows 11 OS, and this is the quickest method. Right-click on Start and select Run. In the Run box, type “winver” and press enter. This will bring up the About Windows pop-up, and here you can see the version and OS build of Windows 11.
For example, in the below screenshot, the “About Windows” shows Windows 11 version as 21H2 and OS build 22000.978. Click OK to close the window.
Windows 11 Versions | Windows 11 Build Numbers – About Windows 11
How to Find Windows 11 Version and Installed Edition
To find the Windows 11 version, build number and edition, perform these steps:
Click Start and type “About Your PC” in the search box and launch it.
On About your PC window, scroll-down and look for Windows Specifications.
Under Windows Specifications, you can find the Edition, Version, OS Build and installation date of Windows 11.
Windows 11 22H2 Build Number
Windows 11 Major Minor Build Rev Details
If you notice the Windows 11 build number, it is represented in a particular format. In this section, I will explain about the Windows 11 major, minor, build, and rev in a bit more detail. Let’s pick the Windows 11 22H2 build number 10.0.22621.521 as an example.
The build number of Windows 11 22H2 original release is 10.0.22621.521. The below table explains how a build number is composed of and the version details.
Name
Build Details
Major
10
Minor
0
Build
22621
Rev
521
Windows 11 Versions and Windows 11 Build Numbers Explained
Note: For every new version of Windows 11 released, the build number is incremented. This build number remains the same for that version however only the Rev value changes as the new updates released for that Windows 11 version. This means for Windows 11 22H2, the build number will remain the same which is “22621” whereas the Rev value is incremented with every update.
Windows 11 Servicing Timeline
Windows 11 will receive monthly quality updates, including security and non-security updates, and a yearly release of new versions. To continue receiving support from Microsoft, users should always install the most recent version before the current version is no longer supported.
Windows 11 Enterprise, Education, IoT Enterprise editions will have servicing timeline of 36 months from the release date. Whereas Windows 11 Pro, Home, Pro Education will have servicing timeline of 24 months from the actual release date.
The servicing timeline for Windows 11 version 22H2 is detailed below, along with the start and end dates for support.
Windows 11 22H2 Edition
Servicing Timeline
Date Available
Retirement Date
Windows 11 22H2 Enterprise Windows 11 22H2 Education Windows 11 22H2 IoT Enterprise
36 months from release date
Sep 20, 2022
Oct 14, 2025
Windows 11 22H2 Pro Windows 11 22H2 Pro Education Windows 11 22H2 Pro for Workstations Windows 11 22H2 Home
24 months from release date
Sep 20, 2022
Oct 8, 2024
Windows 11 22H2 Servicing Timeline
The servicing timeline for Windows 11 version 21H2 is detailed below, along with the start and end dates for support.
Windows 11 22H1 Edition
Servicing Timeline
Date Available
Retirement Date
Windows 11 21H2 Enterprise Windows 11 21H2 Education Windows 11 21H2 IoT Enterprise
36 months from release date
Oct 4, 2021
Oct 8, 2024
Windows 11 21H2 Pro Windows 11 21H2 Pro Education Windows 11 21H2 Pro for Workstations Windows 11 21H2 Home
24 months from release date
Oct 4, 2021
Oct 10, 2023
Windows 11 21H2 Servicing Timeline
Windows 11 Build Numbers and Windows 11 Versions
The below table lists the Windows 11 build numbers and Windows 11 version numbers (production release) along with the release dates. When new versions of Windows 11 are released, they are added to the table.
In this guide, I will show you how to deploy Dell SupportAssist using SCCM (ConfigMgr). We’ll get the latest version of the Dell SupportAssist tool, create an application in SCCM, and then deploy it to our computers.
According to Dell, the SupportAssist is an automated proactive and predictive support solution for computers and tablets. SupportAssist also evaluates the health of your servers, storage, and networking devices to eliminate downtime before it even starts.
When you purchase brand-new laptops and desktop computers from Dell, SupportAssist is already preinstalled. SupportAssist is installed on most Dell PCs with Windows 10 and Windows 11. You can find it by searching for “SupportAssist” in your Windows start menu. Home users can use the Dell SupportAssist tool to update drivers, including the system BIOS, and resolve problems.
Configuration Manager is the best choice for Dell SupportAssist deployment on multiple computers. You can deploy the Dell Support Assist to client computers and allows users to install it via Software Center. An added advantage of Dell SupportAssist deployment using SCCM is Dell provides .msi installer for application deployment for enterprises.
If you are using Configuration Manager to manage Dell laptops, you can use the application model to deploy Dell SupportAssist software to client computers using SCCM. The application can also be added to a task sequence, which lets you use the bare-metal deployment scenarios to install Dell SupportAssist on new laptops.
Let’s understand what exactly is the Dell SupportAssist tool and identify its features. The SupportAssist by Dell is the smart technology, available on your PC that will keep it running like new by removing viruses, detecting issues, optimizing settings and telling you when you need to make updates.
With SupportAssist tool, you can perform the following
Update your drivers and applications for peak PC performance
Remove virus and malware infested files before then can harm your system.
Scan your PCs hardware to find issues and deliver proactive and predictive support.
Clean files, tune performance, and adjust network settings to optimize speed, storage space and stability.
The Dell SupportAssist also has an OS Recovery environment that enables you to diagnose hardware issues, repair your computer, back up your files, or restore your computer to its factory state. The Dell Support Assist OS Recovery is only available on certain Dell laptops with a Microsoft Windows 10/11 operating system that was installed by Dell.
Download Dell SupportAssist MSI Installer
Dell provides the .msi installer for SupportAssist and the same installer can be used for deployment with SCCM. You can download the Dell SupportAssist .msi installer from the following direct download link. Note that this is an offline installer and will include all the installation files without having the system connect to internet to download further files.
Along with Dell SupportAssist msi installer, I recommend you to download a logo for the application. We will assign this logo to the Dell SupportAssist application in SCCM. Copy both the installer and logo to a separate folder on SCCM server or shared folder. We will reference the same folder when we create the Dell SupportAssist application in ConfigMgr.
Each MSI installer has a unique product code and this can be seen under the installer properties. Configuration Manager uses the product to detect if the Dell SupportAssist application already exists on system. If you are curious to know the detection method for Dell SupportAssist application, SCCM basically uses the MSI product code: {E0659C89-D276-4B77-A5EC-A8F2F042E78F} of the installer.
After you have created the Dell Support Assist application in SCCM, go to the Application deployment properties and switch to Detection Method tab. Here you can see the detection method used for Dell SupportAssist application. We see the MSI product code being used for the application detection.
Dell SupportAssist Detection Method
Create Dell SupportAssist Application in SCCM
Let’s create a new application for the Dell SupportAssist in SCCM.
Launch the Configuration Manager console.
Go to Software Library > Overview > Application Management.
Right-click Applications and select Create Application.
Create Dell SupportAssist Application in SCCM
On the General window, select Automatically detect information about this application from installation files. The application type should be Windows Installer (*.msi file) and specify the location of the Dell SupportAssist msi file. Click Next.
Create Dell SupportAssist Application in SCCM
With MSI installers, the Configuration Manager can import information such as product code, install commands, uninstall commands, detection methods etc. In the below screenshot, we see the product information has been populated from Dell SupportAssist MSI installer and imported into SCCM.
Application name: Dell SupportAssist
Publisher:
Software version:

Deployment type name: Dell SupportAssist - Windows Installer (*.msi file)
Product Code: {E0659C89-D276-4B77-A5EC-A8F2F042E78F}
Installation behavior: Install for system

Content location: \\corpcm\Sources\Applications\SupportAssist\
Number of files: 2
Content files:
dellSA_logo.jpg
SupportAssistx64-3.10.4.18.msi
Create Dell SupportAssist Application in SCCM
In the General Information tab, enter the basic information about the Dell Support Assist application. For example, you can specify the application name, publisher details, software version etc. The details that you specify here will be displayed to users when the Dell SupportAssist application is selected in Software Center.
The Configuration Manager also populates the silent installation command for Dell SupportAssist from the .msi installer. You may modify the existing command and add additional parameters supported for .msi installation.
Silent Command Line for Dell SupportAssist installation = msiexec /i "SupportAssistx64-3.10.4.18.msi" /q
Create Dell SupportAssist Application in SCCM
Review the Support Assist application settings on Summary window and click Next. On the Completion tab, click Close button to exit the create application wizard.
Create Dell SupportAssist Application in SCCM
This completes the steps to create application for Dell SupportAssist in SCCM. After this step, the application will appear in the Application node of Configuration Manager console.
Specify an Icon for Dell SupportAssist Application
Configuration Manager lets you specify a logo for Application via the Application Properties and this logo appears along with the application in Software Center. If you are looking to customize software center, use the following guide to customize software center appearance and branding. Assigning an application logo is not mandatory, but it helps users identify the application quickly in Software Center.
The newly created Dell SupportAssist application is located in Software Library\Overview\Application Management\Applications of Configuration Manager console. Right-click on Dell SupportAssist application and select Properties.
Specify an Icon for Dell SupportAssist Application
In the Application properties window, choose the Software Center tab. Click on Browse and select an icon for Dell SupportAssist and click Apply and OK.
Specify an Icon for Dell SupportAssist Application
Deploy Dell SupportAssist using SCCM | ConfigMgr
In this section, we will look at the steps to deploy the Dell SupportAssist using SCCM (ConfigMgr). The deploy software wizard contains steps where you can distribute the content to DP’s along with the application deployment.
When you perform Dell SupportAssist deployment using SCCM, you deploy it either to a device collection or user collection. Typically, applications are deployed to device collections, and we will use the same approach here. You can create device collections for Windows 10 and Windows 11 computers using the following guides.
Once the device collections are ready, you can deploy the application using the deploy software wizard. To deploy the Dell SupportAssist application, launch the Configuration Manager console. Navigate to Software Library\Overview\Application Management\Applications. Right-click Dell SupportAssist application and select Deploy.
Deploy Dell SupportAssist using SCCM
On the General page of Deploy Software Wizard, click Browse and select a device collection to which you want to deploy the Support Assist application. Click Next.
Deploy Dell SupportAssist using SCCM
On the Content page, click Add button and specify the distribution points to which you would like to distribute the Dell Support Assist application content. You may also select distribution point groups when you have numerous distribution points. Click Next to continue.
On the Scheduling tab, you can specify the schedule for the deployment. If you want to deploy the application as soon as possible, then don’t configure anything under Scheduling. Click Next.
Dell SupportAssist Deployment using SCCM
Specify the user experience settings for the application deployment. For user notifications, select the option “Display in Software Center and show all notifications“. Click Next to continue.
Deploy Dell SupportAssist using SCCM User Experience Settings
In the Alerts tab, click Next. Review all the Dell SupportAssist deployment settings on Summary tab and click Next. On the Completion window, click Close.
The Dell SupportAssist application is now distributed to the select distribution points and the client machines should now have the application listed in the Software Center. This completes the steps for Dell SupportAssist deployment with Configuration Manager.
Deploy Dell SupportAssist using SCCM Completion
Test Dell SupportAssist Deployment on Client Computers
After you have created the Dell SupportAssist application and deployed it to device collection, it’s time to test the deployment on devices. Log in to a client computer, and launch the Software center. Click on the Applications tab and select Dell SupportAssist application. To install the application, click the Install button.
Test Dell SupportAssist Deployment on Client Computers
The Dell Support Assist application is now downloaded from the local distribution point server for installation. The installation commands specified during the application creation are executed. You can monitor the application installation process by reviewing the AppEnforce.log located on the client computer.
To locate the AppEnforce.log file and other important files, refer to the SCCM Log files which contains all the log files for troubleshooting issues.
“Matched exit code 0 to a Success entry in the exit codes table” confirms that the Dell Support Assist application has been installed successfully on the computer. The uninstall command that we specified during application packaging should also work fine.
+++ Starting Install enforcement for App DT "Dell SupportAssist - Windows Installer (*.msi file)" ApplicationDeliveryType - ScopeId_67D9092A-81B2-464F-8F38-4D634303C416/DeploymentType_ccf9c1b2-8d31-4cab-87e9-56c700d64d52, Revision - 1, ContentPath - C:\Windows\ccmcache\2, Execution Context - System
    Performing detection of app deployment type Dell SupportAssist - Windows Installer (*.msi file)(ScopeId_67D9092A-81B2-464F-8F38-4D634303C416/DeploymentType_ccf9c1b2-8d31-4cab-87e9-56c700d64d52, revision 1) for system.
    Prepared working directory: C:\Windows\ccmcache\2
Found executable file msiexec with complete path C:\Windows\system32\msiexec.exe
    Prepared command line: "C:\Windows\system32\msiexec.exe" /i "SupportAssistx64-3.10.4.18.msi" /q /qn
Valid MSI Package path = C:\Windows\ccmcache\2\SupportAssistx64-3.10.4.18.msi
    Advertising MSI package [C:\Windows\ccmcache\2\SupportAssistx64-3.10.4.18.msi] to the system.
    Executing Command line: "C:\Windows\system32\msiexec.exe" /i "SupportAssistx64-3.10.4.18.msi" /q /qn with user context
    Working directory C:\Windows\ccmcache\2
    Post install behavior is BasedOnExitCode	AppEnforce
    Waiting for process 3896 to finish.  Timeout = 120 minutes
    Process 3896 terminated with exitcode: 0
    Looking for exit code 0 in exit codes table.
    Matched exit code 0 to a Success entry in exit codes table
Test Dell SupportAssist Deployment on Client Computers