Mitigating Log4j Abuse Using Akamai Guardicore Segmentation

Executive summary

A critical remote code-execution vulnerability (CVE-2021-44228) has been publicly disclosed in Log4j, an open-source logging utility that’s used widely in applications, including many utilized by large enterprise organizations.

The vulnerability allows threat actors to exfiltrate information from, and execute malicious code on, systems running applications that utilize the library by manipulating log messages. There already are reports of servers performing internet-wide scans in attempts to locate vulnerable servers, and our threat intelligence teams are seeing attempts to exploit this vulnerability at alarming volumes. Log4j is incorporated into many popular frameworks and many Java applications, making the impact widespread.

Akamai Guardicore Segmentation is well positioned to address this vulnerability in different ways. It’s highly recommended that organizations update Log4j to its latest version- 2.16.0. Due to the rapidly escalating nature of this vulnerability, Akamai teams will continue to develop and deploy mitigation measures in order to support our customers.

As a follow up to Akamai’s recent post we wanted to provide more detail on how organizations can leverage  Akamai Guardicore Segmentation features to help address log4j exposure.

Log4j vulnerability: scope and impact

Log4j is a Java-based open-source logging library. On December 9, 2021, a critical vulnerability involving unauthenticated remote code execution (CVE-2021-44228) in Log4j was reported, causing concern due to how commonly Log4j is used. In addition to being used directly in a large multitude of applications, Log4j is also incorporated into a host of popular frameworks, including Apache Struts2, Apache Solr, Apache Druid, and Apache Flink.

Although Akamai first observed exploit attempts on the Log4j vulnerability on December 9th, following the widespread publication of the incident, we are now seeing evidence suggesting it could have been around for months. Since widespread publication of the vulnerability, we have seen multiple variants seeking to exploit this vulnerability, at a sustained volume of attack traffic at around 2M exploit requests per hour. The speed at which the variants are evolving is unprecedented.

A compromised machine would allow a threat actor to remotely provide a set of commands which Log4j executes. An attacker would have the ability to run arbitrary commands inside a server. This can allow an attacker to compromise a vulnerable system – including those that might be secured deep inside of a network with no direct access to the internet.

Akamai’s security teams have been monitoring attackers attempting to use Log4j in recent days. Other than the increase in attempted exploitation, Akamai researchers are also seeing attackers using a multitude of tools and attack techniques to get vulnerable components to log malicious content, in order to get remote code execution. This is indicative of threat actors’ ability to exploit a new vulnerability, and the worse the vulnerability is, the quicker they will act.

Mitigating Log4j abuse using Akamai Guardicore Segmentation

Customers using Akamai Guardicore Segmentation can leverage its deep, process level visibility to identify vulnerable applications and potential security risks in the environment. They can then use it to enact precise control over network traffic in order to stop attempted attacks on vulnerable systems, without disruptions to normal business operations. 

Guardicore Hunt customers have their environments monitored and investigated continuously by a dedicated team of security researchers. Alerts on security risks and suggested mitigation steps are immediately sent.

If you’d like to hear more about Akamai Guardicore Segmentation, read more or contact us.

What’s under threat: identify vulnerable Java processes and Log4j abuse

In order to protect against potential Log4j abuse, it is necessary to first identify potentially exploitable processes. This requires deep visibility into network traffic at the process level, which is provided by the Reveal and Insight features of Akamai Guardicore Segmentation. Precise visibility into internet connections and traffic at the process level allows us to see clearly what mitigation steps need to be taken, and visibility tools with historical data are pivotal in helping to prevent disruption to business operations.

Identify internet connected Java applications: using Reveal Explore Map, create a map for the previous week, and filter by java applications- such as tomcat, elastic, logstash- and by applications that have connections to/from the internet. Using this map, you can now see which assets are under potential threat. While this won’t yet identify Log4j applications, this can give you an idea of which machines to prioritize in your mitigation process.

Create a historical map to analyze normal communication patterns: using Reveal Explore Map, create a historical map of previous weeks (excluding the time since Log4j was reported) to view and learn normal communication patterns. Use this information to identify legitimate communications, and respond without disrupting the business. For example, a historical map might indicate what network connections exist under normal circumstances, those could be allowed, while other connections blocked or alerted on. Additionally, compare and contrast with a more recent map to identify anomalies.

Use reveal explore map to identify legitimate communications, and respond without disrupting the business.

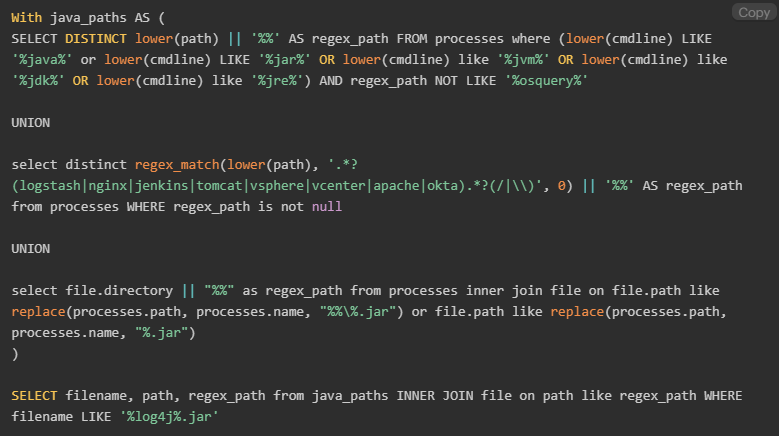
Identify applications vulnerable to Log4j abuse: in the query section below, use Query 1 with Insight queries to identify assets that are running Java applications which have Log4j jar files in their directories. This query should return all Log4j packages in your environment, allowing you to assess and address any mitigation steps needed. To better prioritize exposed machines, cross reference the information with the Reveal Explore Map described previously.

Note that this query identifies Log4j packages that exist in the Java process current working directory or sub-directories.

Detect potential exploitation attempts in Linux logs: run an Insight query using YARA signature rule (Query 2, provided below in the query section) to search for known Log4j IoCs in the logs of linux machines. This can help you identify whether you’ve been attacked.

Note, a negative result does not necessarily mean that no attack exists, as this is only one of many indicators.

Stopping the attack: using Guardicore Segmentation to block malicious IoCs and attack vectors

It is imperative to be able to take action, once vulnerable applications have been identified. While patching is underway, Akamai Guardicore Segmentation offers a multitude of options for alerting on, stopping and preventing potential attacks. Critically, a solution with detailed and precise control over network communication and traffic is required to be able to surgically block or isolate attack vectors, with minimal to no disruption to normal business functions.

Automatically block IoC’s with Threat Intelligence Firewall (TIFW) and DNS Security: Akamai security teams are working around the clock to identify IPs and Domains used for Log4j exploitation. Customers who have these features turned on can expect a constantly updated list of IoCs to be blocked, preventing Log4j being used to download malicious payloads. Note that TIFW can be set to alert or block, please ensure it’s configured correctly. DNS Security is available from V41 onwards. The IoCs are also available on the Guardicore Threat Intel Repository and Guardicore Reputation Service.

Fully quarantine compromised servers: if compromised machines are identified during your investigation, use Akamai Guardicore Segmentation to isolate attacked/vulnerable servers from the rest of your network. Leverage built-in templates to easily enable deployment of segmentation policy to mitigate attacks.

Block inbound and outbound traffic to vulnerable assets: as a precautionary measure, you may also choose to block traffic to all machines identified with an unpatched version of Log4j, until patching is completed. Using a historical map of network traffic can help you limit the impact on business operations.

Create block rules for outgoing traffic from Java applications to the internet: if necessary, all internet-connected Java applications revealed in previous steps can be blocked from accessing the internet, as an additional precaution, until patching is complete.

Search queries

Query 1: To Identify assets that are running Java applications, which also have a Log4j jar file under their directories, run the following Insight query:

This query identifies assets that are running Java applications, which also have a Log4j jar file under their directories.

Query 2: To detect potential exploitation attempts, run an Insight query using YARA signature rules (our thanks to Florian Roth who published the original rule): 

SELECT path, count FROM yara WHERE path LIKE '/var/log/%%' AND sigrule = "rule EXPL_Log4j_CallBackDomain_IOCs_Dec21_1 {
strings:
$xr1 = /\b(ldap|rmi):\/\/([a-z0-9\.]{1,16}\.bingsearchlib\.com|[a-z0-9\.]{1,40}\.interact\.sh|[0-9]{1,3}\.[0-9]{1,3}\.[0-9]{1,3}\.[0-9]{1,3}):[0-9]{2,5}\/([aZ]|ua|Exploit|callback|[0-9]{10}|http443useragent|http80useragent)\b/
condition:
1 of them
}
rule EXPL_JNDI_Exploit_Patterns_Dec21_1 {
strings:
$ = {22 2F 42 61 73 69 63 2F 43 6F 6D 6D 61 6E 64 2F 42 61 73 65 36 34 2F 22}
$ = {22 2F 42 61 73 69 63 2F 52 65 76 65 72 73 65 53 68 65 6C 6C 2F 22}
$ = {22 2F 42 61 73 69 63 2F 54 6F 6D 63 61 74 4D 65 6D 73 68 65 6C 6C 22}
$ = {22 2F 42 61 73 69 63 2F 4A 65 74 74 79 4D 65 6D 73 68 65 6C 6C 22}
$ = {22 2F 42 61 73 69 63 2F 57 65 62 6C 6F 67 69 63 4D 65 6D 73 68 65 6C 6C 22}
$ = {22 2F 42 61 73 69 63 2F 4A 42 6F 73 73 4D 65 6D 73 68 65 6C 6C 22}
$ = {22 2F 42 61 73 69 63 2F 57 65 62 73 70 68 65 72 65 4D 65 6D 73 68 65 6C 6C 22}
$ = {22 2F 42 61 73 69 63 2F 53 70 72 69 6E 67 4D 65 6D 73 68 65 6C 6C 22}
$ = {22 2F 44 65 73 65 72 69 61 6C 69 7A 61 74 69 6F 6E 2F 55 52 4C 44 4E 53 2F 22}
$ = {22 2F 44 65 73 65 72 69 61 6C 69 7A 61 74 69 6F 6E 2F 43 6F 6D 6D 6F 6E 73 43 6F 6C 6C 65 63 74 69 6F 6E 73 31 2F 44 6E 73 6C 6F 67 2F 22}
$ = {22 2F 44 65 73 65 72 69 61 6C 69 7A 61 74 69 6F 6E 2F 43 6F 6D 6D 6F 6E 73 43 6F 6C 6C 65 63 74 69 6F 6E 73 32 2F 43 6F 6D 6D 61 6E 64 2F 42 61 73 65 36 34 2F 22}
$ = {22 2F 44 65 73 65 72 69 61 6C 69 7A 61 74 69 6F 6E 2F 43 6F 6D 6D 6F 6E 73 42 65 61 6E 75 74 69 6C 73 31 2F 52 65 76 65 72 73 65 53 68 65 6C 6C 2F 22}
$ = {22 2F 44 65 73 65 72 69 61 6C 69 7A 61 74 69 6F 6E 2F 4A 72 65 38 75 32 30 2F 54 6F 6D 63 61 74 4D 65 6D 73 68 65 6C 6C 22}
$ = {22 2F 54 6F 6D 63 61 74 42 79 70 61 73 73 2F 44 6E 73 6C 6F 67 2F 22}
$ = {22 2F 54 6F 6D 63 61 74 42 79 70 61 73 73 2F 43 6F 6D 6D 61 6E 64 2F 22}
$ = {22 2F 54 6F 6D 63 61 74 42 79 70 61 73 73 2F 52 65 76 65 72 73 65 53 68 65 6C 6C 2F 22}
$ = {22 2F 54 6F 6D 63 61 74 42 79 70 61 73 73 2F 54 6F 6D 63 61 74 4D 65 6D 73 68 65 6C 6C 22}
$ = {22 2F 54 6F 6D 63 61 74 42 79 70 61 73 73 2F 53 70 72 69 6E 67 4D 65 6D 73 68 65 6C 6C 22}
$ = {22 2F 47 72 6F 6F 76 79 42 79 70 61 73 73 2F 43 6F 6D 6D 61 6E 64 2F 22}
$ = {22 2F 57 65 62 73 70 68 65 72 65 42 79 70 61 73 73 2F 55 70 6C 6F 61 64 2F 22}
condition:
1 of them
}
rule EXPL_Log4j_CVE_2021_44228_JAVA_Exception_Dec21_1 {
strings:
$xa1 = {22 68 65 61 64 65 72 20 77 69 74 68 20 76 61 6C 75 65 20 6F 66 20 42 61 64 41 74 74 72 69 62 75 74 65 56 61 6C 75 65 45 78 63 65 70 74 69 6F 6E 3A 20 22}
$sa1 = {22 2E 6C 6F 67 34 6A 2E 63 6F 72 65 2E 6E 65 74 2E 4A 6E 64 69 4D 61 6E 61 67 65 72 2E 6C 6F 6F 6B 75 70 28 4A 6E 64 69 4D 61 6E 61 67 65 72 22}
$sa2 = {22 45 72 72 6F 72 20 6C 6F 6F 6B 69 6E 67 20 75 70 20 4A 4E 44 49 20 72 65 73 6F 75 72 63 65 22}
condition:
$xa1 or all of ($sa*)
}
rule EXPL_Log4j_CVE_2021_44228_Dec21_Soft {
strings:
$ = {22 24 7B 6A 6E 64 69 3A 6C 64 61 70 3A 2F 22}
$ = {22 24 7B 6A 6E 64 69 3A 72 6D 69 3A 2F 22}
$ = {22 24 7B 6A 6E 64 69 3A 6C 64 61 70 73 3A 2F 22}
$ = {22 24 7B 6A 6E 64 69 3A 64 6E 73 3A 2F 22}
$ = {22 24 7B 6A 6E 64 69 3A 69 69 6F 70 3A 2F 22}
$ = {22 24 7B 6A 6E 64 69 3A 68 74 74 70 3A 2F 22}
$ = {22 24 7B 6A 6E 64 69 3A 6E 69 73 3A 2F 22}
$ = {22 24 7B 6A 6E 64 69 3A 6E 64 73 3A 2F 22}
$ = {22 24 7B 6A 6E 64 69 3A 63 6F 72 62 61 3A 2F 22}
condition:
1 of them
}
rule EXPL_Log4j_CVE_2021_44228_Dec21_OBFUSC {
strings:
$x1 = {22 24 25 37 42 6A 6E 64 69 3A 22}
$x2 = {22 25 32 35 32 34 25 32 35 37 42 6A 6E 64 69 22}
$x3 = {22 25 32 46 25 32 35 32 35 32 34 25 32 35 32 35 37 42 6A 6E 64 69 25 33 41 22}
$x4 = {22 24 7B 6A 6E 64 69 3A 24 7B 6C 6F 77 65 72 3A 22}
$x5 = {22 24 7B 3A 3A 2D 6A 7D 24 7B 22}
condition:
1 of them
}
rule EXPL_Log4j_CVE_2021_44228_Dec21_Hard {
strings:
$x1 = /\$\{jndi:(ldap|ldaps|rmi|dns|iiop|http|nis|nds|corba):\/[\/]?[a-z-\.0-9]{3,120}:[0-9]{2,5}\/[a-zA-Z\.]{1,32}\}/
$fp1r = /(ldap|rmi|ldaps|dns):\/[\/]?(127\.0\.0\.1|192\.168\.|172\.[1-3][0-9]\.|10\.)/
condition:
$x1 and not 1 of ($fp*)
}
rule SUSP_Base64_Encoded_Exploit_Indicators_Dec21 {
strings:
/* curl -s */
$sa1 = {22 59 33 56 79 62 43 41 74 63 79 22}
$sa2 = {22 4E 31 63 6D 77 67 4C 58 4D 67 22}
$sa3 = {22 6A 64 58 4A 73 49 43 31 7A 49 22}
/* |wget -q -O- */
$sb1 = {22 66 48 64 6E 5A 58 51 67 4C 58 45 67 4C 55 38 74 49 22}
$sb2 = {22 78 33 5A 32 56 30 49 43 31 78 49 43 31 50 4C 53 22}
$sb3 = {22 38 64 32 64 6C 64 43 41 74 63 53 41 74 54 79 30 67 22}
condition:
1 of ($sa*) and 1 of ($sb*)
}
rule SUSP_JDNIExploit_Indicators_Dec21 {
strings:
$xr1 = /(ldap|ldaps|rmi|dns|iiop|http|nis|nds|corba):\/\/[a-zA-Z0-9\.]{7,80}:[0-9]{2,5}\/(Basic\/Command\/Base64|Basic\/ReverseShell|Basic\/TomcatMemshell|Basic\/JBossMemshell|Basic\/WebsphereMemshell|Basic\/SpringMemshell|Basic\/Command|Deserialization\/CommonsCollectionsK|Deserialization\/CommonsBeanutils|Deserialization\/Jre8u20\/TomcatMemshell|Deserialization\/CVE_2020_2555\/WeblogicMemshell|TomcatBypass|GroovyBypass|WebsphereBypass)\//
condition:
filesize < 100MB and $xr1
}
rule SUSP_EXPL_OBFUSC_Dec21_1{
strings:
/* ${lower:X} - single character match */
$ = { 24 7B 6C 6F 77 65 72 3A ?? 7D }
/* ${upper:X} - single character match */
$ = { 24 7B 75 70 70 65 72 3A ?? 7D }
/* URL encoded lower - obfuscation in URL */
$ = {22 24 25 37 62 6C 6F 77 65 72 3A 22}
$ = {22 24 25 37 62 75 70 70 65 72 3A 22}
$ = {22 25 32 34 25 37 62 6A 6E 64 69 3A 22}
$ = {22 24 25 37 42 6C 6F 77 65 72 3A 22}
$ = {22 24 25 37 42 75 70 70 65 72 3A 22}
$ = {22 25 32 34 25 37 42 6A 6E 64 69 3A 22}
condition:
1 of them
}"
AND count > 0 AND path NOT LIKE "/var/log/gc%"

Source :
https://www.akamai.com/blog/security/recommendations-for-log4j-mitigation

Record-Breaking DDoS Attack in Europe

They’re back! 

Or, more accurately, the cybercriminals responsible for July’s record-setting European DDoS attack may have never left. In the weeks following our coverage of the previous incident, the victim (a customer based in Eastern Europe) has been bombarded relentlessly with sophisticated distributed denial-of-service (DDoS) attacks, ultimately paving the way for a new European packets per second (pps) DDoS record.

On Monday, September 12, 2022, Akamai successfully detected and mitigated the now-largest DDoS attack ever launched against a European customer on the Prolexic platform, with attack traffic abruptly spiking to 704.8 Mpps in an aggressive attempt to cripple the organization’s business operations.

Attack breakdown

Adversaries are constantly evolving their techniques, tactics, and procedures to evade detection and maximize disruption, as demonstrated by this ongoing attack campaign. Let’s break down and compare the two record-setting events. 

 July AttackSeptember Attack
Peak pps659.6 Mpps704.8 Mpps
Cumulative Attacks75201
IPs Targeted5121813
VectorUDPUDP
Distribution1 location6 locations
Date of AttackJuly 21, 2022September 12, 2022
Top Scrubbing LocationsHKG, LON, TYOHKG, TYO, LON

Prior to June 2022, this customer only saw attack traffic against its primary data center; however, they recognized the importance of a comprehensive defensive strategy early on, and onboarded their 12 remaining global data centers to the Prolexic platform for peace of mind. This proved highly fortuitous, as the attack campaign expanded unexpectedly, hitting six different global locations, from Europe to North America. These events reflect a growing trend in which adversaries are increasingly hitting deep-reconnaissance targets

Attack mitigation

To thwart an attack of this magnitude and complexity, Akamai leveraged a balanced combination of automated and human mitigation: 99.8% of the assault was pre-mitigated thanks to the customer’s proactive defensive posture, a preemptive security measure implemented by the Akamai Security Operations Command Center (SOCC). Remaining attack traffic and follow-up attacks leveraging different vectors were swiftly mitigated by our frontline security responders. In the wake of increasingly sophisticated DDoS attacks worldwide, many businesses struggle with the staffing of internal security resources, and instead look to Akamai’s SOCC to augment and act as an extension of their incident response team.

The attackers’ command and control system had no delay in activating the multidestination attack, which escalated in 60 seconds from 100 to 1,813 IPs active per minute. Those IPs were spread across eight distinct subnets in six distinct locations. An attack this heavily distributed could drown an underprepared security team in alerts, making it difficult to assess the severity and scope of the intrusion, let alone fight the attack. Sean Lyons, Senior Vice President and General Manager of Infrastructure Security says, “Akamai Prolexic’s DDoS specialization culture, focus on customer infrastructure designs and history are rooted in defending the most complex, multifaceted attacks, and our platform is equipped with purpose-built tooling for rapid threat mitigation, even in the ‘fog of war.’ “

Akamai Prolexic’s DDoS specialization culture, focus on customer infrastructure designs and history are rooted in defending the most complex, multifaceted attacks, and our platform is equipped with purpose-built tooling for rapid threat mitigation, even in the ‘fog of war.

Sean Lyons, Senior Vice President and General Manager of Infrastructure Security
Distinct IP Count Per Minute.


Conclusion

Having a proven DDoS mitigation strategy and platform in place is imperative for shielding your business from downtime and disruption. Learn more about Akamai’s industry-leading DDoS solutions and how our advanced attack-fighting capabilities keeps organizations safe from increasingly sophisticated threats. 

Under attack? 

Click here for 24/7 emergency DDoS protection.

Guidance on minimizing DDoS risk

  • Immediately review and implement Cybersecurity and Infrastructure Security Agency (CISA) recommendations. 
  • Review critical subnets and IP spaces, and ensure that they have mitigation controls in place.
  • Deploy DDoS security controls in an always-on mitigation posture as a first layer of defense, to avoid an emergency integration scenario and to reduce the burden on incident responders. If you don’t have a trusted and proven cloud-based provider, get one now. 
  • Proactively pull together a crisis response team and ensure runbooks and incident response plans are up-to-date. For example, do you have a runbook to deal with catastrophic events? Are the contacts within the playbooks updated? A playbook that references outdated tech assets or people who have long left the company isn’t going to help.

For additional information on the steps you can take to protect your organization, please visit the following CISA resources:

How GRC protects the value of organizations — A simple guide to data quality and integrity

Contemporary organizations understand the importance of data and its impact on improving interactions with customers, offering quality products or services, and building loyalty.

Data is fundamental to business success. It allows companies to make the right decisions at the right time and deliver the high-quality, personalized products and services that customers expect.

There is a challenge, though.

Businesses are collecting more data than ever before, and new technologies have accelerated this process dramatically. As a result, organizations have significant volumes of data, making it hard to manage, protect, and get value from it.

Here is where Governance, Risk, and Compliance (GRC) comes in. GRC enables companies to define and implement the best practices, procedures, and governance to ensure the data is clean, safe, and reliable across the board.

More importantly, organizations can use GRC platforms like StandardFusion to create an organizational culture around security. The objective is to encourage everyone to understand how their actions affect the business’s success.

Now, the big question is:

Are organizations getting value from their data?

To answer that, first, it’s important to understand the following two concepts.

Data quality

Data quality represents how reliable the information serves an organization’s specific needs — mainly supporting decision-making.

Some of these needs might be:

  • Operations – Where and how can we be more efficient?
  • Resource distribution – Do we have any excess? Where? And why?
  • Planning – How likely is this scenario to occur? What can we do about it?
  • Management – What methods are working? What processes need improvement?

From a GRC standpoint, companies can achieve data quality by creating rules and policies so the entire organization can use that data in the same ways. These policies could, for example, define how to label, transfer, process, and maintain information.

Data Integrity

Data integrity focuses on the trustworthiness of the information in terms of its physical and logical validity. Some of the key characteristics to ensure the usability of data are:

  • Consistency
  • Accuracy
  • Validity
  • Truthfulness

GRC’s goal for data integrity is to keep the information reliable by eliminating unwanted changes between updates or modifications. It is all about the data’s accuracy, availability, and trust.

How GRC empowers organizations achieve high-quality data

Organizations that want to leverage their data to generate value must ensure the information they collect is helpful and truthful. The following are the key characteristics of high-quality data:

  • Completeness: The expected data to make decisions is present.
  • Uniqueness: There is no duplication of data.
  • Timeliness: The data is up-to-date and available to use when needed.
  • Validity: The information has the proper format and matches the requirements.
  • Accuracy: The data describes the object correctly in a real-world context.
  • Consistency: The data must be the same across multiple databases

A powerful way to make sure the company’s data maintains these six characteristics is by leveraging the power of GRC.

Why?

Because GRC empowers organizations to set standards, regulations, and security controls to avoid mistakes, standardize tasks and guide personnel when collecting and dealing with vital information.

GRC helps organizations answer the following questions:

  • How is the company ensuring that data is available for internal decision and for the clients?
  • Is everyone taking the proper steps to collect and process data?
  • Have redundancies been removed?
  • Is the organization prepared for unexpected events?
  • Does the organization have a backup system?
  • Are the key processes standardized?

Overall, GRC aims to build shared attitudes and actions towards security.

Why every organization needs high-quality data and how GRC helps

Unless the data companies collect is high-quality and trustworthy, there’s no value in it — it becomes a liability and a risk for the organization.

Modern companies recognize data as an essential asset that impacts their bottom line. Furthermore, they understand that poor data quality can damage credibility, reduce sales, and minimize growth.

In today’s world, organizations are aiming to be data-driven. However, becoming a data-driven organization is tough without a GRC program.

How so?

Governance, Risk, and Compliance enable organizations to protect and manage data quality by creating standardized, controlled, and repeatable processes. This is key because every piece of data an organization process has an associated risk.

By understanding these risks, companies can implement the necessary controls and policies for handling and extracting data correctly so that every department can access the same quality information.

Organizations without structured data can’t provide any value, and they face the following risks:

  • Missed opportunities: Many leads are lost because of incomplete or inaccurate data. Also, incorrect data means wrong insights, resulting in missing critical business opportunities.
  • Lost revenue: According to 2021 Gartner’s research, the average financial impact of poor data quality on organizations is $12.9 million annually.
  • Poor customer experience: When data quality is poor, organizations can’t identify customers’ pain points and preferences. As a result, the offer of products or services doesn’t match customers’ needs and expectations.
  • Lack of compliance: In some industries where regulations control relationships or customer transactions, maintaining good-quality data can be the difference between compliance and fines of millions of dollars. GRC is vital to keep compliance in the loop as new regulations evolve worldwide.
  • Increased expenses: A few years ago, IBM’s research showed that businesses lost 3.1 trillion dollars in the US alone. How? Spending time to find the correct data, fixing errors, and just hunting for information and confirmed sources.
  • Misanalysis: Around 84% of CEOs are concerned about the quality of data they are deciding on. Wrong data will lead to bad decisions and ultimately damage operations, finances, HR, and every area within the company.
  • Reputational damage: In today’s world, customers spend a lot of their time reading reviews before making a decision. For instance, if a company fails to satisfy its customers, everyone will know.
  • Reduced efficiency: Poor data quality forces employees to do manual data quality checks, losing time and money.

To sum up:

Having the right processes to manipulate data will prevent organizations from missing business opportunities, damaging their reputation, and doing unnecessary repetitive tasks.

How GRC supports data-driven business and what are the key benefits of clean data

Data-driven businesses embrace the use of data (and its analysis) to get insights that can improve the organization. The efficient management of big data through GRC tools helps identify new business opportunities, strengthen customer experiences, grow sales, improve operations, and more.

For example, GRC helps data-driven businesses by allowing them to create and manage the right policies to process and protect the company’s data.

More importantly, organizations can also control individual policies to ensure they have been distributed and acknowledged accordingly.

In terms of benefits, although clean data has numerous “easy-to-identify” benefits, many others are not easily identified. Trusting data not just improves efficiency and results; it also helps with fundamental, vital factors that affect business performance and success.

What are these factors?

Fundamental benefits:

  • Profits/Revenue
  • Internal communication
  • Employees confidence to share information
  • Company’s reputation
  • Trust

Operational benefits:

  • Efficiency
  • Business outcome
  • Privacy issues
  • Customer satisfaction
  • Better audience-targeting

How GRC protect the value of businesses and their data

In this contemporary world, companies should be measured not only via existing financial measurements but also by the amount of monetizable data they can capture, consume, store and use. More importantly, how the data helps the organization’s internal processes to be faster and more agile.

When people think of high-quality data and big data, they usually associate these two with big organizations, especially technology and social media platforms. However, big quality data gives organizations of any size plenty of benefits.

Data quality and integrity help organizations to:

  • Understand their clients
  • Enhance business operations
  • Understand industry best practices
  • Identify the best partnership options
  • Strengthen business culture
  • Deliver better results
  • Make more money

Using the right GRC platform helps companies create and control the policies and practices to ensure their data is valid, consistent, accurate, and complete — allowing them to get all these benefits.

The key to using GRC tools is that businesses can produce what customers expect on a greater scale and with higher precision and velocity.

Now, what does this have to do with value?

By protecting the value of data, organizations are protecting their overall worth. Indeed, GRC empowers companies to create a culture of value, giving everyone education and agency so they can make better decisions.

Also, GRC helps companies tell better security stories. These stories aim to build trust with customers and partners, enter new markets, and shorten sale cycles.

To summarize:

A better understanding of customers and processes — through data — will lead to better products and services, enhanced experiences, and long-lasting relationships with customers. All these represent growth and more revenue for companies.

What happens when a company’s data is not safe? Can it damage their value?

Trust is a vital component of any interaction (business or personal) and, as such, is mandatory for organizations to protect it — without trust, there is no business.

When data is not protected, the chances of breaches are higher, causing direct and indirect costs.

Direct costs are:

  • Fines
  • Lawsuits
  • Stolen information
  • Compensations
  • Potential business loss

Indirect costs are:

  • Reputation/Trust
  • PR activities
  • Lost revenue from downtime
  • New and better protection

Often, reputation damages can cause long-term harm to organizations, making it hard for them to acquire and maintain business. In fact, reputation loss is the company’s biggest worry, followed by financial costs, system damage, and downtime.

So, what does all this mean?

It’s not just about collecting data; it is also about how companies reduce risks and leverage and protect the data they have. GRC integrates data security, helping organizations be better prepared against unauthorized access, corruption, or theft.

Moreover, GRC tools can help elevate data security by controlling policies, regulations, and predictable issues within the organization.

The bottom line?

When companies can’t get or maintain customers because of a lack of trust, the organization’s value will be significantly lower — or even zero. Unfortunately, this is even more true for small and medium size companies.

How to use GRC to achieve and maintain high-quality data?

Many organizations have trouble managing their data, which, unfortunately, leads to poor decisions and a lack of trust from employees and customers.

Moreover, although companies know how costly wrong information is, many are not working on ensuring quality data through the right processes and controls. In fact, Harward Business Review said that 47% of newly created data records have at least one critical error.

Why is that?

Because there is a lack of focus on the right processes and systems that need to be in place to ensure quality data.

What do poor processes cause?

  • Human errors
  • Wrong data handling
  • Inaccurate formatting
  • Different sets of data for various departments
  • Unawareness of risks
  • Incorrect data input or extraction

Fortunately, GRC’s primary goal is to develop the right policies and procedures to ensure everyone in the organization appropriately manages the data.

GRC aims to create a data structure based on the proper governance that will dictate how people organize and handle the company’s information. As a result, GRC will empower companies to be able to extract value from their data.

That is not everything.

Governance, Risk, and Compliance allow organizations to understand the risks associated with data handling and guide managers to create and distribute the policies that will support any data-related activity.

The following are some of the ways GRC is used to achieve and maintain high-quality data:

  • Data governance: Data governance is more than setting rules and telling people what to do. Instead, it is a collection of processes, roles, policies, standards, and metrics that will lead to a cultural change to ensure effective management of information throughout the organization.
  • Education: Achieving good data quality is not easy. It requires a deep understanding of data quality principles, processes, and technologies. GRC facilitates the education process by allowing the organization to seamlessly implement, share, and communicate its policies and standards to every department.
  • Everyone is involved: Everyone must understand the organization’s goal for data quality and the different processes and approaches that will be implemented. GRC focuses on cultural change.
  • Be aware of threats: When managing data, each process has risks associated with it. The mission of GRC is for the organization to recognize and deal with potential threats effectively. When companies are aware of risks, they can implement the necessary controls and rules to protect the data.
  • One single source of truth: A single source of truth ensures everyone in the organization makes decisions based on the same consistent and accurate data. GRC can help by defining the governance over data usage and manipulation. Furthermore, GRC makes it easy to communicate policies, see who the policy creator is, and ensure employees are acting according to the standards.

Get a free consultation with StandardFusion to learn more about how GRC and data governance can boost your organization’s value.

Source :
https://thehackernews.com/2022/09/how-grc-protects-value-of-organizations.html

How to set up the Surveillance Station of QNAP NAS?

Introduction

To satisfy the increasing demand for embedded network surveillance solutions on NAS, QNAP unveiled a value-added application ‘Surveillance Station’ on its All-in-One Turbo NAS Series. The Surveillance Station enables users to configure and connect many IP cameras at the same time and manage functions including live audio & video monitoring, recording, and playback. Installation and configuration can be easily carried out remotely in a web browser in a few steps. Various recording modes are provided: continuous recording, motion-detection recording, and scheduled recording. Users can flexibly define the recording settings according their security plans.
The Surveillance Station supports a large number of IP camera brands. You can find a list of supported cameras at: https://www.qnap.com/compatibility.

Contents

  • Plan your home/office network topology
  • Set up the IP Cameras
  • Configure the Surveillance Station on the QNAP NAS
  • Configure Alarm Recording on the QNAP NAS
  • Play Video Files from the Surveillance Station

Plan Your Home/Office Network Topology

Write down your plan of the home/office network before starting to set up the surveillance system. Consider the following when doing so:

  • The IP address of the NAS
  • The IP address of the cameras
  • The IP address of your router and the wireless SSID

Your computer, the NAS, and the IP cameras should be installed to the same router in LAN. Assign fixed IP addresses for the NAS and the IP cameras.
For example:

  • The LAN IP of the router: 192.168.1.100
  • Camera 1 IP: 192.168.1.10 (fixed IP)
  • Camera 2 IP: 192.168.1.20 (fixed IP)
  • NAS IP: 192.168.1.60 (fixed IP)

Set up the IP Cameras

Configure the IP address for both IP cameras using the following steps.
You can download a camera IP Finder from official website of your camera’s vendor.
The name of the IP finder may differ between vendors. IP Finder is a utility that helps you search for the IP address of the camera.
CONNECT the IP camera to your home/office network with a network cable and run the IP Finder. Set the IP address of the cameras so that they are on the same LAN as the computer. You will then be able to login to the configuration page of the camera with a web browser. Enter the IP address of the first camera as 192.168.1.10. The default gateway should be set as the LAN IP of the router (192.168.1.100 in our example).

Note: The default IP and ID of administrator may differ based on what camera model is used.

ENTER the web configuration page of the IP camera.
You will then be able to view the monitoring image.

GO to ‘Network/ Network’ and check the IP settings of the camera.

NEXT, if you are using a Wireless IP CAM, please go to “Network/Wireless” and configure the wireless setting of your camera. Please ensure the camera’s settings are completed.

Repeat the above steps to set up the second camera.
To summarize, so far you have finished the following settings:

  • Camera 1 IP: 192.168.1.10
  • Camera 2 IP: 192.168.1.20

Note:
If you forget the camera settings, please press the reset button at the back of the camera for 5-10 seconds. The camera will be restored to default settings. You can then set the IP address and login to the camera’s configuration page with using the default login name and password. The reset function may differ by the brand of the camera. Please refer to the camera’s user manual in advance.

Configure the Surveillance Station on the QNAP NAS

Go to “Control Panel” > “System Settings” >”Network” > “TCP/IP” and press the “Edit” button to specify a fixed IP to the NAS: 192.168.1.60. The default gateway should be the same as the LAN IP of your router, which is 192.168.1.100 in our example.

Install Surveillance Station

  • Auto installation: Go to “App Center” > “Surveillance” > “Surveillance Station” and click “Add to QTS” to start installation.
  • Manual installation: Download the Surveillance Station QPKG from the App Center on the QNAP website. Then you can install it by clicking the “Install Manually” button and by selecting the location of the Surveillance Station QPKG to start installing.

Please note: To ensure proper operations of Surveillance Station, we recommend rebooting the Turbo NAS after its installation is completed.

In the Surveillance Station, please go to “Settings” and select “Camera 1” then click “” to add the camera configuration, e.g. name, model, IP address, recording setting and recording schedule.

In our demonstration we will assign the following IPs to each camera:
Camera 1 IP: 192.168.1.10
Camera 2 IP: 192.168.1.20

Note:
Before applying the settings, you may click “Test” on the right to ensure the connection to the IP camera is successful.

You can enable or change the recording option of the camera in next page. Click “next” to move to the next page.

On this page, you will see the “Schedule Settings.” In the table, 0~23 represents the time period. For example, 0 means 00:00~01:00, 1 means 01:00~02:00. You can set a continuous recording in any period that you want.

Then you will see the “Confirm Settings” on the next page.

After you have added the network cameras to the NAS, go to the “Monitor” page. The first time you access this page by browser, you have to install the ActiveX control (QMon.cab) in order to view the images of Camera 1 and Camera 2.

Note:
You can use the Surveillance Station in Chrome, Firefox or IE. The browser will prompt you to install the “ActiveX control” (QMon.cab) before using Monitor or Playback functions. Please follow the on-screen instructions to complete the installation.

Note:
When you click on the monitoring screen of a camera, the frame will become orange. You can use the s configuration page.
In Surveillance Station 5, there is a new feature called “Instant Playback”. You can click the floating button to play recording and find recent event.

Configure Alarm Recording on the QNAP NAS

The Surveillance Station supports alarm recording by schedule. To use this function, go to “Camera Settings” > “Alarm Settings” in the Surveillance Station. You could select ‘Traditional Mode’ to do basic configurations or ‘Advanced Mode’ to define advanced alarm events.

  • Traditional Mode :
    You may define criteria enabling alarm recording then click ‘Apply’ to save the changes.
  • Advanced Mode :
    You may select the event on the left side and add an action on the right side by clicking “Add”.

Then you may choose the action type you need for this event.

The event “Motion Detection” has a corresponding action “Recording”.

Play Video Files from the Surveillance Station

You have to click or to enter the playback page and follow the steps below to play the video files on the remote Surveillance Station.

1. Drag and drop camera(s) from the server/camera tree to the respective playback window(s) to select the channel(s) for playback.

2. Select playback date from.You can examine each channel to know the time range when the files were recorded for each IP camera. The blue cells indicate regular recording files and the red cells indicate alarm recording files. If it is blank, it means no files are recorded at that time.

3. Clickto start the playback. You can control the speed and playback direction by dragging the button to right or left on the shuttle bar.

4. Specify the time to play back the recording files at that moment. You can view the preview image on the timeline bar to search the moment you want to play.

5. Clickto control all the playback windows to play back the recording files. When this function is enabled, the playback options (play, pause, stop, previous/next frame, previous/next file, speed adjustment) will be applied to all the playback windows.

Source :
https://www.qnap.com/en/how-to/tutorial/article/how-to-set-up-the-surveillance-station-of-qnap-nas

KB5004442—Manage changes for Windows DCOM Server Security Feature Bypass (CVE-2021-26414)

Summary

The Distributed Component Object Model (DCOM) Remote Protocol is a protocol for exposing application objects using remote procedure calls (RPCs). DCOM is used for communication between the software components of networked devices.  

Hardening changes in DCOM were required for CVE-2021-26414. Therefore, we recommended that you verify if client or server applications in your environment that use DCOM or RPC work as expected with the hardening changes enabled.

To address the vulnerability described in CVE-2021-26414, you must install updates released September 14, 2021 or later and enable the registry key described below in your environment. We recommended that you complete testing in your environment and enable these hardening changes as soon as possible. If you find issues during testing, you must contact the vendor for the affected client or server software for an update or workaround before early 2022.

Note We recommend that you update your devices to the latest security update available to take advantage of the advanced protections from the latest security threats.

Timeline

Update releaseBehavior change
June 8, 2021Hardening changes disabled by default but with the ability to enable them using a registry key.
June 14, 2022Hardening changes enabled by default but with the ability to disable them using a registry key.
March 14, 2023Hardening changes enabled by default with no ability to disable them. By this point, you must resolve any compatibility issues with the hardening changes and applications in your environment.

Registry setting to enable or disable the hardening changes

During the timeline phases in which you can enable or disable the hardening changes for CVE-2021-26414, you can use the following registry key:

  • Path : HKEY_LOCAL_MACHINE\SOFTWARE\Microsoft\Ole\AppCompat
  • Value Name: “RequireIntegrityActivationAuthenticationLevel”
  • Type: dword
  • Value Data: default = 0x00000000 means disabled. 0x00000001 means enabled. If this value is not defined, it will default to enabled.

Note You must enter Value Data in hexadecimal format. 

Important You must restart your device after setting this registry key for it to take effect.

Note Enabling the registry key above will make DCOM servers enforce an Authentication-Level of RPC_C_AUTHN_LEVEL_PKT_INTEGRITY or higher for activation.

Note This registry value does not exist by default; you must create it. Windows will read it if it exists and will not overwrite it.

New DCOM error events

To help you identify the applications that might have compatibility issues after we enable DCOM security hardening changes, we added new DCOM error events in the System log; see the tables below. The system will log these events if it detects that a DCOM client application is trying to activate a DCOM server using an authentication level that is less than RPC_C_AUTHN_LEVEL_PKT_INTEGRITY. You can trace to the client device from the server-side event log and use client-side event logs to find the application.

Server events

Event IDMessage
10036“The server-side authentication level policy does not allow the user %1\%2 SID (%3) from address %4 to activate DCOM server. Please raise the activation authentication level at least to RPC_C_AUTHN_LEVEL_PKT_INTEGRITY in client application.”(%1 – domain, %2 – user name, %3 – User SID, %4 – Client IP Address)

Client events

Event IDMessage
10037“Application %1 with PID %2 is requesting to activate CLSID %3 on computer %4 with explicitly set authentication level at %5. The lowest activation authentication level required by DCOM is 5(RPC_C_AUTHN_LEVEL_PKT_INTEGRITY). To raise the activation authentication level, please contact the application vendor.”
10038“Application %1 with PID %2 is requesting to activate CLSID %3 on computer %4 with default activation authentication level at %5. The lowest activation authentication level required by DCOM is 5(RPC_C_AUTHN_LEVEL_PKT_INTEGRITY). To raise the activation authentication level, please contact the application vendor.”(%1 – Application Path, %2 – Application PID, %3 – CLSID of the COM class the application is requesting to activate, %4 – Computer Name, %5 – Value of Authentication Level)

Availability

These error events are only available for a subset of Windows versions; see the table below.

Windows versionAvailable on or after these dates
Windows Server 2022September 27, 2021KB5005619
Windows 10, version 2004, Windows 10, version 20H2, Windows 10, version 21H1September 1, 2021KB5005101
Windows 10, version 1909August 26, 2021KB5005103
Windows Server 2019, Windows 10, version  1809August 26, 2021KB5005102
Windows Server 2016, Windows 10, version 1607September 14, 2021KB5005573
Windows Server 2012 R2 and Windows 8.1October 12, 2021KB5006714

Source :
https://support.microsoft.com/en-us/topic/kb5004442-manage-changes-for-windows-dcom-server-security-feature-bypass-cve-2021-26414-f1400b52-c141-43d2-941e-37ed901c769c

Integrating CrowdSec with Firewall appliances

In this article, we’ll show you how to integrate CrowdSec at the appliance level of a modern IT infrastructure thanks to Blocklist Mirror component.

The majority of modern IT infrastructures already includes some form of the security appliance. Our users requested some way to integrate CrowdSec at the appliance level, within their pre-existing ecosystem. In this article, we’ll show you how to make it happen, using the new crowdsec-blocklist-mirror component.  

Overview

Leveraging the firewall’s ability to pull IP blocklists from external HTTP URLs, we’ll deploy a crowdsec-blocklist-mirror in the network and configure the appliance to pull IP lists from it.

For this example we are going to use FortiGate, but the steps are similar for other vendors.

Deploying Blocklist Mirror

For this, you’ll need a machine that is accessible from the appliance. You can deploy the blocklist mirror in multiple ways, either by installing from a Linux package manager or deploying with docker. This machine should also be able to access the CrowdSec Local API. The Local API can either be installed on the same machine or can be deployed elsewhere.

For this tutorial we’ll assume that CrowdSec Local API is already installed and listening at port 8080. The OS being used here is ubuntu.

Install Blocklist Mirror

Make sure you have set up the CrowdSec repository. See this to learn how. Then run: 

sudo apt install crowdsec-blocklist-mirror

Or if you’re using a RPM-based Linux distribution, run 

‍sudo yum install crowdsec-blocklist-mirror

Configure Blocklist Mirror

After this, we will check and eventually modify the config file located at /etc/crowdsec/bouncers/crowdsec-blocklist-mirror.yaml

Make sure that the lapi_url parameter is correct. If your Local API is deployed on some other machine, please change the lapi_url to the appropriate address and set the lapi_key to a key generated by running the command sudo cscli bouncers add blocklistMirror on the LAPI machine.

By default the blocklist mirror server listens at 127.0.0.1:41412, let’s change this to 0.0.0.0:80 to make this simpler. We can do this by setting listen_uri parameter to 0.0.0.0:80

To load a new configuration use this command:

sudo systemctl restart crowdsec-blocklist-mirror

You can now see the blocklist being served at http://127.0.0.1/security/blocklist.

You can do things like setting authentication, multiple endpoints, TLS etc by tweaking the configuration. Learn more here.

Configure firewall appliance to pull blocklist

This tutorial assumes you are using a FortiGate firewall. Please note that for other vendors steps may vary.

Configuring external blocklist

Open the FortiGate dashboard and navigate to Security Fabric -> External Connectors  and click on Create New button.

Scroll down and select Threat Feed -> IP Address and create a connector

Make sure that the appliance can access the URL. This URL should be the one where the blocklist we deployed earlier is serving the IP-list. Finally, click OK.

After a while you can see that this threat feed will be filled. These are from blocklist mirror. 

Create a firewall policy referencing the blocklist

You can now create a firewall policy/policy which will deny access to your infrastructure if the incoming IP is present in blocklist. To do this you can navigate to Policy & Objects and click on the Create New button. 

Specify the fields as required, and you need to reference the blocklist by selecting it in the Source dropdown

All you have to do next is save the policy and enable it by clicking OK.

Great job!

To sum up

In this way we leveraged CrowdSec in a firewall appliance by using blocklist mirror bouncer. You can further configure the blocklist mirror with authentication, TLS and other security goodies. If you have a question or a suggestion feel free to reach out to us on Discord.

Source :
https://www.crowdsec.net/blog/integrating-crowdsec-with-firewall-appliances

Password Security and the Internet of Things (IoT)

The Internet of Things (IoT) is here, and we’re using it for everything from getting instant answers to random trivia questions to screening visitors at the door. According to Gartner, we were expected to use more than 25 billion internet-connected devices by the end of 2021. But as our digital lives have become more convenient, we might not yet have considered the risks involved with using IoT devices.

How can you keep yourself secure in today’s IoT world, where hackers aim to outsmart your smart home? First we’ll look at how hackers infiltrate the IoT, and then we’ll look at what you can do right now to make sure the IoT is working for you – not against you.

How hackers are infiltrating the Internet of Things

While we’ve become comfortable asking voice assistants to give us the weather forecast while we prep our dinners, hackers have been figuring out how to commandeer our IoT devices for cyber attacks. Here are just a few examples of how cyber criminals are already infiltrating the IoT.

Gaining access to and control of your camera

Have you ever seen someone with a sticker covering the camera on their laptop or smartphone? There’s a reason for that. Hackers have been known to gain access to these cameras and spy on people. This has become an even more serious problem in recent years, as people have been relying on videoconferencing to safely connect with friends and family, participate in virtual learning, and attend telehealth appointments during the pandemic. Cameras now often come with an indicator light that lets you know whether they’re being used. It’s a helpful protective measure, but not a failsafe one.

Using voice assistants to obtain sensitive information

According to Statista, 132 million Americans used a digital voice assistant once a month in 2021. Like any IoT gadget, however, they can be vulnerable to attack. According to Ars Technica, academic researchers have discovered that the Amazon Echo can be forced to take commands from itself, which opens the door to major mischief in a smart home. Once an attacker has compromised an Echo, they can use it to unlock doors, make phone calls and unauthorized purchases, and control any smart home appliances that the Echo manages.

Many bad actors prefer the quiet approach, however, slipping in undetected and stealing information. They can piggyback on a voice assistant’s privileged access to a victim’s online accounts or other IoT gadgets and make off with any sensitive information they desire. With the victim being none the wiser, the attackers can use that information to commit identity fraud or stage even more ambitious cyber crimes.

Hacking your network and launching a ransomware attack

Any device that is connected to the internet, whether it’s a smart security system or even a smart fridge, can be used in a cyber attack. Bad actors know that most people aren’t keeping their IoT gadgets’ software up to date in the same way they do their computers and smartphones, so they take advantage of that false sense of security. Once cyber criminals have gained access to an IoT device, they can go after other devices on the same network. (This is because most home networks are designed to trust devices that are already connected to them.) When these malicious actors are ready, they can launch a ransomware attack that brings your entire digital life to a halt – unless you agree to fork over a hefty sum in bitcoin, that is.

Using bots to launch a DDOS attack

Although most people never notice it, hackers can and do infect IoT devices with malware en masse, gaining control over them in the process. Having turned these zombie IoT devices into bots, the hackers then collectively use them to stage what’s called a botnet attack on their target of choice. This form of assault is especially popular for launching distributed denial of service (DDOS) attacks, in which all the bots in a botnet collectively flood a target with network requests until it buckles and goes offline.

How you can keep your Internet of Things gadgets safe from hackers

So how can you protect your IoT devices from these determined hackers? Fortunately, you can take back control by becoming just a little more cyber smart. Here are a few ways to keep your IoT gadgets safe from hackers:

  • Never use the default settings on your IoT devices. Although IoT devices are designed to be plug-and-play so you can start enjoying them right away, their default settings are often not nearly as secure as they should be. With that in mind, set up a unique username and strong password combination before you start using any new IoT technology. While you’re at it, see if there’s an option to encrypt the traffic to and from your IoT device. If there is, turn it on.
  • Keep your IoT software up to date. Chances are, you regularly install the latest software updates on your computer and phone. Hackers are counting on you to leave your IoT gadgets unpatched, running outdated software with vulnerabilities they can exploit, so be sure to keep the software on your IoT devices up to date as well.
  • Practice good password hygiene. We all slip into bad password habits from time to time – it’s only human – but they put our IoT security at risk. With this in mind, avoid re-using passwords and be sure to set unique, strong passwords on each of your IoT devices. Update those passwords from time to time, too. Don’t store your passwords in a browser, and don’t share them via email. A password manager can help you securely store and share your passwords, so hackers never have a chance to snatch them.
  • Use secure, password-protected WiFi. Cyber criminals are notorious for sneaking onto open, insecure WiFi networks. Once they’re connected, they can spy on any internet activity that happens over those networks, steal login credentials, and launch cyber attacks if they feel like it. For this reason, make sure that you and your IoT devices only use secure, password-protected WiFi.
  • Use multi-factor authentication as an extra layer of protection. Multi-factor authentication (MFA), gives you extra security on top of all the other measures we mentioned above. It asks you to provide one more credential, or factor, in addition to a password to confirm you are who you say you are. If you have MFA enabled and a hacker tries to log in as you, you’ll get a notification that a login attempt is in progress. Whenever you have the option to enable MFA on any account or technology, take advantage of it.

Protect your Internet of Things devices with smart password security

The IoT is making our lives incredibly convenient, but that convenience can be a little too seductive at times. It’s easy to forget that smart home devices, harmless-looking and helpful as they are, can be targeted in cyber attacks just like our computers and phones. Hackers are counting on you to leave your IoT gadgets unprotected so they can use them to launch damaging attacks. By following these smart IoT security tips, you can have the best of both worlds, enjoying your smart life and better peace of mind at the same time.

Learn how LastPass Premium helps you strengthen your password security.

Source :
https://blog.lastpass.com/2022/08/password-security-and-the-iot/

High Severity Vulnerability Patched in Download Manager Plugin

On July 8, 2022 the Wordfence Threat Intelligence team initiated the responsible disclosure process for a vulnerability we discovered in “Download Manager,” a WordPress plugin that is installed on over 100,000 sites. This flaw makes it possible for an authenticated attacker to delete arbitrary files hosted on the server, provided they have access to create downloads. If an attacker deletes the wp-config.php file they can gain administrative privileges, including the ability to execute code, by re-running the WordPress install process.

Wordfence PremiumWordfence Care, and Wordfence Response received a firewall rule on July 8, 2022 to provide protection against any attackers that try to exploit this vulnerability. Wordfence Free users will receive this same protection 30 days later on August 7, 2022.

We attempted to reach out to the developer on July 8, 2022, the same day we discovered the vulnerability. We never received a response so we sent the full details to the WordPress.org plugins team on July 26, 2022. The plugin was fully patched the next day on July 27, 2022.

We strongly recommend ensuring that your site has been updated to the latest patched version of “Download Manager”, which is version 3.2.53 at the time of this publication.

Description: Authenticated (Contributor+) Arbitrary File Deletion
Affected Plugin: Download Manager
Plugin Slug: download-manager
Plugin Developer: W3 Eden, Inc.
Affected Versions: <= 3.2.50
CVE ID: CVE-2022-2431
CVSS Score: 8.8 (High)
CVSS Vector: CVSS:3.1/AV:N/AC:L/PR:L/UI:N/S:U/C:H/I:H/A:H
Researcher/s: Chloe Chamberland
Fully Patched Version: 3.2.51

Download Manager is a popular WordPress plugin designed to allow site content creators to share downloadable files that are stored as posts. These downloads can be displayed on the front-end of the WordPress site for users to download. Unfortunately, vulnerable versions of the plugin contain a bypass in how the downloadable file is stored and subsequently deleted upon post deletion that make it possible for attackers to delete arbitrary files on the server.

More specifically, vulnerable versions of the plugin register the deleteFiles() function that is called via the before_delete_post hook. This hook is triggered right before a post has been deleted and its intended functionality in this case is to delete any files that may have been uploaded and associated with a “download” post.

At first glance this looks like a relatively safe functionality assuming the originally supplied file path is validated. Unfortunately, however, that is not the case as the path to the file saved with the “download” post is not validated to ensure it was a safe file type or in a location associated with a “download” post. This means that a path to an arbitrary file with any extension can be supplied via the file[files][] parameter when saving a post and that would be the file associated with the “download” post. On many configurations an attacker could supply a path such as /var/www/html/wp-config.php that would associate the site’s WordPress configuration file with the download post.

32add_action('before_delete_post', array($this, 'deleteFiles'), 10, 2);
979899100101102103104functiondeleteFiles($post_id, $post){    $files= WPDM()->package->getFiles($post_id, false);    foreach($filesas$file) {        $file= WPDM()->fileSystem->locateFile($file);        @unlink($file);    }}

When the user goes to permanently delete the “download” post the deleteFiles() function will be triggered by the before_delete_post hook and the supplied file will be deleted, if it exists.

This can be used by attackers to delete critical files hosted on the server. The wp-config.php file in particular is a popular target for attackers as deletion of this file would disconnect the existing database from the compromised site and allow the attacker to re-complete the initial installation process and connect their own database to the site. Once a database is connected, they would have access to the server and could upload arbitrary files to further infect the system.

Demonstrating site reset upon download post deletion.

This vulnerability requires contributor-level access and above to exploit, so it serves as an important reminder to make sure you don’t provide contributor-level and above access to untrusted users. It’s also important to validate that all users have strong passwords to ensure your site won’t subsequently be compromised as a result of a vulnerability like this due to an unauthorized actor gaining access via a weak or compromised password.

Timeline

  • July 8, 2022 – Discovery of the Arbitrary File Deletion Vulnerability in the “Download Manager” plugin. A firewall rule is released to Wordfence PremiumWordfence Care, and Wordfence Response users. We attempt to initiate contact with the developer.
  • July 26, 2022 – After no response from the developer, we send the full disclosure details to the WordPress plugins team. They acknowledge the report and make contact with the developer.
  • July 27, 2022. – A fully patched version of the plugin is released as version 3.2.51.
  • August 7, 2022 – Wordfence free users receive the firewall rule.

Conclusion

In today’s post, we detailed a flaw in the “Download Manager” plugin that makes it possible for authenticated attackers to delete arbitrary files hosted on an affected server, which could lead to remote code execution and ultimately complete site compromise. This flaw has been fully patched in version 3.2.51.

We recommend that WordPress site owners immediately verify that their site has been updated to the latest patched version available, which is version 3.2.53 at the time of this publication.

Wordfence PremiumWordfence Care, and Wordfence Response received a firewall rule on July 8, 2022 to provide protection against any attackers trying to exploit this vulnerability. Wordfence Free users will receive this same protection 30 days later on August 7, 2022.

If you believe your site has been compromised as a result of this vulnerability or any other vulnerability, we offer Incident Response services via Wordfence Care. If you need your site cleaned immediately, Wordfence Response offers the same service with 24/7/365 availability and a 1-hour response time. Both these products include hands-on support in case you need further assistance.

Source :
https://www.wordfence.com/blog/2022/08/high-severity-vulnerability-patched-in-download-manager-plugin/

Juniper Releases Patches for Critical Flaws in Junos OS and Contrail Networking

Juniper Networks has pushed security updates to address several vulnerabilities affecting multiple products, some of which could be exploited to seize control of affected systems.

The most critical of the flaws affect Junos Space and Contrail Networking, with the tech company urging customers to release versions 22.1R1 and 21.4.0, respectively.

Chief among them is a collection of 31 bugs in the Junos Space network management software, including CVE-2021-23017 (CVSS score: 9.4) that could result in a crash of vulnerable devices or even achieve arbitrary code execution.

“A security issue in nginx resolver was identified, which might allow an attacker who is able to forge UDP packets from the DNS server to cause 1-byte memory overwrite, resulting in worker process crash or potential other impact,” the company said.

The same security vulnerability has also been remediated in Northstar Controller in versions 5.1.0 Service Pack 6 and 6.2.2.

Additionally, the networking equipment maker cautioned of multiple known issues exist in CentOS 6.8 that’s shipped with Junos Space Policy Enforcer before version 22.1R1. As mitigations, the version of CentOS packed with the Policy Enforcer component has been upgraded to 7.9.

Also listed are 166 security vulnerabilities impacting its Contrail Networking product that impact all versions prior to 21.4.0 and have been collectively given the maximum CVSS score of 10.0.

“Multiple vulnerabilities in third party software used in Juniper Networks Contrail Networking have been resolved in release 21.4.0 by upgrading the Open Container Initiative (OCI)-compliant Red Hat Universal Base Image (UBI) container image from Red Hat Enterprise Linux 7 to Red Hat Enterprise Linux 8,” it noted in an advisory.

Source :
https://thehackernews.com/2022/07/juniper-releases-patches-for-critical.html

5 Key Things We Learned from CISOs of Smaller Enterprises Survey

New survey reveals lack of staff, skills, and resources driving smaller teams to outsource security.

As business begins its return to normalcy (however “normal” may look), CISOs at small and medium-size enterprises (500 – 10,000 employees) were asked to share their cybersecurity challenges and priorities, and their responses were compared the results with those of a similar survey from 2021.

Here are the 5 key things we learned from 200 responses:

— Remote Work Has Accelerated the Use of EDR Technologies

In 2021, 52% of CISOs surveyed were relying on endpoint detection and response (EDR) tools. This year that number has leapt to 85%. In contrast, last year 45% were using network detection and response (NDR) tools, while this year just 6% employ NDR. Compared to 2021, double the number of CISOs and their organizations are seeing the value of extended detection and response (XDR) tools, which combine EDR with integrated network signals. This is likely due to the increase in remote work, which is more difficult to secure than when employees work within the company’s network environment.

— 90% of CISOs Use an MDR Solution

There is a massive skills gap in the cybersecurity industry, and CISOs are under increasing pressure to recruit internally. Especially in small security teams where additional headcount is not the answer, CISOs are turning to outsourced services to fill the void. In 2021, 47% of CISOs surveyed relied on a Managed Security Services Provider (MSSP), while 53% were using a managed detection and response (MDR) service. This year, just 21% are using an MSSP, and 90% are using MDR.

— Overlapping Threat Protection Tools are the #1 Pain Point for Small Teams

The majority (87%) of companies with small security teams struggle to manage and operate their threat protection products. Among these companies, 44% struggle with overlapping capabilities, while 42% struggle to visualize the full picture of an attack when it occurs. These challenges are intrinsically connected, as teams find it difficult to get a single, comprehensive view with multiple tools.

— Small Security Teams Are Ignoring More Alerts

Small security teams are giving less attention to their security alerts. Last year 14% of CISOs said they look only at critical alerts, while this year that number jumped to 21%. In addition, organizations are increasingly letting automation take the wheel. Last year, 16% said they ignore automatically remediated alerts, and this year that’s true for 34% of small security teams.

— 96% of CISOs Are Planning to Consolidate Security Platforms

Almost all CISOs surveyed have consolidation of security tools on their to-do lists, compared to 61% in 2021. Not only does consolidation reduce the number of alerts – making it easier to prioritize and view all threats – respondents believe it will stop them from missing threats (57%), reduce the need for specific expertise (56%), and make it easier to correlate findings and visualize the risk landscape (46%). XDR technologies have emerged as the preferred method of consolidation, with 63% of CISOs calling it their top choice.

Download 2022 CISO Survey of Small Cyber Security Teams to see all the results.

Source :
https://thehackernews.com/2022/07/5-key-things-we-learned-from-cisos-of.html