by Or Katz and Jim Black
Data analysis by Gal Kochner and Moshe Cohen
Executive summary
- Akamai researchers have analyzed malicious DNS traffic from millions of devices to determine how corporate and personal devices are interacting with malicious domains, including phishing attacks, malware, ransomware, and command and control (C2).
- Akamai researchers saw that 12.3% of devices used by home and corporate users communicated at least once to domains associated with malware or ransomware.
- 63% of those users’ devices communicated with malware or ransomware domains, 32% communicated with phishing domains, and 5% communicated with C2 domains.
- Digging further into phishing attacks, researchers found that users of financial services and high tech are the most frequent targets of phishing campaigns, with 47% and 36% of the victims, respectively.
- Consumer accounts are the most affected by phishing, with 80.7% of the attack campaigns.
- Tracking 290 different phishing toolkits being reused in the wild, and counting the number of distinct days each kit was reused over Q2 2022, shows that 1.9% of the tracked kits were reactivated on at least 72 days. In addition, 49.6% of the kits were reused for at least five days, demonstrating how many users are being revictimized multiple times. This shows how realistic-looking and dangerous these kits can be, even to knowledgeable users.
- The most used phishing toolkit in Q2 2022 (Kr3pto, a phishing campaign that targeted banking customers in the United Kingdom, which evades multi-factor authentication [MFA]) was hosted on more than 500 distinct domains.
Introduction
“It’s always DNS.” Although that is a bit of a tongue-in-cheek phrase in our industry, DNS can give us a lot of information about the threat landscape that exists today. By analyzing information from Akamai’s massive infrastructure, we are able to gain some significant insights on how the internet behaves. In this blog, we will explore these insights into traffic patterns, and how they affect people on the other end of the internet connection.
Akamai traffic insights
Attacks by category
Based on Akamai’s range of visibility across different industries and geographies, we can see that 12.3% of protected devices attempted to reach out to domains that were associated with malware at least once during Q2 2022. This indicates that these devices might have been compromised. On the phishing and C2 front, we can see that 6.2% of devices accessed phishing domains and 0.8% of the devices accessed C2-associated domains. Although these numbers may seem insignificant, the scale here is in the millions of devices. When this is considered, along with the knowledge that C2 is the most malignant of threats, these numbers are not only significant, they’re cardinal.
Comparing 2022 Q2 results with 2022 Q1 results (Figure 1), we can see a minor increase in all categories in Q2. We attribute those increases to seasonal changes that are not associated with a significant change in the threat landscape.
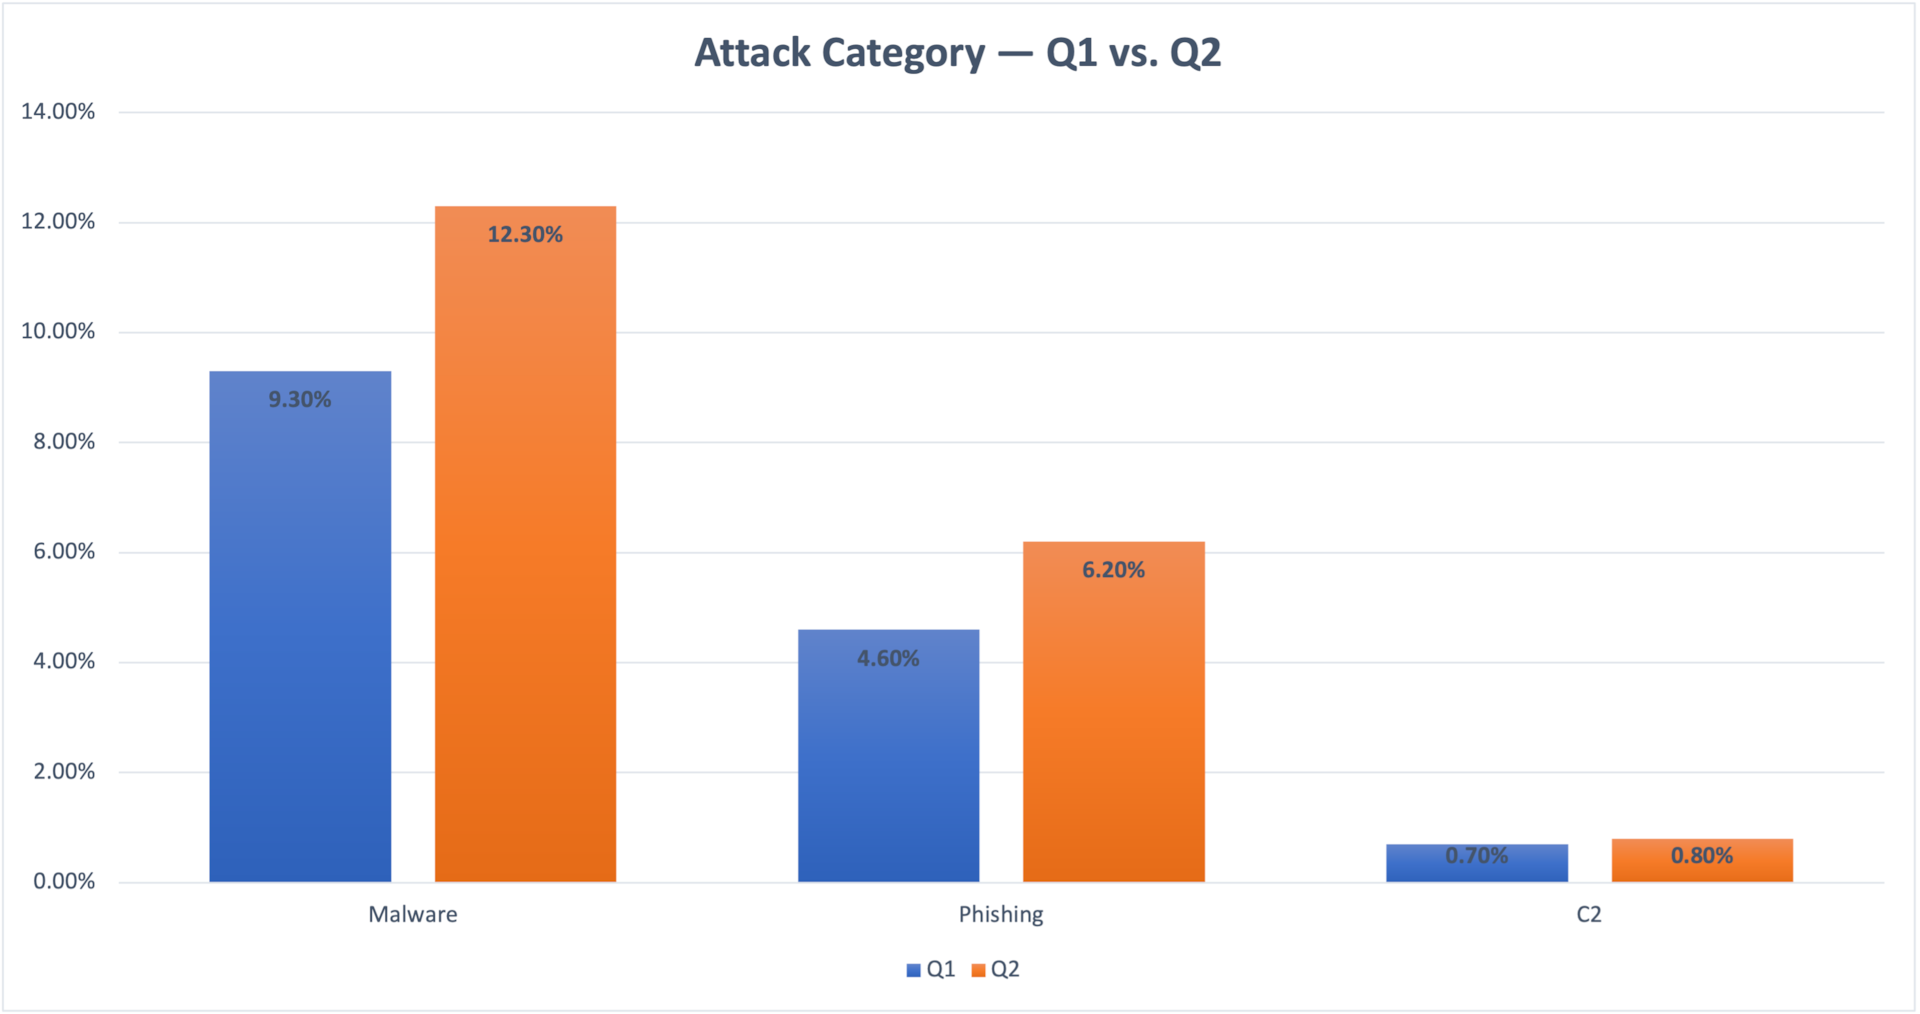 Fig. 1: Devices exposed to threats — Q1 vs. Q2
In Figure 2, we can see that of the 12.3% potentially compromised devices, 63% were exposed to threats associated with malware activity, 32% with phishing, and 5% with C2. Access to malware-associated domains does not guarantee that these devices were actually compromised, but provides a strong indication of increased potential risk if the threat wasn’t properly mitigated. However, access to C2-associated domains indicates that the device is most likely compromised and is communicating with the C2 server. This can often explain why the incidence of C2 is lower when compared with malware numbers.
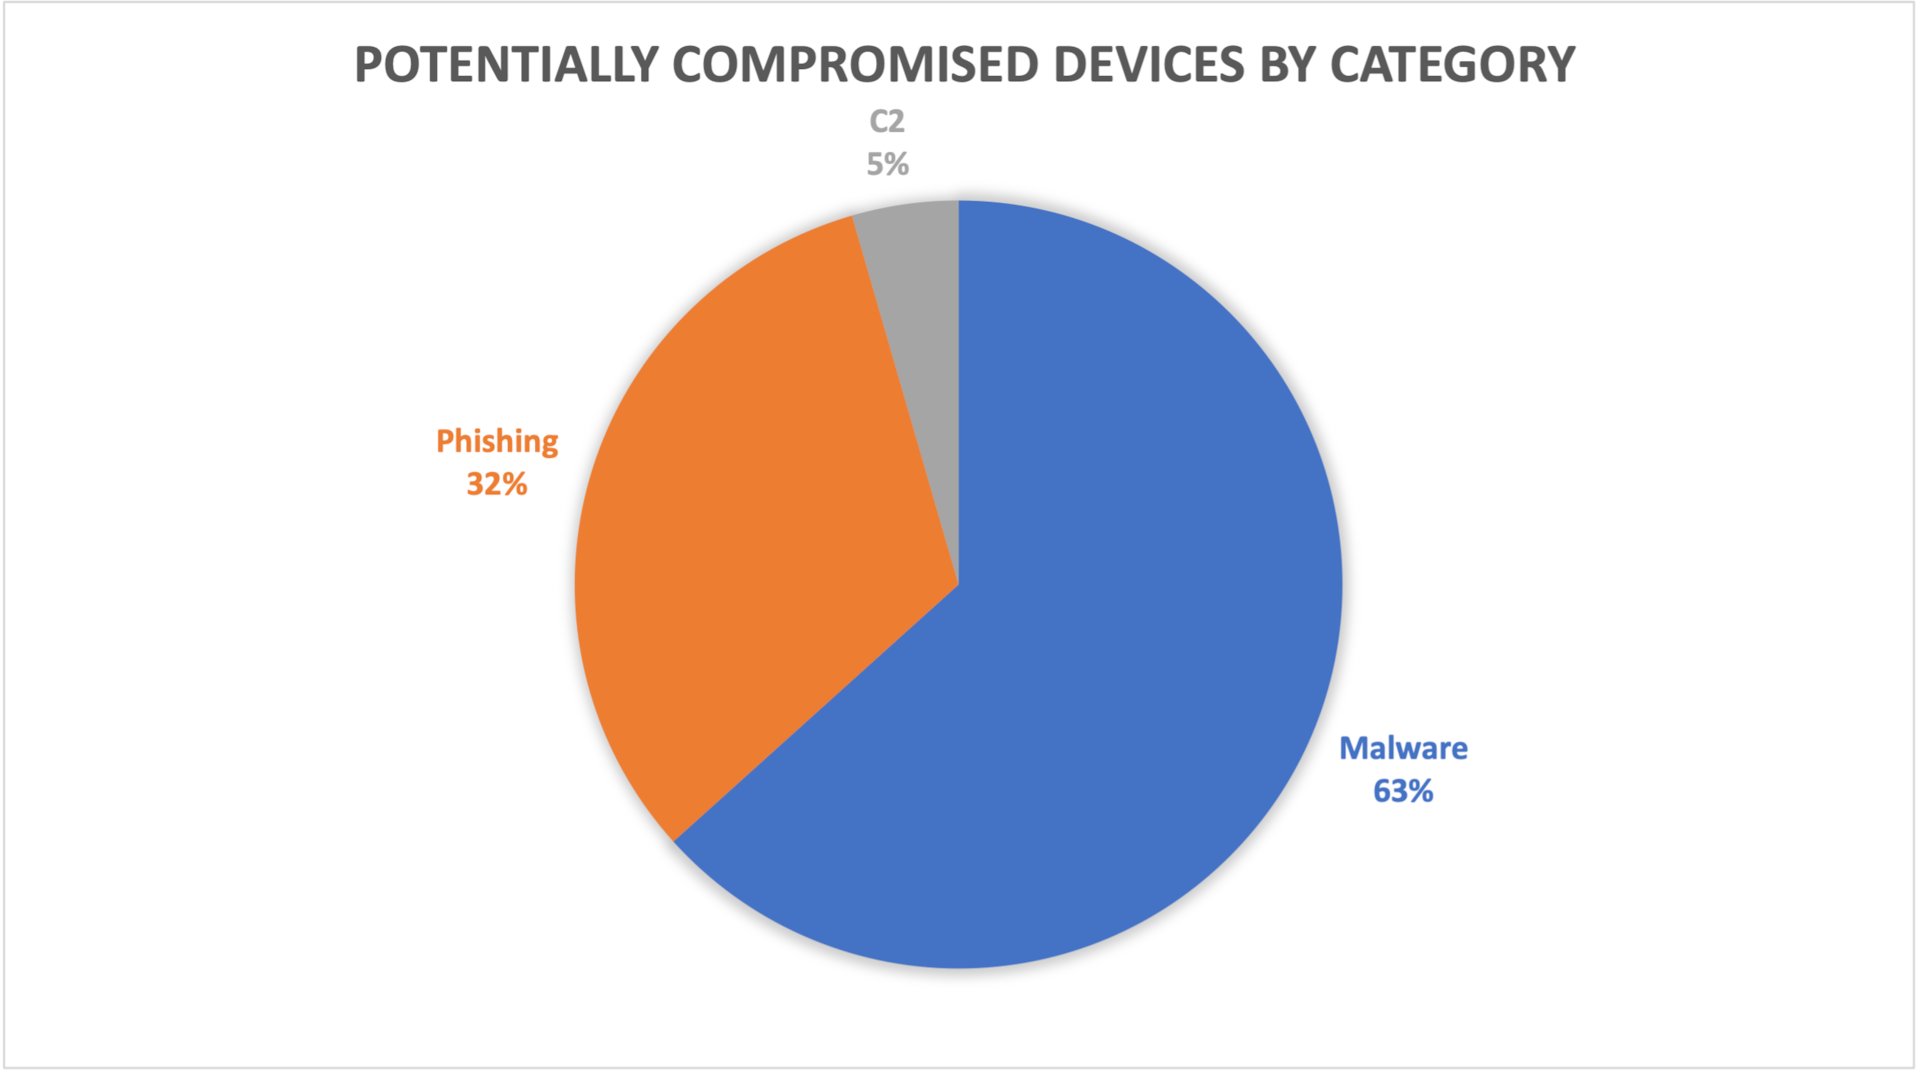 Fig. 2: Potentially compromised devices by category
Phishing attack campaigns
By looking into the brands that are being abused and mimicked by phishing scams in Q2 2022, categorized by brand industry and number of victims, we can see that high tech and financial brands led with 36% and 47%, respectively (Figure 3). These leading phishing industry categories are consistent with Q1 2022 results, in which high tech and financial brands were the leading categories, with 32% and 31%, respectively.
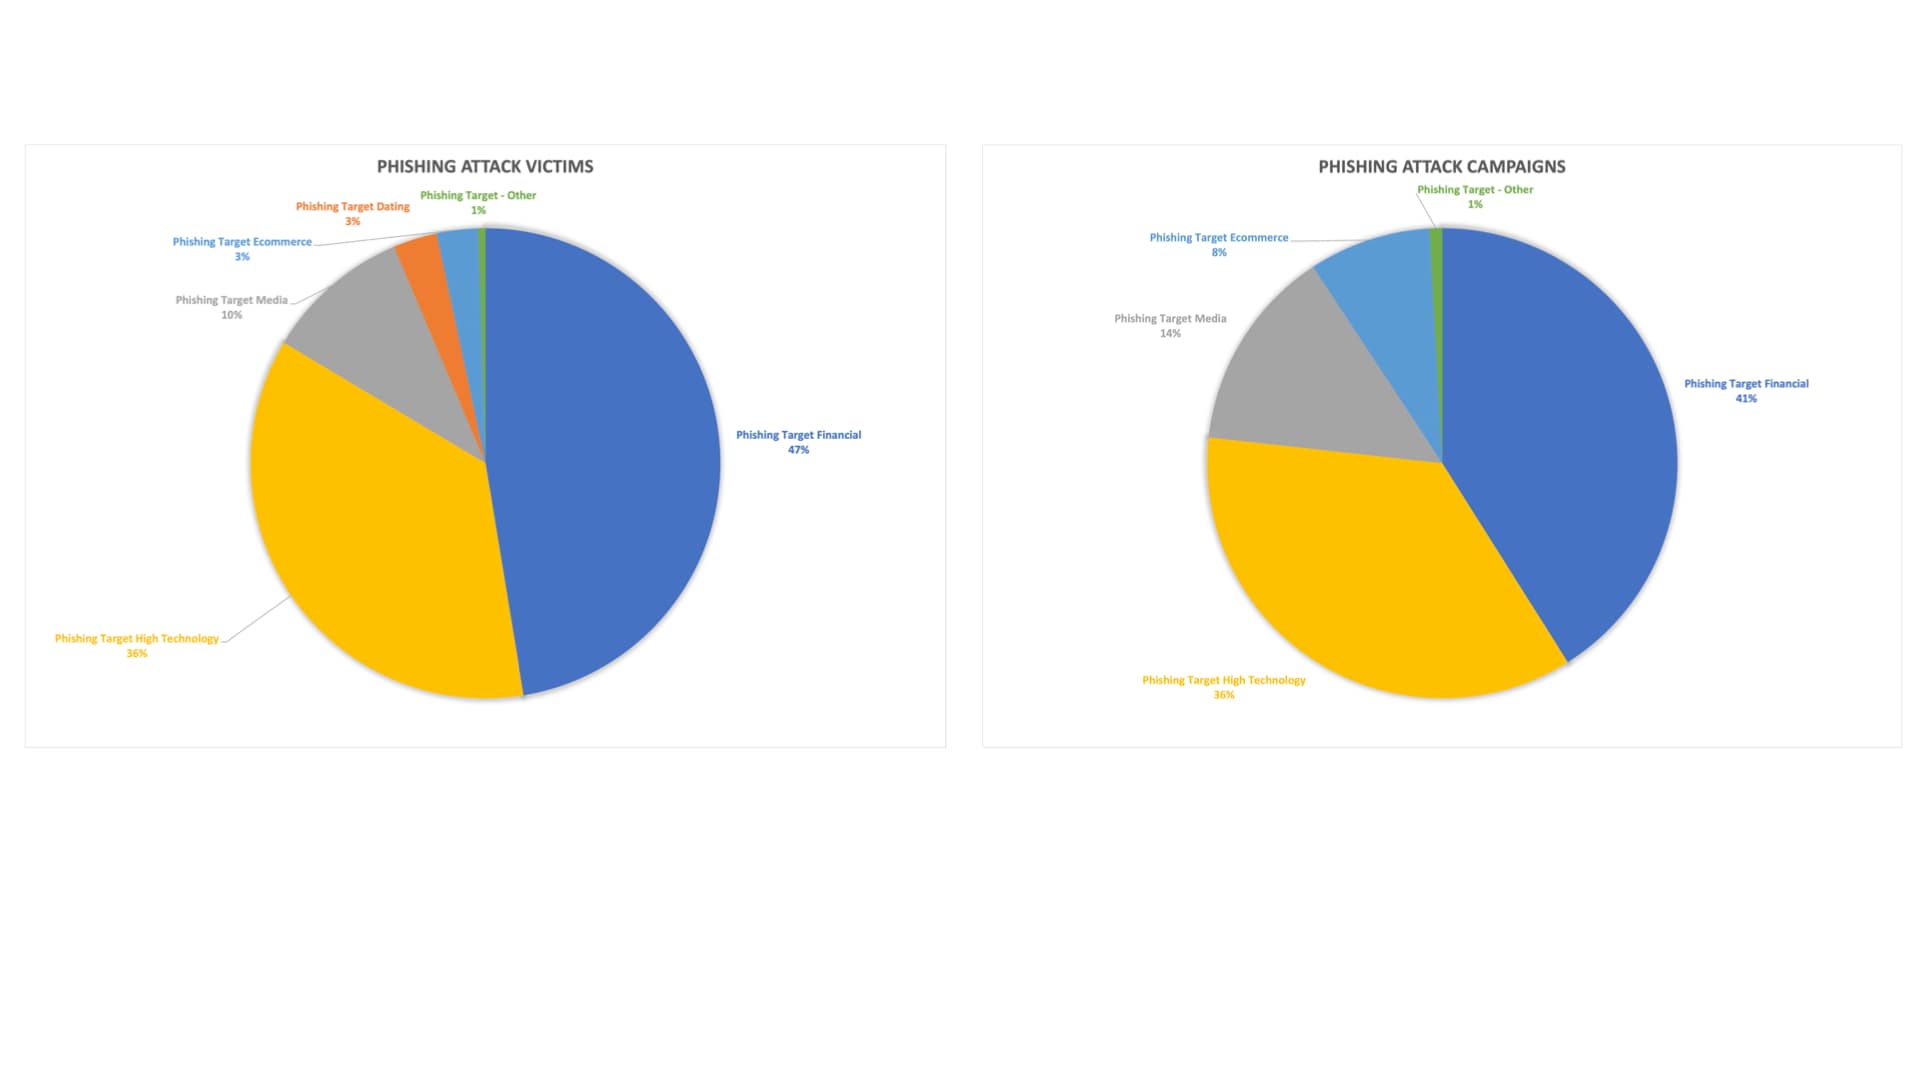 Fig. 3: Phishing victims and phishing campaigns by abused brands
When taking a different view on the phishing landscape–targeted industries by counting the number of attack campaigns being launched over Q2 2022, we can see that high tech and financial brands are still leading, with 36% and 41%, respectively (Figure 3). The correlation between leading targeted brands when it comes to number of attacks and number of victims is evidence that threat actors’ efforts and resources are, unfortunately, effectively working to achieve their desired outcome.
Akamai’s research does not have any visibility into the distribution channels used to deliver the monitored phishing attacks that led to victims clicking on a malicious link and ending up on the phishing landing page. Yet the strong correlation between different brand segments by number of attack campaigns and the number of victims seems to indicate that the volume of attacks is effective and leads to a similar trend in the number of victims. The correlation might also indicate that the distribution channels used have minimal effect on attack outcome, and it is all about the volume of attacks that lead to the desired success rates.
Taking a closer look at phishing attacks by categorization of attack campaigns — consumers vs. business targeted accounts— we can see that consumer attacks are the most dominant, with 80.7% of the attack campaigns (Figure 4). This domination is driven by the massive demand for consumers’ compromised accounts in dark markets that are then used to launch fraud-related second-phase attacks. However, even with only 19.3% of the attack campaigns, attacks against business accounts should not be considered marginal, as these kinds of attacks are usually more targeted and have greater potential for significant damage. Attacks that target business accounts may lead to a company’s network being compromised with malware or ransomware, or to confidential information being leaked. An attack that begins with an employee clicking a link in a phishing email can end up with the business suffering significant financial and reputational damages.
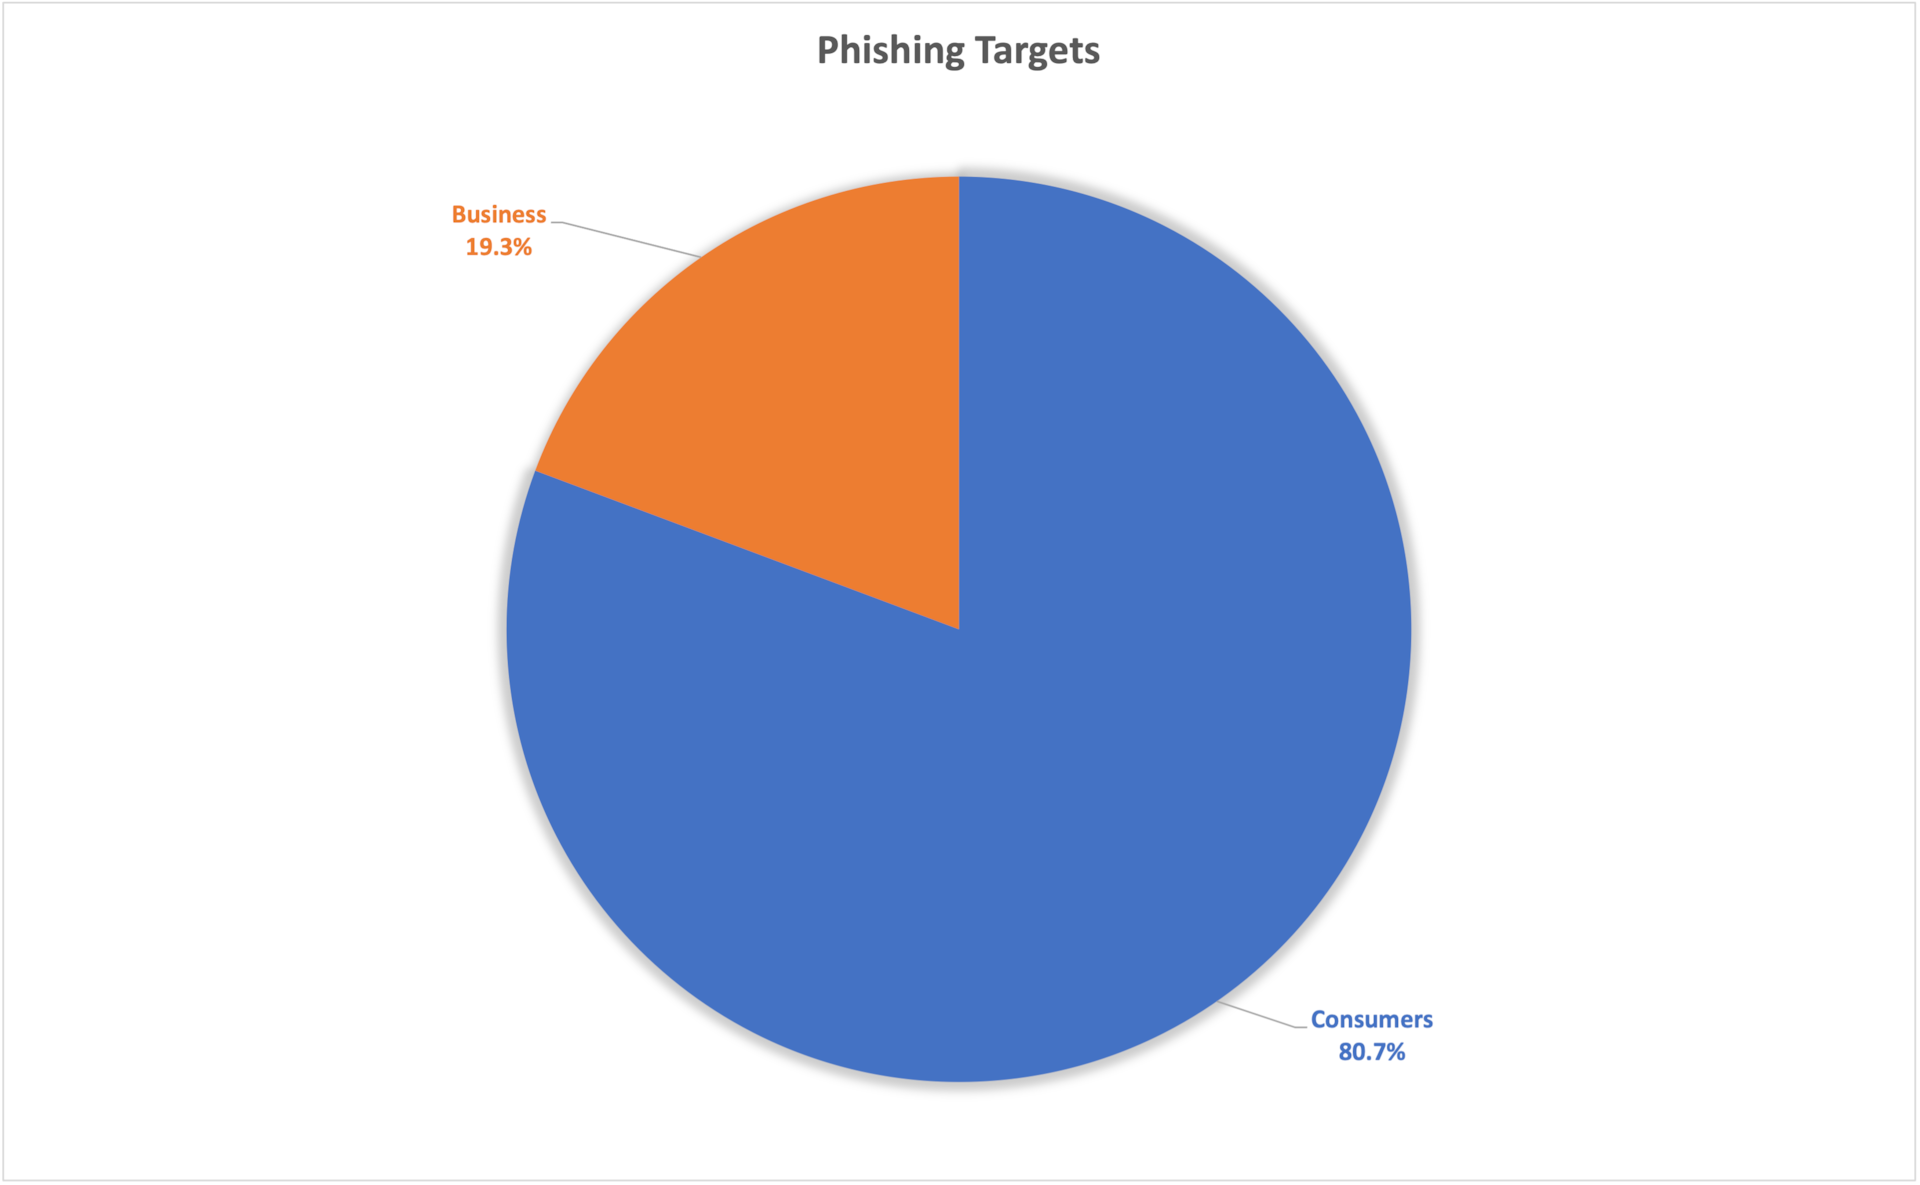 Fig. 4: Phishing targeted accounts — consumers vs. business
Phishing toolkits
Phishing attacks are an extremely common vector that have been used for many years. The potential impacts and risks involved are well-known to most internet users. However, phishing is still a highly relevant and dangerous attack vector that affects thousands of people and businesses daily. Research conducted by Akamai explains some of the reasons for this phenomenon, and focuses on the phishing toolkits and their role in making phishing attacks effective and relevant.
Phishing toolkits enable rapid and easy creation of fake websites that mimic known brands. Phishing toolkits enable even non–technically gifted scammers to run phishing scams, and in many cases are being used to create distributed and large-scale attack campaigns. The low cost and availability of these toolkits explains the increasing numbers of phishing attacks that have been seen in the past few years.
According to Akamai’s research that tracked 290 different phishing toolkits being used in the wild, 1.9% of the tracked kits were reused on at least 72 distinct days over Q2 2022 (Figure 5). Further, 49.6% of the kits were reused for at least five days, and when looking into all the tracked kits, we can see that all of them were reused no fewer than three distinct days over Q2 2022.
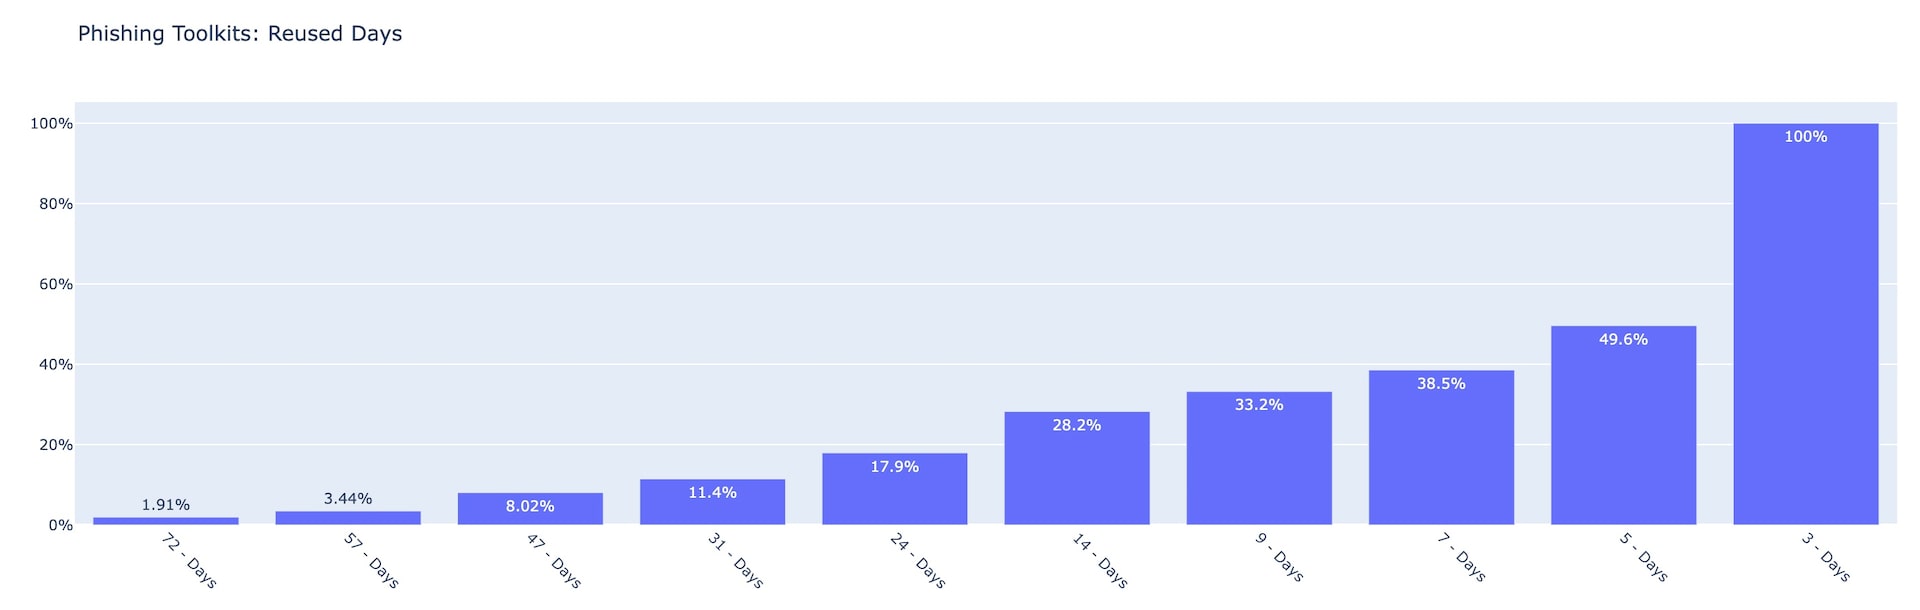 Fig. 5: Phishing toolkits by number of reused days Q2 2022
The numbers showing the heavy reuse phenomenon of the observed phishing kits shed some light on the phishing threat landscape and the scale involved, creating an overwhelming challenge to defenders. Behind the reuse of phishing kits are factories and economic forces that drive the phishing landscape. Those forces include developers who create phishing kits that mimic known brands, later to be sold or shared among threat actors to be reused over and over again with very minimal effort.
Further analysis on the most reused kits in Q2 2022, counting the number of different domains used to deliver each kit, shows that the Kr3pto toolkit was the one most frequently used and was associated with more than 500 domains (Figure 6). The tracked kits are labeled by the name of the brand being abused or by a generic name representing the kit developer signature or kit functionality.
In the case of Kr3pto, the actor behind the phishing kit is a developer who builds and sells unique kits that target financial institutions and other brands. In some cases, these kits target financial firms in the United Kingdom, and they bypass MFA. This evidence also shows that this phishing kit that was initially created more than three years ago is still highly active and effective and being used intensively in the wild.
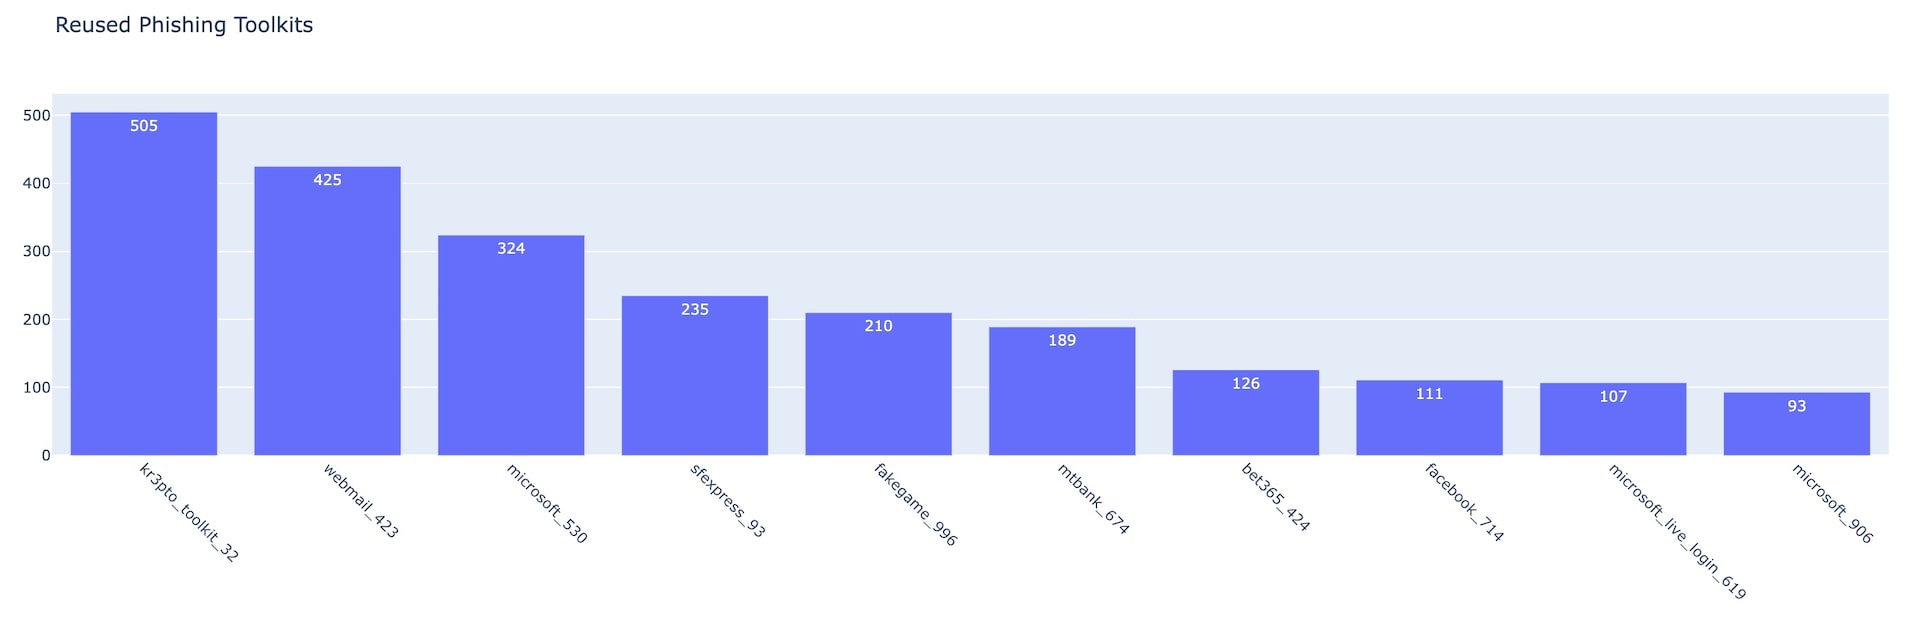 Fig. 6: Top 10 reused phishing toolkits
The phishing economy is growing, kits are becoming easier to develop and deploy, and the web is full of abandoned, ready-to-be-abused websites and vulnerable servers and services. Criminals capitalize on these weaknesses to establish a foothold that enables them to victimize thousands of people and businesses daily.
The growing industrial nature of phishing kit development and sales (in which new kits are developed and released within hours) and the clear split between creators and users means this threat isn’t going anywhere anytime soon. The threat posed by phishing factories isn’t just focused on the victims who risk having valuable accounts compromised and their personal information sold to criminals — phishing is also a threat to brands and their stakeholders.
The life span of a typical phishing domain is measured in hours, not days. Yet new techniques and developments by the phishing kit creators are expanding these life spans little by little, and it’s enough to keep the victims coming and the phishing economy moving.
Summary
This type of research is necessary in the fight to keep our customers safer online. We will continue to monitor these threats and report on them to keep the industry informed.
The best way to stay up to date on this and other research pieces from the Akamai team is to follow Akamai Security Research on Twitter.
Source :
https://www.akamai.com/blog/security-research/q2-dns-akamai-insights