Sonicwall Application Rule Common Configurations

Last Update 03/26/2020

Description

This document explains in detail how the SonicWall rulebase works and provides common configurations.

Topics include:

  • Application Rule tips
  • The SonicOS rulebase
  • App Rules positive matching
  • Inspection of encrypted traffic
  • Methods of designing a rulebase

Resolution

The SonicOS Rulebase
SonicWall has two rulebases, one for Stateful Packet Inspection (SPI), and one for Deep Packet Inspection (DPI). The SPI rulebase deals with socket filters that are defined between source and destination address objects to a combination of destination port and protocol, or a range of ports, called a service. Optionally, source ports can also be defined within the service which is more useful for legacy UDP services than for modern services that randomize the source port. A connection is established with the first UDP packet, or after a successful TCP handshake. All other protocols behave like UDP and establish a connection with the first packet.

App Rules, in contrast, monitor traffic of established connections. When an application is detected and a rule matches, the rule action is applied such as dropping the connection.
Access Rules are processed top-down, which means that on the first rule that is matched, (counted from the top) the rule action is applied, and the rulebase is exited. No further rulebase processing follows. This is the industry standard implementation for SPI rules. In contrast, no industry standard implementation exists for App Rules. In addition to standard top-down behavior known from SPI rules, some vendors match top down, but do not drop out with the first match. SonicOS does something in-between: rule order is non-deterministic because rules are internally optimized for processing speed. App Rules cannot overlap. Per definition, only one rule can match. If a matching rule is found, the rule action is applied.

Access Rules have Allowed, Deny, and Discard actions. The difference between Deny and Discard is that Deny sends a segment with TCP RST flag back, whereas Discard silently drops the packet. It is best to use Discard in most cases, unless that breaks something like long living dormant TCP connections that lack higher layer health monitoring as can be found in some legacy custom applications. Both actions terminate the connection and remove it from the connection table. App Rules can apply various actions but Allowed is not one of them. The reason is that App Rules check on an already established connection. By the very nature on how DPI works, the connection has to be established so that the DPI engine can look for clues within the data traffic to determine the application.

Access Rules are enforced between zones that have interfaces assigned. One zone may match to one or multiple interfaces. App Rules are enforced on ingress of a zone, or globally. Both Access Rules and App Rules can be assigned address objects and address groups. Only one object can be assigned per rule. If multiple objects in a rule are desired, a group needs to be created. Groups can be nested.
In addition to defining source and destination address objects in App Rules, source address exclusions can be defined so that App Rules do not overlap. Both Access Rules and App Rules can have socket services assigned. In contrast to Access Rules, App Rules cannot have service groups. Services are less often used in App Rules because App Signatures generally match independent of sockets. The reason to assign a service is to limit application matches to one specific socket, such as an Application on a cleartext HTTP socket that needs to be dropped. App Rules also may match on indirect traffic such as DNS when inspecting a Web session on an HTTP socket. This is often not obvious. In addition to dropping the connection that carries the service, control connections, or peripheral connections like DNS can be targeted by signatures within one App. This is a reason that one typically wants to leave the socket out of the match criteria for an App Rule.

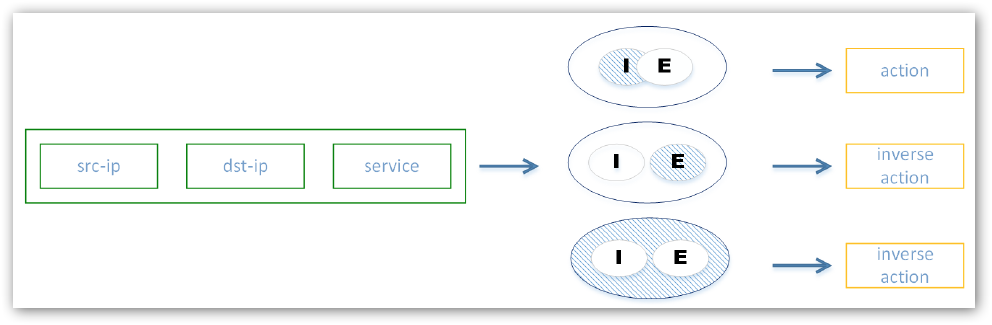
App Rules match on applications which is the main difference to Access Rules that only match on a socket. A variety of match objects can be defined to match within a certain context such as file names, as well as categories, applications, and application sub lists like Social Networking, Facebook, and Like button. The same connection can match many different applications such as HTTP and Netflix. Users are treated as a filter – after a rule was matched. Users are not part of the match criteria of the rule itself. Vendors are not consistent in the implementation of users. Many implement it like SonicWall but some also make the user a match criteria. In SonicOS, an action is applied to all include users minus those users that overlap with exclude users. There is only one rule check; no other rule check is performed regardless whether the user matches or not. Access Rules and App Rules are similar in their behavior to unmatched users. Access Rules apply the inverse of the action such as Deny instead of Allowed, or vice versa. App Rules do not have an Allowed action by their very nature. Unmatched users are simply not applied any action. If the action is Drop, not matched traffic is simply passed without logging. The same is true for the No Action that produces a log for matched users. Remember that not matched users include all user(s) in exclude and all other users not in include. In other words, a rule is applied only to all include users that are not in exclude. All non-defined users are treated as not matching.

Exclude is a concept present in many objects in SonicOS. An exclude is a minus to an include, which means applied to the rule is only what is left of the include, once the exclude was subtracted. No matching of the rule applies to anything in the exclude. This is a bit complicated, but exclude users only matters if also at least partially part of the include. An exclude that does not overlap with an include has no function. This is the same behavior for other object types.

The user concept in SonicOS is a filter after a rule match was made. Only the leftover of include users after subtracting excluded users is applied to that particular matched rule. Users that do not match are no longer processed in the rulebase. This is important to understand.

Image

App Rules
IF source:

  • src-zone
  • src-ip MINUS excluded src-ip

AND IF destination:

  • dst-ip

AND IF application:

  • Apps identified by DPI MINUS excluded Apps, limited to socket

THEN

  • user MINUS excluded users filter
  • action: Drop, BWM, no-DPI, log, nothing

App Rules Positive Matching

While an Access Rule can determine the socket within the first one to three segments within a connection, App Rules match can only be determined deeper into the connection life, after the connection was established. This puts positive matching at a conundrum. How for instance do you permit a connection with Netflix, before you even know that the connection carries Netflix? And how do you make sure after Netflix in a connection stream was detected, that it does not carry other traffic, such as tunneled VPN traffic?

These are interesting questions, and essentially, there is no precise solution. Vendors differ in the implementation of App Rules. Some vendors focus on winning over firewall operators that are used to
maintaining SPI rulebases with hundreds or thousands of simple rules, by hiding the abstracts of an App Rules under the hood. The nice thing is that operators can treat App Rules the same way as Access Rules. It is also nice that migrating an Access Rule base into next-gen land is as easy as swapping socket service objects for App objects. The big disadvantage of this approach is that this is a very rough interface abstraction. A hacker who studies that specific interface abstraction can make traffic look like Netflix and tunnel malicious traffic through a rule that allows Netflix traffic.

SonicWall decided for the sake of efficacy not to implement such user interface abstraction. With SonicOS App Rules follow very closely the inner working of the DPI engine. If an App is detected, the operator can decide what to do about traffic following the detection. If we want to allow Netflix traffic, we really do not care about detecting Netflix at all. We care about detecting traffic that is NOT Netflix so that we can drop this. Whatever we do not drop, is implicitly allowed at the end of the App Rule base. This is the opposite from an Access Rule base where everything is implicitly dropped at the end of the rulebase. Rules are written in a way to disallow all the things that we do not want in our network excluding those Apps that we want. The easiest way to do this is per category. We drop traffic for instance from the entire Multimedia category, with the exclusion of Netflix that we are allowing. This would drop any traffic for which an App Signature exists in the category Multimedia that is NOT Netflix. At the same time, we still can drop traffic from other categories such as Proxies and protect ourselves from an evasion attack.

Inspection of Encrypted Traffic

Access Rules work the same whether traffic is cleartext or encrypted – unless traffic is tunneled within an encrypted connection. For App Rules, all encrypted traffic looks like tunneled as the App detection has to happen within the encrypted traffic stream.
SonicOS solves this problem via DPI-SSL. DPI-SSL client-side intercepts traffic from a client, decrypts it, scans it, re-encrypts it and sends it off on its way to the server. On the return wing, the opposite happens. Vendors who do not implement such functionality fly blind. They have devices that can be easily evaded by SSL or SSH encrypted traffic that already today makes up over 60% of the Internet traffic.

Methods of Designing a Rulebase

The first decision that is made is whether a rule should be an Access Rule or an App Rule. If a rule does not contain a service, or a socket can be clearly defined, then an Access Rule is the better approach. If a rule uses a generic socket, or can run on dynamic sockets, then an Access Rule needs to be chosen. As described above, Access Rules can be negative or positive, hence explicitly permit traffic, or drop traffic. App Rules by design can only be negative. Also, remember that App Rules cannot overlap, hence unlike with Access Rules, rule order does not matter. The author prepared a worksheet where you can turn a positive match into a negative match for an entire category. To allow an application, you deny the entire App Category with the exception of the allowed application. This is a simple approach to configure a positive match on an App Rule.

When you design rules with users, make sure to summarize users into user groups for common applications that are dropped. Again, focus on what is dropped. If you have a combination of networks with users, and networks without users, make sure that you put these networks without users in the src-ip exclude field when referencing a user. Because if you do not do that, the rule is skipped as networks without users would not match any include users, the rule is skipped, and you drop out of the rulebase. Everything that you do not explicitly deny in an App Rules is automatically allowed, just the opposite from an Access Rule where everything that is not explicitly allowed is implicitly denied at the end of the rulebase.

Examples
Admin: YouTube, Vudu, Hulu
Faculty: YouTube and Vudu
Students: YouTube
Nobody: Netflix
Rule 1: Netflix DENY Admin, Faculty, Students
Rule 2: Hulu DENY Faculty, Students
Rule 3: Vudu: DENY Students
Rule 4: MULTIMEDIA except Netflix, Hulu, Vudu DENY all-users

Make use of the spreadsheet to carefully plan out your rulebase before configuring it. On Tab Applications, chose a category in column B. Then in columns D through H check the field to TRUE for the users you want this application allowed. If you do not use users, simply use column D only. Columns J through N is the negative representation, converting a positive match to a negative match as it is entered in an App Rule. App Rules can only drop a connection AFTER an App was recognized. Hence, we cannot permit an App explicitly. Create an App Rule where you deny all users that show TRUE in columns J through N for that application. Put those apps that are allowed, FALSE in J through N, into the exclude Apps. Keep in mind that in SonicOS App Rules cannot overlap. Create non-overlapping rules with the help of excludes. In App Rules, the user group is only applied to include users. All users that are not in include, or excluded, are dropping out of the rule base without any action, and the packet is allowed. If you need a final explicit deny rule, you build rules with all app categories that are not users and simply drop this traffic.

Related Articles

Categories

Source :
https://www.sonicwall.com/support/knowledge-base/application-rule-common-configurations/180208123013371/

Enable Remote Desktop (Windows 10, 11, Windows Server)

Last Updated: June 22, 2023 by Robert Allen

In this guide, you will learn how to enable Remote Desktop on Windows 10, 11, and Windows Server. I’ll also show you on to enable RDP using PowerShell and group policy.

Tip: Use a remote desktop connection manager to manage multiple remote desktop connections. You can organize your desktops and servers into groups for easy access.

Table of contents

In the diagram below, my admin workstation is PC1. I’m going to enable RDP on PC2, PC3, and Server1 so that I can remotely connect to them. RDP uses port TCP 3389. You can change the RDP listening port by modifying the registry.

Enable Remote Desktop on Windows 10

In this example, I’m going to enable remote desktop on PC2 that is running windows 10.

Step 1. Enable Remote Desktop

Right click the start menu and select system.

Under related settings click on Remote desktop.

Click the slider button to enable remote desktop.

You will get a popup to confirm that you want to enable Remote desktop. Click confirm.

Next, Click on Advanced Settings.

Make sure “Require computers to use Network Level Authentication to connect” is selected.

This setting will force the user to authenticate before it will start a remote desktop session. This setting will enable a layer of security and prevent unauthorized remote connections.

Step 2. Select Users Accounts

The next step is to ensure only specific accounts can use RDP.

By default, only members of the local administrators group will be allowed to connect using remote desktop.

To add or remove user accounts click on “select users that can remotely access this PC”.

To add a user click the Add button and search for the username.

In this example, I’m going to add a user Adam A. Anderson.

Tip. I recommend creating a domain group to allow RDP access. This will make it easier to manage and audit RDP access.

That was the last step, remote desktop is now enabled.

Let’s test the connection.

From PC1 I open Remote Desktop Connection and enter PC2.

I am prompted to enter credentials.

Success!

I now have a remote desktop connection to PC2.

In the screenshot below you can see I’m connected via console to PC1 and I have a remote desktop connection open to PC2.

Damware Mini Remote Control

Multiple monitor support. Reboot and wake sleeping computers remotely.

Remote access to Windows, Linux, and Mac OS X operating systems. In session chat, remote screenshot, file transfer, and more.

Download 14 Day Free Trial

Enable Remote Desktop on Windows 11

In this example, I’ll enable remote desktop on my Windows 11 computer (PC3).

Step 1. Enable Remote Desktop

Click on search.

Enter “remote desktop” and click on “Remote desktop settings”

Click the slider to enable remote desktop. You will get a popup to confirm.

Click the down arrow and verify “Require devices to use Network Level Authentication to connect” is enabled.

Remote Desktop is now enabled. In the next step, you will select which users are allowed to use remote desktop.

Step 2. Remote Desktop Users

By default, only members of the local administrators group can use remote desktop. To add additional users follow these steps.

Click on “Remote Desktop users”

Click on add and search or enter a user to add. In this example, I’ll add the user adam.reed.

Now I’ll test if remote desktop is working.

From my workstation PC1 I’ll create a remote desktop connection to PC3 (windows 11).

Enter the password to connect.

The connection is good!

You can see in the screenshot below I’m on the console of PC1 and I have a remote desktop connection to PC3 that is running Windows 11.

Enable Remote Desktop on Windows Server

In this example, I’ll enable remote desktop on Windows Server 2022.

Step 1. Enable Remote Desktop.

Right click the start menu and select System.

On the settings screen under related settings click on “Remote desktop”.

Click the slider button to enable remote desktop.

You will get a popup to confirm that you want to enable Remote desktop. Click confirm.

Click on Advanced settings.

Make sure “Require computers to use Network level Authentication to connect” is enabled.

Remote desktop is now enabled, the next step is to select users that can remotely access the PC.

Step 2. Select User accounts

By default, only members of the local administrators group will be allowed to connect using remote desktop.

To add additional users click on click on “select users that can remotely access this pc”.

Next, click add then enter or search for users to add. In this example, I’ll add the user robert.allen. Click ok.

Now I’ll test if remote desktop is working on my Windows 2022 server.

From my workstation (pc2) I open the remote desktop connection client and enter srv-vm1and click connect. Enter my username and password and click ok.

Awesome, it works!

I’ve established a remote session to my Windows 2022 server from my Windows 10 computer.

PowerShell Enable Remote Desktop

To enable Remote Desktop using PowerShell use the command below. This will enable RDP on the local computer.

Set-ItemProperty -Path 'HKLM:\System\CurrentControlSet\Control\Terminal Server' -name "fDenyTSConnections" -value 0

You can use the below PowerShell command to check if remote desktop is enabled.


if ((Get-ItemProperty "hklm:\System\CurrentControlSet\Control\Terminal Server").fDenyTSConnections -eq 0) { write-host "RDP is Enabled" } else { write-host "RDP is NOT enabled" }

To enable remote desktop remotely you can use the invoke-command. This requires PS remoting to be enabled, check out my article on remote powershell for more details.

In this example, I’ll enable remote desktop on the remote computer PC2.

invoke-command -ComputerName pc2 -scriptblock {Set-ItemProperty -Path 'HKLM:\System\CurrentControlSet\Control\Terminal Server' -name "fDenyTSConnections" -value 0} 

Group Policy Configuration to allow RDP

If you need to enable and manage the remote desktop settings on multiple computers then you should use Group Policy or intune.

Follow the steps below to create a new GPO.

Step 1. Create a new GPO

Open the group policy management console and right click the OU or root domain to create a new GPO.

In this example, I’m going to create a new GPO on my ADPPRO Computers OU, this OU has all my client computers.

Give the GPO a name.

Edit the GPO and browse to the following policy setting.

Computer Configuration -> Policies -> Administrative Templates -> Windows Components -> Remote Desktop Services -> Remote Desktop Session Host -> Connections;

Enable the policy setting -> Allow users to connect remotely by using Remote Desktop Services

That is the only policy setting that needs to be enabled to allow remote desktop

Step 2. Update Computer GPO

The GPO policies will auto refresh on remote computers every 90 minutes.

To manually update GPO on a computer run the gpupdate command.

When remote desktop is managed with group policy the settings will be greyed out. This will allow you to have consistent settings across all your computers. It will also prevent users or the helpdesk from modifying the settings.

That’s a wrap.

I just showed you several ways to enable remote desktop on Windows computers. If you are using Active Directory with domain joined computers then enabling RDP via group policy is the best option.

Related Articles

Recommended: Active Directory Permissions Reporting Tool

The ARM Permissions Reporting Tool helps you monitor, analyze, and report on the permissions assigned to users, groups, computers, and organizational units in your Active Directory

You can easily identify who has what permissions, where they came from, and when they were granted or revoked. You can also generate compliance-ready reports for various standards and regulations, such as HIPAA, PCI DSS, SOX, and GDPR

Get instant visibility into user and group permissions.

Download Free Trial

Source :
https://activedirectorypro.com/enable-remote-desktop-windows/

10 NTFS Permissions Management Best Practices

Last Updated: July 27, 2023 by Robert Allen

ntfs permissions management best practices

This is a list of 10 best NTFS permissions management tips, techniques, and best practices.

These are strategies I have used to implement and manage NTFS security permissions on Windows file shares in medium and large organizations.

NTFS permissions management is critical to ensuring your data is secure from threats and prevents unauthorized access. NTFS permissions need to be properly configured when enabling shared folders on your network.

Let’s get started.

1. Audit & Review NTFS Permissions

Whether you have an existing file server or are setting up a new one it is important to review your NTFS permissions, this at times can even be a requirement of an audit. To simplify this task I recommend using an NTFS Permissions Report Tool that can scan all folders and show you who has access to what. With a reporting tool, you can list all folder permissions, verify users have the correct permissions, check inheritance, find insecure permissions, verify directory rights, and export the report to CSV, Excel, or PDF.

AD Pro NTFS Permissions Reporter

2. Secure NTFS Permissions with Security Groups

It is a best practice to create security groups to set NTFS permissions rather than using individual user accounts. Security groups have the following advantages:

  • Easier to manage permissions for a group of users
  • Easily remove user’s permissions
  • Easily grant users access to a file or folder
  • Makes it easier to identify who has access to what
  • Simplifies auditing and compliance reports

Let me walk through an example of how using security groups simplifies NTFS permissions management.

Say you have 100 employees that need access to the accounting folder, 80 need read/write permissions, and the other 20 need read-only access.

To set these permissions you only need to create two security groups, and then configure the permissions for these two groups. Example below.

Example of using security groups to manage NTFS permissions.

Now as new employees are hired, all you need to do is add the user to one of these groups to give them access. To remove access you would just remove them from the group.

If you did not use security groups for the NTFS permissions you would have to add all 100 users to the ACL, this would be very time consuming and difficult to manage. Example below.

Example of setting individual accounts on NTFS ACL permissions. This is a bad design.

Always use security groups to manage the ACL on NTFS permissions.

3. Standardized Naming Convention & Documentation

This is my favorite NTFS Permissions management tip.

You can easily provide groups of users with unwanted access if you do not use descriptive security group names.

For example, the accounting department just purchased a SaaS based accounting program. It can sync with Active Directory for single sign-on and permissions. The administrator created an Accounting_1 and Accounting_2 group to manage access to the software. Accounting_1 is full access and Accounting_2 is limited. Both groups are generic and have no description or documentation.

The accounting department also needs a shared folder setup so they can share and collaborate on some files. The administrator thinks, oh I’ve already got accounting groups configured, and therefore proceeds to use Accounting_1. Users are added to Accounting_1 to provide access to the NTFS share, but unfortunately this now grants users full access to the SaaS accounting program.

Bad Security Group Names

The groups below are examples of bad security group names because there is no description and are generic, telling the administrator nothing. You would have to scan the entire network to know where these groups are being used.

Good Security Group Names

In the examples below you can look at the group name and instantly know what it is used for and there is information in the description box.

Do not create generic security group names, instead be descriptive in their use and use the description field.

4. Do Not Use the Everyone Group (For Anything)

I might get some hate mail for this but seriously what is the justification for using the everyone group? There is no good reason to use it.

You should not set the everyone group on the ACL

What is the Everyone group?

All interactive, network, dial-up, and authenticated users are members of the Everyone group. This special identity group gives wide access to system resources. When a user logs on to the network, the user is automatically added to the Everyone group. Membership is controlled by the operating system.https://learn.microsoft.com/en-us/windows-server/identity/ad-ds/manage/understand-special-identities-groups

The Everyone group also includes the Guest account. This is just bad news for security so I highly recommend never using the Everyone group for anything.

Unfortunately, there are some poorly designed programs and tech support that do not understand this. Has a vendor tech support ever told you, “you need to add the everyone group and give them it permissions”? This is horrible advice and if followed you have significantly weakened security in your network.

Some admins will argue that it is not an issue to use everyone on shared permissions and then lock it down using NTFS permissions. This would still allow hackers to scan and detect shared folders in the network so why allow it? Instead, use the least principle model and only allow those that need access to it.

You can quickly find where the Everyone account is in use by using a reporting tool and filter for the account.

In the example below, I scanned my file server and found 4 folders that are using the Everyone account and have full control, and this is not good.

Easily search for the everyone group using the AD Pro Toolkit

5. Use the Principle of Least Privilege

The principle of least privilege means a user should only have access to the data, resources, and applications needed to complete a required task.

Preventing unnecessary permissions prevents mishandling of company data and helps to mitigate security threats.

Just because a user is part of a department doesn’t mean they need full access to all department folders and files. Consider using read-only and read/write groups to set granular permissions on files and folders.

6. Avoid setting Full Access Permissions

Only the administrator account or other IT staff should have full control of files and folders. I can’t think of a good reason a regular user needs full control. By giving regular users full control they are granted the ability to change settings and permissions, which is a bad idea.

Do not give regular users full access

7. Limit the Depth of Setting NTFS Permissions

Try and limit settings NTFS permissions to no more than two or three levels deep. There will always be exceptions to this rule, but if you set no rules for this these permissions, things will get out of control. Your users will request for every file or folder to have special permissions which will cause problems.

Here is an example.

The accounting department has a folder that has a level 1 folder and two subfolders (level 2 and level 3). It is no problem to set explicit permissions on level 1 and level 2 but I would not go any level deeper (level 3) as this becomes difficult to manage, and the same goes for files.

I would also try to limit setting explicit permissions to folders only. Users will call and will want to set specific permissions on individual files, this will become a pain to manage so try to avoid this.

8. Avoid Breaking Inheritance

By default, the permissions set at the root folder will be inherited by all subfolders. If you break inheritance it can make it difficult to read and manage NTFS permissions.

Let’s look at an example.

In the above screenshot, accounting, sales, and purchasing are what I consider the root folder. These folders have NTFS permissions set and all the subfolders will inherit their permissions.

For example, I set permissions on the accounting folder, and therefore all its subfolders inherit its permissions. If I broke the inheritance I would have to set the NTFS permissions on the folder.

There will be times when you need to break inheritance such as limiting access to a specific folder but this should be kept to a minimum.

You can easily check for folder inheritance with the AD Pro Toolkit.

Audit Folder Inheritance with the AD Pro Toolkit

9. Use Access Based Enumeration (ABE)

Access Based Enumeration allows you to hide files and folders from users who do not have permission. Limiting visibility to files and folders makes it easier for your users to browse and access resources.

If ABE is not enabled users will still see folders they do not have access to but will be denied if they try to open them. This can cause some confusion and so it is best to just hide them.

To enable ABE follow these steps.

1. Open Server Manager

2. Click on File and Storage Services (left sidebar menu)

3. Click on Shares

4. Right click the share and select properties.

5. Click on Settings

6. Check “Enable Access based enumeration.

Enable access based enumeration

10. Prevent Users from Creating Folders in the Root

It can be frustrating when you take the time to organize your folders and get it all cleaned up just to then find a bunch of new folders in the root directory.

What usually then happens is someone will create a folder and use it to share files with other users bypassing the security you have put in place. To fix this you need to set read and execute permissions at the root folder only, do not set this permission on subfolders. You will then need to add the group again and set the permissions for the subfolders. Be careful configuring this as you can easily mess up permissions.

Bonus #1. File Screening Management

File screen management can increase security and help control data on your Windows file shares. File screen management can be used for the following:

  • Block certain files types such as exe, bat files, videos files.
  • Quote Management – Limit disk space usage to users and groups.
  • Storage Reports – Generate store reports and see who is using the most space and what file types.

Bonus #2. Use Volume Shadow Copy Service (VSS)

VSS is a built-in Windows technology that allows you to take point-in-time snapshots of an entire disk. This allows you to create a backup of your file shares or any other data that resides on the disk. VSS works great as a quick solution to recover deleted files and folders from your file servers. VSS should not be used as your only backup solution.

I hope you enjoyed this article. If you have questions or comments please post them below.

Source :
https://activedirectorypro.com/ntfs-permissions-management-best-practices/

Shared Storage and Monitoring for VMware vSphere Cluster as a base building block with Software Defined Storage from StarWind

By Vladan SEGET | Last Updated: July 31, 2023

Shared storage is a critical component of a VMware vSphere cluster. In a vSphere cluster, multiple hosts are grouped together to provide a pool of computing resources that can be used to run virtual machines. These hosts are connected to shared storage, which provides a centralized location for storing virtual machine files, such as virtual disks and configuration files. This shared storage is accessible to all hosts in the cluster, allowing virtual machines to be migrated between hosts without the need to copy files between them.

Shared storage is a base building block without which most (if not all) cluster services will not work. Shared storage is a requirement for vSphere HA, DRS, FT or other cluster services.

What are the benefits of shared storage?

There are several benefits to using shared storage in a vSphere cluster. One of the most significant benefits is the ability to migrate virtual machines between hosts using vMotion. vMotion allows virtual machines to be moved between hosts without any downtime, allowing administrators to perform maintenance tasks or balance the load on the hosts without impacting the availability of virtual machines. This is possible because the virtual machine files are stored on shared storage, which is accessible to all hosts in the cluster.

Another benefit of shared storage is the ability to use advanced features such as High Availability (HA) and Distributed Resource Scheduler (DRS). HA provides automatic failover of virtual machines in the event of a host failure, while DRS provides load balancing of virtual machines across hosts in the cluster. Both of these features rely on shared storage to function properly.
There are several types of shared storage that can be used in a vSphere cluster, including Fibre Channel, iSCSI, and NFS. Each of these storage types has its own advantages and disadvantages, and the choice of storage type will depend on factors such as performance requirements, budget, and existing infrastructure.

In addition to choosing the right type of shared storage, it is also important to properly configure and manage the storage environment. This includes tasks such as setting up storage arrays, configuring storage networking, and monitoring storage performance. VMware provides a number of tools and best practices to help administrators manage shared storage in a vSphere cluster, including the vSphere Storage APIs, vSphere Storage DRS, and the vSphere Web Client.

StarWind SAN and NAS has another advantage over a hardware based storage array. This is cost. In addition, storage array, despite that you can have multiple PSUs or multiple CPUs or controller cards or NICs, you can only have a single motherboard, which is a still single point of failureStarWind SAN and NAS, that is a software based, is configured to run on at least 2-nodes where each node participate with its internal disks and RAM, to the storage pool created by StarWind. As a result, when you have a 1 host failure, the other host still has your VM file as the storage is simply mirrored. If you have vSphere HA, the restart of VMs on the remaining host is done automatically. Without vSphere HA you simply start those VMs manually from your remaining host.

What is StarWind SAN and NAS?

StarWind SAN and NAS is a software that turns your server or a group of servers into a powerful and easy-to-use storage appliance. It eliminates the need for expensive and complex storage hardware and provides a cost-effective and scalable storage solution for your virtualized environment.

Benefits of StarWind SAN and NAS for VMware vSphere

High Availability – StarWind SAN and NAS provides high availability by creating a redundant storage pool that can withstand hardware failures. It uses synchronous replication to keep the data in sync between the nodes, ensuring that there is no data loss in case of a failure.

Scalability – StarWind SAN and NAS is highly scalable and can be easily expanded by adding more nodes to the storage pool. This allows you to scale your storage capacity as your business grows, without having to invest in expensive hardware.

Cost-Effective – StarWind SAN and NAS is a cost-effective storage solution that eliminates the need for expensive hardware. It uses commodity hardware and turns it into a powerful storage appliance, reducing the overall cost of ownership.

Easy to Use – StarWind SAN and NAS is easy to use and can be set up in minutes. It comes with a user-friendly web-based interface that allows you to manage your storage pool and monitor its performance.

Performance – StarWind SAN and NAS provides high-performance storage that can meet the demands of your virtualized environment. It uses advanced caching algorithms to optimize the performance of your storage pool, ensuring that your virtual machines run smoothly.

Integration with VMware vSphere – StarWind SAN and NAS integrates seamlessly with VMware vSphere, providing a powerful and scalable storage solution for your virtualized environment. It supports all the features of VMware vSphere, including vMotion, High Availability, and Distributed Resource Scheduler.

StarWind Virtual SAN – StarWind Virtual SAN is a software that eliminates the need for physical shared storage by simply “mirroring” internal hard disks and flash between hypervisor servers. It creates a VM-centric and high-performing storage pool for a VMware cluster. This allows you to create a highly available and scalable storage solution for your virtualized environment.

Quote:

StarWind SAN & NAS supports hardware and software-based storage redundancy configurations. The solution allows turning your server with internal storage into a redundant storage array presented as NAS or SAN, exposing standard protocols such as iSCSI, SMB, and NFS. It features Web-based UI, Text-based UI, vCenter Plugin, and Command-line interface for your cluster-wide operations.

A while back, we have created a short video from the deployment process for vSphere. However, please note that this product is evolving and today, it might look a bit different. Check the latest StarWind SAN and NAS version here.

https://www.youtube.com/embed/4Wzzk-d_BOM
How about vCenter server appliance on 2-hosts config?

Note: in 2-node config, your vCenter server appliance (VCSA) should be stored on shared storage. If you running your VCSA from local storage on one of your ESXi hosts, you risking the downtime of your VCSA in case this particular host fails. This does not mean, however, that vSphere HA or other cluster services will fail. Not at all, as VCSA is used only to configure vSphere HA, not responsible in triggering the actual HA event! It mean you can perfectly “lose” your VCSA and still have your VMs restarted on the remaining host automatically.

Performance Improvements of vSphere cluster

StarWind SAN and NAS can improve the performance of VMware vSphere in several ways. One of the main ways is through the use of StarWind Virtual SAN for vSphere, which creates a VM-centric and high-performing storage pool for a VMware cluster. This allows for faster data access and improved performance for virtual machines. StarWind SAN and NAS also uses advanced caching algorithms to optimize the performance of the storage pool. This ensures that frequently accessed data is stored in cache, reducing the time it takes to access the data and improving overall performance.

In addition, StarWind SAN and NAS provides high availability and redundancy, which can improve performance by reducing downtime and ensuring that data is always available. This is achieved through synchronous replicationwhich keeps the data in sync between the nodes, ensuring that there is no data loss in case of a failure. It supports all the features of VMware vSphere, including vMotion, High Availability, and Distributed Resource Scheduler, which can further improve performance by allowing for workload balancing and resource optimization.

Final Words

In conclusion, shared storage is a critical component of a VMware vSphere cluster. It provides a centralized location for storing virtual machine files, allowing virtual machines to be migrated between hosts without downtime and enabling advanced features such as HA and DRS. Properly configuring and managing shared storage is essential for ensuring the availability and performance of virtual machines in a vSphere cluster.

StarWind SAN and NAS is a powerful and cost-effective storage solution that can be used with VMware vSphere. It provides high availability, scalability, and performance, making it an ideal storage solution for virtualized environments. Its seamless integration with VMware vSphere and support for all its features make it a must-have for any virtualized environment.

More posts about StarWind on ESX Virtualization:

More posts from ESX Virtualization:

PHD Virtual Backup 6.0

By Vladan SEGET | Last Updated: June 28, 2023

PHD Virtual Backup 6.0 – Backup, Restore, Replication and Instant recovery. PHD Virtual has released their new version of backup software for VMware vSphere environments. PHD Virtual backup 6.0 comes up with several completely new features. Those features that are specific to virtualized environments. In this review I’ll focus more on those new features instead on the installation process, which is fairly simple. This review contains images, which can be clicked and enlarged (most of them) to see all the details from the UI.

Now first something that I was not aware of. Even if I work as a consultant, I must say I focus most of the time on the technical side of a solution which I’m implementing and I leave the commercial (licensing) part to vendors or resellers.  But with this review I would like to point out that PHD Virtual Backup 6.0 is licensed on a per-host basis. Not CPU Socket like some vendors do, but also not per site like other vendors do. As a result, their price is a fraction of the cost of competitive alternatives.

Introduction of PHD Virtual Backup and Recovery 6.0

The PHD Virtual Backup 6.0 comes up with quite a few new features that I will try to cover in my review. One of them is the Instant Recovery, which enables to run VM directly from a backup location and initiate storage vMotion from within VMware vSphere to move the VM back to your SAN.

But PHD Virtual goes even further by developing a proprietary function to initiate the move of the VM by using PHD Motion. What is it? It’s an alternative for SMB users which does not have VMware Enterprise and Enterprise Plus License, which includes storage vMotion.

PHD Motion does not require VMware’s storage vMotion in order to work. It leverages multiple streams, intelligent data restore, direct storage recovery to copy a running state of a VM back to the SAN, while the VM still runs in the sandbox at the storage location. Therefore, it is much faster at moving the data back to production than storage vMotion.

The delta changes to the VM are maintained in another, separate temporary location.  So the final switch back to SAN happens fairly quickly since only the deltas of changes between the VM which runs from the backup and the VM which is located back on SAN, are quickly copied. So small planned downtime (about the time for a VM reboot) is necessary.

Installation of the Software

PHD Virtual Backup 6.0

The installation will take like 5 minutes, just to deploy the OVF into vCenter and configure the network interface, storage …. and that’s it. Pretty cool!

One of those differences from previous version of PHD Virtual backup is the Instant Recovery Configuration TAB, since this feature has just been introduced in the PHD Virtual Backup 6.0.

The Instant recovery feature is available for Virtual Full backups only. The full/incremental backup types are not currently supported for instant recovery, so if you select the full/incremental option, you might see that the Instant Recovery option isn’t available. Use Virtual Full option when configuring your backup jobs to take benefit of Instant recovery.

PHD Virtual Backup and Replication 6.0 If you choose the full/incremental backup type, the Instant VM recovery isn't currently supported

PHD Virtual backup 6.0 – Replication of VMs.

Replication – This feature requires at least one PHD VBA installed and configured with access to both environments – but if you will be using replication in larger environments, you may need additional PHD VBAs. For instance, one PHD VBA deployed at the primary site would be configured to run regular backups of your VMs while a second PHD VBA could be deployed to the DR site configured to replicate VMs from the primary site to the secondary location.

The replication of VMs is functionality that is very useful for DR plans. You can also configure the replication within the same site as well, and choose a different datastore ( and ESXi host) as a destination. This is my case, because I wanted to test this function, since my lab don’t have two different locations.

The replication job works the way that only the first replica is full copy. PHD VM replication takes data from existing backups and replicates those to a cold standby VM. After the VM is initially created during the first pass, PHD uses its own logic to transfer only the changes from the previous run.

You can see the first and second job, when finishes on the image below. The latter one took only 51 s.

PHD Virtual Backup 6.0 - Replication Jobs

Testing Failover – After the replica VM is created, you have the option to test each replica to validate your standby environment or to failover to your replicated VMs. There is a Start Test button in order to proceed.

PHD Virtual 6.0 - testing failover button

What’s happening during the test. At first, another snapshot is created of the Replica VM. This is only to have the ability to get back to the state before the test. See the image below.

PHD Virtual Backup 6.0 - Testing the Replication with the Failover Test Button

This second snapshot is deleted the moment when you’re done with the testing of that failover VM, you tested that the application is working etc…. The VM is powered off and it is rolled back to the state it was in prior to testing mode.

So when you click the Stop Test button (it changed text), the replica Status is changed back to STANDBY, once again click Refresh button to refresh the UI.

If you lose your primary site, you can go to the PHD console at the DR site and failover the VMs which has been replicated there.  You can recover your production environment there by starting the VMs that has been replicated.  And now, when you run your production (or at least the most critical VMs) from DR site, and because you don’t have a failover site anymore, you should consider start backing up those VMs in failover mode….. it will be helpful when failing back to the main primary site, when damages there gets repaired.

Why one would have to start doing backups as soon as the VMs are in failover state ? …. Here is a quick quote from the manual:

When ending Failover, any changes made to the replica VM will be lost the next time replication runs. To avoid losing changes, be sure to fail back the replica VM (backup and restore) to a primary site prior to ending Failover mode.

I can only highly recommend to read the manual where you’ll find all the step-by-steps and all those details. In this review I can’t focus to provide all those step-by-step procedures. The manual is a PDF file very good quality, with many screenshots and walk through guides. In addition, there are some nice FAQ which were certainly created as a result of feedback from customer’s sites. One of them is for example a FAQ for increasing backup storage and the step-by-step follows. Nice.

You can see the possibility to end the failover test with the Stop Test button.

PHD Virtual Backup 6.0 - end falover test.

Seeding – If you have some huge amount of data to replicate for the DR site you can seed the VMs data before configuring the replication process. The seeding process is process when you pre-populate the VMs to the DR site first. This can be done through removable USB drives, or small NAS device. When the seeding is complete, you can start creating the replication jobs to move only the subsequent changes.

In fact the seeding process is fairly simple. Here is the outline. First create full backup of VMs > copy those backups to NAS or USB for transport >  Go to the DR site and deploy PHD VBA and add the data that you have with you as a replication datastore > create and run replication job to replicate all the VMs from the NAS (USB) to your DR site > Remove the replication datastore and the NAS and create the replication job where you specify the the primary site datastore as a source. Only the small, incremental changes will be replicated and sent over the WAN.

PHD Virtual Backup 6.0 – File level Recovery

File level recovery is a feature that is used at most in virtual environments, when it comes to console manipulations. I think, since more frequently you (or your users) are in need for file restore, than VM crashes or corruption, so the full VM needs to be restored.

I’ve covered the the FLR process in the 5.1 version by creating an iSCSI target and then mounting the volume as an additional disk in computer management, but the option was greatly simplified in PHD Virtual Backup 6.0. In fact when you run the assistant, you have the now a choice between the creation of iSCSI target and create windows share. I took the option Create Windows share.

All the backup/recovery/replication tasks are done through assistants. The task is composed with just few steps:

First selecting the recovery point , then create a windows share (or iSCSI target) > and mount this share to finally be able to copy-paste the files that needs to be restored from withing that particular VM.

The process is fast and direct. It takes few clicks to get the files back to the user’s VM. You can see the part of the process on the images at left and bellow.

PHD Virtual Backup and Replication 6.0 - file level restore final shot - you can than easily copy paste the files you need

PHD Virtual Backup 6.0 – Instant VM Recovery and PHD Motion – as said in the beginning of my review, the PHD virtual backup 6.0 has the ability to run VMs directly from backup location.

The Instant VM Recovery works out of the box without further necessity to setup the temporarily storage location, but if needed, the location for temporary changes can be changed from the defaults. But there is usually no need to do so.

You can do it in Configuration > Instant VM Recovery.

There is a choice between the attached virtual disk and VBA’s backup storage.

PHD Virtual Backup 6.0 - configuration of temporary storage location for Instant VM recovery

Then we can have a look and see how the Instant VM recovery option works. Let’s start by selecting the recovery point that we would want to use for that. An XP VM which I backed up earlier will do. Right Click the point in time from which one you want to recover (usually the latest), and choose recover.

PHD Virtual Backup 6.0 - Instant VM Recovery

At the next screen there is many options. I checked the Power On VM after recovery and Recover using original storage and network settings from backup. Like this the VM is up and running with network connectivity as soon as possible. I did also checked the option to Automatically start PHD Motion Seeding, which will start copying the VM back to my SAN.

When the copy finishes I’ll receive a confirmation e-mail…..  Note that you have a possibility to schedule this task as well.

PHD Virtual Backup 6.0 - Instant VM recovery and PHD Motion

On the next screen you can see the final screen before you hit the submit button. You can make changes there if you want.

PHD Virtual Backup 6.0 - Instant VM recovery and PHD Motion

The VM is registered in my vCenter and started from the backup location. 1 min later my VM was up. The VM was running from temporary storage created by PHD Virtual backup 6.0. The temporary storage that I configured before, when setting up the software.

You can see on the image below which tasks are performed by PHD Virtual backup 6.0 in the background.

PHD Virtual Backup 6.0 - Instant VM Recovery with PHD Motion

So, we have the Instant VM Recovery tested and our VM is up and running. Now there are two options, depending if you have storage vMotion licensed or not.

With VMware Storage vMotion – If that’s the case, you can initiate storage vMotion from the temporary datastore created by PHD Virtual back to your datastore located on your SAN.

When the migration completes, open the PHD Console and click Instant VM Recovery. In the Current tab, select the VM that
you migrated and click End Instant Recovery to remove the VM from the list.

Using PHD Motion – If you don’t have storage vMotion, you can use PHD Motion. How it works… Let’s see. You remember that during the assistant launching the Instant VM recovery, we selected an option to start PHD Motion seeding.

This option will start to copy the whole VM back to the datastore on the SAN (in my case it’s the Freenas datastore). I checked that option to start Automatically PHD Motion seeding when setting up the job, remember?

You can see it in the properties of the VM being run in the Instant VM recovery mode. On the image below you can see the temporary datastore (PHDIR-423…….) and the final destination’s datastore of the VM (the Freenas datastore).

PHD Virtual Backup 6.0 - Instant VM Recovery and PHD Motion

This process will take some time. So when you go back to the PHD Virtual console, you choose the Instant VM Recovery Menu option > Current Tab, you’ll see that Complete PHD Motion is grayed out. That’s because of the above mentioned copy hasn’t finished. Well it really does not matter, since you (or your users) can still work and use the VM.

PHD Virtual Backup 6.0 - Instant VM Recovery and PHD Motion

And you can see on the image below that when the seeding process has finished, the button Complete PHD Motion became activ. (In fact, the software drops you an e-mail that the seeding process has finished copying

PHD Virtual Backup 6.0 - PHD Motion

And then, after few minutes the VM dissapears from this tab. The process has finished the copy of the deltas and the VM can be powered back on. It’s definitely a time saver, and when no storage vMotion licenses (in SMBs) are available, this solution can cut the the downtime quite impressively. The History tab shows you the details.

PHD Virtual Backup 6.0 - Instant VM recovery with PHD Motion

PHD Virtual Backup 6.0 – The E-mail Reporting Capabilities.

PHD Virtual Backup 6.0 has got the possibility to report on backup/replication jobs success (failure). The configuration of it it’s made mores simpler now than in previous release, since there is a big Test button there in order to send test e-mail. I haven’t had any issues after entering the information for my e-mail server, but in case you’re using different ports or you’re behind a firewall, this option is certainly very useful.

PHD Virtual Backup 6.0 - E-mail Reporting Capabilities

In v6, PHD made the email reports WAY more attractive.  They have a great job summary at the job and lots of great information in a nicely formatted chart that shows details for each VM and each virtual disk.  They even color code errors and warnings.  Very cool.

PHD Virtual Backup 6.0 - E-mail reports

PHD Exporter

PHD Virtual Backup .60 has also few tools bundled within the software suite which can be useful. PHD Exporter is one of them. This application can help when you need to archive VMs with data. Usually you would want to install this software on physical windows server which has got a tape library attached. It’s great because you can schedule existing backups to be exported as compressed OVF files. So if you ever had to recover from an archive, you wouldn’t even need PHD to do the recovery.

The tool basically connects itself to the location where the backups are stored and through an internal processing does extract those backup files to be stored temporary in a location that you configure when you setting up – it’s called staging location. Usually it’s a local storage. Then the files are sent to tape for archiving purposes.

Through the console you configure exporting jobs where the VM backups are exported to staging location.

PHD Exporter - Tool to export backups to Tape for archiving purposes

PHD Virtual Backup 6.0 is Application Aware Backup Solution

PHD virtual Backup 6.0 can make a transactionally-consistent backups of MS Exchange with the possibility to truncate the logs. Log truncation is supported for Microsoft Exchange running on Windows 2003 Server 64 bit SP2 and later and Windows Server 2008 R2 SP1 and later.

When an application aware backup is started, PHD Guest Tools initiates the quiesce process and an application-consistent VSS snapshot is created on the VM. The backup process continues and writes the data to the backup store while this snapshot exists on disk. When the backup process completes, post-backup processing options are executed and the VSS snapshot is removed from the guest virtual machine.

PHD Virtual Backup 6.0 provides small agent called PHD Guest Tools, which is installed inside of the VM.  This application performs the necessary application aware functions, including Exchange log truncation. Additionally, you can add your own scripts to perform tasks for other applications. Scripts can be added before and after a snapshot, and after a backup completes. So it looks like they’ve got all the bases covered for when you might want to execute something on your own. I’ve tested with an Exchange 2010 VM and it worked great!

I was nicely surprised with the deduplication performance at the destination datastore. Here is a screenshot from the dashboard where you can see that the Dedupe ration is 33:1 and saved space 1.4 TB.

PHD Virtual Backup 6.0 - The dashboard

During the few days that I had the chance and time to play with the solution in my lab I did not have to look often in the manual, but if you do plan using the replication feature with several remote sites, I highly recommend to read the manual which is as I already told you, good quality.

PHD Virtual Backup 6.0 provides many features that are useful and provide real value for VMware admins. Replication and Instant Recovery are features which becomes a necessity providing short RTO.

PHD Virtual Backup 6.0  is an agent-less backup solution (except VMs which needs Application aware backups) which don’t use physical hardware, but runs as a virtual appliance with 1CPU and 1Gigs of RAM.  This backup software solution can certainly have its place in today’s virtualized infrastructures running VMware vSphere.

Please note that this review was sponsored by PHD Virtual.

Source :
https://www.vladan.fr/phd-virtual-backup-6-0/

Delegate Control in Active Directory (Step-by-Step Guide)

Last Updated: July 20, 2023 by Robert Allen

How to delegate control in active directory

Do you need to give the helpdesk staff permissions to reset passwords and unlock user accounts?

Do you want to allow specific users to modify group membership?

No problem.

In this guide, you will learn how to use the delegation control wizard in Active Directory to grant users very specific permissions.

It is important to know how to correctly use the delegation of control in Active Directory to avoid giving users more rights than they need. Whatever you do, do not add users into highly privileged groups like Domain Admins.

Table of Contents:

Delegation of Control Best Practices

Here are my recommendations and tips for delegating permissions in Active Directory.

Good OU Design

Delegating permissions in Active Directory is done by using organizational units (OU), so it is critical to have a good OU design. The OU design will be different for every organization, but a simple design is to put all similar resources into their own OU.

  • Computer OU – All computers go here
  • Users OU – All user accounts go here
  • Servers OU – All server accounts go here
  • Groups – All groups go here.

You can then create sub-OUs to further organize your resources.

users ou

In the above screenshot, I have the “ADPRO Users” OU for all my user accounts. I then created sub-OUs for each department to further organize the user accounts. With this design, I can easily delegate control to all resources or resources in a specific sub-OU. For example, HR hired their own IT support person and they want to reset passwords for all HR users. I can delegate the password reset permissions to just the HR OU.

You can structure the sub-OUs any way that you like. For example, you could make them based on geographic locations, or by user type such as regular, privileged, and so on.

With a good OU design, it makes delegating permissions easy and helps to avoid delegating more permissions than needed.

To read more on OU design see the Microsoft guide Designing OU structures that work.

Don’t use Built-in Security Groups

When delegating control it is best to create new security groups rather than using built-in AD groups. For example, don’t use “Account Operators” or Backup Operators” when delegating permissions. These built-in AD groups have special permissions that can give users more rights than needed.

Delegate Control to Groups, NOT USERS

Do not delegate control to a user account. This will become a security nightmare as it will be very difficult to audit and manage. Assigning permissions to groups makes it easy to add and remove permissions.

Use Descriptive Group Names

Have you come across a group in Active Directory and have no idea what it is for? This happens a lot and drives me bonkers. Creating a descriptive name will make it easy for you and other admins to identify its use.

For example, if the helpdesk wants to reset user passwords I would create a group like this:

Helpdesk_password_reset

If a group of users needs to modify a specific AD attribute such as the telephone field I would create a group like this:

IT_modify_telephone

active directory group names

You can see that in the screenshot above, the group name and description make it easy for anyone to identify what the group is used for.

Tip: I also put details into the group description. I can then use PowerShell to search for all of the groups that have “delegate control” in the description.

get-adgroup -Properties * -filter {Description -like 'Delegate*'} | select name, description

Audit AD Delegated Controls Yearly

You should review the Active Directory ACL permissions each year. AD permissions can easily get out of control and the only true way to know who has what rights is to audit the ACL permissions.

See the last section in this guide for details on auditing Active Directory Permissions.

Don’t Over Delegate Control (Use lease Privilege)

Only delegate control to what is needed.

If another department wants to reset their own passwords don’t grant them this permission to all user objects, but instead to just their group or department.

If the helpdesk needs the rights to delete computer accounts, don’t grant this permission to all computer objects, but instead to just the ones the helpdesk manages (hint… not the servers).

Over delegating control can easily be avoided by having a good OU design.

Now let’s check out some examples on how to delegate permissions.

Delegate Password Reset and Unlock Permissions

In this example, I’ll use the delegation control wizard to give helpdesk users permissions to reset passwords and unlock user accounts. I’ll also demonstrate how to limit this to a specific group of users (department).

Step 1: Create a New Active Directory Group

I’m going to create a new group and name it “Helpdesk_password_reset”. Use whatever naming convention makes sense to you, I just recommend it to be descriptive. I also recommend using the description field to provide exact details on what the group is used for. With a descriptive name and the description filled out, there should be no confusion about what this group is used for, this will help you and other System Admins.

helpdesk password reset group

Next, I’ll add the helpdesk staff to this group. When the delegation is complete you can easily add or remove rights by changing the membership of this group.

Step 2: Use Delegation of Control Wizard

This is where good OU design is important. I want to grant this group permission to change the password for all users in the domain, and since I have all users in the “ADPro Users” OU this can easily be done. The delegated rights will apply to the root and all sub-OUs.

Right-click on the OU and select “Delegate Control”.

delegate control on ou

Click “Next”

Select the group you want to delegate control to.

delegate control select group

Click “Next”

Select “Create a custom task to delegate”

select custom task to delegate

Select “Only the following objects in the folder” then select “User objects”

select user objects

Click “Next”

Select “General” and “Property-specific”

Then enable the following permissions:

  • Change password
  • Reset password
  • Read lockoutTime
  • Write lockoutTime
delegate control unlock user accounts

Click “Next”

Click “Finish”

Now any member of the “Helpdesk_password_reset” group can change/reset passwords and unlock user accounts for all users in the “ADPRO Users” OU.

What if you had a department that wanted to reset/unlock their own accounts? For example, the HR department wants to reset/unlock their own accounts without having to call IT support.

Here are the steps: (The steps are basically the same as above you just run the delegation control on a specific OU)

  1. Create a new group for the HR users (example, HR_password_reset).
  2. Use the delegation control wizard on the HR OU.
  3. Select the HR group (example, HR_password_reset).
  4. Set permissions (change password, reset password, read lockoutTime, write lockoutTime). See the above screenshots for more details.
delegate control to department

If you delegated control to the entire domain or an OU with all users then you gave HR staff more permissions than they need. They could reset/unlock users for the entire domain, you want to avoid this.

Delegate Permissions to Modify Telephone Number

In this example, I want to give a group of users permission to only modify the Telephone number in Active Directory. You will see in the delegation of control wizard you can grant permissions to other user fields (address, zip, state, and so on).

Step 1: Create a group.

I created a group called “IT_Modify_Telephone”.

Step 2: Run delegation Control Wizard.

Run the delegation control wizard on the target OU.

Select the group.

Select “create a custom task to delegate”

Select “Only the following objects in the folder” then select “User Object”

Select “Property-specific”

Enable “Read Telephone Number” and “Write Telephone Number”

delegate control telephone number

Click “Next” then “Finish” to complete.

Now any member of the group can modify the “Telephone Number” field in Active Directory. All other fields are read-only.

active directory user screenshot

Delegate Permissions to Modify Group Membership

In this example, I will give a group of users permission to modify group membership (add/remove users to groups).

This one is easier than previous examples as Microsoft has a common task for it.

Step 1: Create AD Group

Step 2: Run Delegation Control Wizard

If you have all groups in a specific OU then run the delegation wizard on the OU. For example, all of my groups are in an OU called “ADPRO Groups”.

delegate control to groups ou

Select the group you want to delegate control to.

Click “Next”

Select “Modify the group membership of a group”

modify group membership task

Click “Next” and click “Finish”.

Delegate Control to Delete Computer Accounts

Helpdesk or other IT staff will often need rights to delete computer accounts in Active Directory. Here is how to delegate those rights.

Step 1: Create AD Group

For example “IT_delete_computers”.

Step 2: Run delegation control wizard on OU.

Make sure you run the wizard on the OU that contains the computer objects.

Select the group to delegate control

Click “Next”

Select “Create a custom task to delegate”

Select “This folder, existing objects in this folder, and creation of new objects in this folder”.

Click “Next”

Select “creation/deletion of specific child objects”

Then select “Delete Computer objects”

delete computer objects task

Now members of the selected group can delete computer objects.

How to Audit Active Directory (ACL) Permissions

Over time Active Directory permissions can easily spiral out of control. It is recommended to audit your AD permissions at least once a year. How else are you going to know if someone gave unnecessary rights to a user or group?

Maybe someone used the delegation of control wizard and accidentally gave helpdesk the rights to delete servers. The only way to determine this, is to check the ACL permissions in Active Directory.

You can view the ACL on an OU by right-clicking the OU selecting properties and the Security tab. But this would take too long if you had a lot of OUs.

The best option I have found is the AD ACL Scanner PowerShell tool. This tool lets you choose what to scan and creates an easy-to-read report on Active Directory permissions.

In this example, I’m going to scan my ADPRO Users OU, and scan each Sub-OU.

active directory acl scanner

When the tool is done scanning you will get a report like below.

acl scanner report

In the report, I can see the AD groups that I delegated control to and what permissions they have. Very easy to use and saves a ton of time.

Summary

In this guide, I walked you through several examples of delegating control in Active Directory. The delegation of Control Wizard can be confusing as it’s not always clear where to find specific permissions. It’s best to use groups for delegating control and set very specific permissions. Lastly, I showed you how to audit Active Directory ACL permissions using the AD ACL scanner tool. Don’t forget to audit the ACL permissions at least once a year.

Recommended: Active Directory Permissions Reporting Tool

The ARM Permissions Reporting Tool helps you monitor, analyze, and report on the permissions assigned to users, groups, computers, and organizational units in your Active Directory

You can easily identify who has what permissions, where they came from, and when they were granted or revoked. You can also generate compliance-ready reports for various standards and regulations, such as HIPAA, PCI DSS, SOX, and GDPR

Try the Permissions Reporting Tool today and take control of your permissions management

Download Free Trial

Source :
https://activedirectorypro.com/delegate-control-in-active-directory/

8 Essential Tips for Data Protection and Cybersecurity in Small Businesses

Michelle Quill — June 6, 2023

Small businesses are often targeted by cybercriminals due to their lack of resources and security measures. Protecting your business from cyber threats is crucial to avoid data breaches and financial losses.

Why is cyber security so important for small businesses?

Small businesses are particularly in danger of cyberattacks, which can result in financial loss, data breaches, and damage to IT equipment. To protect your business, it’s important to implement strong cybersecurity measures.

Here are some tips to help you get started:

One important aspect of data protection and cybersecurity for small businesses is controlling access to customer lists. It’s important to limit access to this sensitive information to only those employees who need it to perform their job duties. Additionally, implementing strong password policies and regularly updating software and security measures can help prevent unauthorized access and protect against cyber attacks. Regular employee training on cybersecurity best practices can also help ensure that everyone in the organization is aware of potential threats and knows how to respond in the event of a breach.

When it comes to protecting customer credit card information in small businesses, there are a few key tips to keep in mind. First and foremost, it’s important to use secure payment processing systems that encrypt sensitive data. Additionally, it’s crucial to regularly update software and security measures to stay ahead of potential threats. Employee training and education on cybersecurity best practices can also go a long way in preventing data breaches. Finally, having a plan in place for responding to a breach can help minimize the damage and protect both your business and your customers.

Small businesses are often exposed to cyber attacks, making data protection and cybersecurity crucial. One area of particular concern is your company’s banking details. To protect this sensitive information, consider implementing strong passwords, two-factor authentication, and regular monitoring of your accounts. Additionally, educate your employees on safe online practices and limit access to financial information to only those who need it. Regularly backing up your data and investing in cybersecurity software can also help prevent data breaches.

Small businesses are often at high risk of cyber attacks due to their limited resources and lack of expertise in cybersecurity. To protect sensitive data, it is important to implement strong passwords, regularly update software and antivirus programs, and limit access to confidential information.

It is also important to have a plan in place in case of a security breach, including steps to contain the breach and notify affected parties. By taking these steps, small businesses can better protect themselves from cyber threats and ensure the safety of their data.

Tips for protecting your small business from cyber threats and data breaches are crucial in today’s digital age. One of the most important steps is to educate your employees on cybersecurity best practices, such as using strong passwords and avoiding suspicious emails or links.

It’s also important to regularly update your software and systems to ensure they are secure and protected against the latest threats. Additionally, implementing multi-factor authentication and encrypting sensitive data can add an extra layer of protection. Finally, having a plan in place for responding to a cyber-attack or data breach can help minimize the damage and get your business back on track as quickly as possible.

Small businesses are attackable to cyber-attacks and data breaches, which can have devastating consequences. To protect your business, it’s important to implement strong cybersecurity measures. This includes using strong passwords, regularly updating software and systems, and training employees on how to identify and avoid phishing scams.

It’s also important to have a data backup plan in place and to regularly test your security measures to ensure they are effective. By taking these steps, you can help protect your business from cyber threats and safeguard your valuable data.

To protect against cyber threats, it’s important to implement strong data protection and cybersecurity measures. This can include regularly updating software and passwords, using firewalls and antivirus software, and providing employee training on safe online practices. Additionally, it’s important to have a plan in place for responding to a cyber attack, including backing up data and having a designated point person for handling the situation.

In today’s digital age, small businesses must prioritize data protection and cybersecurity to safeguard their operations and reputation. With the rise of remote work and cloud-based technology, businesses are more vulnerable to cyber attacks than ever before. To mitigate these risks, it’s crucial to implement strong security measures for online meetings, advertising, transactions, and communication with customers and suppliers. By prioritizing cybersecurity, small businesses can protect their data and prevent unauthorized access or breaches.

Here are 8 essential tips for data protection and cybersecurity in small businesses.

8 Essential Tips for Data Protection and Cybersecurity in Small Businesses

1. Train Your Employees on Cybersecurity Best Practices

Your employees are the first line of defense against cyber threats. It’s important to train them on cybersecurity best practices to ensure they understand the risks and how to prevent them. This includes creating strong passwords, avoiding suspicious emails and links, and regularly updating software and security systems. Consider providing regular training sessions and resources to keep your employees informed and prepared.

2. Use Strong Passwords and Two-Factor Authentication

One of the most basic yet effective ways to protect your business from cyber threats is to use strong passwords and two-factor authentication. Encourage your employees to use complex passwords that include a mix of letters, numbers, and symbols, and to avoid using the same password for multiple accounts. Two-factor authentication adds an extra layer of security by requiring a second form of verification, such as a code sent to a mobile device, before granting access to an account. This can help prevent unauthorized access even if a password is compromised.

3. Keep Your Software and Systems Up to Date

One of the easiest ways for cybercriminals to gain access to your business’s data is through outdated software and systems. Hackers are constantly looking for vulnerabilities in software and operating systems, and if they find one, they can exploit it to gain access to your data. To prevent this, make sure all software and systems are kept up-to-date with the latest security patches and updates. This includes not only your computers and servers but also any mobile devices and other connected devices used in your business. Set up automatic updates whenever possible to ensure that you don’t miss any critical security updates.

4. Use Antivirus and Anti-Malware Software

Antivirus and anti-malware software are essential tools for protecting your small business from cyber threats. These programs can detect and remove malicious software, such as viruses, spyware, and ransomware before they can cause damage to your systems or steal your data. Make sure to install reputable antivirus and anti-malware software on all devices used in your business, including computers, servers, and mobile devices. Keep the software up-to-date and run regular scans to ensure that your systems are free from malware.

5. Backup Your Data Regularly

One of the most important steps you can take to protect your small business from data loss is to back up your data regularly. This means creating copies of your important files and storing them in a secure location, such as an external hard drive or cloud storage service. In the event of a cyber-attack or other disaster, having a backup of your data can help you quickly recover and minimize the impact on your business. Make sure to test your backups regularly to ensure that they are working properly and that you can restore your data if needed.

6. Carry out a risk assessment

Small businesses are especially in peril of cyber attacks, making it crucial to prioritize data protection and cybersecurity. One important step is to assess potential risks that could compromise your company’s networks, systems, and information. By identifying and analyzing possible threats, you can develop a plan to address security gaps and protect your business from harm.

For Small businesses making data protection and cybersecurity is a crucial part. To start, conduct a thorough risk assessment to identify where and how your data is stored, who has access to it, and potential threats. If you use cloud storage, consult with your provider to assess risks. Determine the potential impact of breaches and establish risk levels for different events. By taking these steps, you can better protect your business from cyber threats

7. Limit access to sensitive data

One effective strategy is to limit access to critical data to only those who need it. This reduces the risk of a data breach and makes it harder for malicious insiders to gain unauthorized access. To ensure accountability and clarity, create a plan that outlines who has access to what information and what their roles and responsibilities are. By taking these steps, you can help safeguard your business against cyber threats.

8. Use a firewall

For Small businesses, it’s important to protect the system from cyber attacks by making data protection and reducing cybersecurity risk. One effective measure is implementing a firewall, which not only protects hardware but also software. By blocking or deterring viruses from entering the network, a firewall provides an added layer of security. It’s important to note that a firewall differs from an antivirus, which targets software affected by a virus that has already infiltrated the system.

Small businesses can take steps to protect their data and ensure cybersecurity. One important step is to install a firewall and keep it updated with the latest software or firmware. Regularly checking for updates can help prevent potential security breaches.

Conclusion

Small businesses are particularly vulnerable to cyber attacks, so it’s important to take steps to protect your data. One key tip is to be cautious when granting access to your systems, especially to partners or suppliers. Before granting access, make sure they have similar cybersecurity practices in place. Don’t hesitate to ask for proof or to conduct a security audit to ensure your data is safe.

Source :
https://onlinecomputertips.com/support-categories/networking/tips-for-cybersecurity-in-small-businesses/

Three Reasons Endpoint Security Can’t Stop With Just Patching

Last updated: June 14, 2023
James Saturnio
Security Unified Endpoint Management

With remote work now commonplace, having a good cyber hygiene program is crucial for organizations who want to survive in today’s threat landscape. This includes promoting a culture of individual cybersecurity awareness and deploying the right security tools, which are both critical to the program’s success. 

Some of these tools include endpoint patching, endpoint detection and response (EDR) solutions and antivirus software. But considering recent cybersecurity reports, they’re no longer enough to reduce your organization’s external attack surface.

Here are three solid reasons, and real-world situations, that happened to organizations that didn’t take this threat seriously.

  1. AI generated polymorphic exploits can bypass leading security tools
  2. Patching failures and patching fatigue are stifling security teams
  3. Endpoint patching only works for known devices and apps
  4. How can organizations reduce their external attack surface?

1. AI generated polymorphic exploits can bypass leading security tools

Recently, AI-generated polymorphic malware has been developed to bypass EDR and antivirus, leaving security teams with blind spots into threats and vulnerabilities.

Real-world example: ChatGPT Polymorphic Malware Evades “Leading” EDR and Antivirus Solutions

In one report, researchers created polymorphic malware by abusing ChatGPT prompts that evaded detection by antivirus software. In a similar report, researchers created a polymorphic keylogging malware that bypassed an industry-leading automated EDR solution.

These exploits achieved this by mutating its code slightly with every iteration and encrypting its malicious code without a command-and-control (C2) communications channel. 

This mutation is not detectable by traditional signature-based and low-level heuristics detection engines. This means that security time gaps are created for a patch to be developed and released, for the patch to be tested for effectiveness, for the security team to prioritize vulnerabilities and for the IT (Information Technology) team to rollout the patches onto affected systems.

In all, this could mean several weeks or months where an organization will need to rely on other security tools to help them protect critical assets until the patching process is completed successfully.
 

2. Patching failures and patching fatigue are stifling security teams

Unfortunately, updates breaking systems because patches haven’t been rigorously tested occur frequently. Also, some updates don’t completely fix all weaknesses, leaving systems vulnerable to more attacks and requiring additional patches to completely fix. 

Real-world example: Suffolk County’s ransomware attack

The Suffolk County government in New York recently released their findings from the forensic investigation of the data breach and ransomware attack, where the Log4j vulnerability was the threat actor’s entry point to breach their systems. The attack started back in December 2021, which was the same time Apache released security patches for these vulnerabilities. 

Even with updates available, patching never took place, resulting in 400 gigabytes of data being stolen including thousands of social security numbers and an initial ransom demand of $2.5 million.

The ransom was never paid but the loss of personal data and employee productivity and subsequent investigation outweighed the cost of updated cyber hygiene appliances and tools and a final ransom demand of $500,000. The county is still trying to recover and restore all their systems today, having already spent $5.5 million. 

Real world example: An errant Windows server update caused me to work 24-hours straight

From personal experience, I once worked 24 hours straight because one Patch Tuesday, a Microsoft Windows server update was automatically downloaded, installed which promptly broke authentication services between the IoT (Internet of Things) clients and the AAA (authentication, authorization and accounting) servers grinding production to a screeching halt.

Our company’s internal customer reference network that was implemented by our largest customers deployed Microsoft servers for Active Directory Certificate Services (ADCS) and Network Policy Servers (NPS) used for 802.1x EAP-TLS authentication for our IoT network devices managed over the air.

This happened a decade ago, but similar recurrences have also occurred over the next several years, including this update from July 2017, where NPS authentication broke for wireless clients and was repeated in May of last year.

At that time, an immediate fix for the errant patch wasn’t available, so I spent the next 22 hours rebuilding the Microsoft servers for the company’s enterprise public key infrastructure (PKI) and AAA services to restore normal operations. The saving grace was we took the original root certificate authority offline, and the server wasn’t affected by the bad update. 

However, we ended up having to revoke all the identity certificates issued by the subordinate certificate authorities to thousands of devices including routers, switches, firewalls and access points and re-enroll them back into the AAA service with new identity certificates.

Learning from this experience, we disabled automatic updates for all Windows servers and took more frequent backups of critical services and data.
 

3. Endpoint patching only works for known devices and apps 

With the pandemic came the shift to Everywhere Work, where employees worked from home, often connecting their personal devices to their organization’s network. This left security teams with a blind spot to shadow IT. With shadow IT, assets go unmanaged, are potentially out-of-date and cause insecure personal devices and leaky applications. 

The resurgence of bring your own device (BYOD) policies and the lack of company-sanctioned secure remote access quickly expanded the organization’s external attack surface, exposing other attack vectors for threat actors to exploit. 

Real-world example: LastPass’ recent breach 

LastPass is a very popular password manager that stores your passwords in an online vault. It has more than 25 million users and 100,000 businesses. Last year, LastPass experienced a massive data breach involving two security incidents.   

The second incident leveraged data stolen during the first breach to target four DevOps engineers, specifically, their home computers. One senior software developer used their personal Windows desktop to access the corporate development sandbox. The desktop also had an unpatched version of Plex Media Server (CVE-2020-5741) installed.

Plex provided a patch for this vulnerability three years ago. Threat actors used this vulnerability to deliver malware, perform privilege escalation (PE), then a remote code execution (RCE) to access LastPass cloud-based storage and steal DevOps secrets and multi-factor (MFA) and Federation databases.

“Unfortunately, the LastPass employee never upgraded their software to activate the patch,” Plex said in a statement. “For reference, the version that addressed this exploit was roughly 75 versions ago.”

If patching isn’t enough, how can organizations reduce their external attack surface?

Cyber hygiene

Employees are the weakest link to an organization’s cyber hygiene program. Inevitably, they’ll forget to update their personal devices, re-use the same weak password to different internet websites, install leaky applications, and click or tap on phishing links contained within an email, attachment, or text message. 

Combat this by promoting a company culture of cybersecurity awareness and practice vigilance that includes: 

· Ensuring the latest software updates are installed on their personal and corporate devices. 

· Recognizing social engineering attack techniques including the several types of phishing attacks.

· Using multi-factor authentication whenever possible. 

· Installing and automatically updating the databases on antivirus software for desktops and mobile threat defense for mobile devices. 

Continuing education is key to promoting great cyber hygiene within your organization, especially for anti-phishing campaigns.  

Cyber hygiene tool recomendations 

In cybersecurity, the saying goes, “You can’t protect what you can’t see!” Having a complete discovery and accurate inventory of all network-connected hardware, software and data, including shadow IT assets, is the important first step to assessing an organization’s vulnerability risk profile. The asset data should feed into an enterprise endpoint patch management system

Also, consider implementing a risk-based vulnerability management approach to prioritize the overwhelming number of vulnerabilities to only those that pose the greatest risk to your organization. Often included with risk-based vulnerability management solutions is a threat intelligence feed into the patch management system

Threat intelligence is information about known or potential threats to an organization. These threats can come from a variety of sources, like security researchers, government agencies, infrastructure vulnerability and application security scanners, internal and external penetration testing results and even threat actors themselves. 

This information, including specific patch failures and reliability reported from various crowdsourced feeds, can help organizations remove internal patch testing requirements and reduce the time gap to patch deployments to critical assets.

unified endpoint management (UEM) platform is necessary to remotely manage and provide endpoint security to mobile devices including shadow IT and BYOD assets.

The solution can enforce patching to the latest mobile operating system (OS) and applications, provision email and secure remote access profiles including identity credentials and multi-factor authentication (MFA) methods like biometrics, smart cards, security keys, certificate-based or token-based authentication.

The UEM solution should also integrate an AI machine learning-based mobile threat defense (MTD) solution for mobile devices, while desktops require next-generation antivirus (NGAV) with robust heuristics to detect and remediate device, network, and app threats with real-time anti-phishing protection.

And finally, to level the playing field against AI-generated malware, cyber hygiene tools will have to evolve quickly by leveraging AI guidance to keep up with the more sophisticated polymorphic attacks that are on the horizon.

Adding the solutions described above will help deter cyberattacks by putting impediments in front of threat actors to frustrate them and seek out easier targets to victimize. 

About James Saturnio

James Saturnio is the Technical Product Marketing Director for the Technical Marketing Engineering team at Ivanti. He immerses himself in all facets of cybersecurity with over 25 years’ hands-on industry experience. He is an always curious practitioner of the zero trust security framework. Prior to Ivanti, he was with MobileIron for almost 7 years as a Senior Solutions Architect and prior to that, he was at Cisco Systems for 19 years. While at Cisco, he started out as a Technical Assistance Center (TAC) Engineer and then a Technical Leader for the Security Technology and Internet of Things (IoT) business units. He is a former Service Provider and Security Cisco Certified Internetworking Expert (CCIE) and was the main architect for the IoT security architecture that is still used today by Cisco’s lighthouse IoT customers.

Source :
https://www.ivanti.com/blog/three-reasons-endpoint-security-can-t-stop-with-just-patching-or-antivirus

The 8 Best Practices for Reducing Your Organization’s Attack Surface

Last updated: June 20, 2023
Robert Waters
Security Unified Endpoint Management DEX

Increases in attack surface size lead to increased cybersecurity risk. Thus, logically, decreases in attack surface size lead to decreased cybersecurity risk.

While some attack surface management solutions offer remediation capabilities that aid in this effort, remediation is reactive. As with all things related to security and risk management, being proactive is preferred.

The good news is that ASM solutions aren’t the only weapons security teams have in the attack surface fight. There are many steps an organization can take to lessen the exposure of its IT environment and preempt cyberattacks.

How do I reduce my organization’s attack surface?

Unfortunately for everyone but malicious actors, there’s no eliminating your entire attack surface, but the following best practice security controls detailed in this post will help you significantly shrink it:

  1. Reduce complexity 
  2. Adopt a zero trust strategy for logical and physical access control
  3. Evolve to risk-based vulnerability management
  4. Implement network segmentation and microsegmentation
  5. Strengthen software and asset configurations
  6. Enforce policy compliance
  7. Train all employees on cybersecurity policies and best practices
  8. Improve digital employee experience (DEX)

As noted in our attack surface glossary entry, different attack vectors can technically fall under multiple types of attack surfaces — digital, physical and/or human. Similarly, many of the best practices in this post can help you reduce multiple types of attack surfaces.

For that reason, we have included a checklist along with each best practice that signifies which type(s) of attack surface a particular best practice primarily addresses.

#1: Reduce complexity

.

Digital attack surface Physical attack surface Human attack surface 
XX

.

Reduce your cybersecurity attack surface by reducing complexity. Seems obvious, right? And it is. However, many companies have long failed at this seemingly simple step. Not because it’s not obvious, but because it hasn’t always been easy to do.

Research from Randori and ESG reveals seven in 10 organizations were compromised by an unknown, unmanaged or poorly managed internet-facing asset over the past year. Cyber asset attack surface management (CAASM) solutions enable such organizations to identify all their assets — including those that are unauthorized and unmanaged — so they can be secured, managed or even removed from the enterprise network.

Any unused or unnecessary assets, from endpoint devices to network infrastructure, should also be removed from the network and properly discarded.

The code that makes up your software applications is another area where complexity contributes to the size of your attack surface. Work with your development team to identify where opportunities exist to minimize the amount of executed code exposed to malicious actors, which will thereby also reduce your attack surface.

#2: Adopt a zero trust strategy for logical and physical access control

.

Digital attack surface Physical attack surface Human attack surface 
XX

.

The National Institute of Standards and Technology (NIST) defines zero trust as follows:

“A collection of concepts and ideas designed to minimize uncertainty in enforcing accurate, least privilege per-request access decisions in information systems and services in the face of a network viewed as compromised.”

In other words, for every access request, “never trust, always verify.”

Learn how Ivanti can help you adopt the NIST CSF in The NIST Cybersecurity Framework (CSF): Mapping Ivanti’s Solutions to CSF Controls

Taking a zero trust approach to logical access control reduces your organization’s attack surface — and likelihood of data breaches — by continuously verifying posture and compliance and providing least-privileged access.

And while zero trust isn’t a product but a strategy, there are products that can help you implement a zero trust strategy. Chief among those products are those included in the secure access service edge (SASE) framework:

And though it’s not typically viewed in this manner, a zero trust strategy can extend beyond logical access control to physical access control. When it comes to allowing anyone into secure areas of your facilities, remember to never trust, always verify. Mechanisms like access cards and biometrics can be used for this purpose.

#3: Evolve to risk-based vulnerability management

.

Digital attack surface Physical attack surface Human attack surface 
X

.

First, the bad news: the US National Vulnerability Database (US NVD) contains over 160,000 scored vulnerabilities and dozens more are added every day. Now, the good news: a vast majority of vulnerabilities have never been exploited, which means they can’t be used to perpetrate a cyberattack, which means they aren’t part of your attack surface.

In fact, a ransomware research report from Securin, Cyber Security Works (CSW), Ivanti and Cyware showed only 180 of those 160,000+ vulnerabilities were trending active exploits.

Comparison of total NVD vulnerabilities vs. those that endanger an organization

Total NVD graph.
Only approximately 0.1% of all vulnerabilities in the US NVD are trending active exploits that pose an immediate risk to an organization

legacy approach to vulnerability management reliant on stale and static risk scores from the Common Vulnerability Scoring System (CVSS) won’t accurately classify exploited vulnerabilities. And while the Cybersecurity & Infrastructure Security Agency Known Exploited Vulnerabilities (CISA KEV) Catalog is a step in the right direction, it’s incomplete and doesn’t account for the criticality of assets in an organization’s environment.

A true risk-based approach is needed. Risk-based vulnerability management (RBVM) — as its name suggests — is a cybersecurity strategy that prioritizes vulnerabilities for remediation based on the risk they pose to the organization.

Read The Ultimate Guide to Risk-Based Patch Management and discover how to evolve your remediation strategy to a risk-based approach.

RBVM tools ingest data from vulnerability scannerspenetration teststhreat intelligence tools and other security sources and use it to measure risk and prioritize remediation activities.

With the intelligence from their RBVM tool in hand, organizations can then go about reducing their attack surface by remediating the vulnerabilities that pose them the most risk. Most commonly, that involves patching exploited vulnerabilities on the infrastructure side and fixing vulnerable code in the application stack.

#4: Implement network segmentation and microsegmentation

.

Digital attack surface Physical attack surface Human attack surface 
X

.

Once again, borrowing from the NIST glossary, network segmentation is defined as follows:

Splitting a network into sub-networks, for example, by creating separate areas on the network which are protected by firewalls configured to reject unnecessary traffic. Network segmentation minimizes the harm of malware and other threats by isolating it to a limited part of the network.

From this definition, you can see how segmenting can reduce your attack surface by blocking attackers from certain parts of your network. While traditional network segmentation stops those attackers from moving north-south at the network level, microsegmentation stops them from moving east-west at the workload level.

More specifically, microsegmentation goes beyond network segmentation and enforces policies on a more granular basis — for example, by application or device instead of by network.

For example, it can be used to implement restrictions so an IoT device can only communicate with its application server and no other IoT devices, or to prevent someone in one department from accessing any other department’s systems.

#5: Strengthen software and asset configurations

.

Digital attack surface Physical attack surface Human attack surface 
X

.

Operating systems, applications and enterprise assets — such as servers and end user, network and IoT devices — typically come unconfigured or with default configurations that favor ease of deployment and use over security. According to CIS Critical Security Controls (CIS Controls) v8, the following can all be exploitable if left in their default state:

  • Basic controls
  • Open services and ports
  • Default accounts or passwords
  • Pre-configured Domain Name System (DNS) settings
  • Older (vulnerable) protocols
  • Pre-installation of unnecessary software

Clearly, such configurations increase the size of an attack surface. To remedy the situation, Control 4: Secure Configuration of Enterprise Assets and Software of CIS Controls v8 recommends developing and applying strong initial configurations, then continually managing and maintaining those configurations to avoid degrading security of software and assets.

Here are some free resources and tools your team can leverage to help with this effort:

#6: Enforce policy compliance

.

Digital attack surface Physical attack surface Human attack surface 
XX

.

It’s no secret that endpoints are a major contributor to the size of most attack surfaces — especially in the age of Everywhere Work when more employees are working in hybrid and remote roles than ever before. Seven in 10 government employees now work virtually at least part of the time.

It’s hard enough getting employees to follow IT and security policies when they’re inside the office, let alone when 70% of them are spread all over the globe.

Unified endpoint management (UEM) tools ensure universal policy compliance by automatically enforcing policies. This fact should come as no surprise to IT and security professionals, many of whom consider UEM a commodity at this point. In fact, Gartner predicts that 90% of its clients will manage most of their estate with cloud-based UEM tools by just 2025.

Nonetheless, UEM is the best option for enforcing IT and security policy compliance, so I’d be remiss to omit it from this list.

Read The Ultimate Guide to Unified Endpoint Management and learn about the key business benefits and endpoint security use cases for modern UEM solutions.

Additionally, beyond compliance, modern UEM tools offer several other capabilities that can help you identify, manage and reduce your attack surface:

  • Have complete visibility into IT assets by discovering all devices on your network — a key ASM capability for organizations without a CAASM solution.
  • Provision devices with the appropriate software and access permissions, then automatically update that software as needed — no user interactions required.
  • Manage all types of devices across the entire lifecycle, from onboarding to retirement, to ensure they’reproperly discarded once no longer in use.
  • Automatically enforce device configurations (refer to #5: Strengthen software and asset configurations to learn more about the importance of this capability).
  • Support zero trust access and contextual authentication, vulnerability, policy, configuration and data management by integrating with identity, security and remote-access tools. For example, UEM and mobile threat defense (MTD) tools can integrate to enable you to enact risk-based policies to protect mobile devices from compromising the corporate network and its assets.

#7: Train all employees on cybersecurity policies and best practices

.

Digital attack surface Physical attack surface Human attack surface 
X

.

Seventy-four percent of breaches analyzed for the 2023 Verizon Data Breaches Investigation Report (DBIR) involved a human element.

Thus, it should come as no surprise when you review the data from Ivanti’s 2023 Government Cybersecurity Status Report and see the percentages of employees around the world that don’t believe their actions have any impact on their organization’s ability to avert cyberattacks:

Do employees think their own actions matter?

Many employees don’t believe their actions impact their organization’s ability to stay safe from cyberattacks.

In the immortal words of Alexander Pope: “To err is human…” In cybersecurity terms: until AI officially takes over, humans will remain a significant part of your attack surface. And until then, human attack surfaces must be managed and reduced wherever possible.

Thus far, the best way to do that’s proven to be cybersecurity training, both on general best practices and company-specific policies — and definitely don’t forget to include a social engineering module.

Many cybersecurity practitioners agree. When the question “In your experience, what security measure has been the most successful in preventing cyberattacks and data breaches?” was posed in Reddit’s r/cybersecurity subreddit, many of the top comments referenced the need for user education:

Reddit / u/Forbesington
Reddit / u/slybythenighttothecape
Reddit / u/_DudeWhat
Reddit / u/onneseen

To once again borrow from CIS Controls v8, Control 14: Security Awareness and Skills Training encourages organizations to do the following: “Establish and maintain a security awareness program to influence behavior among the workforce to be security conscious and properly skilled to reduce cybersecurity risks to the enterprise.”

CIS — the Center for Internet Security — also recommends leveraging the following resources to help build a security awareness program:

Security and IT staff — not just those in non-technical roles — should also be receiving cybersecurity training relevant to their roles. In fact, according to the IT and security decision-makers surveyed by Randori and ESG for their 2022 report on The State of Attack Surface Management, providing security and IT staff with more ASM training would be the third most-effective way to improve ASM.

Ensuring partners, vendors and other third-party contractors take security training as well can also help contain your human attack surface.

#8: Improve digital employee experience (DEX)

.

Digital attack surface Physical attack surface Human attack surface 
XX

.

No matter how much cybersecurity training you provide employees, the more complex and convoluted security measures become, the more likely they are to bypass them. Sixty-nine percent of end users report struggling to navigate overly convoluted and complex security measures. Such dissatisfied users are prone to distribute data over unsecured channels, prevent the installation of security updates and deploy shadow IT.

That seems to leave IT leaders with an impossible choice: improve digital employee experience (DEX) at the cost of security or prioritize security over experience? The truth is, security and DEX are equally important to an organization’s success and resilience. In fact, according to research from Enterprise Management Associates (EMA), reducing security friction leads to far fewer breach events.

So what do you do? Ivanti’s 2022 Digital Employee Experience Report indicates IT leaders — with support from the C-suite — need to put their efforts toward providing a secure-by-design digital employee experience. While that once may have seemed like an impossible task, it’s now easier than ever thanks to an emerging market for DEX tools that help you measure and continuously improve employees’ technology experience.

Read the 2022 Digital Employee Experience Report to learn more about the role DEX plays in cybersecurity.

One area in which organizations can easily improve both security and employee experience is authentication. Annoying and inefficient to remember, enter and reset, passwords have long been the bane of end users.

On top of that, they’re extremely unsecure. Roughly half of the 4,291 data breaches not involving internal malicious activity analyzed for the 2023 Verizon DBIR were enabled through credentials — about four times the amount enabled by phishing — making them by far the most popular path into an organization’s IT estate.

Passwordless authentication software solves this problem. If you’d like to improve end user experience and reduce your attack surface in one fell swoop, deploy a passwordless authentication solution that uses FIDO2 authentication protocols. Both you and your users will rejoice when you can say goodbye to passwords written on Post-it Notes forever.

For more guidance on how to balance security with DEX, refer to the following resources:

Additional guidance from free resources

Ivanti’s suggested best practices for reducing your attack surface combine learnings from our firsthand experience plus secondhand knowledge gleaned from authoritative resources.

And while these best practices will indeed greatly diminish the size of your attack surface, there’s no shortage of other steps an organization could take to combat the ever-expanding size and complexity of modern attack surfaces.

Check out the following free resources — some of which were referenced above — for additional guidance on shrinking your attack surface:

Next steps

So, you’ve implemented all the best practices above and you’re wondering what’s next. As with all things cybersecurity, there’s no time for standing still. Attack surfaces require constant monitoring.

You never know when the next unmanaged BYOD device will connect to your network, the next vulnerability in your CRM software will be exploited or the next employee will forget their iPhone at the bar after a team happy hour.

On top of tracking existing attack vectors, you also need to stay informed about emerging ones. For example, the recent explosion of AI models is driving substantial attack surface growth, and it’s safe to say more technologies that open the door to your IT environment are on the horizon. Stay vigilant.

About Robert Waters

Robert Waters is the Lead Product Marketing Manager for endpoint security at Ivanti. His 15 years of marketing experience in the technology industry include an early stint at a Fortune 1000 telecommunications company and a decade at a network monitoring and managed services firm.

Robert joined Ivanti in November of 2022 and now oversees all things risk-based vulnerability management and patch management.

Source :
https://www.ivanti.com/blog/the-8-best-practices-for-reducing-your-organization-s-attack-surface

How Cloud Migration Helps Improve Employee Experience

Last updated: June 26, 2023
DEX ITSM and ITAM

The old saying goes, “practice what you preach.” When Ivanti started its “Customer Zero” initiative, Bob Grazioli, Chief Information Officer, saw it as a perfect opportunity to test the products and services consumed by customers.  

For example, during Ivanti’s move to the cloud, Grazioli and the team experienced the same issues that customers would’ve experienced in their migration process. This first-hand experience allowed them to make improvements along the way. Listen to Grazioli go into detail about other crucial findings in the Customer Zero initiative and how expanding ITSM helps elevate the employee experience. 

Key learnings from Ivanti’s “Customer Zero” program  

https://youtube.com/watch?v=unBhdg2rwkg%3Fenablejsapi%3D1%26origin%3Dhttps%253A%252F%252Fwww.ivanti.com

“That’s great to call out our Customer Zero program because we’re really proud of it, actually. We are the first customer in Ivanti. We take every one of our tools that are obviously applicable to IT or SaaS and we implement them first, before the customer,  to provide the feedback to our product managers, our engineering team and make sure that that feedback either makes it into the product or eliminates any potential problems that our customers might experience if something obviously wasn’t discovered during our testing.   

But having said that, we have learned an awful lot about actually moving from on-prem to SaaS. If you look at what we’ve done with Customer Zero, our focus now has been to take a look at the Ivanti on-prem products and move ourself to the cloud. Obviously, I manage SaaS, so I’m very biased towards being in the cloud and that is our focus right now. So, we’ve taken patch, we’ve moved that from on-prem to cloud.  

We now have taken our ITSM converged product with workflow management, with all of low-code, no code, we moved that into IT for ITSM. We have our own CMDB that we’re running against Discovery. Going out to our data centers, we have close to what, 40 different geos globally that we manage — thousands and thousands of assets across all of those data centers. Those are all being discovered placed in our own CMBD and managed.   

We’re now deploying GRC for our compliance. We were like a lot of, you know, companies struggle through our SOC 2, SOC 2 type 2, where artifacts are put into certain repositories. We managed those assets. Now we have GRC, where all those artifacts get managed to ITSM. They’re linked to the proper controls. It makes the audit process so much simpler, so much easier for us to get through every year for compliance.    

We’re learning that through the efficiency of moving to cloud from on-prem to SaaS, we’re learning those efficiencies do save us time, have a great ROI in terms of the OpeEx – CapEx equation, if most of you CIOs that go through that, there is a big advantage on the Capex-Opex side.”

Using ITSM to support a broader organization  

https://youtube.com/watch?v=unBhdg2rwkg%3Fstart%3D152%26enablejsapi%3D1%26origin%3Dhttps%253A%252F%252Fwww.ivanti.com

“And then, just having all of our data in the cloud in ITSM, as I said earlier, becoming a single source of truth for PatchDiscovery, RiskSense [now known as Risk-Based Vulnerability Mangement] vulnerabilities. And obviously, the main focus, all the tickets that are created on the customer facing side, giving us insight into the customer, into what they’re using or what they’re not using. So really, adoption, big part of obviously what you need in SaaS to manage, the real true user experience.   

It really has been eye opening, moving all of our products from on-prem to SaaS, leveraging those SaaS products in our own cloud, gaining that experience, pushing it back to product managers, pushing it back to engineering to produce a better quality product and a better service for all of our customers as they migrate to the cloud.   

So, we kind of blunt any particular problems that our customers would have experienced when they move from on-prem to cloud. Customer Zero – it’s definitely eliminating a lot of issues that customers would have had if they move on-prem to SaaS. And we’re providing valuable telemetry to help improve our product and improve the quality and service to our customers.” 

Important takeaways from Ivanti’s Customer Zero initiative 

https://youtube.com/watch?v=IzbJvG6Izs0%3Fenablejsapi%3D1%26origin%3Dhttps%253A%252F%252Fwww.ivanti.com

“Well, so we’ve improved our catalog for service requests and so on. That is the evolution of what ITSM should do. But DEX is the key. Having all of those tickets in ITSM that show customer issues or customer successes or what they’re using in our product, etc.

That is the game changer because now, as I said earlier, having DEX out there, looking at all those tickets, analyzing the tickets and then proactively either anticipating a problem with their device or potentially the way a customer is adopting certain technologies that we pushed out into the environment.  

Those tickets are gold for that level of telemetry that allows us to gain the insights we need to provide the customer with a better experience. I think ticket management is really, it’s tough — you don’t want a lot of tickets, obviously, because sometimes that’s not a good thing. But what these tickets represent in terms of knowledge of the customer, it really is instrumental in us making things better, making the service better and having the customer have a better experience.” 

How to use DEX to drive cultural change  

https://youtube.com/watch?v=x71aP3P4OCs%3Fenablejsapi%3D1%26origin%3Dhttps%253A%252F%252Fwww.ivanti.com

“I mean, we use the word culture, but let’s face it, the generation of customers that are out there today growing up with technology and having the ability to control a lot of that technology right at their fingertips, that’s really what you’re trying to accommodate.  

You don’t want someone to come into your company as an employee and have them not have that same experience. Not have them engaged with technology the same way they can engage at home or anywhere else out in the market. That’s what we’re trying to get to and be for that customer.   

And we’re doing that because today, with the proactive nature that we’re creating within our products. Proactive nature, that’s DEX.  

That’s having all that intelligence to engage the customer with empathy and with a proactive approach to giving them a solution to whatever issue they have. It’s empathy to what they’re going through and then proactively providing them with a fast, reliable solution to whatever experience they’re calling in on. 

I think that’s our goal and I think ITSM is evolving to that because again, of the amount of information it’s able to collect and use with all of the AI and ML that we’re applying to it, to really create that more proactive experience with a very intelligent, very tech savvy customer that we have both in and outside our company.   

And that’s happening. That’s the culture, if you will, that I see, that I’m engaged with, and we want to make sure our products can satisfy. ”

Broadening ITSM to support other areas brings with it new levels of proactive troubleshooting and empathy, helping you drive a better digital employee experience.

.

If you’d like to learn more, dive into our ITSM + toolkit and listen to this on-demand webinar on Expanding your ITSM: key learnings for building connected enterprise workflows.  

Source :
https://www.ivanti.com/blog/how-cloud-migration-helps-improve-employee-experience