UniFi Protect – Optimizing Camera Connectivity

This article describes how to access your UniFi Protect application locally or remotely, the factors that create access issues, and how to solve said issues.

How to connect to UniFi Protect

There are two ways to access your UniFi Protect application:

  • Locally by accessing the IP address of the UniFi OS Console hosting Protect; or
  • Remotely on the Protect web application (unifi.ui.com ) or mobile app (iOS / Android ).

Note: Remote access must be enabled in your Protect application. It is enabled by default.

To enable Remote Access in your UniFi Protect application:

  1. Access the UniFi OS Console hosting Protect via its IP address. 
    1. If you don’t know your UniFi OS Console’s IP address , use the WiFiman app (iOS / Android ) to locate it on your WiFi network.
  2. Log in to your Ubiquiti SSO account.
  3. Go to the System Settings > Advanced menu, and enable the Remote Access toggle.

Identifying issues

To identify potential reasons for Protect connectivity issues:

  • Try accessing your UniFi OS Console locally by entering its IP address in your web browser, or remotely via Protect web application (unifi.ui.com ) or mobile app.
  • Use different mobile devices, ideally running different operating systems (iOS, Android).
  • Use different supported browsers, such as Chrome, Firefox, or Safari, on different computers.
  • Connect to different client locations, such as:
    • A local network with the same subnet as the Protect application.
    • A mobile carrier network via a mobile device or tethering.
    • A remote network, such as a workplace or public WiFi network.
  • Have multiple users, ideally with different system roles, attempt to access the Protect application.

Note: Note your observations. They may be helpful if you need to contact our technical support team.

My camera streams load slowly or buffer frequently

To identify potential reasons for slow stream loading and/or frequent buffering:

  • Check the stability of network connection:
    • Perform a speed test using the Wifiman app while connected to the same network as your UniFi OS Console. UniFi Protect should perform well with a network connection better than 5 Mbps and decently with a connection of at least 2.5 Mbps. Below this, performance may suffer.
  • Ensure that your computer or mobile network is not limiting bandwidth:
    • A VPN could be preventing client devices from making a peer-to-peer connection with your UniFi OS Console, meaning that all data is first relayed through Ubiquiti’s Remote Management Service—leading to diminished performance. If so, disable the VPN.
    • Check if there’s a subnet conflict where the UniFi OS Console is on a different subnet than the client, but still on LAN. If the client needs to reach your UniFi OS Console’s subnet but doesn’t have a route, it will hit the gateway (the local router), which knows how to route to the UniFi OS Console. If a VPN is enabled and there’s a configured route on the VPN that goes to another network with the same subnet, it will override. 
  • Inspect your UniFi OS Console’s performance data by making sure you haven’t exceeded its maximum supported camera limit . If so, streaming performance will be diminished.
  • Check your computer’s CPU utilization. A lower-specialization computer may not be capable of playing back multiple video streams. If the CPU utilization is nearing 100%, try playing back fewer video streams (e.g., fewer cameras on the live view matrix).

I can access Protect locally but not remotely

If you can’t access the Protect application remotely:

  1. Check if Remote Access is enabled:
    1. If it is enabled , try disabling it and enabling again.
  2. Confirm that you have permission to access Protect remotely. For more information, see UniFi Protect – Add and manage users .
  3. Visit status.ui.com to see if there are any issues with Ubiquiti’s Remote Management Service currently being resolved.

I can’t access Protect from the mobile app

If you can’t access Protect from the mobile app:

  1. Verify that the UniFi Protect mobile app is updated to the latest version.
  2. Ensure that the UniFi Protect mobile app is not restricted from accessing WiFi or cellular data:
    1. For iOS devices , go to the Settings > Cellular Data menu and make sure UniFi Protect is toggled on.
    2. For Android devices , go to the Settings > WiFi & Internet > Data Usage > Cellular Data Usage menu, select UniFi Protect, and make sure WiFi and cellular data are not disabled in the App data usage section.
  3. Disable VPN if one is enabled since some VPNs may block WebRTC connectivity, which is used by Protect.
    1. For Android devices with VPN enabled , try disabling the Private DNS in the Settings > WiFi & Internet > Private DNS menu. On some WiFi and mobile carrier networks, certain Private DNS providers such as CloudFlare’s 1.1.1.1 may interfere with WebRTC.
  4. Disable or remove any third-party security or privacy apps that may interfere with network connectivity.
  5. Force-quit the mobile app and open it again.
  6. Uninstall the mobile app, reinstall, and open it.

I can’t access Protect from my web browser

If you’re having trouble accessing Protect from a web browser, but you can connect with the mobile app or a web browser on a different network, there may be an issue with your network configuration. For more information, see the Advanced troubleshooting processes section. 

If you have a UniFi Cloud Key Gen2 Plus (UCK G2 Plus) updated to Version 2.0.24 running Protect application Version 1.14.0 or higher , it operates via UniFi OS and, therefore, can be accessed remotely at unifi.ui.com , not protect.ui.com.

If you don’t see your Cloud Key-hosted Protect application on unifi.ui.com , make sure your UCK G2 Plus’s firmware is up to date. For more information, see UniFi – How to manage & upgrade the Cloud Key .

If your Cloud Key’s firmware is up to date and can see the Protect application at unifi.ui.com but can’t access it , check if Remote Access is enabled. The recent firmware upgrade might have disabled Remote Access functionality. Follow the steps in the How to connect to UniFi Protect section.

I can’t access Protect on a specific browser

Browser-specific access failures are most often caused by third-party software, such as a browser extension or an application on the host computer.

Common extensions, software, and other features known to cause issues include:

  • uBlock Origin
  • Privacy Badger
  • WebRTC Leak Prevent
  • Various VPN services, such as Tunnelbear
  • Ad or traffic blockers that interfere with WebRTC connectivity used by UniFi Protect

To troubleshoot browser issues:

  1. Disable all suspected third-party security or privacy-related browser extensions and software.
  2. If you can now access Protect , re-enable the extensions and software, one at a time, and test your Protect access after each one. This will help you identify the inhibiting software.
  3. (For Chrome only ) Disable the feature flag, Anonymize local IPs exposed by WebRTC :
    1. Copy and paste the following into your address bar: chrome://flags/#enable-webrtc-hide-local-ips-with-mdns
    2. Select Disabled , then restart Chrome.

Once you’ve found the inhibiting software, leave it disabled or uninstall it. If it’s essential, however, contact the developer’s support team for further guidance on how to configure it so it doesn’t prevent Protect access.

I’m a new user and see a No Controllers Detected notification

If you’re a new user signing in via unifi.ui.com or the Protect mobile app and the UniFi OS Console that hosts your Protect application isn’t appearing , make sure that your user permissions include remote access to the UniFi OS Console. For more information on creating users, see UniFi Protect – Add and manage users .

In some cases, a new user can accept a Protect application invitation, log in to their Ubiquiti account via web browser, initially see their UniFi OS Console, then receive a No Controllers Detected notification.

If you’re a new user and see a No Controllers Detected notification after trying to access Protect web application :

  1. Make sure that your UniFi OS Console and Protect application versions are up to date.
  2. Make sure that you have permission to remotely access the UniFi Protect application. For more information, see UniFi Protect – Add and manage users .
  3. Verify that you are a verified and active user by going to unifi.ui.com , clicking on your UniFi OS Console, navigating to the Users menu, and checking your user status.
  4. If this doesn’t resolve the issue , delete the custom users and user roles created, reboot the UniFi OS Console, and recreate the users:
    1. Log in to your UniFi OS Console from the Owner account.
    2. Go to unifi.ui.com , click on your UniFi OS Console, navigate to the Users menu, and delete all custom users and user groups. 
    3. Click on the dot grid icon in the top-right corner of the dashboard, navigate to Protect > Roles , and delete all custom user roles. 
    4. Click on the dot grid icon in the top-right corner of the dashboard, click the  Settings Advanced tab on the left side of the following screen, and click Restart Device .
    5. Once the device reboots, log in again with the Owner account and recreate all desired users, groups, and roles. 

Advanced troubleshooting processes

Check if a WebRTC connection can be established

UniFi Protect uses WebRTC technology to establish connections between your UniFi OS Console and client devices through NAT and firewalls, such as a UniFi gateway, without requiring explicit port forwarding or the revision of firewall rules.

Typically, you won’t need to make any changes to your network, device, or client configurations in order to access Protect locally or remotely.

However, to establish a WebRTC connection needed to access Protect, both networks (i.e., the one that your Protect application connects to and the one that your client device(s) connect to) must meet these requirements:

  • Reliable access to Internet and DNS service
  • Adequate bandwidth for basic connectivity and video transfer
  • Outbound TCP connection capability on Port 443
  • Outbound UDP connection capability on Ports 0–65535

    Note: Port forwarding is not required for TCP or UDP connectivity.
  • A firewall configured to accept solicited, inbound UDP traffic
  • No network security appliances (e.g., IPS) or services blocking WebRTC (e.g., STUN or DTLS)
  • No gateways configured to use Symmetric NAT, which either block peer-to-peer connections, force the use of a relay server (i.e., TURN), or cause said relay to fail

Note: For more information on the technical aspects of WebRTC, please visit webrtc.org .

Troubleshooting WebRTC connection issues caused by Symmetric NAT

Symmetric NAT , while uncommon, can cause issues when establishing WebRTC and other peer-to-peer connections because it does not maintain a 1:1 port mapping ratio for established connections, causing them to fail.

If that happens, WebRTC will attempt to connect via a relay server (i.e., TURN), which will result in either diminished connection quality or outright connection failure.

If you are behind a Symmetric NAT , you can either:

  • Establish a VPN connection between the client and Protect; or
  • Configure your router to a mode other than Symmetric NAT, such as Cone NAT.

The UniFi OS Console hosting your UniFi Protect application will automatically detect and log Symmetric NAT on its side but will be unable to determine the NAT type on the clients’ side.

If you suspect Symmetrical NAT on the console-side connection:

  1. Establish an SSH connection to your UniFi OS Console.
  2. Execute the following command: grep -Ri “symmetric” /srv/unifi-protect/logs

Any results will confirm that the connection failed due to Symmetric NAT.

Troubleshooting issues with a particular network

If you identify connectivity problems within a particular network , focus your troubleshooting efforts there. For example, if you can connect to your business’s Protect deployment from home, but not while at a friend’s house, focus on troubleshooting the latter network.

If you can’t access Protect from any remote location , focus first on the application’s on-site network.

In both cases:

  1. Verify that the UniFi OS Console hosting Protect and all client device(s) have a stable internet connection, including a valid gateway IP and DNS servers. Some DNS providers are known to cause problems, such as 1.1.1.1. Try changing it to Google’s 8.8.8.8.
  2. Verify that selected DNS servers properly resolve the following domains:
    1. Device.svc.ubnt.com
    2. Device.amplifi.com
    3. Global.stun.twilio.com
    4. Global.turn.twilio.com
  3. Review your firewall configuration to ensure it meets the requirements listed in the Check if a WebRTC connection can be established section. If you’ve configured custom firewall rules, try disabling them temporarily to test.
  4. Remove any port forwards for UniFi Protect that may have been configured incorrectly.
  5. Disable any network-level security appliance or service rules intended to block WebRTC’s internal protocols, STUN or DTLS. If you are using a UniFi gateway , the UniFi Intrusion Prevention System (IPS) does not require a specific configuration to prevent WebRTC connectivity blockage.

    Source :
    https://help.ui.com/hc/en-us/articles/360034238233-UniFi-Protect-Optimizing-Camera-Connectivity
Wordfence 7.7.0 Is Out! Here Are The Changes

Wordfence 7.7.0 has just been released and as usual, it includes several awesome enhancements and updates for our security conscious WordPress publishers and e-commerce websites. This post goes into a little more detail on each change we’ve included. We don’t usually post additional detail like this, and we thought we’d give it a try, and make it a routine if the community approves.

This is based on the official Wordfence 7.7.0 changelog, which is included below. The format I’ve used here is the changelog entry as a heading and some detail on what the entry means and some background where applicable.

Improvement: Added configurable scan resume functionality to prevent scan failures on sites with intermittent connectivity issues
We’ve added “scan resume” functionality which is configurable and will prevent security scan failures on sites that might have intermittent connectivity issues. As you know Wordfence runs on over 4 million websites on over 12,000 unique networks, and to say that we run in a range of environments and configurations is an understatement. Our quality assurance team has an oversized influence on the product, and this is one more way they have made Wordfence even more robust in version 7.7.0.

Improvement: Added new scan result for vulnerabilities found in plugins that do not have patched versions available via WordPress.org

This adds a scan result for plugins that have a vulnerability and are still present in the official WordPress plugin repository, and where there is no fix available. The usual course of action is that the plugin team will disable a plugin in the repository that has a known vulnerability, where the vulnerability has not been fixed yet. In some cases, this doesn’t happen, and this scan result is designed to deal with this unusual case. This change will also allow plugins that are not provided through wordpress.org to be flagged as vulnerable if there is no update available.

Improvement: Implemented stand-alone MMDB reader for IP address lookups to prevent plugin conflicts and support additional PHP versions

We use the Maxmind database internally for location lookups. Our code was using the Maxmind PHP library to perform these lookups. Maxmind stopped supporting older PHP versions a while ago, but many of our customers are still on those old versions. We have also found that other WordPress plugins may use a different version of the Maxmind library, which can lead to conflicts. So we’ve rolled our own stand-alone MMDB reader to resolve both of these issues. We now support older PHP versions than the official Maxmind library, and you won’t see any conflicts if another plugin is using the Maxmind library.

Improvement: Added option to disable looking up IP address locations via the Wordfence API

By default Wordfence contacts our servers to perform an IP address location lookup. This is just the way the plugin was originally engineered (by me actually) to try to move as much processing to our own servers and reduce resource usage on our customer websites. Some of our customers prefer that lookup to happen locally, so we’ve provided that option. The default is still to do the lookup on our servers, but you have the option to enable local lookups. The one downside of enabling this feature is that you’ll only get country-level lookups.

Improvement: Prevented successful logins from resetting brute force counters

Another design decision I made early on is that a successful login on a WordPress website would reset our brute-force login counters to zero. This made sense because if a real user makes multiple login failures and then succeeds, clearly they’re the real user and we should reset our counters so that their next failure doesn’t lock them out. Well, an unintended side effect of this is that a threat actor can register an account on WordPress websites with open registration, and sign in, and that would reset brute force counters to zero, so they can keep trying to guess that admin account’s password. We’ve fixed this by removing the reset that occurs on successful login.

Improvement: Clarified IPv6 diagnostic

We found that a message on our diagnostics page caused users to think they need to fix something related to IPv6. So we clarified the message to prevent our customers from going on wild goose chases trying to fix something that doesn’t need fixing.

Improvement: Included maximum number of days in live traffic option text

This is also a clarification. The maximum amount of data in live traffic that we store is 30 days. This wasn’t clear and some users would enter a larger number of days, expecting to see more than 30 days of data. We’ve fixed this user interface issue to make it clear.

Fix: Made timezones consistent on firewall page

When the page showing firewall activity loaded more results, they’d be in UTC time instead of your correct timezone. Oops! We fixed that little issue.

Fix: Added “Use only IPv4 to start scans” option to search

We have the ability to search your Wordfence options page which is super useful. This option was not included in the search, so we fixed that.

Fix: Prevented deprecation notices on PHP 8.1 when emailing the activity log

PHP 8.1 provides notices that a function has been deprecated if a developer (like us) is using an older function call. We were in this case, and PHP 8.1 was rightfully complaining about it. So we switched to a more modern version of the same code.

Fix: Prevented warning on PHP 8 related to process owner diagnostic

On our diagnostics page, if a hosting provider has restricted an account from seeing its own username, our customers would see a warning that you can’t access an array offset on a boolean. We fixed that.

Fix: Prevented PHP Code Sniffer false positive related to T_BAD_CHARACTER

We use PHP code sniffer to look for things that are incompatible between versions. We were getting a false positive when using this internal tool, so we fixed that. This change is really for the benefit of our engineering team.

Fix: Removed unsupported beta feed option

A long time ago when there was fire in the sky and the seas were boiling, we launched the first version of the Wordfence firewall. Because we wanted to test out new rules, and some of our users were brave enough to try the new stuff, we included this option. We would release beta firewall rules and malware signatures, and our brave testing community would try them out first by enabling this option. We do all our testing internally now and the firewall code and rule syntax has become extremely robust, so we don’t do these kinds of releases anymore. So we removed this configuration option.

Below I’ve included the short version of the changelog that you’ll see on WordPress.org. You’re most welcome to post your comments and questions below. Keep in mind that support questions are best posted via our official support channels, but if you’d like to chat about this post, comment below and a member of the team or I will reply if needed.

Regards,

Mark Maunder – Wordfence Founder & CEO

Wordfence 7.7.0 – OCTOBER 3, 2022

  • Improvement: Added configurable scan resume functionality to prevent scan failures on sites with intermittent connectivity issues
  • Improvement: Added new scan result for vulnerabilities found in plugins that do not have patched versions available via WordPress.org
  • Improvement: Implemented stand-alone MMDB reader for IP address lookups to prevent plugin conflicts and support additional PHP versions
  • Improvement: Added option to disable looking up IP address locations via the Wordfence API
  • Improvement: Prevented successful logins from resetting brute force counters
  • Improvement: Clarified IPv6 diagnostic
  • Improvement: Included maximum number of days in live traffic option text
  • Fix: Made timezones consistent on firewall page
  • Fix: Added “Use only IPv4 to start scans” option to search
  • Fix: Prevented deprecation notices on PHP 8.1 when emailing the activity log
  • Fix: Prevented warning on PHP 8 related to process owner diagnostic
  • Fix: Prevented PHP Code Sniffer false positive related to T_BAD_CHARACTER
  • Fix: Removed unsupported beta feed option

    Source :
    https://www.wordfence.com/blog/2022/10/wordfence-7-7-0-is-out-here-are-the-changes/

PHP 8: How to Update the PHP Version of Your WordPress Site

Considered one of the most beginner-friendly programming languages, PHP continues to introduce tremendous changes with each of its updates. Embracing the change, this blog is focused on the steps to upgrade to PHP 8.0 on a WordPress website.

Previously, PHP 7’s speed optimization update helped a lot with gaining higher rankings on the SERPs. Carrying the legacy forward, PHP surprised its enthusiasts with a release of PHP 8.0 back in November 2020, which brought a list of new features that revolutionized the way programmers worked.

PHP 8 lets you write concise code and build more exemplary applications with exciting changes and improvements to the earlier RFCs. Considering the new improvements, it would be a crime not to upgrade your current PHP version to PHP 8.0 on your WordPress site.

Table of Contents

Before we jump towards the steps to upgrade your PHP version to PHP 8 on WordPress, we will give a brief PHP 8.0 overview to help you get acquainted with the update.

PHP 8.0 – An Overview

PHP (an acronym for Hypertext Preprocessor) is a popular open-source scripting language used by coders worldwide for web and application development. This high-level programming language is easy to learn, hence preferred by starters and novice coders. Still, it is also complex enough to cater to the needs of a professional programmer.

PHP 8.0 is the latest update of PHP and has come up with new features, functions, and methods to facilitate the developers and provide the best user experience.

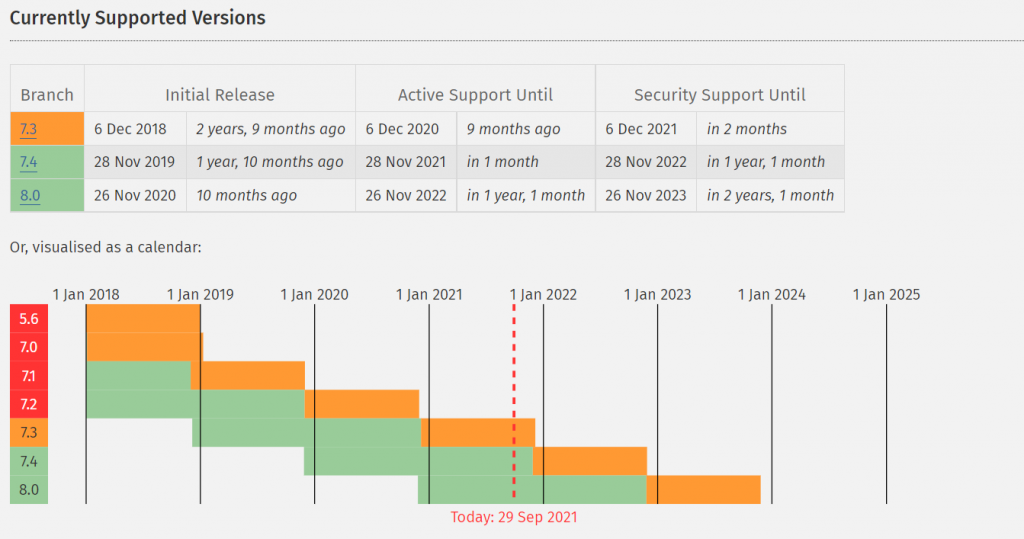
Previously, PHP had released 7.4 in November 2019, ending the support of PHP 7.1. The later version, 7.2, was also discontinued with the release of 8.0. Currently, PHP supports only 7.3, 7.4, and 8.0 versions.

Managed WordPress Hosting Starting From $10/Month

Experience Faster WordPress Themes’ Performance & Constant Availability on Cloudways.

TRY 3 DAYS FREE

PHP 8 Compatibility With WordPress

With every update come compatibility issues. If you want to have a hassle-free PHP 8.0 experience, we recommend opting for the latest WordPress version or going with at least 5.6 or any later versions.

Are you running your website on an older WordPress version but are skeptical about upgrading in fear of getting errors? Don’t worry; you can test your website via a staging environment and proceed with upgrading your live website safely to a newer WordPress version.

If you get any errors in the staging environment, then we’d recommend getting the help of a professional WordPress developer to diagnose and debug the errors before you move ahead with the update.

PHP 8 – Themes & Plugins Compatibility

Discomforts accompany every change; similar is the case with PHP 8. While PHP 8 offers extensive features to support its users and provide them with an ideal user experience, it brings the themes and plugins incompatibility issues.

PHP isn’t the player to be blamed here, as the themes and plugins should be updated to work with the latest software versions. If your favorite and irreplaceable plugin or theme is making problems with PHP 8, then try out the following solutions.

  1. Rollback to the previous PHP version. (A boring option)
  2. Contact the theme or plugin’s support team and inform them about the compatibility issues to boost the optimal user experience with the latest versions of both.

PHP 8 on WordPress: Installation Prerequisites

Before upgrading to PHP 8.0, it’s wise to check the current PHP version that your WordPress site is running.

Using an older version? You can upgrade the PHP version to enjoy the new features and improvements. But not so fast! Remember, safety always comes first. When we talk about security, we consider the “what ifs.”

What if your site is not compatible with the latest version, and you end up losing or corrupting your data in the process. Nope, you don’t want that.

Don’t lose hope; you can create a clone of your website to test it on the latest version.

If the clone website works smoothly after upgrading to PHP 8.0, you can move ahead with updating your actual site. This portion will list out the steps to create a clone website to test it under PHP 8.

Clone a Website via Your Web Hosting Provider

Fortunately, managed WordPress hosting solutions like Cloudways allow the users to create their site’s duplicate without dealing with any complexities. Follow the steps below to create your website’s clone via Cloudways.

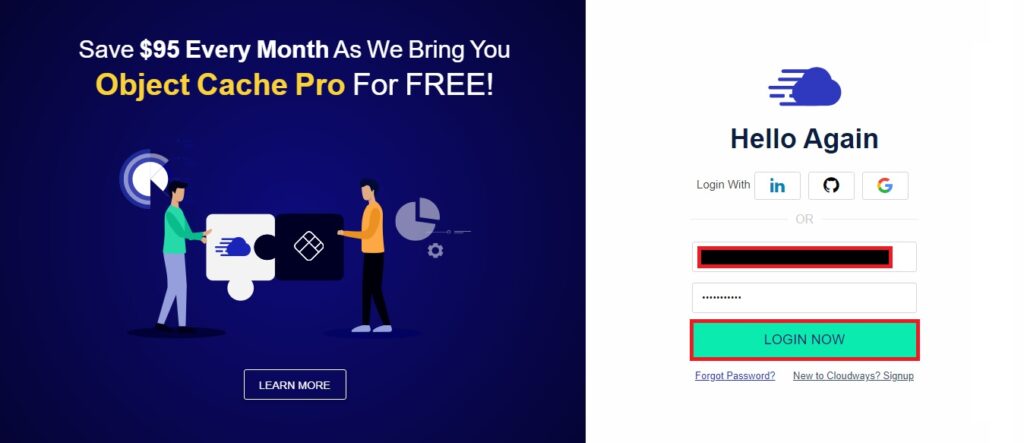
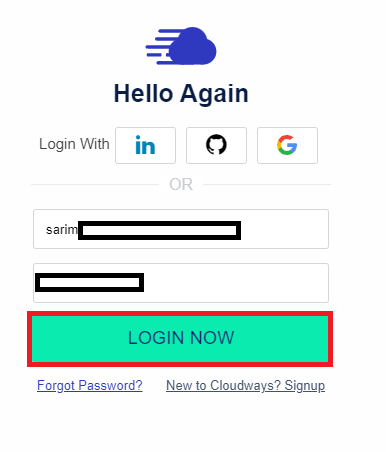
  • Log in to Cloudways with your credentials.
Log in with Cloudways
  • Select your server, and click the application that you want to clone.
select server
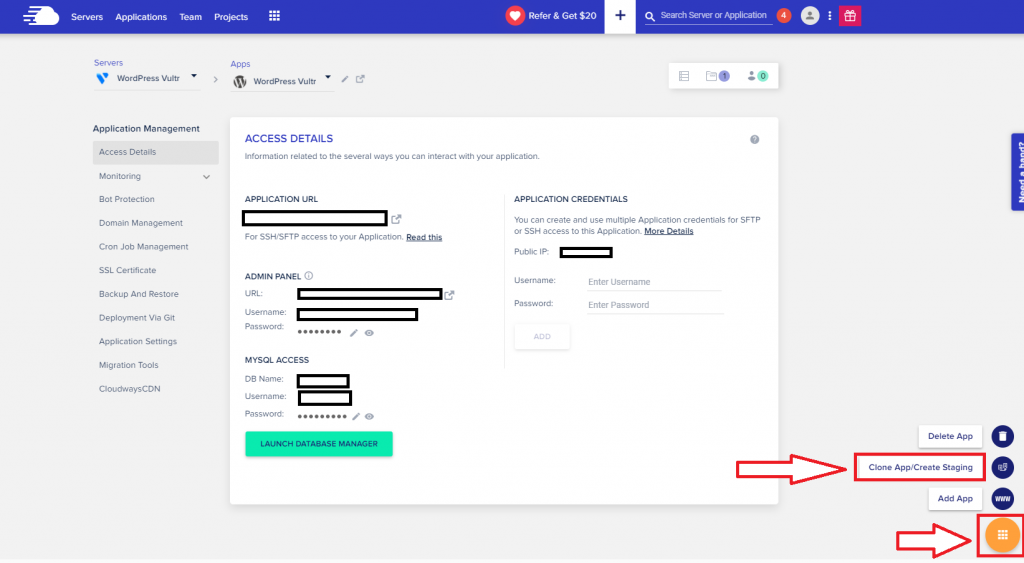
  • Navigate to the bottom, and you will see an orange circle, click it.
  • Click Clone App/Create Staging from the pop-up.
clone app
  • Select your preferred server, then click Continue.
select server to clone app

You will be asked to wait for a few minutes, during which Cloudways will copy your entire website. Now, you are good to experiment on the clone.

Note: Clone App and Create as Staging are different functionalities. Clicking Clone App will only clone your website. Whereas, Create as Staging will sync the live and staged applications to allow you to perform Push/Pull actions on both the replica and live versions.

How to Update PHP in WordPress to PHP 8.0 on Cloudways

Cloudways announced its availability of PHP 8 earlier this year, maintaining its reputation of being the early bird to accept the latest updates. Want to update your PHP version on Cloudways? Follow the easy steps below to upgrade your current PHP version to PHP 8.0.

Note: Cloudways recommends keeping a backup of your server before upgrading to a newer PHP version. Keeping a backup will help you restore your application if you feel the need to revert to your previous PHP version anytime in the future.

Log in with Cloudways

  • Signup on Cloudways. Already have a Cloudways account? Log in with your credentials.
cloudways-login

Select Server

  • Click on Servers. Select, and click the server of your choice.
select server

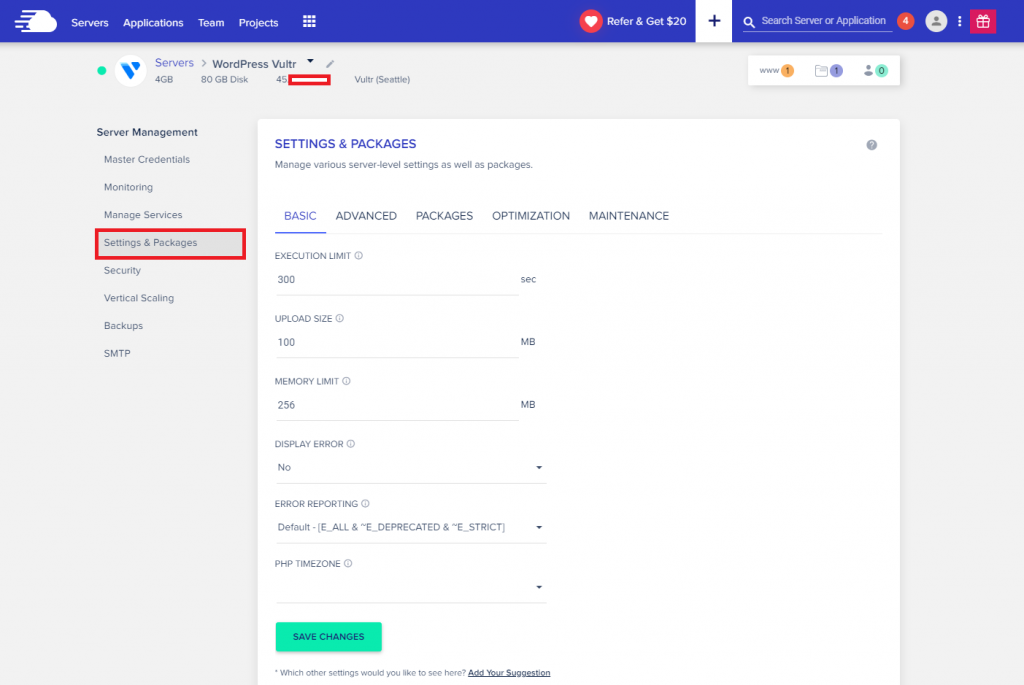
Select Settings & Packages

  • Click on Settings & Packages on the left side.
Select Settings & Packages
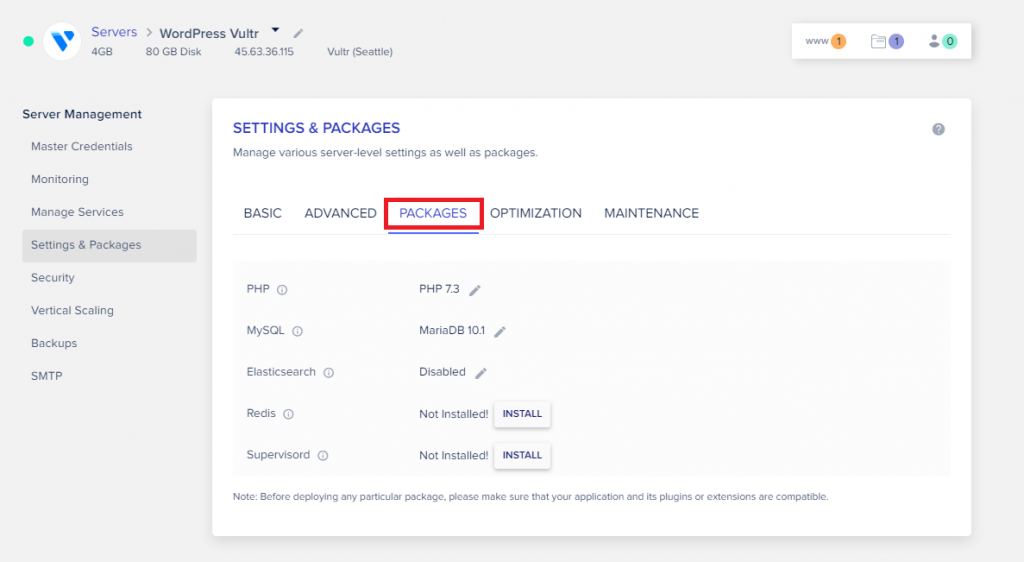
  • Click on the Packages tab.
Select Packages

Upgrade your PHP version

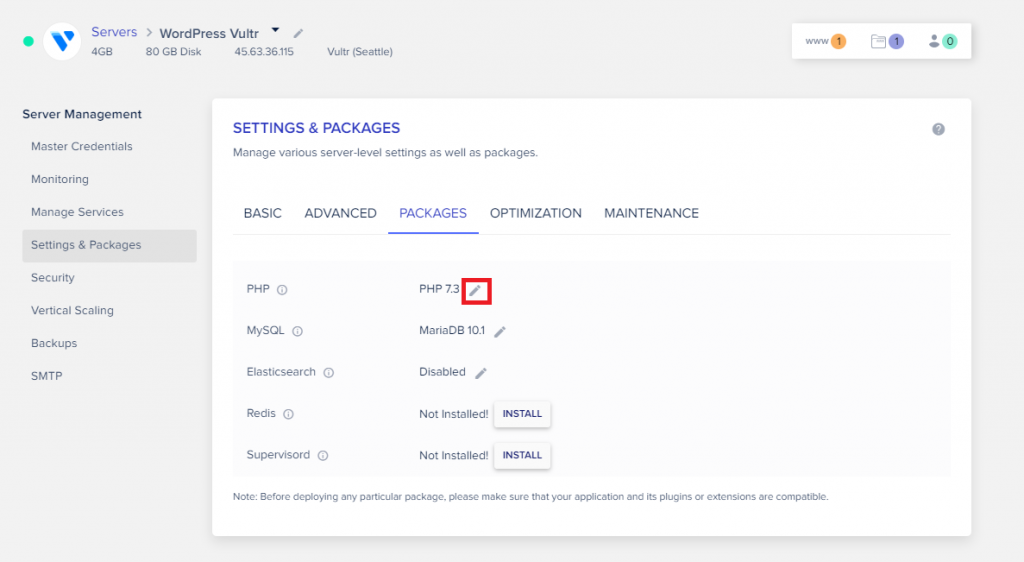
  • Click the edit sign next to your current PHP version.
Upgrade your PHP version
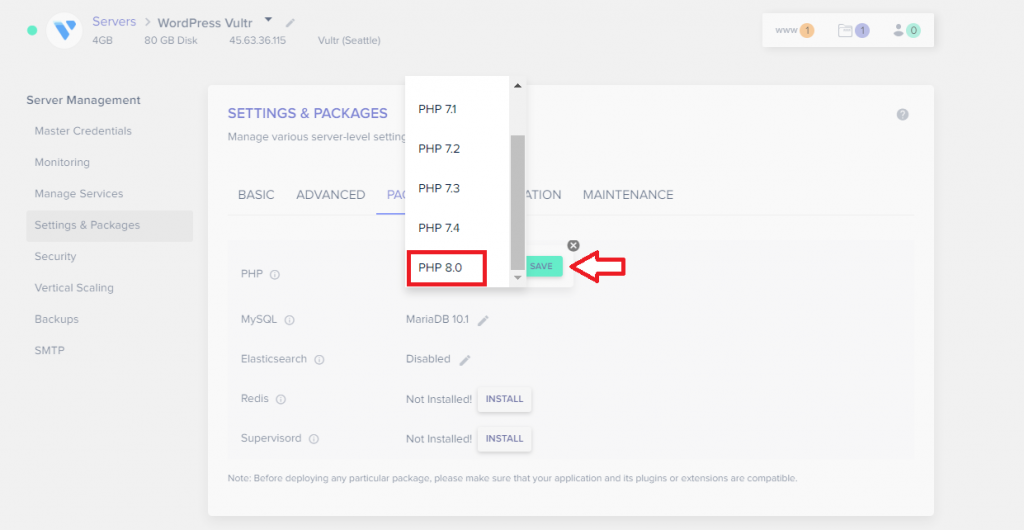
  • Select PHP 8.0 from the drop-down, and click Save.
select PHP 8
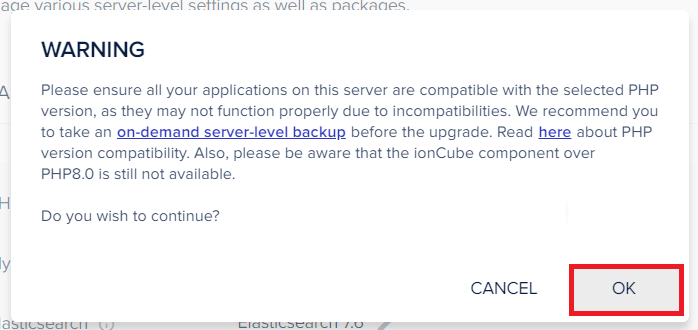
  • The setup will prompt you with a warning to ensure if your application is compatible with the selected PHP version. If yes, then click OK.
click OK to select PHP version

The setup will take a few minutes to finish, and it will notify you once the update is done. After getting the notification, you can enjoy working with PHP 8.

PHP Supported Versions on WordPress

WordPress supports the following seven PHP versions ranging from PHP 5.6 to the latest version 8.0.

  • PHP 5.6
  • PHP 7.0
  • PHP 7.1
  • PHP 7.2
  • PHP 7.3
  • PHP 7.4
  • PHP 8.0
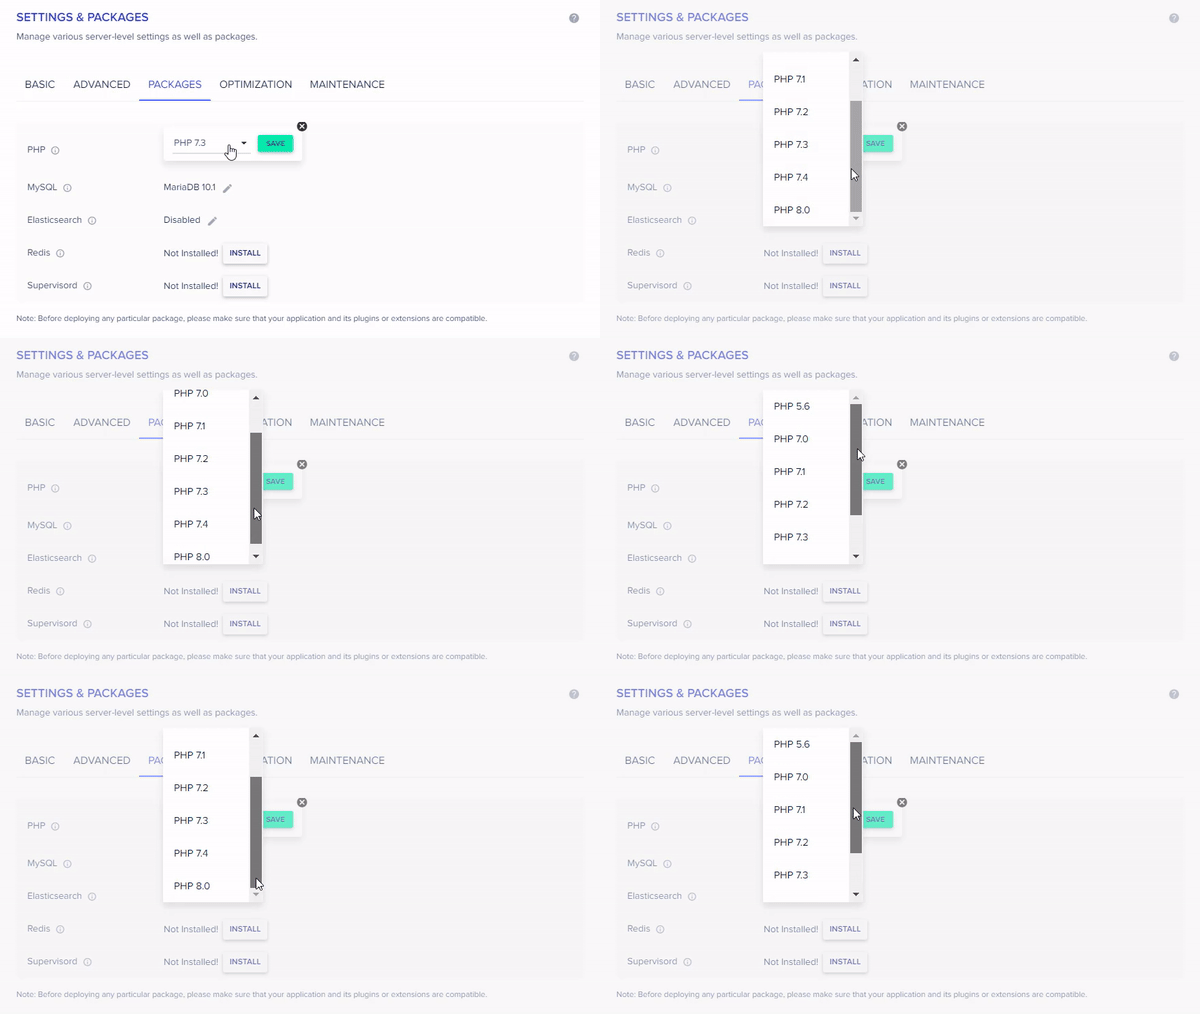
PHP supported versions

Note: Keep in mind that you won’t receive any PHP security updates if you are not using the latest PHP version. We recommend using the 8.0 PHP version.

What Is Holding Back Users From Updating to PHP 8.0?

The major reason that’s holding back users from upgrading to PHP 8 is the incompatibility of their favorite themes and plugins with PHP 8.

That said, every savvy user would like to enjoy the latest PHP features and RFC improvements. Anyone who wants to stay back and keep working with the legacy software would abstain from upgrading their PHP version.

Using the latest PHP versions allows for better and easier development of new features and also facilitates maintenance. Even if some of the themes and plugins are not working on PHP 8.0, they will eventually be updated.

Why Should You Upgrade to PHP 8?

Imagine using an outdated image editing tool for making logos or editing photos. While the world has moved to the latest version and is saving time and getting better quality and performance with the latest edition, you are still doing it the old way. Not really a smart decision, right?

Similarly, why would anyone abstain from upgrading to a newer PHP version when the new upgrade is specifically introduced to bring ease to the user’s end. You should definitely upgrade to PHP 8 if you want to benefit from the latest features, get better error handling, improved RFCs, and optimizations.

PHP 8 will remain in support till November 2022, and its security support will extend till November 2023. This longevity makes this newest version a lot more trustworthy and secure than the previous versions.

Most of the popular WordPress plugins and themes have accepted PHP 8 and are now compatible with it.

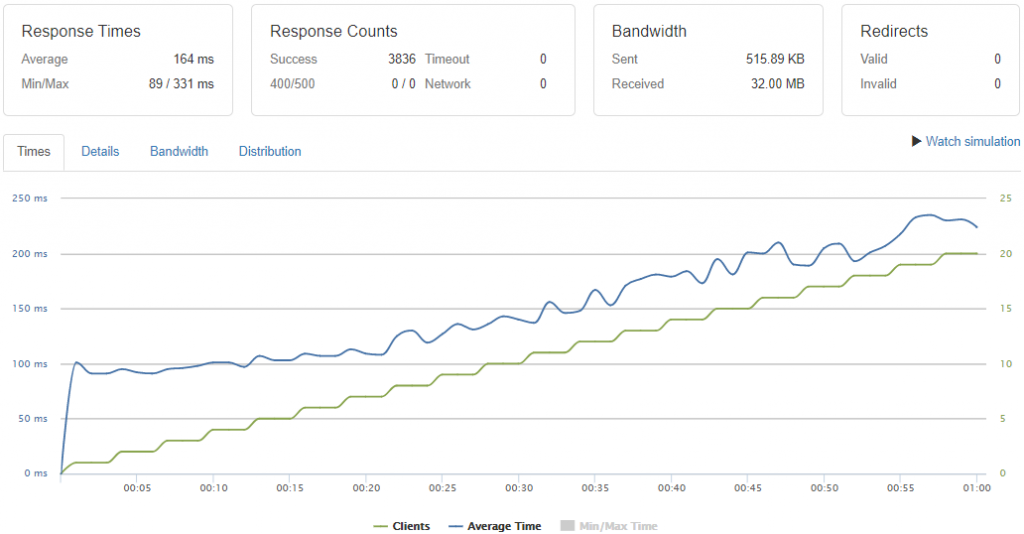
We ran a loader test to check PHP 8’s performance on the Cloudways server, and deduced the following results:

PHP 8 loader test

Source: Loader Test of PHP 8.0 on Cloudways Server

The average response time for the same WordPress website is 164 ms, and total success response counts are 3836.

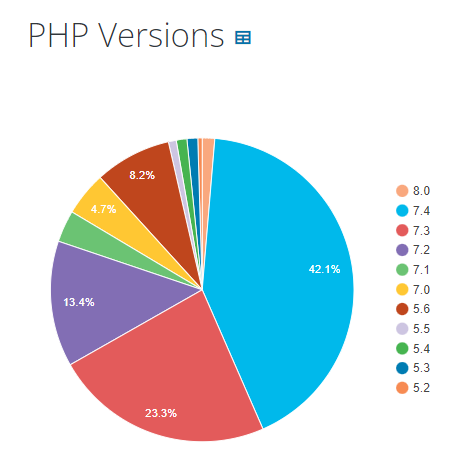
Sadly, only 1.3% of the WordPress sites are using PHP 8.0. As per our experience, WordPress delivers the best performance with PHP 8.0 and gives better speeds than the previous PHP versions. It’s a good practice to use the latest versions, so the number of people migrating from 7.4 to 8.0 is gradually increasing with time.

PHP versions stats

Source: WordPress Version Stats

PHP has worked on the issues reported by the users in the previous versions, and the latest version is free from many recurring problems and has introduced new features.

To enjoy the services at their full potential, you will have to upgrade to the newest WordPress PHP version, as the older versions may eventually fade out or will be declined by most themes and plugins.

PHP Supported Versions

Source: PHP Supported Versions

Disadvantages of Using Older PHP Versions on WordPress

All PHP versions before 7.3 have reached their end of life, and it is advised to upgrade to the latest version if you are using any of the older versions, as it will make you vulnerable to unpatched security errors. Even 7.4 will reach the end of life on 28 Nov 2022.

Why would you risk your website to security vulnerabilities when you can easily upgrade to the latest version and enjoy the new improvements and features?

Also, ensure that you opt for a secure WordPress hosting provider to safeguard your sites from malicious traffic, DDoS attacks, and malware.

Using older PHP versions won’t only provide security issues but also will affect your website’s performance.

Which sane person compromises performance in this competitive era, where everyone is following the best practices to boost their site’s performance and gain their user’s attention?

Improve your website’s performance and security by halting the usage of older PHP versions, and upgrade your WordPress website’s PHP version to 8.0 to maximize safety and performance.

Final Thoughts

This blog covers PHP 8’s compatibility with WordPress and the steps to upgrade your PHP version to 8.0. The information shared in this guide will help you make the right decision to upgrade to PHP 8.0 on your WordPress site and enjoy the benefits of the newest update.

Ranging from the supported versions, disadvantages of using the old PHP version, and the reasons to upgrade to 8.0; we have tried to cover it all. Still, if any questions are popping up in your head, please feel free to comment with your queries; and we will answer all of them ASAP.

Frequently Asked Questions

Can WordPress use PHP 8?

Yes, WordPress can use PHP 8, and it is recommended to use PHP 8.0 with WordPress 5.6 or higher version for compatibility and better performance.
If you are using an older WordPress version, you can test your site with WordPress 5.6 in a staging environment. If you don’t experience any issues, then upgrade your live WordPress site to enjoy using PHP 8.0 on WordPress.

Is WordPress compatible with PHP 8?

Yes, WordPress is compatible with PHP 8.0. However, only WordPress 5.6 or higher versions are compatible with PHP 8. If you are using an older WordPress version, you can upgrade it to at least 5.6 to enjoy using PHP 8.

Should I upgrade to PHP 8?

Yes, if you want to benefit from the latest features, better error handling, improved RFCs, and optimizations, you should upgrade your PHP version to PHP 8.

What version of PHP should I use for WordPress?

We recommend using PHP 8.0 with WordPress if you are using at least WordPress 5.6. The oldest PHP version that we recommend using with WordPress is PHP 7.3.

Source :
https://www.cloudways.com/blog/wordpress-php-8/

Migrate WordPress from PHP 5 to PHP 7

If your website’s PHP version Because PHP is not the same as the PHP version in your backup, it may cause issues with the proper operation of your website and with some applications. This is more common when migrating from PHP 5 to PHP 7.

We recommend that users regularly backup their WordPress sites or network of sites. You can also use the All-in-One WP Migration plugin extensions to set up automatic backups. Make sure your plugin version is always up to date.
In most cases, the PHP update will have no effect on WordPress or popular plugins or themes. However, it is possible that some plugins, themes, or other functionalities will cease to function.

Set the WP_DEBUG constant to true in your wp-config.php file to see all errors, warnings, and notes generated by the website during execution. This will assist you in locating any problems.

If your install is stuck at “restoring X% files,” “restoring database,” or “activating mu-plugins”

1. Leave the plugin running for another 15 minutes while it is on “Restoring database.”
2. After 15 minutes, open another tab and attempt to login to wp-admin using the exported site’s WP Admin username and password.
3. Save the permalinks structure twice by going to settings -> permalinks.
Your website should now be successfully migrated.

If it isn’t and you receive a 500 error, please edit your wp-config.php file and set WP_DEBUG to true, then refresh the page to see an error. This may assist you in determining the problem, or you can share the error with the Servmask support team for assistance.

Could it be my server settings?

Memory limit needs to be at 256M, max_execution_time to 500, and mysql.connect_timeout to 400. You can find these settings by uploading this file. (https://www.dropbox.com/s/ize8t2k4nww5iq7/phpinfo.php?dl=0) in wp-content of your imported site and then open http://YOURDOMAINNAME.COM/wp-content/phpinfo.php. (tip – use Ctr F search the data that you get)

Source :
https://help.servmask.com/knowledgebase/migrate-wordpress-from-php-5-to-php-7/

Enabling & Managing Windows Firewall Settings

About this article

In this article, we are going to start by describing what the Windows Firewall feature is and what it is used for. This information will then allow you to enable and manage the Windows Firewall on your Windows PC or laptop. We will cover all the different versions of the Windows operating system that are currently supported by the Secure Remote Worker Validation Tool.

Lets first describe what a firewall actually is.

What is a firewall?

A firewall can be either a physical hardware device, software-based application that you install on your PC, or in the case of the Windows Firewall, an integrated feature of the operating system that is designed to protect your PC against the attack of malicious files. The firewall checks information and data sent across the internet or other networks to your PC. If the firewall detects that the information may contain malicious files then it will block them from reaching your PC, therefore protecting your PC from that threat. Equally, it can prevent you PC sending malicious content to other PCs.

Windows Firewall is an integrated firewall solution that is part of the Windows operating system. In this article, we are going to configure the Windows Firewall to work with Secure Remote Worker. In the following sections, we are going to discuss the process for each of the different version of the Windows operating, starting with Windows 10.

Important configuration note:

You should only have one software firewall solution installed at any one time. If you install additional security software on your PC that also has its own software-based firewall solution, then you will need to disable this if you are to use the Windows Firewall solution.

Enabling the firewall on Windows 10 devices

In this section, we are going to describe the process for enabling the Windows Firewall feature on Windows 10. Follow the steps below to work through the process of enabling the firewall:

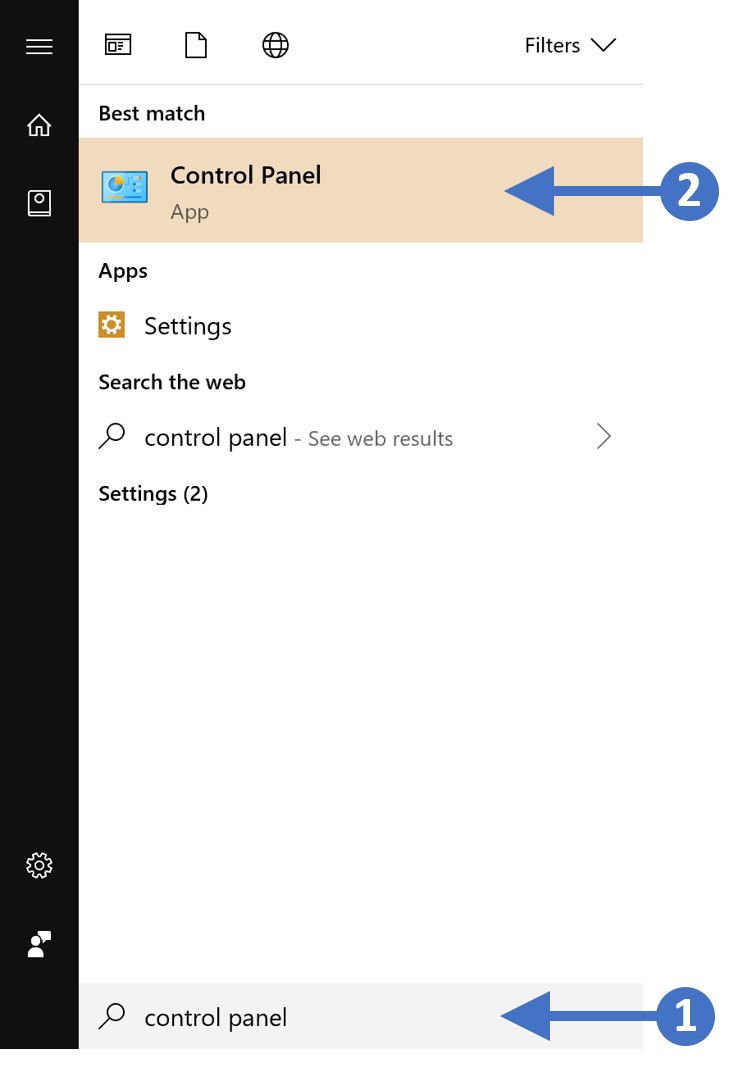
  1. Press the Windows key on your keyboard and then start to type in “control panel” in the search box highlighted (1). You will then see the Control Panel App appear at the top of the list as the best match, highlighted (2). Click on the Control Panel App to launch it as shown in the following screenshot:

Click to Zoom

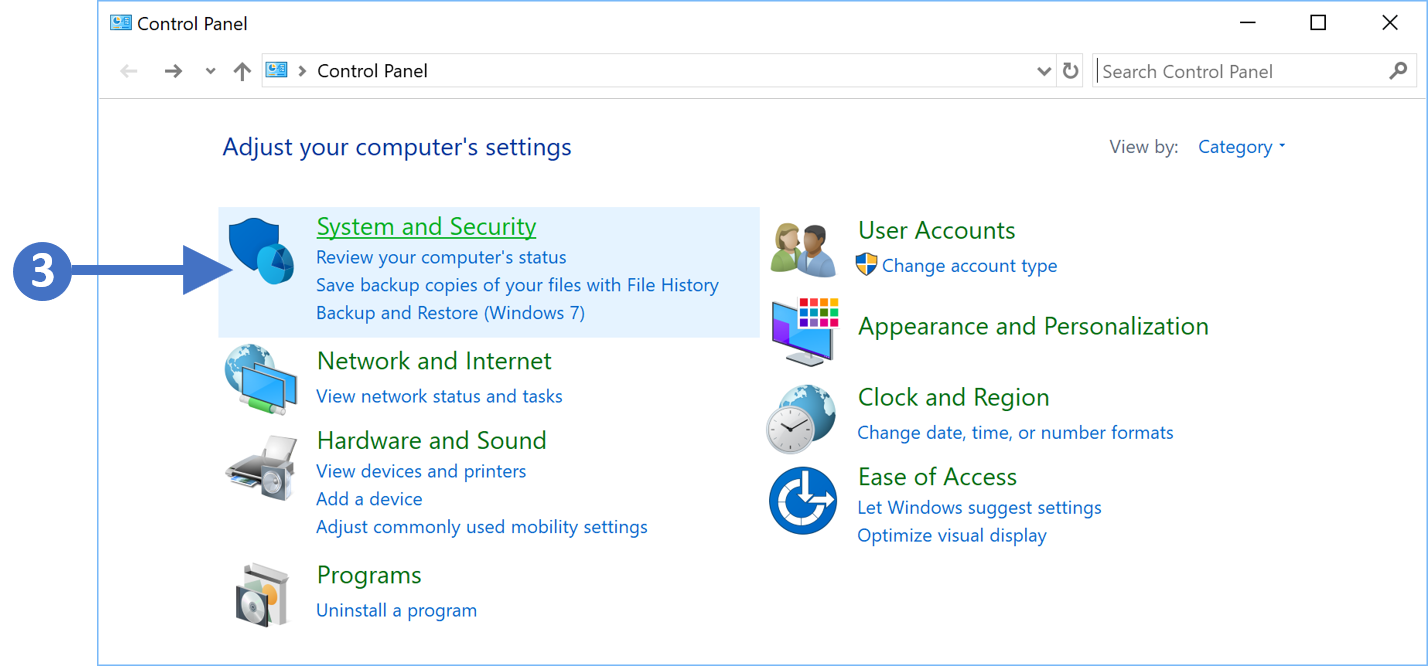
2. You will now see the Control Panel as shown in the following screenshot:

Click to Zoom

3. Now click on System and Security as highlighted (3) in the screenshot above.

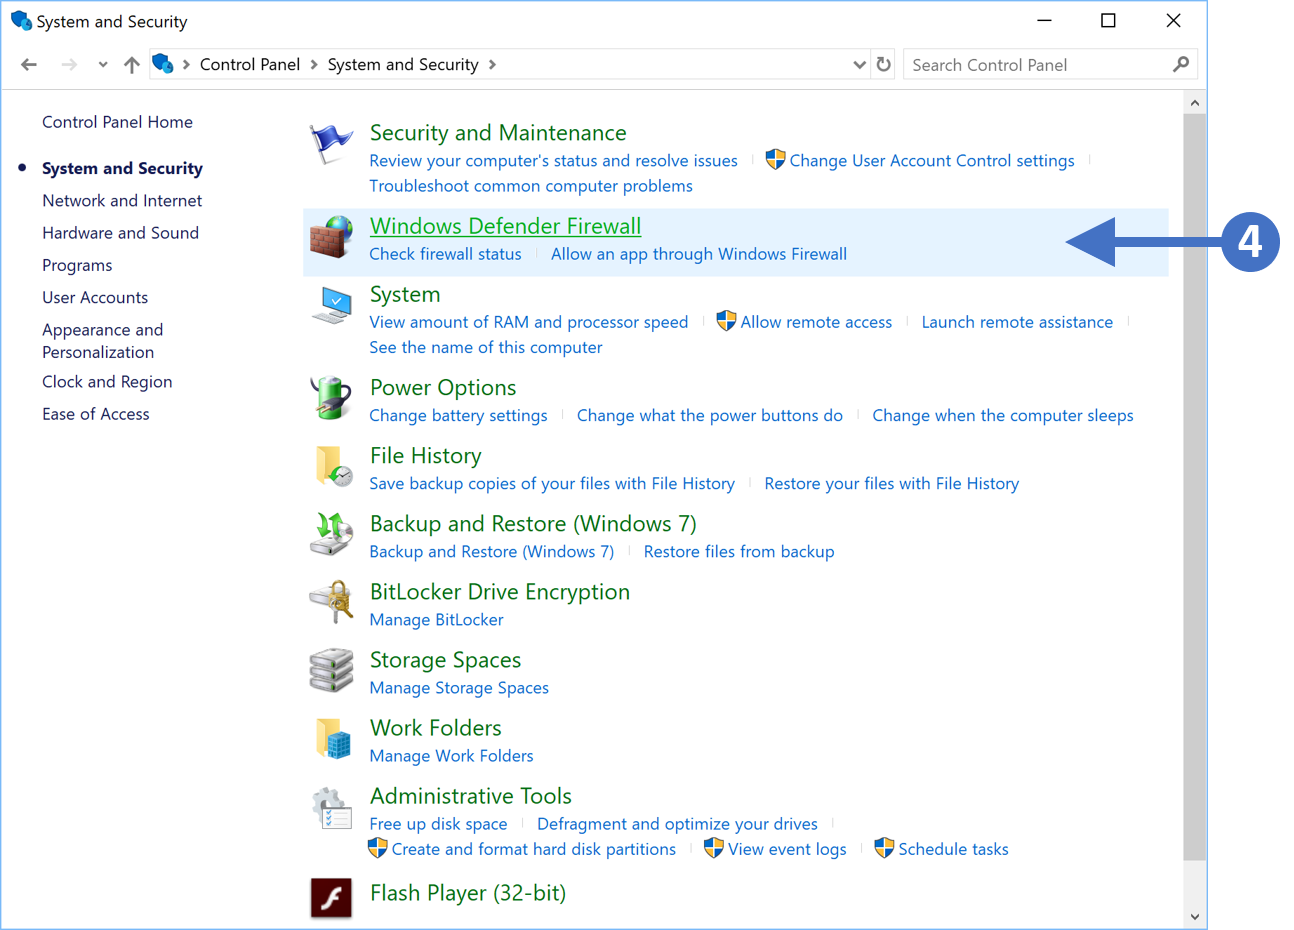
4. You will now see the System and Security configuration options as shown in the following screenshot:

Click to Zoom

5. Click on Windows Defender Firewall as highlighted (4) in the above screenshot.

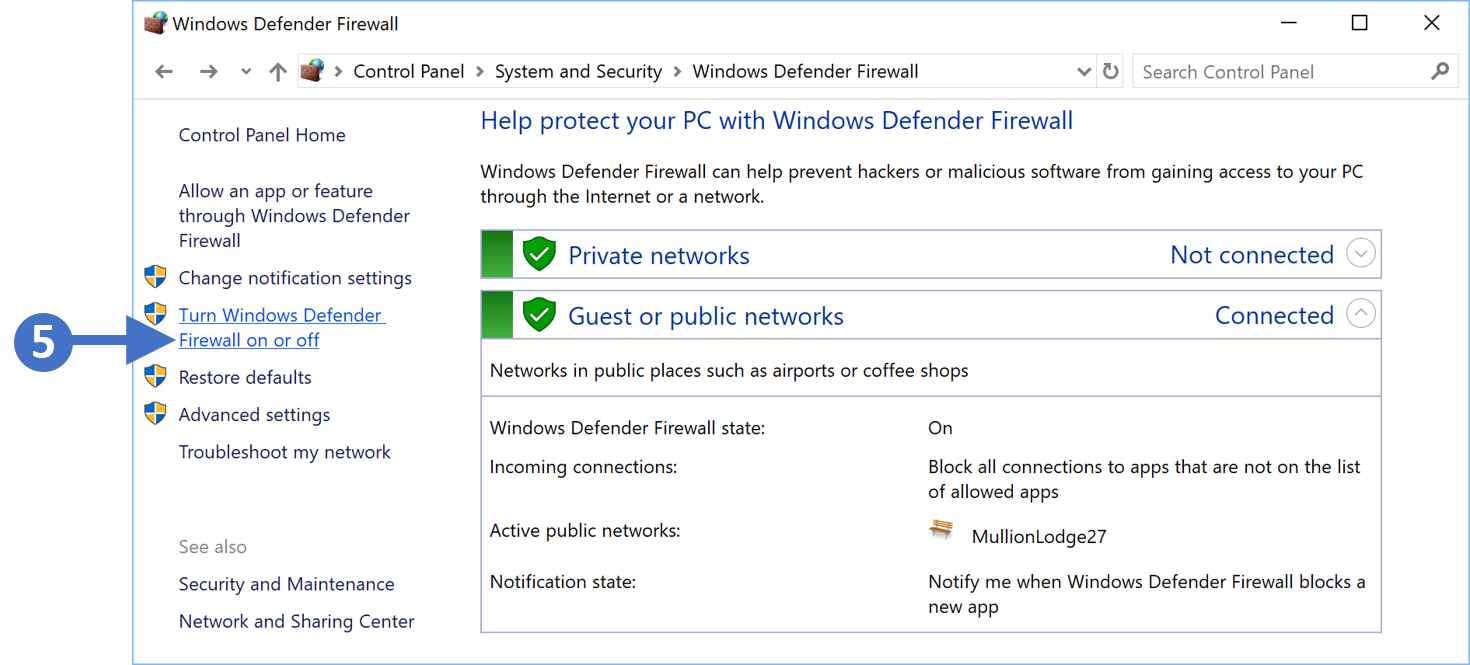
6. You will now see the Windows Defender Firewall configuration screen as shown in the following screenshot:

Click to Zoom

7. Click on Turn Windows Defender Firewall on or off as highlighted (5) in the above screenshot.

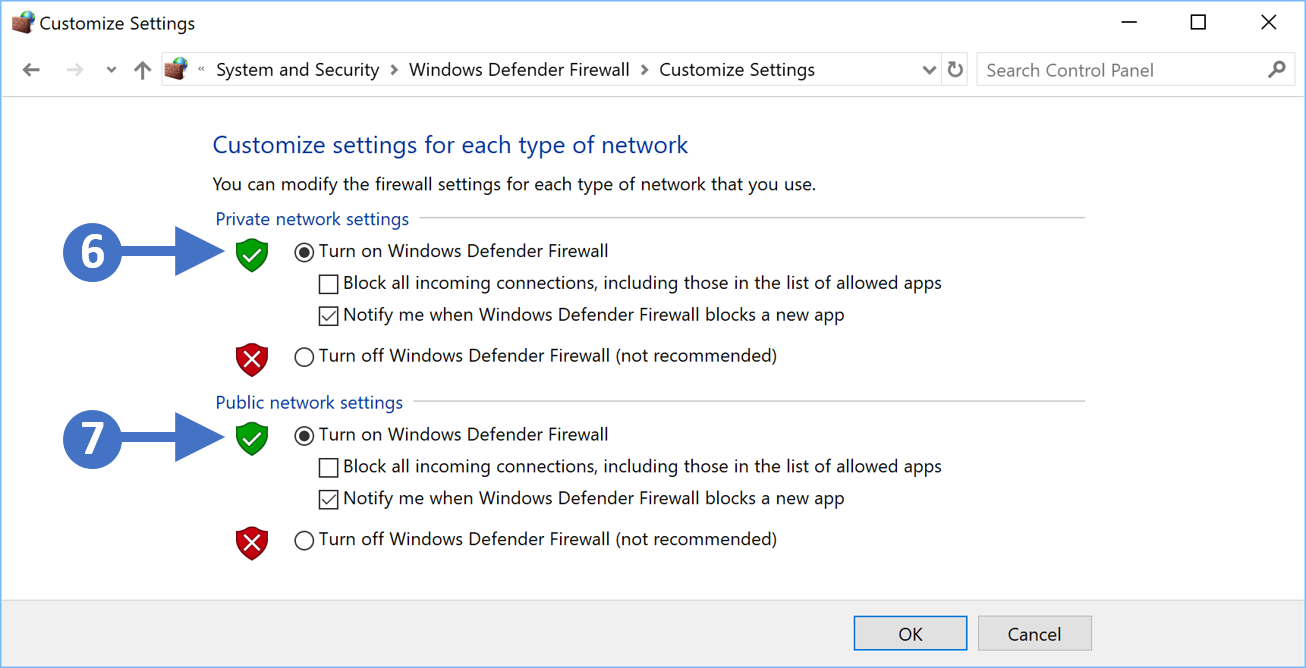
8. You will now see the Customize settings for each type of network as shown in the following screenshot:

Click to Zoom
9. First, enable the firewall for private networks. To do this click the radio button for Turn on Windows Defender Firewall under the Private network settings section as highlighted (6) in the previous screenshot.

10. Next, enable the firewall for public networks. To do this click the radio button for Turn on Windows Defender Firewall under the Public network settings section as highlighted (7) in the previous screenshot.

11. The other thing to configure is to make sure that you check the box for Notify me when Windows Defender Firewall blocks a new app for both network settings, so Public and Private. This means that you will be notified when something potentially malicious is blocked.

12. Finally, once configured, click the OK button to close the configuration window, and then click the red X button in the top right-hand corner to close the control panel.

You have now successfully enabled the Windows Firewall for Windows 10 operating systems.

Enabling the firewall on Windows 8.1 devices

In this section, we are going to describe the process for enabling the Windows Firewall feature on Windows 10. Follow the steps below to work through the process of enabling the firewall:

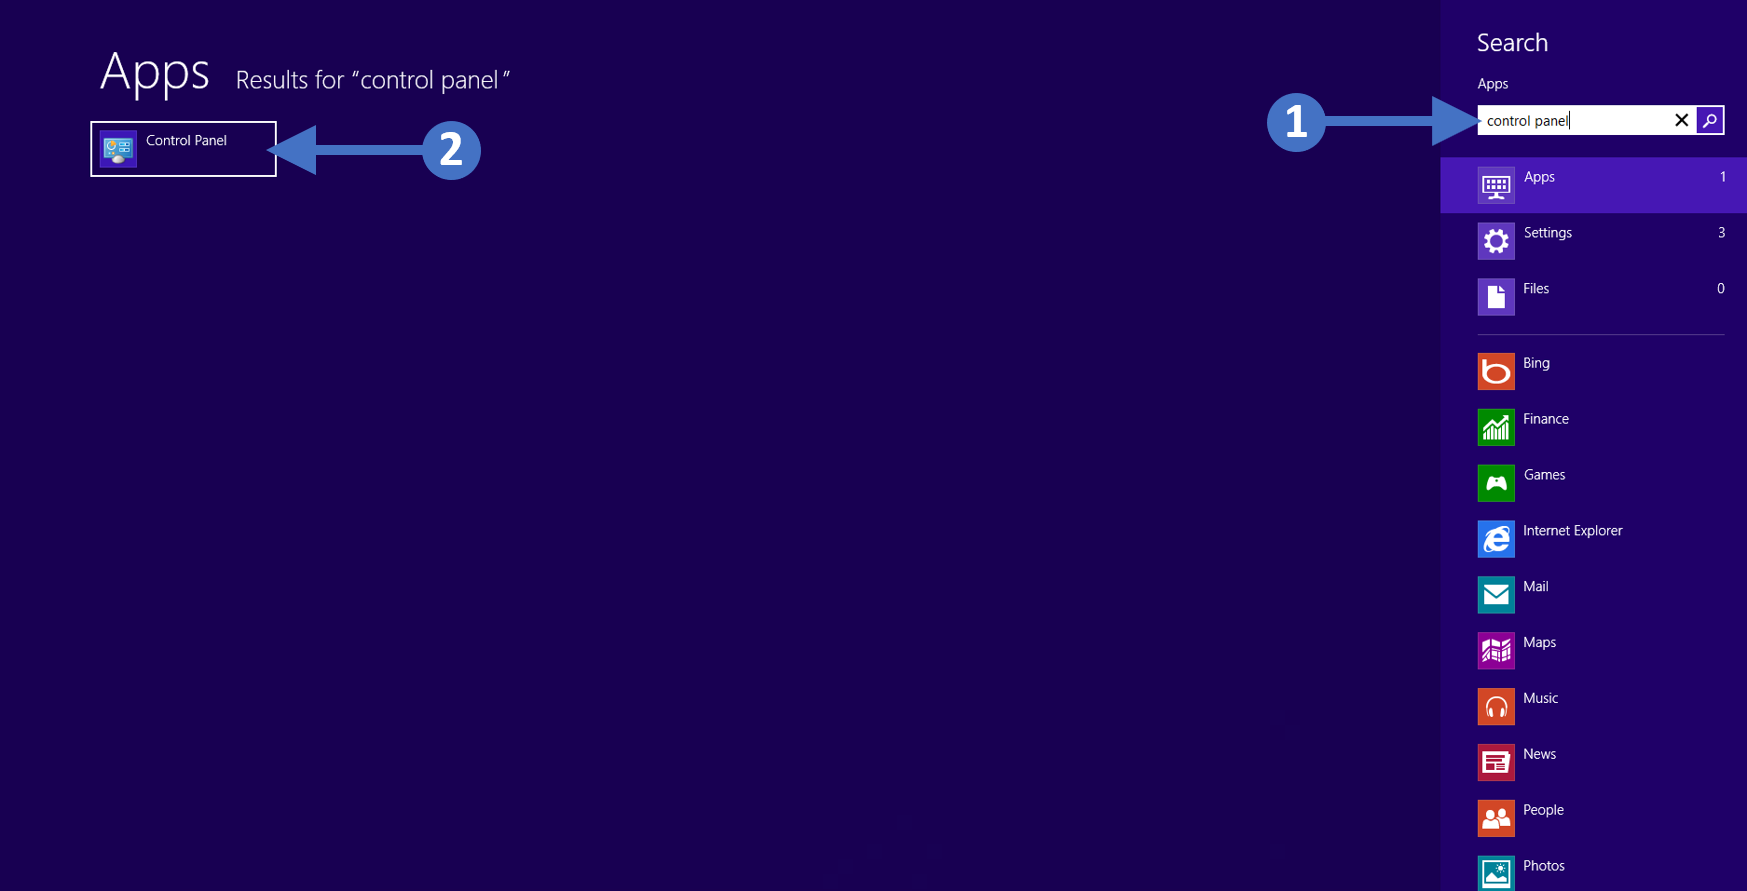
1. Press the Windows key on your keyboard and then start to type in “control panel” in the search box highlighted (1). You will then see the Control Panel icon appear at the top left of the screen in the Results section, highlighted (2). Double click on the Control Panel icon to launch it as shown in the following screenshot:

Click to Zoom

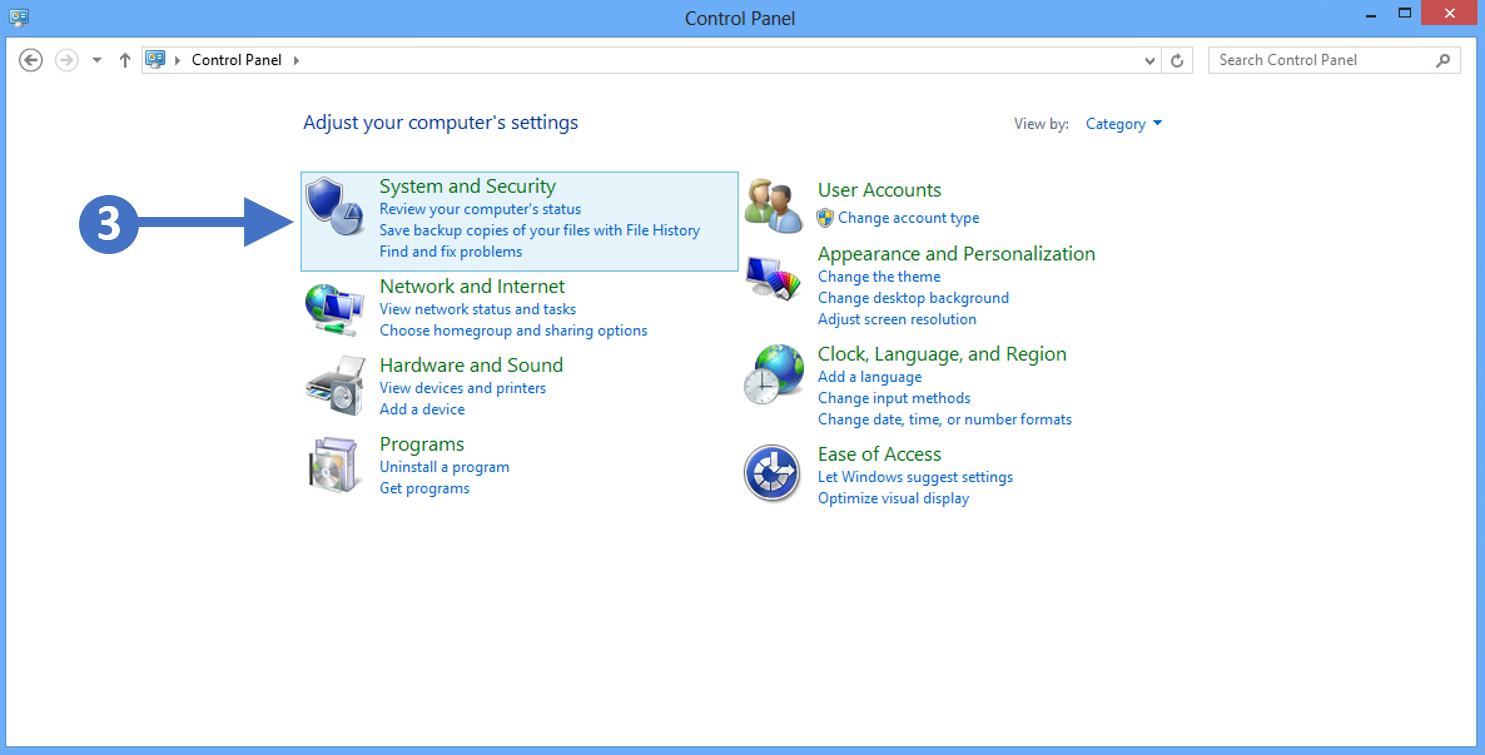
2. You will now see the Control Panel as shown in the following screenshot:

Click to Zoom

3. Now click on System and Security as highlighted (3) in the screenshot above.

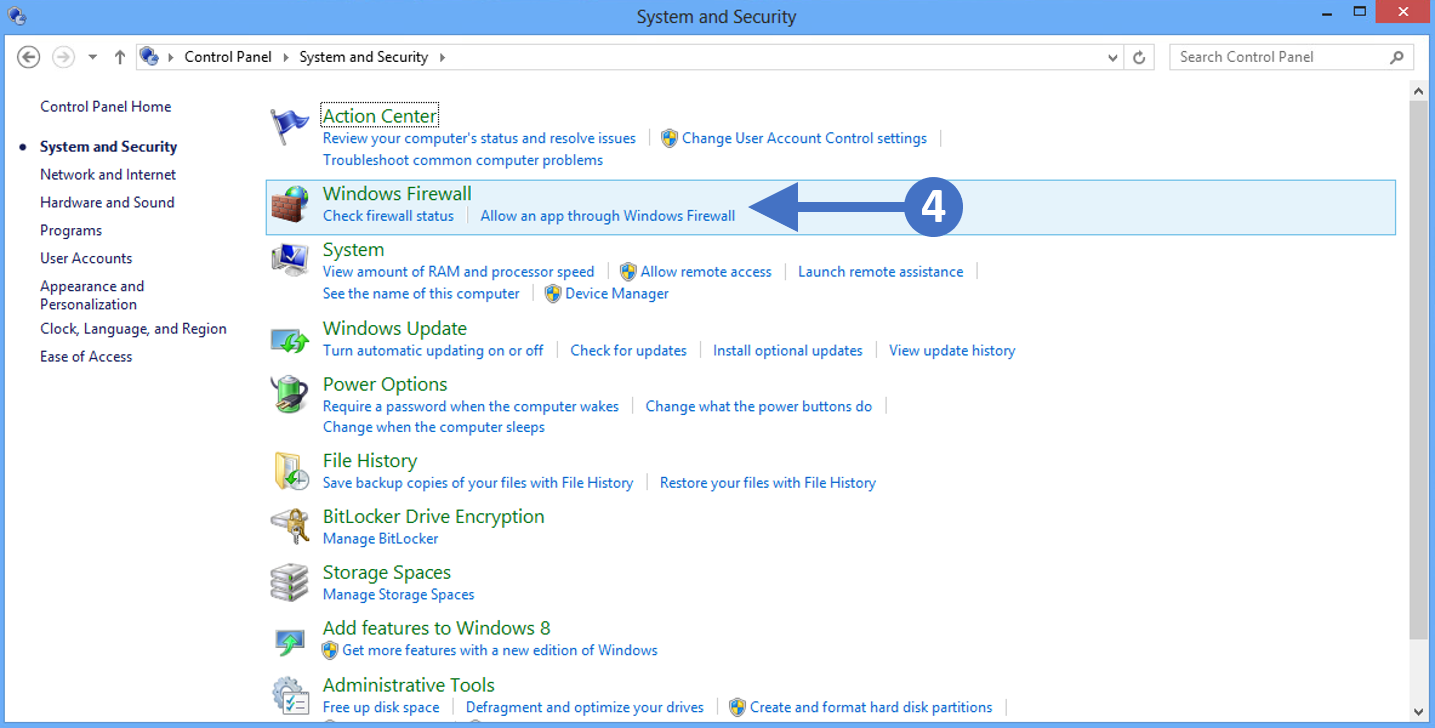
4. You will now see the System and Security configuration options as shown in the following screenshot:

Click to Zoom

5. Click on Windows Firewall as highlighted (4) in the above screenshot.

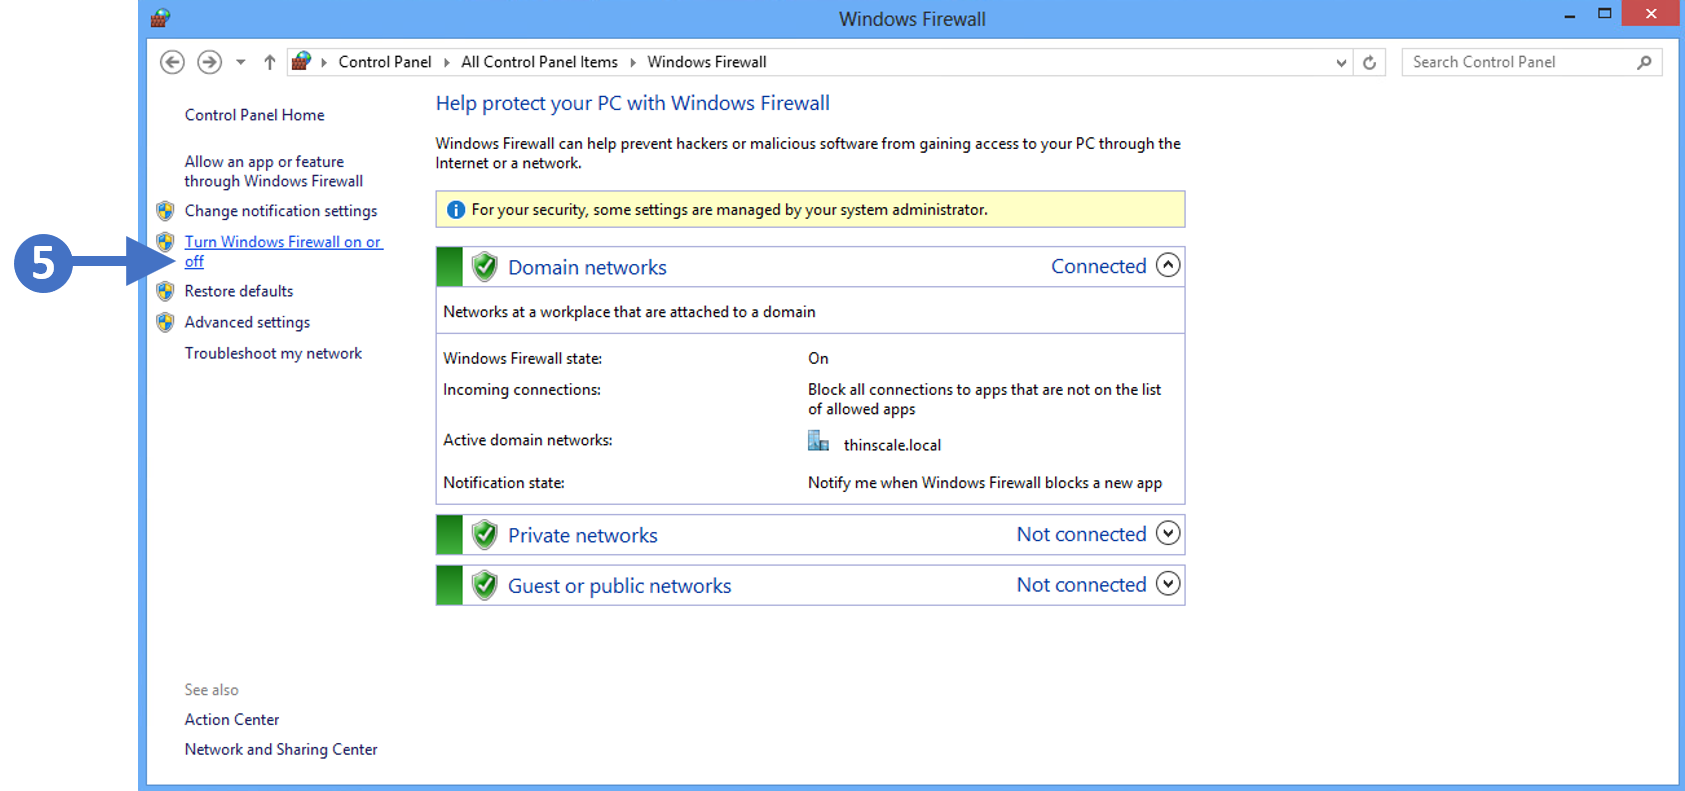
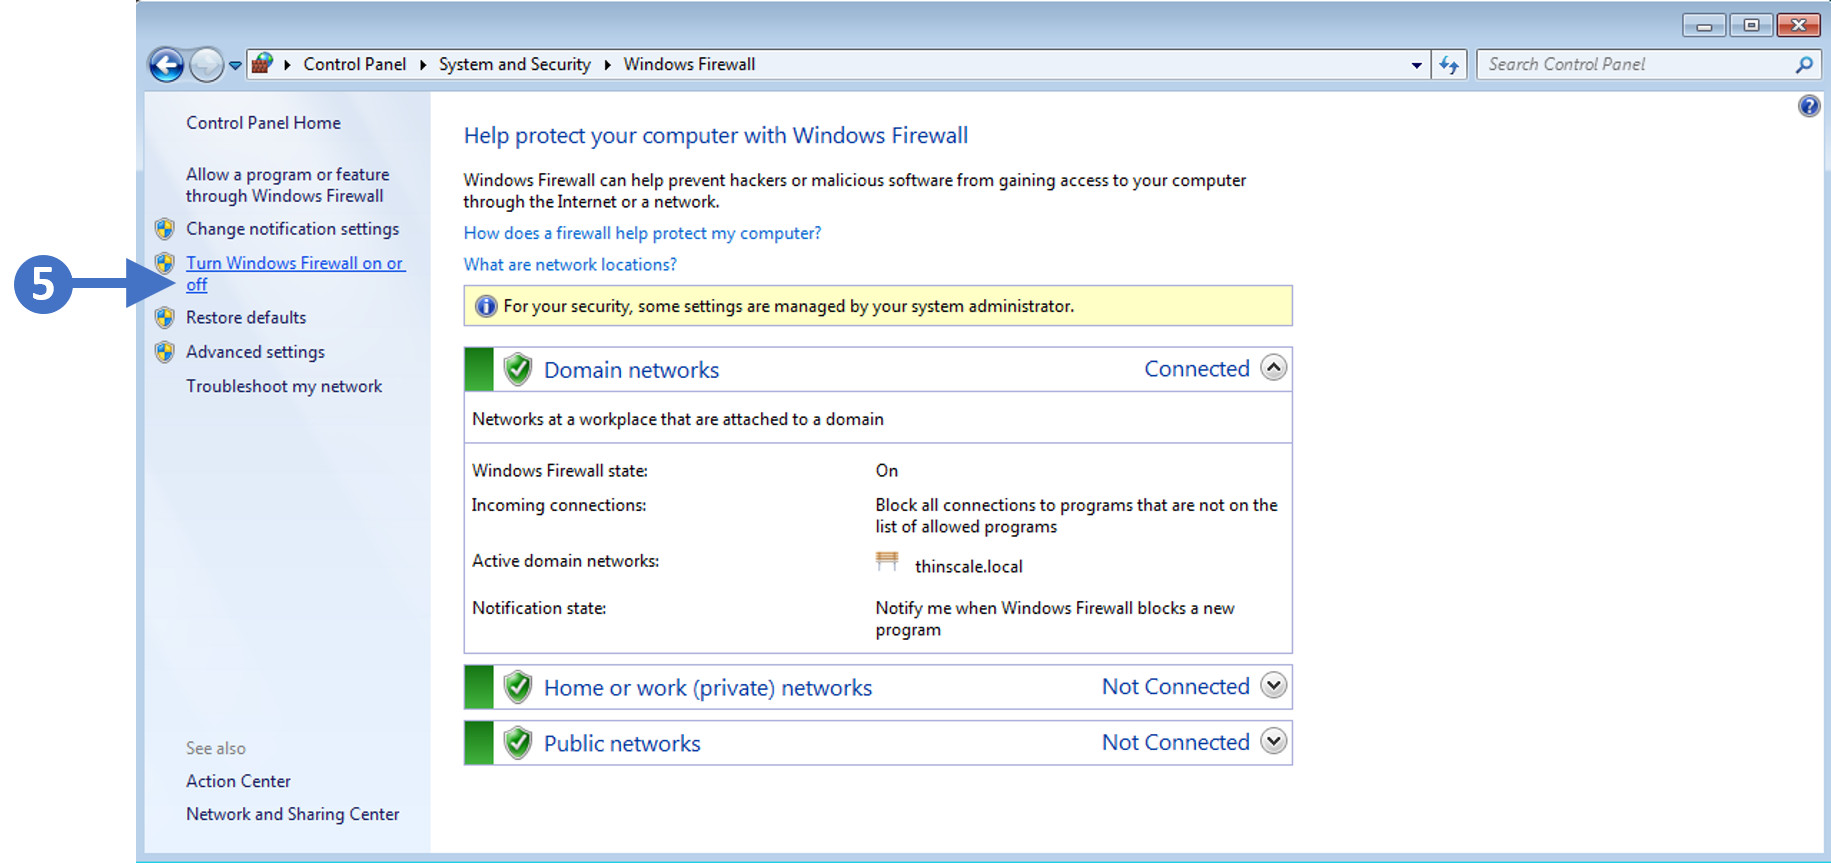
6. You will now see the Windows Firewall configuration screen as shown in the following screenshot:

Click to Zoom

7. Click on Turn Windows Firewall on or off as highlighted (5) in the above screenshot.

8. You will now see the Customize settings for each type of network as shown in the following screenshot:

Click to Zoom

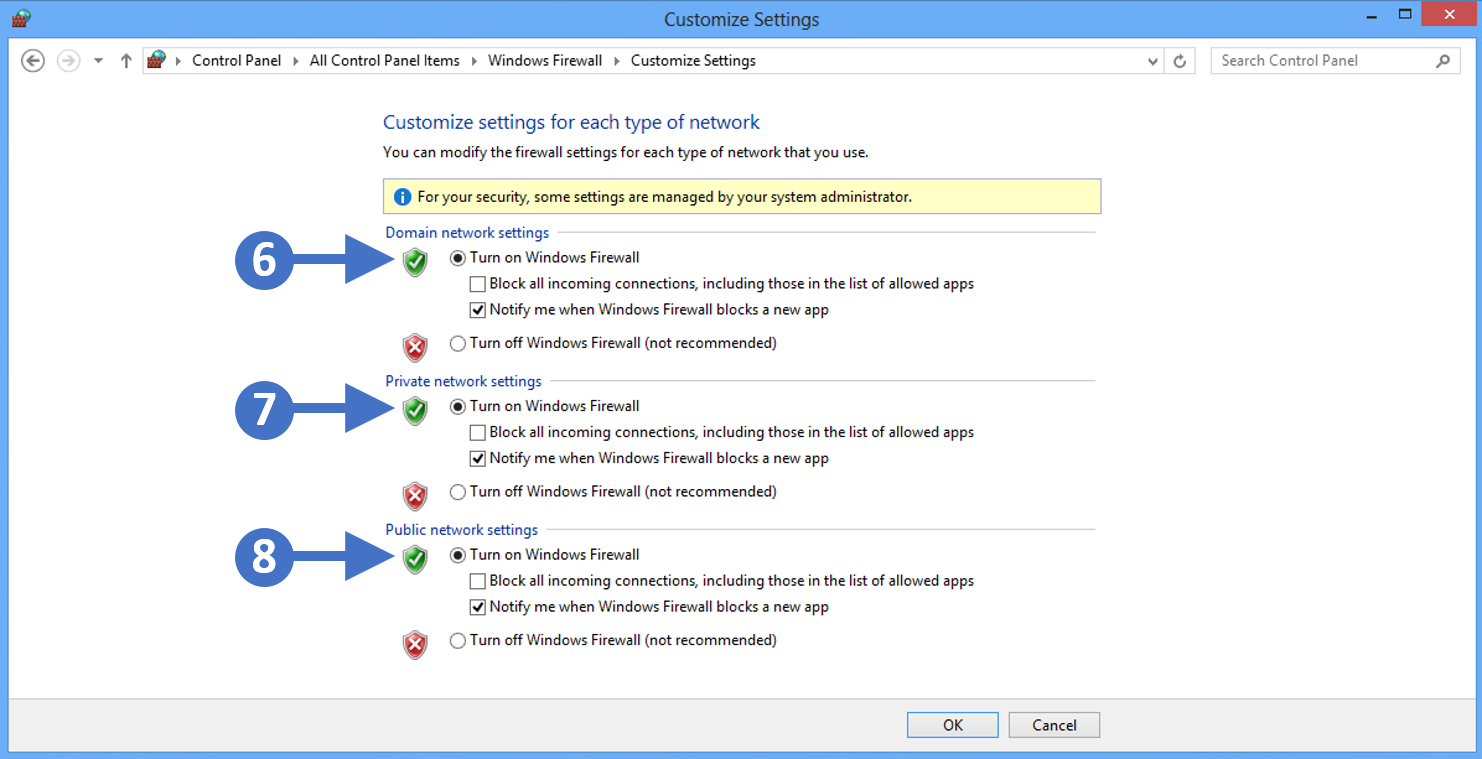
9. First, enable the firewall for domain networks. To do this click the radio button for Turn on Windows Defender Firewall under the Domain network settings section as highlighted (6) in the previous screenshot.

10. Next, enable the firewall for private networks. To do this click the radio button for Turn on Windows Defender Firewall under the Private network settings section as highlighted (7) in the previous screenshot.

11. The final one to enable is the firewall for public networks. To do this click the radio button for Turn on Windows Defender Firewall under the Public network settings section as highlighted (8) in the previous screenshot.

12. The other thing to configure is to make sure that you check the box for Notify me when Windows Firewall blocks a new app for domain settings, public settings, and private settings. This means that you will be notified when something potentially malicious is blocked.

13. Finally, once configured, click the OK button to close the configuration window, and then click the red X button in the top right-hand corner to close the control panel.

You have now successfully enabled the Windows Firewall for Windows 8.x operating systems.

Enabling the firewall on Windows 7 devices

In this section, we are going to describe the process for enabling the Windows Firewall feature on Windows 7. Follow the steps below to work through the process of enabling the firewall:

1. Press the Windows key on your keyboard and then start to type in “control panel” in the search box highlighted (1). You will then see the Control Panel icon appear at the top of the screen under Programs(1), highlighted (2). Double click on the Control Panel icon to launch it as shown in the following screenshot:

Click to Zoom

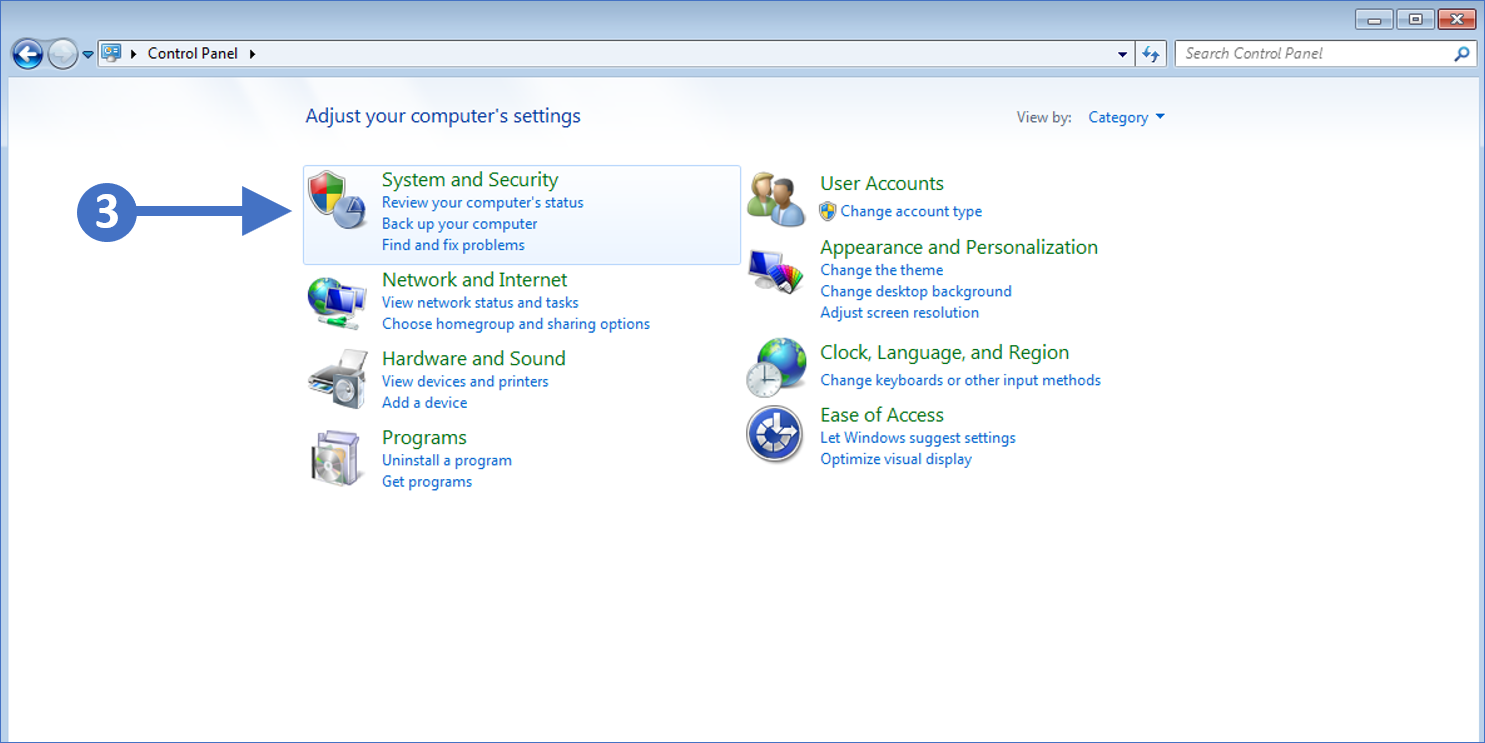
2. You will now see the Control Panel as shown in the following screenshot:

Click to Zoom

3. Now click on System and Security as highlighted (3) in the screenshot above.

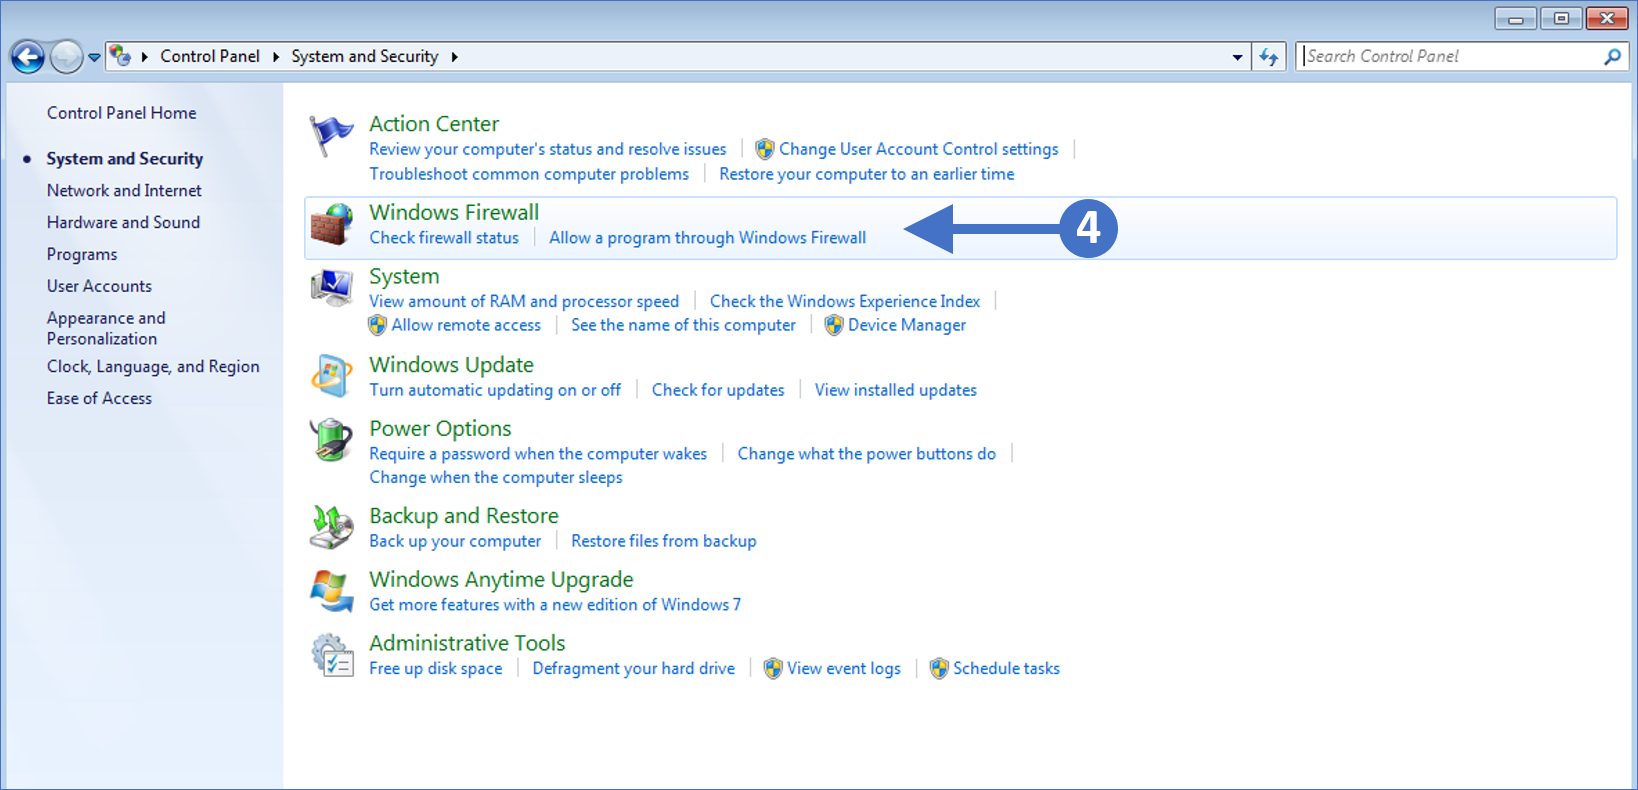
4. You will now see the System and Security configuration options as shown in the following screenshot:

Click to Zoom

5. Click on Windows Firewall as highlighted (4) in the above screenshot.

6. You will now see the Windows Firewall configuration screen as shown in the following screenshot:

Click to Zoom

7. Click on Turn Windows Firewall on or off as highlighted (5) in the above screenshot.

8. You will now see the Customize settings for each type of network as shown in the following screenshot:

Click to Zoom

9. First, enable the firewall for domain networks. To do this click the radio button for Turn on Windows Defender Firewall under the Domain network location settings section as highlighted (6) in the previous screenshot.

10. Next, enable the firewall for private networks. To do this click the radio button for Turn on Windows Defender Firewall under the Home or work (private) network location settings section as highlighted (7) in the previous screenshot.

11. The final one to enable is the firewall for public networks. To do this click the radio button for Turn on Windows Defender Firewall under the Public network location settings section as highlighted (8) in the previous screenshot.

12. The other thing to configure is to make sure that you check the box for Notify me when Windows Firewall blocks a new program for domain settings, public settings, and private settings. This means that you will be notified when something potentially malicious is blocked.

13. Finally, once configured, click the OK button to close the configuration window, and then click the red X button in the top right-hand corner to close the control panel.

You have now successfully enabled the Windows Firewall for Windows 7 operating systems.

Source :
https://kb.thinscale.com/secure-remote-worker-validation-tool/enabling-managing-windows-firewall-settings

Edge Chromium/ Chrome URL Whitelist and Blacklist

In case you do not wish to utilize the “Secure Browser”, instead, you want to use the “Edge Chromium” browser, then the “Secure Browser” URL management will not apply to Chrome or Edge browsers setup as Local Applications. 

In this case, please follow the following steps:

  • In the profile go to Computer Settings | Additional Registry Values
  • Add the link you want to “Allow” or “Deny”

To “Block” all URL’s within “Edge Chromium” use the following registry key:

HKEY_CURRENT_USER\Software\Policies\Microsoft\Edge\URLBlocklist

Value Name: 1

Value Type: REG_SZ

Value Data: *

To “Allow” URL use the following registry key:

HKEY_CURRENT_USER\Software\Policies\Microsoft\Edge\URLAllowlist

Value Name: 1

Value Type: REG_SZ

Value Data: teams.microsoft.com (used as an example)

Multiple links can be allowed by adding another registry key:

Click to Zoom

To “Block” all URL’s within “Chrome” use the following registry key:

HKEY_CURRENT_USER\SOFTWARE\Policies\Google\Chrome\URLBlocklist

Value Name: 1

Value Type: REG_SZ

Value Data: *

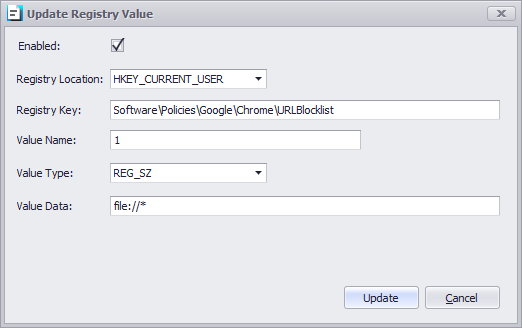
To “Block” file access within “Chrome” use the following registry key:

HKEY_CURRENT_USER\SOFTWARE\Policies\Google\Chrome\URLBlocklist

Value Name: `

Value Type: REG_SZ

Value Data: file://*

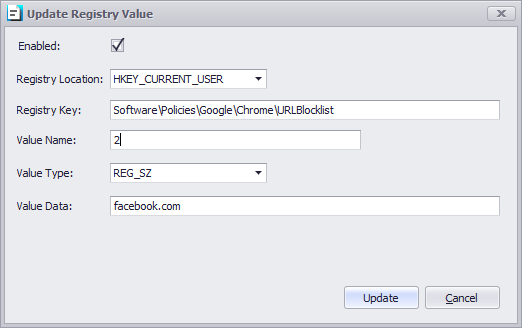
To “Block” facebook.com within “Chrome” use the following registry key:

HKEY_CURRENT_USER\SOFTWARE\Policies\Google\Chrome\URLBlocklist

Value Name: `

Value Type: REG_SZ

Value Data: facebook.com

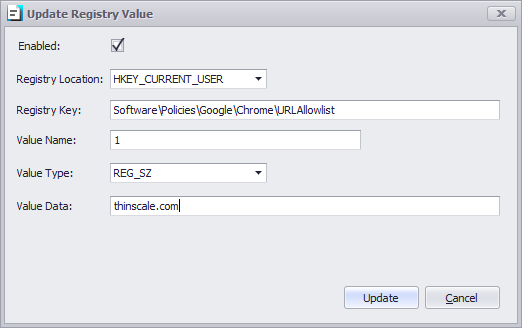
To “Allow” URL use the following registry key:

HKEY_CURRENT_USER\SOFTWARE\Policies\Google\Chrome\URLAllowlist

Value Name: 1

Value Type: REG_SZ

Value Data: https://thinscale.com (used as an example)

Source :
https://kb.thinscale.com/thinkiosk-knowledge-base/edge-url-management

Customer Guidance for Reported Zero-day Vulnerabilities in Microsoft Exchange Server

September 30, 2022 updates:

  • Added link to Microsoft Security blog in Summary.
  • Microsoft created a script for the URL Rewrite mitigation steps and modified step 6 in the Mitigations section.
  • Microsoft released the Exchange Server Emergency Mitigation Service (EMS) mitigation for this issue. More information is in the Mitigations section. 
  • Antimalware Scan Interface (AMSI) guidance, and auditing AV exclusions to optimize detection, and blocking of the Exchange vulnerability exploitation in the Detections section.
  • Microsoft Sentinel hunting queries in the Detections section.

Summary

Microsoft is investigating two reported zero-day vulnerabilities affecting Microsoft Exchange Server 2013, Exchange Server 2016, and Exchange Server 2019. The first one, identified as CVE-2022-41040, is a Server-Side Request Forgery (SSRF) vulnerability, and the second one, identified as CVE-2022-41082, allows Remote Code Execution (RCE) when PowerShell is accessible to the attacker.  

Currently, Microsoft is aware of limited targeted attacks using these two vulnerabilities.  In these attacks, CVE-2022-41040 can enable an authenticated attacker to remotely trigger CVE-2022-41082. It should be noted that authenticated access to the vulnerable Exchange Server is necessary to successfully exploit either vulnerability.

We are working on an accelerated timeline to release a fix. Until then, we’re providing mitigations and the detections guidance below to help customers protect themselves from these attacks. 

Microsoft Exchange Online has detections and mitigations to protect customers. As always, Microsoft is monitoring these detections for malicious activity and we’ll respond accordingly if necessary to protect customers.
Microsoft Security Threat Intelligence teams have provided further analysis of observed activity along with mitigation and detection guidance in a new Microsoft Security blog.
We will also continue to provide updates here to help keep customers informed. 

Mitigations

Exchange Online customers do not need to take any action.

The current Exchange Server mitigation is to add a blocking rule in “IIS Manager -> Default Web Site -> URL Rewrite -> Actions” to block the known attack patterns. Exchange Server customers should review and choose only one of the following three mitigation options.

Option 1: For customers who have the Exchange Server Emergency Mitigation Service (EMS) enabled, Microsoft released the URL Rewrite mitigation for Exchange Server 2016 and Exchange Server 2019. The mitigation will be enabled automatically. Please see this blog post for more information on this service and how to check active mitigations.

Option 2: Microsoft created the following script for the URL Rewrite mitigation steps. https://aka.ms/EOMTv2 

Option 3: Customers can follow the below instructions, which are currently being discussed publicly and are successful in breaking current attack chains. 1. Open IIS Manager. 
2. Select Default Web Site.
3. In the Feature View, click URL Rewrite.

4. In the Actions pane on the right-hand side, click Add Rule(s)…  

5. Select Request Blocking and click OK. 

6. Add the string “.*autodiscover\.json.*\@.*Powershell.*” (excluding quotes).
7. Select Regular Expression under Using.
8. Select Abort Request under How to block and then click OK.

9. Expand the rule and select the rule with the pattern .*autodiscover\.json.*\@.*Powershell.* and click Edit under Conditions

10. Change the Condition input from {URL} to {REQUEST_URI}

NOTE: If you need to change any rule it is best to delete and recreate it.

Impact: There is no known effect on Exchange functionality if URL Rewrite is installed as recommended. 

Detections

Microsoft Sentinel 

Based on what we’re seeing in the wild, looking for the techniques listed below will help defenders. Our post on Web Shell Threat Hunting with Microsoft Sentinel also provides guidance on looking for web shells in general.  

The Exchange SSRF Autodiscover ProxyShell detection, which was created in response to ProxyShell, can be used for queries as there are similarities in function with this threat. Also, the new Exchange Server Suspicious File Downloads and Exchange Worker Process Making Remote Call queries specifically look for suspicious downloads or activity in IIS logs. In addition to those, we have a few more that might be helpful when looking for post-exploitation activity:
Microsoft Defender for Endpoint 
Microsoft Defender for Endpoint detects post-exploitation activity. The following alerts can be related to this threat:  

  • Possible web shell installation 
  • Possible IIS web shell
  • Suspicious Exchange Process Execution 
  • Possible exploitation of Exchange Server vulnerabilities 
  • Suspicious processes indicative of a web shell 
  • Possible IIS compromise 

Customers with Microsoft Defender Antivirus enabled can also detect the web shell malware used in exploitation of this vulnerability in-the-wild as of this writing with the following alerts:

  • ‘Chopper’ malware was detected on an IIS Web server 
  • ‘Chopper’ high-severity malware was detected 

Microsoft Defender Antivirus 
Microsoft Exchange AMSI integration and Antivirus Exclusions

Exchange supports the integration with the Antimalware Scan Interface (AMSI) since the June 2021 Quarterly Updates for Exchange. It is highly recommended to ensure these updates are installed and AMSI is working using the guidance provided by the Exchange Team, as this integration provides the best ability for Defender Antivirus to detect and block exploitation of vulnerabilities on Exchange.

Many organizations exclude Exchange directories from antivirus scans for performance reasons. It’s highly recommended to audit AV exclusions on the Exchange systems and assess if they can be removed without impacting performance and still ensure the highest level of protection. Exclusions can be managed via Group Policy, PowerShell, or systems management tools like System Center Configuration Manager.

To audit AV exclusions on an Exchange Server running Defender Antivirus, launch the Get-MpPreference command from an elevated PowerShell prompt.

If exclusions cannot be removed for Exchange processes and folders, running Quick Scan in Defender Antivirus scans Exchange directories and files regardless of exclusions.

Microsoft Defender Antivirus (EPP) provides detections and protections for components and behaviors related to this threat under the following signatures: 

Why Continuous Security Testing is a Must for Organizations Today

The global cybersecurity market is flourishing. Experts at Gartner predict that the end-user spending for the information security and risk management market will grow from $172.5 billion in 2022 to $267.3 billion in 2026.

One big area of spending includes the art of putting cybersecurity defenses under pressure, commonly known as security testing. MarketsandMarkets forecasts the global penetration testing (pentesting) market size is expected to grow at a Compound Annual Growth Rate (CAGR) of 13.7% from 2022 to 2027. However, the costs and limitations involved in carrying out a penetration test are already hindering the market growth, and consequently, many cybersecurity professionals are making moves to find an alternative solution.

Pentests aren’t solving cybersecurity pain points

Pentesting can serve specific and important purposes for businesses. For example, prospective customers may ask for the results of one as proof of compliance. However, for certain challenges, this type of security testing methodology isn’t always the best fit.

1 — Continuously changing environments

Securing constantly changing environments within rapidly evolving threat landscapes is particularly difficult. This challenge becomes even more complicated when aligning and managing the business risk of new projects or releases. Since penetration tests focus on one moment in time, the result won’t necessarily be the same the next time you make an update.

2 — Rapid growth

It would be unusual for fast-growing businesses not to experience growing pains. For CISOs, maintaining visibility of their organization’s expanding attack surface can be particularly painful.

According to HelpNetSecurity, 45% of respondents conduct pentests only once or twice per year and 27% do it once per quarter, which is woefully insufficient given how quickly infrastructure and applications change.

3 — Cybersecurity skills shortages

As well as limitations in budgets and resources, finding the available skillsets for internal cybersecurity teams is an ongoing battle. As a result, organizations don’t have the dexterity to spot and promptly remediate specific security vulnerabilities.

While pentests can offer an outsider perspective, often it is just one person performing the test. For some organizations, there is also an issue on trust when relying on the work of just one or two people. Sándor Incze, CISO at CM.com, gives his perspective:

“Not all pentesters are equal. It’s very hard to determine if the pentester you’re hiring is good.”

4 — Cyber threats are evolving

The constant struggle to stay up to date with the latest cyberattack techniques and trends puts media organizations at risk. Hiring specialist skills for every new cyber threat type would be unrealistic and unsustainable.

HelpNetSecurity reported that it takes 71 percent of pentesters one week to one month to conduct a pentest. Then, more than 26 percent of organizations must wait between one to two weeks to get the test results, and 13 percent wait even longer than that. Given the fast pace of threat evolution, this waiting period can leave companies unaware of potential security issues and open to exploitation.

5 — Poor-fitting security testing solutions for agile environments

Continuous development lifecycles don’t align with penetration testing cycles (often performed annually.) Therefore, vulnerabilities mistakenly created during long security testing gaps can remain undiscovered for some time.

Bringing security testing into the 21st-century Impact

Cybersecurity Testing

A proven solution to these challenges is to utilize ethical hacker communities in addition to a standard penetration test. Businesses can rely on the power of these crowds to assist them in their security testing on a continuous basis. A bug bounty program is one of the most common ways to work with ethical hacker communities.

What is a bug bounty program?

Bug bounty programs allow businesses to proactively work with independent security researchers to report bugs through incentivization. Often companies will launch and manage their program through a bug bounty platform, such as Intigriti.

Organizations with high-security maturity may leave their bug bounty program open for all ethical hackers in the platform’s community to contribute to (known as a public program.) However, most businesses begin by working with a smaller pool of security talent through a private program.

How bug bounty programs support continuous security testing structures

While you’ll receive a certificate to say you’re secure at the end of a penetration test, it won’t necessarily mean that’s still the case the next time you make an update. This is where bug bounty programs work well as a follow-up to pentests and enable a continuous security testing program.

The impact of bug bounty program on cybersecurity

By launching a bug bounty program, organizations experience:

  1. More robust protection: Company data, brand, and reputation have additional protection through continuous security testing.
  2. Enabled business goals: Enhanced security posture, leading to a more secure platform for innovation and growth.
  3. Improved productivity: Increased workflow with fewer disruptions to the availability of services. More strategic IT projects that executives have prioritized, with fewer security “fires” to put out.
  4. Increased skills availability: Internal security team’s time is freed by using a community for security testing and triage.
  5. Clearer budget justification: Ability to provide more significant insights into the organization’s security posture to justify and motivate for an adequate security budget.
  6. Improved relationships: Project delays significantly decrease without the reliance on traditional pentests.

Want to know more about setting up and launching a bug bounty program?

Intigriti is the leading European-based platform for bug bounty and ethical hacking. The platform enables organizations to reduce the risk of a cyberattack by allowing Intigriti’s network of security researchers to test their digital assets for vulnerabilities continuously.

If you’re intrigued by what you’ve read and want to know about bug bounty programs, simply schedule a meeting today with one of our experts.

www.intigriti.com

Source :
https://thehackernews.com/2022/09/why-continuous-security-testing-is-must.html

Record DDoS Attack with 25.3 Billion Requests Abused HTTP/2 Multiplexing

Cybersecurity company Imperva has disclosed that it mitigated a distributed denial-of-service (DDoS) attack with a total of over 25.3 billion requests on June 27, 2022.

The “strong attack,” which targeted an unnamed Chinese telecommunications company, is said to have lasted for four hours and peaked at 3.9 million requests per second (RPS).

“Attackers used HTTP/2 multiplexing, or combining multiple packets into one, to send multiple requests at once over individual connections,” Imperva said in a report published on September 19.

The attack was launched from a botnet that comprised nearly 170,000 different IP addresses spanning routers, security cameras, and compromised servers located in more than 180 countries, primarily the U.S., Indonesia, and Brazil.

CyberSecurity

The disclosure also comes as web infrastructure provider Akamai said it fielded a new DDoS assault aimed at a customer based in Eastern Europe on September 12, with attack traffic spiking at 704.8 million packets per second (pps).

The same victim was previously targeted on July 21, 2022, in a similar fashion in which the attack volume ramped up to 853.7 gigabits per second (Gbps) and 659.6 million pps over a period of 14 hours.

Akamai’s Craig Sparling said the company has been “bombarded relentlessly with sophisticated distributed denial-of-service (DDoS) attacks,” indicating that the offensives could be politically motivated in the face of Russia’s ongoing war against Ukraine.

Both the disruptive attempts were UDP flood attacks where the attacker targets and overwhelms arbitrary ports on the target host with User Datagram Protocol (UDP) packets.

CyberSecurity

UDP, being both connectionless and session-less, makes it an ideal networking protocol for handling VoIP traffic. But these same traits can also render it more susceptible to exploitation.

“Without an initial handshake to ensure a legitimate connection, UDP channels can be used to send a large volume of traffic to any host,” NETSCOUT says.

“There are no internal protections that can limit the rate of a UDP flood. As a result, UDP flood DoS attacks are exceptionally dangerous because they can be executed with a limited amount of resources.”

Source :
https://thehackernews.com/2022/09/record-ddos-attack-with-253-billion.html

Hackers Exploited Zero-Day RCE Vulnerability in Sophos Firewall — Patch Released

Security software company Sophos has released a patch update for its firewall product after it was discovered that attackers were exploiting a new critical zero-day vulnerability to attack its customers’ network.

The issue, tracked as CVE-2022-3236 (CVSS score: 9.8), impacts Sophos Firewall v19.0 MR1 (19.0.1) and older and concerns a code injection vulnerability in the User Portal and Webadmin components that could result in remote code execution.

The company said it “has observed this vulnerability being used to target a small set of specific organizations, primarily in the South Asia region,” adding it directly notified these entities.

CyberSecurity

As a workaround, Sophos is recommending that users take steps to ensure that the User Portal and Webadmin are not exposed to WAN. Alternatively, users can update to the latest supported version –

  • v19.5 GA
  • v19.0 MR2 (19.0.2)
  • v19.0 GA, MR1, and MR1-1
  • v18.5 MR5 (18.5.5)
  • v18.5 GA, MR1, MR1-1, MR2, MR3, and MR4
  • v18.0 MR3, MR4, MR5, and MR6
  • v17.5 MR12, MR13, MR14, MR15, MR16, and MR17
  • v17.0 MR10

Users running older versions of Sophos Firewall are required to upgrade to receive the latest protections and the relevant fixes.

The development marks the second time a Sophos Firewall vulnerability has come under active attacks within a year. Earlier this March, another flaw (CVE-2022-1040) was used to target organizations in the South Asia region.

CyberSecurity

Then in June 2022, cybersecurity firm Volexity shared more details of the attack campaign, pinning the intrusions on a Chinese advanced persistent threat (APT) known as DriftingCloud.

Sophos firewall appliances have also previously come under attack to deploy what’s called the Asnarök trojan in an attempt to siphon sensitive information.

Source :
https://thehackernews.com/2022/09/hackers-actively-exploiting-new-sophos.html