Transport Layer Security (TLS) – TLS protocol is used to provide privacy and data integrity between two communicating applications. SSL and TLS are both cryptographic protocols but because SSL protocols does not providers sufficient level of security compared to TLS, SSL 2.0 and SSL 3.0 have been deprecated. TLS 1.0 was released in 1999, TLS 1.1 was released in 2006, TLS 1.2 was released in 2008 and TLS 1.3 was released in 2018.
Most of the companies and Internet Browsers are now moving to TLS 1.2 which is having better security algorithms than TLS 1.0 and TLS 1.1. TLS is more secure than SSL. Mozilla Firefox, Google Chrome, Apple and Microsoft are all ending support for TLS 1.0/1.1 in 2020, so its better to plan ahead of time and test all the applications and create Policies to disable TLS 1.0 and TLS 1.1 on Windows machines.
If you are interested in learning more about these protocols, differences between these protocols and security improvements – you can check Protocols RFC’s (Request for Comments) at these links TLS1.0 RFC, TLS 1.1 RFC, TLS 1.2 RFC and TLS 1.3 RFC.
Similar other Blog posts:
- Disable TLS 1.0 And TLS 1.1 For Internet Explorer Using Intune
- Disable TLS 1.0 And TLS 1.1 On Windows 10 Machines Through GPO
- Disable TLS 1.0 And TLS 1.1 On Nginx Server
Disable SSL 2.0, SSL 3.0, TLS 1.0 and TLS 1.1 using Powershell
We can easily disable TLS 1.0 and TLS 1.1 using Powershell. However its recommended to also disable SSL 2.0, SSL 3.0 as well. We will be using below powershell code to create registry keys and registry entries. Once the registry keys are created, a reboot of that device will be required to complete the change.
Please note below Powershell Code needs to be run as an administrator as it needs to perform changes in Windows registry.
To run Powershell code on Windows 11 computer. Please use below steps:
- Login on a Windows 11 PC as administrator.
- Open Powershell Console as an administrator.
- Run below piece of powershell code to enable / disable SSL / TLS Protocols.
Powershell code to disable SSL 2.0
 New-Item 'HKLM:\SYSTEM\CurrentControlSet\Control\SecurityProviders\SCHANNEL\Protocols\SSL 2.0\Client' -Force
 New-Item 'HKLM:\SYSTEM\CurrentControlSet\Control\SecurityProviders\SCHANNEL\Protocols\SSL 2.0\Server' -Force
 Set-ItemProperty -Path 'HKLM:\SYSTEM\CurrentControlSet\Control\SecurityProviders\SCHANNEL\Protocols\SSL 2.0\Client' -Name 'Enabled'           -Value '0' -Type 'DWORD'
 Set-ItemProperty -Path 'HKLM:\SYSTEM\CurrentControlSet\Control\SecurityProviders\SCHANNEL\Protocols\SSL 2.0\Client' -Name 'DisabledByDefault' -value '1' -Type 'DWORD'
 Set-ItemProperty -Path 'HKLM:\SYSTEM\CurrentControlSet\Control\SecurityProviders\SCHANNEL\Protocols\SSL 2.0\Server' -name 'Enabled'           -value '0' –Type 'DWORD'
 Set-ItemProperty -Path 'HKLM:\SYSTEM\CurrentControlSet\Control\SecurityProviders\SCHANNEL\Protocols\SSL 2.0\Server' -name 'DisabledByDefault' -value '1' –Type 'DWORD'
Copy
Powershell code to disable SSL 3.0
New-Item 'HKLM:\SYSTEM\CurrentControlSet\Control\SecurityProviders\SCHANNEL\Protocols\SSL 3.0\Client' -Force
New-Item 'HKLM:\SYSTEM\CurrentControlSet\Control\SecurityProviders\SCHANNEL\Protocols\SSL 3.0\Server' -Force
Set-ItemProperty -Path 'HKLM:\SYSTEM\CurrentControlSet\Control\SecurityProviders\SCHANNEL\Protocols\SSL 3.0\Client' -name 'Enabled'           -value '0' –Type 'DWORD'
Set-ItemProperty -Path 'HKLM:\SYSTEM\CurrentControlSet\Control\SecurityProviders\SCHANNEL\Protocols\SSL 3.0\Client' -name 'DisabledByDefault' -value '1' –Type 'DWORD'
Set-ItemProperty -Path 'HKLM:\SYSTEM\CurrentControlSet\Control\SecurityProviders\SCHANNEL\Protocols\SSL 3.0\Server' -name 'Enabled'           -value '0' –Type 'DWORD'
Set-ItemProperty -Path 'HKLM:\SYSTEM\CurrentControlSet\Control\SecurityProviders\SCHANNEL\Protocols\SSL 3.0\Server' -name 'DisabledByDefault' -value '1' –Type 'DWORD'
Copy
Powershell code to disable TLS 1.0
New-Item 'HKLM:\SYSTEM\CurrentControlSet\Control\SecurityProviders\SCHANNEL\Protocols\TLS 1.0\Client' -Force
New-Item 'HKLM:\SYSTEM\CurrentControlSet\Control\SecurityProviders\SCHANNEL\Protocols\TLS 1.0\Server' -Force
Set-ItemProperty -Path 'HKLM:\SYSTEM\CurrentControlSet\Control\SecurityProviders\SCHANNEL\Protocols\TLS 1.0\Client' -name 'Enabled'           -value '0' –Type 'DWORD'
Set-ItemProperty -Path 'HKLM:\SYSTEM\CurrentControlSet\Control\SecurityProviders\SCHANNEL\Protocols\TLS 1.0\Client' -name 'DisabledByDefault' -value '1' –Type 'DWORD'
Set-ItemProperty -Path 'HKLM:\SYSTEM\CurrentControlSet\Control\SecurityProviders\SCHANNEL\Protocols\TLS 1.0\Server' -name 'Enabled'           -value '0' –Type 'DWORD'
Set-ItemProperty -Path 'HKLM:\SYSTEM\CurrentControlSet\Control\SecurityProviders\SCHANNEL\Protocols\TLS 1.0\Server' -name 'DisabledByDefault' -value '1' –Type 'DWORD'
Copy
Powershell code to disable TLS 1.1
New-Item 'HKLM:\SYSTEM\CurrentControlSet\Control\SecurityProviders\SCHANNEL\Protocols\TLS 1.1\Client' -Force
New-Item 'HKLM:\SYSTEM\CurrentControlSet\Control\SecurityProviders\SCHANNEL\Protocols\TLS 1.1\Server' -Force
Set-ItemProperty -Path 'HKLM:\SYSTEM\CurrentControlSet\Control\SecurityProviders\SCHANNEL\Protocols\TLS 1.1\Client' -name 'Enabled'           -value '0' –Type 'DWORD'
Set-ItemProperty -Path 'HKLM:\SYSTEM\CurrentControlSet\Control\SecurityProviders\SCHANNEL\Protocols\TLS 1.1\Client' -name 'DisabledByDefault' -value '1' –Type 'DWORD'
Set-ItemProperty -Path 'HKLM:\SYSTEM\CurrentControlSet\Control\SecurityProviders\SCHANNEL\Protocols\TLS 1.1\Server' -name 'Enabled'           -value '0' –Type 'DWORD'
Set-ItemProperty -Path 'HKLM:\SYSTEM\CurrentControlSet\Control\SecurityProviders\SCHANNEL\Protocols\TLS 1.1\Server' -name 'DisabledByDefault' -value '1' –Type 'DWORD'
Copy
Powershell code to Enable TLS 1.2
New-Item 'HKLM:\SYSTEM\CurrentControlSet\Control\SecurityProviders\SCHANNEL\Protocols\TLS 1.2\Client' -Force
New-Item 'HKLM:\SYSTEM\CurrentControlSet\Control\SecurityProviders\SCHANNEL\Protocols\TLS 1.2\Server' -Force
Set-ItemProperty -Path 'HKLM:\SYSTEM\CurrentControlSet\Control\SecurityProviders\SCHANNEL\Protocols\TLS 1.2\Client' -name 'Enabled'           -value '1' –Type 'DWORD'
Set-ItemProperty -Path 'HKLM:\SYSTEM\CurrentControlSet\Control\SecurityProviders\SCHANNEL\Protocols\TLS 1.2\Client' -name 'DisabledByDefault' -value '0' –Type 'DWORD'
Set-ItemProperty -Path 'HKLM:\SYSTEM\CurrentControlSet\Control\SecurityProviders\SCHANNEL\Protocols\TLS 1.2\Server' -name 'Enabled'           -value '1' –Type 'DWORD'
Set-ItemProperty -Path 'HKLM:\SYSTEM\CurrentControlSet\Control\SecurityProviders\SCHANNEL\Protocols\TLS 1.2\Server' -name 'DisabledByDefault' -value '0' –Type 'DWORD'
Copy
Powershell code to Enable TLS 1.3
New-Item 'HKLM:\SYSTEM\CurrentControlSet\Control\SecurityProviders\SCHANNEL\Protocols\TLS 1.3\Client' -Force
New-Item 'HKLM:\SYSTEM\CurrentControlSet\Control\SecurityProviders\SCHANNEL\Protocols\TLS 1.3\Server' -Force
Set-ItemProperty -Path 'HKLM:\SYSTEM\CurrentControlSet\Control\SecurityProviders\SCHANNEL\Protocols\TLS 1.3\Client' -name 'Enabled'           -value '1' –Type 'DWORD'
Set-ItemProperty -Path 'HKLM:\SYSTEM\CurrentControlSet\Control\SecurityProviders\SCHANNEL\Protocols\TLS 1.3\Client' -name 'DisabledByDefault' -value '0' –Type 'DWORD'
Set-ItemProperty -Path 'HKLM:\SYSTEM\CurrentControlSet\Control\SecurityProviders\SCHANNEL\Protocols\TLS 1.3\Server'-name 'Enabled'            -value '1' –Type 'DWORD'
Set-ItemProperty -Path 'HKLM:\SYSTEM\CurrentControlSet\Control\SecurityProviders\SCHANNEL\Protocols\TLS 1.3\Server' -name 'DisabledByDefault' -value '0' –Type 'DWORD'
Copy
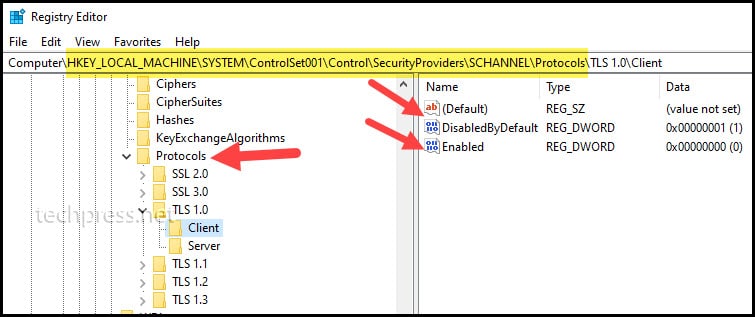
How to verify if TLS 1.0 and TLS 1.1 has been disabled on Windows 11
Please follow below steps to verify if SSL / TLS protocols are disabled or enabled.
- Login on Windows 11 PC as an administrator.
- Click on Windows Icon / Start Menu -> Search for Registry Editor.
- Launch Registry Editor.
- Browse to
HKEY_LOCAL_MACHINE\SYSTEM\ControlSet001\Control\SecurityProviders\SCHANNEL\Protocols
You should find below registry keys / registry entries:
Registry Keys to check if SSL 2.0 is disabled
[HKEY_LOCAL_MACHINE\SYSTEM\CurrentControlSet\Control\SecurityProviders\SCHANNEL\Protocols\SSL 2.0\Server] "Enabled"=dword:00000000
[HKEY_LOCAL_MACHINE\SYSTEM\CurrentControlSet\Control\SecurityProviders\SCHANNEL\Protocols\SSL 2.0\Server] "DisabledByDefault"=dword:00000001
[HKEY_LOCAL_MACHINE\SYSTEM\CurrentControlSet\Control\SecurityProviders\SCHANNEL\Protocols\SSL 2.0\Client] "Enabled"=dword:00000000
[HKEY_LOCAL_MACHINE\SYSTEM\CurrentControlSet\Control\SecurityProviders\SCHANNEL\Protocols\SSL 2.0\Client] "DisabledByDefault"=dword:00000001
Copy
Registry Keys to check if SSL 3.0 is disabled
[HKEY_LOCAL_MACHINE\SYSTEM\CurrentControlSet\Control\SecurityProviders\SCHANNEL\Protocols\SSL 3.0\Server] "Enabled"=dword:00000000
[HKEY_LOCAL_MACHINE\SYSTEM\CurrentControlSet\Control\SecurityProviders\SCHANNEL\Protocols\SSL 3.0\Server] "DisabledByDefault"=dword:00000001
[HKEY_LOCAL_MACHINE\SYSTEM\CurrentControlSet\Control\SecurityProviders\SCHANNEL\Protocols\SSL 3.0\Client] "Enabled"=dword:00000000
[HKEY_LOCAL_MACHINE\SYSTEM\CurrentControlSet\Control\SecurityProviders\SCHANNEL\Protocols\SSL 3.0\Client] "DisabledByDefault"=dword:00000001
Copy
Registry Keys to check if TLS 1.0 is disabled
[HKEY_LOCAL_MACHINE\SYSTEM\CurrentControlSet\Control\SecurityProviders\SCHANNEL\Protocols\TLS 1.0\Server] "Enabled"=dword:00000000
[HKEY_LOCAL_MACHINE\SYSTEM\CurrentControlSet\Control\SecurityProviders\SCHANNEL\Protocols\TLS 1.0\Server] "DisabledByDefault"=dword:00000001
[HKEY_LOCAL_MACHINE\SYSTEM\CurrentControlSet\Control\SecurityProviders\SCHANNEL\Protocols\TLS 1.0\Client] "Enabled"=dword:00000000
[HKEY_LOCAL_MACHINE\SYSTEM\CurrentControlSet\Control\SecurityProviders\SCHANNEL\Protocols\TLS 1.0\Client] "DisabledByDefault"=dword:00000001
Copy
Registry Keys to check if TLS 1.1 is disabled
[HKEY_LOCAL_MACHINE\SYSTEM\CurrentControlSet\Control\SecurityProviders\SCHANNEL\Protocols\TLS 1.1\Server] "Enabled"=dword:00000001
[HKEY_LOCAL_MACHINE\SYSTEM\CurrentControlSet\Control\SecurityProviders\SCHANNEL\Protocols\TLS 1.1\Server] "DisabledByDefault"=dword:00000000
[HKEY_LOCAL_MACHINE\SYSTEM\CurrentControlSet\Control\SecurityProviders\SCHANNEL\Protocols\TLS 1.1\Client] "Enabled"=dword:00000001
[HKEY_LOCAL_MACHINE\SYSTEM\CurrentControlSet\Control\SecurityProviders\SCHANNEL\Protocols\TLS 1.1\Client] "DisabledByDefault"=dword:00000000
Copy
Registry Keys to check if TLS 1.2 is Enabled
[HKEY_LOCAL_MACHINE\SYSTEM\CurrentControlSet\Control\SecurityProviders\SCHANNEL\Protocols\TLS 1.2\Server] "Enabled"=dword:00000001
[HKEY_LOCAL_MACHINE\SYSTEM\CurrentControlSet\Control\SecurityProviders\SCHANNEL\Protocols\TLS 1.2\Server] "DisabledByDefault"=dword:00000000
[HKEY_LOCAL_MACHINE\SYSTEM\CurrentControlSet\Control\SecurityProviders\SCHANNEL\Protocols\TLS 1.2\Client] "Enabled"=dword:00000001
[HKEY_LOCAL_MACHINE\SYSTEM\CurrentControlSet\Control\SecurityProviders\SCHANNEL\Protocols\TLS 1.2\Client] "DisabledByDefault"=dword:00000000
Copy
Registry Keys to check if TLS 1.3 is Enabled
[HKEY_LOCAL_MACHINE\SYSTEM\CurrentControlSet\Control\SecurityProviders\SCHANNEL\Protocols\TLS 1.3\Server] "Enabled"=dword:00000001
[HKEY_LOCAL_MACHINE\SYSTEM\CurrentControlSet\Control\SecurityProviders\SCHANNEL\Protocols\TLS 1.3\Server] "DisabledByDefault"=dword:00000000
[HKEY_LOCAL_MACHINE\SYSTEM\CurrentControlSet\Control\SecurityProviders\SCHANNEL\Protocols\TLS 1.3\Client] "Enabled"=dword:00000001
[HKEY_LOCAL_MACHINE\SYSTEM\CurrentControlSet\Control\SecurityProviders\SCHANNEL\Protocols\TLS 1.3\Client] "DisabledByDefault"=dword:00000000
Copy
Conclusion
In this blog post, we have checked the powershell codes to disable SSL 2.0, SSL 3.0, TLS 1.0 and TLS 1.1. We have checked the Powershell code to enable TLS 1.2 and TLS 1.3. Its highly recommended to disable old unsupported protocols to reduce the security risk on your computer.
Source :
https://techpress.net/how-to-disable-tls-1-0-and-tls-1-1-using-powershell-on-windows-11/


.jpg)


.png)


