Last updated: June 14, 2023
James Saturnio
Security Unified Endpoint Management
With remote work now commonplace, having a good cyber hygiene program is crucial for organizations who want to survive in today’s threat landscape. This includes promoting a culture of individual cybersecurity awareness and deploying the right security tools, which are both critical to the program’s success.
Some of these tools include endpoint patching, endpoint detection and response (EDR) solutions and antivirus software. But considering recent cybersecurity reports, they’re no longer enough to reduce your organization’s external attack surface.
Here are three solid reasons, and real-world situations, that happened to organizations that didn’t take this threat seriously.
- AI generated polymorphic exploits can bypass leading security tools
- Patching failures and patching fatigue are stifling security teams
- Endpoint patching only works for known devices and apps
- How can organizations reduce their external attack surface?
1. AI generated polymorphic exploits can bypass leading security tools
Recently, AI-generated polymorphic malware has been developed to bypass EDR and antivirus, leaving security teams with blind spots into threats and vulnerabilities.
Real-world example: ChatGPT Polymorphic Malware Evades “Leading” EDR and Antivirus Solutions
In one report, researchers created polymorphic malware by abusing ChatGPT prompts that evaded detection by antivirus software. In a similar report, researchers created a polymorphic keylogging malware that bypassed an industry-leading automated EDR solution.
These exploits achieved this by mutating its code slightly with every iteration and encrypting its malicious code without a command-and-control (C2) communications channel.
This mutation is not detectable by traditional signature-based and low-level heuristics detection engines. This means that security time gaps are created for a patch to be developed and released, for the patch to be tested for effectiveness, for the security team to prioritize vulnerabilities and for the IT (Information Technology) team to rollout the patches onto affected systems.
In all, this could mean several weeks or months where an organization will need to rely on other security tools to help them protect critical assets until the patching process is completed successfully.
2. Patching failures and patching fatigue are stifling security teams
Unfortunately, updates breaking systems because patches haven’t been rigorously tested occur frequently. Also, some updates don’t completely fix all weaknesses, leaving systems vulnerable to more attacks and requiring additional patches to completely fix.
Real-world example: Suffolk County’s ransomware attack
The Suffolk County government in New York recently released their findings from the forensic investigation of the data breach and ransomware attack, where the Log4j vulnerability was the threat actor’s entry point to breach their systems. The attack started back in December 2021, which was the same time Apache released security patches for these vulnerabilities.
Even with updates available, patching never took place, resulting in 400 gigabytes of data being stolen including thousands of social security numbers and an initial ransom demand of $2.5 million.
The ransom was never paid but the loss of personal data and employee productivity and subsequent investigation outweighed the cost of updated cyber hygiene appliances and tools and a final ransom demand of $500,000. The county is still trying to recover and restore all their systems today, having already spent $5.5 million.
Real world example: An errant Windows server update caused me to work 24-hours straight
From personal experience, I once worked 24 hours straight because one Patch Tuesday, a Microsoft Windows server update was automatically downloaded, installed which promptly broke authentication services between the IoT (Internet of Things) clients and the AAA (authentication, authorization and accounting) servers grinding production to a screeching halt.
Our company’s internal customer reference network that was implemented by our largest customers deployed Microsoft servers for Active Directory Certificate Services (ADCS) and Network Policy Servers (NPS) used for 802.1x EAP-TLS authentication for our IoT network devices managed over the air.
This happened a decade ago, but similar recurrences have also occurred over the next several years, including this update from July 2017, where NPS authentication broke for wireless clients and was repeated in May of last year.
At that time, an immediate fix for the errant patch wasn’t available, so I spent the next 22 hours rebuilding the Microsoft servers for the company’s enterprise public key infrastructure (PKI) and AAA services to restore normal operations. The saving grace was we took the original root certificate authority offline, and the server wasn’t affected by the bad update.
However, we ended up having to revoke all the identity certificates issued by the subordinate certificate authorities to thousands of devices including routers, switches, firewalls and access points and re-enroll them back into the AAA service with new identity certificates.
Learning from this experience, we disabled automatic updates for all Windows servers and took more frequent backups of critical services and data.
3. Endpoint patching only works for known devices and apps
With the pandemic came the shift to Everywhere Work, where employees worked from home, often connecting their personal devices to their organization’s network. This left security teams with a blind spot to shadow IT. With shadow IT, assets go unmanaged, are potentially out-of-date and cause insecure personal devices and leaky applications.
The resurgence of bring your own device (BYOD) policies and the lack of company-sanctioned secure remote access quickly expanded the organization’s external attack surface, exposing other attack vectors for threat actors to exploit.
Real-world example: LastPass’ recent breach
LastPass is a very popular password manager that stores your passwords in an online vault. It has more than 25 million users and 100,000 businesses. Last year, LastPass experienced a massive data breach involving two security incidents.
The second incident leveraged data stolen during the first breach to target four DevOps engineers, specifically, their home computers. One senior software developer used their personal Windows desktop to access the corporate development sandbox. The desktop also had an unpatched version of Plex Media Server (CVE-2020-5741) installed.
Plex provided a patch for this vulnerability three years ago. Threat actors used this vulnerability to deliver malware, perform privilege escalation (PE), then a remote code execution (RCE) to access LastPass cloud-based storage and steal DevOps secrets and multi-factor (MFA) and Federation databases.
“Unfortunately, the LastPass employee never upgraded their software to activate the patch,” Plex said in a statement. “For reference, the version that addressed this exploit was roughly 75 versions ago.”
If patching isn’t enough, how can organizations reduce their external attack surface?
Cyber hygiene
Employees are the weakest link to an organization’s cyber hygiene program. Inevitably, they’ll forget to update their personal devices, re-use the same weak password to different internet websites, install leaky applications, and click or tap on phishing links contained within an email, attachment, or text message.
Combat this by promoting a company culture of cybersecurity awareness and practice vigilance that includes:
· Ensuring the latest software updates are installed on their personal and corporate devices.
· Recognizing social engineering attack techniques including the several types of phishing attacks.
· Using multi-factor authentication whenever possible.
· Installing and automatically updating the databases on antivirus software for desktops and mobile threat defense for mobile devices.
Continuing education is key to promoting great cyber hygiene within your organization, especially for anti-phishing campaigns.
Cyber hygiene tool recomendations
In cybersecurity, the saying goes, “You can’t protect what you can’t see!” Having a complete discovery and accurate inventory of all network-connected hardware, software and data, including shadow IT assets, is the important first step to assessing an organization’s vulnerability risk profile. The asset data should feed into an enterprise endpoint patch management system.
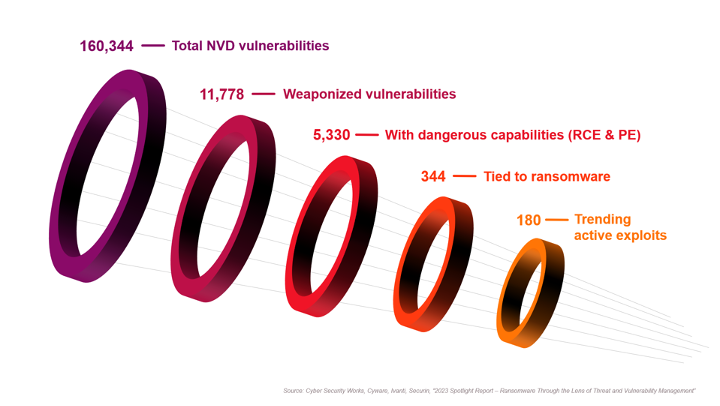
Also, consider implementing a risk-based vulnerability management approach to prioritize the overwhelming number of vulnerabilities to only those that pose the greatest risk to your organization. Often included with risk-based vulnerability management solutions is a threat intelligence feed into the patch management system.
Threat intelligence is information about known or potential threats to an organization. These threats can come from a variety of sources, like security researchers, government agencies, infrastructure vulnerability and application security scanners, internal and external penetration testing results and even threat actors themselves.
This information, including specific patch failures and reliability reported from various crowdsourced feeds, can help organizations remove internal patch testing requirements and reduce the time gap to patch deployments to critical assets.
A unified endpoint management (UEM) platform is necessary to remotely manage and provide endpoint security to mobile devices including shadow IT and BYOD assets.
The solution can enforce patching to the latest mobile operating system (OS) and applications, provision email and secure remote access profiles including identity credentials and multi-factor authentication (MFA) methods like biometrics, smart cards, security keys, certificate-based or token-based authentication.
The UEM solution should also integrate an AI machine learning-based mobile threat defense (MTD) solution for mobile devices, while desktops require next-generation antivirus (NGAV) with robust heuristics to detect and remediate device, network, and app threats with real-time anti-phishing protection.
And finally, to level the playing field against AI-generated malware, cyber hygiene tools will have to evolve quickly by leveraging AI guidance to keep up with the more sophisticated polymorphic attacks that are on the horizon.
Adding the solutions described above will help deter cyberattacks by putting impediments in front of threat actors to frustrate them and seek out easier targets to victimize.
About James Saturnio
James Saturnio is the Technical Product Marketing Director for the Technical Marketing Engineering team at Ivanti. He immerses himself in all facets of cybersecurity with over 25 years’ hands-on industry experience. He is an always curious practitioner of the zero trust security framework. Prior to Ivanti, he was with MobileIron for almost 7 years as a Senior Solutions Architect and prior to that, he was at Cisco Systems for 19 years. While at Cisco, he started out as a Technical Assistance Center (TAC) Engineer and then a Technical Leader for the Security Technology and Internet of Things (IoT) business units. He is a former Service Provider and Security Cisco Certified Internetworking Expert (CCIE) and was the main architect for the IoT security architecture that is still used today by Cisco’s lighthouse IoT customers.