Alongside our usual work to discover, report, and remediate vulnerabilities in the WordPress ecosystem, the WordPress Threat Intelligence team has been conducting a deep-dive into WordPress plugin code with the objective of finding methods to bypass authentication and gain elevated privileges in WordPress plugins so we can help developers patch these vulnerabilities before threat actors can exploit them.
One such plugin we examined recently is Directorist, a popular tool used by over 10,000 WordPress sites to manage directory listings and classified ads.
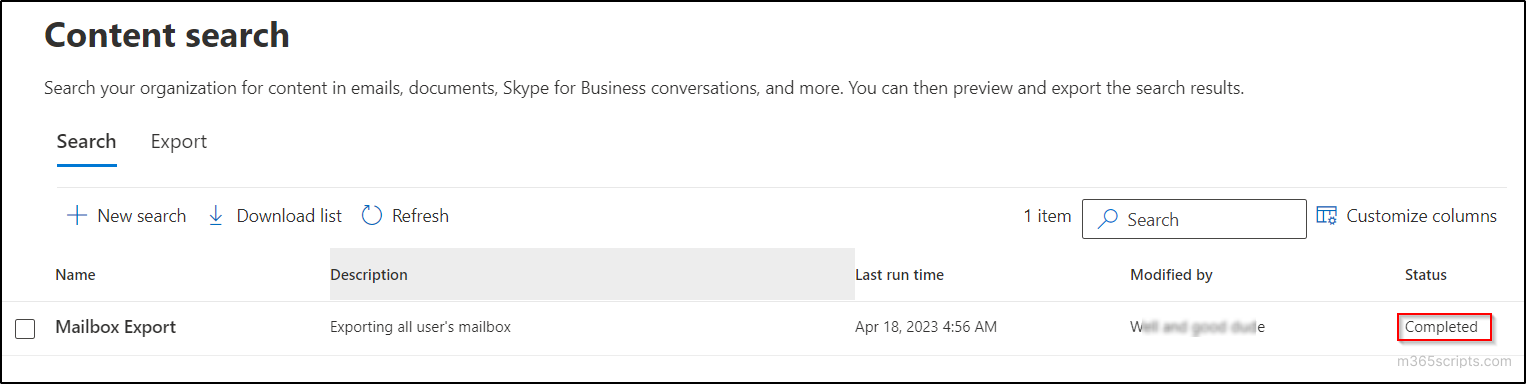
On April 3, 2023, our team uncovered two significant vulnerabilities – an Arbitrary User Password Reset to Privilege Escalation, and an Insecure Direct Object Reference leading to Arbitrary Post Deletion. Both vulnerabilities were found to affect Directorist versions 7.5.4 and earlier.
Wordfence Premium, Wordfence Care, and Wordfence Response customers received a firewall rule to protect against any exploits targeting these vulnerabilities on April 4, 2023. Sites still using the free version of Wordfence received the same protection on May 4, 2023.
Unfortunately, on June 1, 2023, the plugin was closed due to developer unresponsiveness, and it currently remains unavailable for download from the repository. This presents an issue as site owners are unable to request an update directly via their WordPress dashboard. Given this situation, we advise site owners to either temporarily uninstall the plugin, or manually download the patched version, 7.5.5, and upload it to their sites for optimal protection. For this reason, we have intentionally kept specific vulnerability details to a minimum in this post.
Vulnerability Summaries from Wordfence Intelligence
Authenticated (Subscriber+) Arbitrary User Password Reset to Privilege Escalation
The Directorist plugin for WordPress is vulnerable to an arbitrary user password reset in versions up to, and including, 7.5.4. This is due to a lack of validation checks within login.php. This makes it possible for authenticated attackers, with subscriber-level permissions and above, to reset the password of an arbitrary user and gain elevated (e.g., administrator) privileges.
Authenticated (Subscriber+) Insecure Direct Object Reference to Arbitrary Post Deletion in listing_task
The Directorist plugin for WordPress is vulnerable to an Insecure Direct Object Reference in versions up to, and including, 7.5.4. This is due to improper validation and authorization checks within the listing_task function. This makes it possible for authenticated attackers, with subscriber-level permissions and above, to delete arbitrary posts.
Technical Analysis
Password Reset Vulnerability
Directorist, created by wpWax, is designed to help businesses establish directory listings and classified ads on their WordPress sites. It includes a Login and Registration form that can be enabled using the [directorist_user_login] shortcode.
The Directorist Login and Registration form
This form features a “Recover Password” function, akin to the default WordPress “lost your password?” feature. In vulnerable versions, the underlying code lacks essential validation checks to ensure that the user attempting to reset a password is indeed the account owner. This could allow attackers with subscriber-level permissions or higher to reset the passwords of other users, including administrators, thereby gaining unauthorized elevated privileges and taking over the site.
Directorist “Recover Password” logic
Arbitrary Post Deletion Vulnerability
In addition, we found an arbitrary post deletion vulnerability in the plugin. Directorist listings are essentially custom WordPress posts. In vulnerable versions, the code designed to manage listing deletions lacks the necessary authorization checks to confirm the user is permitted to delete the listing and does not verify that the post being deleted is a Directorist listing. Consequently, this could enable threat actors with subscriber-level and above permissions to delete any post on a WordPress instance, including posts by administrators.
Directorist directory listing deletion logic
Disclosure Timeline
April 3, 2023 – The Wordfence Threat Intelligence team discovers and documents two vulnerabilities in Directorist. April 4, 2023 – The Wordfence Threat Intelligence team releases firewall rules to Wordfence Premium, Wordfence Care, and Wordfence Response users and begins the responsible disclosure process. May 4, 2023 – Wordfence Free users receive the firewall rules. June 1, 2023 – The plugin developers release a patch in version 7.5.5 of Directorist.
Conclusion
In this blog post, we reviewed two vulnerabilities in our ongoing vulnerability research focused on bypassing authentication and gaining elevated privileges – an Arbitrary User Password Reset to Privilege Escalation that allows threat actors to gain full control of a WordPress instance, and a less-severe Insecure Direct Object Reference to Arbitrary Post Deletion, both in Directorist versions 7.5.4 and prior.
The Wordfence Threat Intelligence team reported these vulnerabilities to the Directorist team on April 4, 2023, following responsible disclosure protocols. The Directorist team addressed these vulnerabilities and released the patch in Directorist version 7.5.5 on June 1, 2023.
We recommend all users update their Directorist plugin to the newest version available, which is 7.5.5 at the time of this writing, immediately to secure their websites.
Wordfence Premium, Wordfence Care, and Wordfence Response customers received a firewall rule to protect against any exploits targeting these vulnerabilities on April 4, 2023. Sites still using the free version of Wordfence received the same protection on May 4, 2023.
If you know someone who uses this plugin on their site, we recommend sharing this advisory with them to ensure their site remains secure, as these vulnerabilities pose a significant risk.
The process to install Windows Updates can be a pain. Managing WSUS servers can be a headache too. However, with PowerShell, a special module, and some automation, we can schedule and automate the installation process of Windows Updates. Let’s look at PSWindowsupdate automated Windows Updates with PowerShell and see how it can come to the rescue for keeping your Windows environment up-to-date.
PSWindowsUpdate is a PowerShell third-party module found in the PowerShell gallery repository available for download designed to help administrators manage Windows updates and install updates flexibly and precisely.
Unlike the standard Windows Update Service Manager (WSUS) interface, the PSWindowsUpdate module provides commands for downloading, installing, and managing updates in an automated way. However, it can work in conjunction with WSUS or pull updates directly from Microsoft.
Admins can control every aspect of Windows updates with this module – from viewing available updates and initiating installations to setting update schedules. It includes advanced features like installing specific updates, managing hidden updates, or even automating the entire update process using the Windows Task Scheduler.
Why is Installing Windows Updates Important?
Before diving into the PSWindowsupdate module, why is installing Windows updates important? Installing Windows updates is essential to maintaining a secure and stable system. These updates often contain security patches that protect your systems from vulnerabilities and threats. By regularly installing these updates, you’re ensuring your system’s defenses are up-to-date.
Updates also introduce new features, improve system stability, and fix existing system and software bugs. This can lead to better performance, fewer errors, and a smoother overall user experience. As such, regular updates can go a long way in minimizing downtime and reducing the need for troubleshooting.
If you are a system administrator, it may seem like a headache to patch systems constantly. However, you will thank yourself later for having a fully patched system when the next ransomware variant takes advantage of known patched vulnerabilities. Also, if you are looking at introducing any new integration or software into the environment, it is always best practice to be on the latest version of Windows, patches installed, etc.
Installing the PSWindowsUpdate Module
The installation process for the PSWindowsUpdate module starts with the command line in your PowerShell console. You need to install the module from the PowerShell gallery by typing:
Install-Module -Name PSWindowsUpdate
This command will download and install the module on your local system. However, it’s critical to note that you may need administrator privileges to install modules. Open the PowerShell prompt as an admin and run the command.
You will be prompted to trust the untrusted repository, which is normal.
Installing the PSWindowsupdate PowerShell module
Type “Y” to trust the PSGallery repository.
Accept the untrusted repository to install the module
Importing the PSWindowsUpdate Module
Once installed, you need to import the module PSWindowsUpdate to begin using it. Use the following command:
Import-Module -Name PSWindowsUpdate
It loads the module into your active PowerShell session, making the related cmdlets available for use.
Importing the module in PowerShell
Checking for Available Updates
Upon successful import of the PSWindowsUpdate module, you can quickly check for available updates using the command:
Get-WindowsUpdate
This command will query your machine’s Windows Update Client settings and connect to the Microsoft Update servers to fetch the list of all available updates. You can see critical updates, security updates, and all other types of updates that your system can download and install.
Using the Get WindowsUpdate to see available updates
Downloading Windows Updates
The PSWindowsUpdate module offers the command:
Download-WindowsUpdate
Use this to download Windows updates. Depending on your settings, this command initiates the download process for all approved updates from the Windows Server Update Service (WSUS) or Microsoft Update.
Download Windows Update with PowerShell
Installing Windows Updates
With the updates downloaded, you can install them using the ‘Install-WindowsUpdate‘ command. This command installs all downloaded updates, following which your system might need to reboot.
Install-WindowsUpdate
Running the Install WindowsUpdate command
Managing Windows Update History
The PSWindowsUpdate module provides an opportunity to access your system’s update history. You can use the ‘Get-WUHistory‘ command to get a detailed log of all installed updates.
Get-WUHistory
This command returns a detailed list, including the KB number, update title, and the status of the installed updates.
Get the reboot status of your Windows Server
Customizing Update Installation with an XML File
Advanced users might appreciate the ability to customize update installations using XML files. These files can specify category names to include or exclude from the update process. You can also use them to specify whether to include or exclude updates marked for automatic installation.
Scheduling Updates with Task Scheduler
In many environments, you may want to run the PSWindowsupdate command in an automated way. One way you can do this is by leveraging the power of the Windows Task Scheduler in conjunction with the PSWindowsUpdate module.
Using this combination, you can automate the download and install process at specific intervals, ensuring your system stays updated without manual intervention. We will take a look below at a script you can schedule with the Task Manager to run on a regular interval.
Installing Specific Updates
You can install specific updates using their unique KB number with the Install-WindowsUpdate command. For example, suppose you only want to install the update with the KB number KB4012606, you can do so with the following command:
This command first fetches only the security updates and then pipes them into the Install-WindowsUpdate command, installing only the security updates.
Hiding Specific Updates
There may be times when you want to hide a problematic update. If you want to hide Windows updates, maybe because it’s causing issues on your system, you can do so with the Hide-WindowsUpdate command. Suppose you want to hide the update with the KB number KB4012606, you can do so with the following command:
Hide-WindowsUpdate -KBArticleID KB4012606
This command will hide the specified update, preventing it from appearing in future searches for updates.
Checking if a Reboot is Required
You may want to see if there is a pending reboot required. If you want to check if a reboot is required after installing updates, you can do so with the Get-WURebootStatus command like so:
Get-WURebootStatus
This command will check and let you know if any installed updates require a reboot.
In the example, replace the placeholder KB numbers in the commands with the actual KB number of the update you’re interested in. Also, always ensure to run these commands in a safe and controlled environment, particularly when executing them on production systems or remote computers.
Get Windows Update history using PSWindowsupdate
Automate Windows Updates using PSWindowsUpdate
Automation is one of the powerful features of PowerShell and by extension, the PSWindowsUpdate module. In this section, we’ll cover an example of how to write a script for automating Windows updates using PSWindowsUpdate.
# Import the PSWindowsUpdate module
Import-Module PSWindowsUpdate

# Get all available updates
$updates = Get-WindowsUpdate -MicrosoftUpdate

# Filter out optional updates
$importantUpdates = $updates | Where-Object {$_.IsDownloaded -eq $true -and $_.IsMandatory -eq $true}

# Install important updates
$importantUpdates | Install-WindowsUpdate -AcceptAll -AutoReboot
In this script, we first import the PSWindowsUpdate module. We then fetch all available updates using Get-WindowsUpdate. Using Where-Object, we filter out only the important (mandatory and already downloaded) updates, ignoring the optional ones. Lastly, we install these important updates using Install-WindowsUpdate, automatically accepting EULAs and rebooting if necessary.
You can automate the execution of this script using Task Scheduler. Here’s a basic example of how you can do this:
Open Task Scheduler and create a new task.
In the Triggers tab, set the schedule for the task according to your needs (for example, daily at 3 AM).
In the Actions tab, select ‘Start a program’ and input powershell.exe as the program.
In the ‘Add arguments’ field, input -ExecutionPolicy Bypass -File “c:your script file path.ps1” where <your script file path> is the path to your PowerShell script.
Finish the wizard and the task will be scheduled.
Remember to replace the path to the script with the actual path of your script file. The system will automatically execute the update script at the specified time.
This script and scheduling are basic examples. You may need to modify the script and task parameters according to your specific requirements, such as filtering updates based on criteria or sending a report by email after installation.
Also, be sure to test these scripts in a safe and controlled environment before deploying them in production, especially when executing them on remote computers.
PSWindowsupdate Frequently Asked Questions
Can I use the PSWindowsUpdate module to manage updates on remote computers?
Using the PSWindowsUpdate module, you can manage updates both locally and on remote computers. You must ensure you have all the necessary permissions as you would normally to administer and manage a remote machine.
Can I automate the update process using the PSWindowsUpdate module?
One of the strong suits of the PSWindowsUpdate module is the ability you have to automate the process of applying Windows Updates. You can easily create a simple PowerShell script to download and install Windows Updates. It can also apply various logic such as hiding updates, downloading only certain types of updates, etc. Using Task Scheduler, it is easy to have a way to trigger the automation of PSWindowsUpdate.
How do I view hidden updates using PSWindowsUpdate?
You can use the Get-WUHiddenUpdate command to view all hidden updates on your system. If you wish to unhide an update, use the UnHide-WindowsUpdate command with the appropriate KB number.
How can I install specific categories of updates using the PSWindowsUpdate module?
You can filter updates based on a particular category using PSWindowsUpdate. It is common to see administrators only install the “security updates” available for an operating system. You can easily accomplish this with the following command:
The PSWindowsUpdate module is a great way for system administrators to manage single or multiple Windows servers using a fully automated solution built on top of PowerShell. It provides many capabilities that give you full control over the Windows Update service. You can use it to review available updates, download approved updates, or manage the update history. The PSWindowsupdate PowerShell module can help streamline your system’s update process, including all Windows PCs and Servers across the board.
This week started pretty harsh, a ton of customers reaching out to our team having WSUS issues. Everything from the “traditional” CPU and Memory spikes, to severe network traffic over port 8530 to the WSUS/SUP server. Basically Clients downloading massive amount of info, some customers reporting up to 700 MB per endpoint.
Note #1: One ongoing issue right now seem to be that the Windows version next updates contains a ton of metadata, causing a massive headache for WSUS admins. See below for scripts to help cleanup the mess, and to perform needed maintenance tasks. Also, if you are missing some info here, let me know. I’m @jarwidmark on Twitter.
WARNING: Whatever solution you pick for the maintenance of your WSUS/SUP server, ensure that you do not sync your WSUS/SUP during the maintenance process!
WSUS Housekeeping
Until Microsoft replaces WSUS with something better, you have to do some housekeeping for WSUS to behave. Your mileage is going to vary, but you simply have to keep the WSUS database in shape, as well as declining unused updates. Here are a few resources that can help when WSUS goes bad.
Update: The network traffic from WSUS can also be heavily loaded due an out-dated Microsoft Compatibility Appraiser version on the machines. See this KB:
When all 8 CPU’s on your site site server are constantly at 95-100 percent, there is little room for any admin work, nor cleanup. So make sure to throttle CPU on the WsusPool application pool, to give you some working room.
Use any or all of the listed solutions to get rid of junk in your WSUS database:
Tip: Before starting to run decline scripts, PowerShell / SQL etc., make sure your SUSDB is not heavily fragmented. Use the Maintenance Solution from Ola Hallengren to optimize the SUSDB indexes: http://ola.hallengren.com/
Optional Speed Tip: If you don’t mind going totally unsupported, you can create additional indexes in the WSUS database that speeds up the cleanup dramatically. More info here: http://kickthatcomputer.wordpress.com/2017/08/15/wsus-delete-obsolete-updates, a great post by Scott Williams (@ip1). Again, not supported by Microsoft so don’t blame me if something happens Fun fact: In my environment that change made the deletions go 30 times faster!!!
Tip #1: If you have a lot of obsolete updates (Script 2.), consider using an alternate version below that runs in batches, and also shows total number of updates. The script is from Scott Williams (see Resource #6 further down this post). I just added a comment on where to change the batch numbers.
Decline weird stuff #3 – Decline Updates Script by Jeff Carreon
In the same post as the SQL script to view updates with large metadata (In the “Additional Resources” section” further down this post), you find a great decline update scripts by Jeff Carreon (@jeffctangsoo10). It’s in the same post as the SQL script, but kind of hidden if you don’t look carefully. Here is a direct link:
Here follows some additional resources that I found useful:
Resource #1 – Script to view updates with large metadata
Here is another contribution from Sherry’s team. This SQL script was put together by Jeff Carreon, after working with Microsoft support on a WSUS performance issue. Very shiny.
The script is used to identify and measure the metadata that the clients are downloading, it tells you what articles (fancy word for update metadata) the are deployable and the size of each article.
Resource #3 – Clients cannot report Scan Results back to WSUS
During the day, Matthew Krause (@MatthewT_Krause) also provided info on an issue he was having: Quite many clients, 75 percent out of 6500,were not reporting back the scan results to WSUS. Basically the server got overloaded with IIS 500 errors as the clients kept trying to report scan results, fail, and then try again. In the WindowsUpdate.log on the client they found that clients would get the error message stating invalid parameter but the sub message was Message:parameters.InstalledNonLeafUpdateIDs (see below).
WindowsUpdate.log on a client failing to report back scan results.
So if you are running into the non-leaf error message, one solution that proved to be working was changing the maxInstalledPrerequisites value in the WSUS Web.config file, and then do an IIS Reset. Doing this change made 90% of clients report scan results back within one day for this environment.
Posted: August 15, 2017 in Configuration Manager, Information, SQL, Windows Update Tags: delete obsolete updates, deleteobsoleteupdates, index, wsus
NOTE: Usual warnings apply. Do a backup before making any changes. If you are unsure about anything in the post then ask or look for more information or help before attempting it.
Over time WSUS will accumulate update metadata that can create performance issues for clients. In large environments this can be quite an issue.
There is a script Microsoft often provides during Premier Support calls to cleanup this update metadata, however there are a few issues:
The query can take a *really* long time to run if there are a lot of updates to cleanup. In some cases it can take *days*
You need to stop all the WSUS services while it runs
If it fails for whatever reason, it will have to start all over because it doesn’t commit the changes until it completes successfully
While it runs, the TEMPDB and Transaction logs will grow quite significantly until the data is committed
It gives no useful information on progress
There is a TechNet article (This is essential reading and has LOTS of important stuff) and a Forum Post where an improved version was written that gave progress of the cleanup, however it didn’t address the temp/transaction growth issues or the time issues. To this end I have applied my very rudimentary SQL scripting skills.
To find out just how many updates are waiting to be cleaned up, run this stored procedure:
EXEC spGetObsoleteUpdatesToCleanup
Firstly, when the script runs on a default WSUS install it can take over a minute to process *each* record. If there are thousands or tens of thousands or updates to remove this is going to take a while. There is an index you can add to the WSUS table that dramatically improves this so it happens at about 1 second per record. Microsoft confirmed this index is OK, however it is not officially supported (at time of writing)
USE [SUSDB]
GO
CREATE NONCLUSTERED INDEX [IX_tbRevisionSupersedesUpdate] ON [dbo].[tbRevisionSupersedesUpdate]([SupersededUpdateID])
GO
CREATE NONCLUSTERED INDEX [IX_tbLocalizedPropertyForRevision] ON [dbo].[tbLocalizedPropertyForRevision]([LocalizedPropertyID])
GO
Now to the cleanup script. Simply this script will cleanup obsolete records, provide progress feedback and also allow you to run it in small blocks. This allows you to run in short blocks without needing to stop the WSUS server and avoids generating huge transaction loads on the SQL server.
To “tweak” the script, modify this line with the number of updates you want to do in each block. Start with 50, see how it runs in your environment and increase as needed. Ideally don’t run batches that take more than 5-10 minutes to prevent those SQL transaction logs growing.
IF @curitem < 101
If you do want to run a larger batch that may take hours, you should of course stop the WSUS services to do so. Also, don’t run this script if a WSUS Sync is in progress or scheduled to start.
USE SUSDB
DECLARE @var1 INT, @curitem INT, @totaltodelete INT
DECLARE @msg nvarchar(200)
CREATE TABLE #results (Col1 INT) INSERT INTO #results(Col1)
EXEC spGetObsoleteUpdatesToCleanup
SET @totaltodelete = (SELECT COUNT(*) FROM #results)
SELECT @curitem=1
DECLARE WC Cursor FOR SELECT Col1 FROM #results
OPEN WC
FETCH NEXT FROM WC INTO @var1 WHILE (@@FETCH_STATUS > -1)
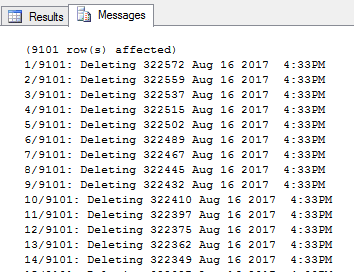
BEGIN SET @msg = cast(@curitem as varchar(5)) + '/' + cast(@totaltodelete as varchar(5)) + ': Deleting ' + CONVERT(varchar(10), @var1) + ' ' + cast(getdate() as varchar(30))
RAISERROR(@msg,0,1) WITH NOWAIT
EXEC spDeleteUpdate @localUpdateID=@var1
SET @curitem = @curitem +1
IF @curitem < 101
FETCH NEXT FROM WC INTO @var1
END
CLOSE WC
DEALLOCATE WC
DROP TABLE #results
If for any reason the script is interrupted, you will find SQL still has the transaction table open and won’t let you run again (There is already an object named ‘#results’ in the table). To resolve this highlight and execute the last line to drop the table.
If this still doesn’t help, close the SQL Studio Manager session and you should be prompted with a warning about uncommitted transactions. Select Yes to commit then reopen and start the query again.
If for any reason the query is not properly closed there may be locks held on the SQL database that will prevent the normal WSUS service functioning resulting in failure of service.
The contents of this article are the results of a long path of investigation, trial and error, and (bloody-minded) determination to find a way to clean up our corporate WSUS (Windows Server Update Services) installation. What I’ve documented below is partly based on work done by others (which I’ll provide attribution for as they are definitely due the credit), and other parts are based on my own personal investigations.
There have been several updates to this post since I first wrote it in late October 2018, based on findings of other readers using it for newer versions of WSUS. Thank you to Vladimir, Ulrich, and James for your helpful feedback!
Note that this article assumes you have some familiarity with SQL Server and its management studio (SSMS), as well as with general server management, like starting and stopping services.
The Background
As many other companies do, the one I work for employs WSUS to manage the Windows updates which are delivered to our various servers and workstations. I set this up back in mid-2015 to mitigate the fact that 50+ servers and workstations were hammering our 10Mbps corporate internet connection once a month to grab the updates directly from Microsoft. Given that a large part of our business relies on connecting to customer installations remotely, having little to no bandwidth available during a business day is not desirable. It took a few days to set up WSUS, and a few evenings for it to pull down all of the latest updates. With network policies in place to make workstations instead grab updates from the internal server, all was good. At least for the first while…
A year or so in I noticed that updates didn’t seem to be happening on a regular schedule anymore. I took a deeper look at the WSUS machine I’d set up and found that the 500GB drive the updates were stored on was full to the brim. I hastily cloned it over to a 1TB drive (providing about 800GB of total space on the update partition), expanded the partition to use the extra space, and synced down the latest updates. All was good. Until I had to do it again in less than a year, this time increasing the drive to a 2TB unit. I thought that would hold us for a while.
Fast forward a couple of years. That 2TB drive now had about 10GB free, and the database housing the WSUS data had grown to nearly 40GB. I researched things and shifted the database to the OS partition through a detach-move-attach cycle. I had to first install a copy of SSMS (SQL Server Management Studio) on the server to be able to interact with the Windows Internal Database instance. In the end, it was a simple enough process, and that solution is well documented on the internet. That database move freed up enough disk space to stop the low disk space warnings, but only just barely. The database was still 40GB and the update files were still consuming almost all of the partition’s 1.6TB of disk space.
So, How Did Things Get This Bad?
So, in between other tasks, I started researching whether or not the system could be cleaned up. It became very clear early on in my searches that this was not an uncommon problem, and was caused by a general “set it and forget it” mentality around WSUS management. Like so many other systems, maintenance of the system can be automated, but by default is not. And so the system runs, accumulating more data about available updates in the database, and more update files on the file system, eating up disk space while the performance of the database degrades.
In a perfect world, dutiful administrators run the cleanup tasks in the WSUS console every few weeks or so. These tasks clear out old, superseded updates from the database and their associated update files. However, if this kind of maintenance hasn’t been done in a few years, the WSUS console winds up timing out when it is instructed to do this, as the queries take too long to run. In addition, the indexing in the database becomes horribly inefficient, further slowing things down. One of the early indicators of this problem is the frequent display of an error when bringing up the WSUS console:WSUS displaying the “Reset Server Node” error message.
There Must Be A Way To Clean Up This Mess
Thankfully, there are many people out there who have worked out various parts of the solution, and I’ve found a few reliable ways to do some other cleanup. The general process follows this list of tasks:
Install SSMS on the WSUS server if it isn’t already there. You’ll need this for running various scripts to clean up the WSUS database.
Stop a few services on the WSUS server so that the following steps don’t prevent various maintenance steps from working.
Take a backup of the WSUS database in case something goes horribly wrong during the cleanup.
Run a script to rebuild/optimize the indexes in the WSUS database, which will make the other steps run faster.
Run a WSUS stored procedure to determine how many obsolete updates are recorded in the database.
Run a script to remove a batch of those updates from the database.
Repeat steps 4 through 6 until there are no more updates to be removed. This may take several days depending on the volume of updates to be removed, though it speeds up as the number of updates in the database is reduced.
Shrink the database files to reclaim space, and then rebuild/optimize the indexes.
Using a copy of the WSUS database and a list of update files on the WSUS server, determine what files can safely be deleted, and then delete them.
1. Installing SSMS
This is probably the easiest part of the whole process. If WSUS is deployed on a full SQL Server instance instead of a Windows Internal Database, then the server may already have SSMS installed. Otherwise, it’s a matter of picking the right version. For my own purposes, I was working with Windows Server 2008 R2 and the WSUS version that came with it. I installed it with the Windows Internal Database, as the server’s sole purpose was to support WSUS. As such, I needed to install SSMS for SQL Server 2008 R2. It’s easy enough to find online. What you may need will vary by your own installation, so I leave it up to you to find on your own.
Connecting to the WSUS database through the Windows Internal Database is a bit different than doing so with a standard SQL Server instance. As well, you generally can’t access the instance from anywhere else but the WSUS server, hence needing to install SSMS on the WSUS server. The connection string I use in the SSMS connection prompt for the WSUS server is:
\\.\pipe\MSSQL$MICROSOFT##SSEE\sql\query
The connection is done using the named pipes protocol, pointing to the local machine, and employs Windows Authentication to get to the database. You need to be a local admin or a WSUS admin to do this. However, if you’re connecting to a true SQL Server instance, you can point at the machine’s instance in a more standard way. Either way, once you’re connected, you can explore the database objects and run queries in the normal manner.
2. Stopping Services
If your WSUS server is anything like mine, you’ll find that it is frequently running at the limits of its available memory, which slows down the queries. In order to free up memory, a few services can be temporarily stopped on the WSUS server. In my case, it dropped from consuming nearly 6GB of memory down to 1GB. Note that stopping these services will prevent WSUS from picking up new updates and block workstations from querying it for new updates, so you likely want to do this outside of normal business hours if you’re in a corporate environment.
The services are:
IIS Admin Service
World Wide Web Publishing Service
Update Services
They may be named slightly differently on newer operating systems.
In addition, you can restart the database instance service, which for the Windows Internal Database is named:
Windows Internal Database (MICROSOFT##SSEE)
For a standard SQL Server instance, it is often named something like:
SQL Server ([instance name])
where [instance name] reflects what you named the instance, or is the default instance name, which is based on what version of SQL Server is installed.
3. Backup the WSUS Database
Since there is a real potential that the cleanup process could damage the WSUS database, I highly recommend taking a backup of it. If you have the disk space, you can simply stop the SQL Server or Windows Internal Database service, copy the WSUS database files to somewhere else, and then restart the service. Otherwise, you should be able to use the normal backup methods for SQL Server to take a full backup. If you’re not sure where the files are, look at the properties of the database when logged into SSMS.
4. Rebuild the WSUS Database Indexes
The following script was sourced from Microsoft. Run this within SSMS while connected to the WSUS database. It may take 15 minutes or more to run, depending on the size of the WSUS database.
/******************************************************************************
This sample T-SQL script performs basic maintenance tasks on SUSDB
1. Identifies indexes that are fragmented and defragments them. For certain
   tables, a fill-factor is set in order to improve insert performance.
   Based on MSDN sample at http://msdn2.microsoft.com/en-us/library/ms188917.aspx
   and tailored for SUSDB requirements
2. Updates potentially out-of-date table statistics.
******************************************************************************/

USE SUSDB;
GO
SET NOCOUNT ON;

-- Rebuild or reorganize indexes based on their fragmentation levels
DECLARE @work_to_do TABLE (
	 objectid int
	,indexid int
	,pagedensity float
	,fragmentation float
	,numrows int
)

DECLARE @objectid int;
DECLARE @indexid int;
DECLARE @schemaname nvarchar(130);
DECLARE @objectname nvarchar(130);
DECLARE @indexname nvarchar(130);
DECLARE @numrows int
DECLARE @density float;
DECLARE @fragmentation float;
DECLARE @command nvarchar(4000);
DECLARE @fillfactorset bit
DECLARE @numpages int

-- Select indexes that need to be defragmented based on the following
-- * Page density is low
-- * External fragmentation is high in relation to index size
PRINT 'Estimating fragmentation: Begin. ' + convert(nvarchar, getdate(), 121)

INSERT @work_to_do
SELECT
	 f.object_id
	,index_id
	,avg_page_space_used_in_percent
	,avg_fragmentation_in_percent
	,record_count
FROM
	sys.dm_db_index_physical_stats (DB_ID(), NULL, NULL , NULL, 'SAMPLED') AS f
WHERE
	(f.avg_page_space_used_in_percent < 85.0 and f.avg_page_space_used_in_percent/100.0 * page_count < page_count - 1)
	or (f.page_count > 50 and f.avg_fragmentation_in_percent > 15.0)
	or (f.page_count > 10 and f.avg_fragmentation_in_percent > 80.0)

PRINT 'Number of indexes to rebuild: ' + cast(@@ROWCOUNT as nvarchar(20))

PRINT 'Estimating fragmentation: End. ' + convert(nvarchar, getdate(), 121)

SELECT @numpages = sum(ps.used_page_count)
FROM
	@work_to_do AS fi
	INNER JOIN sys.indexes AS i ON fi.objectid = i.object_id and fi.indexid = i.index_id
	INNER JOIN sys.dm_db_partition_stats AS ps on i.object_id = ps.object_id and i.index_id = ps.index_id

-- Declare the cursor for the list of indexes to be processed.
DECLARE curIndexes CURSOR FOR SELECT * FROM @work_to_do

-- Open the cursor.
OPEN curIndexes

-- Loop through the indexes
WHILE (1=1)
BEGIN
	FETCH NEXT FROM curIndexes
	INTO @objectid, @indexid, @density, @fragmentation, @numrows;
	IF @@FETCH_STATUS < 0 BREAK;

	SELECT
		 @objectname = QUOTENAME(o.name)
		,@schemaname = QUOTENAME(s.name)
	FROM
		sys.objects AS o
		INNER JOIN sys.schemas as s ON s.schema_id = o.schema_id
	WHERE
		o.object_id = @objectid;

	SELECT
		 @indexname = QUOTENAME(name)
		,@fillfactorset = CASE fill_factor WHEN 0 THEN 0 ELSE 1 END
	FROM
		sys.indexes
	WHERE
		object_id = @objectid AND index_id = @indexid;

	IF ((@density BETWEEN 75.0 AND 85.0) AND @fillfactorset = 1) OR (@fragmentation < 30.0)
		SET @command = N'ALTER INDEX ' + @indexname + N' ON ' + @schemaname + N'.' + @objectname + N' REORGANIZE';
	ELSE IF @numrows >= 5000 AND @fillfactorset = 0
		SET @command = N'ALTER INDEX ' + @indexname + N' ON ' + @schemaname + N'.' + @objectname + N' REBUILD WITH (FILLFACTOR = 90)';
	ELSE
		SET @command = N'ALTER INDEX ' + @indexname + N' ON ' + @schemaname + N'.' + @objectname + N' REBUILD';
	PRINT convert(nvarchar, getdate(), 121) + N' Executing: ' + @command;
	EXEC (@command);
	PRINT convert(nvarchar, getdate(), 121) + N' Done.';
END

-- Close and deallocate the cursor.
CLOSE curIndexes;
DEALLOCATE curIndexes;


IF EXISTS (SELECT * FROM @work_to_do)
BEGIN
	PRINT 'Estimated number of pages in fragmented indexes: ' + cast(@numpages as nvarchar(20))

	SELECT
		@numpages = @numpages - sum(ps.used_page_count)
	FROM
		@work_to_do AS fi
		INNER JOIN sys.indexes AS i ON fi.objectid = i.object_id and fi.indexid = i.index_id
		INNER JOIN sys.dm_db_partition_stats AS ps on i.object_id = ps.object_id and i.index_id = ps.index_id

	PRINT 'Estimated number of pages freed: ' + cast(@numpages as nvarchar(20))
END
GO


--Update all statistics
PRINT 'Updating all statistics.' + convert(nvarchar, getdate(), 121)
go

EXEC sp_updatestats
go

PRINT 'Done updating statistics.' + convert(nvarchar, getdate(), 121)
GO
5. Determine How Many Obsolete Updates Exist
Once the indexes are rebuilt, you need to find out how many updates need to be cleaned up. When I started, the following stored procedure call identified over 28,000 of them. Open a new query window in SSMS, copy/paste the following, and run it. It may take several minutes to run.
USE SUSDB
GO

EXEC spGetObsoleteUpdatesToCleanup
This stored procedure returns a listing of the updates that are marked as obsolete, which are ones that have been superseded by other, newer updates. Because those older updates are obsolete, they will never be deployed to servers and workstations, and as such are no longer needed.
6. Remove a Batch of Obsolete Updates
If you have a lot of obsolete updates to delete, you’ll want to do so in manageable chunks so that you can periodically have the WSUS server obtaining and providing new updates to computers like it should. The following script, which I sourced and reformatted from here, lets you do just that. You can adjust the size of a batch by changing the number assigned to the @batchSize variable near the start of the script. When run, the script deletes obsolete updates one at a time until either it runs out of updates or it reaches the batch size.
In my circumstances, when I first started using the script, it took slightly more than 60 seconds per update, meaning a batch of 2,000 updates would take about 36 hours to go through. The speed is dependent on the hardware resources it has available, so it may be faster or slower for you. I recommend running the script for a small batch of maybe 20 to start with, average the amount of time it takes for each delete to complete, and then based on that calculate how many updates you could delete in the time span you have available at night and on weekends. For example, at 65 seconds per update, during the 10 or so hours an office is likely closed overnight, you could process slightly more than 500 updates. As the time to delete individual updates decreases, you can increase the number of updates you process in that time span. You can easily determine this by looking at the output of the script, shown the Messages tab, where it lists the exact time down to the millisecond of when each delete started.
As of this writing, with my WSUS database cleaned up, updates delete within about 8 seconds each.
Here’s the script:
USE SUSDB

DECLARE
     @updateID       INT
    ,@currentItem    INT
    ,@itemsToDelete  INT
    ,@batchSize      INT

DECLARE @msg NVARCHAR(200)

SELECT
     @currentItem    = 1
    ,@batchSize      = 2000

CREATE TABLE #obsoleteUpdates (localUpdateID INT)

INSERT INTO #obsoleteUpdates (localUpdateID)
EXEC spGetObsoleteUpdatesToCleanup

SET @itemsToDelete = (SELECT COUNT(1) FROM #obsoleteUpdates)

DECLARE ObsoleteUpdates CURSOR
FOR
    SELECT localUpdateID
    FROM #obsoleteUpdates

OPEN ObsoleteUpdates

FETCH NEXT
FROM ObsoleteUpdates
INTO @updateID

WHILE (@@FETCH_STATUS > - 1)
BEGIN
    SET @msg = cast(@currentItem AS VARCHAR(5)) + '/' + cast(@itemsToDelete AS VARCHAR(5)) + ': Deleting ' + CONVERT(VARCHAR(10), @updateID) + ' @ ' + replace(convert(VARCHAR(50), getdate(), 126), 'T', ' - ')

    RAISERROR (@msg, 0, 1) WITH NOWAIT

    EXEC spDeleteUpdate @localUpdateID = @updateID

    SET @currentItem = @currentItem + 1

    IF @currentItem < (@batchSize + 1)
        FETCH NEXT
        FROM ObsoleteUpdates
        INTO @updateID
END

CLOSE ObsoleteUpdates
DEALLOCATE ObsoleteUpdates

DROP TABLE #obsoleteUpdates
7. Keep At It!
It may take a week or so of evenings and weekends to clear out all of the obsolete updates using the steps above, but it will eventually finish. This is the first half of the battle, though. The scripts above clean up only the WSUS database, and do nothing to remove the already downloaded Windows Update files stored on the server.
8. Shrink the WSUS Database Files
This isn’t absolutely necessary, but if your WSUS database has grown to a huge size, you can shrink it down. There are a multitude of articles out there (like this one) that describe how to do this, so I won’t provide steps here. As a point of common sense, back up the WSUS database first. That said, once you shrink it, make sure you go back and run the script from step 4 above to rebuild all the indexes, as the shrink process makes them inefficient again.
9. Get Rid of the Obsolete Update Files
This was, frankly, the hardest part to figure out. A lot of the discussion I saw online about this part of the issue generally came to the conclusion of “reset WSUS and start again.” This essentially requires you to record the configuration of your WSUS installation, issue a command that wipes the databases and the file store, re-enter all of the configuration, and then have the server download the latest updates. In some ways, this approach is quicker than the cleanup steps described above.
However, in my mind, this seemed a bit extreme, as WSUS already knows what files need to be pushed out to workstations when they ask for an update. So, theoretically, it should be possible to query WSUS about what files are needed to support the updates it knows about, compare that to the files stored on the file system, and delete any files which aren’t referenced by any updates.
I sleuthed around for a few days, off and on, and could not find any articles that described a process like this. I did figure out how to determine what a particular update file is called and where they are located on the file system, but I wasn’t finding anything to link an update to the files. The WSUS database refers to files in many tables through a binary field named FileDigest. The textual representation of its hexadecimal value matches the name of the actual file in the file system, which I verified by locating several update files on the file system and comparing their details to what was recorded in the WSUS database.
Then I found this article in which a comment by ClaudioG64 described how to query for the files needed for a particular update. This way, you could manually grab them from the WSUS server, copy them to another server that couldn’t talk to WSUS, and apply them. The critical piece was the WSUS stored procedure he referenced, which is named spGetInstallableItems.
I looked at the output from it after calling it for one of the updates on my WSUS server. I then looked at the code in the stored procedure and unwound the queries to work backwards to a point where I could get a FileDigest value. After that, I just needed a list of the files on the file system to compare to, and an outer join would tell me what files matched to the updates in WSUS and what files had no corresponding update in WSUS. Generating the list was a cinch using Powershell, where I could query for particular values and export it to a .CSV file for later import.
In Powershell 2 or earlier, as is found on Windows Server 2008 R2 and earlier (unless you’ve upgraded it), use the following snippet:
The different snippets above are necessary to deal with some functional and syntactical differences arising as Powershell evolved over the years. The first snippet only returns files, leaving out folders, but only works properly in Powershell 2 or earlier. In Powershell 3 and later, the syntax changed, and the first snippet, while it works, returns both files and folders, which causes problems in what needs to happen later on in this process. The second snippet uses appropriate syntax to return only files, but its syntax does not work in Powershell 2.
Open an elevated Powershell command prompt, switching into the folder that contains the WSUS files, and then run the above command (which is entered as a single line). It dumps the list of files out to a CSV file, creating C:\temp\WsusContent.csv, though you can specify a different file location that works for you. The file name I chose, which will be the name the import tool used later defaults to, doesn’t conflict with any table names in the WSUS database, and reflects the name of the folder the files are kept in. The WSUS files are usually located off the root of a drive (C: or D: in most cases) in the following folder:
WSUS\WsusContent
When the above Powershell command was run for my problematic WSUS server, it produced a file with just over 476,000 rows in it. Each row provides:
the full path and name of the update file
the name of the update file with no path information or file extension
the path of the directory the update is located in
the size of the file in bytes
This structure allowed me enough information to work with it to verify a few things while building and testing my queries. But first, the data needs to be brought into the WSUS database. Unfortunately, I was unable to create tables in the Windows Internal Database on the WSUS server itself, so I wound up pulling a copy of the WSUS database files down to my workstation and attaching them to my local SQL Server 2016 Developer Edition instance. If you’re using a full SQL Server installation for WSUS, you may have rights to create tables. I created a table named WsusContent to import the data into, using the following SQL script:
USE [SUSDB]
GO

SET ANSI_NULLS ON
GO

SET QUOTED_IDENTIFIER ON
GO

CREATE TABLE [dbo].[WsusContent]
(
     [FullName]         [varchar](250)    NOT NULL
    ,[BaseName]         [varchar](250)    NOT NULL
    ,[DirectoryName]    [varchar](250)    NOT NULL
    ,[Length]           [int]             NOT NULL
    ,[FileDigest]       [binary](20)      NULL
)
ON [PRIMARY]

GO

CREATE NONCLUSTERED INDEX [IX_WsusContent_FileDigest] ON [dbo].[WsusContent]
(
    [FileDigest] ASC
)
WITH
(
     PAD_INDEX = OFF
    ,STATISTICS_NORECOMPUTE = OFF
    ,SORT_IN_TEMPDB = OFF
    ,DROP_EXISTING = OFF
    ,ONLINE = OFF
    ,ALLOW_ROW_LOCKS = ON
    ,ALLOW_PAGE_LOCKS = ON
)
ON [PRIMARY]

GO
It also sets up an index on the FileDigest column, which starts out empty but will be filled in after the main data import. This index will be useful later on in the process. From there, it was a simple matter to tell SSMS to import the contents of the WsusContent.csv file into the new table. In the import wizard, you need to tell it the following things:
the source data is coming from a flat file, which is WsusContent.csv
the column names are in the first data row of the source data file
set the text qualifier to a double quote
adjust the size of the first three columns (FullName, BaseName, and DirectoryName) to be 250 characters
adjust the size of the last column (Length) to be a 4-byte signed integer
the data is being imported through a SQL Server native client connection
it should automatically pick the WsusContent table, at least if the source data file has the same name as the table created by the script above
The import itself should complete fairly quickly, and you should be able to query the new table through SSMS to confirm it has data. Once the data is imported, run the following SQL script to populate the FileDigest column:
This command converts the base file names (the file’s name without the extension) into binary values. This binary value can then be matched to FileDigest values recorded elsewhere in the WSUS database, which is done in a query a little further down in this article.
Note that it is possible you can encounter an error with this UPDATE, especially if working with newer versions of WSUS. One reader, James, reported encountering a file named “anonymousCheckFile.txt” in the WSUSContent folder, which doesn’t exist in the folders for WSUS 2008 R2. The error is caused by the above query not being able to convert “anonymousCheckFile” to a binary value, as it isn’t a hexadecimal value. Simply delete this row out of the dbo.WsusContent table (or the CSV file before doing the import), and the command should work.
After some tinkering and testing, I came up with the following SQL query to determine what update files on the file system have no corresponding update information in the WSUS database. I carefully checked it in my testing to ensure that the number of files on the file system matched the total number of files needed for the WSUS updates plus the total number of files on the file system that had no matching WSUS update entry. I didn’t want to be removing files that were needed for updates.
The query below is structured to create commands that can be saved into a “batch” file and run from an elevated command prompt. Here’s the query:
SELECT
    'del "' + y.FullName + '"'
FROM
    WsusContent y
LEFT OUTER JOIN
    (
        SELECT DISTINCT
             wc.FullName
            ,wc.FileDigest
        FROM
            WsusContent wc
        JOIN
            tbFile f ON f.FileDigest = wc.FileDigest
        JOIN
            tbFileForRevision ffr ON ffr.FileDigest = f.FileDigest
        JOIN
            tbRevision r ON r.RevisionID = ffr.RevisionID
        JOIN
            tbProperty p ON p.RevisionID = r.RevisionID
    ) x ON y.FileDigest = x.FileDigest
WHERE
    x.FileDigest IS NULL
The results of this query can be exported to a text file. For my WSUS system, the resulting file had somewhere over 440,000 lines in it. You may need to do some cleanup on it because of the way SSMS exports the data for particular file formats.
If you export the results as a tab-delimited file, the file requires no modifications, so you can skip past the steps below.
If you export the results as a comma-delimited file, the file needs the following modifications. This is because it encloses each of the lines in double quotes, and converts the double quotes around the file names to a pair of double quotes. The lines start out looking like this:
They all need to be fixed up so that they look like this instead:
del "D:\wsus\WsusContent\01\9AC0F6B420813C870A63F8F252D0739A71D41A01.exe"
Thankfully, this is quick and easy to do with the search and replace features of a good text editor like Notepad++. You can do the following search/replace for the entire file, in the following order:
search for “”” (three double quotes) and replace with “ (a single double quote); this handles the double quotes at the end of each line
search for “del “ (there is a space before the final double quote) and replace with del[space]; this handles the start of the line; also note that the [space] indicates a single space should be entered
Finally, save the updated text file.
Note: Because of the way this blog tries to format posts in a “smart” way, I don’t recommend copying and pasting the search/replace text from above, as the double quotes above are likely formatted as “smart” quotes instead of as a normal ASCII double quote (character 34).
The export file can now be renamed to have a BAT extension turning it into a batch command file. Copy the batch file over to the drive on the WSUS server that holds the WsusContent folder.
All that’s left to do is open an elevated command prompt on the WSUS server and run the batch file. When I did so, it took a couple of hours to run. Once it was done, the drive’s free space had increased from about 40GB to just over 1TB, leaving about 600GB of updates on it. After that, I defragmented the drive for good measure.
I hope this article helps some other WSUS admins who are struggling to clean up their servers. Of course, I appreciate any feedback on this process.
Small and medium-sized businesses (SMBs) are increasingly becoming targets for cyber attacks. According to Verizon, about 61 percent of SMBs reported at least one cyber attack in 2021. Worse, Joe Galvin, chief research officer at Vistage, reported that about 60 percent of small businesses fold within six months of a cyber attack.
To protect your network from potential threats, you need a reliable and effective firewall solution. This tool will act as the first line of defense against unauthorized access and can help prevent malicious attacks from infiltrating a business’s network.
We reviewed the top SMB firewall solutions to help you determine the best one for your business.
Founded in 2018, Perimeter 81 is a cloud and network security company that provides organizations with a secure and unified platform for accessing and managing their applications and data.
It provides many security solutions, including firewall as a service (FWaaS), secure web gateway (SWG), zero trust network access (ZTNA), malware protection, software-defined perimeter, VPN-alternative and secure access service edge (SASE) capabilities, to ensure that data is secure and accessible to authorized personnel. It also provides centralized management and user access monitoring, enabling organizations to monitor and control user activity across the network.
Perimeter 81 provides granular access control policies that enable organizations to define and enforce access rules for their network resources based on the user’s identity, device type, and other contextual factors—making it easy for employees to access the company’s resources without compromising security.
Pricing
Pricing plans
Minimum users
Cost per month, plus gateway cost
Cost per year, plus gateway cost
Cloud firewall
Agentless application access
Device posture check
Essential
10
$10 per user, plus $50 per month per gateway
$8 per user, plus $40 per month per gateway
No
2 applications
No
Premium
10
$12 per user, plus $50 per month per gateway
$15 per user, plus $40 per month per gateway
10 policies
10 applications
3 profiles
Premium Plus
20
$16 per user, plus $50 per month per gateway
$20 per user, plus $40 per month per gateway
100 policies
100 applications
20 profiles
Enterprise
50
Custom quotes
Custom quotes
Unlimited
Unlimited
Unlimited
Features
Identity-based access for devices and users.
Network segmentation.
OS and application-level security and mutual TLS encryption.
Enable traffic encryption enforcement, 2FA, Single Sign-On, DNS filtering, and authentication.
Pros
Provides visibility into the company network.
Allows employee access from on-premise.
Automatic Wi-Fi security.
30-day money-back guarantee.
Cons
Low and mid-tiered plans lack phone support.
Limited support for Essential, Premium, and Premium Plus.
pfSense
Best open-source-driven firewall
pfSense is an open-source firewall/router network security solution based on FreeBSD. Featuring firewall, router, VPN, and DHCP servers, pfSense is a highly customizable tool that can be used in various network environments, from small home networks to large enterprise networks.
The tool supports multiple WAN connections, failover and load balancing, and traffic shaping, which can help optimize network performance. pfSense can be used on computers, network appliances, and embedded systems to provide a wide range of networking services.
Pricing
pfSense pricing varies based on your chosen medium—cloud, software, or hardware appliances.
For pfSense cloud:
pfSense on AWS: Pricing starts from $0.01 per hour to $0.40 per hour.
pfSense on Azure: Pricing starts from $0.08 per hour to $0.24 per hour.
The tool’s open-source version support is limited to community or forum. It lacks remote login support, private login support, a private support portal, email, telephone, and tickets.
Complex initial setup for inexperienced users.
Comodo Free Firewall
Best for Windows PCs
Comodo Firewall is a free firewall software designed to protect computers from unauthorized access and malicious software by monitoring all incoming and outgoing network traffic.
The firewall features packet filtering, intrusion detection and prevention, and application control. It also includes a “sandbox” feature that allows users to run potentially risky applications in a protected environment without risking damage to the underlying system.
The software works seamlessly with other Comodo products, such as Comodo Antivirus and Comodo Internet Security.
Pricing
Comodo is free to download and use. The vendor recommends adding its paid antivirus product (Comodo Internet Security Pro) to its firewall for added security. The antivirus costs $29.99 per year for one PC or $39.99 per year for three PCs.
Features
Auto sandbox technology.
Cloud-based behavior analysis.
Cloud-based allowlisting.
Supports all Windows OS versions since Windows XP (Note: Windows 11 support forthcoming).
Website filtering.
Virtual desktop.
Pros
Monitors in/out connections.
Learn user behavior to deliver personalized protection.
Real-time malware protection.
Cons
Lacks modern user interface.
Pop-up notifications—some users may find the frequent alerts generated by the software annoying and intrusive.
ManageEngine Firewall Analyzer
Best for log, policy, and firewall configuration management
It provides real-time visibility into network activity and helps organizations identify network threats, malicious traffic, and policy violations. It supports various firewalls, including Cisco ASA, Palo Alto, Juniper SRX, Check Point, SonicWall, and Fortinet.
Firewall Analyzer helps monitor network security, analyze the security posture of the network, and ensure compliance with security policies. It also provides reports, dashboards, and automated alerting to ensure the network remains secure.
Pricing
The amount you will pay for this tool depends on the edition you choose and the number of devices in your organization.
You can download the enterprise edition’s 30-day free trial to test-run it and learn more about its capabilities. It’s available in two versions: Windows OS or Linux. You can also download it for mobile devices, including iPhone devices and Android phones or tablets.
Standard Edition: Starts at $395 per device, up to 60 devices.
Professional Edition: Starts at $595 per device, up to 60 devices.
Enterprise Edition: Starts at $8,395 for 20 devices, up to 1,200 devices.
Regulatory compliance with standards such as ISO, PCI-DSS, NERC-CIP, SANS, and NIST.
Network behavioral anomaly alert.
Security reports for viruses, attacks, spam, denied hosts, and event summaries.
Historical configuration change tracking.
Bandwidth report for live bandwidth, traffic analyzer, URL monitor, and employee internet usage.
Compatible with over 70 firewall versions.
Pros
Excellent technical support.
Users praise its reporting capability.
In-depth auditing with aggregated database entries capability.
VPN and security events analysis.
Cons
Complex initial setup.
Users reported that the tool is occasionally slow.
Fortinet FortiGate
Best for hybrid workforces
Fortinet FortiGate is a network security platform that offers a broad range of security and networking services for enterprises of all sizes. It provides advanced threat protection, secure connectivity, and secure access control. It also provides advanced firewall protection, application control, and web filtering.
Business owners can use Fortinet’s super-handy small business product selector to determine the best tool for their use cases.
Small and mid-sized businesses may find the following FortiGate’s model suitable for their needs:
IPS
NGFW
Threat Protection
Interfaces
Series
FortiGate 80F
1.4 Gbps
1 Gbps
900 Mbps
Multiple GE RJ45 | Variants with PoE, DSL,3G4G, WiFi and/or storage
Multiple GE RJ45 | Variants with internalstorage | WiFi variants
FG-60F, FG-61F, FWF-60F, and FWF-61F
FortiGate 40F
1 Gbps
800 Mbps
600 Mbps
Multiple GE RJ45 | WiFi variants
FG-40F, FG-40F-3G4G, FWF-40F, FWF-40F-3G4G
Fortinet FortiGate is compatible with several operating systems and can easily be integrated into existing networks.
Pricing
Unfortunately, Fortinet doesn’t publish their prices. Reseller prices start around $335 for the FortiGate 40F with no support. Contact Fortinet’s sales team for quotes.
Features
Offers AI-powered security services, including web, content, and device security, plus advanced tools for SOC/NOC.
Continuous risk assessment.
Threat protection capability.
Pros
Top-rated firewall by NSS Labs.
Intrusion prevention.
Cons
According to user reviews, the CLI is somewhat complex.
Complex initial setup.
SonicWall TZ400 Security Firewall
Best for advanced threat protection
The SonicWall TZ400 is a mid-range, enterprise-grade security firewall designed to protect small to midsize businesses. It supports up to 150,000 maximum connections, 6,000 new connections per second, and 7×1-Gbe.
The TZ400 features 1.3 Gbps firewall inspection throughput, 1.2 Gbps application inspection throughput, 900 Mbps IPS throughput, 900 Mbps VPN throughput, and 600 Mbps threat prevention throughput.
Pricing
This product’s pricing is not available on the Sonicwall website. However, resellers such as CDW, Staples, and Office Depot typically sell it in the $1,000–$1,500 range. You can request a quote for your particular use case directly from Sonicwall.
Fast performance with gigabit and multi-gigabit Ethernet interfaces.
Protects against intrusion, malware, and ransomware.
High-performance IPS, VPN, and threat prevention throughput.
Efficient firewall inspection and application inspection throughput.
Cons
Support can be improved.
It can be difficult to configure for inexperienced users.
Cisco Meraki MX68
Best for small branches with up to 50 users
The Cisco Meraki MX68 is a security appliance designed for SMBs. It’s part of the Cisco Meraki MX series of cloud-managed security appliances that provide network security, content filtering, intrusion prevention, and application visibility and control.
The MX68 is equipped with advanced security features such as a stateful firewall, VPN, and intrusion prevention system (IPS) to protect your network from cyber attacks. The MX68 has a variety of ports and interfaces, including LAN and WAN ports and a USB port for 3G/4G failover. It also supports multiple WAN uplinks, providing redundancy and failover options to ensure your network remains online and available.
Pricing
The Cisco Meraki MX68 pricing isn’t listed on the company’s website, but resellers typically list it starting around $640. You can request a demo, free trial, or quotes by contacting the Cisco sales team.
Features
Centralized management via web-based dashboard or API.
Intrusion detection and prevention (IDS/IPS).
Next-generation layer 7 firewalls and content filtering.
SSL decryption/inspection, data loss prevention (DLP), and cloud access security broker (CASB).
Instant wired failover with added 3G/4G failover via a USB modem.
Pros
Remote browser isolation, granular app control, and SaaS tenant restrictions.
Support for native IPsec or Cisco AnyConnect remote client VPN.
Provides unified management for security, SD-WAN, Wi-Fi, switching, mobile device management (MDM), and internet of things (IoT)
Cons
The license cost is somewhat high.
Support can be improved.
Sophos XGS Series
Best for remote workers
Sophos XGS Series Desktop is a range of network security appliances designed to provide comprehensive protection for SMBs. These appliances combine several security technologies, including firewall, intrusion prevention, VPN, web filtering, email filtering, and application control, to provide a robust and integrated security solution.
Here’s a comparison table of the Sophos XGS series firewalls:
Firewall
TLS inspection
IPS
IPSEC VPN
NGFW
Firewall IMIX
Threat protection
Latency (64 byte UDP)
XGS Desktop Models
3,850 Mbps
375 Mbps
1,200 Mbps
3,000 Mbps
700 Mbps
3,000 Mbps
280 Mbps
6 µs
XGS 107 / 107w
7,000 Mbps
420 Mbps
1,500 Mbps
4,000 Mbps
1,050 Mbps
3,750 Mbps
370 Mbps
6 µs
XGS 116 / 116w
7,700 Mbps
650 Mbps
2,500 Mbps
4,800 Mbps
2,000 Mbps
4,500 Mbps
720 Mbps
8 µs
126/126w
10,500 Mbps
800 Mbps
3,250 Mbps
5,500 Mbps
2,500 Mbps
5,250 Mbps
900 Mbps
8 µs
136/136w
11,500 Mbps
950 Mbps
4,000 Mbps
6,350 Mbps
3,000 Mbps
6,500 Mbps
1,000 Mbps
8 µs
The Sophos XGS Series Desktop appliances are available in several models with varying performance capabilities, ranging from entry-level models suitable for small offices to high-performance models suitable for large enterprises. They are designed to be easy to deploy and manage, with a user-friendly web interface and centralized management capabilities.
Pricing
Sophos doesn’t advertise the pricing for their XGS Series Desktop appliances online, but they typically retail starting at about $520 from resellers.
Potential customers are encouraged to request a free trial and pricing information by filling out a form on the “Get Pricing” page of their website.
Features
Centralized management and reporting.
Wireless, SD-WAN, application aware routing, and traffic shaping capability.
SD-WAN orchestration.
Advanced web and zero-day threat protection.
Pros
Zero-touch deployment.
Lateral movement protection.
Users find the tool scalable.
Cons
Performance limitations.
Support can be improved.
Protectli Vault – 4 Port
Best for building your own OPNsense or pfSense router and firewall
The Protectli Vault is a small form-factor network appliance designed to act as a firewall, router, or other network gateway. The 4-Port version has four gigabit Intel Ethernet NIC ports, making it ideal for SMB or home networks.
The device is powered by a low-power Intel processor and can run a variety of open-source firewall and router operating systems, such as pfSense, OPNsense, or Untangle. It comes with 8GB DDR3 RAM and up to 32GB DDR4 RAM.
The Protectli Vault is designed to be fanless, silent, and compact, making it ideal for use in the home or office environments where noise and space may be an issue. It’s also designed to be energy-efficient, consuming only a few watts of power, which can save businesses considerable amounts of money on energy costs over time.
Pricing
The amount you will pay for this tool depends on the model you select and your desired configuration. The rates below are starting prices; your actual rate may vary based on your configuration. Note that all these items ship free to U.S. addresses.
VP2410 – 4x 1G Port Intel J4125: Starts at $329.
VP2420 – 4x 2.5G Port Intel J6412: Starts at $379.
FW4B – 4x 1G Port Intel J3160: Starts at $269.
FW4C – 4x 2.5G Port Intel J3710: Starts at $289.
Features
Solid-state and fanless tool.
Provides 2.5 GB ports unit.
AES-NI, VPN, and coreboot options.
Pros
A 30-day money-back guarantee.
Transparent pricing.
Coreboot support.
CPU supports AES-NI.
Cons
Steep learning curve.
OPNSense
Best for flexibility
OPNsense is a free and open-source firewall and routing platform based on the FreeBSD OS. It was forked from the popular pfSense and m0n0wall project in 2014 and was officially released in January 2015.
OPNsense provides a modular design that allows users to easily add or remove functionality based on their needs.
OPNsense is popular among IT professionals and network administrators who need a flexible and customizable firewall and routing platform that they can tailor to their specific needs. It’s also a good choice for small businesses and home users who want to improve their networks’ security without spending a lot of money on commercial solutions.
VPN (site-to-site and road warrior, IPsec, OpenVPN, and legacy PPTP support).
Built-in reporting and monitoring tools, including RRD Graphs.
Pros
Free, open source.
Traffic shaper.
Support for plugins.
Multi-language support, including English, Czech, Chinese, French, German, Italian, Japanese, Portuguese, Russian, and Spanish.
Cons
Reporting capability can be improved.
The interface can be improved.
Key features of SMB firewalls
Firewalls designed for SMBs share many of the same characteristics as their enterprise-grade cousins—such as firewall rule and policy configuration, content filtering, reporting and analytics—while placing additional emphasis on affordability and ease of use.
Firewall rules and policies
Administrators should be able to set up firewall rules and policies that control traffic flow and block or permit traffic based on various criteria, such as source/destination IP addresses, ports, and protocols.
These rules and policies can be used to control the types of applications, services, and data that are allowed to traverse the network, as well as create restrictions on access.
Firewall rules and policies are essential to the security of a network, as they provide the first line of defense against malicious attacks.
Content filtering
Content filtering is the process of blocking or restricting certain types of content from entering or leaving a network. It can be used to block websites, applications, or data that may contain malicious or unwanted content, such as malware, viruses, or pornographic material.
Content filtering is typically implemented using a combination of hardware and software solutions. Hardware solutions, such as routers and switches, can be configured to block certain types of traffic or data or to restrict access to certain websites or applications. Software solutions, such as firewall rules and policies, can also be used to block or restrict certain types of content.
Reporting and analytics
Reporting and analytics are essential for any business network, as they provide important insights into the health and security of the network. Firewall reporting and analytics features allow network administrators to identify trends, detect potential threats, and analyze the performance of the network over time.
Reporting and analytics can also be used to identify any areas of the network that may be vulnerable to attack, as well as identify any areas where the network may not be performing optimally.
Affordability
For SMBs, affordability is a key factor when it comes to purchasing a firewall. SMB firewalls are typically more affordable than enterprise firewalls and can be purchased for as little as a few hundred dollars, so it is important to consider your budget when selecting a firewall.
Some SMB firewalls offer additional features for a fee, so consider what features are necessary for your network and the ones you can do without, as this will help you decide on the most cost-effective firewall solution. At the same time, be careful not to cut corners—your business’s data is too important to be insufficiently protected.
Ease of use and support
For SMBs, finding a firewall solution that is easy to use and has good support is essential. Firewalls should be easy to configure and manage so the network administrator can quickly and easily make changes as needed.
Additionally, good support should be available for any issues or questions that arise. This support should include an online knowledge base and access to technical support staff that can assist with any questions or problems, ideally 24/7.
How to choose the best SMB firewall software for your business
When shopping for the best SMB firewall software for your business, look for software that offers the features you need, easy installation and management, scalability to grow with your business, minimal impact on network performance, and an affordable price.
It’s also important to choose a vendor with a good reputation in the industry, backed up by positive reviews and customer feedback.
Frequently asked questions (FAQs)
What is an SMB firewall?
An SMB firewall is a type of network security device that is designed specifically for small and medium-sized businesses. It’s used to protect networks from unauthorized access, malicious attacks, and other security threats.
What features should I look for in an SMB firewall?
Above all you need a solution with a strong security profile. Look for specific security measures such as:
Intrusion prevention
Content filtering
Malware protection
Application control
Traffic shaper
Other factors to consider include ease of management, scalability, and cost.
Do small businesses need a firewall?
Yes, small businesses need a firewall. It provides an essential layer of network security that helps protect against unauthorized access, malware, and other security threats. Without a firewall, small businesses are vulnerable to attacks that could compromise sensitive data, cause network downtime, and damage their reputation.
How much does a firewall cost for SMBs?
The cost of an SMB firewall can vary widely depending on the features, capabilities, and brand of the firewall. Generally, SMB firewalls can range in price from a few hundred to several thousand dollars.
How many firewalls do you need for a small business?
The number of firewalls needed for a small business will depend on the size and complexity of the network. In many cases, a single firewall may be sufficient to protect the entire network. However, in larger networks, it may be necessary to deploy multiple firewalls to provide adequate protection.
Factors such as network segmentation, geographic location, and compliance requirements may also influence the number of firewalls needed. It’s best to consult with a network security expert to determine the appropriate number of firewalls for your small business.
Methodology
We analyzed dozens of SMB firewall software and narrowed down our list to the top ten. We gathered primary data—including pricing details, features, support, and more—from each tool provider’s website, as well as third-party reviews. We selected each software based on five key data points: security, ease of use, affordability, quality of service, and user satisfaction.
Bottom line: Choosing an SMB firewall
The solutions we evaluated are some of the best SMB firewalls currently available on the market. They are designed to provide SMBs with advanced security features, easy management, and scalability at affordable rates.
In the fast-paced realm of cyberspace where threats continue to multiply, firewall software represents a critical line of defense for businesses of all sizes.
Such programs function as digital gatekeepers, regulating the flow of inbound and outbound network traffic according to a set of rules defined by the user.
With the continued rise of data breaches, investing in the best firewall software isn’t a mere consideration; it’s a necessity.
That’s why we researched, analyzed, and selected the best firewall software solutions for 2023:
Norton is a household name in cybersecurity that has long been delivering top-tier firewall software that signifies its wealth of experience in the sector.
The standout attribute of Norton is its comprehensive security suite, going beyond basic firewall protection to incorporate a smart firewall and intrusion prevention system (IPS), antivirus capabilities, identity theft protection, and even a VPN offering.
All that adds up to a holistic solution for businesses desiring a single-stop security software.
Pricing
Norton’s Smart Firewall is included in Norton 360, whose pricing plans at the time of writing are:
Deluxe: $49.99 for the first year for 5 PCs, Macs, tablets, or phones.
Select + LifeLock: $99.99 for the first year for 10 PCs, Macs, tablets, or phones.
Advantage + LifeLock: $191.88 for the first year for 10 PCs, Macs, tablets, or phones.
Ultimate Plus + LifeLock: $299.88 for the first year for unlimited PCs, Macs, tablets, or phones.
Features
Advanced smart firewall with customizable rules, allowing businesses to modify access based on their specific needs, thus providing a higher level of personalized security.
Integrated VPN for safe browsing ensures users can access the internet securely without worrying about potential threats or privacy breaches.
Identity theft protection is another vital feature, which helps safeguard sensitive personal and business data from potential hackers.
SafeCam feature prevents unauthorized access to your webcam, thwarting any potential spying or privacy intrusions.
Automatic updates ensure that your protection is always up-to-date, reinforcing defenses against new and evolving threats.
Pros
Norton offers a comprehensive security suite, providing a broad spectrum of protective measures beyond the typical firewall, creating a fortified line of defense against a myriad of cyber threats.
The interface is easy to navigate, making the process of setting up and managing the firewall less complex and more user-friendly, even for those with limited technical knowledge.
It provides 24/7 customer support, ensuring that you’ll have access to assistance whenever you need it, regardless of the hour or day.
Cons
While perfect for small to mid-sized businesses, Norton might not be as scalable for larger businesses with a vast network of devices, potentially limiting its effectiveness in such an environment.
Depending on your requirements, the subscription can become expensive with add-ons, which might be a drawback for businesses on a tight budget.
Fortinet
Best for scalability
Fortinet is a well-regarded player in the cybersecurity arena and its firewall software exemplifies its commitment to delivering high-quality solutions. FortiGate, Fortinet’s firewall offering, is recognized for its advanced firewall solutions that are scalable and robust.
Particularly useful for growing businesses, FortiGate brings forward top-notch features that can effortlessly adapt to the needs of expanding network infrastructures.
Pricing
Fortinet offers a variety of solutions priced broadly to accommodate all business sizes—from $250 for home office to $300,000 for large enterprises. Contact Fortinet for accurate pricing information.
Features
FortiGate offers an advanced firewall with extensive protection against incoming threats, thus maintaining the security of your network.
With scalability at its core, FortiGate can adapt and grow along with your business, addressing increasing security demands seamlessly.
Smooth integration with other Fortinet security solutions, enabling a comprehensive security ecosystem for your business.
FortiGate Cloud-Native Firewall offers high resiliency to ease security delivery across cloud networks and availability zones at scale.
Automatic updates keep the firewall current and equipped to deal with the latest threats, ensuring your network’s protection remains robust.
Pros
Fortinet’s robust firewall features deliver comprehensive security for your network, providing the necessary defenses to ward off potential threats.
With a strong focus on scalability, Fortinet is an ideal choice for rapidly growing businesses that need a security solution to match their expanding network.
The software’s high-performance nature means that it delivers robust security without hampering your network’s speed or efficiency.
Cons
Despite (or because of) offering a wealth of features, Fortinet’s interface may not be as user-friendly as some other options, potentially causing difficulties for those without substantial technical knowledge.
While Fortinet offers a range of pricing options, the cost can quickly escalate for larger networks or when additional features are included, which may not suit budget-conscious businesses.
Pricing information is not transparent and requires negotiation. Your mileage may vary.
GlassWire
Best for user-friendly interface
GlassWire is an elegant and visually appealing firewall software that provides comprehensive network monitoring capabilities.
It uniquely combines a network monitor and firewall, offering users a clear visual representation of their network activity. This functionality helps users to understand their online behavior and potential threats in a way that’s easy to interpret.
Pricing
GlassWire offers a tiered pricing model:
Free: provides limited features, perfect for individual users or small businesses.
Premium: Starts at $2.99 per month per license, paid annually. Its premium tier plans suitable for business range between 10 and 200 licenses.
Features
Real-time and detailed visualization of your current and past network activity, offering an intuitive and easy-to-understand representation of what’s happening on your network.
Built-in firewall that allows users to easily monitor applications using the network and block any suspicious activity, providing a comprehensive network security solution.
A unique “Incognito” mode for users who do not want certain network activities to appear on the network graph, ensuring user privacy.
Firewall profiles to instantly switch between different environments, such as public and private networks.
The network time machine feature allows users to go back in time up to 30 days to see what their computer or server was doing in the past.
Pros
GlassWire offers a beautifully designed, user-friendly interface that presents complex network security information in a visually appealing and understandable way.
Its comprehensive network monitoring capability allows users to understand their online behavior, identify patterns and detect anomalies.
The software’s built-in firewall offers users the flexibility to control which applications can access the network, enhancing the overall security of their systems.
Cons
The software requires a moderate amount of system resources to run efficiently, which might be an issue for systems with limited resources.
Although GlassWire’s visualizations are beautiful and informative, some users may find them overwhelming and would prefer a more traditional interface.
Cisco Secure Firewall Management Center
Best for centralized management and control
The Cisco Secure Firewall Management Center provides a comprehensive solution for centralized control and management of security policies. It enhances the overall efficiency of network administration by offering a unified platform to manage multiple Cisco security appliances.
Businesses that use a variety of Cisco security tools will find this a valuable addition to streamline operations and enhance control.
Pricing
Cisco Secure Firewall Management Center’s pricing depends on the scale of operations and the specific needs of a business. For detailed and customized pricing information, you can directly contact Cisco or its partners.
Features
A unified management console that can control a wide range of Cisco security appliances, reducing the complexity associated with managing multiple devices.
Advanced threat detection and analysis capabilities, enabling administrators to swiftly identify and respond to security incidents.
Flexible deployment options, including on-premises, virtual and cloud-based solutions, catering to various operational needs and preferences.
Comprehensive policy management, allowing administrators to efficiently establish and enforce security policies across their Cisco security infrastructure.
Integration with other Cisco security tools, such as Cisco Threat Response, provides a cohesive and powerful security solution.
Pros
The ability to manage multiple Cisco security appliances from a single platform is a significant advantage, especially for larger enterprises managing complex security infrastructures.
Cisco Secure Firewall Management Center offers advanced threat detection and analysis capabilities, aiding in swift and efficient incident response.
Its flexible deployment options cater to diverse operational needs, providing convenience and ease of setup to businesses of all sizes.
Cons
Although powerful, the platform may require a steep learning curve, particularly for those who are new to Cisco’s ecosystem.
Some users have reported a desire for more customization options within the management interface to meet their specific operational needs.
Pricing information is not transparent and requires negotiation. Your mileage may vary.
pfSense: Best open source solution
pfSense is an open-source firewall software solution that is highly customizable, suitable for tech-savvy businesses that prefer having the flexibility to tailor their firewall to specific needs. It’s built on the FreeBSD operating system, offering a comprehensive range of features for network management and security.
Pricing
As an open-source platform, pfSense is free to download and use. However, Netgate, the company behind pfSense, offers paid support and services, including hardware solutions integrated with pfSense software.
Features
A wide array of networking functionalities, including firewall, VPN, and routing services, ensuring comprehensive network protection.
Being open-source, it offers extensive customization options, allowing businesses to tailor the software to their specific needs.
Supports a large selection of third-party packages for additional features, granting more flexibility in expanding its capabilities.
Detailed network monitoring and reporting tools, allowing for granular insight into network traffic and potential security threats.
It has a community-backed development model, ensuring continuous improvements and updates to its features.
Pros
pfSense’s open-source nature allows for extensive customization, giving businesses control over how they want to configure their firewall.
The software provides a comprehensive set of features, ensuring thorough network protection and management.
Its support for third-party packages allows for the addition of further functionalities, enhancing its overall capabilities.
Cons
The configuration of pfSense can be quite complex, particularly for users without a strong technical background, which could pose a challenge for some businesses.
The user interface, while functional, may not be as polished or intuitive as some commercial firewall solutions.
As with many open-source projects, while there’s a supportive community, professional customer service might not be as accessible as with commercial solutions.
Sophos Firewall
Best for cloud-based management
Sophos Firewall brings a fresh approach to the way you manage your firewall and how you can detect and respond to threats on your network.
Offering a user-friendly interface and robust features, this product provides businesses with an effective and efficient solution for their network security needs. It’s a versatile solution that not only offers traditional firewall capabilities but also integrates innovative technologies to ensure all-round security.
Pricing
Sophos does not publicize pricing information, because their solutions are provided by resellers and can vary depending on the business’s size, needs, and location. You can contact them directly for accurate pricing information.
Features
All-in-one solution by integrating advanced threat protection, IPS, VPN, and web filtering in a single comprehensive platform, thereby providing robust security for your network.
Deep learning technology and threat intelligence, both of which work in synergy to identify and respond to threats before they can cause damage, offering advanced protection against malware, exploits, and ransomware.
User-friendly interface that simplifies configuration and management tasks, making it easier for users to set up security policies and monitor network activities.
Synchronized Security technology that facilitates communication between your endpoint protection and your firewall, creating a coordinated defense against cyber threats.
The Sophos Firewall comes with an effective cloud management platform, allowing administrators to remotely manage the system, configure settings, and monitor network activity.
Pros
A user-friendly interface that simplifies the process of setting up and managing network security policies, making it suitable for businesses with limited technical expertise.
It integrates advanced protection capabilities, such as threat intelligence and deep learning technology, to provide robust defense against sophisticated cyber threats.
This firewall software’s unique Synchronized Security feature offers a coordinated and automated response against threats, enhancing the overall effectiveness of your network security.
Cons
Some users have reported that while the user interface is intuitive, it might take some time to navigate due to the depth of features available.
The initial setup and configuration might require technical expertise, although Sophos provides comprehensive resources and customer support to guide users.
Although Sophos’ site advertises “Simple Pricing,” their costs are not in fact transparent and will require negotiating a quote. Your mileage may vary.
ZoneAlarm
Best for personal use
ZoneAlarm is an excellent choice for personal use and small businesses due to its simplicity and effectiveness.
With a robust set of features and an intuitive interface, it provides robust protection without requiring extensive technical knowledge. Its reputation as a reliable firewall solution makes it an attractive choice for users seeking to safeguard their systems from various threats.
Pricing
ZoneAlarm offers both free and premium versions of their firewall software. The free version provides basic protection, while the Pro Firewall version, which comes at a yearly subscription fee starting from $22.95 for 1 PC, offers advanced features such as zero-day attack protection and full technical support.
Features
Robust two-way firewall protection, preventing unauthorized access to your network while also stopping malicious applications from sending out your data.
Advanced privacy protection feature that protects your personal information from phishing attacks.
Unique ID Lock feature that keeps your personal information safe.
ZoneAlarm boasts an Anti-Phishing Chrome Extension that detects and blocks phishing sites, protecting your information online.
The premium version offers advanced real-time antivirus protection, ensuring that your system is continuously protected from threats.
Pros
ZoneAlarm offers a straightforward interface and setup process, making it an ideal choice for users who lack advanced technical skills.
The software provides a comprehensive suite of features, including robust firewall protection, advanced privacy tools and real-time antivirus capabilities.
ZoneAlarm’s ID Lock feature is a standout, helping to ensure the security of personal data.
Cons
While ZoneAlarm offers robust features, its protection level may not be adequate for large enterprises or businesses with complex network architectures.
Some users have reported that the software can be resource-intensive, potentially slowing down system performance.
Key features of firewall software
When choosing the best firewall software for your business, there are key features you should consider. These range from the extent of the security suite to scalability and cloud-based management, all of which play a significant role in how effectively the software will serve your needs.
Comprehensive security suite
A comprehensive security suite is more than just a basic firewall. It includes additional layers of security like antivirus capabilities, identity theft protection, and a VPN.
The best firewall software solutions should deliver this kind of comprehensive coverage, protecting against a wide variety of threats and helping you maintain the security of your entire network. Norton, Cisco, and Sophos firewalls excel in this area.
Scalability
Scalability is particularly important for businesses that are growing or plan to grow. As the size of your network increases, your security needs will change and become more complex.
Firewall software like FortiGate and pfSense are designed with scalability in mind, allowing them to adapt to the increasing security demands of your expanding network.
User-friendly interface
A user-friendly interface is crucial, especially for those who may not have a lot of technical expertise. Firewall software should be easy to navigate and manage, making the process of setting up and adjusting the firewall less daunting.
Norton excels in this area, with an intuitive interface that is straightforward to use. GlassWire, while not as intuitive, also offers an attractive and convenient interface.
Robust features
Having robust features in firewall software is key to ensuring comprehensive protection. This includes an advanced firewall with extensive customizable rules, IPS, and threat detection capabilities.
The most robust firewall solutions include Norton, FortiGate, Cisco, and Sophos, as well as pfSense, although you’ll have to do some legwork to program the latter in particular.
Cloud-based management
Cloud-based management is a significant advantage in today’s digital landscape. It allows for the remote configuration and monitoring of your firewall, making it easier to manage and adjust as needed. This feature is particularly beneficial for businesses with remote workers or multiple locations.
Norton, FortiGate, Cisco, Sophos, and ZoneAlarm all provide this capability.
Advanced firewall protection
Advanced firewall protection includes capabilities like deep packet inspection, which examines data packets to detect malware that could otherwise bypass standard firewalls. This kind of advanced protection is vital to secure your network from sophisticated threats. Most of the firewalls in this list offer advanced, next-generation capabilities.
Integration
Integration capabilities are crucial as they allow your firewall software to work in harmony with other security solutions you might have in place. Cisco firewalls, as you might expect, integrate seamlessly with other Cisco solutions, but can falter when trying to integrate with third-party solutions. On the other hand, thanks to its open-source nature, pfSense can be configured to integrate very broadly.
By considering these features when choosing your firewall software, you can ensure that you select a solution that meets the specific needs of your business, provides comprehensive protection and offers room for growth and adaptation as your business evolves.
Benefits of working with firewall software
Employing robust firewall software within your network infrastructure brings along a myriad of benefits that contribute to the overall security and efficiency of your business operations, from enhanced network security and data protection to reduced downtime and regulatory compliance.
Enhanced network security
Perhaps the most fundamental advantage of using firewall software is the enhanced network security it provides. Firewall software acts as the first line of defense against potential threats, including hackers, viruses, and other cyberattacks.
By monitoring and controlling incoming and outgoing network traffic based on predetermined security rules, firewall software ensures that only safe connections are established, thus protecting your network.
Data protection
With the increasing incidence of data breaches and cyber theft, data protection is more crucial than ever. Firewall software plays a pivotal role in safeguarding sensitive data from being accessed or stolen by unauthorized users.
By blocking unauthorized access, it ensures the safety of important information and reduces the risk of data breaches.
Traffic management
Firewall software is not only about protection but also about managing and optimizing the network traffic. Features like bandwidth management can be leveraged to allocate network resources effectively and ensure the smooth functioning of your online operations.
Real-time security updates
With the constantly evolving threat landscape, maintaining up-to-date security measures is vital. Firewall software frequently receives real-time security updates, which help to protect your network against the latest threats. This ensures that your network remains secure against even the most recent forms of cyberattacks.
Reduced downtime
Downtime can be a significant issue for any business, leading to financial losses and damage to reputation. By proactively identifying and preventing potential threats, firewall software can significantly reduce the risk of system outages, leading to increased uptime and reliability.
Scalability
As your business grows, so does the complexity and the scope of your network. Scalable firewall software grows with your business, adjusting to the increased demands and providing consistent protection despite the expanding network size. This makes it a cost-effective solution that can support your business in the long term.
Regulatory compliance
Many industries have regulations in place requiring businesses to protect sensitive data. Firewall software helps meet these regulatory requirements by providing robust security measures that prevent data breaches and protect client and customer information.
Incorporating firewall software into your network infrastructure is a critical step towards securing your business in an increasingly digital world. The benefits it offers are invaluable, providing not just enhanced protection, but also efficiency and adaptability that can significantly contribute to your business’s success.
How to choose the best firewall software for your business
Choosing the best firewall software for your business involves a careful examination of your specific needs and security requirements.
Size and security level: The size and nature of your business, the sensitivity of your data, and the extent of your network operations are crucial factors that determine what kind of firewall software will be the most beneficial.
Comprehensive features: Moreover, you should consider firewall solutions that offer a comprehensive suite of security features, such as VPN services, antivirus protection, and advanced threat detection capabilities.
Scalability: The scalability of a firewall software solution is important, particularly for growing businesses. Opt for software that can seamlessly adapt to the expanding needs of your network, providing reliable protection irrespective of your business size.
Interface: Unless you have a robust, well-trained IT department, the interface of your chosen software will need to be user-friendly and easily manageable, even for those with minimal technical expertise.
Cloud-based management: Features that allow for remote configuration and monitoring are highly beneficial in the current era of remote work. These features offer the flexibility of managing your network’s security from any location, improving overall efficiency.
Integration: Your chosen software should integrate smoothly with your existing security infrastructure to create a comprehensive, effective security system.
Support: Solid customer support from the vendor is also crucial to navigating any issues that may arise during setup or throughout the software’s lifespan.
Choosing firewall software is an investment in your business’s security, so take the time to evaluate each option thoroughly.
Frequently Asked Questions (FAQs)
Who should use firewall software?
Any individual, business, or organization that uses a network or the internet should consider using firewall software. Whether you’re a small business owner, a large corporation, or a home user, a firewall can provide essential protection against unauthorized access and various cyber threats.
Where are firewalls located on a network?
Firewalls are typically located at the edge of a network, serving as a barrier between a trusted internal network and an untrusted external network, such as the internet. They can also be positioned between different parts of an organization’s networks to control access.
Are there any downsides to using a firewall?
While firewalls are essential for network security, they can occasionally block legitimate traffic if the security settings are too restrictive. Additionally, managing and maintaining a firewall can require technical expertise. However, the benefits of using a firewall far outweigh these potential challenges.
How often should a firewall be updated?
Firewall software should be updated regularly to ensure it can protect against the latest threats. Many firewall providers release updates regularly and many firewalls are set to update automatically. However, it’s a good idea to check for updates manually periodically to ensure your firewall is up-to-date.
What is firewall software’s role in regulatory compliance?
For many businesses, especially those in regulated industries like healthcare or finance, firewall software plays a critical role in meeting compliance requirements. Regulations like the Health Insurance Portability and Accountability Act (HIPAA) or the General Data Protection Regulation (GDPR) require robust data protection measures, which includes network security provided by a firewall.
Can firewall software protect against all cyber threats?
While firewall software provides a strong layer of protection, it’s not a panacea for all cyber threats. Some sophisticated threats, like targeted phishing attacks or insider threats, require additional security measures. It’s essential to have a comprehensive security strategy in place that includes firewall software, antivirus software, strong access controls, and user education about safe online practices.
Methodology
To deliver this list, we based our selection on an examination of firewall software features and overall reputation in addition to their ease of use, quality of customer support, and value for money.
This information is available in user reviews as well as official product pages and documentation. Nonetheless, we encourage you to conduct your own research and consider your unique requirements when choosing a firewall software solution.
Bottom line: Choosing the best firewall software for your business
The evolving threat landscape necessitates a robust and reliable firewall solution for both personal use and businesses of all sizes. Based on the products listed, it’s evident that several excellent options exist in the market, each with its own unique strengths and capabilities.
Choosing the best firewall software ultimately depends on your requirements, the nature of the network environment, and the budget at hand. It’s essential to consider each product’s features, pros, and cons, and align them with your individual or business needs.
The chosen solution should provide comprehensive protection, be user-friendly, and ideally offer scalability for future growth. Whether it’s for personal use or to protect a multilayered enterprise network, there’s a firewall solution out there that fits the bill.
Also see
Firewalls come in all shapes and sizes. Here’s a look at eight different types of firewalls.
And once you’ve selected your firewall, make sure you define and implement a clear, strong firewall policy to back it up—as well as setting robust firewall rules to govern the software.
Enterprise firewall software is an essential component of network security infrastructure for organizations. These firewalls are designed to provide high availability and scalability to meet the needs of large and complex networks because they can handle high traffic volumes and accommodate the growth of network infrastructure.
By exploring the following top firewall solutions, enterprises can make an informed decision to fortify their network defenses and safeguard critical assets from ever-evolving cyber threats.
Palo Alto is a leading network security provider of advanced firewall solutions and a wide range of network security services.
The company offers various firewall solutions for various enterprise use cases, including cloud next generation firewalls, virtual machine series for public and private clouds, container series for Kubernetes and container engines like Docker, and its PA-series appliances designed for data centers, network edge, service providers, remote branches and retail locations, and harsh industrial sites.
These firewalls provide enhanced visibility, control, and threat prevention capabilities to protect networks from various cyber threats, including malware, viruses, intrusions, and advanced persistent threats (APTs).
Pricing
Palo Alto doesn’t advertise its product pricing on its website. Our research found that the Palo Alto PA-series price range from $2,900 to $200,000 (more or less). To get the actual rates for your enterprise, contact the company’s sales team for custom quotes.
Standout features
Advanced threat prevention.
Advanced URL filtering.
Domain name service (DNS) security.
Medical IoT security.
Enterprise data loss prevention (DLP).
Up to 245 million IPv4 OR IPv6 sessions.
Pros
Provides visibility across IoT and other connected devices.
Provides visibility across physical, virtualized, containerized and cloud environments.
Offers a variety of products for different business sizes, from small businesses to large enterprises.
Easy-to-navigate dashboard and management console.
Cons
Complex initial setup.
Some users reported that the Palo Alto license is pricey.
Check Point Quantum
Best for connected devices
Check Point is an Israeli multinational company that develops and sells software and hardware products related to network, endpoint, cloud, and data security.
Check Point Quantum is designed to protect against advanced cyber threats, targeting Gen V cyber attacks. This solution encompasses various components to safeguard networks, cloud environments, data centers, IoT devices, and remote users.
Check Point’s SandBlast technology employs advanced threat intelligence, sandboxing, and real-time threat emulation to detect and prevent sophisticated attacks, including zero-day exploits, ransomware, and advanced persistent threats.
Pricing
Check Point does not publicly post pricing information on its website. Data from resellers shows that Check Point products can range from around $62 for a basic solution to over $50,000 for an enterprise-level solution. Contact the Check Point sales team for your actual quotes.
Standout features
URL filtering.
DLP.
Full active-active redundancy.
Zero-trust protection for IoT devices.
Check Point Quantum protects against GenV attacks.
Advanced threat protection.
Pros
24/7 customer service and support.
Easy to setup and use.
Management platform with automation features.
Sandblast protection for testing malware.
Cons
Users reported that the Check Point firewall is expensive.
Documentation can be improved.
Fortinet FortiGate
Best for flexibility and scalability
Fortinet offers various firewall products for different organization sizes, from home offices to large enterprises.
The FortiGate 7000 series (FG-7121F, FG-7081F, FG-7081F-2, FIM-7921F, FIM-7941F, and FPM-7620F) is an enterprise firewall product that provides high-performance network security. It is designed for organizations with high network traffic volumes and that have to manage large network infrastructures.
This firewall series is powered by a Security Processing Unit (SPU) of up to 520Gbps and also includes the latest NP7 (Network Processor 7) and CP9 (Content Processor 9).
Pricing
Fortinet’s FortiGate firewall tool pricing is available upon request. Pricing will depend on various factors, including the size of the network, the number of users, and the types of security features needed. Contact a Fortinet representative for pricing and product information.
Standout features
Protects IT, IIoT, and OT devices against vulnerability and device-based attack tactics.
FortiGate 7000F series provides NGFW, segmentation, secure SD-WAN, and mobile security for 4G, 5G, and IoT.
Offers various types of firewalls, including container firewalls, virtual firewalls and hardware firewall appliances.
Zero Touch Integration with Fortinet’s Security Fabric Single Pane of Glass Management.
Pros
Integrations with over 500 third-party services.
AI-powered capabilities.
Users reported that the tool is user-friendly.
Cons
Support can be improved.
Its reporting feature can be improved.
Juniper Networks
Best for logging and reporting capability
Juniper Networks’ firewall helps enterprises protect their network edge, data center, and cloud applications.
The company is also known for its Junos operating system (OS), a scalable network OS that powers Juniper Networks devices. Junos provides advanced routing, switching, and security capabilities and allows for seamless integration with third-party software and applications.
Juniper Networks vSRX virtual firewall provides enhanced security for Amazon Web Services (AWS), Microsoft Azure, Google Cloud Platform, IBM Cloud, and Oracle Cloud environments, while its cSRX Container Firewall offers advanced security services to secure applications running in containers and microservices. The company’s SRX firewalls series is designed for various organization sizes, from small to large enterprises.
Pricing
Juniper Network pricing is available on request. However, they offer different license methods, including Pay-As-You-Go (PAYG) and Bring-Your-Own-License (BYOL) options for public clouds. Contact the company’s sales team for custom quotes.
Standout features
Juniper Network has various types of firewalls, including container firewalls, virtual firewalls and hardware firewall appliances.
Public cloud workload protection, including AWS, Microsoft Azure, and Google Cloud Platform.
Logging and reporting capability.
Supports VMware ESXi, NSX, and KVM (Centos, Ubuntu).
Pros
Advanced threat prevention capability.
Deployable on-premises and cloud environments.
Cons
Support can be improved.
Users report that some Juniper Networks firewall products are expensive.
Cisco Secure Firewall
Best for centralized management
Cisco Secure Firewall combines firewall capabilities with advanced security features to protect networks from various threats, including unauthorized access, malware, and data breaches.
Cisco Secure Firewall integrates with Cisco Talos, a threat intelligence research team. This collaboration enables the firewall to receive real-time threat intelligence updates, enhancing its ability to identify and block emerging threats.
Cisco Secure Firewall can be centrally managed through Cisco Firepower Management Center (FMC). This management console provides a unified interface for configuration, monitoring, and reporting, simplifying the administration of multiple firewalls across the network.
Pricing
Contact Cisco’s sales team for custom quotes.
Standout features
IPS to protect against known threats.
Web filtering.
Network segmentation.
Centralized management.
Pros
Provides comprehensive visibility and control.
Efficient support team.
Highly scalable tool.
Cons
Support can be improved.
Complex initial setup.
Zscaler
Best for businesses with cloud network infrastructure
The Zscaler firewall provides cloud-based security for web and non-web traffic for all users and devices. Zscaler inspects all user traffic, including SSL encrypted traffic, with elastically scaling services to handle high volumes of long-lived connections.
One of the key advantages of Zscaler’s cloud-based approach is that it eliminates the need for on-premises hardware or software installations. Instead, organizations can leverage Zscaler’s infrastructure and services by redirecting their internet traffic to the Zscaler cloud. This makes scaling and managing security easier across distributed networks and remote users.
Pricing
Zscaler doesn’t advertise its rates on its website. However, data from resellers shows that its pricing starts from about $72 per user per year. For your actual rate, contact the Zscaler sales team for quotes.
Standout features
Centralized policy management.
Fully-integrated security services.
Real-time granular control, logging, and visibility.
User-aware and app-aware threat protection.
Adaptive IPS security and control.
File transfer protocol (FTP) control and network address translation (NAT) support.
Pros
Easy to use and manage.
AI-powered cyberthreat and data protection services.
Always-on cloud intrusion prevention system (IPS).
AI-powered phishing and C2 detection.
Cons
Complex initial setup.
Documentation can be improved.
pfSense
Best open-source firewall
pfSense is an open-source firewall and routing platform based on FreeBSD, an open-source Unix-like OS. It is designed to provide advanced networking and security features for small and large networks.
pfSense can be deployed as a physical appliance or as a virtual machine. pfSense offers many capabilities, including firewalling, VPN connectivity, traffic shaping, load balancing, DNS and DHCP services, and more.
Pricing
For pfSense cloud:
pfSense on AWS: Pricing starts from $0.01 per hour to $0.40 per hour.
pfSense on Azure: Pricing starts from $0.08 per hour to $0.24 per hour.
For pfSense software:
pfSense CE: Open source version available to download for free.
pfSense+ Home or Lab: Available at no cost for evaluation purposes only.
pfSense+ W/TAC LITE: Currently available at no charge, but the vendor may increase the rate to $129 per year in the future.
pfSense+ W/TAC PRO: $399 per year.
pfSense+ W/TAC ENT: $799 per year.
pfSense offers three hardware appliances tailored to the needs of large enterprises.
Netgate 8200: Cost $1,395. It has 18.55 Gbps IPERF3 and 5.1 Gbps IMIX traffic speed.
Netgate 1537: Cost $2,199. It has 18.62 Gbps(10k ACLs) IPERF3 and 10.24 Gbps (10k ACLs) IMIX traffic speed.
Netgate 1541: Cost $2,899. It has 18.64 Gbps(10k ACLs) IPERF3 and 12.30 Gbps(10k ACLs) IMIX traffic speed.
Standout features
NAT mapping (inbound/outbound).
Captive portal guest network.
Stateful packet inspection (SPI).
Pros
Free open-source version.
Community support.
Anti-spoofing capability.
Cons
Steep learning curve for administrators with limited experience.
GUI is old-fashioned and could be simplified.
Key features of enterprise firewall software
There’s a wide variety of capabilities that enterprise firewall software can provide, but some of the key features to look for include packet filtering, stateful inspection, application awareness, logging and reporting capabilities, and integration with your existing security ecosystem.
Packet filtering
Firewall software examines incoming and outgoing network packets based on predefined rules and policies. It filters packets based on criteria such as source/destination IP addresses, ports, protocols, and packet attributes. This feature enables the firewall to block or allow network traffic based on the configured rules.
Stateful inspection
Enterprise firewalls employ stateful inspection to monitor network connections’ state and analyze traffic flow context. By maintaining information about the state of each connection, the firewall can make more informed decisions about which packets to allow or block.
Application awareness
Modern firewall software often includes application awareness capabilities. It can identify specific applications or protocols within network traffic, allowing organizations to enforce granular policies based on the application or service used. This feature is handy for managing and securing web applications and controlling the use of specific services or applications.
Logging and reporting
Firewall software logs network events, including connection attempts, rule matches, and other security-related activities. Detailed logging enables organizations to analyze and investigate security incidents, track network usage, and ensure compliance with regulatory requirements. Reporting capabilities help generate comprehensive reports for auditing, security analysis, and compliance purposes.
Integration with the security ecosystem
Firewall software is typically part of a broader security ecosystem within an organization. Integration with other security tools and technologies, such as antivirus software, threat intelligence platforms, Security Information and Event Management (SIEM) systems, and network access control (NAC) solutions, allows for a more comprehensive and coordinated approach to network security.
Benefits of working with enterprise firewalls
Key advantages of enterprise firewall solutions include enhanced network security, threat mitigation, and access control, as well as traffic analytics data.
Network security: Firewalls act as a protective barrier against external threats such as unauthorized access attempts, malware, and other malicious activity. Enforcing access control policies and modifying network traffic helps prevent unauthorized access and protect critical data.
Threat mitigation: By combining intrusion prevention techniques, deep packet monitoring, and threat intelligence, a firewall can detect and block suspicious traffic, reducing the risk there that the network will be corrupted and damaged so
Access control: Firewall software allows administrators to restrict or allow access to network resources, applications, and services based on specific user roles, departments, or needs. This ensures that only authorized people or systems can access the screen and its accessories.
Traffic data and analytics: In addition to protecting your network, firewalls can also provide granular information about traffic and activity passing through your network, as well as its overall performance.
How do I choose the best enterprise firewall solution for my business?
When choosing the best enterprise firewall software for your business, consider the following factors.
Security: Assess your organization’s specific security needs and requirements.
Features: Evaluate the features and capabilities of firewall solutions, such as packet filtering, application awareness, intrusion prevention, VPN support, centralized management, and scalability. Consider the vendor’s reputation, expertise, and support services.
Compatibility: Ensure compatibility with your existing network infrastructure and other security tools.
Hands-on tests: Conduct a thorough evaluation of different firewall solutions through demos, trials, or proofs of concept to assess their performance, ease of use, and effectiveness in meeting your organization’s security goals.
Total cost of ownership (TCO): Consider the cost, licensing models, and ongoing support and maintenance requirements.
By considering these factors, you can make an informed decision and select the best enterprise firewall software that aligns with your business needs and provides robust network security.
Frequently Asked Questions (FAQ)
Is an enterprise firewall different from a normal firewall?
Although they share many characteristics, an enterprise firewall is not the same as a consumer-grade firewall. Enterprise firewalls are designed to meet large organizations’ security needs and network infrastructure challenges. They are robust, scalable, and can handle high network traffic volumes and sophisticated threats, compared to generic firewalls for home or small office environments.
What is the strongest type of firewall?
A firewall’s strength depends on various factors, and no universally dependable firewall exists. A firewall’s effectiveness depends on its materials, configuration, and how well it fits into the organization’s security needs.
That said, next-generation firewalls (NGFWs) provide improved security capabilities and are often considered the ideal firewall solution in today’s enterprise. NGFWs combine traditional firewall features with additional functionality such as application awareness, intrusion prevention, deep packet monitoring, and user-based policies. They provide advanced protection against modern threats with greater visibility and control over network traffic.
How do you set up an enterprise firewall?
Setting up an enterprise firewall involves several steps:
We recommend engaging network security experts or reviewing vendor documentation and support materials for specific guidance in installing and configuring your enterprise firewall.
Methodology
The firewall solutions mentioned in this guide were selected based on extensive research and industry analysis. Factors such as industry reputation, customer reviews, infrastructure, and customer support were considered.
We also assessed the features and capabilities of the firewall solutions, including packet filtering, application awareness, intrusion prevention, DLP, centralized management, scalability, and integration with other security tools.
As an organization admin, you may encounter situations such as users leaving their position or migrating to another mail service, etc. In such circumstances, you need to export Office 365 mailbox to PST and store them offline for investigation purposes. You can accomplish this in Office 365 without depending on any external third-party tools. You can export individual mailboxes or entire exchange mailboxes as an eDiscovery admin through the Microsoft Purview compliance portal.
This guide will walk you through the steps to export Office 365 mailboxes to PST format using eDiscovery and PowerShell.
Why Do We Need to Export Exchange Online Mailbox to PST?
PST stands for Personal Storage Table file format used by Microsoft Outlook to store email messages, contacts and calendar entries. When you back up your email mailbox to a PST file, that will be saved on your computer.
Here are some reasons why PST files are commonly used for exporting Office 365 mailbox data:
Compatibility: PST files can be opened and accessed by a variety of email clients, including Outlook and some third-party email clients. This makes it easy to share data with others or to access your data from different devices.
Portability: PST files are small in size and can be easily transferred to a different location, such as a hard drive, USB drive, or cloud storage. This makes it easy to create backups of your mailbox data or to move your data to a different computer.
Offline Access: PST files can be accessed even when you are not connected to the internet, making it easy to access your email messages and other data when you are on the go.
Organization: PST files allow you to organize your email messages, contacts, and other data into folders, making it easy to find and retrieve specific items.
Steps to Export Office 365 Mailbox to PST
As an Office 365 admin you can get the Exchange Online mailboxes and their details by exporting them to PST with eDiscovery admin permission. You need to follow the steps listed below.
To export Office 365 mailboxes, you must be an eDiscovery Administrator. By default, this role is not assigned to a global administrator. Follow the steps to assign user(s) to eDiscovery admin role.
Navigate to ‘Roles & Scopes’ tab and select ‘Permissions’ option.
Select ‘Roles’ under ‘Microsoft Purview Solutions’ category.
Click on ‘eDiscovery Manager’ role and select ‘Edit’ option in the popup window.
Navigate to ‘Manage eDiscovery Administrator’ page by clicking on ‘Next’ button.
Select ‘Choose users’ and select the user(s) who you want to make as eDiscovery admin. Then click on the ‘Select’ button in the popup and select ‘Next’ button.
Finally, click ‘Save’ on the ‘Review and finish’ page.
Content Search to Export Office365 Mailbox to PST
In Office 365, before exporting a mailbox, it’s necessary to perform a content search that collects all the mail of the specified user(s) or all the contents of a mailbox. Once you complete the search, you can use the Export option to export the results to a PST file.
Note: An informational alert will trigger, and you will receive mail when an eDiscovery search started or exported.
Login to the Microsoft Purview compliance portal with the user account with which you have assigned an eDiscovery Administrator role.
Go to ‘Content search’ tab in the solutions menu and click on ‘New Search’ option.
Type the preferred name and description in the ‘Name and description’ page and click on ‘Next’.
Turn ‘Exchange mailboxes’ on and click on ‘Choose users, groups, or Teams’ to select the users from the list.
Select the required users whose mailbox is to be exported or leave this option to export all user’s mailboxes and click on the ‘Next’ button.
Leave the conditions empty if you want to export the complete mailbox and click on ‘Next’. You can also define your conditions if you want filtered results.
Check the details in ‘Review your search’ page and click on ‘Submit’.
A message ‘New search created. Soon you will be able to review estimates and preview results for your search’ will show in the portal.
Click on ‘Done’ and wait for the status to change to ‘Completed’ in the content search page.
Note: The waiting time may differ with respect to the size of the mailboxes you have performed a content search.
You can also perform Content search using the PowerShell with ‘New-ComplianceSearch’cmdlet. First, connect to the compliance center ‘Connect-IPPSSession‘ cmdlet.
Connect-IPPSSession
Now run the cmdlet below by providing the name for the content search and Exchange location that you want to do content search.
Once you have successfully created a mailbox content search, the next step is to export the search results. To do this, simply follow the steps below, which will guide you through the process.
Click on the content search ‘Mailbox Export’ that you have created in the previous steps.
Select ‘Actions’ and choose ‘Export results’.
Select the appropriate ‘Output options’ and the ‘Export Exchange Content as’ options. Then click on ‘Export’. If you are not sure about the options, leave it as default.
A message box with a message “A job has been created” is displayed. Click on ‘OK’. It will take some time to complete the export.
You can also perform export using the PowerShell with ‘New-ComplianceSearchAction’cmdlet.
Run the below cmdlet with the content search name to export the mailbox.
Download Exported PST File From Office 365 Mailbox
With the help of Microsoft Office 365 eDiscovery Export Tool, you can download the exported mailbox results as a PST file.
Note: It’s important to note that this can only be done using the Microsoft Edge browser.
Make sure that the status of the export is completed by clicking on the export job name in the ‘Export’ tab.
Copy the ‘Export key’ by clicking on the ‘Copy to clipboard’ option and click on the ‘Downloadresults’ option.
If this is the first time you are downloading a .pst file, you are prompted to install Microsoft Office 365 eDiscovery Export Tool. If you have already installed, skip this step and go to the next step.
Click ‘Open’ button in the upcoming popup and paste the export key.
Select the required location to store the download file by clicking on the ‘Browse’ button and click ‘Start’.
You can be able to see the “Processing has completed” message after the download. Go to the specified location in your PC to view the downloaded PST file(s).
Office 365 Export PST File Size Limit
When exporting PST files, the default file size limit is 10 GB. However, you have the ability to change this limit depending on your specific needs by increasing or decreasing the file size. Additionally, if the exported mailbox exceeds the PST size limit, the tool will automatically split the PST file into sequentially numbered files to accommodate the larger size.
The main reason to do this is so PST files can fit on removable media, such a DVD, a compact disc, or a USB drive. You can adhere to the following steps to change the PST export file size limit.
Before proceeding, make sure to check whether the eDiscovery Export tool is open, and if so, be sure to close it before continuing.
Type the following text in a notepad and save the following text to a filename suffix of .reg. For example, Pst.reg.
Windows Registry Editor Version 5.00
[HKEY_LOCAL_MACHINE\SOFTWARE\Microsoft\Exchange\Client\eDiscovery\ExportTool]
"PstSizeLimitInBytes"="1073741824"
In the example above, the PstSizeLimitInBytes value is set to 1,073,741,824 bytes or approximately 1 GB. However, if you need to change this limit, you can easily do so by replacing the existing value with your desired limit in bytes.
Once you have created the .reg file by following the previous steps, it’s time to open it and proceed with the next steps.
In the User Access Control window, choose ‘Yes’ to grant permission to the Registry Editor to make the change.
When asked to confirm, select ‘Yes’.
The Registry editor will then display a confirmation message indicating that the “keys and values was successfully added to the registry”.
Limitations in Exporting PST File in Office 365
When exporting an Office 365 mailbox to a PST file, it is important to be aware of the limitations involved. Here is a list of the limitations you may encounter during the export process.
Browser Restrictions: You need to use Microsoft Edge browser. It’s not possible to export mailboxes to PST using other browsers without any extensions.
File Corruption Issues: Increasing the default size of PST files larger than 10 GB might have corruption issues.
Mailbox count limitation: You cannot download more than 100,000 mailboxes for search results using the eDiscovery Export Tool.
Export Data Size Constraint: An organization can export 2TB data per day through content search.
Output Display Restriction: Only 1,000 exports or reports will be displayed in Content search.
Thus, exporting Office 365 mailbox to PST is a simple process that can be done in a few clicks. You can have a clear understanding of how to complete this task efficiently by following the above steps. Feel free to leave a comment below if you encounter any difficulties or need any assistance.
Unmanaged devices, external file-sharing, and email integration impose a big question mark on the security posture of Microsoft Teams. In order to secure and manage Microsoft Teams, policies are used under various sections like messaging, meetings, calling, conferencing, and many more. Usually, these Teams policies for users, groups, and batches are managed in the Microsoft Teams admin center or using the Teams PowerShell Module (TPM). But now Microsoft extends the managing capability of additional Office 365 group policies using the Teams PowerShell Module as per MC557818.
According to this latest update, group policy assignments for Microsoft 365 groups, distribution lists, mail-enabled security groups, and security groups support additional policies in the Teams PowerShell Module. Apart from action control, policy assignments also set way for security controls like restricting anonymous access in meetings.
Let us see how to assign group policies using Microsoft Teams PowerShell Module and their functionalities under this blog.
What are Group Policy Assignments?
As the name suggests, assigning a policy to a particular group of users is known as a group policy assignment. The groups can be managed in Microsoft 365 admin center whereas group policies can be managed under the single roof of the Teams PowerShell Module.
Policy assignments are applied only to the direct members of a group and not to the nested group. That too, they are applied according to the precedence rules. And at the time of addition or deletion of users from a group, the policy assignments are updated which is also applicable when a policy is unassigned. Before jumping into group policy assignments, let us look through the precedence rules and ranking of policies.
What are Microsoft Teams Policy Precedence Rules?
Policy precedence determines the user’s effective policy when a user is assigned two or more of the same policy types. The precedence rules of policies are listed below for deeper insights into how an assigned policy will be deployed according to these rules.
If a user is directly assigned a policy, the same type of policy can’t be inherited from the group. Therefore, the directly assigned policy takes precedence over the same policy type defined by the group.
Also, if a user doesn’t contain a directly assigned policy, the user inherits the highest-ranking policy from the same type of policies applied by two or more groups.
Finally, if the user is not assigned a policy directly or by group, then the global (organization-wide) policy takes precedence.
The user policy is updated under the following circumstances.
Especially when a user is added or removed from the policy assigned group.
And when a group policy is unassigned.
At last, if a directly assigned policy is removed from a user.
What is Group Policy Assignment Rank in Teams?
As an admin, you are asked to define the rank of policy while assigning the policy. Primarily this ranking weighs the priority of the same type of policies assigned from two or more groups for a common user. Finally, the highest-ranking group policy is assigned as the effective policy to the end user after weighing the priority. Because a policy type can be assigned to a maximum number of 64 groups in Office 365.
NOTE: If the rank value is undefined, then the lowest ranking is given to the policy assignment.
How to Assign Policy to a Group in Teams Admin Center?
Follow the below steps to configure group policies in the Teams admin center where it majorly supports Teams calling policy, Teams call park policy, Teams policy, Teams live events policy, Teams meeting policy, and Teams messaging policy.
Navigate using the path below.
Microsoft Teams admin center 🡢 Messaging Policies (Select the desired policy type page) 🡢 Group policy assignment 🡢 Add group 🡢 Assign policy to group
2. Then, select a group to which you want to assign a policy. 3. Set the ranking value for the group policy assignment through the select rank option. 4. After that, select a policy from the available policy types in the drop-down list and click Apply.
Unfortunately, all policy types can’t be managed under the Microsoft Teams admin center since it supports only certain policy types. Without a second thought, PowerShell is the go-to solution! Yes, managing policies using PowerShell is easy and efficient as it is the primary automation tool that ensures the deployment of objects in multiple tenants. Also, it is a place where error handling and logging are more flexible compared to the native admin center. Thus, let us deeply look through the next section of the blog to manage group policy assignments using Microsoft Teams PowerShell.
Manage Group Policy Assignments Using Teams PowerShell Module
As per the new update, Teams PowerShell Module now helps to manage group policies of Microsoft 365 groups, mail-enabled security groups, distribution lists, and security groups including Teams-related policies. Thus, create & manage groups in Microsoft 365 admin center and manage their policies in Teams PowerShell. Before getting started with PowerShell cmdlets, make sure to connect to the Teams PowerShell Module.
Assign Policy to Group Using Teams PowerShell Module
By defining group policies, you can control user-specific actions like allowing them to schedule meetings, edit sent messages, etc. You can assign the available policies or create and assign custom policies depending on your requirements. Execute the following cmdlet after replacing the unique group identifier, policy type, policy name, and expected rank to assign a new policy for a group.
This “New-CsGroupPolicyAssignment” cmdlet is basically used to create new policy assignments for security groups and distribution lists. In which the group ID, policy type, policy name, and rank must be mentioned as mandatory parameters. Here with the rank value as one, the ‘AllOn’ policy under TeamsMeetingPolicy type is created for the given group.
The rank of the policy must be defined to determine the precedence. The recommended group membership size is 50,000 users per group while assigning a group policy. Also, it takes 24 hours or more to propagate the policy to all members of the larger groups.
Get Group Policy Assignments Using MS Teams PowerShell
Knowing all the available policy assignments allows you to understand the working conditions and their precedence levels better. Using this you can remove unnecessary policies, alter the desired ranking for policies and efficiently manage teams & groups around your Office environment.
The “Get-CsGroupPolicyAssignment” cmdlet primarily returns all the group policy assignments with some optional parameters to filter the results.
Primarily, list all the policy-assigned groups by running the following command.
Get-CsGroupPolicyAssignment
2. However, you can also retrieve all the policies assigned to a particular group using the below cmdlet.
In this case, the policy type is mentioned as TeamsMeetingPolicy. Hence this cmdlet returns only the groups assigned with this policy.
Remove Policy Assignment from a Group Using TPM
Remove the unnecessary policies found in your organization that are interrupting the ranking and slowing down the work progress. Most importantly, the removal of policies will update the ranking value of the same type policies where the policies in the list will be ranked consecutively after the removal.
Run the following cmdlet to remove a specific group policy assignment in Microsoft 365 environment.
The” Remove-CsGroupPolicyAssignment” cmdlet removes the given policy type in mentioned group ID.
Modify Group Policy Assignment Using Teams PowerShell Module
Directly altering the policy assignment ranking value is not possible in the Teams admin center. The policy assignments should be removed and newly assigned again with a new rank value to change the ranking. To take away this hassle, PowerShell lends you a hand with a simple and reusable cmdlet which is described below.
The “Set-CsGroupPolicyAssignment” cmdlet can be used to make the following alterations in group policy assignments based on the given attributes.
Change policy assignment ranking.
Change the policy under the existing policy type.
Change policy assignment ranking value and policy of a given policy type.
In this example, the policy is changed to ‘SupportCallPark’ policy, and the rank value is assigned to 3.
NOTE: The “Set-CsGroupPolicyAssignment” cmdlet is currently not released for use. So, for now, you need to remove policies and add new policies to change the policy or ranking. But you can easily alter the policy settings once after the availability of this cmdlet.
New Group Policy Assignment Support in Teams PowerShell Module
Microsoft rolls out group policy assignment support for additional policies in Teams PowerShell Module as a new update. So that admins can manage their groups in the M365 admin center and group policies in Teams PowerShell with a breeze. This feature will allow you to configure custom policies to groups for all Microsoft commercial licenses. With this update, dependency on global or direct policy assignments through manual methods is eliminated. In addition to the core policies such as meeting policies, calling policies, and messaging policies, the following policies are now expected to be available in Teams PowerShell by late May 2023.
Application Access Policy
Call Hold Policy
Carrier Emergency Call Routing Policy
Cortana Policy
Dial Out Policy
Education Assignments App Policy
Emergency Calling Policy
Enhanced Encryption Policy
Events Policy
External Access Policy
Feedback Policy
Files Policy
IPPhone Policy
Media Logging Policy
Meeting Branding Policy
Meeting Template Permission Policy
Mobility Policy
Notification And Feeds Policy
Room Video Tele Conferencing Policy
Synthetic Automated Call Policy
Teams Branch Survivability Policy
Template Permission Policy
VDI Policy
Video Interop Service Policy
Voice Routing Policy
Voicemail Policy
In conclusion, ultimately manage all group policies including Teams using PowerShell cmdlets. Take charge of the user-specific actions and security controls through this group policy assignment. Not only policies, you can also manage your Teams using PowerShell for effective administration. Rather than performing numerous repetitive tasks in the Teams admin center, automate them with just a few cmdlets in PowerShell.
I hope that this blog provides you with deeper insights into group policy assignments using Teams PowerShell. For any clarifications feel free to reach us through comments.
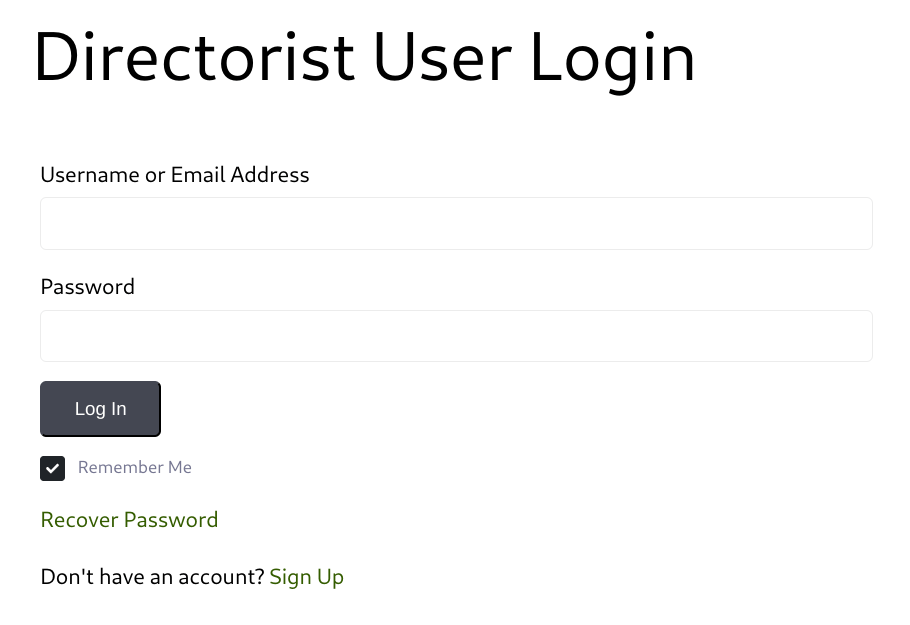
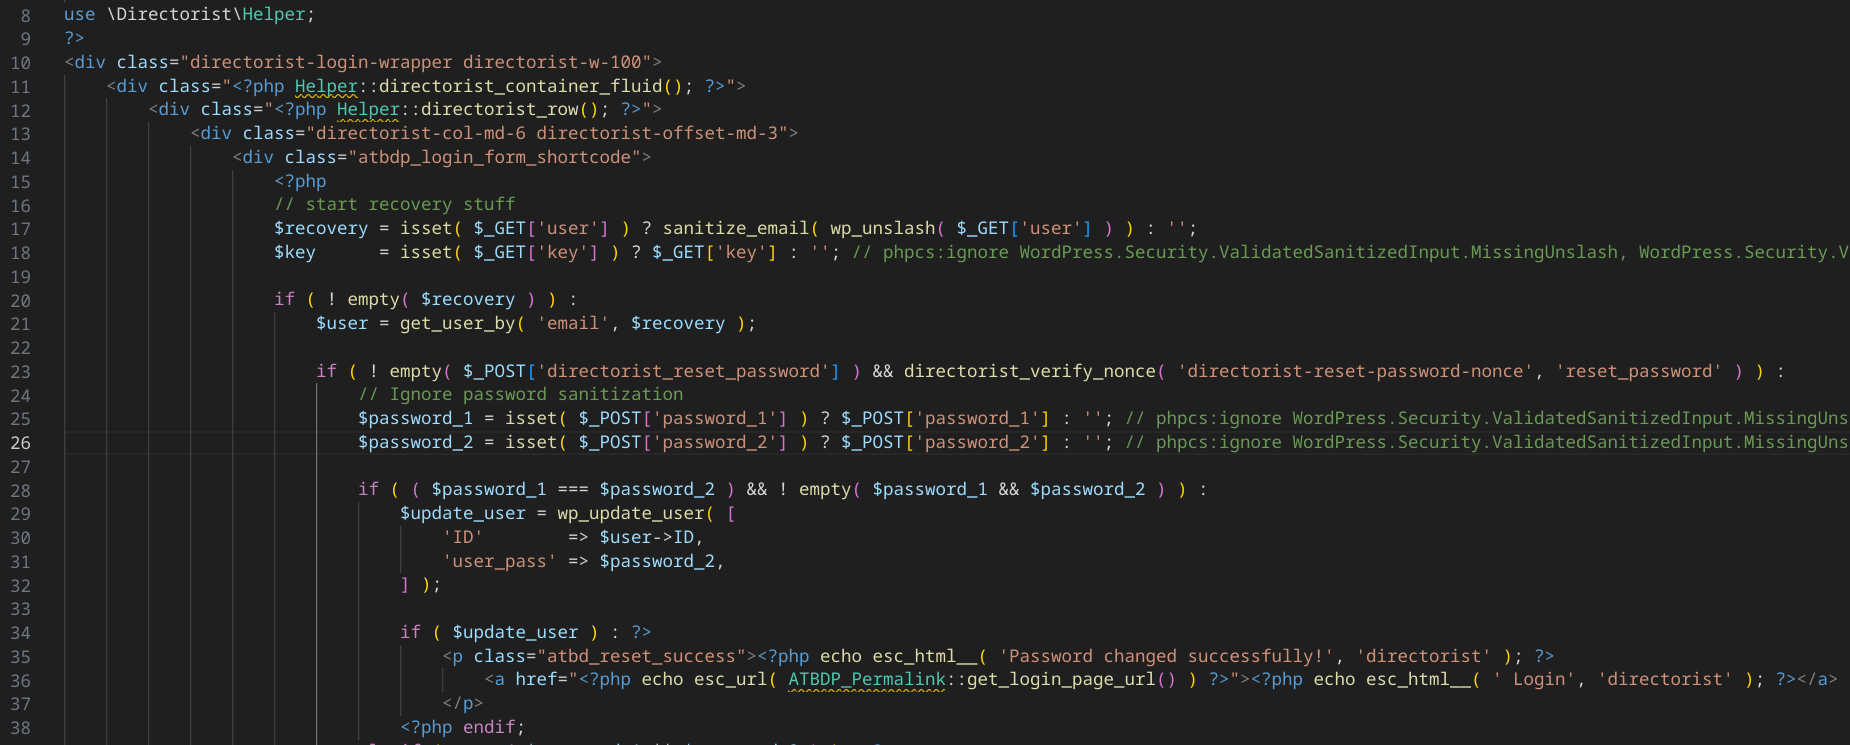

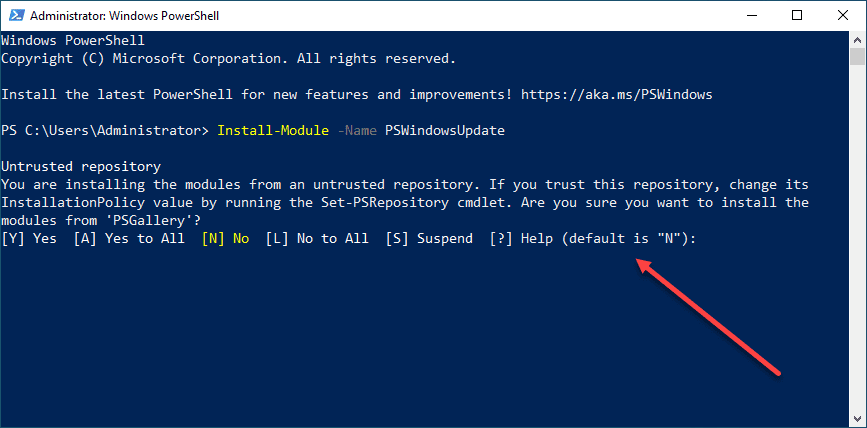
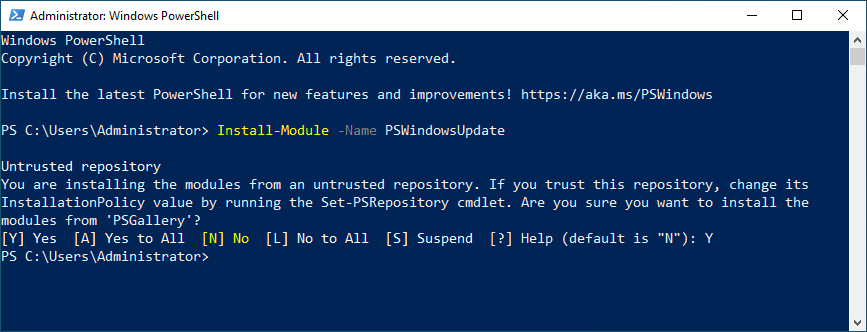
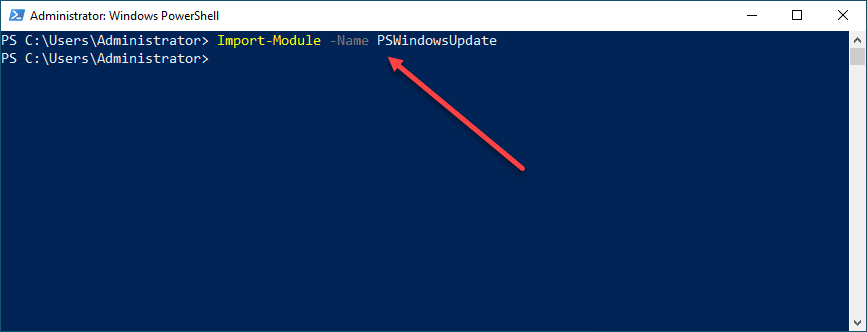
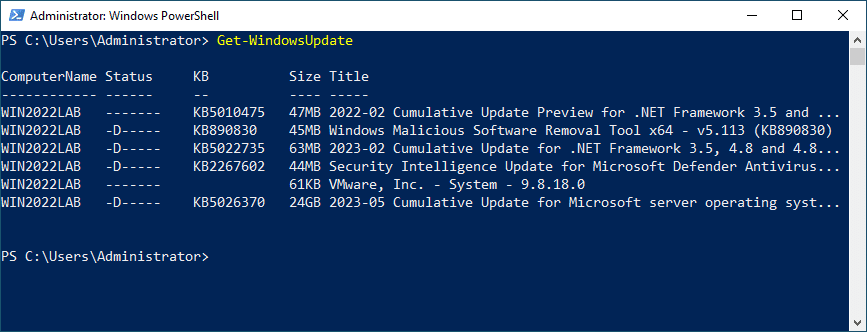
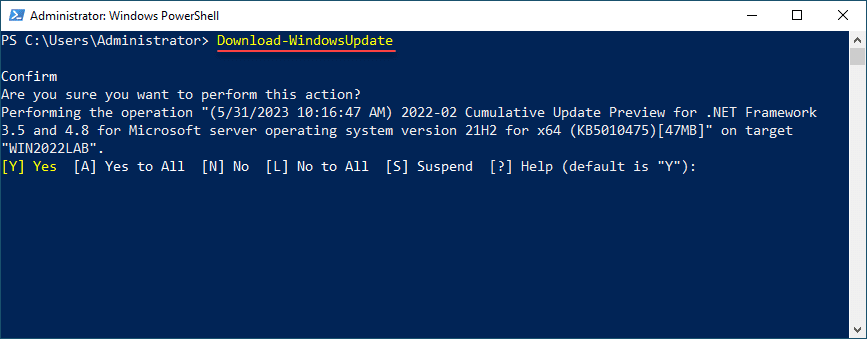

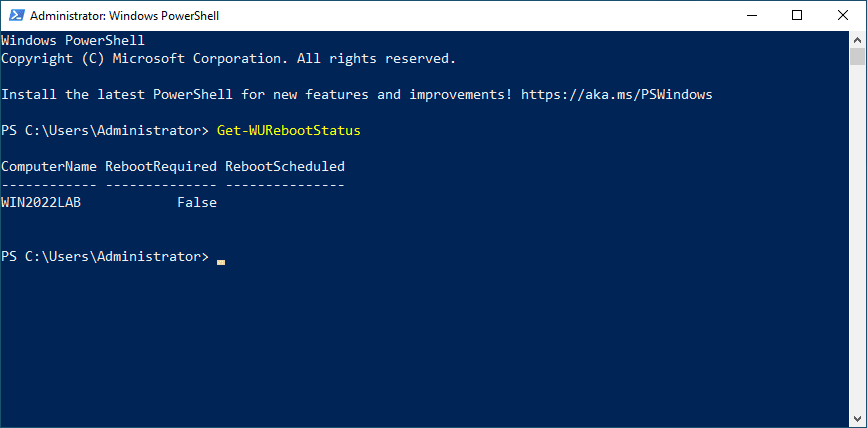
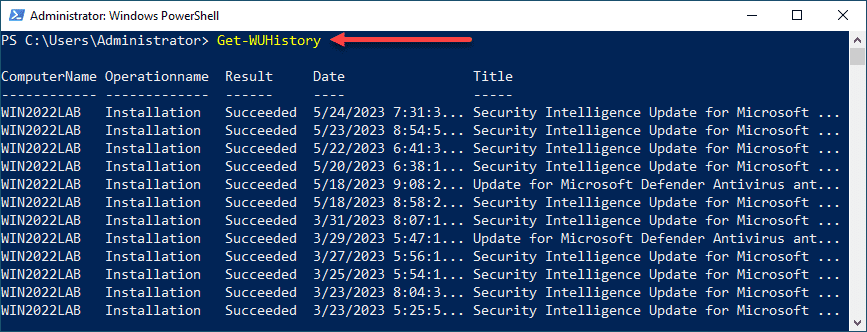

 Fun fact: In my environment that change made the deletions go 30 times faster!!!