Description
On the High Availability | Monitoring page, you can configure both physical and logical interface monitoring. By enabling physical interface monitoring, you enable link detection for the designated HA interfaces. The link is sensed at the physical layer to determine link viability. Logical monitoring involves configuring the SonicWall to monitor a reliable device on one or more of the connected networks. Failure to periodically communicate with the device by the Active unit in the HA Pair will trigger a Failover to the Idle unit. If neither unit in the HA Pair can connect to the device, no action will be taken.
The Primary and Backup IP addresses configured on this page are used for multiple purposes.
- As independent management addresses for each unit (supported on all physical interfaces).
- To allow synchronization of licenses between the Idle unit and the SonicWall licensing server .
- As the source IP addresses for the probe pings sent out during logical monitoring.
When using logical monitoring, the HA Pair will ping the specified Logical Probe IP address target from the Primary as well as from the Backup SonicWall. The IP address set in the Primary IP Address or Backup IP Address field is used as the source IP address for the ping. If both units can successfully ping the target, no Failover occurs. If both cannot successfully ping the target, no Failover occurs, as the SonicWalls will assume that the problem is with the target, and not the SonicWalls. But, if one SonicWall can ping the target but the other SonicWall cannot, the HA Pair will Failover to the SonicWall that can ping the target.
Resolution for SonicOS 7.X
This release includes significant user interface changes and many new features that are different from the SonicOS 6.5 and earlier firmware. The below resolution is for customers using SonicOS 7.X firmware.
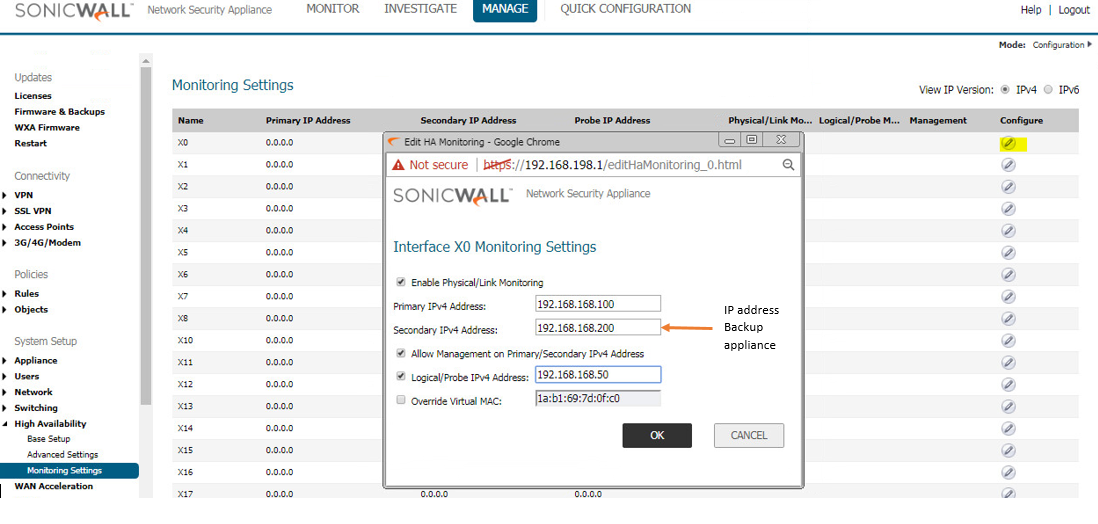
The configuration tasks on the High Availability | Monitoring page are performed on the Primary unit and then are automatically synchronized to the Backup.
- Login as an administrator to the SonicOS user interface on the Primary SonicWall.
- Go to Device In top menu , navigate to High Availability | Monitoring Settings .
- Click Configure icon for an interface on the LAN, such as X0.
- To enable link detection between the designated HA interfaces on the Primary and Backup units, leave the Enable Physical / Link Monitoring checkbox selected.
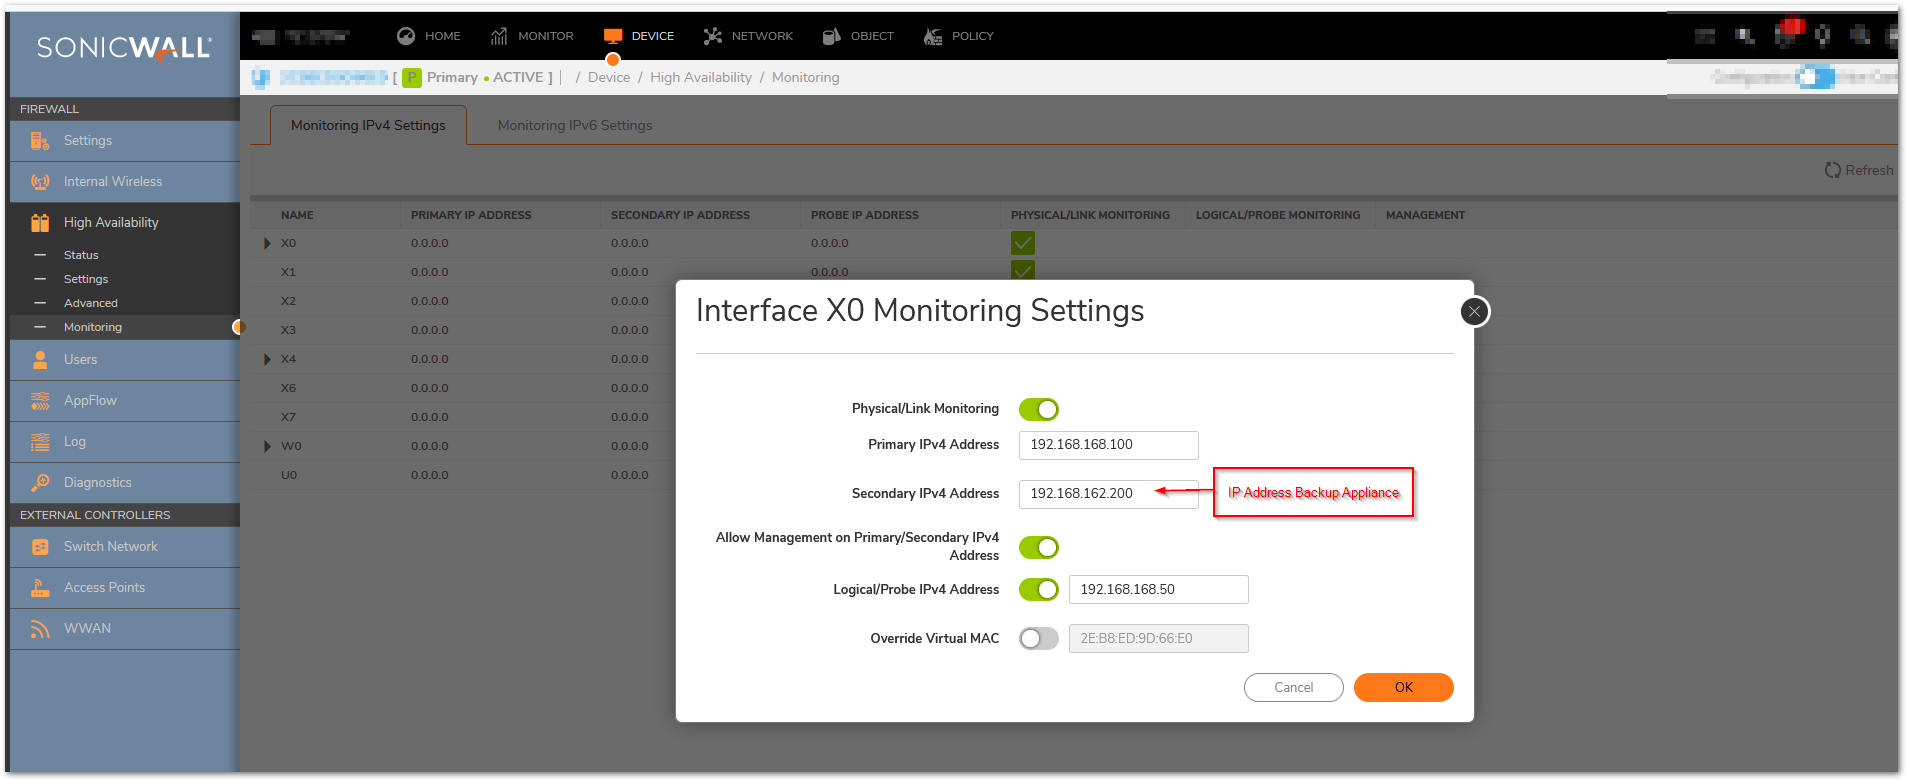
- In the Primary IP Address field, enter the unique LAN management IP address of the Primary unit.
- In the Backup IP Address field, enter the unique LAN management IP address of the Backup unit.
Configuring unique management IP addresses for both units in the HA Pair allows you to log in to each unit independently for management purposes. Note that non-management traffic is ignored if it is sent to one of these IP addresses. The Primary and Backup SonicWall security appliances’ unique LAN IP addresses cannot act as an active gateway; all systems connected to the internal LAN will need to use the virtual LAN IP address as their gateway.
The management IP address of the Backup/Idle unit is used to allow license synchronization with the SonicWall licensing server, which handles licensing on a per-appliance basis (not per-HA Pair). Even if the Backup unit was already registered on MySonicWall before creating the HA association, you must use the link on the Device | Settings | Licenses page to connect to the SonicWall server while accessing the Backup appliance through its management IP address. - Select the Allow Management on Primary/Backup IP Address checkbox. When this option is enabled for an interface, a green icon appears in the interface’s management column in the Monitoring Settings table on the High Availability | Monitoring page. Management is only allowed on an interface when this option is enabled.
- In the Logical Probe IP Address field, enter the IP address of a downstream device on the LAN network that should be monitored for connectivity.Typically, this should be a downstream router or server. (If probing is desired on the WAN side, an upstream device should be used.) The Primary and Backup appliances will regularly ping this probe IP address. If both can successfully ping the target, no failover occurs. If neither can successfully ping the target, no failover occurs, because it is assumed that the problem is with the target, and not the SonicWall appliances. But, if one appliance can ping the target but the other appliance cannot, failover will occur to the appliance that can ping the target.
 NOTE: The Primary IP Address and Backup IP Address fields must be configured with independent IP addresses on a LAN interface, such as X0, (or a WAN interface, such as X1, for probing on the WAN) to allow logical probing to function correctly.
 - Optionally, to manually specify the virtual MAC address for the interface, select Override Virtual MAC and enter the MAC address in the field. The format for the MAC address is six pairs of hexadecimal numbers separated by colons, such as A1:B2:C3:d4:e5:f6. Care must be taken when choosing the Virtual MAC address to prevent configuration errors.
Note:There is a design change on Gen7 in the way MAC Addresses are handled for the HA native vs. monitoring. GEN7 uses the Virtual MAC for all interface IPs, both the Virtual IPs and Primary / Secondary Monitoring IPs, Hence the MAC addresses of the X0 Interface IP(Or any VLAN under X0), will have the same MAC address as of the Primary firewall X0 monitoring IP, the same applies for all the interfaces X1, X2, wherever monitoring IPs will be configured.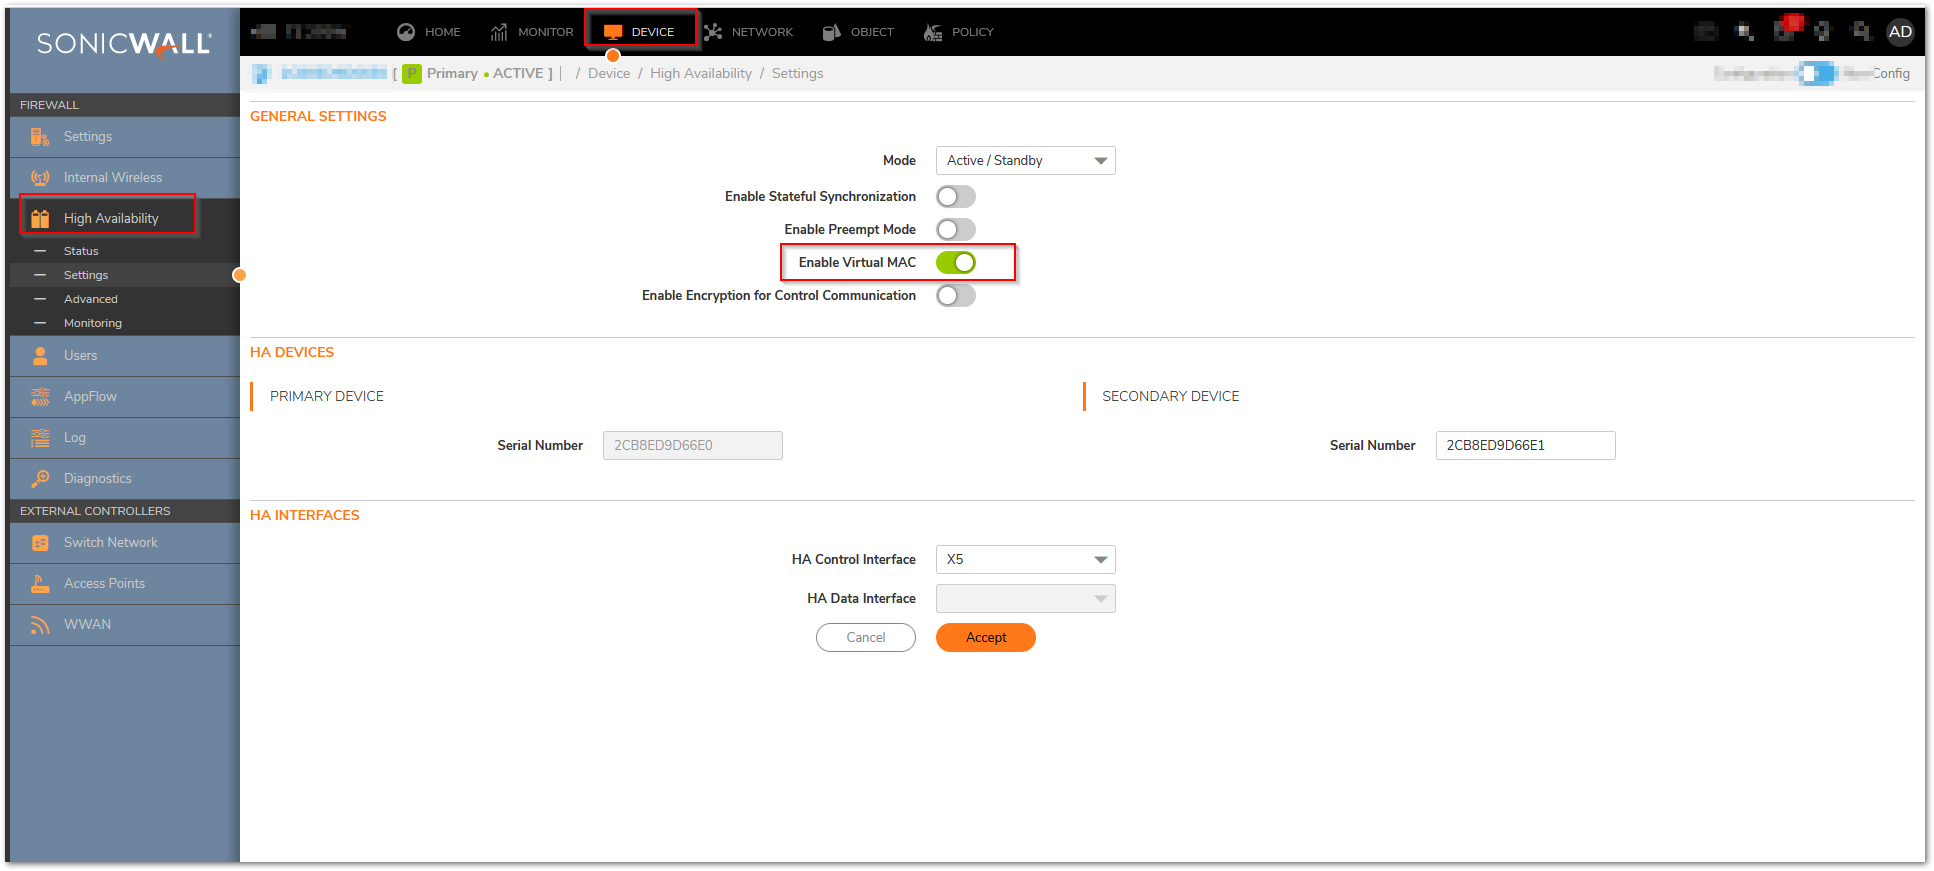
- To configure monitoring on any of the other interfaces, repeat the above steps.
- When finished with all High Availability configuration, click Accept. All settings will be synchronized to the Idle unit automatically.
Resolution for SonicOS 6.5
This release includes significant user interface changes and many new features that are different from the SonicOS 6.2 and earlier firmware. The below resolution is for customers using SonicOS 6.5 firmware.
The configuration tasks on the High Availability | Monitoring page are performed on the Primary unit and then are automatically synchronized to the Backup.
- Login as an administrator to the SonicOS user interface on the Primary SonicWall.
- Go to Manage In top menu , navigate to High Availability | Monitoring Settings .
- Click Configure icon for an interface on the LAN, such as X0.
- To enable link detection between the designated HA interfaces on the Primary and Backup units, leave the Enable Physical / Link Monitoring checkbox selected.
- In the Primary IP Address field, enter the unique LAN management IP address of the Primary unit.
- In the Backup IP Address field, enter the unique LAN management IP address of the Backup unit.
Configuring unique management IP addresses for both units in the HA Pair allows you to log in to each unit independently for management purposes. Note that non-management traffic is ignored if it is sent to one of these IP addresses. The Primary and Backup SonicWall security appliances’ unique LAN IP addresses cannot act as an active gateway; all systems connected to the internal LAN will need to use the virtual LAN IP address as their gateway.
The management IP address of the Backup/Idle unit is used to allow license synchronization with the SonicWall licensing server, which handles licensing on a per-appliance basis (not per-HA Pair). Even if the Backup unit was already registered on MySonicWall before creating the HA association, you must use the link on the System | Licenses page to connect to the SonicWall server while accessing the Backup appliance through its management IP address. - Select the Allow Management on Primary/Backup IP Address checkbox. When this option is enabled for an interface, a green icon appears in the interface’s management column in the Monitoring Settings table on the High Availability | Monitoring page. Management is only allowed on an interface when this option is enabled.
- In the Logical Probe IP Address field, enter the IP address of a downstream device on the LAN network that should be monitored for connectivity.Typically, this should be a downstream router or server. (If probing is desired on the WAN side, an upstream device should be used.) The Primary and Backup appliances will regularly ping this probe IP address. If both can successfully ping the target, no failover occurs. If neither can successfully ping the target, no failover occurs, because it is assumed that the problem is with the target, and not the SonicWall appliances. But, if one appliance can ping the target but the other appliance cannot, failover will occur to the appliance that can ping the target. NOTE: The Primary IP Address and Backup IP Address fields must be configured with independent IP addresses on a LAN interface, such as X0, (or a WAN interface, such as X1, for probing on the WAN) to allow logical probing to function correctly.
- Optionally, to manually specify the virtual MAC address for the interface, select Override Virtual MAC and enter the MAC address in the field. The format for the MAC address is six pairs of hexadecimal numbers separated by colons, such as A1:B2:C3:d4:e5:f6. Care must be taken when choosing the Virtual MAC address to prevent configuration errors.When the Enable Virtual MAC checkbox is selected on the Manage | High Availability| Base Setup page, the SonicOS firmware automatically generates a Virtual MAC address for all interfaces. Allowing the SonicOS firmware to generate the Virtual MAC address eliminates the possibility of configuration errors and ensures the uniqueness of the Virtual MAC address, which prevents possible conflicts.

- To configure monitoring on any of the other interfaces, repeat the above steps.
- When finished with all High Availability configuration, click Accept. All settings will be synchronized to the Idle unit automatically.
Resolution for SonicOS 6.2 and Below
The below resolution is for customers using SonicOS 6.2 and earlier firmware. For firewalls that are generation 6 and newer we suggest to upgrade to the latest general release of SonicOS 6.5 firmware.
The configuration tasks on the High Availability | Monitoring page are performed on the Primary unit and then are automatically synchronized to the Backup.
- Login as an administrator to the SonicOS user interface on the Primary SonicWall.
- In the left navigation pane, navigate to High Availability | Monitoring.
- Click Configure icon for an interface on the LAN, such as X0.
- To enable link detection between the designated HA interfaces on the Primary and Backup units, leave the Enable Physical Interface Monitoring checkbox selected.
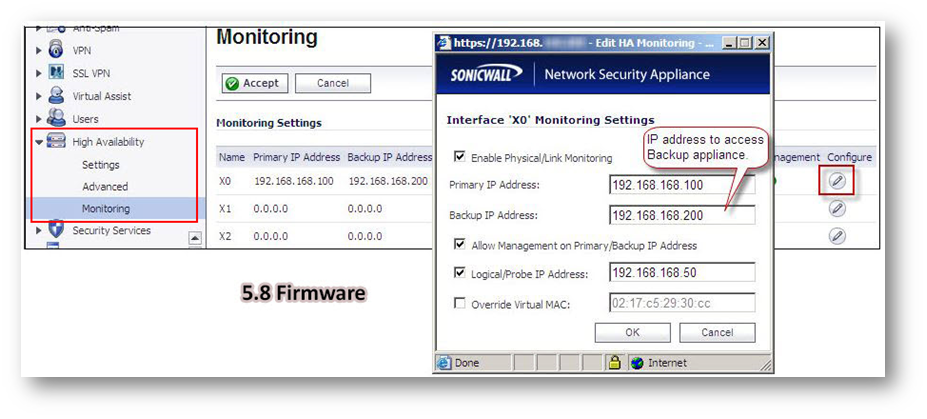
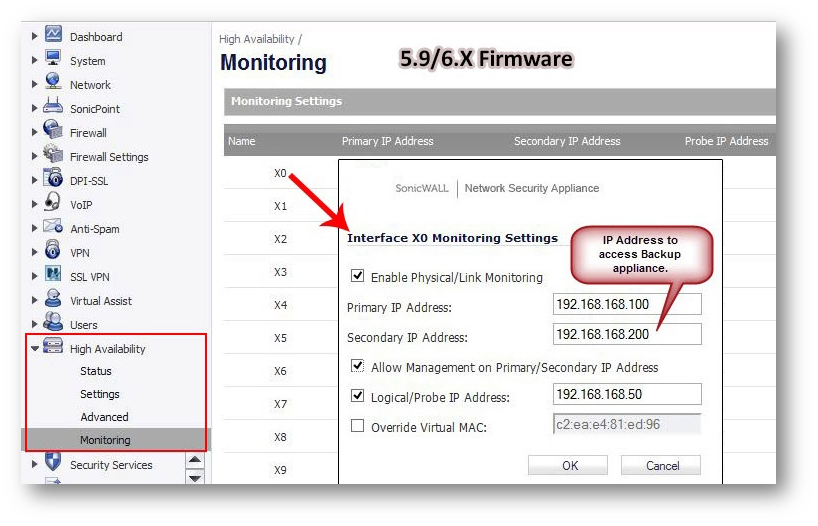
- In the Primary IP Address field, enter the unique LAN management IP address of the Primary unit.
- In the Backup IP Address field, enter the unique LAN management IP address of the Backup unit.
Configuring unique management IP addresses for both units in the HA Pair allows you to log in to each unit independently for management purposes. Note that non-management traffic is ignored if it is sent to one of these IP addresses. The Primary and Backup SonicWall security appliances’ unique LAN IP addresses cannot act as an active gateway; all systems connected to the internal LAN will need to use the virtual LAN IP address as their gateway.
The management IP address of the Backup/Idle unit is used to allow license synchronization with the SonicWall licensing server, which handles licensing on a per-appliance basis (not per-HA Pair). Even if the Backup unit was already registered on MySonicWall before creating the HA association, you must use the link on the System | Licenses page to connect to the SonicWall server while accessing the Backup appliance through its management IP address. - Select the Allow Management on Primary/Backup IP Address checkbox. When this option is enabled for an interface, a green icon appears in the interface’s Management column in the Monitoring Settings table on the High Availability | Monitoring page. Management is only allowed on an interface when this option is enabled.
- In the Logical Probe IP Address field, enter the IP address of a downstream device on the LAN network that should be monitored for connectivity.Typically, this should be a downstream router or server. (If probing is desired on the WAN side, an upstream device should be used.) The Primary and Backup appliances will regularly ping this probe IP address. If both can successfully ping the target, no failover occurs. If neither can successfully ping the target, no failover occurs, because it is assumed that the problem is with the target, and not the SonicWall appliances. But, if one appliance can ping the target but the other appliance cannot, failover will occur to the appliance that can ping the target. NOTE:The Primary IP Address and Backup IP Address fields must be configured with independent IP addresses on a LAN interface, such as X0, (or a WAN interface, such as X1, for probing on the WAN) to allow logical probing to function correctly.
- Optionally, to manually specify the virtual MAC address for the interface, select Override Virtual MAC and enter the MAC address in the field. The format for the MAC address is six pairs of hexadecimal numbers separated by colons, such as A1:B2:C3:d4:e5:f6. Care must be taken when choosing the Virtual MAC address to prevent configuration errors.When the Enable Virtual MAC checkbox is selected on the High Availability| Advanced page, the SonicOS firmware automatically generates a Virtual MAC address for all interfaces. Allowing the SonicOS firmware to generate the Virtual MAC address eliminates the possibility of configuration errors and ensures the uniqueness of the Virtual MAC address, which prevents possible conflicts.
- Click OK.
- To configure monitoring on any of the other interfaces, repeat the above steps.
- When finished with all High Availability configuration, click Accept. All settings will be synchronized to the Idle unit automatically.
Related Articles
- How can I block Anydesk application using Application Control feature in Sonicwall
- ‘Application Signature List’ type match object does not appear under App list in route policy configuration.
- How to enable logging for SonicPoint?