Over the past few years, Google has observed that distributed denial-of-service (DDoS) attacks are increasing in frequency and growing in size exponentially. Today’s internet-facing workloads are at constant risk of attack with impacts ranging from degraded performance and user experience for legitimate users, to increased operating and hosting costs, to full unavailability of mission critical workloads. Google Cloud customers are able to use Cloud Armor to leverage the global scale and capacity of Google’s network edge to protect their environment from some of the largest DDoS attacks ever seen.
On June 1, a Google Cloud Armor customer was targeted with a series of HTTPS DDoS attacks which peaked at 46 million requests per second. This is the largest Layer 7 DDoS reported to date—at least 76% larger than the previously reported record. To give a sense of the scale of the attack, that is like receiving all the daily requests to Wikipedia (one of the top 10 trafficked websites in the world) in just 10 seconds.
Cloud Armor Adaptive Protection was able to detect and analyze the traffic early in the attack lifecycle. Cloud Armor alerted the customer with a recommended protective rule which was then deployed before the attack ramped up to its full magnitude. Cloud Armor blocked the attack ensuring the customer’s service stayed online and continued serving their end-users.
Figure 1: DDoS attack graph peaking at 46M requests per second.
What happened: Attack analysis and timeline
Starting around 9:45 a.m. PT on June 1, 2022, an attack of more than 10,000 requests per second (rps) began targeting our customer’s HTTP/S Load Balancer. Eight minutes later, the attack grew to 100,000 requests per second. Cloud Armor Adaptive Protection detected the attack and generated an alert containing the attack signature by assessing the traffic across several dozen features and attributes. The alert included a recommended rule to block on the malicious signature. The following is the alert showing details of the attack before it ramped to its peaks.
Figure 2: Cloud Armor Adaptive Protection alert listing the top region codes detected as a part of the attack.
Our customer’s network security team deployed the Cloud Armor-recommended rule into their security policy, and it immediately started blocking the attack traffic. In the two minutes that followed, the attack began to ramp up, growing from 100,000 rps to a peak of 46 million rps. Since Cloud Armor was already blocking the attack traffic, the target workload continued to operate normally. Over the next few minutes, the attack started to decrease in size, ultimately ending 69 minutes later at 10:54 a.m. Presumably the attacker likely determined they were not having the desired impact while incurring significant expenses to execute the attack.
Analyzing the attack
In addition to its unexpectedly high volume of traffic, the attack had other noteworthy characteristics. There were 5,256 source IPs from 132 countries contributing to the attack. As you can see in Figure 2 above, the top 4 countries contributed approximately 31% of the total attack traffic. The attack leveraged encrypted requests (HTTPS) which would have taken added computing resources to generate. Although terminating the encryption was necessary to inspect the traffic and effectively mitigate the attack, the use of HTTP Pipelining required Google to complete relatively few TLS handshakes.
Approximately 22% (1,169) of the source IPs corresponded to Tor exit nodes, although the request volume coming from those nodes represented just 3% of the attack traffic. While we believe Tor participation in the attack was incidental due to the nature of the vulnerable services, even at 3% of the peak (greater than 1.3 million rps) our analysis shows that Tor exit-nodes can send a significant amount of unwelcome traffic to web applications and services.
The geographic distribution and types of unsecured services leveraged to generate the attack matches the Mēris family of attacks. Known for its massive attacks that have broken DDoS records, the Mēris method abuses unsecured proxies to obfuscate the true origin of the attacks.
How we stopped the attack
The attack was stopped at the edge of Google’s network, with the malicious requests blocked upstream from the customer’s application. Before the attack started, the customer had already configured Adaptive Protection in their relevant Cloud Armor security policy to learn and establish a baseline model of the normal traffic patterns for their service.
As a result, Adaptive Protection was able to detect the DDoS attack early in its life cycle, analyze its incoming traffic, and generate an alert with a recommended protective rule–all before the attack ramped up. The customer acted on the alert by deploying the recommended rule leveraging Cloud Armor’s recently launchedrate limiting capability to throttle the attack traffic. They chose the ‘throttle’ action over a ‘deny’ action in order to reduce chance of impact on legitimate traffic while severely limiting the attack capability by dropping most of the attack volume at Google’s network edge.
Before deploying the rule in enforcement mode, it was first deployed in preview mode, which enabled the customer to validate that only the unwelcome traffic would be denied while legitimate users could continue accessing the service. As the attack ramped up to its 46 million rps peak, the Cloud Armor-suggested rule was already in place to block the bulk of the attack and ensure the targeted applications and services remained available.
Protecting your applications in the cloud
Attack sizes will continue to grow and tactics will continue to evolve. To be prepared, Google recommends using a defense-in-depth strategy by deploying defenses and controls at multiple layers of your environment and your infrastructure providers’ network to protect your web applications and services from targeted web attacks. This strategy includes performing threat modeling to understand your applications’ attack surfaces, developing proactive and reactive strategies to protect them, and architecting your applications with sufficient capacity to manage unanticipated increases in traffic volume.
With Google Cloud Armor, you are able to protect your internet facing applications at the edge of Google’s network and absorb unwelcome traffic far upstream from your applications.
SSL Certificates are a great way to increase the security of your hostname because they add an extra layer of security for you and anyone that visits your hostname. Learn the benefits of adding an SSL Certificate to your Free, Enhanced Dynamic DNS or Plus Managed DNS hostname.
What is an SSL Certificate? SSL stands for Secure Socket Layer. This means that your hostname is given a secure connection between it, the Internet browser, and the webserver. This allows websites to transmit private data online, without the worry of it being stolen. You can tell when a website has an SSL certificate enabled, when the HTTP in the URL ends with an S, making it an HTTPS. Example: https://www.noip.com.
What are the advantages of adding an SSL Certificate to your Free, Enhanced Dynamic DNS or Plus Managed DNS hostname?
Encryption and Verification
This is the biggest benefit of adding an SSL certificate to your hostname. The extra layer of encryption shows that your hostname is safe for people to visit. All of your visitor’s data will now be transmitted over an encrypted connection to the hostname and others won’t be able to see what is being sent.
The SSL Certificate also checks that the information it receives is coming from the expected domain. So, if your customer sends personal or private information, the SSL Certificate guarantees it is being sent to the secure site, and not to a potentially malicious one.
Ensures Data Integrity
A website that doesn’t have an SSL Certificate enabled sends data in a plain text format. This means that all of the data that is being sent between the server and the browser can be easily read. If a hacker were to gain access to your domain and then change the information being presented on your hostname, this is an example of domain spoofing.
Domain spoofing happens when a hacker gains access to the information on a website and then changes it before it gets sent to the browser for the user. When this happens, the user is typically not even aware they are visiting a compromised website. When an SSL certificate is enabled on the hostname, this becomes much harder as the data is not sent in plain text, but is sent in an encrypted, unreadable format.
Gains Your Users Trust
When you use an SSL Certificate, your hostname shows up with an HTTPS and a lock icon, signifying the hostname is secure. This helps users feel safe when they are on your hostname and makes them feel comfortable if you are asking them to enter sensitive information, like credit cards, or Social Security numbers.
Our Free Dynamic DNS, Enhanced Dynamic DNS and Plus Managed DNS accounts both come with 1 Free TrustCor Standard DV SSL Certificate. Additional SSL Certificates can be purchased and start at just $19.99 per year. You can learn more about each SSL Certificate and how you can add one today here.
We are so excited to announce the release of Two-Factor Authentication (2FA). This new feature helps keep our customers’ accounts secure by ensuring that only authorized people are able to access accounts. This helps limit the impact of malicious activity because it adds another layer of security on top of your password.
Why Two-Factor Authentication?
You may be wondering why No-IP added 2FA as a security feature, or even how 2FA is different from our current login policy. 2FA is one of the highest levels of security that can be implemented to ensure customer accounts remain secure. 2FA is a security practice that requires you to verify your identity using multiple forms of account verification.
When 2FA is enabled, you will log in with the same username and password, but you will be required to enter a time-based one-time password (TOTP) pin from an authenticator app of your choice on your smartphone.
It is more important than ever to enable data security measures like 2FA whenever possible. As threats like password breaches, keylogging, and other security threats are becoming a normal thing, 2FA is an added layer of account protection.
What are the Benefits of Two-Factor Authentication?
Additional layer of security on account login 2FA requires users to identify themselves through additional verification measures, this helps protect accounts from theft. Making it so a password alone isn’t enough to authenticate a login. Lately, major password breaches across all industries happen so often that even a very secure password can be breached. 2FA adds another layer of security to help reduce this risk.
Identity Protection Identity theft and data breaches are all too common lately. 2FA ensures that if your username or password were ever leaked, your account is still protected by an additional layer of authentication.
Compliance Many of our customers work in industries like the Government and Health Industries that require extra compliance for third-party accounts.
Effective Cybersecurity Solution 2FA is an effective strategy to keep accounts safe because it is difficult for hackers to crack both a password and have access to the 2FA device.
Easy Implementation We have made enabling and using 2FA simple and easy by offering authentication using TOTP, which is supported by various smartphone apps. You choose the one that works best for you.
How Do I Enable 2FA On My No-IP Account?
Login to your No-IP account, you can then find the 2FA option within your No-IP account under “Account” and then click ”Security”.
The first step is to choose which authentication app you will use. We suggest using Authy, Duo, LastPass Authenticator, or 1Password. However, any 2FA application app that supports TOTP will work. You will then need to download and install whichever authentication app you choose.
After you have downloaded your authentication app, you will need to follow the steps for that certain app to finish the configuration process and fully activate 2FA. Please ensure that you keep your Recovery Codes in a safe place, so you can always get back into your account.
The following Knowledge Base Guides will help you configure 2FA on your No-IP account for the specific apps listed below. Consult your application’s documentation for support with other TOTP authentication apps.
Any 2FA application that works with TOTP will work with No-IP’s 2FA.
Does No-IP Require 2FA?
While we don’t currently require No-IP accounts to have 2FA enabled, we strongly suggest that you enable it. 2FA is a simple solution to help keep your No-IP account secure.
What Happens If I Lose Access To My Two-Factor Authentication App?
When you set up 2FA you will be provided with ten, one-time-use recovery codes that allow you to get into your account without needing to enter your TOTP code. Each code can only be used one time. If you lose your backup codes and your authentication app, you will no longer be able to access your account. Keep these codes in a safe and secure spot that only you have access to.
If I have 2FA set up, do I need an account Security Question?
Yes, if you ever need to contact No-IP Customer Support. we will need to verify you. One way of verification is by answering your security question. If you cannot verify your account, we will not be able to assist you.
Will you provide other factors of authentication besides TOTP and Recovery Codes? For now, we are monitoring the usage of TOTP. However, we’re open to adding additional factors dependent on customer feedback.
Does My Dynamic Update Client (DUC) or Other Update Device Require Two-Factor Authentication When Logging In or Sending Dynamic IP Updates?
No, 2FA will only be prompted on our website at this time. We are currently working on separating the Dynamic Update Client credentials from dynamic updates completely. If you want to use different credentials other than your login, you can set up sub-account groups.
A few months ago, we announced that all Enhanced Dynamic DNS subscriptions now include one TrustCor Standard DV SSL Certificate. Well, to finish the year off with a bang, we are here with another announcement!
We now include one TrustCor Standard DV SSL Certificate with every Free Dynamic DNS, Enhanced Dynamic DNS and Plus Managed DNS service. We know that having a secure hostname is important to you and now you can install an SSL on any hostnames managed by No-IP for free!
Our Enhanced Dynamic DNS and Plus Managed DNS customers are eligible to create a TrustCor Standard DV SSL Certificate at any time. Free Dynamic DNS accounts are eligible to create a certificate on an active hostname after their account has been active for at least 30 days.
What are SSL Certificates?
An SSL certificate allows internet connections between two systems to be authenticated and encrypted. This allows people to connect to your server and send information without anyone in the middle being able to see what is being sent. Most browsers will display a security warning to your site’s visitors if you do not have a valid certificate installed.
Why is a TrustCor Standard DV SSL Certificates (Included with No-IP Free Dynamic DNS) better than a different free SSL Certificate solution?
Our free TrustCor Standard DV SSL Certificates are valid for a year, but can be easily reissued. Free SSL Certificates from others require validation once every 90 days.
Domain Validation is automated and happens instantly. No more waiting around for your domain to be verified. Other solutions can take days and are not automated with No-IP.
TXT Record automatically added for domain validation.
Very rapid time to issue and validate (typically within 20 minutes).
Strongest SSL encryption using SHA-2 algorithms and 2048-bit RSA keys.
Not currently a No-IP customer? Let us introduce ourselves to you.
We are a Dynamic DNS and Managed DNS company that has been around since 1999. We have over 30 million customers, all around the world who utilize our services for remote accessing devices in a simple and secure way that eliminates the need to use third-party cloud services.
We offer a Free Dynamic DNS service that millions of customers use daily to access their devices from anywhere. Whether it is checking in on a loved one via a remote security camera, accessing a computer remotely, or even running a game server to play games with friends and family safely, No-IP has a remote access solution that works! To learn more about our Free Dynamic DNS, check out our Remote Access and sign up for your Free Dynamic DNS account now.
A VMware vSphere environment includes many components to deliver business-critical workloads and services. However, there is a feature of today’s modern VMware vSphere infrastructure that is arguably underutilized – the VMware Content Library. Nevertheless, it can be a powerful tool that helps businesses standardize the workflow using files, templates, ISO images, vApps, scripts, and other resources to deploy and manage virtual machines. So how can organizations manage resources across sites with the VMware Content Library?
What is the VMware Content Library?
Most VI admins will agree with multiple vCenter Servers in the mix, managing files, ISOs, templates, vApps, and other resources can be challenging. For example, have you ever been working on one cluster and realized you didn’t have the ISO image copied to a local datastore that is accessible, and you had to “sneakernet” the ISO where you could mount and install it? What about virtual machine templates? What if you want to have the virtual machine templates in one vCenter Server environment available to another vCenter Server environment?
The VMware Content Library is a solution introduced in vSphere 6.0 that allows customers to keep their virtual machine resources synchronized in one place and prevent the need for manual updates to multiple templates and copying these across between vCenter Servers. Instead, administrators can create a centralized repository using the VMware Content Library from which resources can be updated, shared, and synchronized between environments.
Using the VMware Content Library, you essentially create a container that can house all of the important resources used in your environment, including VM-specific objects like templates and other files like ISO image files, text files, and other file types.
The VMware Content Library stores the content as a “library item.” Each VMware Content Library can contain many different file types and multiple files. VMware gives the example of the OVF file that you can upload to your VMware Content Library. As you know, the OVF file is a bundle of multiple files. However, when you upload the OVF template, you will see a single library entry.
VMware has added some excellent new features to the VMware Content Library features in the past few releases. These include the ability to add OVF security policies to a content library. The new OVF security policy was added in vSphere 7.0 Update 3. It allows implementing strict validation for deploying and updating content library items and synchronizing templates. One thing you can do is make sure a trusted certificate signs the templates. To do this, you can deploy a signing certificate for your OVFs from a trusted CA to your content library.
Another recent addition to the VMware Content Library functionality introduced in vSphere 6.7 Update 1 is uploading a VM template type directly to the VMware Content Library. Previously, VM templates were converted to an OVF template type. Now, you can work directly with virtual machine templates in the VMware Content Library.
VMware Content Library types
VMware Content Library enables managing resources across sites using two different types of content libraries. These include the following:
Local Content Library – A local content library is a VMware Content Library used to store and manage content residing in a single vCenter Server environment. Suppose you work in a single vCenter Server environment and want to have various resources available across all your ESXi hosts to deploy VMs, vAPPs, install from ISO files, etc. In that case, the local content library allows doing that. With the local content library, you can choose to Publish the local content library. When you publish the Content Library, you are making it available to be subscribed to or synchronized.
Subscribed Content Library – The other type of Content Library is the subscribed content library. When you add a subscribed VMware Content Library type, you are essentially downloading published items from a VMware Content Library type that has published items as mentioned in the Local Content Library section. In this configuration, you are only a consumer of the VMware Content Library that someone else has published. It means when creating the Content Library, the publish option was configured. You can’t add templates and other items to the subscribed VMware Content Library type as you can only synchronize the content of the subscribed Content Library with the content of the published Content Library.
With a subscribed library, you can choose to download all the contents of the published Content Library immediately once the subscribed Content Library is created. You can also choose to download only the metadata for items in the published Content Library and download the entire contents of the items you need. You can think of this as a “files on-demand” type feature that only downloads the resources when these are required.
Below is an example of the screen when configuring a content library that allows creating either a Local Content Library or the Subscribed Content Library:
Choosing the content library type
Create a local or subscription Content Library in vSphere 7
Creating a new VMware Content Library is a relatively straightforward and intuitive process you can accomplish in the vSphere Client. Let’s step through the process to create a new VMware Content Library. We will use the vSphere Web Client to manage and configure the Content Library Settings.
Using the vSphere Web Client to manage the Content Library
First, click the upper left-hand “hamburger” menu in the vSphere Client. You will see the option Content Libraries directly underneath the Inventory menu when you click the menu.
Choosing the Content Libraries option to create a manage Content Libraries
Under the Content Libraries screen, you can Create new Content Libraries.
Creating a new Content Library in the vSphere Client
It will launch the New Content Library wizard. In the Name and Location screen, name the new VMware Content Library.
New Content Library name and location
On the Configure content library step, you configure the content library type, including configuring a local content library or a subscribed content library. Under the configuration for Local content library, you can Enable publishing. If publishing is enabled, you can also enable authentication.
Configuring the Content Library type
When you configure publishing and authentication, you can configure a password on the content library.
Step 3 is the Apply security policy step. It allows applying the OVF default policy to protect and enforce strict validation while importing and synchronizing OVF library items.
Choosing to apply the OVF default policy
The VMware Content Library needs to have a storage location that will provide the storage for the content library itself. First, select the datastore you want to use for storing your content library. The beauty of the content library is that it essentially publishes and shares the items in the content library itself, even though they may be housed on a particular datastore.
Select the storage to use for storing items in the VMware Content Library
Finally, we are ready to complete the creation of the Content Library. Click Finish.
Finishing the creation of the VMware Content Library
Once the VMware Content Library is created, you can see the details of the library, including the Publication section showing the Subscription URL.
Viewing the settings of a newly created VMware Content Library
As a note. If you click the Edit Settings hyperlink under the Publication settings pane, you can go in and edit the settings of the Content Library, including the publishing options, authentication, changing the authentication password, and applying a security policy.
Editing the settings of a VMware Content Library
Creating a subscribed VMware Content Library
As we mentioned earlier, configuring a subscribed content library means synchronizing items from a published content library. In the New Content Library configuration wizard, you choose the Subscribed content library option to synchronize with a published content library. Then, enter the subscription URL for the published content library when selected. As shown above, this URL is found in the settings of the published content library.
You will need to also place a check in the Enable authentication setting if the published content library was set up with authentication. Then, enter the password configured for the published content library. Also, note the configuration for downloading content. As detailed earlier, you can choose to synchronize items immediately, meaning the entire content library will be fully downloaded. Or, you can select when needed, which acts as a “files on demand” configuration that only downloads the resources when needed.
Configuring the subscribed content library
Choose the storage for the subscribed Content Library.
Add storage for the subscribed VMware Content Library
Ready to complete adding a new subscribed VMware Content Library. Click Finish.
Ready to complete adding a subscribed VMware Content Library
Interestingly, you can add a subscribed VMware Content Library that is subscribed to the same published VMware Content Library on the same vCenter Server.
Published and subscribed content library on the same vCenter Server
What is Check-In/Check-Out?
A new feature included with VMware vSphere 7 is versioning with the VMware Content Library. So often, with virtual machine templates, these are frequently changed, updated, and configured. As a result, it can be easy to lose track of the changes made, the user making the modifications, and track the changes efficiently.
Now, VMware vSphere 7 provides visibility into the changes made to virtual machine templates with a new check-in/check-out process. This change embraces DevOps workflows with a way for IT admins to check in and check out virtual machine templates in and out of the Content Library.
Before the new check-in/check-out feature, VI admins might use a process similar to the following to change a virtual machine template:
Convert a virtual machine template to a virtual machine
Place a snapshot on the converted template to machine VM
Make whatever changes are needed to the VM
Power the VM off and convert it back to a template
Re-upload the VM template back to the Content Library
Delete the old template
Internally notify other VI admins of the changes
Now, VI admins can use a new capability in vSphere 7.0 and higher to make changes to virtual machine templates more seamlessly and track those changes effectively.
Clone as template to Library
The first step is to house the virtual machine template in the Content Library. Right-click an existing virtual machine to use the new functionality and select Clone as Template to Library.
Clone as Template to Library functionality to use the check-in and check-out feature
As a note, if you see the Clone to Library functionality instead of Clone as Template to Library, it means you have not converted the VM template to a virtual machine. If you right-click a VM template, you only get the Clone to Library option. If you select Clone to Template, it only allows cloning the template in a traditional way to another template on a datastore.
Right-clicking and cloning a VM template only gives the option to Clone to Library
Continuing with the Clone to Library process, you will see the Clone to Template in Library dialog box open. Select either New template or Update the existing template.
Clone to Template in Library
In the vCenter Server tasks, you will see the process begin to Upload files to a Library and Transfer files.
Uploading a virtual machine template to the Content Library
When you right-click a virtual machine and not a virtual machine template, you will see the additional option of Clone as Template to Library.
Clone as Template to Library
It then brings up a more verbose wizard for the Clone Virtual Machine To Template process. The first screen is the Basic information where you define the Template type (can be OVF or VM Template), the name of the template, notes, and select a folder for the template.
Configuring basic information for the clone virtual machine to template process
On the Location page, you select the VMware Content Library you want to use to house the virtual machine template.
Select the VMware Content Library to house the virtual machine template
Select a compute resource to house your cloned VM template.
Select the compute resource for the virtual machine template
Select the storage for the virtual machine template.
Select storage to house the VM template
Finish the Clone Virtual Machine to Template process.
Finish the clone of the virtual machine to template in the VMware Content Library
If you navigate to the Content Library, you will see the template listed under the VM Templates in the Content Library.
Viewing the VM template in the Content Library
Checking templates in and out
If you select the radio button next to the VM template, the Check Out VM From This Template button will appear to the right.
Launching the Check out VM from this template
When you click the button, it will launch the Check out VM from VM Template wizard. First, name the new virtual machine that will be created in the check-out process.
Starting the Check out VM from VM template
Select the compute resource to house the checked-out virtual machine.
Selecting a compute resource
Review and finish the Check out VM from VM template process. You can select to power on VM after check out.
Review and Finish the Check out VM from VM Template
The checked-out virtual machine will clone from the existing template in the Content Library. Also, you will see an audit trail of the check-outs from the Content Library. You are directed to Navigate to the checked-out VM to make updates. Note you then have the button available to Check In VM to Template.
Virtual machine template is checked out and deployed as a virtual machine in inventory
If you navigate to the Inventory view in the vSphere Client, you will see the machine has a tiny blue dot in the lower left-hand corner of the virtual machine icon.
Viewing the checked-out VM template as a virtual machine in vSphere inventory
After making one small change, such as changing the virtual network the virtual machine is connected to, we see the option appear to Check In VM to Template.
Check In VM to Template
It will bring up the Check In VM dialog box, allowing you to enter notes and then click the Check In button.
Check In the VM
We see the audit trail of changes reflected in the Content Library with the notes we entered in the Check in notes.
Virtual machine template checked back in with the notes entered in the check-in process
You will also see a new Versioning tab displayed when you view the virtual machine template in the inventory view.
Viewing the versioning of a virtual machine template in the inventory view
VMware Content Library Roles
There are various privileges related to Content Library privileges. VMware documents the following privileges that can be assigned to a custom VMware Content Library Role.
Privilege Name
Description
Required On
Content library.Add library item
Allows addition of items in a library.
Library
Content library.Add root certificate to trust store
Allows addition of root certificates to the Trusted Root Certificates Store.
vCenter Server
Content library.Check in a template
Allows checking in of templates.
Library
Content library.Check out a template
Allows checking out of templates.
Library
Content library.Create a subscription for a published library
Allows creation of a library subscription.
Library
Content library.Create local library
Allows creation of local libraries on the specified vCenter Server system.
vCenter Server
Content library.Create or delete a Harbor registry
Allows creation or deletion of the VMware Tanzu Harbor Registry service.
vCenter Server for creation. Registry for deletion.
Content library.Create subscribed library
Allows creation of subscribed libraries.
vCenter Server
Content library.Create, delete or purge a Harbor registry project
Allows creation, deletion, or purging of VMware Tanzu Harbor Registry projects.
Registry
Content library.Delete library item
Allows deletion of library items.
Library. Set this permission to propagate to all library items.
Content library.Delete local library
Allows deletion of a local library.
Library
Content library.Delete root certificate from trust store
Allows deletion of root certificates from the Trusted Root Certificates Store.
vCenter Server
Content library.Delete subscribed library
Allows deletion of a subscribed library.
Library
Content library.Delete subscription of a published library
Allows deletion of a subscription to a library.
Library
Content library.Download files
Allows download of files from the content library.
Library
Content library.Evict library item
Allows eviction of items. The content of a subscribed library can be cached or not cached. If the content is cached, you can release a library item by evicting it if you have this privilege.
Library. Set this permission to propagate to all library items.
Content library.Evict subscribed library
Allows eviction of a subscribed library. The content of a subscribed library can be cached or not cached. If the content is cached, you can release a library by evicting it if you have this privilege.
Library
Content library.Import Storage
Allows a user to import a library item if the source file URL starts with ds:// or file://. This privilege is disabled for content library administrator by default. Because an import from a storage URL implies import of content, enable this privilege only if necessary and if no security concern exists for the user who performs the import.
Library
Content library.Manage Harbor registry resources on specified compute resource
Allows management of VMware Tanzu Harbor Registry resources.
Compute cluster
Content library.Probe subscription information
This privilege allows solution users and APIs to probe a remote library’s subscription info including URL, SSL certificate, and password. The resulting structure describes whether the subscription configuration is successful or whether there are problems such as SSL errors.
Library
Content library.Publish a library item to its subscribers
Allows publication of library items to subscribers.
Library. Set this permission to propagate to all library items.
Content library.Publish a library to its subscribers
Allows publication of libraries to subscribers.
Library
Content library.Read storage
Allows reading of content library storage.
Library
Content library.Sync library item
Allows synchronization of library items.
Library. Set this permission to propagate to all library items.
Content library.Sync subscribed library
Allows synchronization of subscribed libraries.
Library
Content library.Type introspection
Allows a solution user or API to introspect the type support plug-ins for the content library service.
Library
Content library.Update configuration settings
Allows you to update the configuration settings.
Library
No vSphere Client user interface elements are associated with this privilege.
Content library.Update files
Allows you to upload content into the content library. Also allows you to remove files from a library item.
Library
Content library.Update library
Allows updates to the content library.
Library
Content library.Update library item
Allows updates to library items.
Library. Set this permission to propagate to all library items.
Content library.Update local library
Allows updates of local libraries.
Library
Content library.Update subscribed library
Allows you to update the properties of a subscribed library.
Library
Content library.Update subscription of a published library
Allows updates of subscription parameters. Users can update parameters such as the subscribed library’s vCenter Server instance specification and placement of its virtual machine template items.
Library
Content library.View configuration settings
Allows you to view the configuration settings.
Library
No vSphere Client user interface elements are associated with this privilege.
Advanced Content Library settings
Several advanced configuration settings are configurable with the VMware Content Library. You can get to these by navigating to Content Libraries > Advanced.
This setting enables automatic synchronization of subscribed content libraries.
Library Auto Sync Refresh Interval (minutes)
The Interval between two consequent automatic synchronizations of the subscribed content library. This interval is measured in minutes.
Library Auto Sync Setting Refresh Interval (seconds)
This is the Interval after which the refresh interval for the automatic synchronization settings of the subscribed library will be updated if it has been changed. It is measured in seconds. A change in the refresh interval requires a restart of vCenter Server.
Library Auto Sync Start Hour
This setting refers to the time of day when the automatic synchronization of a subscribed content library begins
Library Auto Sync Stop Hour
This setting refers to the time of day when the automatic synchronization of a subscribed content library stops. Automatic synchronization stops until the start hour.
Library Maximum Concurrent Sync Items
The maximum number of items concurrently synchronizing for each subscribed library.
Max concurrent NFC transfers per ESX host
The maximum concurrent NFC transfers per ESXi host limit
Maximum Bandwidth Consumption
The bandwidth usage threshold. It is measured in Mbps across all transfers where 0 means unlimited bandwidth.
Maximum Number of Concurrent Priority Transfers
The Concurrent transfer limit for priority files. Tranfers are queued if the bandwidth limit is exceeded. This threadpool is used only to transfer priority objects. For example, if you change the concurrent transfer limit for priority files, such as OVF, you must restart vCenter Server.
Maximum Number of Concurrent Transfers
Concurrent transfer limit. When exceeded, the transfers are queued. If you change the concurrent transfer limit, it requires a restart of vCenter Server.
To properly protect your VMware environment, use Altaro VM Backup to securely backup and replicate your virtual machines. We work hard perpetually to give our customers confidence in their VMware backup strategy.
To keep up to date with the latest VMware best practices, become a member of the VMware DOJO now (it’s free).
Wrapping up
The VMware Content Library provides a centralized repository that allows keeping required file resources, virtual machine templates, ISO images vApps, and other files synchronized and available across the vSphere datacenter. In vSphere 7, the Content Library allows organizations to have a better way to keep up with and track changes to virtual machine templates. Using the new check-in/check-out process, VI admins can track changes made with each check-out and ensure these are documented and synchronized back to the Content Library.
It effectively provides a solution to remove the need to copy files between ESXi hosts or vSphere clusters and have what you need to install guest operating systems or deploy virtual machine templates. In addition, the subscribed Content Library allows synchronizing vCenter Server content libraries so that many other vCenter Servers can take advantage of the files already organized in the published Content Library.
The VMware Content Library is one of the more underutilized tools in the VI admin’s toolbelt that can bring about advantages in workflow, efficiency, and time spent finding and organizing files for deploying VMs and OS’es. In addition, the recent feature additions and improvements, such as check-ins/check-outs, have provided a more DevOps approach to tracking and working with deployment resources.
Google Workspace (formerly G Suite) now has stronger protections for risky account actions, automatically blocking hijacking attempts with identity verification prompts and logging them for further investigation.
This added layer of security will block threat actors who gain access to a user’s account to protect personal data and sensitive information belonging to their organization.
The enhanced account protection capabilities are available to all Google Workspace customers, including legacy G Suite Basic and Business customers.
“Google will evaluate the session attempting the action, and if it’s deemed risky, it will be challenged with a ‘Verify it’s You’ prompt,” Google said.
“Through a second and trusted factor, such as a 2-step verification code, users can confirm the validity of the action.”
For instance, this new feature would block sensitive actions such as attempts to change the account’s name until “the true account owner can verify that this was intentional.”
Admins can disable it for users stuck behind login prompts
Google added that admins could also temporarily disable login challenges triggered on sensitive account actions for users who can’t get past the verification prompts.
“In the Admin console under Users > ‘UserName’> Security, admins can toggle login challenges OFF for ten minutes if a user gets stuck behind a ‘verify it’s you prompt’,” the company explained.
“We strongly recommend only using this option if contact with the user is credibly established, such as via a video call.”
It’s also important to mention that this feature only supports users using Google as their identity provider, blocking actions taken within Google products, with SAML users not being supported now.
This update builds on a previous Google Workspace security improvement announced in June, with new alerts added to inform of critical and sensitive changes to admin accounts.
Google has further secured Workspace users from attacks by rolling out new Google Drive warning banners in January to warn them of potentially suspicious files used for malware delivery and phishing attacks.
A new large-scale phishing campaign targeting Coinbase, MetaMask, Kraken, and Gemini users is abusing Google Sites and Microsoft Azure Web App to create fraudulent sites.
These phishing pages are promoted through comments posted to legitimate sites by a network of bots controlled by the threat actors. Posting links to phishing pages on various legitimate sites aims to increase traffic and boost the malicious site’s search engine rankings.
Furthermore, because the phishing sites are hosted in Microsoft and Google services, they aren’t flagged by automated moderator systems, allowing promotional messages to stay in the comment section for longer.
Comment containing multiple links to phishing pages(Netskope)
The new campaign was spotted by analysts at Netskope, who noted that this tactic has allowed some of the fraudulent sites to appear as the first result in Google Search.
Even worse, as shown below, Google has also included the phishing pages as featured snippets, giving them the highest exposure possible in the search results.
The first result for the given search term(Netskope)
Abusing legitimate services
Google Sites is a free web page creation tool, part of Google’s online service suite, allowing users to create websites and host them on Google Cloud or other providers.
Similarly, Microsoft’s Azure Web Apps is a platform helping users create, deploy, and manage web applications and websites.
Both services are trusted by internet security tools, offer competitive pricing and high availability, so they are a good option for creating phishing pages.
The crooks in the campaign seen by Netskope created sites that mimicked Metamask, Coinbase, Gemini, and Kraken, targeting people’s wallets and their assets.
The sites are just landing pages, and their visitors are redirected to the actual phishing sites when they click on the “login” buttons.
Landing page for Kraken phishing(Netskope)
Targeting wallets and services
The phishing campaign is currently attempting to steal MetaMask wallets and credentials for crypto exchanges, such as CoinBase, Kraken, and Gemini.
The MetaMask phishing site attempts to steal the user’s password and wallet’s secret recovery phrase (seed phrase). This information allows the threat actor to import the wallet on their own devices and drain the contents.
MetaMask phishing site asking the seed phrase(Netskope)
For the crypto exchange phishing pages, the threat actors attempt to steal their login credentials.
In all four cases, users who enter their credentials are redirected to a fake 2FA (two-factor authentication) page that requests the victim to provide their phone number.
After entering the code, the websites generate a fake error alleging unauthorized activity and authentication problems, prompting the victim to click on an “Ask Expert” button.
Bogus error message served to victims(Netskope)
This takes the victims to an online chat page where a scammer pretending to be a customer support agent promises to solve the problem by directing the victim to install the TeamViewer remote access tool.
The remote access is likely to allow the threat actors to retrieve the multi-factor authentication codes required to log in to the exchanges with the stolen credentials.
Don’t get phished
When attempting to log in to a crypto exchange, always make sure you are on the platform’s official website and not on a clone.
Users of locally installed cryptocurrency wallets, such as MetaMask, Phantom, and TrustWallet, should never share their recovery phrase on any website, regardless of the reason.
It is also important to remember that Google Ads can be abused, and Google Search SEO can be manipulated, so the ranking of the results shouldn’t be seen as a guarantee of safety.
Finally, protect your cryptocurrency exchange accounts with MFA and keep most of your crypto investments on cold wallets that are much more challenging to hack.
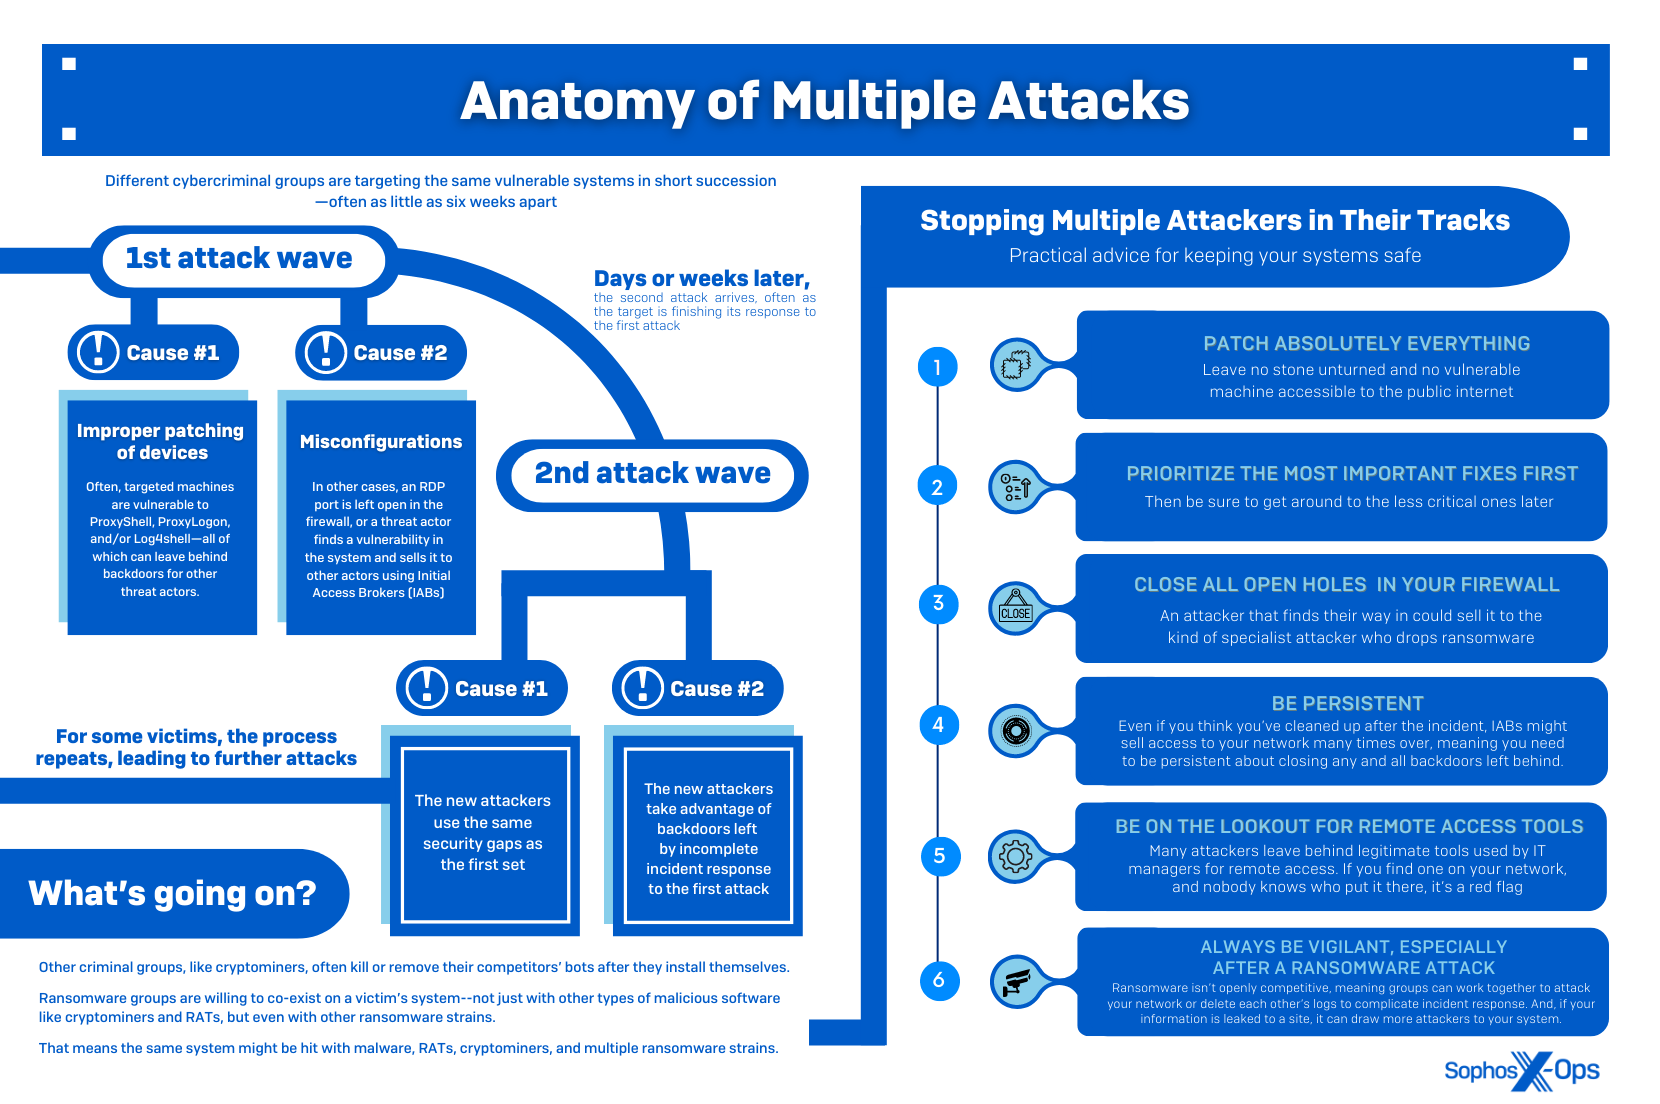
There’s a well-worn industry phrase about the probability of a cyberattack: “It’s not a matter of if, but when.” Some of the incidents Sophos recently investigated may force the industry to consider changing this rule-of-thumb: The question is not if, or when – but how many times?
In an issue we highlighted in our Active Adversary Playbook 2022, we’re seeing organizations being hit by multiple attackers. Some attacks take place simultaneously; others are separated by a few days, weeks, or months. Some involve different kinds of malware, or double – even triple – infections of the same type.
Today, Sophos X-Ops is releasing our latest Active Adversary white paper: Multiple Attackers: A Clear and Present Danger. In the paper, we take a deep dive into the problem of multiple attackers, exploring how and why organizations are attacked several times. Recent case studies from our Managed Detection and Response (MDR) and Rapid Response (RR) teams provide insight into the how, and exploring cooperation and competition among threat actors helps explain the why.
Our key findings are:
The key drivers of multiple exploitations are vulnerabilities and misconfigurations going unaddressed after a first attack
Multiple attacks often involve a specific sequence of exploitation, especially after big, widespread vulnerabilities like ProxyLogon/ProxyShell are disclosed – with cryptominers arriving first, followed by wormable botnet builders, RATs, initial access brokers (IABs), and ransomware
While some threat actors are interdependent (e.g., IABs later enabling ransomware), others, such as cryptominers, try to terminate rival malware, and may even ‘close the door’ by patching vulnerabilities or disabling vulnerable services after gaining access
Historically, threat actors have been protective of their infections, to the extent of kicking rivals off compromised systems
Ransomware actors, despite occasionally tangling with each other, seem less concerned about competition, and sometimes adopt strategies which directly or indirectly benefit other groups
Certain features of the underground economy may enable multiple attacks – for instance, IABs reselling accesses, and ransomware leak sites providing data that other threat actors can later weaponize
Some of the case studies we analyze include a ransomware actor installing a backdoor which was later abused by a second ransomware group; and an incident where one organization was attacked by three ransomware groups in the space of a few weeks, all using the same misconfigured RDP server to gain access. After the dust had settled, Sophos discovered some files which had been encrypted by all three groups
At this stage there’s only anecdotal evidence to suggest that multiple attacks are on the rise, but, as Sophos’ Director of Incident Response, Peter Mackenzie, notes: “This is something we’re seeing affecting more and more organizations, and it’s likely due to an increasingly crowded market for threat actors, as well as ransomware-as-a-service (RaaS) becoming more professionalized and lowering the bar to entry.”
Key takeaways for organizations
Multiple attacks not only complicate incident response, but also place additional pressure on victims – whether that’s through more than one ransom demand, or just the sheer technical difficulty of trying to recover from two or more attacks in a short space of time.
In the white paper we provide best practice security guidance, as well as the following eight actionable takeaways to help organizations lower the risk of falling victim to multiple attackers:
Takeaway 1: Update absolutely everything It sounds simple, but: Update everything. One of our key findings is that cryptominers, and webshells and backdoors deployed by IABs, often come first when a vulnerability has been disclosed, and the latter typically try to operate stealthily – so you might think you’ve avoided an attack, when in fact there’s already malware on your system. That might be compounded (in a subsequent attack) by ransomware. Patching early is the best way to avoid being compromised in the future – but it doesn’t mean you haven’t already been attacked. It’s always worth checking that your organization wasn’t breached prior to patching.
Takeaway 2: Prioritize the worst bugs first But how can you patch early, and how do you know what to patch? Prioritizing can be a big ask, given how many vulnerabilities are disclosed (18,429 in 2021, more than 50 a day on average, and the greatest number of reported vulnerabilities ever disclosed during a calendar year). So focus on two key elements: 1) critical bugs affecting your specific software stack; and 2) high-profile vulnerabilities that could affect your technology. There are paid services which offer vulnerability intelligence, but there are also free tools which let you set up custom alerts for particular products. Bug Alert is a non-profit service that aims to give early warning of high impact bugs. Monitoring ‘infosec Twitter’ is also recommended, as that’s where many prominent vulnerabilities are discussed when first released. Or you could use CVE Trends, which collates data from several sites to show the most-talked-about vulnerabilities.
Takeaway 3: Mind your configurations Misconfigurations – and a failure to remediate them after an attack – are a leading cause of multiple exploitations. Cryptominer operators, IABs, and ransomware affiliates always look for exposed RDP and VPN ports, and they’re among the most popular listings on most criminal marketplaces. If you do need remote access and/or management over the internet, put it behind a VPN and/or a zero-trust network access solution that uses MFA as part of its login procedure.
Takeaway 4: Assume other attackers have found your vulnerabilities Threat actors don’t operate in isolation. IABs might resell or relist their products, and ransomware affiliates may use multiple strains – so one vulnerability or misconfiguration can lead to multiple threat actors seeking to exploit your network.
Takeaway 5: Don’t slow-walk addressing an attack in progress Being listed on a leak site may attract other, opportunistic threat actors. If you’re unfortunate enough to be hit with a ransomware attack, take immediate action, in conjunction with your security teams and incident response provider(s), to close the initial entry point and assess what data has been leaked, as part of your wider remediation plan.
Takeaway 6: Ransomware plays nicely with ransomware Many threat actors have traditionally been competitive, to the point of kicking each other off infected systems, and that’s still true today when it comes to cryptominers and some RATs. But ransomware doesn’t seem to follow this trend, and may proceed to encrypt files even if other ransomware groups are on the same network – or operate in a mutually beneficial way, so that one group exfiltrates and the other encrypts.
Takeaway 7: Attackers open new backdoors Some attackers may introduce further vulnerabilities after gaining access, or create deliberate or unintentional backdoors (including the installation of legitimate software), which a subsequent threat actor can exploit. So while it’s crucial to close off the initial infection vector, it’s also worth considering a) other weaknesses and misconfigurations that could be used to gain access, and b) any new ingress points that may have appeared.
Takeaway 8: Some attackers are worse than others Not all ransomware strains are equal. Some have capabilities and features that may complicate attempts to respond to and investigate others – another reason to try to avoid becoming a victim of multiple attacks.
Conclusion
In an increasingly crowded and competitive threat environment, the problem of multiple attackers is likely to grow, with more threat actors coming into the mix and exploiting the same targets – either deliberately or unintentionally.
For organizations, this means that rapidly responding to attacks, applying patches, fixing misconfigurations – and checking for backdoors which attackers might have installed prior to any entry points being closed – will become more and more important.
Multiple attackers are bad news for analysts and responders too, complicating incident response, threat intelligence, and security monitoring. In one of the case studies we explore in the report, for example, one ransomware group wiped Windows Event Logs – which not only deleted traces of that group’s activities, but also those of the two ransomware groups which had attacked the network previously. In another case study, one threat actor was likely an affiliate of two separate ransomware groups.
The threat actors themselves –particularly ransomware actors – will at some point have to decide how they feel about cooperation: whether to fully embrace it or become more competitive. Going forward, some groups might deliberately team up, so that one group’s tactics complement another’s. Or we might see ransomware become more like cryptominers – actively searching for, and terminating, rivals on infected hosts. At the moment, however, it’s an uncertain area – one which we hope our report will shed some light on.
After gaining access via RDP, all three threat actors encrypted files, in an investigation complicated by event log clearing and backups. 3 attackers, 2 weeks – 1 entry point.
In May 2022, an automotive supplier was hit with three separate ransomware attacks. All three threat actors abused the same misconfiguration – a firewall rule exposing Remote Desktop Protocol (RDP) on a management server – but used different ransomware strains and tactics.
The first ransomware group, identified as Lockbit, exfiltrated data to the Mega cloud storage service, used Mimikatz to extract passwords, and distributed their ransomware binary using PsExec.
The second group, identified as Hive, used RDP to move laterally, before dropping their ransomware just two hours after the Lockbit threat actor.
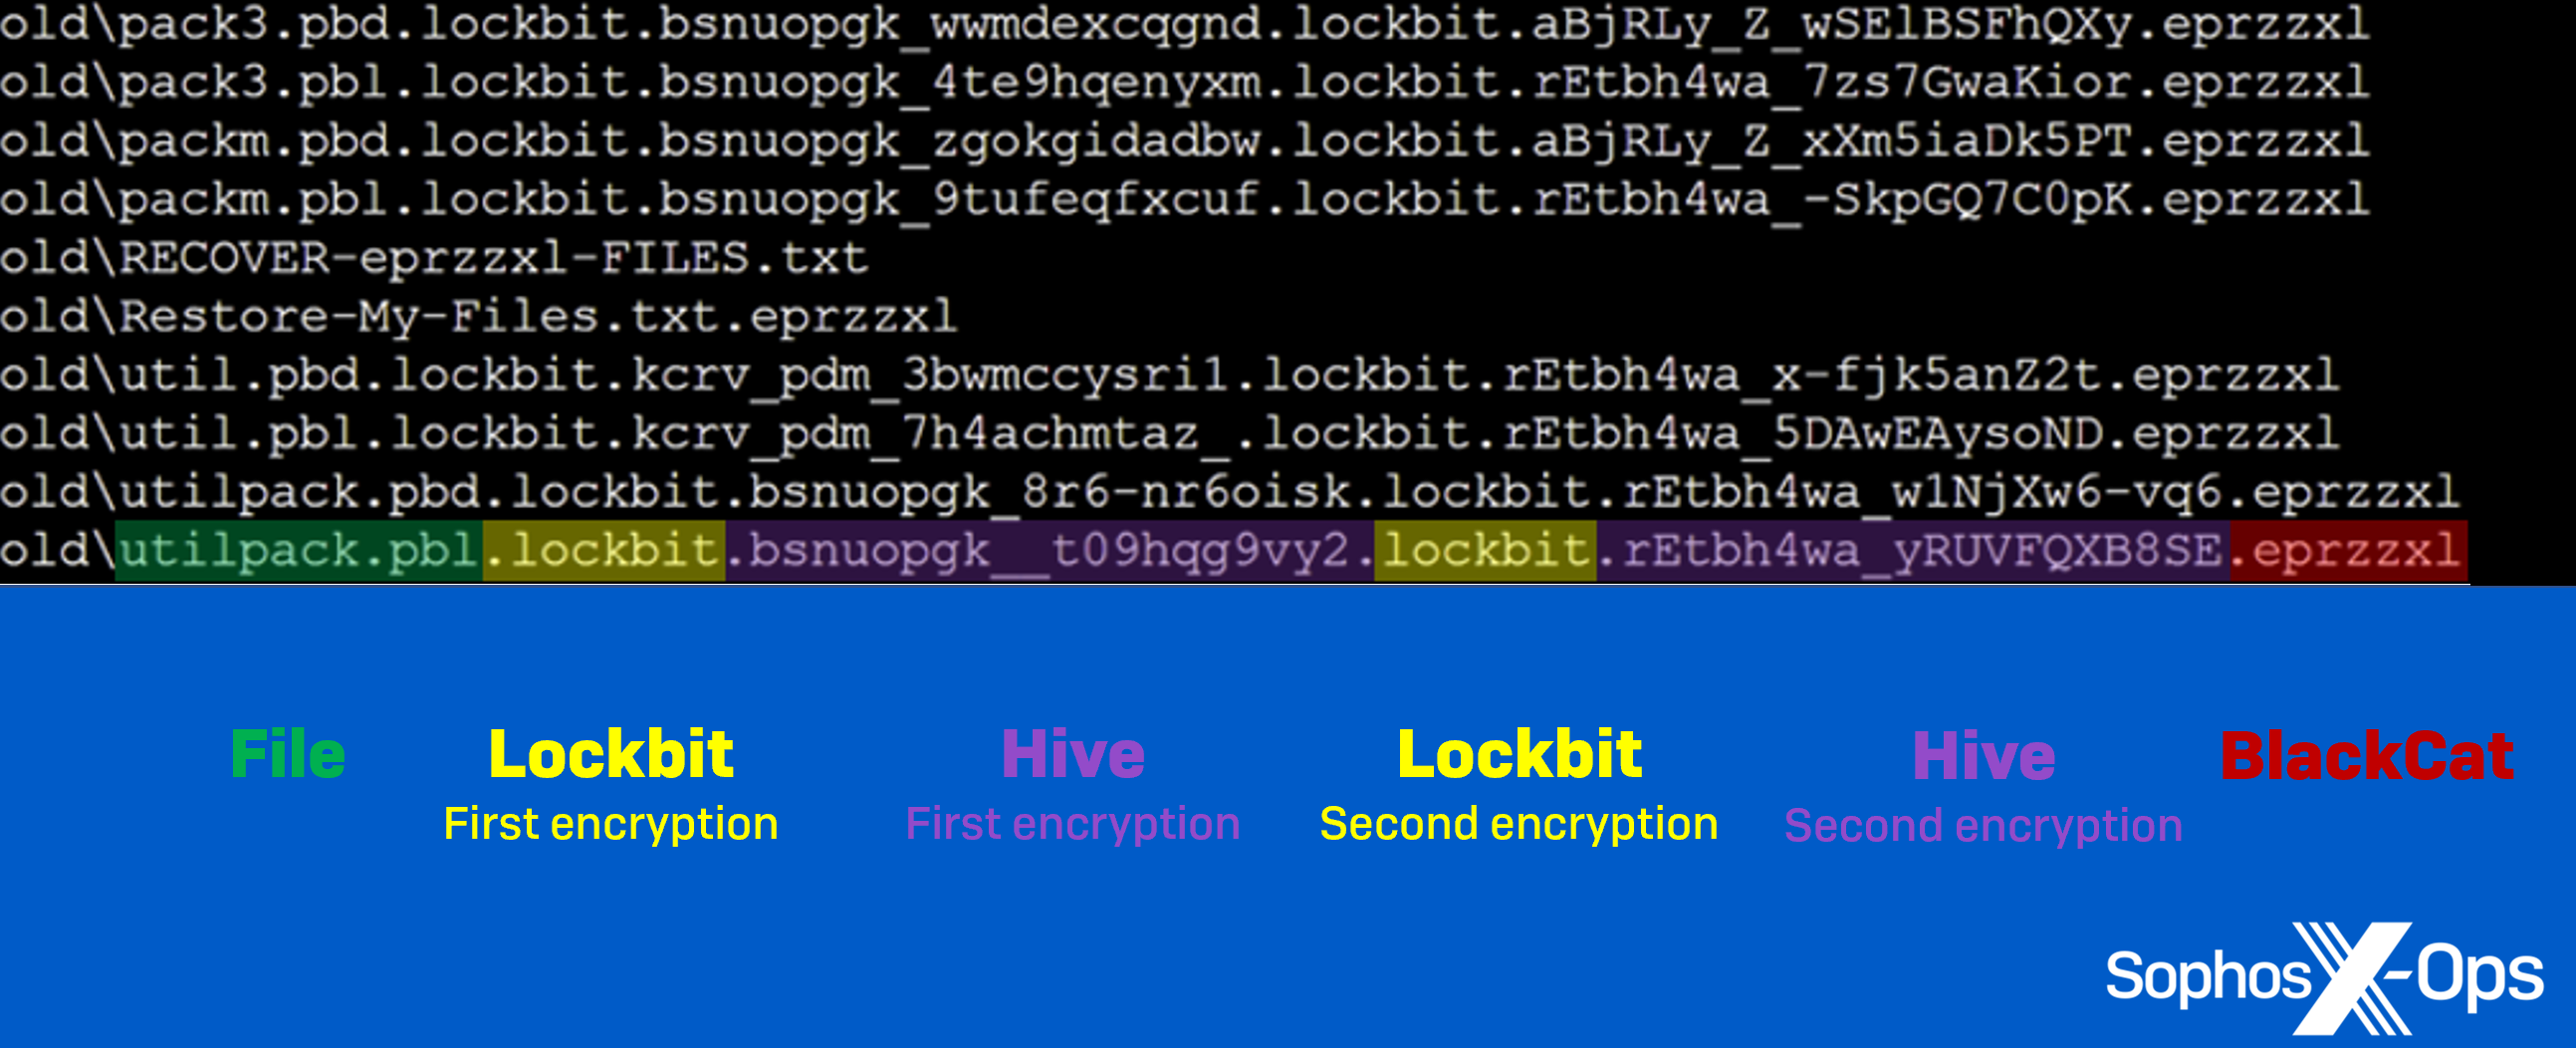
As the victim restored data from backups, an ALPHV/BlackCat affiliate accessed the network, installed Atera Agent (a legitimate remote access tool) to establish persistence, and exfiltrated data. Two weeks after the Lockbit and Hive attacks, the threat actor distributed their ransomware, and cleared Windows Event Logs. Sophos’ Rapid Response (RR) team investigated, and found several files which had been encrypted multiple times – as many as five in some instances.
Figure 1: Files which had been encrypted five times – twice each by Lockbit and Hive, and once by ALPHV/BlackCat
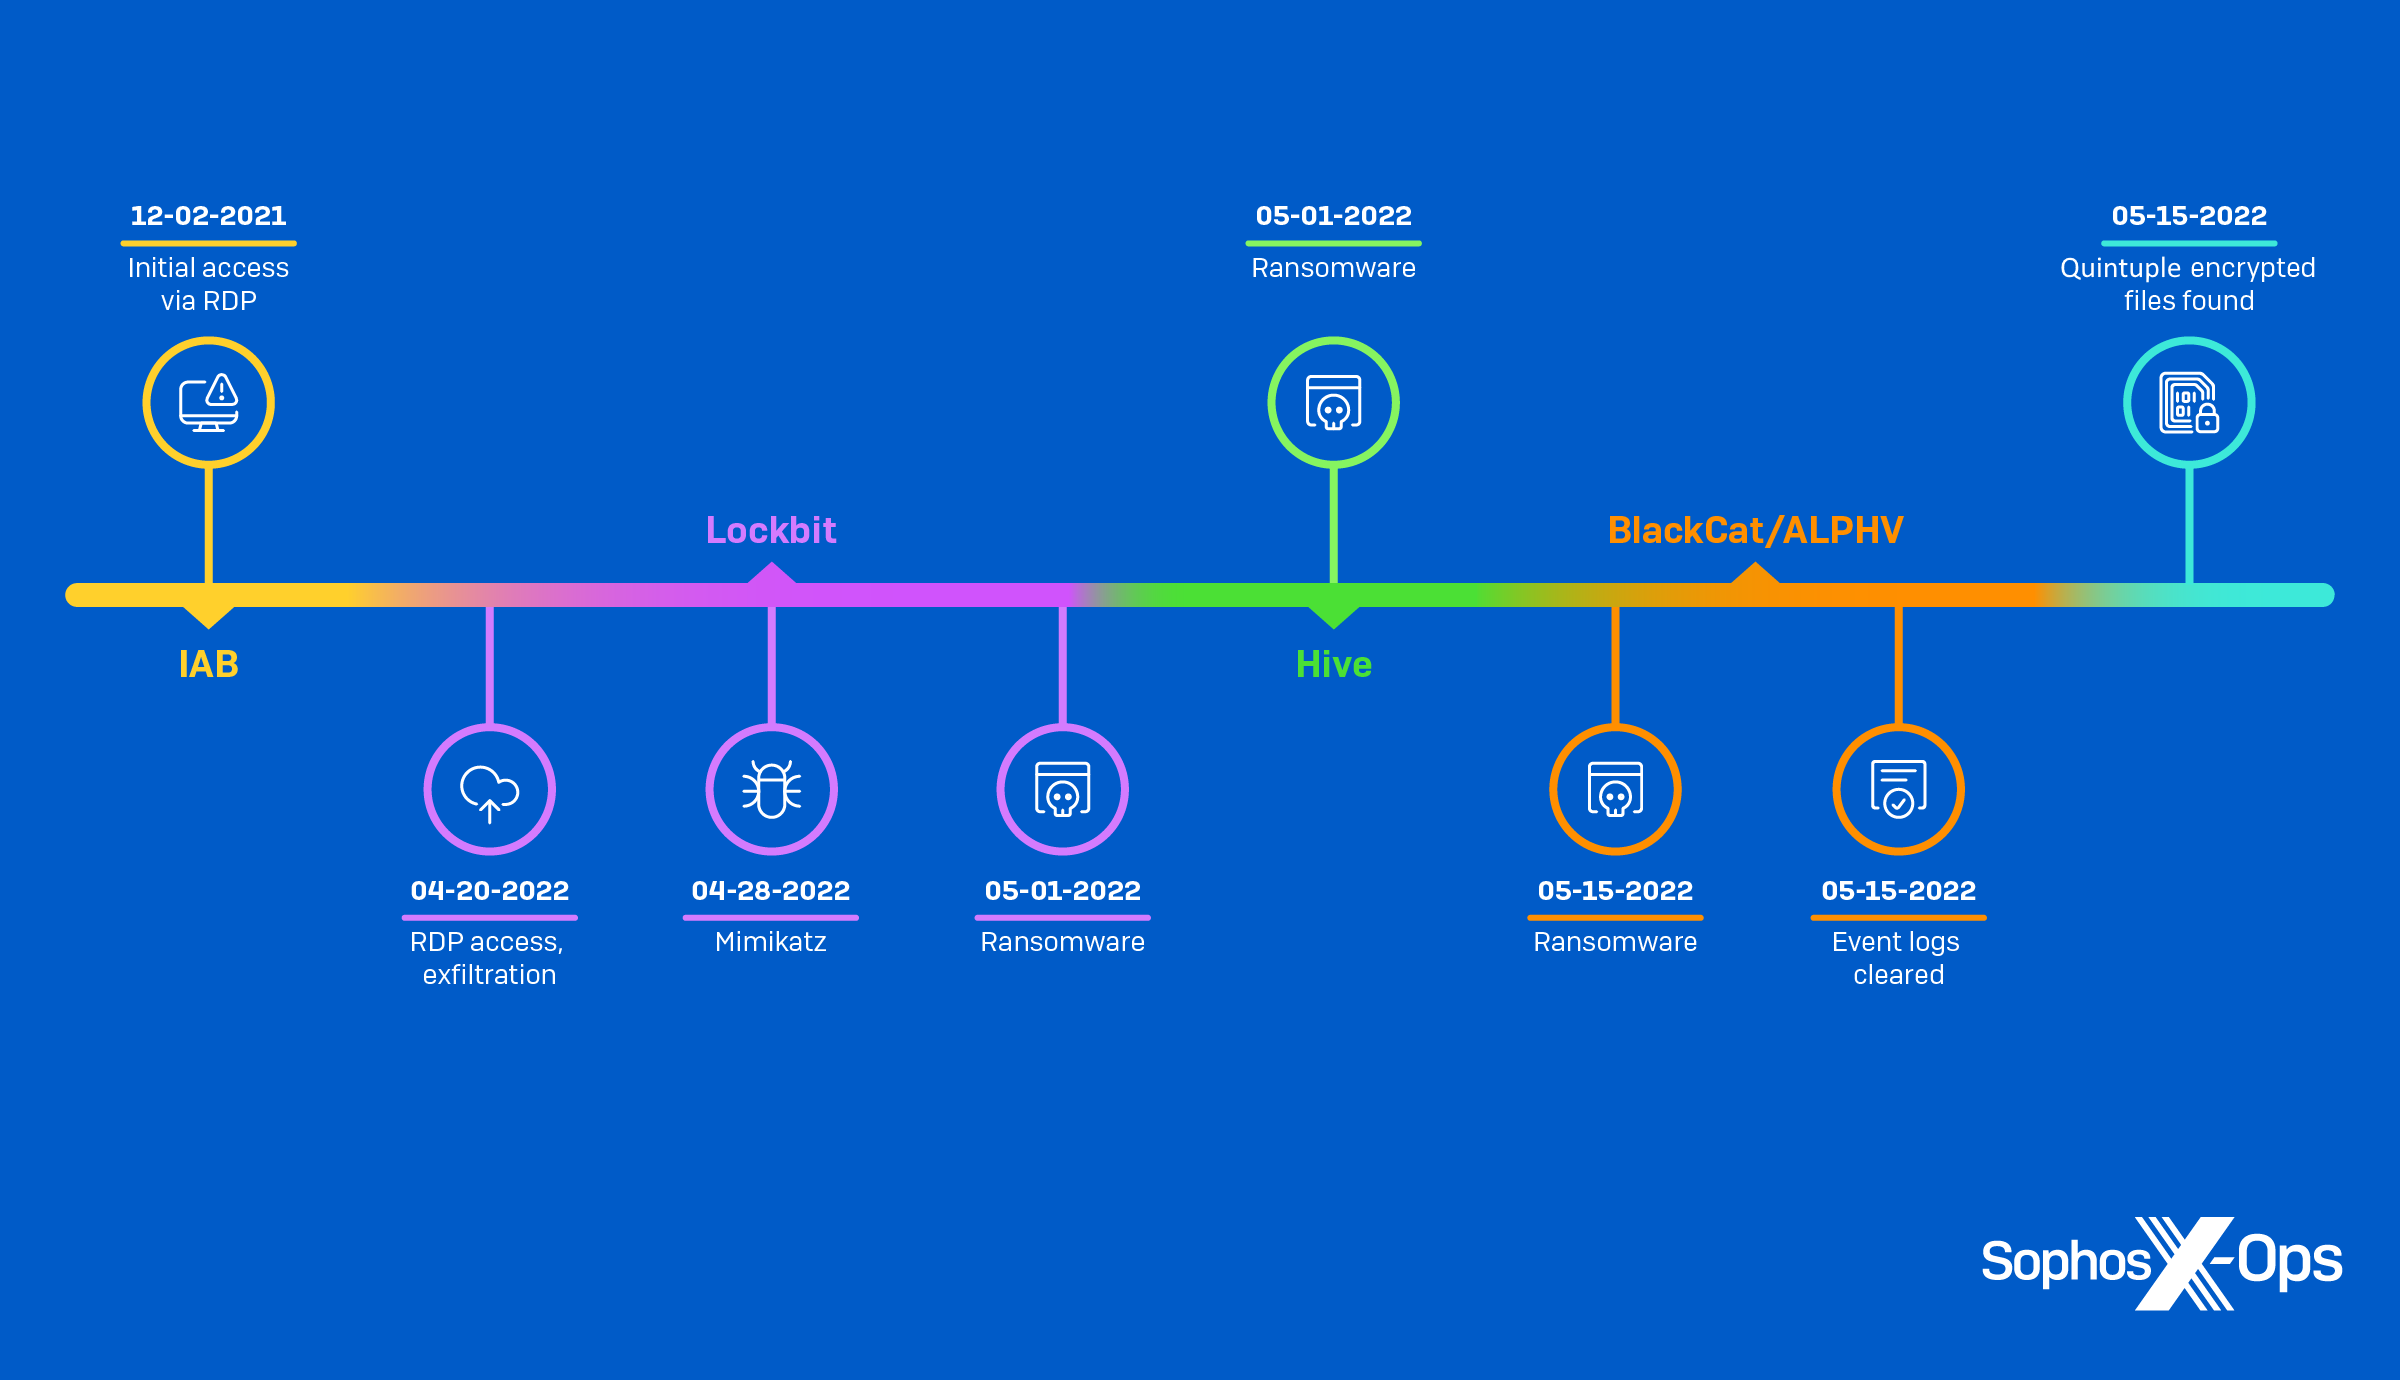
Figure 2: The multi-attacker timeline discovered by Sophos X-Ops
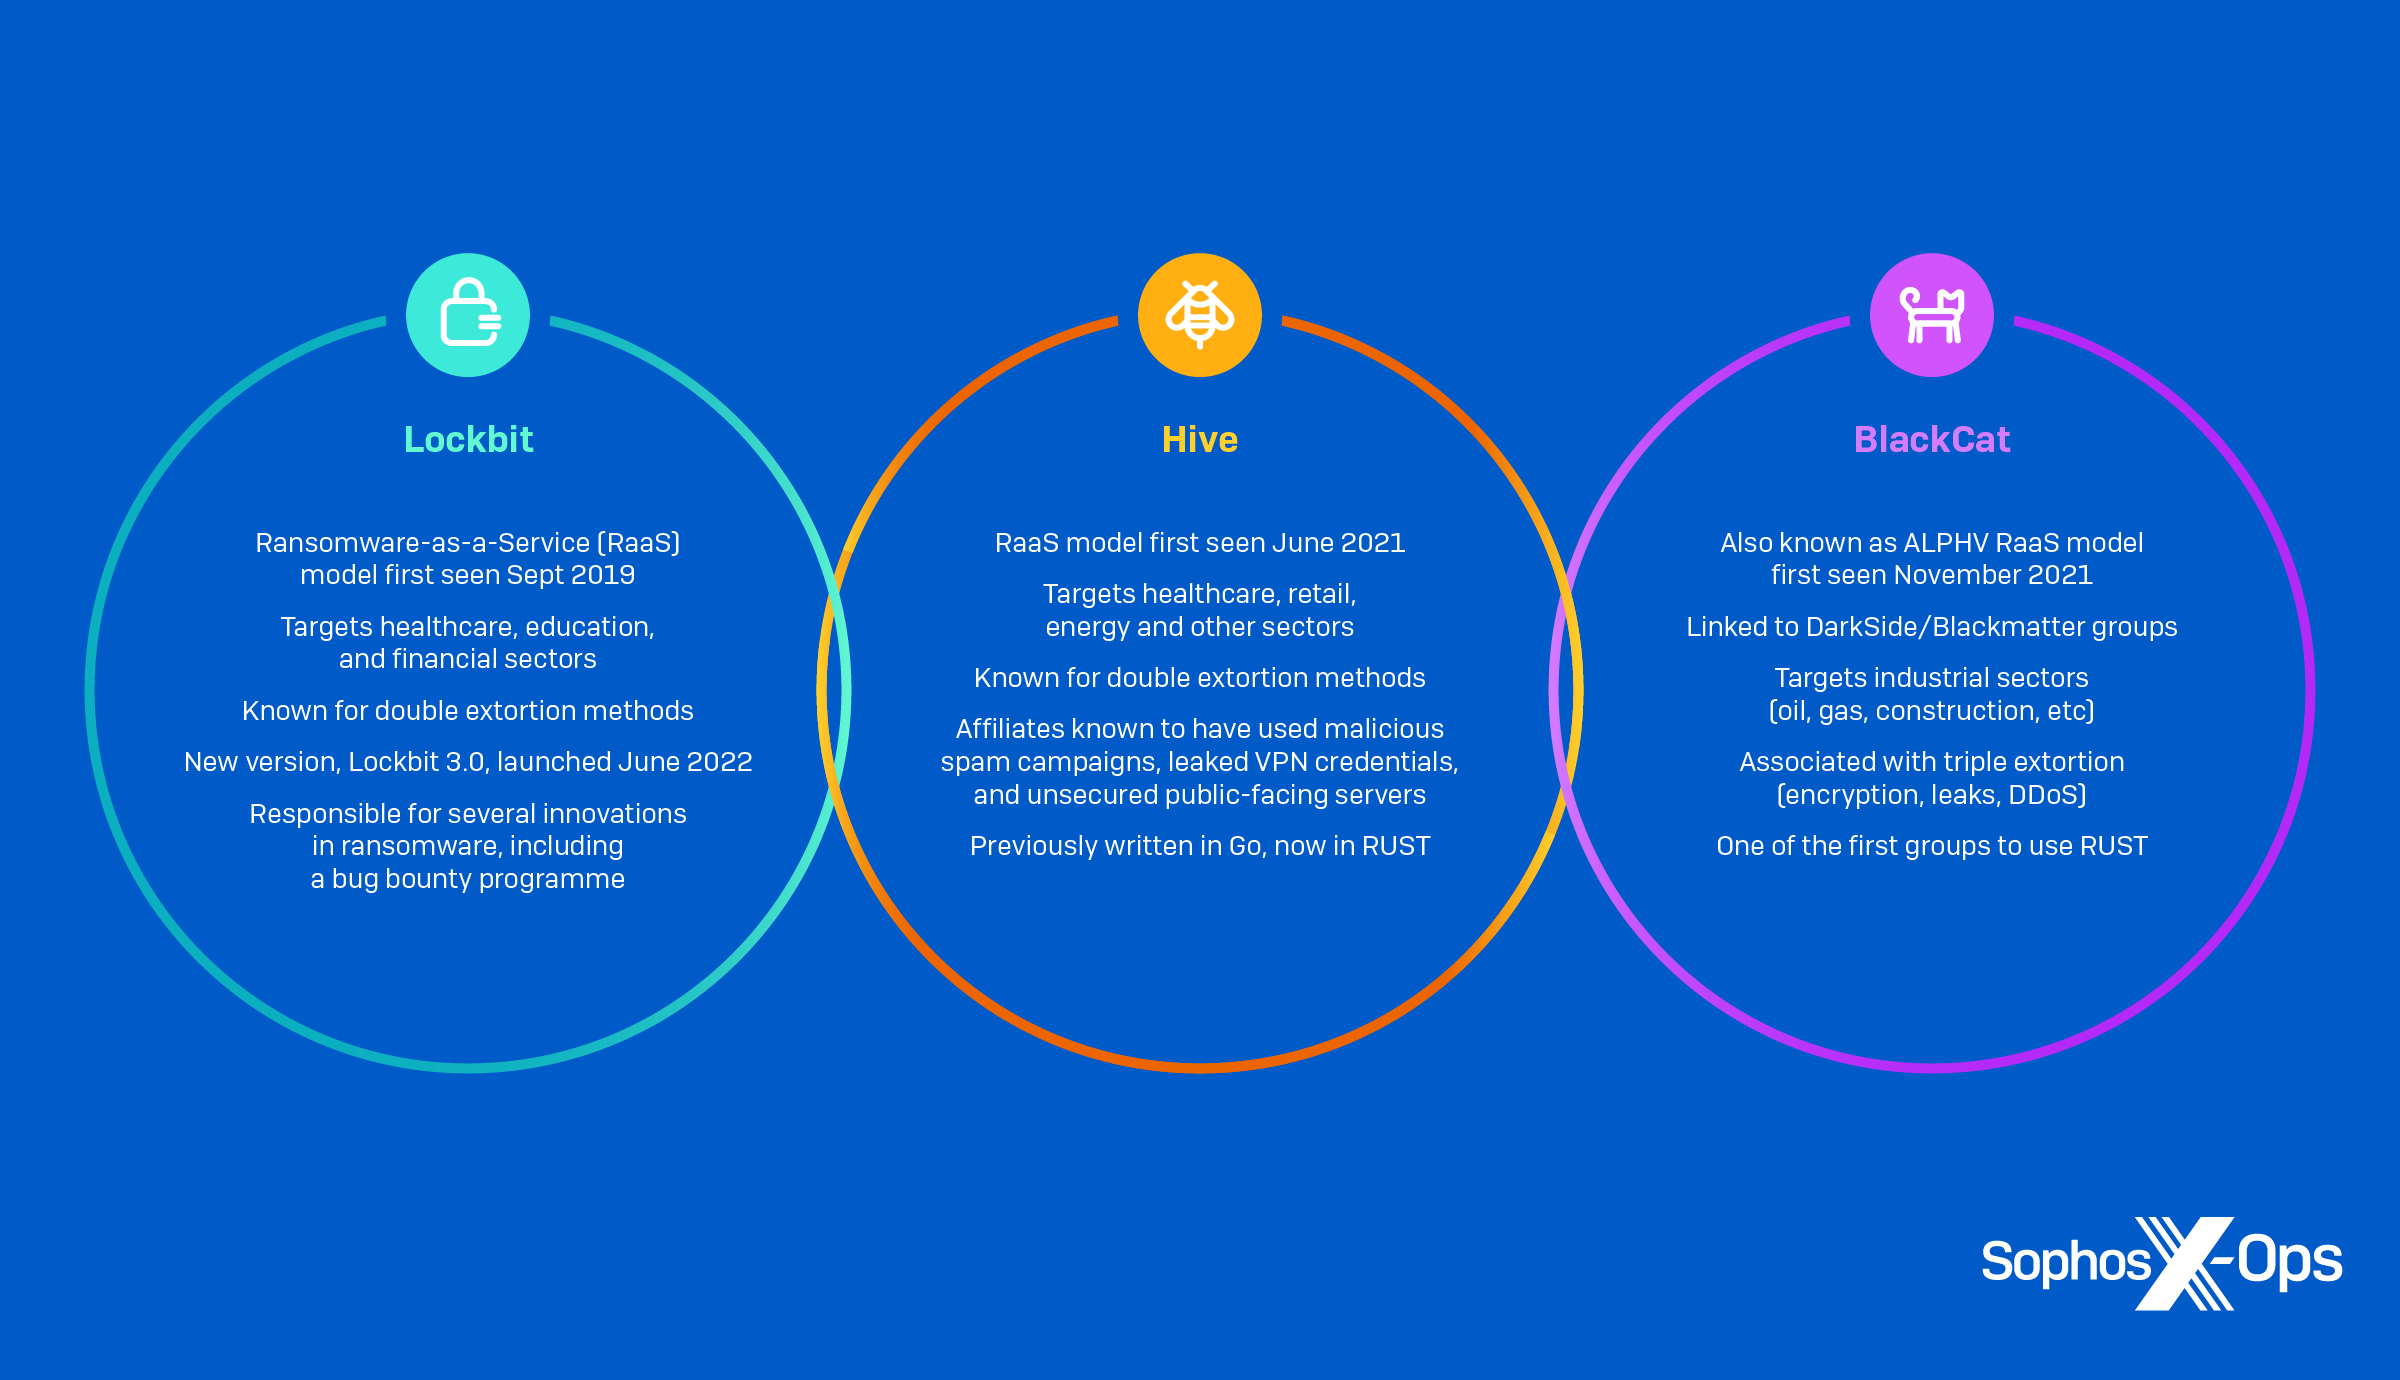
Figure 3: A brief overview of the three ransomware groups that consecutively attacked one organization
While the attacks took place in May, we discovered that a threat actor established an RDP session on the organization’s domain controller, way back in December 2021. This might have been an initial access broker (IAB) – an attacker who finds vulnerable systems and sells access to them on criminal marketplaces – or an early scouting mission by one of the three threat actors.
Either way, in mid-April 2022, a Lockbit affiliate gained RDP access to the organization’s corporate environment through an exposed management server.
Next, the threat actor moved laterally to a domain controller and other hosts, and began exfiltrating data to the Mega cloud storage service, as well as executing two PowerShell scripts: sharefinder.ps1 (to gather information about connected domain network shares) and invoke-mimikatz.ps1 (to extract passwords from LSASS, the Local Security Authority Subsystem Service).
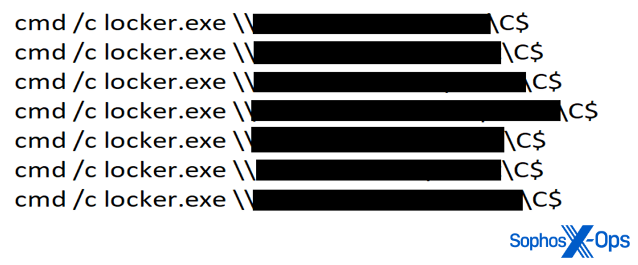
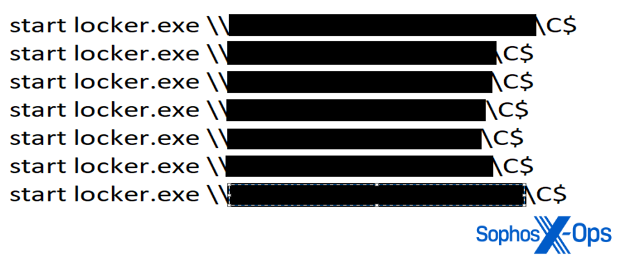
On May 1st, the Lockbit affiliate created two batch scripts (1.bat and 2.bat) to distribute the ransomware binaries LockBit_AF51C0A7004B80EA.exe and Locker.exe across the network, via PsExec.
Figure 4: 1.bat script
Figure 5: 2.bat script
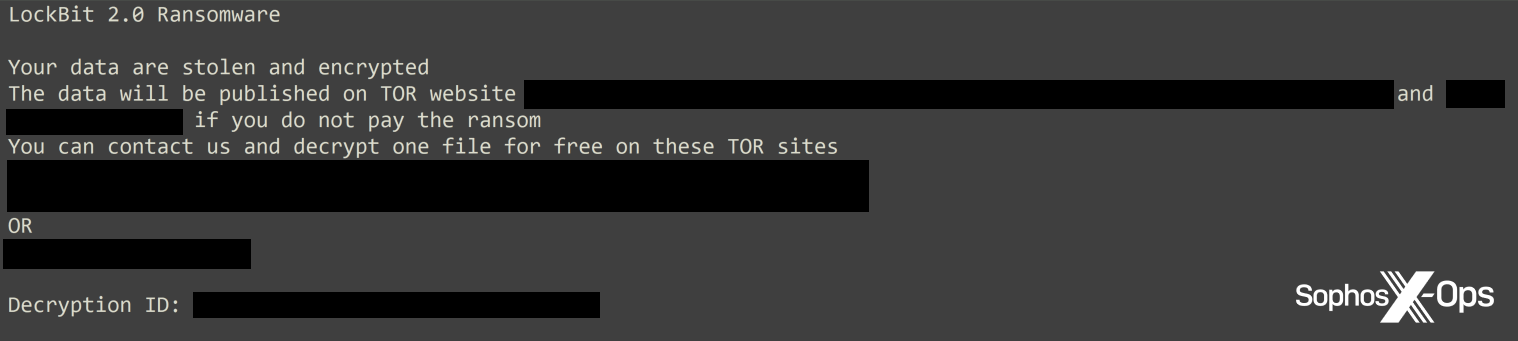
Upon execution, the ransomware encrypted files on nineteen hosts and dropped ransom notes entitled Restore-My-Files.txt.
Figure 6: The Lockbit ransom note
Two hours later, while the Lockbit threat actor was still encrypting files, a Hive ransomware affiliate gained access to the network via the same exposed RDP server and used RDP to move laterally to other hosts.
Hive used legitimate software (PDQ Deploy) already installed on the network to distribute its ransomware binary windows_x32_encrypt.exe. This tactic, known as ‘living off the land’, is popular among threat actors – particularly ransomware actors – as it has a small footprint and is less likely to be detected than downloading malicious tools.
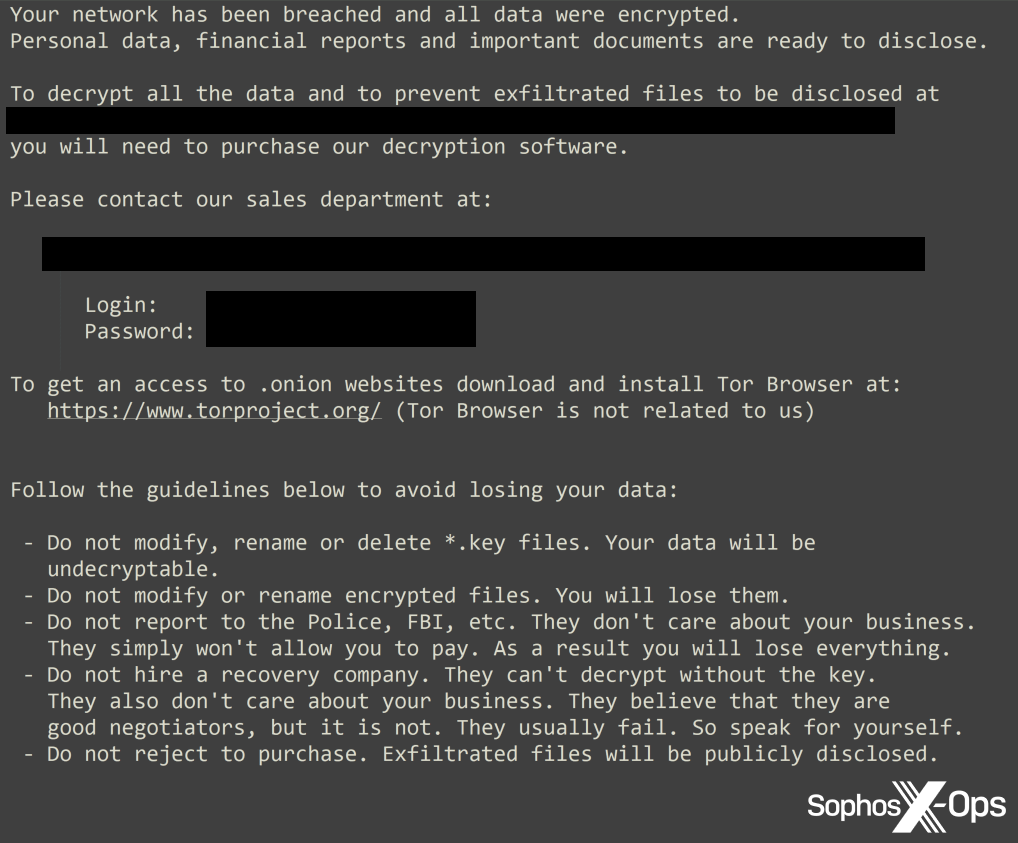
Hive’s ransomware binary encrypted files on sixteen hosts and dropped a further ransom note, HOW_TO_DECRYPT.txt, on impacted devices.
Figure 7: The Hive ransom note
At this point, the organization’s IT team restored most of the infected systems to April 30, the day before the Lockbit threat actor began to encrypt files. From an investigative perspective, this meant some crucial evidence was lost. But the attacks were not over yet.
Only a day after that system restore, an ALPHV/BlackCat affiliate arrived, making RDP connections to domain controllers, file servers, application servers, and other hosts – all from the same management server exploited by Lockbit and Hive.
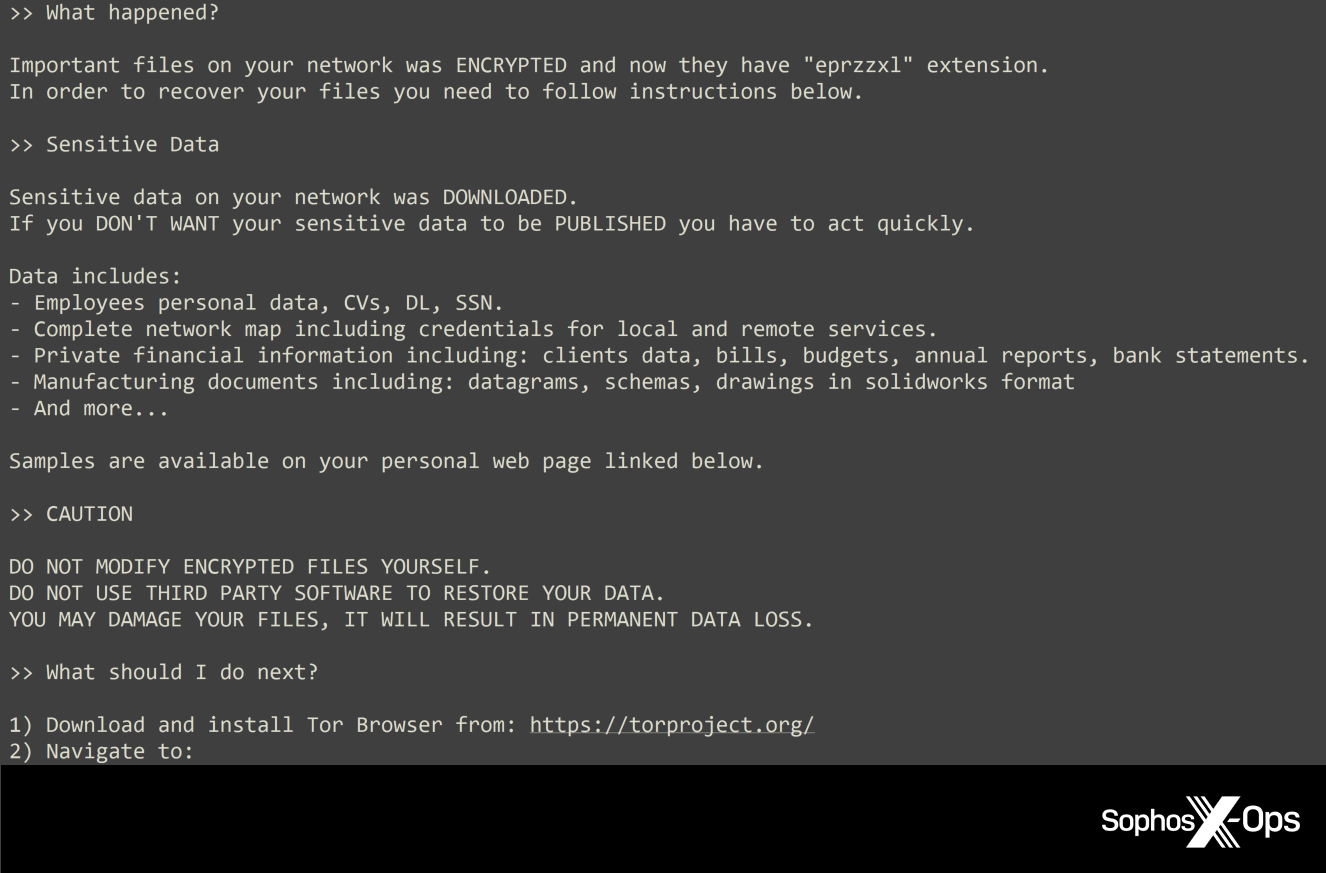
The ALPHV/BlackCat threat actor exfiltrated data to Mega over the course of a week, and established persistence by installing a backdoor: a legitimate remote access tool named Atera Agent. On May 15th – two weeks after the Lockbit and Hive attacks – the ALPHV/BlackCat affiliate used the credentials of a compromised user to drop ransomware binaries fXXX.exe and fXXXX.exe on six hosts, leaving a ransom note titled RECOVER-eprzzxl-FILES.txt in every folder.
Figure 8: The ALPHV/BlackCat ransom note
Based on analysis from SophosLabs researchers, these binaries not only encrypted files but also deleted volume shadow copies and Windows Event logs. This further complicated our subsequent investigation, as the ALPHV/BlackCat actor erased not only logs relating to their attack, but also those relating to the attacks by Lockbit and Hive.
It’s not clear why Lockbit and ALPHV/BlackCat deployed two ransomware binaries, but one possible reason is fault tolerance: If one executable is detected or blocked, or fails to encrypt, the second might act as a back-up.
Key features of the BlackCat ransomware binaries
The two BlackCat ransomware binaries, fXXX.exe and fXXXX.exe, have the following functionality:
Encrypt files and add the extension .eprzzxl
Collect Universally Unique IDs (UUIDs) from the impacted devices:
wmic csproduct get UUID
Enable Remote to Local and Remote to Remote symbolic link evaluations that allow easy access to files and folders in remote locations:
fsutil behavior set SymlinkEvaluation R2L:1
fsutil behavior set SymlinkEvaluation R2R:1
Modify a registry key to allow the maximum number of network requests by remote processes:
Disable Windows automatic repair on the impacted device
bcdedit /set {default} recoveryenabled No
Clear Windows Event logs
cmd.exe /c for /F \"tokens=*\" %1 in ('wevtutil.exe el') DO wevtutil.exe cl \"%1\"
The aftermath
After the dust had settled, Sophos’ RR team found files that had been encrypted by all three ransomware groups. In fact, as shown in the screenshot below, some files had even been encrypted five times! Because the Hive attack started 2 hours after Lockbit, the Lockbit ransomware was still running – so both groups kept finding files without the extension signifying that they were encrypted.
Figure 9: An example of quintuple-encrypted files
However, despite all three ransomware groups being known for ‘double extortion’ techniques (where, in addition to encrypting files, threat actors threaten to publish the victim’s data if the ransom is not paid), no information was published on any of the groups’ leak sites.
Several things complicated this investigation. The system restoration, BlackCat’s log-wiping, and a lack of DHCP logging all contrived to make piecing together the attacks extremely difficult. Despite these challenges, Sophos’ Rapid Response team was able to gather and analyze the evidence left behind.
When it comes to defense, there are two elements: proactive (following security best practices to minimize the risk of being attacked), and reactive (how to recover quickly and safely if an attack does happen).
Patch and investigate. Keep Windows and other software up to date (and consider setting up some vulnerability alerts, and monitoring in-the-know sources, to get a head start on breaking news about new bugs). This also means double-checking that patches have been installed correctly and are in place for critical systems like internet-facing machines or domain controllers. Patching early is the best way to avoid being compromised in the future – but it doesn’t mean that you haven’t already been attacked. It’s always worth investigating to ensure that your organization wasn’t breached prior to patching. Threat actors may leave backdoors (which may include the installation of legitimate software) or introduce new vulnerabilities, either deliberately or inadvertently, so this is a key thing for responders to look for to reduce the likelihood of a second attack.
Lock down accessible services. Perform scans of your organization’s network from the outside and identify and lock down the ports commonly used by VNC, RDP, or other remote-access tools. If a machine needs to be reachable using a remote management tool, put that tool behind a VPN or zero-trust network access solution that uses MFA as part of its login. It’s also worth remembering that attacks can happen more than once; if an access point remains open, other threat actors are likely to find and exploit it.
Practice segmentation and zero-trust. Separate critical servers from each other and from workstations by putting them into separate VLANs as you work towards a zero-trust network model.
Set and enforce strong passwords and multifactor authentication (MFA). Strong passwords serve as one of the first lines of defense. Passwords should be unique or complex and never re-used. This is easier to do if you provide staff with a password manager that can store their credentials. But even strong passwords can be compromised. Any form of multifactor authentication is better than none for securing access to critical resources such as e-mail, remote management tools, and network assets.
Inventory your assets and accounts. Unprotected and unpatched devices in the network increase risk and create a situation where malicious activities could pass unnoticed. It is vital to have a current inventory of all connected computers and IoT devices. Use network scans and physical checks to locate and catalog them.
Install layered protection to block attackers at as many points as possible. Extend that security to all endpoints that you allow onto your network.
But once threat actors are inside a network, there’s not much that can be done to ‘stop the bleeding’ without having comprehensive Incident Response and remediation plans, and taking immediate action. We’ve written a series of articles called ‘Hindsight security: Actions breach victims wish they had taken sooner’, which includes advice on securing RDP, enforcing MFA, setting up an incident response plan, and more. You can also request a copy of the Sophos Incident Response Guide here.
IOCs
Sophos X-Ops has posted IOCs relating to the Lockbit, Hive, and BlackCat attacks covered in this report on our Github repository.
Adding clarifying details on activity involving active directory.
Aug. 10th 2022
Update made to the Cisco Response and Recommendations section related to MFA.
EXECUTIVE SUMMARY
On May 24, 2022, Cisco became aware of a potential compromise. Since that point, Cisco Security Incident Response (CSIRT) and Cisco Talos have been working to remediate.
During the investigation, it was determined that a Cisco employee’s credentials were compromised after an attacker gained control of a personal Google account where credentials saved in the victim’s browser were being synchronized.
The attacker conducted a series of sophisticated voice phishing attacks under the guise of various trusted organizations attempting to convince the victim to accept multi-factor authentication (MFA) push notifications initiated by the attacker. The attacker ultimately succeeded in achieving an MFA push acceptance, granting them access to VPN in the context of the targeted user.
CSIRT and Talos are responding to the event and we have not identified any evidence suggesting that the attacker gained access to critical internal systems, such as those related to product development, code signing, etc.
After obtaining initial access, the threat actor conducted a variety of activities to maintain access, minimize forensic artifacts, and increase their level of access to systems within the environment.
The threat actor was successfully removed from the environment and displayed persistence, repeatedly attempting to regain access in the weeks following the attack; however, these attempts were unsuccessful.
We assess with moderate to high confidence that this attack was conducted by an adversary that has been previously identified as an initial access broker (IAB) with ties to the UNC2447 cybercrime gang, Lapsus$ threat actor group, and Yanluowang ransomware operators.
For further information see the Cisco Response page here.
INITIAL VECTOR
Initial access to the Cisco VPN was achieved via the successful compromise of a Cisco employee’s personal Google account. The user had enabled password syncing via Google Chrome and had stored their Cisco credentials in their browser, enabling that information to synchronize to their Google account. After obtaining the user’s credentials, the attacker attempted to bypass multifactor authentication (MFA) using a variety of techniques, including voice phishing (aka “vishing”) and MFA fatigue, the process of sending a high volume of push requests to the target’s mobile device until the user accepts, either accidentally or simply to attempt to silence the repeated push notifications they are receiving. Vishing is an increasingly common social engineering technique whereby attackers try to trick employees into divulging sensitive information over the phone. In this instance, an employee reported that they received multiple calls over several days in which the callers – who spoke in English with various international accents and dialects – purported to be associated with support organizations trusted by the user.
Once the attacker had obtained initial access, they enrolled a series of new devices for MFA and authenticated successfully to the Cisco VPN. The attacker then escalated to administrative privileges, allowing them to login to multiple systems, which alerted our Cisco Security Incident Response Team (CSIRT), who subsequently responded to the incident. The actor in question dropped a variety of tools, including remote access tools like LogMeIn and TeamViewer, offensive security tools such as Cobalt Strike, PowerSploit, Mimikatz, and Impacket, and added their own backdoor accounts and persistence mechanisms.
POST-COMPROMISE TTPS
Following initial access to the environment, the threat actor conducted a variety of activities for the purposes of maintaining access, minimizing forensic artifacts, and increasing their level of access to systems within the environment.
Once on a system, the threat actor began to enumerate the environment, using common built-in Windows utilities to identify the user and group membership configuration of the system, hostname, and identify the context of the user account under which they were operating. We periodically observed the attacker issuing commands containing typographical errors, indicating manual operator interaction was occurring within the environment.
After establishing access to the VPN, the attacker then began to use the compromised user account to logon to a large number of systems before beginning to pivot further into the environment. They moved into the Citrix environment, compromising a series of Citrix servers and eventually obtained privileged access to domain controllers.
After obtaining access to the domain controllers, the attacker began attempting to dump NTDS from them using “ntdsutil.exe” consistent with the following syntax:
powershell ntdsutil.exe 'ac i ntds' 'ifm' 'create full c:\users\public' q q
They then worked to exfiltrate the dumped NTDS over SMB (TCP/445) from the domain controller to the VPN system under their control.
After obtaining access to credential databases, the attacker was observed leveraging machine accounts for privileged authentication and lateral movement across the environment.
Consistent with activity we previously observed in other separate but similar attacks, the adversary created an administrative user called “z” on the system using the built-in Windows “net.exe” commands. This account was then added to the local Administrators group. We also observed instances where the threat actor changed the password of existing local user accounts to the same value shown below. Notably, we have observed the creation of the “z” account by this actor in previous engagements prior to the Russian invasion of Ukraine.
C:\Windows\system32\net user z Lh199211* /add
C:\Windows\system32\net localgroup administrators z /add
This account was then used in some cases to execute additional utilities, such as adfind or secretsdump, to attempt to enumerate the directory services environment and obtain additional credentials. Additionally, the threat actor was observed attempting to extract registry information, including the SAM database on compromised windows hosts.
reg save hklm\system system
reg save hklm\sam sam
reg save HKLM\security sec
On some systems, the attacker was observed employing MiniDump from Mimikatz to dump LSASS.
tasklist | findstr lsass
rundll32.exe C:\windows\System32\comsvcs.dll, MiniDump [LSASS_PID] C:\windows\temp\lsass.dmp full
The attacker also took steps to remove evidence of activities performed on compromised systems by deleting the previously created local Administrator account. They also used the “wevtutil.exe” utility to identify and clear event logs generated on the system.
wevtutil.exe el
wevtutil.exe cl [LOGNAME]
In many cases, we observed the attacker removing the previously created local administrator account.
net user z /delete
To move files between systems within the environment, the threat actor often leveraged Remote Desktop Protocol (RDP) and Citrix. We observed them modifying the host-based firewall configurations to enable RDP access to systems.
netsh advfirewall firewall set rule group=remote desktop new enable=Yes
We also observed the installation of additional remote access tools, such as TeamViewer and LogMeIn.
The attacker frequently leveraged Windows logon bypass techniques to maintain the ability to access systems in the environment with elevated privileges. They frequently relied upon PSEXESVC.exe to remotely add the following Registry key values:
This enabled the attacker to leverage the accessibility features present on the Windows logon screen to spawn a SYSTEM level command prompt, granting them complete control of the systems. In several cases, we observed the attacker adding these keys but not further interacting with the system, possibly as a persistence mechanism to be used later as their primary privileged access is revoked.
Throughout the attack, we observed attempts to exfiltrate information from the environment. We confirmed that the only successful data exfiltration that occurred during the attack included the contents of a Box folder that was associated with a compromised employee’s account and employee authentication data from active directory. The Box data obtained by the adversary in this case was not sensitive.
In the weeks following the eviction of the attacker from the environment, we observed continuous attempts to re-establish access. In most cases, the attacker was observed targeting weak password rotation hygiene following mandated employee password resets. They primarily targeted users who they believed would have made single character changes to their previous passwords, attempting to leverage these credentials to authenticate and regain access to the Cisco VPN. The attacker was initially leveraging traffic anonymization services like Tor; however, after experiencing limited success, they switched to attempting to establish new VPN sessions from residential IP space using accounts previously compromised during the initial stages of the attack. We also observed the registration of several additional domains referencing the organization while responding to the attack and took action on them before they could be used for malicious purposes.
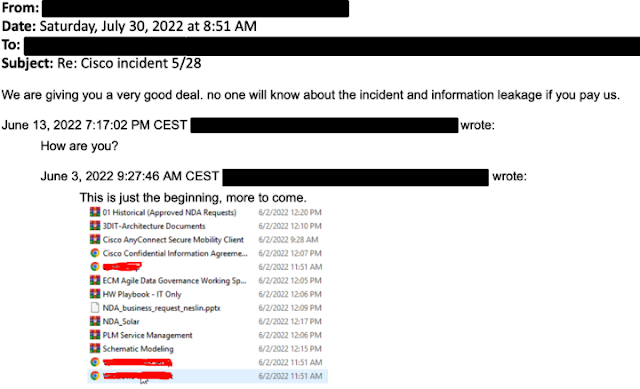
After being successfully removed from the environment, the adversary also repeatedly attempted to establish email communications with executive members of the organization but did not make any specific threats or extortion demands. In one email, they included a screenshot showing the directory listing of the Box data that was previously exfiltrated as described earlier. Below is a screenshot of one of the received emails. The adversary redacted the directory listing screenshot prior to sending the email.
BACKDOOR ANALYSIS
The actor dropped a series of payloads onto systems, which we continue to analyze. The first payload is a simple backdoor that takes commands from a command and control (C2) server and executes them on the end system via the Windows Command Processor. The commands are sent in JSON blobs and are standard for a backdoor. There is a “DELETE_SELF” command that removes the backdoor from the system completely. Another, more interesting, command, “WIPE”, instructs the backdoor to remove the last executed command from memory, likely with the intent of negatively impacting forensic analysis on any impacted hosts.
Commands are retrieved by making HTTP GET requests to the C2 server using the following structure:
/bot/cmd.php?botid=%.8x
The malware also communicates with the C2 server via HTTP GET requests that feature the following structure:
/bot/gate.php?botid=%.8x
Following the initial request from the infected system, the C2 server responds with a SHA256 hash. We observed additional requests made every 10 seconds.
The aforementioned HTTP requests are sent using the following user-agent string:
Mozilla/5.0 (Windows NT 10.0; Win64; x64) AppleWebKit/537.36 (KHTML, like Gecko) Chrome/99.0.4844.51 Safari/537.36 Edg/99.0.1150.36 Trailer/95.3.1132.33
The malware also creates a file called “bdata.ini” in the malware’s current working directory that contains a value derived from the volume serial number present on the infected system. In instances where this backdoor was executed, the malware was observed running from the following directory location:
C:\users\public\win\cmd.exe
The attacker was frequently observed staging tooling in directory locations under the Public user profile on systems from which they were operating.
Based upon analysis of C2 infrastructure associated with this backdoor, we assess that the C2 server was set up specifically for this attack.
ATTACK ATTRIBUTION
Based upon artifacts obtained, tactics, techniques, and procedures (TTPs) identified, infrastructure used, and a thorough analysis of the backdoor utilized in this attack, we assess with moderate to high confidence that this attack was conducted by an adversary that has been previously identified as an initial access broker (IAB) with ties to both UNC2447 and Lapsus$. IABs typically attempt to obtain privileged access to corporate network environments and then monetize that access by selling it to other threat actors who can then leverage it for a variety of purposes. We have also observed previous activity linking this threat actor to the Yanluowang ransomware gang, including the use of the Yanluowang data leak site for posting data stolen from compromised organizations.
UNC2447 is a financially-motivated threat actor with a nexus to Russia that has been previously observed conducting ransomware attacks and leveraging a technique known as “double extortion,” in which data is exfiltrated prior to ransomware deployment in an attempt to coerce victims into paying ransom demands. Prior reporting indicates that UNC2447 has been observed operating a variety of ransomware, including FIVEHANDS, HELLOKITTY, and more.
Apart from UNC2447, some of the TTPs discovered during the course of our investigation match those of the Lapsus$. Lapsus$ is a threat actor group that is reported to have been responsible for several previous notable breaches of corporate environments. Several arrests of Lapsus$ members were reported earlier this year. Lapsus$ has been observed compromising corporate environments and attempting to exfiltrate sensitive information.
While we did not observe ransomware deployment in this attack, the TTPs used were consistent with “pre-ransomware activity,” activity commonly observed leading up to the deployment of ransomware in victim environments. Many of the TTPs observed are consistent with activity observed by CTIR during previous engagements. Our analysis also suggests reuse of server-side infrastructure associated with these previous engagements as well. In previous engagements, we also did not observe deployment of ransomware in the victim environments.
CISCO RESPONSE AND RECOMMENDATIONS
Cisco implemented a company-wide password reset immediately upon learning of the incident. CTIR previously observed similar TTPs in numerous investigations since 2021. Our findings and subsequent security protections resulting from those customer engagements helped us slow and contain the attacker’s progression. We created two ClamAV signatures, which are listed below.
Win.Exploit.Kolobko-9950675-0
Win.Backdoor.Kolobko-9950676-0
Threat actors commonly use social engineering techniques to compromise targets, and despite the frequency of such attacks, organizations continue to face challenges mitigating those threats. User education is paramount in thwarting such attacks, including making sure employees know the legitimate ways that support personnel will contact users so that employees can identify fraudulent attempts to obtain sensitive information.
Given the actor’s demonstrated proficiency in using a wide array of techniques to obtain initial access, user education is also a key part of countering MFA bypass techniques. Equally important to implementing MFA is ensuring that employees are educated on what to do and how to respond if they get errant push requests on their respective phones. It is also essential to educate employees about who to contact if such incidents do arise to help determine if the event was a technical issue or malicious.
For Duo it is beneficial to implement strong device verification by enforcing stricter controls around device status to limit or block enrollment and access from unmanaged or unknown devices. Additionally, leveraging risk detection to highlight events like a brand-new device being used from unrealistic location or attack patterns like logins brute force can help detect unauthorized access.
Prior to allowing VPN connections from remote endpoints, ensure that posture checking is configured to enforce a baseline set of security controls. This ensures that the connecting devices match the security requirements present in the environment. This can also prevent rogue devices that have not been previously approved from connecting to the corporate network environment.
Network segmentation is another important security control that organizations should employ, as it provides enhanced protection for high-value assets and also enables more effective detection and response capabilities in situations where an adversary is able to gain initial access into the environment.
Centralized log collection can help minimize the lack of visibility that results when an attacker take active steps to remove logs from systems. Ensuring that the log data generated by endpoints is centrally collected and analyzed for anomalous or overtly malicious behavior can provide early indication when an attack is underway.
In many cases, threat actors have been observed targeting the backup infrastructure in an attempt to further remove an organization’s ability to recover following an attack. Ensuring that backups are offline and periodically tested can help mitigate this risk and ensure an organization’s ability to effectively recover following an attack.
Auditing of command line execution on endpoints can also provide increased visibility into actions being performed on systems in the environment and can be used to detect suspicious execution of built-in Windows utilities, which is commonly observed during intrusions where threat actors rely on benign applications or utilities already present in the environment for enumeration, privilege escalation, and lateral movement activities.
MITRE ATT&CK MAPPING
All of the previously described TTPs that were observed in this attack are listed below based on the phase of the attack in which they occurred.

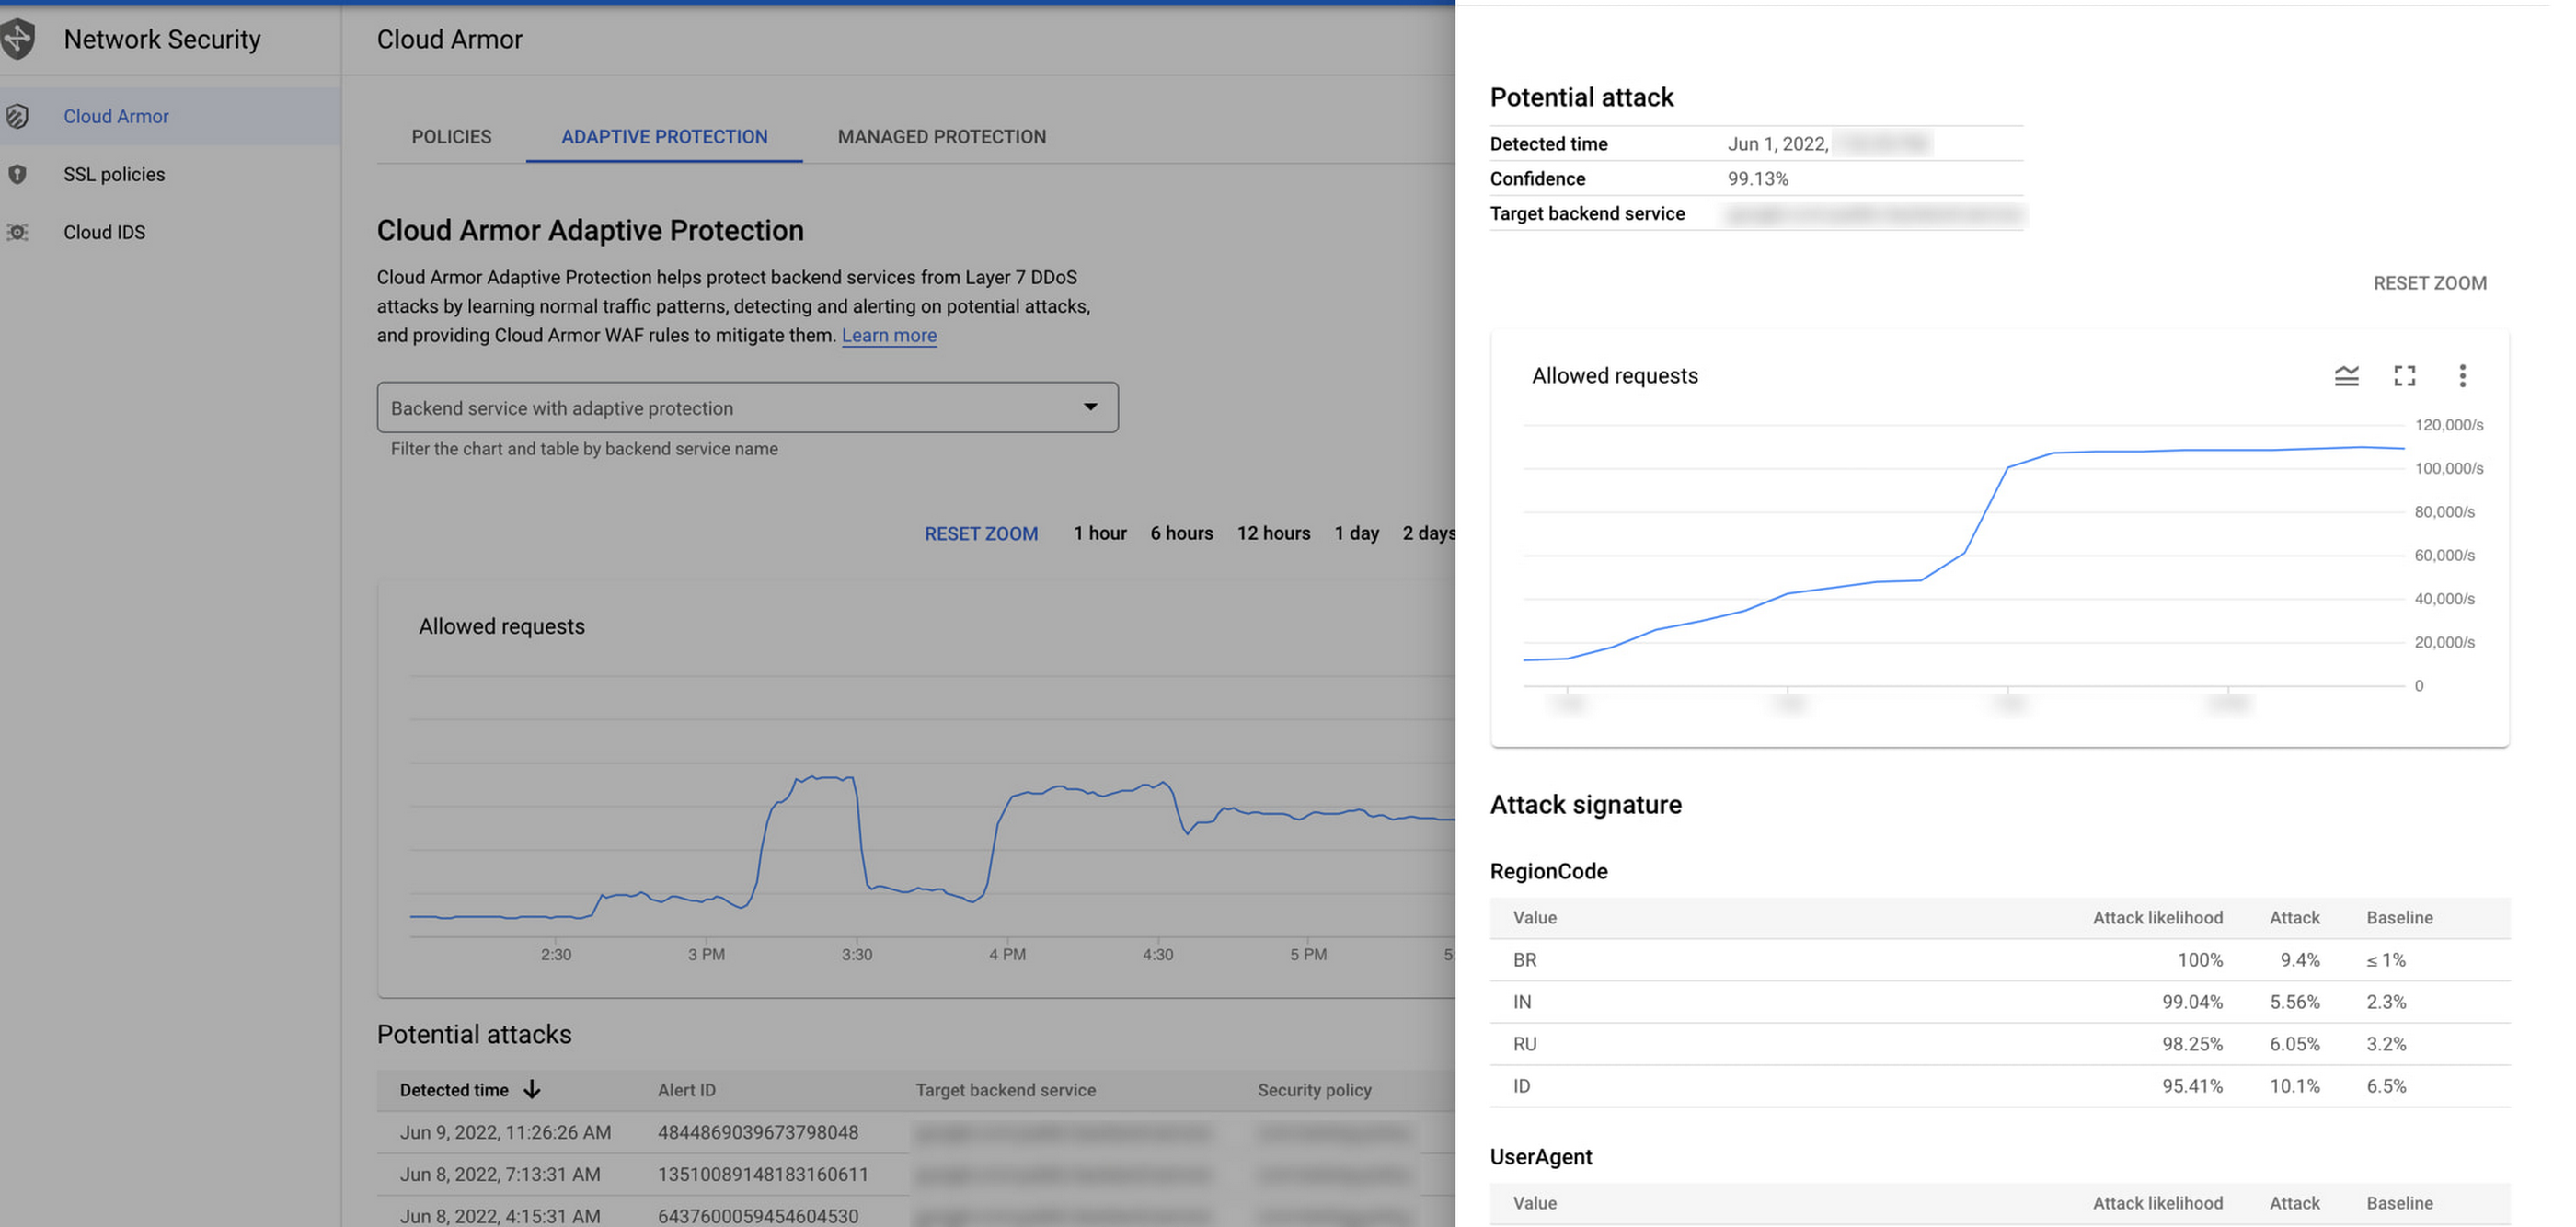


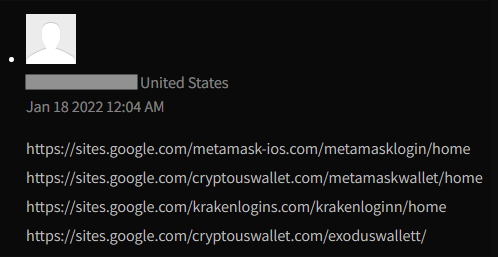
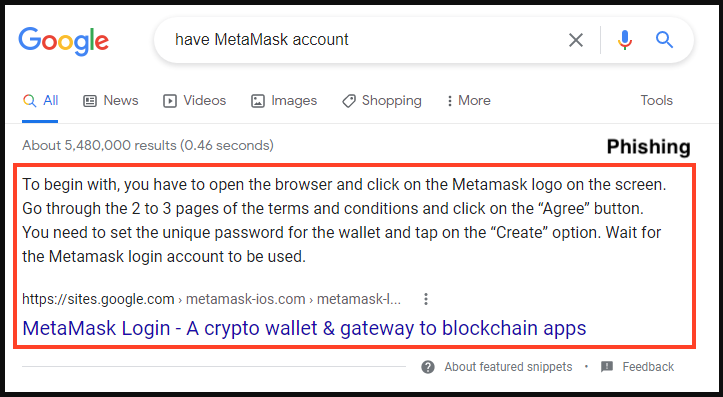

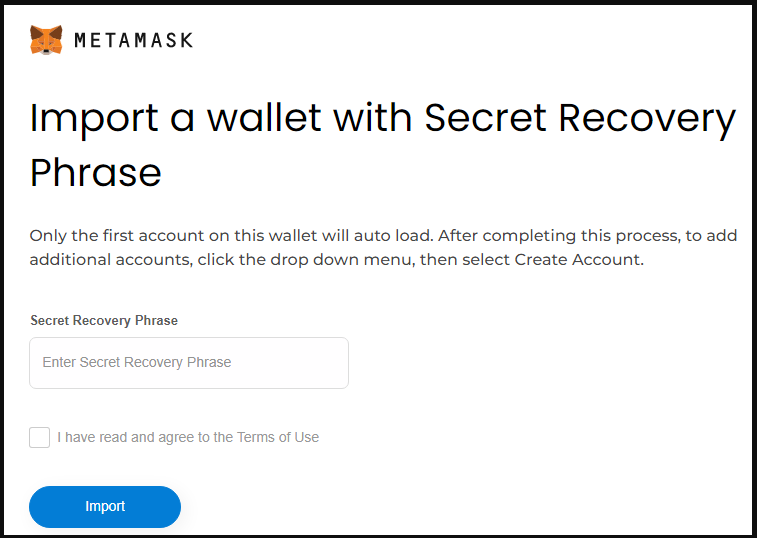
.png)