How to Fix WordPress Search Not Working (5 Common Errors)

Are you trying to fix issues with WordPress search not working on your website?

While WordPress comes with basic search feature, it has some common errors and limitations that can keep your visitors from finding what they’re looking for.

In this post, we’ll show you how to fix problems with WordPress search not working.

How to fix WordPress search not working

Why Do WordPress Search Errors Happen?

Most websites have a search feature that helps visitors find interesting content on your WordPress blog or products that they may want to buy on your online store.

However, WordPress’ built-in search feature is very basic.

By default, it doesn’t search all types of content such as comments, reviews, or custom post types. This may stop the visitor from finding what they’re looking for.

The built-in search also focuses on matching search words with the post or page content without paying attention to things such as tags, categories, or custom fields. This is important information that can help your visitors get more accurate search results.

Lastly, there’s no easy way to customize the built-in search. For example, if you wanted to prioritize a post’s titles over its excerpt, or exclude certain pages from WordPress search, you would need to edit the code.

With that in mind, let’s look at how you can easily fix common problems with WordPress search not working. Simply use the quick links below to jump straight to the issue you’re having with WordPress search.

How to Fix WordPress Search Box Not Appearing

While WordPress has built-in search feature, not all themes may come with a search bar design. If your theme doesn’t come with a search bar, then there are a few ways that you can create one.

You can add a Search block to any widget-ready area of your WordPress website such as the header or footer. This is a quick and easy way to show a search bar across every page of your WordPress site.

To add a Search block, simply go to Appearance » Widgets. You can then find the area where you want to add a search bar, and click on its arrow icon to expand.

Adding a search bar to a widget ready area

Then, just click on the + icon.

In the popup that appears, type in ‘search’ and then select the Search block.
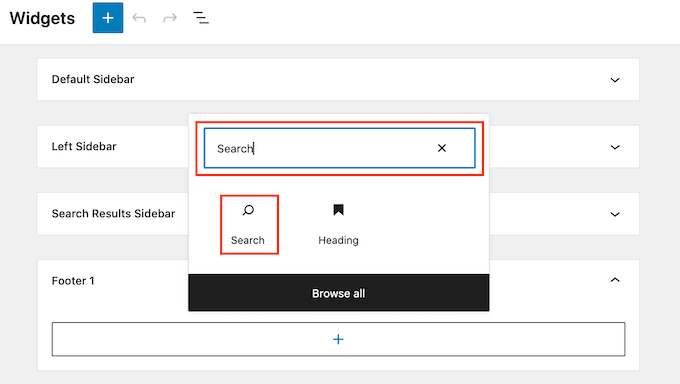
The WordPress search block

Once you’ve done that, you can customize the Search block using the row of icons that appears above the block. This includes changing the size of the search button and adding some text.

When you’re happy with how your Search block looks, go ahead and click on the ‘Update’ button. You can now visit your website to see the search bar live.

Another option is adding the Search block to a specific page or post. For example, you might just want to show a search bar on your homepage or landing page.

To do this, just open the page or post where you want to show your search bar. You can then click on the + icon and add a Search block following the same process described above.
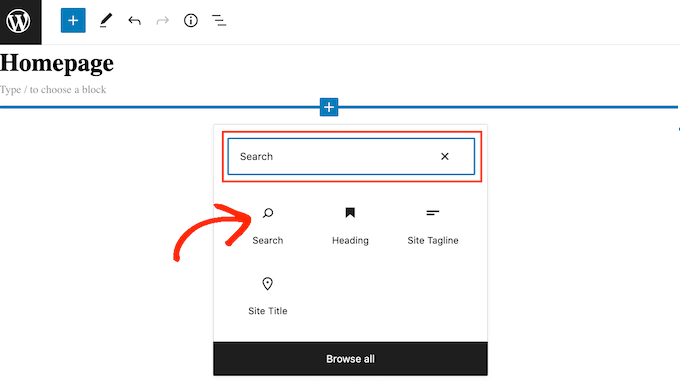
Adding a search bar to the WordPress homepage

WordPress’ ready-made Search block is an easy way to add basic search to your site. However, if you want complete control over how your search bar looks and acts, then you’ll need a page builder plugin.

SeedProd is the best drag and drop page builder for WordPress and comes with over 80 professionally-designed blocks including a Search Form block. This allows you to instantly add a search bar to any area of your WordPress website.

All you need to do is open SeedProd’s editor and then drag and drop the Search Form block into place on your website’s layout.
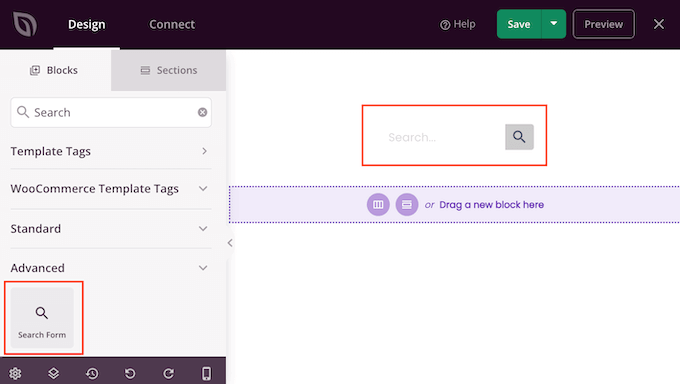
The SeedProd Search Form block

Once you’ve done that, you can customize it using all the settings in the left-hand menu.

Once you’ve added a search bar, you can use the SeedProd theme builder to design a completely custom search results page that perfectly matches your brand. For more information, please see our guide on how to easily create a custom WordPress theme.

How to Fix WordPress Search Showing 404 Error

When a visitor performs a search, your site may show a 404 error such as ‘This page could not be found!’

A WordPress 404 error

You can often fix 404 errors by regenerating your permalinks. This rebuilds and repairs the WordPress permalink structure without changing anything on your site.

This may sound complex, but WordPress does all of the hard work for you.

To regenerate your permalinks, simply go to Settings » Permalinks.
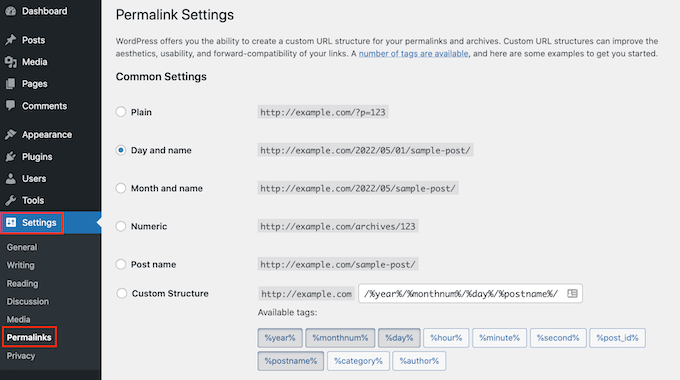
WordPress' permalink settings

Then, scroll to the bottom of the page and click on the ‘Save Changes’ button.

That’s it. WordPress will now regenerate your permalink structure. To make sure it worked, head over to your site and try performing a search.

For a more detailed look at rebuilding your permalink structure, see our complete guide on how to regenerate your permalinks in WordPress.

How to Fix WordPress Search Showing Irrelevant Results

Every time a visitor performs a search, you’ll want to show relevant search results. This helps visitors find interesting content, which will keep them on your site for longer and increase your sales and conversions.

However, the built-in WordPress search doesn’t always show the most accurate results. This is because it looks for the search term in your post’s title and content only.

With that in mind, we recommend installing an advanced search plugin.

SearchWP is the best custom search plugin for WordPress, used by over 30,000 websites. SearchWP can search every part of your site including custom fields, WooCommerce products, categories and tags, PDF files, and more.

You can use SearchWP to adjust your website’s search algorithm and make sure your most important content appears at the top of the visitor’s search results.

The first thing you need to do is install and activate the SearchWP plugin. For more details, see our step by step guide on how to install a WordPress plugin.

Upon activation, click on the new ‘SearchWP’ button in your website’s toolbar. You can then go ahead and click on ‘Activate License.’

Activating the SearchWP WordPress plugin

Once you’ve done that, click on the ‘License’ tab.

You can now either paste or type your license into the ‘License’ box. You’ll find this key in the email you got when you purchased SearchWP.
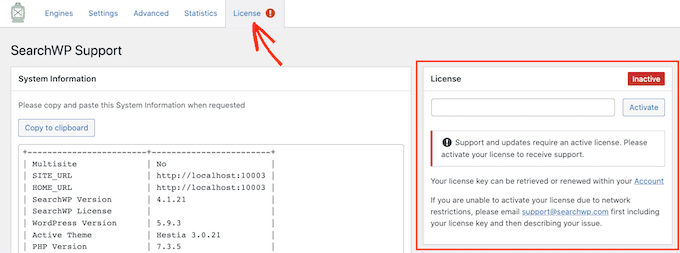
The SearchWP advanced search WordPress plugin

After that, go ahead and click on the ‘Activate’ button.

SearchWP integrates with WordPress search automatically, so right away your site will start showing more accurate results. However, to get the best results you’ll want to customize SearchWP’s search engine settings.

Here it helps to think about the way that search engines such as Google rank their content.

These search engines use algorithms to find high-quality content that closely matches the search term. It then ranks this content to make sure the best matches appear at the top of the search results page.

With SearchWP you can build your own algorithms and set your own rules, just like Google. This can improve the visitor experience, boost your conversions, and help you make money online with WordPress.

To configure SearchWP’s settings, click on the ‘Engines’ tab.
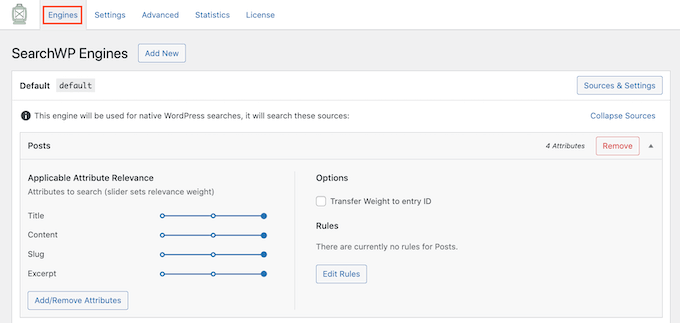
The SearchWP search engine settings

On this screen, you’ll see sections for the different types of WordPress content such as pages and posts.

For each section, SearchWP shows the attributes it looks at when performing a search. In the following image, we can see that SearchWP searches the page’s title, content, slug, and the page’s excerpt.
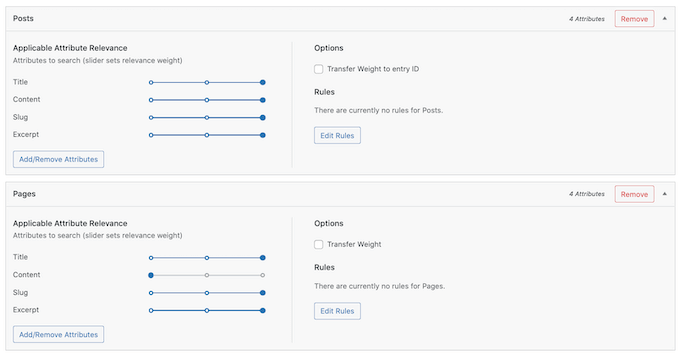
The SearchWP search algorithm settings

There is also an ‘Applicable Attribute Relevance’ scale for each attribute. This is the weight that SearchWP gives to each attribute when ranking its search results.

In the following image, we can see that a post’s title has more weight than its URL slug.
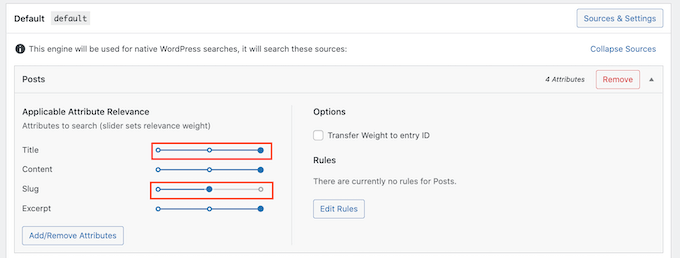
The SearchWP WordPress settings

You can make an attribute more or less relevant using its slider.

There are no settings that are guaranteed to provide accurate results for every website. With that in mind, you may want to try different relevancy settings to see what gives you the most accurate search results.

You can also add different types of content to be included in your search results. For example, you can add PDF searching and indexing in WordPress if you have PDF files you want your visitors to be able to search for.

If you have any custom taxonomies or fields, then you can also tell SearchWP to look at this content when searching your site.

To add or remove attributes, click on the ‘Add/Remove Attributes’ button.
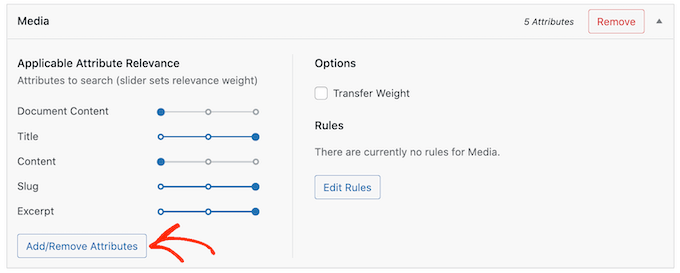
The SearchWP Add/Remove attributes button

This opens a popup. To get SearchWP to ignore an attribute, simply uncheck its box.

If you want to add an attribute, then click to check its box.
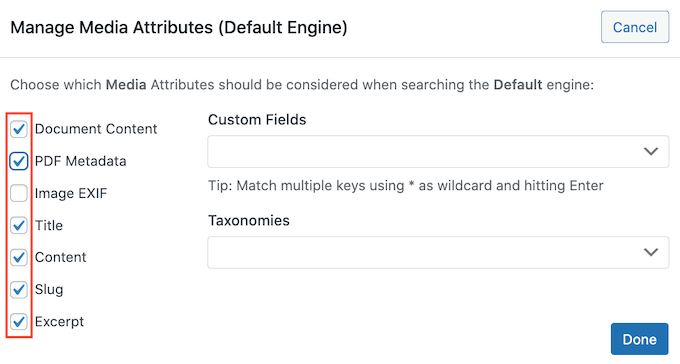
Removing attributes from WordPress search

Want to include a custom field or taxonomy in your searches?

Simply type in the name of that field or taxonomy, and then select it when it appears.
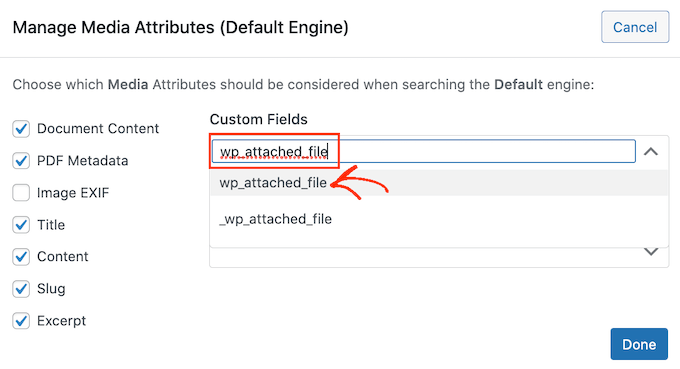
Adding a custom field to WordPress search

Once you’re happy with your attributes, click on the ‘Done’ button.

You can now change the relevancy for your new attributes following the same process described above.
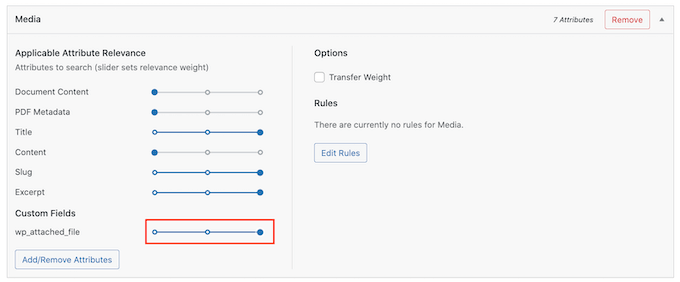
SearchWP's custom relevancy settings

To learn more, please see our step by step guide on how to improve WordPress search with the SearchWP.

Once you’ve finished customizing SearchWP’s settings, make sure to click on the ‘Save Engines’ button to save your changes.
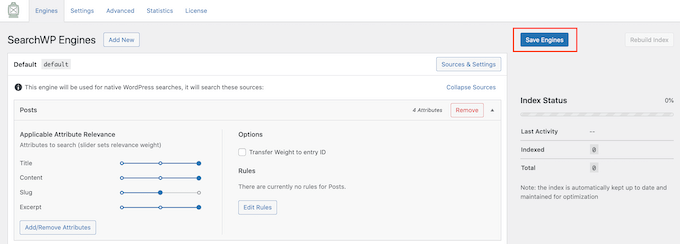
Saving your WordPress custom search settings

SearchWP will now use these new settings for all of its searches.

It’s worth visiting your site and performing a few searches just to check that you’re getting accurate results.

If you don’t see any improvement, then your WordPress theme may be performing its own search. This is known as a redundant search.

The easiest way to check whether this is happening with your theme, is by opening its search.php file.

To access this file, you’ll need an FTP client, or you can use the file manager of your WordPress hosting cPanel. If this is your first time using FTP, then you can see our complete guide on how to connect to your site using FTP.

Once you’re connected to your site, you can use FTP to open the wp-content/themes/ folder.
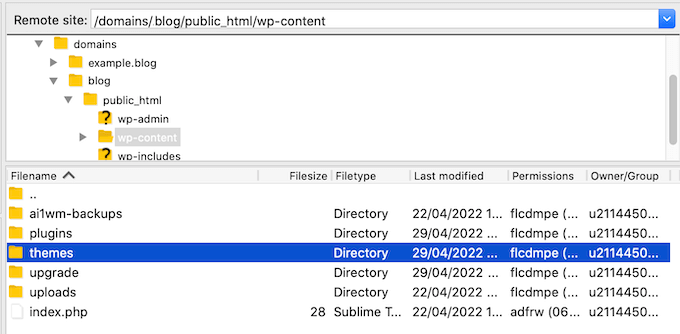
The FileZilla FTP client

Inside the ‘themes’ folder, find the theme you’re currently using on your WordPress website. You can then open this folder and find the search.php file.

Next simply click on the search.php file and select ‘View/Edit.’
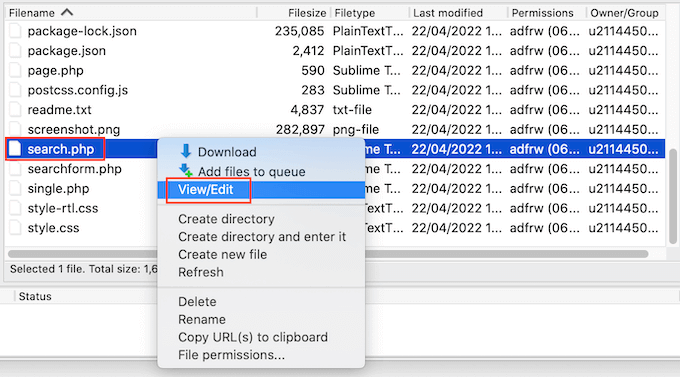
Editing the WordPress search.php file

This will open search.php in your computer’s default text editor.

Now, check this template for any queries that contain query_posts, new WP_Query, or get_posts. This usually means that your theme is performing a redundant search.

If search.php has any of these queries, then we recommend switching to an alternative WordPress theme. To help you out, we’ve created a list of the most popular and best WordPress themes.

Another option is to hire a WordPress developer who can write a new template that doesn’t perform a redundant search.

How to Fix WooCommerce Product Search Not Showing Accurate Results

If you have a WooCommerce store, then search results can help customers find products to buy. To sell more products, you’ll need to display accurate product search results.

However, by default WordPress doesn’t look at your product reviews, attributes, or the product description when performing its searches.

SearchWP can easily fix the problems with WooCommerce search.

You can set up SearchWP by following the same process described above.

Once you’ve done that, go to Settings » SearchWP. You can then click on the ‘Sources & Settings’ button.
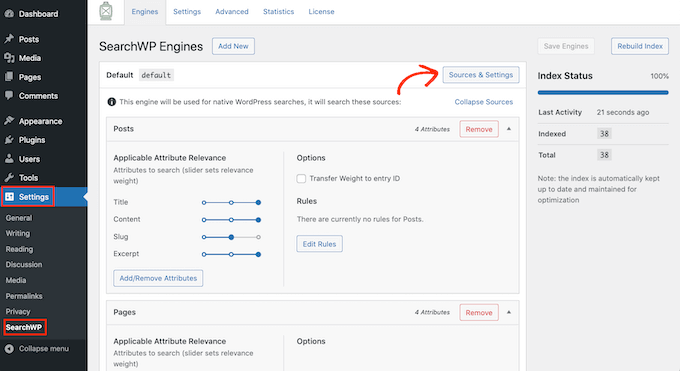
SearchWP's source settings

In the popup, make sure you check ‘Products.’

After that, just click on the ‘Done’ button to close the popup.
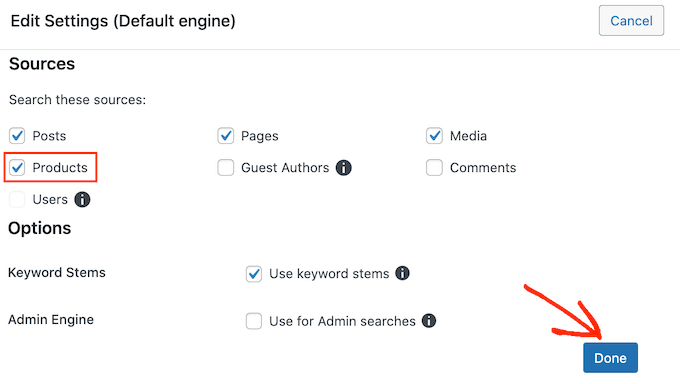
Creating a custom WooCommerce product search

You can now scroll to the new ‘Products’ section.

Here, you can customize the attributes that WordPress uses in its product searches by following the same process described above.
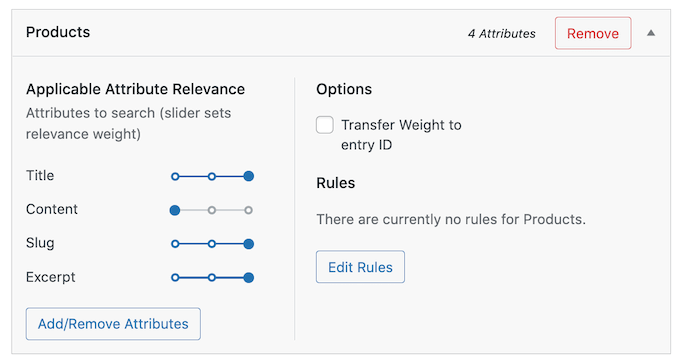
SearchWP's WooCommerce product search settings

For more information, please see our complete guide on how to make a smart WooCommerce product search.

Fast search helps visitors find what they’re looking for in less time. This will improve the user experience and can increase your pageviews and conversion rate.

Unfortunately, the built-in WordPress search isn’t particularly fast. As you add more content, you may notice that your site takes longer and longer to return the search results.

The good news is that there are ways to speed up your site’s search. If you’re using an advanced search plugin like SearchWP, then you’re already off to a great start.

SearchWP is designed to deliver search results, fast. It’s also fully customizable, so you can ignore some of your site’s content when performing a search. For example, you may tell SearchWP to ignore your media metadata. This can speed up your search by reducing the amount of content it has to look through.

You can also improve the search experience by adding live Ajax search to your WordPress site. This is a dropdown that guesses what visitors are searching for as they type, which can make your searches feel instant.

Live Search Preview

For more information, please see our guide on how to add live Ajax search to your site.

Anything you do to improve your website’s overall performance will also speed up your search. You can see our ultimate guide on how to speed up your WordPress site and boost performance.

We hope this article helped you learn how to fix problems with WordPress search not working. You may also want to see our guide on how to get a free SSL certificate for your website, or our expert comparison of the best chatbot software for small business.

Source :
https://www.wpbeginner.com/wp-tutorials/how-to-fix-wordpress-search-not-working-common-errors/

How to Accept Google Pay in WordPress (The Easy Way)

Would you like to accept Google Pay on your WordPress site?

When you allow your customers to choose their preferred payment method, you’ll build trust and increase conversions on your website.

In this article, we’ll show you how to accept Google Pay in WordPress.

How to Accept Google Pay in WordPress

Why Accept Google Pay in WordPress?

If you’re selling products or services on your WordPress website or asking for donations, then it’s important to let your visitors pay using their preferred method.

Often they will want to pay by credit card or PayPal, but newer methods like Google Pay and Apple Pay are becoming more popular.

Google Pay is available in 40 countries around the world and makes online payments simple. However, your customers can only use it if they’re on an Android device running version Lollipop 5.0 or higher, so you’ll probably want to include additional payment options for people using other devices.

That being said, let’s take a look at how to accept Google Pay in your online store.

Note: We’ll cover how to add a Google Pay option in WordPress without adding a full eCommerce cart, but we will leave other helpful resources at the end of this article for those looking for full eCommerce solutions.

How to Accept Google Pay in WordPress

The first thing you need to do is install and activate the WP Simple Pay plugin. For more details, see our step by step guide on how to install a WordPress plugin.

WP Simple Pay is a simple yet powerful WordPress invoicing and payments plugin. The best part is that WP Simple Pay does not charge you any additional transaction fees, and you can set it up without the complexity of a cart system.

It lets you add Apple Pay, Google Pay, credit card as well as ACH bank payments, so you can give users multiple payment options which improves conversion.

While there is a free version of the plugin, you need the Pro plugin to accept Google Pay, create on-site payment forms, and more.

Upon activation, the WP Simple Pay setup wizard will start automatically. You simply need to click the ‘Let’s Get Started’ button to continue.

The WP Simple Pay Setup Wizard Will Start Automatically

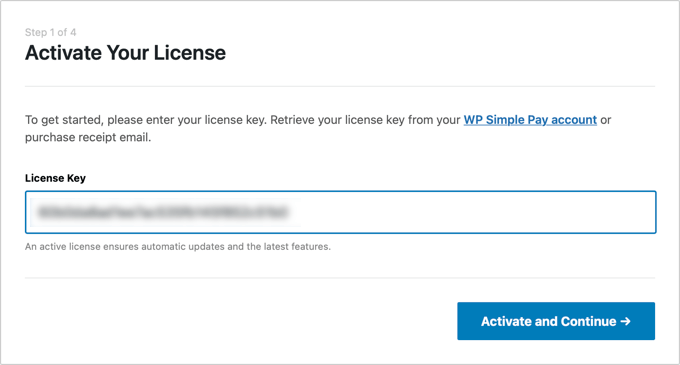
On the first page, you’ll be asked to enter your license key. You can find this information from your account on the WP Simple Pay website.

After that, you need to click the ‘Activate and Continue’ button to move to the next step.

You’ll Be Asked to Enter Your WP Simple Pay License Key

On the second page, you will need to connect WP Simple Pay to Stripe. Stripe is a popular payment gateway, and it’s the easiest way to add Google Pay to your website. It also supports all top credit and debit cards, Apple Pay, ACH payments, and more.

Simply click the ‘Connect with Stripe’ button, and from there you can log in to your Stripe account or create a new one. Anyone with a legitimate business can create a Stripe account and accept payments online.

You Need to Connect WP Simple Pay to Stripe

Note: Stripe requires your site to be using SSL/HTTPS encryption. If you don’t already have an SSL certificate for your website, then please see our step by step guide on how to add SSL in WordPress.

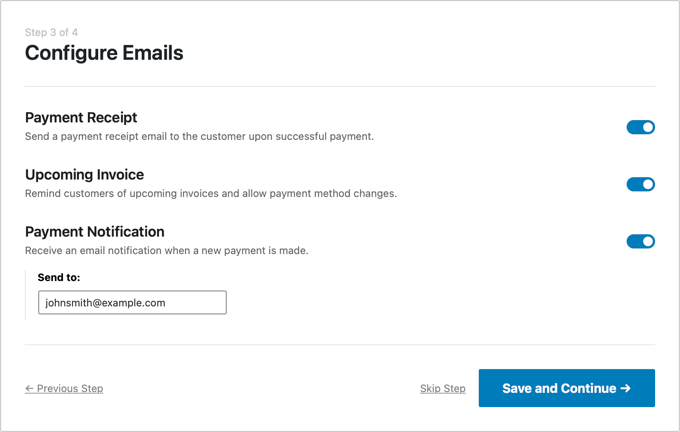
Once you’ve connected to Stripe, you’ll be asked to configure your WP Simple Pay emails.

The options for payment and invoice emails to your customers have already been enabled for you. So is the option for sending payment notification emails.

Configure Your WP Simple Pay Emails

You just need to enter the email address where the notifications should be sent.

Once you’ve done that, you need to click the ‘Save and Continue’ button to complete your setup of WP Simple Pay.

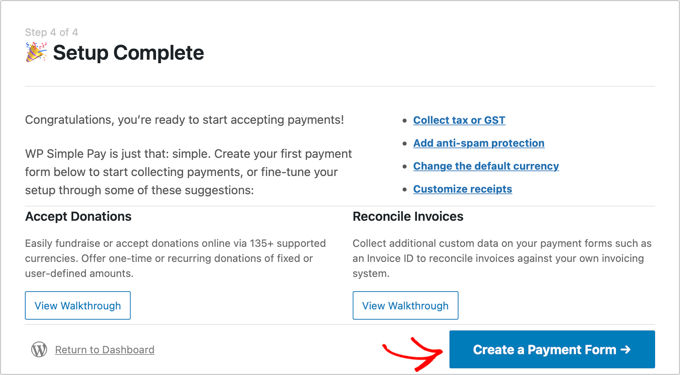
WP Simple Pay Setup Is Complete

Google Pay is enabled by default when using Stripe Checkout, and will be automatically offered to Android users in participating countries.

If you decide to disable Google Pay in the future, then you will need to change the payment method settings in the Stripe Dashboard.

Creating a Payment Form in WordPress

Next, you need to create a payment form.

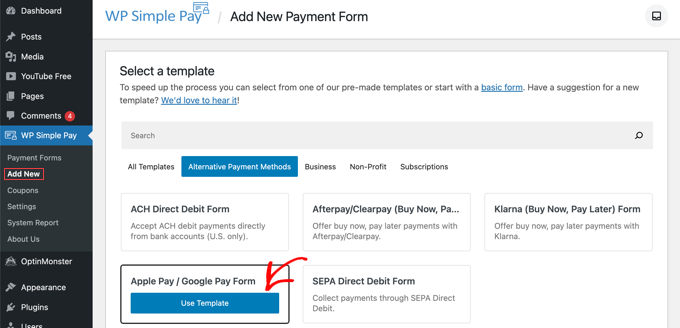
You can do that by clicking the ‘Create a Payment Form’ button on the last page of the setup wizard. This will automatically take you to the WP Simple Pay » Add New page.

You’ll be shown a list of payment form templates. You need to scroll down until you locate the Apple Pay / Google Pay template.

Simply hover over the template and click the ‘Use Template’ button when it appears.

Select the Apple Pay / Google Pay Template

This will take you to the payment form editor.

If you like, you can rename the form and give it a description. After that, you need to select the ‘Stripe Checkout’ option under Form Type.

Select the Stripe Checkout Option

After you’ve done that, we’ll move on to the Payment tab.

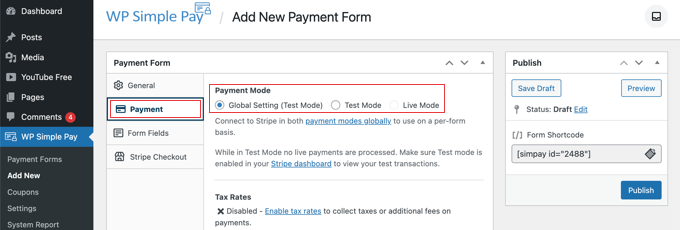
Here you can set the payment mode to either live or testing. Testing mode will let you make payments that are not actually charged so you can make sure your form is working properly and emails are being sent.

Don’t forget to change this to ‘Live’ when you’ve finished testing and are ready to start receiving payments from your customers.

Set the Payment Mode to Either Live or Testing

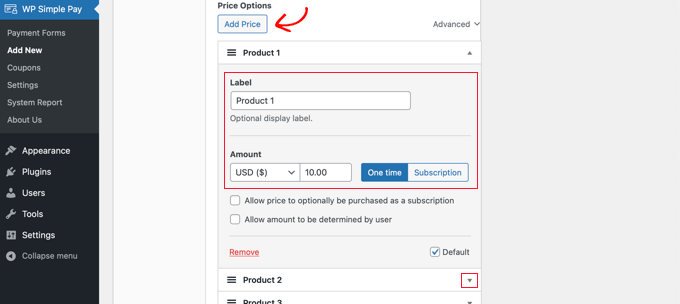
You can also add the products or services that you offer, along with their prices and whether they are a one-time payment or a subscription.

Simply click the ‘Add Price’ button until you have added as many prices as you need. After that, you will need to add a label and price for each one. You can also select other options, such as recurring payments, or the user can determine the price, as in a donation.

Add Your Products and Services to the Payment Form

You can show or hide a price by clicking the small arrow on the right.

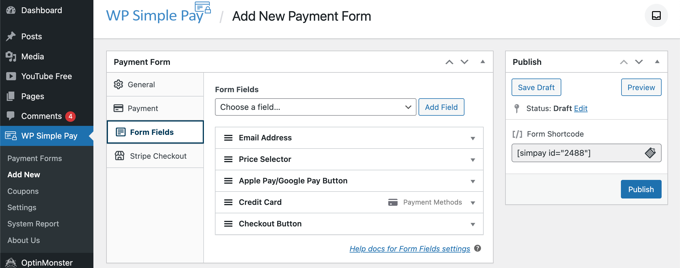
Next, we’ll move on to the ‘Form Fields’ tab. Notice that the essential fields have already been added to the form, including an ‘Apple Pay / Google Pay’ button, credit card details, and a checkout button.

The Essential Form Fields Have Been Added For You

Using the ‘Form Fields’ drop down, you can choose additional fields and add them by clicking the ‘Add Field’ button. Options include name, phone number, address, and much more.

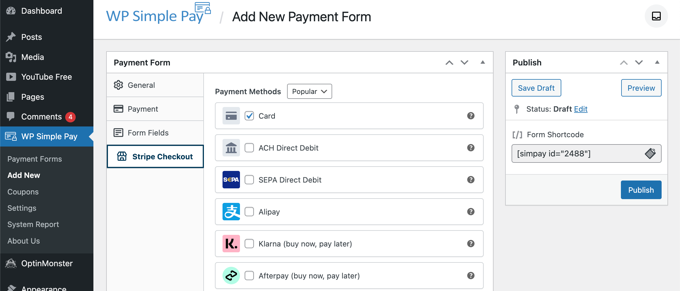
Finally, the ‘Stripe Checkout’ tab allows you to select additional payment methods and tweak the checkout form that is displayed after the user clicks the ‘Pay’ button.

For this tutorial, we’ll leave those settings as they are.

Select any Additional Payment Methods and Tweak the Checkout Form

When you are happy with your payment form, click on the ‘Publish’ button to store your settings and push the form live.

Now we can add the form to a post or page on your website.

Adding the Payment Form to Your Website

WP Simple Pay makes it super easy to add forms anywhere on your website.

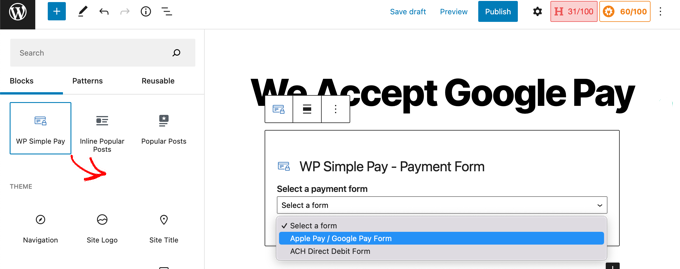
Simply create a new post or page, or edit an existing one. Then, click on the plus (+) sign at the top and add a WP Simple Pay block in the WordPress block editor.

Insert a WP Simple Pay Block and Choose the Correct Form

After that, select your order form from the dropdown menu in the WP Simple Pay block.

Once you’re finished, you can update or publish the post or page, and then click on the preview button to see your form in action.

WP Simple Pay Payment Form Preview

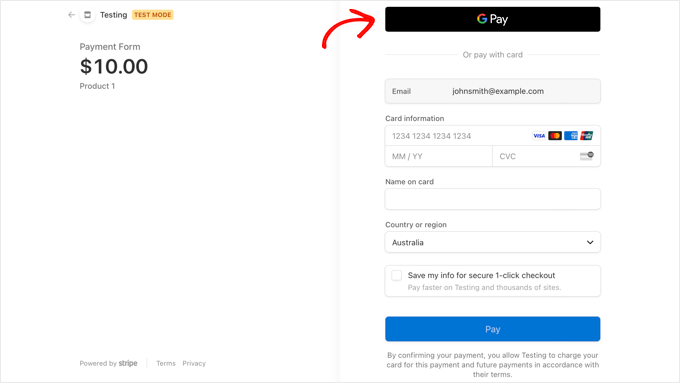
When your users click the Pay button, the Stripe checkout form will be displayed.

If they are using an Android device running Lollipop 5.0 or higher, then the Google Pay option will be displayed at the top of the form. Otherwise, the Google Pay option will be hidden, and your customers can pay using a credit card.

Stripe Checkout Preview With Google Pay

If you’re looking for other ways to add Google Pay in WordPress, then you can use full eCommerce solutions like Easy Digital Downloads or WooCommerce. Both of them have support for Apple Pay and Google Pay options.

We hope this tutorial helped you learn how to accept Google Pay in WordPress. You may also want to learn the right way to create an email newsletter, or check out our expert pick of the best contact form plugins for WordPress.

Source :
https://www.wpbeginner.com/plugins/how-to-accept-google-pay-in-wordpress/

How to Switch to Google Analytics 4 in WordPress (The RIGHT Way)

Are you looking to switch to the latest Google Analytics version?

Google is now recommending website owners to move to the new Google Analytics 4 because they will be sunsetting the previous Universal Analytics on July 1, 2023. After the sunset day, you won’t be able to track data in the older version.

In this article, we’ll show you how to easily switch to Google Analytics 4 in WordPress.

Switch to Google Analytics 4 in WordPress

Why Switch to Google Analytics 4?

Google Analytics 4 (GA4) is the latest version of Google Analytics. It lets you track your mobile apps and websites in the same account, and offers new metrics, reports, and tracking features.

If you haven’t created a GA4 property yet, then now is the best time to switch to the latest version. That’s because Google announced that it will be closing down the old Universal Analytics on July 1, 2023.

What this means is that Universal Analytics will no longer receive data from your WordPress website, and it will eventually stop working after the sunset date. That means that all your old analytics data will be lost.

Switching to Google Analytics 4 as soon as possible will protect you from starting from scratch with no historical data.

To do this right, a lot of smart website owners are using the dual tracking method which allows you to continue using the current Universal Analytics while start sending data to GA4.

This way, you can future-proof your data while giving yourself plenty of time to learn the new Google Analytics dashboard and features.

That being said, let’s see how you can switch to Google Analytics 4 in WordPress with dual tracking.

Video Tutorial

https://youtube.com/watch?v=8dihyjwMNnE%3Fversion%3D3%26rel%3D0%26fs%3D1%26showsearch%3D0%26showinfo%3D1%26iv_load_policy%3D1%26wmode%3Dtransparent

Subscribe to WPBeginner

If you’d prefer written instructions, just keep reading.

Creating a Google Analytics 4 Property

If you already have an existing Google Analytics account using the old version, then you can eaily create a new GA4 property and start sending stats to GA4.

First, you’ll need to visit the Google Analytics website and login to your account.

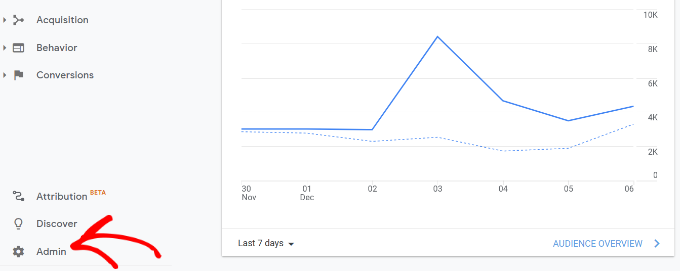
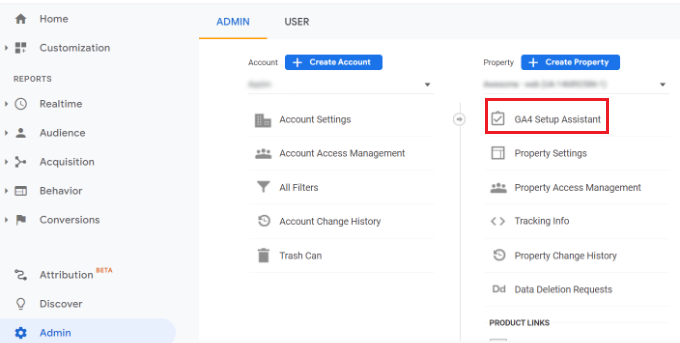
After that, head over to the ‘Admin’ settings page in the bottom left corner.

Click admin settings

If you’re on classic Google analytics, then you’ll see the option to setup GA4.

Go ahead and click on ‘GA4 Setup Assistant’ under the Property column.

Click on GA4 setup assistant

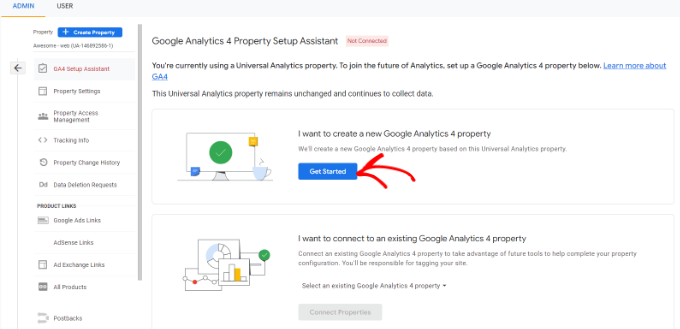
In the next step, the setup assistant will give you 2 options. You can create a new Google Analytics 4 property or connect an existing one.

Since we’re setting up a new property, simply click the Get Started button under the ‘I want to create a new Google Analytics 4 property’ option.

Create a new GA4 property

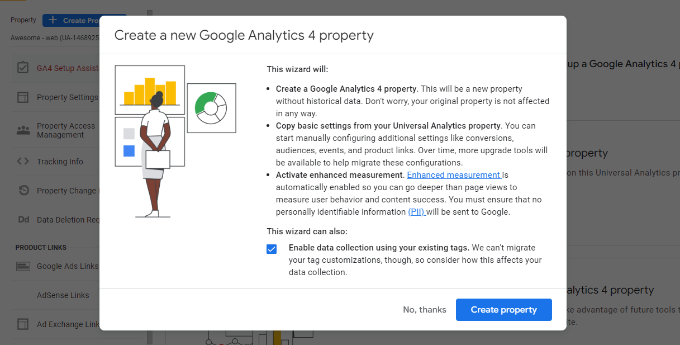
A popup will now appear with the details about the setup wizard.

If you’ve implemented your Universal Analytics using the Global Site Tag (gtag.js) code, then you’ll see an option to Enable data collection using existing tags.

This uses the existing tracking code on your site to collect information. That said, if you don’t already have the right tracking code on your website, we’ll show you how to add it to your WordPress blog below.

For now, you can go ahead and click the ‘Create property’ button.

Click the create property button

The setup wizard will add a new GA4 property and copy the Universal Analytics property name, website URL, timezone, and currency settings.

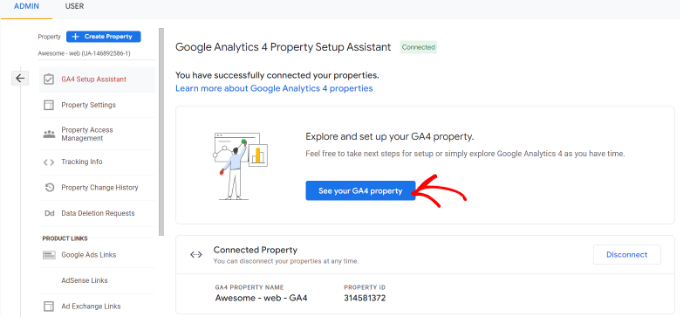
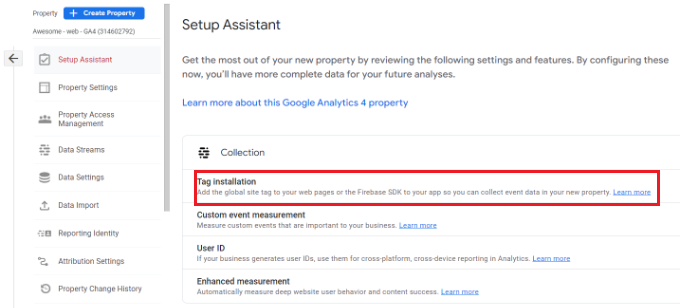
You can now view your new Google Analytics 4 property in the GA4 Setup Assistant.

View your connected property

Next, you’ll need to click on the ‘See your GA4 property’ button to see your Google Analytics tracking code.

After clicking on the button, simply click on the ‘Tag installation’ option to retrieve your tracking code.

Go to tag installation

You should now see your new GA4 property under Data Streams.

Go ahead and click on your new property.

Select your data stream

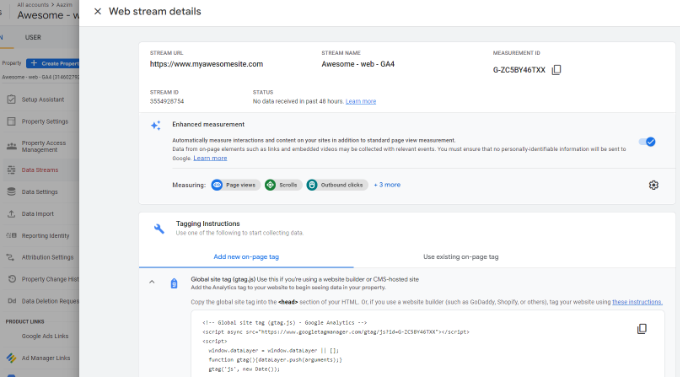
A new window will slide in from the right, and you’ll be able to see your web stream details.

Note: Google Analytics 4 uses both ‘data stream’ and ‘web stream’. These both simply mean the flow of analytics data that Google Analytics receives from your website.

Simply scroll down to Tagging Instructions section and click the Global site tag (gtag.js) option to expand the settings. You’ll now see your Google Analytics tracking code that needs to be added to your WordPress site.

See web stream details

One thing you need to know is that Google Analytics 4 reports are quite different than what you’re used to in Universal Analytics.

They have introduced new terminology, and many familiar metrics and reports are missing completely. Basically if you were using common reports like the Top Landing Pages report or others, then you’d have to recreate those from scratch in Google Analytics 4.

That’s why we recommend using MonsterInsights Pro or even the free version of MonsterInsights.

It will help you see all the familiar analytics reports right in your WordPress dashboard, and it also lets you use both Universal Analytics and Google Analytics 4 at the same time.

Not to mention, with MonsterInsights you get all the powerful tracking features such as outbound link tracking, author tracking, and more which can be enabled without writing any code.

Let’s take a look at how to easily set up Google Analytics 4 on your WordPress site with MonsterInsights.

Adding Google Analytics Tracking Code to WordPress Site

The best way to add Google Analytics tracking code to your WordPress website is by using MonsterInsights. This is the plugin that we use on WPBeginner.

MonsterInsights is the best Analytics solution for WordPress, and it’s trusted by over 3 million websites because it lets you easily setup advanced tracking without any coding skills.

You can use the MonsterInsights Lite version to set up Google Analytics in no time. There are also premium MonsterInsights plans that offer more features like custom dashboard reports, email summaries, scroll tracking, eCommerce tracking, premium integrations, and more.

MonsterInsights also offers dual tracking, meaning you can use both Universal Analytics and Google Analytics 4 at the same time. This is available in both the free version as well paid, and we highly recommend using this to ensure that your transition to GA4 goes smoothly.

First, you’ll need to install and activate the MonsterInsights plugin. For more details, please see our guide on how to install a WordPress plugin.

Upon activation, you’ll be taken to the MonsterInsights welcome screen in your WordPress dashboard. Simply click the ‘Launch the Wizard’ button to add Google Analytics to your site.

Launch setup wizard

After clicking the button, the setup wizard will ask you to choose a category that best describes your website.

You can choose from a business website, publisher (blog), or online store. Once you’ve selected a category, click the ‘Save and Continue’ button.

The MonsterInsights setup wizard

In the next step, you’ll need to connect MonsterInsights with your WordPress site.

Go ahead and click the ‘Connect MonsterInsights’ button.

Connect MonsterInsights with your site

Once you click the button, you’ll need to sign in to your Google Account.

Simply select your account and click the ‘Next’ button.

Choose Google account to sign in

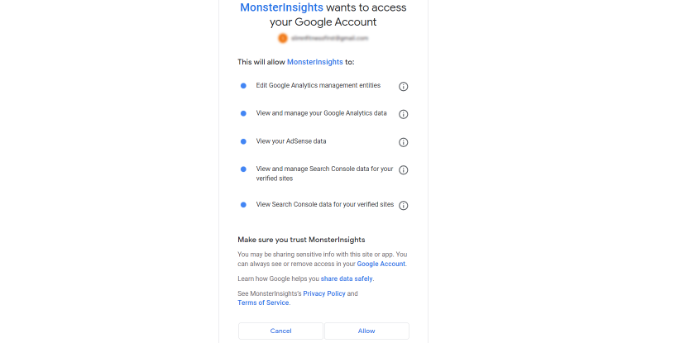
Next, MonsterInsights will require access to your Google Analytics Account.

MonsterInsights App needs these permissions, so it can help you setup analytics properly and show you all the relevant stats right inside your WordPress dashboard.

You can click the ‘Allow’ button to continue.

Allow access to your Google account

After that, you’ll be redirected back to the MonsterInsights setup wizard.

To complete the connection, select your Google Analytics 4 property from the dropdown menu and click the ‘Complete Connection’ button.

Select your GA4 property

Next, MonsterInsights will connect Google Analytics with your WordPress website.

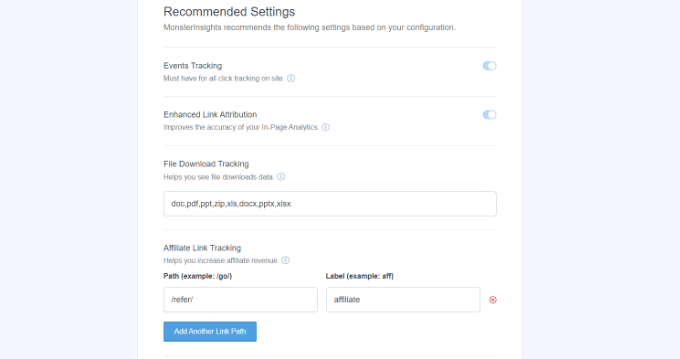
On the next screen, you’ll see some recommended settings like file download tracking and affiliate link tracking.

You can use the default settings in the setup wizard. However, if you’re using an affiliate link plugin, then you’ll need to enter the path you use to cloak the affiliate links.

Recommended settings

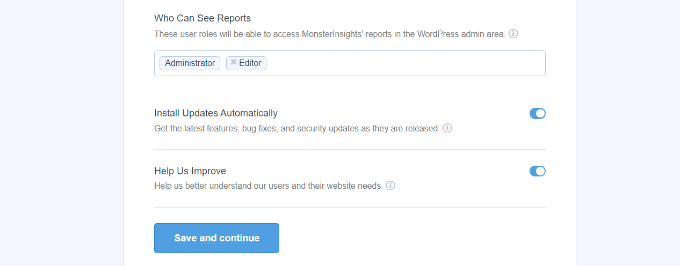
Next, you can scroll down and select who can see reports and add different WordPress user roles.

Once you’re done, click the ‘Save and continue’ button.

Who can see the reports

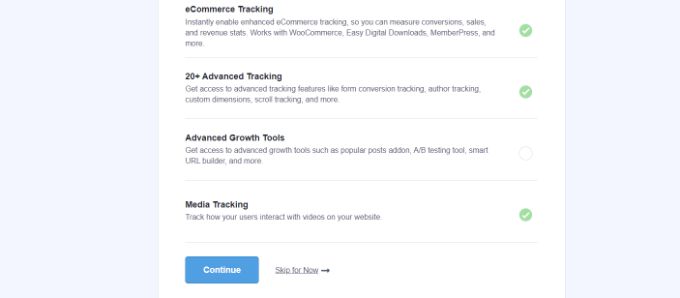
After that, MonsterInsights will show different tracking features that you can enable for your website.

You can scroll down and click the ‘Skip for Now’ button.

Choose which tracking features to enable

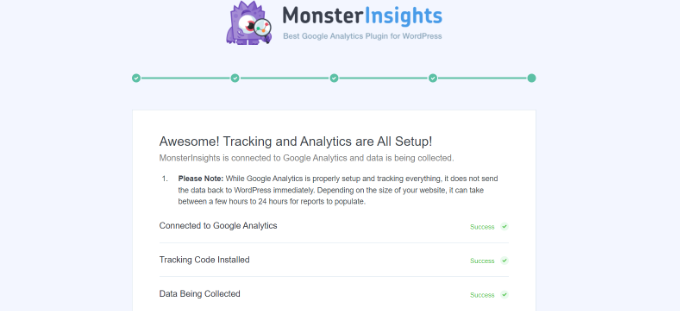
Next, you’ll see a checklist showing that you’ve successfully connected Google Analytics to your website.

For example, it will show that you’re successfully connected to Google Analytics, the tracking code is properly installed, and the data is being collected.

Tracking should be all setup

That’s it, you’ve added Google Analytics 4 property to your WordPress site.

Creating a Measurement Protocol API Secret

If you want to MonsterInsights to track eCommerce purchases, form conversions, and more advanced tracking in Google Analytics, then you’ll need to create a Measurement Protocol API Secret.

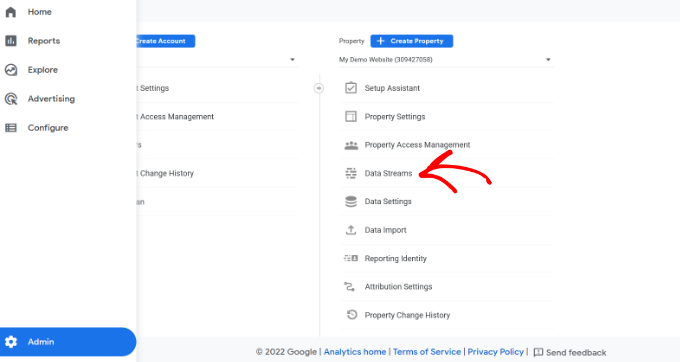
First, you’ll need to go back to your Google Analytics account and then go to Admin settings. Next, click on the ‘Data Streams’ option under Property column.

Go to admin and data stream settings

Then you’ll need to select the Google Analytics 4 property that we created earlier.

Go ahead and select your property under Data Streams.

Select your data stream

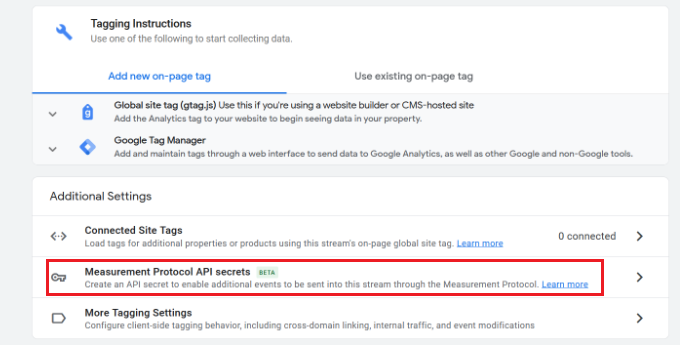
After that, you can scroll down to the ‘Advanced Settings’ section.

Simply click the ‘Measurement Protocol API secrets’ option.

Select measurement protocol API secrets option

A new window will now slide in with your Measurement Protocol API secrets.

You will have to click the ‘Create’ button.

Create an API key

After that, enter a nickname for your API secret so it’s easily identifiable.

When you’re done, click the ‘Create’ button.

Enter a name for your API

You should now see your Measurement Protocol API secret.

Simply copy the API secret under the ‘Secret value’ field.

Copy the secret value

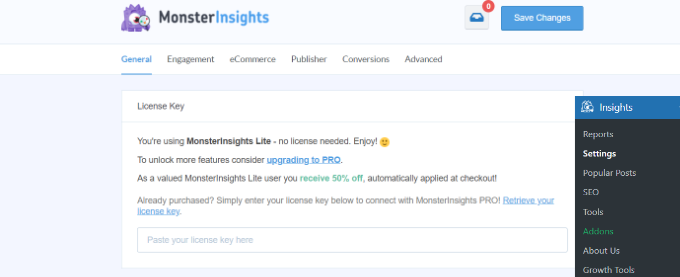
After that, you can head back to your WordPress website and navigate to Insights » Settings from your dashboard.

Now click on the ‘General’ tab at the top.

General settings tab in MonsterInsights

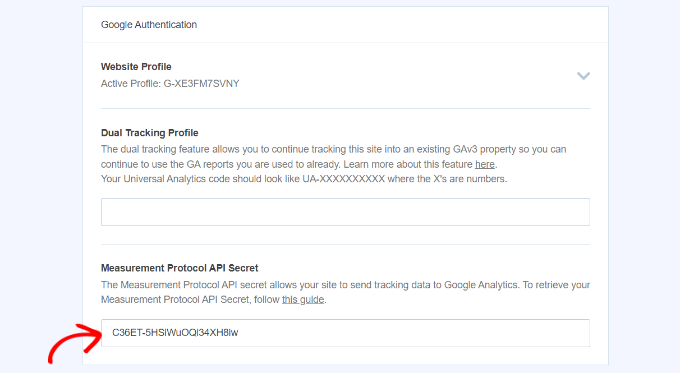
Next, you will have to scroll down to the ‘Google Authentication’ section.

Go ahead and enter the Secret value you just copied in the Measurement Protocol API Secret field.

Enter measurement protocol API secret in MonsterInsights

You’ve successfully added Measurement Protocol API Secret in MonsterInsights.

Setting Up Universal Analytics Dual Tracking

Now that you have setup GA4, the next step is to enable dual tracking for Universal Analytics, so it can run alongside your Google Analytics 4 property in WordPress.

With MonsterInsights, you can easily set up dual tracking and simultaneously track both properties without writing code.

Note: If you already have Universal Analytics tracking code added to your WordPress website, then we recommend disabling it first. Otherwise, it could lead to double-tracking and can skew your data.

To start setting up dual tracking properly, you can head to Insights » Settings from your WordPress admin panel and then click on the ‘General’ tab.

General settings tab in MonsterInsights

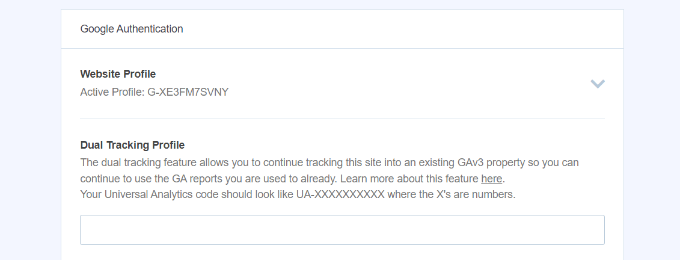
Next, you’ll need to scroll down to the ‘Google Authentication’ section.

Now under the Dual Tracking Profile, enter your Universal Analytics (UA) code.

Enter your UA Code

You can easily find your UA code in Google Analytics Admin settings.

Simply go to the Admin settings page in Google Analytics of your Universal Analytics property.

Click admin settings

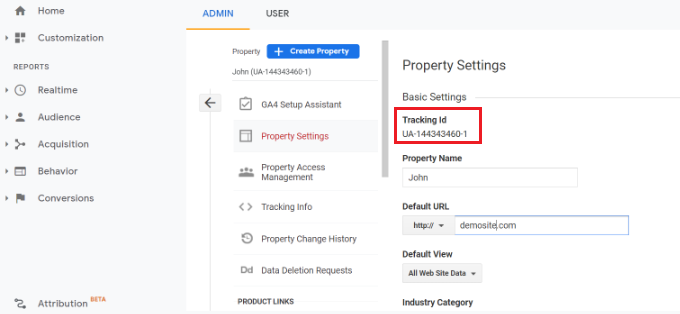
Then click on ‘Property Settings’ under the Property column.

You should see the Tracking Id, and it will look like this: UA-123856789-5

Find your tracking ID

You’ve now successfully set up dual tracking on your WordPress website.

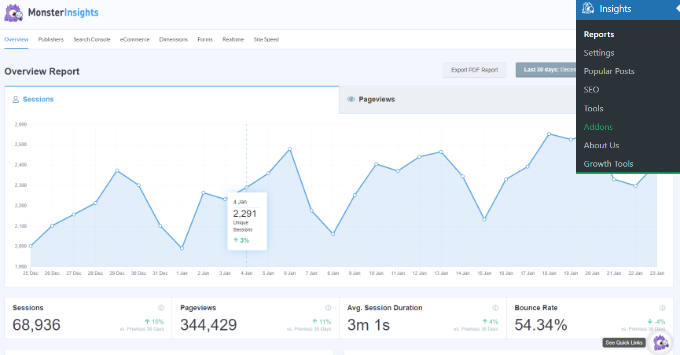
To see how your website is performing, simply go to Insights » Reports. Here you’ll find all the data you need to make the right decisions to grow your website.

Dashboard reports

We hope this article helped you learn how to switch to Google Analytics 4 in WordPress. You may also want to see our ultimate WordPress SEO guide to improve your rankings, or see our comparison of the best email marketing services for small business.

Source :
https://www.wpbeginner.com/wp-tutorials/how-to-switch-to-google-analytics-4-in-wordpress/

2022’s Most Popular and Best WordPress Themes (Expert Pick)

Are you looking for the best WordPress themes of 2022?

With thousands of free and premium WordPress themes available, it’s hard for beginners to choose the right WordPress theme for their site.

In this article, we will share our expert picks of all the best and most popular WordPress themes of 2022.

Most Popular and Best WordPress Themes

The Most Common Traits of All Popular and Best WordPress Themes

WordPress themes are either niche-based or multipurpose in terms of features and options.

You can use a niche-based theme that’s designed especially for your industry, such as a restaurant theme.

Alternatively, you can choose a multipurpose theme that’s highly flexible and can work for any kind of website.

Regardless of the type, all the best WordPress themes have the following features and traits:

  • Mobile-responsive design: The theme designs are responsive and retina-ready, so your WordPress website looks great on all screen sizes and mobile devices.
  • SEO optimization: The theme follows the best SEO (search engine optimization) practices, so your website can rank higher in search results.
  • Page builder support: The theme is compatible with popular WordPress drag and drop page builders. This helps you create custom landing pages whenever you need them.
  • Speed and performance: Your theme plays an important role in the speed and performance of your website. You should look for themes that are well-designed to keep your site fast.
  • Customer support: The best themes include documentation and instructions that are easy to follow, are updated often, and are backed by a great support team to help you out if you get stuck.

These are the essential features that you should look for in a theme before selecting it for your website. Every theme in our list comes with many other useful features aside from the main ones that we mentioned above. You can read about these features in their descriptions.

Now that we have discussed the common traits of all popular themes, let’s take a look at our expert pick of the best themes of 2022.

Note: Looking to start a new website, blog, or online store? Follow our step by step guide on how to start a bloghow to create a website, or how to start an online store.

You can even have our team set up your blog or WordPress site for free with our free blog setup service.

1. Divi

Divi

Divi is one of the most popular WordPress themes and is owned by Elegant Themes. It includes an ultimate page builder. It has multiple visual elements and modules that help you create a beautiful website.

The theme comes with hundreds of free ready-made layouts for multiple industries and niches. The 1-click demo importer lets you import professionally designed pages and blog layouts to get started quickly. You can then replace the content with your own using the frontend editor.

With the built-in drag and drop page builder, you can move elements, save and manage custom designs, and use global styles on all your website pages. You can easily add testimonials, too.

Divi gives you complete control of the layout design, inline text editing, and custom CSS on your site. It’s highly flexible and easy to use. Plus, it’s SEO friendly to help your site rank well in Google and other search engines.

Elegant Themes offers great customer support if you have any problems with the theme.

Get the Divi theme today!

2. Astra

Astra

Astra is a modern WordPress theme designed to create any website. It works with all the popular drag and drop page builders seamlessly.

The theme comes with several starter sites that you can use to launch your website quickly. These ready-made websites are perfect for small businesses, startups, blogs, and WooCommerce stores.

Astra has tons of amazing features, including page headers, mega menu, multiple layout choices, Google Fonts, unlimited color customization options, separate blog page layouts, and custom widgets.

Plus, Astra offers powerful integration with the WooCommerce plugin to create an online store. Their WooCommerce theme includes infinite scrolling, quick product view, shop page, product gallery, and cart options.

It also integrates with popular learning management systems like LearnDash. Astra has built-in SEO optimization to help your website rank well in Google and other search engines.

Get the Astra theme today!

3. SeedProd

SeedProd WordPress Website Builder

SeedProd is the best WordPress website builder on the market. It lets you design your custom theme layout with a visual drag and drop builder, without writing code.

SeedProd comes with several professionally-designed theme templates. These templates include all the page layouts that you need for your website, as well as high-converting landing pages. They can be used as-is, or completely customized to suit your needs.

You can use the SeedProd page builder to customize the layout and design of all of your theme pages. It shows a real-time preview of all the changes, so you can see how your website will appear to users before it’s even published.

Besides the theme builder, it also offers coming soon and maintenance mode templates. When you’re making your website, you can enable the coming soon page to engage your users and grow your email list.

SeedProd’s visual builder is powerful yet beginner-friendly. Whether you want to design a custom landing page or a complete website, it’s easy to set up with the drag and drop option.

Get the SeedProd theme builder today!

4. Ultra

Ultra

Ultra is a powerful multipurpose WordPress theme built to help you easily make a website. It comes with dozens of ready-made sites for niches such as lifestyle, magazines, restaurants, photography, fashion, and more.

It also includes the Themify page builder that you can use for customization. Ultra has several builder addons to add advanced elements like progress bars, counters, pricing tables, an audio player, and more.

Other notable features include smart layout options, color choices, crisp typography, section-based scrolling, image filters, and portfolio options.

Ultra is also a perfect theme to start an online store as it has full WooCommerce compatibility. It’s easy to set up and customize your site with the live WordPress theme customizer.

Get the Themify Ultra theme today!

5. OceanWP

OceanWP

OceanWP is a free responsive WordPress theme. It comes with a 1-click demo content importer and hundreds of ready-made sites to launch a website instantly.

The theme has multiple extensions to add features to your website like a login popup, an Instagram feed, a sticky footer, a featured posts slider, and more. It’s translation ready to create a multilingual website.

The OceanWP theme supports WooCommerce out of the box. It has built-in SEO features to help improve your website rankings.

Get the OceanWP theme today!

6. Breakthrough Pro

Breakthrough Pro

Breakthrough Pro is a minimalist WordPress theme. It’s built on top of the Genesis Framework by StudioPress which makes it powerful and robust.

The theme is ideal for any business website. It comes with 9 custom widgets, 3 layout options, landing page templates, and a custom header. It works with the WordPress block editor (Gutenberg editor) to customize posts and pages smoothly.

StudioPress is now part of WP Engine, the most popular managed WordPress hosting company. You can get this theme and all 35+ other StudioPress themes when you sign up for WP Engine hosting to build your website.

Bonus: WPBeginner users also get an additional 20% OFF. Get started with WP Engine today!

Get the Breakthrough Pro theme today!

7. Hestia Pro

Hestia Pro

Hestia Pro is a modern multipurpose WordPress theme that’s optimized for speed. It has both one-page and multi-page layouts to make any type of website.

With a slick design, Hestia Pro lets you showcase your business and services professionally. It integrates with popular page builders like Beaver BuilderElementorVisual Composer, and more.

Hestia Pro is fully compatible with WooCommerce, and it allows you to create beautiful products and shop pages easily. It also ships with multiple starter sites for eCommerce stores and other business niches.

Get the Hestia Pro theme today!

8. Nozama

Nozama

Nozama is a WordPress WooCommerce theme built to start an online store quickly. It’s highly customizable to display your featured products on the homepage.

It comes with a built-in storefront to create product filters, custom product layouts, and more. Other features include social media integrations, color customization, and header visibility.

Get the Nozama theme today!

9. Eclipse

Eclipse

Eclipse is an advanced WordPress photography and personal blog theme. It’s well-suited for photographers, bloggers, and authors.

The theme comes with a featured slideshow, widgetized columns, Instagram image carousel, ad placement spaces, and more. It’s beginner-friendly and easy to set up.

Get the Eclipse theme today!

10. Sydney Pro

Sydney

Sydney Pro is a fantastic WordPress multipurpose theme. It uses the custom Elementor blocks for a carousel slider, pricing tables, and a timeline.

Other notable features include page templates, header choices, customizer options, and a video header. The theme is translation ready and allows you to create a multilingual website easily.

Get the Sydney Pro theme today!

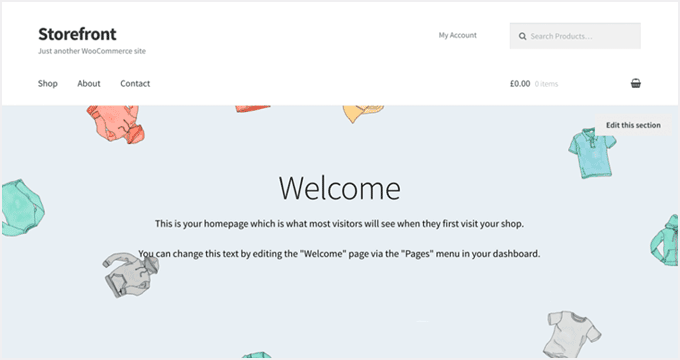
11. Storefront

Storefront

Storefront is a high-quality and popular WordPress WooCommerce theme. It comes with an intuitive and flexible layout to create an online store.

It works with all WooCommerce extensions seamlessly. The theme is fully customizable for background, colors, and font using the WordPress customizer that shows your changes in real-time.

Get the Storefront theme today!

Bonus: see our guide on the best WooCommerce plugins to grow your store.

12. Inspiro

Inspiro

Inspiro is a stylish WordPress theme. It comes with a fullscreen video background slideshow that supports YouTube, Vimeo, and custom videos.

The theme is perfect for a portfolio, small business, or eCommerce website. It ships with a gallery module to display your images, videos, and work portfolio beautifully.

Don’t miss our article on the best portfolio WordPress themes.

Get the Inspiro theme today!

13. Neve

Neve

Neve is a modern WordPress multipurpose theme designed to create all kinds of websites easily. It’s highly flexible and easy to use.

This theme is compatible with popular page builders, including the Divi website builder, Beaver Builder, and more. Neve also supports the WordPress block editor to customize your pages and posts.

Get the Neve theme today!

14. Authority Pro

Authority Pro

Authority Pro is a powerful WordPress theme. It’s built with a multipurpose approach to let you create any professional business website or online store.

The theme is highly scalable and works equally well for small to large business websites. It supports the WPForms plugin to create a contact form or any other form quickly.

Get the Authority Pro theme today!

15. News Portal

News Portal

News Portal is a free WordPress magazine theme. It has a widgetized layout and multiple ready-made magazine templates to launch your online magazine instantly.

It comes with multiple color schemes, category color options, background colors, and more. The theme is easy to set up and manage with the WordPress live customizer. Plus, you can easily add widgets and shortcodes to the widget areas.

News Portal is also retina ready and uses responsive design, meaning your site will look great on all devices.

Get the News Portal theme today!

16. Shoptimizer

Shoptimizer

Shoptimizer is a fast WordPress WooCommerce ready theme. It comes with multiple features to set up and grow your eCommerce store quickly.

The theme has a beautiful layout, custom header, featured content section, cart options, a wishlist, and more. It’s optimized for SEO and speed performance. Plus, it’s designed to boost conversions.

Related: You should check out our article on the best WooCommerce WordPress themes.

Get the Shoptimizer theme today!

17. Gema

Gema

Gema is a beautiful WordPress theme designed specifically for photographers, personal bloggers, authors, lifestyle, and fashion websites.

It comes with a custom logo, a classic navigation menu, buttons, post layouts, and a style manager. The Gema theme is beginner-friendly and easy to set up.

Get the Gema theme today!

18. Tusant

Tusant

Tusant is a unique WordPress podcast theme well-suited for musicians, bands, podcasters, vlogs, and any audio or video streaming website.

It allows you to embed videos and audios from multiple sources. The theme has several layout choices, crisp typography, and custom background color. You can also use the drag and drop page builders for customization.

Related: If you want to check out other options, then take a look at our handpicked list of the best WordPress themes for podcasters.

Get the Tusant theme today!

19. Saved

Saved

Saved is a WordPress church theme ideally built for non-profits, churches, and fundraising websites. It comes with a built-in homepage builder to set up your website’s homepage quickly.

It comes with a Church Content plugin that lets you add sermons, staff profiles, events, and locations. Other useful functionality includes custom page templates, sticky menu, font choices, color schemes, and more.

Get the Saved theme today!

20. Didi

Didi

Didi is a WordPress theme designed specifically for fashion, lifestyle, and wellness blogs. It comes with a white background that makes your content stand out.

It offers multiple layout choices, custom page templates, sidebar layouts, and video support. The Didi theme is compatible with WPML to create a multilingual website.

Get the Didi theme today!

21. Travel Way

Travel Way

Travel Way is a modern WordPress theme ideally built for travelers, travel bloggers, and travel photographers.

It features a fullscreen custom header background with call-to-action buttons, social icons, logo, navigation menu, and other details. The theme has multiple sections to display your favorite locations beautifully.

You should also check out our article on the best WordPress themes for travel blogs.

Get the Travel Way theme today!

22. Fitness

Fitness

Fitness is an elegant WordPress theme beautifully crafted for personal trainers, gyms, yoga instructors, and any health-related business.

It allows you to create custom pages for trainers and fitness classes, such as online yoga classes. With the 1-click demo content importer, you can import a ready-made website and get started quickly.

Looking for more options? Check out our experts’ pick of the best WordPress themes for crossfit and gym.

Get the Fitness theme today!

23. Foodica

Foodica

Foodica is a modern WordPress theme for food bloggers, food critics, chefs, and food recipe websites. It comes with a minimalist layout and 10 color schemes.

On the homepage, Foodica has a beautiful featured slider, featured recipes section, multiple ad placement spaces, and more. The theme integrates with WooCommerce to start an online food delivery service quickly.

Related: You should also check out our article on the best WordPress restaurant themes.

Get the Foodica theme today!

24. Kale Pro

Kale Pro

Kale Pro is a premium WordPress food blog theme. It has a beautiful layout that you can also use to create a lifestyle blog, a fashion website, or an online magazine.

It features recipe index templates to showcase your recipes stylishly. Other features include a sticky navigation menu, an image slider, custom fonts, color schemes, and a background image.

You should also check out our article on the best WordPress magazine themes.

Get the Kale Pro theme today!

25. Kea

Kea

Kea is a WordPress hotel theme designed for hotels, resorts, BnBs, and accommodation businesses. It offers a fullscreen image background on the homepage.

Kea allows you to integrate a reservation and booking service to manage your online bookings easily. The theme supports a fullscreen video or carousel slideshow to display your hotel rooms, lobby, and services.

Get the Kea theme today!

26. Elite

Elite

Elite is a creative WordPress fullscreen theme packed with tons of features that you can use to launch a powerful eCommerce store. It allows you to showcase your products in beautiful image galleries and increase your sales.

It comes with image and video galleries, a custom logo option, Google Fonts, page layouts, and more. The Elite theme is easy to set up using the WordPress customizer with a live preview.

Get the Elite theme today!

27. Essence Pro

Essence Pro

Essence Pro is a beautiful WordPress theme designed specifically for health, wellness, and lifestyle niches. It features an eye-catching fullwidth custom header image to create a powerful first impression.

The theme is built on top of the Genesis Framework, which makes it rock solid and robust. It ships with the Atomic Blocks and WPForms plugin to help you get started quickly.

Other notable features include 6 layout options, custom widget areas, landing pages, and more. It’s translation ready and supports WooCommerce out of the box.

Get the Essence Pro theme today!

28. Panoramic

Panoramic

Panoramic is a free WordPress multipurpose theme to create any website. It has a minimal layout with a simple and clean design that makes a great first impression on your visitors.

The theme integrates seamlessly with popular WordPress plugins like WPForms, SiteOrigin’s page builder, and WooCommerce. It comes with a homepage slider and flexible theme options that you can manage using the WordPress live customizer.

Get the Panoramic theme today!

29. Agama

Agama

Agama is a free WordPress theme designed specifically for digital agencies, corporate businesses, photographers, freelancers, and portfolio websites.

It has a white background with a beautiful color selection for fonts, links, and buttons. The theme is SEO-ready and compatible with the WPML plugin to translate your website easily.

Get the Agama theme today!

30. Silk

Silk

Silk is a modern WordPress fashion blog theme. It comes with an attractive layout and a featured content slider on the homepage.

With this theme, you get an Instagram feed display, social tools, custom post layouts, an image slider, and a mega menu. It has color choices, animations, fonts, and custom backgrounds.

Related: Check out our complete article on how to start a fashion blog and make money.

Get the Silk theme today!

31. Blockchain

Blockchain

Blockchain is a crypto business WordPress theme. It’s ideally built for financial traders, investors, advisors, and consultants.

The theme includes cryptocurrency exchange tables, post types, unlimited color schemes, custom widgets, and more. It fully supports drag and drop page builder plugins and the WordPress WooCommerce plugin.

Get the Blockchain theme today!

We hope this article helped you find the best and most popular WordPress themes. You may also want to see our handpicked list of the best free and premium plugins for all WordPress websites, or see our guide on how to register a domain name and get it for free.

Source :
https://www.wpbeginner.com/showcase/best-wordpress-themes/

How to Remove the Remember Me Option from WordPress Login

Do you want to remove the remember me option from your WordPress login page?

The ‘Remember Me’ option is a small checkbox that lets you and your users save their username and password on the WordPress login screen.

In this article, we’ll show you how to remove the ‘Remember Me’ option, step by step.

How to Remove the Remember Me Option from Your WordPress Login (2 Ways)

Why Remove ‘Remember Me’ from Your WordPress Login Screen?

When you or your website users check the ‘Remember Me’ box on the WordPress login page, it will store that information in a browser cookie for 2 weeks.

Remember me checkbox example

That means that next time they’re on your site, they can access the dashboard right away without having to go to the login page again.

Although it makes logging in faster, it could be a potential security risk for people accessing their WordPress admin area from public computers and WiFi networks.

By disabling the ‘Remember me’ checkbox, you and your users will have to log in every time the web browser is closed. They can still save their username and password in their browser’s storage or a password manager app so they don’t have to type it in every time.

Overall, this improves your WordPress security and helps to keep your website safe from hackers.

With that said, let’s show you how to remove the ‘Remember Me’ option on your WordPress login page. Simply use the quick links below to jump straight to the method you want to use.

Method 1. Removing the Remember Me Option from the Default WordPress Login Page

The easiest way to remove the remember me option from the default WordPress page is by using the Remember Me Controls plugin. 

First thing you need to do is install and activate the plugin. For more details, see our beginner’s guide on how to install a WordPress plugin.

Note: We’ve tested the plugin as of this post’s last updated date, and it works with WordPress 6.0 with no issues. 

Upon activation, navigate to Settings » Remember Me to configure the plugin settings.

Then, simply check the box in the ‘Disable the “Remember Me” feature’ section and click the ‘Save Changes’ button.

Disable remember me checkbox

Now, you can log out of your WordPress site.

When you return to the login screen, the ‘Remember Me’ checkbox will be disabled. 

Remember me checkbox disabled

Method 2. Removing the Remember Me Option from Custom WordPress Login Pages

If you’re creating a custom WordPress login page for your WordPress membership site or online store, then you can hide the ‘Remember Me’ option by using SeedProd.

SeedProd Website Builder Coupon Code

SeedProd is the best drag and drop WordPress page builder in the market used by over 1 million websites. You can use it to create a completely custom WordPress theme without writing any code.

Aside from create custom WordPress themes, SeedProd also comes with the ability to create custom WordPress login pages, custom 404 pages, and more.

First, you will need to use SeedProd plugin to create a custom login page. For more details, see our step by step guide on how to create a custom login page.

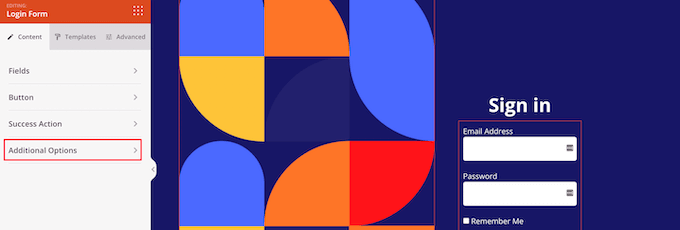
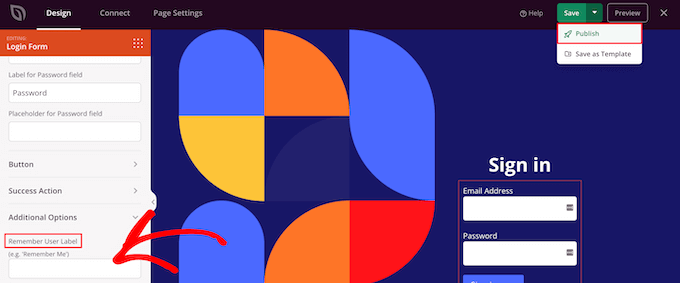
Then, when you’re customizing the login page, you can disable the ‘Remember Me’ option by clicking on the ‘Additional Options’ drop down in the left-hand options menu.

Click additional options in page builder

Next, delete the text in the ‘Remember User Label’ box. 

Then, click the ‘Save’ button and select the ‘Publish’ drop down to make your login page live.

Delete remember me text and publish

Now, you can visit your custom login page to see the ‘Remember Me’ option is gone.

Custom login page no remember me

We hope this article helped you learn how to remove the remember me option from your WordPress login page. You may also want to see our ultimate guide on how to speed up WordPress, and our expert picks of the best business phone services for small businesses.

Source :
https://www.wpbeginner.com/plugins/how-to-remove-the-remember-me-option-from-your-wordpress-login/

14 Best WordPress SEO Plugins and Tools That You Should Use

Often we’re asked about what are the best WordPress SEO plugins and tools that we recommend.

That’s because search engines are a major source of traffic for most websites on the internet. Optimizing your website for search engines can help you rank higher in search results and significantly grow your business.

In this article, we will share the best WordPress SEO plugins and tools that you should use. Some of these tools offer similar functionalities, so we will also highlight which ones are the best for specific use-cases.

best wordpress seo plugins

Things You Must Know About WordPress SEO Plugins & Tools

When reading SEO WordPress tips or searching for “best free WordPress SEO plugins”, you will come across articles that feature several dozen tools.

This can be quite overwhelming for beginners and non-techy users.

The truth is that you don’t need dozens of top SEO tools to get higher search engine result rankings.

While most blog posts (including ours) will share the top most popular SEO plugins, it is extremely important for you to understand the use-cases of each tool.

For example, you never want to use more than one WordPress SEO plugin on your website. We will mention All in One SEO (formerly All in One SEO Pack), Yoast SEO, SEOPress, and Rank Math. You need to pick only one to avoid plugin conflict.

We’ll mention SEMRush, Ahrefs, and few other powerful tools, but you don’t need them all when you’re first starting out since they have a similar feature set. We will share what tools we use in our business, and which features are the best among each tool.

With that said, let’s take a look at our expert pick of the best WordPress SEO plugins and tools.

1. All in One SEO for WordPress (AIOSEO)

All In One SEO - AIOSEO

All in One SEO for WordPress (AIOSEO) is the best WordPress SEO plugin on the market. Used by over 3+ million users, it is the most comprehensive SEO toolkit that helps you improve search rankings without learning any complicated SEO jargon.

The free version of AIOSEO has all the essential features, but the pro version gives you everything you need to outrank your competitors.

It comes with the easiest setup wizard that automatically helps you choose the best SEO settings for your business. AIOSEO shows you TruSEO on-page analysis with an actionable checklist to optimize your posts and pages.

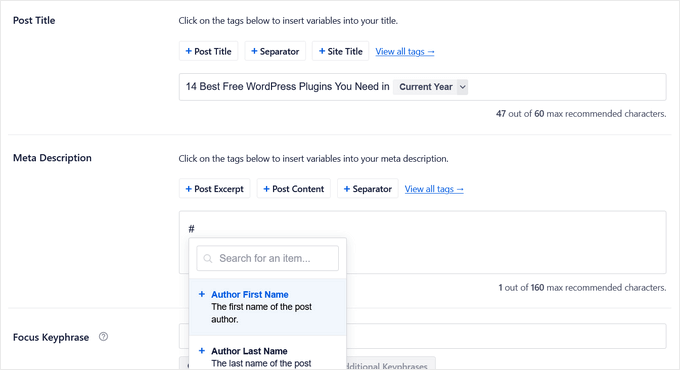
The on-page SEO checklist includes a smart meta tag generator where you can use dynamic values (current year, month, day, custom fields, author info, and much more) in your SEO title and meta descriptions. This means you don’t need to update a post just to change SEO titles.

All in One SEO (AIOSEO) dynamic meta title and description

AIOSEO also comes with Rich snippet schema markup, smart XML sitemaps (with advanced controls), SEO health check, and other useful features to grow your search engine visibility.

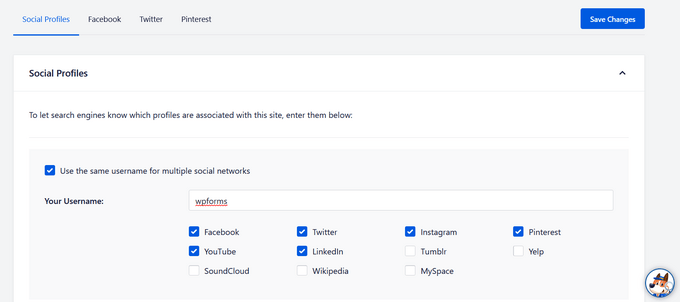
There is a built-in social media integration to add Open Graph metadata as well. This means you can choose which image or thumbnail you want to show when your pages are shared on social media websites like Facebook, Twitter, Pinterest, etc.

All in One SEO for WordPress (AIOSEO) social media profiles

AIOSEO also comes with built-in WooCommerce SEO tools for eCommerce sites. This includes features like dynamic optimizations, individual product page optimizations, product image SEO, and other handy features to bring more organic traffic to your online store.

For more SEO savvy users, it includes full control of RSS feeds, Robots.txt editor, local SEO, breadcrumbs, Google News sitemaps, video SEO, advanced redirect manager, 404 tracking, IndexNow integration, and more.

For business owners, it comes with SEO user roles, so you can manage access to important SEO features without handing over control of your website.

Update: Recently AIOSEO added a Link Assistant which is a game-changer for internal linking. It helps identify link opportunities, gives you linking suggestions in real-time, and you can bulk-add internal links with just a few clicks.

Overall, All in One SEO (AIOSEO) is the most beginner-friendly and comprehensive WordPress SEO plugin on the market. It’s easy to configure and eliminates the need to install multiple plugins to do things on your WordPress site. It works perfectly for all types of businesses, eCommerce, blogs, news, and other websites.

As a WPBeginner user, you get 50% off AIOSEO Pro.

For those who’re on a budget, you can use the free version of AIOSEO to get started.

2. SEMRush

Semrush review

SEMRush is the best overall SEO tool on the market. Used by professional SEO experts, marketers, bloggers, large and small businesses, it provides a comprehensive set of tools to grow your traffic.

You can use it to find organic keywords and search terms that you can easily rank for. It also allows you to do competitive research and see which keywords your competitors rank for, and how you can beat them.

SEMRush SEO Writing Assistant tool helps you improve your website content to beat the top 10 results for your focus keyword. It integrates with WordPress, and this will help you write more SEO-friendly content.

You can also generate SEO templates and get easy search engine optimization suggestions for your content along with advanced SEO recommendations.

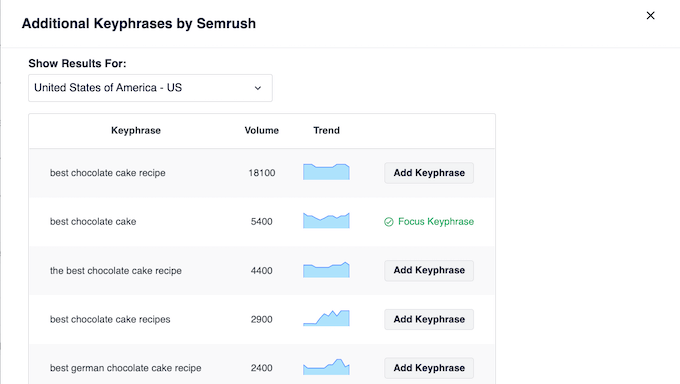
SEMRush seamlessly integrates with All in One SEO (AIOSEO) to help you find additional keyphrases for your focus keyphrase. You can see related keyphrases and their search volume right from WordPress. Then, you can add them to your content with the click of a button.

AIOSEO's Semrush integration

To learn more, see our complete guide on how to do keyword research for your website.

We use SEMRush for our websites because of their competitive intelligence and SEO rank tracker features.

3. Google Search Console

google search console

Google Search Console is a free tool offered by Google to help website owners and webmasters monitor and maintain their site’s presence in Google search results.

It alerts you when Google is unable to crawl and index pages on your website. You also get helpful tips on how to fix those crawl errors.

Most importantly, it shows which keywords your website is ranking for, anchor texts, average position, impressions, and more. You can use this data to find keywords where you can easily rank higher by simply optimizing your content. You can also use this keyword data to come up with new blog post ideas.

For more details, see our comprehensive Google Search Console guide for beginners.

Tip: You can use MonsterInsights to track your keyword rankings inside WordPress admin area using Google Seach Console data. We will cover this tool later in the article below.

4. Yoast SEO

yoast seo

Yoast SEO is a popular WordPress SEO plugin that allows you to optimize your WordPress website for search engines.

It lets you easily add SEO titles and descriptions to all posts and pages on your website. You can also use it to add Open Graph metadata and social media images to your articles.

Yoast SEO automatically generates an XML sitemap for all your website content which makes it easier for search engines to crawl your website. It also helps you easily import your SEO data if you have been using another SEO plugin.

Other features include readability analysis, Google and social previews, and faster load times for a better user experience.

For more details, see our complete guide on how to install and set up Yoast SEO plugin in WordPress.

5. Google Keyword Planner

google keyword planner

Google Keyword Planner tool helps you generate your own keyword ideas from Google itself.

No one on the planet has more insights into what people are searching for than the search giant Google. This free tool is offered to Google’s advertisers for free and anyone can use it. Its main purpose is to show advertisers the keywords they can bid on for their advertising campaigns.

It also helps advertisers choose the right keywords by showing them an estimate of search volume, number of results, and difficulty level.

As a content marketer or blogger, you can use this data to find keywords with high search volume, high advertiser interest, and more importantly keywords where you can easily outrank all other sites.

Bonus: See these 103 Blog Post Ideas that your Readers will Love (Cheat Sheet).

6. Ahrefs

ahrefs

Ahrefs is an all-in-one SEO analysis tool for marketers, bloggers, and businesses. It is a popular alternative to SEMRush and offers a lot of similar tools and features.

It allows you to do keyword research, competition analysis, backlink research, SEO audit, monitor keyword rankings, and more.

It also offers a detailed content analysis tool that helps you improve content while targeting specific keywords.

While there’s a huge feature overlap, what Ahrefs does really well is backlink analysis. We can use it to see which sites are linking to multiple competitors, but not us. This helps us get more backlinks and build more partnerships.

They also help us identify which content multiple of our competitors are ranking for that we aren’t, so we can create content on those subjects to get more exposure.

Last but not least, Ahrefs helps us better identify duplicate content and keyword cannibalization which helps us merge and upgrade the right content to boost our rankings.

For the reasons above, we pay for both SEMRush and Ahrefs because they’re both good for specific use-cases.

7. SEOPress

seopress

SEOPress is another simple yet powerful WordPress SEO plugin. It includes all the features you would expect from an SEO plugin like meta title, description, open graph support, image and content XML sitemaps, redirects, and more.

It comes with a straightforward setup for beginners and advanced controls for more experienced users. It is comparable to other top WordPress SEO plugins on the market in terms of features and options.

The paid version of the plugin is cheaper than some other premium WordPress SEO plugins on the market.

Note: SEOPress is a WordPress SEO plugin. Remember, you only need one WordPress SEO plugin on your site.

8. Rank Math

rankmath

Rank Math is another user-friendly WordPress SEO plugin that allows you to optimize your website for search engines and social media. It comes with a setup wizard and allows you to import data from other SEO plugins during the setup.

You can use it to easily add meta title, description, and Open Graph metadata to your blog posts. The plugin also allows you to generate an XML sitemap, connect Google Search Console, and control access to plugin features based on user roles.

Note: Rank Math is an AIOSEO alternative. Remember, you only need one WordPress SEO plugin on your site.

9. Schema Pro

schema pro

Schema Pro allows you to add rich snippets to your website which makes it stand out in search results.

Rich Snippets allow you to make your website stand out in search results by showing star ratings below a review, prices below a product, image or video next to the description, and so on.

Top WordPress SEO plugins, like All in One SEO (AIOSEO) already add structured rich snippets data to your website. However, if you need more schema types or want to extend the functionality of your existing WordPress SEO plugin then Schema Pro is the way to go.

Schema Pro also allows you to use it alongside your existing WordPress SEO plugin by mapping the plugin data to Schema Pro fields.

10. KeywordTool.io

keyword tool io

KeywordTool.io is one of the best free keyword research tools available right now. It allows you to simply generate keyword ideas by typing in a keyword. These keyword suggestions are gathered from Google’s autosuggest feature. It also shows you keyword suggestions from Bing, YouTube, Amazon, and more.

These keyword suggestions are a treasure of information. You can also get search volume, cost per click, and other data for each keyword by upgrading to their paid plan.

11. Redirection

redirection plugin

Redirection helps you set up SEO friendly redirects in WordPress. It is a handy broken link checker that helps you easily fix 404 errors in WordPress by setting up redirects.

Broken links can affect your site’s SEO and create a bad experience for your users. If you have been running a blog for some time, then you should check your site from time to time for broken links and fix them.

There are multiple ways to easily find broken links in WordPress. Once you find a broken link, you may need to fix it by pointing users to the correct link or removing the incorrect link.

For more details, see our step by step guide on how to find and fix broken links in WordPress.

Alternative: AIOSEO Advanced Redirects is a powerful alternative to the Redirection plugin.

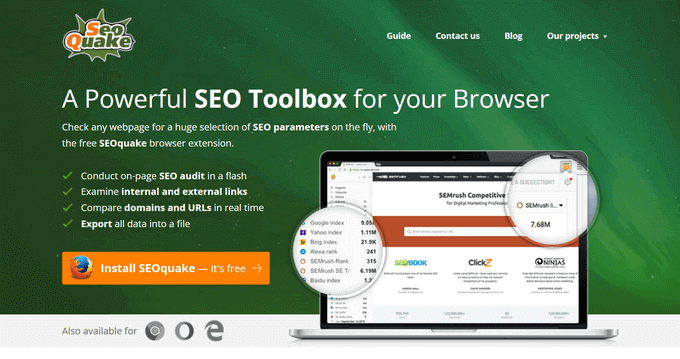
12. SEOQuake

seoquake

SEOQuake is a useful SEO tool for website owners. It is available as a browser add-on for Google Chrome, Mozilla Firefox, Opera, and Safari web browsers.

It provides SEO related information for any website. This data includes page health, age, last updated, Alexa rank, and many other parameters. It is one of the most downloaded browser addons by SEO professionals.

Apart from that, the SEOQuake toolbar can show you all the same data search results when you type in a keyword. This information can be extremely useful if you are gauging competition for different keywords. You can even download search results in CSV format and prepare your own excel sheets of search data.

Alternative: Ahrefs SEO Toolbar

Bonus Plugins for WordPress Website Owners

These tools give you the additional advantage when optimizing your website for SEO. They do not advertise themselves as SEO tools but they are essential for every website and play a significant role in your website’s search performance.

13. WP Rocket

WP Rocket WordPress Caching Plugin

Site speed is a major factor in search rankings. That’s why you need to monitor your website speed & performance to make sure it’s not affecting your SEO.

The easiest way to boost your website speed is by enabling caching. WP Rocket is the best WordPress caching plugin on the market, which allows you to set up caching without diving into any technical stuff.

Alternative: WP Super Cache

14. MonsterInsights

MonsterInsights

Many beginners rely on their best guess to make their marketing decisions. You don’t need to do that when you can easily get the insights you need to improve your website’s SEO strategy.

MonsterInsights is the best Google Analytics plugin for WordPress. It allows you to easily install Google Analytics in WordPress and shows human-readable reports inside your WordPress dashboard.

It tells you where your users are coming from, your top content, what users do on your website, and more. It also allows you to track your eCommerce SEO by seeing which products are popular and where you are losing customers.

Bonus tip: See what other marketing data you must track on your website to grow your business.

Other Powerful Growth Tools:

Aside from the above plugins, we also recommend the following tools to increase your traffic and conversions from SEO visitors:

  • PushEngage – connect and engage with SEO visitors after they leave your website with web push notifications.
  • OptinMonster – convert abandoning visitors into email subscribers & customers.
  • Constant Contact – stay in touch with SEO visitors through email marketing.
  • WPForms – get more leads from your SEO traffic with #1 WordPress form builder.
  • SeedProd – create SEO friendly custom landing pages with drag & drop WordPress page builder (no coding needed).

We hope this article helped you find the best WordPress SEO plugins and tools for your website. You may also want to see our proven tips to easily increase your website traffic, and our comparison of best chatbot software to boost conversions.

Source :
https://www.wpbeginner.com/showcase/9-best-wordpress-seo-plugins-and-tools-that-you-should-use/

How to Fix a Slow Loading WordPress Dashboard (Step by Step)

Is your WordPress dashboard loading too slow?

Having a slow loading WordPress dashboard is annoying, and it hurts overall productivity when it comes to creating content and managing your website. Also the underlying cause of a slow WordPress dashboard can also impact your website conversions.

In this article, we’ll show you how to easily fix a slow loading WordPress dashboard, step by step.

Fixing a slow loading WordPress admin area

What Causes a Slow Loading WordPress Dashboard?

A slow loading WordPress dashboard can be caused by a number of reasons, but the most common one is limited server resources.

Most WordPress hosting providers offer a set number of resources for each hosting plan. These resources are enough to run most websites.

However, as your WordPress website grows, you may notice slight performance degradation or slower loading across the board. That’s because more people are now accessing your website and consuming server resources.

For the front end section of your website which is what your visitors likely see, you can easily install a WordPress caching plugin to overcome WordPress speed and performance issues.

However, the WordPress admin area is uncached, so it requires more resources to run at the optimal level.

If your WordPress dashboard has become annoyingly slow, then this means a WordPress plugin, a default setting, or something else on the site is consuming too many resources.

That being said, let’s take a look at how to troubleshoot and fix the slow loading WordPress admin dashboard.

Here is an overview of the steps we’ll cover in this article.

1. How to Test Performance of WordPress admin area

Before making any changes, it’s important to measure the speed of your WordPress admin area, so you can get an objective measurement of any improvement.

Normally, you can use website speed test tools to check your website’s speed and performance.

However, the WordPress admin area is behind a login screen, so you cannot use the same tools to test it.

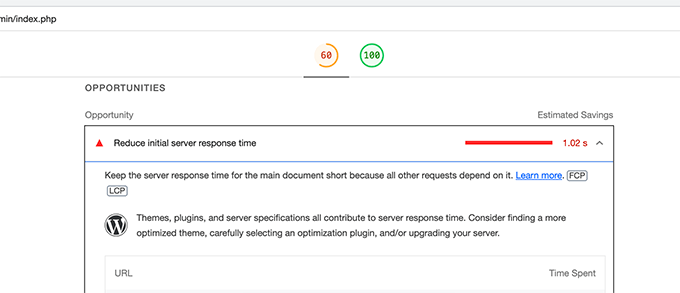
Luckily, many modern desktop browsers come with built-in tools to test the performance of any web page you want.

For example, if you’re using Google Chrome, then you can simply go to the WordPress dashboard and open the Inspect tool by right-clicking anywhere on the page.

Lighthouse to test performance

This will split your browser screen and you will see the Inspect area in the other window either at the bottom or side of your browser window.

Inside the Inspect tool, switch to the Lighthouse tab and click on the Generate Report button.

This will generate a report similar to the Web Vitals report generated by Page Speed Insights.

Performance results

From here, you can see what’s slowing down your WordPress admin area. For instance, you can see which JavaScript files are taking up more resources and affecting your server’s initial response time.

2. Install WordPress Updates

The core WordPress team works hard on improving performance with each WordPress release.

For instance, the block editor team tests and improves performance in each release. The performance team works on improving speed and performance across the board.

If you are not installing WordPress updates, then you are missing out on these performance improvements.

Similarly, all top WordPress themes and plugins release updates that not only fix bugs but also address performance issues.

To install updates, simply go to Dashboard » Updates page to install any available updates.

WordPress updates

For more details, see our guide on how to properly update WordPress (infographic).

3. Update the PHP Version Used by Your Hosting Company

WordPress is developed using an open-source programming language called PHP. At the time of writing this article, WordPress requires at least PHP version 7.4 or greater. The current stable version available for PHP is 8.1.6.

Most WordPress hosting companies maintain the minimum requirements to run WordPress, which means they may not be using the latest PHP version out of the box.

Now, just like WordPress, PHP also releases new versions with significant performance improvements. By using an older version, you are missing that performance boost.

You can view which PHP version is used by your hosting provider by visiting the Tools » Site Health page from your WordPress dashboard and switching to the ‘Info’ tab.

Check PHP version

Luckily, all reliable WordPress hosting providers offer an easy way for customers to upgrade their PHP version.

For instance, if you are on Bluehost, then you can simply login to your hosting control panel and click on the Advanced tab in the left column.

Multi PHP in Bluehost

From here, you need to click on the MultiPHP Manager icon under the Software section.

On the next page, you need to select your WordPress blog and then select the PHP version that you want to use.

Change PHP version

For other hosting companies, see our complete guide on how to update your PHP version in WordPress.

4. Increase PHP Memory Limit

Your web hosting server is like any other computer. It needs memory to efficiently run multiple applications at the same time.

If there is not enough memory available for PHP on your server, then it would slow down your website and may even cause it to crash.

You can check the PHP memory limit by visiting Tools » Site Health page and switching to the Info tab.

Check PHP memory limit

You’ll find PHP memory limit under the Server section. If it is less than 500M, then you need to increase it.

You can increase PHP memory limit by simply entering the following line in your wp-config.php file.

1define( 'WP_MEMORY_LIMIT', '512M');

For more details, see our article on increasing the PHP memory limit in WordPress.

5. Monitor WordPress Plugins for Performance

Some WordPress plugins may run inside the WordPress admin area. If plugin authors are not careful, their plugins can easily consume too many resources and slow down your WordPress admin area.

One way to find out about such plugins is by installing and activating the Query Monitor plugin. For more details, see our step by step guide on how to install a WordPress plugin.

Upon activation, the plugin will add a new menu item to your WordPress toolbar.

Query Monitor tab

Clicking on it will show performance results for the page you are currently viewing on your website.

This will bring up the Query Monitor console.

Here you need to switch to ‘Queries by Component’ tab on the left side. From here, you can see the performance impact of plugins and find out which one is taking up too many resources.

Query Monitor results

You can now temporarily disable the slow plugins and see if that improves performance.

If it does, then you can reach out to plugin author and seek support or find an alternative plugin.

6. Install a WordPress Caching Plugin

WordPress caching plugins not only improve your website speed, but they can also help you fix a slow loading admin dashboard.

A good WordPress caching plugin helps you optimize page load speed, CSS and JavaScript delivery, your WordPress database, and more.

This frees up resources on your WordPress hosting server that your WordPress admin area can utilize for improved performance.

We recommend using WP Rocket. It is the best WordPress caching plugin on the market. It works out of the box and makes it super easy to optimize your WordPress performance.

WP Rocket dashboard

For more details, see our guide on how to properly install and setup WP Rocket in WordPress.

7. Tweak Admin Screens & Disable WordPress Dashboard Widgets

WordPress automatically loads some widgets on the dashboard screen. This includes Quick Draft, Events and News, Site Health, and more.

Some WordPress plugins add their own widgets to the dashboard screen as well. If you have a lot of these widgets loading on your dashboard, it could slow things down.

You can turn off these widgets by simply clicking on the Screen Options button and unchecking the box next to the widgets.

Screen Options to remove unnecessary widgets

Similarly, you can use the Screen Options menu to show and hide sections on different admin screens.

For instance, you can choose the columns you want to see on the posts screen.

Clean up posts screen

8. Fix Slow WooCommerce Admin Dashboard

If you run an online store using WooCommerce, then there are some specific WooCommerce features that can affect the performance of your WordPress admin area.

For instance, you can turn off the WooCommerce dashboard widget by clicking on the Screen Options menu.

Similarly, you can change the information displayed on the Products page.

Products page

After a while, your WooCommerce store may add unnecessary data to your WordPress database.

If you are already using WP Rocket, then you can simply switch to the Database tab under plugin settings. From here, you can delete transients and optimize your WordPress database with a click.

Database optimize

9. Lock WordPress Admin Area and Login Pages

Random hackers and DDoS attacks are common internet nuisances that can affect WordPress websites.

These automated scripts access WordPress login pages and attempt to login hundreds of times in a short amount of time.

They may not be able to gain access to your WordPress website, but they would still be able to slow it down.

One easy way to block these scripts is by locking your WordPress admin directory and login pages.

If you are on Bluehost, then you can simply go to your hosting control panel and switch to the Advanced Tab. From here, you need to click on the Directory Privacy icon.

Directory Privacy

Next, you need to locate wp-admin directory (usually found inside public_html folder).

Then simply click on the Edit button next to it.

WordPress admin folder

Next, you will be asked to provide a name for your protected directory.

Name folder

Click on the Save button to continue. The control panel will save your options and you’ll need to click on the Go Back button to continue.

After that, you will need to create username and password for the protected folder.

Create username and password

Now, when you visit your WordPress admin area, you will be prompted to enter username and password.

Login prompt

For more details, see our tutorial on how to password protect the WordPress admin directory.

Password Protect WordPress Login Page

Next, you would want to block access to WordPress login page. For this, you’ll need to manually edit .htaccess file on your website and generate a password file.

First, connect to your WordPress website using an FTP client or the File Manager app inside your hosting control panel.

After that, go to the root folder of your website (the root folder is where you can see the wp-admin, wp-includes, and wp-content folders).

Here you need to create a new file and name it .htpasswd.

Create htpasswd file

Next, you need to visit this online tool to generate a .htpasswd string.

You need to use the same username and password that you used for the WordPress admin directory.

Then click on the Generate button.

Generate password

The tool will generate a username and password string under the output box.

You need to copy and paste this string inside the .htpasswd file you created earlier.

Next, you need to edit the .htaccess file and copy and paste the following code inside it.

123456789### BEGIN BASIC BLOCK<Files wp-login.php>AuthType BasicAuthName "Protected Folder"AuthUserFile /home/username/public_html/yourwebsite/.htpasswdRequire user jsmithSatisfy All</Files>### END BASIC BLOCK

Don’t forget to replace jsmith with your own username and change AuthUserFile value with the path to your .htpasswd file. You can find it inside the File Manager app.

You can now visit your WordPress login page to see the password protection in action.

10. Manage WordPress Autosave Intervals

The WordPress block editor comes with built-in autosave feature. It allows you to easily restore your content in case you close the editor without saving your changes.

However, if multiple users are working on your website during peak traffic, then all those autosave requests will slow down WordPress admin area.

Now autosave is a crucial feature and we don’t recommend turning it off. However, you can slow it down to reduce the performance impact.

Simply add the following line to your wp-config.php file.

1define( 'AUTOSAVE_INTERVAL', 120 )

This line simply tells WordPress to run autosave once every 2 minutes (120 seconds) instead of 1.

Reduce Heartbeat API Calls

WordPress uses something called the heartbeat API to send Ajax calls to a server without reloading a page. This allows WordPress to show other authors that a post is being edited by another user, and it enables plugin developers to show you notifications in real-time.

By default, the API pings back every 60 seconds. If multiple authors are working on your website at the same time, then these server calls can become resource-intensive.

If you are already using WP Rocket, then it will automatically reduce heartbeat API activity to pingback every 120 seconds.

Reduce Heartbeat API activity using WP Rocket

Alternately, you can also use their standalone plugin called Heartbeat Control to reduce Heartbeat API calls.

We recommend reducing them to at least 120 seconds or more.

Heartbeat API calls

11. Upgrade or Switch to Better WordPress Hosting

All WordPress performance issues depend on the infrastructure provided by your WordPress hosting providers.

This limits your ability to improve performance to the resources offered by your hosting provider.

The above tips will certainly help you reduce load on your WordPress server, but it may not be enough for your hosting environment.

To improve performance even more, you can move your WordPress site to a new host and sign up with a different hosting provider.

We recommend using Bluehost, as one of the top WordPress hosting companies. Their shared hosting plans come with built-in caching which improves WordPress performance.

Bluehost Coupon Code

However, as your website grows you may need to upgrade your hosting plan.

High traffic sites would benefit from moving to a managed WordPress hosting platform like WP Engine or SiteGround.

At WPBeginner, we use SiteGround to host our website.

We hope this article helped you learn how to fix a slow loading WordPress dashboard. You may also want to see our complete WordPress security handbook or see our pick of the best WordPress plugins to grow your business.

Source :
https://www.wpbeginner.com/wp-tutorials/how-to-fix-a-slow-loading-wordpress-dashboard/

How to Change the WordPress Admin Email (3 Methods)

Do you want to change the WordPress admin email for your website?

By default, WordPress uses the first email address you provide as your website’s admin email. It is also used as the email address of the first admin account.

In this article, we will show you how to easily change the WordPress admin email address.

Changing WordPress admin email

Why and When You Need to Change The WordPress Admin Email?

Normally, beginners use their personal email address when installing WordPress. Also some WordPress hosting companies have auto-installers which automatically use your hosting account’s email address during the installation.

This email address is then used by WordPress as the website’s email address as well as the email for the first admin user account.

Your website will use this email address to send important notifications. For example, when a new user account is created, an auto-update is installed, and for comment moderation notices.

The admin user’s email address is used to recover lost password and notifications about their account.

Most website owners soon realize that they want to use a professional business email address instead of generic free email accounts. They may also want to use a different email address for site administration and the admin user.

Having said that, let’s take a look at how to easily change the WordPress admin email address.

Things to Do Before Changing Admin Email Address in WordPress

First, you need to choose the email address you want to use as your WordPress admin email address. You can use a free email service like Gmail or Yahoo. However, this does not look very professional.

Ideally, you would want to use a branded email address using your website’s domain name. For instance, info@yourbusinessname.com

For detailed instructions, see our guide on how to get a free business email address.

Secondly, you’ll need to make sure that you can receive emails from your WordPress website.

Once you change your admin email address, WordPress will send an email to verify the new email address. If you cannot receive emails from your WordPress site, then you will not be able to verify the new admin email address.

To ensure that, you need to install and activate the WP Mail SMTP plugin. For more details, see our step by step guide on how to install a WordPress plugin.

For detailed instructions, see our guide on how to set up WP Mail SMTP with any hosting company.

Now that you are all set, let’s take a look at how to change the WordPress admin email address.

Method 1. Changing WordPress Admin Email Address via Admin Area

This method is simpler and recommended for beginners. In most cases, you will be using this method to change your WordPress site email and your WordPress admin user account’s email address.

To change the WordPress website email address, go to Settings » General and change the ‘Email Address’ option.

Changing WordPress site admin email

Don’t forget to save your changes.

WordPress will now save your new admin email address. However, it will not change the admin email address until you verify the email.

Verify email address

Once you have verified the email address, WordPress will start sending important administration related emails to the new address.

Next, if you want to change the email address of the admin user account, then you need to visit Users » All Users page and click on the ‘Edit’ link below the user you want to change.

Editing a user account in WordPress

This will open the profile edit page for that particular user account. Simply scroll down to the email option and then change the email address.

Change email address

Don’t forget to click on the ‘Update profile’ button to save your changes.

If you are currently logged in to the user account that you are changing, then WordPress will now send an email notification to the new email address.

You need to click on the link in the email to confirm the change of your email address.

User profile updated

Method 2. Change WordPress Admin Email without Verification (using a Plugin)

If you are unable to get the verification email to change the admin email address, then you can use this method.

It basically allows you to bypass the WordPress verification and directly change the admin email address.

First, you need to install and activate the Change Admin Email plugin. For more details, see our step by step guide on how to install a WordPress plugin.

Upon activation, you need to visit the Settings » General page. Go to the ‘Administration Email Address’ option and enter the new email address you want to use.

Change admin email address without verification

Finally, click on the ‘Save Changes’ button to store your changes.

The plugin will immediately change the admin address without verification. It will also send you a test email to the new admin email address.

Method 3. Change WordPress Admin Email via PhpMyAdmin

In this method, we will show you how to change both of these email addresses via phpMyAdmin. This method should only be used when you are unable to access the WordPress admin area.

First, you need to visit the cPanel dashboard on your hosting account. Under the database section, you need to click on the phpMyAdmin icon.

phpMyAdmin in cPanel

Note: Depending on your hosting company, your cPanel dashboard may look slightly different than the above screenshot. We’re using Bluehost, so that’s the screenshot of our control panel.

This will launch the phpMyAdmin app. It is a database management tool, and we will be using it to directly change the admin email address in the WordPress database.

In the phpMyAdmin window, you will see your database listed in the left column. Clicking on it will show you all the tables inside it. You need to locate the _options table and click to open it.

Options table in phpMyadmin

It will now show you the data rows inside the options table. You need to click on the ‘Edit’ button next to the row where option_name is ‘admin_email’.

phpMyAdmin will now open the row in a form where you can just go ahead and change the admin email for your site.

Change site admin email

Don’t forget to click on the ‘Go’ button to save your changes.

You have successfully updated the email address for WordPress website email notifications.

Let’s go ahead and change the email address for the admin user account.

Click to open the _users table in phpMyAdmin window. Next, click on the edit button next to the row where user login matches the user you want to edit.

edit user account via phpMyAdmin

PhpMyAdmin will now open the user row in a form. You can enter the new email address in the user_email field.

Don’t forget to click on the ‘Go’ button to save your changes.

Troubleshooting

Sometimes WordPress email notifications may never reach your inbox. It is a common issue, and you might be unable to receive password reset or user confirmation emails because of this.

If you are unable to receive WordPress email notifications, then please see our guide on how to fix WordPress not sending email issue.

We hope this article helped you learn how to change the WordPress admin email. You may also want to see our ultimate guide on WordPress user role permissions, and our expert pick of the must have WordPress plugins for all websites.

Source :
https://www.wpbeginner.com/beginners-guide/how-to-change-the-wordpress-admin-email/

Five years of 100% renewable energy – and a look ahead to a 24/7 carbon-free future

Google operates the cleanest cloud in the industry, and we have long been a leading champion of clean energy around the world. Since we began purchasing renewable energy in 2010, Google has been responsible for more than 60 new clean energy projects with a combined capacity of over 7 gigawatts — about the same as 20 million solar panels. Our long-term support for clean energy projects has contributed to the rapid growth of the industry, remarkable declines in the cost of solar and wind power, and innovative new contracting models and industry partnerships to accelerate corporate clean energy procurement.

Global Corporate PPA Volumes - Chart [June 2022].jpg

In 2021, we were the only major cloud provider to match 100% of the electricity consumption of our operations with renewable energy purchases – a goal we’ve accomplished for the past five years. This establishes Google Cloud as the cleanest cloud in the industry, and is particularly exciting given the rapid expansion of computing conducted in our data centers over the same period. This required significantly ramping up our global renewable energy purchasing: in 2021 alone we signed agreements to buy power from new renewable energy projects with a combined capacity of nearly 1300 MW – expanding our global portfolio by almost 25%.

A new frontier: 24/7 Carbon-Free Energy

Matching our annual energy consumption with renewable energy purchases has been an important step in our sustainability journey, but there are still regions and times of day where clean energy is unavailable and we are forced to rely on fossil fuels to meet our electricity needs. That is why we are now working towards our moonshot goal of operating on 24/7 carbon-free energy (CFE) by 2030, the last step in our journey to fully decarbonize Google’s global operations.

https://youtube.com/watch?v=YhSSW9LAUyw%3Fenablejsapi%3D1%26

Operating on 24/7 CFE is a far more complex and technically challenging goal than matching our annual global energy use with renewable energy purchases. It means matching our electricity demand with carbon-free energy supply every hour of every day, in every region where we operate. No company has achieved this before, and there is no playbook for achieving this.

In the spirit of transparency, today we are releasing the 2021 carbon-free energy percentages (CFE%) for each of Google’s data centers. Globally, Google operated at 66%1 CFE in 2021 – 5% higher than 2019, but 1% lower than 2020. We expected this kind of short-term fluctuation: building new clean energy is a multi-year process, and our near-term priority is to build strong foundations for long-term CFE growth.

2021 CFE% Clocks - Global Map.jpg

Our largest percentage increases were at our data centers in Chile, at 4%, and Ohio and Virginia, at 4%. In other regions, we encountered significant new headwinds, including a lack of available renewable energy supply and delays to CFE construction due to supply chain disruptions and interconnection challenges. Notably, we also saw flat or declining CFE percentages on the majority of the grids where we operate, underscoring the need for more ambitious action to accelerate grid-level decarbonization everywhere. This is an enormous challenge that requires holistic and long-term solutions, and we are working with our partners across government, industry, and civil society to build a global movement to drive progress at the speed and scale required.

As we work to operate on 24/7 carbon-free energy by 2030, we remain confident in our long-term trajectory and are increasing our focus on regions and times of day where carbon-free energy is not readily available due to resource constraints, policy barriers, or market obstacles. We are building solutions to fill these gaps, including: 

  • New approaches to buying diverse portfolios of carbon-free energy
  • Projects to advance next-generation technologies like geothermal and batteries
  • A first-of-its kind carbon-intelligent computing platform to maximize the reduction in grid-level CO2 emissions
  • Advanced methods for tracking clean energy and maximizing the economic value of clean energy projects
  • Expanded efforts to advocate for public policies that accelerate grid-level decarbonization 

Getting to 24/7 CFE won’t be easy, but we’re optimistic for the future. Our CFE goal is part of our third decade of climate action and company goal of reaching net-zero emissions across our operations and value chain, including our consumer hardware products, by 2030. We aim to reduce the majority of our emissions (versus our 2019 baseline) before 2030, and plan to invest in carbon removal solutions to neutralize our remaining emissions. 

We will continue to share our progress and lessons as we work towards our goal, and to work with our partners to accelerate the global transition to a prosperous, carbon-free future.

Source :
https://cloud.google.com/blog/topics/sustainability/5-years-of-100-percent-renewable-energy

Azure powers rapid deployment of private 4G and 5G networks

As the cloud continues to expand into a ubiquitous and highly distributed fabric, a new breed of application is emerging: Modern Connected Applications. We define these new offerings as network-intelligent applications at the edge, powered by 5G, and enabled by programmable interfaces that give developer access to network resources. Along with internet of things (IoT) and real-time AI, 5G is enabling this new app paradigm, unlocking new services and business models for enterprises, while accelerating their network and IT transformation.

At Mobile World Congress this year, Microsoft announced a significant step towards helping enterprises in this journey: Azure Private 5G Core, available as a part of the Azure private multi-access edge compute (MEC) solution. Azure Private 5G Core enables operators and system integrators (SIs) to provide a simple, scalable, and secure deployment of private 4G and 5G networks on small footprint infrastructure, at the enterprise edge.

This blog dives a little deeper into the fundamentals of the service and highlights some extensions that enterprises can leverage to gain more visibility and control over their private network. It also includes a use case of an early deployment of Azure Kubernetes Services (AKS) on an edge platform, leveraged by the Azure Private 5G Core to rapidly deploy such networks.

Building simple, scalable, and secure private networks

Azure Private 5G Core dramatically simplifies the deployment and operation of private networks. With just a few clicks, organizations can deploy a customized set of selectable 5G core functions, radio access network (RAN), and applications on a small edge-compute platform, at thousands of locations. Built-in automation delivers security patches, assures compliance, and performs audits and reporting. Enterprises benefit from a consistent management experience and improved service assurance experience, with all logs and metrics from cloud to edge available for viewing within Azure dashboards.

Enterprises need the highest level of security to connect their mission critical operations. Azure Private 5G Core makes this possible by natively integrating into a broad range of Azure capabilities. With Azure Arc, we provide seamless and secure connectivity from an on-premises edge platform into the Azure cloud. With Azure role-based access control (RBAC), administrators can author policies and define privileges that will allow an application to access all necessary resources. Likewise, users can be given appropriate access to manage all resources in a resource group, such as virtual machines, websites, and subnets. Our Zero Trust security frameworks are integrated from devices to the cloud to keep users and data secure. And our complete, “full-stack” solution (hardware, host and guest operating system, hypervisor, AKS, packet core, IoT Edge Runtime for applications, and more) meets standard Azure privacy and compliance benchmarks in the cloud and on the enterprise edge, meaning that data privacy requirements are adhered to in each geographic region.

Deploying private 5G networks in minutes

Microsoft partner Inventec is a leading design manufacturer of enterprise-class technology solutions like laptops, servers, and wireless communication products. The company has been quick to see the potential benefit in transforming its own world-class manufacturing sites into 5G smart factories to fully utilize the power of AI and IoT.

In a compelling example of rapid private 5G network deployment, Inventec recently installed our Azure private MEC solution in their Taiwan smart factory. It took only 56 minutes to fully deploy the Azure Private 5G Core and connect it to 5G access points that served multiple 5G endpoints—a significant reduction from the months that enterprises have come to expect. Azure Private 5G Core leverages Azure Arc and Azure Kubernetes Service on-prem to provide security and manageability for the entire core network stack. Figures 1 and 2 below show snapshots from the trial.

Logs with time stamps showing start and completion of the core network deployment.

Figure 1: Screenshot of logs with time stamps showing start and completion of the core network deployment.

Trial showing one access point successfully connected to seven endpoints.

Figure 2: Screenshot from the trial showing one access point successfully connected to seven endpoints.

Inventec is developing applications for manufacturing use-cases that leverage private 5G networks and Microsoft’s Azure Private 5G Core. Examples of these high-value MEC use cases include Automatic Optical Inspection (AOI), facial recognition, and security surveillance systems.

Extending enterprise control and visibility from the 5G core

Through close integration with other elements of the Azure private MEC solution, our Azure Private 5G Core essentially acts as an enterprise “control point” for private wireless networks. Through comprehensive APIs, the Azure Private 5G Core can extend visibility into the performance of connected network elements, simplify the provisioning of subscriber identity modules (SIMs) for end devices, secure private wireless deployments, and offer 5G connectivity between cloud services (like IoT Hub) and associated on-premises devices.

Azure Private 5G Core is a central control point for private wireless networks.

Figure 3: Azure Private 5G Core is a central control point for private wireless networks.

Customers, developers, and partners are finding value today with a number of early integrations with both Azure and third-party services that include:

  • Plug and play RAN: Azure private MEC offers a choice of 4G or 5G Standalone radio access network (RAN) partners that integrate directly with the Azure Private 5G Core. By integrating RAN monitoring with the Azure Private 5G Core, RAN performance can be made visible through the Azure management portal. Our RAN partners are also onboarding their Element Management System (EMS) and Service Management and Orchestrator (SMO) products to Azure, simplifying the deployment processes and have a framework for closed-loop radio performance automation.
  • Azure Arc managed edge: The Azure Private 5G Core takes advantage of the security and reliability capabilities of Azure Arc-enabled Azure Kubernetes Service running on Azure Stack Edge Pro. These include policy definitions with Azure Policy for Kubernetes, simplified access to AKS clusters for High Availability with Cluster Connect and fine-grained identity and access management with Azure RBAC. 
  • Device and Profile Management: Azure Private 5G Core APIs integrate with SIM management services to securely provision the 5G devices with appropriate profiles. In addition, integration with Azure IoT Hub enables unified management of all connected IoT devices across an enterprise and provides a message hub for IoT telemetry data. 
  • Localized ISV MEC applications: Low-latency MEC applications benefit from running side-by-side with core network functions on the common (Azure private MEC) edge-compute platform. By integrating tightly with the Azure Private 5G Core using Azure Resource Manager APIs, third-party applications can configure network resources and devices. Applications offered by partners are available in, and deployable from the Azure Marketplace.

It’s easy to get started with Azure private MEC

As innovative use cases for private wireless networks continue to develop and industry 4.0 transformation accelerates, we welcome ISVs, platform partners, operators, and SIs to learn more about Azure private MEC.

  • Application ISVs interested in deploying their industry or horizontal solutions on Azure should begin by onboarding their applications to Azure Marketplace.
  • Platform partners, operators, and SIs interested in partnering with Microsoft to deploy or integrate with private MEC can get started by reaching out to the Azure private MEC Team.

Microsoft is committed to helping organizations innovate from the cloud, to the edge, and to space—offering the platform and ecosystem strong enough to support the vision and vast potential of 5G. As the cloud continues to expand and a new breed of modern connected apps at the edge emerges, the growth and transformation opportunities for enterprises will be profound. Learn more about how Microsoft is helping developers embrace 5G.

Source :
https://azure.microsoft.com/en-us/blog/azure-powers-rapid-deployment-of-private-4g-and-5g-networks/